


|
sigma 6 posted:Just about done with that mono wheel. Lookin good.
|
 #
?
Oct 15, 2014 18:48
#
?
Oct 15, 2014 18:48
|
|

|

|
| # ? Apr 26, 2024 07:26 |
|
|
After being such a staunch and admittedly crotchety advocate of keeping ZBrush geometry non-destructive, I finally tried out Decimation Master once my back was against a count limit wall. And then I used Dynamesh to change something. And then decimated again. I've gone down the rabbit hole.
|
|
#
?
Oct 15, 2014 23:13
|
|

|
I am still suspicious of Zremesher creating animatable topology. A lot of artists will decimate->dynamesh->zremesh to create sculptable topology from a scan, but they will retopo one final time for the animators to have proper topology. Zremesher has a tendency to make spiral topology. Anyone here know how to fix that? Other than making a lot of guides I mean. cYn: Thanks! Still have a long time to go with the materials but I really want to work on the character at this point. sigma 6 fucked around with this message at 02:36 on Oct 16, 2014 |
|
#
?
Oct 16, 2014 02:34
|
|


|
I don't think there's a push-button solution that gives better results than retopologizing by hand yet. Every animator, rig, and model has different requirements.
|
|
#
?
Oct 16, 2014 03:04
|
|

|
Yeah even on next gen titles the majority of it is retopo'd by hand. A good trick for next gen stuff that is typically pretty high poly is to retopo by hand with mostly quads, and fairly low, and then subdivide that and re-snap it to your high resolution geo. I used this technique a lot on the last next gen title I worked on that had 40k+ tri characters. Way better than using ZRemesher as it produces nice edgeflow that animators like.
|
|
|
#
?
Oct 16, 2014 03:12
|
|
|
ceebee posted:Yeah even on next gen titles the majority of it is retopo'd by hand. A good trick for next gen stuff that is typically pretty high poly is to retopo by hand with mostly quads, and fairly low, and then subdivide that and re-snap it to your high resolution geo. I used this technique a lot on the last next gen title I worked on that had 40k+ tri characters. Way better than using ZRemesher as it produces nice edgeflow that animators like. Is there a quick way to do the "resnap it to your high res geo" part, or are you saying to snap each vertex by hand?
|
|
#
?
Oct 16, 2014 03:41
|
|
mutata posted:Is there a quick way to do the "resnap it to your high res geo" part, or are you saying to snap each vertex by hand? You can resnap it in Max, Maya, Topogun, and 3DCoat I believe.
|
|
|
#
?
Oct 16, 2014 04:07
|
|
|
Well, nothing beats retopologizing by hand. Just depends if you are faster creating the topo in Maya, Max, Topogun, etc. The algorithm that 3d coat uses for it's auto retopo is the same one that Zbrush uses for zremesher. As I said earlier, some modelers use zremesher to quickly get decent topo for sculpting but I don't know anyone who risks an algorithm vs. doing it by hand for a character or important asset. Here is a paintover of that monowheel with the flying monkey. Paintovers are hard. 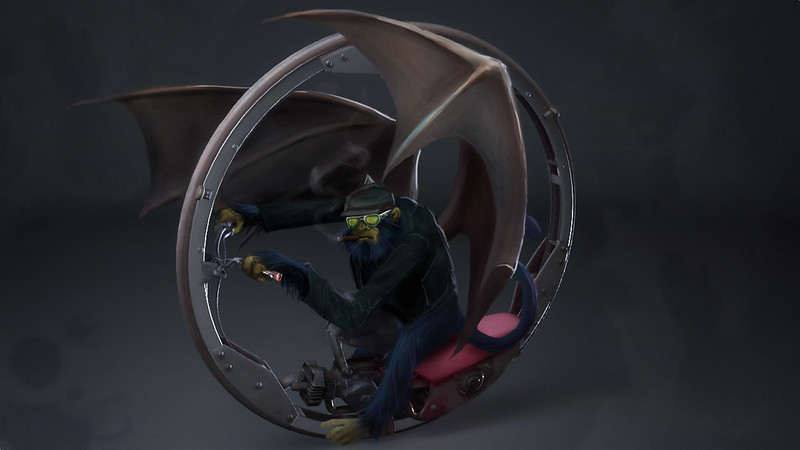 Brighter version any better? 
sigma 6 fucked around with this message at 21:25 on Oct 16, 2014 |
|
#
?
Oct 16, 2014 13:25
|
|
|
FuzzySlippers posted:How does Zbrush / Mudbox painting compare to Substance Painter? (if anyone has tried it) Substance Painter 1.0 just came out yesterday, I was pretty skeptical of it, but it seems good. It's better than Mudbox for painting textures, but Mudbox is kind of awful. It's got a much better viewport and it's set up for physically based rendering, so if you're using a modern renderer it's a lot easier to generate and preview roughness values with. It seems to have a nicer layering system and much better support for painting in UV space, which in mudbox is hilariously terrible anyway. It's also able to paint multiple channels at once, which is fantastic. On the other hand the particle painting is useless outside of maybe a few very specific circumstances. It also doesn't have any blur/clone/dodge/burn utility brushes. I'm not quite sure how well this will deal with higher density meshes, there's a toggle for PBR shaders at least, those are a big performance hit. I'm a little worried about scalability, the substance stuff seems more geared towards games and real time after all, I don't think it'll be able to compete with Mari in handling huge data sets. It's also no help with displacement maps and has no Ptex support. So yeah, Mudbox is a pretty barebones painter and Substance Painter definitely seems far more modern. You are obviously missing out the whole poly manipulation side of Mudbox though. I've not really dealt with Zbrush polypainting much but I'm under the impression that it only deals with diffuse textures. I could see a zBrush > Substance Painter workflow working pretty well but neither program really covers everything on its own.
|
|
#
?
Oct 16, 2014 14:53
|
|
|
ceebee posted:You can resnap it in Max, Maya, Topogun, and 3DCoat I believe. It's been a long time at this point from where I've used it but the conform brush in the Graphite Modeling Tools in Max will do this for you easy peasy.
|
|
#
?
Oct 17, 2014 03:11
|
|
|
Wrapit for max, I don't think Matt is updating it anymore but it rules for retop in max I reckon
|
|
#
?
Oct 17, 2014 03:28
|
|

|
Most of the graphite tools have made wrapit a bit redundant but it's still an awesome tool.
|
|
#
?
Oct 17, 2014 08:28
|
|

|
cYn posted:It had crossed my mind as a potentially cool glitch art thing. I love this kind of thing. Yeah, it'd be cool to see you do a lot of these and try seeing what scary strange things you can do with it. It seems like the basis for a really cool art photo series. Especially if you come up with some kind of overarching mood or minimal narrative to tie in with them. In this one's case where you were messing with it, I like that it's realistic looking enough that initially it doesn't look like a glitch or a CG dude. Stuff like this could be a rather cool basis for an album cover or something too. Spacedad fucked around with this message at 10:00 on Oct 17, 2014 |
|
#
?
Oct 17, 2014 09:57
|
|


|
Yeah thanks I was thinking all those things too. It happened because he got distracted and moved, started talking. I carried on anyway. But now I do have a lot of ideas, the iteration is just a bit slow, it's a lot of work.
|
|
#
?
Oct 17, 2014 18:50
|
|
|
Just spent an hour trying to figure why i couldn't line up all the polys on a hand, and eventuallyall the poo poo came down to one irregularity at the base of the finger. gently caress retopo.
|
|
#
?
Oct 20, 2014 10:22
|
|

|
I've upgraded from Max 2010 to 2015 and have noticed uv relaxing is giving some really weird results. Say you want to really quickly unwrap half of a box. You just planar it, break some of the edges then relax right? Well now it's not spreading everything out evenly, it's just sort of doing half the job and skewing the other half. Am I missing something?
|
|
#
?
Oct 20, 2014 11:58
|
|
|
concerned mom posted:I've upgraded from Max 2010 to 2015 and have noticed uv relaxing is giving some really weird results. Say you want to really quickly unwrap half of a box. You just planar it, break some of the edges then relax right? Well now it's not spreading everything out evenly, it's just sort of doing half the job and skewing the other half. Am I missing something? I don't have any answers, but Roadkill does a similar thing sometimes and I have no idea why. I can take a perfectly symmetrical mesh, cut exactly the same edges on either side, and it'll unwrap both halves completely differently, generally loving one half and doing a decent job on the other. Drives me insane. I should probably be doing my unwrapping in something a bit more modern than Roadkill though...
|
|
#
?
Oct 20, 2014 12:36
|
|

|
For some reason it's just started working properly and the only thing I changed was changing the units to metres (although it didn't work immediately after doing it..) No idea what the heck happened there.
|
|
#
?
Oct 20, 2014 13:43
|
|
|
concerned mom posted:I've upgraded from Max 2010 to 2015 and have noticed uv relaxing is giving some really weird results. Say you want to really quickly unwrap half of a box. You just planar it, break some of the edges then relax right? Well now it's not spreading everything out evenly, it's just sort of doing half the job and skewing the other half. Am I missing something? It happens to me too and I have NO IDEA why. Sometimes it is fine, sometimes it will relax things all wonky like that - drives me crazy.
|
|
#
?
Oct 20, 2014 19:34
|
|

|
Does anyone know of a ui pack or mode for Zbrush that reduces the size of everything? When I put it on the cintiq I can't see or scroll to half the buttons.
|
|
#
?
Oct 21, 2014 13:25
|
|
|
concerned mom posted:Does anyone know of a ui pack or mode for Zbrush that reduces the size of everything? When I put it on the cintiq I can't see or scroll to half the buttons. Under Preferences\UI you can change the size of buttons and toggle on/off Wide Buttons. That's about all I know, if you're talking about the top row of buttons I can't help.
|
|
#
?
Oct 21, 2014 18:59
|
|

|
 only 2 more days until fun begins! Feels good to not have a giant looming deadline over my head and get everything (mostly) done in time. Diabetes Forecast fucked around with this message at 21:03 on Oct 21, 2014 |
|
#
?
Oct 21, 2014 20:58
|
|
|
It was asked earlier but I forgot about it til just now and just did a test. It looks like yes, you can use projection master to paint directly into a texture inside Zbrush, ignoring polygon density.
|
|
#
?
Oct 22, 2014 01:03
|
|


|
 A screenshot from a game I'm makin'. Keeping it "low-poly", mainly because it's easy on the GPU but mainly because it's significantly easier to model. No "textures" as such, just colours and roughness/metallic/specular etc
|
|
#
?
Oct 22, 2014 06:03
|
|

|
From the Nuke 9 personal learning edition limitations: Not available for use during the user�s normal working hours 
|
|
#
?
Oct 22, 2014 16:27
|
|

|
keyframe posted:From the Nuke 9 personal learning edition limitations: How on earth could they ever enforce this? And what if your job has nothing to do with VFX anyway? The Foundry have always been a bit weird on the restrictions for their PLE licenses. I was hoping they would announce a limited commercial license a la Houdini Indie, but a PLE that doesn't watermark your renders is better than nothing.
|
|
#
?
Oct 22, 2014 17:29
|
|

|
echinopsis posted:
This looks super nice! What are you making it in?
|
|
#
?
Oct 23, 2014 02:04
|
|

|
Thanks! It's kinda fun to play but so far very little content, need to focus on getting UI working and a few other things before I can get too stuck into the content itself UE4, modelled in Blender.
|
|
#
?
Oct 23, 2014 02:29
|
|
|
Cyne posted:How on earth could they ever enforce this? And what if your job has nothing to do with VFX anyway? The Foundry have always been a bit weird on the restrictions for their PLE licenses. Yeah, it's not really a very clear EULA and I suspect it will be updated soon. It's mean to mean "Please only use this for personal, non paid projects. Don't use it for commercial work"
|
|
#
?
Oct 23, 2014 12:35
|
|

|
What's a proper way to add detail to a specific part of a mesh without introducing ngons? For example, I'm working on a simple head of a T-Rex, and I'd like to add vertices to the head and around the eyes:  If I subdivide the faces where the eye should be, it's going to introduce ngons of 5 vertices where I've subdivided. Is there a better practice to handling this? I'd prefer not to add additional edgeloops around my entire object.
|
|
#
?
Oct 23, 2014 15:23
|
|


|
It comes with practice, but I find it easiest to lay out the cuts that you want and then work backwards. Make the circle for the eye, and then find places for the geometry to terminate. Once you've done that, you can relax the surface, smooth it, and ensure that it has the proper density all around. Start with a six-sided circle. You already have rectangular polys in that face area, so there's plenty of room for an extra loop or two.
|
|
#
?
Oct 23, 2014 15:27
|
|
|
Hazed_blue posted:It comes with practice, but I find it easiest to lay out the cuts that you want and then work backwards. Make the circle for the eye, and then find places for the geometry to terminate. Once you've done that, you can relax the surface, smooth it, and ensure that it has the proper density all around. Start with a six-sided circle. You already have rectangular polys in that face area, so there's plenty of room for an extra loop or two. Sorry but I'm a bit confused, I'm still trying to learn good practices and such. I'd added in the general cuts I wanted for the eye detail:  In terms of terminating, looping, relaxing, and 'proper density', I'm not sure what I'm looking for or how to perform those actions. Should I really add an edge loop to my entire Dino just to avoid those 7-gons that result on either side of the eye? Blender's edge loop doesn't even wrap around the entire object at this point. Very interested to do this the right way, though. Thanks for the help.
|
|
#
?
Oct 23, 2014 15:39
|
|
|
Even more simple than that: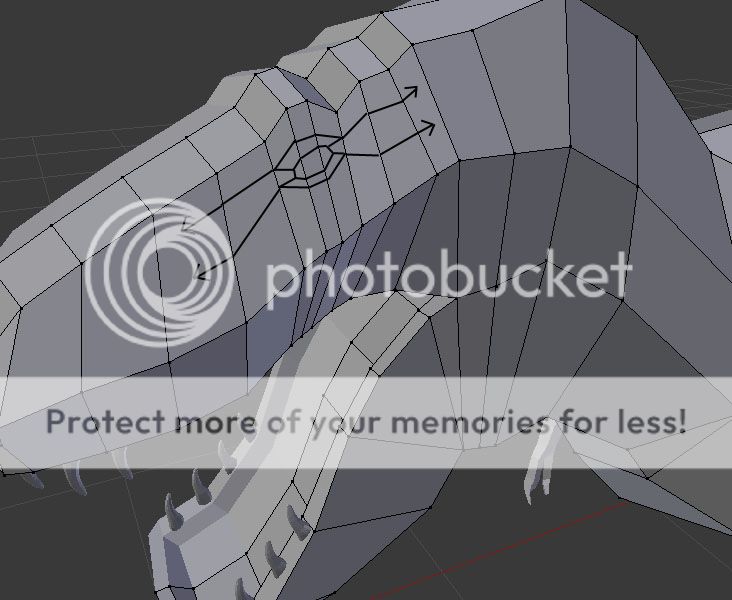 Start with the most simple primitive you can, and then start adding in more loops and finessing. With what you had above, you've made the eye socket far more dense than the rest of the mesh, which is why you're having trouble terminating those loops. Work in the same level of complexity, and then when you have the barebone loops in there, you can subdivide more if you need to.
|
|
#
?
Oct 23, 2014 17:40
|
|
|
Hazed_blue posted:Even more simple than that: Thanks a lot, I appreciate the advice. I don't have any good place to terminate the lines in your example, because they'll run the length of the entire T-Rex down the body. That seems like a lot of polys which will result across my model due to just adding in the details for the eye, are there ways to avoid that or should I just accept that adding detail in one place will usually result in adding detail across an entire mesh.
|
|
#
?
Oct 23, 2014 19:03
|
|
|
Accept it. Like I was mentioning above, the geo you have running through the face is rectangular already, so running another loop through there will help give you the form necessary for that section. And you don't have to allow the loops to run all the way down the back. Instead, you can have them turn inward towards the dividing line of the model so that they meet one another and create a toplographical loop that crosses through the middle. edit: I'm assuming that you're concerned about n-gons because you're taking this into a sculpting program, yes?
|
|
#
?
Oct 23, 2014 22:11
|
|
|
You need more loops there in the head anyway. To cancel an edge you can use a triangle, or to add an edge you can use a 5-quad intersection.
|
|
#
?
Oct 23, 2014 22:32
|
|
|
Hazed_blue posted:Accept it. Like I was mentioning above, the geo you have running through the face is rectangular already, so running another loop through there will help give you the form necessary for that section. And you don't have to allow the loops to run all the way down the back. Instead, you can have them turn inward towards the dividing line of the model so that they meet one another and create a toplographical loop that crosses through the middle. I'm not going to be sculpting it, I'll be loading it into Unity for a game. I always hear advice about avoiding n-gons in general, but I'm not sure if they actually effect performance. Every time I try to work up a complex model, I invariably end up creating n-gons or don't have the experience to recognize ways to add detail in specific areas of a mesh without creating n-gons at some point. You can see my first post in this thread August of last year where my first model was a crappy sofa with face problems. I went on to make Jeremy's Dance Magic for the SA GameDev, and made many of the models and levels in the game (character models came from the program Fuse). I'm pretty proud of the work, but my next project is going to be a simple game with even more models. I figure learning the best practices now can help me learn the right moves as I keep going, and making detailed surfaces is a skill I'm sorely lacking. mutata posted:You need more loops there in the head anyway. To cancel an edge you can use a triangle, or to add an edge you can use a 5-quad intersection. Thanks for the triangle suggestion. I tried to google up the 5-quad intersection but I'm not sure what that would look like. Edit: VVV Incredibly cool. Thank you for this or any other resources outside the OP you'd suggest. Atoramos fucked around with this message at 23:32 on Oct 23, 2014 |
|
#
?
Oct 23, 2014 22:55
|
|
|
I saved these off cgtalk a while back, they may come in handy: http://we.tl/pThW8Bnp8l A few people were talking about creating a full on reference guide for every situation that you might encounter when modeling with meshsmooth. It kind of fizzled out and didnt get as far as they hoped but they mocked up some reference sheets of some situations. it's still real helpful, and I wish they'd finished the full interactive flash version. These cover arcs, elbow joints, termination, moving poles, stepping down from 5 edges to 3 etc. loads of good reference that very nearly became the bible. cubicle gangster fucked around with this message at 23:32 on Oct 23, 2014 |
|
#
?
Oct 23, 2014 23:27
|
|

|
Is Zbrush adequate for someone who just wants to sculpt? I primarily draw/paint but I'd like to start making sculpts too, I don't have any intention of doing animation or anything.
|
|
#
?
Oct 23, 2014 23:37
|
|


|
|
| # ? Apr 26, 2024 07:26 |
|
|
yep.
|
|
#
?
Oct 24, 2014 00:16
|
|