

|
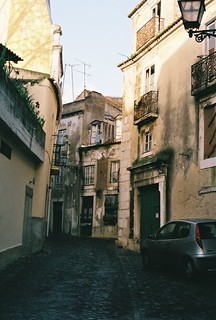
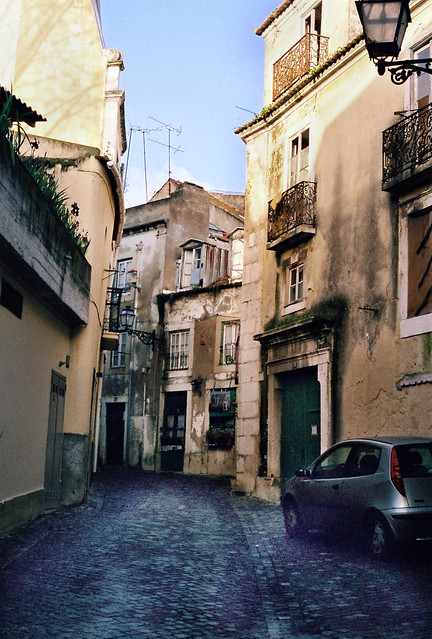
I have this image I have it in a RAW as well, aside from the fact I just noticed it's mis-focused, what would be a good technique to make his hands and hair 'pop' I feel that the image is very flat and somewhat lifeless which de-saturated images shouldn't be. I was considering trying a psedo-HDR treatment on it and comping some of the result over to give more depth. Ideas?
|
 #
¿
Jan 14, 2010 05:39
#
¿
Jan 14, 2010 05:39
|
|

|

|
| # ¿ Apr 27, 2024 23:49 |
|
|
^^^^^ I have this problem where I automatically jump to the most convaluted soloution to simple problems. I was digging through my 'done' folder today and thought that could do with some work. Thanks.
|
|
#
¿
Jan 14, 2010 06:27
|
|
|
Goons may be able to answer this. I'm taking files from lightroom into photoshop via "open as smart-object". Once I've done something to them there I'll generally save them as a .psd. Let's say XXXXX.psd, problem is, when I hit CTRL-S to save it saves it off as some random lightroom name along the lines of IMG_xxxx_edit.psd. Any idea why it isn't replacing the XXXXX.psd as it should?
|
|
#
¿
Feb 25, 2010 08:16
|
|
|
Hey, don't know if this is the place to ask but I'm looking to create some background elements for some shots I did. Trying to make something like this  sans the dots. That's done in After Effects using a series of dots (particles) and a vector blur. However Photoshop doesn't have a vector blur filter. I could possibly create the element in AE export it as a .STILLIMAGEFORMAT and then take it into PS but that's a-lot of work for something I'm sure PS could do internally. Any help would be great.
|
|
#
¿
Jun 30, 2010 08:18
|
|
|
Speaking of white balance in LR, is there a way to swap it so it goes the "proper" way? As in higher-colder lower-hotter? It really tweaks me out as I have to keep mentally adjusting my WB calculations for uni or LR.
|
|
#
¿
Aug 4, 2010 15:23
|
|
|
spf3million posted:Lightroom is killing me... I have my photos stored on several different external HDs since my main laptop dive is a small SSD. If I plug one of the HDDs into a USB port, LR doesn't find the photos on the drive if it was plugged into a different USB port than the last time I used it. It looks like I have to reimport them but when I go the import screen, all of the pictures are grayed out when I check the "do not import suspected duplicates" leading me to believe that they are in the catalog somewhere. When I click on the "all photographs" table in the library tab, all of my photos ever imported are there, but when I go to develop one of them "the folder can not be found". Anyone else have problems like this with multiple external HDDs? Just thinking out loud but could it be that the drives are coming up with different drive letters each time? (If you're on mac I presume it has a similar way of identifying drives) Differing drive letters would change the file path of the photo and Lightroom might poo poo itself.
|
|
#
¿
Dec 4, 2010 18:20
|
|
|
My guess is no blacks and a very mild color to the darks as a good starting point.
|
|
#
¿
Feb 24, 2011 15:20
|
|
|
I'd say you'd be better off adding color to the shadows rather than the highlights, as all the highlights are in the sky. Perhaps try a very subtle deep blue?
|
|
#
¿
May 19, 2011 15:22
|
|
|
It's the brightest point of the image, which is why we're drawn to it. Try burning it back and dodging her face?
|
|
#
¿
Jun 13, 2011 16:00
|
|
|
I'm trying to blend this with this  In order to get rid of that horrendous blank background which was unavoidable on the day. Unfortunately blending using Blend if isn't really working because of the horrendous and apparently unremoveable aberration around the branches top left. Even in the low Q jpegs I've put up they're pretty obvious and I'm having real trouble getting the background to sit in nicely around them. Is there an easy solution or am I going to have to mask it out manually? I know I need to adjust the exposure of the sky layer a bit and I've tried masking it out via color but nothing looks natural. There's always hot lines around the branches. EDIT: Defringe in lightroom seemed to help a little with the edges, the mask is still pretty rough though. XTimmy fucked around with this message at 13:15 on Jul 3, 2011 |
|
#
¿
Jul 3, 2011 13:13
|
|
|
tarepanda posted:What about ditching the branches entirely, and the white thing on the right side? I did a quick test and it looked nice, though I was too lazy to properly mask the woman. Tempted but alot of the other photos in the set revolve around her being inside this little area looking out. I've got it up to an acceptable standard through some careful masking now so I'm relatively happy.
|
|
#
¿
Jul 3, 2011 17:24
|
|
|
Tamgerine posted:I shot this photo last night and it's just...ugly. It was such low lighting and I didn't have a flash, and no matter what I do to it it just doesn't seem...right. I don't want to resort to throwing actions at it or turning it black and white, so I came here for help. Who's got ideas? I think my major issue is that the bright candelabra and the cake vie for my attention. I'm unsure how you'd achieve it but you need to make the cake more prominent in the shot. I'd probably start by brightening the cake up a little.
|
|
#
¿
Aug 28, 2011 06:36
|
|

|
Wouldn't the magnetic lasso fare better? Especially if you followed MrBlandAverage's advice with the denoise layer. That plus a bit of manual work.
|
|
#
¿
Dec 7, 2011 16:56
|
|
|
Bit worried about the color handling on my new laptop, when I look at an image in PS or LR it looks slightly flat and washed out, but 'correct' since I shoot mainly in Faithful, but when I open up the liquefy filter the colours are more vibrant and have a very slight red cast, this is not monitor specific. Exporting to Jpeg produces an image with the same inconsistencies. Can anyone help me figure out what's wrong, have I forgone some vital step in setting up the colour space of the computer?
XTimmy fucked around with this message at 07:52 on Dec 8, 2011 |
|
#
¿
Dec 8, 2011 07:50
|
|
|
Q =/=Edit
|
|
#
¿
Dec 8, 2011 07:50
|
|
|
Suicide Watch posted:It's 27 exposures, all at the same settings. Would I have to tune each image individually before tossing them into my merging software? I'd say it depends on what your merging software does, if it down converts them all to jpegs (which it shouldn't) the data in that area is probably gone, if it converts them to tiff or something lossless then it wouldn't surprise me if there's data still there, and you can probably get it back within the panorama itself, check if the data is available in the original RAW. Really pretty photo by the way.
|
|
#
¿
Jan 8, 2012 05:14
|
|
|
So my LR 2 export dialogue has decided it only wants to show the desktop and my user folder as viable locations to export to. They're the only two places listed, this makes it hard to export to the external that I've been exporting to for several years. Anyone encountered this issue before?
|
|
#
¿
Feb 5, 2012 11:49
|
|
|
bassguitarhero posted:I'm using Photoshop for this, I have Lightroom 3 and the beta for 4 but I don't really know them as well. Anyway, I switched from my Samsung Syncmaster 2494 to a 20" Apple Cinema Display and I could see how much darker the photos were. I warmed them up and then split the higher end to be a little bit cooler. They're updated them here. Is this better? I don't like heavy vignetting so I may be biased but I feel that you're pushing a little too much on the edges there. My feeling would be to play with curves till you get an image that pops, maybe try using an adjustment layer to separate couple from background.
|
|
#
¿
Mar 2, 2012 13:40
|
|


|
Primo Itch posted:
Look at the ground, whatever adjustment you've made is introducing alot of noise and is bleeding into the car.
|
|
#
¿
May 3, 2013 00:35
|
|
|
Haggins posted:I made bracketed shots of the smokies at sunrise at 0EV +2 and -2. I'd like to use one exposure for the the dark mountains and another for the sky. What is the best way to do this in photoshop? I remember someone posted a nice tutorial here or the landscape thread but I can't seem to find it. I think they used the HDR tool but didn't tonemap it or something. This is super brief but I'm sure someone can elaborate a bit. In my experience you have a few options: You can manually cut the sky out of the mountains layer then place in the sky behind them if you're patient. You can layer the layers over each other and use the blending mode tools to make the brighter areas of the mountains shot transparent, which is quicker but can produce some weird looks, or you can use the HDR tool, produce a very flat image then use curves/levels/exposure adjustment masks to bring back more 'correct' contrast to the scene. Much of this depends on what sort of sky it is, a sunset very close to being blown out is generally easier to mash in since it looks more real, whereas a perfectly exposed sunset doesn't make a great deal of sense behind some perfectly exposed mountains.
|
|
#
¿
May 19, 2013 13:53
|
|
|
Haggins posted:I ended up trying a few things like that but it ended up not mattering much. I don't think you would have found much more detail in the mountains anyway, nice picture.
|
|
#
¿
May 20, 2013 10:18
|
|


|
No, because Lightroom doesn't do layers is basically the short answer to that. You could try GIMP if you don't want to use photoshop.
|
|
#
¿
Jul 9, 2013 10:55
|
|
|
I think he means multiple exposures as in this Perhaps without the Depth by TimFPictures, on Flickr Rather than the usual radioactive garbage.
|
|
#
¿
Jul 10, 2013 09:30
|
|
|
Ah, that's exposure blending or HDR, multiple exposures generally refers to exposing the same piece of 'film' multiple times to achieve a composite in camera. Evidently I can't read and skipped over thre entire description of what you wanted.
|
|
#
¿
Jul 11, 2013 01:30
|
|
|
Looking at Silvia Gravs work recently. I get how she gets the tones, it's hard black and white with the edges clipped. But stuff like the light breath is confusing me in how she got such a natural looking way. The textures in particular interest me. Maybe she's just better at pre-composing an image than me but holy poo poo. 
|
|
#
¿
Jul 12, 2013 06:43
|
|
|
Lightroom is a very powerful image correction/library software, but Photoshop is still miles ahead in terms of functionality. Just the simple addition of layers and masks in all their various forms puts photoshop ahead in what it can do. Besides, the two are not in direct competition and are designed to be used together, it's just that most day to day photography for many people doesn't require anything Photoshop has to offer. EDIT: Yup, which is why you do your event photos in lightroom but your portraits in Photoshop. XTimmy fucked around with this message at 23:40 on Jul 15, 2013 |
|
#
¿
Jul 15, 2013 23:25
|
|
|
emotive posted:The picture posted was the style I'm after. But yes, I definitely know from experience it won't work with harsh shadows. Crush the blacks with a levels adj. layer first, then use a curve to bring the black point up a bit. It's easier to do in Lightroom since you have both controls on the same page, but the effect is the same Here's an example, using a shot of me and my twenty something friends trying to forget that we live in a tanking economy and that only one of us has found steady, reliable, build-a-house work. (Not me)  It's black and white since this is a tonal thing. We apply levels to get rid of that pesky black data, who needs latitude when you can have hipster post-processing and make everything look like a bad film scan.  Then we bring Mr. Curves in and pull the black point up, the white point down (YMMV, I do it because hard white tends to look bad if you don't have a hard black)  See, it's easy! Now split tone it to poo poo and put it on Facebook.
|
|
#
¿
Jul 25, 2013 23:19
|
|

|
404notfound posted:Does anybody here strive for a consistent "look" across all their pictures? Right now I just kinda dick around in Lightroom until I get something that looks cool, but it can vary a fair bit from one picture to another. Is it sort of a conscious decision, or does it just happen as you work on more and more pictures? Or is it something that I shouldn't even waste time thinking about if I only ever plan to shoot for fun? Snap shotting I just do whatever. But if I'm doing a pre-planned shoot I'll go into it with a halfway decent idea of what I want the end product to look like. I may even try and run some test images before hand so that I have a post workflow ready.
|
|
#
¿
Sep 25, 2013 00:07
|
|
|

|
| # ¿ Apr 27, 2024 23:49 |
|
|
Anyone else use LR2Mogrify to add borders/watermarks to their images? I've been using it for years but it's suddenly broke down on me, throwing a "failed to run mogrify, aborting export" error if I try and export anything, the first export hangs indefinetly , with each further export throwing the above error, tried reinstalling everything, Lightroom 5 included, with no effect, Google has nothing.
|
|
#
¿
Mar 30, 2014 06:51
|
|