

|
I'm a beginner and I would love some advice on post-processing for the following picture: I'm pretty lost with this picture. I want the bison to really pop out but after playing with the levels for a long time I realised I need some advice. All my attempts looked washed out and muted. I think the snow is throwing off everything else.
|
 #
¿
Mar 10, 2010 18:57
#
¿
Mar 10, 2010 18:57
|
|


|

|
| # ¿ Apr 28, 2024 00:27 |
|
|
torgeaux posted:Have you thought about using local contrast? Duplicate layer, high pass filter, mask out all but the bison, set to hard light for blending. This is my best attempt so far, but I'm at the point now where I can't even be sure the photo looks realistic anymore: 
|
|
#
¿
Mar 10, 2010 23:21
|
|
|
Cross_ posted:It doesn't. You've gone overboard with the saturation - though the hair looks like it has better contrast. The original recommendation was to mask out the bisons; try that and play around with the blending percentage of the high pass layer. edit -- Sorry for posting the same picture over and over. This attempt with different filter layers for the ground and buffalo. Any improvement? 
InternetJunky fucked around with this message at 01:07 on Mar 11, 2010 |
|
#
¿
Mar 10, 2010 23:47
|
|
|
How would I go about toning down the overexposed bits in the sky in this? 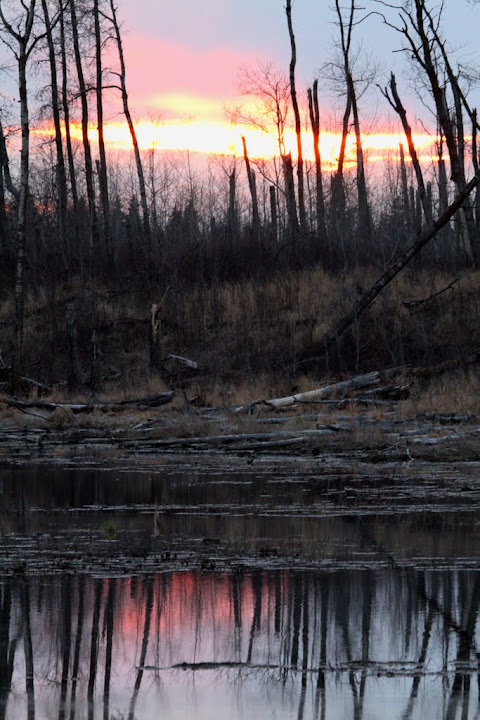
|
|
#
¿
May 7, 2010 16:35
|
|
|
I've been trying to really put the time into post-processing recently to a point where I'm spending hours on certain photos. For the photo below I've separated the picture into 3 parts (bird, wood, background) and adjusted each separately. Is this what I should do? Does it make the photo look like a frankenstein image? Are there other adjustments that I should be making? Cropped original from RAW:  Post-processing: 
|
|
#
¿
May 17, 2010 15:39
|
|
|
I'm sure there's a way to do this easily, but I couldn't find it... Say I have a picture of a bird sitting on a branch. For this picture I want to apply some sharpening to the bird, and some noise reduction on the background. In photoshop, on a new layer I use the magic wand to select the bird and branch, delete them, and apply noise reduction on what's left. Then I re-select the bird and branch and invert the selection, delete the background this way, then sharpen the bird/branch. Is there an easy way to do this other than re-selecting everything again? This takes ages and it feels like there is probably something easy I'm missing.
|
|
#
¿
Mar 22, 2011 00:33
|
|
|
teethgrinder posted:It's been a long time since I've used Photoshop (I use The Gimp), but I guess you're saying that the selection deselects itself at one point? I don't see why you can't just keep working with the same selection, inverting it as required. ")
|
|
#
¿
Mar 22, 2011 00:52
|
|
|
I was masking a very complex object (bird with tons of stray feathers everywhere) with the intention of doing severe noise reduction on the background but not the bird. When I applied the NR I noticed I had botched my mask in a couple of spots and I need to go back and unmask certain areas. How can I do this? I have a layer with the bird shape completely masked out. I have a feeling I'm missing something easy.
|
|
#
¿
Dec 3, 2011 18:39
|
|
|
I feel like a retard, but I think I really need someone to dumb down how to mask properly. If there's a clear delineation between foreground and background I have no problem, but if there's not I'm in trouble. Below is my picture straight of the camera. I want to do much different processing on the eagle than the background, so I want to create a separate layer with just the eagle and another with the background. The problem is the high noise in the image:  Trying to select the eagle is difficult because there are lots of areas where there is no clear boundary between the eagle feathers and the background. Magic wand is useless for selecting these areas. How would the rest of you pick out just the eagle? Paint the mask manually by painting over each individual feather? It would take me hours for just one picture, but if that's the only way I don't mind. I just feel like I'm missing something that might make this easier. Also, what kind of brush setting do you use when painting the mask (specifically the hardness setting)? Any tips/advice would be most appreciated.
|
|
#
¿
Dec 6, 2011 18:45
|
|
|
Thanks all for the tips and advice. I think I managed to get a decent result, even if it did take way too long.  Original for reference: 
InternetJunky fucked around with this message at 18:03 on Dec 7, 2011 |
|
#
¿
Dec 7, 2011 17:56
|
|
|
What's the easiest way to drop the glare in this shot a bit? Usually when I import the RAW into photoshop I would use the 'recovery' slider in this case, but my source image is JPG so I don't even get that import screen and I'm not sure what photoshop is doing behind the scenes with the recovery option.
|
|
#
¿
Jan 5, 2012 18:21
|
|
|
I could use some pointers if anyone is feeling generous with their time. Here's my original, no-adjustments shot:  Here's my best attempt at post processing:  Should I be separating the sky, mountain, and foreground and adjusting each individually? I've been fighting my habit of over-saturating, so I'm curious if the colours look natural to everyone else or if I still need to work on that.
|
|
#
¿
Sep 13, 2012 15:51
|
|
|
1st AD posted:Haha, my friend is the photographer who did this: http://deanbradshaw.com.au/Diageo-Stark-Raving Not that I don't appreciate the final images, I think they look awesome, but that is a hell of a lot of staff for some some wine label photos. Wouldn't it have been significantly cheaper to just commission an artist to paint a couple of images instead?
|
|
#
¿
Nov 21, 2012 00:27
|
|
|
I could use some advice on processing. I have a whole sequence I've shot of an owl eating a vole. One such frame is below (gore warning): From start to finish it took him about a minute to eat the thing, so if I tried to move to get a shot without that oof branch I probably would have missed most of it. I've already taken out a few oof brances at the top, but the one at the bottom is a different story since it covers part of the tail. Do you think it's worth trying to clone out the branch and recreate the tail somehow? Is it really distracting as-is? I would also love to do something about the shadows on the owl's body. Is there any way to lighten those areas to reduce the harsh contrast at least? I've tried a bunch of methods and it looks obvious and fake no matter what I do.
|
|
#
¿
Dec 22, 2012 16:59
|
|
|
I spent some more time working with some of my owl shots. Original:  Processed:  I could use some outside input at this point. I think I had some decent success at lightening/removing some of the shadows, and rather than trying to remove the oof branch entirely I tried to minimize its impact on the picture. Does the thing look too cooked at this point?
|
|
#
¿
Dec 23, 2012 17:05
|
|
|
I have a photoshop question that I've been unable to find an answer to. A lot of my shots are processed like what you see in the picture below, where I've masked separate areas of the picture, grouped them via mask, and applied different processing to each masked area. 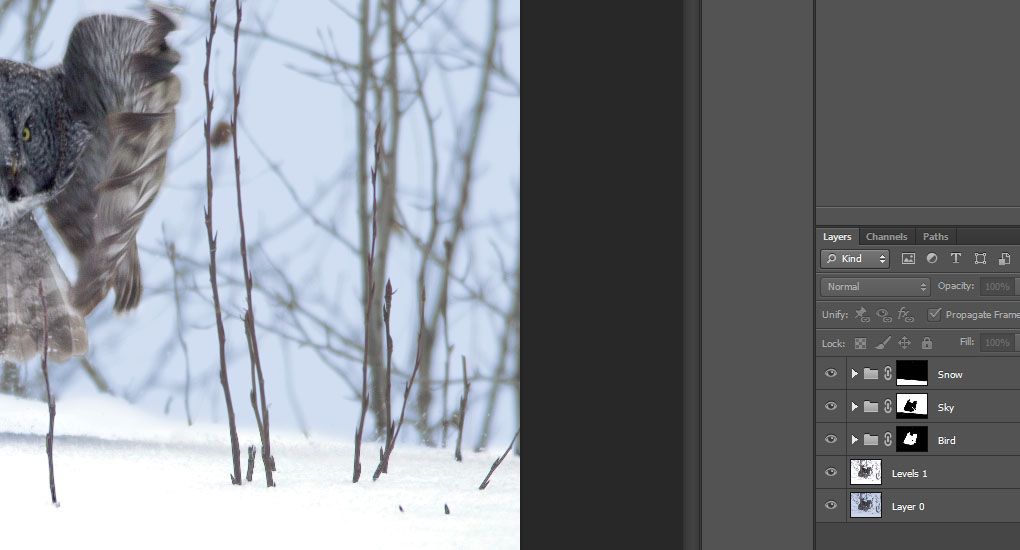 Now say I want to remove the branch that is covering part of my bird. Currently the only way I know to do this is to flatten all my layers and then start cloning, but is there a way to do this so that I don't need to flatten the image first (other than doing the cloning step first to get rid of the branch)?
|
|
#
¿
Jan 1, 2013 05:59
|
|
|
TheLastManStanding posted:Are you not using adjustment layers?
|
|
#
¿
Jan 1, 2013 06:12
|
|
|
Thanks for the replies everyone.TheLastManStanding posted:Rather than making permanent alterations to layers and then masking, you can make adjustment layers (the little black/white circle at the bottom of the layers palate) which are non destructive, can be changed at any point, and can each have individual masks: That way your image is only taking up one layer. quote:For this image, since you are already have everything set up like you do, you can select all (ctrl-a), then copy merged (crtl-shift-c), then paste: This makes a new layer that is basically a flattened version of your image, but without actually flattening it. That way you can clone however you want without losing your previous masks or layers. Also, if you hadn't found out already, you can merge selected layers (ctrl-e) rather than flatten: This can be useful if you want to merge your cloned edits back in at some point without losing other layers.
|
|
#
¿
Jan 1, 2013 15:23
|
|
|
This feels like another question that has an obvious answer but I can't figure it out. I have a sequence of images and I want to ensure exact same crop size for all of them (ie. 500 x 500 pixels exactly). I tried the "size & resolution" option of the crop tool and specified 500x500, but all that does is resize the cropped area to 500x500 after cropping. What am I missing?
|
|
#
¿
Jan 28, 2013 19:11
|
|
|
Insanely helpful. Thanks so much for putting that together!
|
|
#
¿
Mar 3, 2013 04:24
|
|
|
William T. Hornaday posted:I made these for a friend to help her with post processing, but since I've got them I figured I might as well post them here too.
|
|
#
¿
Mar 5, 2015 18:00
|
|
|
A photo contest has short-listed one of my photos and now they want and full-sized original of what I submitted. For the submission I had to resize the image to 1920x1280. Unfortunately I can't find the original, edited version before resizing. When I overlay the image I submitted over the original RAW in photoshop the image doesn't line up at all, so I can't use that as a template. Is there an easy way to match the exact crop in photoshop?
|
|
#
¿
Mar 30, 2015 22:04
|
|
|
William T. Hornaday posted:Wait, so you do or don't have a Photoshop copy with all the adjustment layers intact and separate?
|
|
#
¿
Mar 31, 2015 01:07
|
|
|
I'm trying to push more of my post-processing into lightroom instead of photoshop so I'm just learning what's available. I'm using a few graduated filters in this shot to drop the background and really put the focus on the bird, but I don't want the filter to touch the branch. Is there a way to achieve this? Original:  After filters (bottom left part of the branch is the problem): 
|
|
#
¿
Oct 17, 2015 01:28
|
|
|
A Saucy Bratwurst posted:Can you use the adjustment brush with a big feather? Might have to do it in stages though quote:Anyway, as mentioned above, either use an adjustment brush to darken the background or darken all and use an adjustment brush to bring the bird and branch back. I tried to undo the gradient with an adjustment brush, but it's really hard to match the gradient. I was kind of hoping that I was missing a masking-type of feature, but I guess not. Dren posted:Seems like a task that would be best accomplished using masks. LR only has auto mask, which can't be used for the gradient tool. PS has real masks, you're best off using PS for this sort of job. That's what I figured. Thanks. Caryna posted:I don't know, but the original photo looks much better than the edited one. The darkened corners are very distracting because they make my brain go "there's something supposed to be there, where is it?!". The background is already so much out of focus that it draws all the attention to the bird anyway.
|
|
#
¿
Oct 17, 2015 13:22
|
|
|
I hate to keep coming to this thread every time I have a lightroom question, but I can't find anything about this problem online. Hopefully someone here knows what I'm screwing up. After I do my development on the picture in lightroom, this is what the image looks like when viewing it in "library" mode:  If I click on "develop", I can see that the sharpness is actually there.  Why does the version shown in the library view have all the sharpness gone?
|
|
#
¿
Oct 21, 2015 01:52
|
|
|
NeuralSpark posted:https://helpx.adobe.com/lightroom/kb/optimize-performance-lightroom.html
|
|
#
¿
Oct 21, 2015 02:07
|
|
|

|
| # ¿ Apr 28, 2024 00:27 |
|
|
I've been printing a lot of canvas prints lately. Adding mirrored 2" borders to all my shots in photoshop is getting annoying. Does anyone know of an existing photoshop action/macro that will automatically add the wrapped edges to an image?
|
|
#
¿
Mar 3, 2016 21:54
|
|