

|
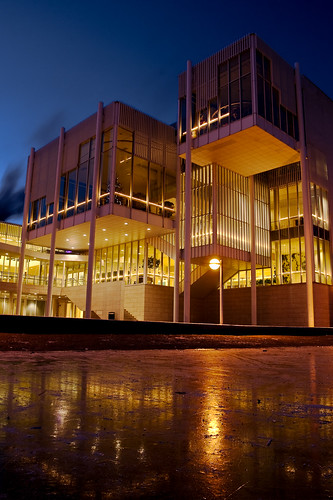
I'll post some examples a bit later. Great idea for a thread!quazi posted:I took the eraser, set it to about 1000 pixels, completely soft-edged, and at about 30% transparency. I started erasing the underexposed ground from the top layer to let the bottom layer show through. I don't understand why people use the eraser tool. To me it's dangerous. I always use layer masks. I can "erase" with a paintbrush in a mask just as easily with the eraser tool, and the effect can always be undone - at any stage of the game. If you erase something, it's gone. There's no getting it back if you're 25 steps into the process unless you do a massive history undo.... which might take away steps you wanted to keep. Tziko posted:Well done. The only thing you didn't do which you should have (except it wouldn't have been possible because of the lack of free space), was to fix the left column of the building using the Transform tool (or Lens Correction tool). The fact that the perspective distortion from the wide lens makes it appear as though the building is listing backwards is a problem and a distraction. Otherwise, nicely done! Mannequin fucked around with this message at 03:20 on Jan 13, 2009 |
 #
¿
Jan 13, 2009 03:18
#
¿
Jan 13, 2009 03:18
|
|

|

|
| # ¿ Apr 27, 2024 08:27 |
|
|
NM
Mannequin fucked around with this message at 17:35 on Feb 19, 2009 |
|
#
¿
Jan 14, 2009 18:04
|
|
|
Edit: It'd be nice if we could actually delete our posts, but I guess that doesn't exist anywhere. Ignore this!
Mannequin fucked around with this message at 13:14 on Jan 16, 2009 |
|
#
¿
Jan 14, 2009 19:01
|
|
|
NM
Mannequin fucked around with this message at 13:11 on Jan 16, 2009 |
|
#
¿
Jan 14, 2009 19:41
|
|
|
Edit: NM
Mannequin fucked around with this message at 13:14 on Jan 16, 2009 |
|
#
¿
Jan 14, 2009 20:02
|
|
|
Tziko posted:Also, if any of you have good post-processing resources (online or books), please share them so that I can add them to the OP. This is really nice site for a bunch of different tutorials. Very professional. I like their Photomatix / HDR tutorial. Mannequin fucked around with this message at 07:18 on Jan 15, 2009 |
|
#
¿
Jan 14, 2009 20:11
|
|
|
Kefka, great tutorial! I absolutely never bother sharpening my images because I never got into the habit of doing it, and now there are all these fancy features in Photoshop to help you do it better. Woops! Guess I should start.GoonsInDepth posted:Does anyone have any suggestions? Err, what is it exactly you want to do? Is there a specific effect you're trying to achieve?
|
|
#
¿
Jan 16, 2009 07:32
|
|
|
I guess I'm the only one who likes Bridge. I have a custom layout and everything. I see all my thumbnails in Bridge, see what the photo settings were down below (and even further will show me the lens and camera type), and then rate it or just open it. Works like a loving charm. I can make ACR adjustments and apply it to the RAW or JPEG or open it into Photoshop for further edits. I like Lightroom as well but I really don't use it that much except for some of the silly effects like the split toning. Here's a screenshot I started working on but never finished writing the tutorial. (I ended up taking a ridiculous amount of screenshots and then realizing it was waay it overboard. Plus I shot in JPG - HUGE SIN! But this is an old picture before I cared about RAW.) Speaking of tutorials I really will add one soon I promise. I've got lots of examples. The key is I want to keep it short. Edit: actually if you're bored and want to page through the screenshots, just change the URL from "step01" to stepxx - up to step19. That way I don't actually have to write anything. ") vvvv I've always wondered about this. How do you shoot tethered? Mannequin fucked around with this message at 02:05 on Jan 17, 2009 |
|
#
¿
Jan 17, 2009 02:00
|
|
|
^^ How do you shoot so the photo you take on your camera immediately loads onto your laptop screen? I figured that's what you meant.brad industry posted:Bridge is awful for shooting tethered compared to basically anything else (ie Capture One). What does other software do better? I mean, it loads thumbnails, shows previews, displays EXIF, lists folders, allows you to run batch processes and actions created in Photoshop (love this), it filters results by ratings or labels (standard) and it works all the time. What does other software do better? I am just curious, not trying to sound defensive. I really can't think of much else I need from a workflow program other than maybe tagging things (which I probably wouldn't do anyway). Mannequin fucked around with this message at 02:26 on Jan 17, 2009 |
|
#
¿
Jan 17, 2009 02:24
|
|
|
mcsuede posted:Yeah the Bridge improvements in CS4 are pretty good, it's at least worth a second look for certain things (or for people who don't have Lightroom for some reason). How is Bridge like Lightroom? You mean organizationally or in that you can apply curves and sharpening, etc? Because my version of Bridge is strictly an organizational tool. Sorry to rant so long about Bridge, I feel like I'm derailing the thread here.
|
|
#
¿
Jan 17, 2009 02:49
|
|
|
Well, I've gone against my rule of making this short, but hopefully it's helpful. . . . . . . Beginning sometime over the summer, I started faking skies. It helped make pictures more dramatic and it was fairly easy to do. The below pictures incorporated fake skies. (Some of them are repeated, too.  ) )        Of course I don't always do it, usually only when there is a vast blankness up above or I think it just might compliment nicely. It's a pretty simple procedure so I will sum it up below: Every now and then I'll go outside when there are interesting formations in the sky, look upwards, and take pictures of clouds. Maybe 2-3 times a year. I'll take a few hundred shots, normally at narrow apertures (f/11) to capture details that might escape larger apertures. The majority of the clouds used in these photos were taken after a storm, where I was able to net pictures like these:   In fact, the one on the left is a composite as well. The moon and gradient were added in separately during a shoot of the lunar eclipse with my D200.  . . . . . . Here's a quick overview of what I do to composite in skies and other things: 1) My starting image, before I have done any adjustments except basic cloning out of lens dust and slight cropping: 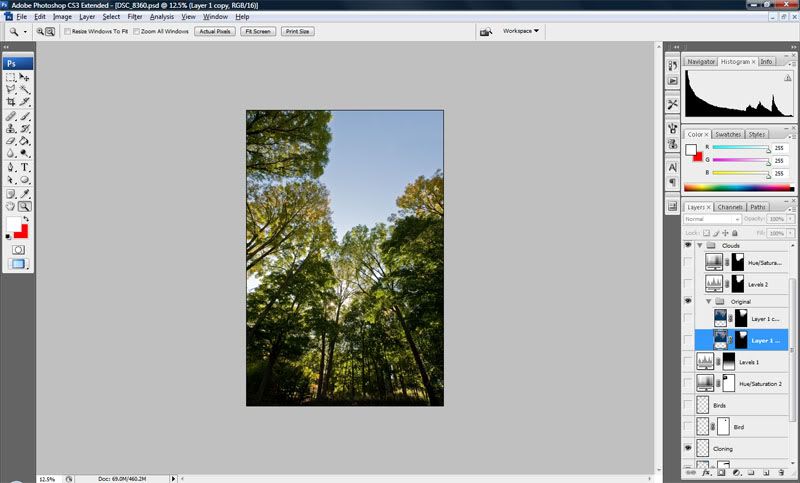 2) Clouds are brought in from a separate image and pasted on top. I create a mask and using the airbrush, quickly erase the part of the clouds that hit the tree branches. It's supposed to look seamless: 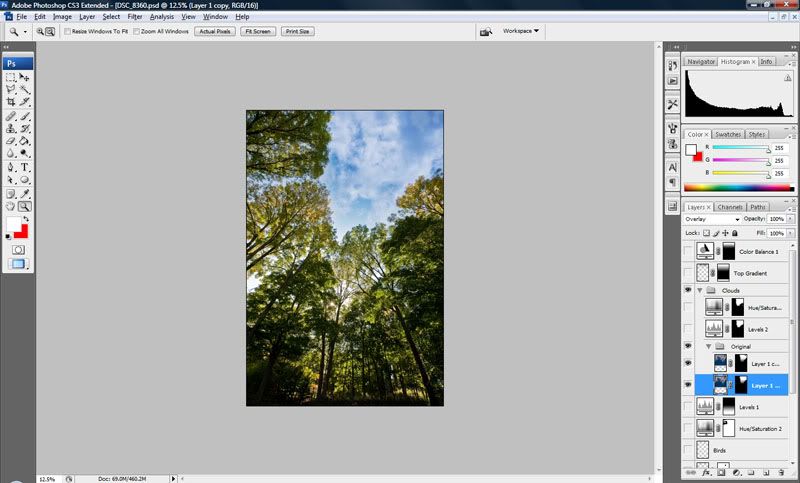 In fact, the clouds are duplicated and layer modes are changed to Overlay, because this helps them blend into the background more. 3) Unfortunately, as you can see, the hue of the new clouds is a little bright and too cyan in color, so adjustments have to be made. A Hue/Saturation adjustment layer is added to desaturate the cyan, and alter the hue to a deeper blue color. The combination of removing saturation and altering hue is effective, but the clouds lost some punch, so a Levels adjustment layer was added to bring back brightness and some darks. The key is that it's supposed to look natural. 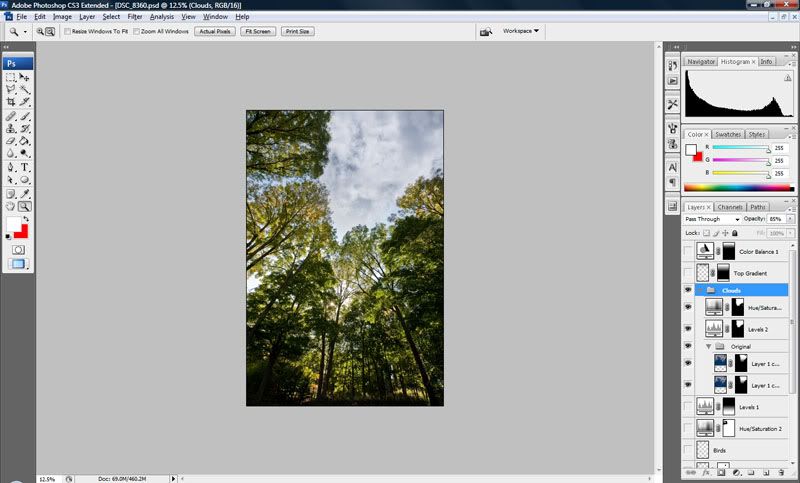 4) As the skies typically work in nature, the further up you look the darker they get as they reach closer to the outer edges of the atmosphere. Makes sense, right? Knowing this, I often introduce black gradients to my images to help emphasize this technique. I did it recently with one of Luk3's pictures here, somewhat dramatically. But you can also see how I've done it in the image below (compared to the above screenshot). It's subtle, but it compliments the overall feel. 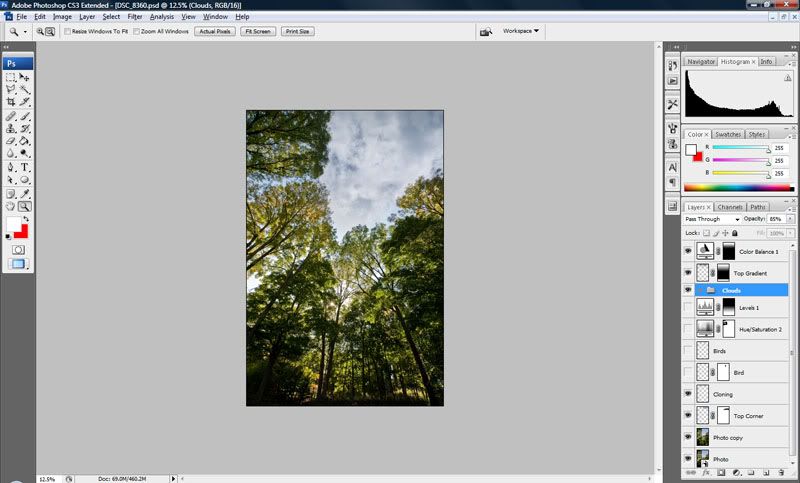 I also added a Color Balance adjustment layer to color correct some of the loss in blue from my previous hue/saturation. A minor adjustment there. 5) At this point, I'm basically finished with the sky. I add a quick Levels adjustment layer with a mask to lighten the darks in the foreground, and a Hue/Saturation adjustment layer boost the saturation of the golds and the greens. Nothing crazy or complicated here: 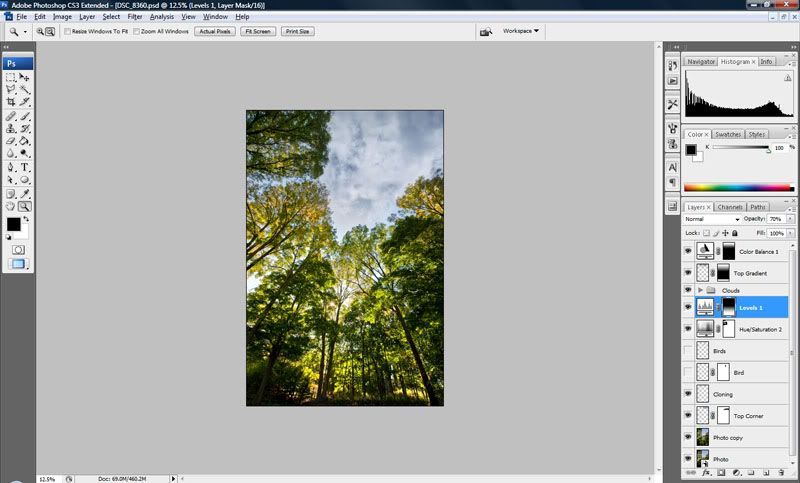 6) Birds from prior shots of this same scene are pasted in and masked into the image with relative ease. And then I'm done. 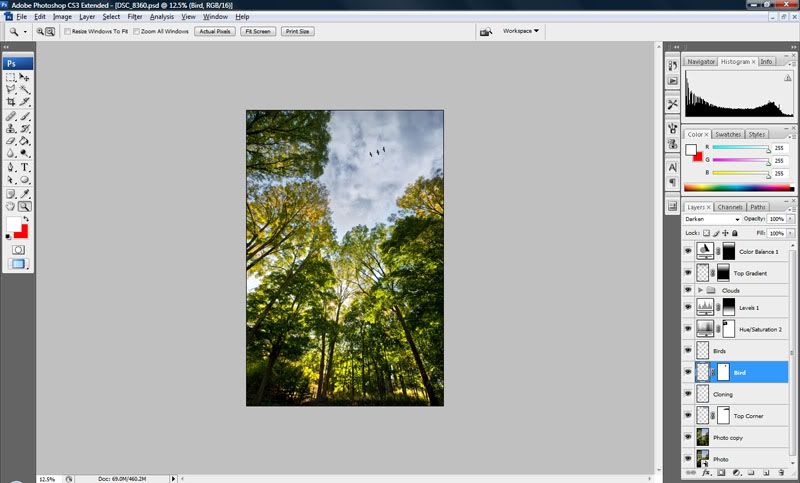 Total processing time was probably 30 minutes. . . . . . . A few things to note: Some of you might think doing this is a lot of work and a pain in the rear end. I actually enjoy doing post work. When I'm happy with a picture, I immediately start thinking about ways that I can improve it - sometimes with very little adjustment, and sometimes with heavy adjustment like in the image above. To me, it's a form of creative expression, and since I like being creative it's fun. There are no rules and really, no right answers. If you're happy with it, then your goal is accomplished. Nevertheless, I find making these changes easily. It helps that I've been using Photoshop for over 15 years now (since version 2.0!) I know all the shortcuts and generally how everything works. That makes it easier. I would say, if you have trouble with post-processing because you don't know how to do it and you want to improve, you have to want it. You have to have a natural curiosity for it and that desire to be creative. If you don't, then it becomes strictly educational and in my opinion, harder to soak up. I've taught a few Photoshop and Illustrator classes and found that the people who benefited from it the most were those who wanted to be creative and have that extra control over their images - whatever they may be. Photoshop is a bit of a mystery. When I first started using it I was pretty baffled because the interface was really nothing, especially back then, and I was confused at how people could generate such beautiful things with this software. Remember, it is really first and foremost a photo editing tool. Although it can be used to make something out of nothing beginning with an empty canvas, it helps to bring something in that already exists, and then to start experimenting with the filters and layer types. (Sorry if that was painfully obvious.) The point is, if you know this, then it starts to get easier. Once something is brought in, start playing with the filters and the adjustment layers. I never read a Photoshop book or took a class, I learned by experimenting. I feel this is one of the best ways because you learn from your own mistakes.
Sorry if this sounds horribly rudimentary. I'm just trying to sum up key things that will help you grow if you're really starting from nowhere. I guess I'll shut up now. . . . . . . I guess what would help me and possibly others is if you had specific questions on processing techniques. That way it's less of a shot in the dark. I have a question for people like LuisX and Zoowick on how they achieve the uber-smooth airbrushing of skin on portraits. That's sort of been a weak point for me. Fidel Castronaut posted:I'm also going to go ahead and request someone do tutorials for digital cross-processing and proper clonestamping. this is a really informative thread and i appreciate everyone that has taken the time to do step-by-step tutorials. Since I rarely do excessive cloning and I'm not sure what digital cross-posting is, I'll leave this to the other pros. I'll try and find some examples of heavy cloning though if I can.
|
|
#
¿
Jan 17, 2009 15:35
|
|
|
johnasavoia posted:^^^ I hear you. It's definitely manipulation but I am okay with it. Just about everything I do is a form of manipulation, though. If you look at the last things I shot recently you'll see very strong black and white conversions (to the point of it exceeding the look of film) or alterations to hue and saturation and layer modes to the point where images take on a completely different feel. Your photography is quite different, though. You are more or less trying to imitate the effect of unprocessed film - or rather, film processed through a dark room with little to no manipulation. It's hard to compare.
|
|
#
¿
Jan 17, 2009 16:27
|
|
|
Don't forget "z" for zoom! One I use frequently is if I accidentally zoom in to like 800% by inadvertently making a tiny selection with the zoom tool, you can instantly zoom out with the zero key. Brings you to the "fit in window" size, which isn't always perfect, but then it's like 1 negative zoom out vs. 20. Quick time saver.ferdinand posted:Since you keep all of your cloud work in it's own group it might be easier for you to just put the mask of the clouds into a layer mask on the group, then you wouldn't need to repeat it so often. The clouds needed to be duplicated in order to increase their strength. Since I had already created the mask for the first sky, it was easier to just duplicate the existing layer of clouds and keep the mask in place. But sure, it could have gone on to the group, I do this fairly frequently. quote:For skin a lot of people just clone and heal, really to give it a nice clean tone you want to dodge and burn. Wait a second. Is this a joke or are you really a high-end fashion photographer and this is your shot?
|
|
#
¿
Jan 18, 2009 06:21
|
|

|
RangerScum posted:Hey guys, I have a question on how to edit this photo. Yeah, easy. Add a Hue/Saturation adjustment layer and go the "Red" channel in the dropdown at the top. Focus your eyes on her skin and desaturate to where you feel it's needed. Click okay when you're done. Click on the white mask to the right of the adjustment layer, select a small paintbrush and choose the color black. Zoom in on her face and carefully brush over the lips. This will erase the saturation adjustment wherever you paint black.
|
|
#
¿
Jan 31, 2009 23:52
|
|

|
evil_bunnY posted:He suddenly disappeared when challenged to show his own work didn't he? Fire away! Yeah, friendship waffle is gone from CC for good as far as I know. I actually asked him to come back because I thought he had good things to say about gear recommendations and things of that sort, but he essentially said it wasn't worth the bother since everything turned into bickering.
|
|
#
¿
Mar 4, 2009 20:45
|
|
|
Bottom Liner posted:reposting this from the wedding thread to hopefully get a suggestion tonight: I would consider taking a few underexposed shots of the sky, and a few really good ceremony shots, and bring the underexposed sky into the final image in post. I wouldn't normally recommend doing this, I have gone off the idea of compositing things into the frame later (even though I've done it myself), but: A) it's not too hard in this scenario B) heavy flash might be obnoxious during the reception C) a good picture will make the wedding couple happy, they won't care how you executed it
|
|
#
¿
Oct 24, 2009 03:16
|
|

|
I took a picture of this girl but did not get her bag fully out of view: Do you think it's possible to remove this in Photoshop? I want to basically keep this perspective, I don't want to do a close-in crop, and I want to maintain the square. Am I totally screwed or is this salvageable?
|
|
#
¿
Nov 3, 2011 04:53
|
|
|

|
| # ¿ Apr 27, 2024 08:27 |
|
|
Wow, I totally forgot about content aware fill. I fixed it in like 10 minutes!!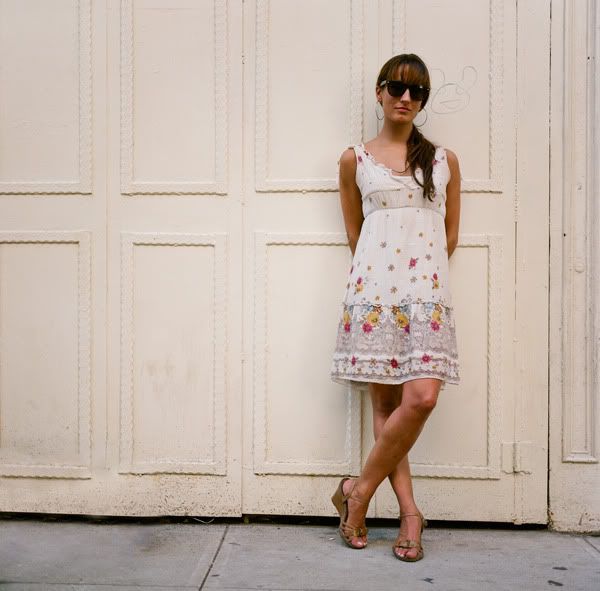 It might need a bit of slight re-touching but this got me close. Thanks.
|
|
#
¿
Nov 3, 2011 05:39
|
|