

|
Too bad you don't get to take their much-bigger ship, or at least raid their cargo before scuttling it.
|
 #
?
Jun 11, 2013 15:09
#
?
Jun 11, 2013 15:09
|
|

|

|
| # ? Apr 18, 2024 08:39 |
|
|
Give the shield to Celica. If she's gonna whiff attacks that much, she should be able to survive the counter attack, at least. Christ, so much missing...
|
|
#
?
Jun 11, 2013 19:23
|
|

|
I vote to have Celica get the shield.
|
|
#
?
Jun 12, 2013 20:39
|
|
|
Jenny has a defense of ONE. Give her the shield.
|
|
#
?
Jun 12, 2013 20:49
|
|

|
Chapter 2, Part 5: Pirate Fort Time to storm the pirate fort. 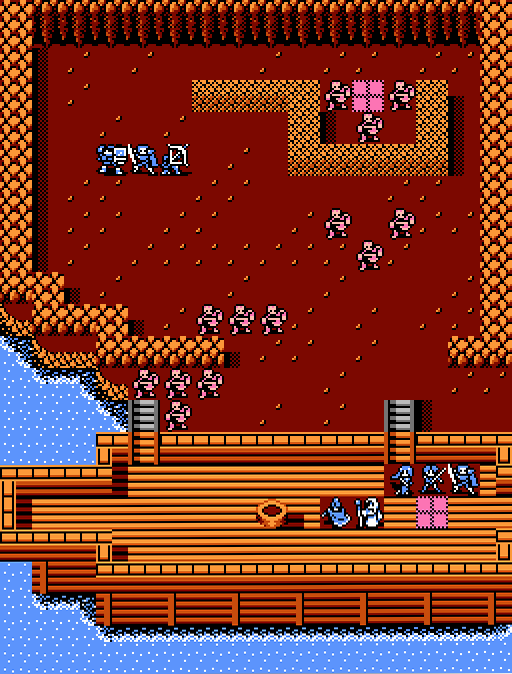 Our ship has docked directly at the fort, where an army of thieves awaits us. There's also a small knot of other units to the northwest.... 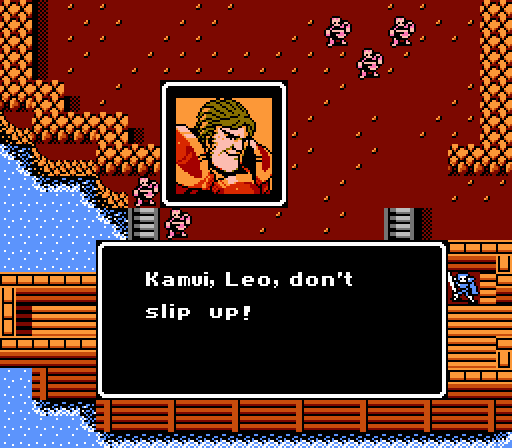 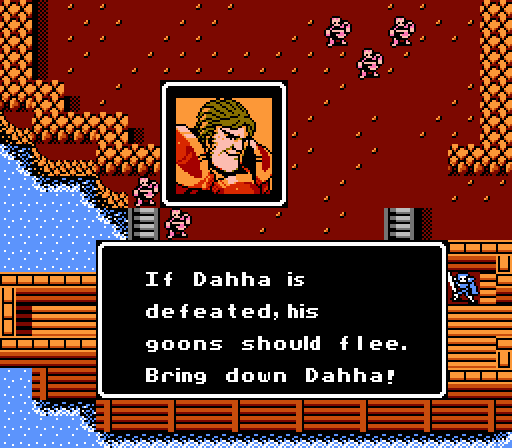 Looks like they're here to help, at least. And by 'help', I really mean 'steal Exp from us' since this battle wouldn't be all that hard without them. If you're really into a min-max style of play, you can retreat from the battle and re-enter it, and the allied units will be gone. 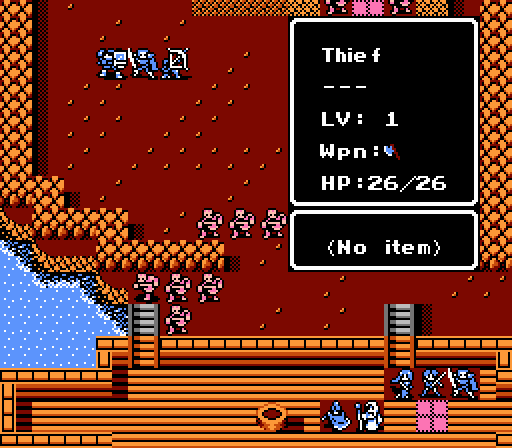 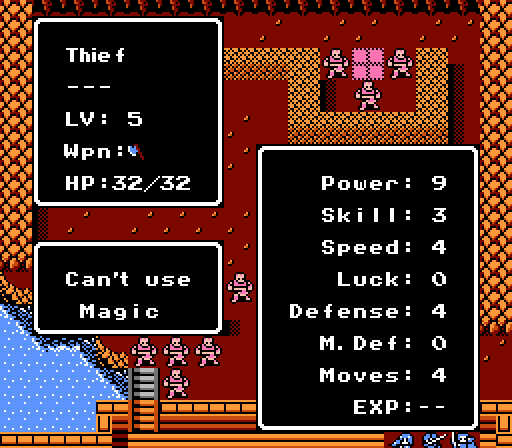 The seven thieves closest to us are level 1 fodder. All but one of the rest are level 5, a little tougher but nothing we can't handle at this point. 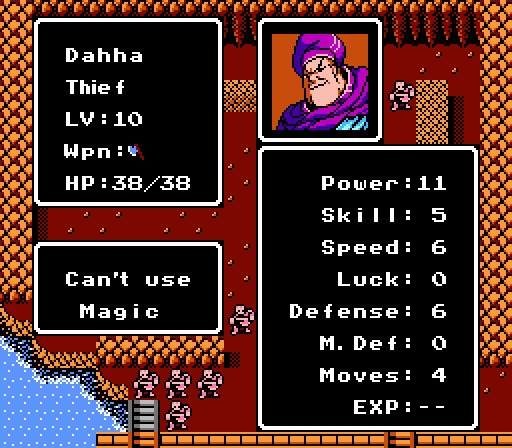 The thief just below the healing tile is Dahha, the boss of the pirates. At level 10 he might actually be threatening if he attacked with the rest of his troops, but he's going to park himself on the healing tile until someone gets in his attack range. 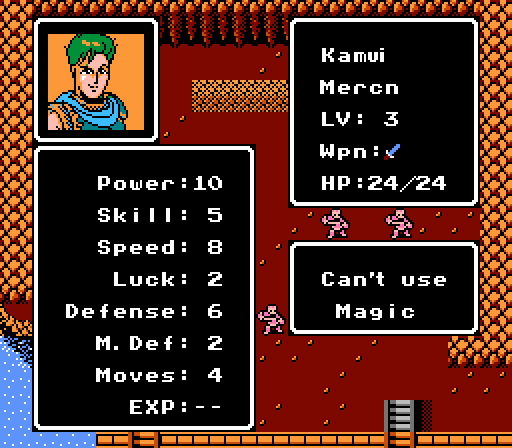 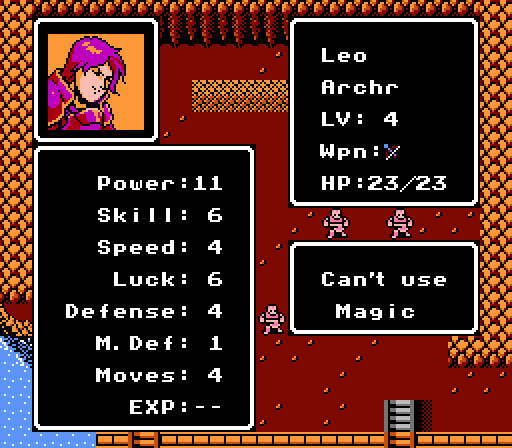 Kamui starts off at the same level as Saber and with a portrait that's missing an eyepatch and has some different colors but is otherwise identical. Since Saber's first couple of levels have been great, Kamui's actually behind in both Power and Speed and tied on Defense. Leo is built like an Archer with a high-reaching Power and not much else.  Valbo is the leader of the allied group, a pre-promoted Knight with high Power and Defense and worse Speed than Boey. Turn 1 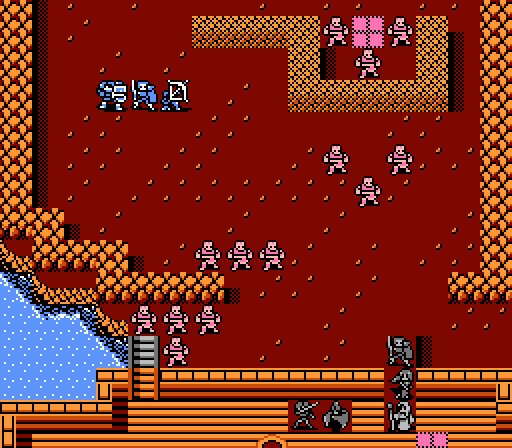 Celica, with the Leather Shield boosting her Defense, moves to the west, while Saber leads to the east. 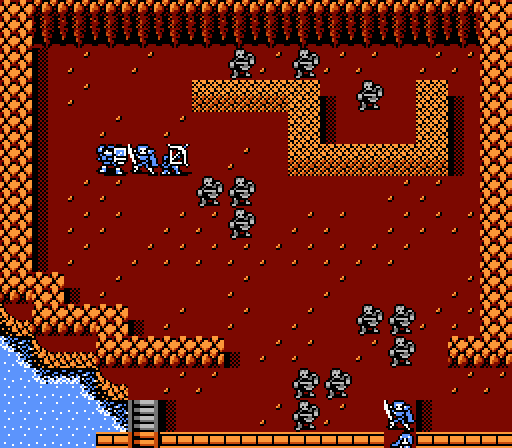 Most of the thieves go after Saber, with most of the rest headed for Valbo and friends. Only one thief headed down the western bridge towards Celica. 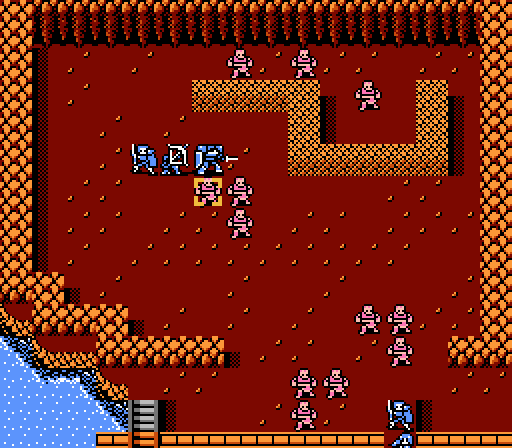  The ally phase is technically at the start of the player phase, but since they don't move on the first turn it's effectively at the end of the first full round of actions. Here Valbo takes out a chunk of a thief and laughs off the counterattack, then Kamui moves in to finish it off and steal the first kill of the fight.  Leo takes a couple shots at another thief to wrap things up for the turn. Turn 2   We have our own problems to take care of here. Celica starts with a couple fireballs over the ship railing, and actually hits both of them for once, too. Still not quite enough for the kill, though.  It is enough for a rather odd but welcome level. 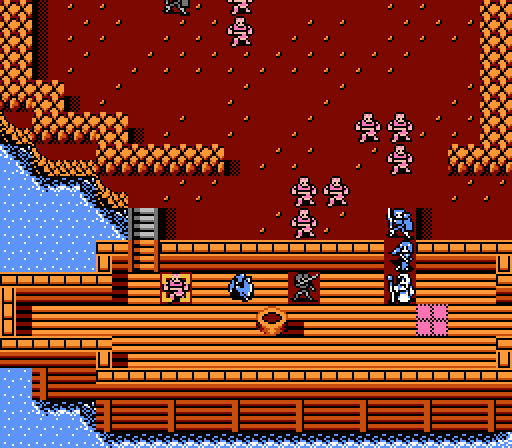 Boey moves up to attack the one thief on the boat, because why not. Saber stays where he is to protect May and Jenny. 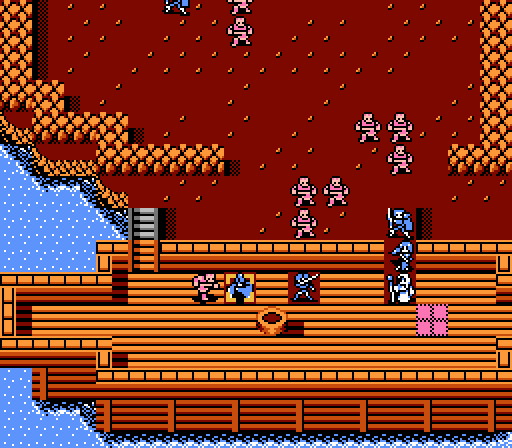 Boey is attacked in turn on the enemy phase - double-attacked, even - but he actually lands his second straight fireball to send the thief back into retreat mode. 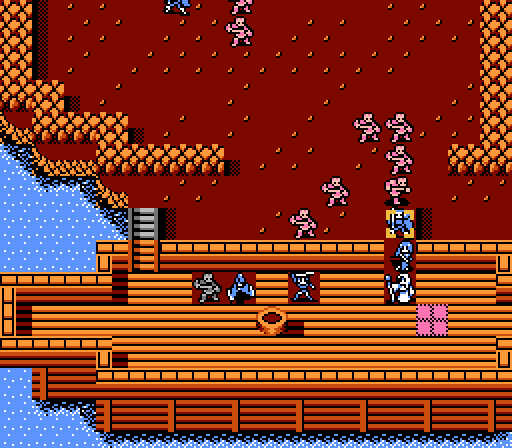 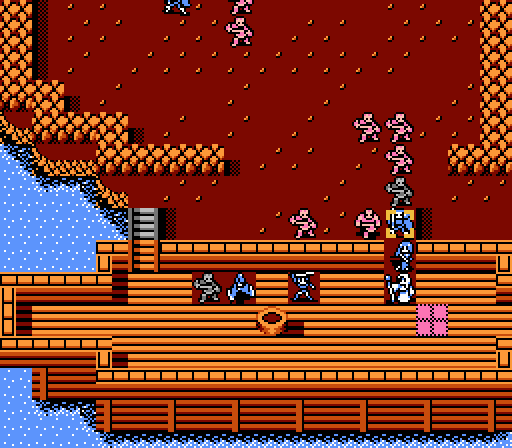 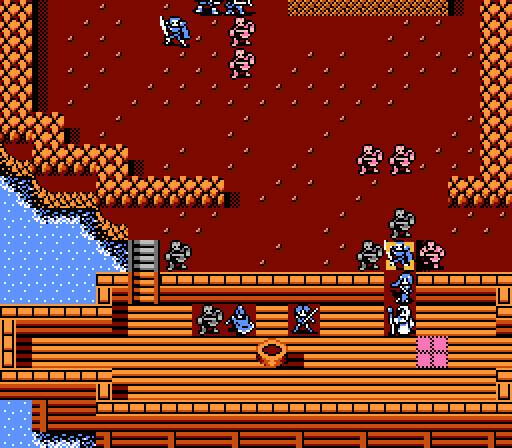 Saber fends off a few attacks, dishing out major counterattacks to each thief. 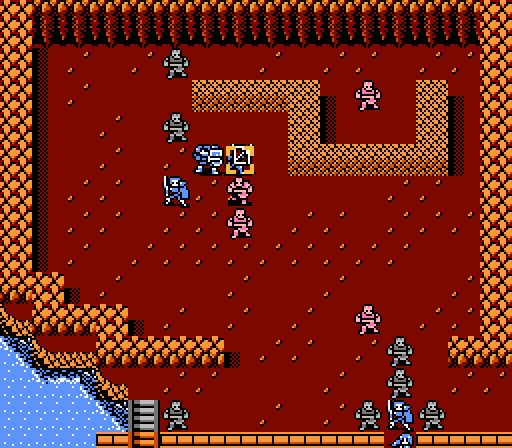 Another thief attacks Leo, who dodges and then counters for 7 damage. 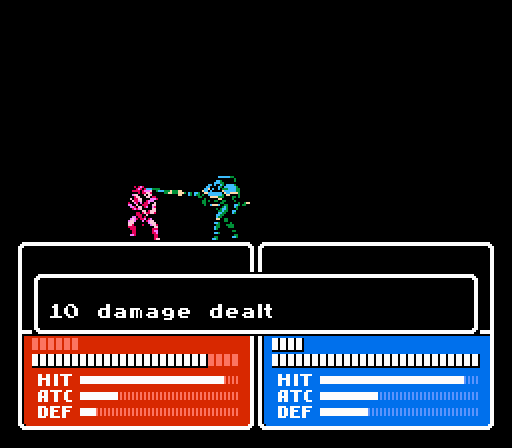 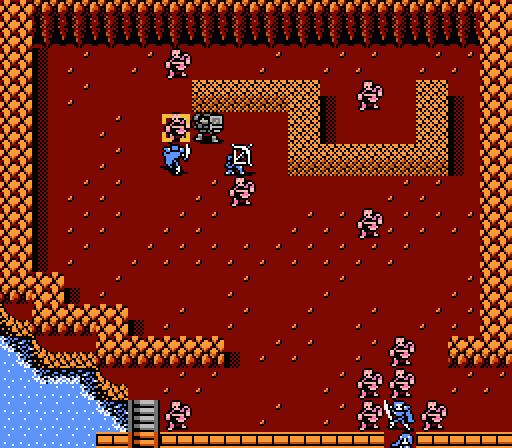 Valbo and Kamui tag-team another thief, but this one is level 5 so survives the dual attack.  Leo moves over to steal another kill. Turn 3   Our allies can handle themselves, they'll just steal as much Exp from us as they can. Time to start a bit of a break-out here. Celica kills off one thief, but Jenny misses the other.   Boey pulls off the impossible and lands his third straight attack to finish off another thief.   May isn't fast enough to double so can't kill off her target, but Saber does get in the kill on his opponent.  Four thieves left on each side, now. 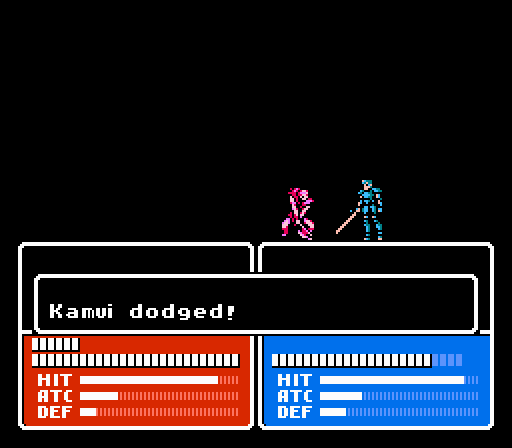 Kamui dodges an attack and gets a critical on the counter but doesn't get the kill. 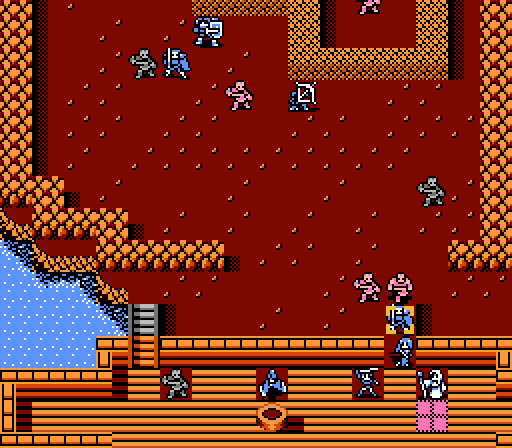 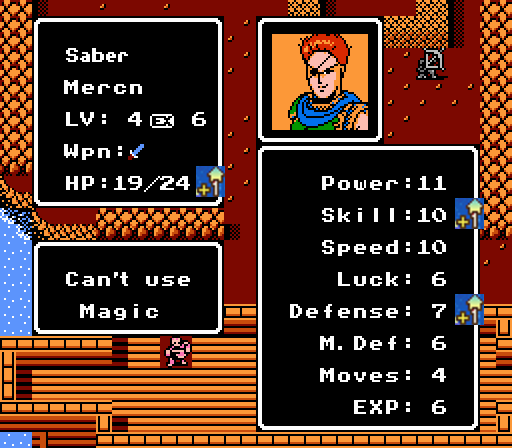 Saber gets enough Exp from more counterattacks to get another great level. 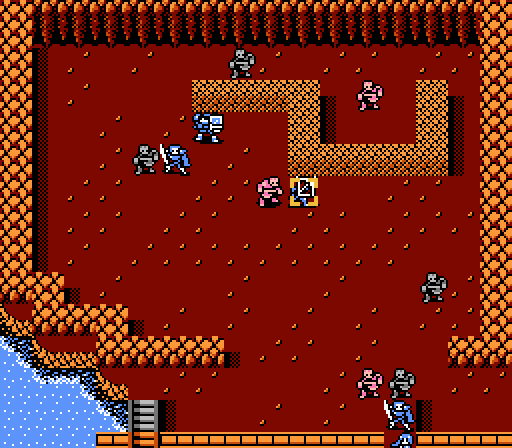 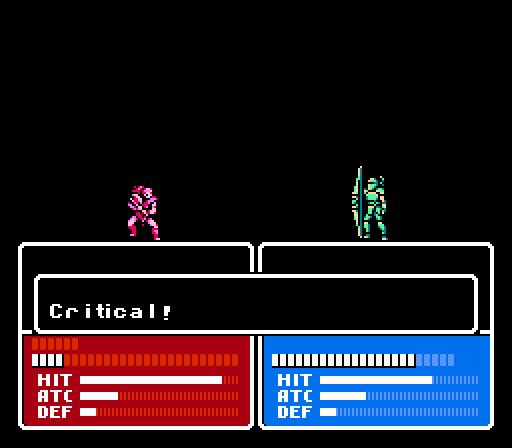 Another thief attacks Leo, who gets another critical but not a kill. 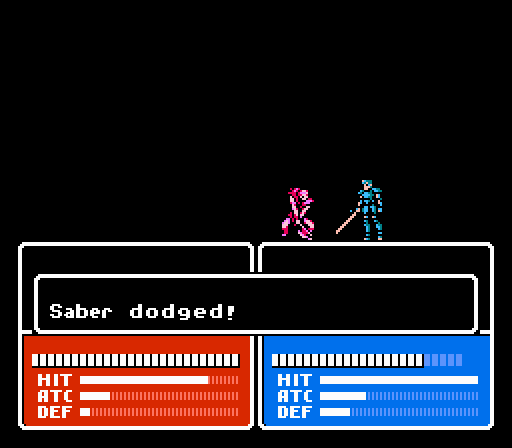  Saber dodges another thief, getting in two more attacks of his own. 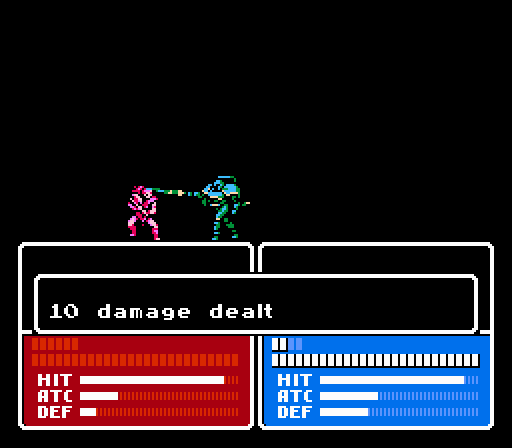 Volba steals another kill, finishing off Leo's attacker. 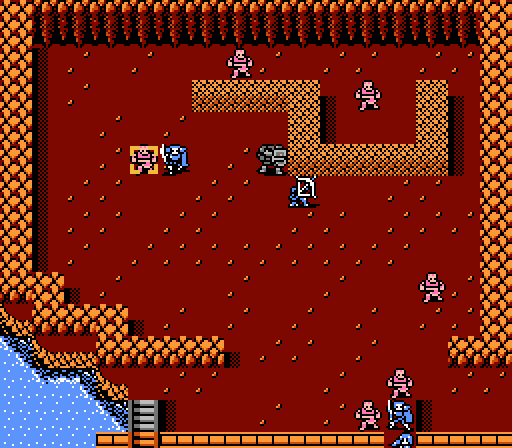 Kamui gets another kill as well. 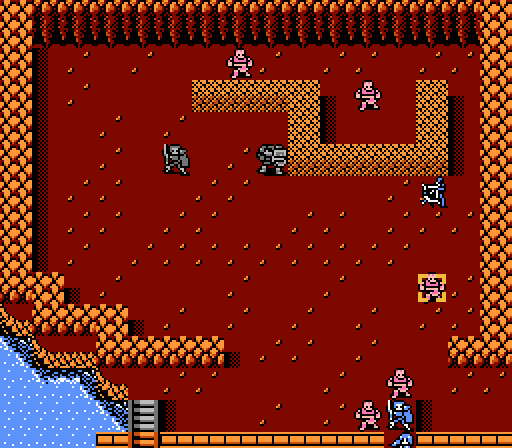  Leo looks to make it 3-for-3 in the kill-steal department, but fortunately misses. Turn 4 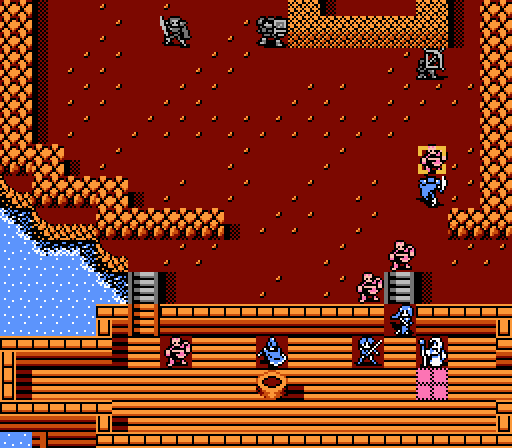 Still four targets near us, so let's see how much damage we can do. Saber starts off by rushing forward to finish off the thief that Leo just missed. 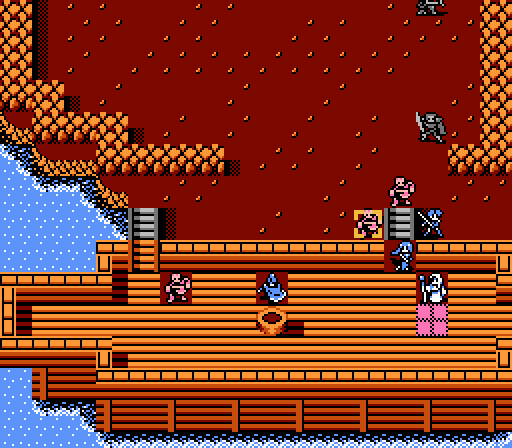 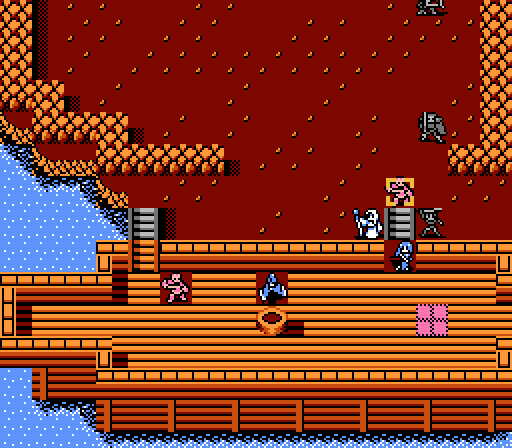 Celica and Jenny attack together again, with Celica getting the kill and Jenny landing a weak single attack. 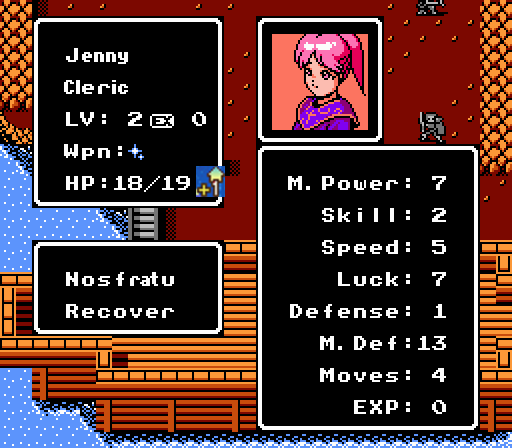 More healing fuel I guess.  May finishes off Jenny's target. 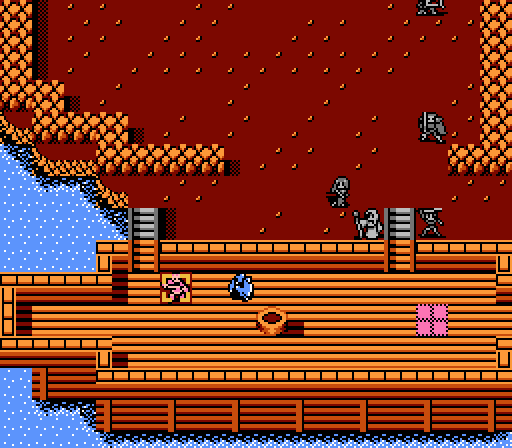 This thief had 2 HP left and was making a run for the healing tile on our ship. Boey turns him to ash. After all the trouble last battle, every single spell has found its target this time around. 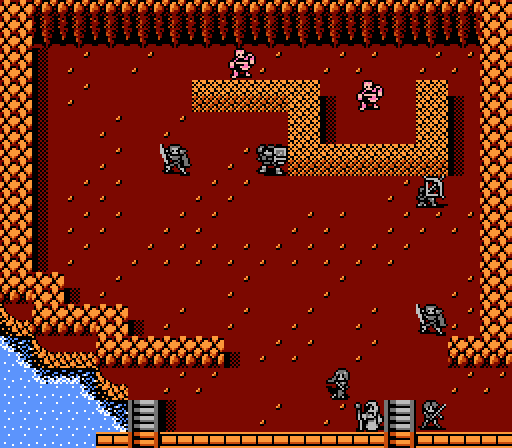 Just two thieves left, including the boss, Dahha. 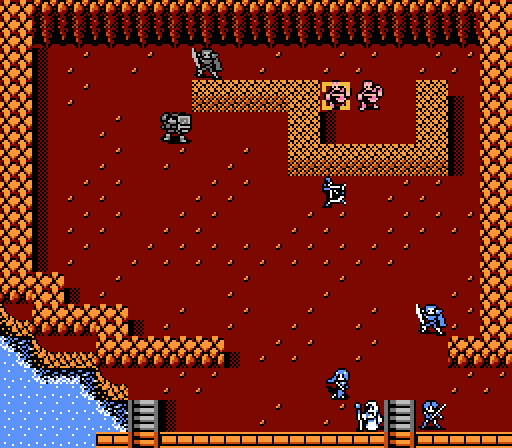 Leo wounds the remaining wandering thief further but can't finish it off just yet. Turn 5 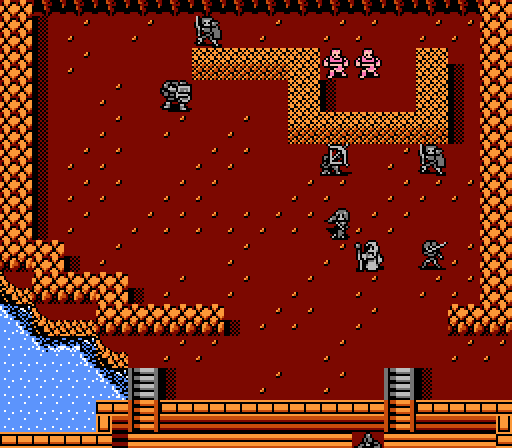 Movin' on up. 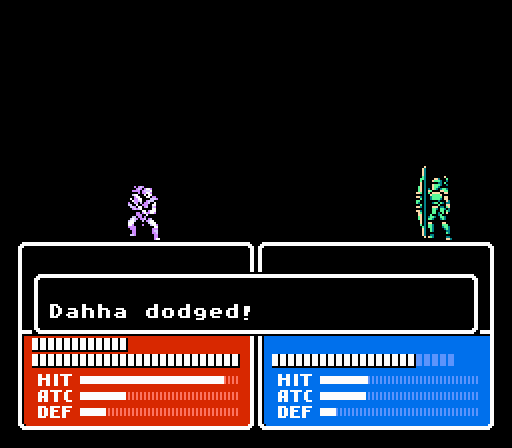 Leo takes a shot at Dahha this time, but it's tough for an archer to hit an enemy hiding on a healing tile - look at that low hit rate. Turn 6 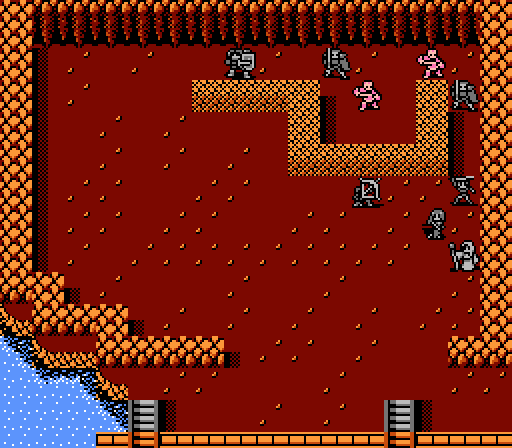 Still can't reach anyone just yet. 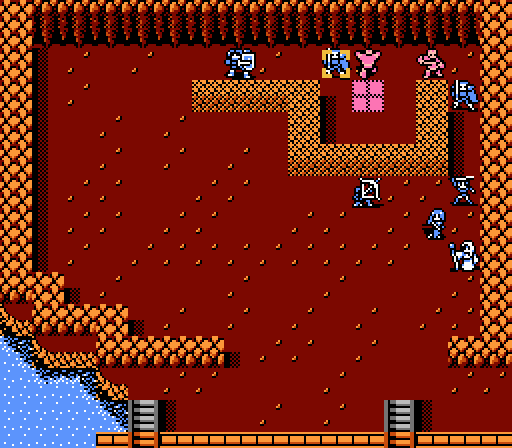 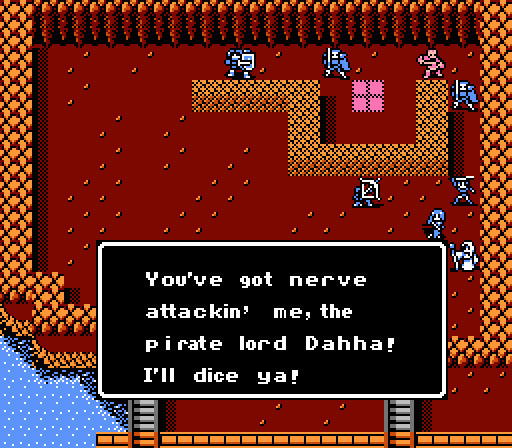 Dahha finally moves off the healing tile to attack Kamui. 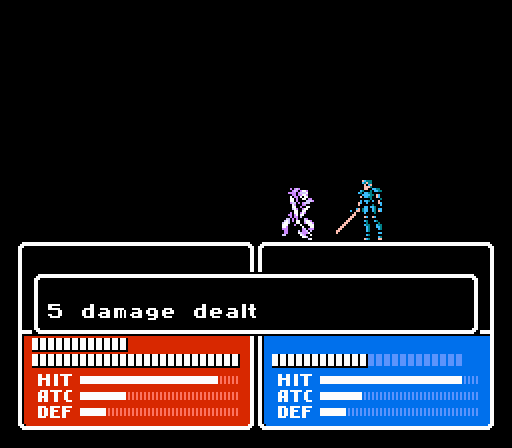 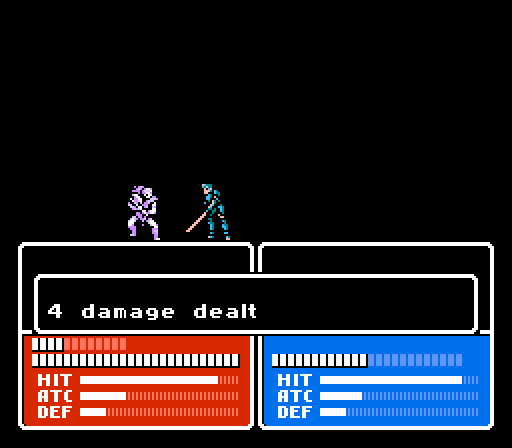 Kamui's Speed limits the damage, fortunately. 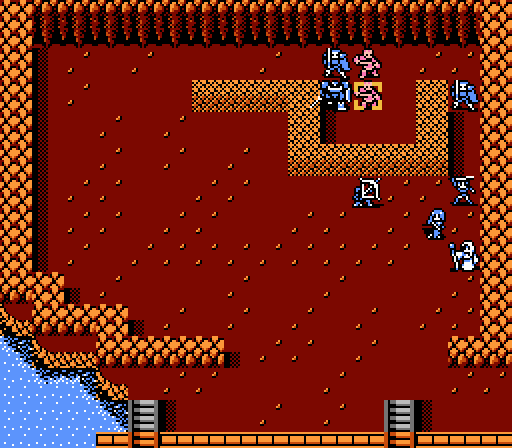  The other thief retreats to the healing tile, but Valbo chases him down and connects for the killing blow. 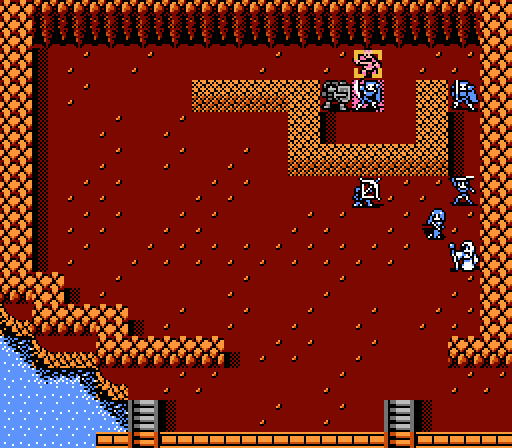 Kamui rather cleverly steps onto the healing tile to attack Dahha. I have to say, the friendly AI has been more competent than I would have expected for an NES game. Or any Fire Emblem game, really. Turn 7 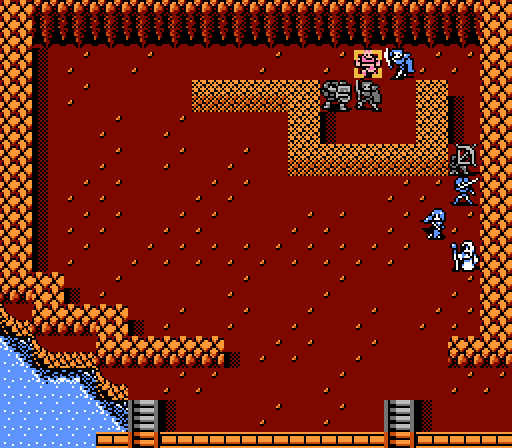  Saber finally arrives to help out our allies, though he misses his first attack somehow.   Dahha was put below 50% HP so didn't attack anyone on the enemy phase. Valbo and Kamui together bring Dahha down to just 1 HP remaining. 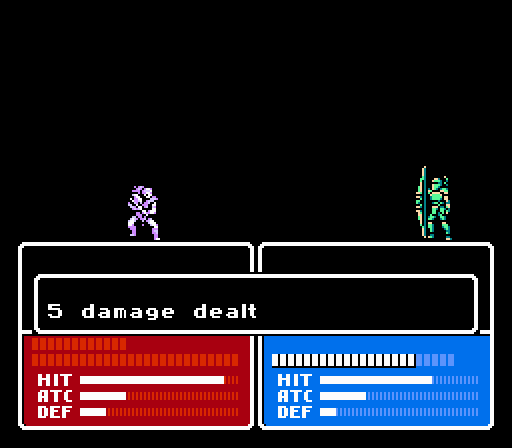 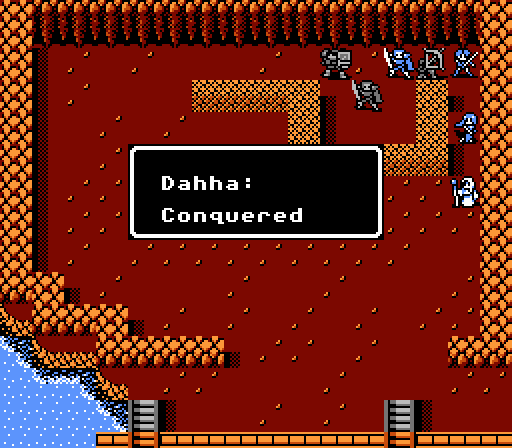 And Leo steals the boss-kill, immediately ending the battle. 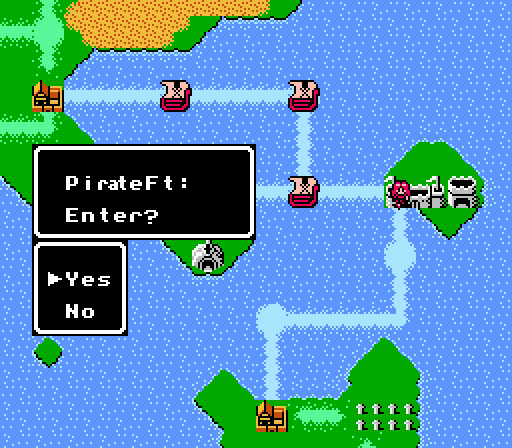 With the pirates cleared out, it's time to explore the fort. 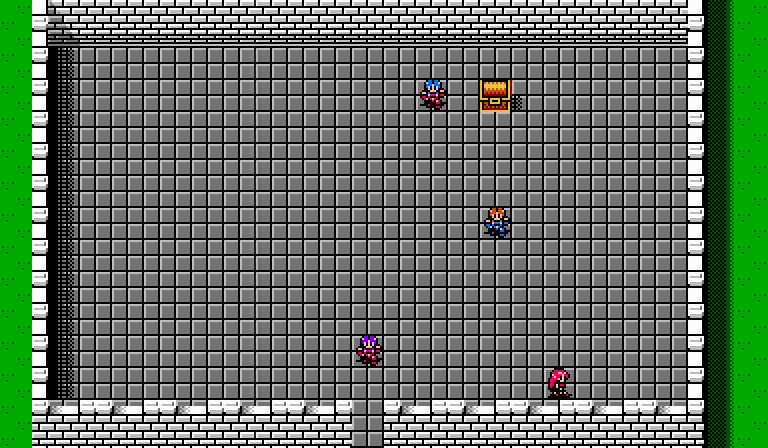 Not much for decoration, but we have a treasure and a few people to chat with.    Where ya go, I'll follow you! Where ya go, I'll follow you!Our allies from the battle are here in the fort, waiting to be recruited.   ...Unless you're gonna fight the Dragon Zombie. There's no way to defeat that thing without Angel magic. ...Unless you're gonna fight the Dragon Zombie. There's no way to defeat that thing without Angel magic.Kamui's a real downer, and really just a worse version of Saber. He doesn't even have an eyepatch.   I'll show you my marksmanship! I'll show you my marksmanship!Leo is at least cheerful.  The treasure is probably the best thing here. The Steel Sword gives +4 to Power at a cost of 10% less Accuracy and 1 more Weight over the basic Sword. It's going straight to Celica, since the boost to Power also helps out her spellcasting without any of the drawbacks. I give the Leather Shield to Saber instead. Current Roster  New Characters Valbo is our first pre-promoted unit. He starts off with great Power and Defense and makes for a pretty good wall, but his tiny base Speed really limits his utility in the long-term.pre:Stat Base L1 Growth HP 30 40 Power 14 20 Skill 4 35 Speed 2 25 Luck 1 10 Defense 12 20 M. Def 0 0 Moves 4 0 Quality 33 110 Kamui starts with lower bases than Saber, thanks to a few great levels from Saber, but he can be a pretty good complementary piece with a good Speed growth.pre:Stat Base L3 Growth HP 34 30 Power 10 25 Skill 5 20 Speed 8 40 Luck 2 20 Defense 6 20 M. Def 2 0 Moves 4 0 Quality 31 125 Leo's the archer for Celica's group, starting with a solid base Power but not much Speed and just terrible growths in everything but HP and Defense, which really shouldn't matter much for an archer.pre:Stat Base L4 Growth HP 23 50 Power 11 20 Skill 6 20 Speed 4 10 Luck 6 10 Defense 4 30 M. Def 1 0 Moves 4 0 Quality 31 90   Another sea battle against what appears to be a very strong single opponent.
|
|
#
?
Jun 17, 2013 01:52
|
|

|
Chapter 2, Part 6: Sea III 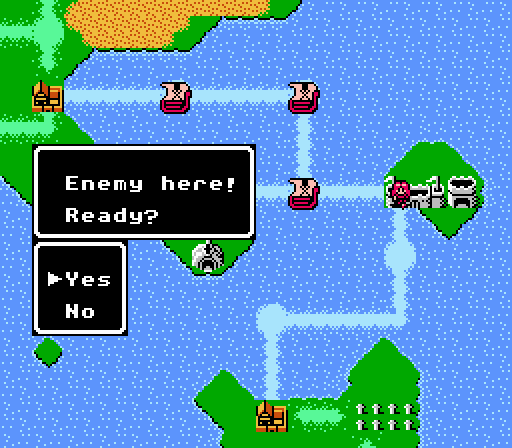 Time for something of a gimmick battle here, only a single opponent awaits us.  Pretty straightforward, a single chokepoint to hold off the single enemy. 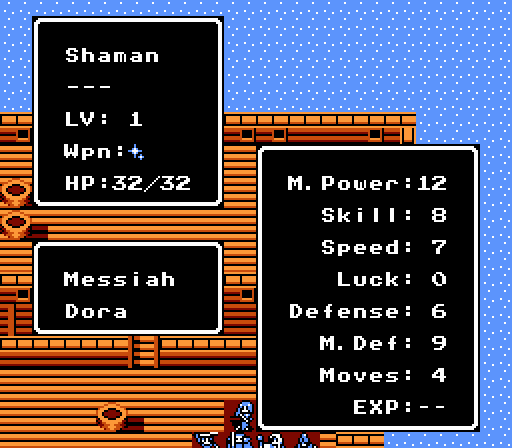 That enemy is not as intimidating as advertised - quality is actually only 33, not 133. We saw a wizard with Dora at the end of the first chapter, but the Messiah spell is a new one. Will demonstrate it when we see it. The shaman class is an enemy-only mage class. Turn 1  Moving up and guarding the bridge in case the shaman rushes us. It doesn't. Turn 2 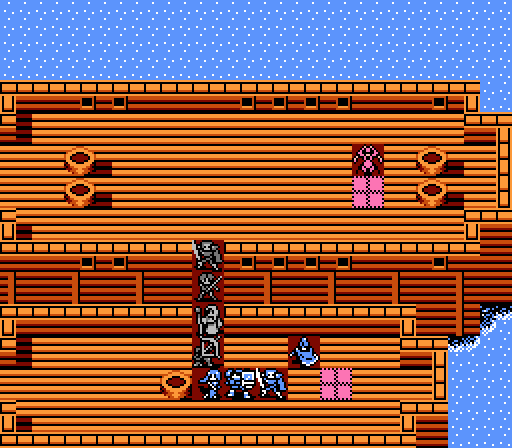 Still something of a cautious advance here, but the enemy phase holds a surprise:  - Chapter 2 Part 6 Battle 1.gif) The Messiah spell actually summons a random number of monsters to fight for the caster. In this case the shaman can summon zombies at a cost of just 1 HP. Since the shaman is sitting on a healing tile, he can basically summon zombies every turn. The zombies are just level 1 - the same as what Celica fought in the graveyard in her first battle - so not really much of a threat. That makes this battle something of a good grinding opportunity, even though zombies don't give much XP. Turn 3  Celica only takes 1 damage from the zombies and I need to get her a couple of levels here so I put her out in front.  The shaman starts off the enemy phase by summoning six more zombies, though they can't actually move or attack on the same turn.  The first zombie to approach immediately eats a critical from Celica.  Two others reach Celica and suffer the consequences. Turn 4  At this point, the battle is really just about setting up a line across the ship and keeping an eye on HP. The zombies can't double-attack anyone and can't do more than 1 damage to anyone but May and Jenny - who will stay out of the way. Really this battle is more of a tutorial on summons than a real challenge.  The rest of the army moves up to form the line, with Jenny and May taking long-range shots from the back.  May also gets a strange level out of the action. Turn 5  The zombies attacked with no real effect but the shaman chose not to summon any more for some reason. So this turn everyone just attacked their favorite target to thin the herd a bit and creep the line forward. Two of the remaining zombies suicide against Celica and Kamui on the enemy phase, and the shaman again chooses not to summon any more for some reason. Turn 6  Leo and Jenny take out one zombie, while Celica finishes off the other.  That leaves a clear path to the shaman, but I'm going to spend a few turns getting Celica to level 5 instead. Turn 7 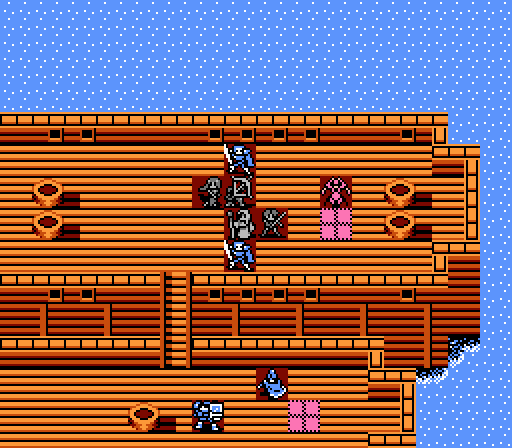 Jenny patches up Celica and we wait. At this point I'm starting to wonder if the enemy shaman was programmed to only summon a couple times before giving up, but this turn he finally summons another batch of six XP-feeders. Turn 8 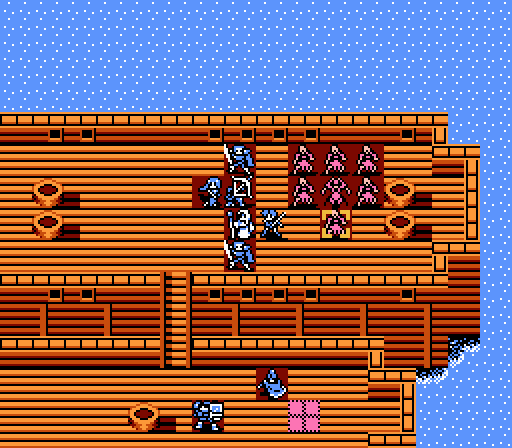  A few more attacks from Saber and the mages, but nothing too exciting. At this point I realize that the extra Power from the Steel Sword that Celica's been holding isn't actually helping the power of her Fire spells at all - the internet lied to me! On the enemy phase, the shaman takes the turn off again, while the zombies ineffectively rush Celica. 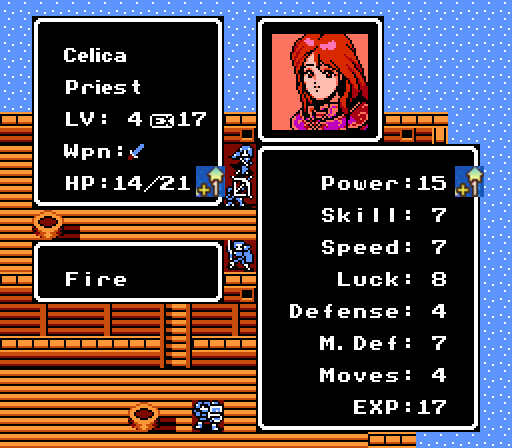 She grows stronger from all the attention, though. Turn 9 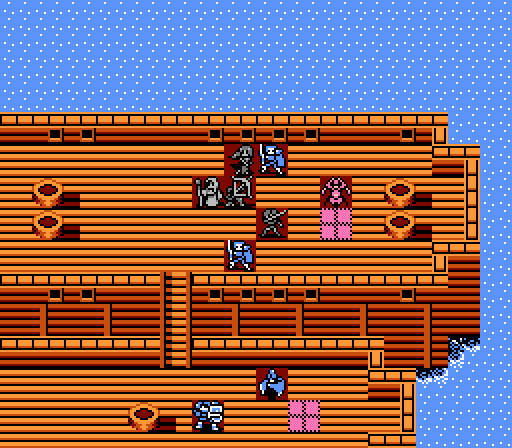 Some more long-range attacks wipe out the rest of the zombie wave. 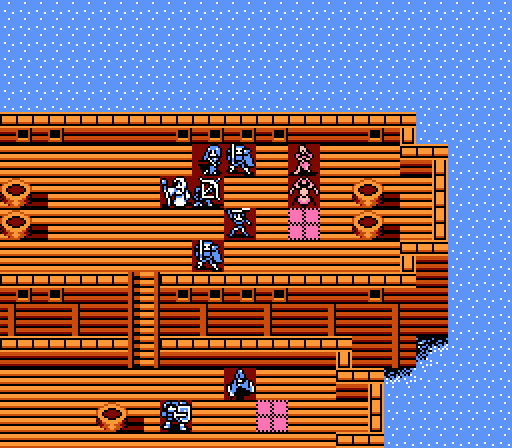 A bad roll from the shaman gives him only one summoned zombie this turn. Turn 10 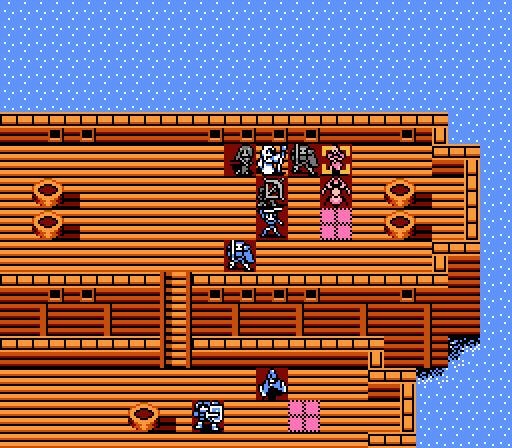 May and Leo soften up the one zombie so that Jenny can actually get a kill for once. Turn 11 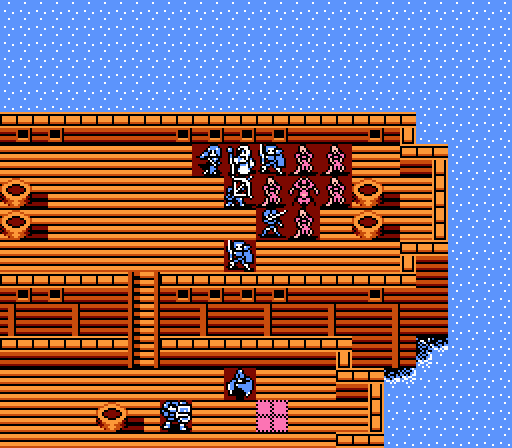 Five new zombies for us to play with. Two of them go down immediately, while another falls to Celica on the enemy phase. Turn 12 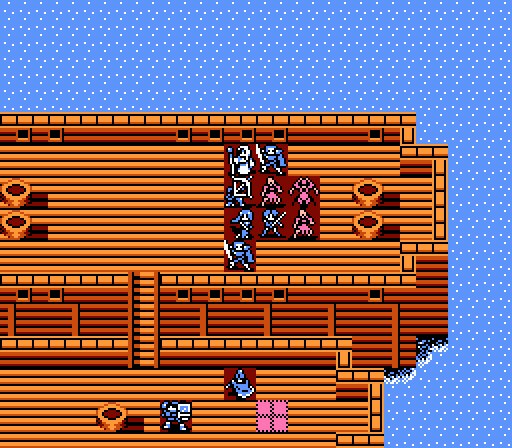 May finishes off one zombie, Leo and Jenny take out the other. 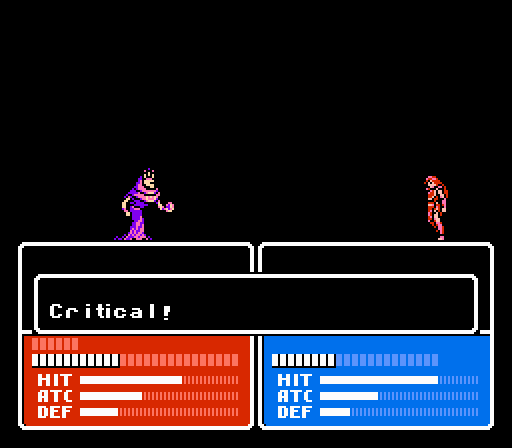 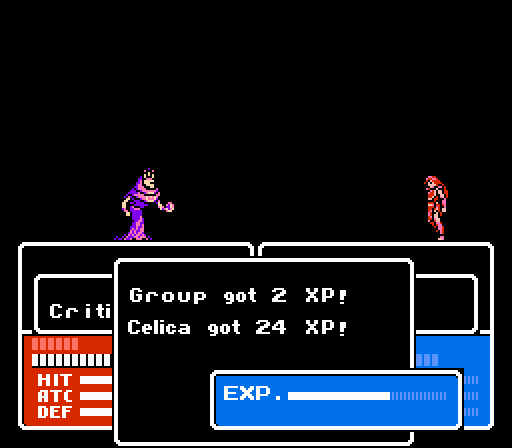 Celica gets bored and tosses a fireball at the shaman, landing a lucky critical. She got as much XP from that as from killing four zombies. Unfortunately it also put the shaman into 'retreat' mode so it didn't summon any more zombies for us to play with. Turn 13 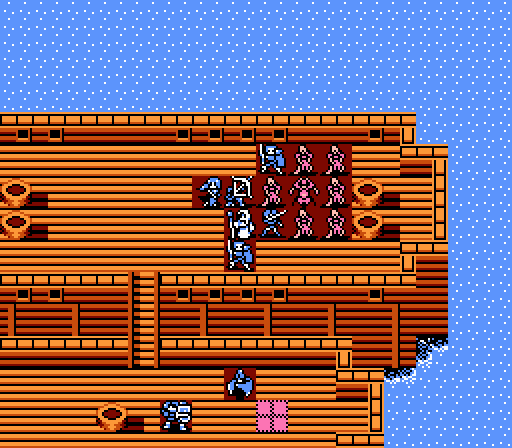 I actually patch up Celica and let the shaman heal up on the healing tile, and am rewarded with another six zombies to slaughter. Turn 14  Jenny tops off May's magic tank as everyone else gets some action on the zombies. Turn 15  The rest of the zombies are wiped out.  So not worth the wait. Turn 16  We're about ready to go after the shaman directly, so Jenny heals up Celica first.  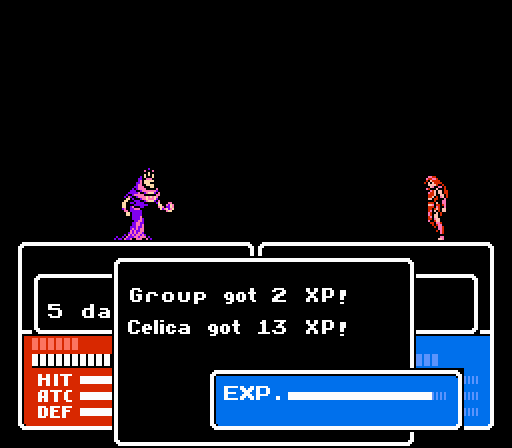 Celica's close to another level. Another turn should do it, as no more zombies are summoned. Turn 17 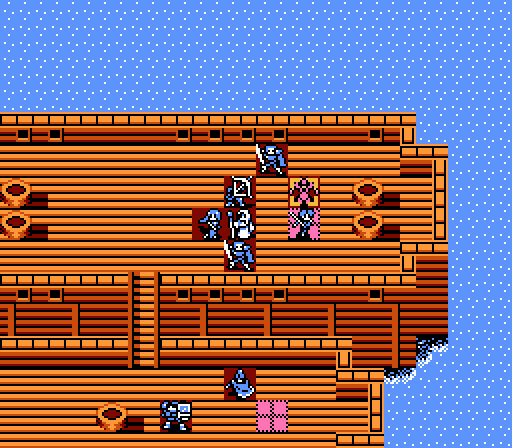 Celica moves onto the healing tile for another shot at the shaman. 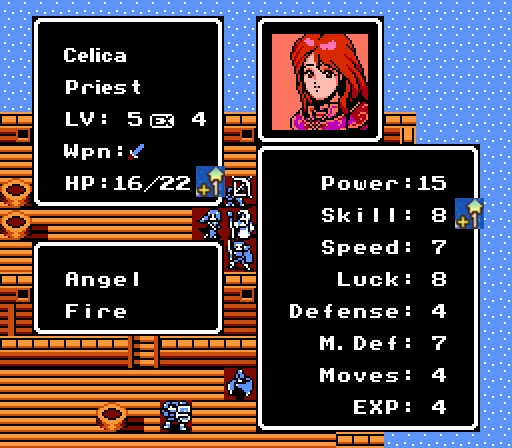 The level sucks, but the important part is the new spell - Angel. It has 8 Might, a 90% Hit Rate and 4 Weight for a 4 HP cost. The best part, though, is that it's effective against monsters - for 24 Might. 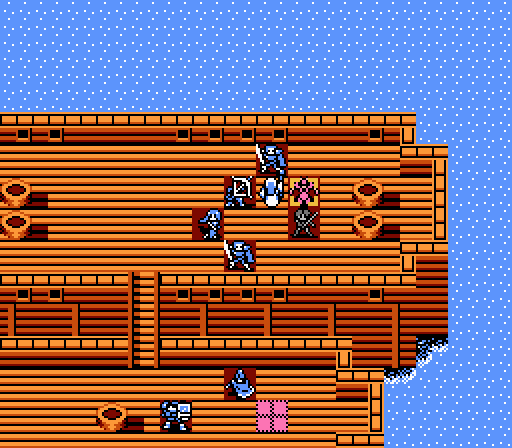 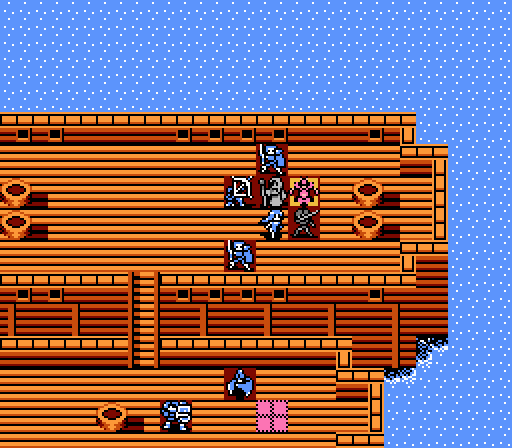 Jenny doesn't actually land her attack, but the shaman's two attacks cost a couple of its HP and Jenny has enough Magic Defense to only take 2 damage in return. May is a bit more successful, hitting for 3 damage. 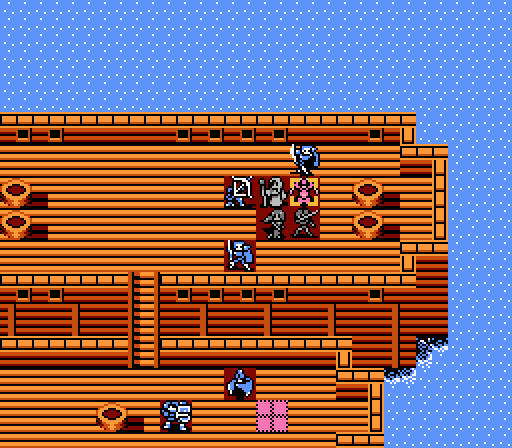 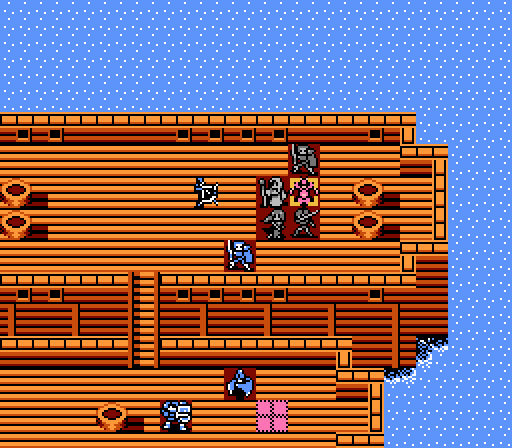 Saber lands one attack and misses the other, while Leo misses his one attack. Guess the shaman lives another turn. Turn 18 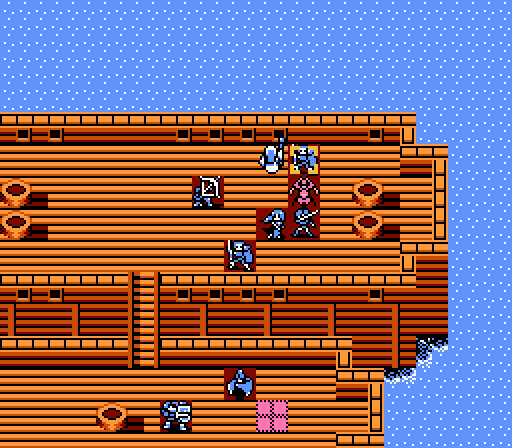 The shaman actually did 9 damage to Saber last turn, so Jenny heals up him a bit just in case he misses again. 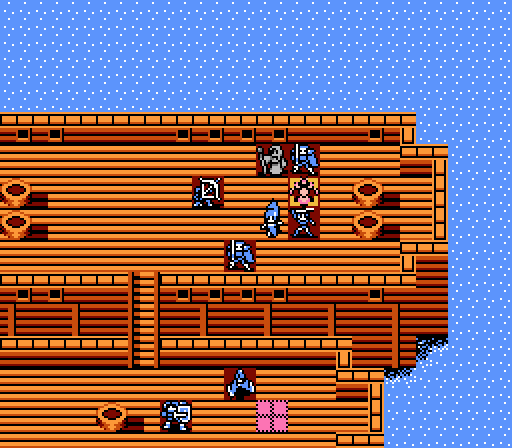  May and Leo both miss. 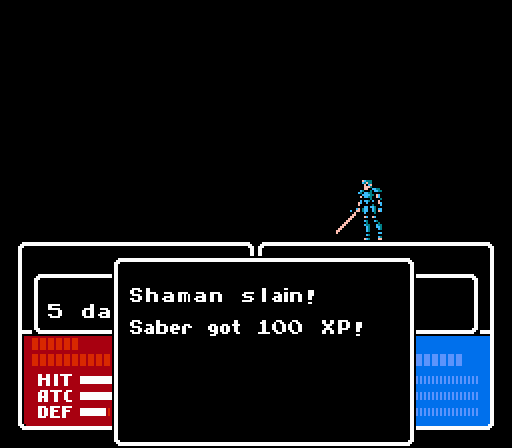 Saber comes through with two hits, gaining a massive amount of XP. 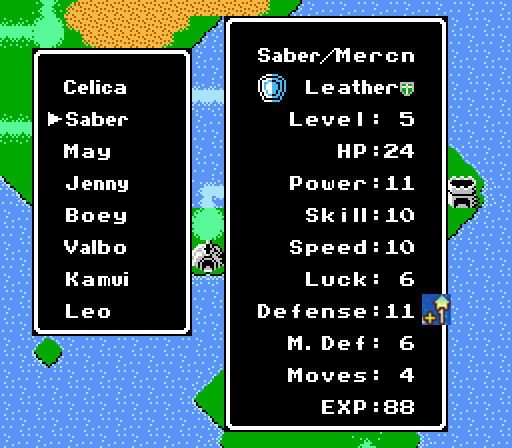 He's turning into a wall. Not a bad way to end the battle, really. Current Roster 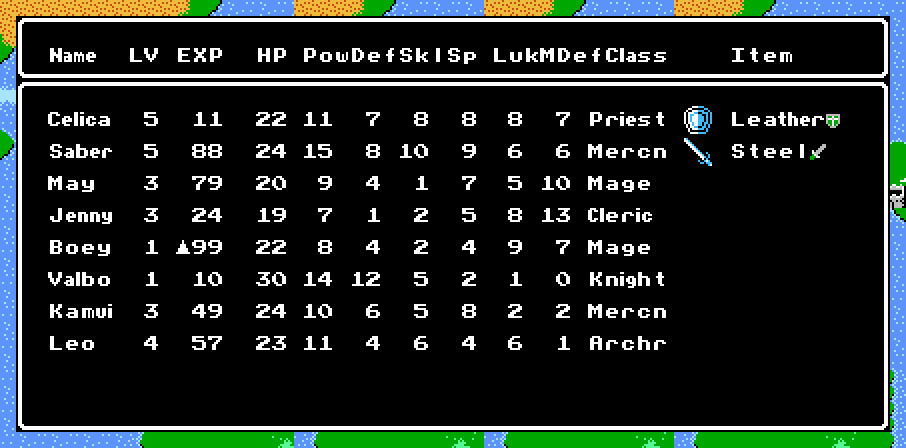 (Since the Steel Sword wasn't actually helping Celica's spells, I handed it off to Saber and gave her back the Leather Shield.) Next time: 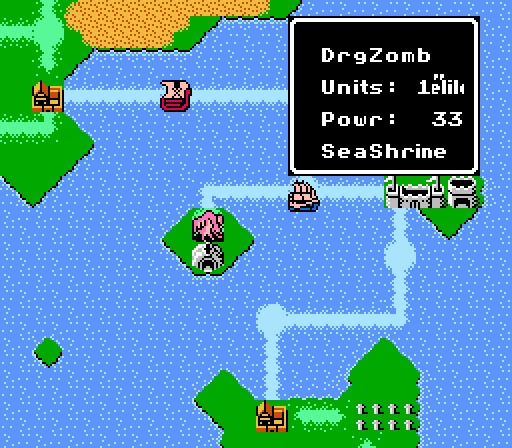 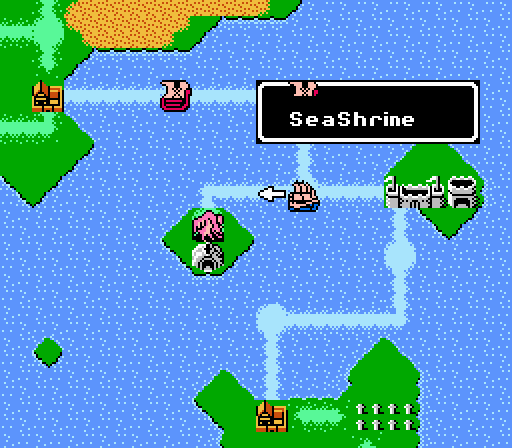 Another single-unit battle against a Dragon Zombie. DKII fucked around with this message at 22:28 on Jun 23, 2013 |
|
#
?
Jun 23, 2013 22:18
|
|
|
That monster must be pretty badass if it broke the text table D:
|
|
#
?
Jun 24, 2013 00:21
|
|
|
Wounded Land posted:That monster must be pretty badass if it broke the text table D: I'll have a short update with it tonight. There's really only one way to do it given our current army (hint: it's not sitting around grinding out a long, drawn-out fight).
|
|
#
?
Jun 25, 2013 16:37
|
|
|
Chapter 2, Part 7: Sea Shrine 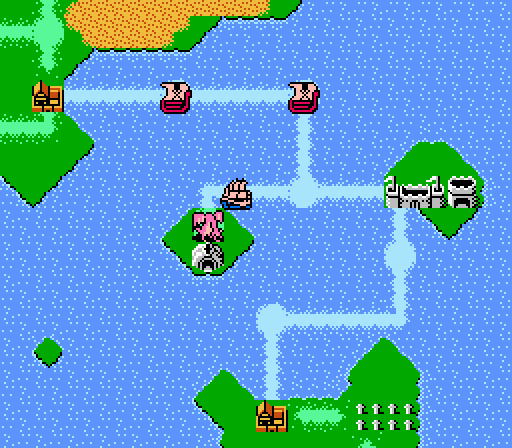 Sailing into battle against a dragon zombie.... 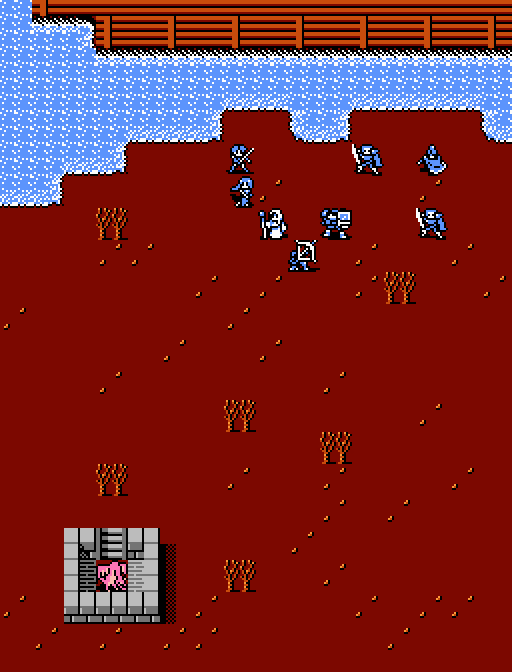 The dragon zombie is tucked away inside the fort, but that won't last for long. 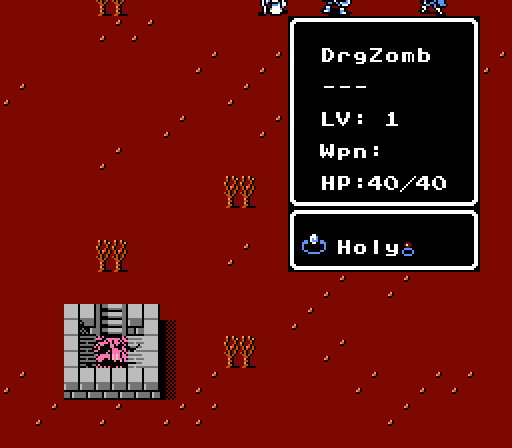 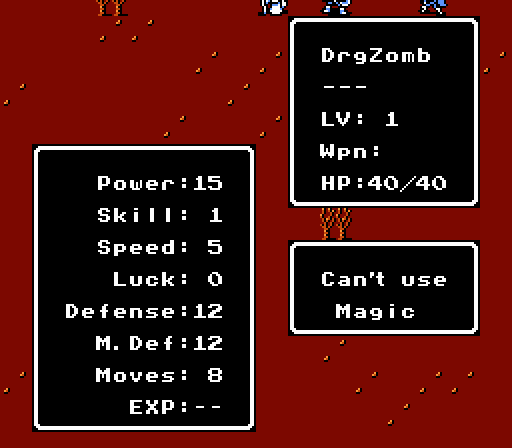 Just one enemy again, but it's a lot tougher than the shaman we fought last time. Defense and Magic Defense are both 12, so right away half our army can't do any damage and the rest can only manage a few points, with one exception - Celica's Angel spell can do 23 damage, since it's effective against the undead. The dragon zombie's 15 Power will tear through our magic users, and 8 Moves means that it's difficult to keep it away from us. It also has just enough Speed to make trouble for us. To top it all off, the dragon zombie holds a Holy Ring, which heals it for 5 HP at the start of each turn. So any scratch damage we deal it will be healed away. Turn 1 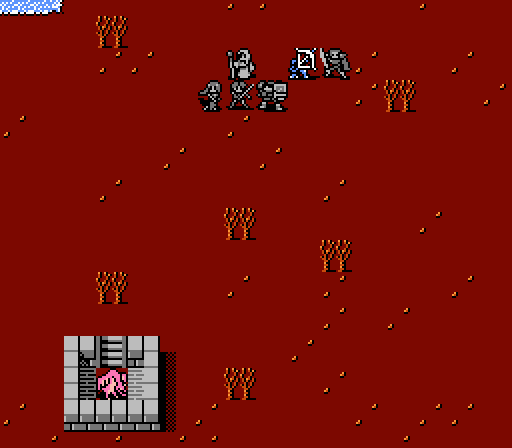 The dragon zombie won't come out until we get in range, so the first couple turns are just a cautious approach. Turn 2 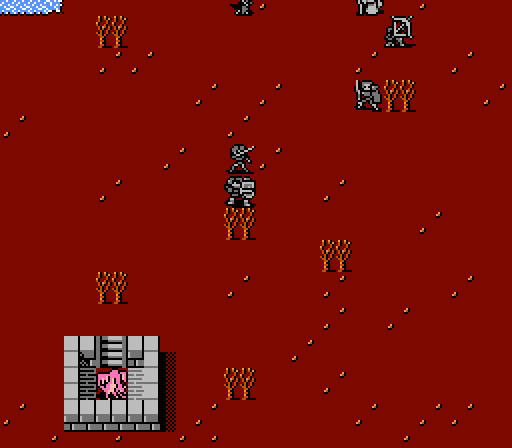 My first two attempts at this chapter, I sent May and Jenny forward as well. But each time, the dragon zombie would eventually be able to fly all the way around the battle line and one-round Jenny. So this time only Celica, Valbo and Saber are moving ahead. Turn 3 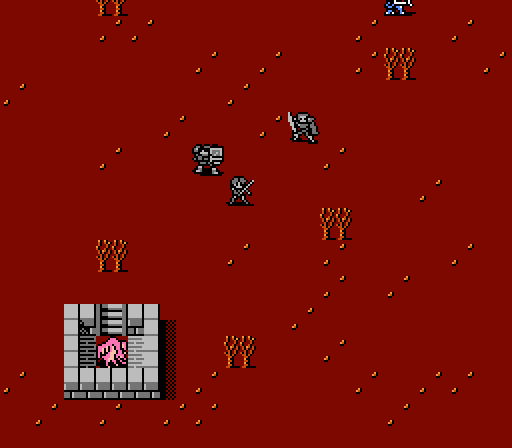 Celica's in the forest for some extra evasion, ready to lure out the dragon zombie.  - Chapter 2 Part 7 Battle 1.gif) She dodges, with a couple of scratches dished out in return. Turn 4  - Chapter 2 Part 7 Battle 2.gif) Celica unleashes the Angel spell, but it's not enough for the kill. Also the Angel spell is heavy enough that she's double-attacked, but fortunately dodges once. 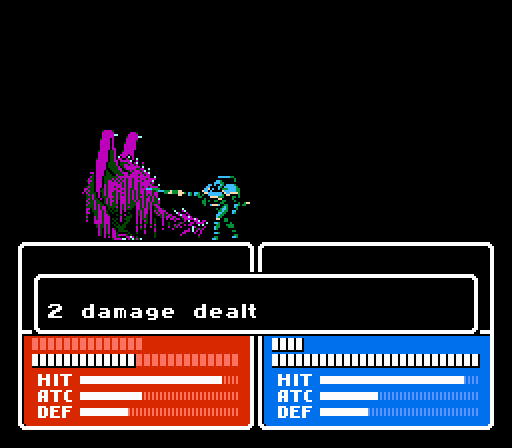 Volba scratches the dragon zombie for no real reason. 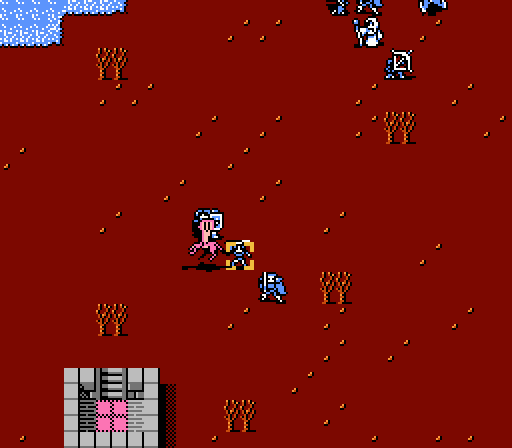 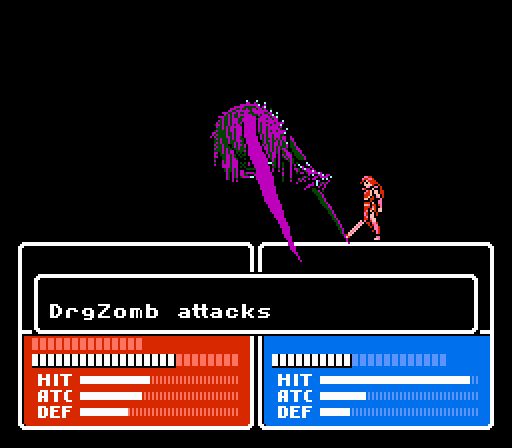 The dragon zombie goes after Celica on the enemy phase. If the blow lands, the battle's pretty much lost as Celica won't have enough HP to cast Angel. Since I couldn't get Jenny close enough for healing without her getting killed first, there aren't really any options left if that happens. 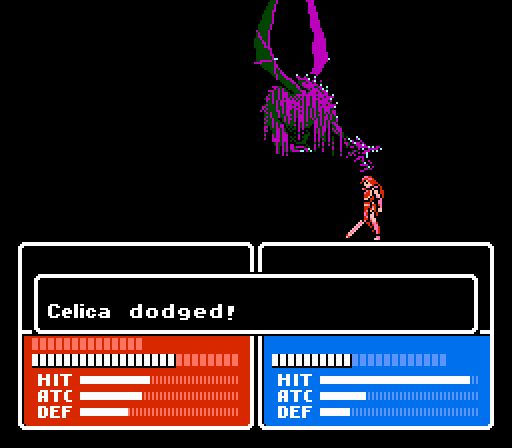 For once, luck is on my side. Turn 5 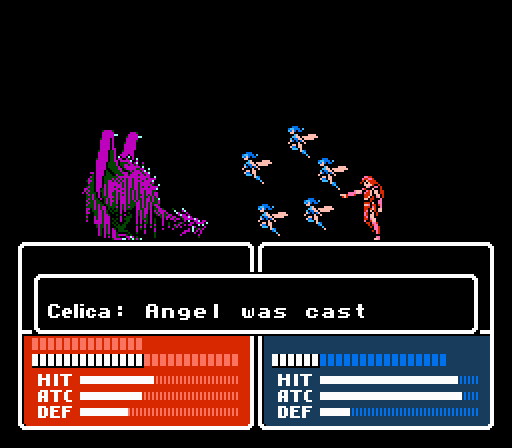 So, the first time I made it here, Celica missed a 90% chance. She was then promptly killed on the counter-attack. 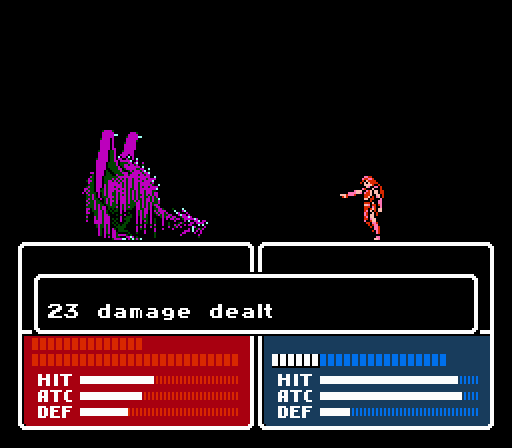 Finally, on the fourth attempt at the battle, Celica wins. 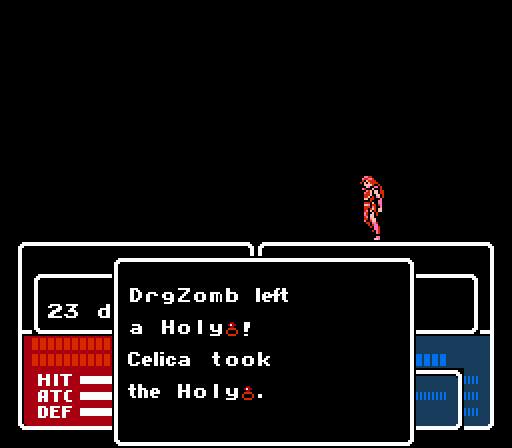 She gets the Holy Ring for her trouble. It goes into storage for now until the thread decides what to do with it. Next time: 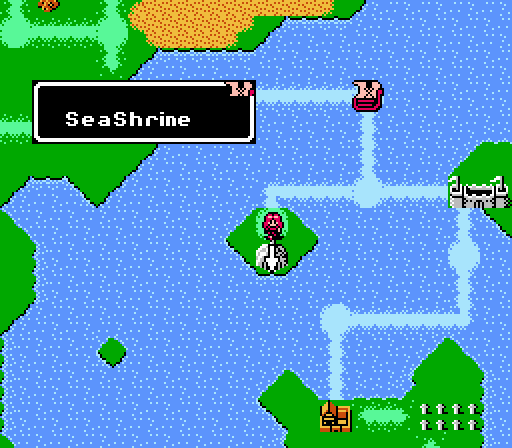 We enter the Sea Shrine. DKII fucked around with this message at 07:25 on Aug 15, 2013 |
|
#
?
Jun 26, 2013 05:02
|
|
|
I always found the Angel spell annoyingly inaccurate at times. Maybe I'm just used to true hit, but it seemed to miss a lot more than it should have.
|
|
#
?
Jun 26, 2013 07:03
|
|
|
I like how that stage looks to be completely impossible unless you leveled Celica into learning Angel by now.
|
|
#
?
Jun 26, 2013 09:43
|
|
|
I'd say to put the ring on one of the two mains (do the groups share an inventory?), but if they only get one item per person, that space would be better taken up by weapons.
|
|
#
?
Jun 26, 2013 15:40
|
|
|
Kanos posted:I like how that stage looks to be completely impossible unless you leveled Celica into learning Angel by now. Well it's also optional and can be done at any time during the chapter, so she had a couple more sea battles if necessary to gain the levels and could also grind more in the graveyard. At least the game outright told us that Angel was necessary, though, not always a given in the NES era. Wounded Land posted:I'd say to put the ring on one of the two mains (do the groups share an inventory?), but if they only get one item per person, that space would be better taken up by weapons. Yea only one item per person, and we barring some weird game manipulation later we can't really send it over to Alm's group, either. The next update won't be too difficult so there's some time to think on it.
|
|
#
?
Jun 26, 2013 15:53
|
|
|
5 HP per turn? That's pretty beefy. And hey, you've finally got multiple frontliners. That's good stuff. Maybe it should go on one of them.
|
|
#
?
Jul 3, 2013 18:16
|
|


|
Just got back from vacation again, should have another couple updates this weekend.
|
|
#
?
Jul 9, 2013 19:27
|
|
|
Chapter 2, Part 8: Sea Shrine II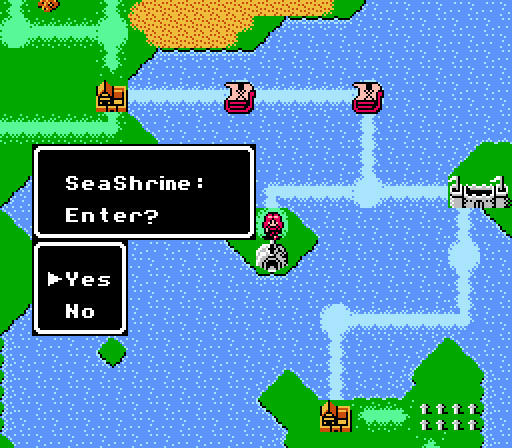 Time to enter Sea Shrine and claim whatever treasures lie within. 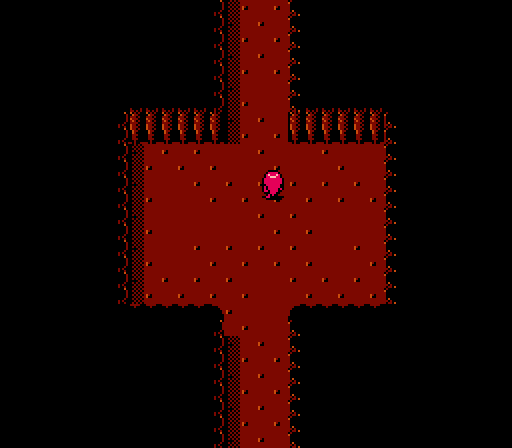 Another empty room to start, and then.... 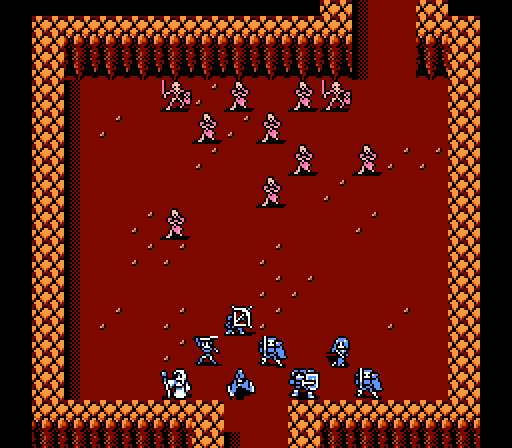 More undead to fight. The zombies are all level 1, barely qualified to be cannon fodder at this point. 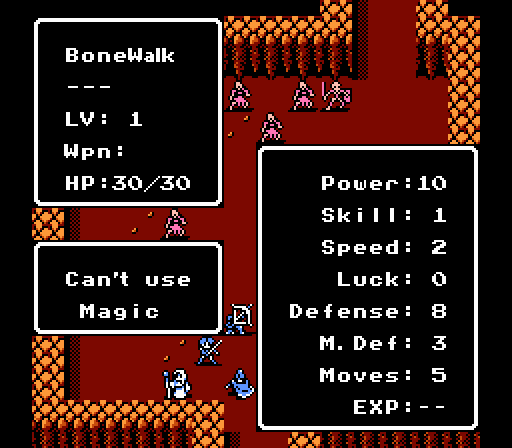 The skeletons are a little tougher, but still so slow that our front-liners will be able to handle them pretty easily. This fight is the same as the one Alm fought clearing out the rebel camp, at about the same point in his chapter. Let's see how we compare. Turn 1   Angel is a very useful spell here. Celica's one Power away from being able to one-shot the zombies. Her second attack obliterates it. 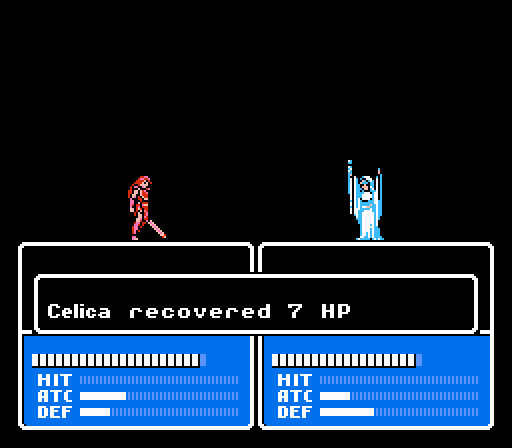 Angel's also an expensive spell so Jenny heals up Celica here. I gave Jenny the Holy Ring since basically the only thing that can go wrong in this battle is the healer getting beat up. 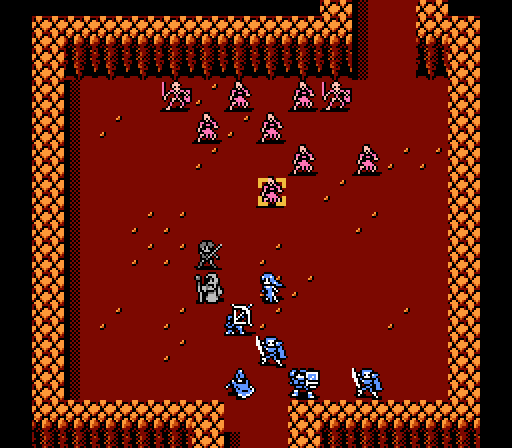  May tries for some long-distance action, but misses both attacks. Let's not start that trend again, please.   Leo takes a couple shots at the same zombie, and hits with one of them.   Saber aggressively charges straight ahead to finish off the zombie in style.  Unfortunately he spent his luck on the critical, as he gets his first bad level.  The skeleton on the left is just out of range of Jenny, and everyone else should be fine here.   Celica holds off the skeleton pretty well thanks to the Leather Shield, dealing out 3 damage in return. Somehow she missed a 99% hit chance on her second attack.  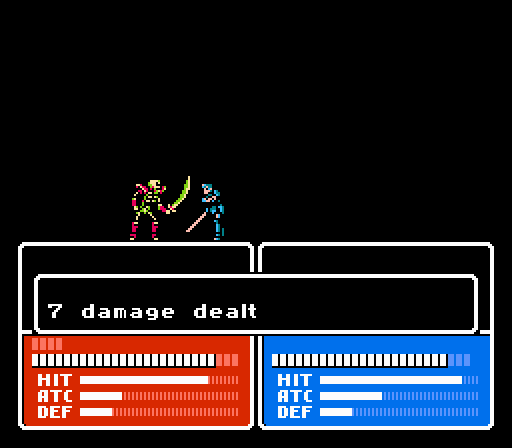 The other one goes after Saber for just 2 damage. Saber is really the only one in our army with enough Power to really harm the skeletons physically, thanks mostly to the Steel Sword he's holding. 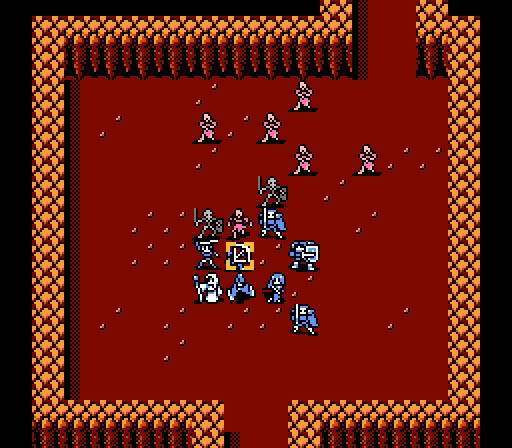 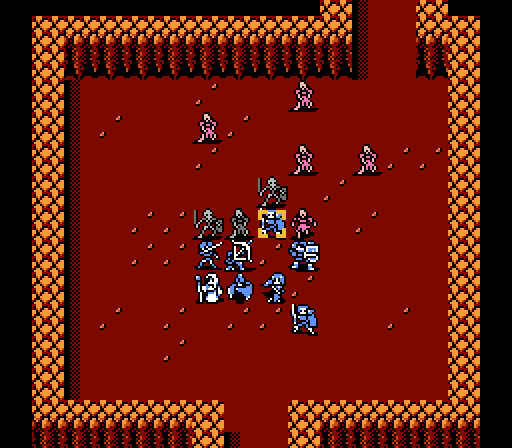 Zombies eat major counterattacks in exchange for some scratch damage. 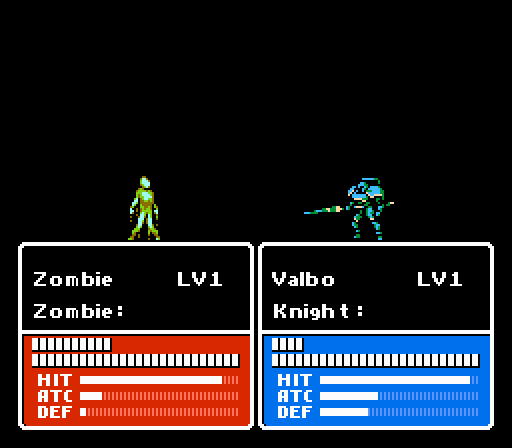 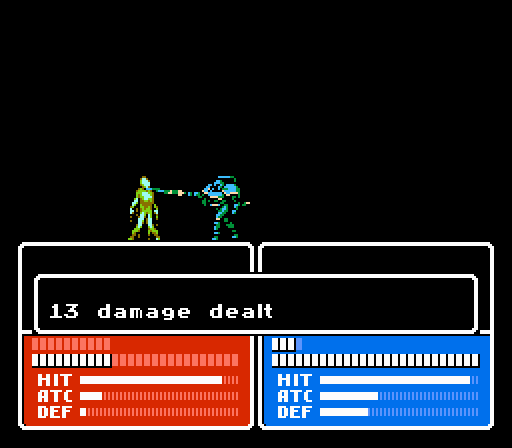 Only option available to this zombie isn't really a good one. Turn 2 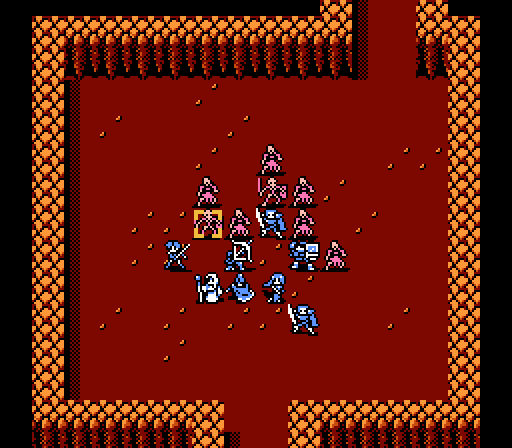  Angel wipes out one skeleton immediately. 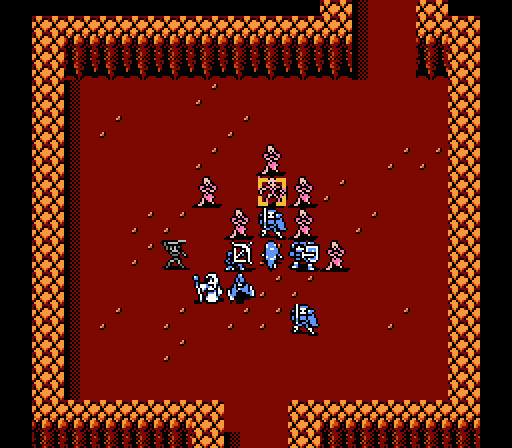 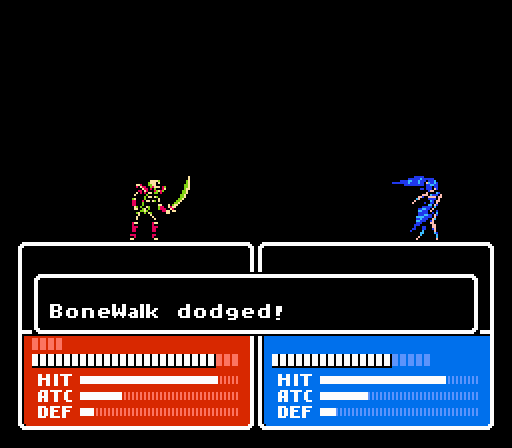 Seriously May, get your poo poo together. She does land the second attack for 9 damage, at least. 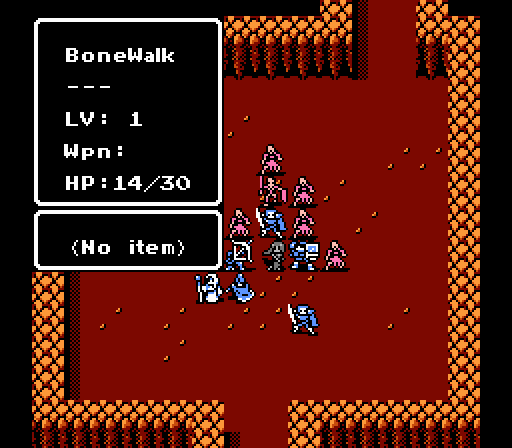 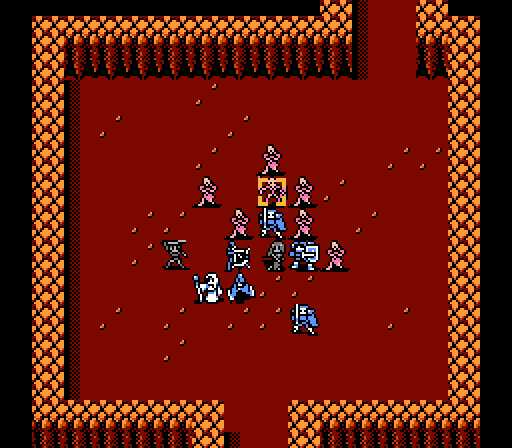 The skeleton's down to 14 HP. Saber does 7 damage per attack so could just finish off the skeleton here. Instead I have Leo attack for some reason. Even if he hits both attacks, it's just 6 damage, and Saber still needs to lands both attacks to get the kill. So kind of a wasted attack here. And Leo missed once anyway.  - Chapter 2 Part 8 Battle 1.gif) Goddammit, Saber.   Instead of going after someone she could actually kill, I have Jenny take two shots at this random zombie instead. And she actually lands both 50% attacks somehow. Yet I'm missing 90%+ attacks everywhere else.   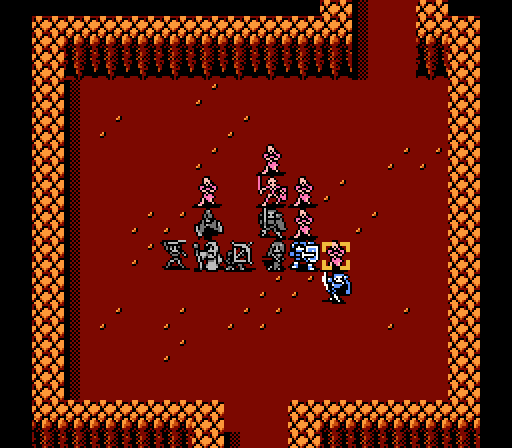 Boey and Kamui each grab a zombie kill. 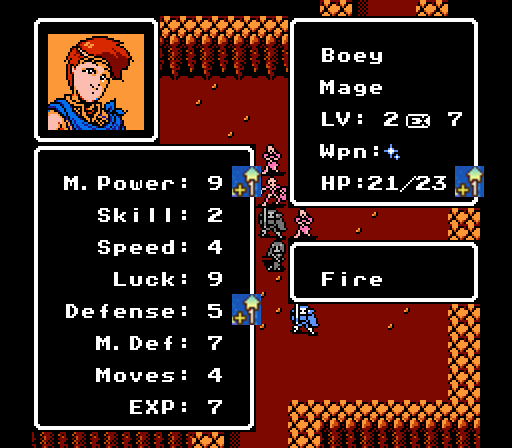 Keep that up Boey and I might actually let you get some more levels. 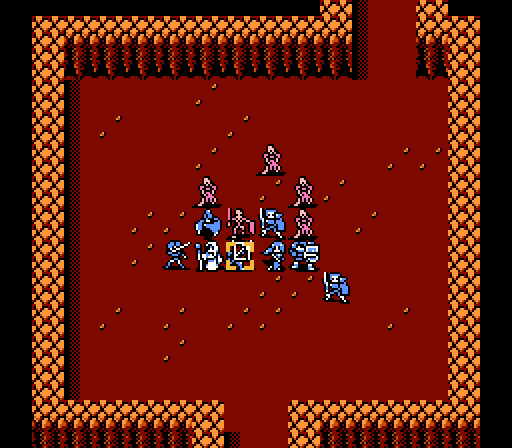 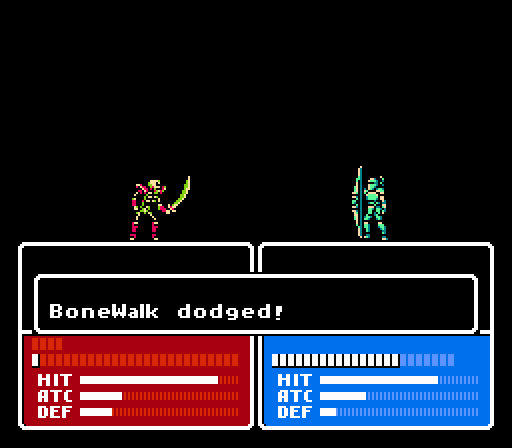 The skeleton attempts suicide-by-Leo, but Leo isn't having any of it. 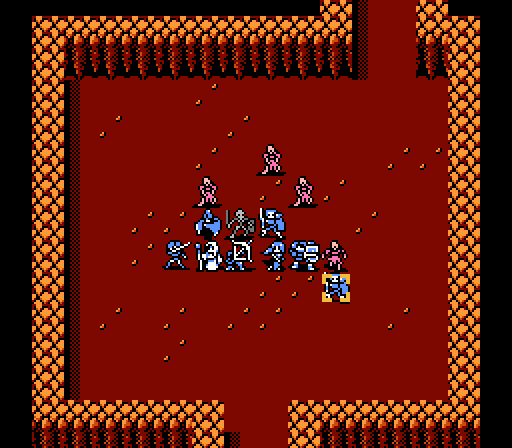  Kamui's much more understanding about that kind of thing. 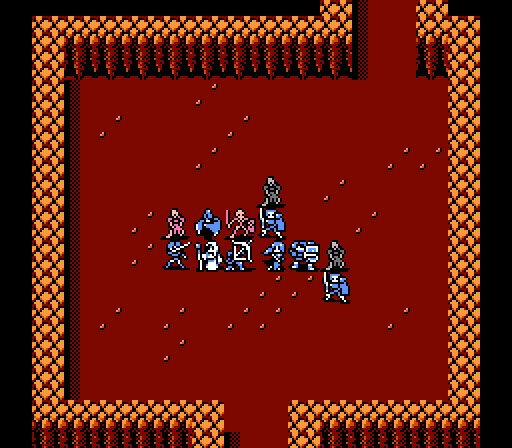 The rest of the zombies started the turn at full health, and ended it with less than half HP after scratching Celica, Saber, and Kamui. Turn 3 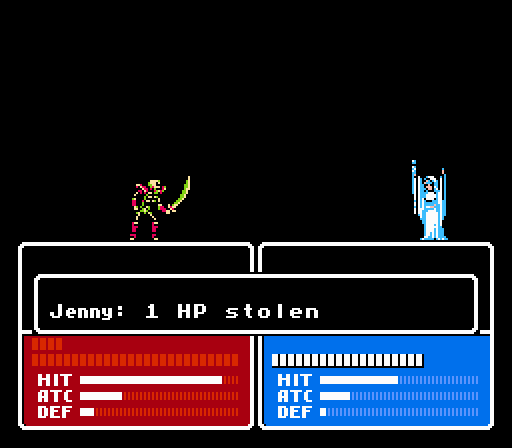 Screw healing, Jenny has some bloodlust to work out of her system. 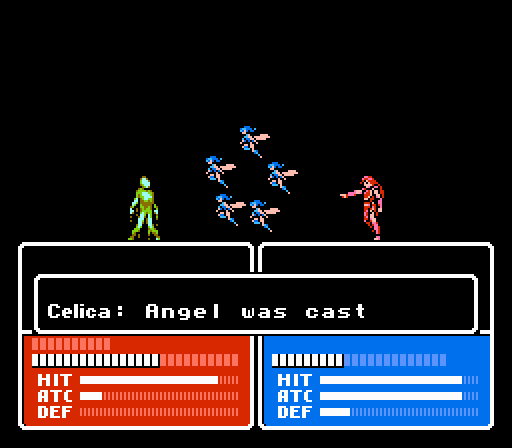 No kill like overkill. 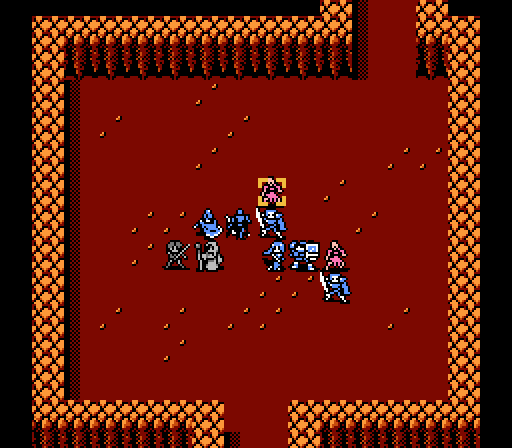 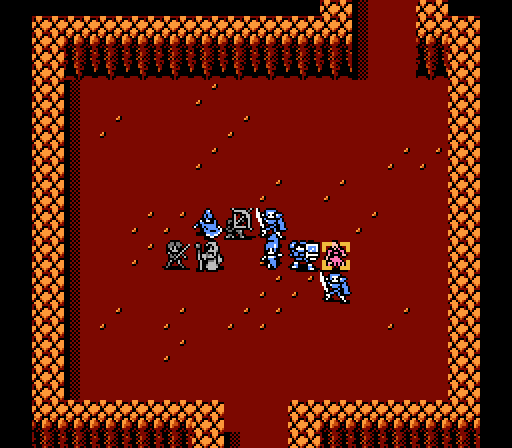 Leo and May take care of the remaining zombies. 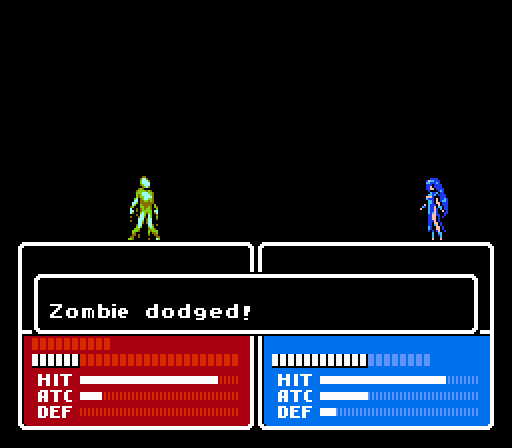 Wait, no, we're still going because May's drunk and can't aim her fireballs. 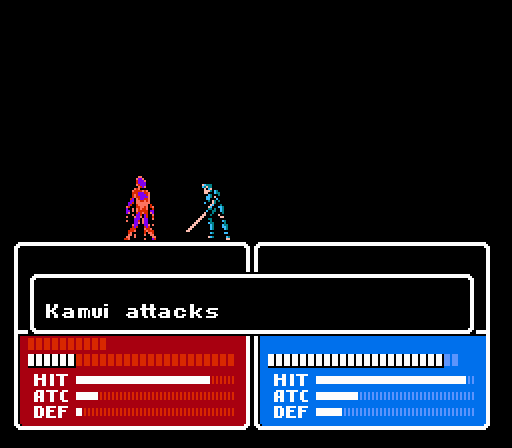 Thanks, Kamui. 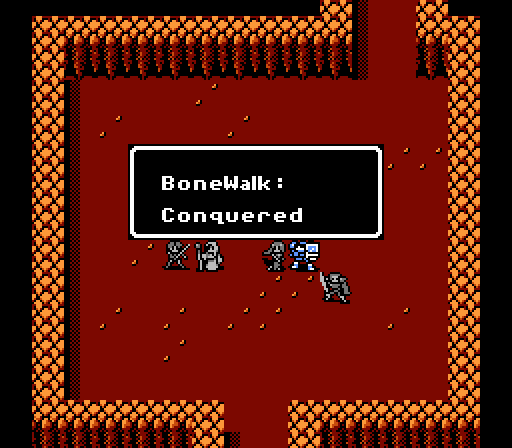   Celica, you've just cleared out a pack of undead from the Sea Shrine, let's see what you've won! 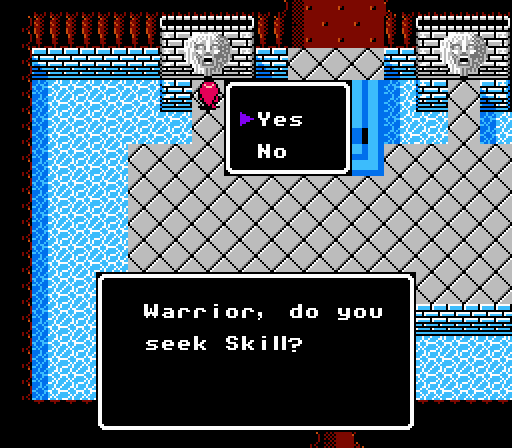    There's a promotion statue here too, if you've really been grinding those zombies back in the graveyard.  But wait! There's more....  That's right, the Sea Shrine holds two battles, with the second far more difficult. We've traded three zombies for skeletons, and added a couple of new enemies. 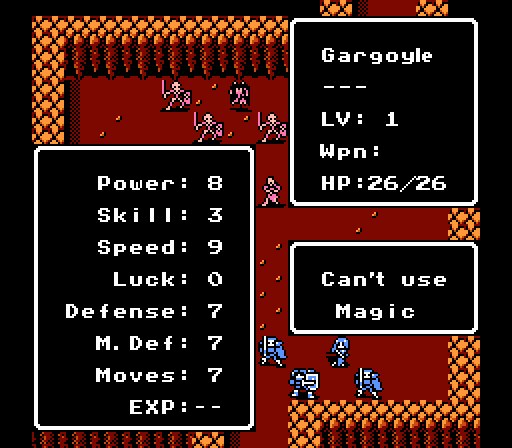 Gargoyles aren't as strong as skeletons, but they're fast and also have high Magic Defense and Moves to mess with us. The best way to deal with them is for Celica to one-shot them with Angel magic since they have much less HP than the other monster types. Turn 1 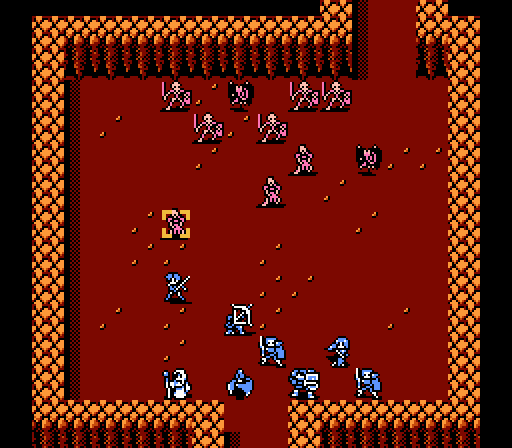 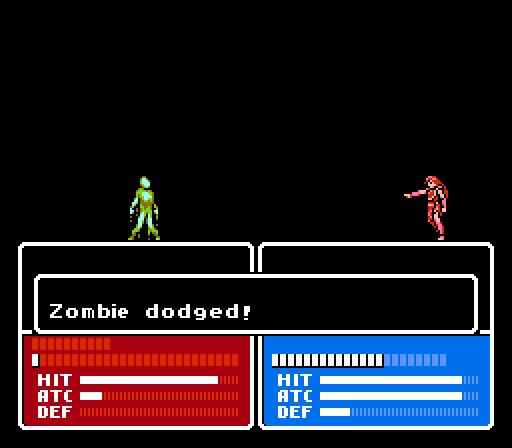 Same start as the first battle, except for Celica's second attack the squad of flying angels somehow missed. 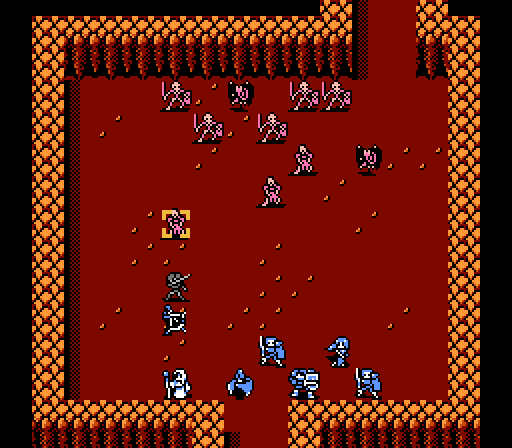 That leaves Leo to clean up the mess.  So not a good start.  A solid defensive line is much more important in this battle. I probably should've had Jenny heal up Celica, though.   Not much damage for this crit. 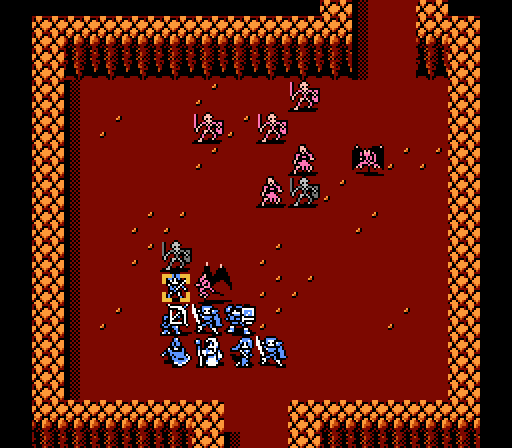 Here come's the gargoyle....  - Chapter 2 Part 8 Battle 2.gif) The Leather Shield saves Celica again. Also she misses again. Note how the gargoyle's the one getting two attacks this time, flying around like a Pegasus Knight or something. 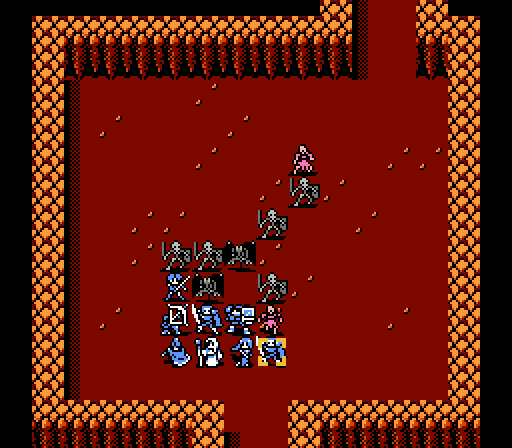 Kamui fends off the only other enemy that can reach us this turn. 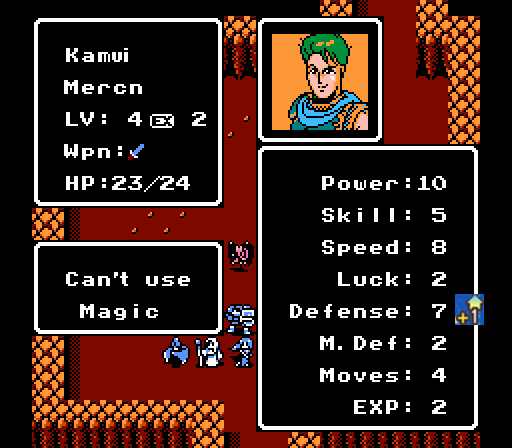 You're no Saber, but not bad. Turn 2 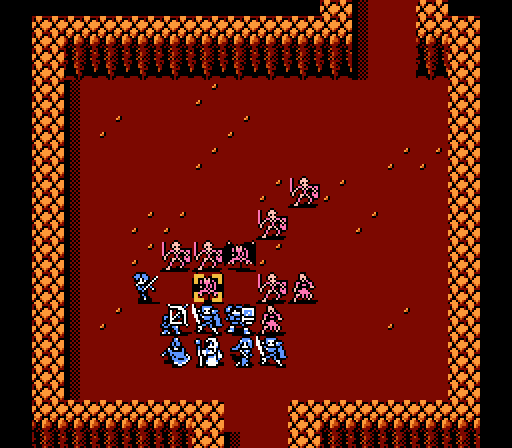 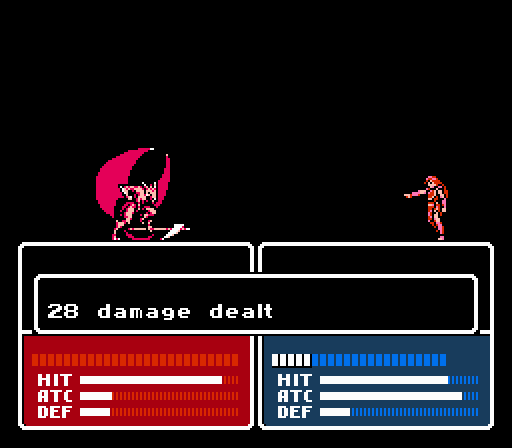 First step is taking out this gargoyle before it can cause anymore trouble. 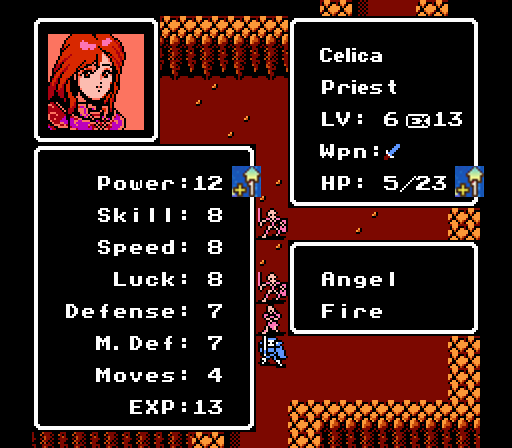 We're going to have a very strong, slow army, aren't we? 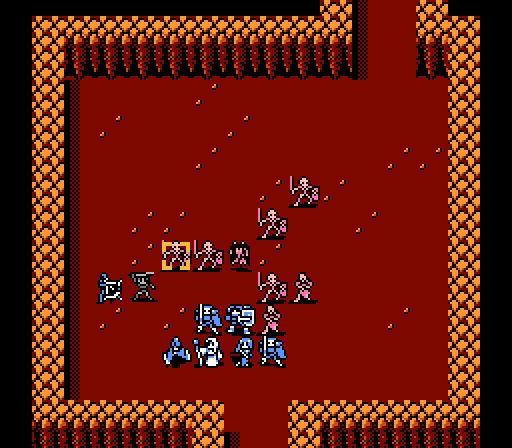 Next is extending our line further to the left to protect Jenny. Leo manages to land both attacks but only does 6 damage total. 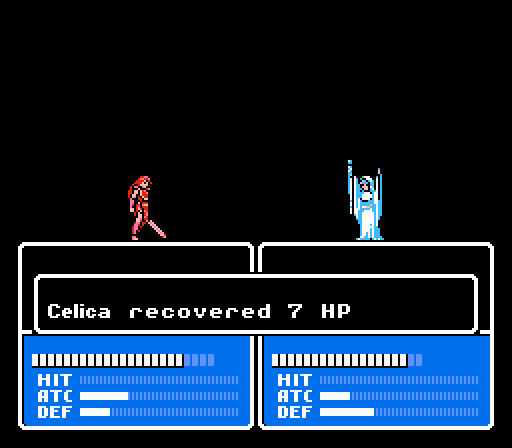 Jenny picked a good time to pull out a double heal. 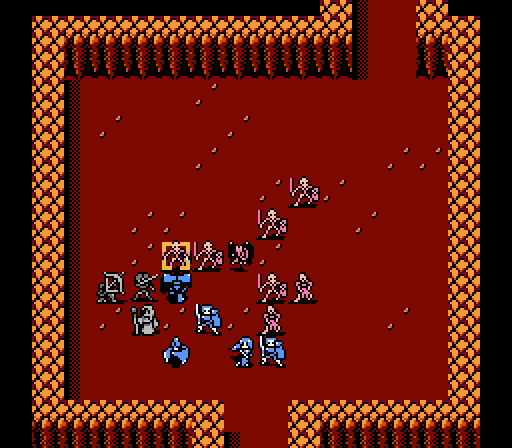 Valbo gets in a solid 6 damage but is too slow for a second attack. 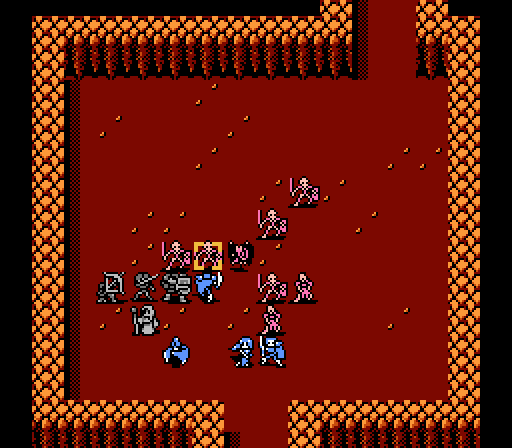 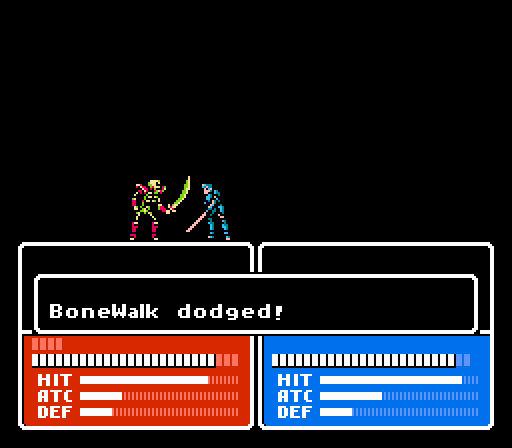 Seriously, Saber, what the hell? 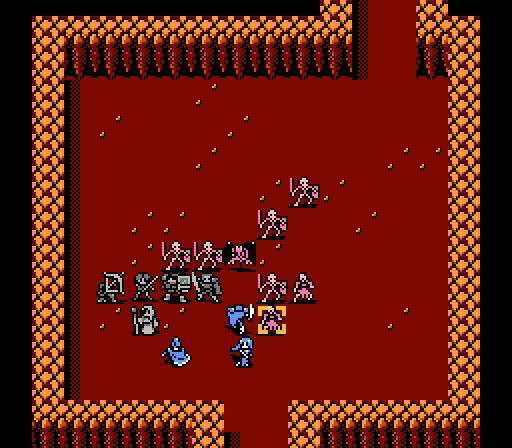 Kamui holding the right edge here should prevent anyone from getting to Jenny for another turn. Killing the zombie is just a bonus.  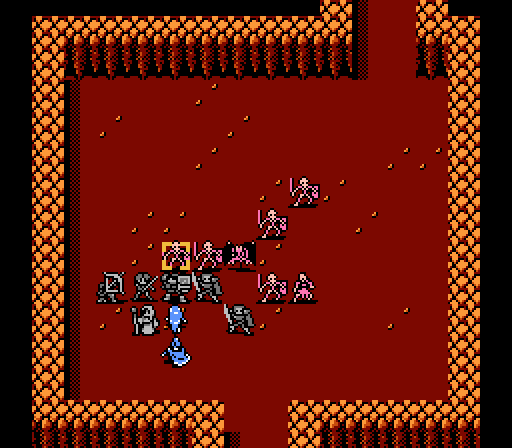 May's holding the Holy Ring this time so she never has to worry about running out of spell juice. She uses a fireball to finish off this skeleton. 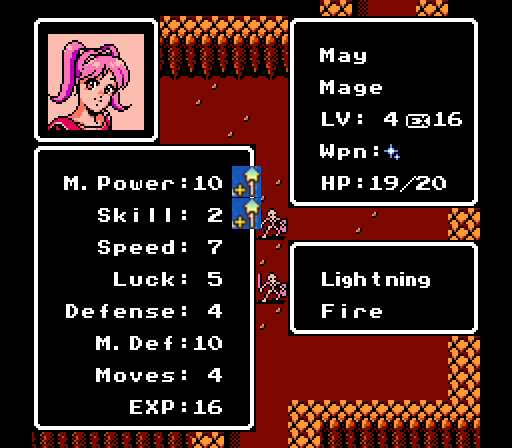 Not getting any Speed now will catch up to us eventually, but I'm not saying no to more Power. 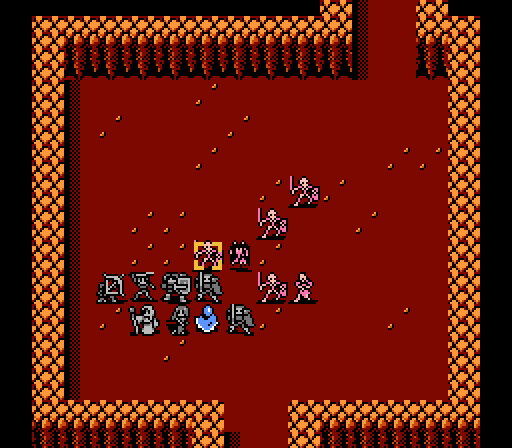 Boey gets in on the action, too. Let's see what the enemy phase holds for us.... 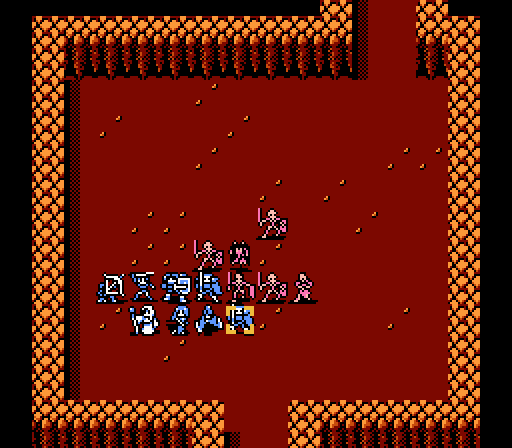 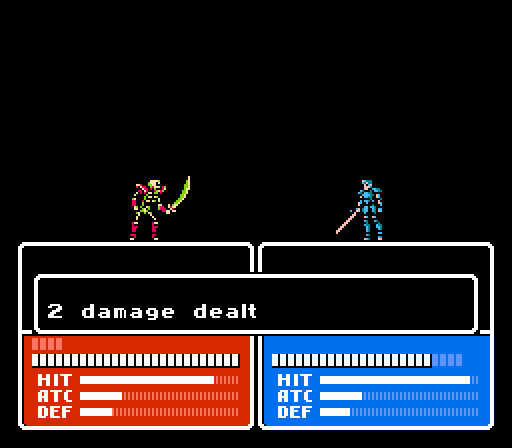 Two skeletons and a zombie all go for Kamui, without much effect. 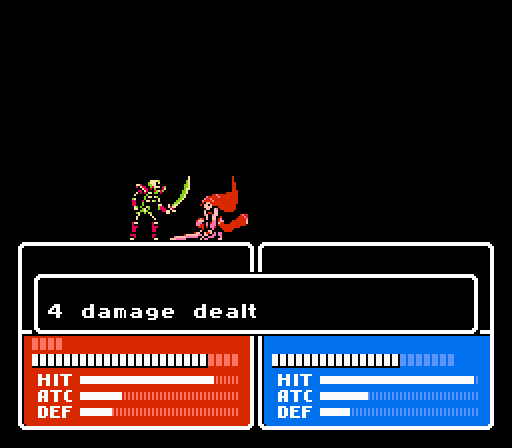 Celica puts her extra Power to work, fighting off another skeleton. 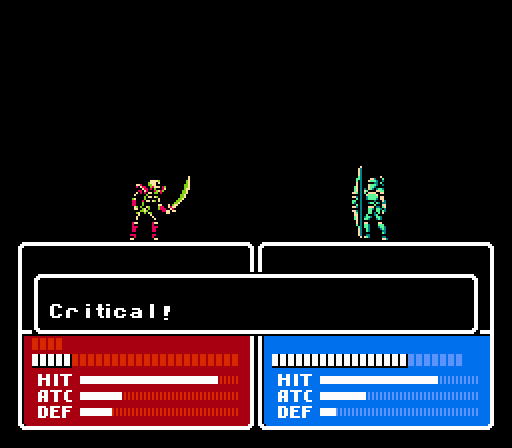 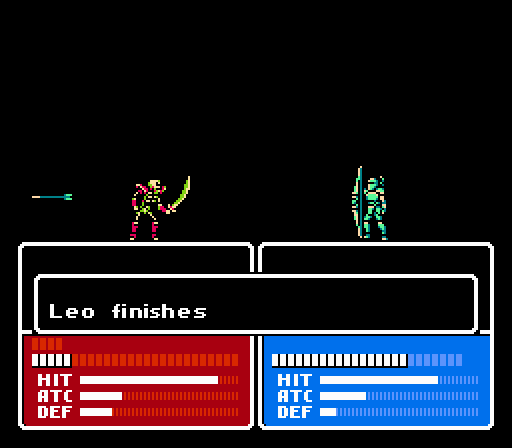 Leo gets some attention from another skeleton, and follows up a critical with a miss. 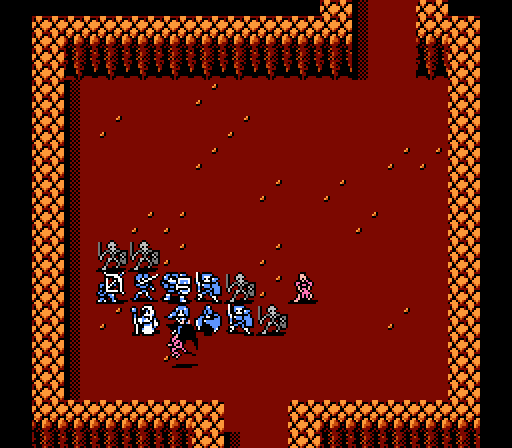 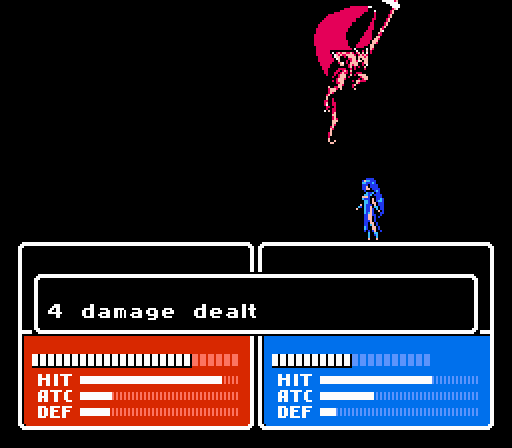 The gargoyle flies all the way around our line but can't quite reach Jenny. It settles for two attacks on May instead. Fortunately she's got the Holy Ring which wipes out half the damage at the start of the next turn. Turn 3 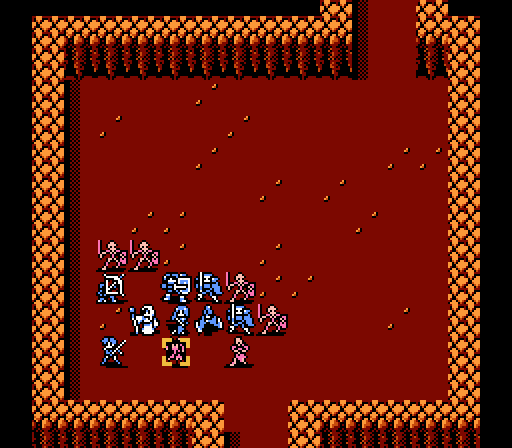 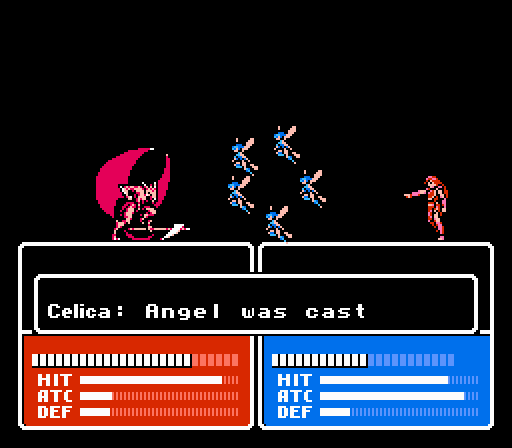 Celica tries to get rid of the other gargoyle. She misses.  Jenny retreats and heals up Celica on the way. That gargoyle is going to cause problems if we leave it where it is, though.   Leo closes off the left side but fails to kill off the skeleton.   May tries to help out with the gargoyle but also misses. At least Jenny's safe, now.   Saber and Valbo each connect for a total of 15 damage, but even Saber isn't fast enough to get in two attacks on the gargoyle. 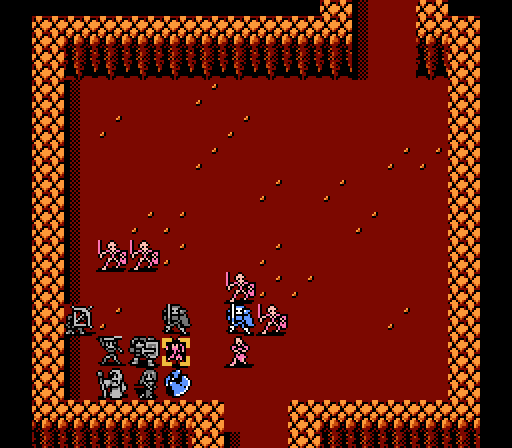  Boey, of all people, steps in to get the kill.  Kamui moves here not so much to kill the zombie but to prevent more than one skeleton from getting to Boey at once. 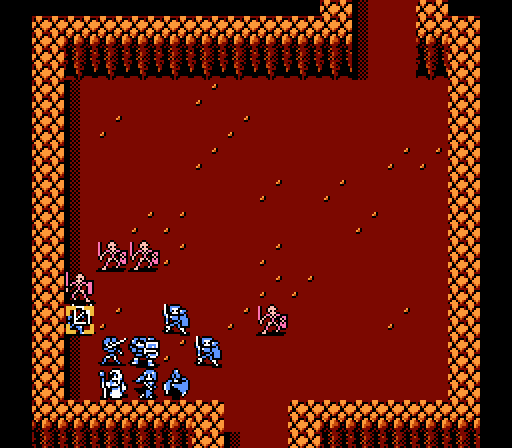 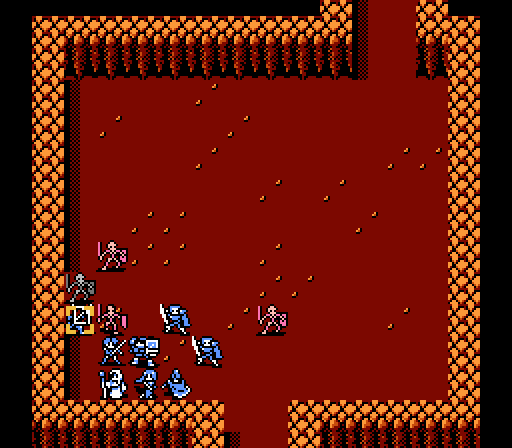 Leo fends off a couple of skeletons. 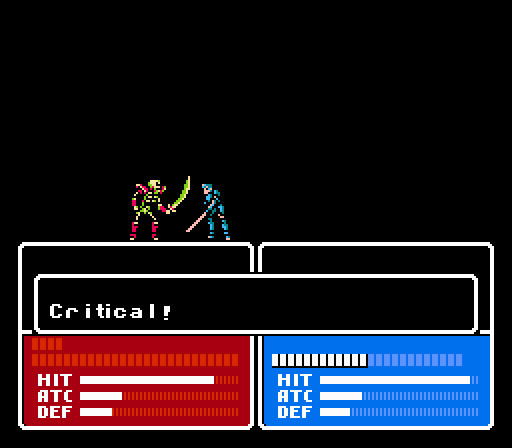  The other two attack Kamui, who counter-kills one of them. Turn 4  Celica lands here shot of Angel this time, wiping out this skeleton.   Saber softens up another skeleton but Jenny misses out on the kill.  Kamui takes the kill instead.   May and Leo tag-team the last enemy. 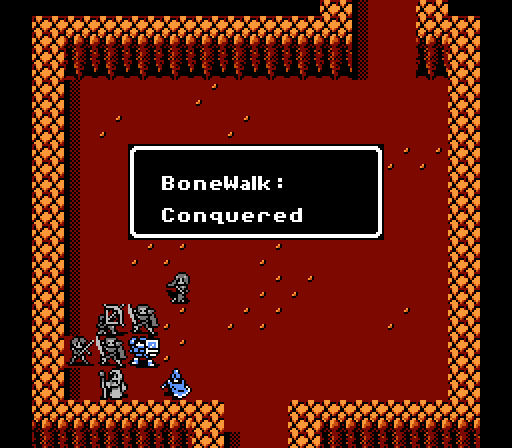 What do we get this time? 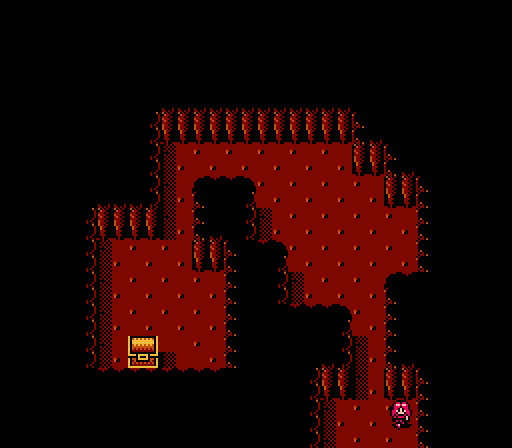 Ooh, a treasure. 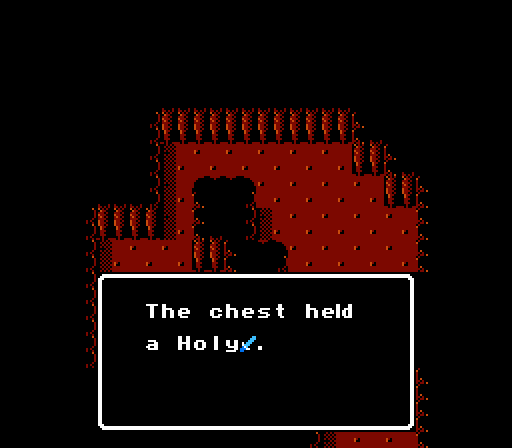 The Holy Sword has a fantastic combination of effects. It has +3 Might, 100% Accuracy, 15% Crit Rate, and 0 Weight. It's also effective against monsters, like the Angel spell. On top of all that, it restores 5 HP per turn, like the Holy Ring. Totally worth all the effort. Saber takes the Holy Sword, giving the Steel Sword to Kamui. 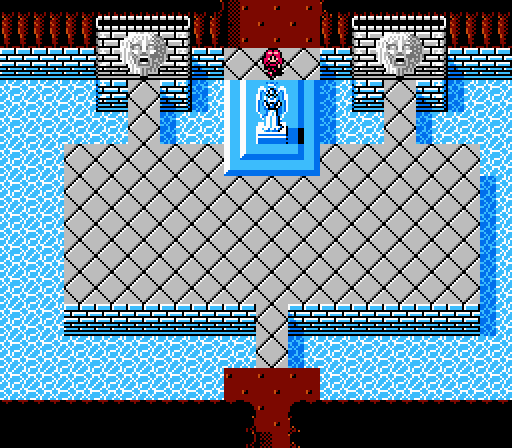 It's not much, but we still need to decide who gets the minimal benefits from the shrine - three total uses of +Skill and/or +HP. Choose up to 3 Sea Shrine uses: HERE Current Roster 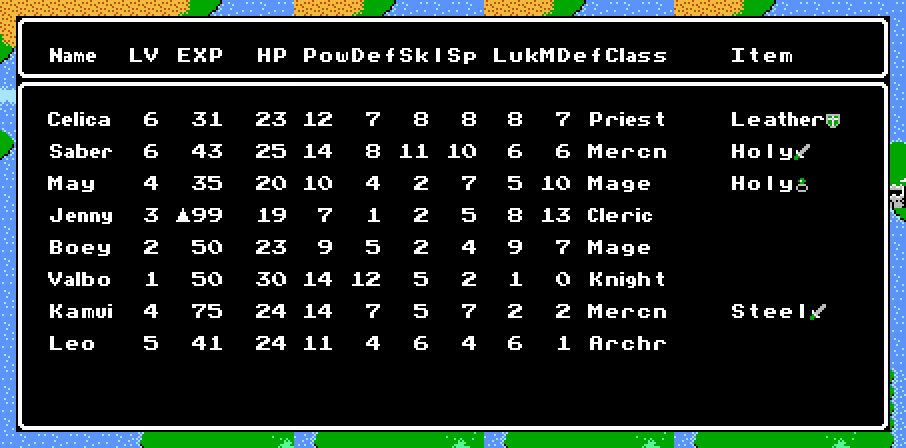 Next time: 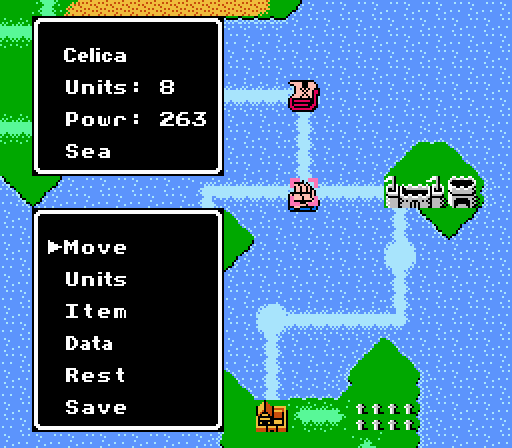 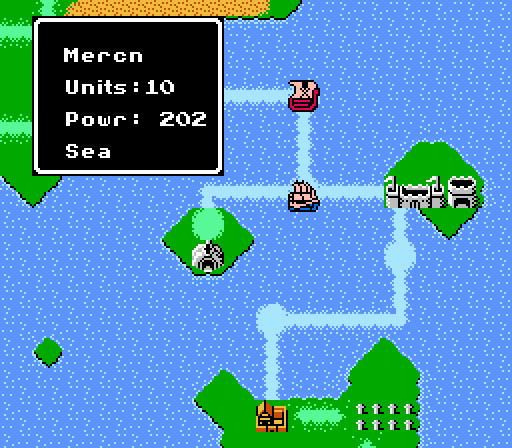 Another sea battle, with a mercenary force.
|
|
#
?
Jul 14, 2013 23:00
|
|
|
How much HP does it give? Is it just one? If so, it's far worse than the skill. Let's say +1 SKL May and +2 SKL Leo. I'll reconsider if it's multiple hit points, but I doubt it.
|
|
#
?
Jul 14, 2013 23:37
|
|


|
Yup just +1 HP per shrine use. On the other hand, Skill isn't all too useful (accuracy and crit rate), and for mages won't even help accuracy. Leo as an archer is hurting for accuracy so definitely a good choice for some Skill, though. Though with the way we've been missing everywhere high accuracy isn't exactly helping....
|
|
#
?
Jul 15, 2013 03:09
|
|
|
Skill doesn't help your mages' accuracy? drat. I mean, it's kind of interesting seeing a very early entry to the series, but drat am I glad it's you playing and not me!
|
|
#
?
Jul 15, 2013 03:29
|
|
|
Silver Falcon posted:Skill doesn't help your mages' accuracy? drat. The lack of the combat previews is probably the worst part, followed by the lack of movement/attack range indicators on the map. Fortunately these first two games aren't really difficult enough to require those aids.
|
|
#
?
Jul 15, 2013 05:52
|
|
|
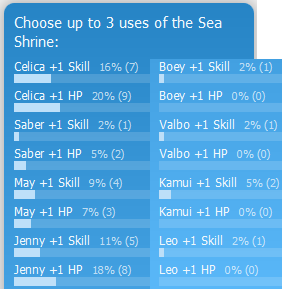 More Celica fans than trolls - Celica gets +1 Skill and +1 HP, while Jenny gets +1 HP for a bigger healing tank. Seriously, though, who voted for +1 Skill to Boey? Troublemaker.
|
|
#
?
Jul 16, 2013 18:55
|
|
|
I kinda like these optional battles for treasures. You can tell they're still feeling out what Fire Emblem should be.
|
|
#
?
Jul 21, 2013 21:00
|
|
|
I've got the rest of Chapter 2 recorded and the first part of Chapter 3. Next update will be tonight once I finish writing it up.
|
|
#
?
Aug 2, 2013 21:55
|
|
|
Chapter 2, Part 9: Sea IV First, some unfinished business in the shrine.   Celica wins the popular vote and takes a hit from each lion head.  Jenny gets the leftovers for some extra healing fuel. Moving on! 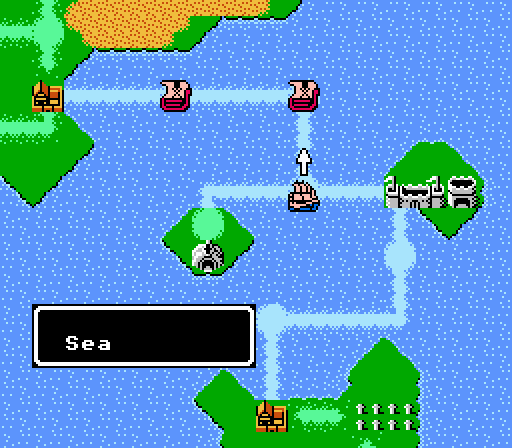 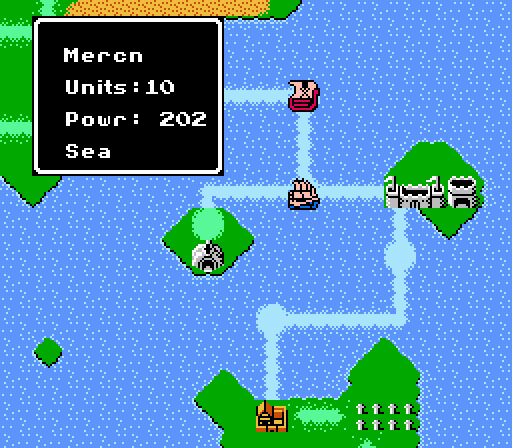 Another sea battle awaits. The difficulty appears to be a small step up from prior battles, but nothing that should really bother us.  Yes, let's get on with this already! 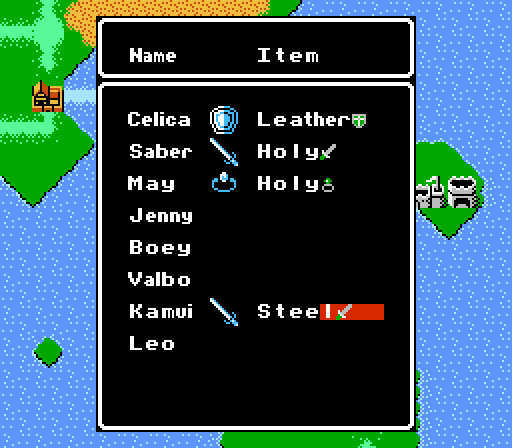 Okay, I wasn't totally ready yet. Jenny was still holding our new Holy Sword which was mostly useless on her. Instead Saber takes it, giving his Steel Sword to Kamui. Now, we're ready. 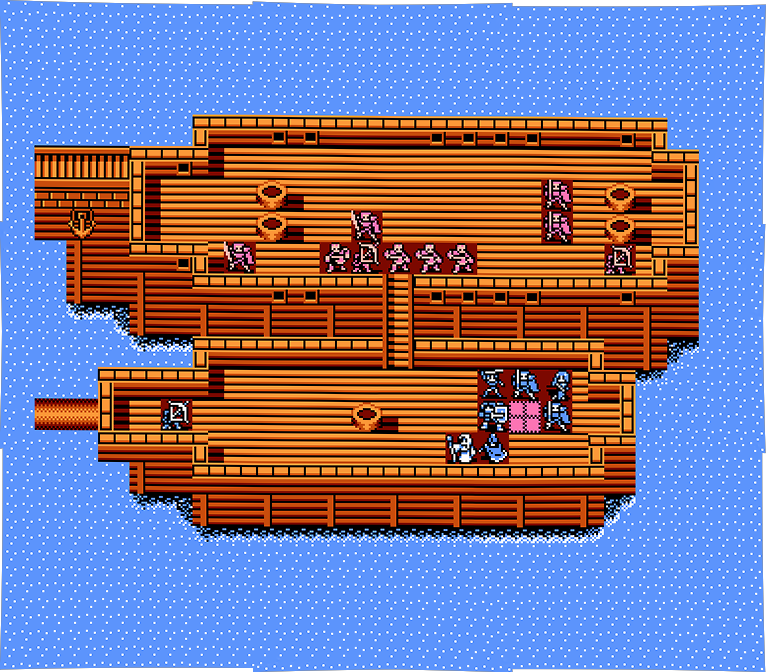 Four thieves, four mercs, two archers, single point of attack. This battle is going to be very trivial.   All of the thieves are level 1, not even remotely a threat. Three of the mercs are also level 1, which means they double-attack everyone but Saber but don't do much damage to our front-liners. The level 4 merc is only slightly more threatening at this point. The two archers are level 1 as well, which means they have enough Power to hurt May and Jenny but only if we let them get close. Turn 1  Saber is taking the lead. He only takes 1 damage from every enemy on the map, and his Holy Sword will heal up him for 5 HP at the start of every turn. He's literally invincible in this battle, as long as we hold the chokepoint and don't let him get swarmed somehow. May and Jenny hang back a bit in case the front archer moves first.  Instead the archer misses Celica entirely.  A thief gets the bright idea of attacking Saber head-on. 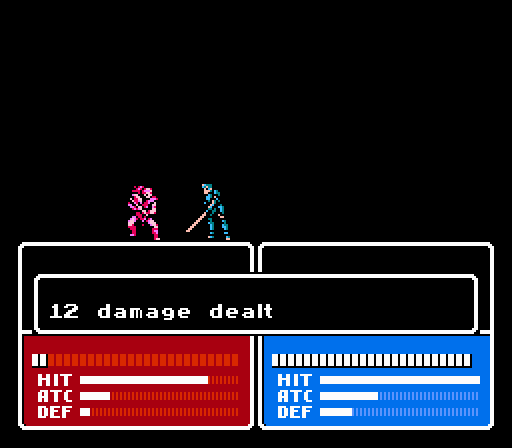 It doesn't work out great for him. Turn 2 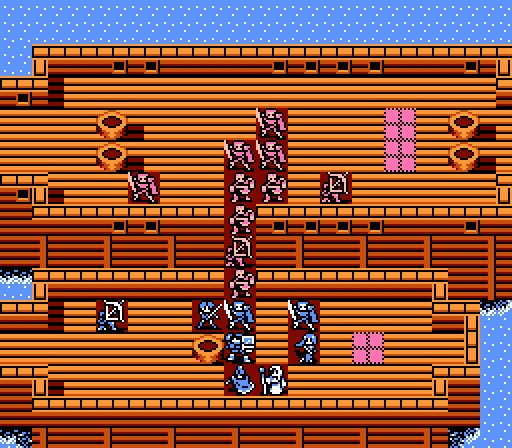 Enemies are stacked up on the bridge. Let's take care of that. 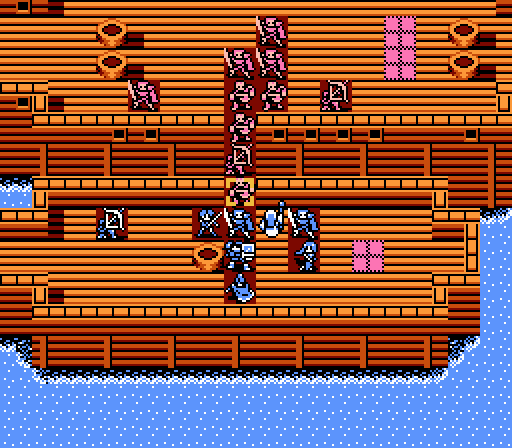 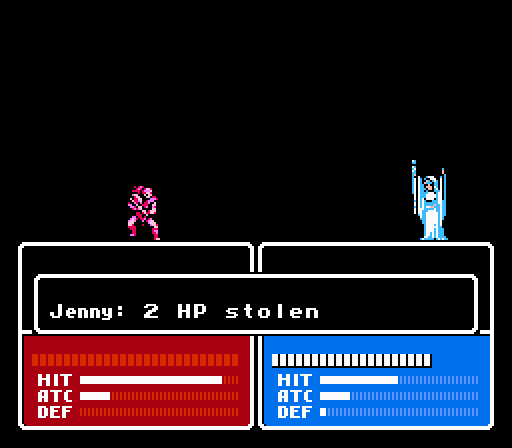 Jenny has a rare opportunity for an easy kill here on the wounded thief, and takes advantage.  She gets a worthless level in terms of stats, but check out the new Illusion spell. I'll show it off next turn - for now we need to get rid of that archer before it gets a free shot at Jenny.   Saber again does the heavy lifting, giving the easy kill to Celica.  No point moving anyone else into that gap, let the enemies break themselves on Saber.  This time a merc gets in on Saber first for all of 1 damage, taking 10 in return. Turn 3  Leo starts off trying to chip the enemy front-line merc, but misses.  So Celica switches to Angel magic to blow the merc away for 19 damage.  That frees up Saber to advance another tile and take off most of this thief's HP.  May takes the easy kill this time. The archer won't reach her this turn, as the mercs will move first and fill the gap.  Meanwhile, Jenny moves onto the healing tile to show off the very expensive Illusion spell.  - Chapter 2 Part 9 Battle 1.gif) Much like the enemy Messiah spell that summoned a random number of zombies, Jenny's Illusion gives us a random number of Soldiers. The illusions are level 1 and not that great on their own, but a swarm of them can easily turn a battle that's going against you. However they soak up experience that your real units could use, and you can't actually control them directly - they move after the enemy phase on their own.  They'll hit hard with one attack against most of the weaker enemies we've been facing so far, and have enough Defense and HP to last awhile.  The "boss" of the battle approaches Saber on the enemy phase. Even with twice the number of attacks, he only does 2 damage to Saber's 9 damage.  The illusionary soldiers move up on their own. I plan to keep the bridge clogged enough that they never get any closer to the front. Turn 4 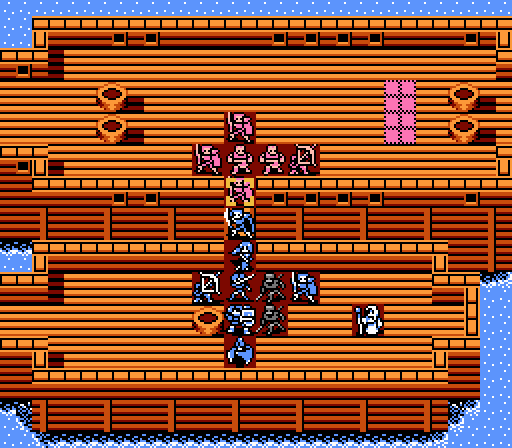 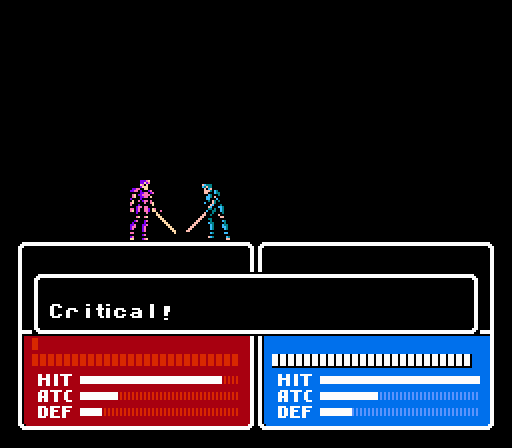 Saber goes for round two, ending things immediately with a timely crit. 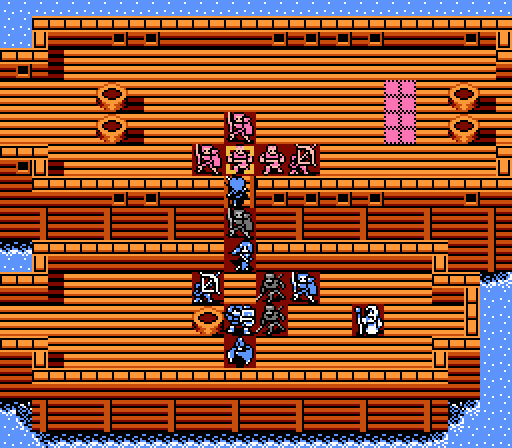 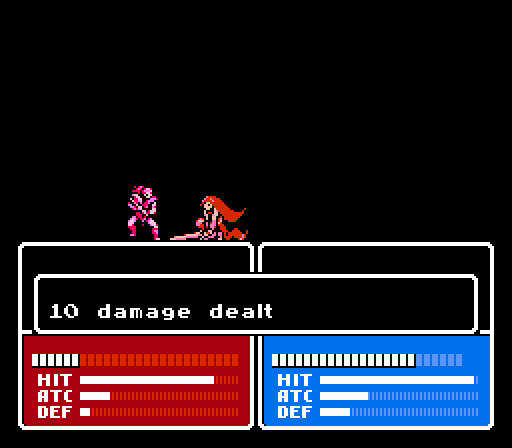 With most of the enemies defeated, Celica hurries things along by taking the lead against this thief.  For some reason I just end the turn there rather than have May or even Leo try to finish off the thief.  Celica doesn't dodge this arrow, but it's only 2 damage.   The injured thief retreats; the other one probably should have. Turn 5  This time I get May out of the way and let Leo get a kill on the thief.   Saber and Celica team up to take out the last archer.  ...This level is terrible. But there's a more interesting note here....  Saber can now promote into a Myrmidon! He still has 13 levels he could gain as a merc, so promoting early would cause him to lose out on any stat gains he might have received otherwise. However a promotion would also immediately raise him to the myrmidon's base stats - currently that would give him just +5 HP and +4 Speed since his levels have been pretty good up until now. The immediate Speed increase would be nice but isn't necessary right now. Moreover as a promoted unit Saber would gain less experience from the weak units we're currently fighting. Since we're unlikely to actually run out of levels for Saber to gain either way, the tradeoff essentially becomes slower future level gains in exchange for the immediate promotion bonuses. I'll revisit the question when we come across another shrine, but for now I'm not going to go back to the Sea Shrine just to promote him. 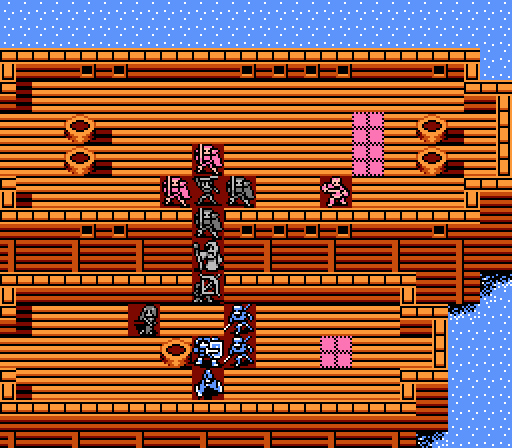 With the ranged threats eliminated, Jenny and Kamui move up onto the bridge, mostly to keep our illusions from getting in the way. 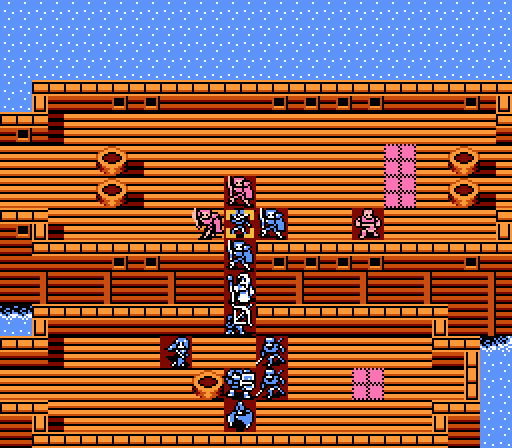 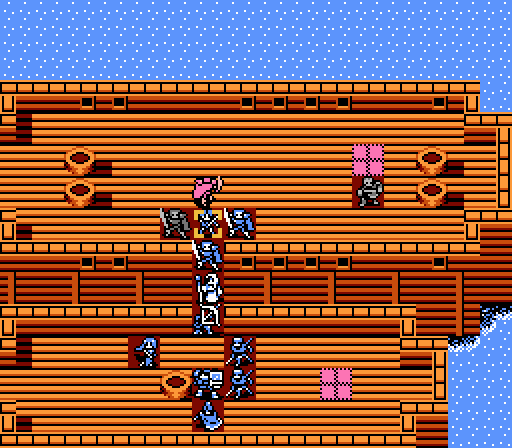 Even if the mercs crit on all 4 hits against Celica here, she'd live with 2 HP. Instead they land regular hits for a total of 4 damage. Turn 6 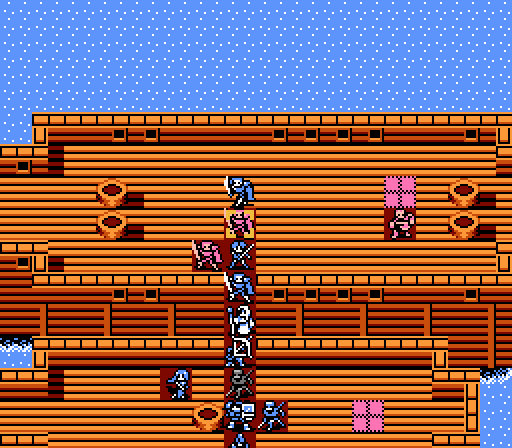 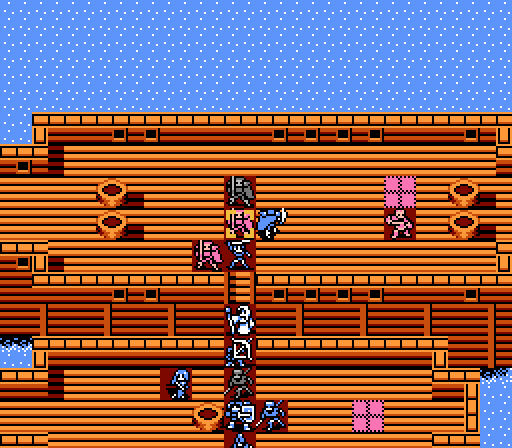 Saber sets up Kamui for his first action of the battle, netting a kill. 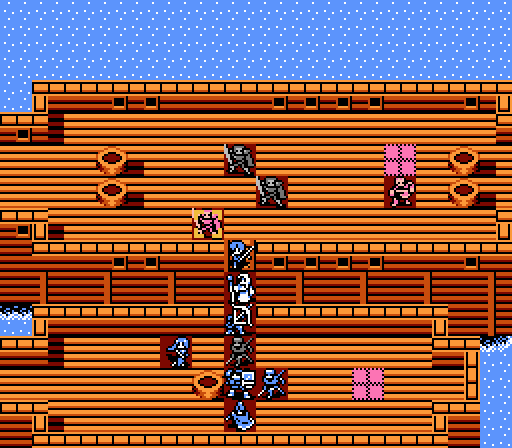 Celica just blows away the other mercenary with some Angel magic.  Not really necessary, but Jenny gets another double-shot of Recover for Celica. 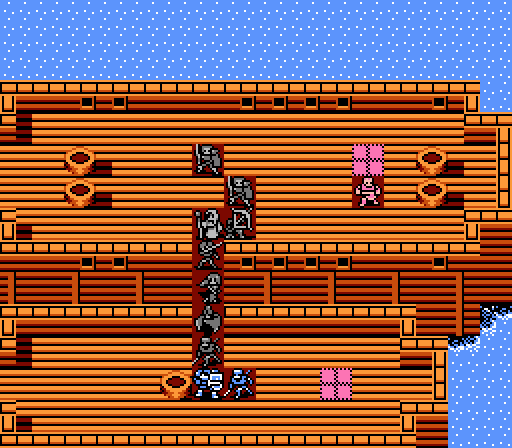 The thief is still in retreat mode on the healing tile, so after filling up the bridge again it's time for another turn. Turn 7  Kamui's close to a level so I let him get the final blow. 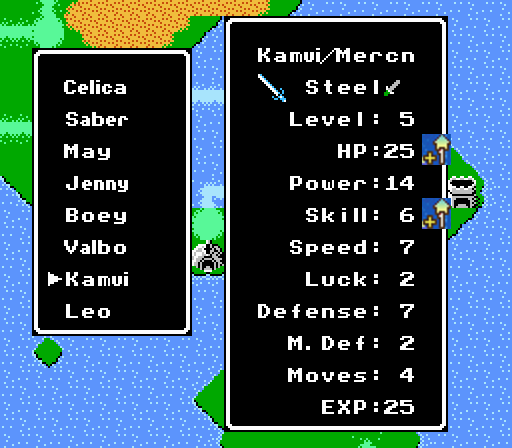 I'm pretty sure the Skill/HP shrine cursed our levels. 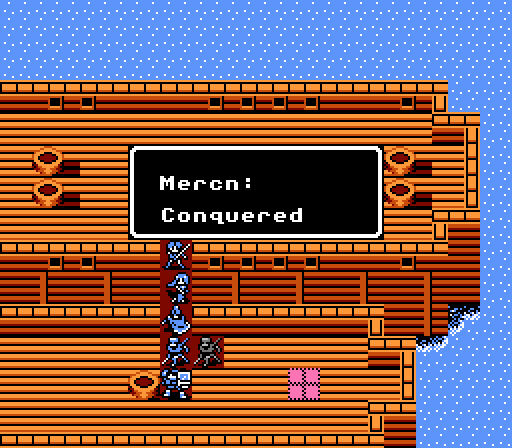 Anyway, Celica remains queen of the seas. Current Roster: 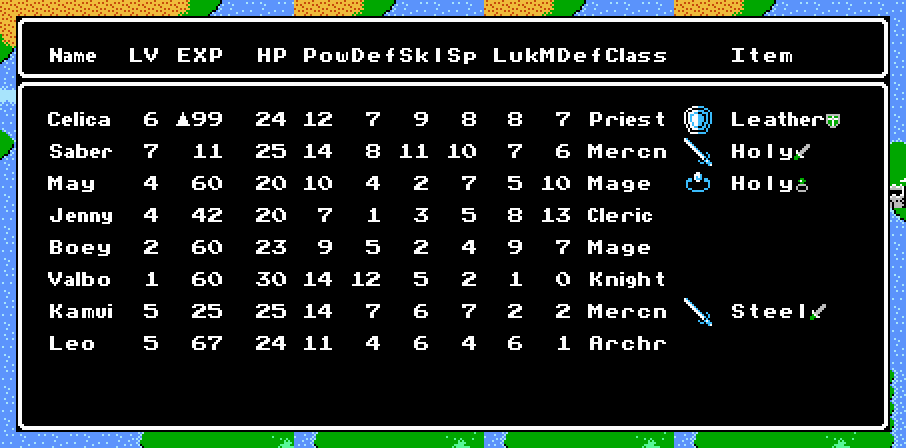 Next time: 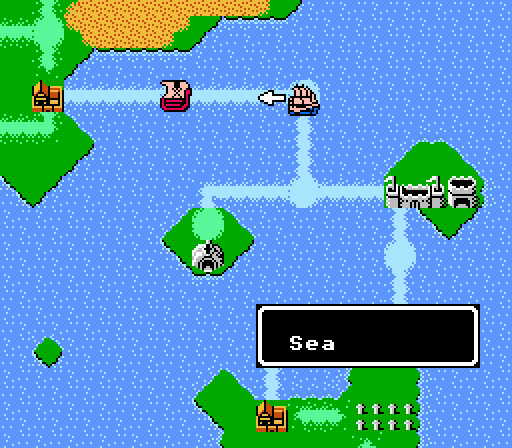 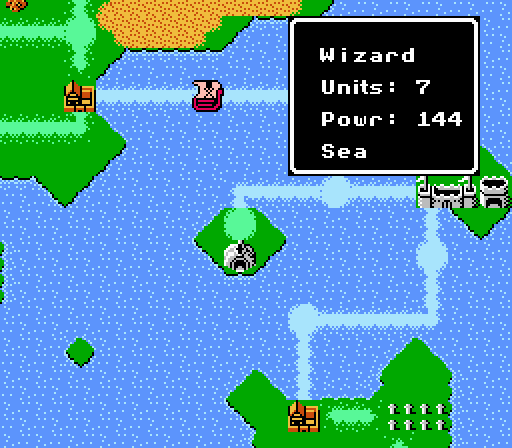 The final sea battle, with a group of wizards.
|
|
#
?
Aug 3, 2013 02:06
|
|
|
So that's where the Summoner from FE8 comes from. I prefer the 1HP ones from that game to these ones, as they usually don't stay around long enough to steal your experience.
|
|
#
?
Aug 3, 2013 07:43
|
|

|
Chapter 2, Part 10: Sea V Let's go take out some wizards.  Seven wizards, two chokepoints. A rather interesting setup, but Celica's army has a lot of units with high Magic Defense so we shouldn't have too much trouble here. 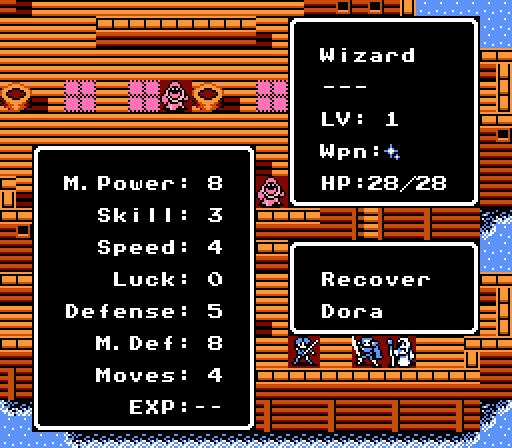 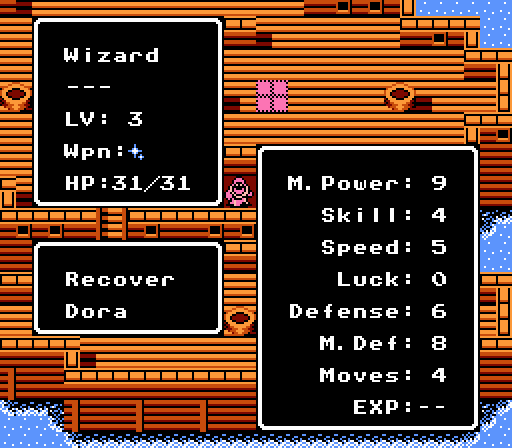 All of the wizards have Recover and Dora. The one on the right of the front line is level 3, the rest are all level 1. 11-12 magic damage per attack, but not enough Speed to really be threatening. A physical attacker with high Magic Defense is the best option here - think we have anyone like that? Turn 1 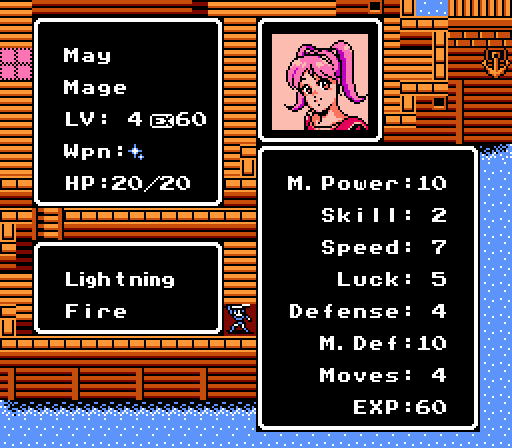 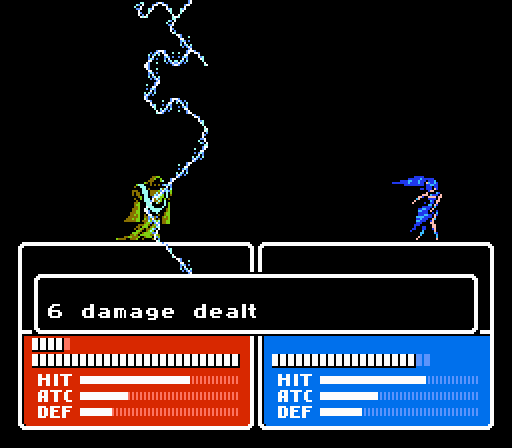 May's high Magic Defense and possession of the Holy Ring make her all but invulnerable here. She gets started with some long-range lightning, but it's too heavy for her to get in a second attack. 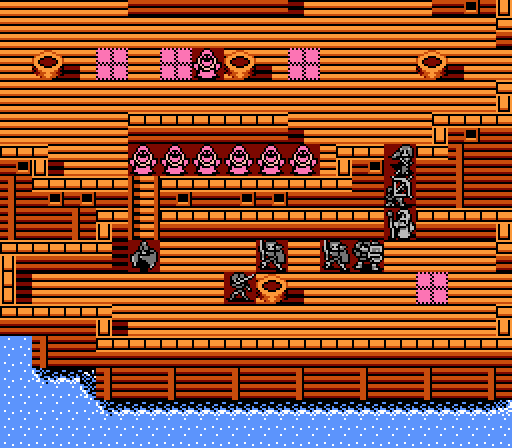 Boey's the only one on the left side, so he's just going to make sure that the wizards don't break through over there this turn.  - Chapter 2 Part 10 Battle 1.gif) Leo is one of the few in our army without enough Magic Defense to really hold his own here, but he gets double-lucky with a dodge and a crit. 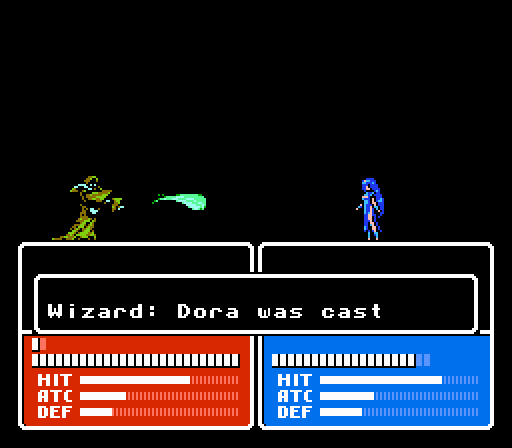 Another wizard singes May for 1 damage. May lands one attack for 5 damage herself.   Boey dodges both wizards here, paying back for all of his earlier misses. Turn 2   Leo attempts to finish off the wizard that attacked him last turn. He misses his first attack, eats a nasty counter, then gets the kill with his second attack.  Not particularly helpful for an archer.  May moves up a tile, trading blows with the wizard again while still blocking the bridge.  Jenny is the safest she's ever been on this map - with her 13 Magic Defense, she literally can't take more than 1 damage from the enemies in this battle. Unfortunately all of the wizards have enough Magic Defense to limit her Nosferatu attacks to just 1 damage as well. Instead she heals up Leo.   Boey pulls back to make room for the A-team, but still gets a crit on the way out.   Saber has enough Magic Defense that, combined with the Holy Sword's free healing, he can tear through the wizards without much trouble. Another crit doesn't hurt, either.  Saber and May hold the two bridges.  Celica dodges, then lands two fireballs of her own for 14 damage.  Seriously, something other than Skill and HP, please.  Saber takes a fireball to the face, but will heal all the damage next turn. 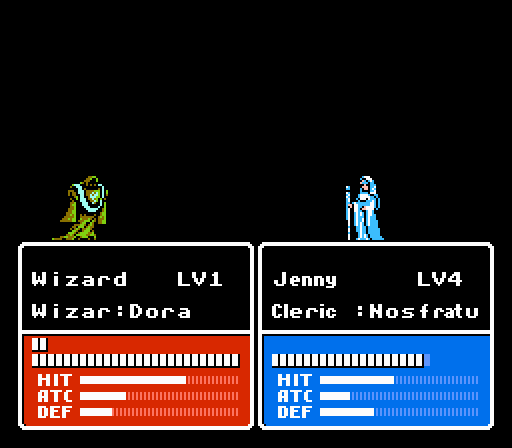 A waste of time all around, here. Jenny takes one damage and then misses both of her attacks. Turn 3  Saber starts off with another crit. 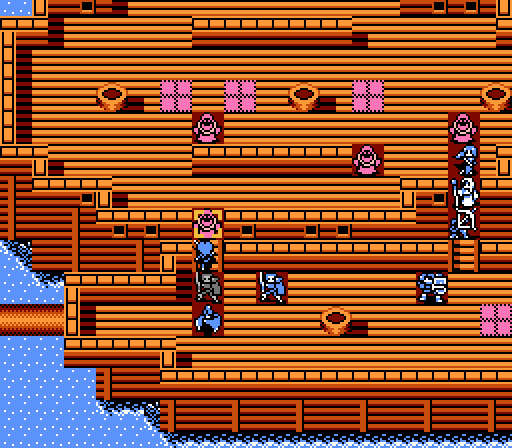 Celica moves in to soften up the next wizard.  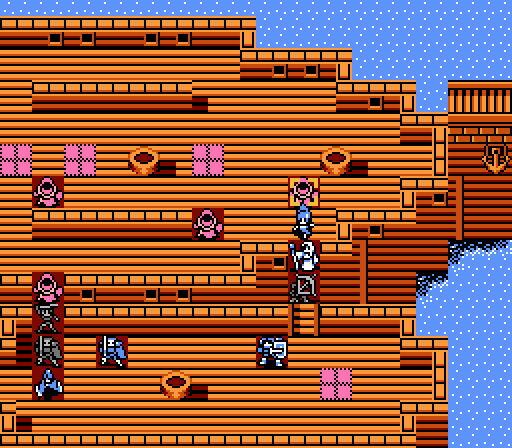 Leo and May together can't finish off this wizard, though. 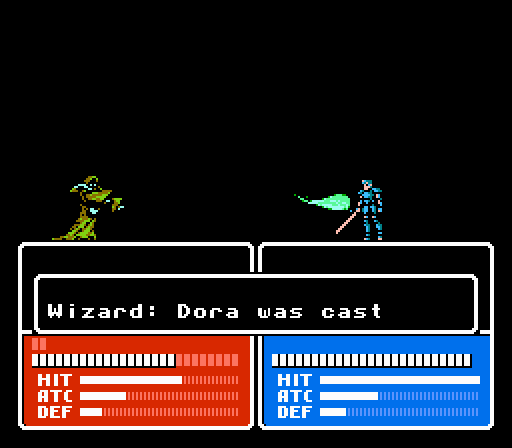 On the enemy phase, this wizard takes the opportunity for a free shot at Saber from range. 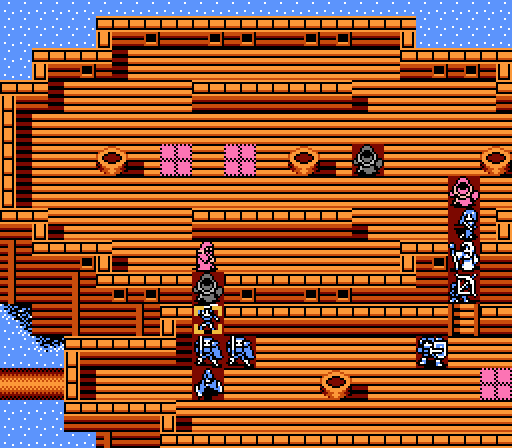 Another wizard comes down to go after Celica, but she can fight back. 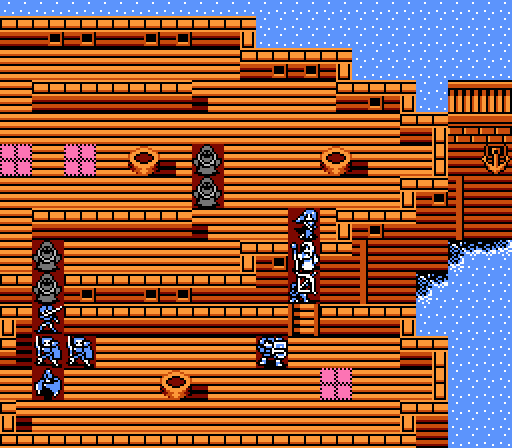 The other two wizards retreat and heal each other up. Turn 4 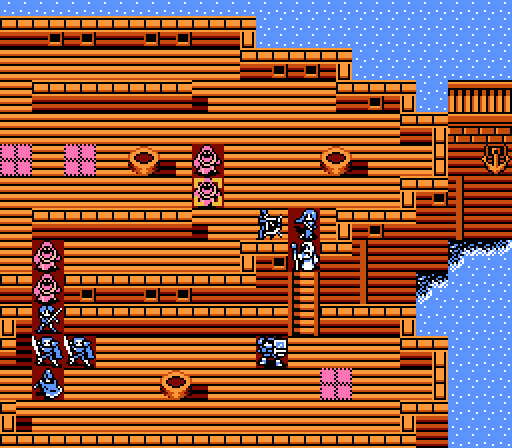 Leo starts off with a quick kill shot.  May gets in a couple attacks on the other wizard to keep it in retreat mode. 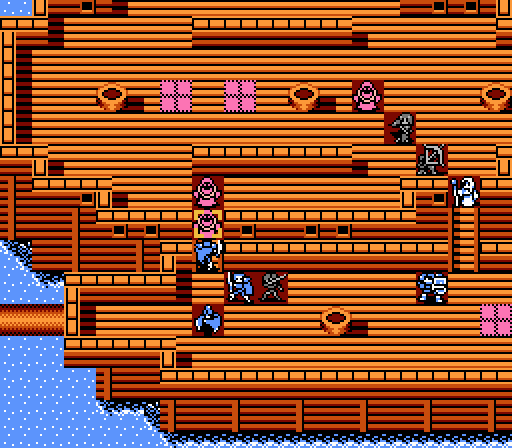 Celica gets out of the way so that Saber can make with the wizard-killing. 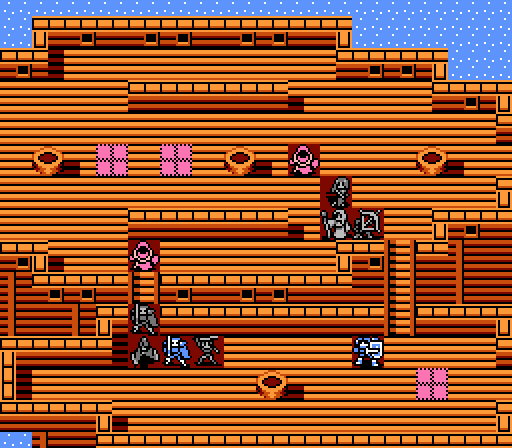 Just two left. 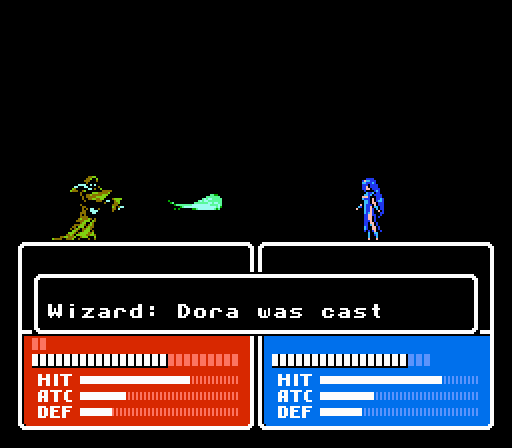 May fends off one attack on the enemy phase. If she could actually land more of her own attacks this wizard would already be dead. 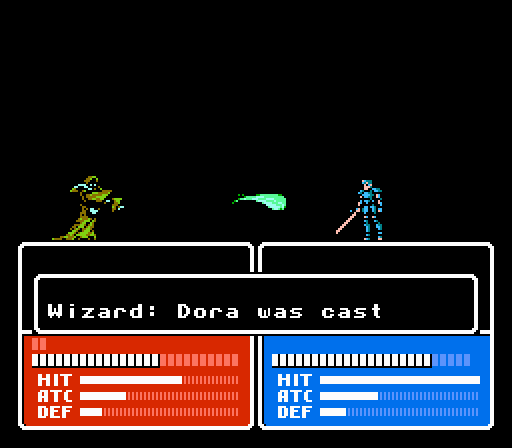 Pretty much the only way to go after Saber. He shrugs it off. Turn 5 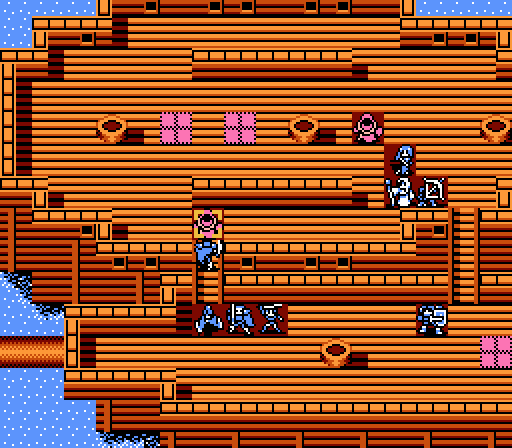 Saber gets another easy kill. 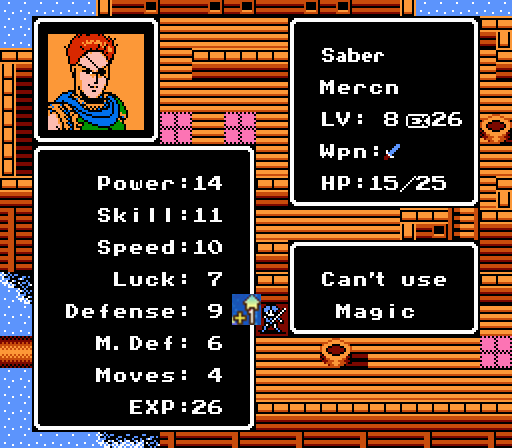 He's already hit another level, too. It's not much, but he's just that much more unkillable now. 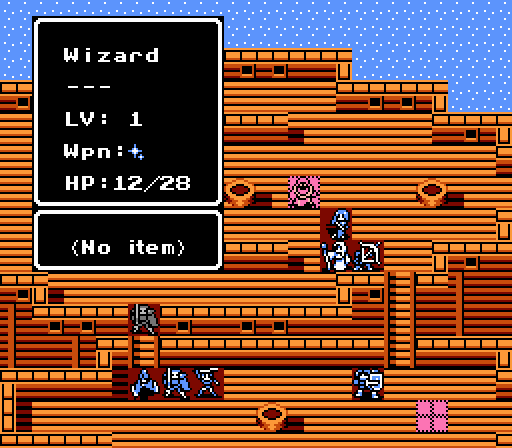 The last wizard has 12 HP. May only does 10 damage with a pair of fireballs, but I really want her to get the kill since she's close to a level as well. The wizards count as promoted units so they spit out a lot of experience. 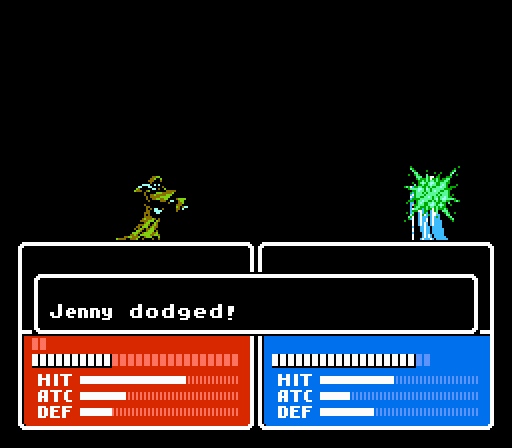 The solution's actually pretty simple. I can't have Leo attack since if he lands both shots he'd get the kill himself. Instead I send in Jenny - even if she misses both of her attacks, the wizard will use up 1 HP to counterattack her, and another 1 HP to counter May. Then all May has to do is actually land both of her attacks.... 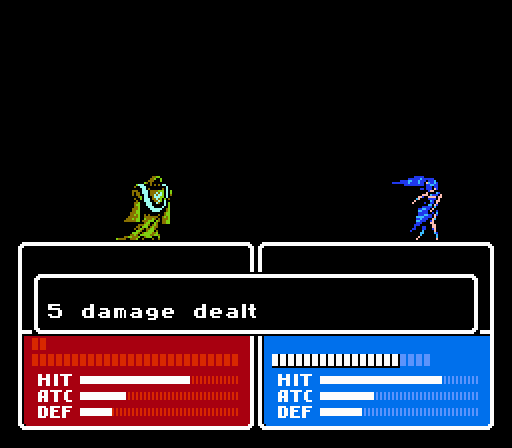 And we're golden. 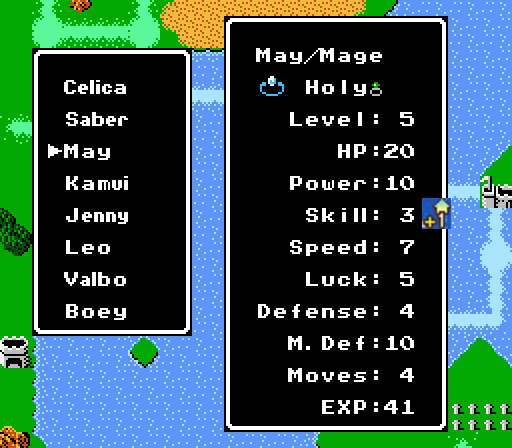 This level might as well be empty for all the good it does May. 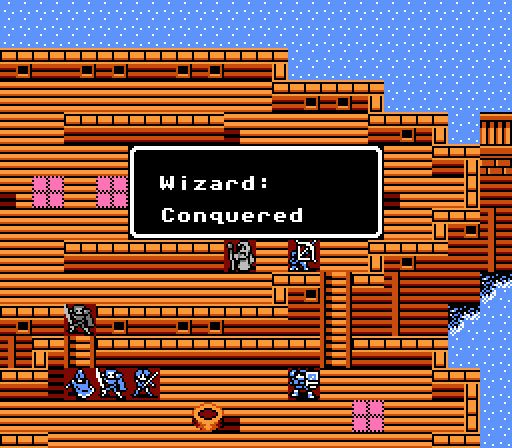 Oh well, another ship sunk. Current Roster 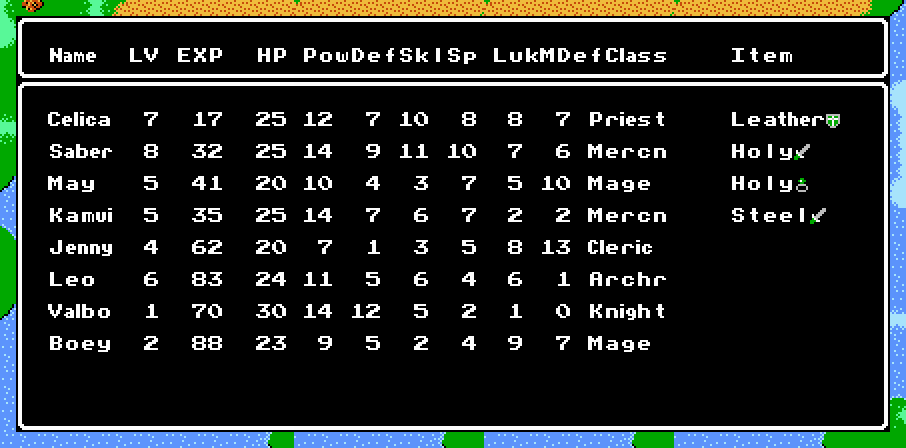 Next time: 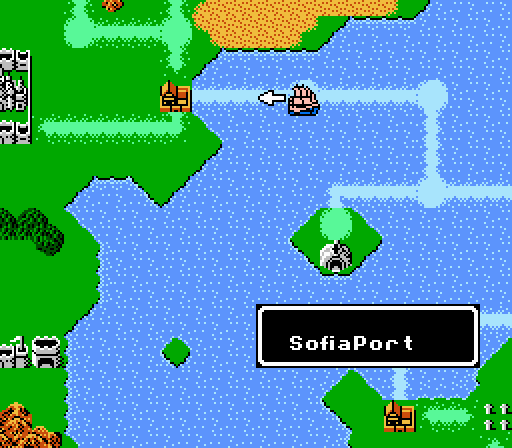 Time to wrap up the second chapter as Celica and company arrive at Sofia Port.
|
|
#
?
Aug 4, 2013 20:31
|
|
|
Is there anything you can do to improve the hit rate of Nosferatu? Stats to raise or something?
|
|
#
?
Aug 6, 2013 22:48
|
|
|
I'm sad this game hasn't gotten a remake, there's some cool, unique stuff in this game. It would also be nice to see this game with updated graphics. So, Saber's basically the best guy in the army, correct? I guess it shows just how much base stats matter over growths in this game.
|
|
#
?
Aug 7, 2013 02:02
|
|

|
Alas, nothing can help a spell's hit rate as Skill doesn't apply to magic attacks. Saber's great but the Holy Sword would make most melee units awesome and there's still a long way to go. We've basically just gotten through the introduction for each army, now the real game starts. Speaking of which....
|
|
#
?
Aug 7, 2013 05:25
|
|
|
Chapter 2, Epilogue: Sofia Port and Sofia Castle II After many battles along the way, Celica's group finally reaches Sofia. 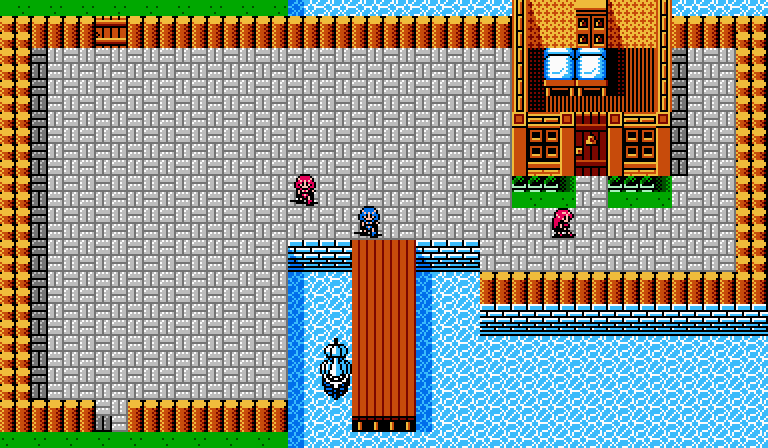 Sofia Port isn't much to look at. A closed gate in the northwest, an open one to the southwest, a cabin with a couple of beds, and a couple of visitors. 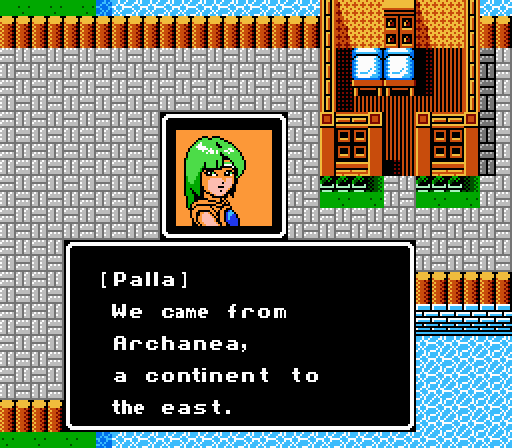 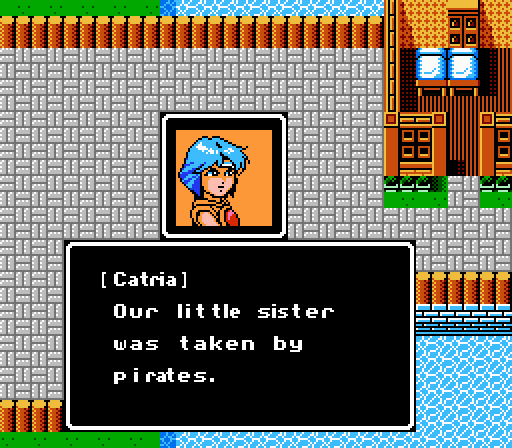  We gave chase, but lost them around here. We gave chase, but lost them around here.Didn't find anyone at the pirate base we cleared out. Must be further ahead. Palla and Catria are actually a call-back to the first Fire Emblem game. They and their sister, Est, were Pegasus Knights in the player's army, fighting in Archanea. It's a nice little cameo and a way of confirming that Gaiden takes place in the same 'world' but just a different part.  Anyway, there's nothing else here, so let's leave through the open gate. 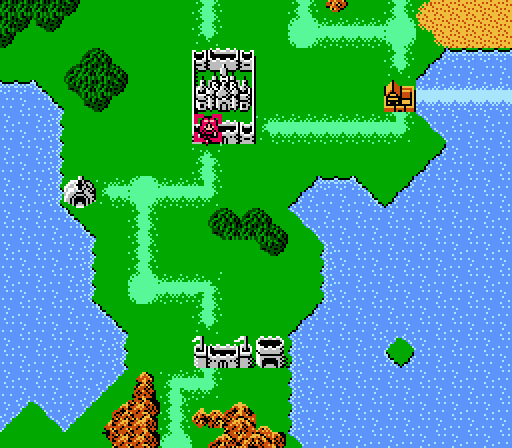 Celica is now in Alm's half of the map. The only thing for her to do here is head for Sofia Castle, but there's nothing stopping you from going to the Thief Shrine or any of the other locations. In fact, if you skipped anything with Alm - shrine uses, recruitable characters, etc. - you can actually pick them up with Celica instead. There's not much point in doing so, but theoretically you could try and do Alm's chapter with as few allies as possible, leaving the rest to Celica.  Anyway, off to the castle. 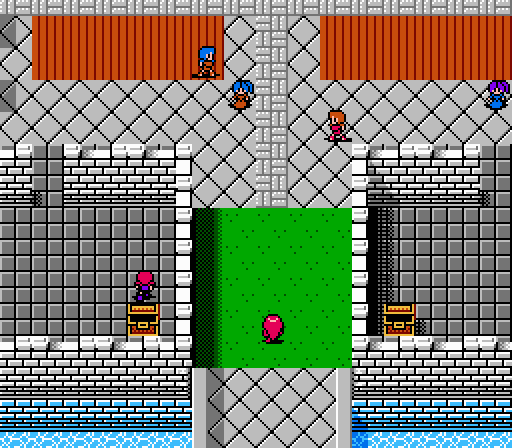 Everyone's still abuzz over Alm's victory over Dozer. The first two chapters of the game happen pretty much in parallel. 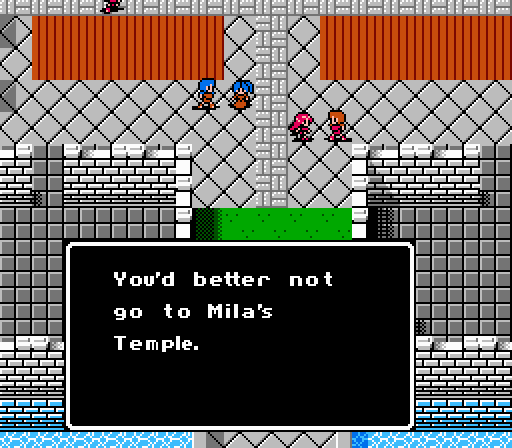 ...That area's crawling with Geyse's bandits. Guess where Celica's headed? 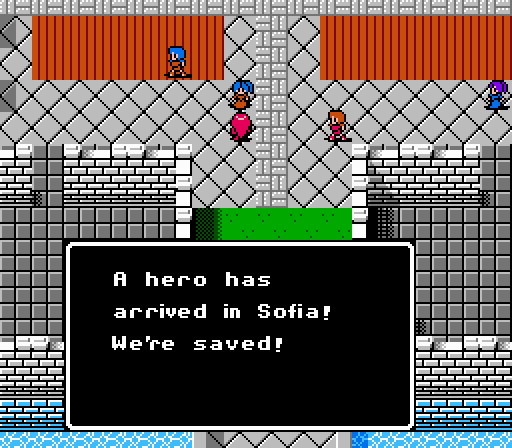 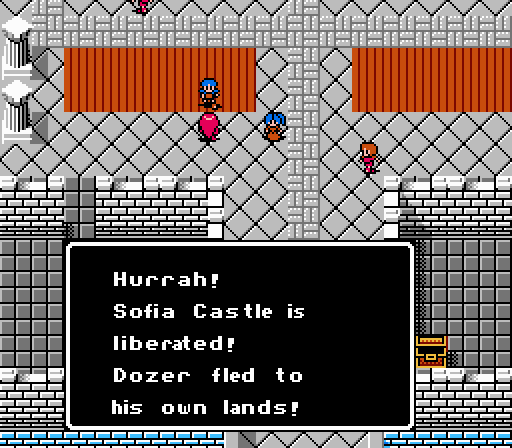 Some of the conversations have at least changed since the end of the first chapter. They're not much more interesting, though. 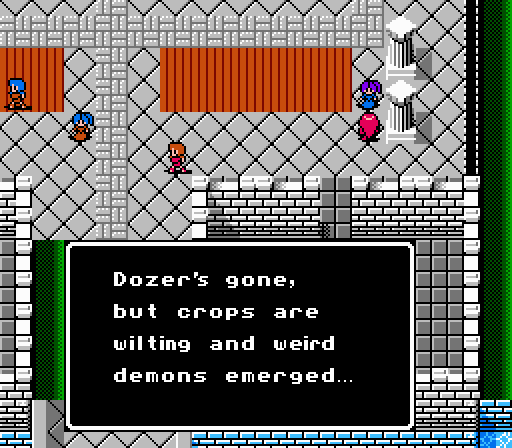 ...What's happened to the Earth Goddess Mila? More signs of larger problems with the world. 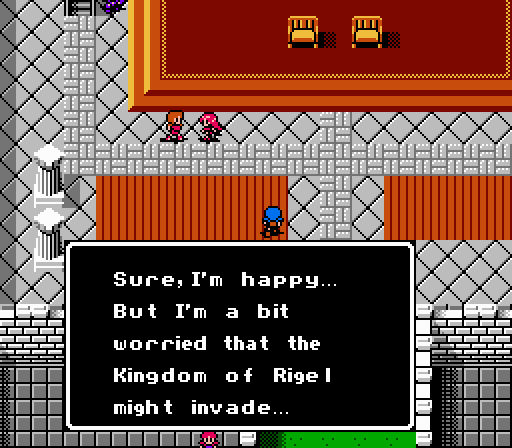 Who cares, that sounds like Alm's problem. 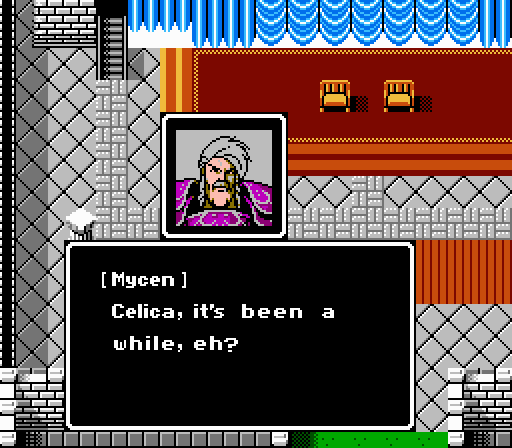 Remember, Mycen placed Celica in the care of the island church where we started the chapter.  Celica also refers to Mycen as 'Grandfather'. A common term of affection, there's no actual relation between her, Mycen, and Alm. I think. It's not super clear.  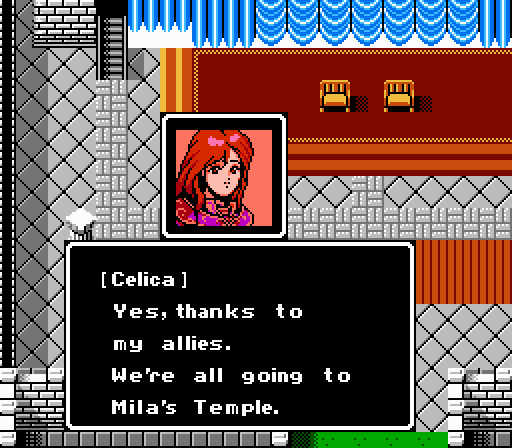  There's one person left for Celica to meet, after all.  You should find someone you've been wishing to meet. You should find someone you've been wishing to meet.I just said that Mycen! 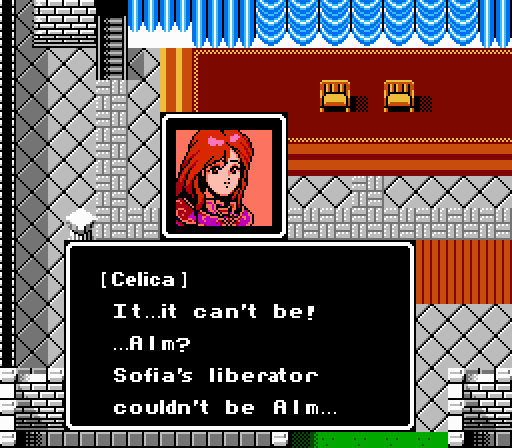  ...could it? Well, why don't you go see? ...could it? Well, why don't you go see?Might as well, nothing else to do here. 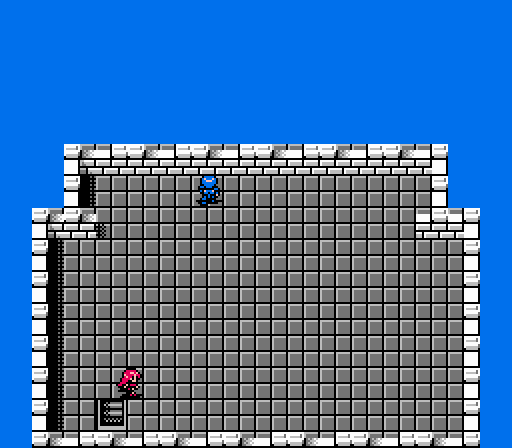 Alm's still waiting upstairs where we left him last chapter. Let's have a chat. 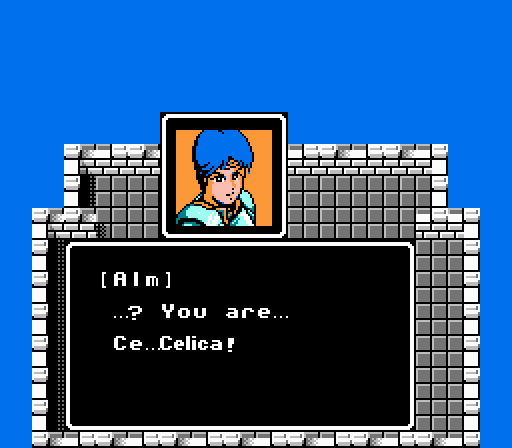 These two already know each other. Makes sense, having both apparently grown up with Mycen.  I haven't seen you since I left the village.... I haven't seen you since I left the village.... Yeah. We always used to play together. I held a serious grudge against Gramps the day you were sent away. I was sad too, but Grandfather told me why he did it: 'If you stay in Ram, Dozer will come to kill you.' But why? Why would Dozer want to kill you, Celica? Yeah. We always used to play together. I held a serious grudge against Gramps the day you were sent away. I was sad too, but Grandfather told me why he did it: 'If you stay in Ram, Dozer will come to kill you.' But why? Why would Dozer want to kill you, Celica?Alm hasn't quite put it all together yet. That.... I'm sorry. I'd rather not say right now. In any case, Alm, I have a request. Can war be avoided with the kingdom of Rigel? That's impossible. King Rudolf of Rigel decided to attack while Sofia is weak. At this rate, Sofia will be destroyed. But aren't we all the same? We should be able to coexist. There's no way. Sofians won't tolerate Rigel's barbaric rule. We must retaliate! How sad.... I'm sure if we talked, we could come to an understanding....Celica's hiding in the church all this time has rubbed off on her a bit, here. Unless, Alm, now that the Sofians call you their hero, you want to become their king as well?That was kind of out of nowhere. What! That's mean, Celica. I just want to protect the people of Sofia, that's all. Besides, Sofia's only remaining princess is still alive. I'm planning to search for her. After I find her, I'm returning to Ram.Yes, the princess is alive. Somewhere. If only we could find her. That's not true! Sofia's royal family is gone! But I get it, Alm. You go ahead to Rigel. My companions and I are going to Mila's Temple.   And with that, we've finally reached the end of the second chapter. Next time: 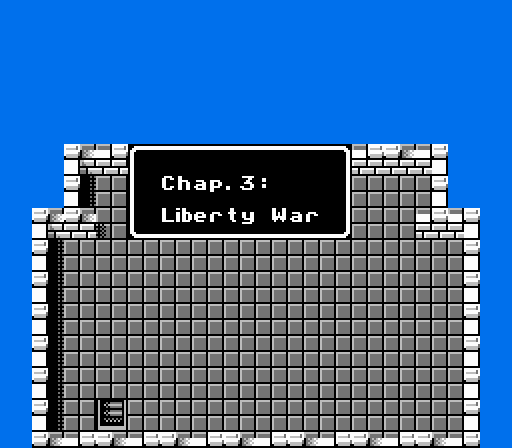 Time to continue 'liberating' the continent. DKII fucked around with this message at 05:32 on Aug 7, 2013 |
|
#
?
Aug 7, 2013 05:29
|
|
|
Chapter 3, Prologue: Sofia Castle III Time for the third chapter. We're back in control of Alm.  Let's head back downstairs, then.  Picture the screen rapidly (60 Hz, literally) shaking back and forth here. Then some dude rushes up from off-screen. I tried to capture it a few times but I either lost the shaking or ended up with an animated GIF somehow 3.5 MB big. So just use your imagination instead. 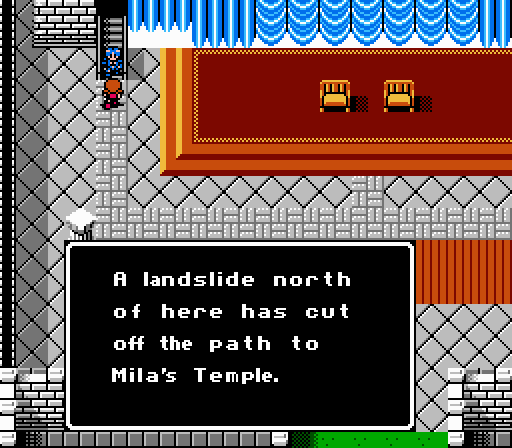 ...The priestesses who just left are safe, but.... And this event is how the game justifies Alm and Celica remaining separated for this chapter. 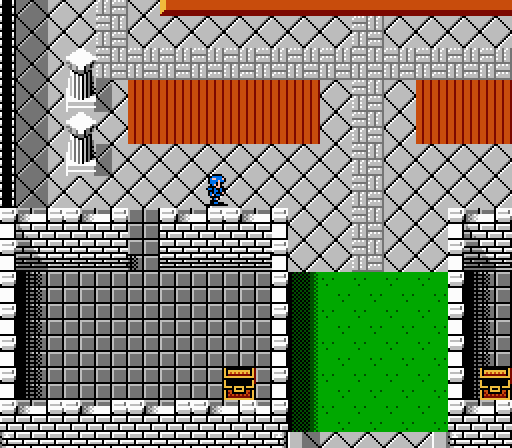 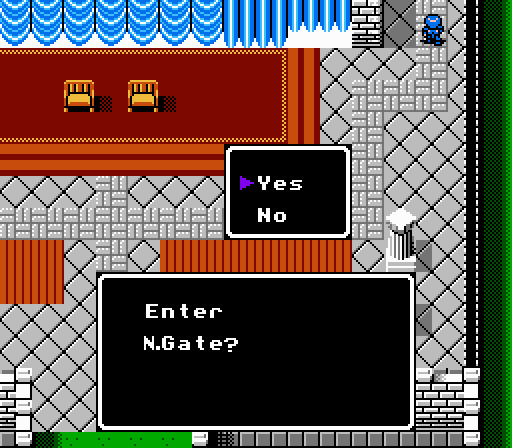 There's no one left in the castle. We could leave to the south again, but there's no point in doing so. Instead, let's finally head out the north gate. 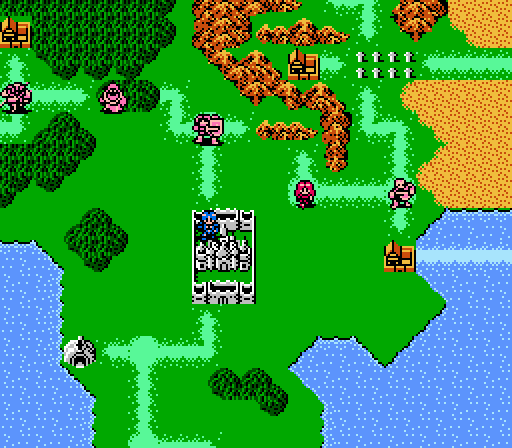 The world map for the third chapter. We can see both Alm and Celica, separated by the landslide to the north. 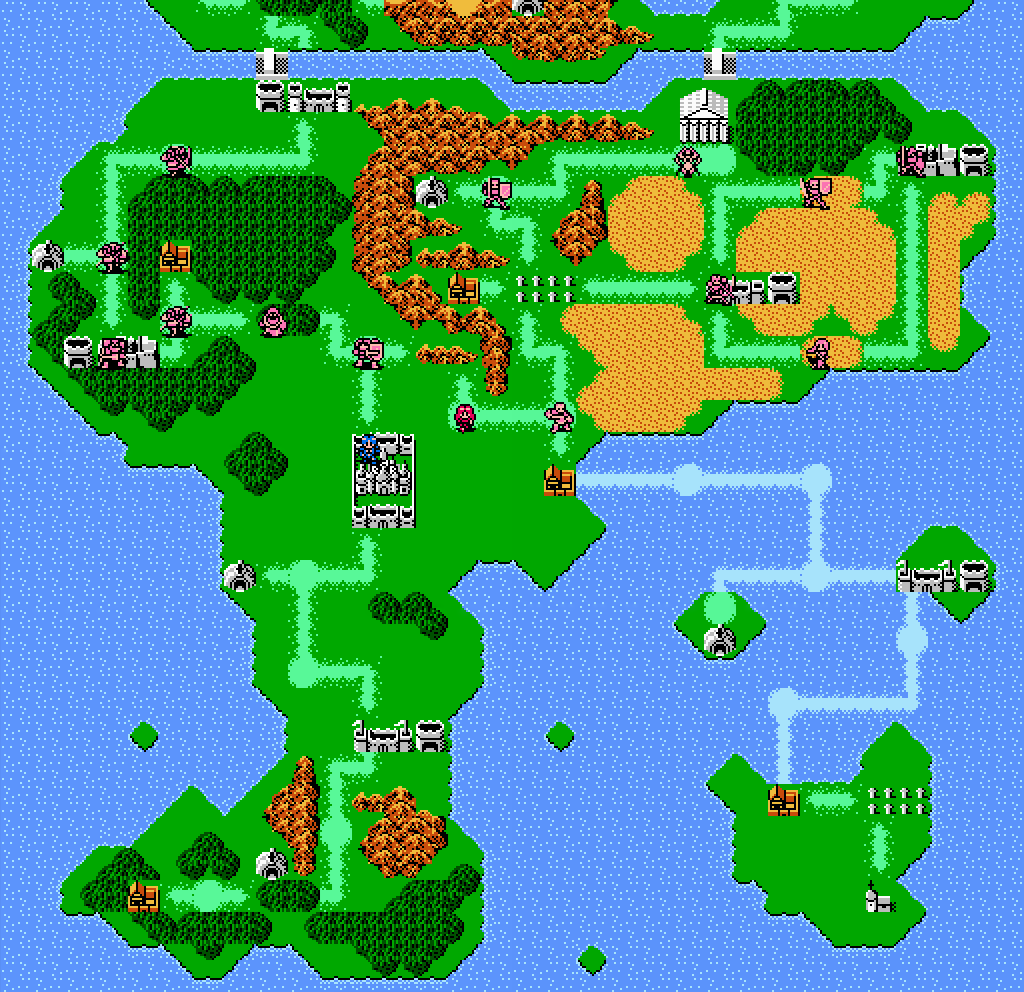 And the full map. Plenty of action as we clear out the northern half of Sofia. 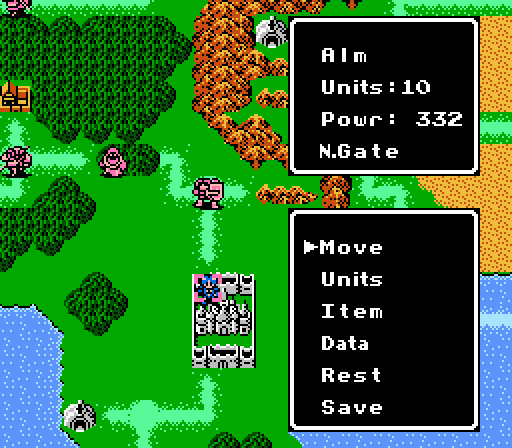 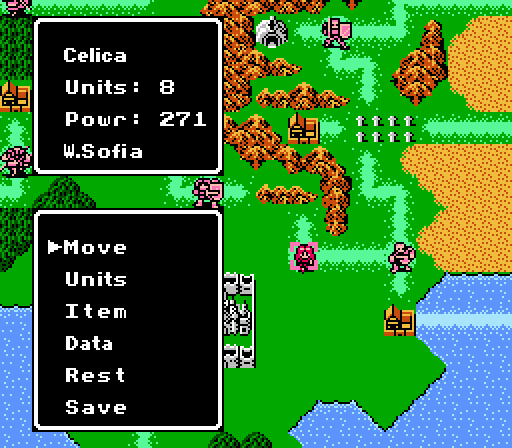 We can now independently control both armies. Alm's goal is to take out Dozer. Celica's headed for Mila's Temple. So who should we have fight first? 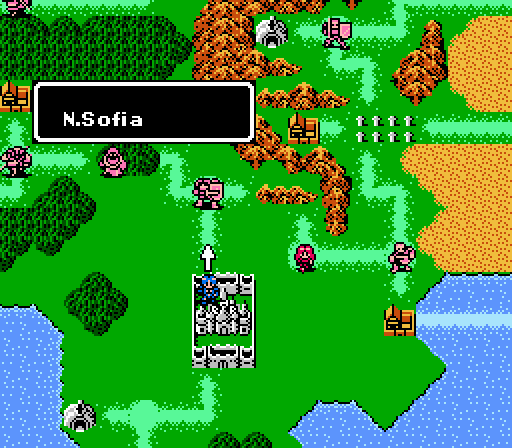 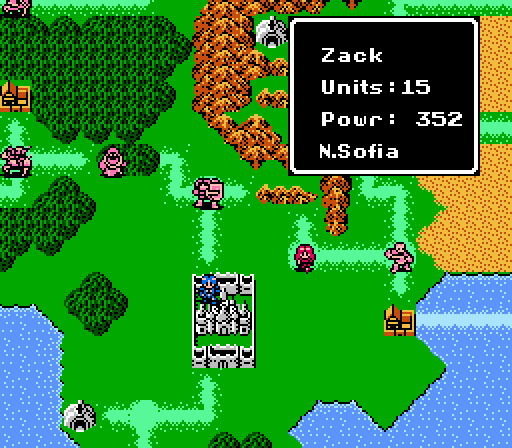 Alm is headed into North Sofia to face Zack's knights. 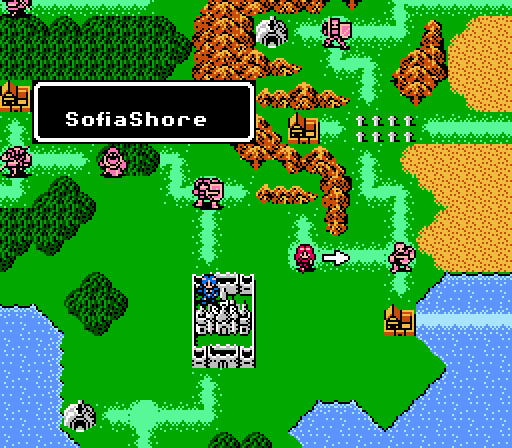 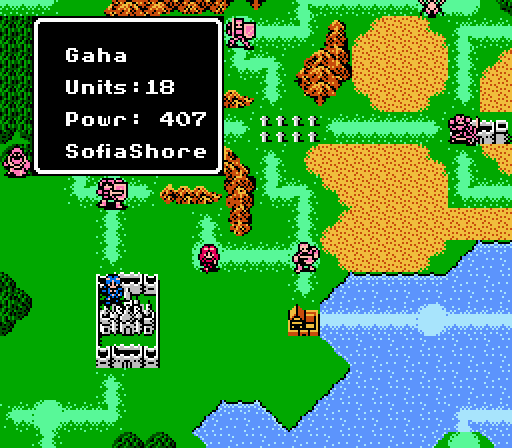 Celica is headed for Sofia Shore to face Gaha's thieves. Both battles are a step up in difficulty from what we've faced so far, so which shall it be: Vote for the next update here: VOTE
|
|
#
?
Aug 8, 2013 07:16
|
|
|
I was going to vote for Celica, just to see the harder fight, but then I remembered it was really: Celica (8 units, 271 quality, 1 nigh-invincible regenerating swordsman) vs Gaha (18 units, 407 quality) Which sounds a lot less challenging.
|
|
#
?
Aug 8, 2013 14:41
|
|

|
PFlats posted:I was going to vote for Celica, just to see the harder fight, but then I remembered it was really: It's been awhile since we've seen Alm's army but yeah, they don't really have the same quality and quantity of equipment and stats for sure.
|
|
#
?
Aug 8, 2013 16:19
|
|
|
They actually put a physical wall between them, huh? Seems a bit heavy-handed, but at the same time I'm kind of honored they felt they had to try.
|
|
#
?
Aug 12, 2013 08:27
|
|
|
Chapter 3, Part 1: North Sofia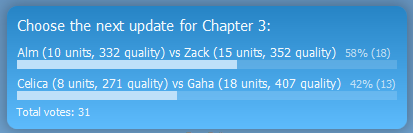 It was close, but we'll be starting off with Alm. Haven't seen his group in awhile. Music: World Map 3  Alm has 10 units in his army and an assortment of equipment. 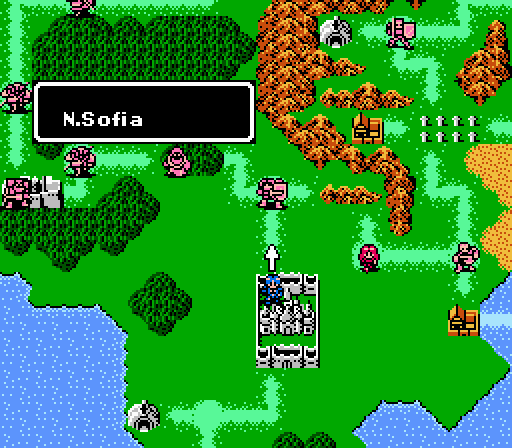 Let's get this started. 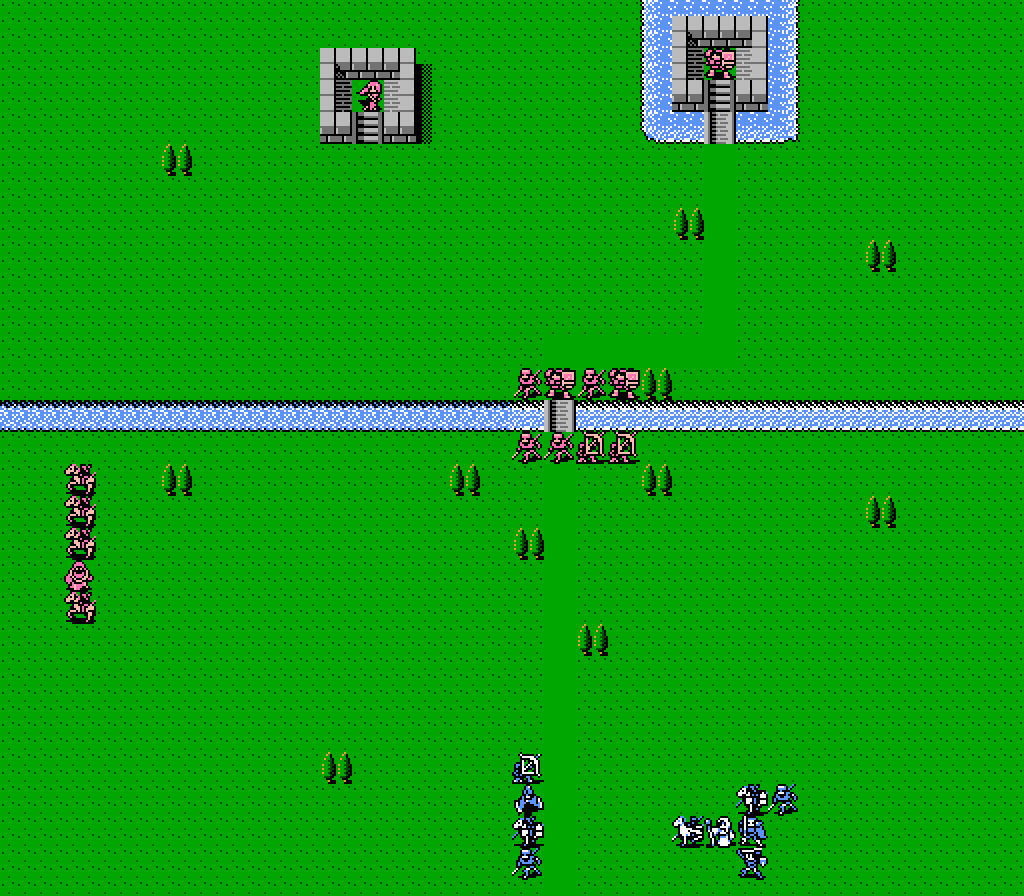 Lots of enemies this time, including a few promoted units and a female class we haven't yet seen. We have almost no cover, and can only heal 9 HP each turn with Silk; should be a blast. But first - 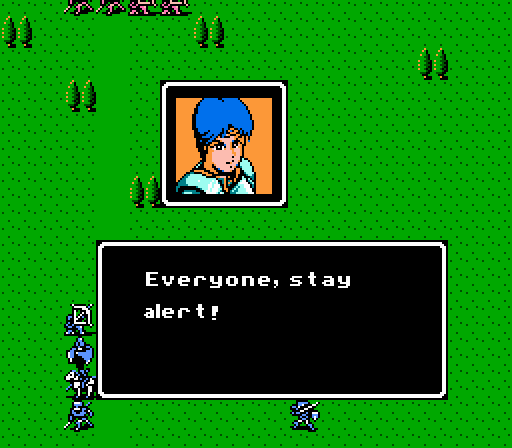 A brigade from Rigel is closing in. Fortify our defenses! Scatter our foes and pick them off one by one! A brigade from Rigel is closing in. Fortify our defenses! Scatter our foes and pick them off one by one!The most difficult battle to date comes with a pre-game speech from Alm. Now let's look at the enemies. 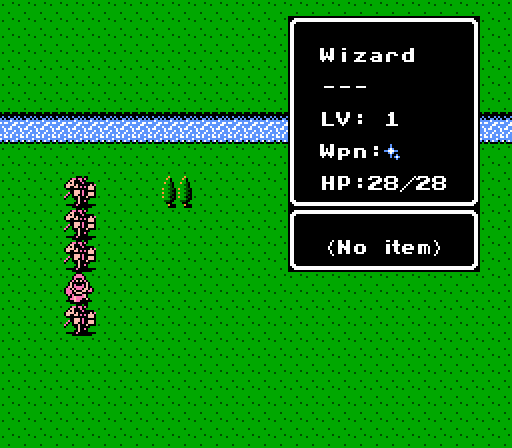 The wizard is the same that Celica fought at the end of the last chapter, with Recover and Dora. The cavaliers are all level 1 and will close towards us pretty quickly.   The center group has two knights that will be tough to kill and dish out a ton of damage to us. The four soldiers and two archers are all level 1, nothing to worry about too much.  Zack is a pretty big upgrade over the other knights (+2 Power, +2 Defense). Only our magic attackers will really have a chance against him, but fortunately he starts pretty far away and moves slowly.  The upper left corner holds a Witch, a special enemy-only magic class. She's strong and fast and all but immune to magic, plus she has another trick up her sleeve that we'll come across soon. Turn 1  We need to be aggressive here. The goal will be to try and eliminate as much of the center group as possible before the other enemies converge on us. 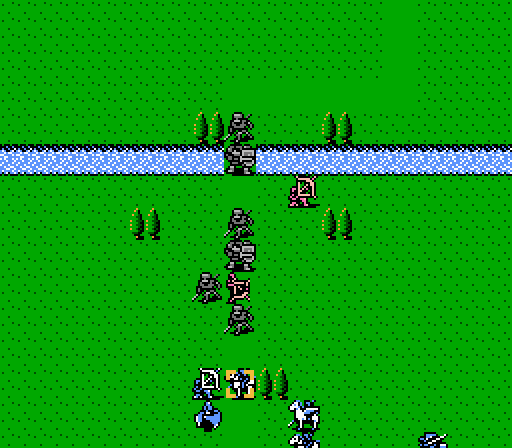 Robin dodges an arrow.  A terrifying sight in other Fire Emblem games, here Claire just shrugs off 4 damage. Turn 2  Unfortunately we can only bring about half our army to bear this turn. Cleive takes out one archer by himself, then Claire and Python team up to wipe out the lead soldier, and Robin and Gray team up to kill the other archer. 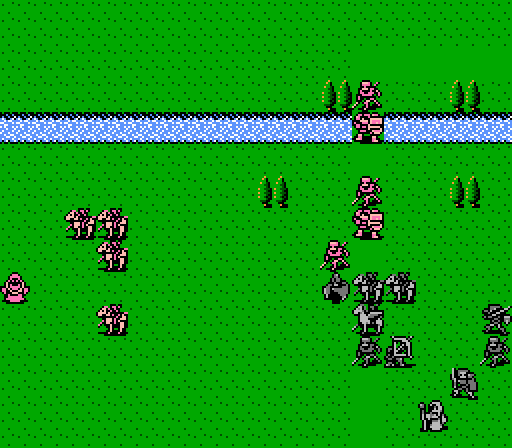 Not a bad start, but the enemy phase is going to hurt.  Python can double attack the knights for 1 damage now at least.   Robin gets impaled by one of the knights. Fortunately the other one can't reach anyone.   A soldier moves up to attack Cleive, who immediately counters for 22 damage.   Gray fights off two attacks from another soldier, but misses his counterattack.   One of the cavaliers is able to reach us, beating up on Gray some more. Gray misses again. 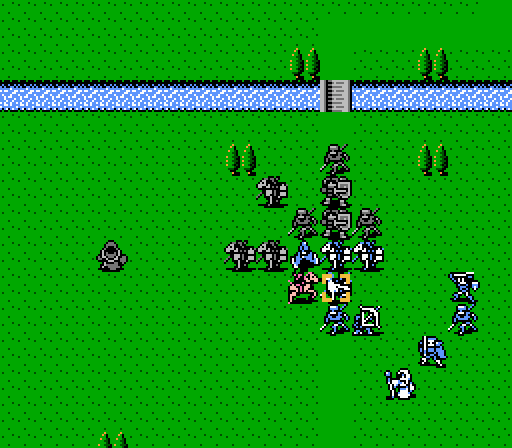 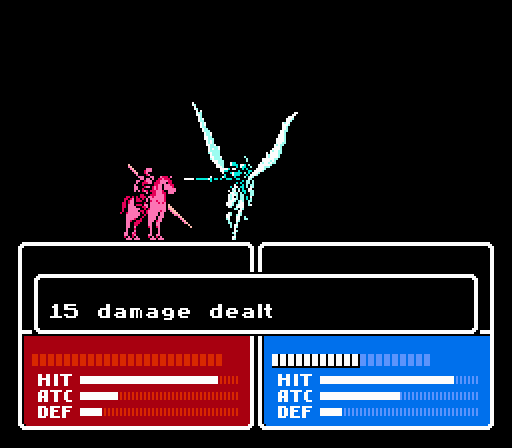 Another reaches Claire. Bad idea for him - Claire has the Knight Killer equipped, and makes short work of him. Turn 3  The battlefield is a mess now. Time to pick off some stragglers. 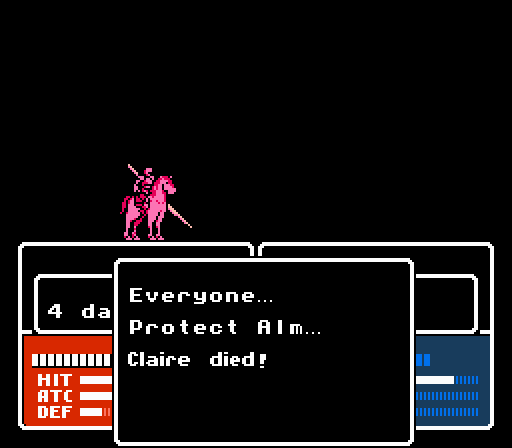 The first time through, I got a little too aggressive and Claire took one too many attacks after the enemy phase. 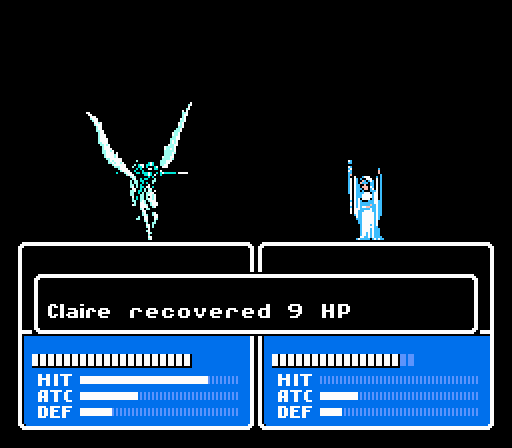 This time, I have Silk heal up Claire to start the turn. 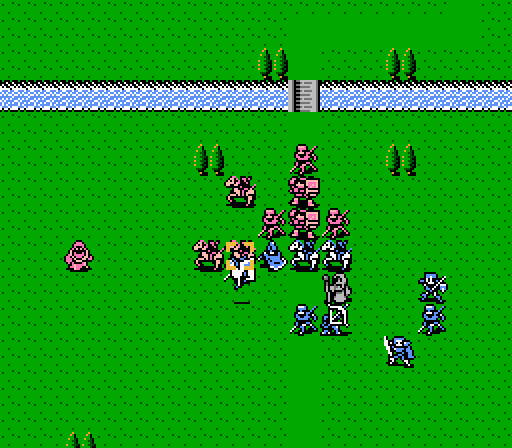 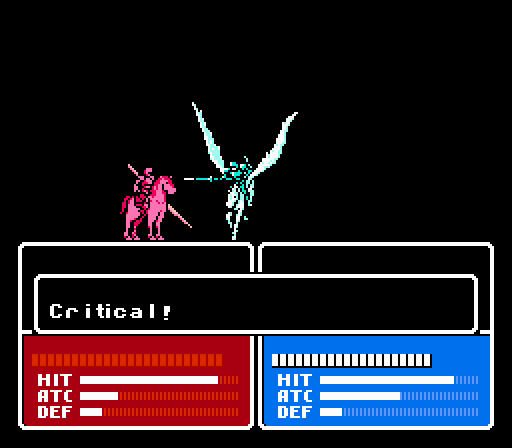 She goes on to demolish another cavalier. 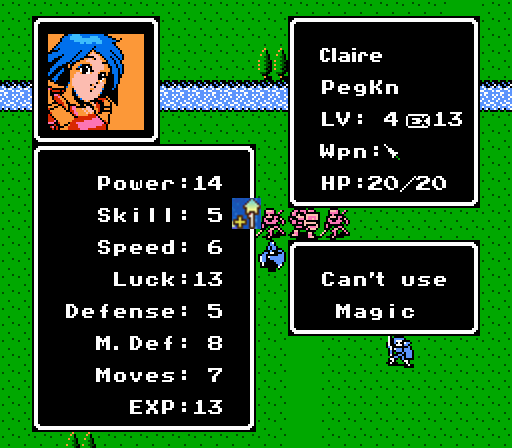 Ugh, terrible. At least when she died she got Speed and Luck first. 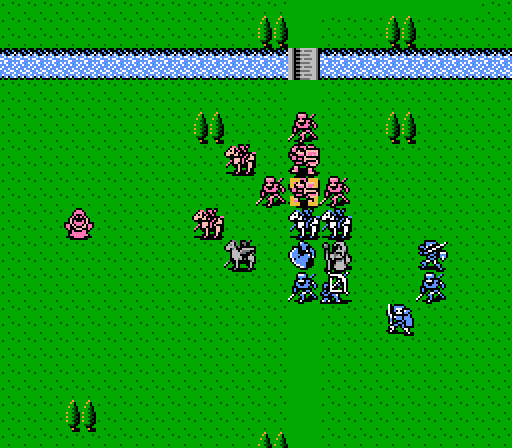  Gray is best used against these knights, since not much else we have can hurt them. 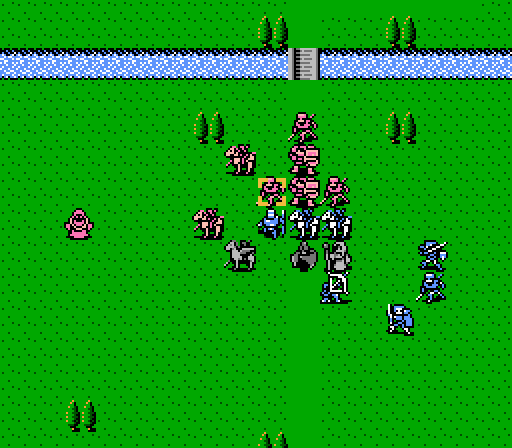 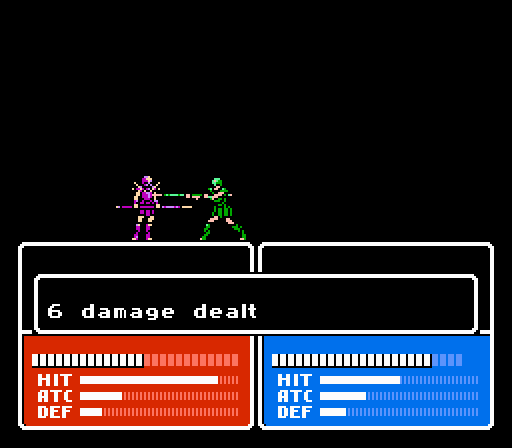 Luka finally reaches the battle, landing a couple of hits despite the low hit rate in the forest. 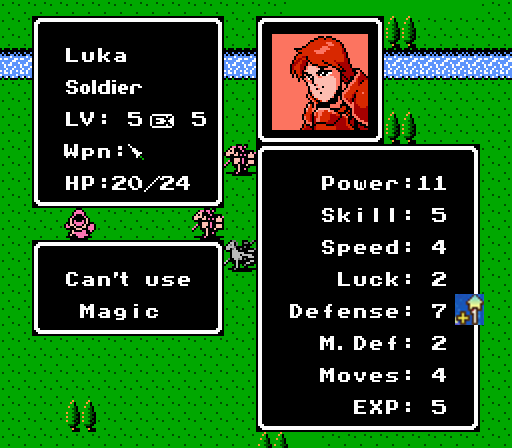 Future knight in the making here. Kind of a waste really since the knight's base Defense is 12 anyway. 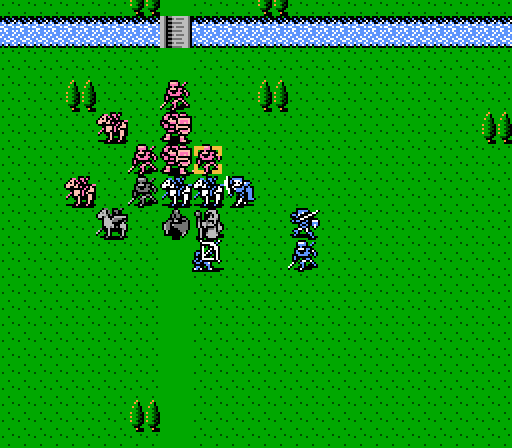 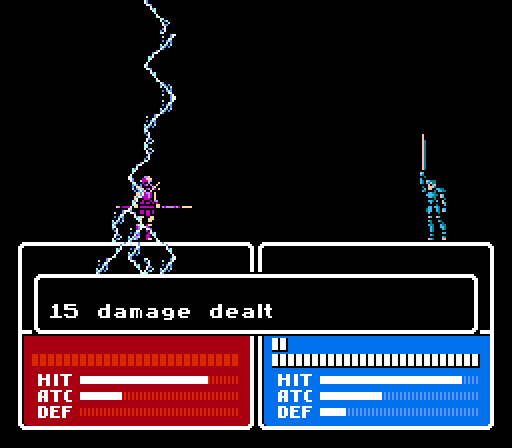 Our biggest handicap so far has been Cliff starting so far away from the battle. He finally gets in a shot here to take out another soldier. 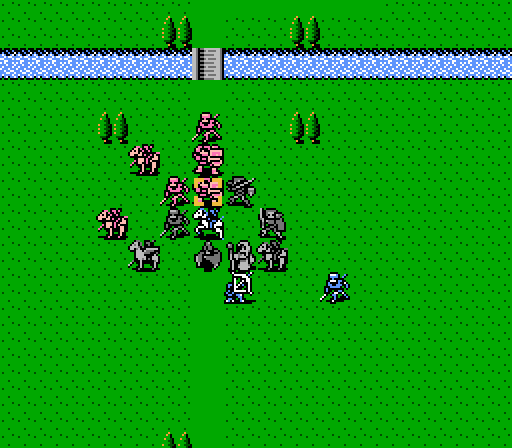 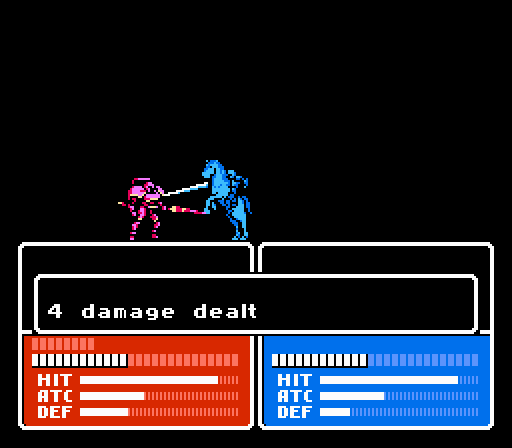 Alm moves up but doesn't attack, since he's pretty well outmatched by the knight. Robin retreats for now since he's hurting pretty bad. Cleive manages 8 damage in his two attacks, but takes 9 damage in return. 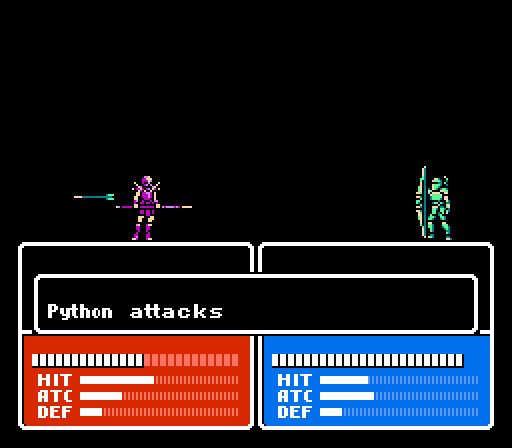 Not sure why I bothered with this. An archer trying to hit a target that's hiding in a forest is a pretty pointless task. Python did land his second hit but it was only 8 damage, not enough for the kill.  We've still got two knights, two cavaliers, and two soldiers to deal with, and the wizard is about to join in as well.  - Chapter 3 Part 1 Battle 1.gif) The witch throws a curveball, teleporting behind our lines, then moving in and attacking Force in the same turn.  - Chapter 3 Part 1 Battle 2.gif) She looks like May's pink sister. Unfortunately May never learns the teleporting trick.   One of the knights targets Alm, but he has enough HP to weather it for now.   The other knight also connects with Alm. He's still got 10 HP left though so he should make it through the turn. 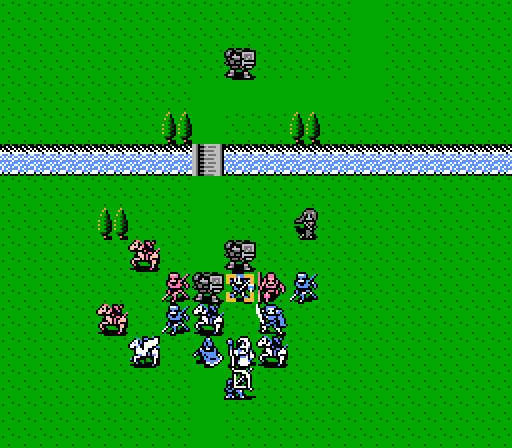 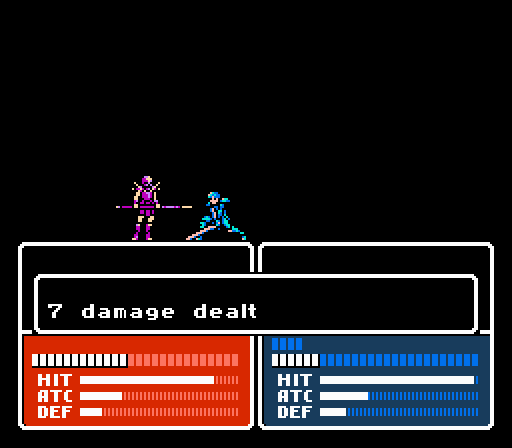 Alm gets targeted by a soldier as well, but it only manages 4 damage. Alm does 14 damage this time after only being able to scratch the knights. Good thing we got rid of the archers - no one else can get to Alm this turn, now. 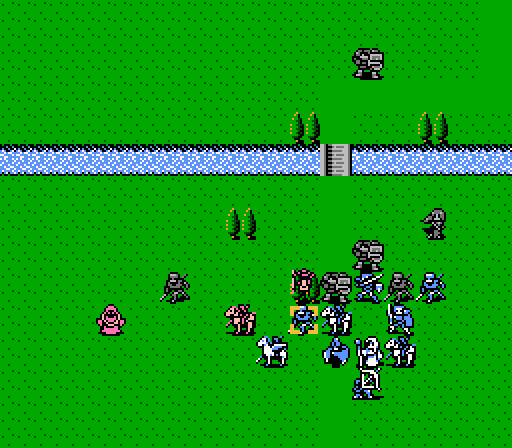 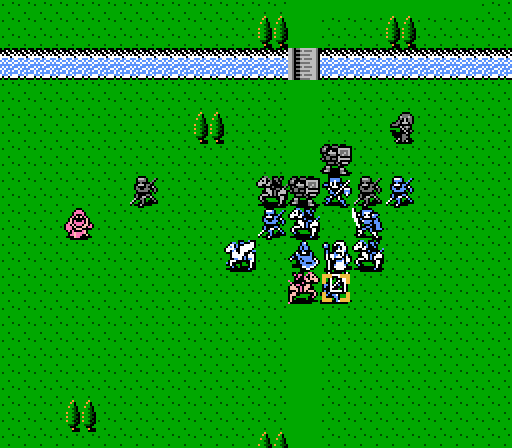 One cavalier goes after Luka for just 4 damage, while the other gets all the way down to Python for 8 damage. 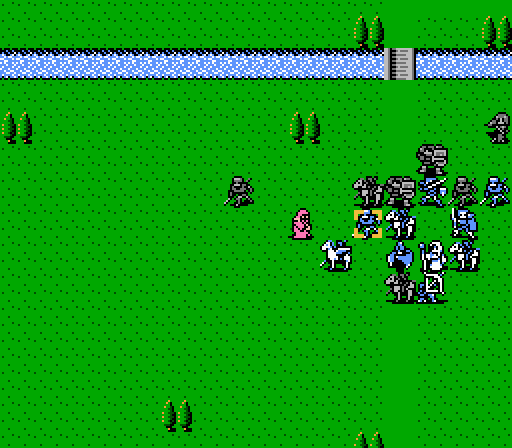 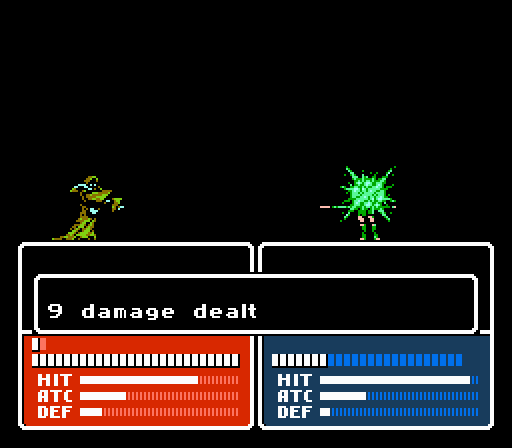 The wizard reaches the battle at the end of the turn, landing a shot of Dora on Luka. All in all, we weathered the assault pretty well. Turn 4 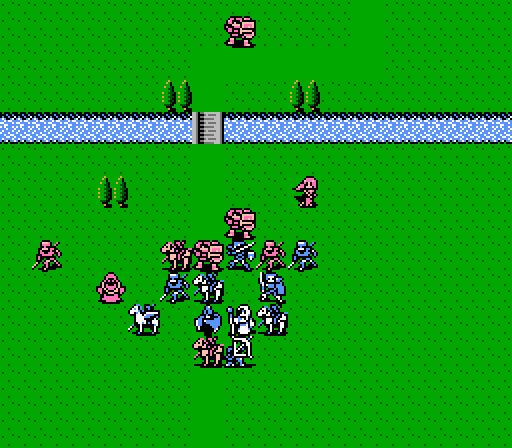 The witch and wizard have joined the battle, but we still have a couple turns before Zack gets here. Let's make the most of it. 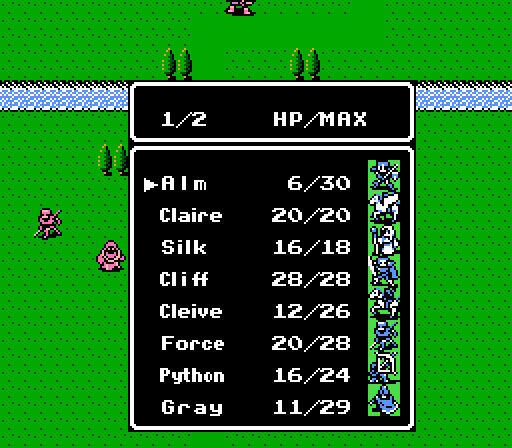 Silk is our only source of healing, and she can only manage 9 HP each turn. Going to have to carefully manage the group's HP totals, here. 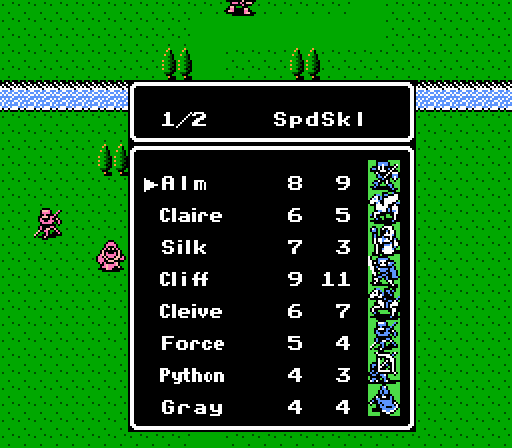 I was trying to figure out who had enough Speed to double-attack the witch, who has an Attack Speed of 5. Alm and Cliff are the only ones, given that Claire and Cleive each have equipped weapons slowing them down. And Cliff won't do any damage with his Bolt Sword against the witch's insane Magic Defense. But Alm is really low on HP.... 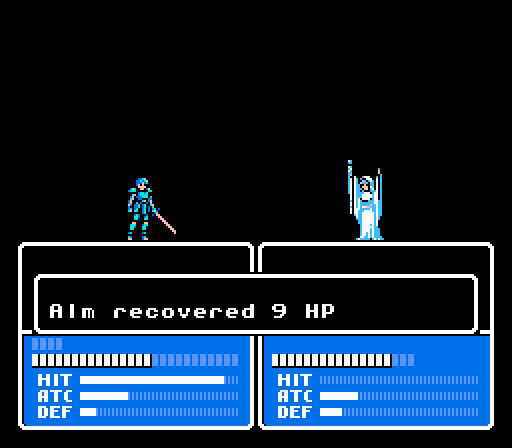 Ok, so first Silk spends her healing on Alm this turn. He was in the most dire need of it, anyway.... 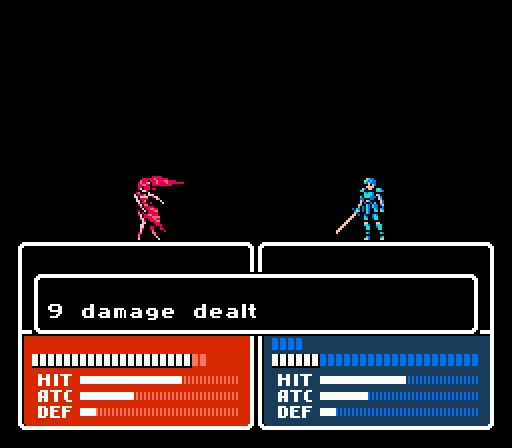 Alm then goes after the witch, misses both of his attacks, and then eats a fireball to undo all of the healing.  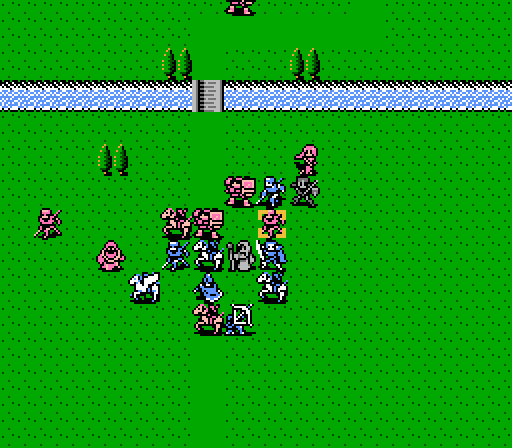 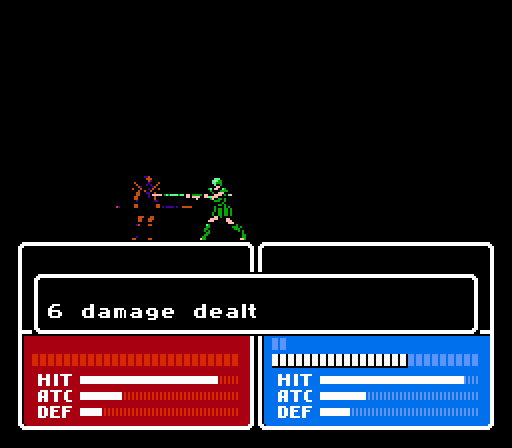 In the meantime, Force comes through and takes out another soldier. 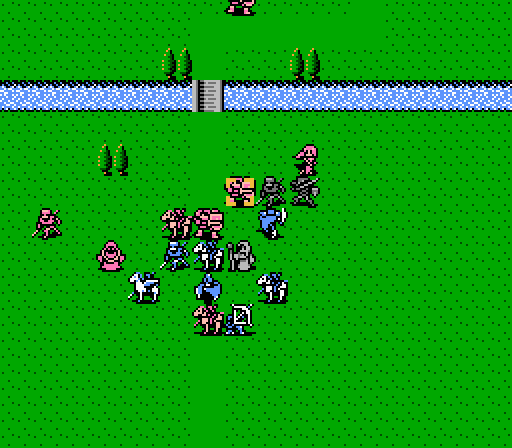  The knight has enough HP to survive two lightning bolts from Cliff. 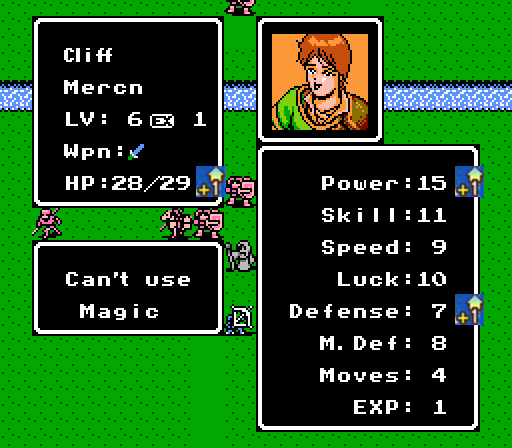 Cliff is still amazing. Without the Bolt Sword, his Power is up to 10 now. 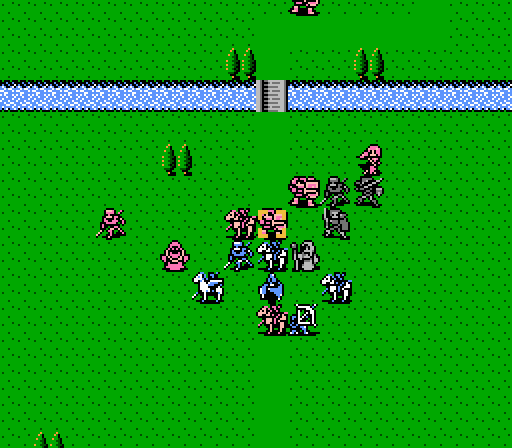  Gray comes through with another critical kill, finishing off one of the knights. 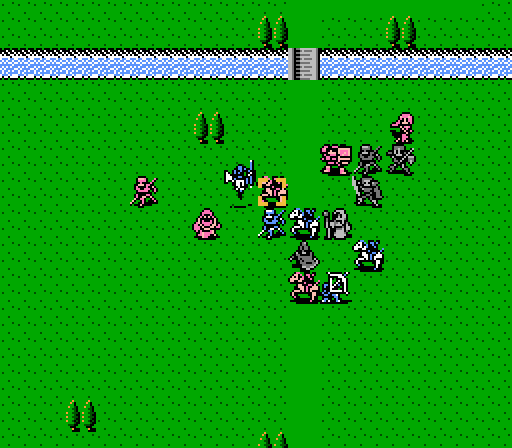 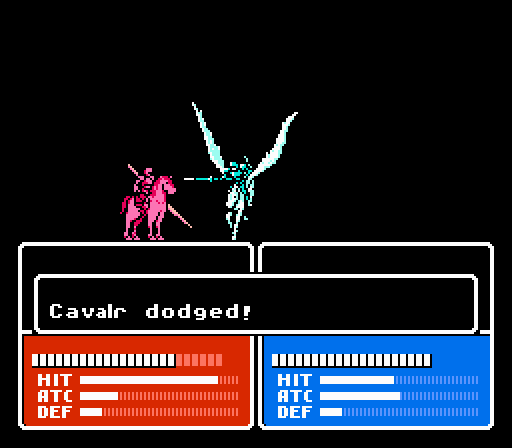 Hitting people in trees is hard. She does land her second attack at least, but it's not enough for the kill. 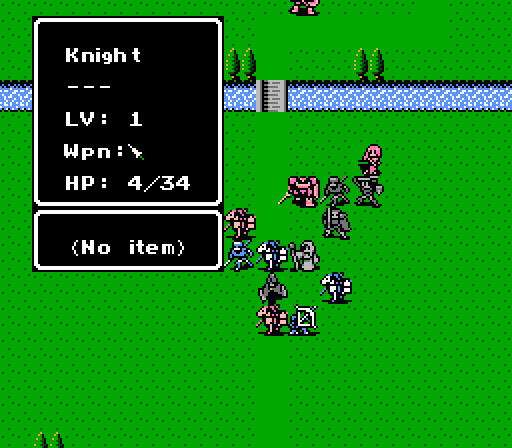 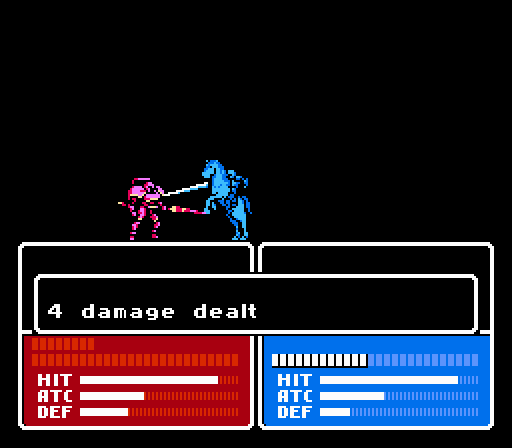 The second knight has just 4 HP left, and Cleive has enough Power with the Steel Sword to take away the rest. 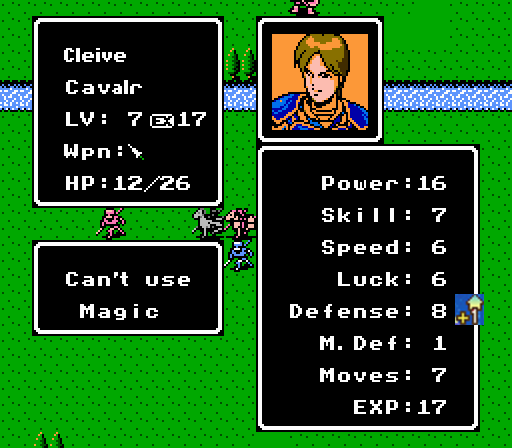 Eh, could've been worse. 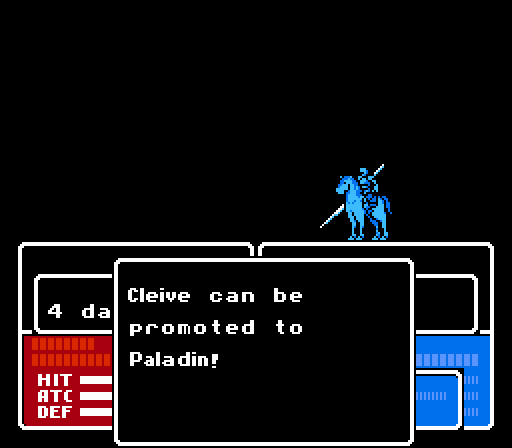 Now this is more interesting. At his current stats, if he promoted immediately, he'd gain 2 HP, 2 Speed and 1 Magic Defense. Might be worth it - Speed is his weak point right now. I'll give it until the next shrine. 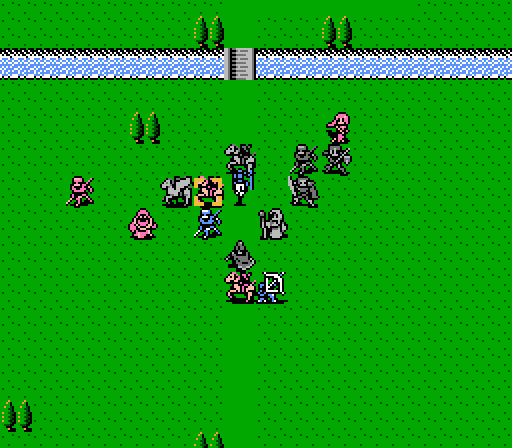 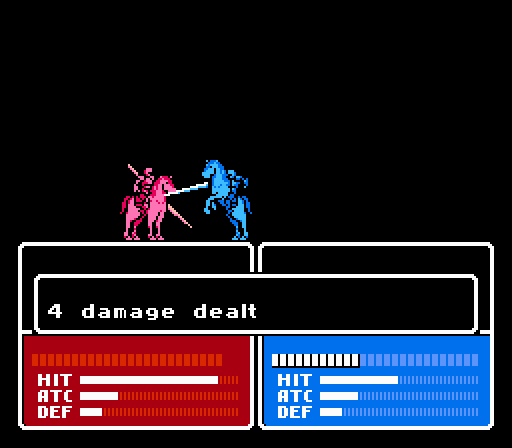 Robin's able to finish off one of the cavaliers. 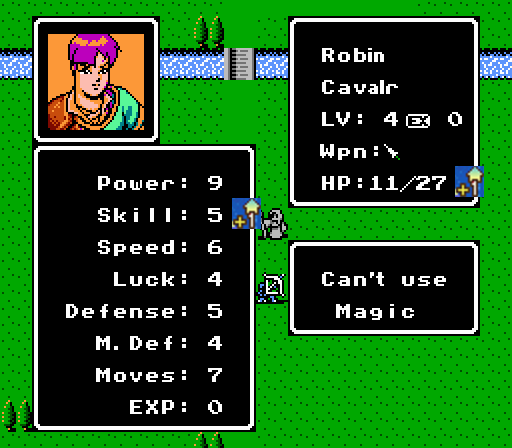 Well that was pretty useless. 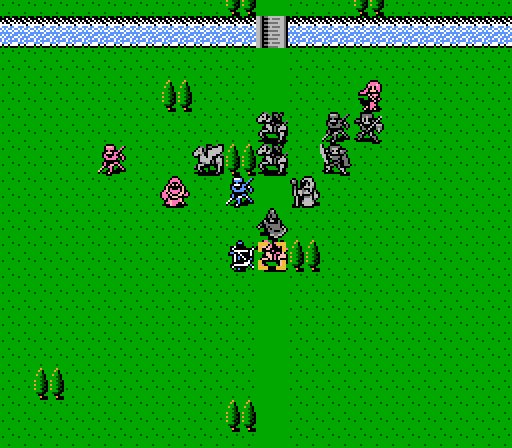 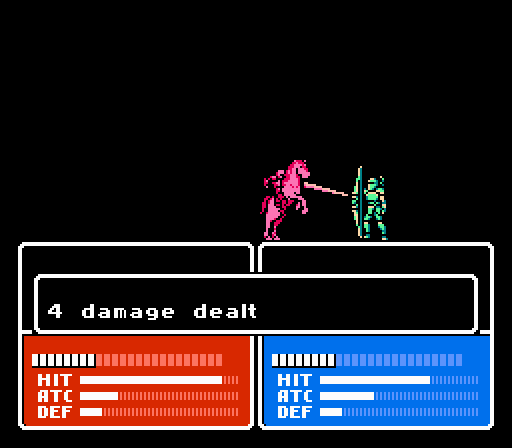 The turn was going pretty well, so I decided to screw it up by moving Python out of the forest to attack the cavalier from melee range and get double-counterattacked.  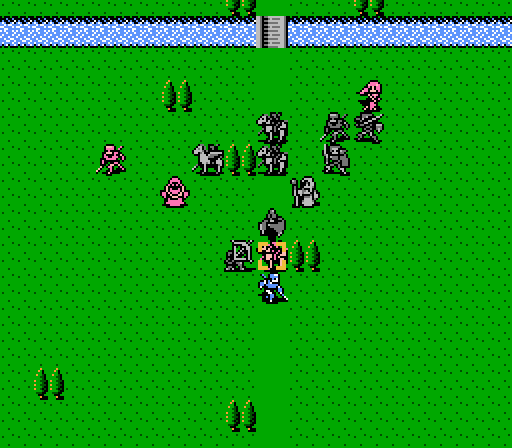  I think I was trying to protect Luka from the wizard. Except the wizard can still reach him. And Luka couldn't finish off the cavalier anyway. Whatever.  One soldier and one cavalier are still alive, but severely wounded. The wizard and witch are both unscathed and ready to cause a world of hurt on the enemy phase.   Lucky - the witch decides to stay in the forest and target Force instead of Alm, and then misses entirely. 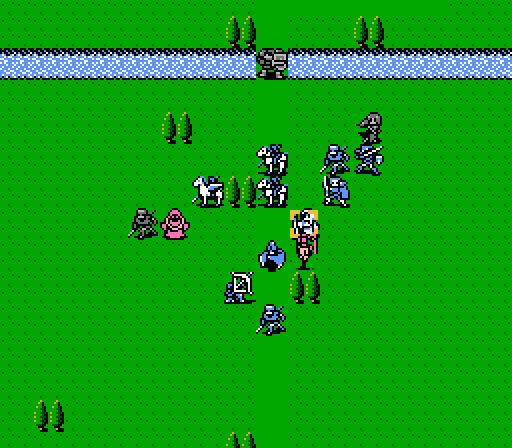 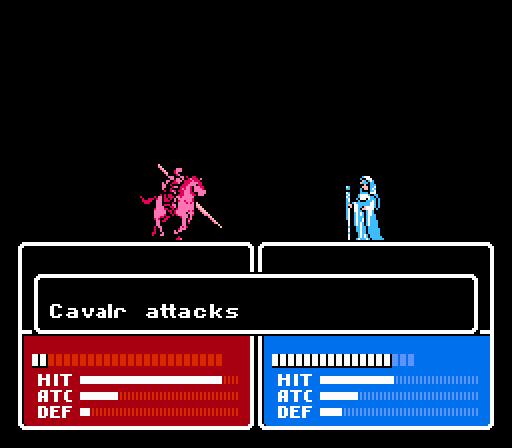 This attack is actually a bit of luck as well - Silk is still near full health, and with the Leather Shield weathers the attack pretty well. She misses her shot of Nosferatu, though. 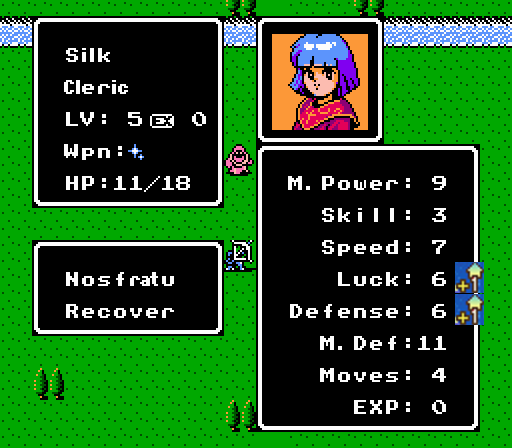 Some more survivability for the healer. 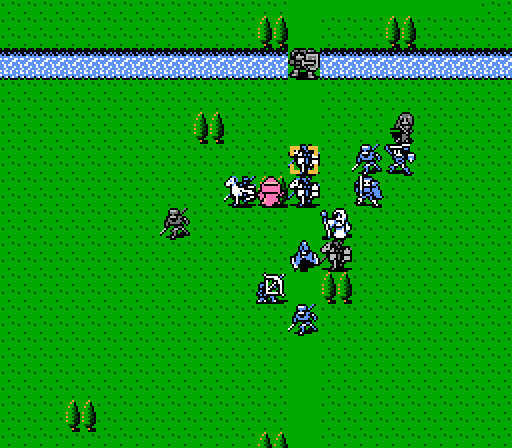  The wizard also prioritizes hiding in the forest rather than getting a sure kill on Luka. Cleive has just enough HP to survive. Turn 5  Five enemies remain. Two near death nobodies, two tough magic-users hiding in forests, and a souped-up tank.   Cliff is the best counter to Zack - two shots with the Bolt Sword takes off 28 of his 40 HP. That's just enough for Gray to pick up another important kill. 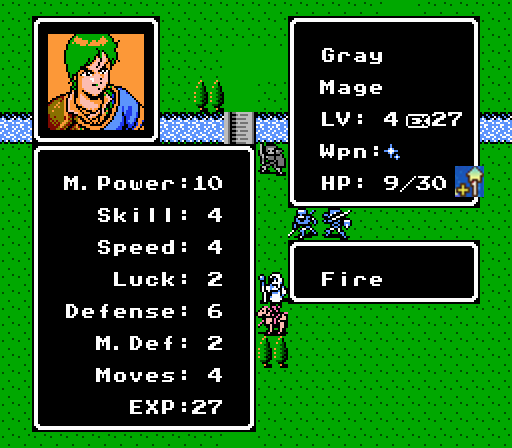  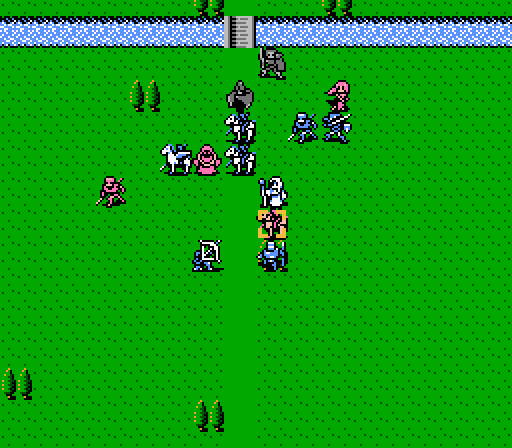 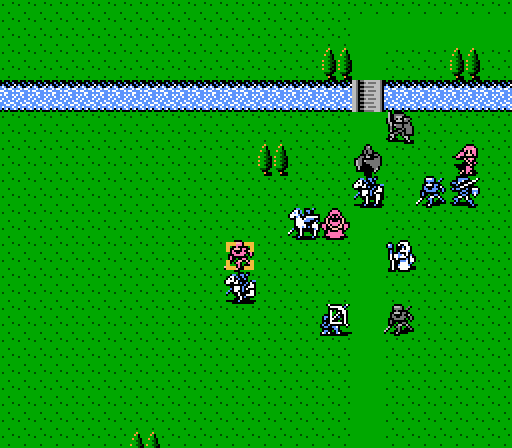 Well, the boss is toast. We've got 8 units left to try and take care of the rest. Luka and Robin are low on HP, so they safely finish off the likewise wounded enemies. Unfortunately we can't heal them both so we need to finish the battle this turn to make sure we don't lose one of them on the enemy phase.  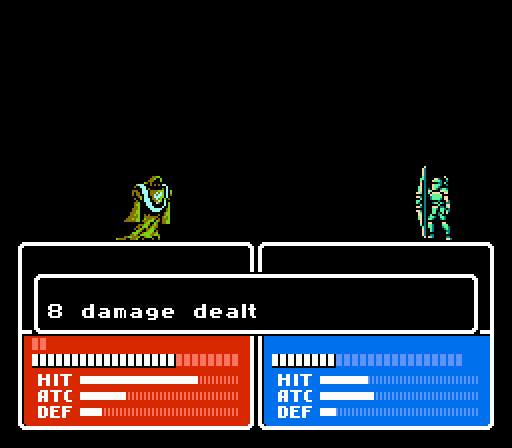 This attack is safe enough for Python. Just glad he landed even one attack with that terrible hit rate.  Alm's still the only one that can double-attack the witch and actually do damage, so easy choice here, too.  - Chapter 3 Part 1 Battle 3.gif) He gets in one hit, and as a bonus even dodges the fireball. Notice how on the second attack Alm actually triggered a crit (the flourish with the sword and leaping attack are clear indicators) but still misses the attack.   Hey, at least he got a good level out of it.   Anyway, the witch is now weak enough that Cleive only needs to hit once to get the kill, and he does so on his first try. 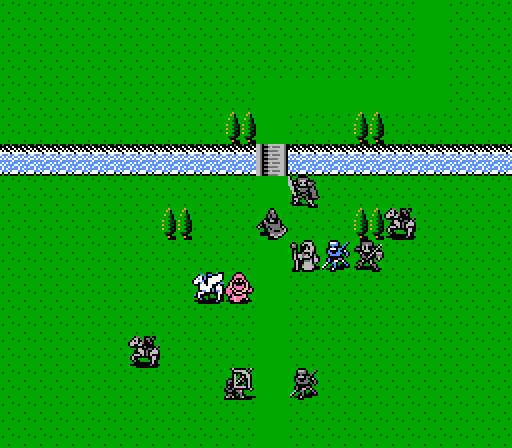 Silk healed up Force. It's down to Claire and Force to finish off the wizard. I just need to have each one land just one of their two attacks.... 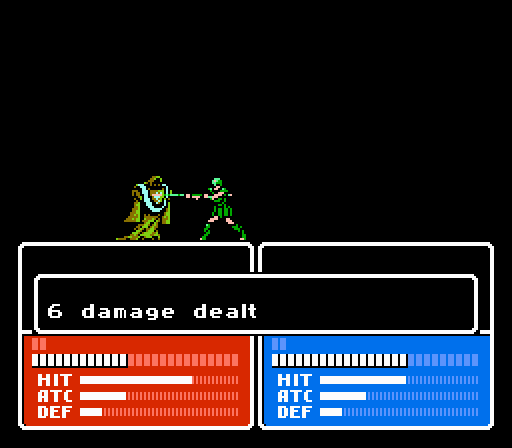 There's one.... 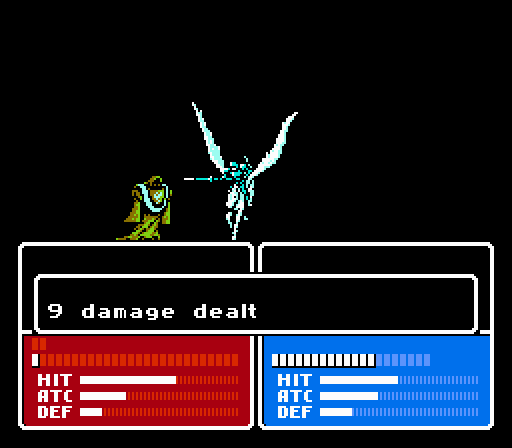 And there's two. Except I miscalculated and the wizard actually still has 1 HP left. Fortunately he can't actually cast any spells in that condition, so he just makes a futile attempt to run away on the enemy phase. Turn 6 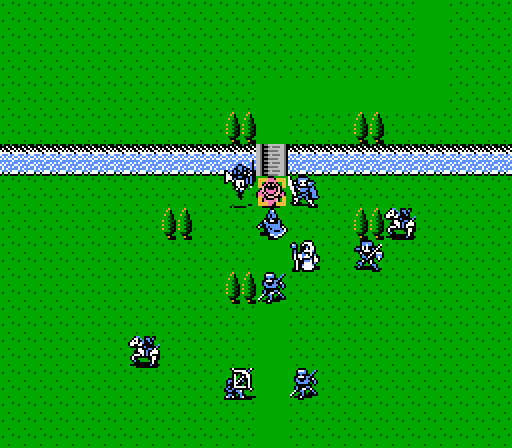 Claire's been a trooper this battle so I give her the final kill. 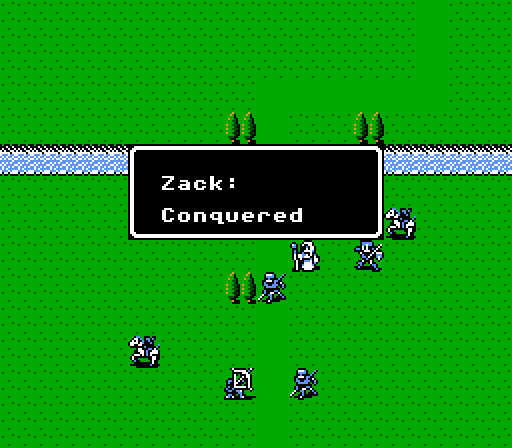 That battle was actually legitimately difficult (at least in terms of keeping everyone alive) since I haven't been doing any extra fighting. 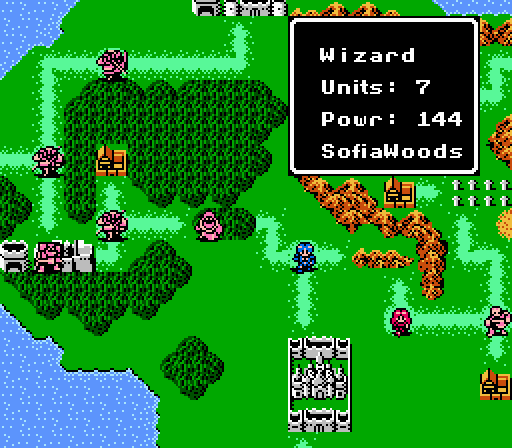 Up next for Alm is a group of wizards in the woods. 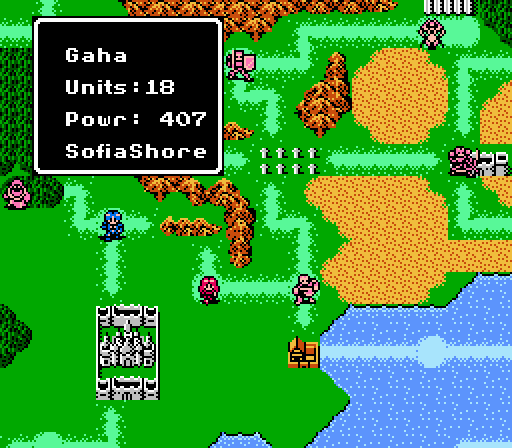 Or we could go take Celica's group to clear out some thieves from the beach. Your choice! Pick the next update here: VOTE Both groups' rosters are now in the second post of the thread, here, for reference.
|
|
#
?
Aug 15, 2013 07:15
|
|
|
Aside from the sea maps, is bottleneck-style terrain ever really a factor in this game? It looks like you couldn't have set up any kind of barricade at those bridges.
|
|
#
?
Aug 17, 2013 18:49
|
|
|
Glazius posted:Aside from the sea maps, is bottleneck-style terrain ever really a factor in this game? It looks like you couldn't have set up any kind of barricade at those bridges. Celica's next map will have some more. Alm's Chapter 1 finale also had narrow pathways to some extent. It's the wide-open outdoors stuff that you won't usually see it, due to the maps trying to be 'realistic' representations of the battle site. Anyway, looks like we'll be switching back to Celica for the next update.
|
|
#
?
Aug 17, 2013 21:11
|
|
|
Chapter 3, Part 2: Sofia Shore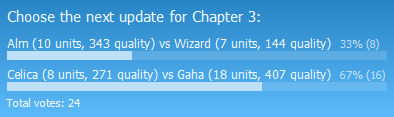 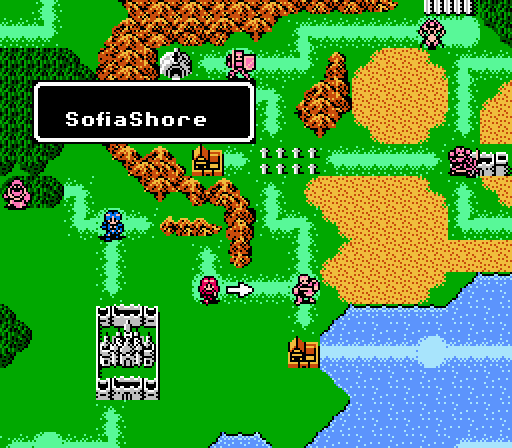 It's Celica's turn today. A horde of thieves led by Gaha await. 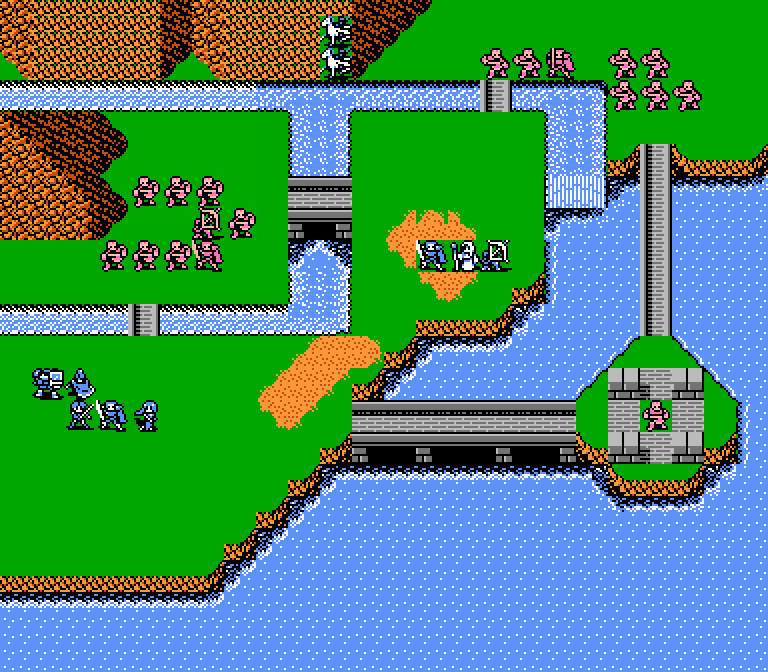 Well, this map is kind of a mess. 15 thieves, a couple mercs, and an archer. Plus we have Kamui, Leo, and Jenny isolated on the center island and stuck in a patch of 'desert' (beach) which severely hampers movement. But, we also have some help: 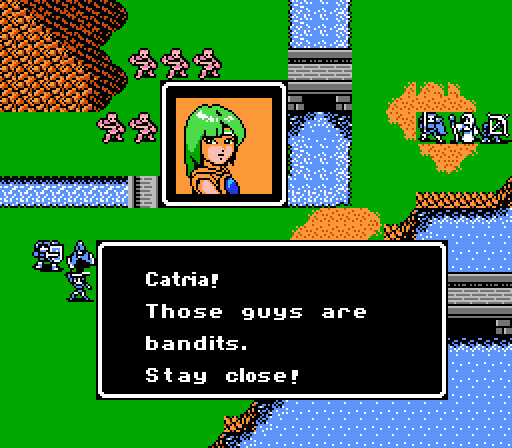 Palla and Catria are here to help us out. They're allied units so we can't control them directly, however. 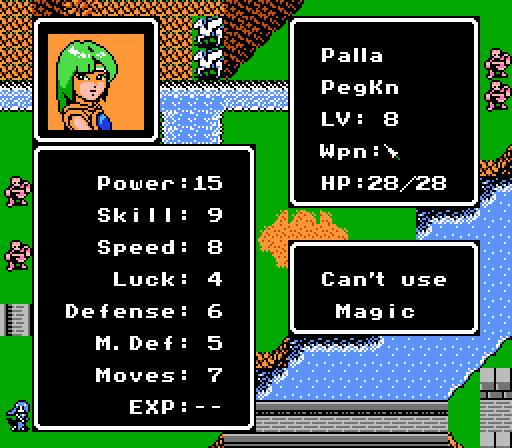 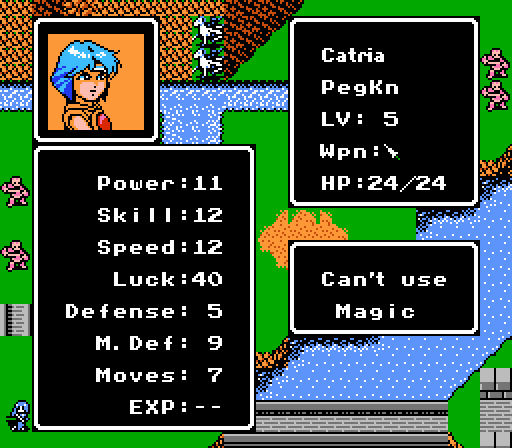 They both come in pretty strong. Catria has an Angel Ring, which in addition to healing 5 HP per turn sets the wearer's luck to 40 and doubles stat gains from levels. So, it's awesome, but pretty much wasted on an ally unit that doesn't gain experience. Palla has a Hand Lance (Javelin), which gives an extra 3 Might for 70 Accuracy and 2 Weight, but comes with a range of 1-2 tiles. 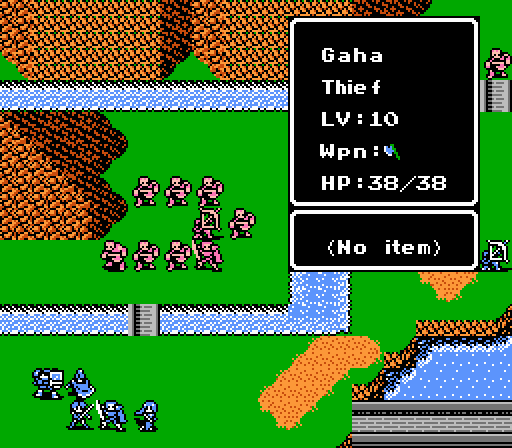 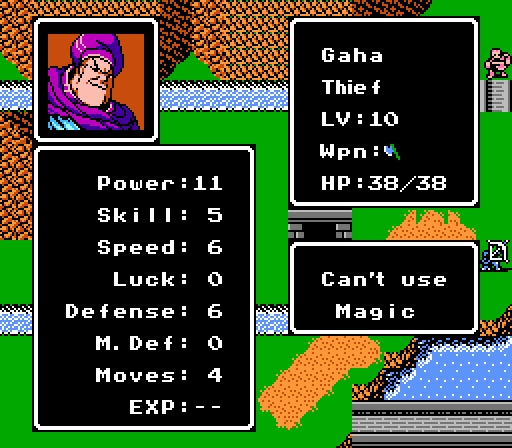 The boss for this map is Gaha, and rather than sit by himself in the mini-fort like you might expect he's out leading the charge himself. He's still just a level 10 thief, though, so nothing we can't handle. 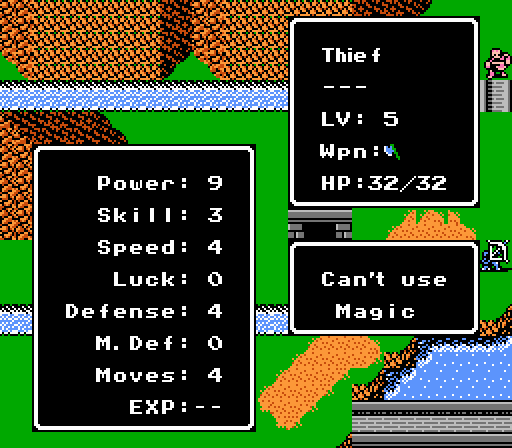 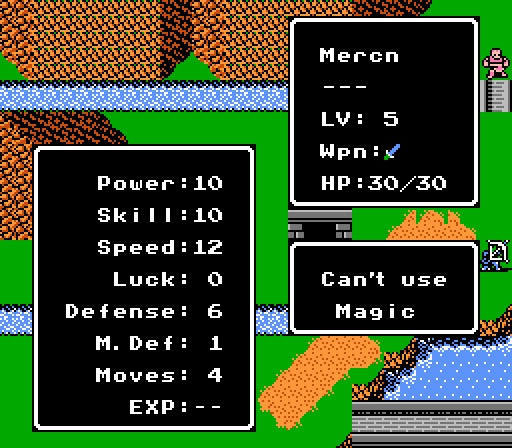 Everyone else is level 5, which is a step up from what Celica's group has been used to facing. Individually each unit won't be much trouble but the center group is in danger of being swarmed. Turn 1 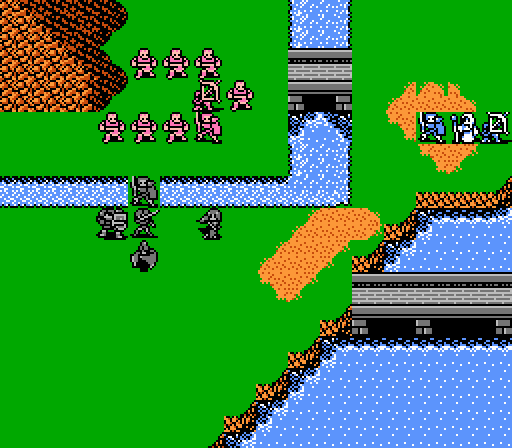 Saber holds the western bridge, while May zaps the enemy merc with lightning. 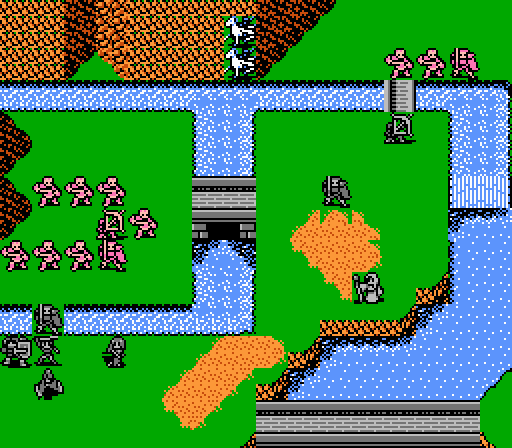 On the center island, Leo is able to hold the bridge while taking a shot at the lead thief. Kamui moves up slowly through the sand, while Jenny retreats to the far corner. 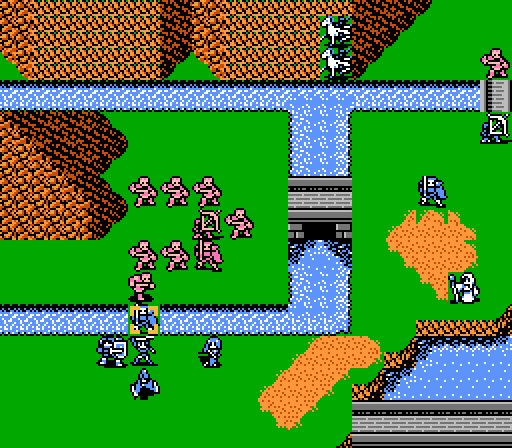 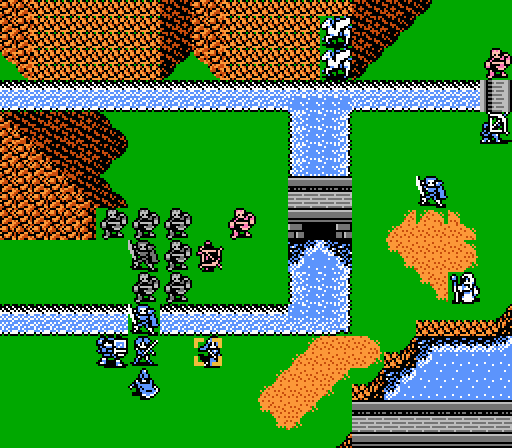 Gaha takes the lead for the enemy force, but misses Saber. May takes 7 damage from the archer. 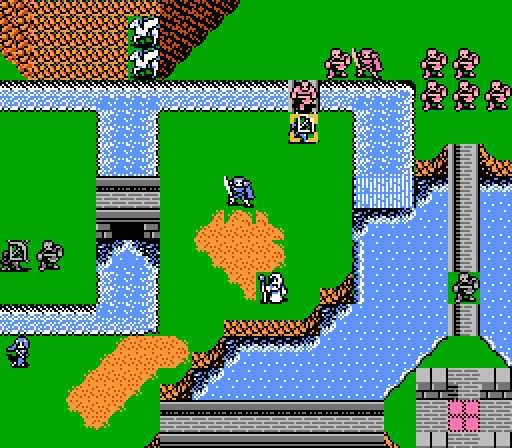 Leo fights off the thief and the rest of the enemies back up behind it.  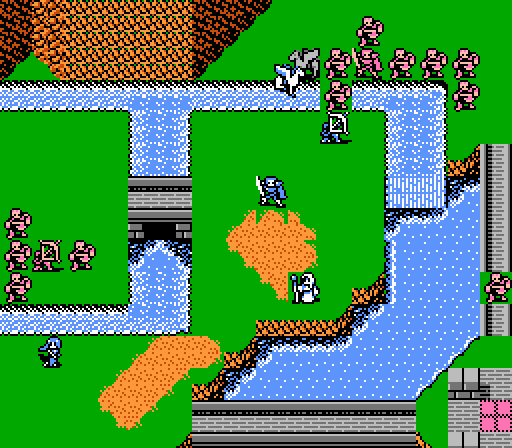 On the ally phase, Palla and Catria swoop in to finish off the lead thief. Turn 2 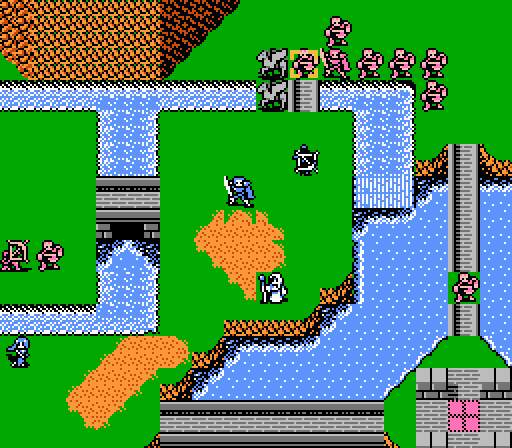 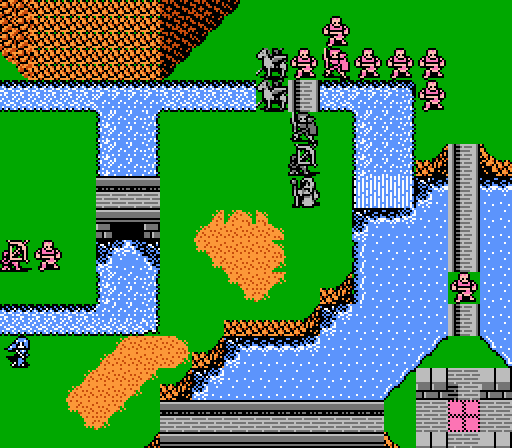 Leo backs up a space to chip at another thief and let Kamui in to take up tanking duties. 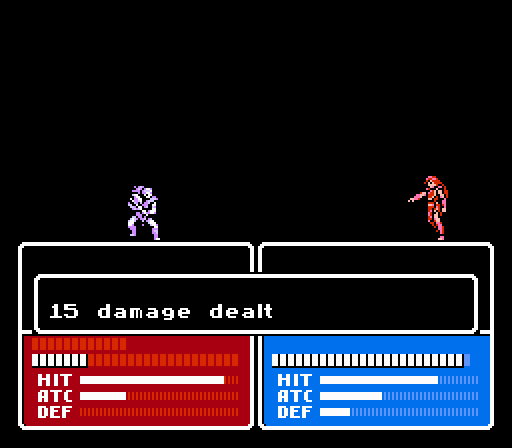 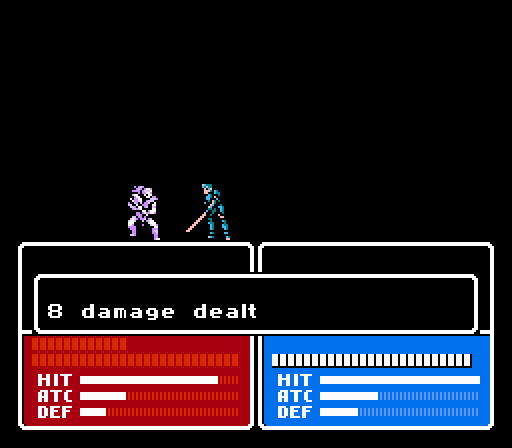 Celica and Saber take out Gaha. Enemy boss dead, just like that. 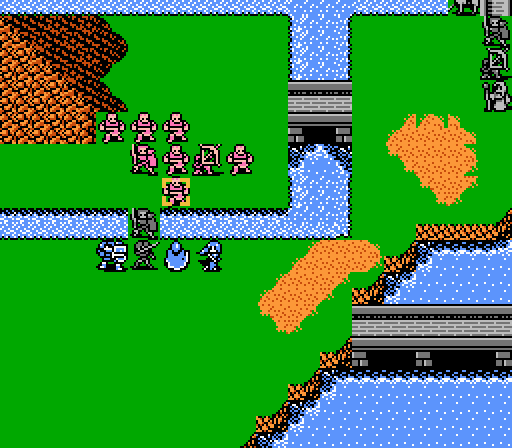  Boey softens up another thief, but May misses with her lightning bolt.   Second turn, same as the first. A thief attacks Saber, the archer attacks May.   The northeast enemies gang up on the pegasus knights, but they can handle themselves. 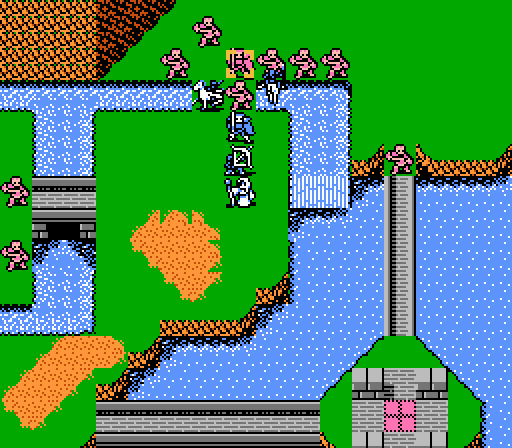 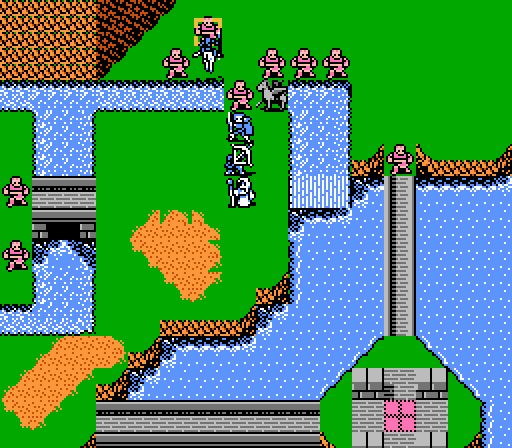 Then on the ally phase Palla finishes off the northeast merc and another thief falls to Catria. Turn 3 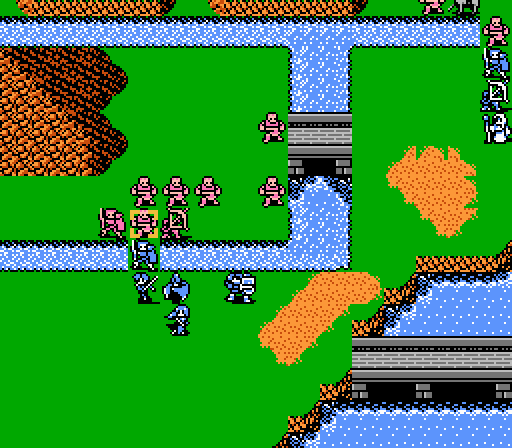 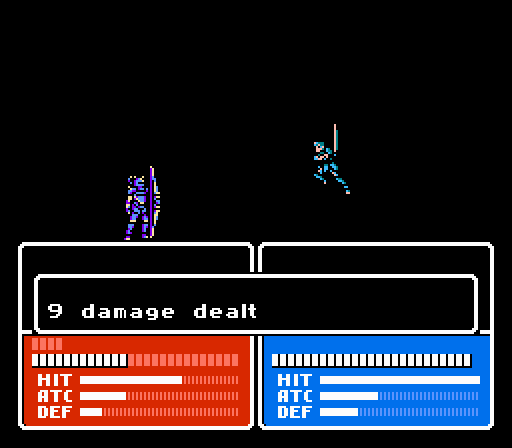 Celica starts off the turn by incinerating another thief, which opens up the space for Saber to start on the archer.  Then Boey actually comes through with another kill. 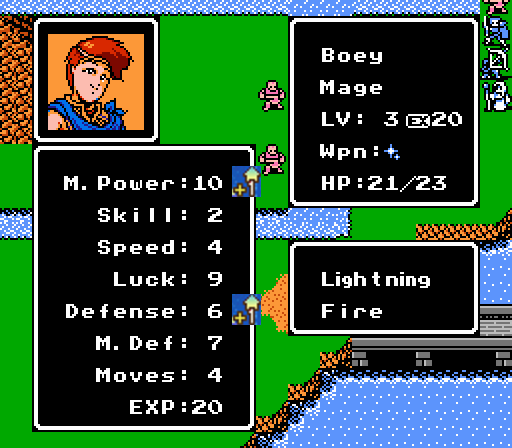 Hey, another good level for him, too.  May follows up by bringing the merc down to critical condition. 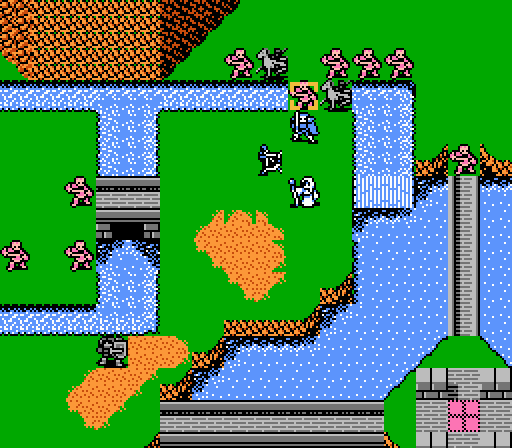  Leo softens up the thief enough for Jenny to go in and take the kill. 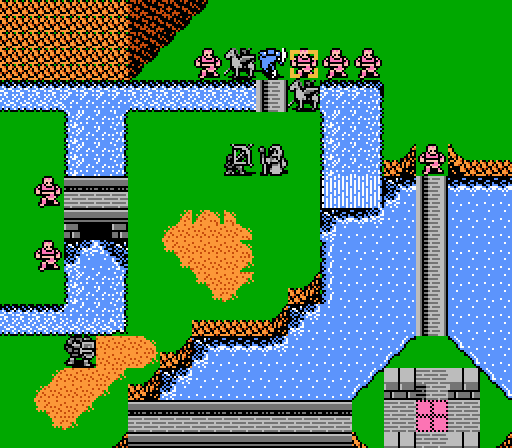 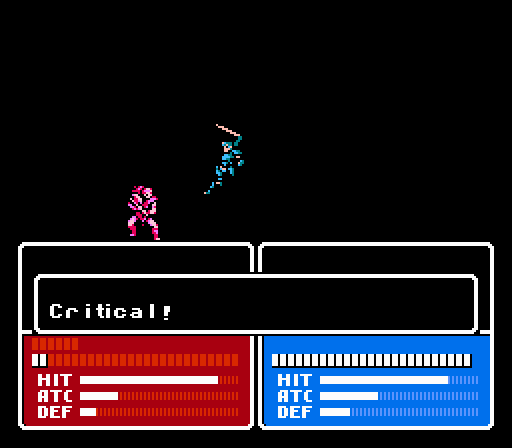 Kamui then advances and uses a nicely-timed critical to kill off yet another thief.   Saber counter-kills three more thieves with more crits.  Unfortunately he used up all his luck on his crit rate.  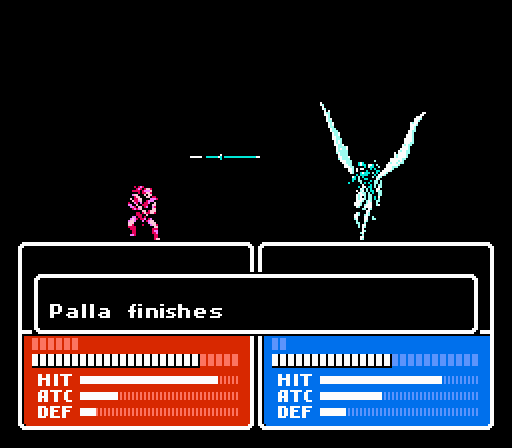 The remaining northeast thieves go after the girls on the flying horses again.  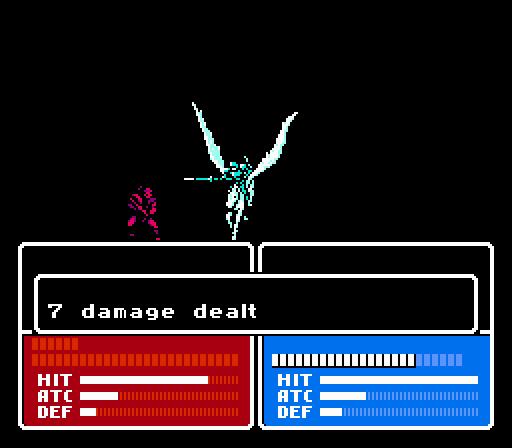 And they again take their revenge and steal our experience. Turn 4  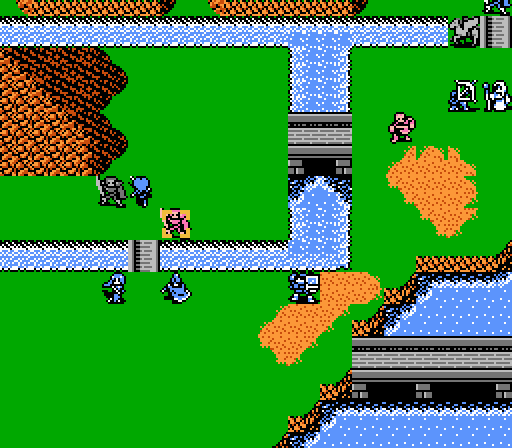 Just some mop-up left. Saber gets yet another critical to finish off the thief, while Celica turns the merc to ash. 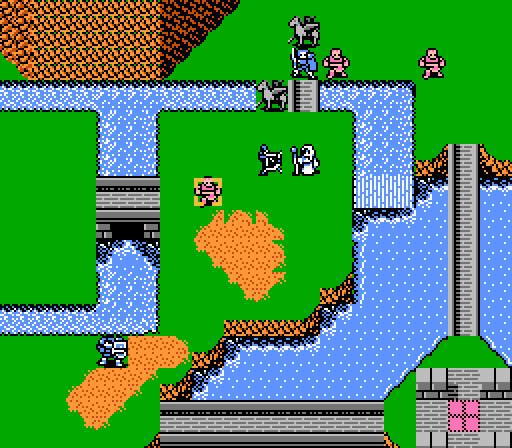 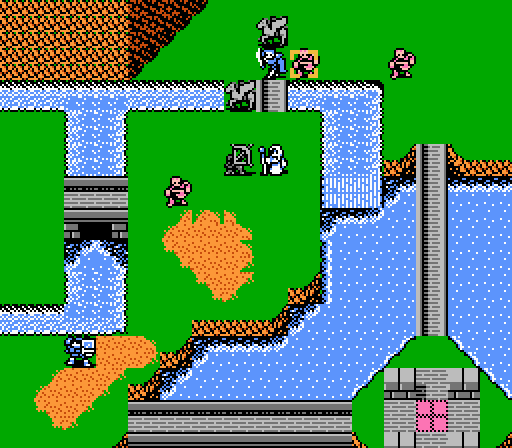 One of the western thieves ended up wandering away so Leo heads it off. Kamui continues working on his targets but isn't nearly as crit-happy as Saber. 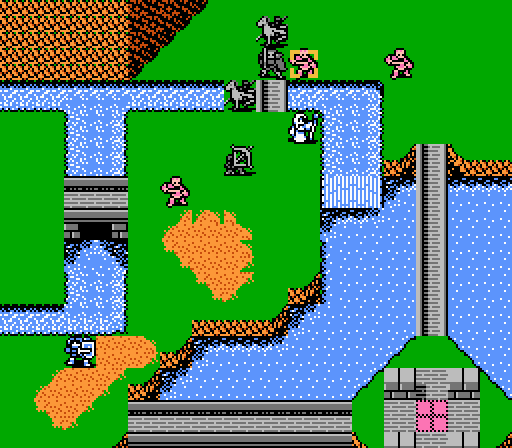 Jenny misses a shot of Nosferatu but is mostly just trying to stay out of the way here. 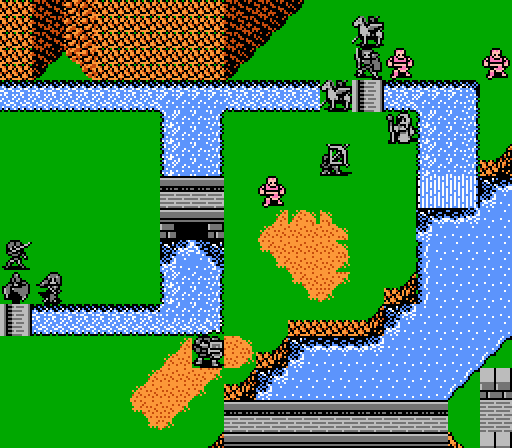 Just a few thieves left now. Also I'm not sure what I was doing with Valbo but he's never gonna make it through the sand there. 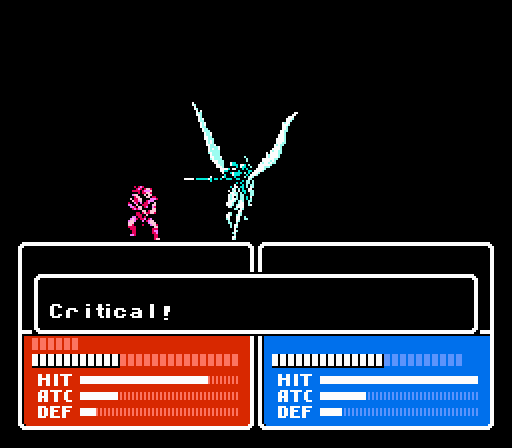 Now Catria getting crits isn't really surprising with that fixed 40 Luck. 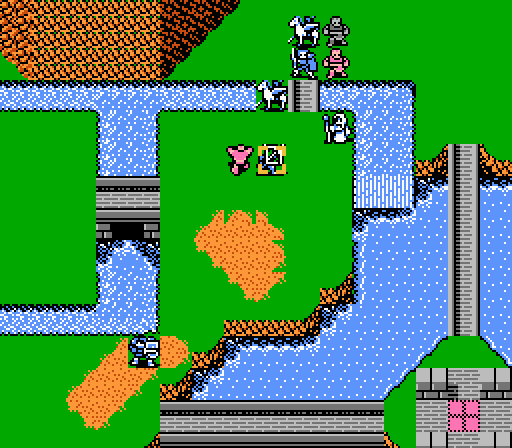 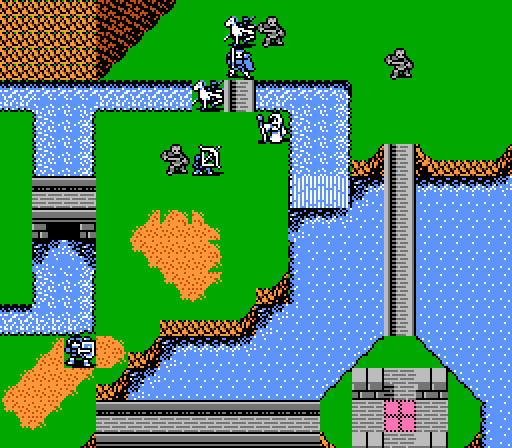 The second thief takes a shot at Leo, while the other one futily tries to run away. 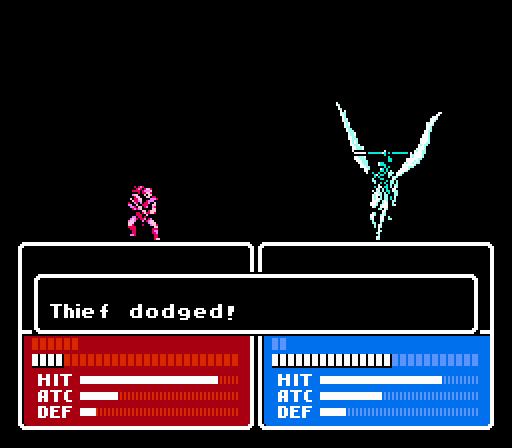 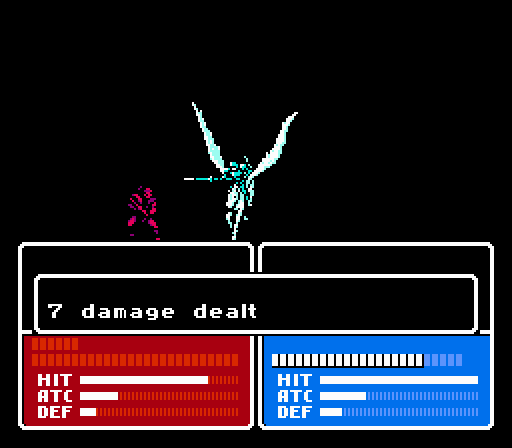 Palla finally misses but Catria cleans it up. Turn 5 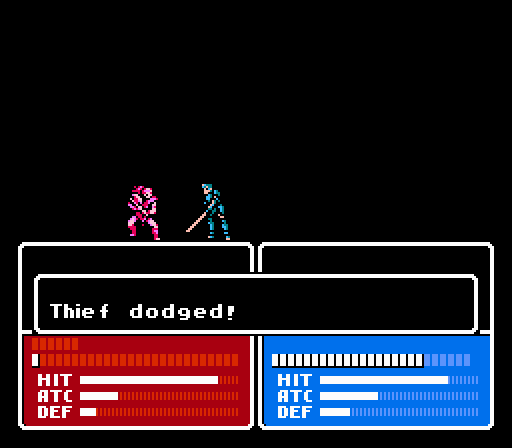 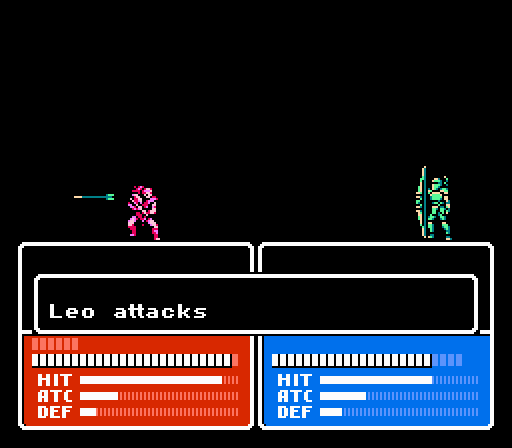 Kamui misses out on finishing off the runaway, and Leo whiffs as well. 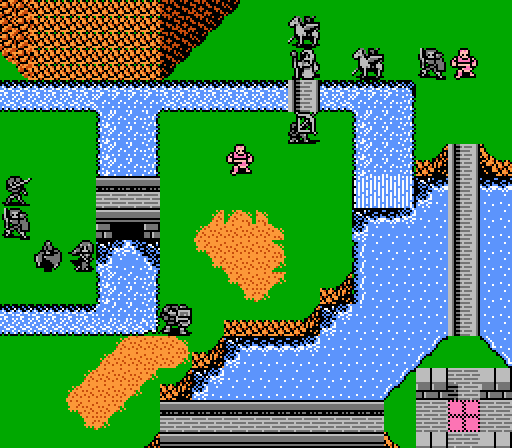 Anyway not much going on this turn, our bit hitters aren't in range of the stragglers. 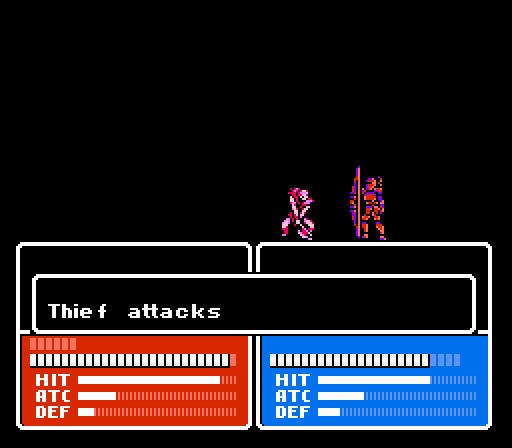 Leo shrugs off another hit on the enemy phase, no big deal. The other thief is still trying to run away.   Palla nabs the fleeing thief, and Catria weakens the last enemy for us. Turn 6   Leo and Jenny are the only ones in range, but they manage to come through and finish the battle.  Pretty good level for her, too. But where did our allies run off to?  Let's check out the port again. 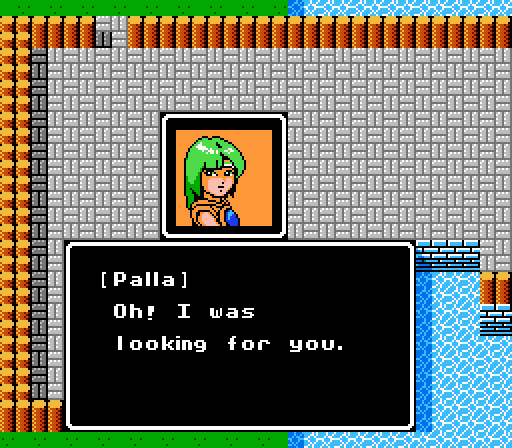  Our sister, Est, is still missing, and I was thinking.... Your journey will be tough, like ours. May we travel together? We can help each other out. Our sister, Est, is still missing, and I was thinking.... Your journey will be tough, like ours. May we travel together? We can help each other out.Hell yes we can.  This is a secret, but if the three of us surround a foe, there's a really cool move we can use. This is a secret, but if the three of us surround a foe, there's a really cool move we can use.Three guesses as to what that is. Also, the Angel Ring is ours! 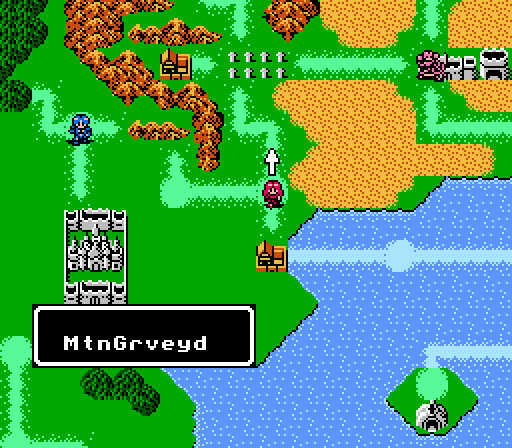 Where to next? Off to the wizardly woods with Alm, or continue with Celica into the Mountain Graveyard? Vote here: VOTE Up-to-date rosters in the second post. New Characters: Catria joins at around the same level as the rest of Celica's army, with great base stats and good enough growths. Her Defense might handicap her later on, making her a good candidate for Shields.pre:Stat Base L5 Growth HP 24 30 Power 11 30 Skill 12 30 Speed 12 40 Luck 12 20 Defense 5 20 M. Def 9 0 Moves 7 0 Quality 52 140 Palla comes in at a higher level than Catria with stats that aren't really any better and growths that are mostly worse. She'll end up with better Power and Defense, though, and her base Speed is high enough to keep her relatively fast for awhile.pre:Stat Base L8 Growth HP 28 40 Power 12 40 Skill 9 15 Speed 10 10 Luck 4 10 Defense 6 30 M. Def 5 0 Moves 7 0 Quality 41 105 DKII fucked around with this message at 16:17 on Sep 15, 2013 |
|
#
?
Sep 2, 2013 08:10
|
|
|
These items seem pretty silly with how powerful they are. Plus with the relatively low stat gains here it seems like strategy is relatively unimportant and just put your most powerful dudes with the best items at bottlenecks and watch everything die.
|
|
#
?
Sep 2, 2013 10:44
|
|
|

|
| # ? Apr 18, 2024 08:39 |
|
|
X_countryguy posted:These items seem pretty silly with how powerful they are. Plus with the relatively low stat gains here it seems like strategy is relatively unimportant and just put your most powerful dudes with the best items at bottlenecks and watch everything die. True, but they're also meant to mitigate the low stat gains - most FE games throw a million units at you and hope that enough of them work out to use. This game doesn't really use that tactic, but gives you some over-powered items to compensate. The weird balance here is Celica's group has seen the most maps where you can stuff your best units in a bottleneck, but has also gotten the most powerful items. Alm's last map was actually pretty difficult in terms of keeping everyone alive.
|
|
#
?
Sep 2, 2013 19:14
|
|