

|
tatankatonk posted:How rare are smoke rounds for artillery on both sides? If the Germans are smart, they'll drop smoke rounds on the open ground east of the G ford while they move north to the B ford. Not terribly. But if they're firing smoke missions, they're not harassing our fording process. I'd personally urge a double mortar smoke mission timed so we can rush mounted across our primary ford. SMG infantry who wants to desant (hang on the loving tanks) welcome. \/ Welcome, Comrade!
|
 #
?
Jul 2, 2014 21:17
#
?
Jul 2, 2014 21:17
|
|

|

|
| # ? Apr 23, 2024 12:21 |
|
|
Tovarich Marauder invited me here as reserve. I'll refrain from reading German thread or giving orders until I have a command. Za rodinu!
|
|
#
?
Jul 2, 2014 21:17
|
|

|
Krysmphoenix posted:Page 54 of the manual (28 of the pdf) gives me three T-34-85's. M1943, M1944 Early and M1944 Late. Not sure which one to nab for you guys. dtkozl posted:So we will need 3 company commanders, one of whom is comfortable with tanks. The two infantry companies will need 3 platoon leaders and 1 support goon commanding a gun and a truck. The rest will be 3 t-34s, 3 t-70s, and 1 IS-2 who will be semi broken up to support the different axes of attack, etc. Feel free to volunteer for positions, I will try and respect the sheet but I don't care if you suddenly want to move or whatever this is like taking penalty kicks I want confidence man I've been watching too much soccer. So, yeah, we have more armor on the list.
|
|
#
?
Jul 2, 2014 21:19
|
|

|
I have a strong preference for an infantry platoon command, but if they're all filled up I'll go anywhere.
|
|
#
?
Jul 2, 2014 21:20
|
|


|
The Merry Marauder posted:I'd personally urge a double mortar smoke mission timed so we can rush mounted across the fields and over the Fritz. SMG infantry who wants to desant (hang on the loving tanks) welcome. 
|
|
#
?
Jul 2, 2014 21:24
|
|

|
 This time with the correct 76mm (was searching "76mm" instead of "76 mm") and the new medium tank. T-34-85 Early has the same date as the IS-2 Mid so I'm assuming that's correct until told otherwise.
|
|
#
?
Jul 2, 2014 21:32
|
|

|
The Merry Marauder posted:Not terribly. But if they're firing smoke missions, they're not harassing our fording process. Okay cool, working on a post riffing off of Asehujiko's map (good work, btw!) and was gonna broach this because getting the SMG and AT infantry off the field and into the town or the german lines ASAP is going to be pretty freakin crucial. If anything, could the rifle platoons consider detaching a scout to move into the town if we don't have a rifle platoon entering? Or at least find some good elevation local to the fighting to slap them on? Good recon as the situation develops past the second turn is going to change a lot about anything we're thinking right now. Willie Tomg fucked around with this message at 21:54 on Jul 2, 2014 |
|
#
?
Jul 2, 2014 21:35
|
|
|
"Hither came Uncle Joe, black-haired, sullen-eyed, with gigantic armor and gigantic cannon, to tread the filthy fascists under his, uh, treads."
|
|
#
?
Jul 2, 2014 21:38
|
|
|
Oh, by the way, I never specified what I wanted to take. Since I have no idea what I'm doing and it looks like the Infantry is claimed already, shove me in a T-35-85. Middle tanks were the best in Advance Wars, clearly that still applies here!
|
|
#
?
Jul 2, 2014 21:42
|
|
|
I suppose I'll ask: Grey Hunter: What is the time of day? Weather? Strength and direction of wind?
|
|
#
?
Jul 2, 2014 22:10
|
|
|
What's the scale for the gridded map? Like, how long is 100, 200, 300, meters etc.
|
|
#
?
Jul 2, 2014 22:14
|
|
|
I was hoping for an IS-2, but it looks like they're all taken. Put me down for a T-34-85 if the IS-2s are all accounted for. We should probably get a google doc up for assigning forces and later for placing orders
|
|
#
?
Jul 2, 2014 22:29
|
|
|
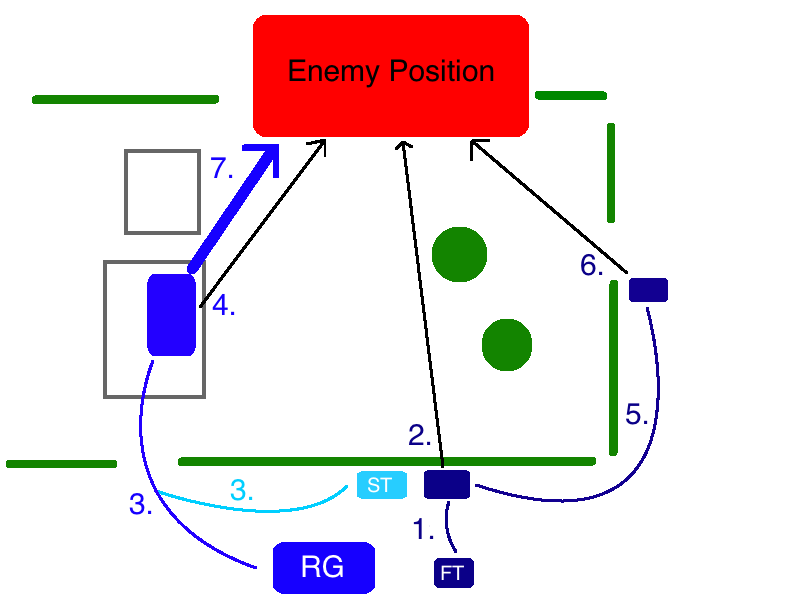
Asehujiko posted:I made a quick sketch of how I see the situation: This is a good map! Some thoughts: --There are three basic scenarios for the Hitlerite sneak attack and all of them favor a limited screening force as we move on the town (especially as dublish says, forest fortress is labeled with a big 'BOMBARD ME' sign). 1) The attack doesn't occur, or they pop smoke to cover their advance to defang our interdiction in which case, great, we covered a flank for cheap. 2) Its a probing attack, which is annoying since it'll scout us out some but its okay since we're mostly shifting away from that position anyway and by the time anything stealthy enough to get close gets close, we'll be mostly into the town I'd hope. or 3) They advance in force in which case HELL YEA comrades, they just advanced a platoon+ and armor trying to rush our position while we moved to objectives worth giving a poo poo about, even though it sucks for the rearguard who stayed behind. I see it as a good staging point for reserves, or for a place from which to bombard and/or assault the German spawn immediately with our heavy tanks parallel to the TRICK SHOTS axis. If we aren't doing those, I don't see a dedicated force doing much there. --I really hate all of our feasible crossings, but I hate the exposed one less. Worst case scenario, that at least can be screened with smoke. The worst case scenario in the marsh is that the lead vehicle gets stuck in front of the ford and its fifteen minutes before our first troops enter the town which is a thing I'd rather not contemplate. Have y'all seen Come and See? We're Soviets, come on now, you should go and see Come and See. Seen it yet? Okay, yeah, gently caress marshes. Marshes suck. The exposed crossing also has the benefit of putting us more central to the town averaging out the Germans' really safe crossing to the northwest. --You label really good and realistic initial objectives in the town here, and I'm 100% on board with them. Clusterfuck is pretty aptly named, but it's also the focal point of the map. I have no reasonable solution to taking it right now, especially approaching from the relatively exposed eastern side, but it'll probably involve lots of arty and tank shells and jellied gasoline. If we can shut down the southernmost crossing, getting an AT platoon or or Rifle/Flamethrower platoon over the exposed crossing puts Clusterfuck into contention, but that's a high-risk high-reward plan that'll probably kill everyone involved if one of the prerequisites for the plan folds.
|
|
#
?
Jul 2, 2014 22:41
|
|

|
I promised not to say anything but dear commie gods, there's really one plan. Terrain dictates all.
|
|
#
?
Jul 2, 2014 22:48
|
|
|
I believe this is still firmly the "spitballing" stage before the "planning" stage, so don't sweat it! This is the USSR: Where all may speak their minds without fear!
|
|
#
?
Jul 2, 2014 22:58
|
|
|
One of the light tanks ought to be enough to cover the "sneak attack" angle just fine, without getting stuck in the wood or being wasted. If nothing comes of it it's not exactly slow, it'll catch back up. We only need one or two for the town portion of the map, anyway. It'll be able to take out infantry well enough and a T-34 is fast enough to be able to divert for any tanks. Now. The main mission is to murder them, the objective is just a paltry bonus.
|
|
#
?
Jul 2, 2014 23:43
|
|


|
Terrain does dictate all, but until we can actually get sight lines and figure out where we're covered/concealed, nothing's 100% certain.
|
|
#
?
Jul 2, 2014 23:46
|
|


|
Is the map getting uploaded somewhere so we can zoom around? That would solve a lot of problems.
|
|
#
?
Jul 2, 2014 23:48
|
|
|
I don't think the Germans will both drop smoke ahead of Forest Fortress and HE on it, that seems a bit redundant. Option A: -Their smoke goes in front of our forest -Their HE goes towards interdicting our northern force Option B: -Their smoke is used to screen their Panzers heading towards the far west crossing -Their HE goes onto our forest Personally I am inclined to aim our own artillery barrage south of the westernmost crossing forcing them to either get wrecked by it on their way to their "natural expansion" for lack of a better term or get into a very disadvantageous fight against anything we decide to put into our forest. Related question: how many volleys of artillery do we have and how many can we reasonably expect them to have?
|
|
#
?
Jul 2, 2014 23:50
|
|

|
tatankatonk posted:What's the scale for the gridded map? Like, how long is 100, 200, 300, meters etc. Going from the size and spacing of the buildings, I'd say about 50m per square.
|
|
#
?
Jul 3, 2014 00:05
|
|
|
 The Red Army in 1944 was a different beast all together than the one Hitler so easily crushed in 1941. Gone were the pretenses of maneuver warfare or officer initiative. Offensives were intricately planned at the operational level by a veteran group of staff officers and then only the applicable pieces were given to the lower ranks, the minimum needed to achieve their local objectives. This created a system that could be called unwieldy, but it was extremely effective at overcoming whatever obstacle the Wehrmacht throws in its way. Troop were massed on the front lines with densities of around 5 to 10 rifle battalions per kilometer supported by over 200 guns and mortars, and 10 to 20 tanks/assault guns. Forces would first infiltrate the German position and mark fortifications, strong points, etc. followed by a huge artillery barrage over the length of the front. Then infantry and tanks would come in three waves. The first would assault the positions denuded by the artillery and knock out any remaining hard points that withstood the barrage. The second force would then sprint through this area and engage rear echelon forces, exploit breakthroughs, and blunt any counterattacks. Finally the third would move in and secure prisoners, mop up any remaining resistance, and fortify the area. It was so effective that Hitler shot himself.  So there should be some basic tutorials floating around in those old archived threads, I remember making at least one or two. The pictures are probably long gone now so I might have to make some more. I will give you guys some basic tips though on how to interact with your little pixeltruppen. The secret to doing well in a combat mission game: Never put a squad where you have not previously put a team, never a company where you have not previously a squad, and never a tank where you have not previously put a company. He who fires first generally wins. Remember that always. Infantry will generally be using 2 commands, Quick and Move. Quick is a brisk jog that will fatigue your soldier but it is the best all around for getting somewhere in a timely fashion. Generally only use Quick for 3 turns (each turn is 1 minute) in a row and try and keep the ratio of Quick and Move 1:1 so they can rest a bit. Tired troops in combat are poo poo, so save the sprinting for when you really need it. Fast command use only when you notice 75mm HE shells landing at your feet, think of it as the "oh, gently caress!" command. Hunt is the command you want to use with your scouts in say a wooded area where you might hit enemy fire at any moment. It is a slow walk where you will stop and return fire upon sighting and enemy. Slow is crawling, it is also very fatiguing. Don't bother with assault. Tanks want to balance the ability to spot with not getting caught out in the open. You should always be unbuttoned except when your tank commander can be killed with a rifle, so try and stay at least 500 meters away from the enemy. Move and Quick are good, move provides good spotting along with a better chance of not getting bogged down in bad terrain. So if you want to move out of our starting area I'd tell grey to keep on the grass, go Quick, but once you get the soft ground near the river, use a Move command and afterwards you want to sprint between firing positions. A stationary tank will beat a moving tank every single time (except that one time it doesn't and you cry into your pillow that night). Hunt is really useful for fine tuning a position and making sure your poo poo is covered but you can see in front of you to hit what you are shooting at. Don't use anything else. Here is one I made that we should use for posts that are our actual orders:  So initially I'm thinking we have the Rifle company cover grids 5 down to the river. Those flamethrowers look cool but they are slow so it will take them a while to walk and get stuck in. The SMG company will concern itself with the railway station and that patch of woods initially, with maybe a platoon on the t-34s, that is a good idea and then the t-34s will move back and cover the rest of the smgs as they make their way up. The IS 2s will be on M/N 10 with their flanks covered and looking at the town and those mid-map fords. Maybe we can catch something with their side armor exposed and see if they are trying to rush up there too. Each t70 will aid a company and be the first ones in. Guns and artillery I dunno yet. I think we can get by without smoke, that HE number is the max and using smoke takes away from the total shells we can fire. dtkozl fucked around with this message at 00:32 on Jul 3, 2014 |
|
#
?
Jul 3, 2014 00:06
|
|

|
Asehujiko posted:Related question: how many volleys of artillery do we have and how many can we reasonably expect them to have? 4x76mm infantry guns, 8x82mm mortars in the OOB, I don't know if we have anything offmap. A quick google doesn't give me any data on Russian artillery, but I did find http://combatmission.wikia.com/wiki/German_Artillery_Characteristics for German artillery, which should be comparable.
|
|
#
?
Jul 3, 2014 00:10
|
|
|
The 82mm mortars have 160 rounds total, 24 can be smoke. The 76mm have 140 HE rounds. Should be about 8-10 minutes to call it in. On the first turn we can do a preplanned barrage, but I dunno if grey wants to allow these, they can be kind of gamey.
|
|
#
?
Jul 3, 2014 00:34
|
|
|
Bugger, I'm late. If I've counted correctly, everything bigger than a T-70 is gone in terms of tanks. I'd prefer a T-34 if one becomes available, but otherwise I'll take that T-70. How experienced are our tank crews (veteran, green, etc.)? This determines how ballsy I get with my tank. Am I right in thinking that out anti-tank squads do not have rocket weaponry but anti-tank rifles? So we don't have organic anti-tank like those bastard panzerfausts? Also, could someone remind me what the coloured dots and crosses, and colum symbols represent on here? 
|
|
#
?
Jul 3, 2014 00:40
|
|


|
Everything is regular, high motivation, +1 leadership. I wanted to get as much stuff as I reasonably could. We will not be getting ballsy with tanks at all, we will let them get ballsy and then laugh when we brew them up.
|
|
#
?
Jul 3, 2014 00:46
|
|
|
simplefish posted:Also, could someone remind me what the coloured dots and crosses, and colum symbols represent on here? From left to right, front armor, side armor, rear armor, top armor. From bottom to top, small calibre, large calibre, shells, ACPR ammo. If it's green, you've got nothing to worry about. If it's red, your day's going to get bad very fast. vvv Nothing to see here. dublish fucked around with this message at 01:07 on Jul 3, 2014 |
|
#
?
Jul 3, 2014 00:50
|
|
|
dublish posted:From left to right, front armor, side armor, rear armor, top armor. *bottom to top ")
|
|
#
?
Jul 3, 2014 00:59
|
|
|
dtkozl posted:
Do you mean you want us to take up overwatch positions covering these grids? Or actually ford the river and occupy a line from grid 5 to the bank?
|
|
#
?
Jul 3, 2014 01:03
|
|
|
Dug this out of the archives, it's a good read for everyone here, but keep in mind it was written for German players. We're going to be less concerned with the positioning of MG-42s, our platoons have a different composition, but the basics hold for everyone.tanglewood1420 posted:Infantry Tactics Primer tanglewood1420 posted:Platoon Level Tactics
|
|
#
?
Jul 3, 2014 01:20
|
|

|
Davin Valkri posted:So our ORBAT looks like this, then? I've kind of lost track of who else has signed on. And I don't have a unit. Oh well. Dtkozl, how's this ORBAT look? Do you want to split off MG sections or mortar batteries for additional commanders? Davin Valkri fucked around with this message at 02:04 on Jul 3, 2014 |
|
#
?
Jul 3, 2014 01:43
|
|
|
Edit: Agh, missed last post. I'll take the billet with the AT gun as per Davin's post Jaguars! fucked around with this message at 01:59 on Jul 3, 2014 |
|
#
?
Jul 3, 2014 01:57
|
|
|
Davin Valkri posted:I've kind of lost track of who else has signed on. And I don't have a unit. Oh well. Dtkozl, how's this ORBAT look? Do you want to split off MG sections or mortar batteries for additional commanders? I also don't have a unit yet and have no idea what I'm doing so I don't want to take something incredibly useful then spend 20 turns pushing it by hand into a ditch. I'm probably already hosed by this point but give me anything (or nothing  ) )
|
|
#
?
Jul 3, 2014 02:04
|
|
|
Jaguars! posted:
T-70's yours, since you expressed a preference just now and uPen didn't.
|
|
#
?
Jul 3, 2014 02:04
|
|
|
I don't have a position either, so err, I'll take anything? I wanted to be infantry, but you have more people than positions for platoon commanders it looks like.
|
|
#
?
Jul 3, 2014 02:08
|
|
|
If everyone in the google doc (here) shows up, then both sides are probably gonna need some extra troops to accomodate everyone.
|
|
#
?
Jul 3, 2014 02:10
|
|
|
Jaguars! posted:If everyone in the google doc (here) shows up, then both sides are probably gonna need some extra troops to accomodate everyone. I'm all for having more troops. Let's bury those fascist pigs! The following names from the signup spreadsheet do not have a position in the OOB: Obliterati Comstar Cthulhu Dreams Davin Valkri Kaislioc tehkeen Tetrakarn That's enough for another whole infantry company and two tanks. dublish fucked around with this message at 02:22 on Jul 3, 2014 |
|
#
?
Jul 3, 2014 02:13
|
|
|
1st Battalion Headquarters Team (BATTALION COMMANDER--dtkozl) [x] Infantry Gun Battery (light) 4 x 76mm Infantry Gun (OB-25) (SUBORDINATE TO BATTALION COMMANDER--dtkozl) [x] 1st Rifle Company Headquarters Team (COMPANY COMMANDER--tatankatonk) [x] Sniper Team (SUPPORT COMMANDER--Tetrakarn) [x] 1st Platoon (3 squads infantry, 1 sniper team, 1 scout team, 1 flamethrower team) (PLATOON COMMANDER--dublish) [x] 2nd Platoon (3 squads infantry, 1 sniper team, 1 scout team, 1 flamethrower team) (PLATOON COMMANDER--RedFlag) [x] 3rd Platoon (3 squads infantry, 1 sniper team, 1 scout team, 1 flamethrower team) (PLATOON COMMANDER--AceBuckeye13) [x] Machine Gun section (Maxim M1910) (SUPPORT COMMANDER--Kaisloc) [x] Machine Gun Team (Maxim HMG) (SUPPORT COMMANDER--Davin Valkri) [x] Antitank gun Team (76mm Antitank gun) (SUPPORT COMMANDER--Hob Gadling) [x] Truck (Studebaker) (SUBORDINATE TO SUPPORT COMMANDER) Mortar Platoon [Medium] (4x82mm Mortars, BM-43) (tatankatonk) [x] 2nd SMG Company Headquarters Team (COMPANY COMMANDER--Herp Derp) [x] 1st Platoon (3 SMG squads, 1 Tank Hunter team) (PLATOON COMMANDER--brakeless) [x] 2nd Platoon (3 SMG squads, 1 Tank Hunter team) (PLATOON COMMANDER--RedLobster) [x] 3rd Platoon (3 SMG squads, 1 Tank Hunter team) (PLATOON COMMANDER--Willie Tomg) [x] Machine Gun Team (Maxim HMG) (SUPPORT COMMANDER-- Machine Gun Team (Maxim HMG) (SUPPORT COMMANDER--Comstar) [x] Antitank gun Team (76mm Antitank gun) (SUPPORT COMMANDER--Jaguars!) [x] Truck (Studebaker) (SUBORDINATE TO SUPPORT COMMANDER) Mortar Platoon [Medium] (4x82mm Mortars, BM-43) (Herp Derp) [x] 3rd Tank Company HQ Heavy Tank (IS-2 (mid)) (COMPANY COMMANDER--The Merry Marauder) [x] 1st Heavy Tank (IS-2 (mid)) (TANK COMMANDER--Asehujiko) [x] HQ Tank (T-70M (M1943)) (TANK COMMANDER--uPen) [x] 1st Light Tank (T-70M (M1943)) (TANK COMMANDER--duckfoot) [x] 2nd Light Tank (T-70M (M1943)) (TANK COMMANDER--Simplefish) [x] HQ Medium Tank (T-34-85) (TANK COMMANDER--Gamerofthegame) [x] 1st Medium Tank (T-34-85) (TANK COMMANDER--Krysmphoenix) [x] 2nd Medium Tank (T-34-85) (TANK COMMANDER--Grumio) [x] The mortars are off map so no, but if we still got people we can do 5 more support slots, 2 hmgs from 2nd Co and 2 hmgs the one marksman from 1st company. I'll give Kaisloc a HMG because he signed up for it and reported ready and I'll give Davin and Comstar the two HMGs in 2nd Co. Davin Valkri you filled this out you should have given yourself a choice spot! So that leaves 1 marksman and 1 HMG from 1st Co to be filled. The x's are there for people who have checked in on this thread. Let me know if you guys I added are cool. Also if you are unhappy or wish to trade speak up now! Now as for the ORDERS thing I just wanted to throw that up there now so we can use it later, those are just my first thoughts. Tankatonk pretty much everyone is going over the river that is where the objective is. I might chill near the IS 2s because we get a good view of the lower village from there. dtkozl fucked around with this message at 03:28 on Jul 3, 2014 |
|
#
?
Jul 3, 2014 02:39
|
|
|
I haven't got time to take a unit, but I favour a limited assault down the trickshot axis. It doesn't have to be all in, but a heavy tank assault coupled with a bombardment of the fjord could see us completely throw their advance into disarray while our main force takes the town.
|
|
#
?
Jul 3, 2014 02:45
|
|
|
Actually, if it's not too much trouble, I don't want to be under Herp Derp. I'll switch to 1st Company's open HMG. Oh, and Jaguars! said he wanted a T-70 and uPen hasn't expressed a preference. So if you want to switch them, go ahead.
|
|
#
?
Jul 3, 2014 02:51
|
|
|

|
| # ? Apr 23, 2024 12:21 |
|
|
Davin Valkri posted:Actually, if it's not too much trouble, I don't want to be under Herp Derp. I'll switch to 1st Company's open HMG. Done. Jaguars!, uPen, what say you?
|
|
#
?
Jul 3, 2014 02:58
|
|