

|
disperse posted:Sorcerer, you're starting in the caves and only have two basic actions. Also, be aware that the ghosts are always prowling and will leap upon you when you end your turn in Curst Valley (you have purple magic enchanted and are safe, never-the-less). Want to Move, Hide? Or Move, Spell, Spell? I'm an idiot, sorry. Hide Move to Curst Valley 1
|
 #
?
Apr 29, 2016 21:35
#
?
Apr 29, 2016 21:35
|
|


|

|
| # ? Apr 27, 2024 15:06 |
|
|
Day 11 Results The Sorcerer leaves his dragon friend behind and heads to the Curst Valley, which also happens to be haunted by the sisters of the Witch Queen, who, once exorcised by the White Knight, have now returned. The Sorcerer hides when the banshees come to investigate their visitor. 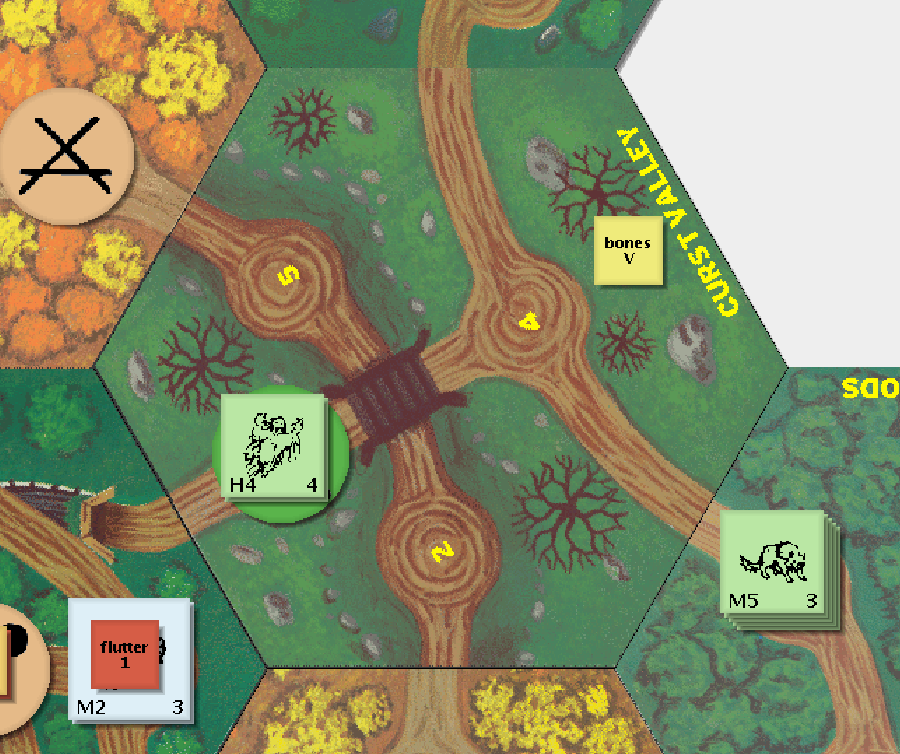 Move (Curst Valley 1), Hide (success) The Black Knight scours the battleground outside the Inn for his helmet, but only manages to find an extra shield instead.  Search (Nothing), Search (Nothing), Search (Found Shield), Search (Nothing) The Dwarf uses his cave expertise to search for the submerged treasure trove of the giant octopus but is unable to locate anything today. At the end of the day, a pair of trolls come to investigate the tapping and scraping noises:  Search (Locate - Nothing), Search (Locate - Passages, none to find), two heavy armored trolls arrive The Company Commander chips in to try and find the lost helmet but is unable to locate it. Search (Nothing), Search (Nothing), Search (Nothing), Search (Nothing) The White Knight spends another dusty day moving rocks, but even with the help of the deft gloves he is unable to locate anything. Hide (fail), Alert (morning star), Search (fatigues Fight H4*, nothing), Search (fatigues Fight H3**, makes change with Fight H4*, finds nothing), Rest (Rests Fight H4*) The Witch's Familiar gets an early start and beats the Witch to the Shrine, peering around a bit but finding nothing interesting. Move (Deep Woods 1), Move (Deep Woods 6), Move (Deep Woods 4), Peer (hidden enemies, none) The Witch cautiously follows her familiar to the Shrine, taking the time to (attempt to) hide and rest up some black magic first. 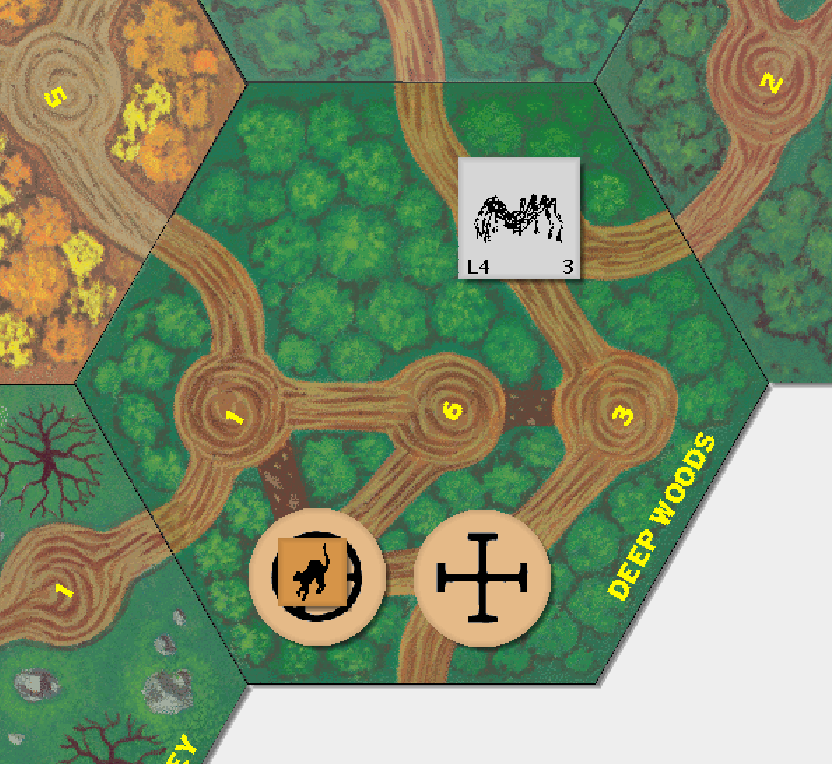 Hide (fail), Rest (Magic V6*), Spell Prep, Spell (Enchant Magic V6* into black magic), Move (Deep Woods 4), Search (Locate, Passages, none) The Witch Queen spends her day in meditation, restoring her store of black and purple magic. Spell Prep, Spell (Magic V3*), Spell (Magic V3*), Spell (Magic IV4*), Spell (Magic IV4*)
|
|
#
?
Apr 29, 2016 23:42
|
|

|
Evening orders needed The Sorcerer is hidden in a clearing with the two banshees:  The Dwarf is unhidden in a clearing with two heavy trolls:
|
|
#
?
Apr 29, 2016 23:45
|
|
|
I think my best plan is to use H4** plus axe length to undercut one of them round one, hope I don't die to the other one's attack, then repeat H4** on round two. If one of them flips over to the H5 side that's actually better for me because in that case I can use my T3* duck and an H5* attack first round and an H4** round two. Sound right?
|
|
#
?
Apr 30, 2016 22:50
|
|

|
I've only got one magic. Stay hidden.
|
|
#
?
May 1, 2016 04:54
|
|
|
Witch Queen casts Broomstick on herself with V2 and a black chit.
|
|
#
?
May 1, 2016 06:10
|
|

|
Bouquet posted:I think my best plan is to use H4** plus axe length to undercut one of them round one, hope I don't die to the other one's attack, then repeat H4** on round two. If one of them flips over to the H5 side that's actually better for me because in that case I can use my T3* duck and an H5* attack first round and an H4** round two. The heavy trolls have a move speed of 4 on both sides so you'll be unable to undercut them. In round 1 the length advantage of the great axe will cause you to strike first so you can use a fight with no asterisks (H6) in smash and cover your duck maneuver. In round 2 you may want to use your H5* fight instead (this will require you to fatigue a move or a fight) so you strike first if the trolls flip to their H5/4 side. This is a pretty good fight to play through using the RealmSpeak battle feature if you're so inclined. Let me know what you want to do.
|
|
#
?
May 2, 2016 16:46
|
|
|
disperse posted:In round 1 the length advantage of the great axe will cause you to strike first so you can use a fight with no asterisks (H6) in smash and cover your duck maneuver.  Am I missing something?
|
|
#
?
May 3, 2016 02:49
|
|
|
Bouquet posted:This didn't seem to work: Your Fight chit's speed is too high (meaning slow) to hit the trolls. You need to have your weapon Alerted to gain an override number, if the weapon has one. EDIT: Oh, also you can only hit the enemy you target, so the troll you're lined up with wasn't even attacked. EclecticTastes fucked around with this message at 05:27 on May 3, 2016 |
|
#
?
May 3, 2016 05:24
|
|

|
Bouquet posted:This didn't seem to work: Nope, that's the danger of fighting two trolls at once (and the reason why you have an extra helmet). You can only safely cover yourself against one enemy, if the troll you aren't targeting lines up with you, you're going to take damage to your helmet and a wound.
|
|
#
?
May 3, 2016 16:11
|
|
|
Ok, so I've run the simulation a bunch of times and haven't seen either scenario you mention (first round H6 lining up with target and winning due to length or 2+ round H5* lining up with a flipped target). I don't want to hold things up any longer, so here's my strategy: 1. Play Duck T3* as my defense every turn. 2. Use H6 attack in smash round 1. 3. Use H5* attack in smash in future rounds if my target has flipped, otherwise stick with H6. 4. If only one of them has flipped, target that one. 5. Put my other helmet on if the first one gets busted. 6. Preferentially fatigue move chits over attack because the goal is to stay in this space until something cool is found.
|
|
#
?
May 3, 2016 23:14
|
|
|
Bouquet posted:Ok, so I've run the simulation a bunch of times and haven't seen either scenario you mention (first round H6 lining up with target and winning due to length or 2+ round H5* lining up with a flipped target). Sounds like a solid strategy, I'll run the combat and let you know how it goes.
|
|
#
?
May 4, 2016 15:49
|
|
|
Evening 11 Results The Dwarf spits in a gloved hand, claps twice, and hefts his oak-hafted weapon shoulder high as the two scaly trolls charge. 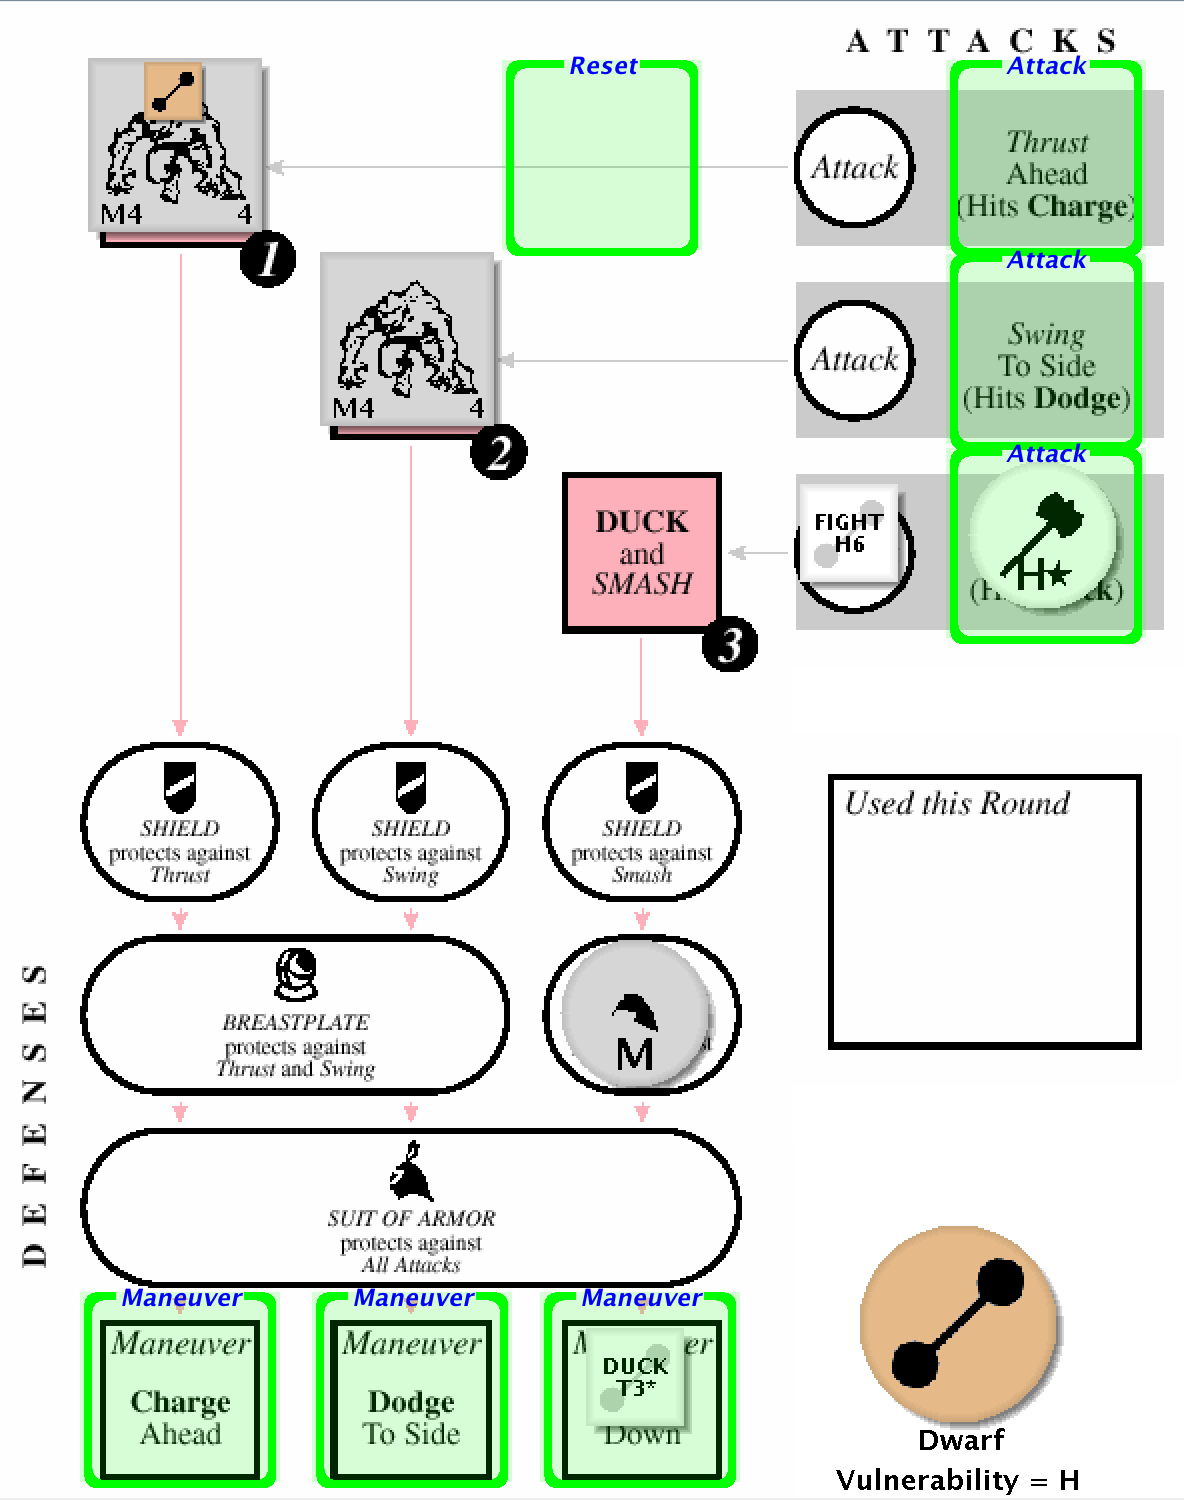 The Dwarf ducks under a ragged claw as the first troll charges past him and then, loading up on his back foot, turns and swings at the second, sending its head flying in a bloody arc. It's a bloop single! 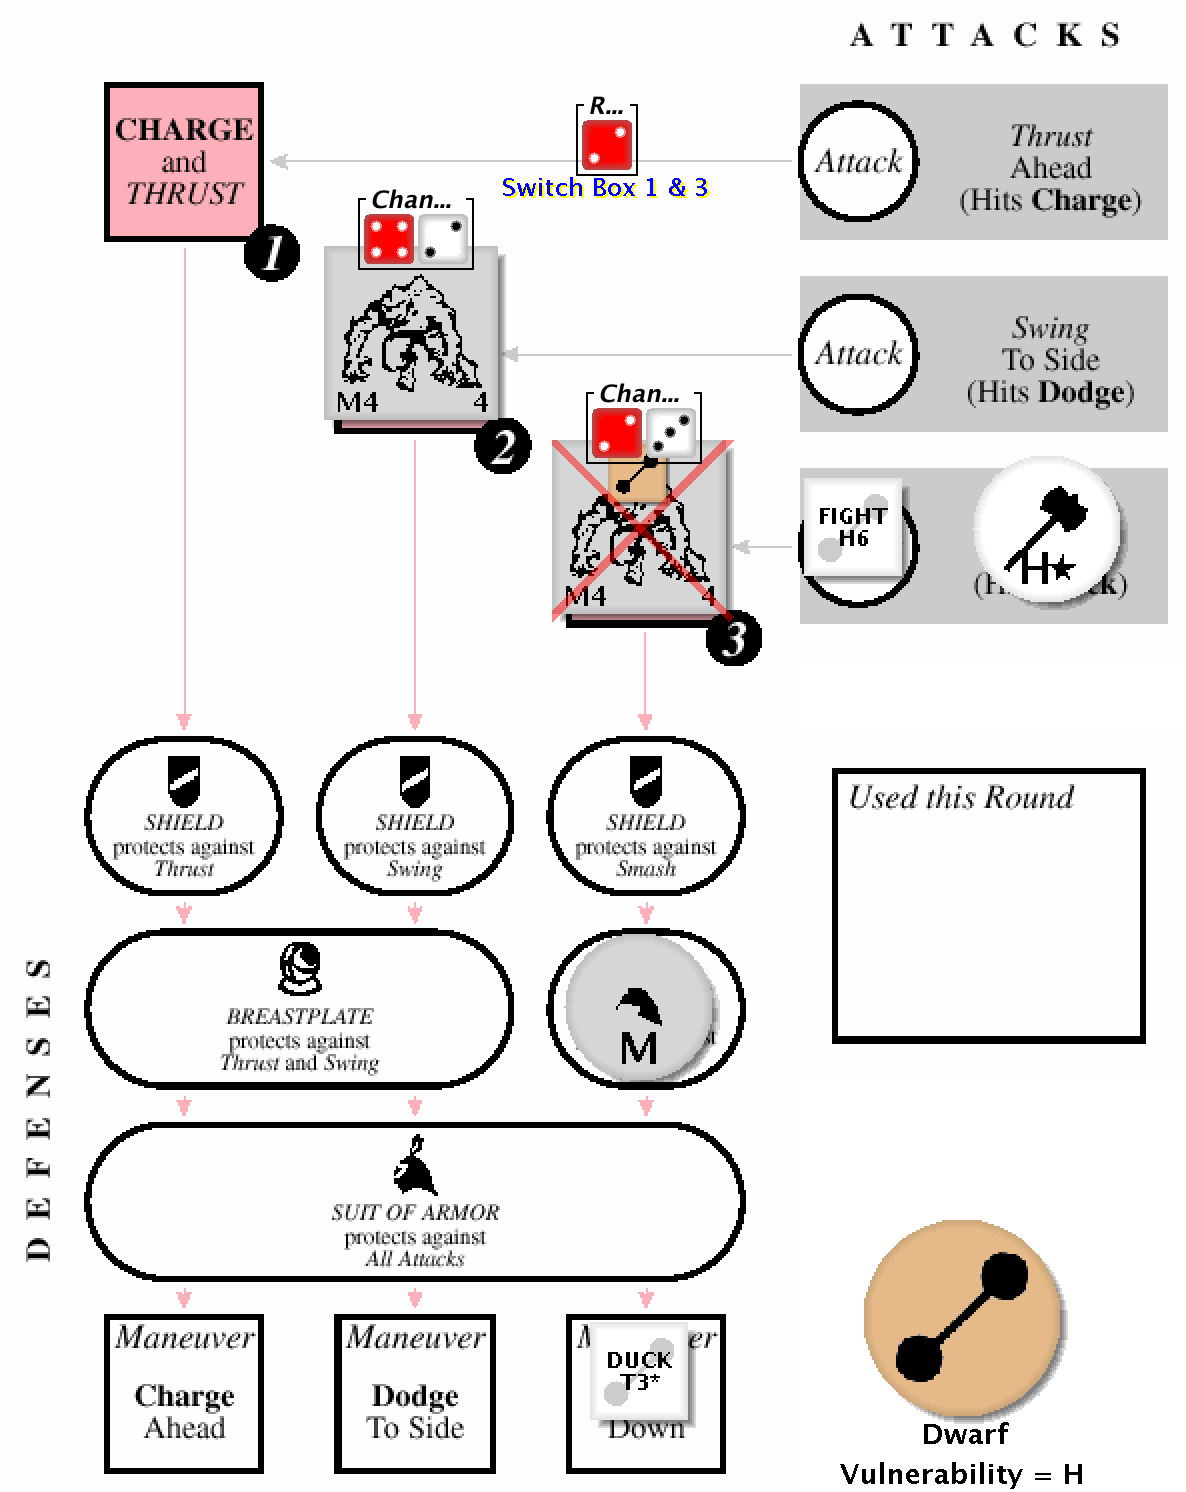 The remaining troll spins around and charges again as the Dwarf hurriedly gets back into his batting stance. 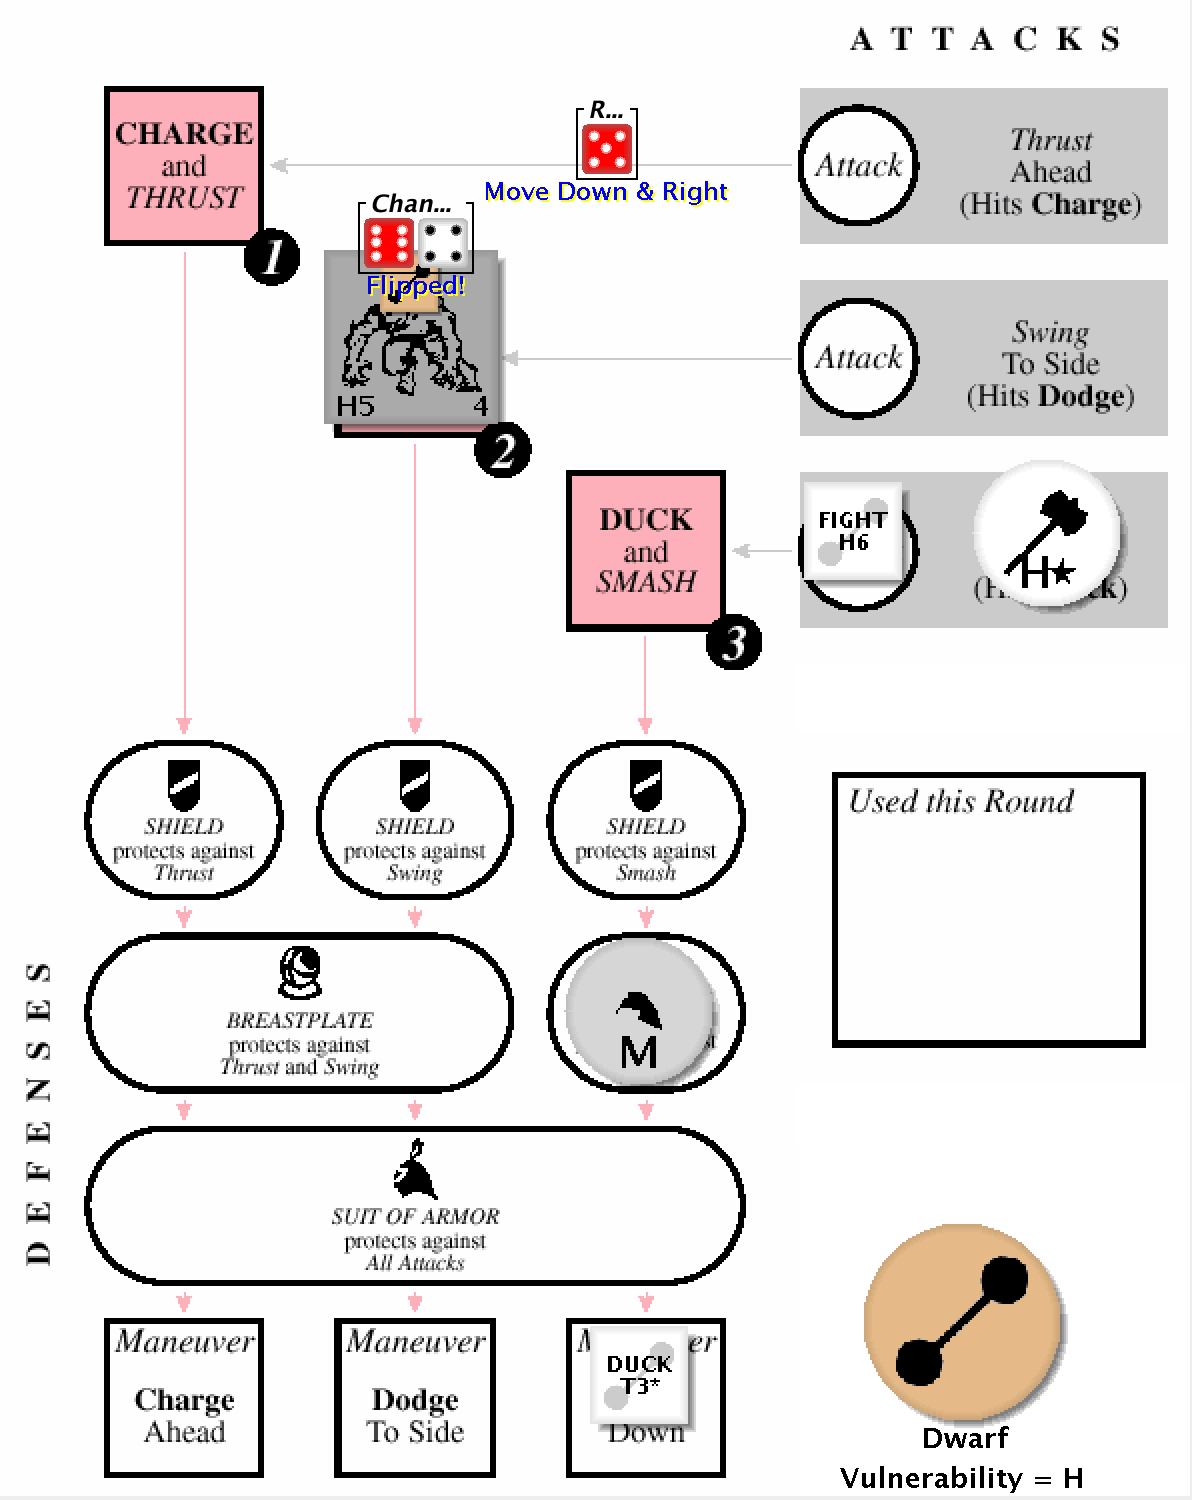 But his swing is too late, strike one! 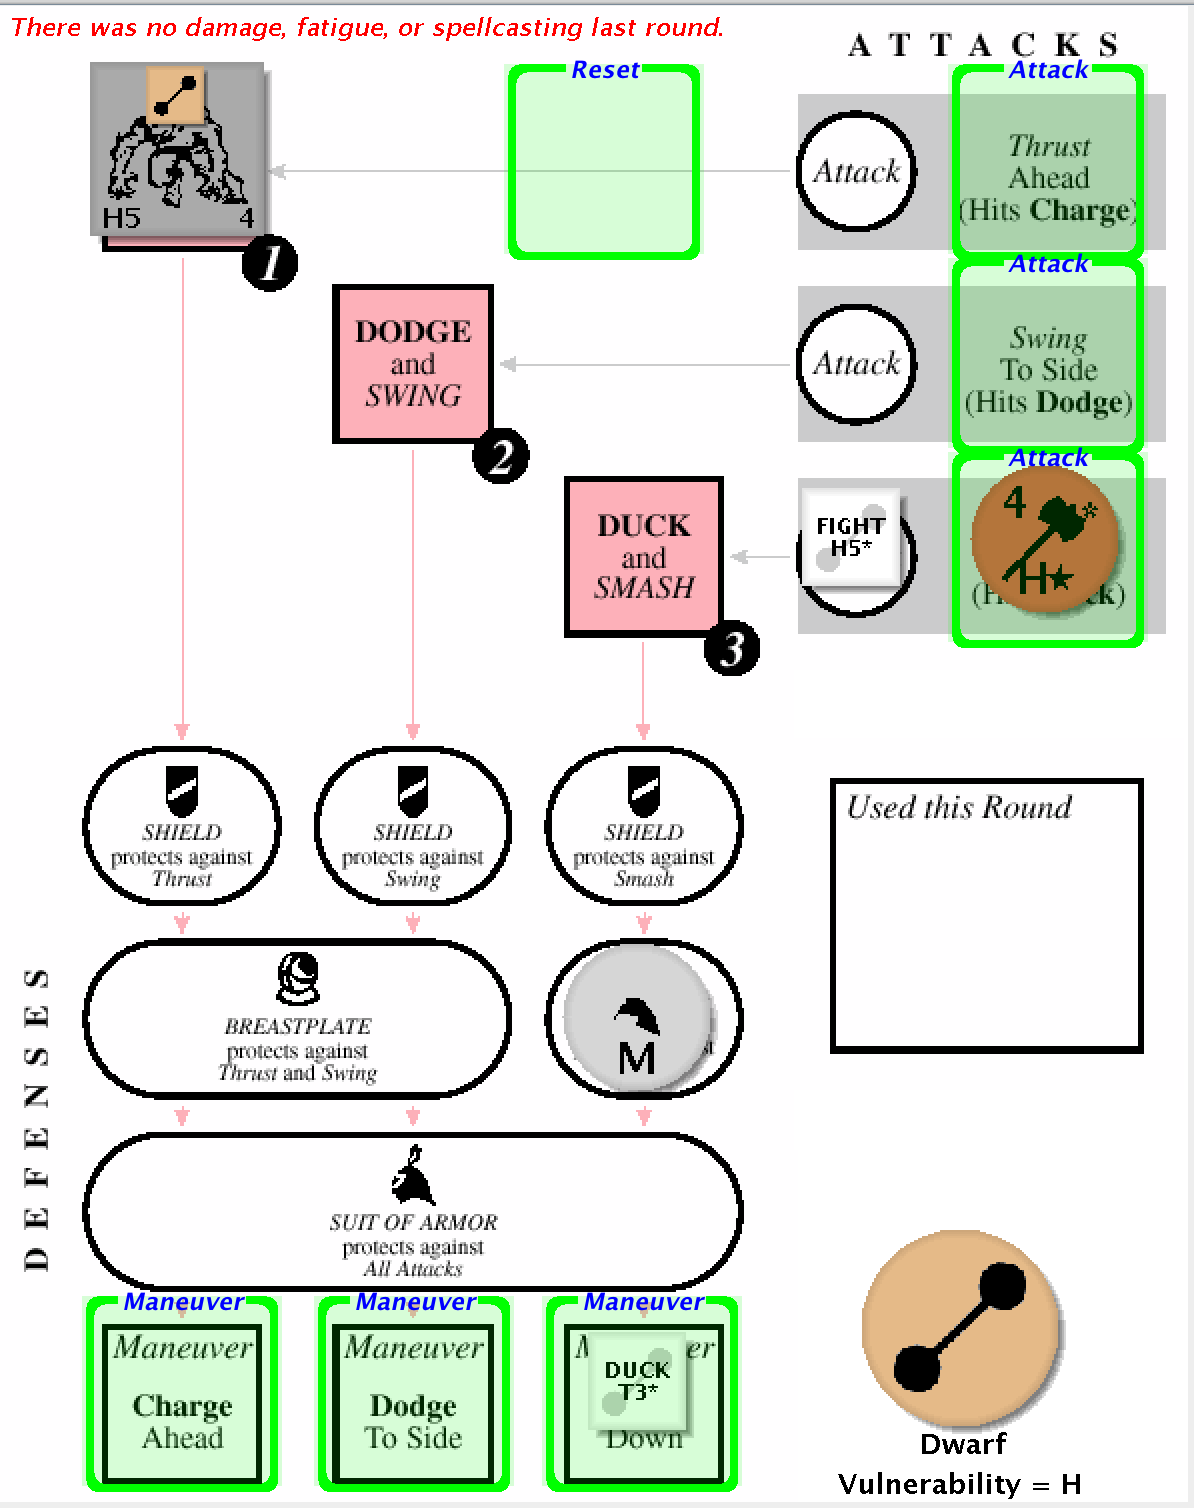 The Dwarf readies himself for the next assault, hands high and axe at the ready. 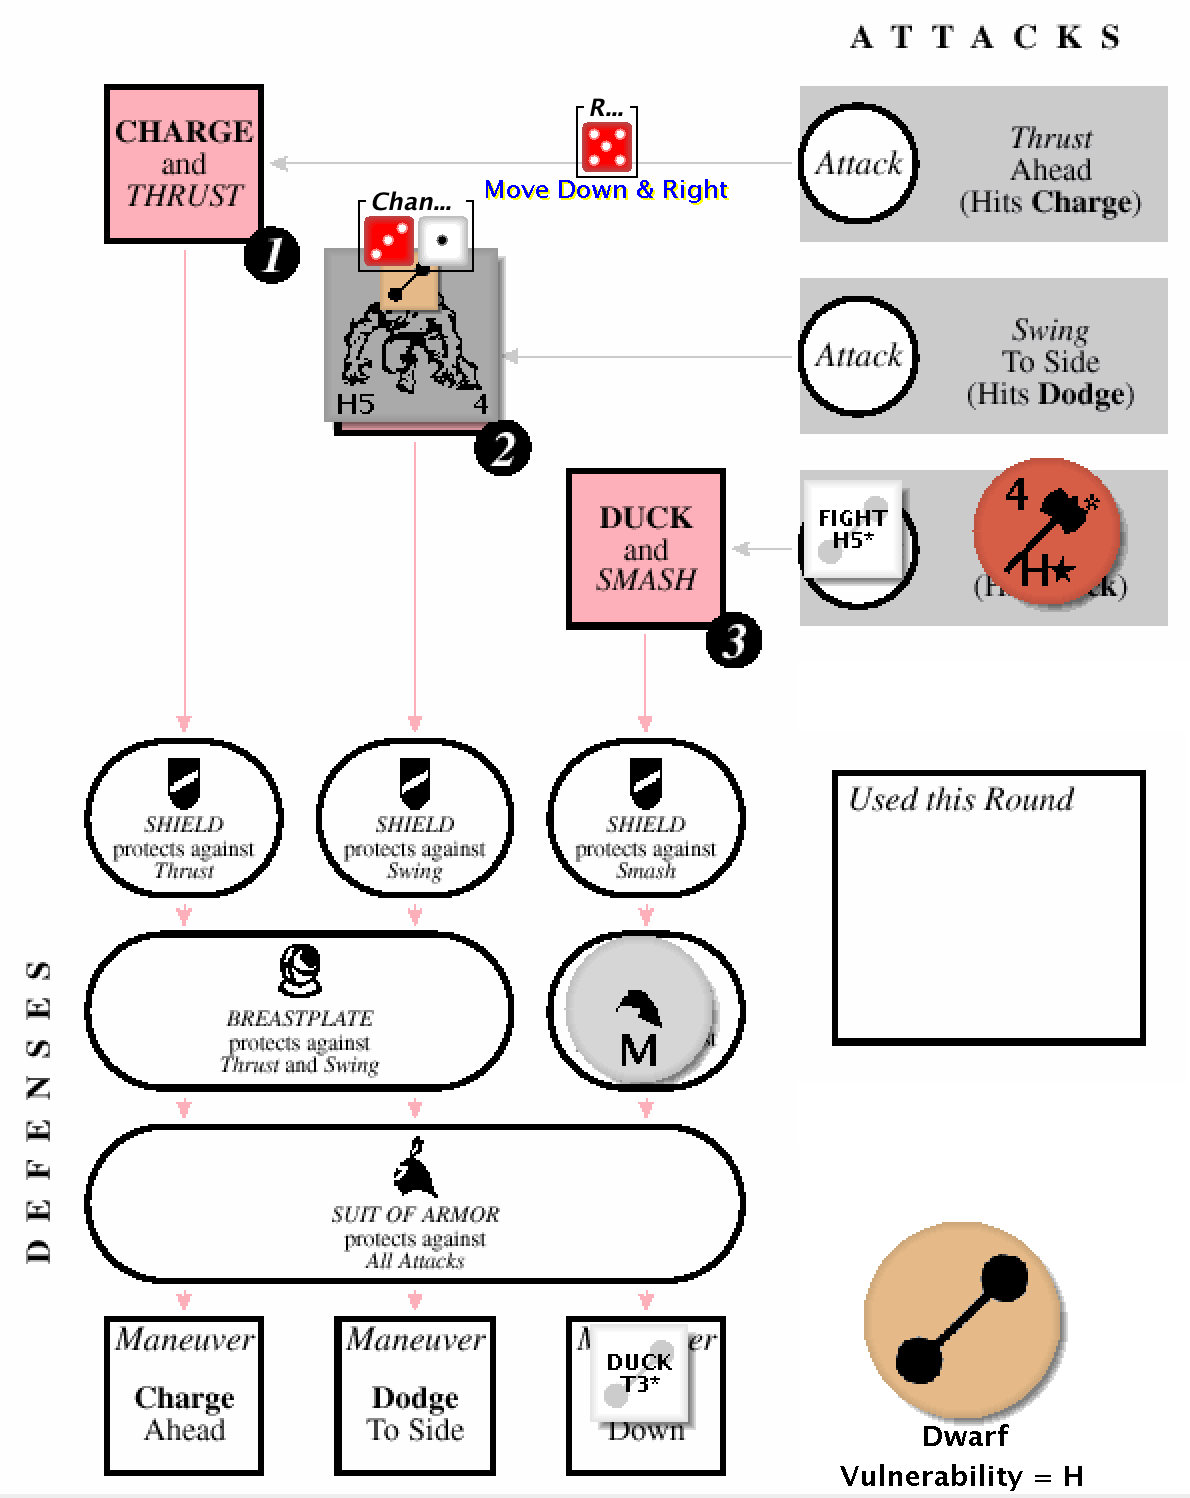 Just a bit high, strike two! (Fatigues Move T6* to keep combat going.) 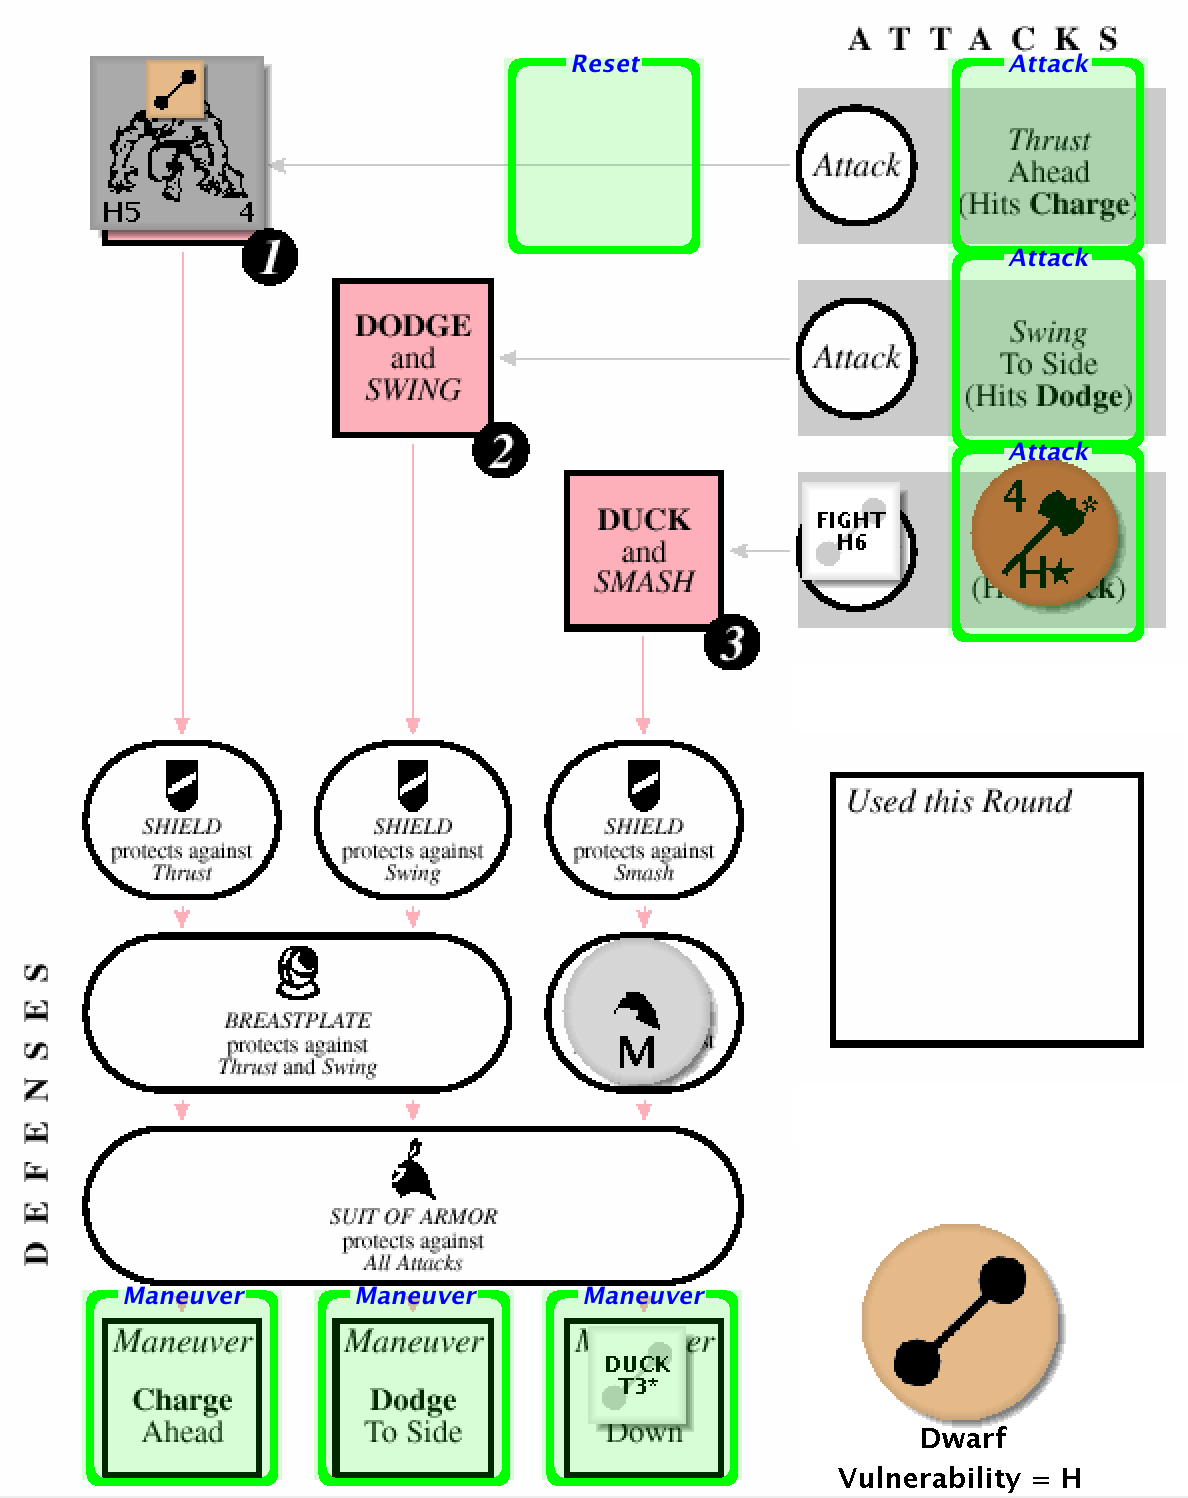 The Dwarf bounces the haft of his weapon on his shoulder, he lifts his front foot and prepares for a mighty swing: 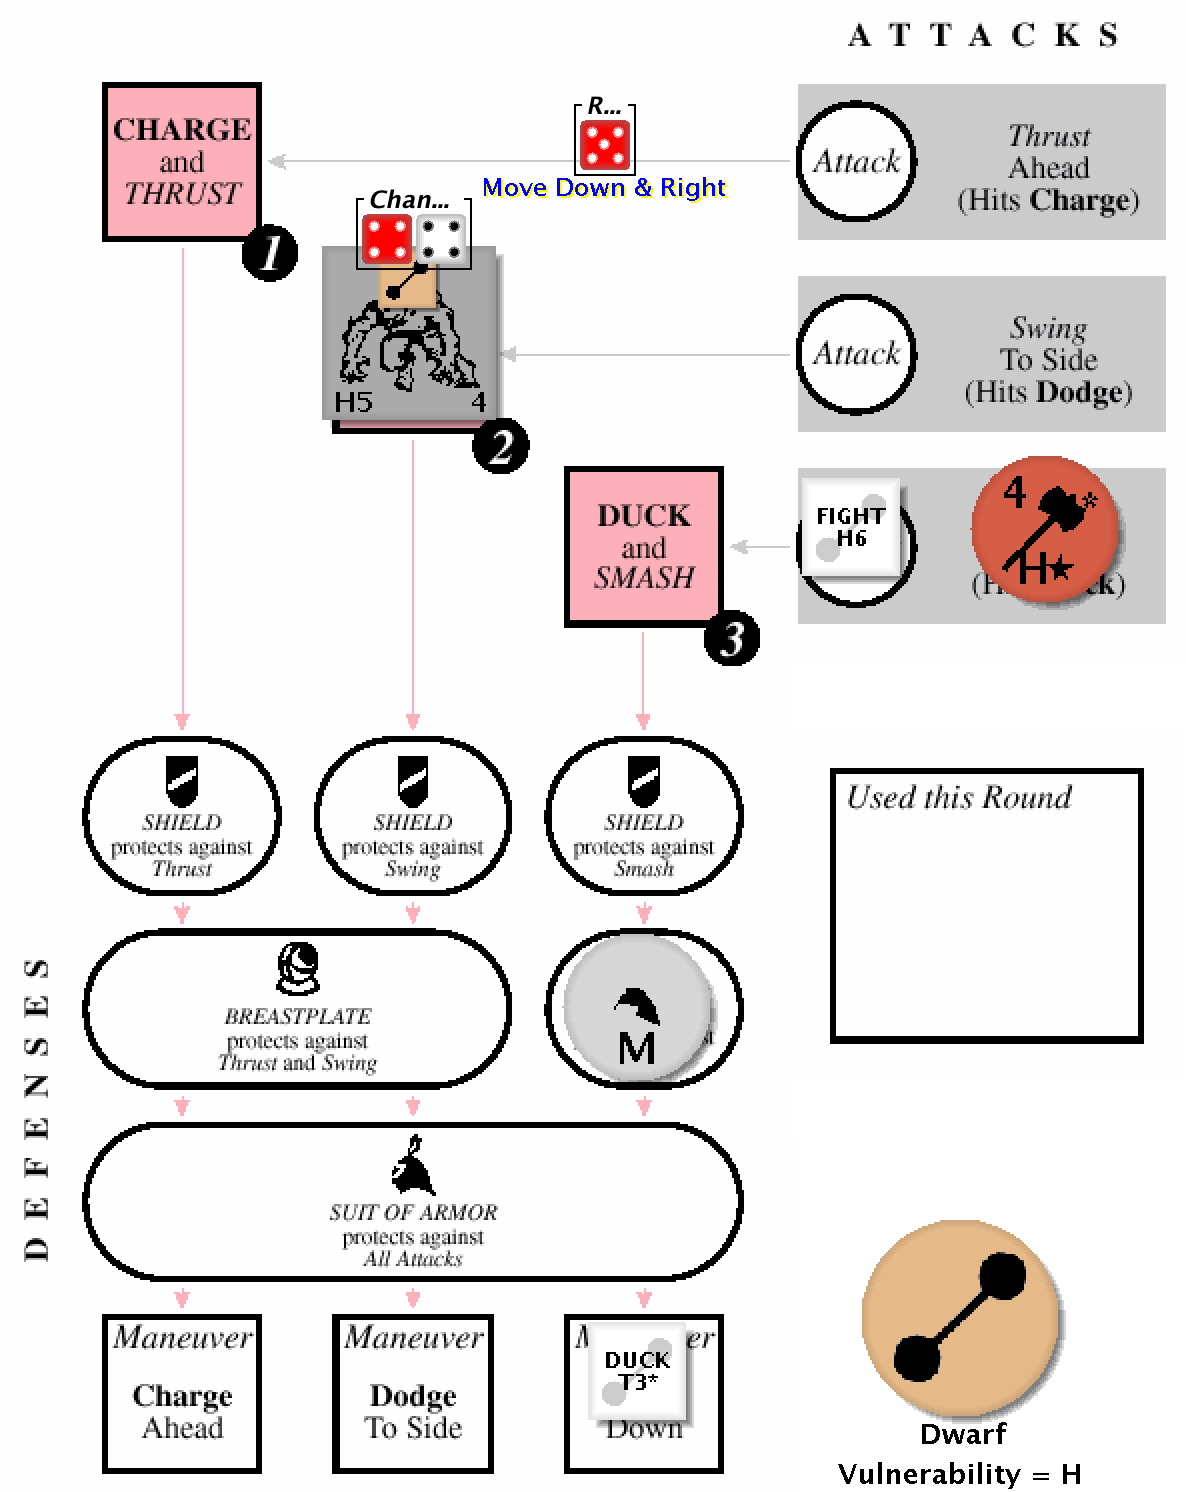 Strike three, you're out! Not one to give up, the Dwarf gets back in the box and swings away, missing again, until:  The Dwarf twists his hips and gets all of his weight behind this swing hitting the troll waist high and sending its top half toppling over into the murky pool, it's a home run! Result: +15 fame, +15 notoriety, fatigues Move T6** The Witch Queen pulls a second sapling from the ground as its roots shrivel up and leaves turn brown and fall to the ground. Imbued with black magic, it begins to float off of the ground.  The Sorcerer spends a restless night in the Curst Valley, sung to sleep by the banshees' eerie lullaby.
|
|
#
?
May 10, 2016 15:59
|
|
|
Day 12 Orders! You can find the high quality HTML export of the game board here. 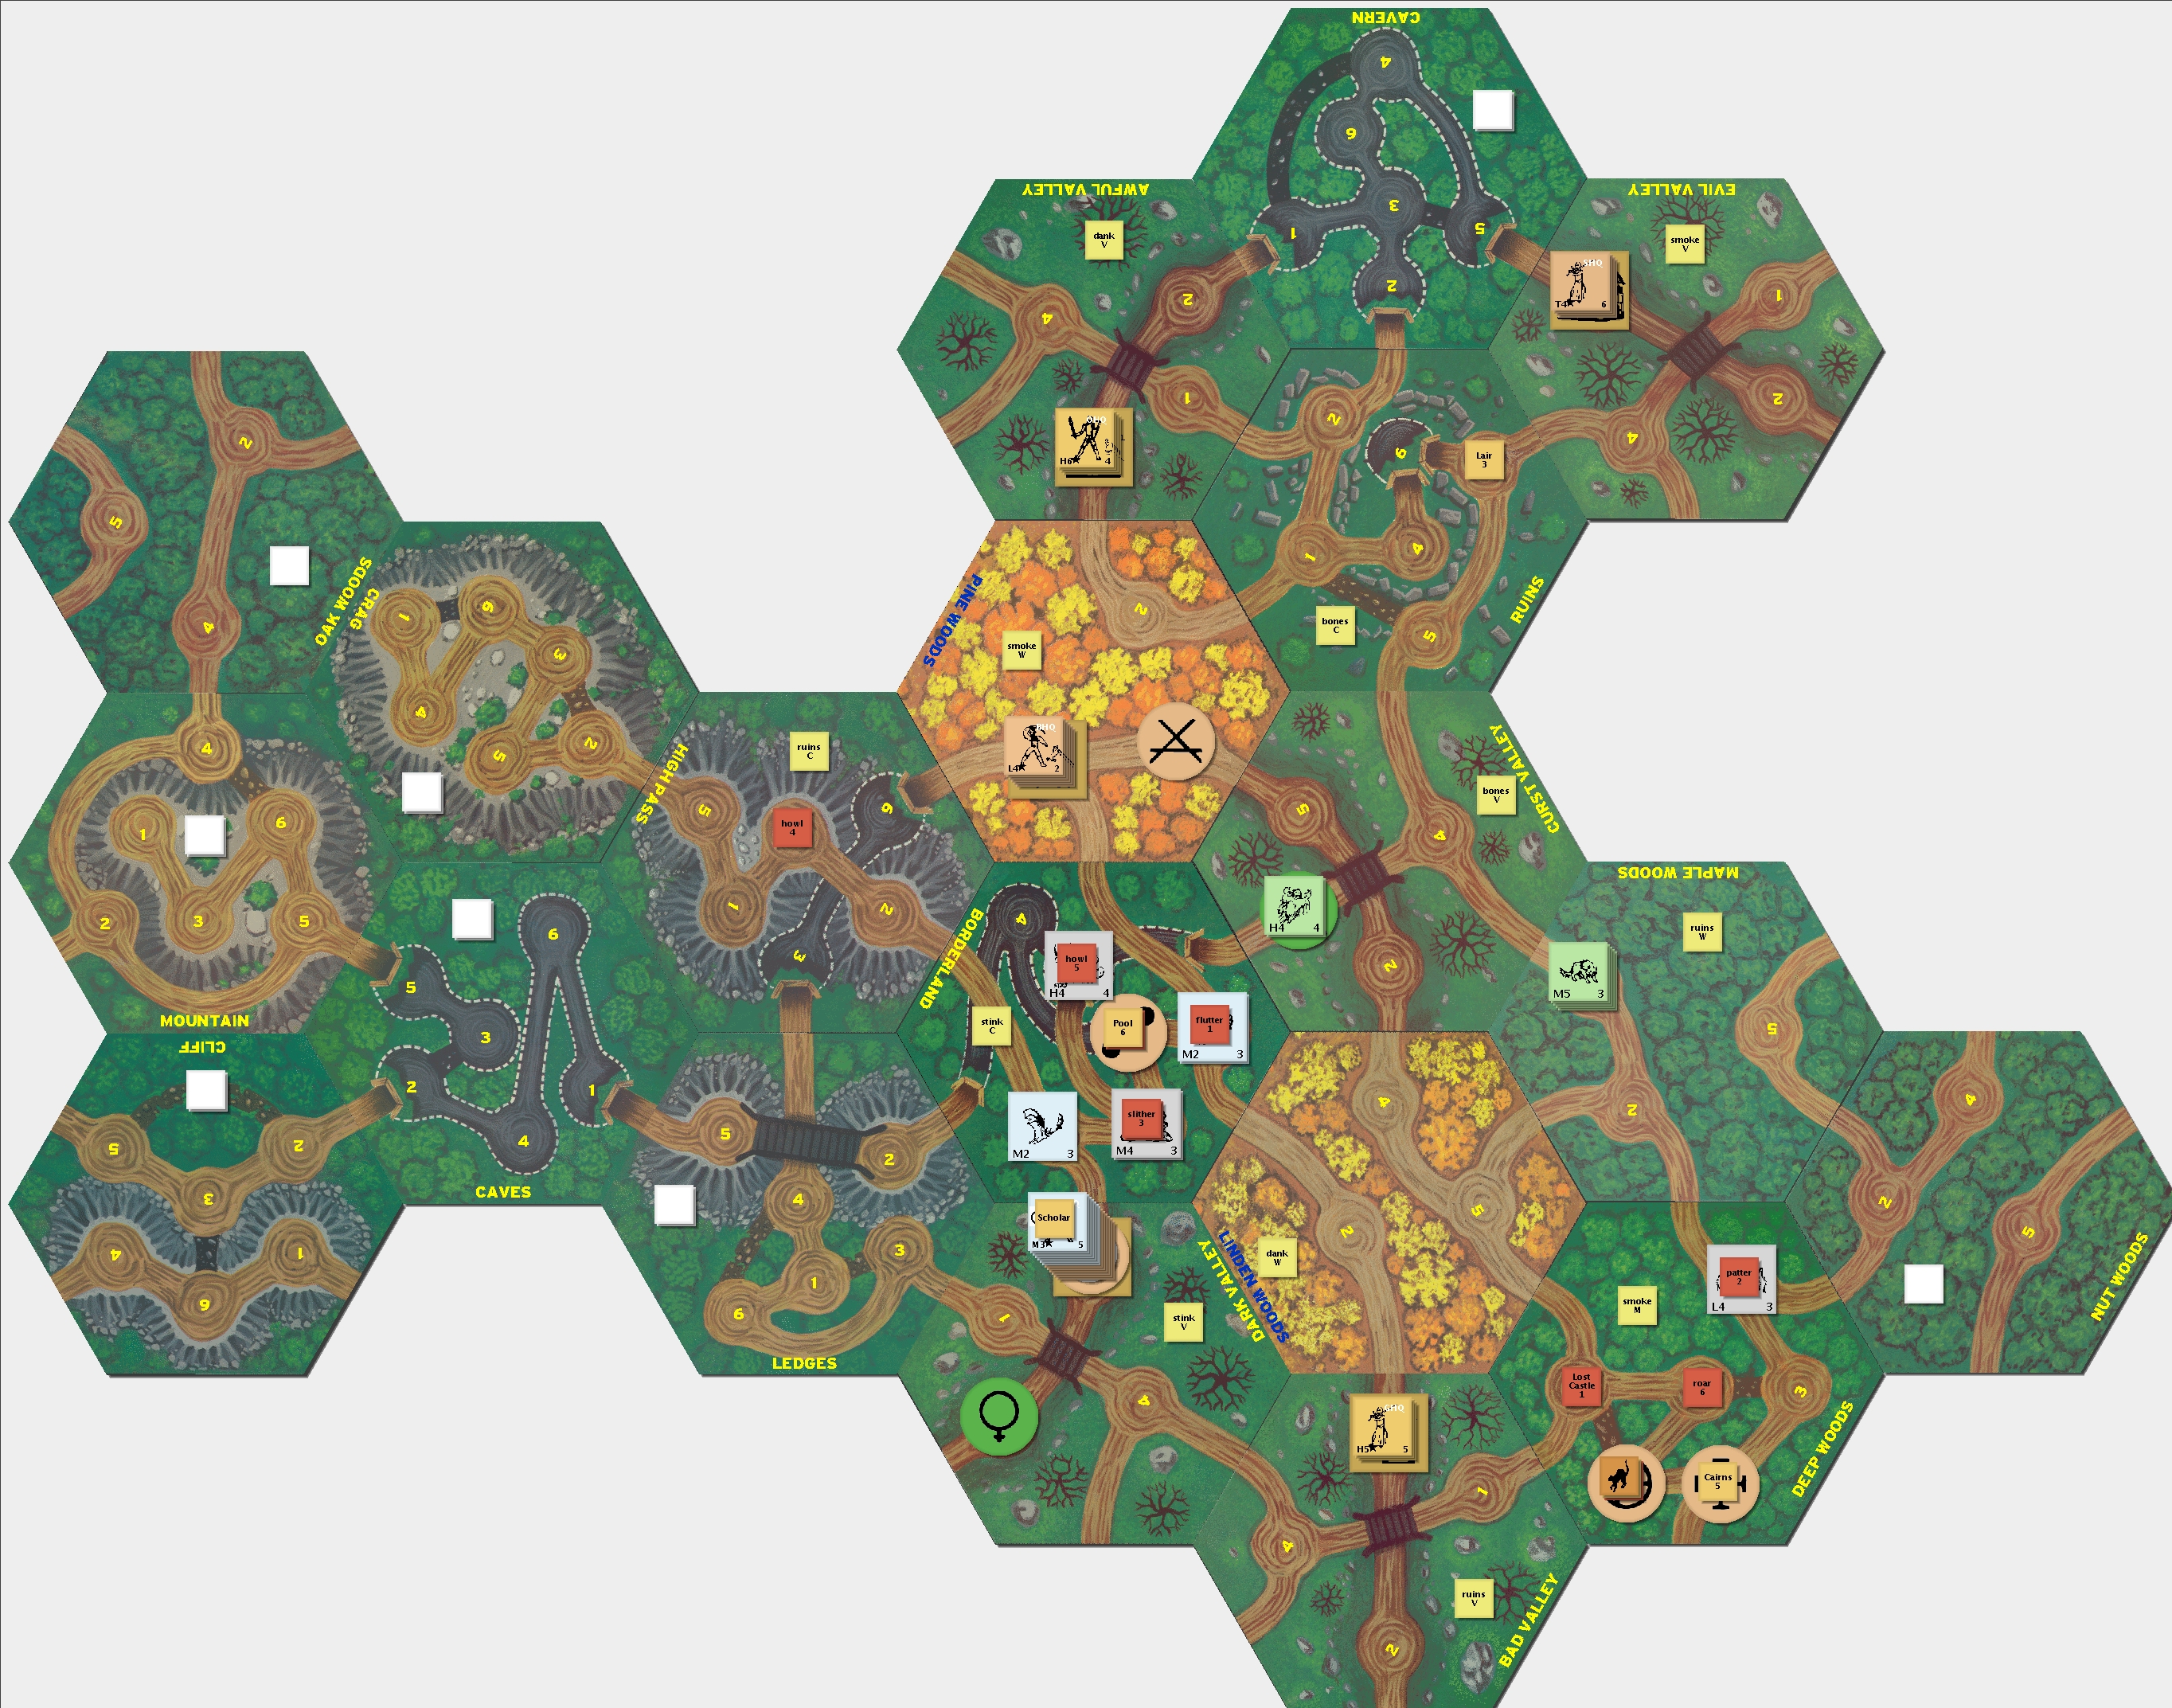
|
|
#
?
May 10, 2016 16:03
|
|
|
disperse posted:The Dwarf twists his hips and gets all of his weight behind this swing hitting the troll waist high and sending its top half toppling over into the murky pool, it's a home run!
|
|
#
?
May 10, 2016 20:24
|
|
|
I have orders from the Dwarf and Witch Queen and standing orders from the White Knight. Still waiting on orders from the Sorcerer, Black Knight, and Witch, thanks!
|
|
#
?
May 12, 2016 14:43
|
|
|
Just waiting on the Sorcerer and Black Knight, I'll just have the Black Knight continue searching for that helmet unless he tells me otherwise. (Is there any way to follow or watch threads on this forum? If so, let me know.)
|
|
#
?
May 13, 2016 14:39
|
|
|
disperse posted:Just waiting on the Sorcerer and Black Knight, I'll just have the Black Knight continue searching for that helmet unless he tells me otherwise. (Is there any way to follow or watch threads on this forum? If so, let me know.) Click the star in the corner of the thread to bookmark it, it'll show updates in the control panel.
|
|
#
?
May 13, 2016 16:14
|
|
|
EclecticTastes posted:Click the star in the corner of the thread to bookmark it, it'll show updates in the control panel. OK, thanks, but any way to get email notifications when there are new posts?
|
|
#
?
May 13, 2016 19:38
|
|
|
disperse posted:OK, thanks, but any way to get email notifications when there are new posts?
|
|
#
?
May 13, 2016 20:23
|
|
|
My apologies. My followers and I will move to Borderlands 2 to rid us all of a troublesome bat.
|
|
#
?
May 15, 2016 20:28
|
|

|
Sorry about holding up the game. I just don't have the energy to keep up with this game anymore so I'm going to bow out. Feel free to feed the Sorceror to a dragon or put him on idle. It was cool getting to learn about Magic Realm, but it turned out to be too fiddly for me.
|
|
#
?
May 16, 2016 22:56
|
|
|
Day 12 Results The Witch Queen haunts the Curst Valley with her sisters for a while before floating on and passing into Linden Woods. 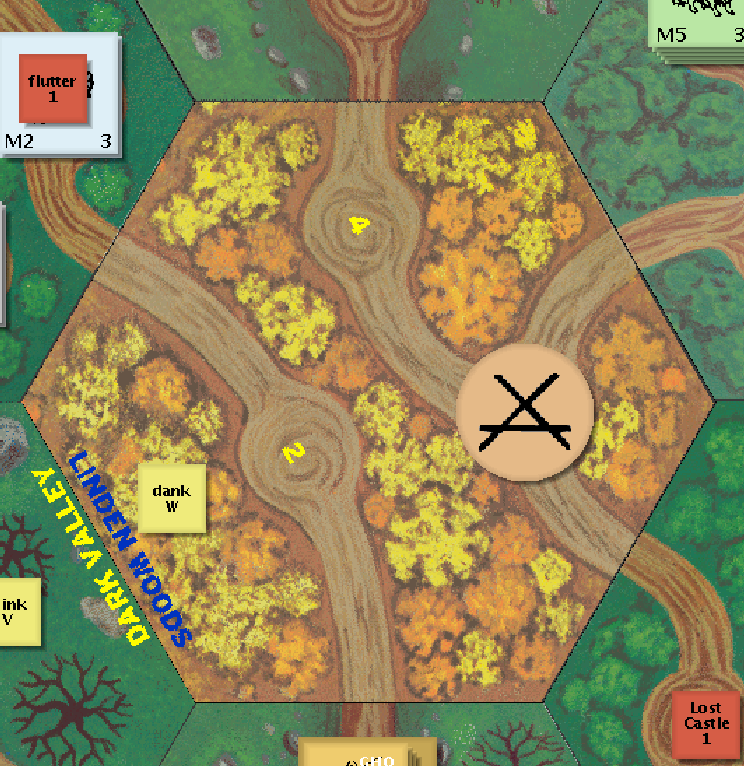 Move (Curst Valley 5), Move (Curst Valley 2), Move (Linden Woods 4), Move (Linden Woods 5) The Witch's Familiar sneaks into the Cairns to spy on the White Knight toiling there. Move (Deep Woods 5), Peer, Peer, Peer The Witch finds the Shrine and then spends the rest of the day hunched over the evil runes carved into the black stone of the Shrine. She learns a second copy of the Broomstick spell but then is surrounded by black energies and cursed. She feels restless and will not be sleeping well until she is able to cast remedy on herself or get to the Chapel. Hide (failed), Search (Locate - Found Shrine!), Search (Read Runes - Learn and Awaken Broomstick), Search (Read Runes), Search (Read Runes - Cursed with Ill Health, cannot rest) The White Knight slips on his Deft Gloves and uses the enhanced dexterity to slip his hands between the heavy rocks; unfortunately, he is unable to locate anything. Hide, Alert (Morning Star), Search (Loot - Nothing), Search (Loot - Nothing), Rest The Dwarf spends the morning resting by the dank and bubbling pool before resuming his search for the Octopus' treasure trove. Peering in the water, he sees the glinting of treasure, that must be it! Rest, Search (Locate - Found Pool!) A dragon hatchling, hearing the Dwarf stomping around the pool, comes to investigate.  The Sorcerer gets a wistful look in his eyes and marches off toward the edge of the realm, ready to leave the map and retire with the notoriety and fame he acquired killing goblins.  The Black Knight gives up on searching for the helmet and marches into Borderlands where a circling giant bat caught his eye. His army follows him.  Hide (Success), Hide, Alert (Mace), Move (Borderland 2)
|
|
#
?
May 17, 2016 17:12
|
|
|
Evening Orders Needed The Witch has been cursed and has the option of casting her Remedy spell to get rid of the ailment. The Dwarf is unhidden in a clearing with a heavy armored dragon. The Black Knight and his army are hidden in a clearing with a single giant bat.
|
|
#
?
May 17, 2016 17:14
|
|
|
I don't think I'm actually allowed into the Chapel, so I best remedy up.
|
|
#
?
May 17, 2016 17:41
|
|

|
TheNabster posted:I don't think I'm actually allowed into the Chapel, so I best remedy up. You're absolutely allowed in! The natives there hate you and will probably try to kill you on sight if they see you. (And the Order are the baddest motherfuckers on the board, so they have a better shot at it than basically anyone else.) But you can totally still go there! 
|
|
#
?
May 17, 2016 20:30
|
|
|
I think my strategy is even simpler this time: 1. Play Duck T3* as my defense every turn. 2. Use H6 attack in smash. 3. Put my other helmet on if the first one gets busted. 4. Preferentially fatigue move chits over attack because the goal is to stay in this space until something cool is found. 5. Fatigue something if combat would otherwise end.
|
|
#
?
May 17, 2016 20:39
|
|
|
TheNabster posted:I don't think I'm actually allowed into the Chapel, so I best remedy up. If you find the Holy Grail (it generates white magic), bring it over to me and I can cast my heal spell on ya.
|
|
#
?
May 18, 2016 00:35
|
|
|
EclecticTastes posted:If you find the Holy Grail (it generates white magic), bring it over to me and I can cast my heal spell on ya. Hmm, that doesn't have anything to do with the 50 fame reward you get when turning the Holy Grail in to the Order does it?
|
|
#
?
May 18, 2016 15:44
|
|
|
Gutter Owl posted:You're absolutely allowed in! Yep, just record a couple hides, even if the Order battle you and you fail to hide you can always run, their warhorses are not very fast on their non-galloping side.
|
|
#
?
May 18, 2016 15:46
|
|
|
disperse posted:Hmm, that doesn't have anything to do with the 50 fame reward you get when turning the Holy Grail in to the Order does it? Nah I'm good with it being 1 Great Treasure that also supplies me with an incredible source of healing for anyone I want.
|
|
#
?
May 18, 2016 23:22
|
|
|
Evening 12 Results The Witch prepares a soothing cup of chamomile and peppermint leaves (along with a few secret ingredients) to remedy the Ill Health curse and allow her to rest comfortably. 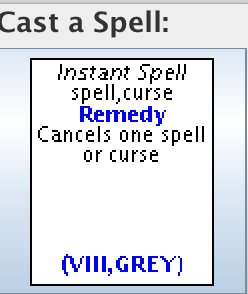 The Dwarf squares off against the dragon hatchling, ready with his helmet gleaming in the sun: 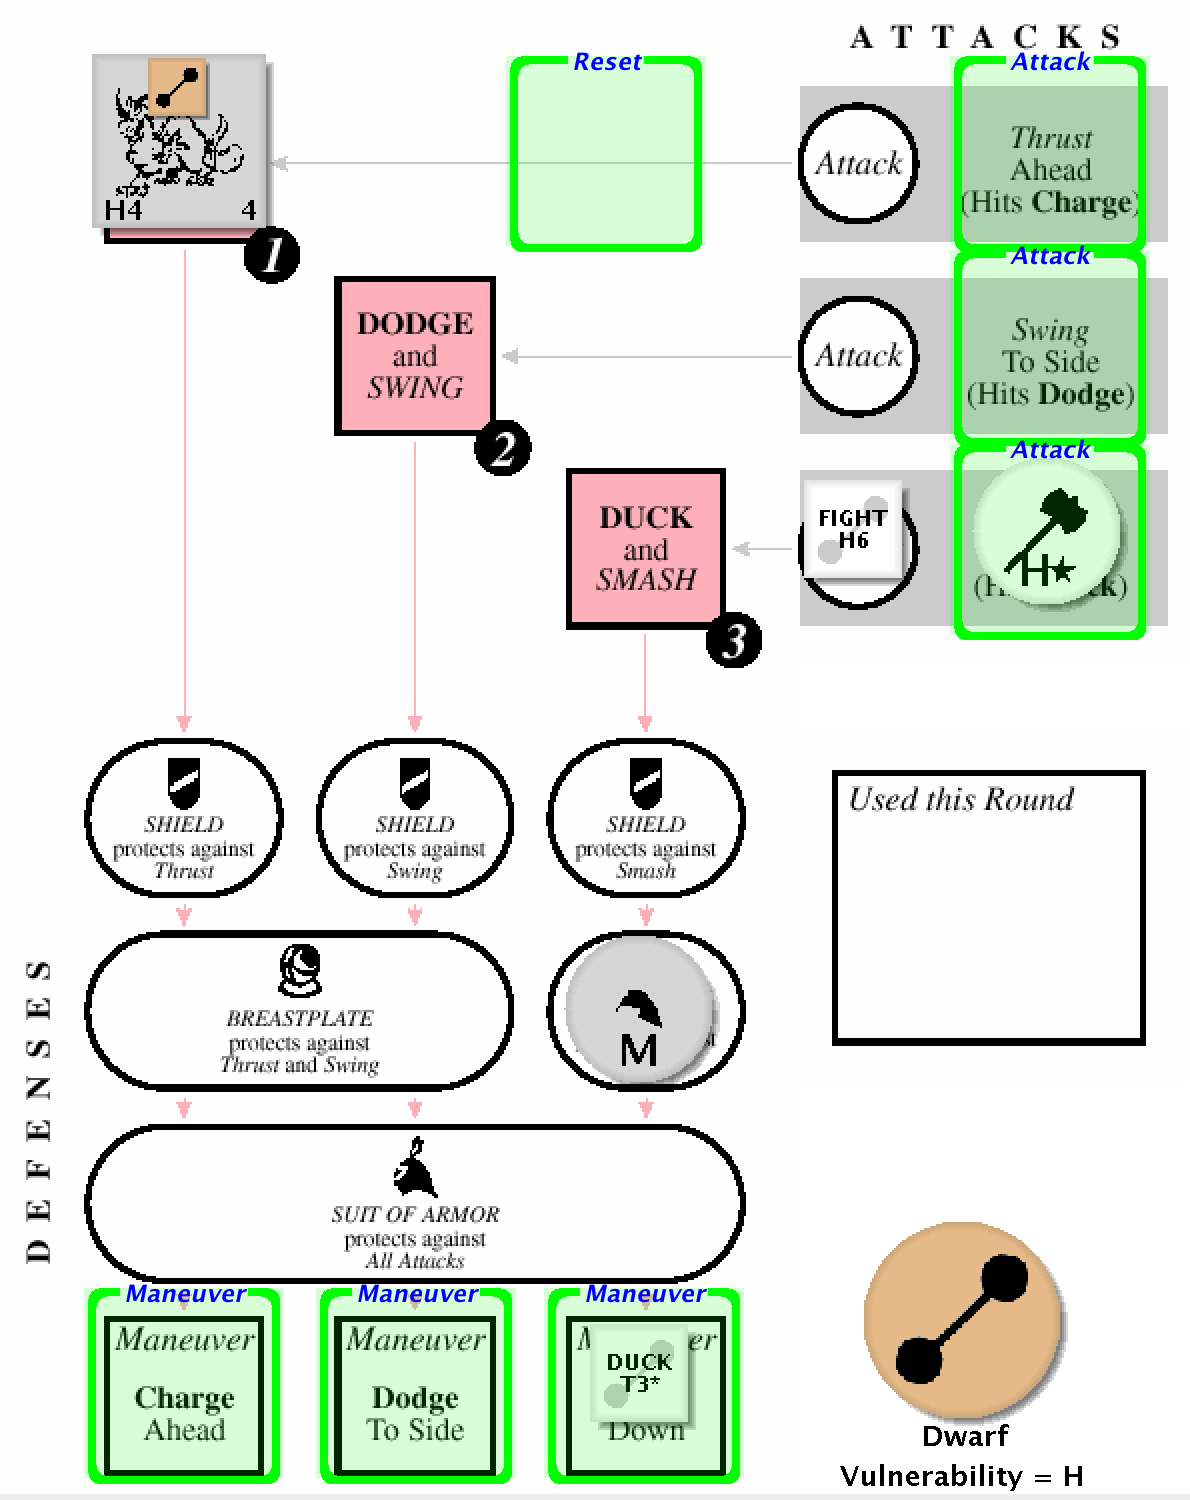 He misses the dragon and prepares for an extended fracas. 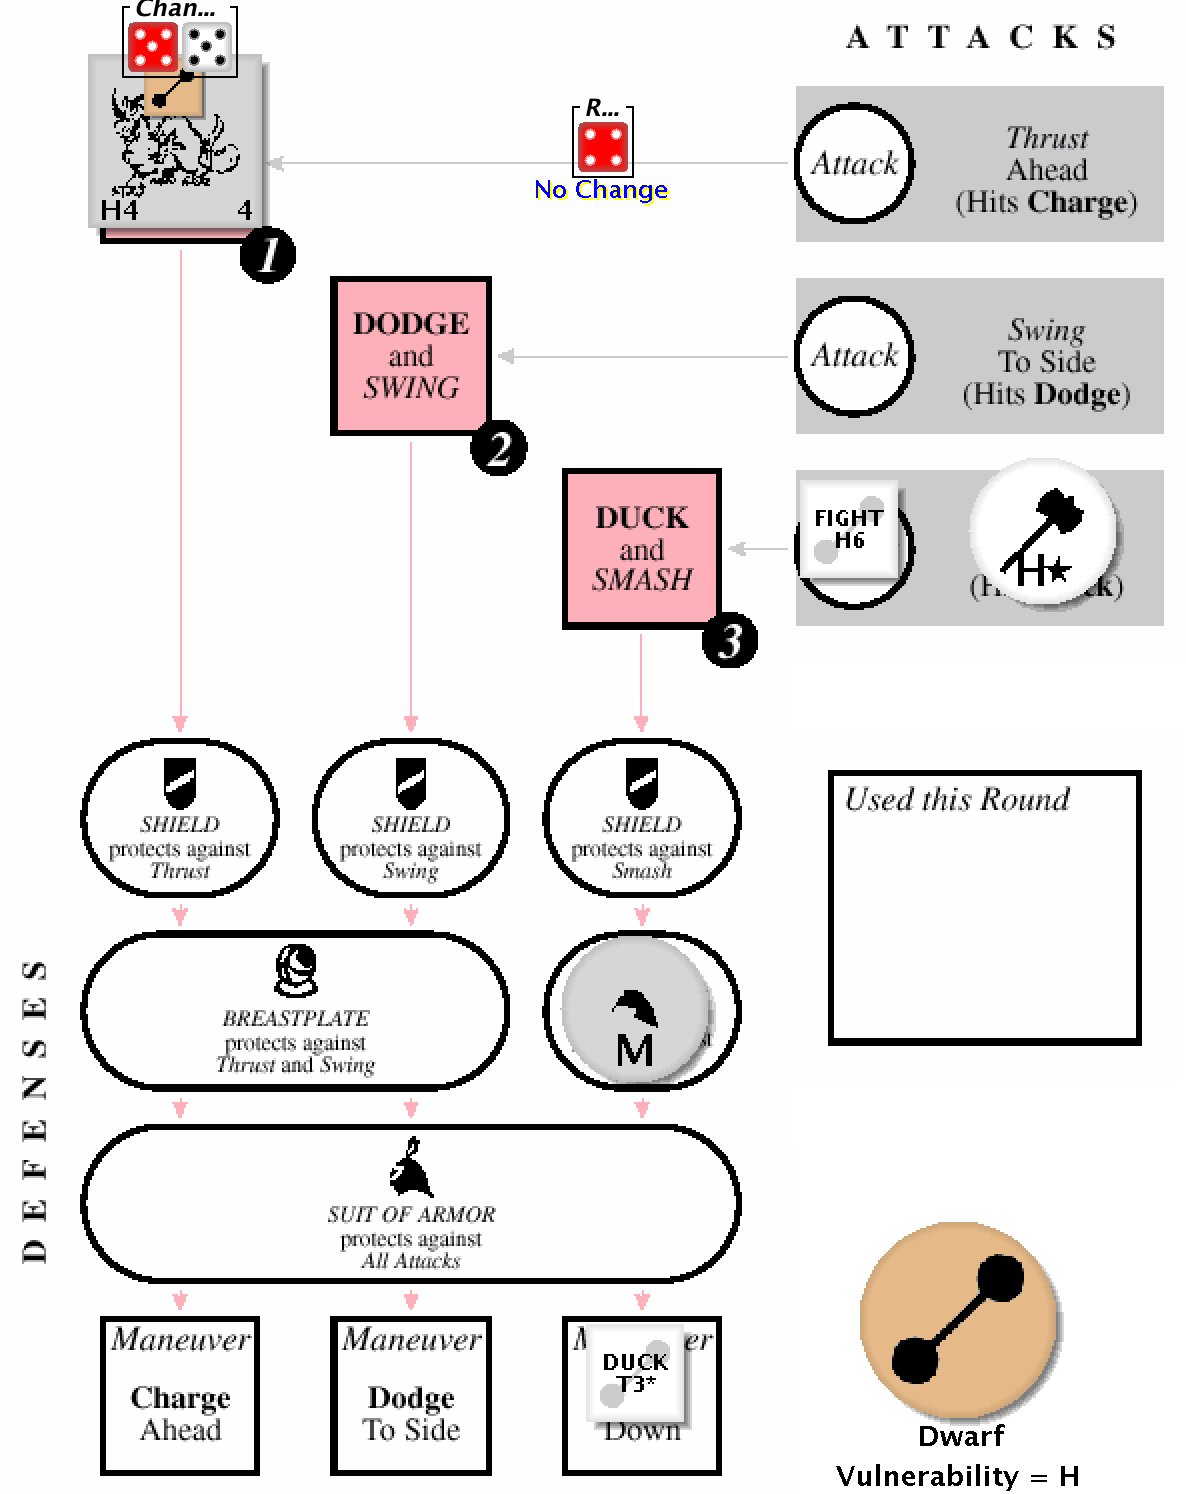 For the rest of the combat the Dwarf will alternate between using the Fight H6 and Fight H5* to prevent combat from ending. It's just a matter of time... 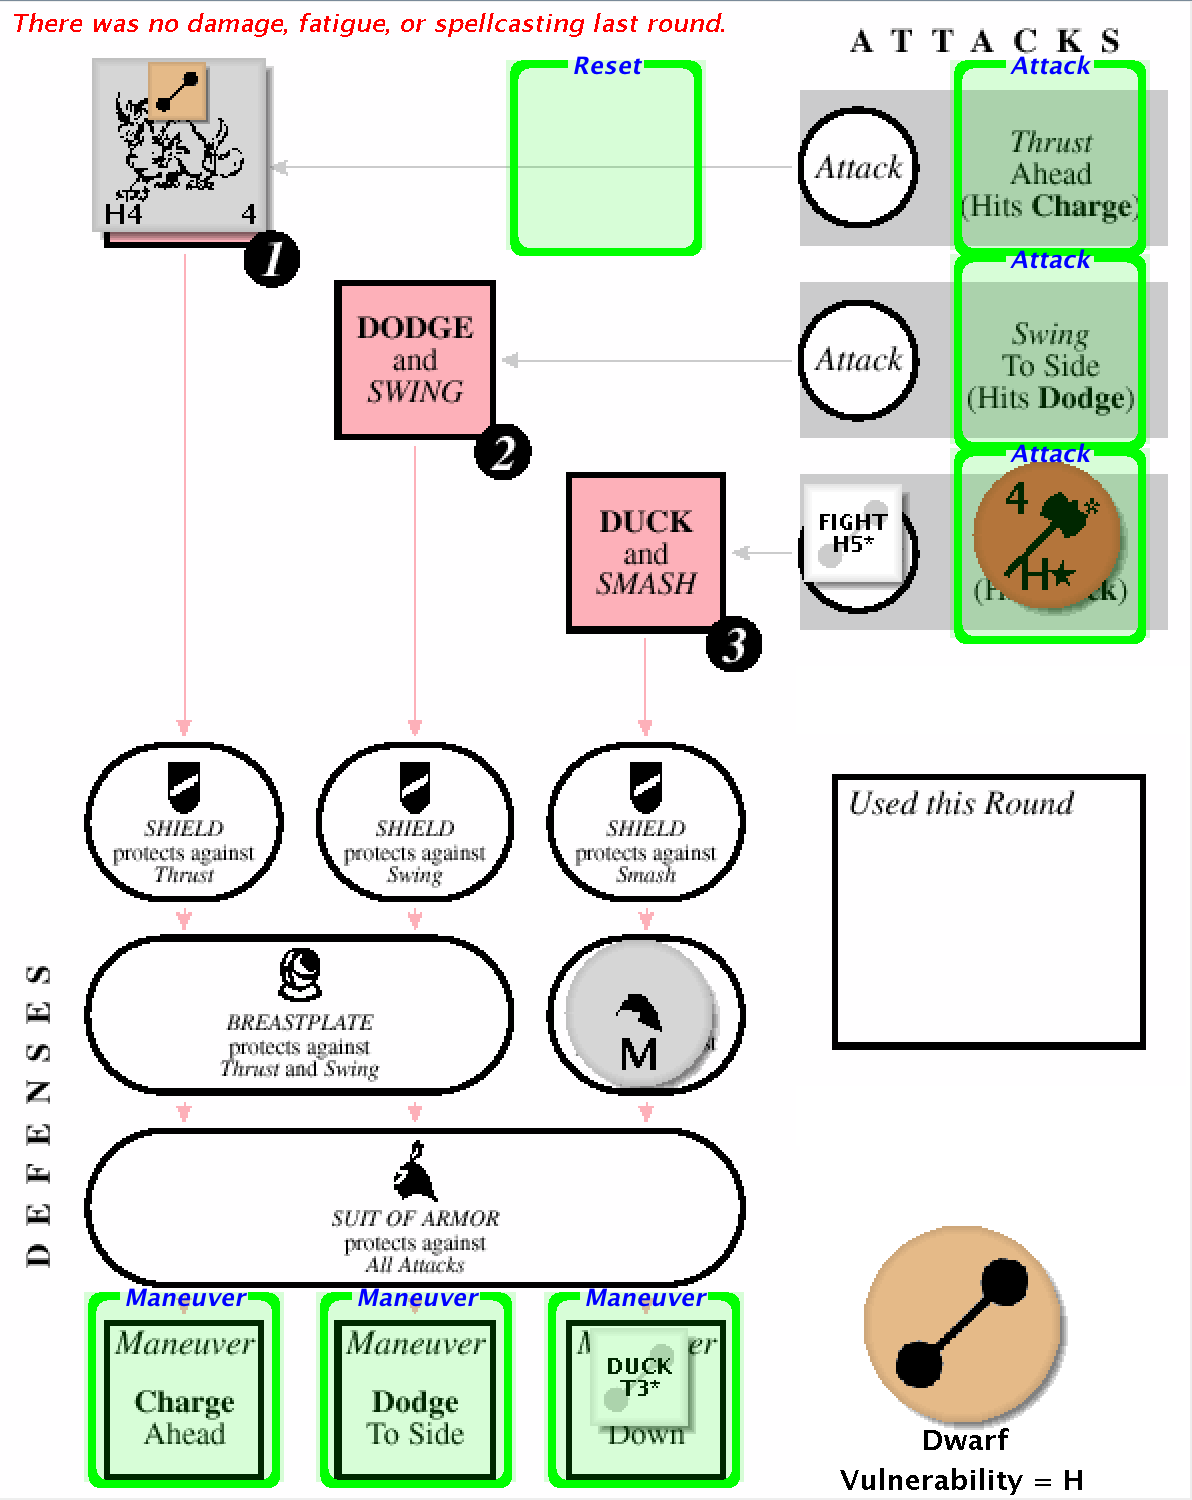 Finally, after 12 exhausting rounds of combat, the Dwarf connects with the dragon hatchling and puts an end to its life:  Results: +5 Fame, +5 Notoriety, Fatigues Move H5*, Move T5**, Move T6*, and Fight T5** The Black Knight and his army surround the giant bat. 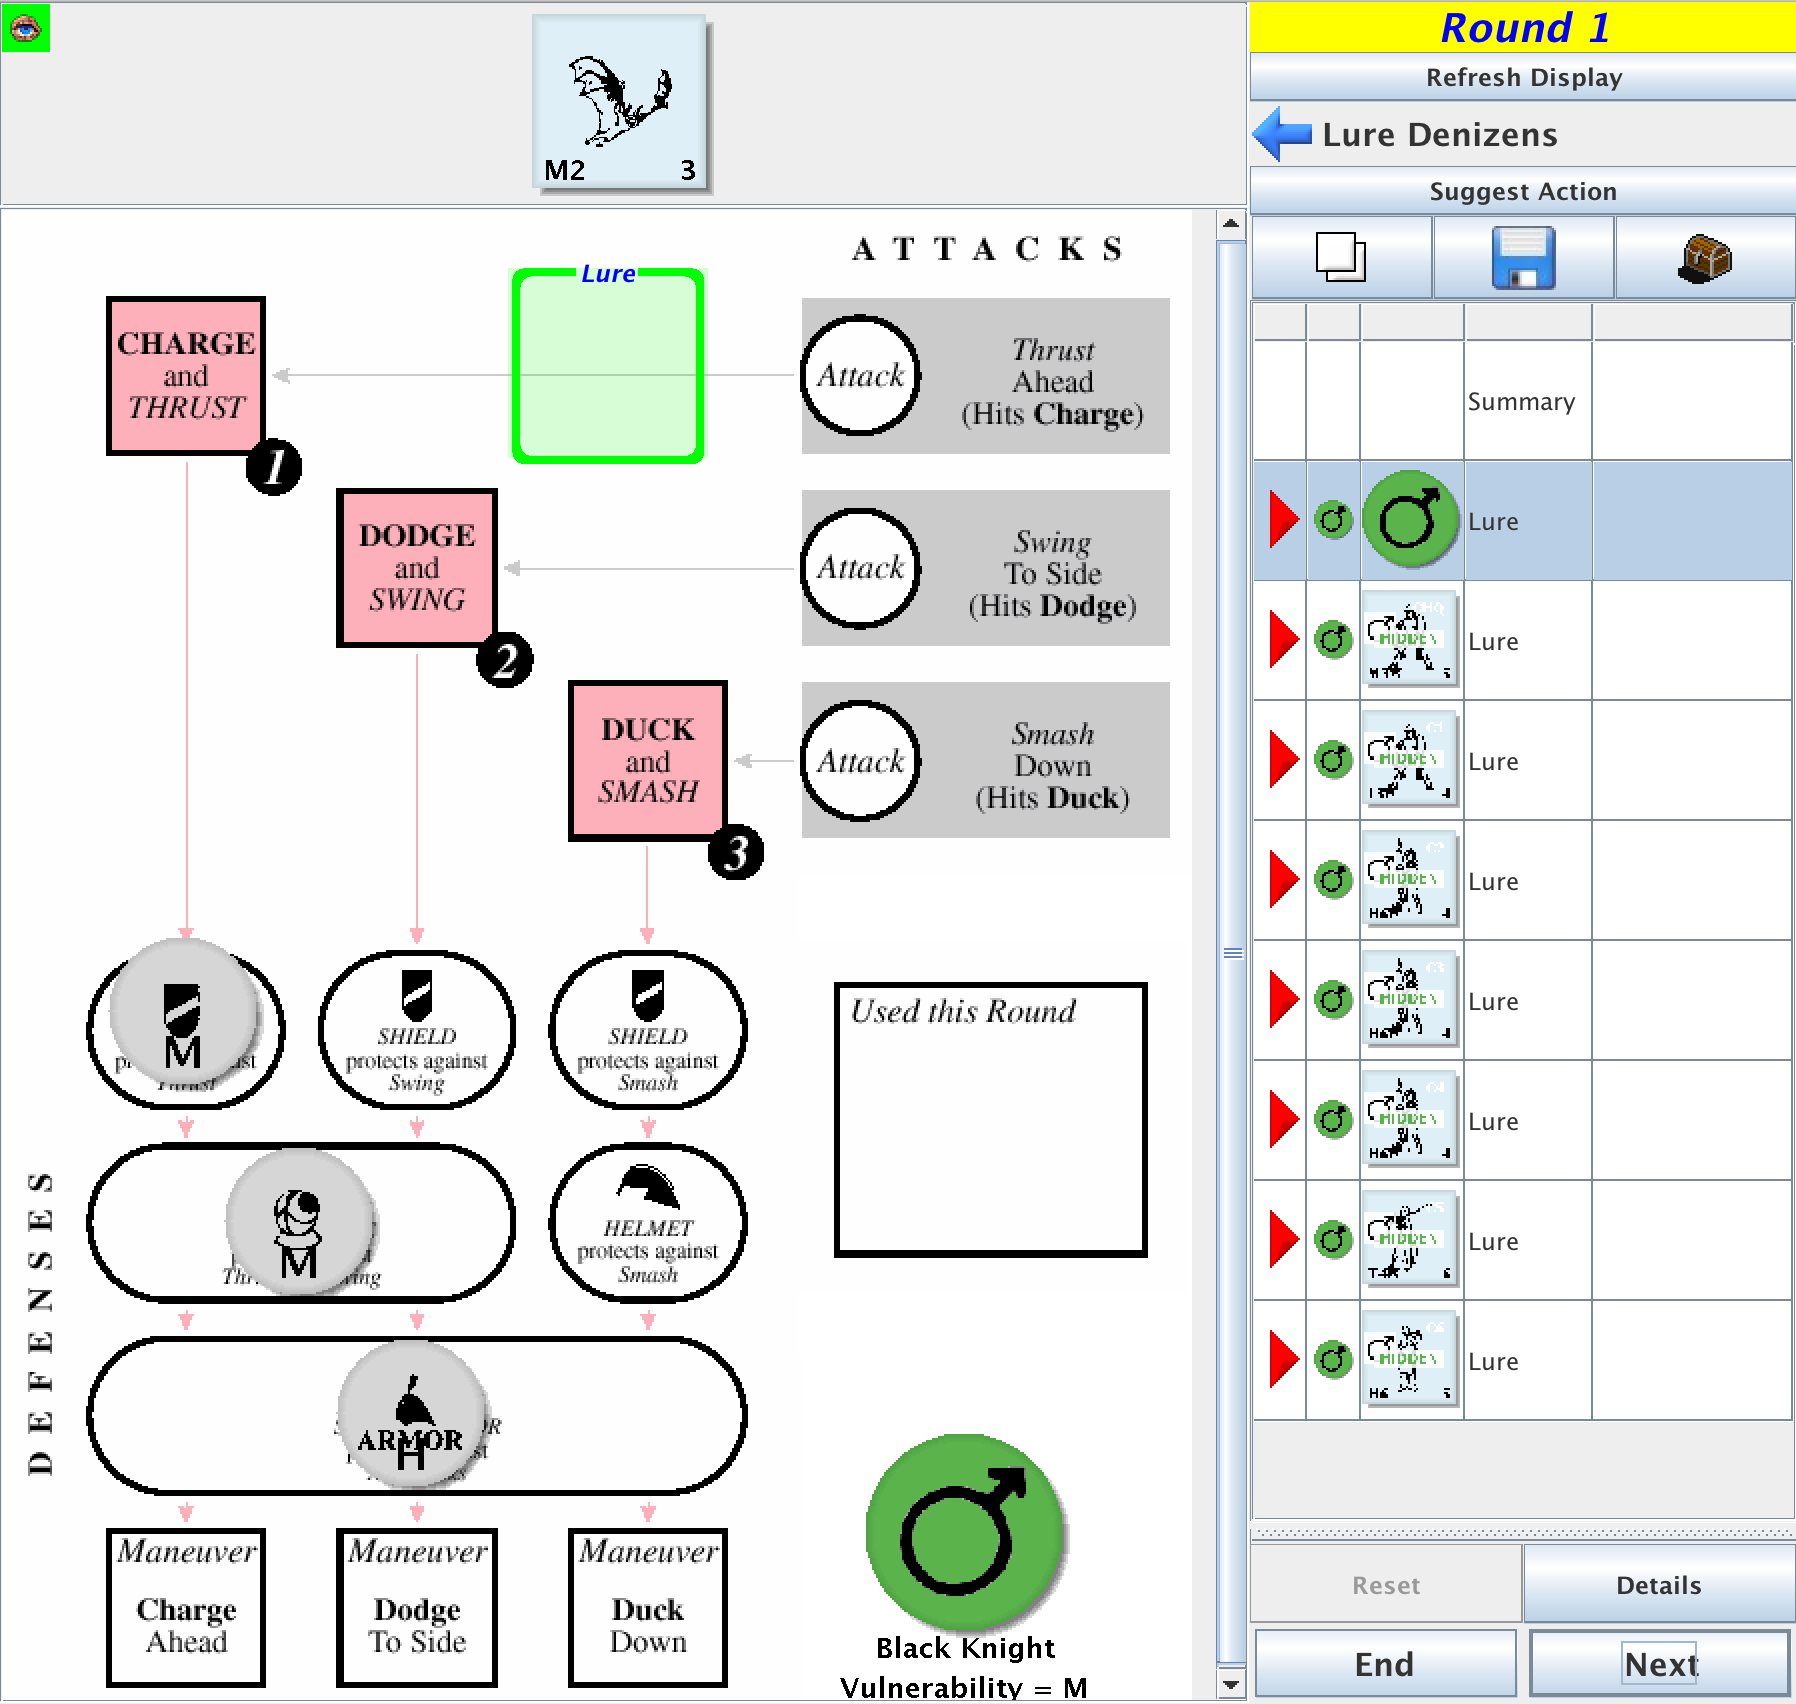 All they have to do is have C5, in his heavy armor, safely lure the giant bat, while the rest of the crew surrounds and dispatches the bat, which looks something like this: 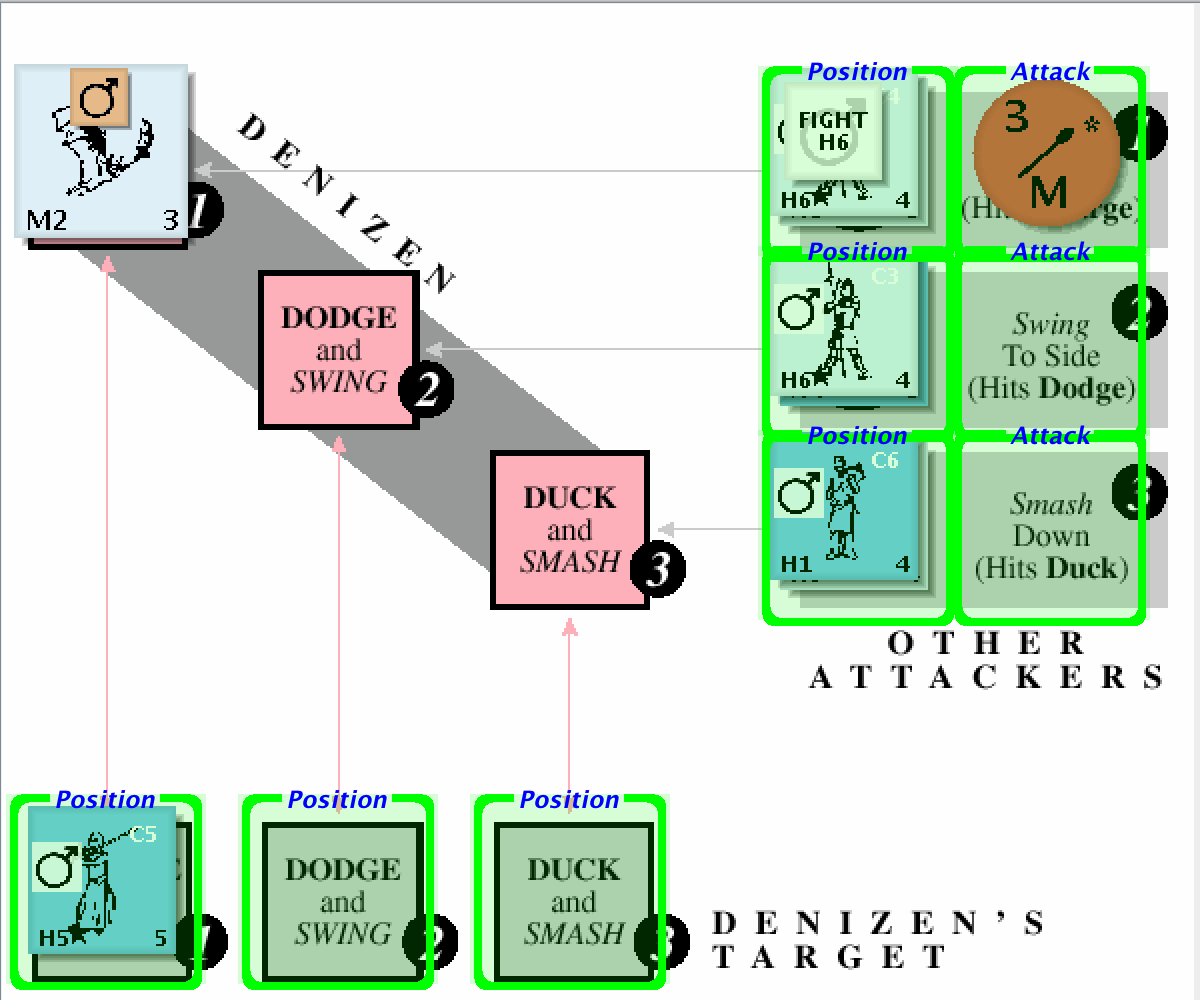 ...and then this: 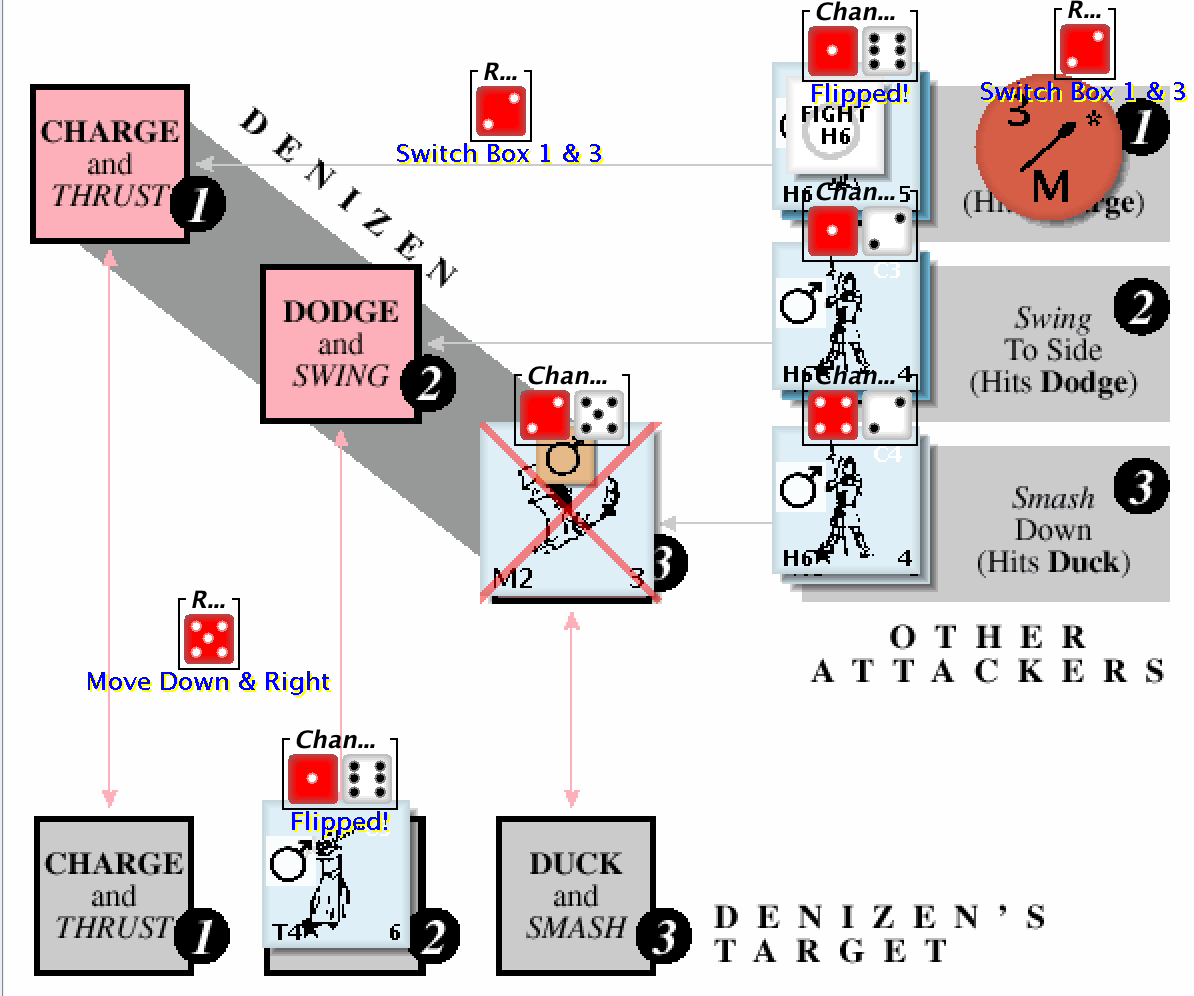 For those keeping score, C4, the pikeman, with his long, pointy, stick is the one who scores the kill. Results: +3 Fame, +3 Notoriety
|
|
#
?
May 20, 2016 20:04
|
|
|
Day 13 Orders Needed You can find the current state of the game board here.
|
|
#
?
May 20, 2016 20:05
|
|
|
Did the bat have any chance to hurt anyone with C5 luring?
|
|
#
?
May 21, 2016 06:29
|
|
|
LeSquide posted:Did the bat have any chance to hurt anyone with C5 luring? Nope, the only chance it had was avoiding death for two rounds in a row and allowing combat to end.
|
|
#
?
May 23, 2016 15:11
|
|
|
Sorry for the long delay, I'm coaching little league and the baseball season has kept me very busy, winding up now... Day 13 Results The White Knight, exhausted after days of digging through piles of stones in search of the tremendous spider's hidden treasure, spends the day resting. First, he uncorks and applies the Poultice of Health on his aching limbs which greatly speeds up the resting process. By the end of the day, he is fully rested.  In the evening, a winged demon arrives at the Shrine where the Witch is studying runes: 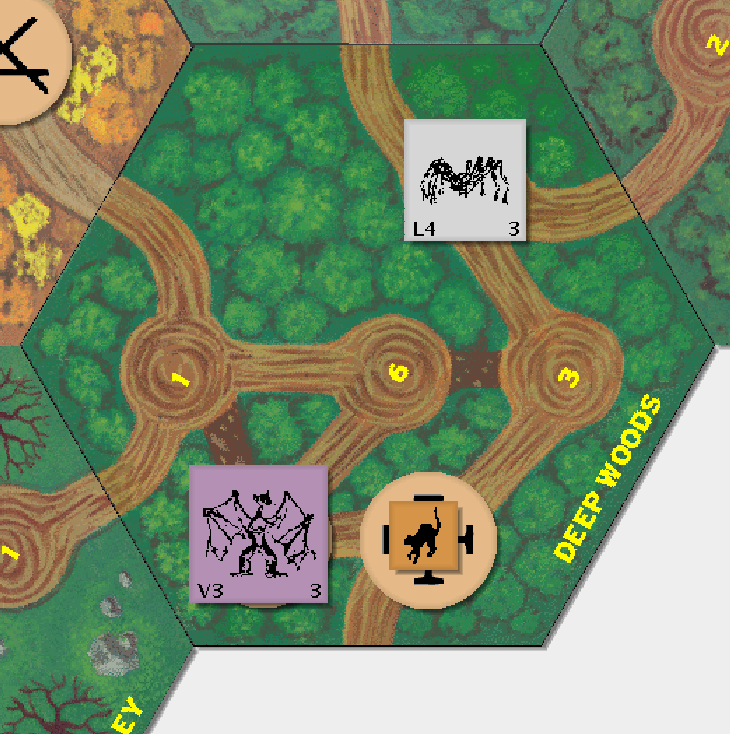 Rest X 5 (Resting Fight H3** X 2, Fight H4*, Fight T3**, and Magic I3**) The Witch's familiar follows the White Knight, watching his every move. The Sorcerer leaves the realm, never to be heard from again (at least not in this game)... Moves off map The Dwarf rests up after his long and grueling combat from the night previous and then continues to search for treasures in the deep and murky pool. He finds a curious circle of mushrooms along the edge of the pool and, sweeping away the dirt and grime, finds evil mystical runes carved into the stone beneath. Perhaps revealing and reading more of the text will bring great reward (or ruin)... The Toadstool Circle is a new treasure location that radiates black magic in the clearing. The Dwarf now has the choice to either continue looting the pool or to roll on the Toadstool Circle table: 1. Take the Devil sword (H4*/H3*) 2. Take a treasure card 3. Instantly teleport to any cave clearing of your choice 4. For the rest of the day recorded searches may use Peer table to search any clearing 5. Roll on the Power of the Pit(!) table 6. Roll for a Curse The Devil Sword is just what the Dwarf asked for, it's a fast and heavy weapon with a sharpness star. The Dwarf in the caves is also one of the few characters with a chance to find it (1 in 6 chance as opposed to 1 in 36 chance for everyone else). The bad news is that on a roll of a 6, the Dwarf is cursed, annoying, but can be cured at the Chapel, and worse, on a roll of a 5, he has to roll on the Power of the Pit table which is as follows: 1. Fiery Chasm Opens: All unhidden characters in the clearing are killed! 2. Carried Away: The target is instantly killed 3. Terror: All Light and Medium chits are wounded, Light or Medium natives, monsters, and horses are killed 4. Blight: All of the targets chits with effort asterisks become wounded 5. Forget: All of the target's Magic chits become fatigued 6. Rust: All of the target's active armor counters suffer damage Fortunately, the Dwarf is unaffected by Terror and Forget results but on a roll of 1 or 2 he is killed! At the end of the day, two heavy snakes slither down to the pool for a drink and find the Dwarf searching there: 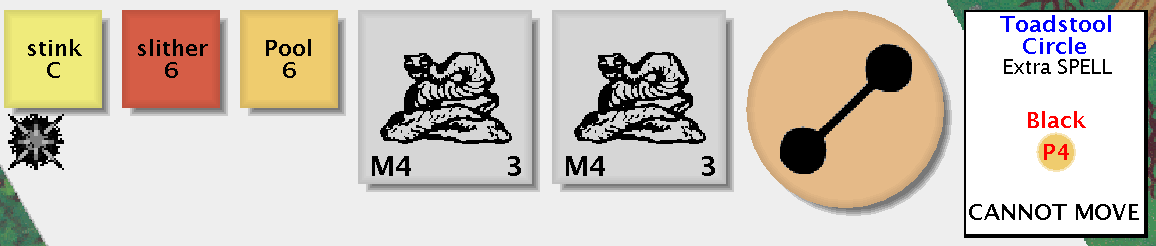 Rest (Fight T5**), Search (Loot Pool - Finds Toadstool Circle) The Witch, unhidden and distracted by the scintillating magic runes in front of her, is surprised by (and blocked by) the winged demon who has returned to the Shrine. She is unable to accomplish any studies today. 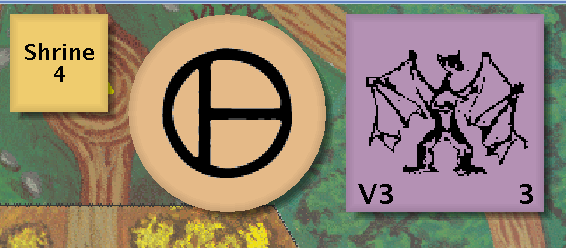 Hide (Blocked), Rest (Blocked), Search (Blocked), Search (Blocked) The Witch Queen follows the strangely soothing sounds of the howls of wolves into the woods. She sneaks into a clearing where five of the pack remain. 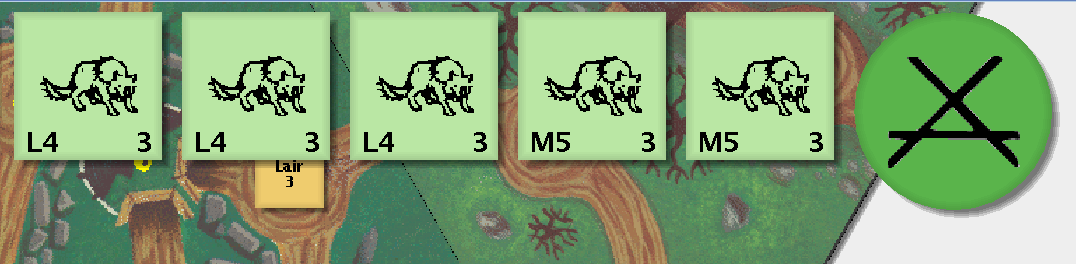 Hide (success), Hide, Move (Maple Woods 2), Move (Maple Woods 4) The Black Knight leads his army in an ambush of the pair of snakes he saw nearby; unfortunately, they slithered away earlier in the day. 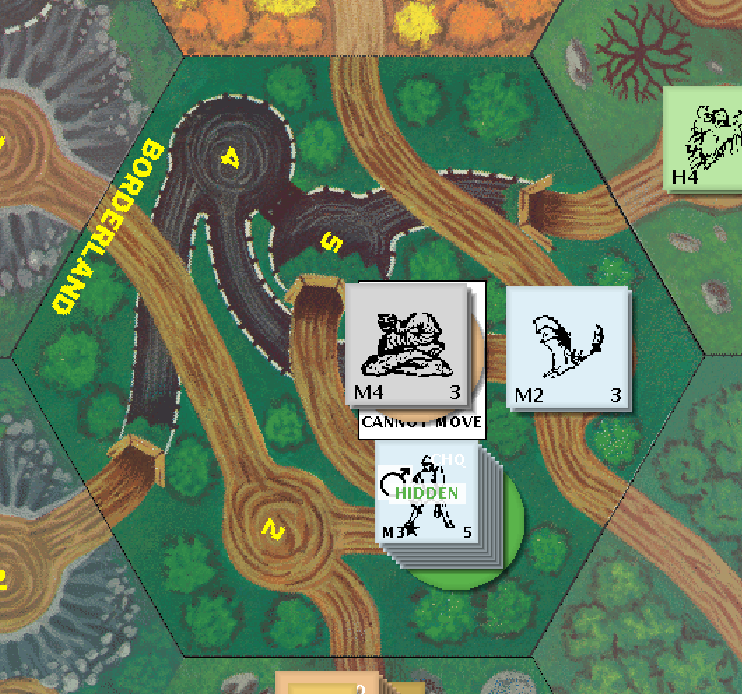 Hide X 3 (success), Move (Borderlands 3)
|
|
#
?
Jun 3, 2016 20:50
|
|
|
Evening Combat Orders Needed The Witch is unhidden in a clearing with a tremendous winged demon: The Dwarf is unhidden in a clearing with two heavy armored serpents: The Witch Queen is hidden in a clearing with five wolves (I have the combat orders you sent already):
|
|
#
?
Jun 3, 2016 20:53
|
|
|
Unleash the TROOOOOOLL.
|
|
#
?
Jun 3, 2016 21:19
|
|
|
Good luck, Witch. The two demons are really, really loving awful to fight unless you're the Pilgrim. They cast Power of the Pit instead of attacking, and can drop a lucky instakill on you.
|
|
#
?
Jun 3, 2016 22:19
|
|
|

|
| # ? Apr 27, 2024 15:06 |
|
|
Yeah, if you can't pop off an Exorcism (only possible if you're the Pilgrim or a phenomenally lucky White Knight, or get an even more phenomenally lucky combination of spell-bearing item and contained spell), demons are bad news and it's often better to just amscray. Oh and I guess if you have the Magic Wand you can mitigate the danger (it lets you choose the main spellcasting die's result rather than rolling, and actually affects enemy spells as well as your own due to a quirk of the rules), but it's still pretty bad.
|
|
#
?
Jun 3, 2016 23:04
|
|