


|
gradenko_2000 posted:huh, that's fascinating. Maybe I should look around and see if there are any after-action reports to see how other people have "beat" it, from either side These are all of the comments I could find on ASLSA that are relevant - might've missed one or two but you can get a glimpse of what did or didn't work for peeps. quote:Came down to the wire, no reinforcements ever arrived!
|
 #
?
Mar 1, 2024 15:02
#
?
Mar 1, 2024 15:02
|
|


|

|
| # ? Apr 28, 2024 06:38 |
|
|
I bought a little dice tower to do my rolls in while I'm playing for a little bit of authenticity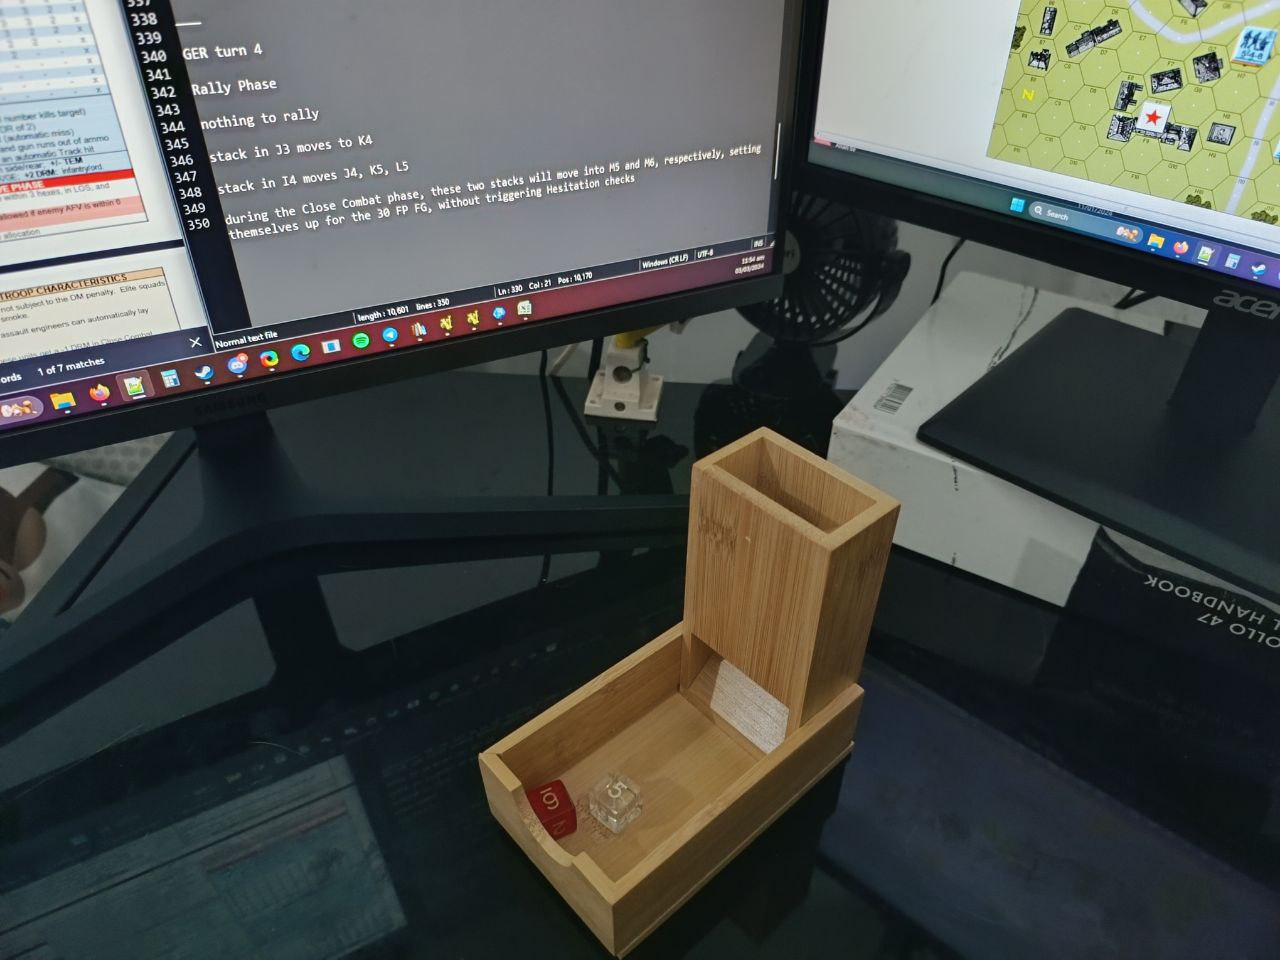
|
|
#
?
Mar 3, 2024 04:59
|
|
|
I respect how nerdy you are being about this.
|
|
#
?
Mar 3, 2024 12:50
|
|
|
War of the Rats, Round Two - with tougher Hesitation rules We're going back to this same scenario, but we are using alternative rules to make Hesitation checks tougher to pass, while also applying them even to non-open hexes: 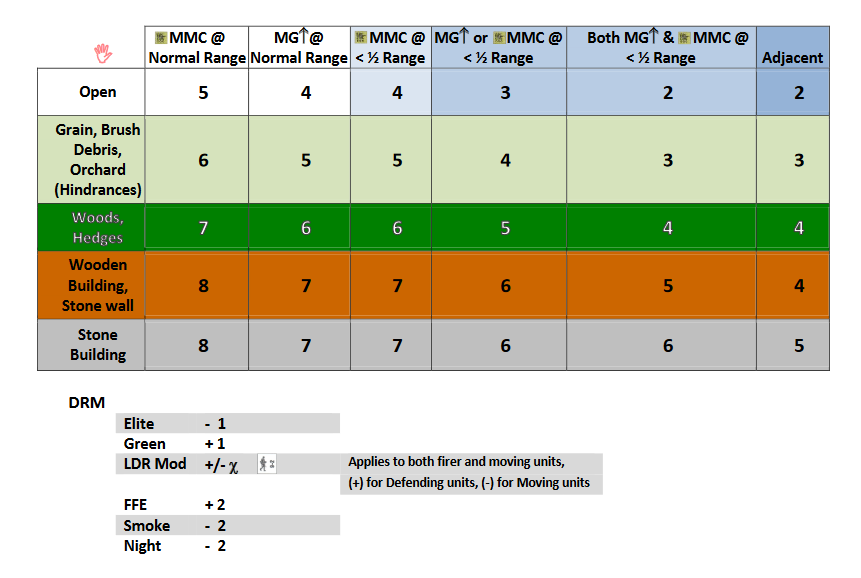 ___  We'll be using the same opening set-up, though this is more because I did give it a think and couldn't come up with any new ideas, rather than a deliberate attempt to duplicate the circumstances of the first playthrough precisely. Knowing what I know now, I think I would have spread out the Soviets even more, like to L5, E8, and E9, and not stack so much in J5. But, on with the game. GER turn 1 Rally Phase nothing happens Movement Phase 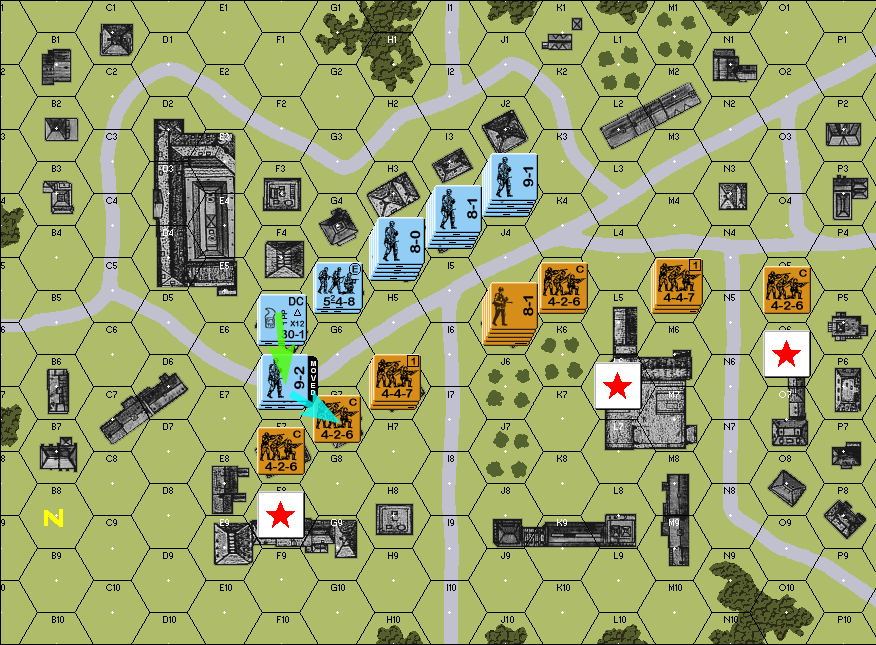 A 548 squad and a 9-2 leader attempts to move from F5 to F6 Referring back to that chart of Hesitation checks, with an open hex, moving adjacent to an enemy unit, means Target Number of 2; with a -1 DRM for an Elite squad, and -2 DRM for leadership A 3 is rolled, modified to 0, which passes. The 548 also attempts Demo Charge placement in G7 - if the 548 is still in Good Order after the Defensive Fire phase, the DC will explode at the start of the Close Combat Phase 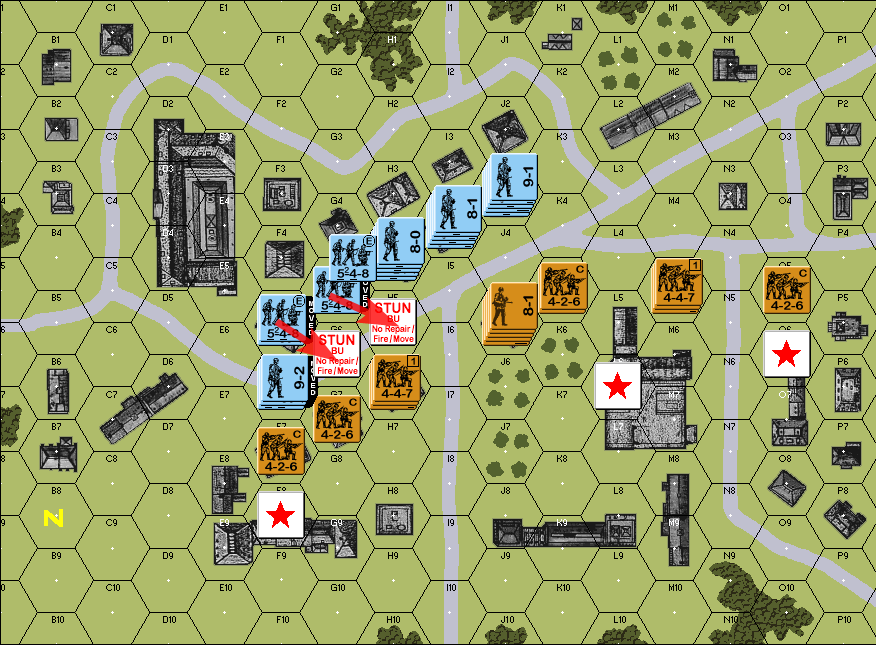 The other 548 with a DC in F5 attempts to move to G6. It rolls a 5 on the HC and halts. Another 548, in G5, attempts to move to H5, and it rolls a 2 on the HC and halts.  now, per the Hesitation rules, once a unit fails to enter a hex due to Hesitation, no other unit can try to enter that same hex, so the second 548 in G5 cannot even attempt to get to G6 or H5, and it has to take a longer route around even entering F5 requires a Hesitation check, since it is within LOS and range of enemy units - but the TN is high, at a 6, and the squad rolls a 1 on the HC and passes entering E6, an open hex, has a TN of 5, and the squad rolls a 2 and passes entering E7, an open hex adjacent to an enemy, has a TN of 2 (as we've seen previously), but the squad rolls a natural 1, modified to 0, and also passes 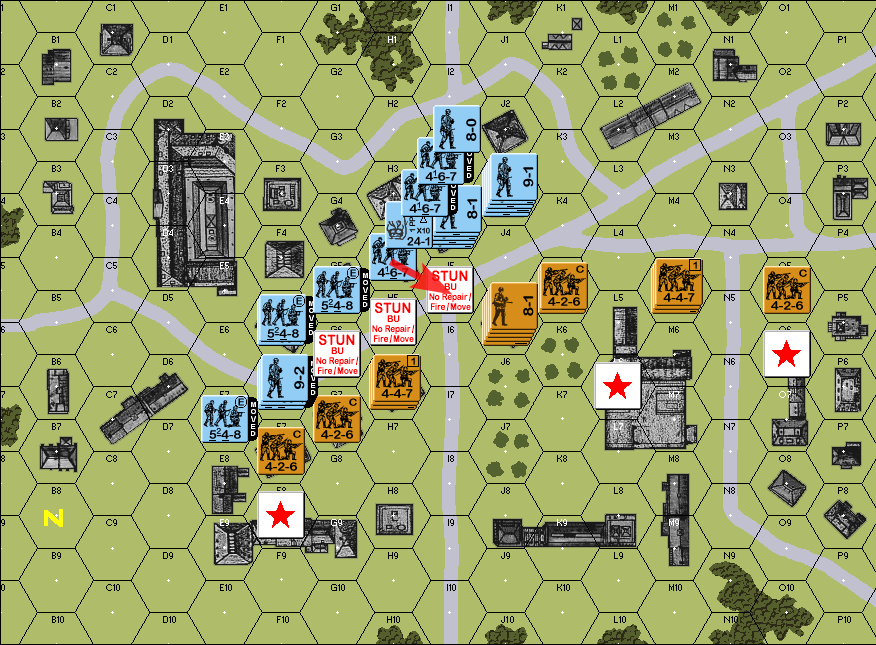 finally, two 467s in H4 attempt to move to I5, but they roll a 2 on the TN 2, and halt in place I will not be as verbose in going through the movement phase as we go along, but since we're dealing with new mechanics here, I'm going through it step-by-step. Fire Phase 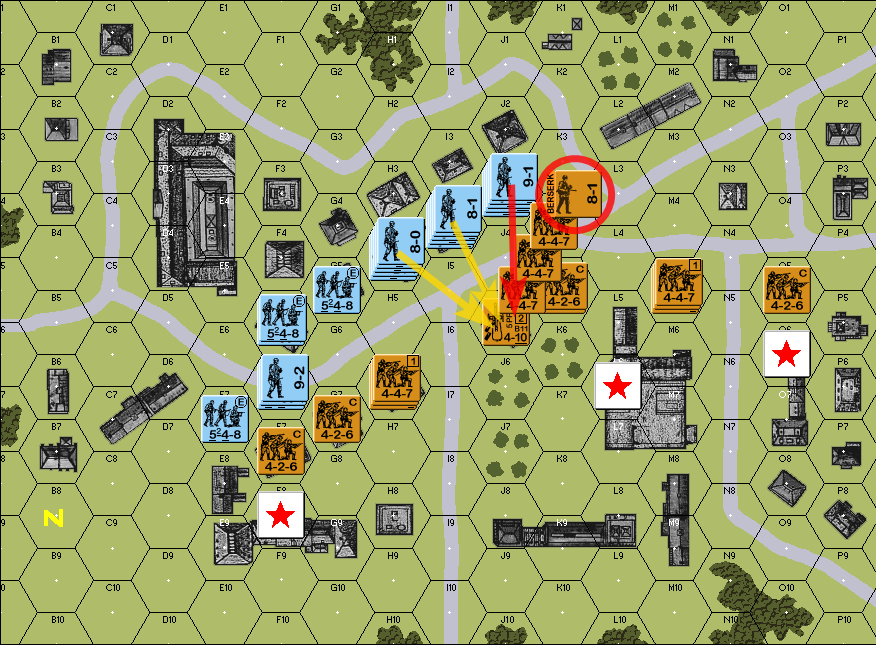 The Flamethrower in H4 shoots at J5, to no effect The stack in I4 shoots at J5, but also to no effect The stack in J3 shoots at J5, and they get an ELR check result - the Soviets pass the ELR check with a 3, which causes the 8-1 leader (based on random selection) to go Berserk. This is actually a bad thing, for reasons that will become painfully clear very soon. Defensive Fire Phase lots of no-effect results here. The 426 in F7 gets an ELR check against the 548, but it passes. The MMG stack in J5 does roll well, and it gets the German stack in H4 to break. Close Combat Phase 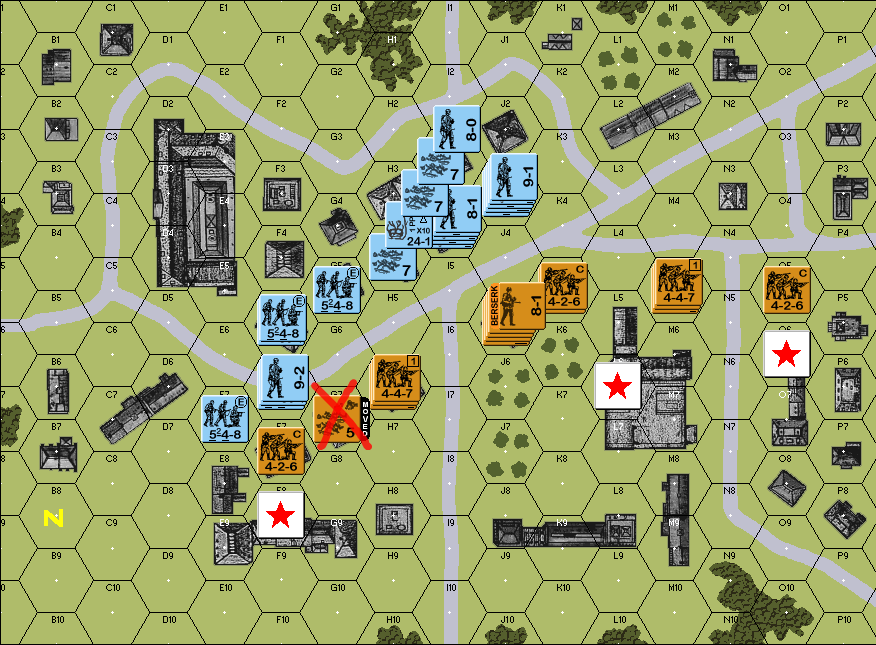 The DC that was planted in G7 explodes - the 30 FP attack rolls a 10, which breaks all 6-morale units or lower, but since the 426 there are conscripts with only 6 morale, then they not only break, but they also get eliminated for failure-to-rout: - hex G8 is within LOS of the 548 in F6 - hex H7 is within LOS of the 548 in G5 - F7 is not an eligible rout hex because it reduce range to a Known Enemy Unit, such as reducing the range to the 548 in E7 from 2 to 1 - H6 is not an eligible rout hex because it reduces range to a KEU, such as reducing the range to the stack in I4 from 4 to 3 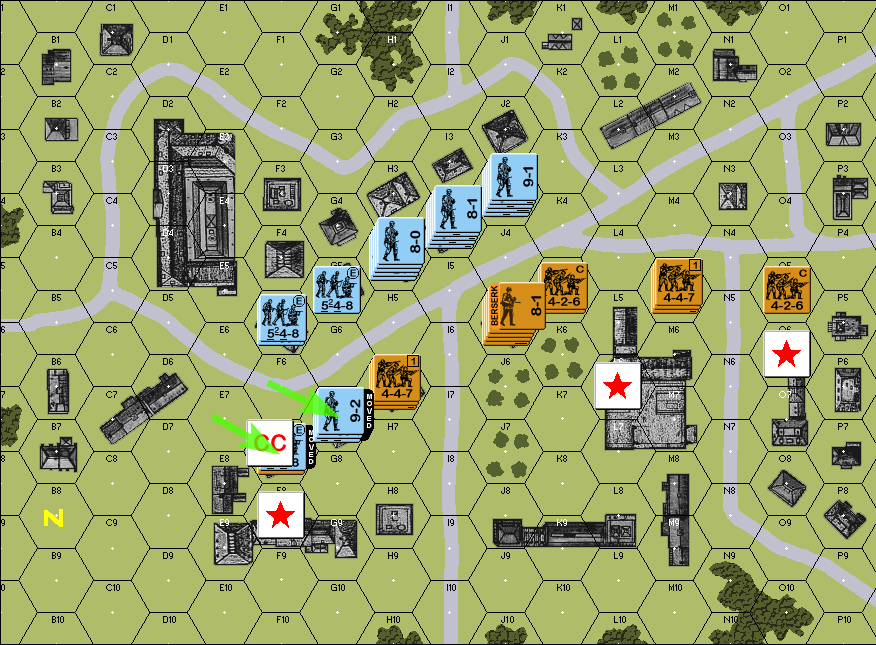 the 548 and the 9-2 leader advances to the new-empty hex in G7, while the 548 in E7 advances into Close Combat with the conscripts in F7 quote:CC in F7 The Soviets fight tenaciously despite their green status, and beat back the Germans. 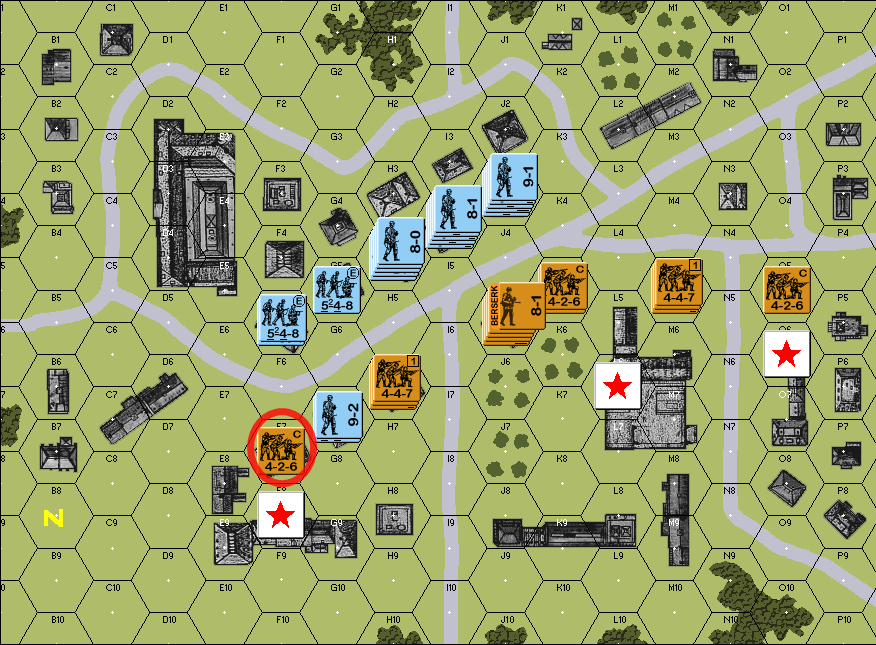 End of GER turn 1
|
|
#
?
Mar 4, 2024 11:33
|
|
|
Much more mixed bag this time around. Hesitation seemed to have much more of an effect and the assault on the left Soviet flank was less successful, but that Berserk result does mean that a whole stack of Soviets are gonna be charging across the street...
|
|
#
?
Mar 4, 2024 12:16
|
|


|
Curious as to why the 4-2-6 was eliminated for failure to rout. Or am I just forgetting something specific to ASLSK?
|
|
#
?
Mar 4, 2024 12:37
|
|
|
Jobbo_Fett posted:Curious as to why the 4-2-6 was eliminated for failure to rout. Or am I just forgetting something specific to ASLSK? it's Retro's routing rules if a unit is broken by fire, and it's in a non-open hex, or is adjacent to an enemy, it needs to rout [at the moment it was broken, as part of the fire attack's resolution] the broken unit needs to head for the closest non-open hex, within 4 MF they cannot enter hexes that would bring them closer to enemy units if they enter an open hex that is within line-of-sight and normal range of an enemy unit, they are eliminated I guess it's technically more accurate to say that the 426 would have entered G8 or H7, and then got eliminated that way
|
|
#
?
Mar 4, 2024 13:00
|
|
|
Gross.
|
|
#
?
Mar 4, 2024 14:07
|
|
|
SOV turn 1 Rally Phase nothing happens Movement Phase 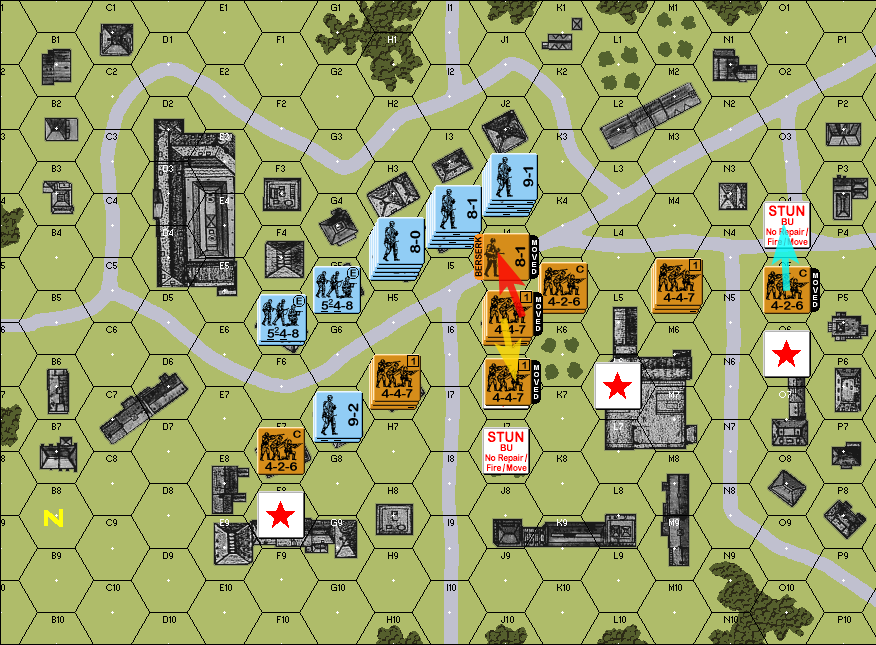 - red: the 8-1 leader, because they're Berserk, charges across the street. I still make them take a Hesitation check, but they pass to be clear, the Berserk status gained from the ELR check only applies to a single unit in the stack, chosen at random, so they weren't obliged to support the leader with all the rest of the troops as they did this. - yellow: the Soviets can sort of already see that the left-wing sweep might develop again, so they try to move squads south to block the I hex-row, but only get as far as one hex down before Hesitation holds them up. There's even another 447 in J5 that couldn't make it to J6 - teal: the Soviets also recognize the value of taking the house at the N3 intersection, so they try to move a squad there, but the conscripts are easily suppressed Fire Phase  lots of shots taken, but to no effect Defensive Fire Phase 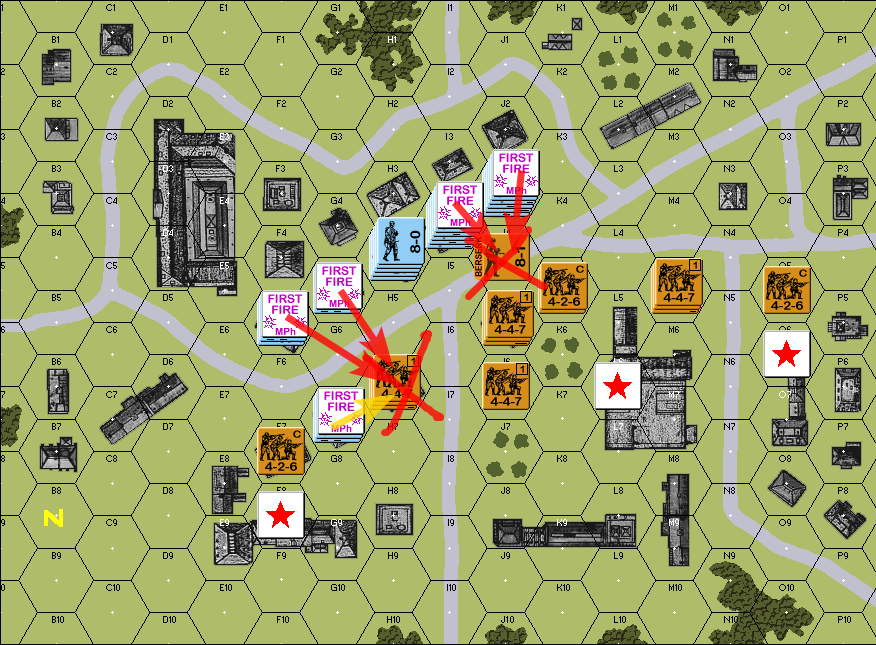 on the left, the stack in H6 breaks, then gets eliminated during the rout process (all hexes are either adjacent to enemy units, or are open hexes within LOS/range of Good Order enemies) and then the Berserking leader is just shot to pieces outright Close Combat Phase 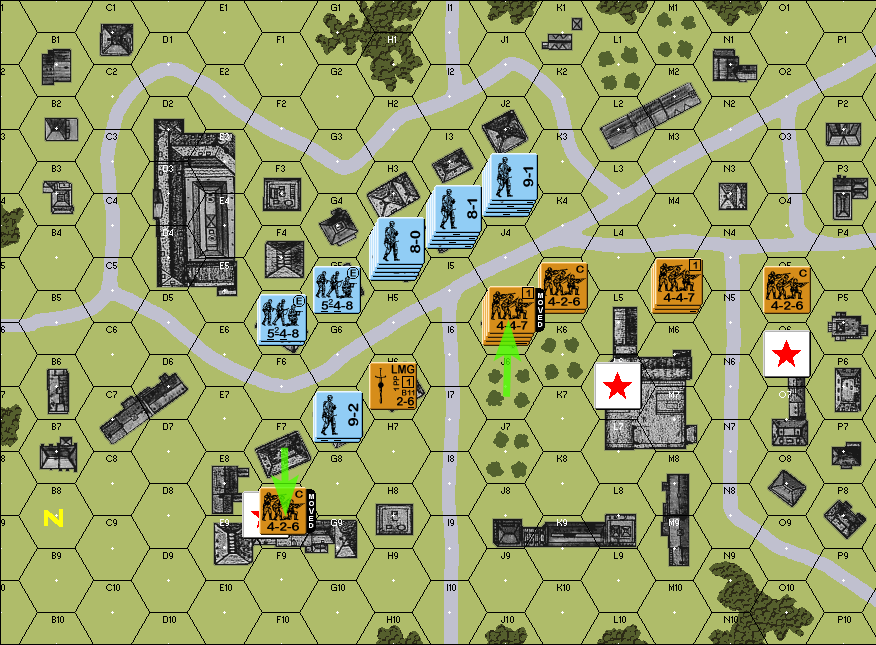 the conscripts on the left withdraw to defend the objective building directly and to break LOS with some of the rest of the Germans, while the 447 in the center thinks better of staying out in the orchards and hops back into a building End of SOV turn 1
|
|
#
?
Mar 5, 2024 03:04
|
|
|
Is that a Retro rule thing to change the ELR happenings on a leader? ASL would see all the units with the Leader roll to see if they fail(?) the berserk check. I believe Commissars automatically force everyone to Berserk...
|
|
#
?
Mar 5, 2024 04:31
|
|
|
Jobbo_Fett posted:Is that a Retro rule thing to change the ELR happenings on a leader? ASL would see all the units with the Leader roll to see if they fail(?) the berserk check. I believe Commissars automatically force everyone to Berserk... yep  rolling a 3 is specifically what happened in this case, so only one unit went Berserk - I rolled a d4 and the result corresponded to the leader
|
|
#
?
Mar 5, 2024 04:41
|
|
|
Not even SS go berserk? That's... strange. Its like they just took the Human Wave rules and said "That's Berserk now and also much worse"
|
|
#
?
Mar 5, 2024 04:44
|
|
|
GER turn 2 Rally Phase 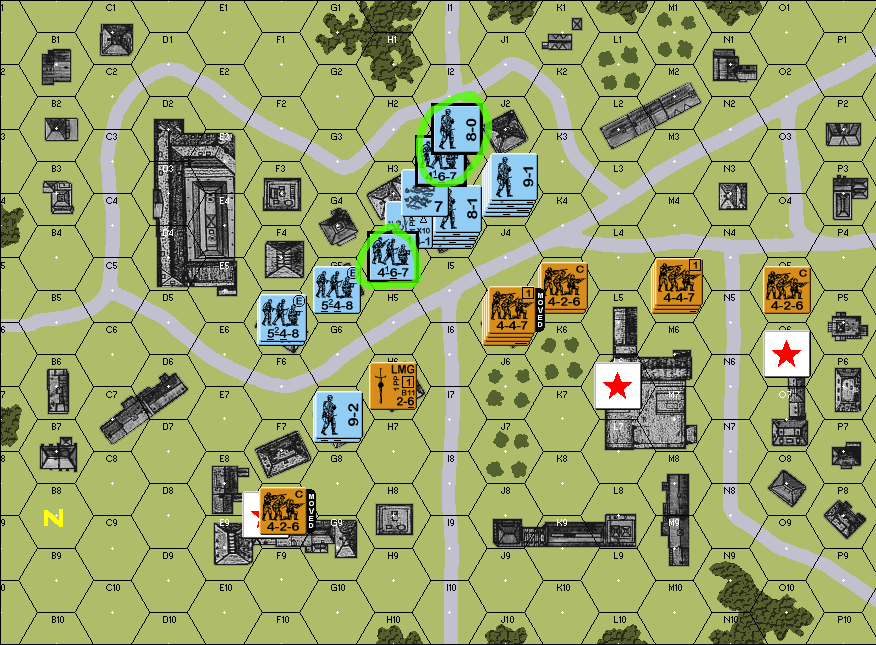 out of the wholly-broken stack in H4, the leader, and two out of the three squads successfully rally. Movement Phase 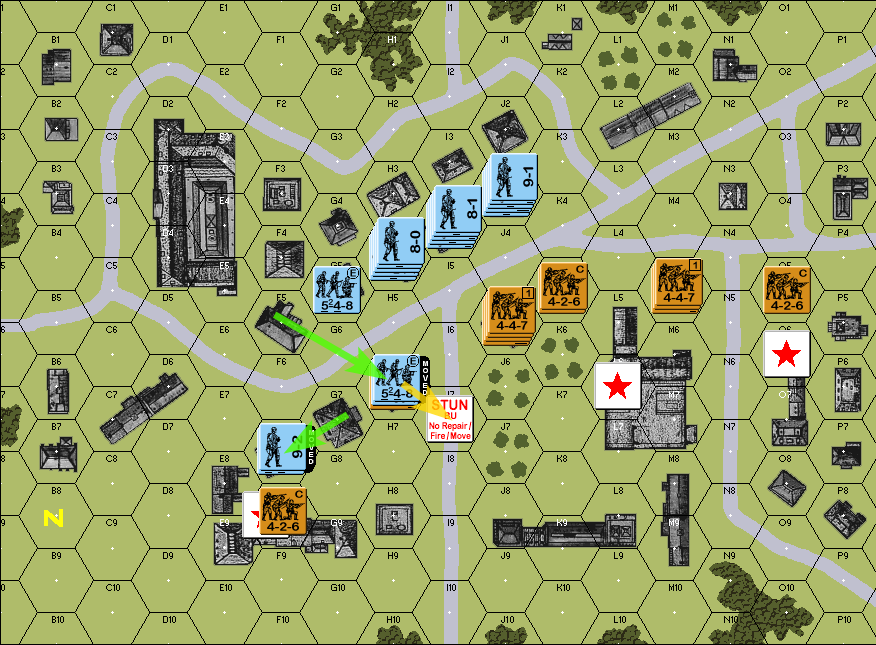 The 548 and 9-2 stack in the south moves towards the objective building, passing its Hesitation check easily another 548 from F5 dashes across the street, and tries to go for broke, but halts at the second crossing. quote:There is one more additional optional Hesitation rule, which is that a natural 6 is always a failed Hesitation check, in order to prevent "free movement" (my phrasing) in cases where Elite squads and/or leaders make it impossible to fail Hesitation checks. That would have applied to the move to H6, where the 548 rolled a natural 6, but then the -1 DRM for being Elite modified the roll to 5 and let it pass. I did not implement that rule in this play-through, but it's something to consider. In the event, the 548 did fail to get to I7 anyway. 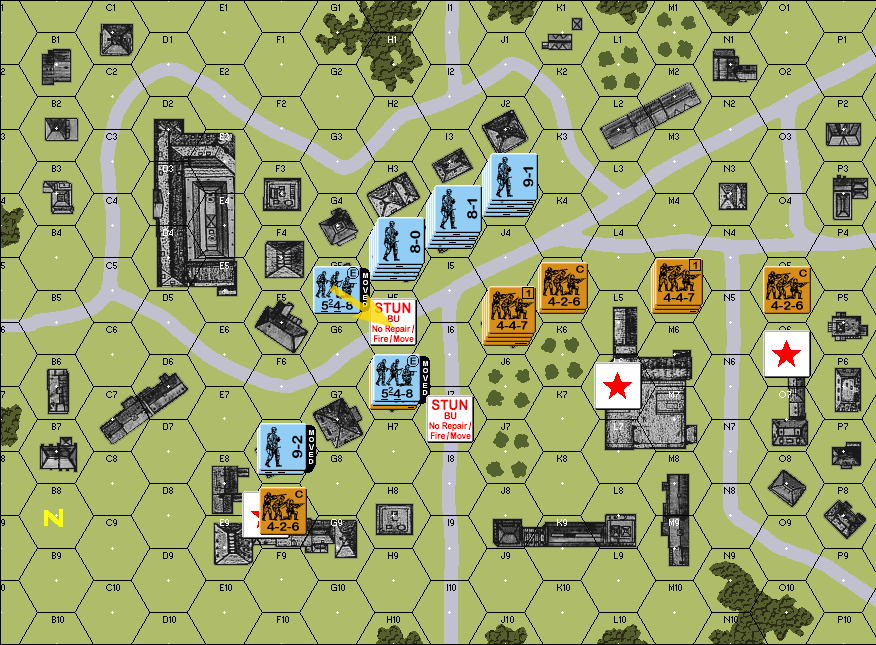 the other 548 tries to dash across the street as well, but Hesitates at the first step quote:In this case, the Hesitation TN was 3, for an open hex within less-than-half range of an MG - the MMG in J5. The 548 rolled a 5, modified to a 4 for being Elite, which was still too high. Fire Phase 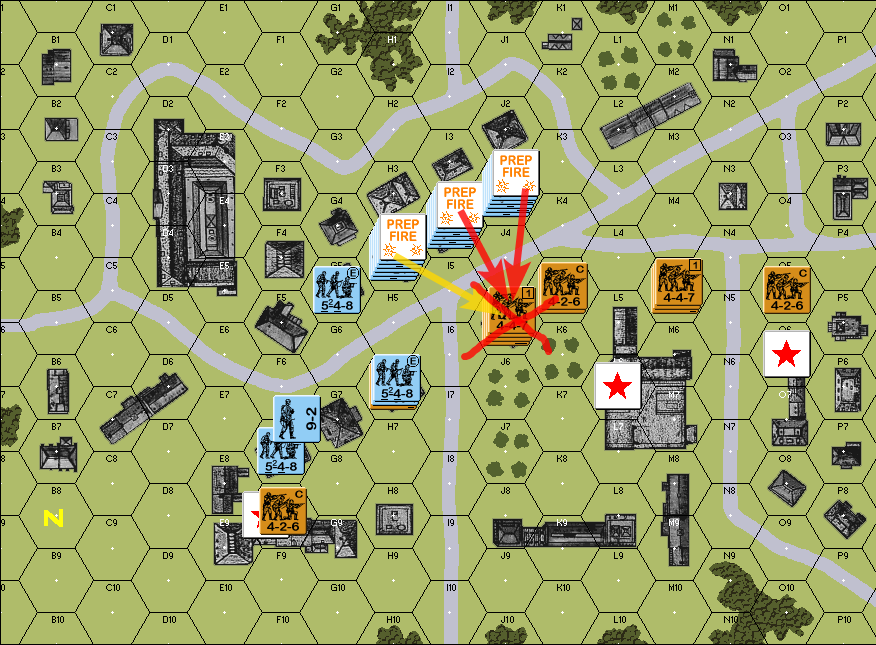 The flamethrower in H4 misses, but the 30 FP fire group across I4 and J3 rolls snake-eyes, and since it's leader-directed fire, there's no cowering. All three Soviet 447s are eliminated. Defensive Fire Phase 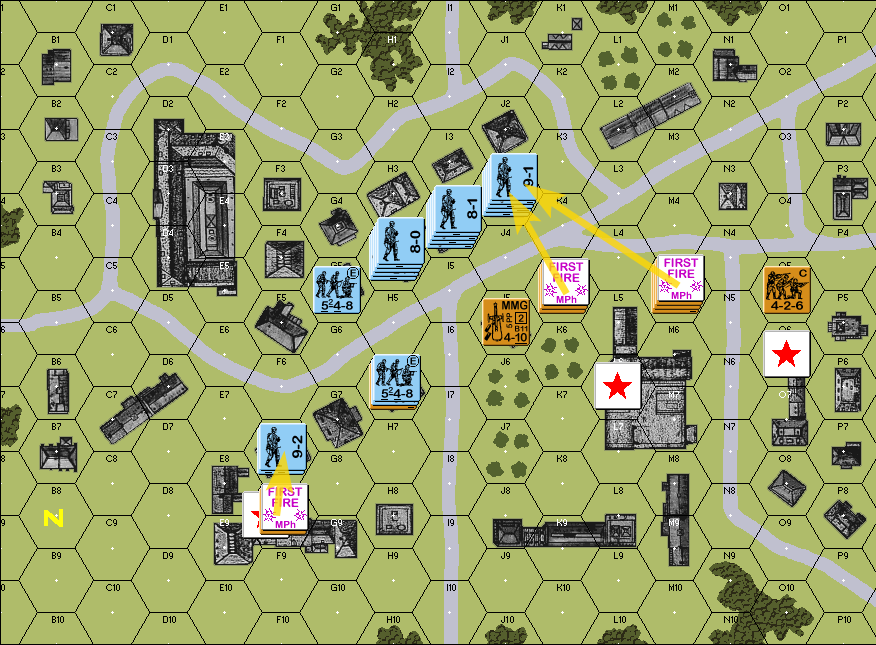 The defenders open up, but to no effect. Close Combat Phase  The 9-2 stack advances to the southern objective, and during the close combat they roll low enough to win without even needing the leader DRM. End of GER turn 2 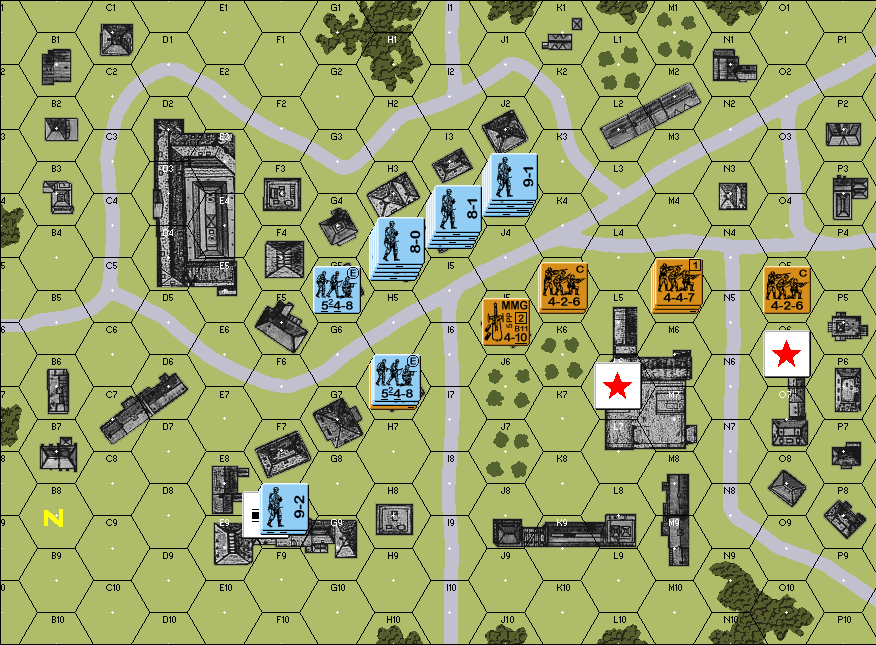
|
|
#
?
Mar 6, 2024 04:11
|
|
|
SOV turn 2 Rally Phase The Soviets roll for reinforcements, but fail (5 on a target of < 2) Movement Phase 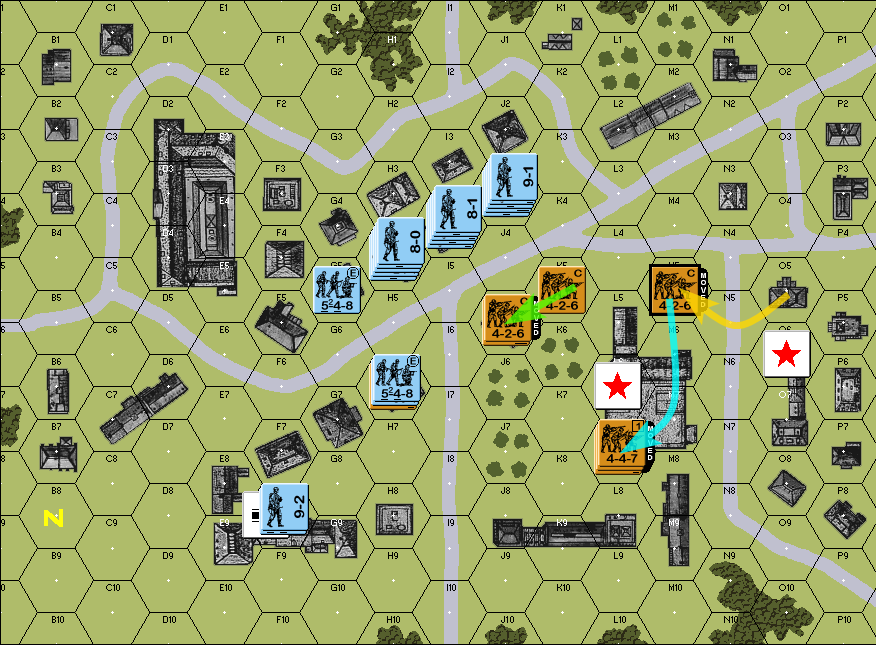 - green: one of the conscript squads in K5 jumps to the other building to man the MMG again - teal: the 447 with the LMG and its 8-0 leader moves to L7. The idea here being that the LMG is now covering the left-hand approach to the middle building - yellow: the 426 in O5 passes its Hesitation check this time, but uses it to man the position that the LMG just left Fire Phase no fire taken quote:The 426 in K5, if it had tried to shoot anything, would not accomplish anything: if they roll snake eyes, that's a final DR of 5, but also counts as a cower, and a 5 on an FP 2 attack is no-effect. If they roll a natural 3, for a final DR of 6, a 6 on an FP 4 attack is also no-effect. Defensive Fire Phase 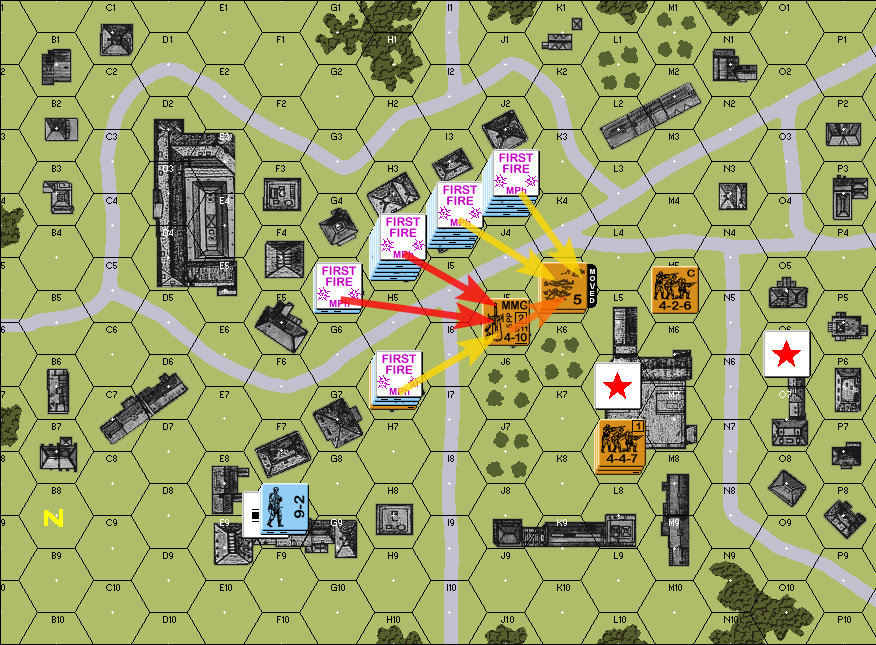 the Soviets get a storm of steel coming down on them, and their men are forced to abandon the MMG once again quote:the 30 FP fire group across I4 and J3 rolled a final DR of 12 to no effect, but the 9 FP fire group across G5 and H4 rolled snake-eyes: that comes out to a 5 + cower after the DRM, but even a 5 on the 4 FP column was enough to break 6-morale squads. The perils of working with conscripts. Close Combat Phase 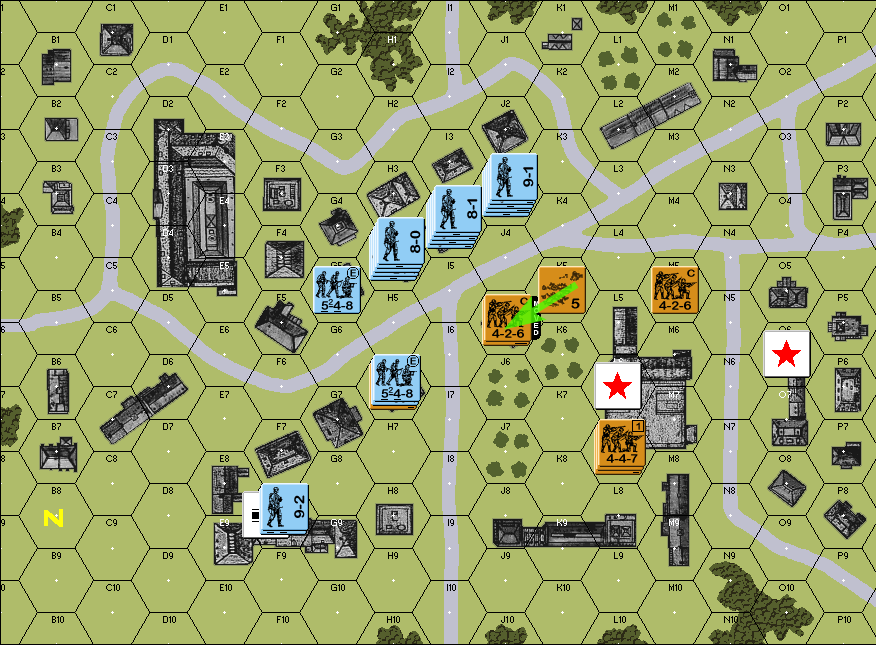 the remaining Good Order 426 uses the advance to move back into J5 anyway quote:As I understand the ASL rules, an MMC has an Inherent Portage Capacity of 3 PP. The Soviet MMG has a PP cost of 5 printed on it, so that means the just-broken squad could not have brought it with them when they routed, and it gets dropped on the ground, which is why I then needed to send the other Good Order 426 into the same hex to "recover" the MMG. End of SOV turn 2
|
|
#
?
Mar 7, 2024 02:19
|
|
|
GER turn 3 Rally Phase 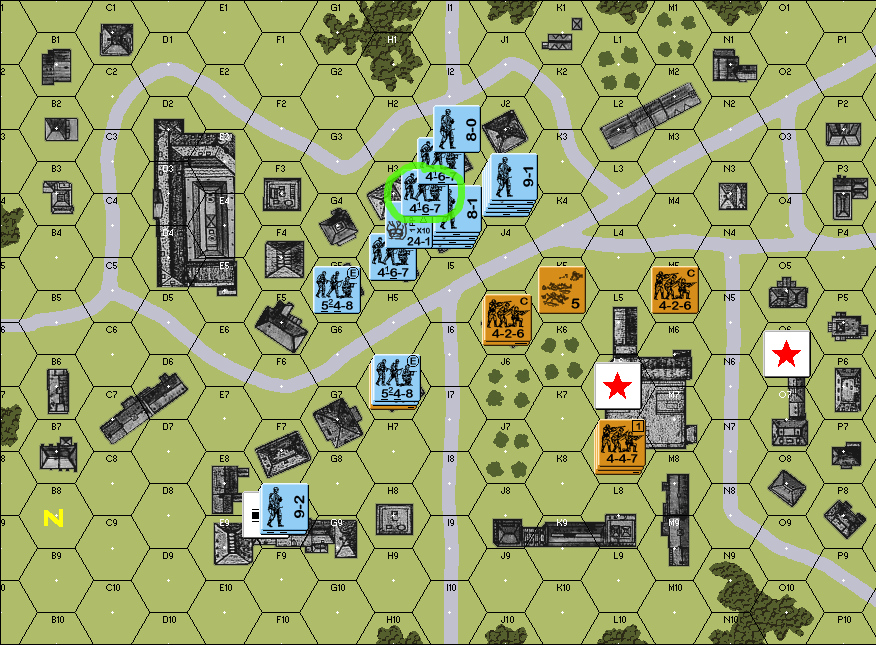 the remaining 467 that missed its rally last turn, gets it Movement Phase  the 9-2 stack that just captured the southern building dashes to the orchards near the middle objective, passing three Hesitation checks in the process. meanwhile three squads make attempts to get adjacent to the Soviet MMG team, but are suppressed (i.e. they keep failing their TN 2 Hesitation checks) Fire Phase 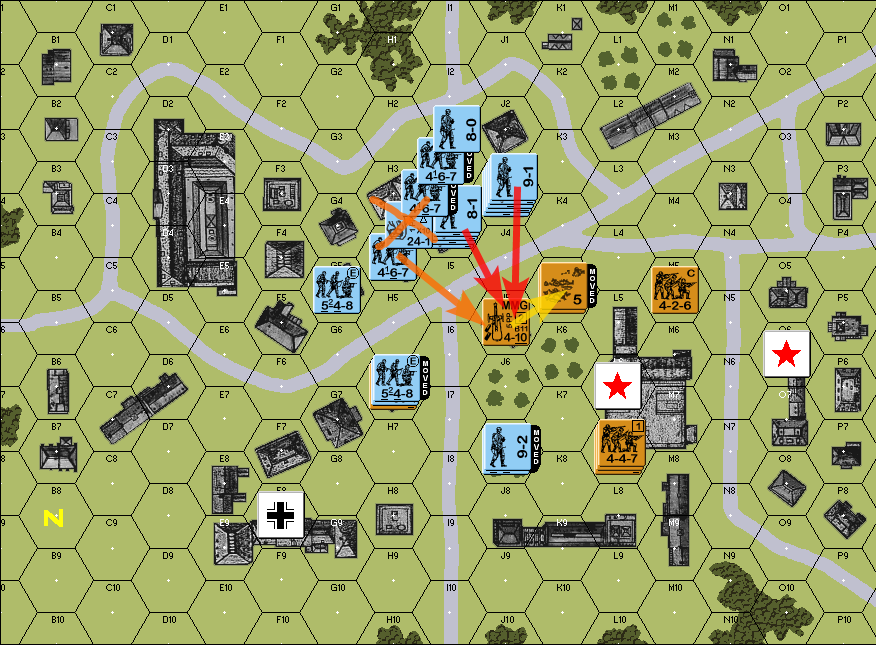 the flamethrower in H4 runs out of fuel and has to be discarded, but the I4 / J3 fire group rolls well and gets to break their second conscript squad in as many turns quote:I'm still not really sure I'm doing routing correctly Defensive Fire Phase 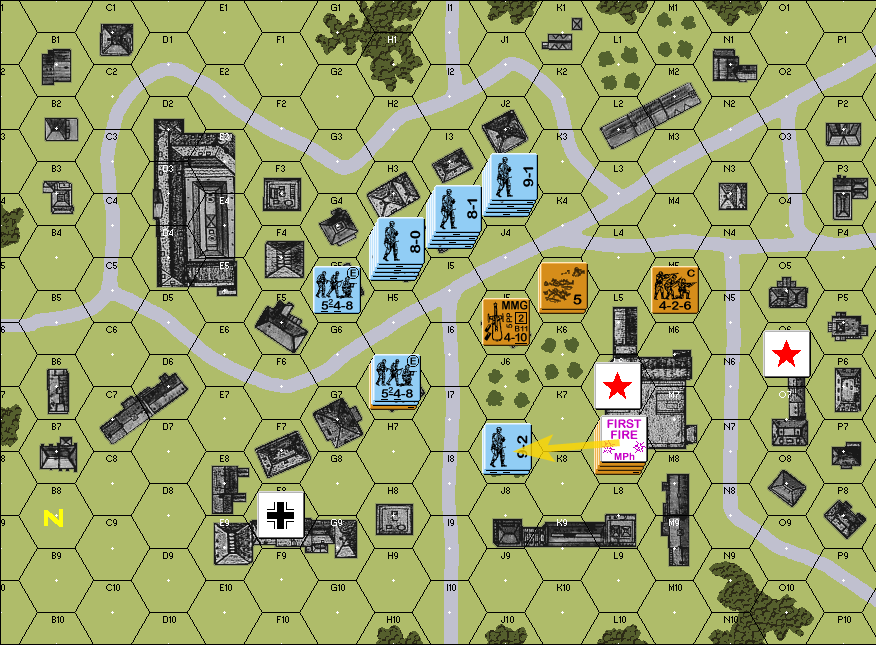 the LMG team in the middle building takes shots at the incoming Germans, but to no effect Close Combat Phase 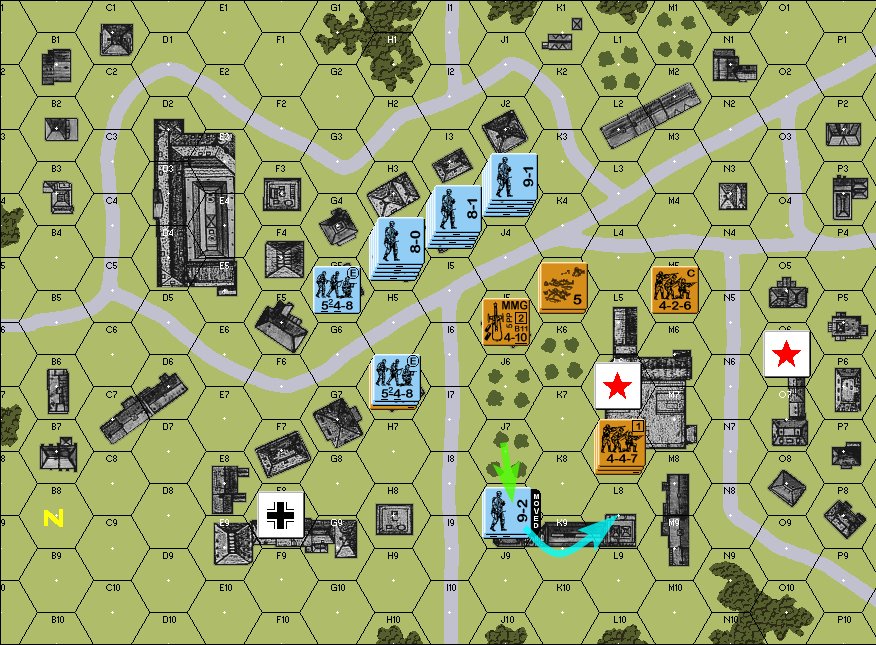 finally, that same stack moves one hex to enter a building at K8 quote:reminder that in Retro, the one-hex advance cannot be used to move into an open hex, such as K8, unless it will result in a close combat, so you cannot use the Close Combat phase to circumvent an open-hex Hesitation check that you cannot seem to pass End of GER turn 3
|
|
#
?
Mar 8, 2024 02:49
|
|
|
You def could have routed further if using ASL rules, unless Retro changes some stuff I'm unaware of.
|
|
#
?
Mar 8, 2024 03:09
|
|
|
SOV turn 3 The Soviets roll for reinforcements, and fail again (5 on a target of < 3) Rally Phase the two broken squads in K5 are not in reach of a leader, and so cannot rally. Movement Phase  the two remaining Soviet squads withdraw to the last objective quote:The thinking here is - the German 9-2 stack with the 548 is in J8, and they can move to K9 then L8, then advance into L7 for close combat. Because K9 and L8 are both stone buildings, the stack is going to pass the Hesitation checks. The worst-case is a TN of 5, and with a -2 DRM from the leader and a -1 from being elite, even a roll of a natural 6 is going to be a 3. Fire Phase all units moved, no fire Defensive Fire Phase while O7 is in LOS of J3 and J8, the range is beyond 3 hexes, so no defensive fire is triggered. Close Combat Phase no advances, no combats End of SOV turn 3
|
|
#
?
Mar 9, 2024 04:41
|
|
|
GER turn 4 Rally phase nothing to Rally Movement Phase 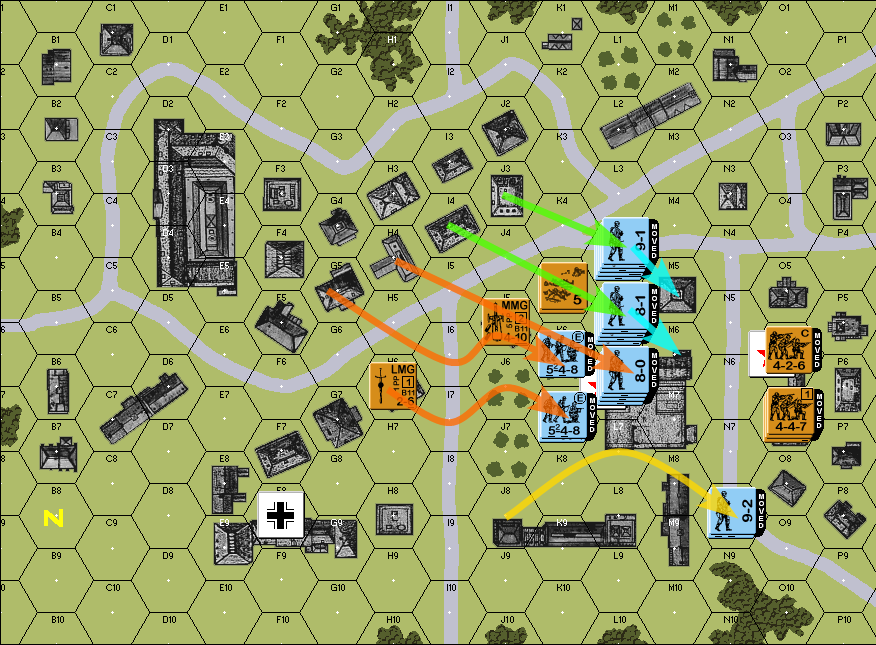 - green: the two big MG stacks move across the street and into the L hex-row, setting themselves up to move to M5/M6 during the Close Combat phase without triggering Hesitation checks (teal) - yellow: the stack of the 548 and 9-2 moves aggressively towards the last objective. They're risking fire, but they want to get a "beachhead" onto the final block of buildings before the Soviets block it with hard-to-pass adjacency Hesitation - orange: and the rest of the German squads move up as well Fire Phase all units moved, no fire Defensive Fire Phase 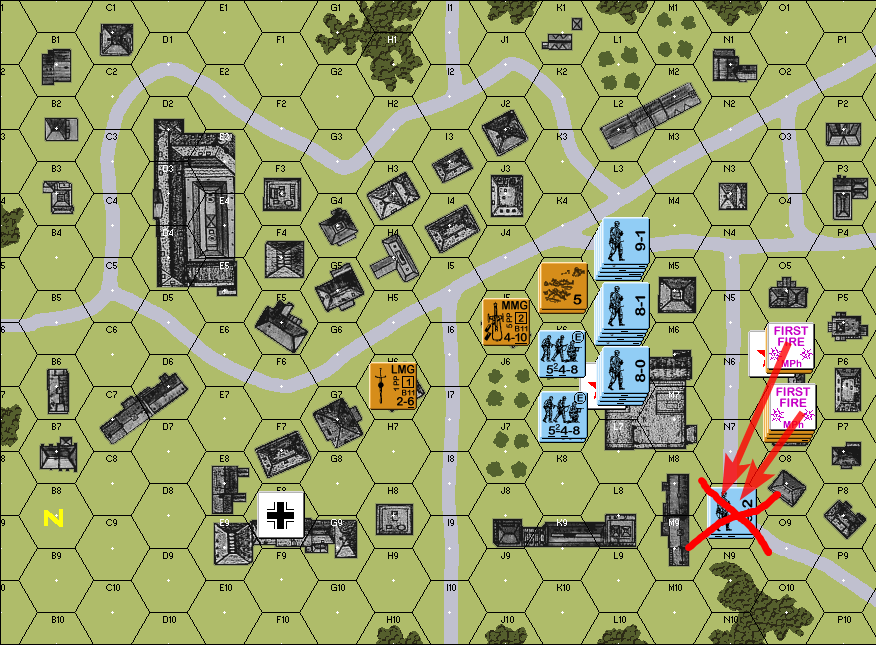 the two Soviet squads form a fire group and shoot at the Germans on the street. They roll snake eyes and eliminate them outright. Even cowering wouldn't have mattered because a 2 on the 6 FP column (instead of the 8 FP column) still results in a KIA. If the Soviets rolled as much as a 6, the Landsers could have gotten away with it, but this time the conscripts were on-target. Close Combat Phase 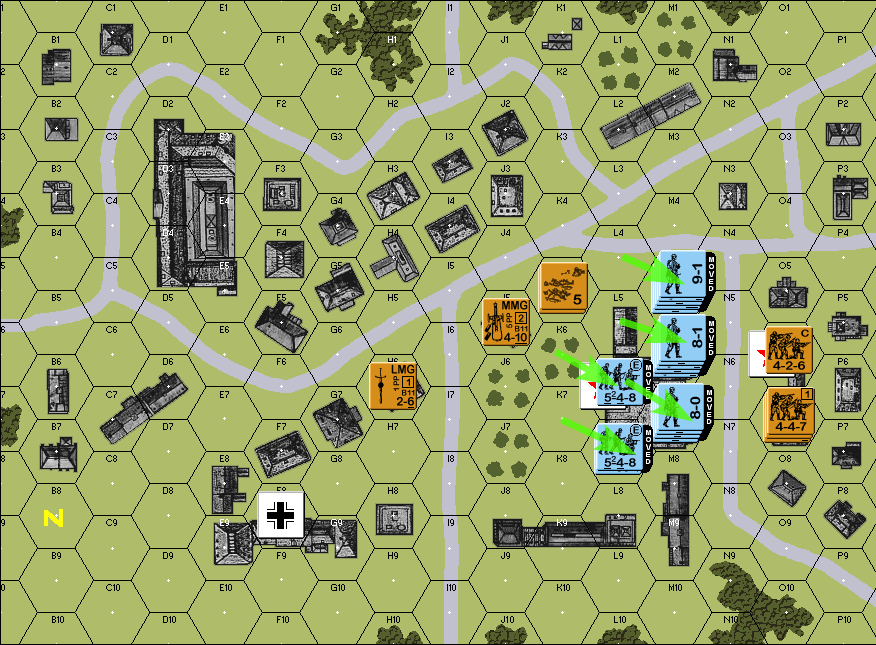 as planned, the rest of the German forces use the CC phase's one-hex movement to advance further. quote:I realize at this point that the two broken Soviet squads in K5 are still there, and the Germans just passed through them. I think that might have triggered another rout, but in any case there's no way the Soviets are getting to them anytime soon, and they might well have been eliminated due to failure-to-rout, so it's mostly inconsequential for now. End of GER turn 4
|
|
#
?
Mar 11, 2024 03:17
|
|
|
SOV turn 4 The Soviets roll for reinforcements, and succeed (2 on a target of < 4) The reinforcements will arrive this turn Rally Phase nothing to rally Movement Phase 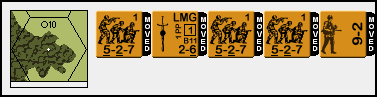 the reinforcements appear in hex O10 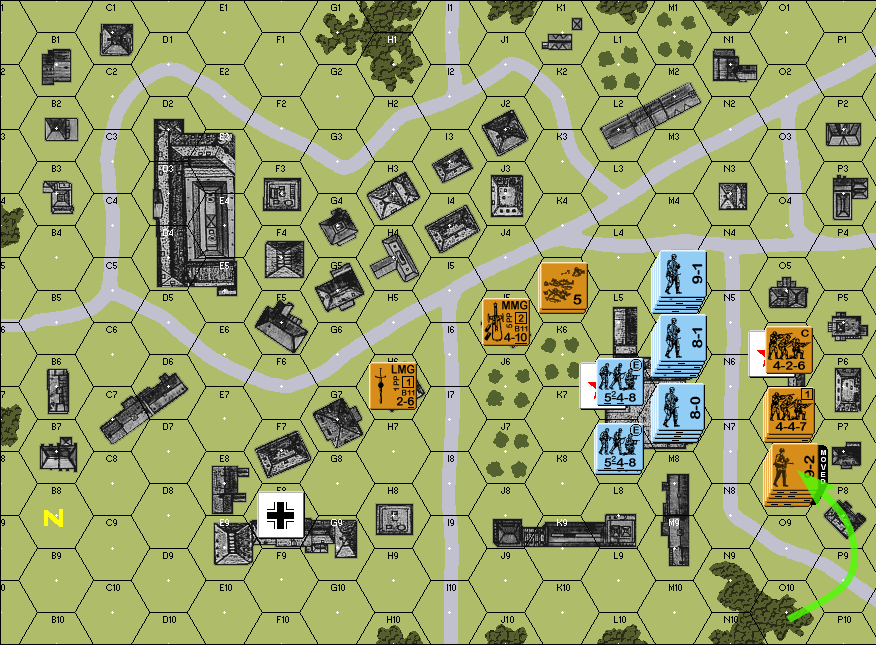 moving together as a stack, they cross the street and enter the city block where the remaining Soviet forces are holding on, passing three Hesitation checks as they do so Fire Phase 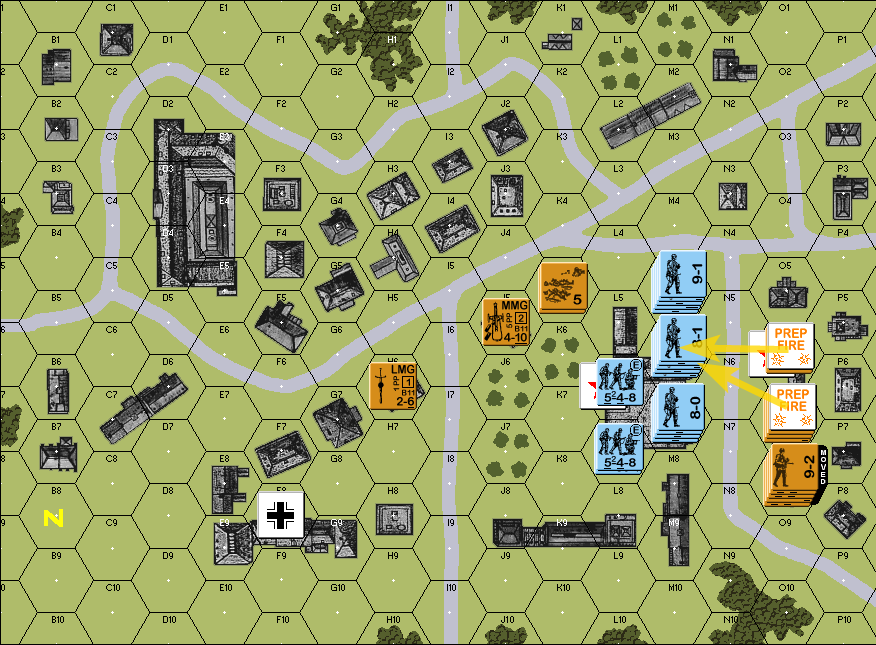 the remaining squads take their shots at the Germans, but to no effect Defensive Fire Phase 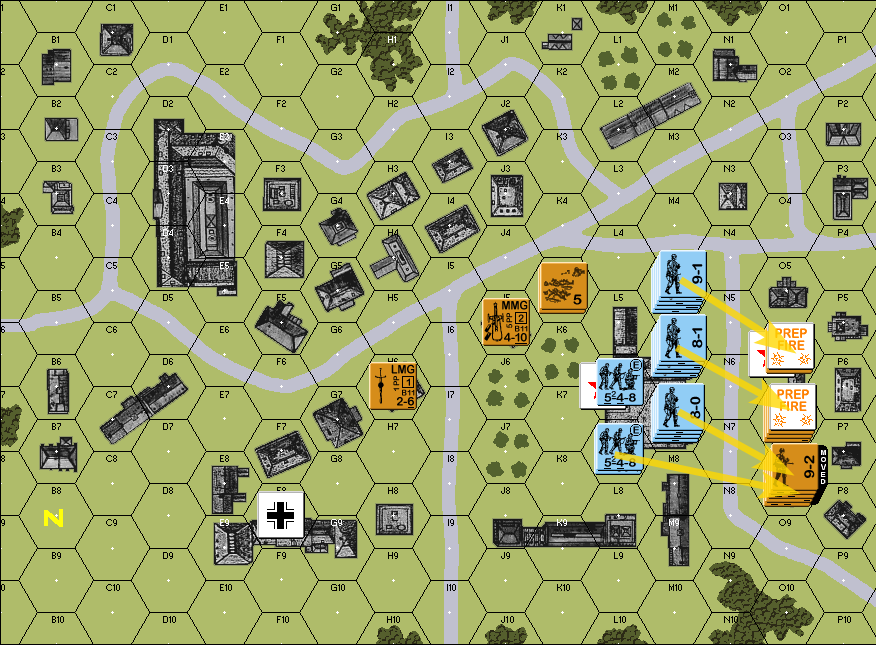 The Germans return fire, but nothing is achieved here, either. quote:In this case, the German stacks did not form fire groups, because per the rules of target selection, they were all supposed to shoot at different targets: Close Combat Phase 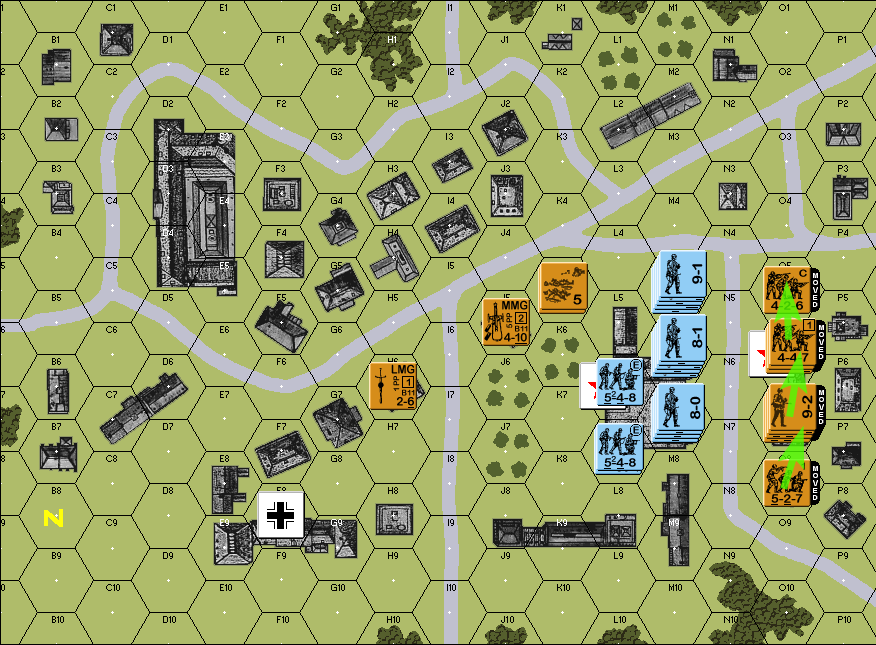 The Soviets use the Close Combat advance to rearrange their defensive positions from top to bottom, we've got: O5 - a single 426 O6 - a 447 with an LMG, and an 8-0 leader O7 - two 527s, one with an LMG, and a 9-2 leader O8 - a single 527 quote:by deploying this way, all of the street hexes along hex-row N4 to N8, plus O4 and O9, are going to require TN 2 Hesitation checks, and the Germans might not have enough time within their two remaining turns to take it slowly (which is why they tried to rush across with the 9-2 stack last turn in the first place) End of SOV turn 4
|
|
#
?
Mar 12, 2024 02:09
|
|
|
Looks really close this time, hopefully the soviets manage to hold on!
|
|
#
?
Mar 12, 2024 07:32
|
|
|
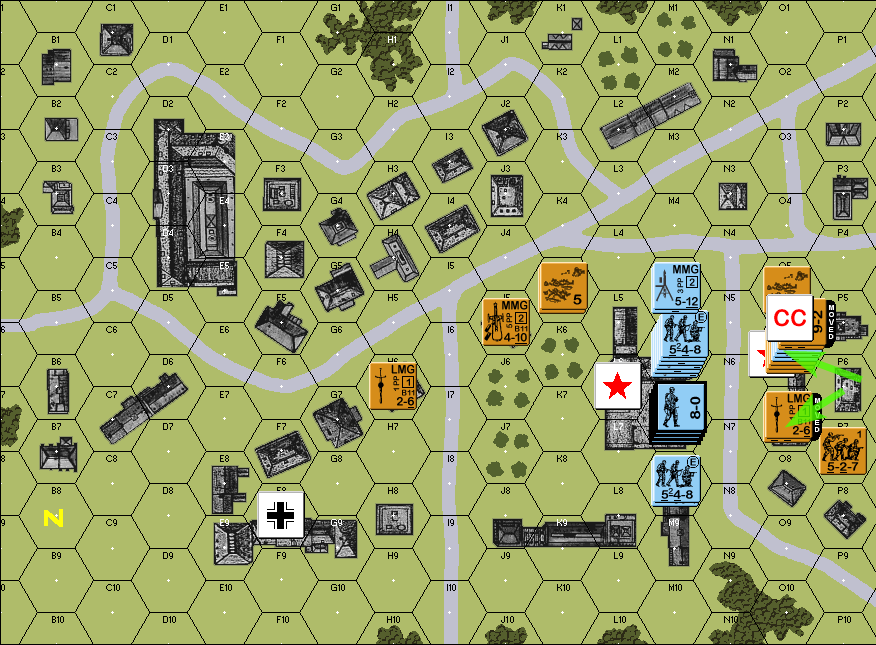
GER turn 5 Rally phase nothing happens Movement Phase quote:Let's consider our options. Moving adjacent to an enemy unit on an open hex will cause a Hesitation check of TN 2, which means only a result of 1 (or less) will pass. 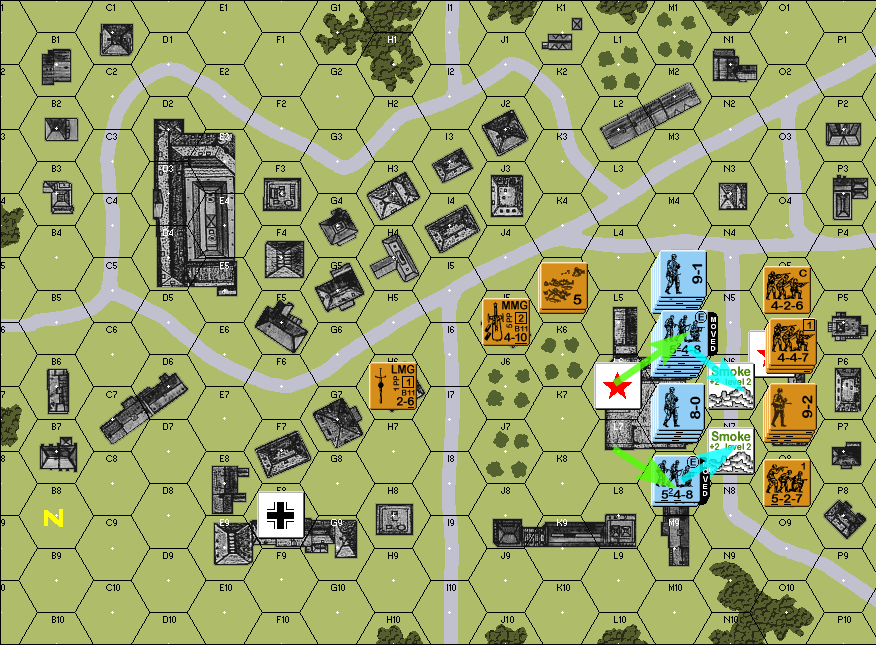 first, the 548s move up, and both them successfully place smoke on the streets (for clarity, there were already three squads stacked in M7, so the 548 in L7 had to move to M8 instead) 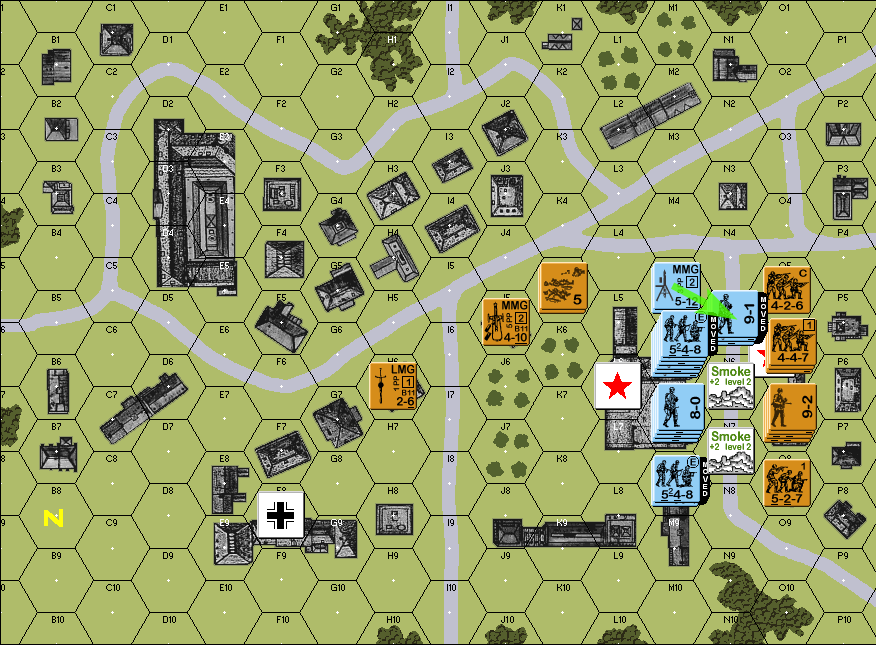 then, a 467 with an LMG, and a 9-1 leader, passes the Hesitation Check to make it to N5... 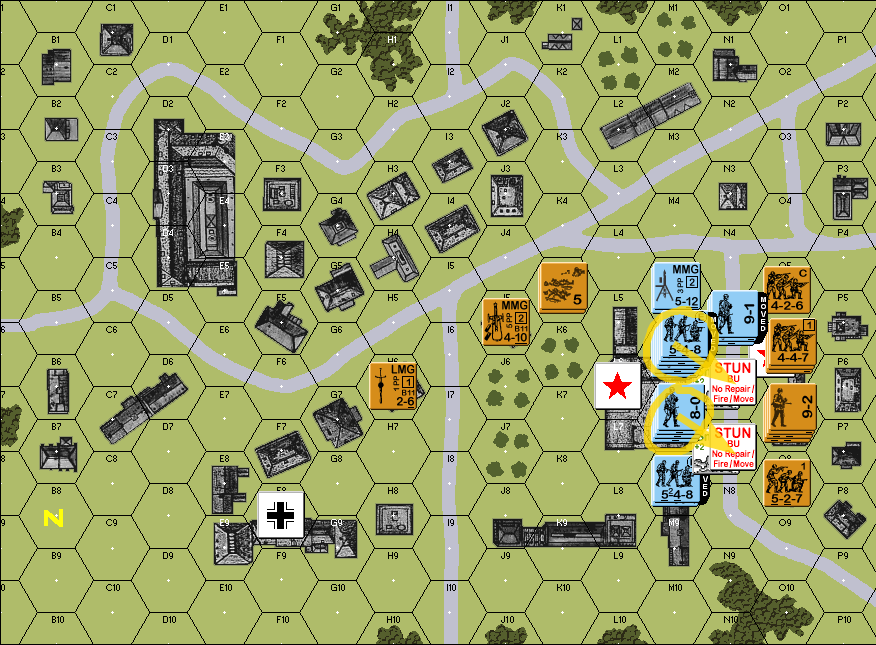 ... but nobody else does. Two 467s and an 8-1 in M6 roll a 2, and three 467s in M7 roll a 3, and halt from Hesitation. Fire Phase 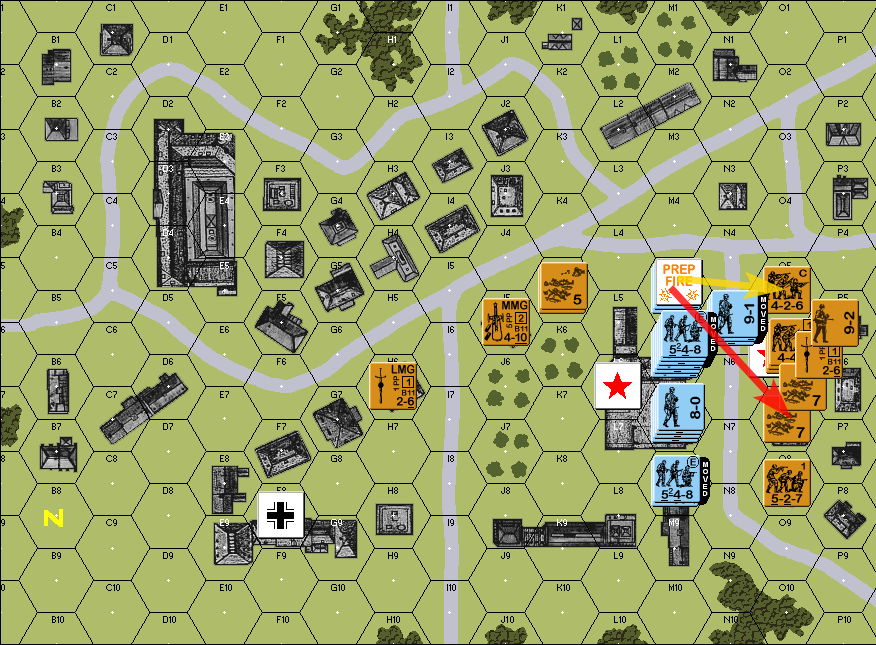 The MMG in M5 shoots at the stack in O7, and roll well enough to break the two 7-morale squads, but not the 9-2 leader. The MMG rolls ROF twice and takes shots at O6, but doesn't get anything done on subsequent shots. Defensive Fire Phase 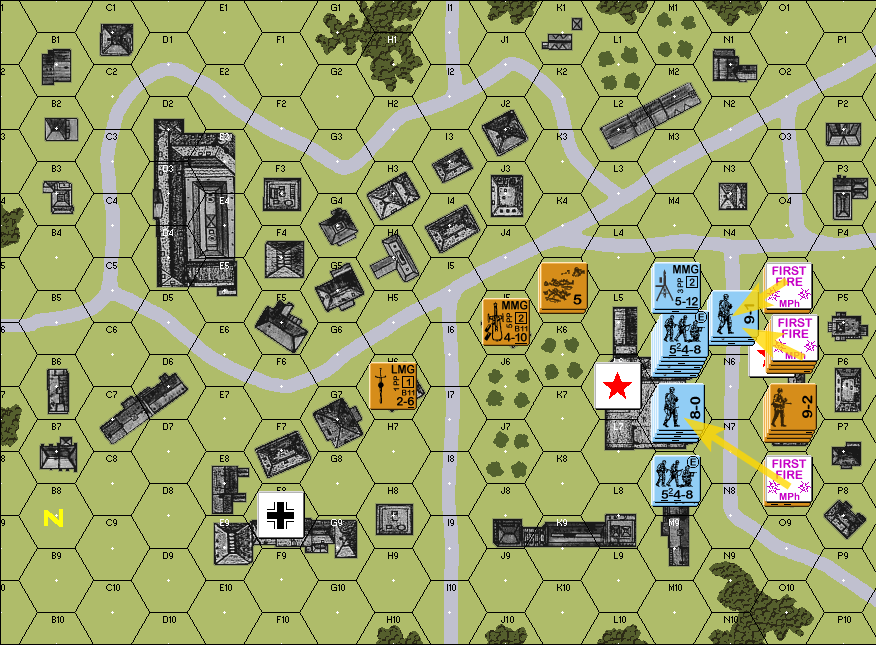 The Soviets take their shots, but the best they can manage is forcing an ELR check on the 9-1 stack, and they pass it handily. Close Combat Phase 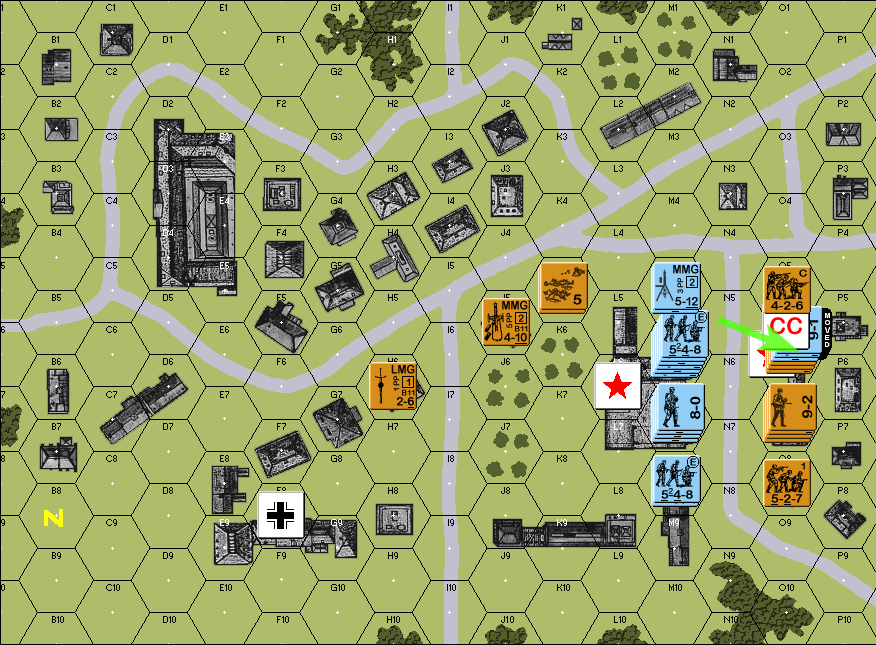  The Germans that made it onto the street close in on O6, but the melee is inconclusive at this time. End of GER turn 5
|
|
#
?
Mar 13, 2024 02:00
|
|
|
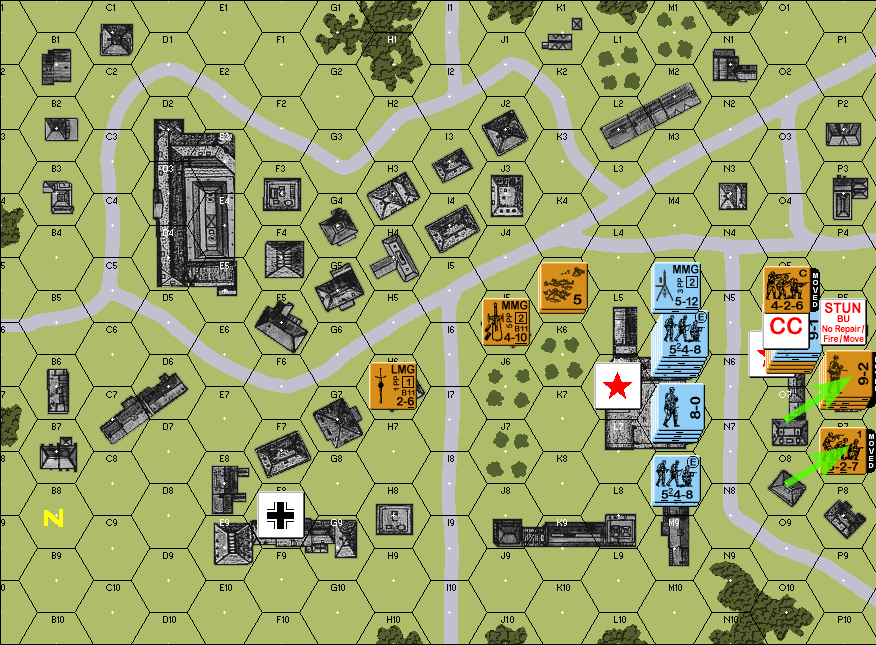
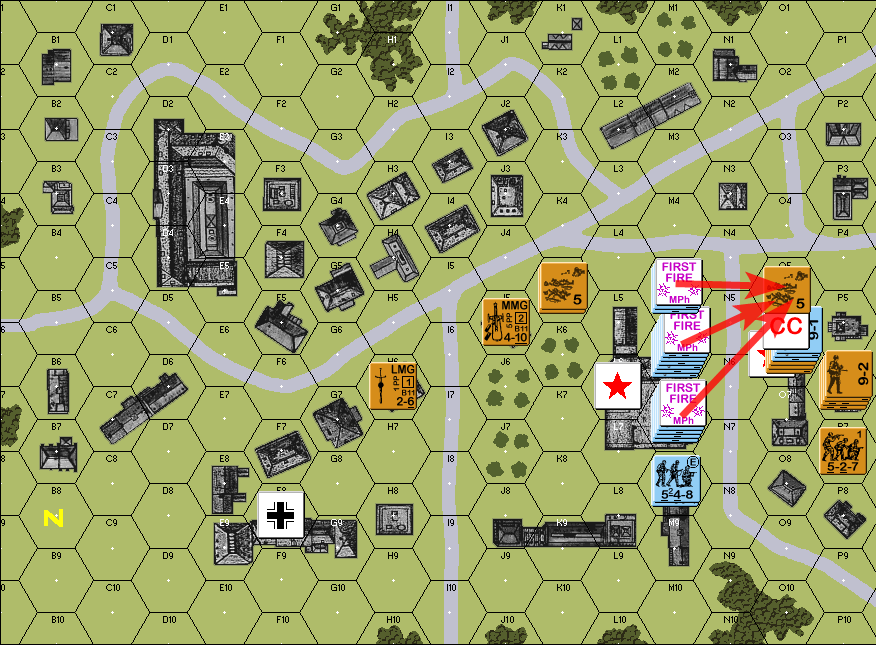
SOV turn 5 Rally Phase 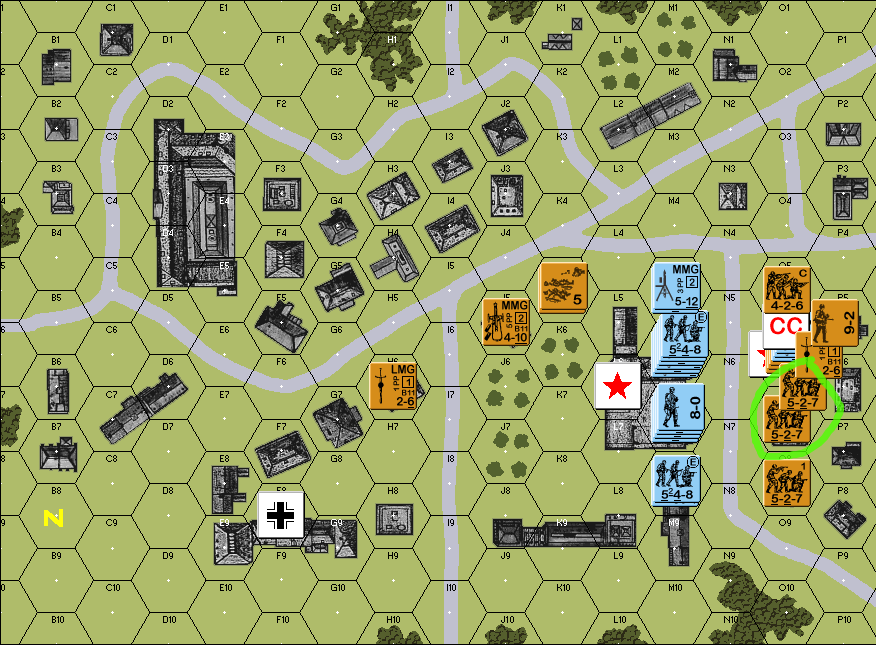 the two 527s broken by German fire last turn are rallied Movement Phase quote:Now we are going to (try to) do a little thing called skulking: during the movement phase, move one hex back, to break LOS with the enemy, so that they cannot shoot you during the Defensive Fire phase, and then use the one-hex movement during the Close Combat Phase (or the Advance Phase in regular ASL) to move back to your original position before the end of your turn. 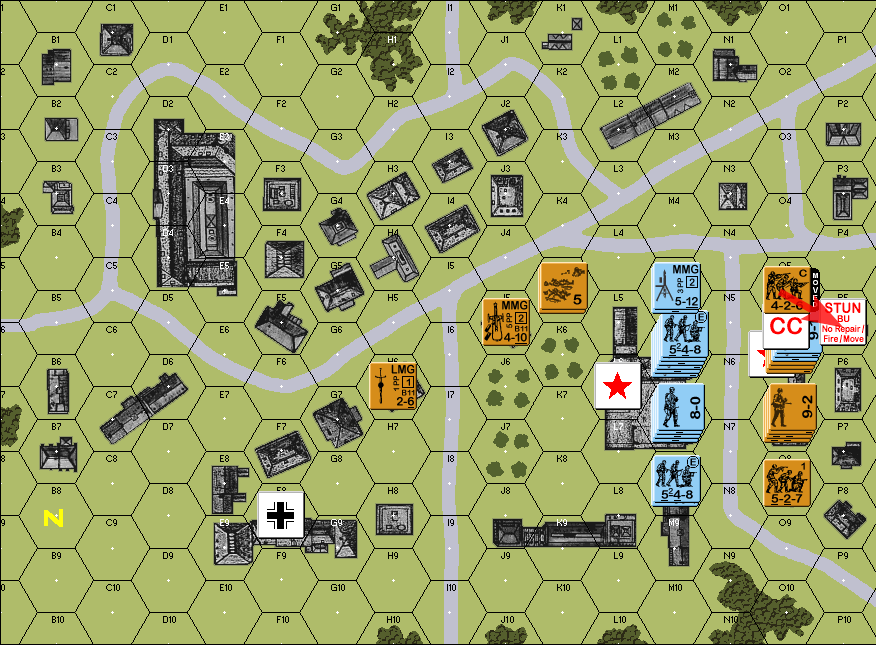 quote:426 in O5 attempts to move to P5  quote:CC in O6 the GER 467 and the 9-1 leader are eliminated End of SOV turn 5 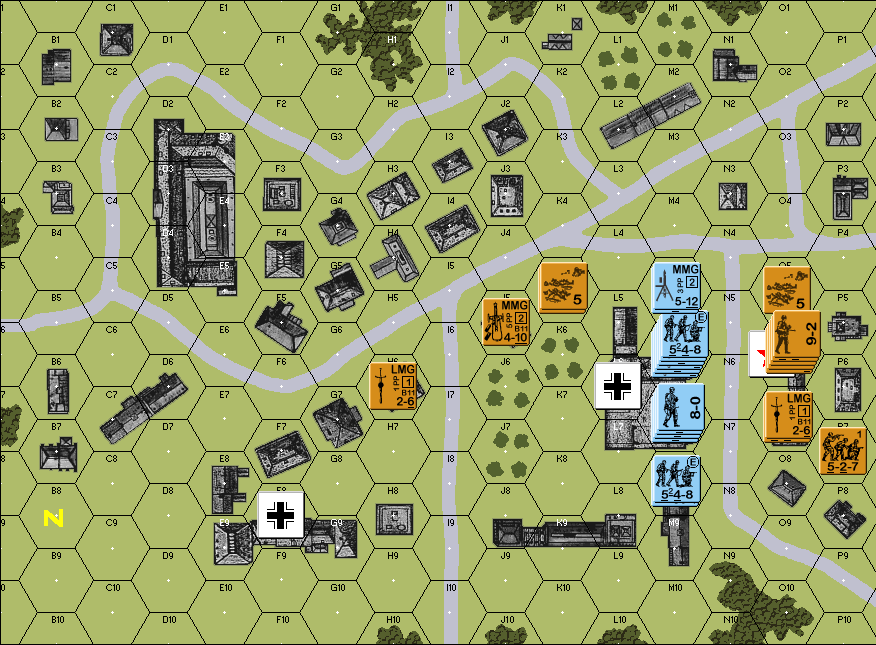
|
|
#
?
Mar 15, 2024 03:06
|
|
|
Unsubbed for use of skulking.
|
|
#
?
Mar 15, 2024 03:32
|
|
|
GER turn 6 Time to go for broke. This is the last turn. Rally Phase nothing happens Movement Phase 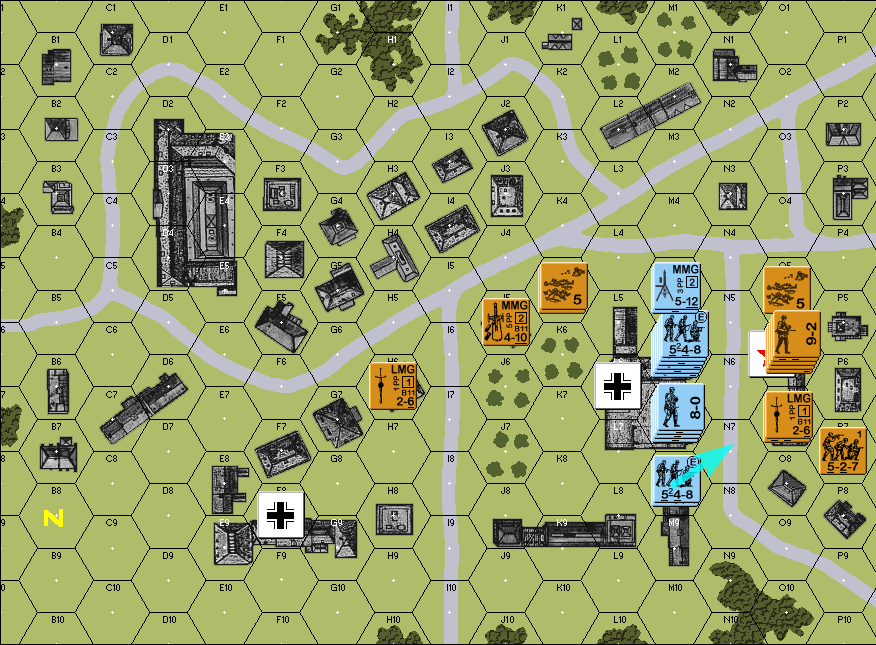 first, the 548 in M8 tries to place smoke on the street. They roll a 5, which fails. 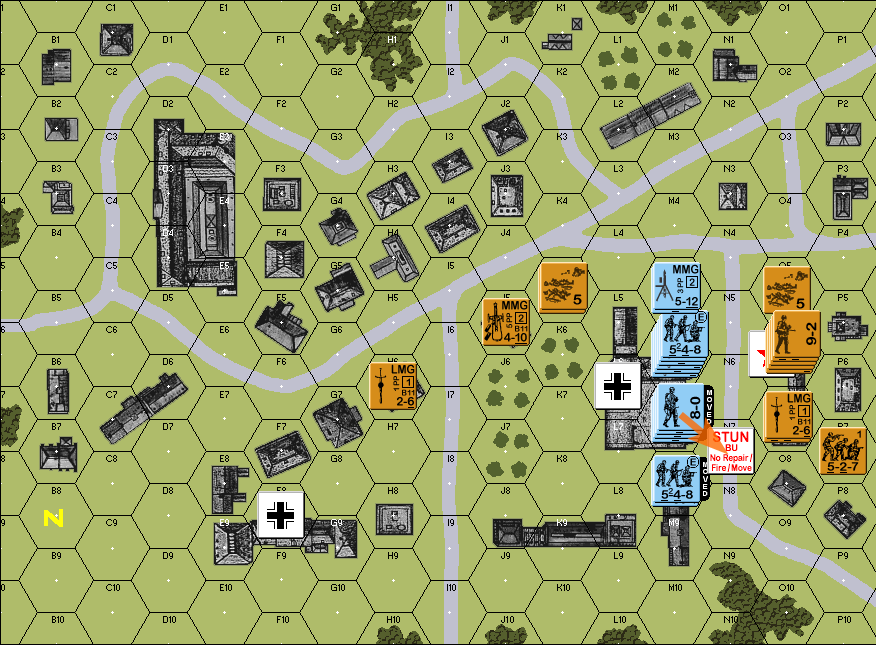 then, the whole stack in M7 attempts to move to N7. They roll a 3 on the Hesitation Check, which fails.  the other 548, in M6, actually does succeed in placing smoke in N6 ...  ... but when the stack actually tries to move into the hex, they roll a natural 5 on the Hesitation Check. This gets reduced to 3 after the leader direction and the smoke, but that's still not enough to pass the target number of 2 for moving adjacent to an enemy on an open hex. At this point, the scenario is effectively over - with a victory for the Soviets. Even if the 467 in M5 with the MMG manages to pass the Hesitation check to move to N5, and survives the Defensive Fire phase, and closes-in to Close Combat in O6, and wins the combat... that only seizes one hex of the objective building, and the Soviets would still have control of O7. This was a much closer fight than the last two scenarios we've played through, with a far less obvious outcome and a less obvious approach. The Germans could have waited one turn longer: hold the 9-2 leader back, consolidate the 548s, use turn 5 to shoot them off their positions, and surge strong in turn 6. Up next: we're going back to Vierville, using these tougher Hesitation rules again, to see how that shakes out.
|
|
#
?
Mar 18, 2024 09:27
|
|
|
Retaking Vierville, Round 2 as promised, we're taking another shot at this scenario, but using the tougher Hesitation rules, and adding one more: a natural 6 on the Hesitation Check is always a Halt, regardless of modifiers. I did not use such a rule in the previous scenario, but will do so here. 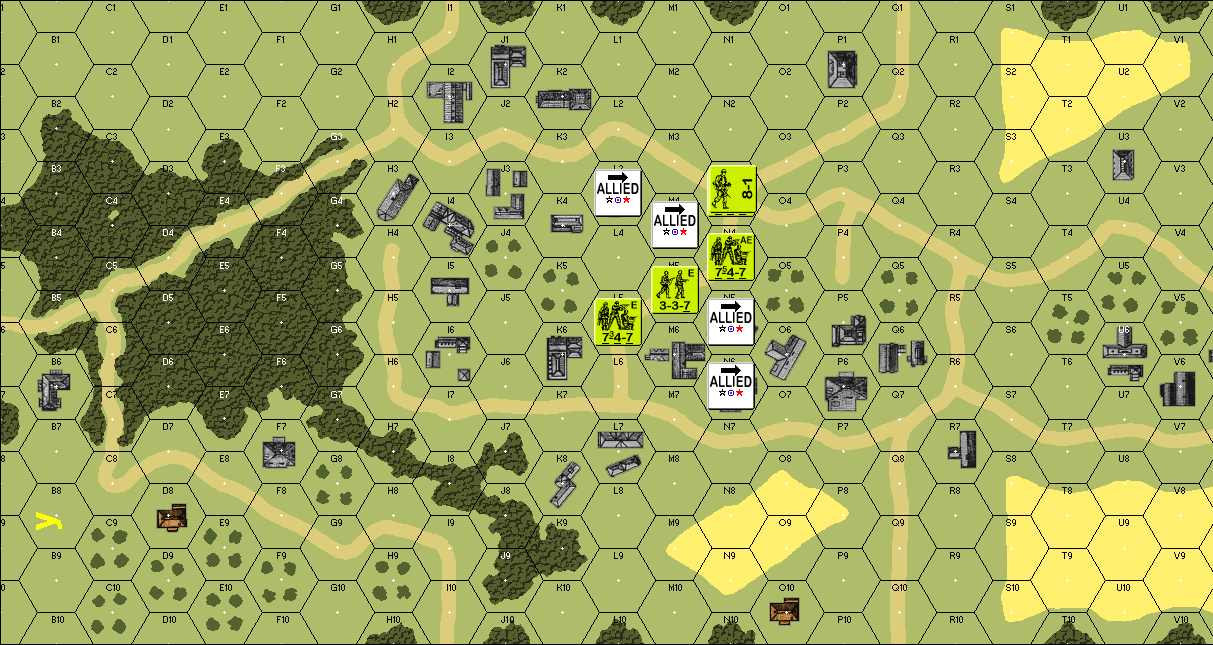 The initial set-up. The Americans changed things up a bit compared to the first time we played this. As before, the win condition is for all four marked objective hexes to be free of Good Order German units by the end of the game. GER turn 1 Rally Phase nothing happens Movement Phase a German platoon enters from the top of the map... 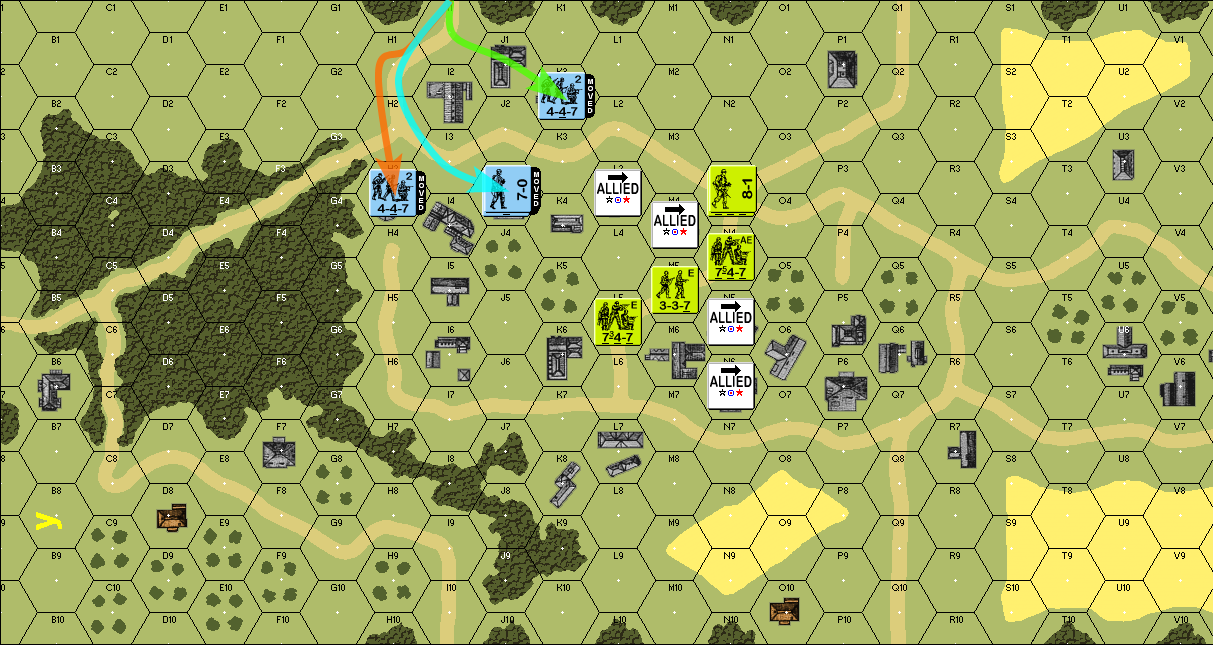 - green: a single 447 moves to the building at J1, passing a Hesitation Check as it does so - orange: another 447 moves to H3, staying out of line-of-sight the whole time - teal: a third 447, with a 7-0 leader, dashes to J3, handily passing another HC and then a second platoon enters from the bottom of the map... 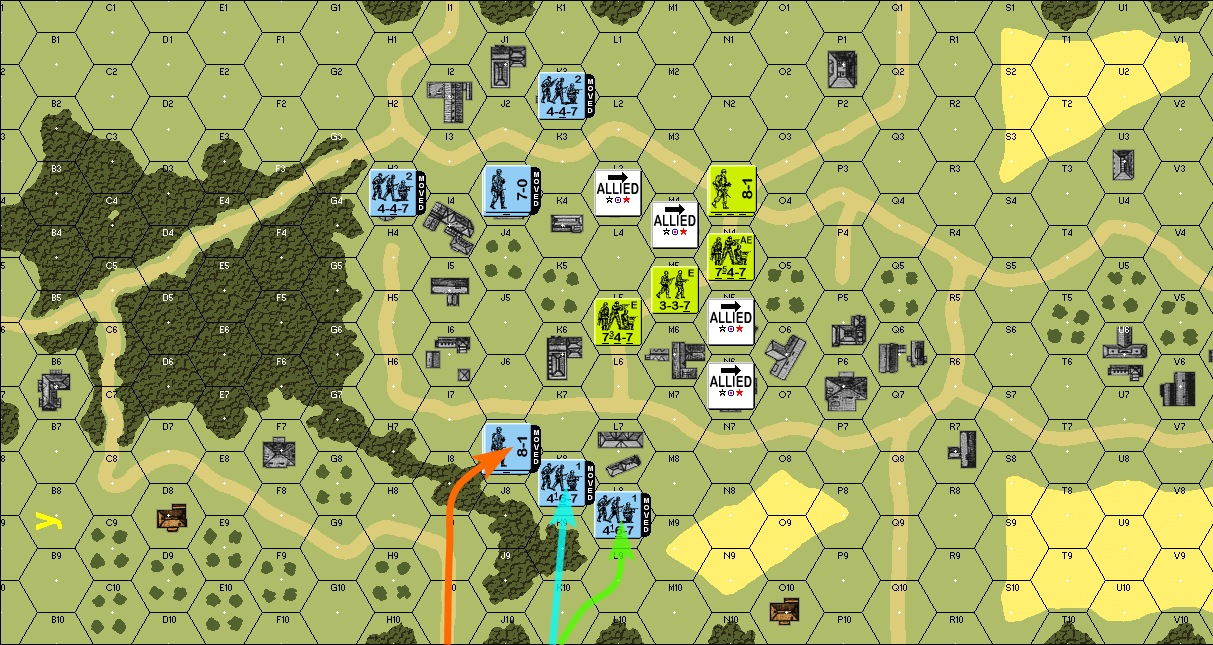 - green: a single 467 enters at K10, and moves just outside of the building at L7, stopping at L8 quote:Note: the follow-up is going to be an advance into L7 during the Close Combat phase. I bring this up because all of the other moves done this phase could have been done the same way, in order to avoid needing to pass Hesitation checks. - teal: another 467 also enters at K10, moves through the woods, and enters the building at K8, passing an HC to do so - orange: a third 467, with an 8-1 leader, enters at I10, and moves to the edge of the treeline at J7, also passing an HC Fire Phase all units moved, no fire Defensive Fire Phase 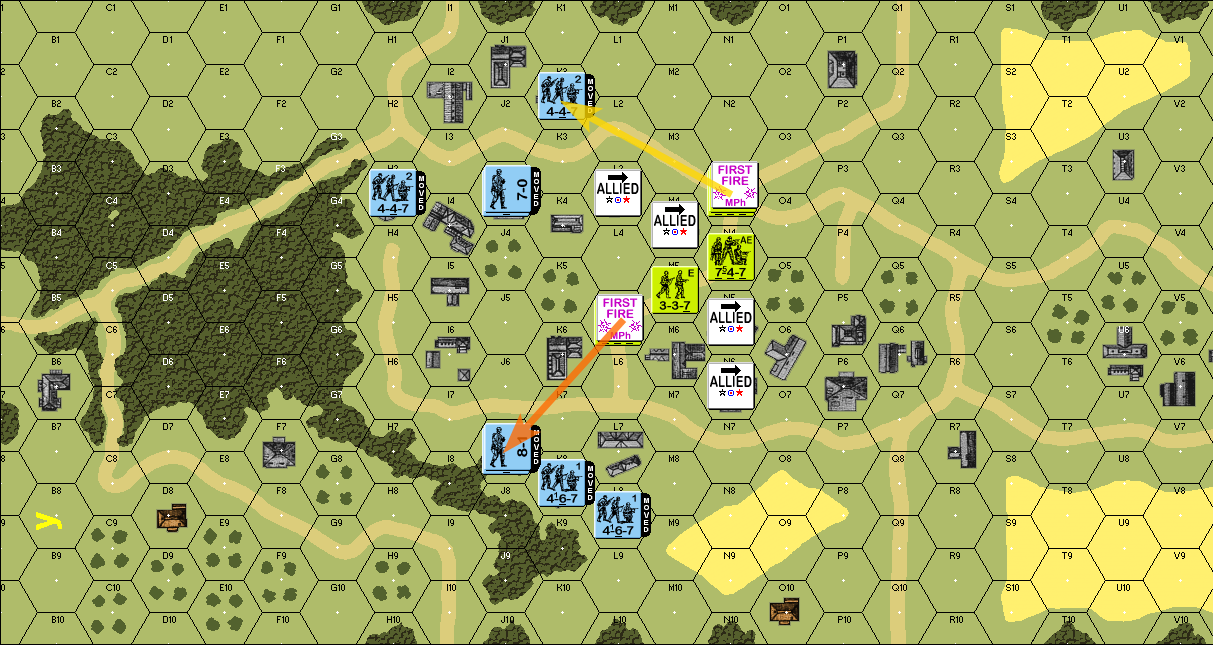 The Americans fire the first shots of the scenario. The attack against K2 has no effect; and while the Germans in the woods at J7 do take an ELR check, they pass it, so the GIs get no results. Close Combat Phase 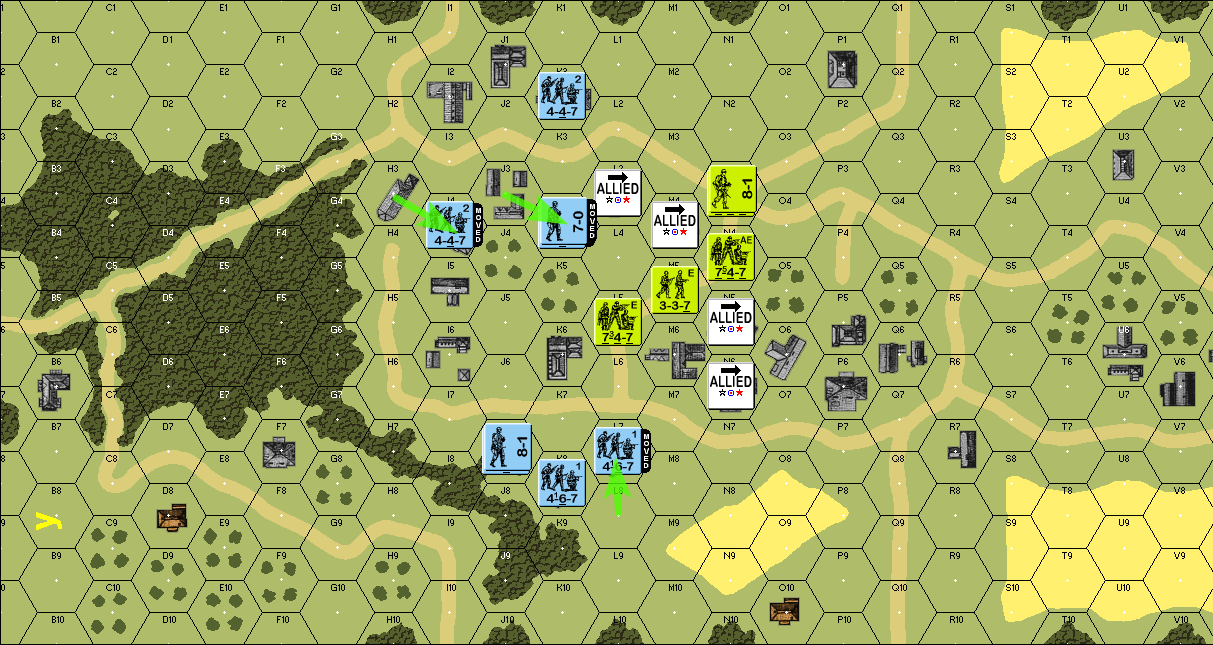 the Germans use the CC phase to make their one hex movements, creeping closer to their objectives. End of GER turn 1
|
|
#
?
Mar 19, 2024 13:26
|
|
|
USA turn 1 Rally Phase nothing happens Movement Phase 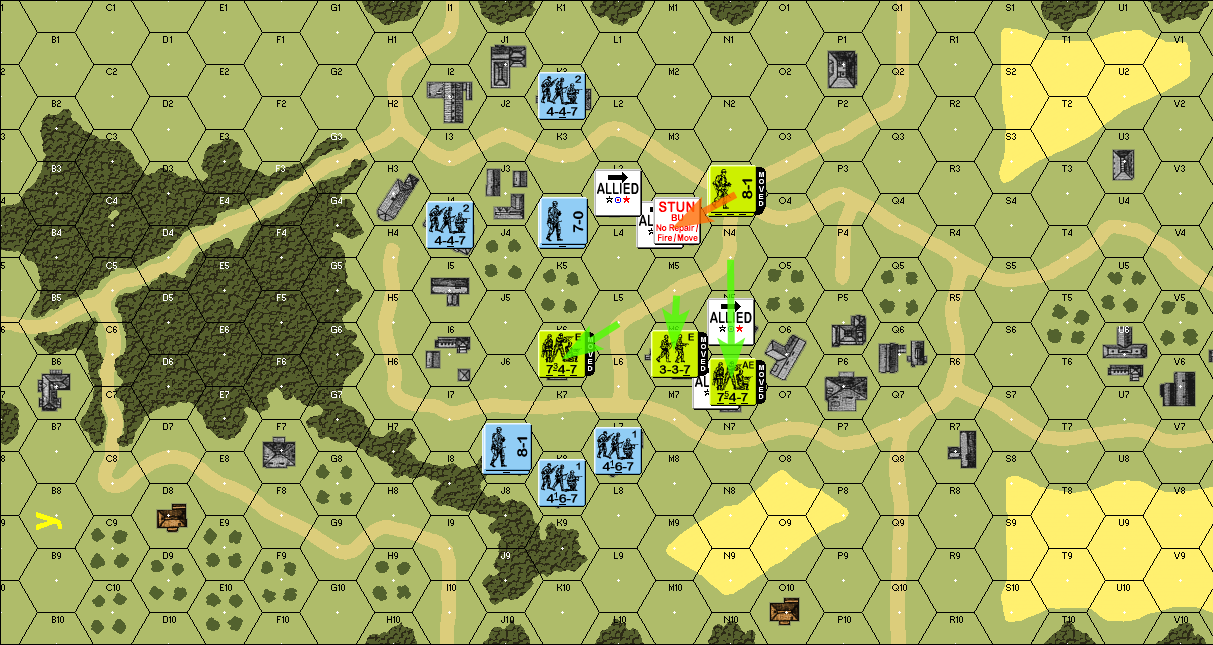 The paratroopers fan out, with an emphasis on securing good spots for the bottom-facing set of objectives. Our new rule does come into play this early, with the 747 and the 8-1 leader Halting right out in the open after rolling a natural 6 on what should have been a Hesitation Check that was impossible to fail otherwise. 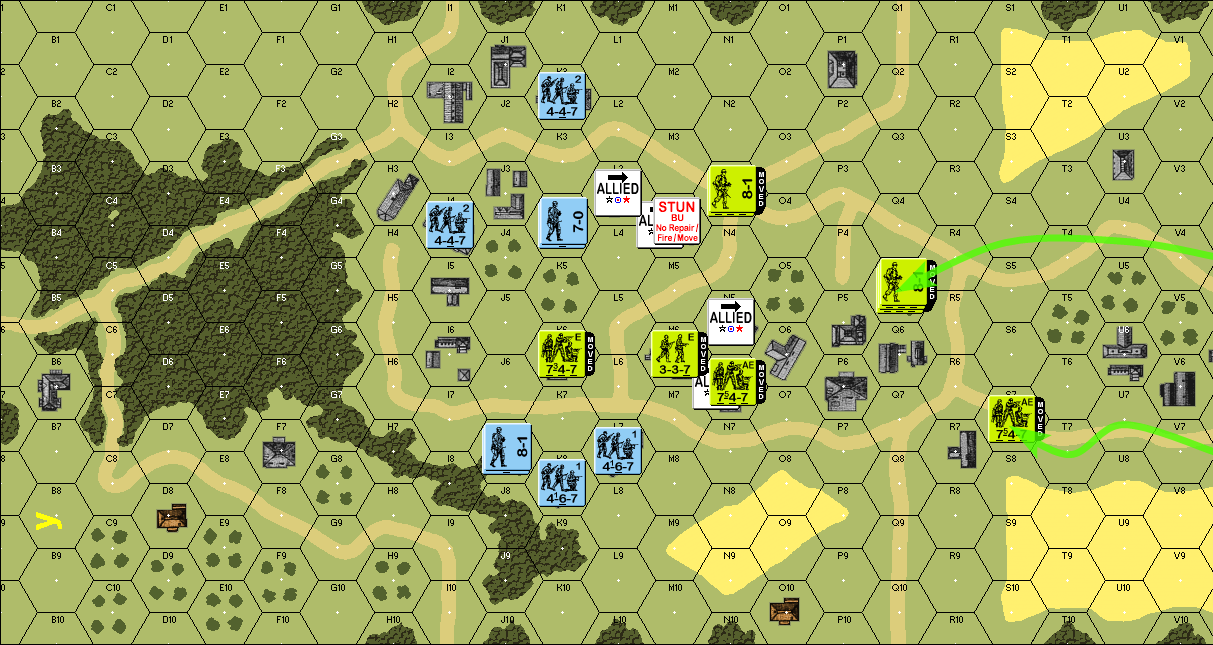 American reinforcements also arrive: two 747s and an 8-1 leader head for the orchard outside of town, while another 747 marches on over to that house at hex R7. Fire Phase all units moved, no fire Defensive Fire Phase 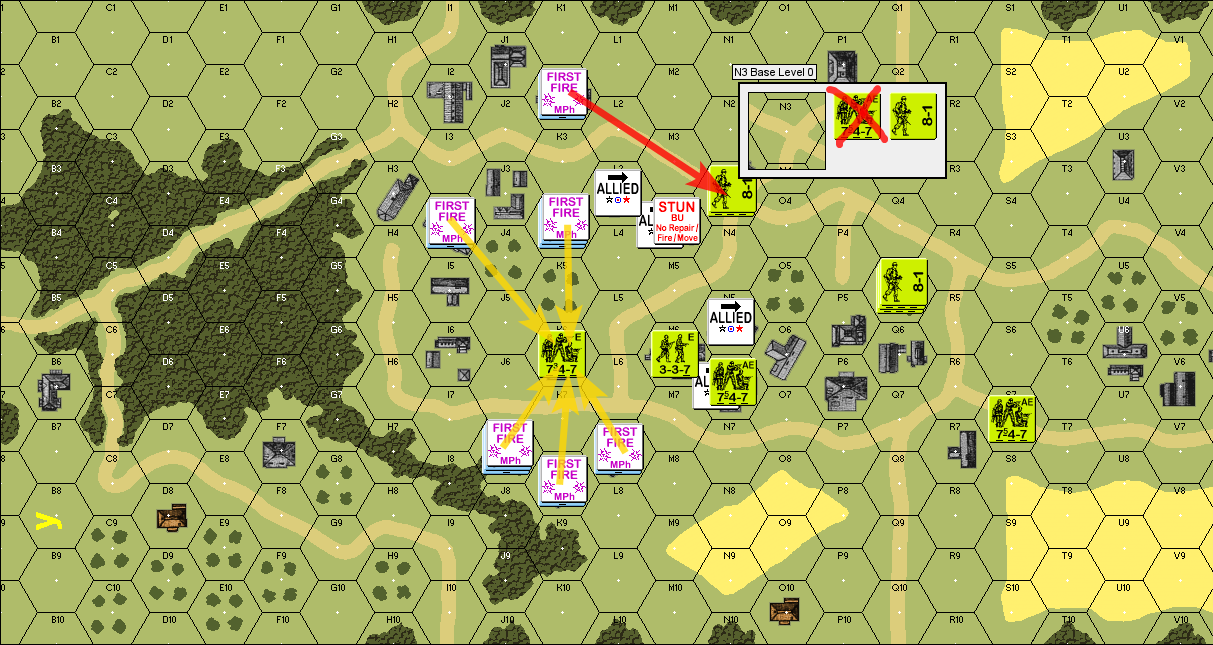 - red: the GER 447 in K2 shoots at the stack of paras out in the open. They get a "7" result, which breaks the USA 747 squad, but the 8-1 passes. The 747 is eliminated for failure to rout: M3, N2, O3, O4, and N4 are all open hexes with LOS of a Good Order Known Enemy Unit, and M4 cannot be entered despite being a non-open hex because it would bring the 747 closer to a Good Order KEU. - yellow: a storm of fire greets the troops in K6, but the house provides great cover, and nothing happens. Close Combat Phase 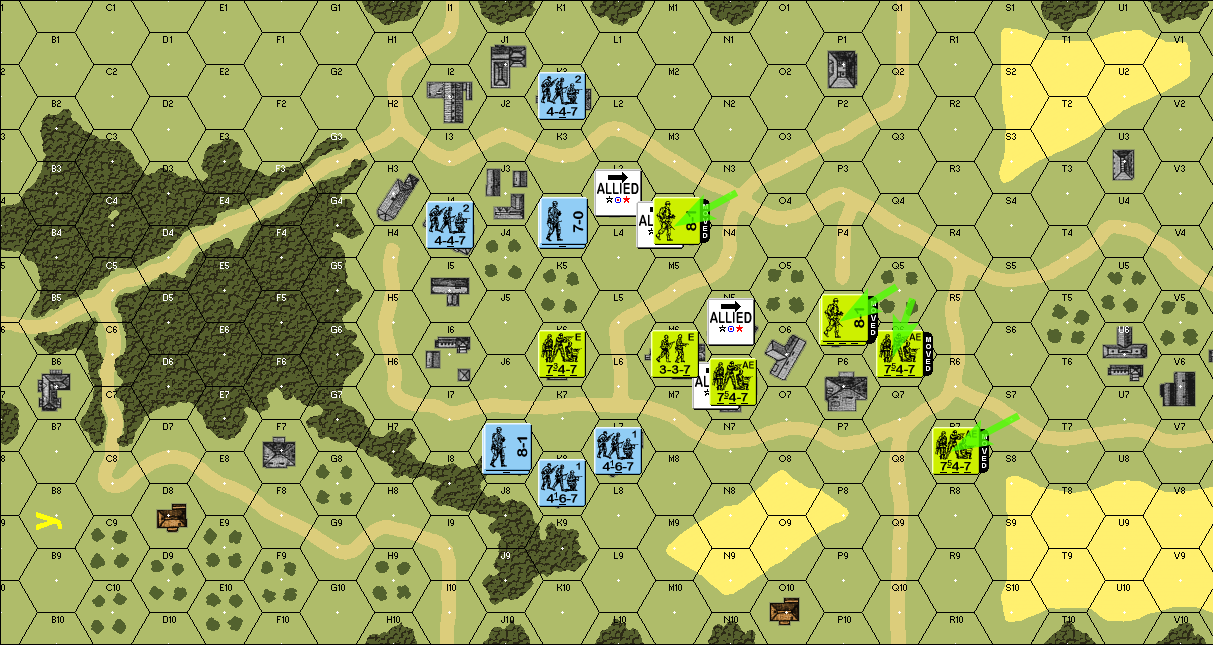 lastly, the squads use the one-hex movement to advance, though that 8-1 leader is now hanging out very close to the enemy with no protection. End of USA turn 1
|
|
#
?
Mar 21, 2024 11:22
|
|
|
GER turn 2 Rally Phase nothing happens Movement Phase 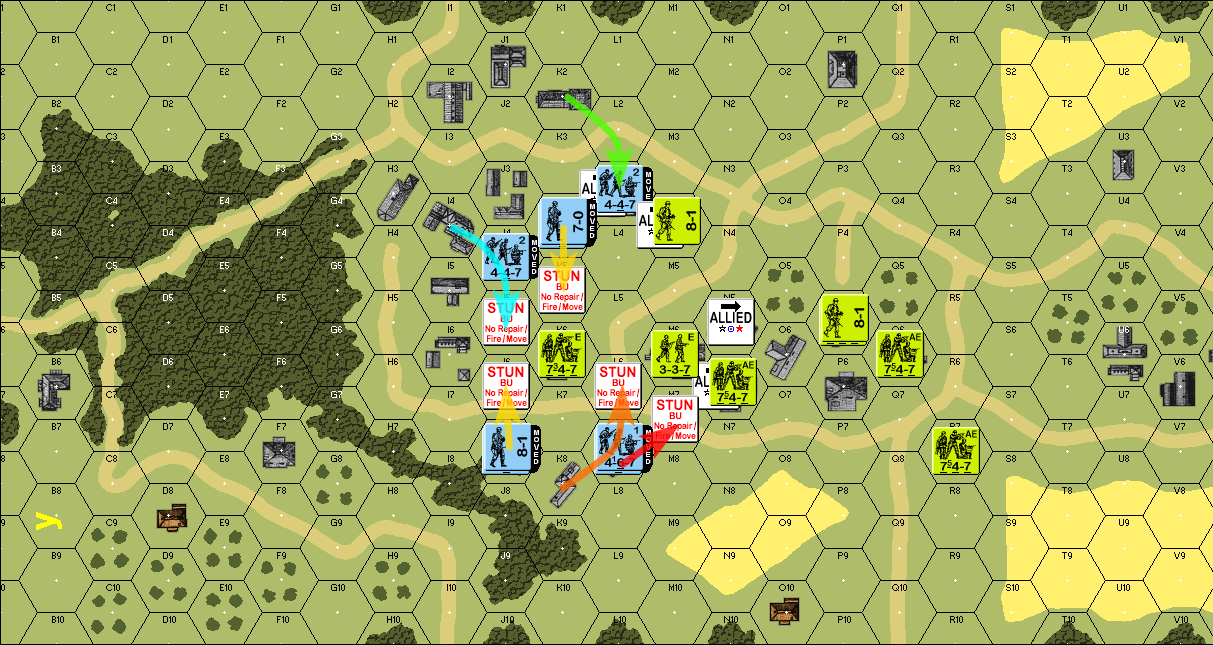 - green: the 447 in K2 moves to L2, then to the objective hex in L3, passing an Hesitation Check as it does so - red: the 467 in L7 tries to move to M7, but fails the HC - orange: the 467 in K8 passes the move to L7, but then also fails the HC trying to get to L6 quote:note that moving to L6 or M7 has a target number of 2 for the HC; the rolls in this case were 2 and a 6, respectively, hence the failures. - yellow: the 467 and 8-1 in J7 tries to move to J6, to assault K6, but they roll a 2 and fail the HC. Similarly, the 447 and 7-0 in K4 tries to move to K5, but they roll a 6 and also fail. - teal: the 447 in I4 passes the HC to get to J4 (which is an orchard with a TN of 6), but fails again at the adjacent hex J5. then, German reinforcements arrive  - green: a 548 enters at K10 and moves into the treeline at K9 - teal: two 548s and a 9-1 leader enter at S10 and pass two HCs to end adjacent to the occupied house at R7 Fire Phase all units moved, no fire Defensive Fire Phase 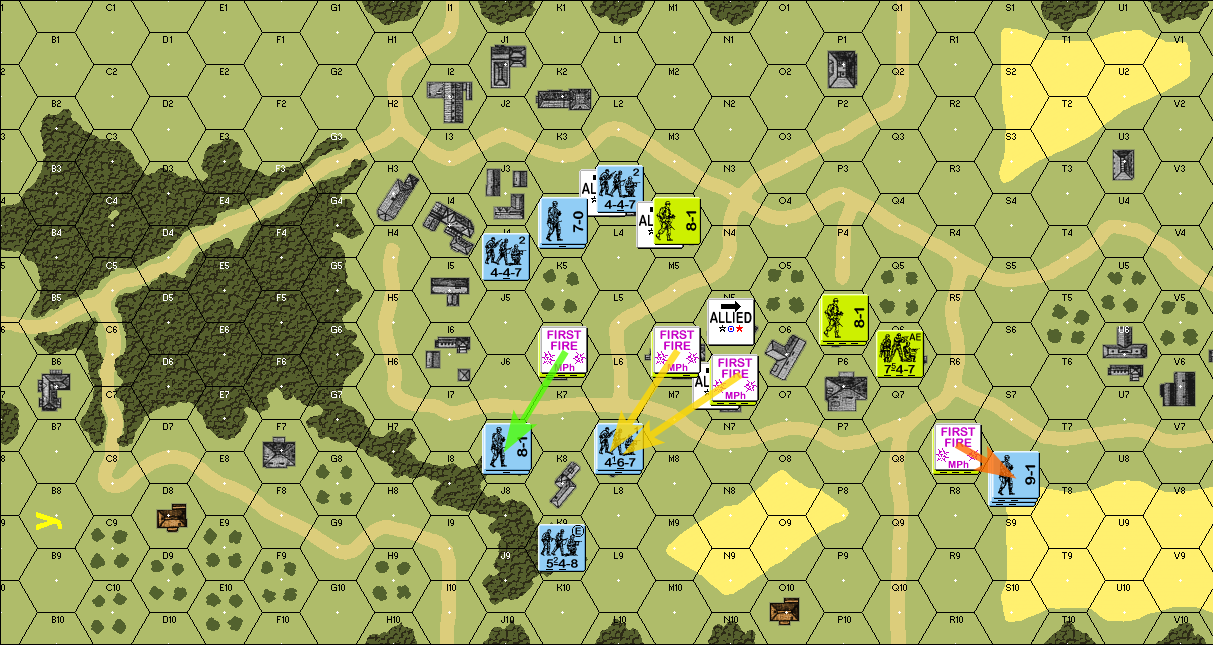 - green: quote:The 747 in K6 is equidistant from three stacks: K4, J7, and L7. And all three stacks are of similar size. As such, Retro rules state the targets should be picked randomly. This is one instance where predetermined defensive fire target selection is arguably to the attacker's benefit, since there is a 447 in J4 standing in orchard that would be a much easier shot than the three stacks, but since it's just one unit compared to the two units in each of the three other hexes, it can't be included in the target selection. In the event, random selection chose the stack in J7; the result was an ELR check, but the Germans passed it - yellow: the M6 and N6 squads shoot L7, but to no effect - orange: the 747 in the house at R7 shoots the coming platoon, and they obtain an ELR check, but the Germans pass it again. Close Combat  - green: the American leader at M4, and the squad at R7, are both engaged in Close Combat - teal: the 548 in the forest uses its advance to move to the building at K8 - orange: the 447 in the orchard at J4 moves to the building at J5. In this case, it uses the advance to slink back into the cover of a stone building. It would seem like a bad idea to stay out in the open and then pray to survive until GER turn 3. 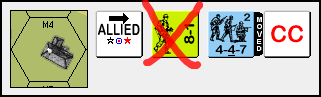 during close combat resolution, the lone American leader is eliminated (unsurprisingly, they were facing 4:1 odds), but the fighting in R7 is inconclusive. The state of play at the end of the turn: 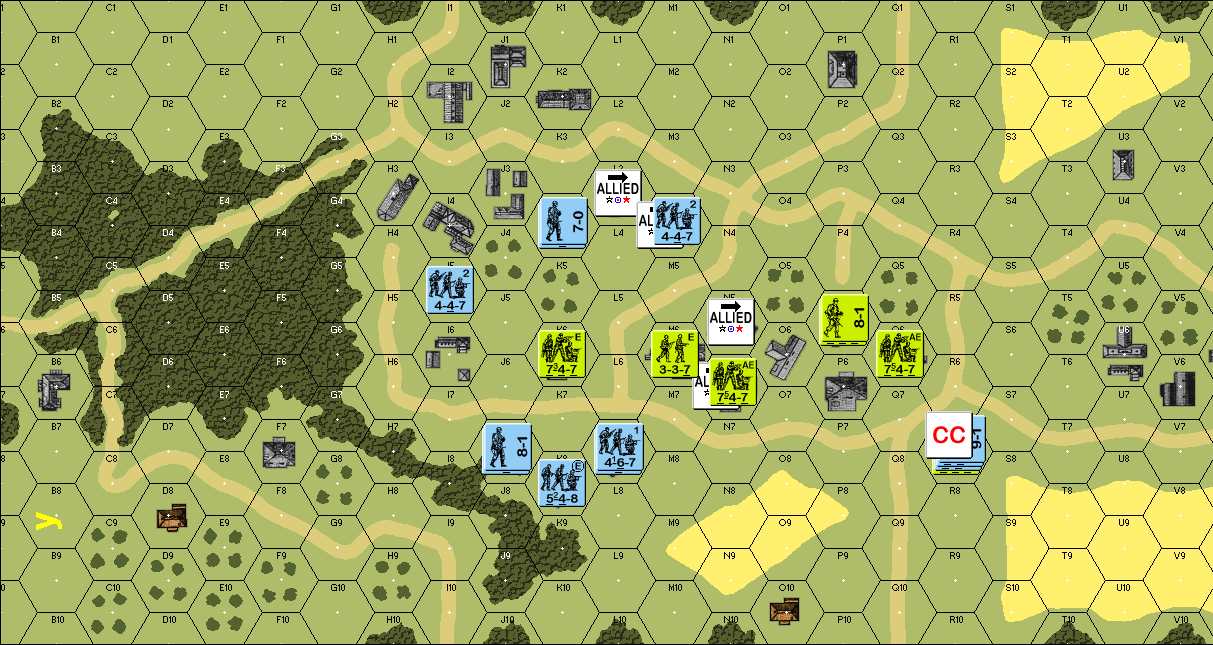 End of GER turn 2
|
|
#
?
Mar 22, 2024 05:51
|
|
|
USA turn 2 Rally Phase nothing happens Movement Phase  two 747 squads and an 8-1 leader move out of P5 and Q6, and hustle to R6. quote:No hesitation checks here since the GER units embroiled in the CC cannot impose it, so the Americans are going to seize the opportunity to crush the squads in this hex. The thinking here is that the position in K6/M6/N6 has proven to be fairly difficult to approach so far, so the squads can hold there, and the L2/M4 sector can be dealt with later 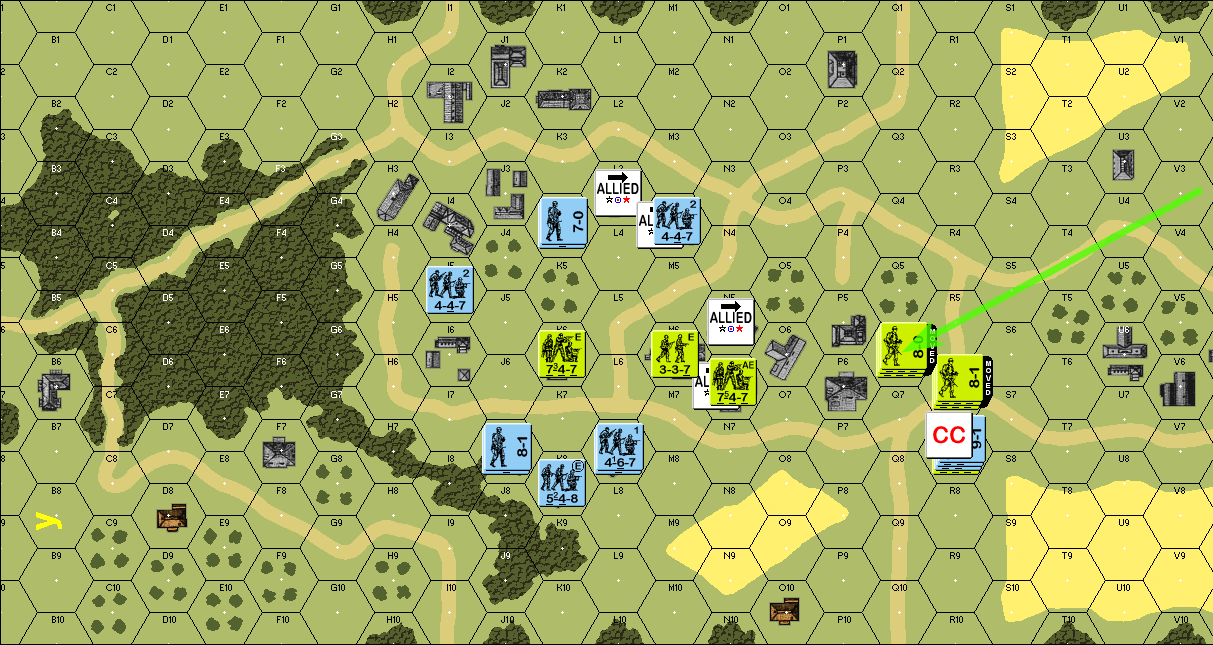 additional reinforcements arrive in the form of two more 747s and an 8-0 leader, and move to the center of the town Fire Phase  the two squads in M6 and N6 form a fire group, and they manage to break the stack in J7. then the 747 in K6 shoots at the elite squad in K8 and gets an ELR check, but the Germans pass it. It would have been nice to get even just an ELR check failure, because downgrading the 548 loses the Elite status, and thereby the bonus when making Hesitation checks. Defensive Fire Phase 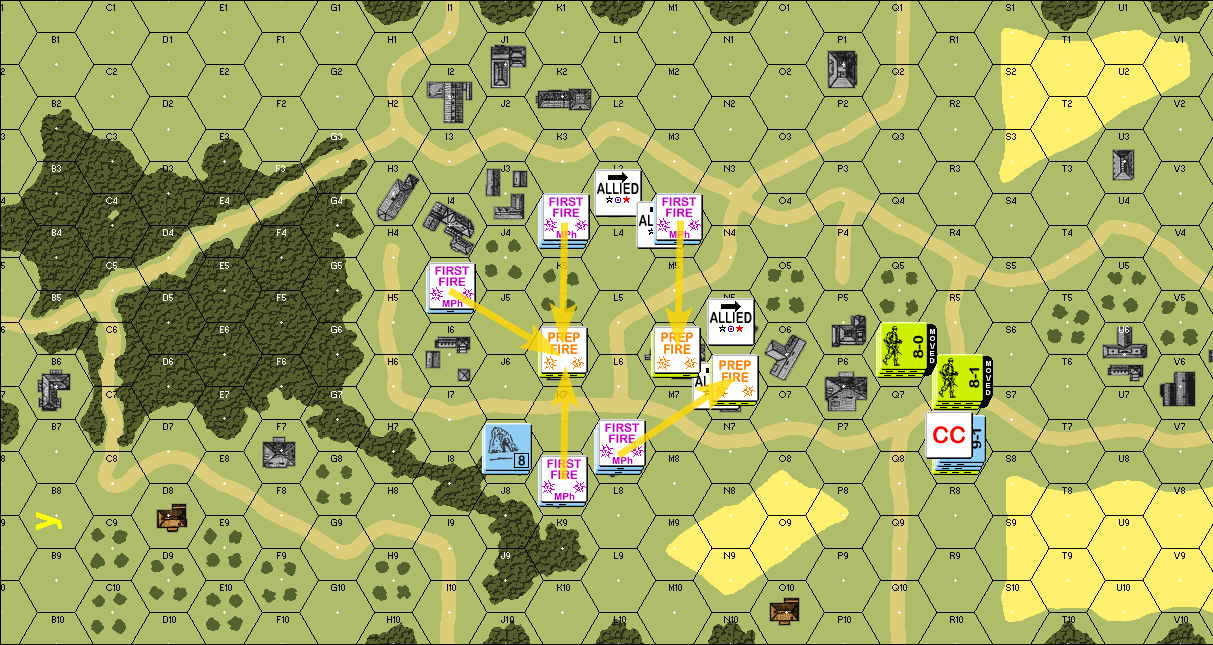 lots of fire here, but none of it makes a lick of difference. Close Combat Phase  the stack of two 747s and 8-1 move to add to the Close Combat, while on 747 and the 8-0 moves to P6, while still leaving one 747 in Q6 quote:in the event that the CC in R7 goes against the Americans, holding hexes in both P6 and Q6 gives good Hesitation check coverage for wherever the Germans might want to go next - putting the whole stack in P6 would allow the R5 hex to be out of LOS.  ... and it turns out that the Americans might need that coverage, because they rolled an 8, while the Germans rolled a 4, which means the paratroopers get wiped out. End of USA turn 2 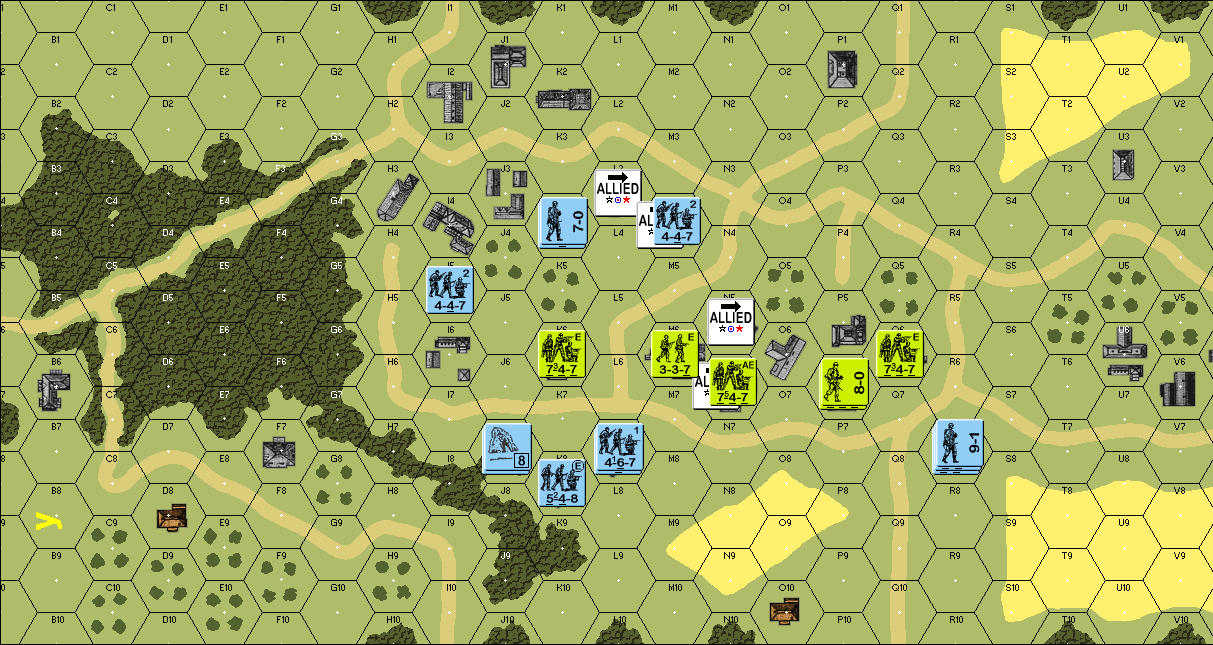
|
|
#
?
Apr 1, 2024 12:06
|
|
|
GER turn 3quote:Even after crushing the American stack at R7, the German player is still in an interesting position: does that R7 stack head straight for Q7 and engage the stack at P6? Do they go around along Q8, P8, O8, then N7, aiming straight for the objective? These are elite squads with a -1 leader, so they're almost certainly going to pass the the first three Hesitation checks when they're not yet adjacent to the enemy, and then they could pass the N7 movement half the time, but that's four rolls where they're hoping that they do not get a natural 6. Rally Phase 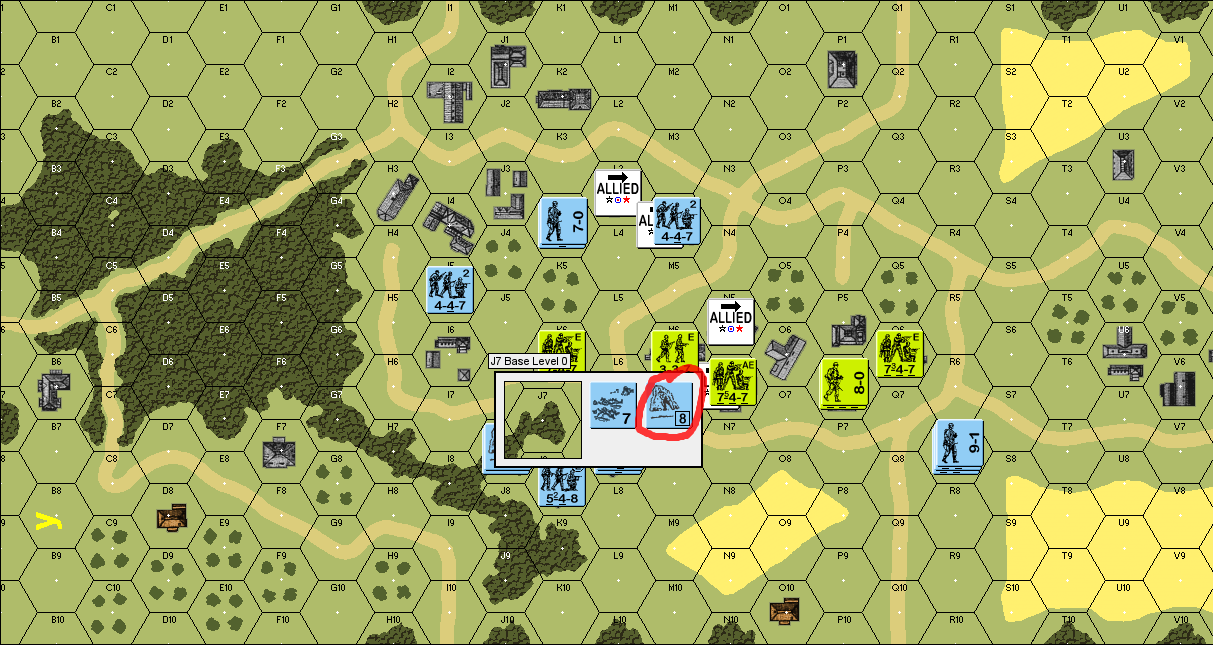 in J7, the leader tries to rally, but gets a 9 and fails; and this means the MMC can't rally either because the leader is still broken Movement Phase 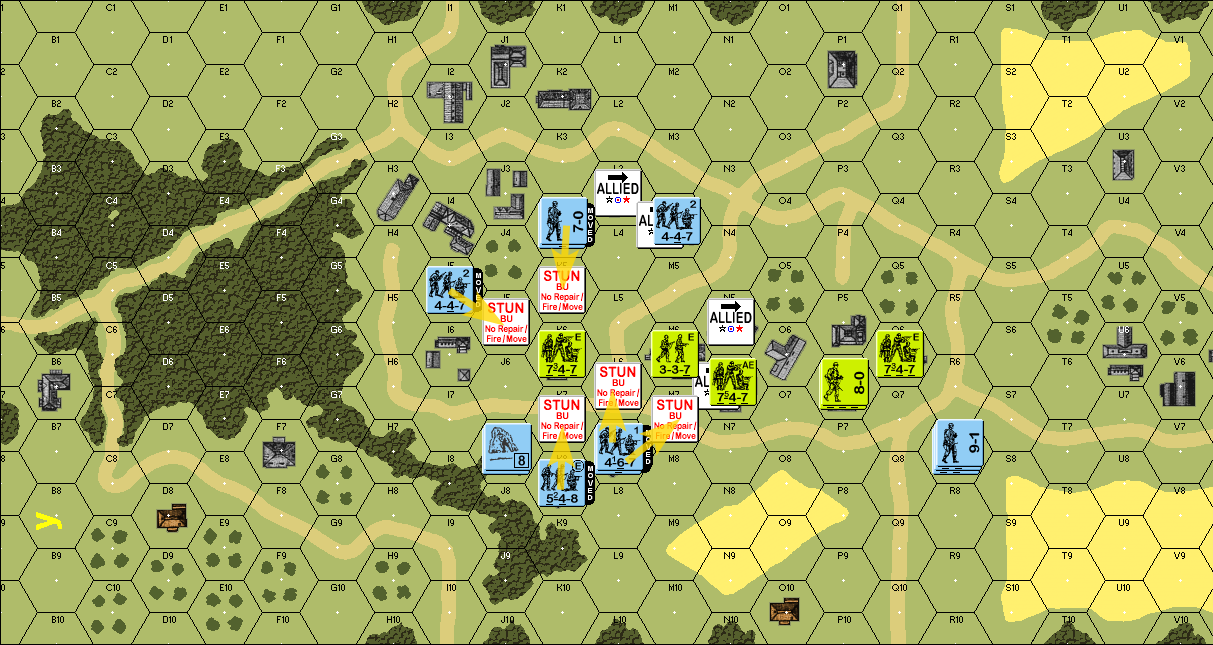 all these units try to move adjacent to the American defenses, but all they get is a bunch of Halt results 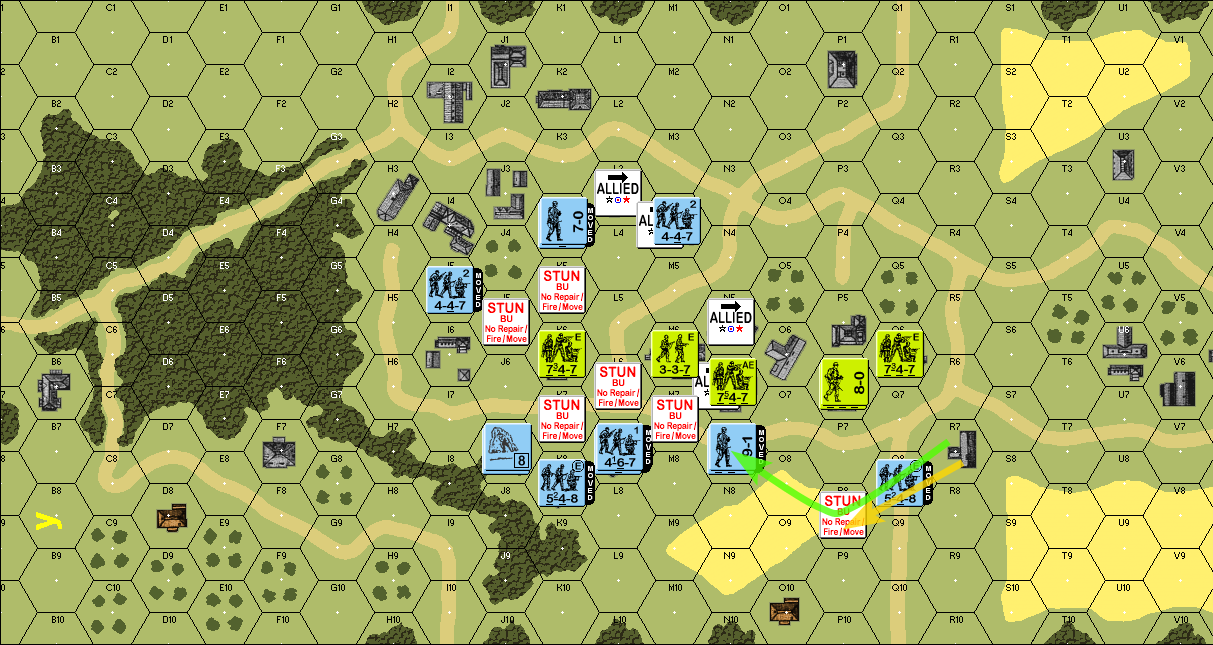 from the house in R7, one 548 and a 9-1 leader makes an end-run for the town, and passes all four Hesitation Checks to do it, even the final adjacency move the other 548 tries to follow, but fails at the second hex 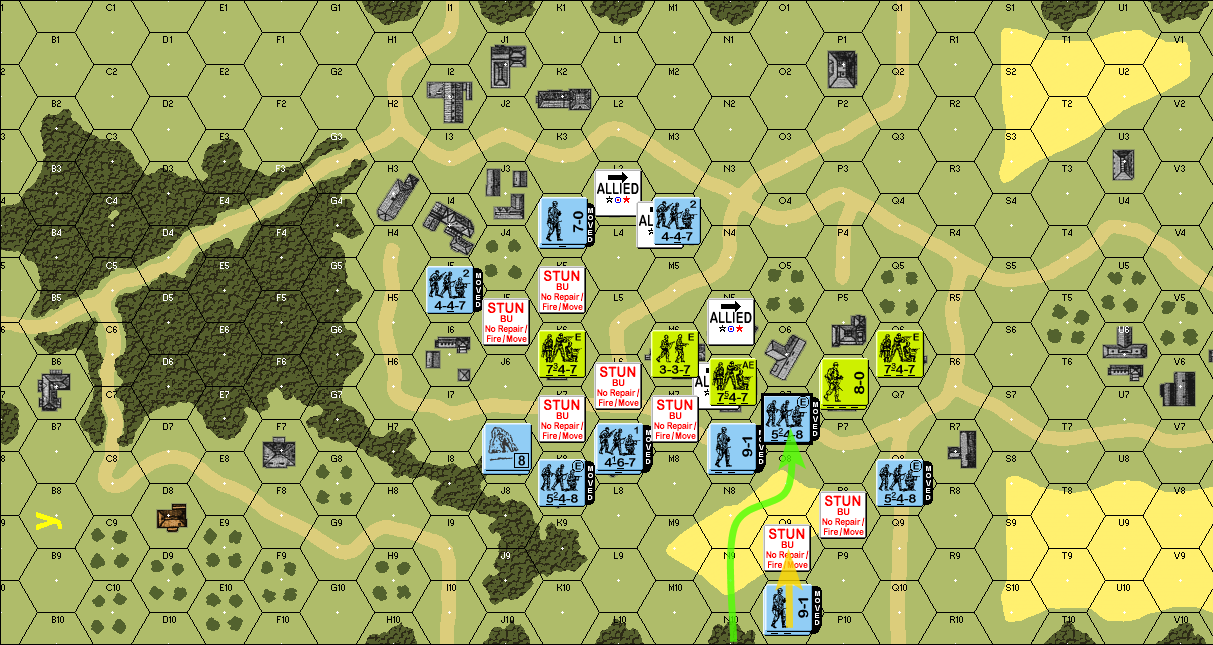 German reinforcements arrive: a new 548 and a 9-1 leader halt immediately upon trying to enter some grain fields, but a second 548 gets far enough in to enter an assault position 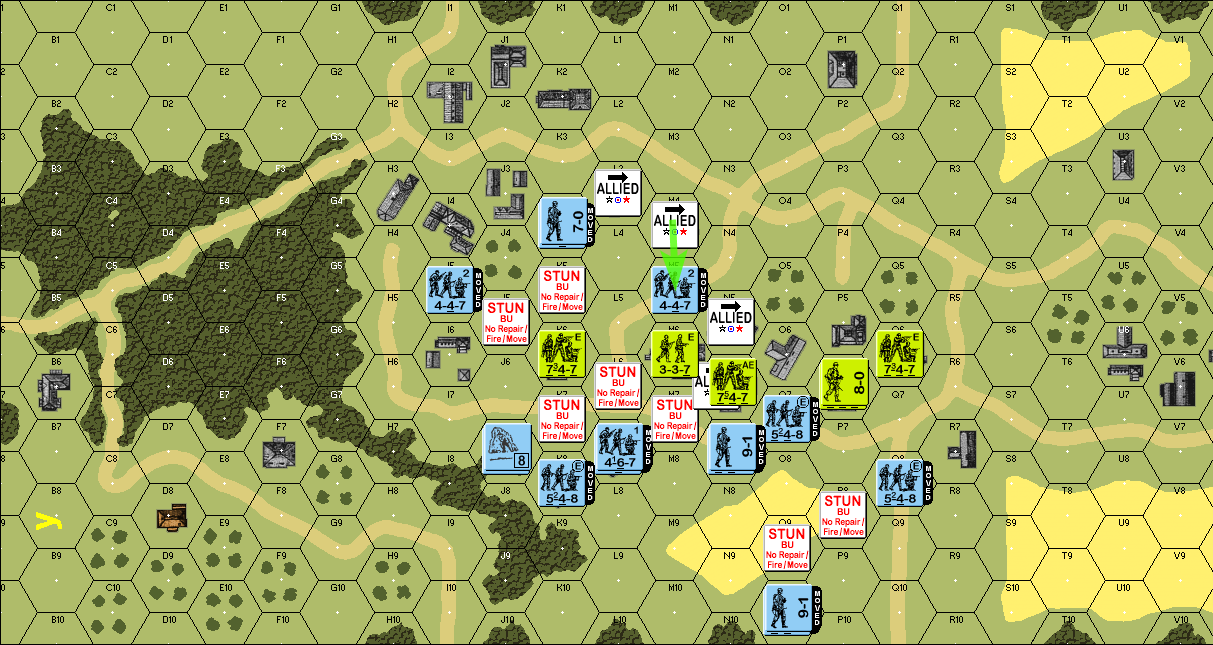 and finally, the 447 in M5 passes the HC to also get into adjacency Fire Phase all units moved, no fire Defensive Fire Phase 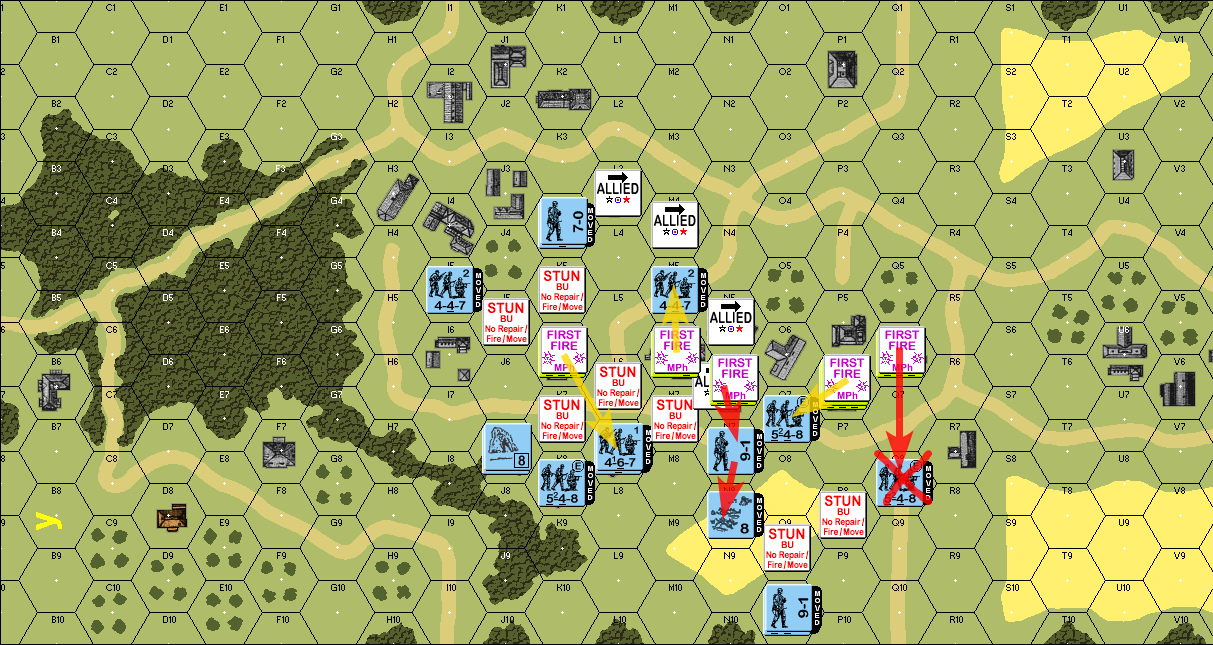 from right to left: - the 747 in Q6 rolls low and takes out the German 548 squad with a straight KIA result quote:this is maybe one of the best examples of the Hesitation rule "working as intended". You've got a squad that tries to advance into position, gets a Halt result that's leaves them out in the open, and then defensive fire tears them to pieces. That's classic, man. - the 747 and 8-0 in P6 get no effect despite the doubled FP - the 747 in N6 shoots at the stack in N7 and they get an "8" result on the attack; the 9-1 leader passes, but the 548 breaks, routs to N8 as a non-open hex, and then stops there - the 337 in M6 shoots at the German 447, but also gets no effect - and same for the 747 shooting at the building in L7 Close Combat Phase 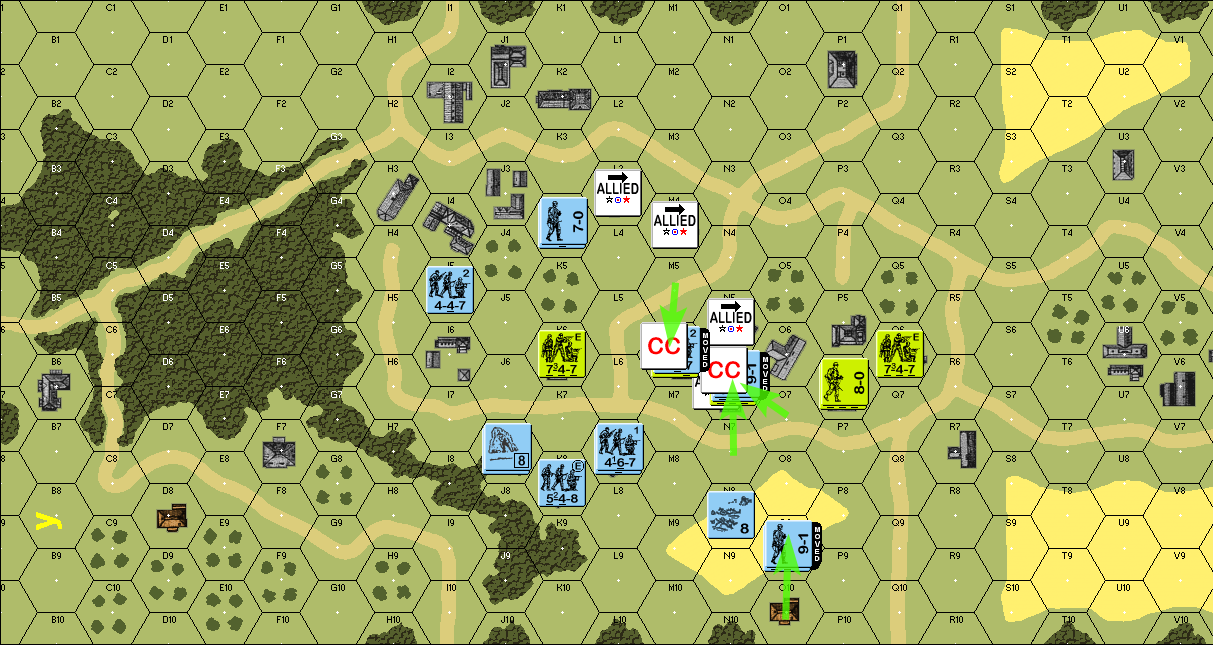 the stack in O10 uses this phase's movement to advance to the grain hex in O9 then we get two close combats developing, at M6 and N6 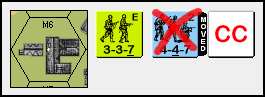 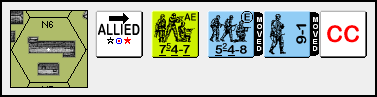 in M6, the American half-squad takes out the 2nd-line German full squad while in N6, the close combat is inconclusive as of this turn End of GER turn 3
|
|
#
?
Apr 2, 2024 01:59
|
|
|
USA turn 3 Rally Phase nothing happens Movement Phase 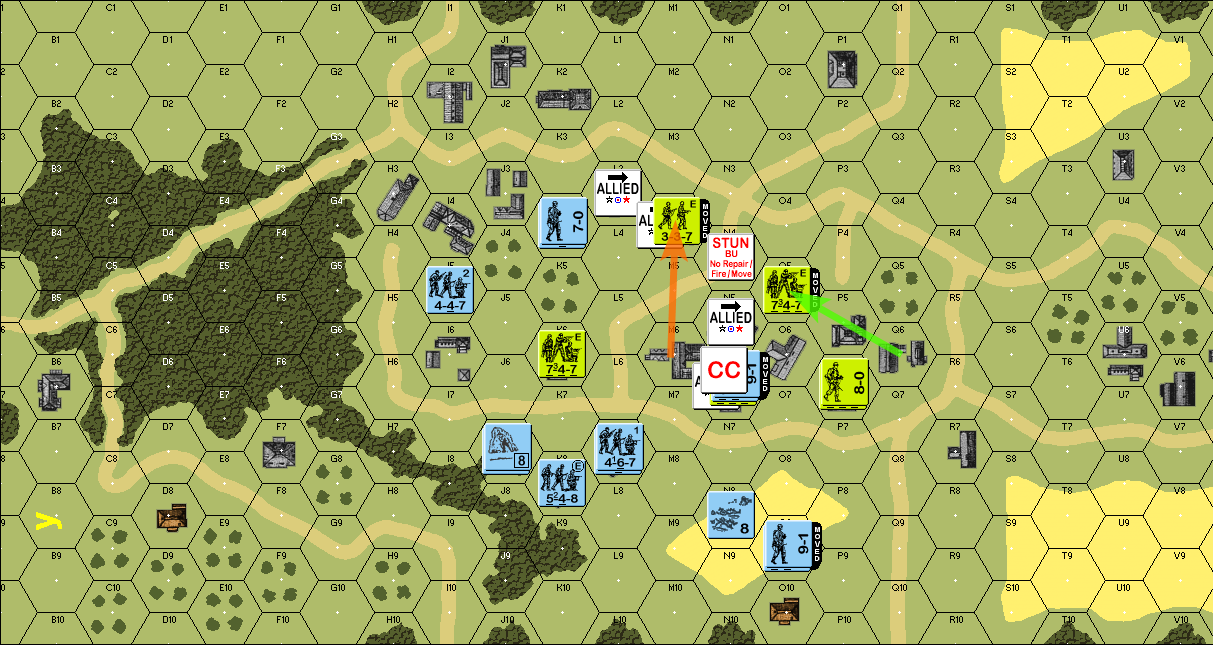 - green: the 747 in Q6 tries to make it to the left-hand objective hexes, but halts when trying to cross the street ... - orange: ... leaving it to the 337 in M6 to pick up the slack  the last group of American reinforcements arrive, and they head immediately for the town Fire Phase 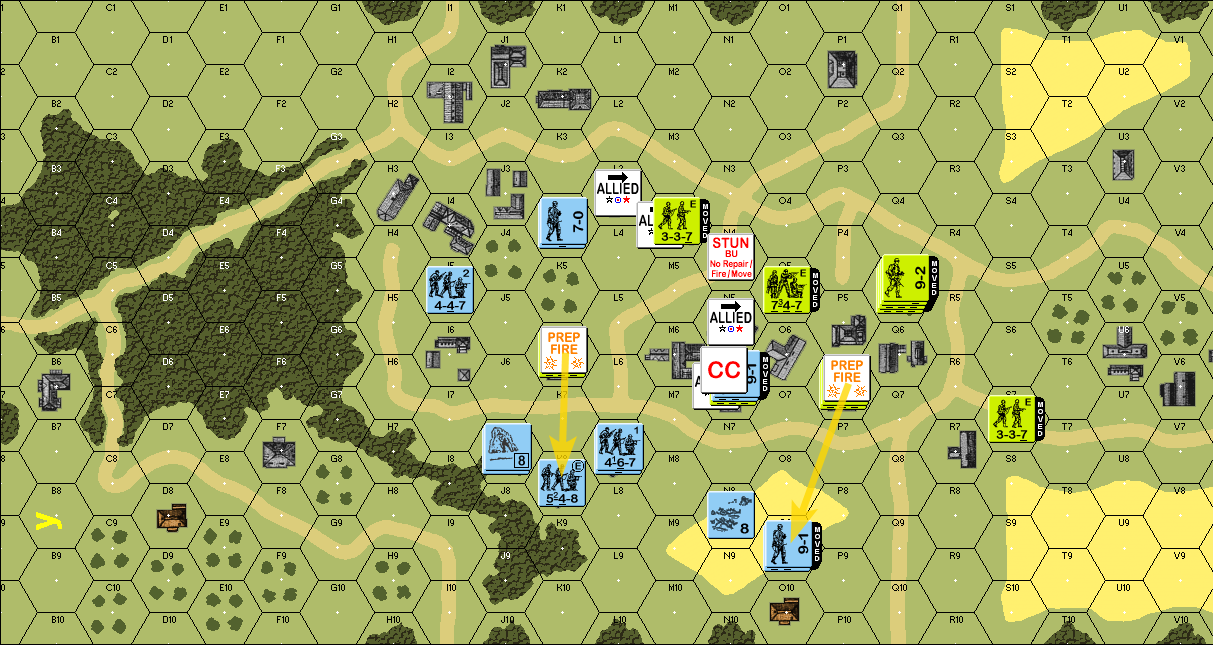 the remaining squads that didn't move take their shots, but none land Defensive Fire Phase 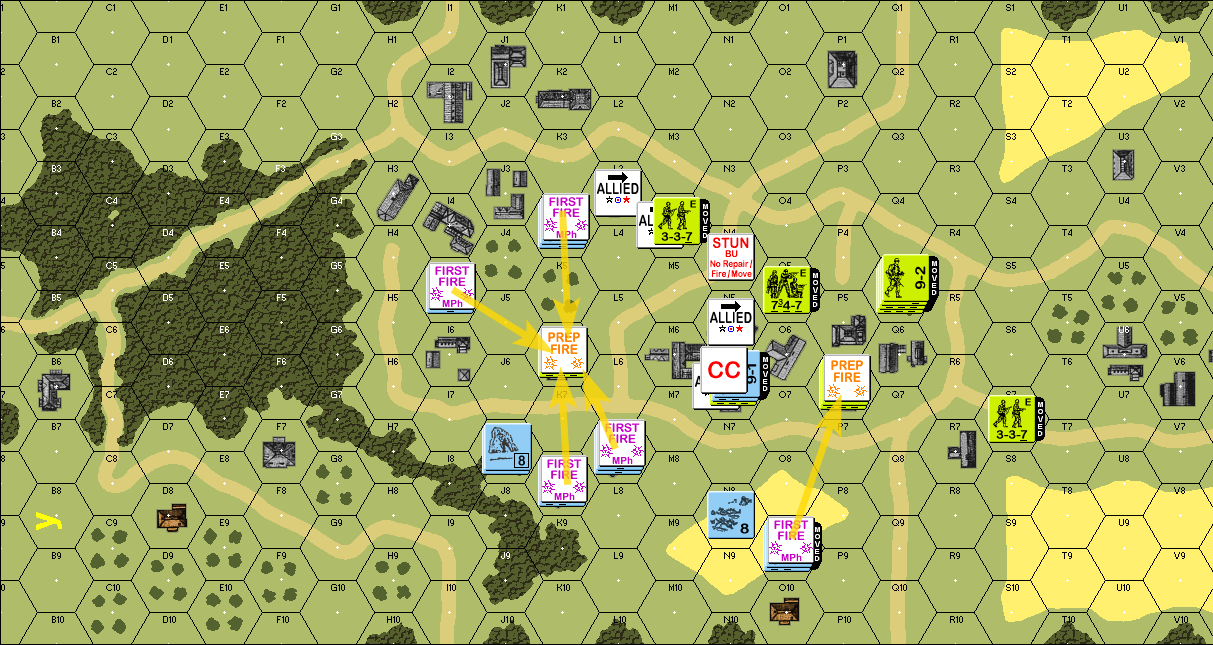 the Germans don't get anything done with their return fire, either Close Combat Phase 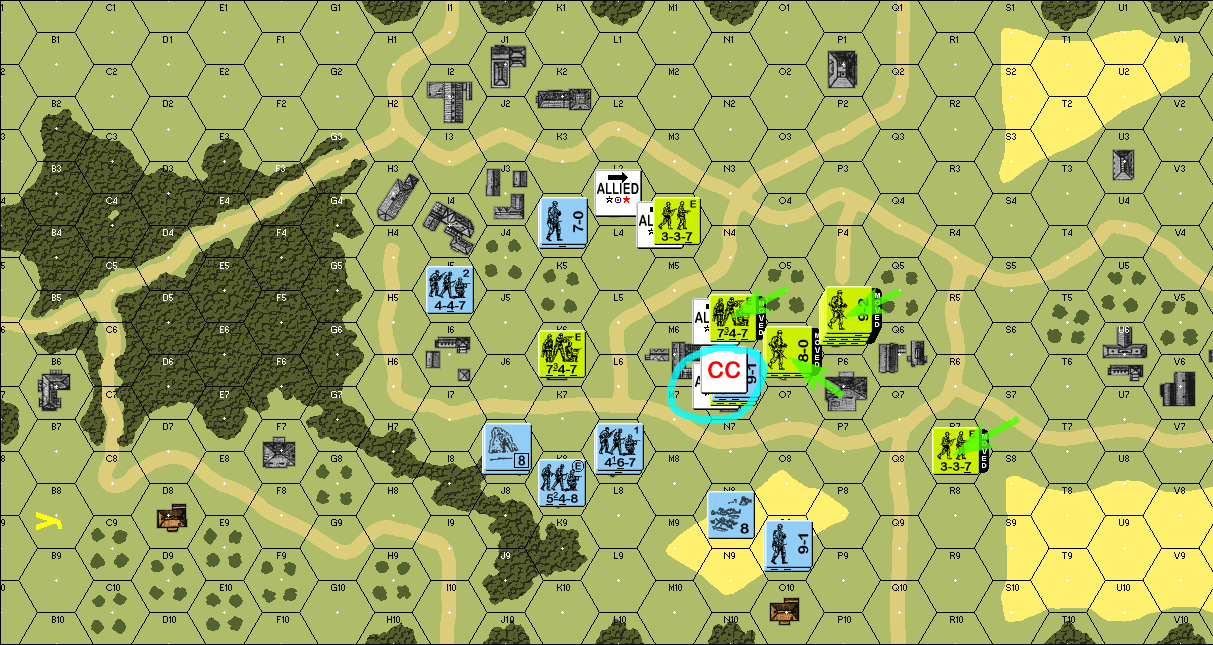 the paratroopers use their one-hex movement to jockey for position further, while in the fighting in N6, both sides roll high and the melee remains undecided End of USA turn 3
|
|
#
?
Apr 3, 2024 03:43
|
|
|
GER turn 4 Rally Phase 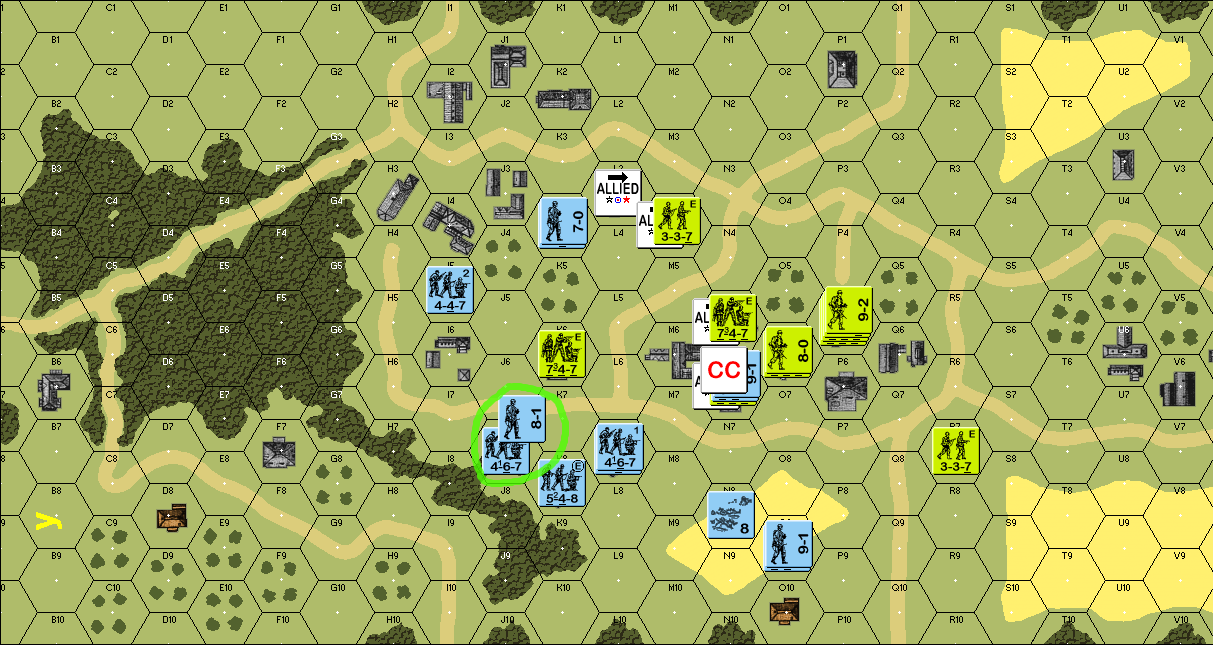 both the 8-1 leader, and then the 467 squad, rally successfully Movement Phase quote:at this point, I thought about the wisdom of continually trying to assault K6, only to fail Hesitation Checks: could I shoot the Americans out of the house instead? If I take the fire group at J7, K8, and L7, I'd come up with 17 FP, rounded down to 16. A natural 7 roll on the 16 FP column would be modified to a 10, which is No Effect. So no, I wouldn't be able to scrounge up enough FP to have a decent chance of getting anything done with fire combat anyway.  for transparency, I'm going to post my log of how this phase played out quote:548 in K8 attempts to move to K7 the Germans get just about nowhere this turn Fire Phase all units moved, no fire Defensive Fire Phase 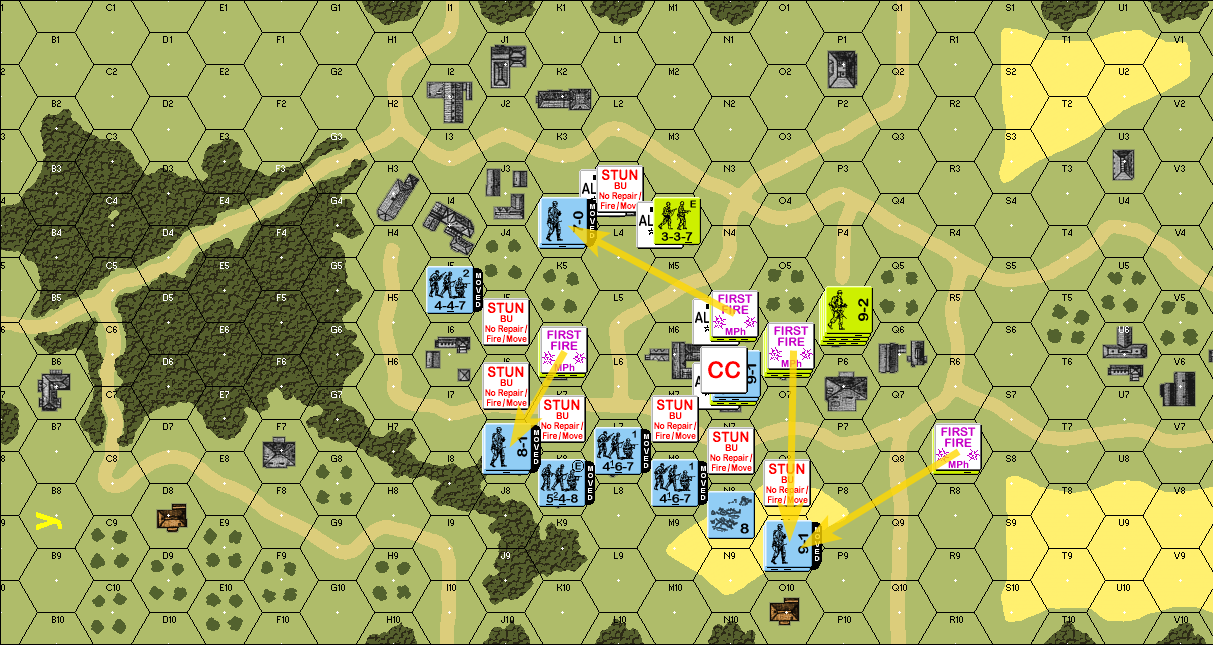 that said, the American defensive fire is ineffective also Close Combat Phase 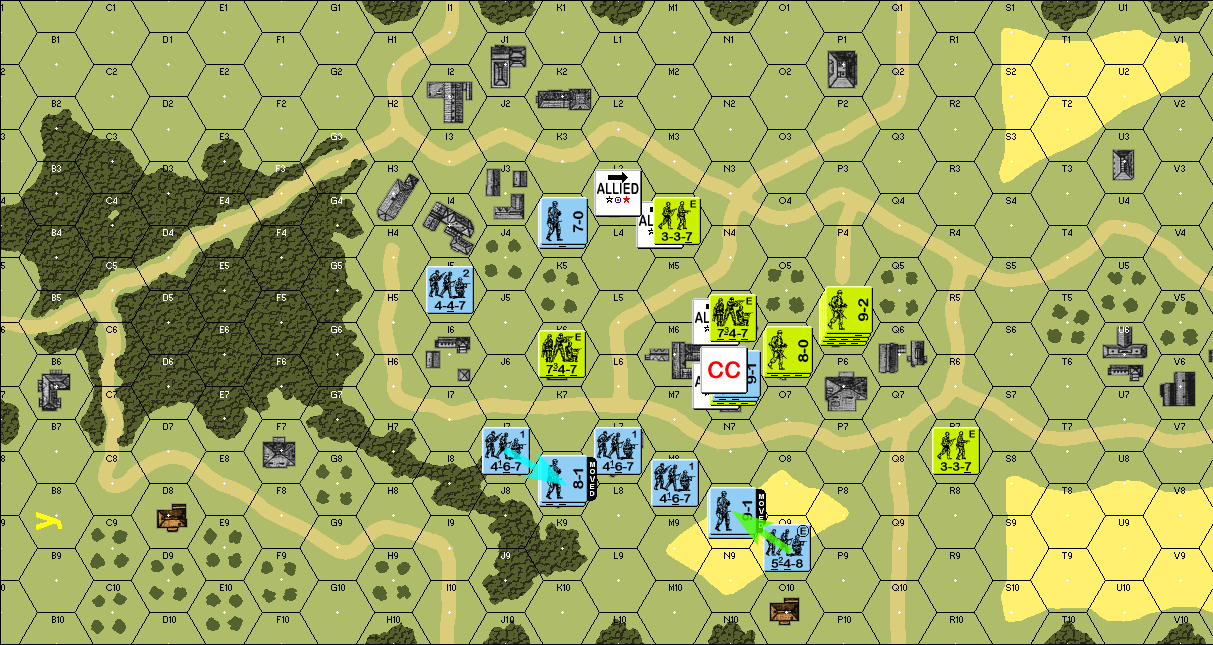 - green: the 9-1 in O9 moves to N8 so they can try to rally the broken squad - teal: the 8-1 in J7 moves to K8 so they can stack DRM with the elite squad to try and beat the Hesitation Check  for the close combat in N6, both parties roll low, and they mutually annihilate End of GER turn 4 
|
|
#
?
Apr 4, 2024 03:39
|
|
|
USA turn 4 Rally Phase nothing to rally Movement Phase 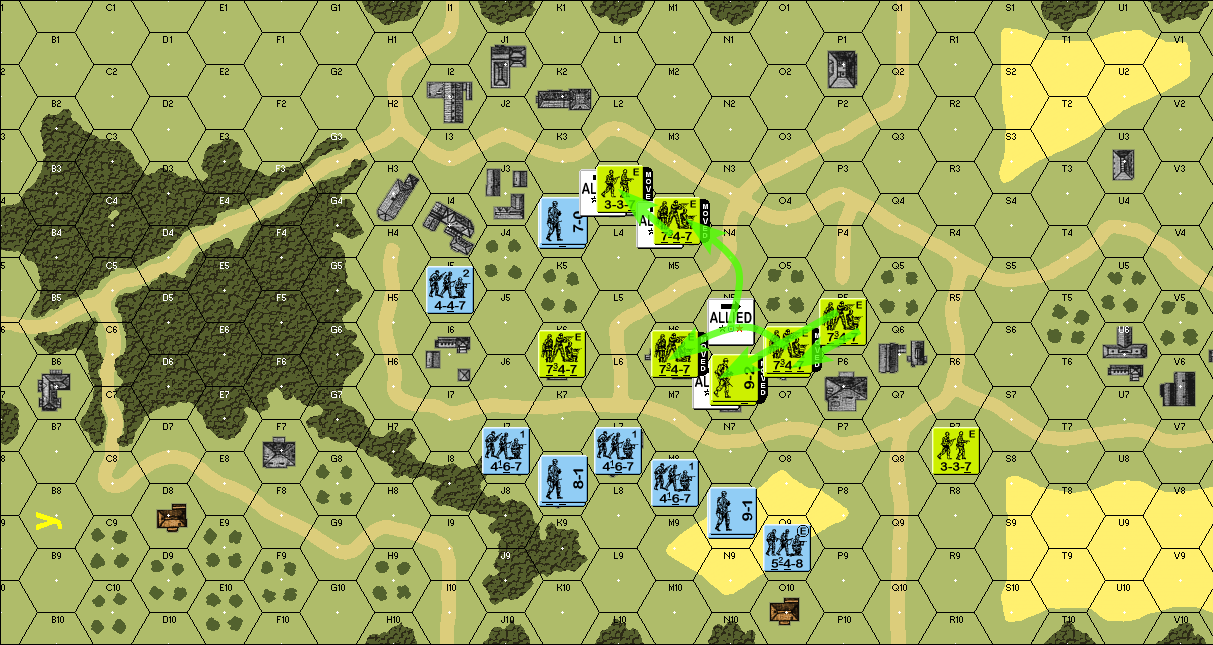 in sharp contrast to the previous turn, the Americans pass all of their Hesitation Checks (granted, the worst TN was only a 5) as they position themselves to secure all four objectives. Fire Phase  only one shot taken here, and to no effect Defensive Fire Phase 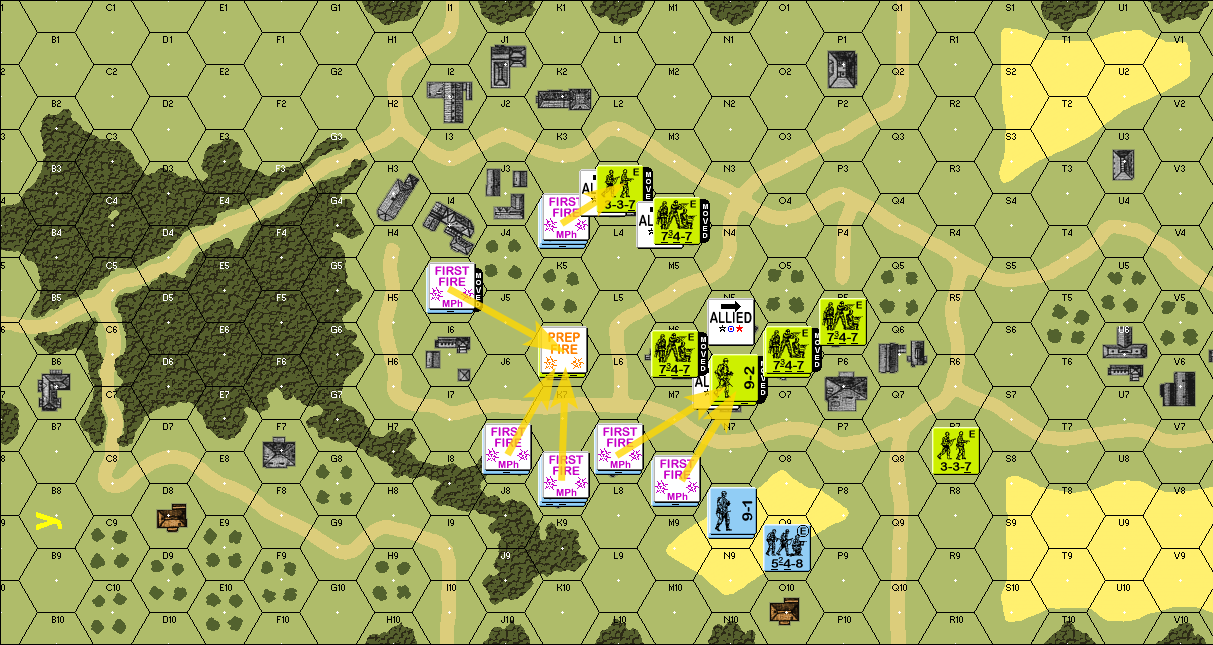 no successful attacks here, neither Close Combat Phase 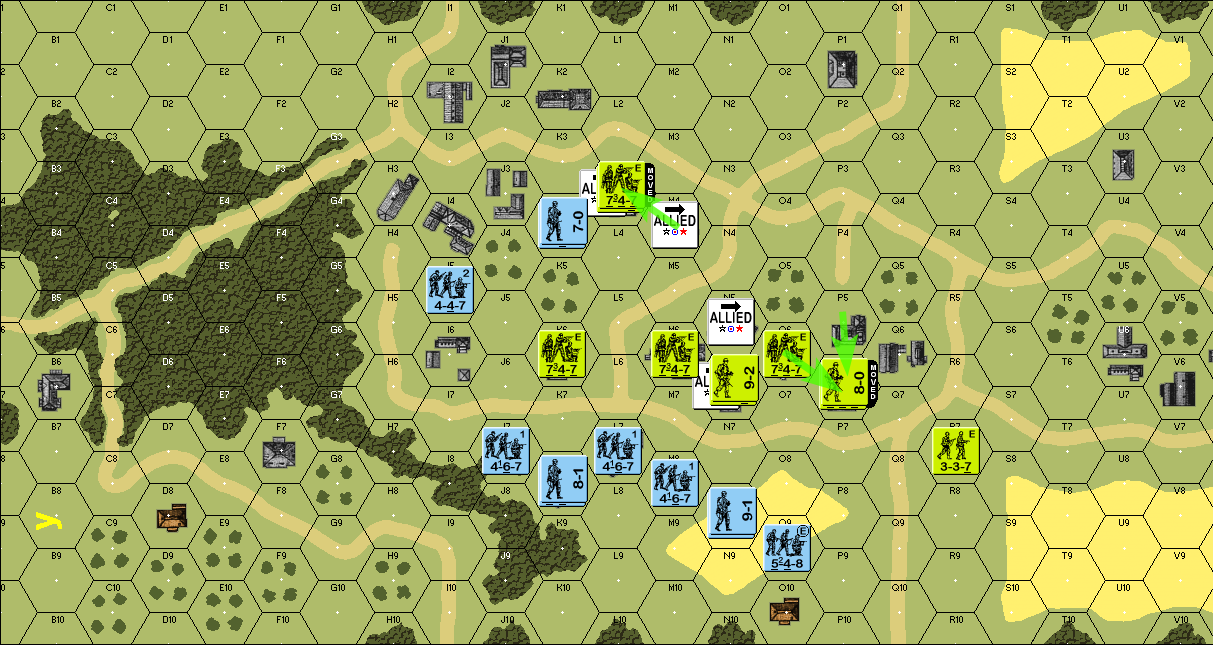 the paratroopers use their one-hex movement to further consolidate End of USA turn 4
|
|
#
?
Apr 5, 2024 08:15
|
|
|
Seems like the Americans stabilised by now, seems difficult for the Germans to make much ground unless they get lucky.
|
|
#
?
Apr 5, 2024 08:49
|
|
|
GER turn 5 Rally Phase 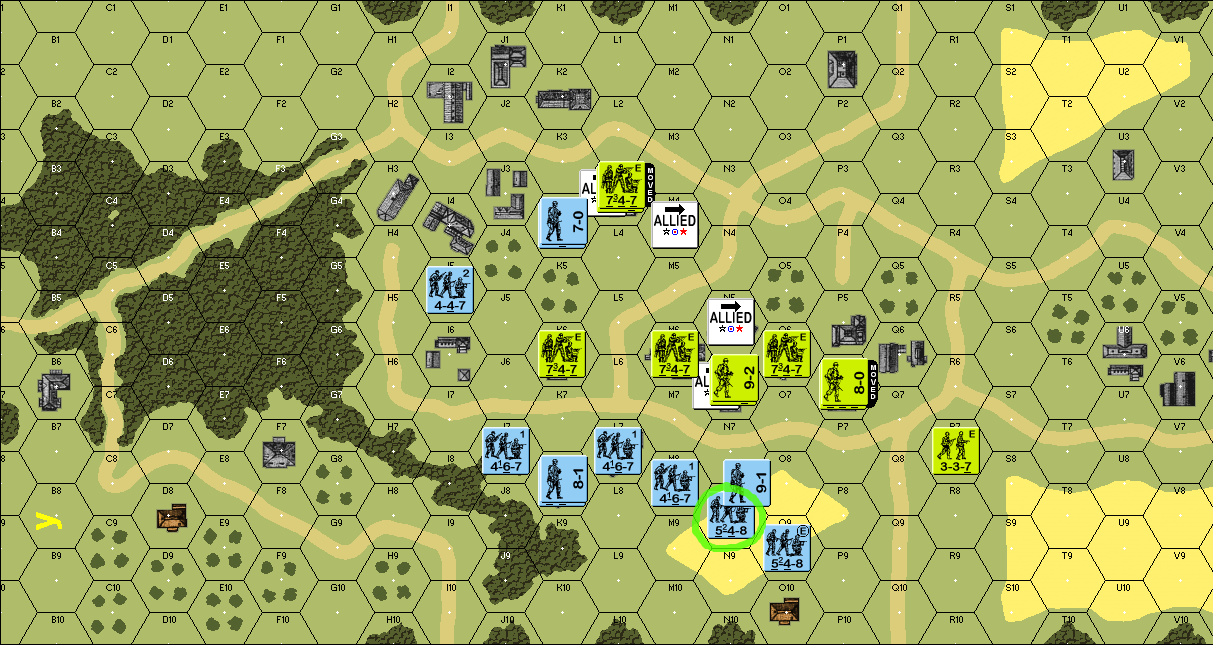 the 548 in N8 successfully rallies Movement Phase 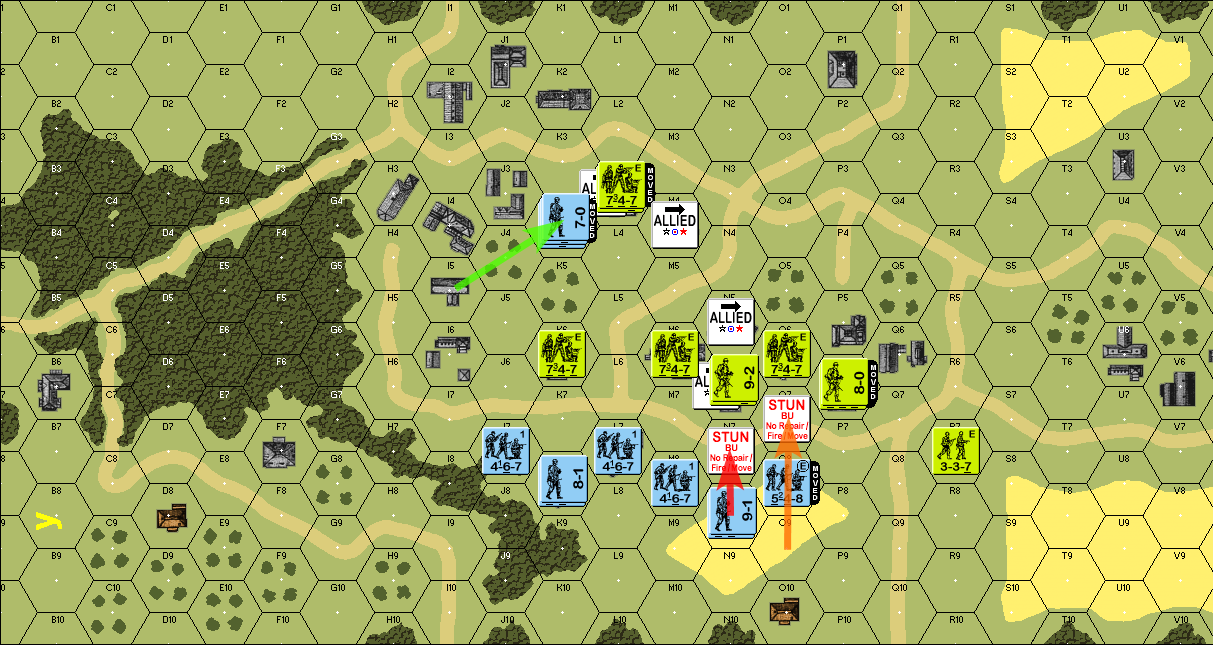 - green: the 447 in K4 passes two HCs to get adjacent to the objective hex - red: the newly-rallied 548 and 9-1 fail their HC to advance to N7 - orange: the 548 in O9 passes the first HC to get to O8, but fails the second one to get adjacent in O7 quote:from the Hesitation rules we're using, the USA 9-2 leader is adding a penalty to the Hesitation checks, since it's the "firer" of the hex, as we saw in the previous War of the Rats scenario. While that would presumably make the TN 2 Hesitation check difficult if not outright impossible to pass, I do want to note that the two 548s rolled high enough [natural 2's both times] that they would not have been able to pass the HC even if the defender's leadership DRM did not apply. 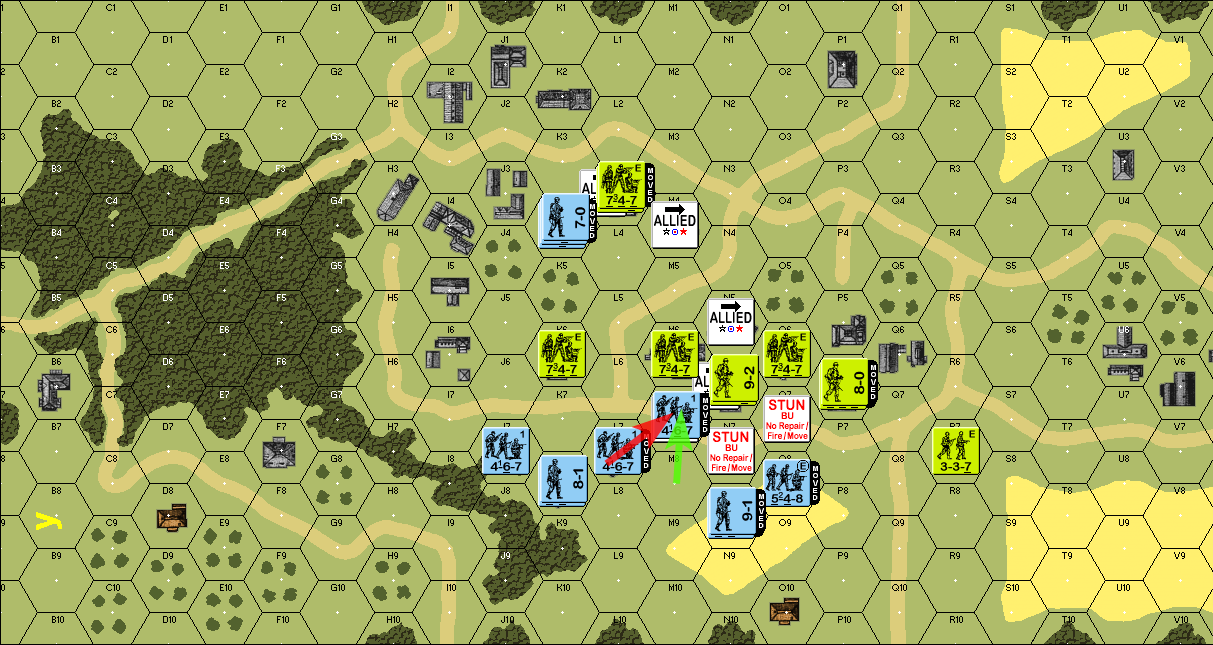 - green: the 467 in M8 attempts to move to M7, and passes quote:it would have been completely impossible for the 467 to pass this one: TN 2 with a +2 DRM means the lowest final dr is a 3, but in this case, the 467 rolled a natural 1. I decided to give it to them, if only because it would make for a more interesting result (while also serving as a counterpart that a natural 6 is always a halt regardless of modifiers). - red: the other 467 tries to follow after them, but halts quote:this 467 rolled a natural 4, so it would have halted anyway regardless of the American leader, just like the 548s. 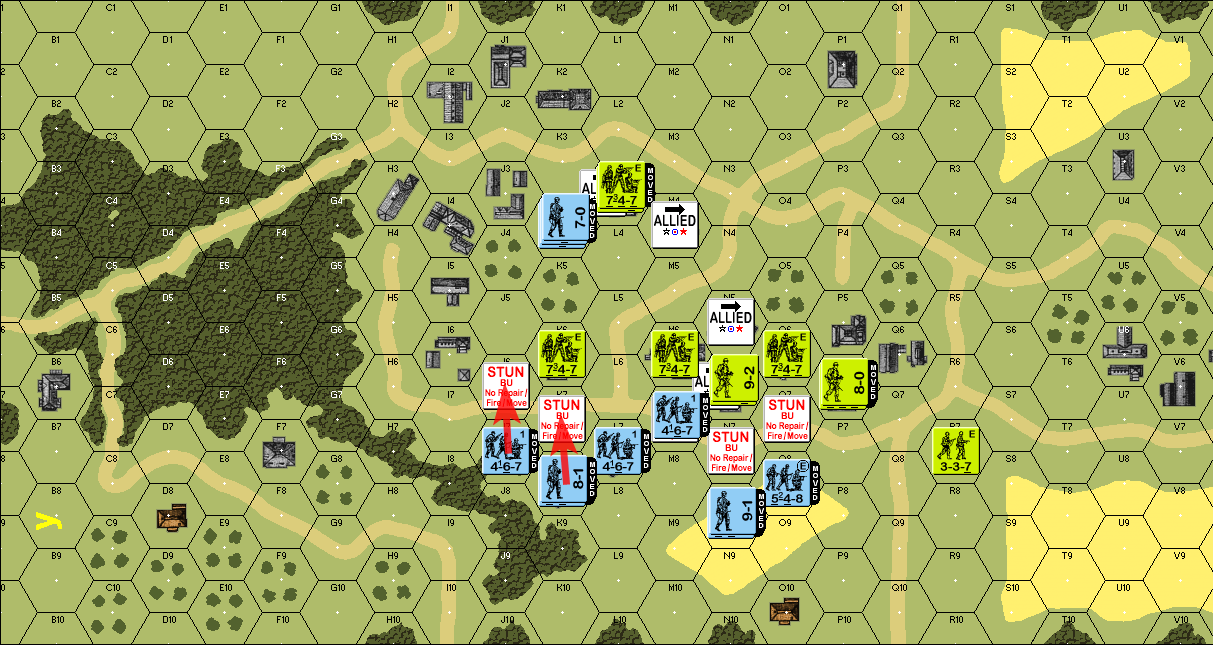 finally, the two squads across from the house in K8 try to advance again, but hesitate yet again. Fire Phase 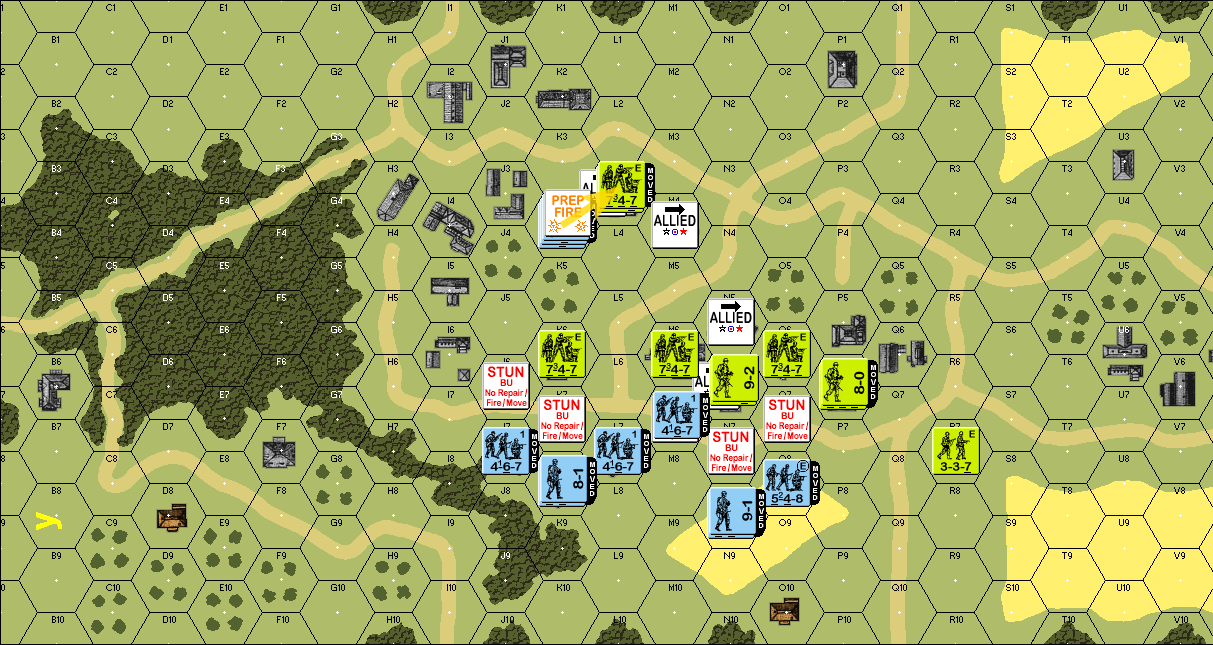 the 447 and 7-0 that began the turn in K4 take their shots against the Americans, but to no effect. Defensive Fire Phase 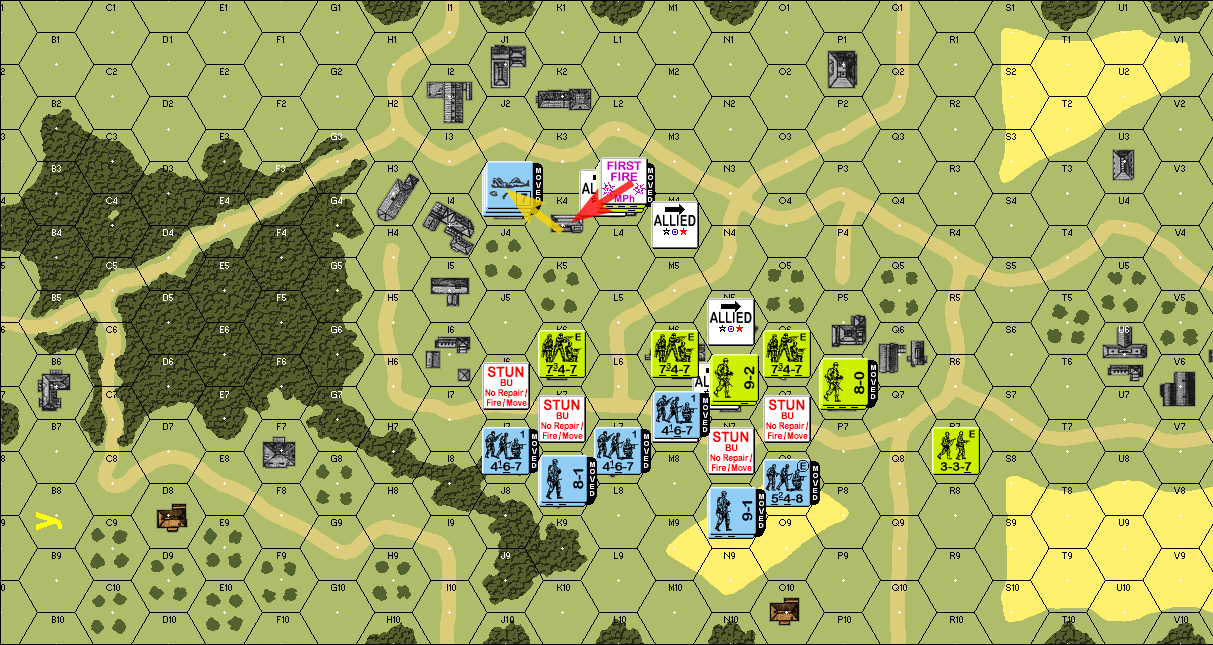 the American squads that were just shot at return fire - they roll a 6, which translates to a "9" result. This breaks the whole German stack, and they rout. quote:that was a really lucky break for the Americans: out of the two chances that the Germans had at still ekeing out a win here, advancing into L3 and winning the close combat was one of them, and now that's out the window  [issuing a correction to myself here: the 747 in O6 should have moved to N5 during USA turn 4. I wrote it down in the log but didn't "do" it while replaying the moves over as I'm writing up these posts. I bring it up because it's going to be essential to the following sequence of events] - yellow: the 747 in K6 shoots at K8, but to no effect - red: a fire group is formed between M6, N5, and N6. They roll snake eyes, and the German 467 is eliminated with a KIA result. quote:for the 747 in M6, M7 was the closest hex with an enemy in it (adjacent) at this point, the scenario is effectively decided: the victory condition for the Germans requires that they have at least a single Good Order unit in any one of the four hexes, and their last opportunity (after being shot out of K4) was for the 467 to advance to N6 and win the close combat. whatever else happens, the scenario ends with an American victory. if I had to critique my own play, I would say that the German units north of K6 should have stopped trying to break into K6 so much and just secured the L3 and M4 hexes, but even setting that aside, up until this most recent roll, the Germans still had a chance of winning.
|
|
#
?
Apr 9, 2024 03:11
|
|
|
Post Mortem This LP was as much about trying to review Retro as it was playing it and showing it to an audience. In this sense, I've found that the incompleteness of the rules-as-written is inconvenient at best. Because it won't (or can't) write an entire ruleset by itself, I frequently had to refer back to ASL to fill-in the gaps where it was necessary to do so. And at that point, why not just play ASL itself? As far as the gameplay itself is concerned, I think it does accomplish its goal of converting the game into one where there's almost no back-and-forth involved, along with cutting out some rules that involve additional dice-rolling, such as morale checks. And setting aside the back-and-forth rules-referencing, the game is that much simpler to follow along with. I make no assertions as regards to balance, though I did find myself enjoying the increased dynamism imposed by stricter Hesitation Checks over the rules that "come in the box". I suppose my biggest takeaway from this whole experience is that it allowed me to deepen my understanding and enjoyment of base ASL all the more, in the quest to essentially play through both side-by-side. Hesitation Checks, in particular, provide an intuitive guide as to how a player should be moving their units, which is not something I thought was particularly well-conveyed in the stutter-step action of ASL's triggered defensive fire. I'm calling that a wrap on this LP - I'm still playing ASL on my own time, outside of posting, and this is a game and a subject I may well come back to later (as indeed this thread marks me coming back to it seven years after my first introduction to the game), and I'd like to thank everyone who followed along.
|
|
#
?
Apr 10, 2024 05:51
|
|
|

|
| # ? Apr 28, 2024 06:38 |
|
|
Thanks for the thread! It was really interesting and informative in regards to the thread.
|
|
#
?
Apr 10, 2024 07:15
|
|