


|
 "Retro" is a set of "Tactical WWII Wargame Variant Rules", published by Minden Games. The verbiage is little evasive to get around possible legal issues, but the game is very obviously designed to be an alternate set of rules for Advanced Squad Leader. Retro itself is "just" a 62-page rulebook - the expectation is that the player owns the "host game" for Retro to be laid on top of. So the story goes, developer Gary Graber and a work colleague wanted to play Squad Leader against each other, but they couldn't be in the same room at the same time, so Graber developed this set of rules to allow one person to do their entire turn on the table, leave, and then the other person gets to do their turn. As you might expect, these rules "convert" a game of ASL into a complete IGOUGO system. The interactivity of ASL, where the "defending" player still gets to be involved during the attacker's turn such as in the case of declaring defensive fire is obviously sacrificed, but Graber is rather honest about the intent of these rules. Personally, my interest was piqued in this game precisely because, as a mostly solitaire player, eliminating the second player in this manner somewhat eases the burden of having to look over my shoulder that I'm giving one side or the other an easier time, unintentionally or otherwise. I won't spend too much time going into ASL itself, as there's a wealth of information about it already out there, including on-going Let's Plays of it elsewhere (and by much more skilled and knowledgeable folks), but I do want to go over the major revisions of Retro relative to ASL: Hesitation This is probably the biggest change of the game - during movement, whenever a unit tries to enter an open hex that is within [normal] range of a Good Order squad or MG, they need to roll a d6. On 5 or less, the unit can enter the hex normally. On a 6 or more, the unit Halts. They do not get to enter the hex that they were trying to move to, but they are still considered to have moved. Further, the Halt condition applies not just to the unit that was Halted, but to the hex that the unit was trying to move to: no other unit can move into that hex. There are some modifiers to the roll - Leadership DRMs apply, and Elite units also get a bonus. Taken together, ths introduces some interesting choices: do you cross an entire stack together, with a leader, and hope they pass the one roll? Do you combine the leader with an elite unit to guarantee your chances at passing the roll? Do you use the leader with the conscripts to help them along? Do you send them first so you can revise the rest of the turn's plans if you get an early Halt result? The idea here is that this simulates some of the effects of defensive fire: as the attacker, you will want to move into buildings, you will want to move to hexes that the enemy does not have LOS into, you will want to move into non-open hexes like grain or orchard, and so on, because all of those prevent Hesitation checks from needing to be rolled. And yet, at the same time, eventually you will have to take a chance on it: if the enemy is in a building facing a street, you might be able to avoid Hesitation checks right up until getting adjacent to the street, but actually moving to the street (in preparation for the one-hex move into melee during the Advance Phase) is ultimately going to require a Hesitation check (unless you Break the enemy first with Fire), and if you fail the Hesitation check at this crucial point, you might be delayed by an entire turn. Defensive Fire In essence, defensive fire is "automated" in Retro. After the attacker's Movement and Fire phases, the Defensive Phase is simply: every Good Order enemy unit within three hexes of the attacker's units will shoot at the attacker's units; closest first, hexes with most units first, and then randomly decided by die roll for any ties. This goes back to the idea that the attacker needs to be able to conduct the whole turn all by themselves. One might ask if restricting defensive fire to within three hexes undermines the value of long-range units. Setting aside that those units can still reach as far as they could during the attacker's Fire phase, Hesitation actually ties back into it: a 12-range MMG is not only going to apply Hesitation checks to anything within those 12 hexes that it has a LOS to, but Hesitation checks get a penalty if the unit is trying to get past an MG specifically. And there's another penalty again if movement is within half of the normal range of an enemy unit, which could be as much as 8 hexes when dealing with a 16-range HMG. Routing In keeping with the design intent, routing rules are simplified, but also are done at the instant that a squad breaks. A squad that's broken after getting fired on (whether in the Fire or the Defensive Fire phase) and is either in an open hex or adjacent to an enemy, has to move until it gets to a non-open hex. If it can't, it gets eliminated. Revised IFT Retro comes with its own Infantry Fire Table that eliminates morale checks entirely. Instead, the IFT results will simply cause units at or below a certain morale to automatically break. For example, a DR of 6 with 12 FP will cause all units with 8 morale or lower to break; a DR of 4 breaks everyone with 10 morale or lower, and a 2 or 3 eliminates everyone in the hex. As far as I can see it, this wasn't necessarily done in keeping with the whole IGOUGO design, since you can still process MCs by yourself, but instead was an attempt at streamlining (my word) the rules by cutting down on dice rolls. Comparing it to ASL's original IFT, you will need more FP to get anything done, so to speak: when rolling a 7 (the most common result on a 2d6) with a +2 DRM (wooden building, or a stone building with leadership, etc.), you need at least 12 FP to have a shot at getting an NMC, or 16 FP to get a 1MC. With Retro, you need 24 FP to get a "7" result (breaks everything with 7 morale or less) on a roll of 7. On the other hand, Retro does guarantee such breaks when you get them, where a 16 or 20 FP attack on the ASL IFT might still have the units pass the MCs anyway. There are still more changes besides, but those are the major ones, and I think that's enough preamble for us to start on our first scenario, using ASL Starter Kit #1's "Retaking Vierville". 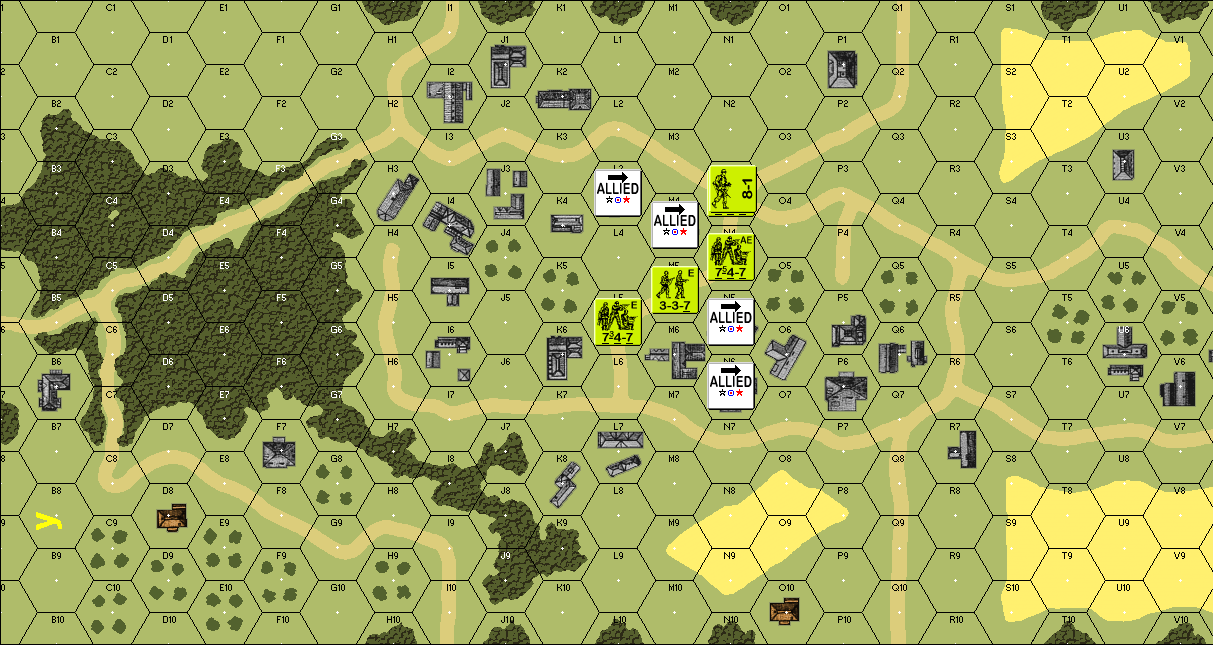 I've already done the set-up for the Americans, and the Germans, who go first, will be entering from off-map. The objective is for the Germans to enter and occupy at least one of the four objective hexes marked ALLIED, while the Americans have to make sure no Good Order German units are in those hexes at the end of five turns. German Turn 1 Rally Phase - nothing happens here, nothing to rally Movement Phase 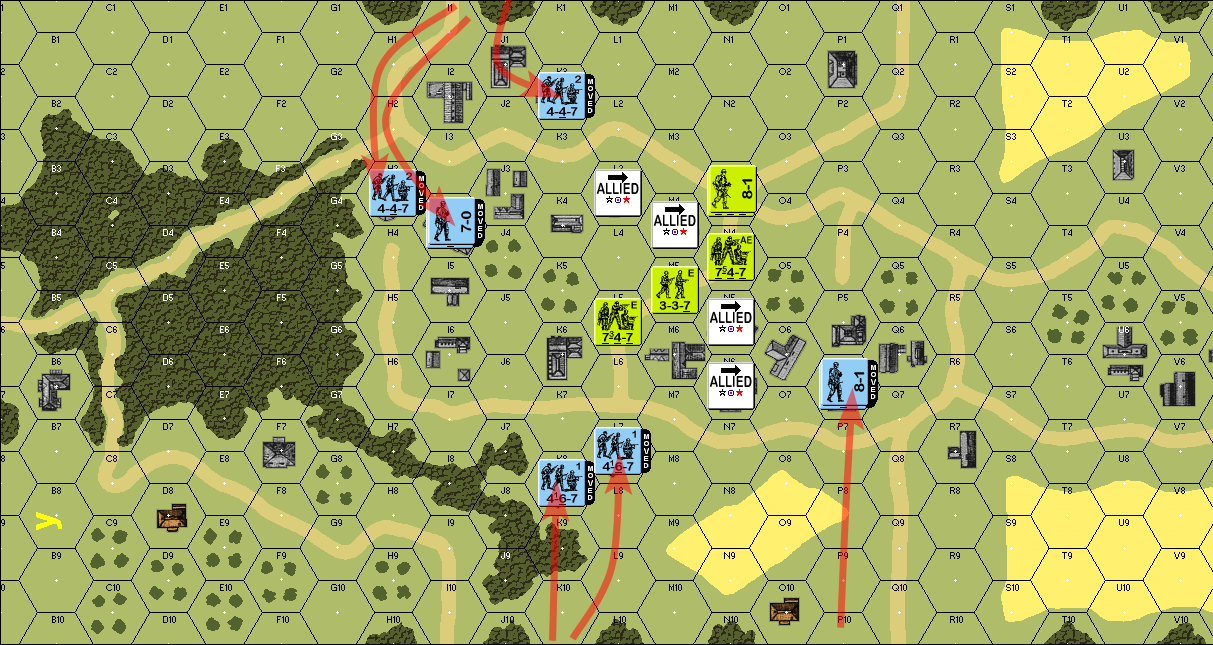 We have three squads and a leader entering from the top of the map, and another set of three squads and a leader entering from the bottom edge of the map. All of the movement done here is either out of LOS of the Americans, or out of range, so there were no Hesitation checks. For example, moving from I1 to H1 has no LOS, and while moving to H2 is within LOS of the USA 747 squad in N3, that's a range of 6, so it's outside the 747's range of 4, and no Hesitation is checked. Meanwhile, moving from K10, to L9, to L8, to L7 is within LOS and range of the 747 in L5, but since L7 is a stone building, ergo a non-open hex, no Hesitation is checked there either. Fire Phase - all units moved, so no fire is done. Defensive Fire Phase  The two USA squads within 3 hexes of the two GER squads take defensive fire - rolling 8's on 7 FP attacks yields no effect on both counts. Close Combat Phase Retro abbreviates the normal ASL turn order: there's no Advancing Fire, no Rout Phase, and the Advance Phase and the Close Combat Phase are considered a single phase. 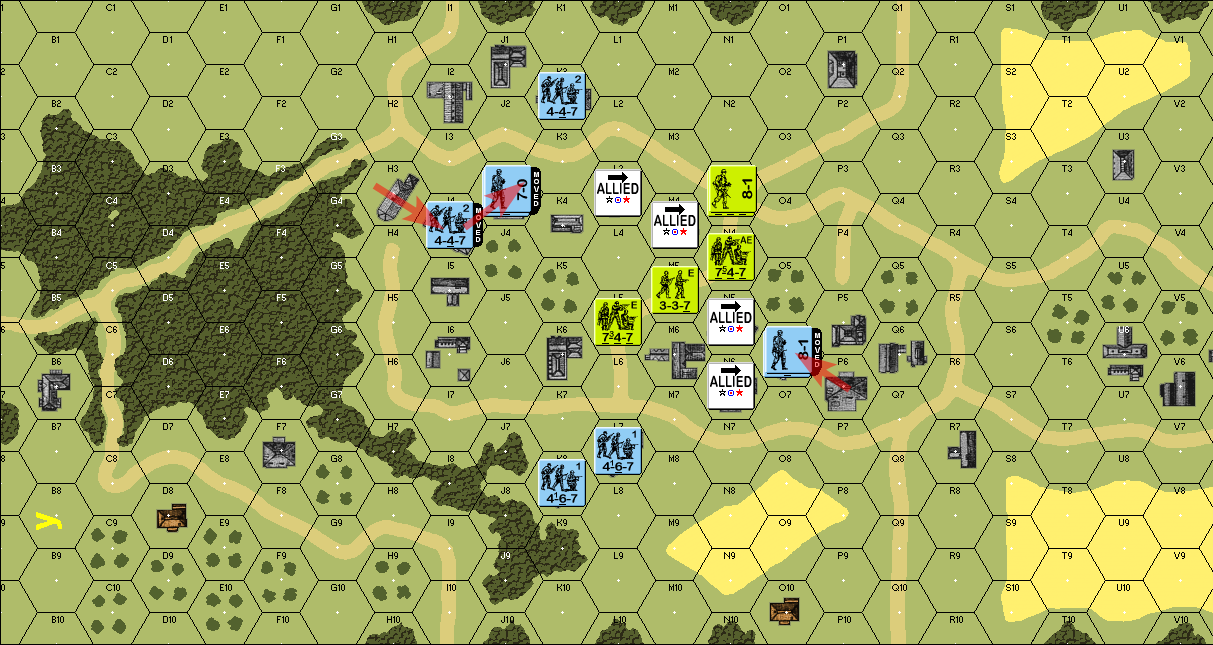 Here, the two GER squads from the top advance one hex each, as does the one squad and one leader from P6. Of note is that Retro doesn't allow an advance into open hexes that's within normal range of Good Order enemy units, so the GER 467 in L7 couldn't use the Close Combat Phase to move into M7 (or K7, or L6, or M8, for that matter). End of German Turn 1
|
 #
¿
Feb 12, 2024 01:53
#
¿
Feb 12, 2024 01:53
|
|

|

|
| # ¿ May 11, 2024 06:38 |
|
|
American Turn 1 Rally phase - nothing to rally Movement Phase 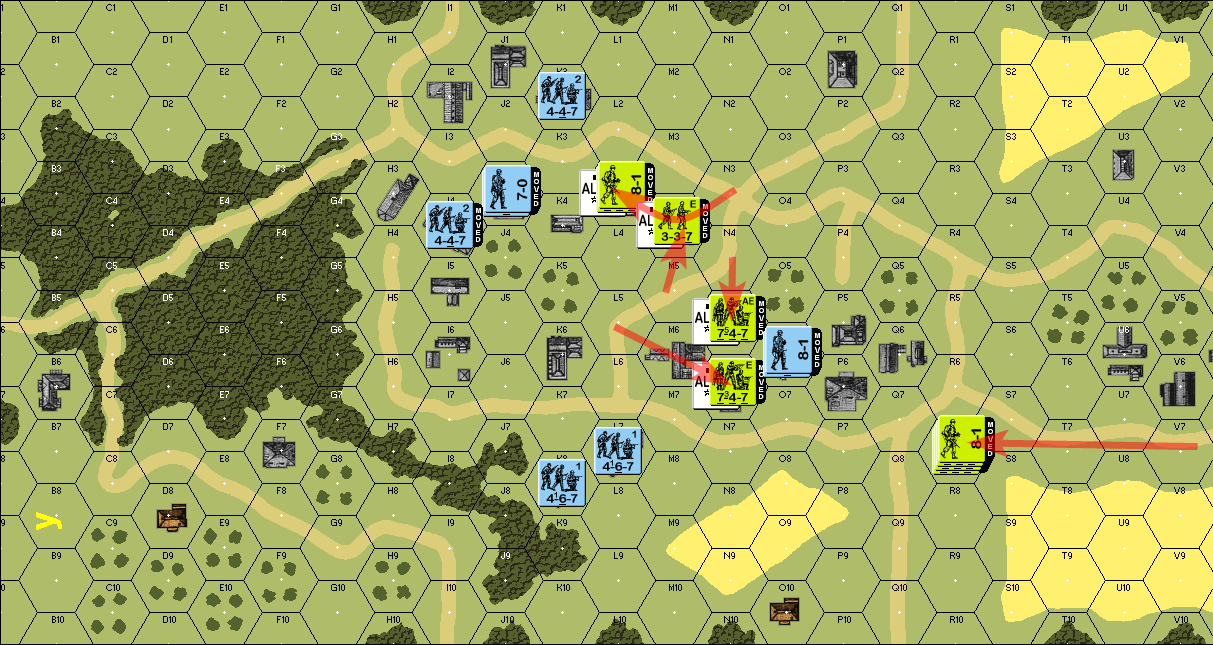 Two 747 squads move to head off the GER squad and leader at O6, while the other 747, the leader, and the half-squad move to secure the upper objective hexes. quote:Retro has a rule where infantry during the movement phase have to end their movement as soon as they move adjacent to a Good Order enemy unit. Reinforcements arrive in the form of three 747 squads and another leader coming from the right-hand edge of the map, and they move to the stone building at R7. quote:Consider the GER 467 in L7: hex S7 is still out of normal range. Hex R7 is, however, in range, but R7 being a stone building means it's non-open hex, so the USA stack can freely move into it. Since the USA squads are moving with a leader, they have 6 Movement Factors instead of the standard 4, and moving to R7 has only cost them 5 MF so far, but moving to hex Q7 would require a Hesitation roll. Fire Phase - all USA units moved, no fire. Defensive Fire Phase 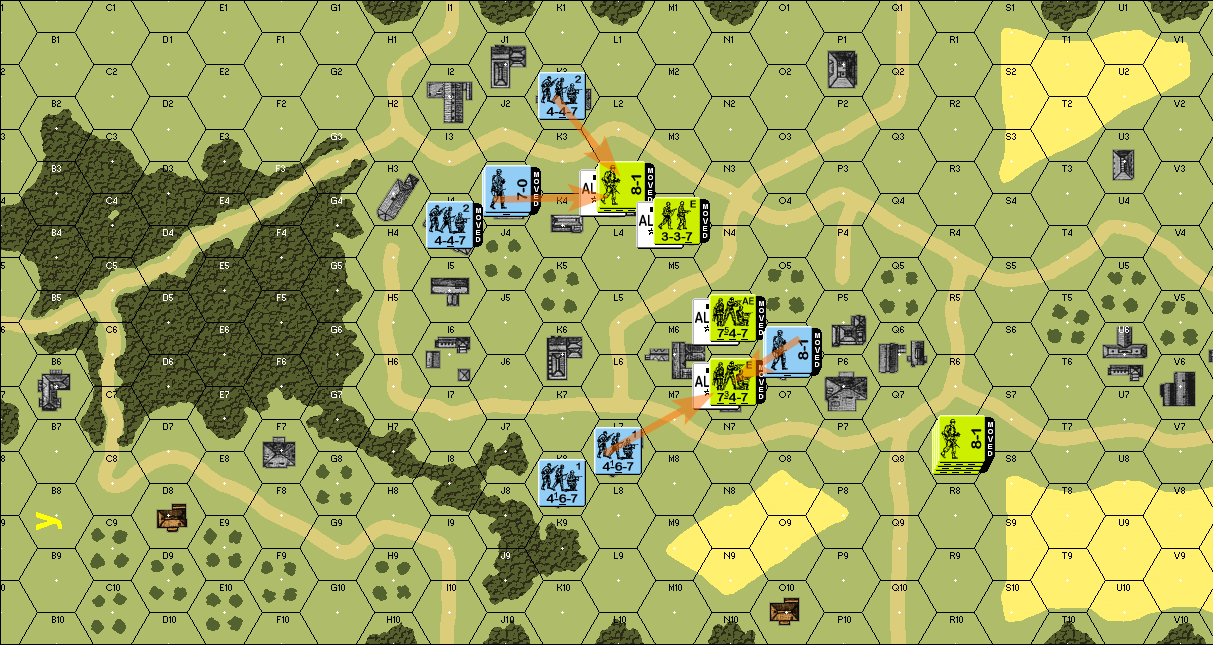 We get a sprinkling of small arms fire from the German squads, but to no effect. quote:You're going to see this a lot: if you run the rules 'by-the-book', you're going to get a lot of defensive fire that you're obliged to roll for, but feels like it's too weak to really do anything. Contrast this to regular ASL, where you tend to have much finer control over whether a shot is worth taking, though I suppose it's also true that there are still instances in ASL where you're taking 4 FP shots into a stone building just because you can and hoping for snake eyes. Close Combat Phase 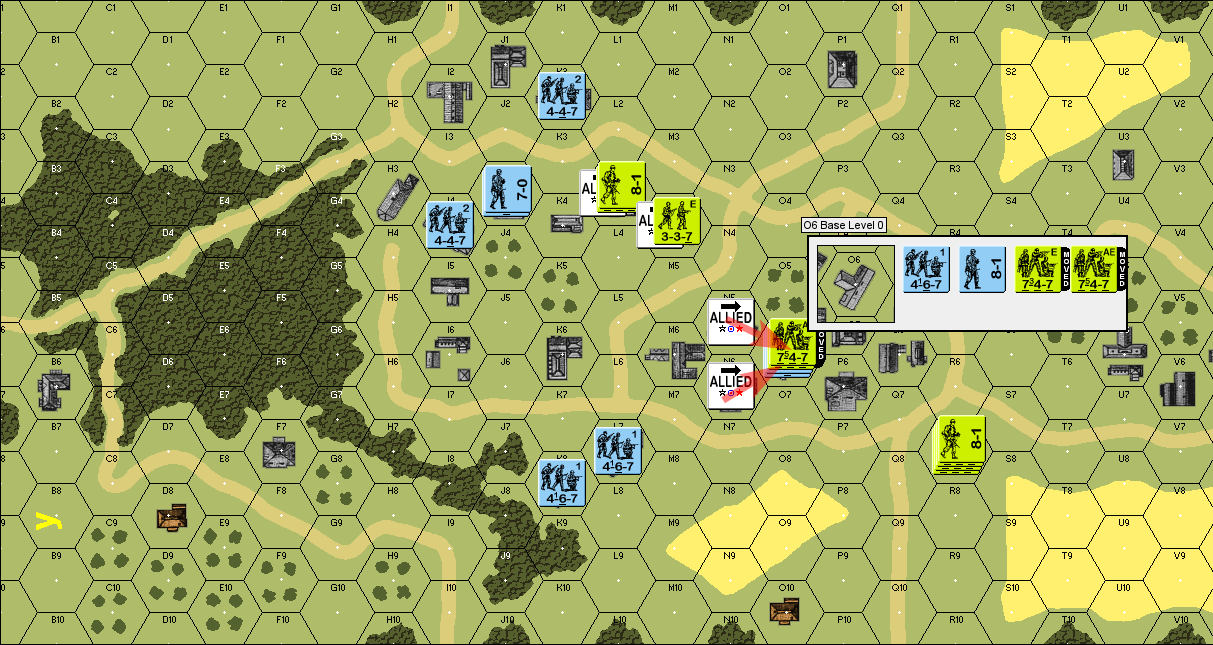 The two USA 747s move into O6 to engage the Germans in melee... quote:Close combat in O6 ... but the fight is inconclusive for now, and the men are locked in hand-to-hand fighting in the small building. quote:Retro comes with its own Close Combat results table, but to my eyes, it's result ranges are about the same with ASL's CCT. The big differences are that there's no check for Ambush, and that LMGs (but not other MGs) can add their FP value to the odds. End of American Turn 1
|
|
#
¿
Feb 12, 2024 04:04
|
|
|
Jobbo_Fett posted:In Retro, do you have to roll for attacking everyone in CC or can you choose to attack a single US squad? the former. Everyone's FP is totaled and used for the odds comparison, and a successful roll in the kill range wipes out the entire enemy stack, and the rolls are considered simultaneous, so both sides can completely destroy each other.
|
|
#
¿
Feb 12, 2024 05:11
|
|
|
German Turn 2 Rally Phase - nothing to rally Movement Phase 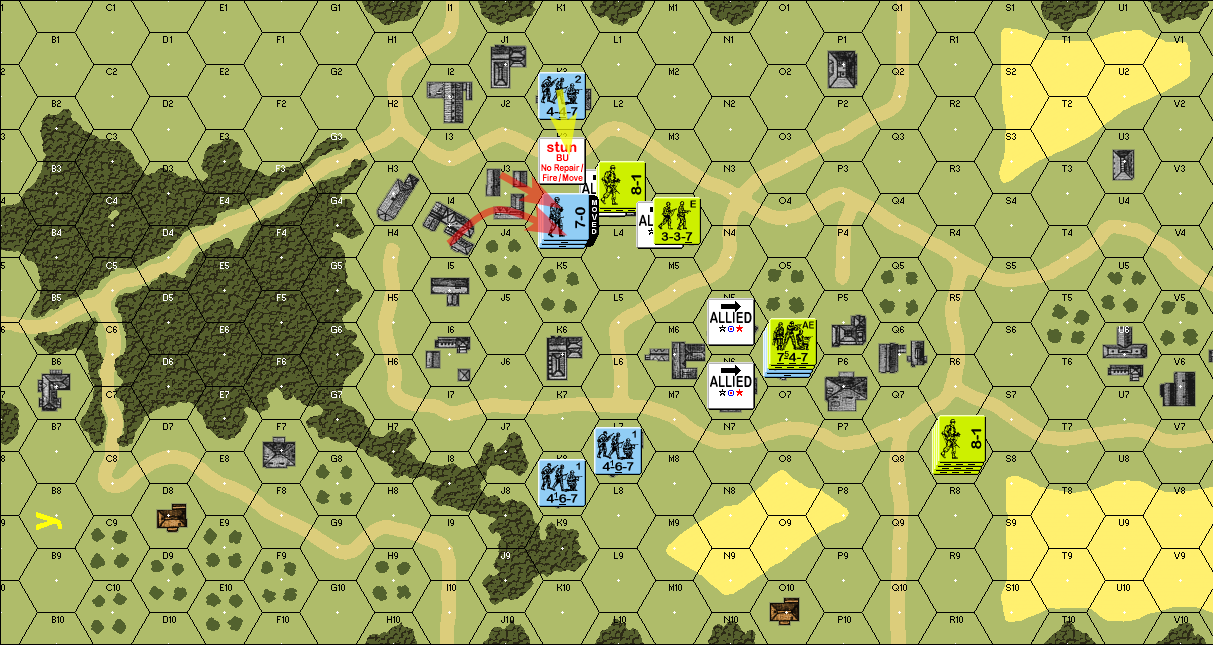 in this first part of movement, the GER 447 and the 7-0 leader in J3 moves adjacent to the L3 objective hex, and the other 447 in I4 moves two hexes to stack with them the 447 in K2 wants to move to K3, and that's going to be a Hesitation check: an open ground hex, within normal range of a Good Order enemy unit. the d6 roll is also going to have a -1 DRM since the movement is going to be within less than half the range of the USA 747 in L3. the 447 rolls a 6+1, and so it Halts. It's considered to have moved, and therefore cannot do anything else in this turn (like try to place smoke) nor can it fire during the Fire phase. It's not really necessary to place a marker on hex K3 to denote that no other unit can enter the hex, since no other unit would be in a position to try, but it's useful to remember in case it's a busier scenario, and I'm doing it here for visualization purposes. Similarly, one can/should turn on the MOVED marker that VASSAL has, to remind oneself that that unit is already considered to have moved. quote:for clarity, if there were two squads in K2, and we were moving them one at a time, and got a Halt result in K3 like we did now, a second squad still has the option to move to L2, though that would require another Hesitation checks. If we got a Halt result there also, and we still had a third squad we wanted to maneuver, they could try going L1-M2-M3, though that would need three Hesitation checks in a row. 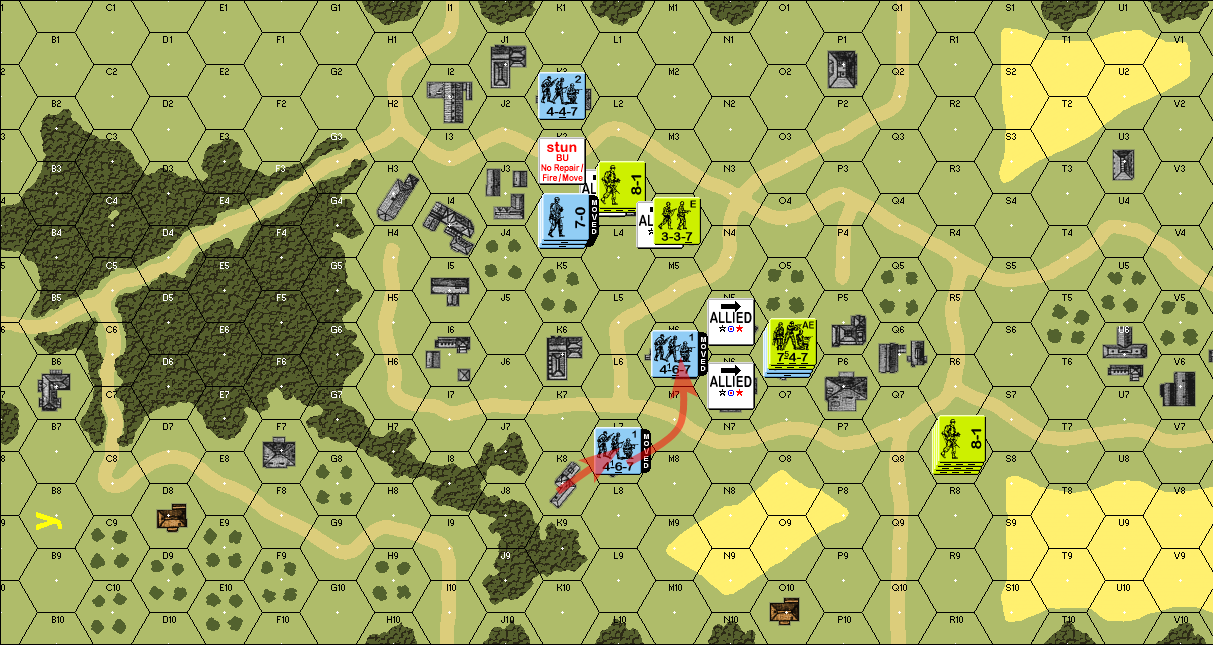 in this next movement, the 467 in L7 moves to M7, then to M6. No Hesitation check moving to M7 since nobody has LOS, and then M6 is a non-open hex. the 467 in K8 moves up one, to L7, but remains across the street 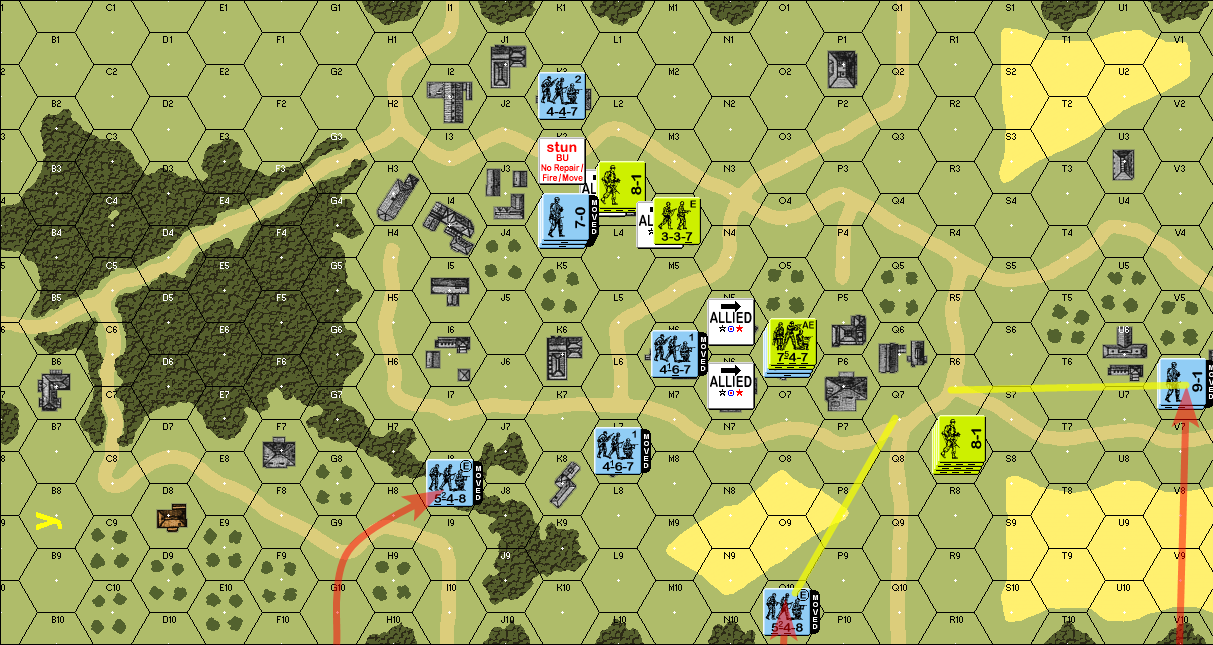 in this final bit of movement, - a 548 enters from the bottom of the map, at G10, and moves into the woodline at I8 - another 548 enters a O10, and stops there. The idea is that hex Q7 is now going to require a Hesitation check, if the stack in R7 wants to cross the street - then, a 548 and a 9-1 leader enters at V10, and moves up all the way to V6; now R6 is also covered by a potential Hesitation check. quote:when I was playing this at the time, I rolled for Hesitation checks in V9 and V8. I passed both of them, but it turns out they were unnecessary since grain is considered a non-open hex (even if it offers no TEM) Fire Phase - all units moved, no fire Defensive Fire Phase 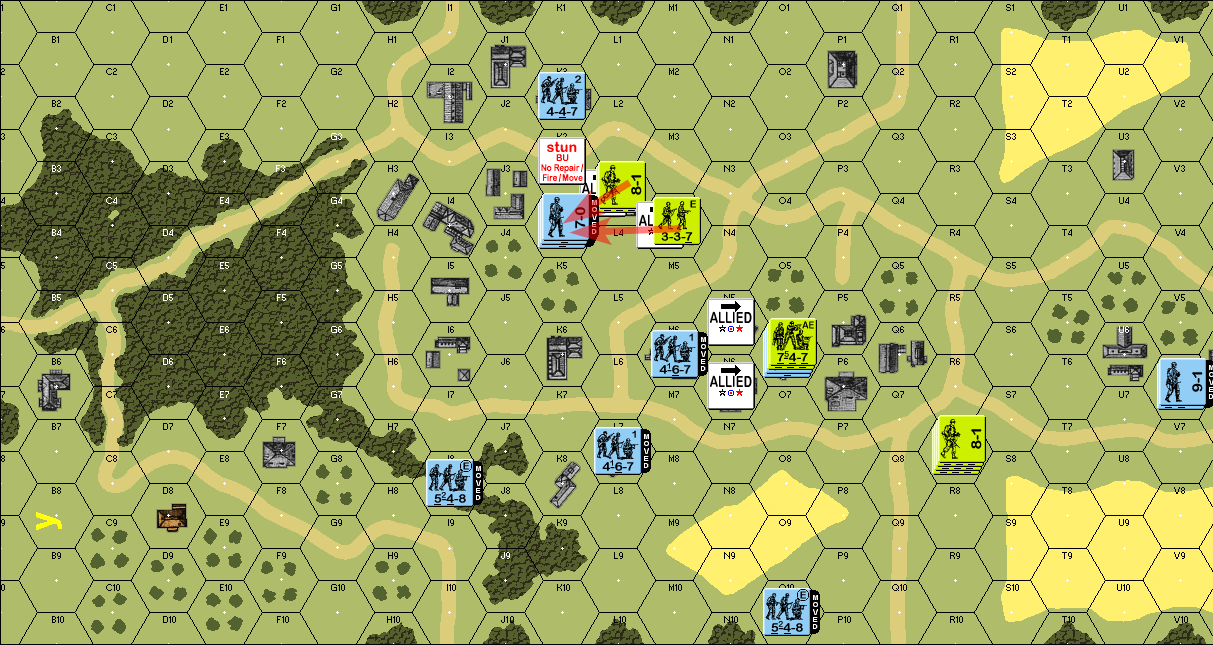 just one attack here, the stack in L3 and the half-squad in M4 shoot at the stack in K4 quote:Retro is unclear on whether you can do Fire Groups, and specifically Fire Groups during the Defensive Fire Phase, but I made an executive decision to go ahead and allow it in this case where the two hexes wouldn't be shooting anything else under the target-selection rules. the result I get from the attack is "6*", which means everything with 6 morale or less with break, but all units regardless will take an ELR check. quote:Where regular ASL uses ELR as a threshold of failure during an Morale Check, Retro does an ELR check. Take the published ELR of a scenario, where here the GER ELR is 3, and add 6 to it, giving a Retro ELR of 9. Make a DR, and if you roll over the ELR, the squad fails and gets replaced with a lower quality unit. I roll an 8 on the ELR check, which passes, so the Defensive Fire has no effect quote:I made a mistake here: only rolling for an ELR check once, when I should have done it for every unit in the stack. Oops Close Combat Phase The fight in O6 gets rolled for again, and ... quote:Close combat in O6 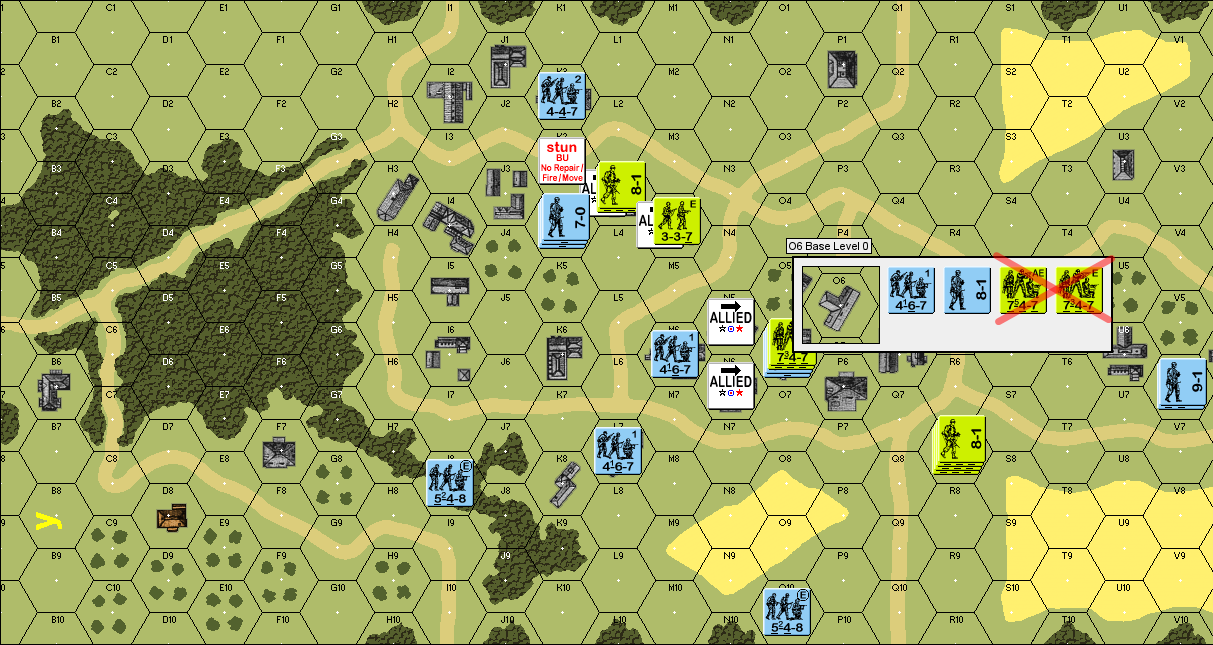 The Americans are eliminated, despite having a significant advantage in the target numbers I was so shocked by the result that I completely forgot to advance the K4 stack into L3 and try for Close Combat there. End of German Turn 2 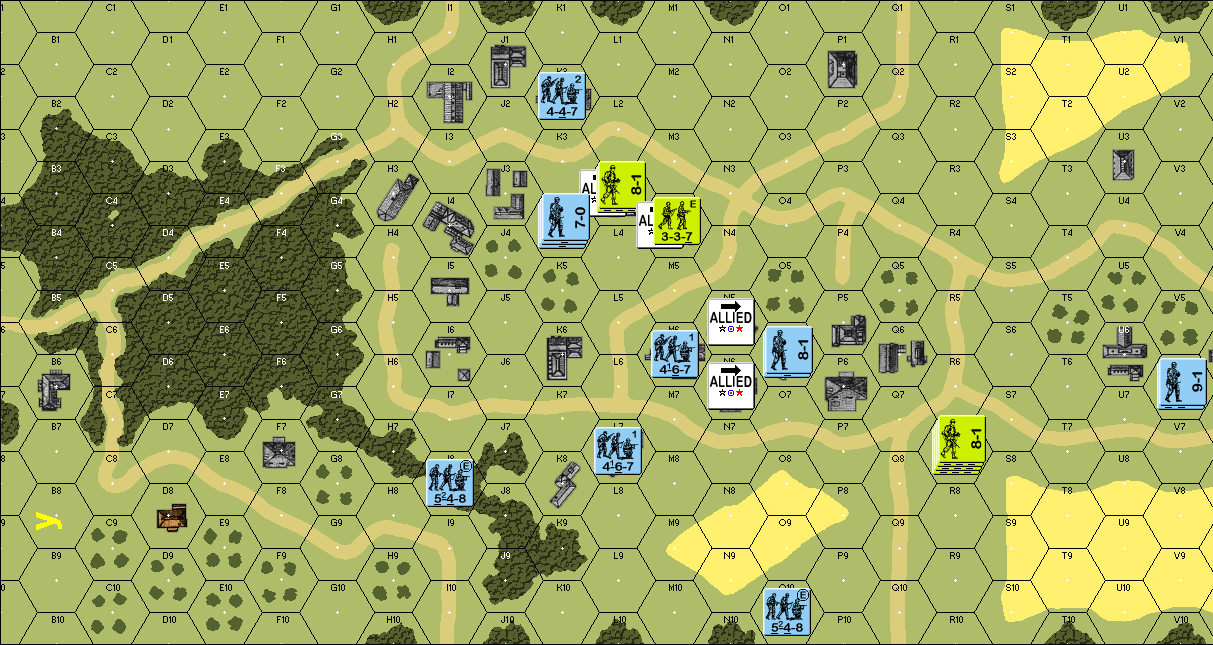
|
|
#
¿
Feb 13, 2024 03:52
|
|
|
American Turn 2 Rally phase - nothing to rally Movement Phase 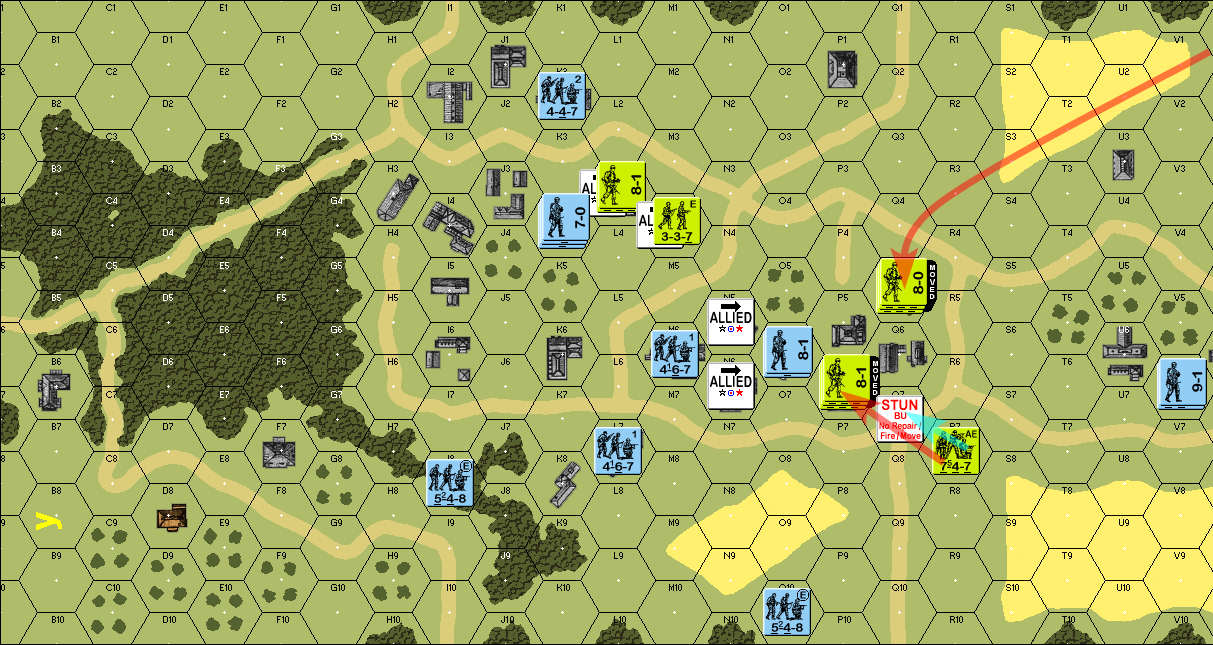 There are three squads and a leader in R7. One squad and one leader run across the street at Q7, passing their Hesitation check, and then a second squad runs across, also passing. The third rolls a 6 and Halts. Then, reinforcements in the form of two 747s and an 8-0 enter from the right-hand edge of the map. They start in V1 and move all the way to the orchards in Q5. They have to make Hesitation checks in R3 and Q4 due to the GER 467 in O6, but they pass both of the checks, while T2, S3, and Q5 don't require checks since they're non-open hexes. Fire Phase 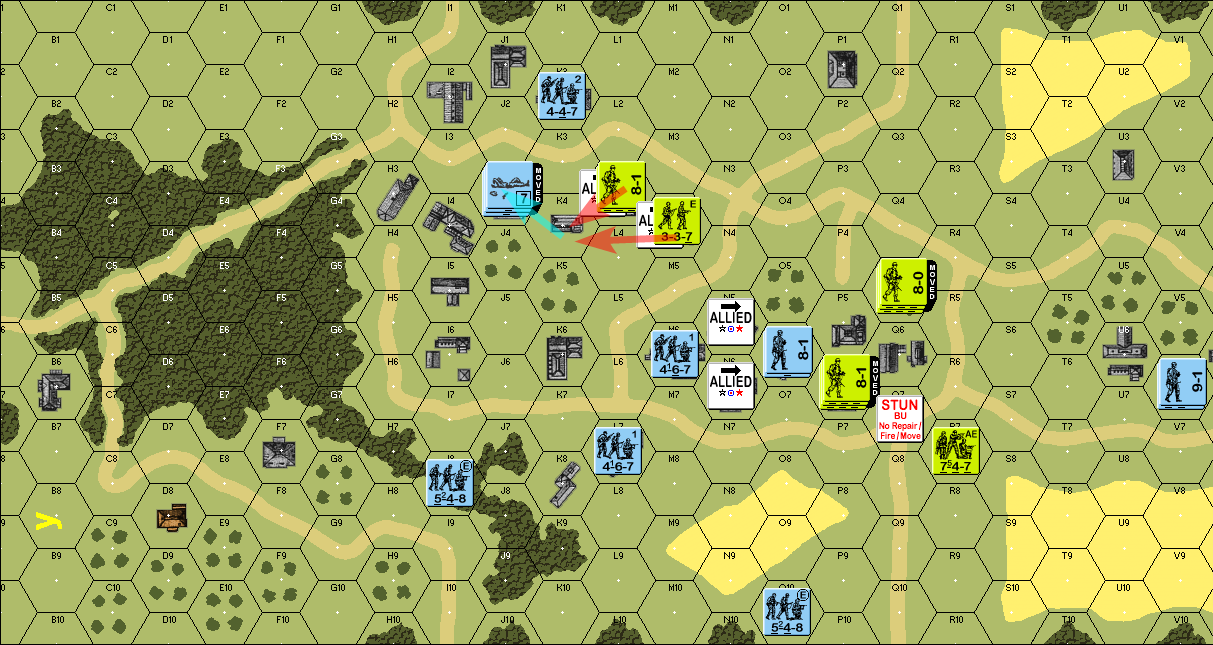 The two squads in L3 and M4 fire again on the Germans in K4, and this time they roll a result of "8". Since these GER units are all 7 morale, they break, and have to rout. quote:As I'd mentioned in the OP, routing in Retro is done the instant that a unit is broken by fire. A broken unit that's adjacent to a Good Order enemy unit, or a broken unit that's within normal range of a Good Order enemy unit while in an open hex, has to rout towards the nearest non-open hex. They have to 4 MF to do this with, and they will stop as soon as they enter their first non-open hex (that is not adjacent to a Good Order enemy). The broken units rout from K4 to J3, then stop. Defensive Fire Phase 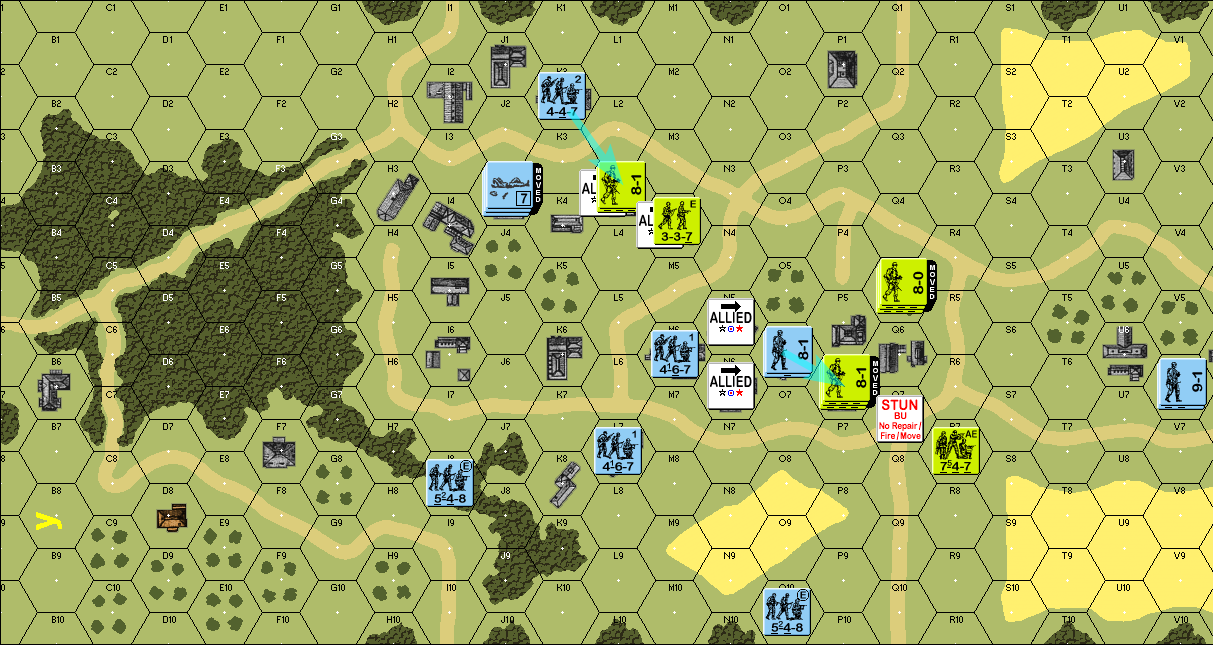 Some desultory fire from K3 and O6 towards the Americans, to no effect. Close Combat Phase 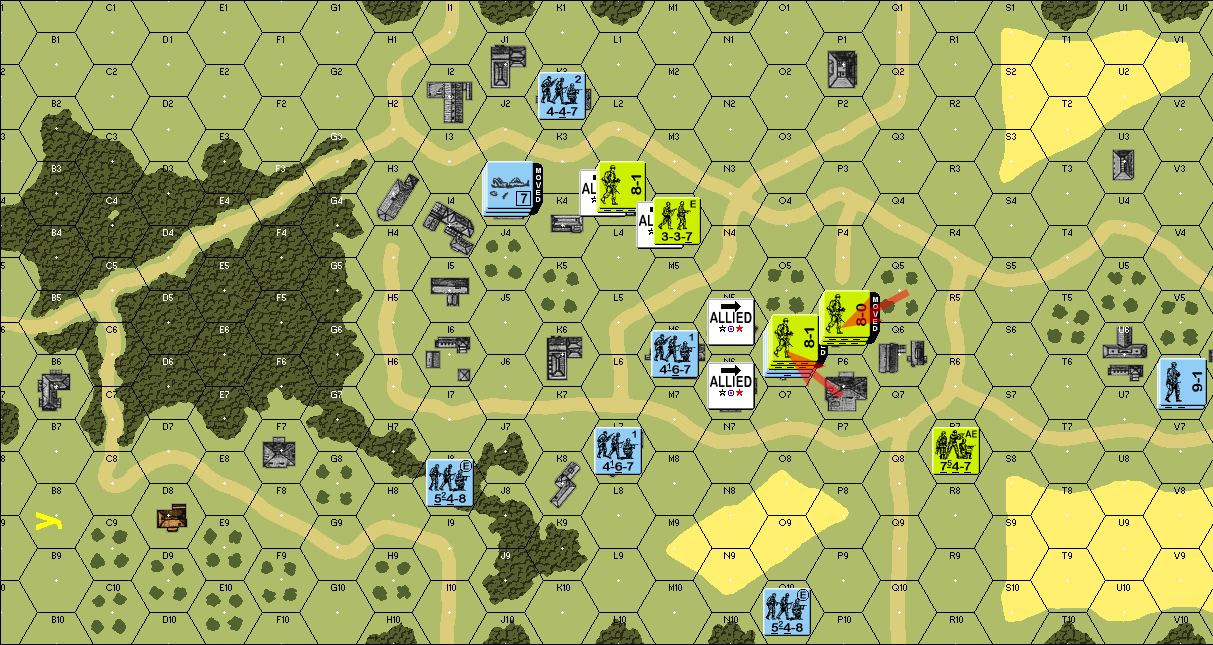 The two 747s and their leader in Q5 move to P5, while the other two 747s and their leader in P6 move to engage in Close Combat with the German stack in O6. quote:In I haven't mentioned it before, the one-hex advance you get in the Close Combat Phase cannot be used to move into non-open hexes within range/LOS of enemies, unless that movement is also going to result in close combat. So the 747 in R7 that was left behind due to a failed Hesitation check cannot use this phase to move to Q7 or R6, since it's an open hex within sight of the Germans. Close combat ensues ... quote:Close combat in O6 The entire stack is wiped out on both sides. 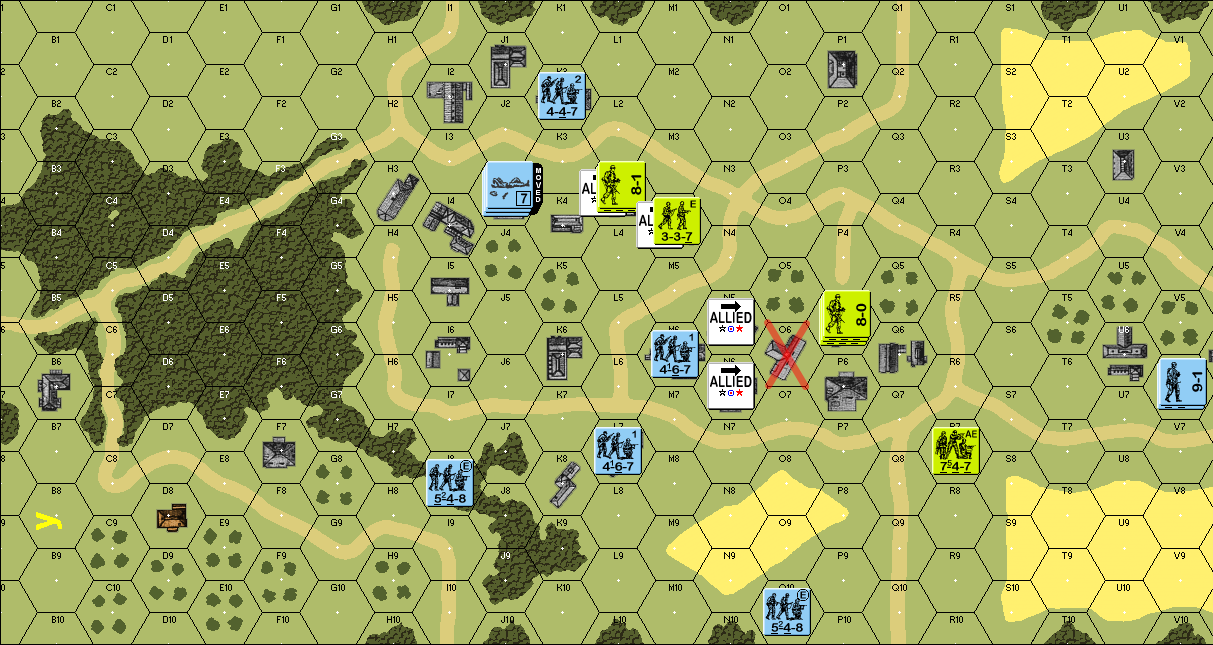 End of American Turn 2
|
|
#
¿
Feb 14, 2024 04:10
|
|
|
German Turn 3 Rally Phase quote:in Retro, rallies only happen for the attacker side 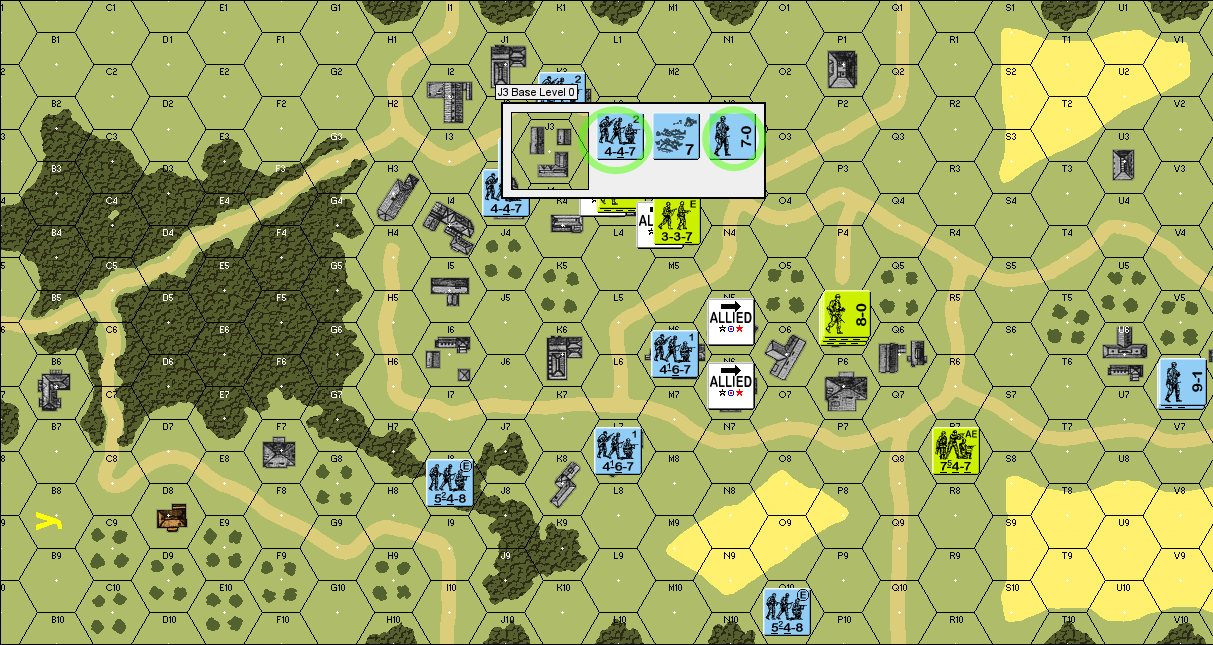 in the event, the 7-0 leader and one of the 447's rallies successfully, but the other squad rolls a final DR of 8 and fails and stays broken. Movement Phase 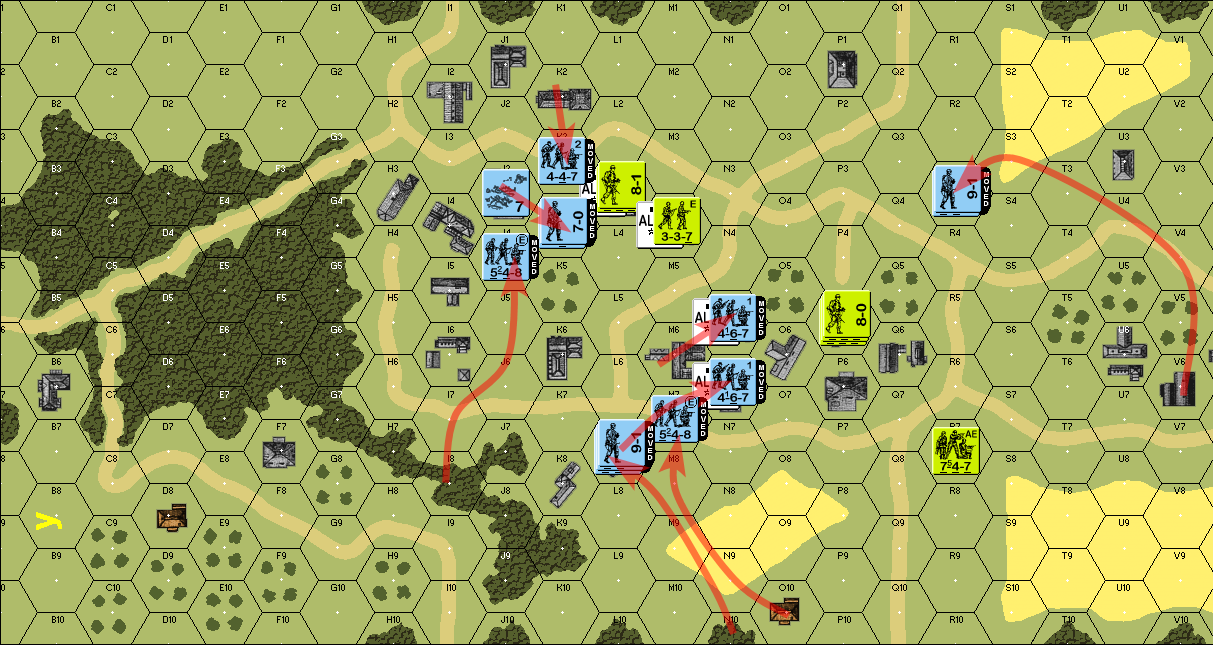 lots of activity this turn; roughly from left to right: - the just-rallied 447 and 7-0 move to K4, in preparation for another assault on the objective hex in L3 - the 447 in K3 passes its Hesitation check this time, and also gets to move adjacent to L3 - the 548 in the woods at I8 heads to the same area to pile on, passing on Hesitation check at J5 on the way - the 467 in M6 takes the objective hex in N5 - the other 467 in the building at L7 crosses the street to take the other objective hex in N6 (no Hesitation check: the 747 in R7 is out of range) - the 548 in the wooden building at O10 hustles up to M7; N9 and M9 are non-open hexes, and M8 and M7 are out of range - reinforcements arrive: two 548's and a 9-1 leader appear in N10 and run through the grain fields to take up positions at the building in L7 Fire Phase - all units moved, no fire 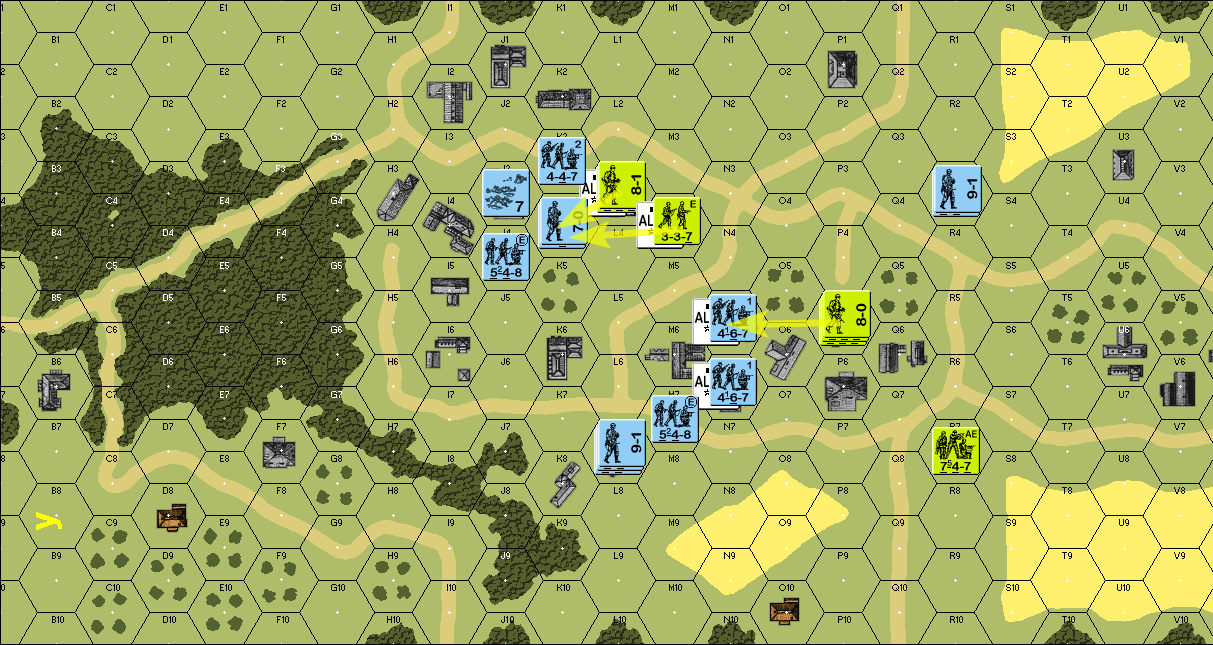 more desultory fire, to no effect quote:it certainly feels like P5 taking a shot at R3 would have been better: only a +1 DRM from shooting through the Q5 orchard rather than a +4. That's a consequence of taking direct control away to allow the attacker to process the defensive fire themselves. Close Combat Phase 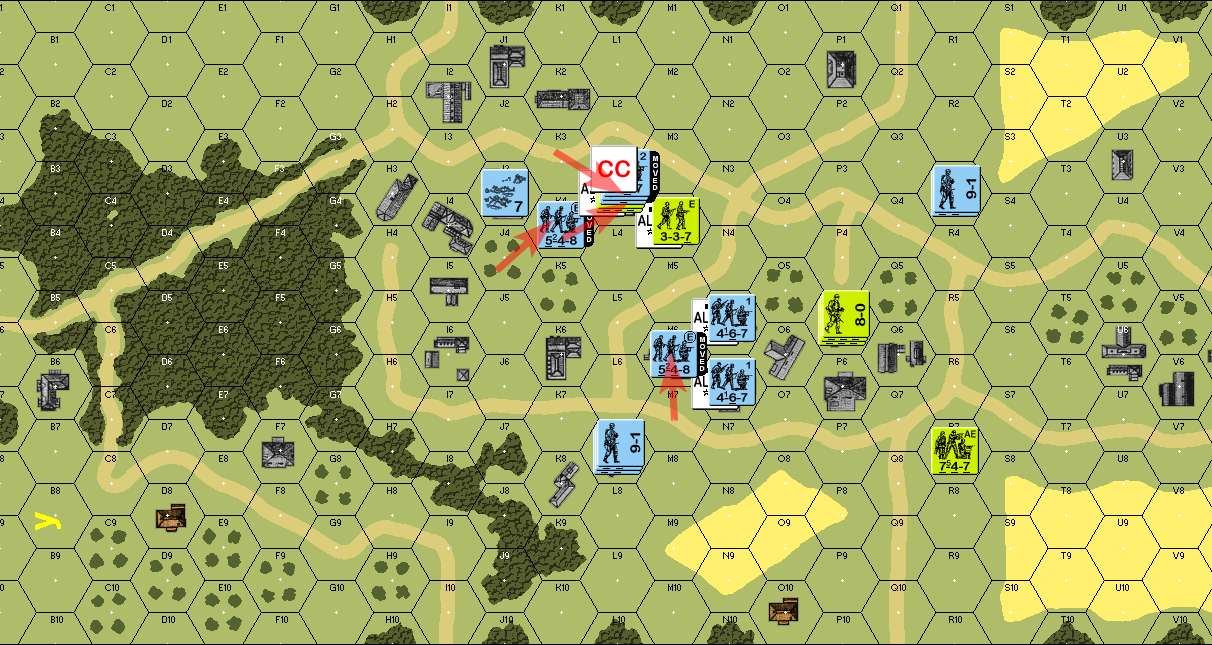 - the 548 at J4 advances to K4 - the 548 at M7 advances to M6 - two 447s and the 7-0 leader advance into the objective hex at L3 - the Close Combat is inconclusive, and both sides continue to be locked in combat End of German Turn 3
|
|
#
¿
Feb 15, 2024 05:32
|
|
|
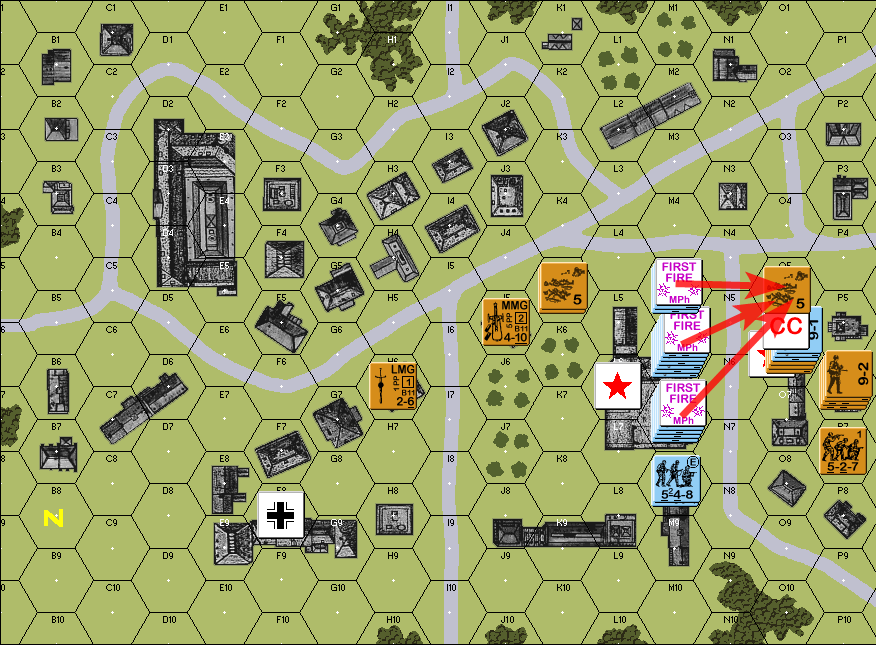
As I'd mentioned upthread, I had already finished playing through this scenario, and I'm already mid-way through the next scenario. In the process of doing so, I've been doing a lot of musing about the game, and how it relates to ASL, as such comparisons are practically impossible to avoid, given the game's pedigree. In particular, I was thinking about how easy it seemed for units here in Retro to move around, despite the existence of Hesitation checks, but I figured that perhaps I was only getting that impression because I didn't really understand the math of ASL firepower either, so I sat down and tried to think through some things. [it's entirely possible that all of this is blithely obvious and has been tackled before in the 30+ years that ASL has been in existence, but I'll be damned if I'm going to find some grainy PDF scan of an Avalon Hill magazine that beat me to the same conclusions] ___ On a roll of 2d6, the most common result is a 7: you have a 58.33% chance of getting a 7 or less (where in ASL, rolling low is good). Let's consider the American squads in "Retaking Vierville" - 7 FP each. In ASL's Infantry Fire Table... 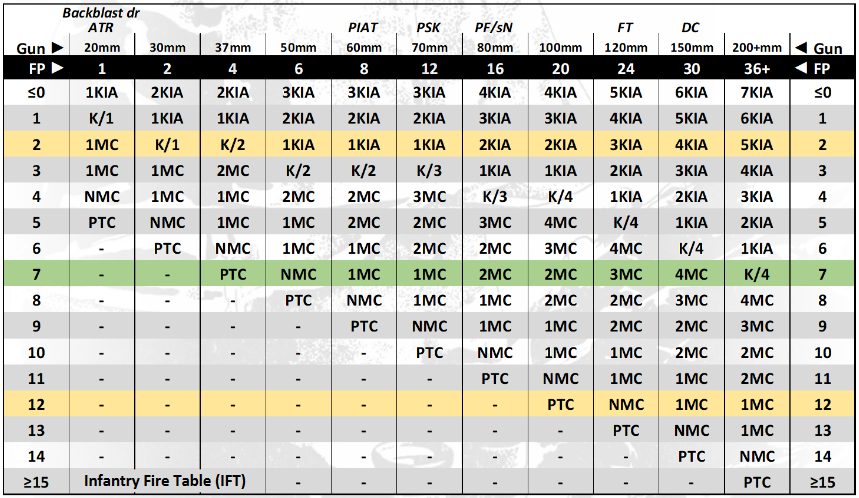 ... that 7 FP gets rounded down to the 6 FP column. If you Fire Group two of them together, you'll get 14 FP, rounded down to the 12 FP column, but that's already a big chunk of your entire force, so let's assume that we're looking at what is feasible with just a single 747 squad. Rolling a DR 7 on 6 FP results in an NMC... but a German squad with 7 morale is also going to have a 58.33% chance of passing that, which means you really only have a 24.30% chance of breaking the target: first, you'd need to roll 7 or lower on the IFT, and then they need to roll 8 or higher on the NMC. You as the shooter can't really do anything about their morale, so all you can really do is aim for a better result on the IFT. If you're rolling with a -1 DRM, then your [natural] roll of 7 becomes a 6, which results in a 1MC for the Germans. That ups your chances of breaking them to 34.02%. You don't get a 2MC on 6 FP until you hit a final die roll of 4, so I don't think it's really feasible to aim for that - getting a DRM of -3 would require something really exceptional like FFMO plus FFNAM plus a -1 leader. ___ Let's look at it from the other direction: if you have a +3 DRM on a 6 FP shot, the natural 7 gets bumped up to 10, which is a no-effect. In order to get an NMC with +3 DRM, you'd need a natural 4, which you'd only roll 16.67% of the time. Couple that with a 7 morale squad's chance of passing an NMC, and you're only looking at 6.94% chance of getting any kind of result. At +2 DRM, your chances getting a favorable result goes up to 11.57%; at +1 DRM, it goes up to 17.36% Let's reorder this: code:Well, if the target is sitting in a stone building and has no other modifiers, shooting at them probably going to be a waste of time, and you'd be better off doing anything else. On the other extreme, if the target is played in such a way that you'd have a -1 DRM to the shot, take the shot! You are never going to get anything better. Those two are the extremes, and lower DRMs are always better, but whether or not you're going to take the shot at +2 DRM is going to depend on whether you think the enemy is still going to give you anything better. If the second hex they move to is a +2 because it's passing through a Hindrance, but the third hex they move to is a +1 because the orchard isn't in the way anymore, you might want to wait for that third hex. On the other hand, if you're the German player, and you're plotting your movement, you've got to know that even a 0 DRM is going to let you get away with a lot of stuff. If you're not using Assault Move, then FFNAM applies and you're at a -1 DRM, but if you're moving into a non-open hex, then you avoid FFMO and it stays at a -1 DRM. You can use hindrances and/or TEM on top of that to keep the DRM on the positive side. ___ Having said all that, this only applies to the specific case of a 6 FP shot against a 7 morale target. An 8 morale squad (like the GER 548s that enter the scenario as reinforcements) can get away with "riskier" moves... ... or two 747s firing together on the 12 FP column can still get a 1MC on an roll of 8, so they can afford to take a +1 DRM shot and still have a reasonable chance of getting something done... ... or the Germans have much lower FP relatively at just 4, so you either have to pair up two 467s to shoot from the 8 FP column, or you take advantage of the 6 range to give yourself a much bigger radius to pick a good shot, considering that the 4 FP column wants a -1 DRM to have a shot at an NMC, or a -2 to have a shot at a 1MC... ... or we assume that even a Pin Task Check is good enough, just for the purpose of halting movement, which shifts all our assumptions one row down on the IFT... ... and then we have to factor in that an ASL unit would have multiple chances to fire, between Defensive First Fire, Subsequent First Fire/Final Fire, and Final Protective Fire. ___ The final impression I'm taking away from all this is that it seems to make a lot of sense, across both games, to really want to get to Close Combat / Hand-to-Hand, because that's the thing that has a reliable chance of eliminating entire units at a single go. EDIT: I guess another way too look at this is, the Germans in the scenario above spent most of their time in pure movement, no [Prep] Fire, and it sort of bothered me because I couldn't tell if that was "intended", but now I'm thinking that it probably is. Even if I were playing this on ASL, the Germans have 4 FP squads, and trying to assemble enough of them to get to a decent place on the IFT when shooting against the GIs in stone buildings is going to take way too many troops. I feel more confident now, having grasped the math, that it's more correct to take chances on closing up to the objective hexes as soon as possible. Any fire combat on the German side would be on the part of setting up squads with good LOS across the right-hand side of the map, to interdict American reinforcements coming in from that side and needing to cross open ground... which was coincidentally what I also did playing it through on Retro! gradenko_2000 fucked around with this message at 13:12 on Feb 15, 2024 |
|
#
¿
Feb 15, 2024 12:14
|
|
|
Consider the IFT used by Retro: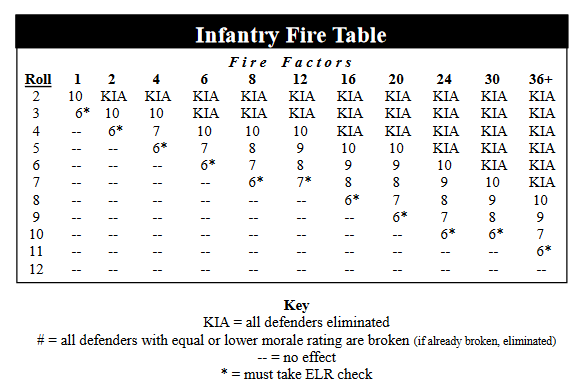 In this case, there's no morale check at all, and just getting a result of "7" means every 7 morale unit in the hex breaks automatically. Let's take the American 747 squad again, firing along the 6 FP column: getting a result of "7" means rolling a 5, which only happens 27.78% of the time, but if we think back to the ASL math we just did, an American 747 shooting a 7 morale German squad would have a 24.30% chance of both rolls ending favorably: that the Americans roll a 7 on the IFT to get a NMC, and the Germans rolling an 8 or more to fail the NMC and breaking. That's pretty close. Continuing the comparisons: - in ASL, the 747 would have a 6.94% chance of breaking a 7 morale squad sitting in a stone building for +3 DRM - in Retro, the same 747, shooting with the same +3 DRM, would need to roll a natural 2 to get a result of "7", which would happen a mere 2.78% of the time - the comparison is a bit better at a +2 DRM: an 11.57% chance to break the 7 morale target under ASL rules, versus an 8.33% chance to do the same in Retro. And so on and so forth. ___ Thinking about this situation that came up in the next scenario, War of the Rats: The Soviets are sitting in a stone building with 7 morale squads - they're sitting in a stone building, giving them a +3 TEM on the DRM - The Germans can use -1 leaders in a potential Fire Group, making the final DRM +2 according to the Retro IFT, a natural 7 is going to become a roll of 9 after the DRM, and the Germans would need 24 FP to get the "7" result on a roll of 9. The Germans have a flamethrower with 24 FP, halved to 12 since it's firing at range, and that takes care of half of the 24 FP milestone. The squad that's firing the flamethrower will itself contribute 4 FP; 8 FP to go Add in another 4 FP squad that's firing a 5 FP MMG, and the -1 leader, and Bob's your uncle : a 58.33% chance to get a "7" result, which breaks the Soviet hex Going to the 30 FP column doesn't yield any benefit, so you have to go to 36 FP to be able to get a "7" result on a roll of 10. That would require another 12 FP, which would require another two squads plus MGs minimum*, in exchange for increasing the chance of a favorable result to 72.22% The question is whether it'd be worth delving into such diminishing returns. I don't know if I really know the "correct" answer to this, but I'd like to think it's useful to gain a better understanding of the trade-offs. ___ * there's a clever bit of design here: the German LMG has 3 FP. That makes it perfect for getting a 5 FP squad up to the 8 FP column, but trying to get to 36 FP from 24 is awkward because a 4 FP squad + a 3 FP LMG = 7 FP, so you're forced to still throw two of them at the problem, with a "wastage" of 2 FP. Or you could use a 5 FP squad, and then a 4 FP squad + a 3 FP LMG... but you'd be giving up one of your elite 548's, which might be better suited for close assault since the 8 morale lets it shrug off MCs more easily. gradenko_2000 fucked around with this message at 12:54 on Feb 15, 2024 |
|
#
¿
Feb 15, 2024 12:29
|
|
|
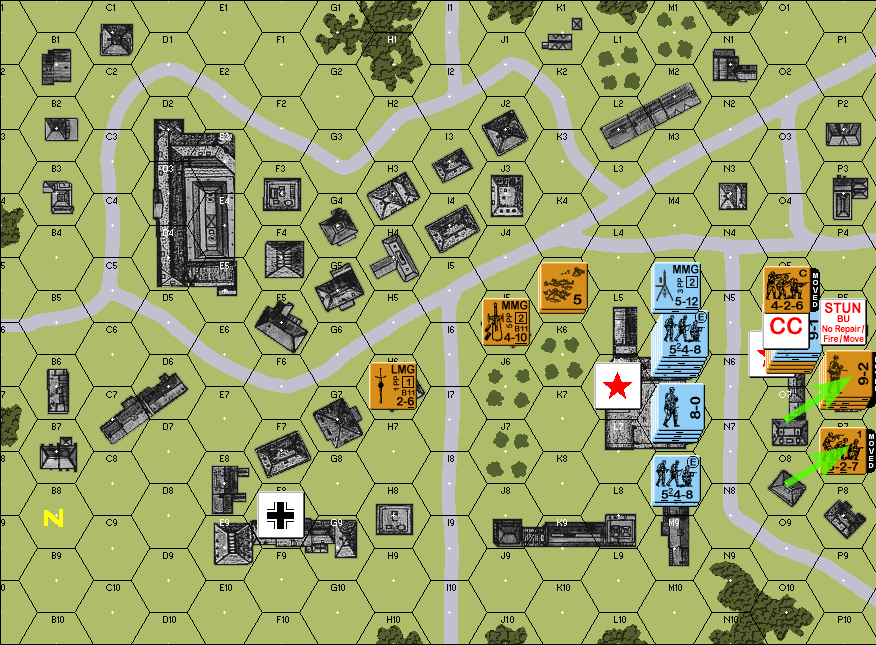
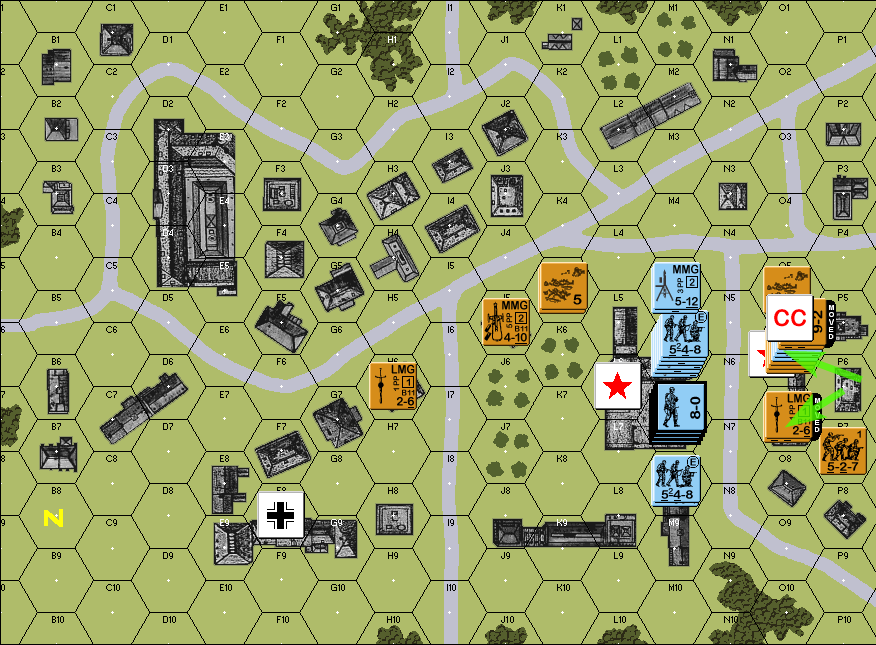
American Turn 3 Rally phase - nothing happens Movement Phase 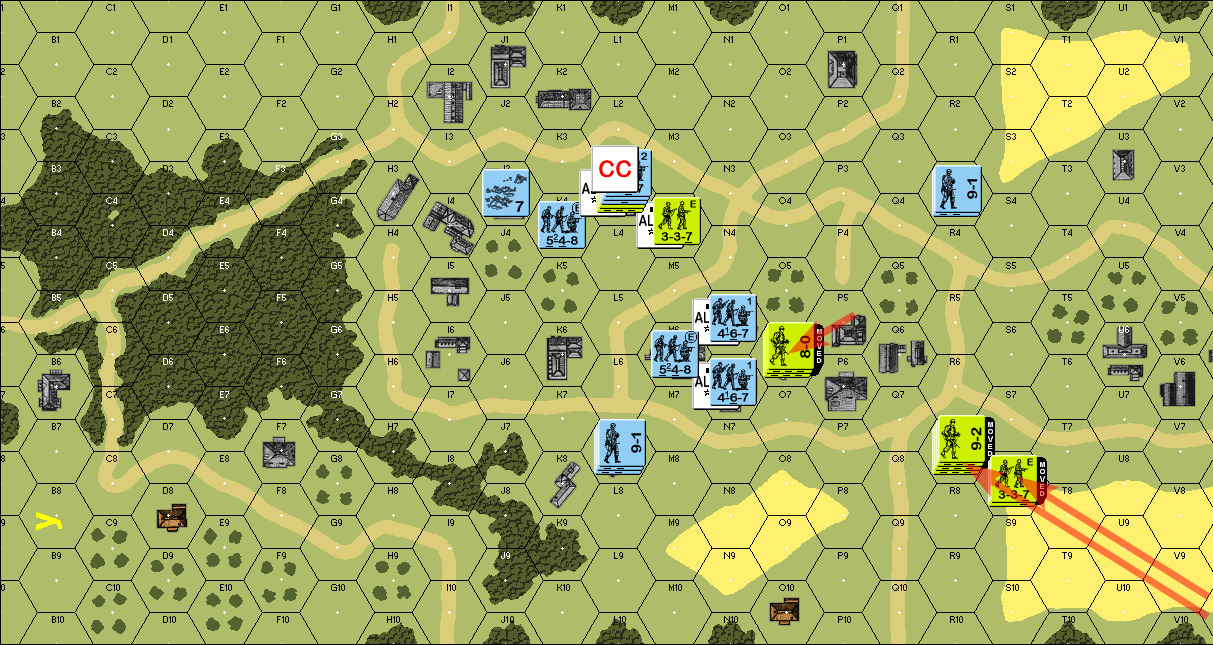 the two 747's and 8-0 at P5 move to O6, looking to retake one of the objective hexes then, reinforcements arrive, with two more 747s and a 9-2 entering from the right-hand edge of the map; they rush up to the stone building at R7, while a pair of 337 half-squads follow right behind them Fire Phase 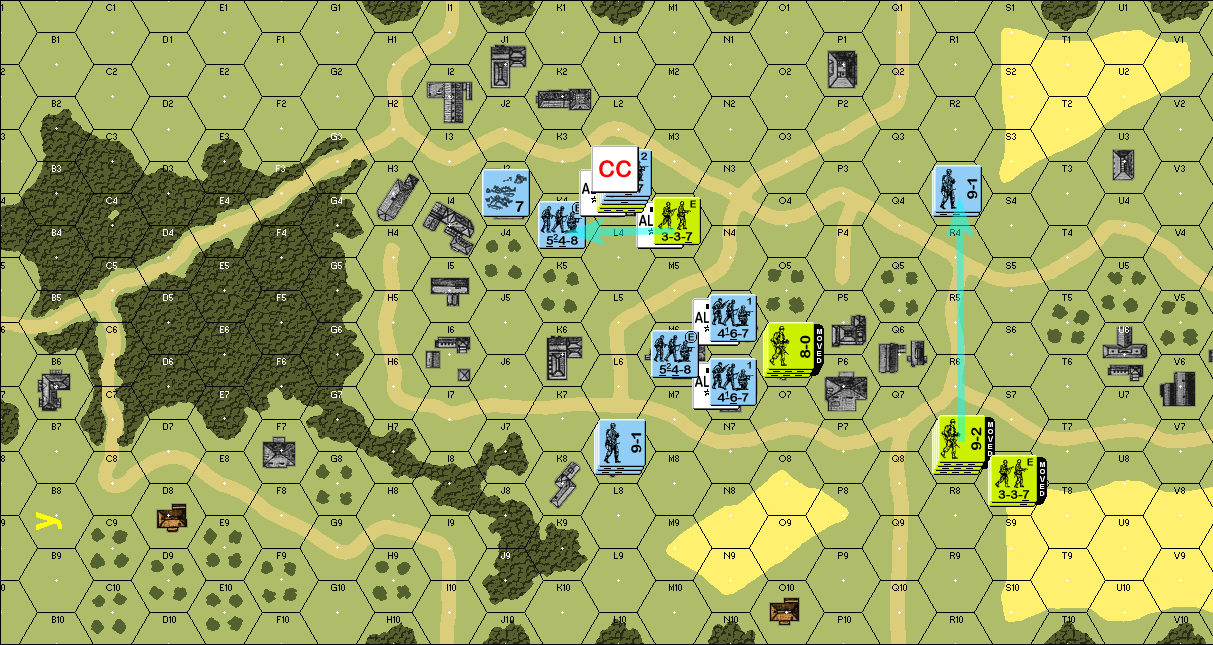 The half-squad in M4 takes a low-hope shot at K4, while the 747 that was already in R7 since the beginning of the turn tries to hit the Germans out in the open in R3, but both roll high and nothing happens. Defensive Fire Phase 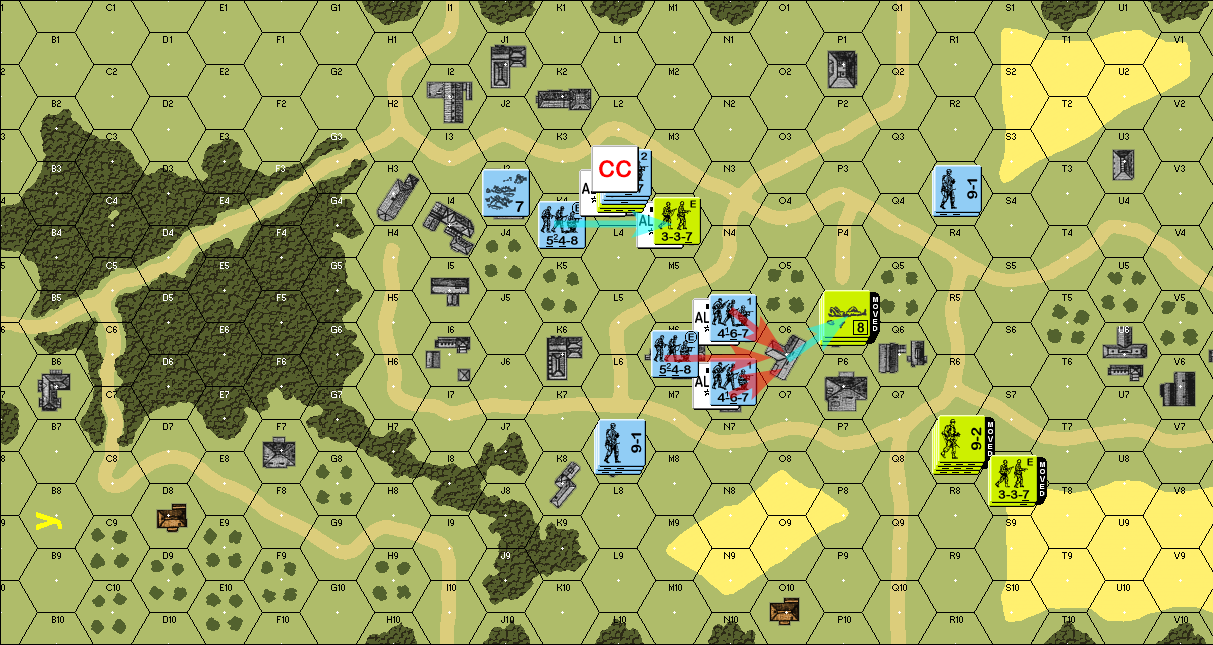 The 548 in K4 that was just shot at returns fire against the half-squad, but their attack is just as ineffective. Meanwhile, the three squads in the middle all fire on the closing Americans in O6... and they roll a natural 2. That goes up to 5 after the +3 DRM, and a Cower for rolling snake-eyes without a leader, but even after shifting one column from 12 FP to 8 FP, the result is still an "8", which breaks the whole stack and forces them to rout. Close Combat Phase 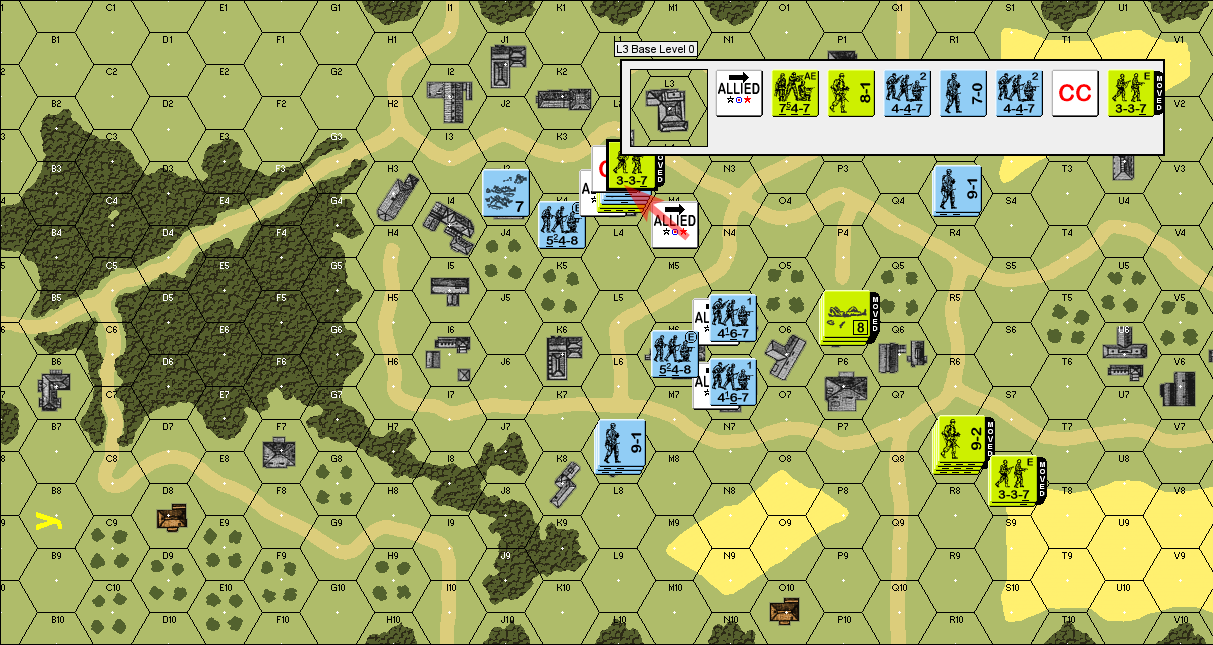 The 337 piles into the melee at L3 ... quote:Close combat in L3 it really shouldn't be surprising, because the odds were actually quite close and hardly dramatically in the Americans's favor, but the GIs rolled high and the Landsers rolled low and the latter prevailed. 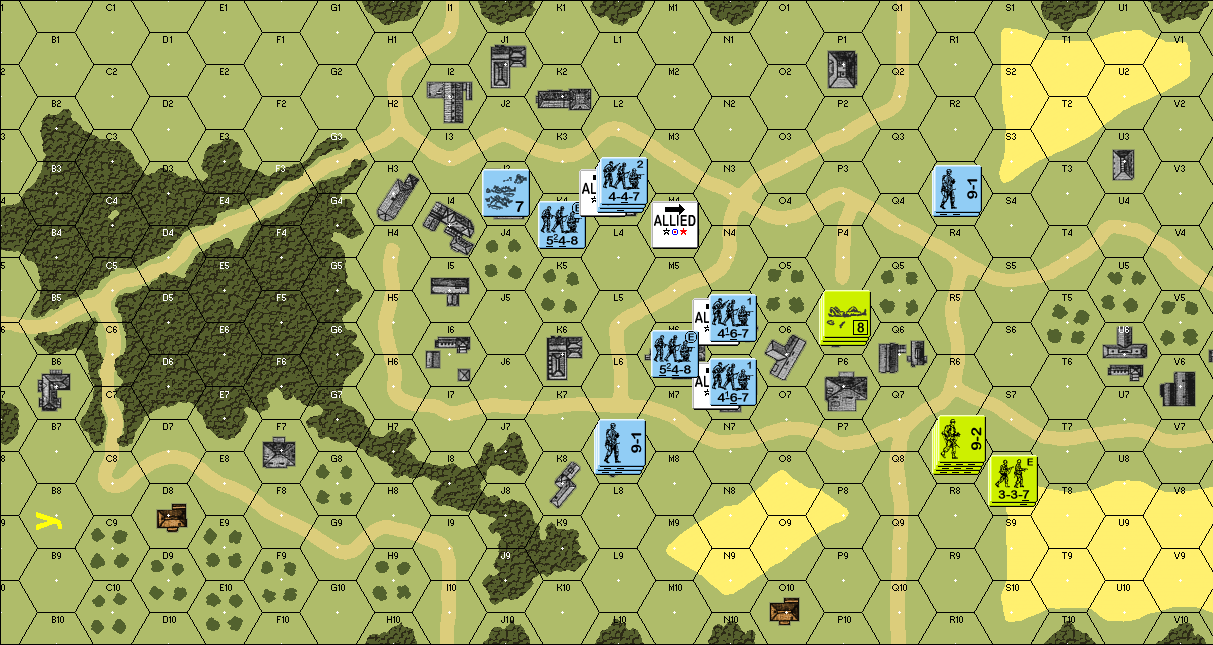 At this point, I decide to call it for the Germans. The Americans have four hexes they need to take, and they only have two turns to do it with. Even if they could make it to M4 by turn 4 with 6 MF movement plus an advance, they'd also have to precisely win the CC on the same turn, then also also precisely win another CC on turn 5 to take L3. ... which then means you'd need to capture N5 and N6 with just one squad each, and then they'd also have zero margins on winning the Close Combats for them against Germans that are guaranteed to outnumber them in least one of the hexes.
|
|
#
¿
Feb 16, 2024 04:12
|
|
|
For our second scenario, we'll be playing "War of the Rats", an engagement between German and Soviet forces, set in the ruins of Stalingrad, circa September 1942.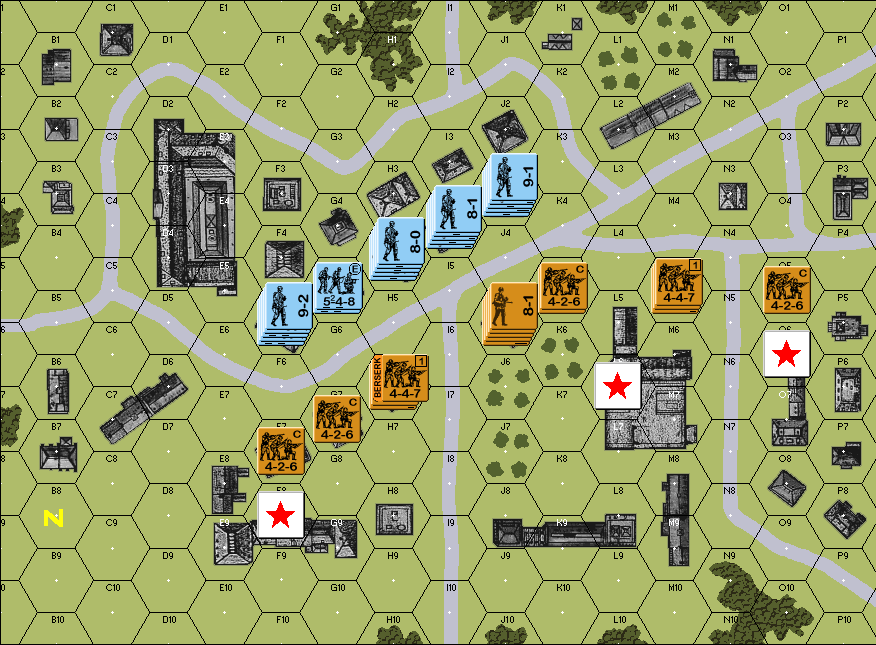 The goal of the Germans is to take the three buildings marked with red stars, while the Soviets have to stop them. The Soviets deployed first, and their thinking was to give the MMG in J5 a nice wide field of fire, with the rest of the troops dispersed across the front. The Germans deployed second, and their plan was to go heavy on the left-hand side of the map, and sweep from left to right. German Turn 1 Rally phase - nothing happens Movement phase 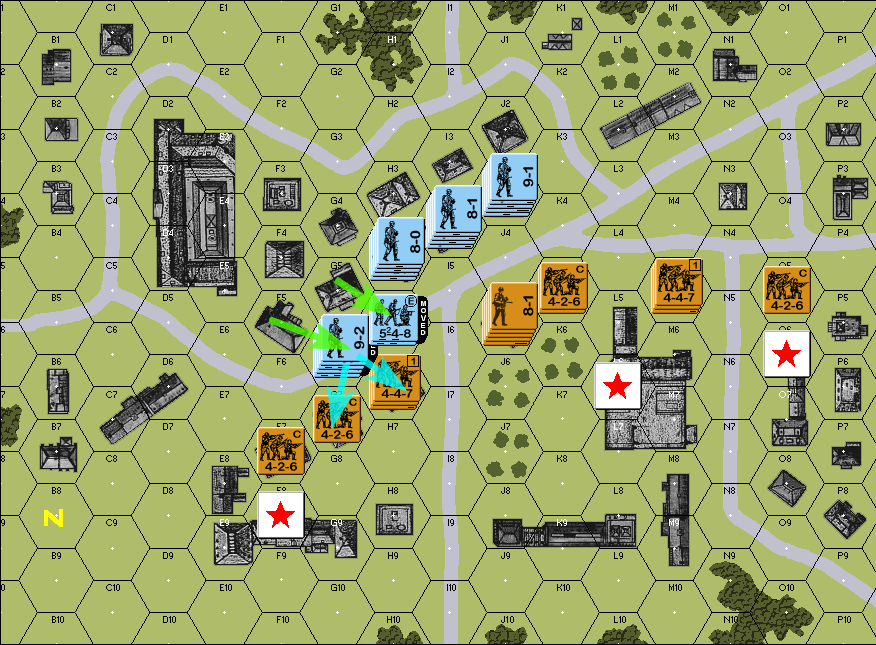 From hex F5, two 548 squads and their 9-2 leader move to the street; they make a Hesitation check, but pass it. Actually, it would have been impossible for them to fail: -2 DRM from the leader -1 DRM from being elite +1 DRM from being within range of an MG +1 DRM from being within less-than-half normal range of gunfire total of -1 DRM, so at a natural 6, it would have still been a modified 5, which passes The teal arrows denote that they are going to attempt to place Demolition Charges on those two hexes. Based on my interpretation of how Retro and ASL can fit together, if the two squads are still in Good Order after the Defensive Fire phase, then the Charges will be placed properly, and then they will explode as a 30 FP attack at the very start of the Close Combat phase (as the closest analogue to ASL's Advance phase). meanwhile, two 548 squads in G5 move to H5, passing a Hesitation check to do so. Fire Phase  - green: the stack in H4, which includes a Flamethrower, fires a 24 FP attack against the Soviets in H6, which results in an ELR check; the Soviets roll a 3, which is not only a pass, but also makes one unit go Berserk. Random selection assigns the Berserk to the 447 squad. quote:Berserk: squad gets 8 MF, and during its Movement Phase, must move towards an enemy, and attempt to enter Close Combat with it. If it survives Close Combat, the Berserk status is lost. - red: the two stacks in I4 and J3 form a 30 FP fire group and tries to take out the Soviet MMG team in J5. They succeed and break the entire stack. The Soviets are already in a non-open hex, and not adjacent to an enemy, so no rout is needed. - teal: the fire group's MGs get Rate-of-Fire and shift to attack K5, but to no effect. Defensive Fire Phase 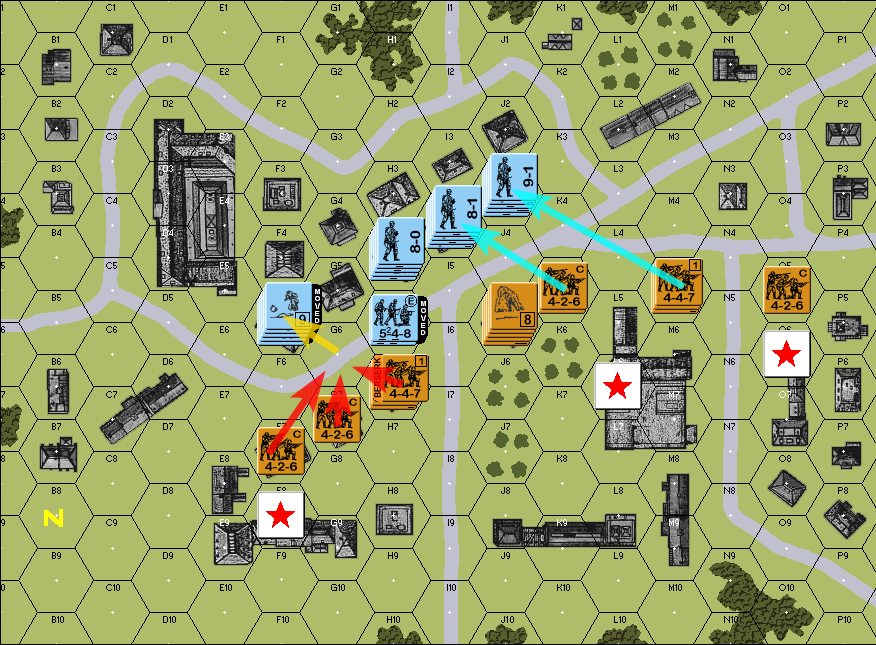 - red: the Soviets on the left flank form a fire group and blast the Germans trying to plant Demo Charges. They break the stack, foiling the plant attempt, and force them to rout to F5 - teal: the rest of the defensive fire this turn is of no effect Close Combat Phase 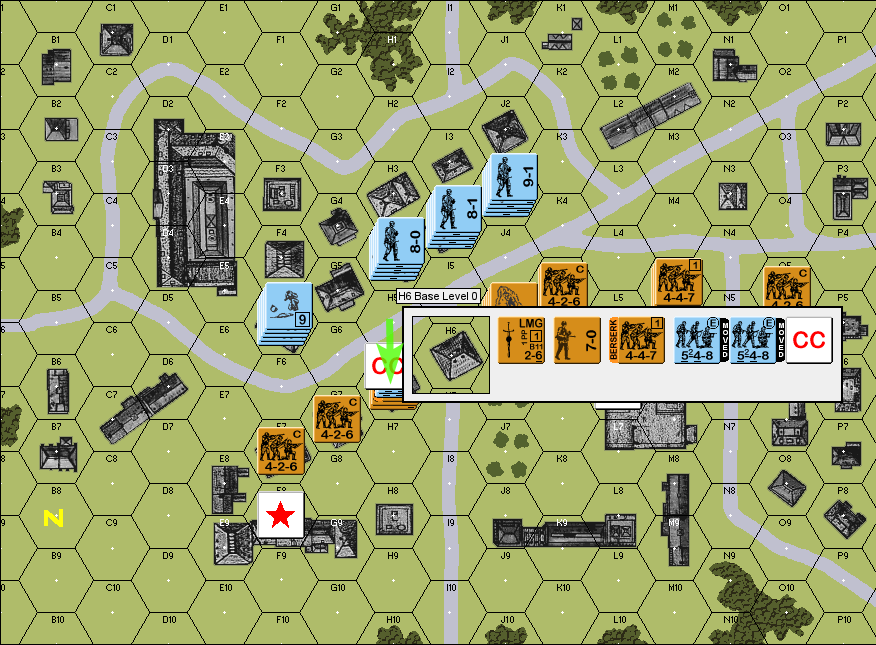 The two 548s in H5 advance H6 and engage in close combat. The rolls are inconclusive, and the two groups are locked together. End of German Turn 1
|
|
#
¿
Feb 21, 2024 12:24
|
|
|
I goofed on the flamethrower because I was correctly halving the FP for a range-two attack but I was counting it as part of a fire group, which it shouldn't be able to do as for the DCs, Retro doesn't have an Advance Fire phase: the Close Combat phase is both the "move one hex" and "resolve CC" phase in one, so I figured "start of CC, before any movement" would be close enough
|
|
#
¿
Feb 21, 2024 15:30
|
|
|
Soviet Turn 1 Rally Phase 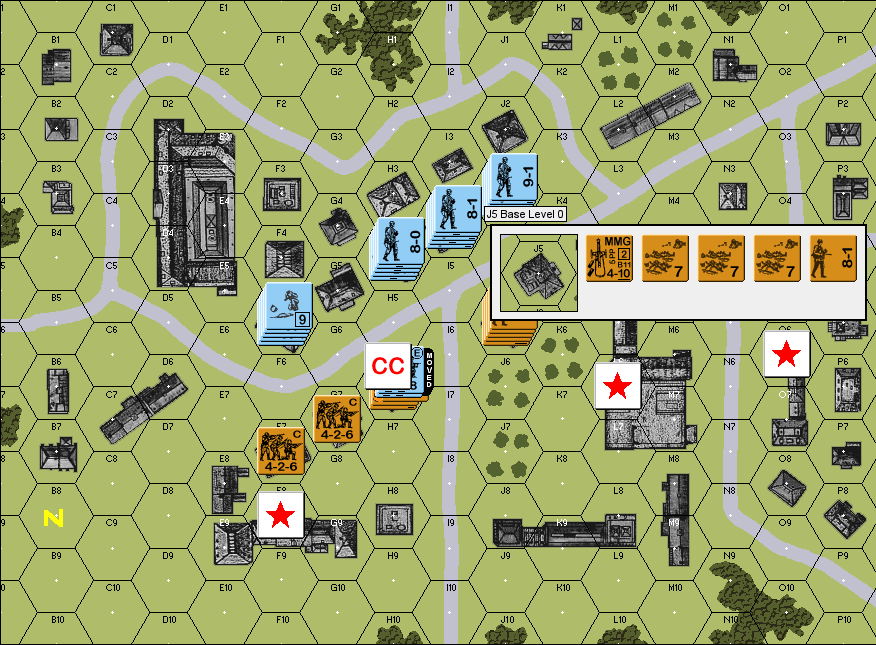 in hex J5, the leader rallies, but the three other squads do not. quote:in Retro, leaders are not affected by Desperation Morale (which, to recap, is a +2 DRM in Retro, and always applies as long as the unit is within LOS of a Good Order enemy). There's also a -1 DRM for rallying in a woods, building, trench or pillbox hex, so the leader's Rally DRM is -1 overall. They rolled a 9, modified to 8, which passes Movement Phase 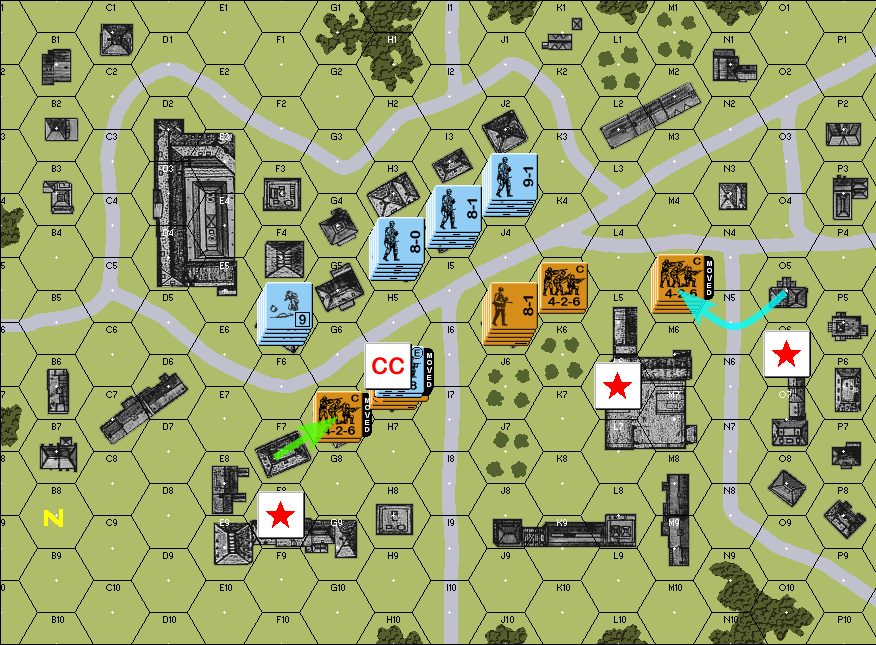 - green: the 426 in F7 moves to G7, with the intent of piling onto the on-going Close Combat - teal: the 426 in O5 moves to reinforce the squads across the street Fire Phase the Soviets fire against the Germans holed up in J3, but to no effect. Skipping a screenshot since it wouldn't show anything Defensive Fire Phase 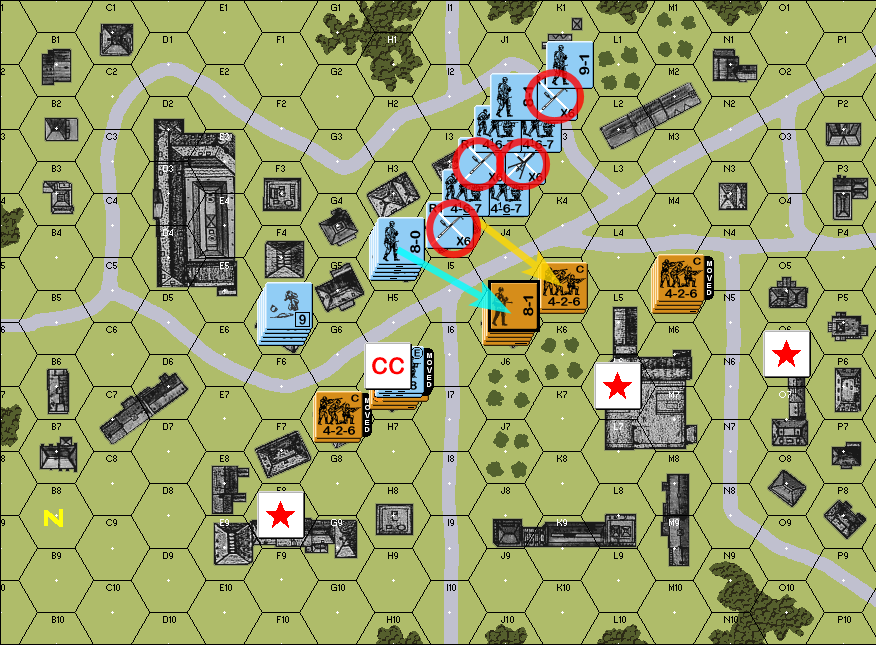 - teal: the German stack in H4 fires against the Soviets across the street. The result is an ELR check that the Soviets pass with a 3, which is supposed to make one squad go Berserk, but all the squads are broken anyway, so nothing happens. quote:I'm not actually sure if a Berserk result can cause a broken squad to rally, but I decided to leave it well enough alone - yellow: the two German stacks form a 24 FP fire group, but they roll boxcars, which not only makes the shots miss completely, but also breaks all four of their machine guns. A lucky break for the Soviets. Close Combat Phase 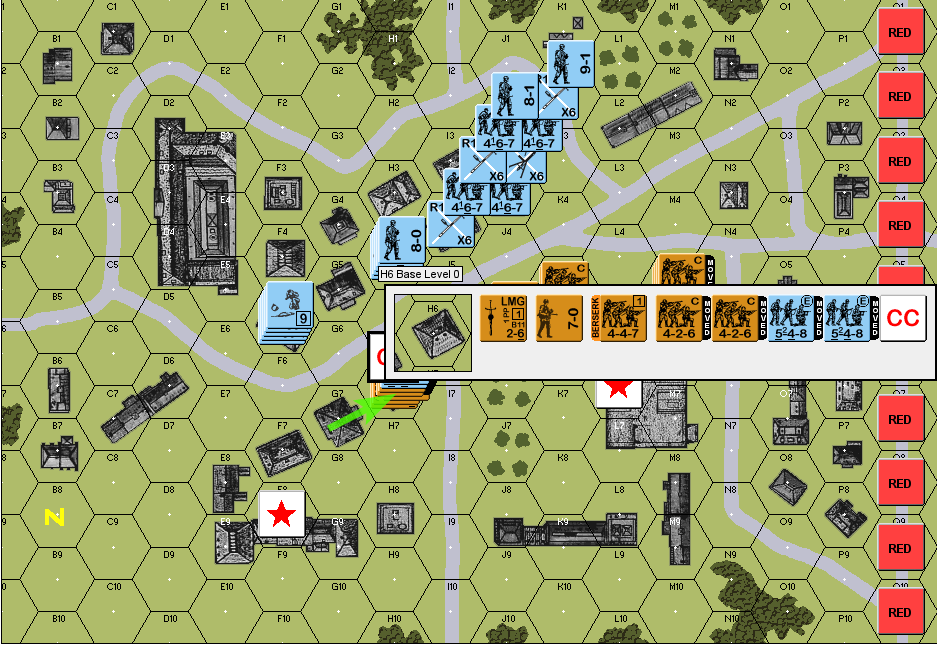 the two 426 squads in G7 join the Close Combat already on-going, but despite the Soviets shifting the odds to 3:2, both they and the Germans roll high and the melee remains inconclusive. (the RED counters are just a marker for me to denote the limits of the playable area) End of Soviet Turn 1
|
|
#
¿
Feb 23, 2024 05:31
|
|
|
German Turn 2 Rally Phase 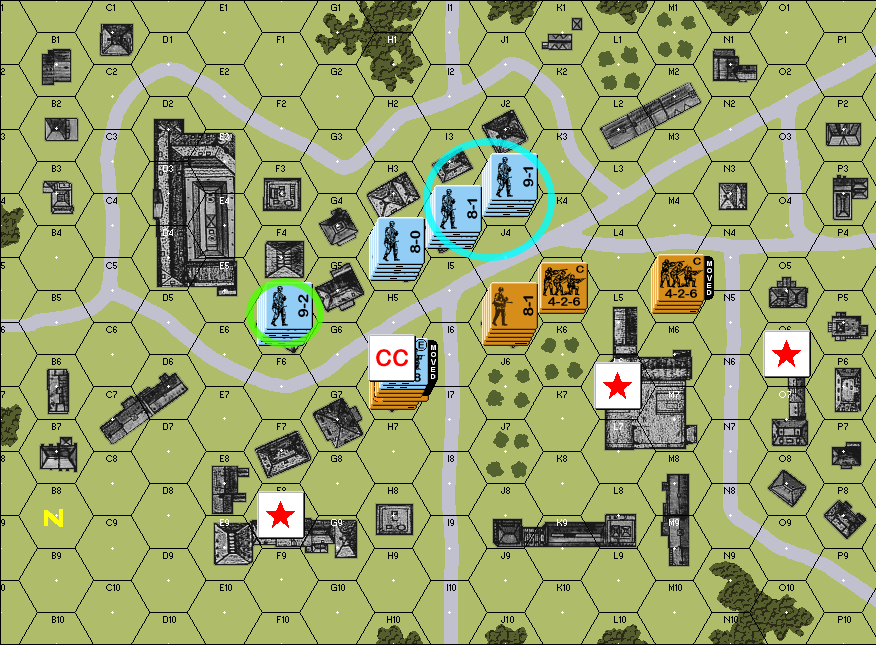 The stack of two 548s and a 9-2 in F5 all rally successfully. And in the I4/J3 Fire Group, one LMG and one MMG are repaired, while the other two remain broken quote:Taking note of the feedback that MG malfunctions are supposed to be randomly selected, for future reference. Movement Phase 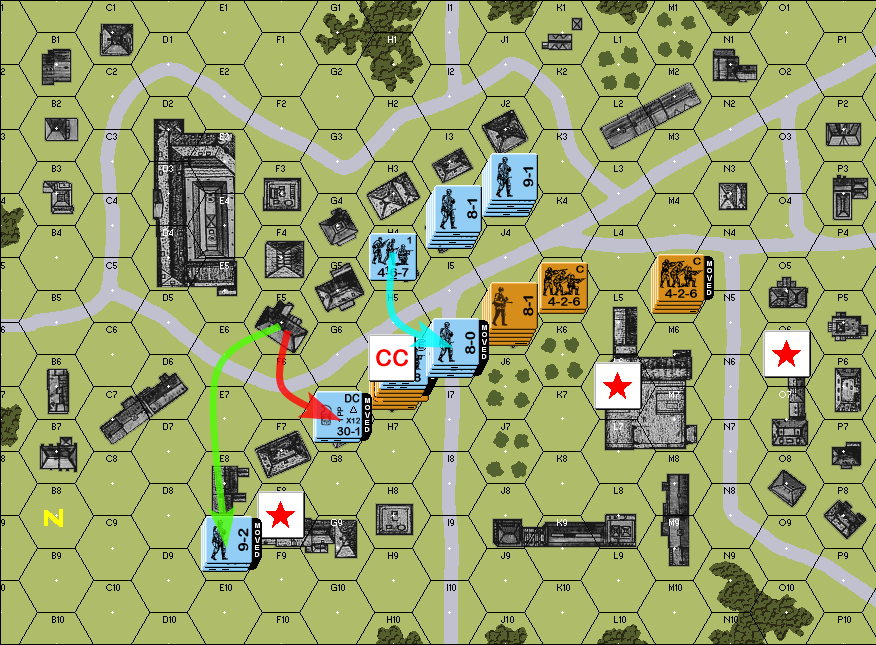 - green: a 548 squad and the 9-2 leader runs to take the left-hand objective building - red: the other 548 positions itself to assist in the melee in H6 - teal: two 467s, one of them with the flamethrower, and the 8-0 leader, move from H4 to H5, then to I6. The H5 move is not a Hesitation check, because the Soviet squads in J5 are broken, and H5 is beyond the normal 2 range of the 426s in K5. Fire Phase Defensive Fire Phase 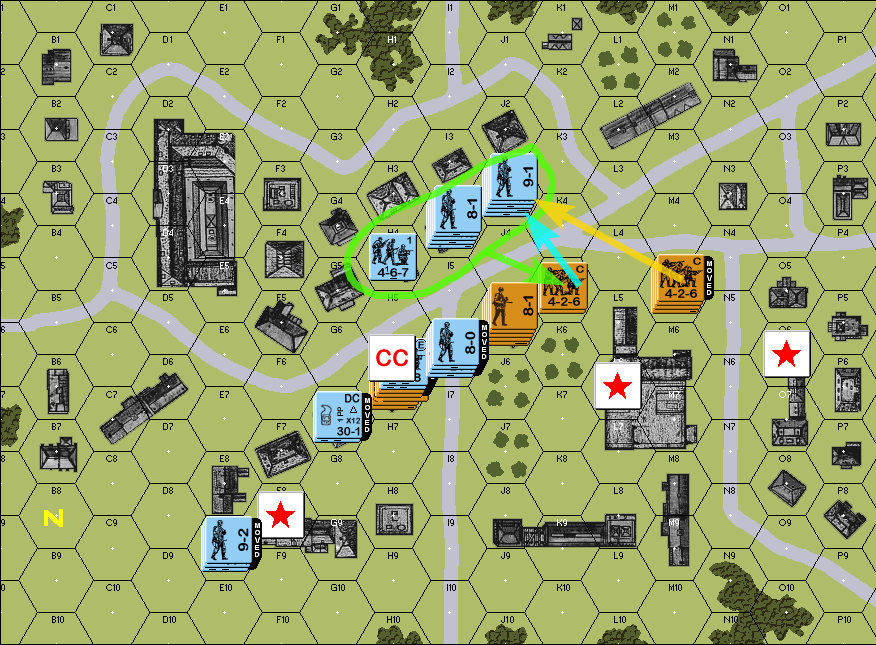 - green: during the Fire Phase, the squads in H4, I4, and J3 all form a big FG to shoot at the conscripts in K5, but they roll a 12 and accomplish nothing - yellow: during the Defensive Fire Phase, the stack in M5 shoots at J3, to no effect - teal: also during the DFP, the stack in K5 also shoots at J3, also to no effect Close Combat Phase 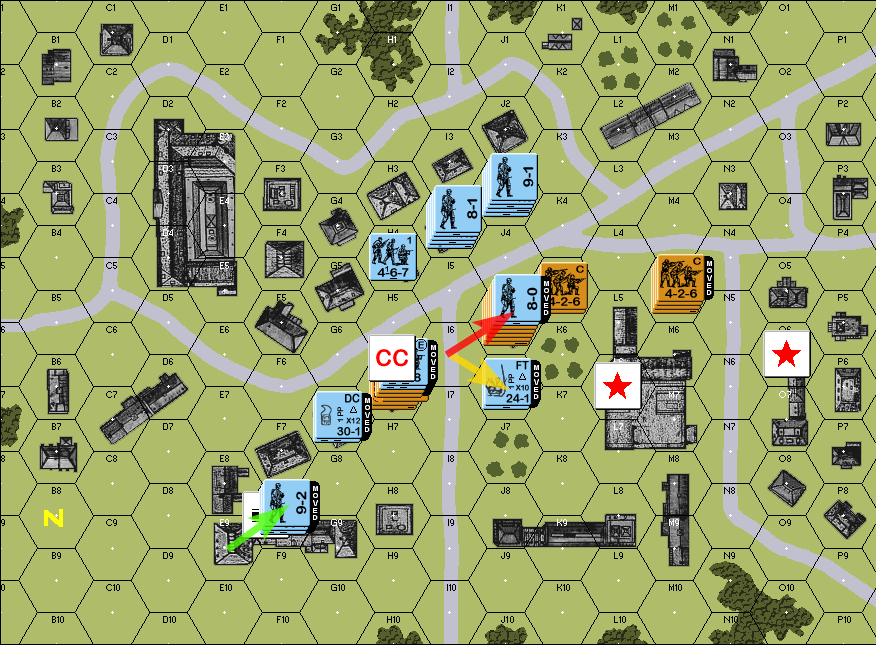 - green: the 548 and the 9-2 advance one hex to confirm securing the objective building - yellow: the 467 with the flamethrower advances to the orchard in J6 - red: the 467 and the 8-0 leader advances to Close Combat with the Soviet stack in J5 on to the close combat resolution: 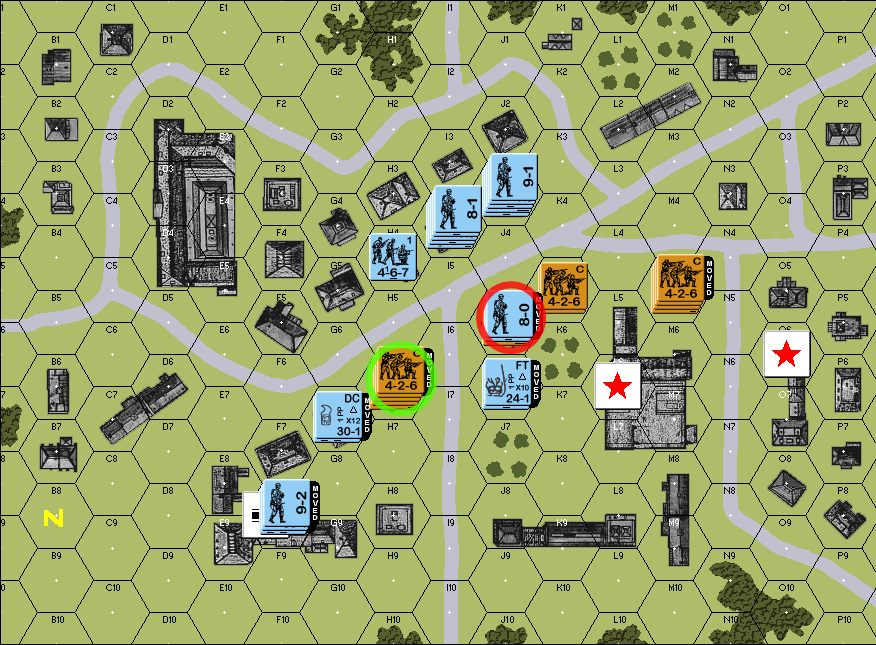 - green: the Soviets prevail here, eliminating the two German 548s - red: the Germans prevail here, eliminating the three Soviet 447s and the 8-1 leader quote:In retrospect, I could have run the red combat differently. The way I did it here, I didn't count the broken Soviet squads at all, leading it as a 1:5 / 5:1 odds CC. I reviewed the CC rules closer later in this scenario and found that I should have let the 447s have half of their FP when defending against the German attack (but still not counting when attacking). That might have shifted the odds enough to let the stack survive for another turn. End of German turn 2
|
|
#
¿
Feb 26, 2024 07:38
|
|
|
for the life of me I couldn't remember why I made the FT squad pause in the orchard. I think I might have intended it to do a follow-up attack on K5, but in retrospect it seems like a poor move the way I'm doing this, where I'm playing through the scenario first, then doing the post and write-up after-the-fact, has an interesting vibe when I've been learning so much about the game in such a short time and I start to wonder "what was I thinking?" a week later EDIT: Jobbo, per straight-ASL, what is the procedure for an MMC attacking a Gun target with their inherent FP? It's going to be relevant to me very soon and I can't find anything about it. Given the lack of any specific reference, it seems like the answer is "it's just like if the squad was shooting at the crew of a gun". from the ASL-SK rulebook: 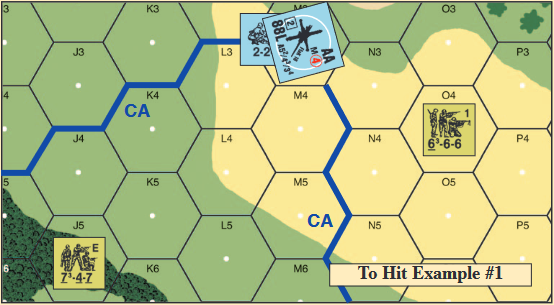 if the 6-6-6 in O4 wanted to attack the German 88, the thing they would actually be shooting at is the 2-2-8 crew, and it would be a plain 6 FP attack on the IFT with a +2 Hindrance DRM from firing across two grain hexes (if the grain is in-season)? my impression is that the gun itself offers no particular protection to the crew in terms of DRM, but the advantage is that guns have much longer ranges (the infantry might not ever be able to get into range even if the gun is in an Open hex), guns might be placed in hexes where they have cover, and guns might even be Hidden-In-Place gradenko_2000 fucked around with this message at 13:04 on Feb 26, 2024 |
|
#
¿
Feb 26, 2024 12:35
|
|
|
Soviet turn 2 Rally Phase SSR reinforcements are supposed to enter the map on a roll of < the current turn. The Soviet player rolls a 5, which means no entry. Movement Phase 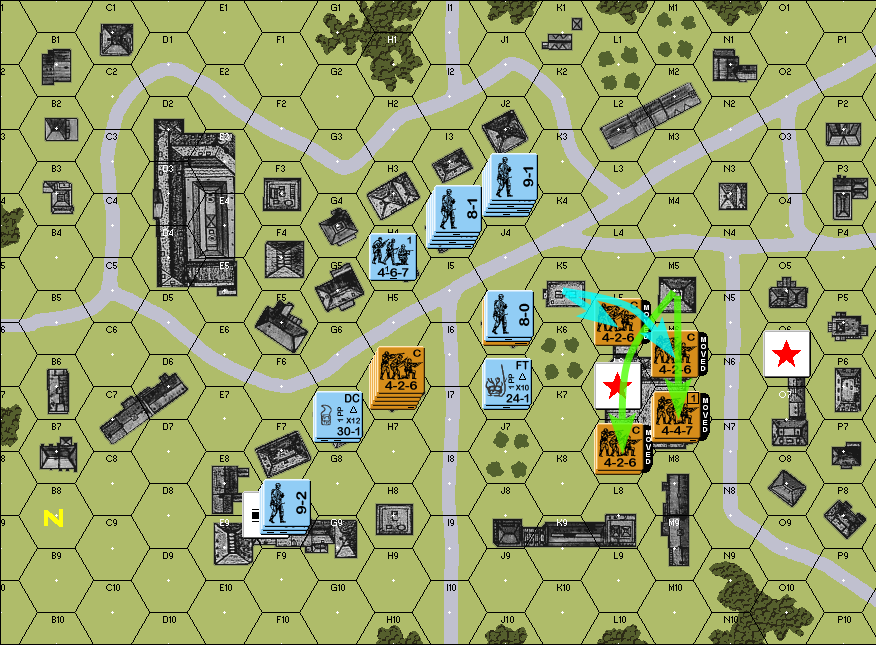 The four currently unengaged squads disperse across the central building objective. Fire Phase 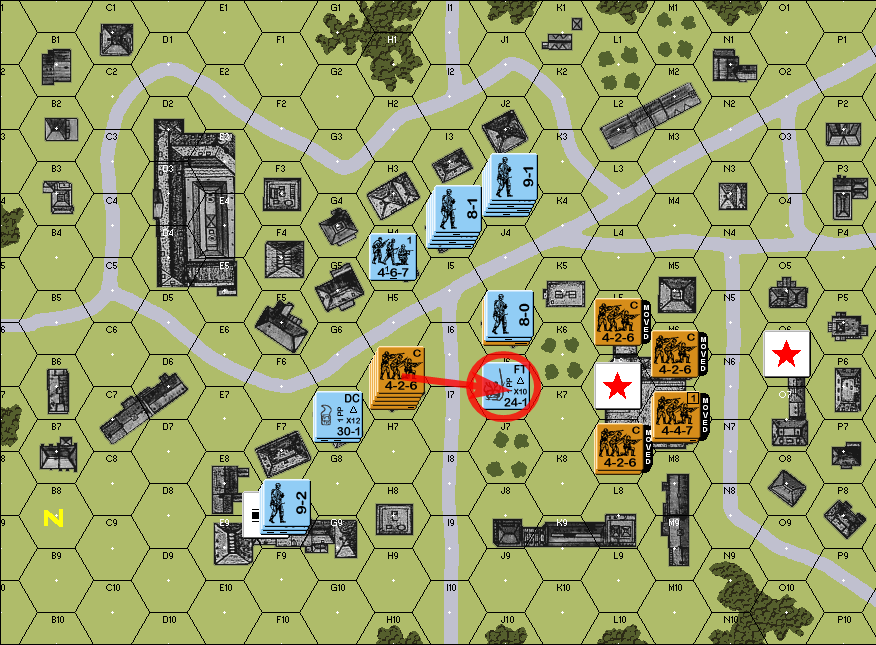 The stack in H6 fires a 16 FP attack against the flamethrower squad and rolls a 3, which eliminates the German unit completely. Defensive Fire Phase  The one 548 in G7 makes a point-blank shot at the stack that just knocked out the flamethrower. The 548, with a 10 FP attack, rolls a 5 and cowers, but shifting over to the 6 FP column (from 8) still yields a "7" result, which breaks the whole stack (a 7 morale leader, a 7-morale 1st-line, and two 6-morale conscripts). When considering the rout, there's no place for the broken stack to go: G6, H5, I6, I7 and H7 are all both open hexes, and are within LOS and range of Good Order enemy squads, and so the whole stack is eliminated due to failure-to-rout. quote:This can feel a little extreme, though it's also the case that the Soviet units were in a particular situation where not only did the enemy surround them with sight-lines (the stack in F8 especially), but also that the hex they were in just happened to not have any kind of nearby cover available. The stack in J5 also shoots at the Soviet squad in L5, but to no effect. Close Combat Phase - no advances, no close combat End of Soviet turn 2 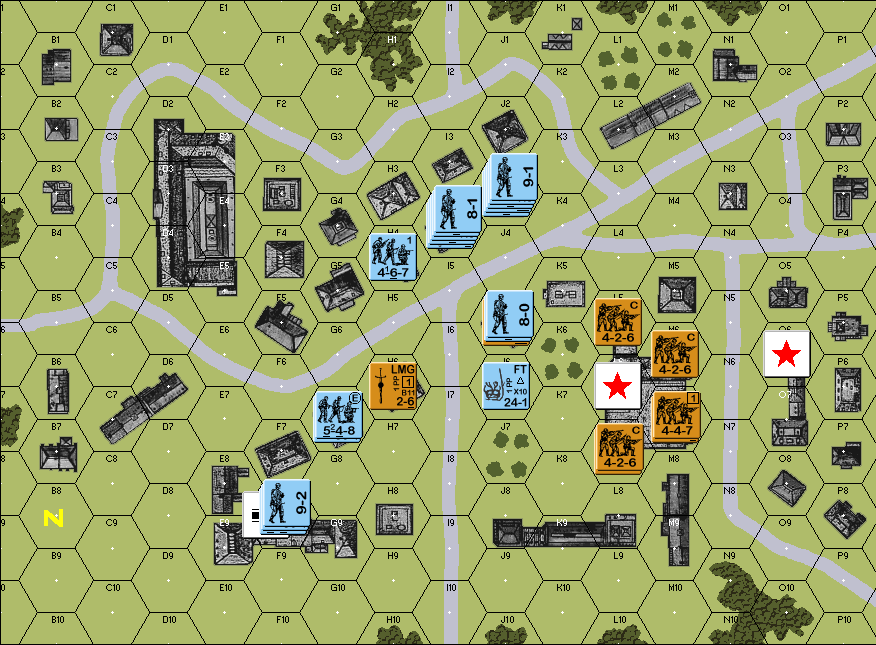
|
|
#
¿
Feb 27, 2024 10:18
|
|
|
German Turn 3 Rally Phase of the two broken MGs still remaining, one gets repaired Movement Phase 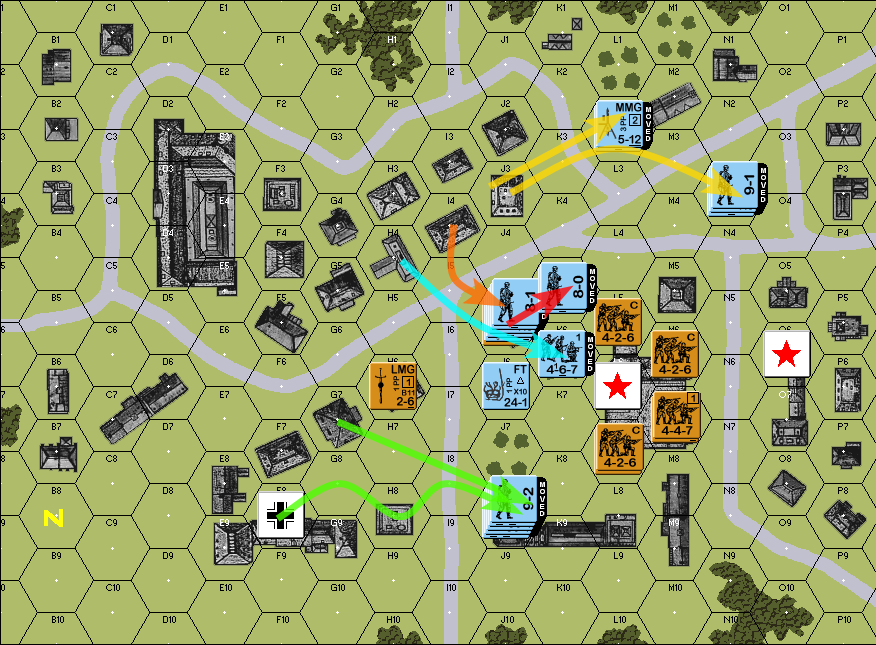 The Germans go all-in, trying to surround the factory building from all sides. - green: two 548's and the 9-2 leader combine to the south, looking to engage at L7 - red and teal: two more squads and another leader are aiming to break in along L5... - orange: ... with another two squads and a third leader right behind them - yellow: and the MG position at J3 breaks up to threaten the exposed right-hand objective Fire Phase - all German units moved, no fire Defensive Fire Phase 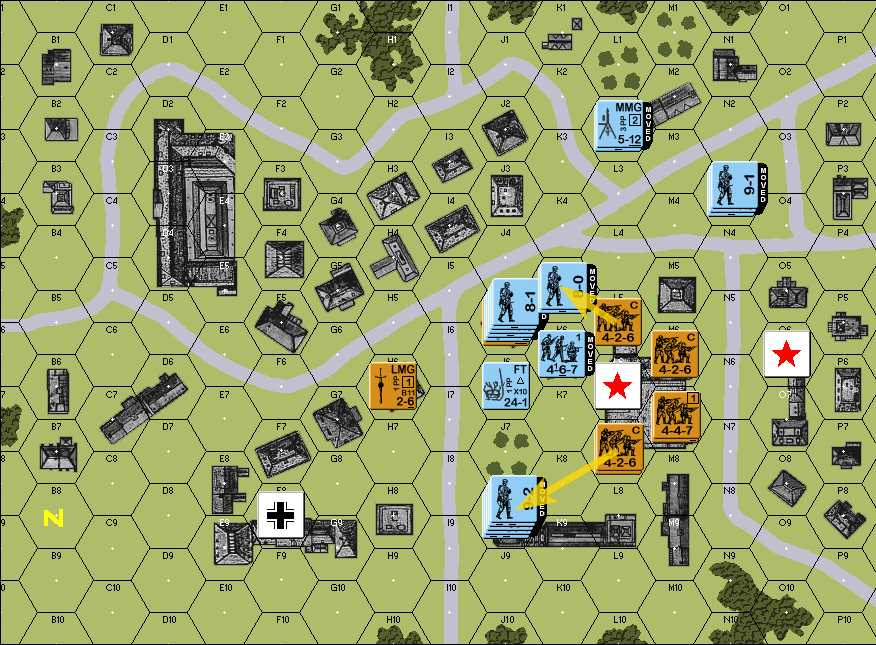 The Soviets attempt to fend off the approach, but the fire is desultory, and has no effect Close Combat Phase 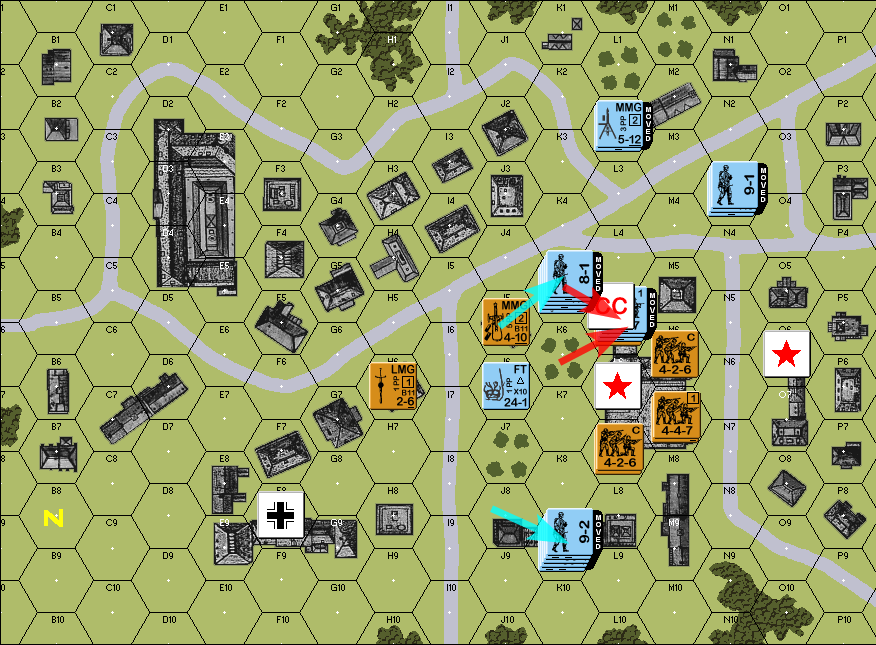 two German 467s and a leader close in on a single Soviet squad in L5, then the two other big stacks scoot closer Close Combat is rolled, and the Germans prevail, eliminating the Soviet 426 End of German turn 3 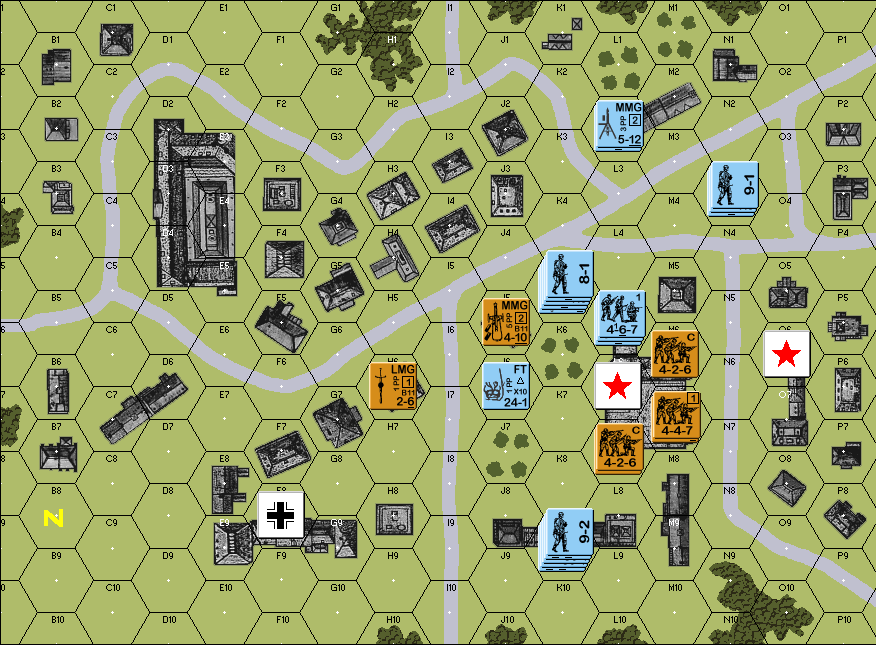 To be completely frank, this turn (and the ones that would follow) left a bad taste in my mouth. While Hesitation does teach you how you should move - look for non-open hexes, only cross open hexes when absolutely necessary, and have a plan for how to survive such a crossing, the way it's set up gives the attacker a LOT of freedom in being able to move almost without repercussions. Even if the Soviet 447 was in L6 or L7 to get a clearer shot at the Germans as they came in, the only Hesitation check would be at I8, and the 9-2 leader guarantees that they'd be able to pass the check anyway. I kept thinking that, under ASL, all of these units would at least have had to survive PBF and SFF and even FPF - and while the odds of such shots getting the stop the Germans might have been low, it wouldn't have been zero. Alternatively, Retro does have "optional rules" on how to remove guaranteed Hesitation, as well as for implementing Hesitation checks on all types of terrain, but then you start "running home to mama" anyway with increasing complexity.
|
|
#
¿
Feb 28, 2024 03:51
|
|
|
Soviet Turn 3 The Soviets roll a 1 on their SSR reinforcement roll, so new units will enter the board on this turn. Movement Phase 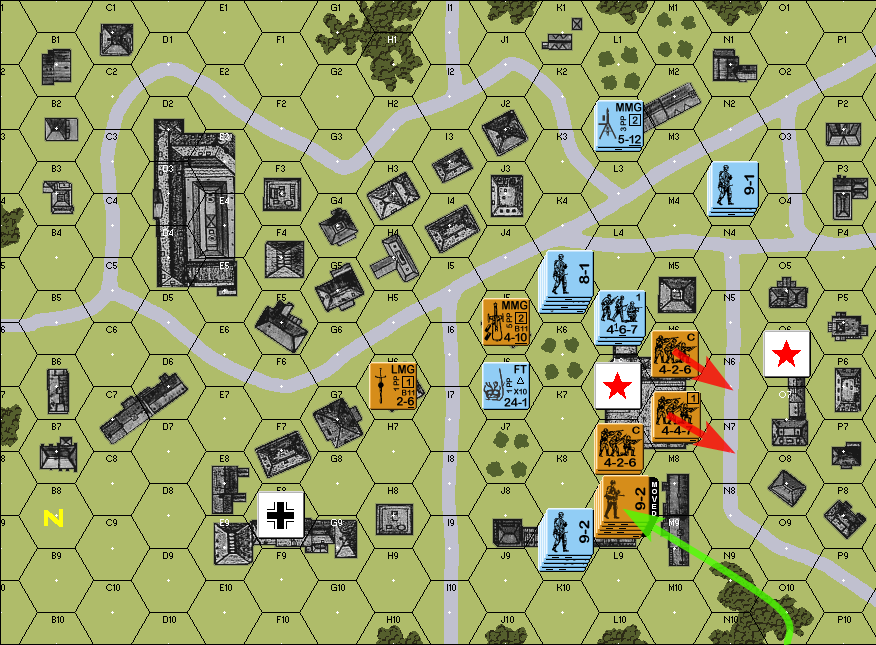 - green: the reinforcements arrive - three 1st-line 527 squads, an LMG, and a 9-2 leader. They move to L8 to prepare to engage the German elite stack coming up from the bottom - red: the 426 and 447 in the middle building attempt to reposition themselves, but the MMG in the N hexrow forces Hesitation checks, which they both fail when trying to cross the street Fire Phase - no fire done Defensive Fire Phase 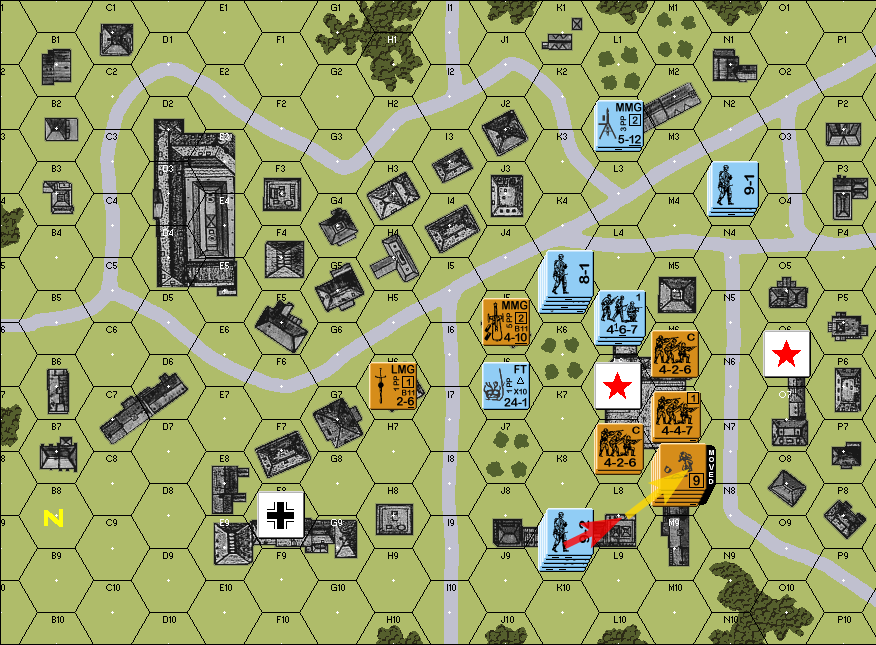 The German stack in K9 fires against the reinforcement group - they roll really well, getting a 5, which breaks the whole Soviet stack and gets them to rout quote:The game was already turning against the Soviets pretty bad before, but this right here sealed their fate. Very difficult to come back from this. Close Combat Phase - no actions taken End of Soviet turn 3
|
|
#
¿
Feb 29, 2024 03:45
|
|
|
I know there's only like, two of you reading this thread rn, but we're almost done with this scenario, and I've got some follow-up material planned, but I'd like to ask which one you'd like to see (first): - another playthrough of this scenario, War of the Rats, still in Retro, but with tougher Hesitation rules: 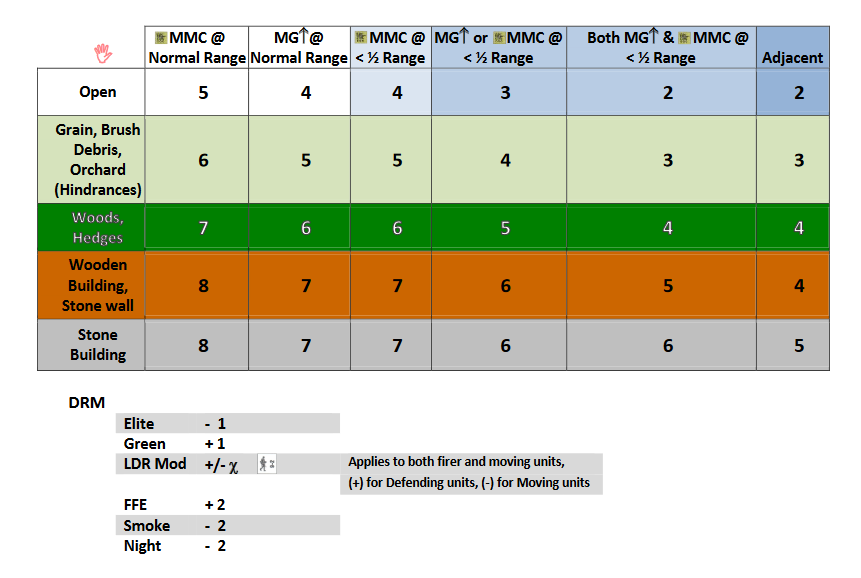 - a new scenario, played in straight ASL-SK rules, with an eye towards providing color commentary that contrasts it against our current experience
|
|
#
¿
Feb 29, 2024 04:40
|
|
|
German Turn 4 Rally Phase The Germans still have two broken MGs - they roll to repair, but to no effect Movement Phase 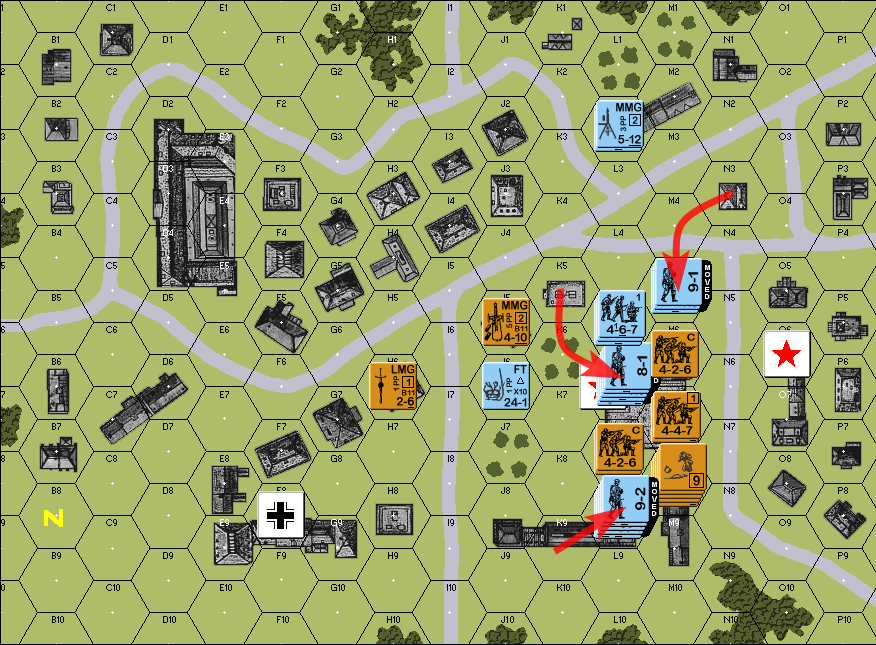 the three big German stacks move in to contest the middle building Fire Phase - no fire done Defensive Fire Phase 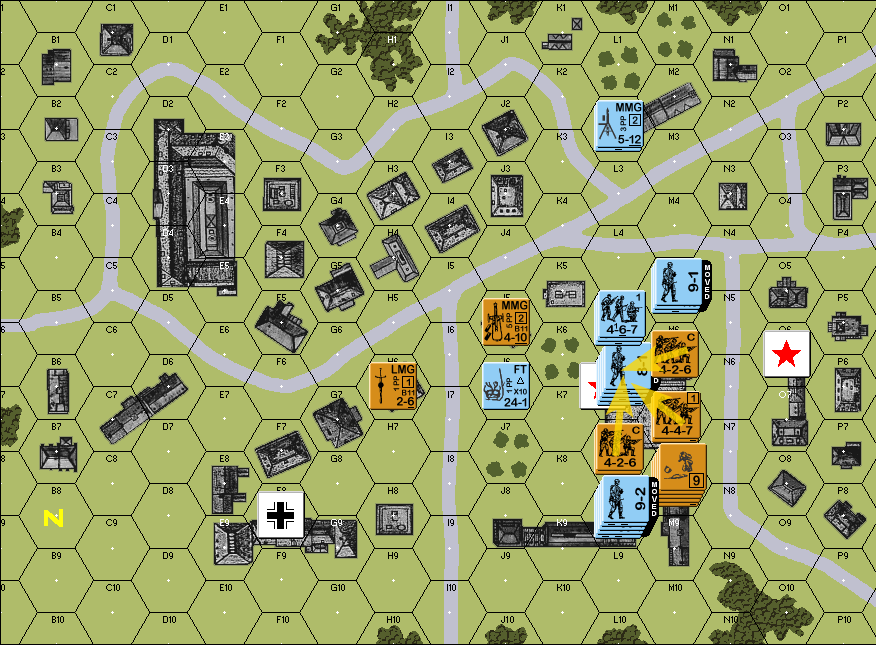 the Soviets drop a 28 FP fire group on the big stack, but they roll a 13 and accomplish nothing Close Combat Phase 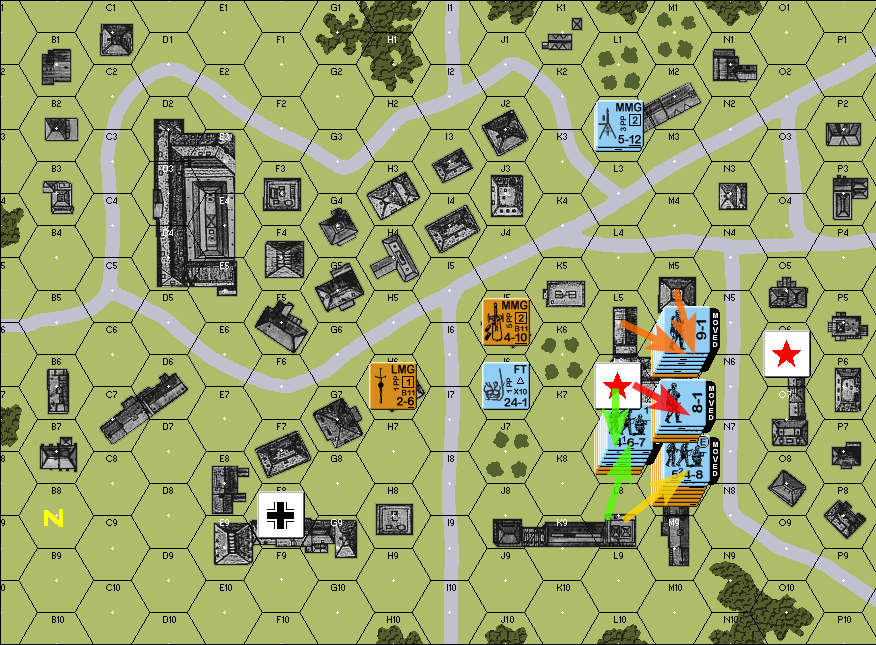 - yellow: a single 548 engages the broken stack in M8 - green: a 548 and the 9-2 leader from L8, and a 467 from L6, engages the Soviet stack in L7. That's a Soviet 426 and an 8-0 leader defending - red: a 467 and an 8-1 leader, the other half of the stack from L6, engages the Soviet 447 in M7 - orange: finally, the two German stacks from L5 and M5 converge on M6. That's a single Soviet 426 defending against three 467s and a 9-1 leader resolving all the Close Combats: quote:Close combat in M6 This is what the map looks like at the end of the German turn: 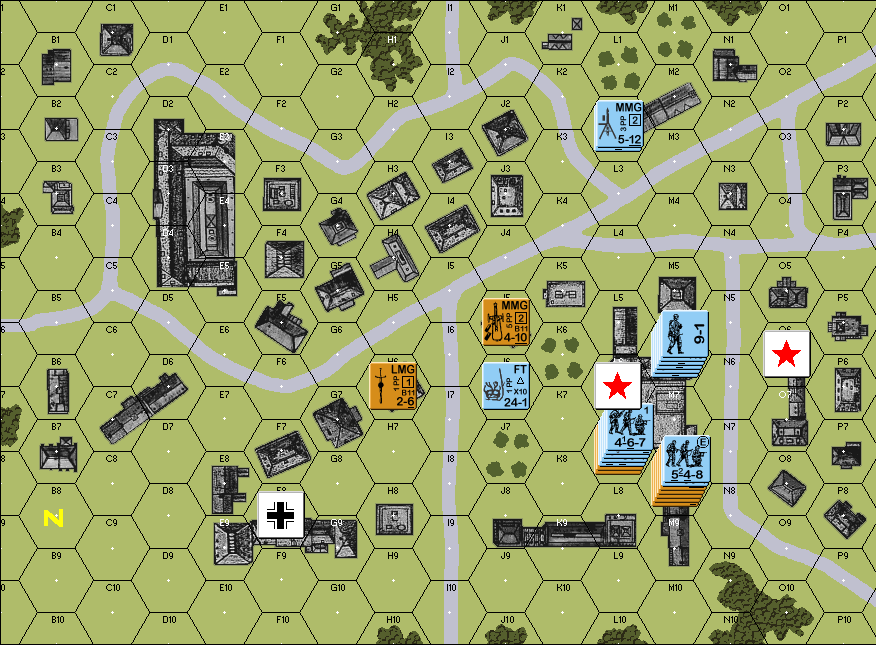 The scenario is effectively over at this point: the Soviet stacks are locked in melee, and nothing happens on the Soviet turn except re-rolling for the two remaining Close Combats. Assuming they survive, on the next German turn, L7 gets dogpiled further. As long as L7 gets eliminated, then the broken stack in M8 never gets to recover/rally and is guaranteed to be eliminated As I'd mentioned previously, I wasn't particularly happy with how this scenario played. Not that I was rooting for one side in particular, but rather that there didn't seem to be a lot of tactical choice besides bumrushing the Soviets because the German elite squads can pass the single hex of Hesitation. That said, I think the next scenario is going to be a bit more interesting, so stay tuned!
|
|
#
¿
Mar 1, 2024 03:38
|
|
|
Jobbo_Fett posted:War of the Rats suffers from not being a complex scenario, too I do think this is also a factor, yes - the Germans can start the game already right up next to the Soviets, with no ingress required save the final street crossing, and they're given a ton of heavy weaponry, and the variability of the arrival of the Soviet reinforcements can screw the Reds over big-time after spending some more time with the system over the past week, I'm trying to not be so negative as I might have come off as, as I think WOTR's idiosyncrasies might not make it a particularly good vehicle to evaluate Retro's rules
|
|
#
¿
Mar 1, 2024 07:44
|
|
|
huh, that's fascinating. Maybe I should look around and see if there are any after-action reports to see how other people have "beat" it, from either side
|
|
#
¿
Mar 1, 2024 14:15
|
|
|
I bought a little dice tower to do my rolls in while I'm playing for a little bit of authenticity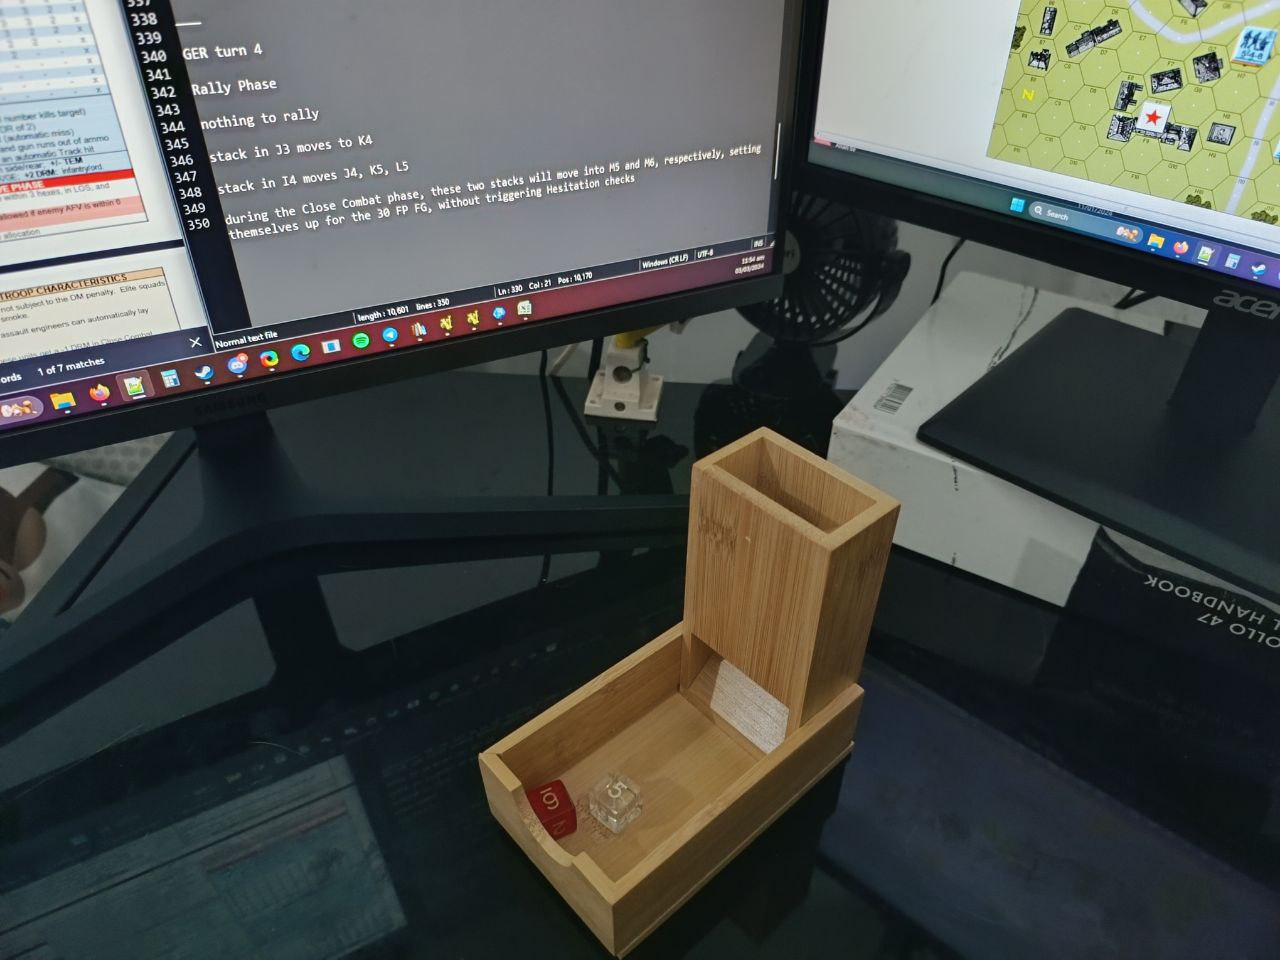
|
|
#
¿
Mar 3, 2024 04:59
|
|
|
War of the Rats, Round Two - with tougher Hesitation rules We're going back to this same scenario, but we are using alternative rules to make Hesitation checks tougher to pass, while also applying them even to non-open hexes: ___  We'll be using the same opening set-up, though this is more because I did give it a think and couldn't come up with any new ideas, rather than a deliberate attempt to duplicate the circumstances of the first playthrough precisely. Knowing what I know now, I think I would have spread out the Soviets even more, like to L5, E8, and E9, and not stack so much in J5. But, on with the game. GER turn 1 Rally Phase nothing happens Movement Phase 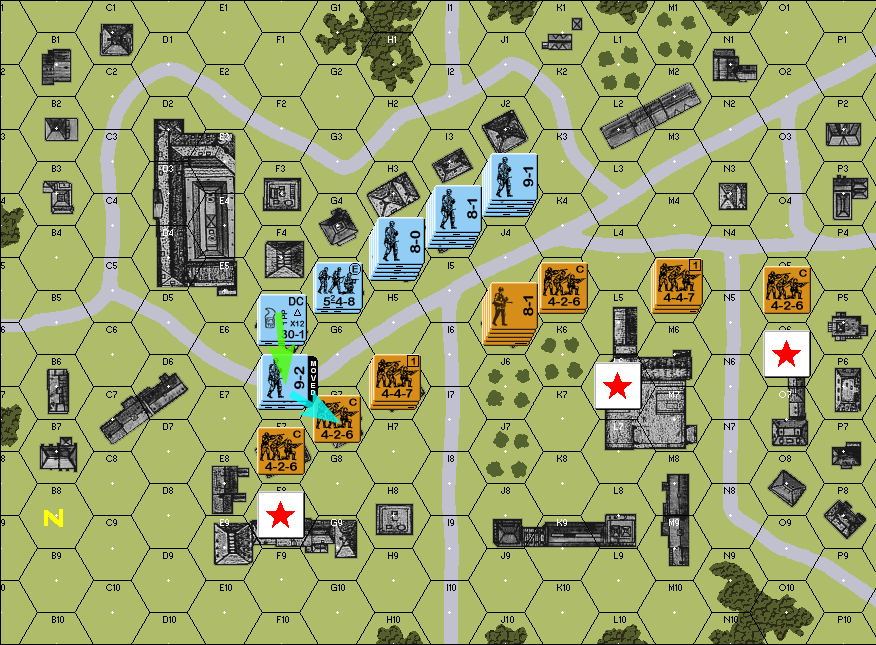 A 548 squad and a 9-2 leader attempts to move from F5 to F6 Referring back to that chart of Hesitation checks, with an open hex, moving adjacent to an enemy unit, means Target Number of 2; with a -1 DRM for an Elite squad, and -2 DRM for leadership A 3 is rolled, modified to 0, which passes. The 548 also attempts Demo Charge placement in G7 - if the 548 is still in Good Order after the Defensive Fire phase, the DC will explode at the start of the Close Combat Phase 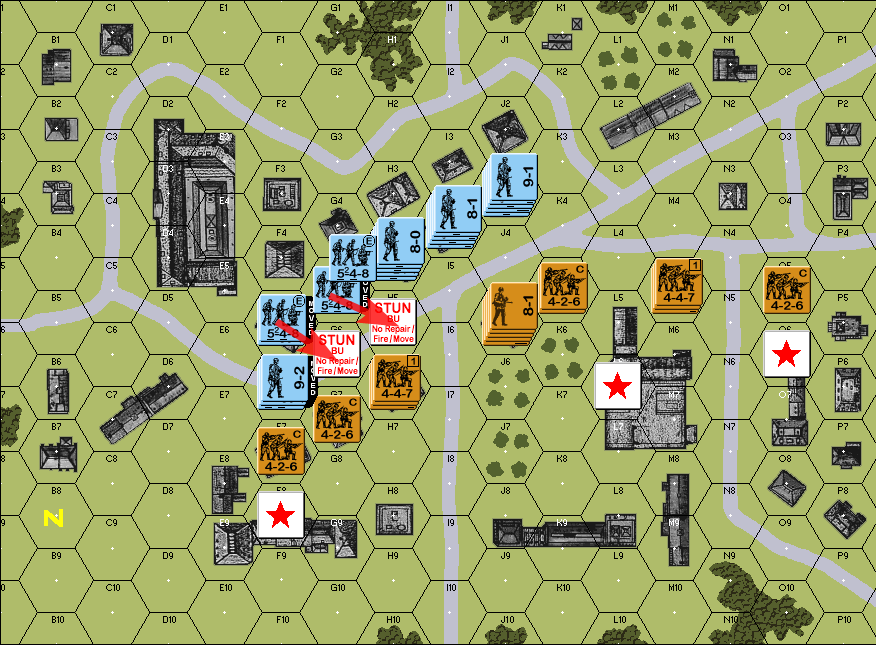 The other 548 with a DC in F5 attempts to move to G6. It rolls a 5 on the HC and halts. Another 548, in G5, attempts to move to H5, and it rolls a 2 on the HC and halts.  now, per the Hesitation rules, once a unit fails to enter a hex due to Hesitation, no other unit can try to enter that same hex, so the second 548 in G5 cannot even attempt to get to G6 or H5, and it has to take a longer route around even entering F5 requires a Hesitation check, since it is within LOS and range of enemy units - but the TN is high, at a 6, and the squad rolls a 1 on the HC and passes entering E6, an open hex, has a TN of 5, and the squad rolls a 2 and passes entering E7, an open hex adjacent to an enemy, has a TN of 2 (as we've seen previously), but the squad rolls a natural 1, modified to 0, and also passes 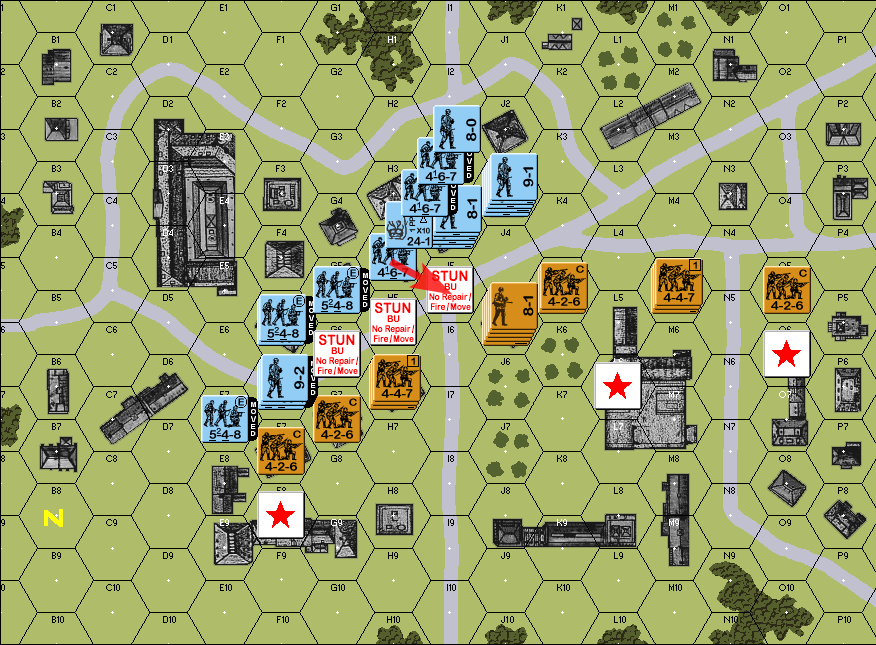 finally, two 467s in H4 attempt to move to I5, but they roll a 2 on the TN 2, and halt in place I will not be as verbose in going through the movement phase as we go along, but since we're dealing with new mechanics here, I'm going through it step-by-step. Fire Phase 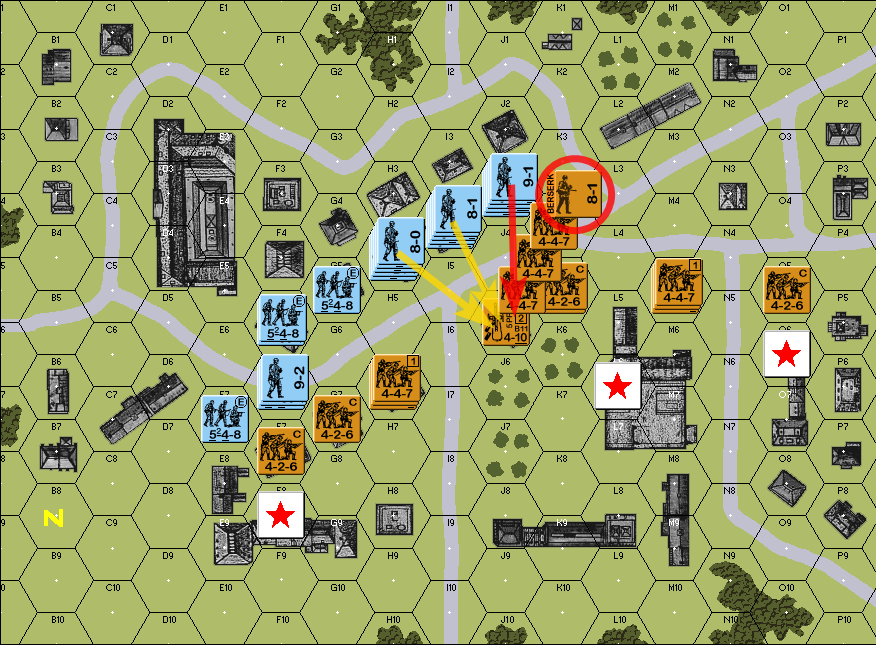 The Flamethrower in H4 shoots at J5, to no effect The stack in I4 shoots at J5, but also to no effect The stack in J3 shoots at J5, and they get an ELR check result - the Soviets pass the ELR check with a 3, which causes the 8-1 leader (based on random selection) to go Berserk. This is actually a bad thing, for reasons that will become painfully clear very soon. Defensive Fire Phase lots of no-effect results here. The 426 in F7 gets an ELR check against the 548, but it passes. The MMG stack in J5 does roll well, and it gets the German stack in H4 to break. Close Combat Phase 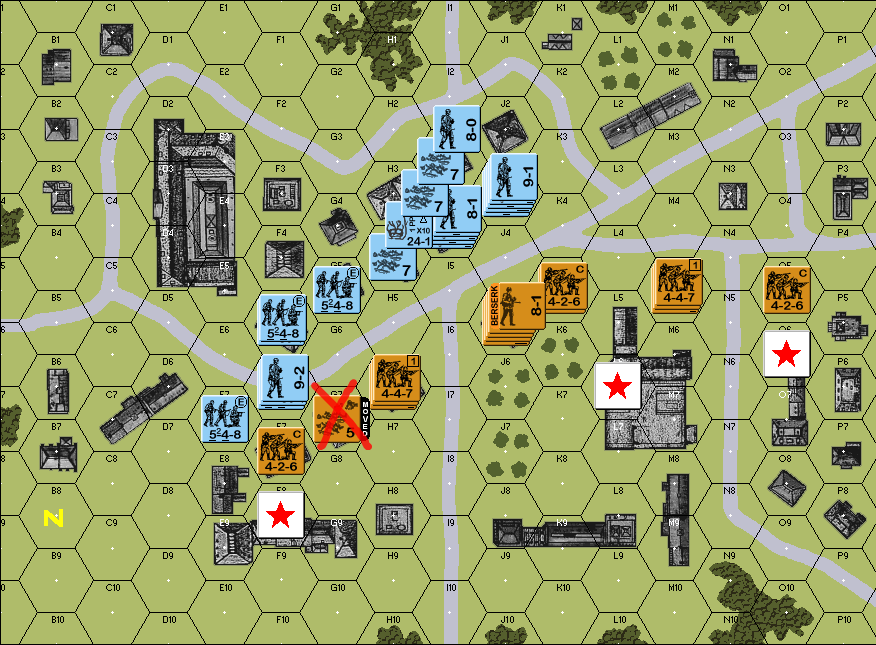 The DC that was planted in G7 explodes - the 30 FP attack rolls a 10, which breaks all 6-morale units or lower, but since the 426 there are conscripts with only 6 morale, then they not only break, but they also get eliminated for failure-to-rout: - hex G8 is within LOS of the 548 in F6 - hex H7 is within LOS of the 548 in G5 - F7 is not an eligible rout hex because it reduce range to a Known Enemy Unit, such as reducing the range to the 548 in E7 from 2 to 1 - H6 is not an eligible rout hex because it reduces range to a KEU, such as reducing the range to the stack in I4 from 4 to 3 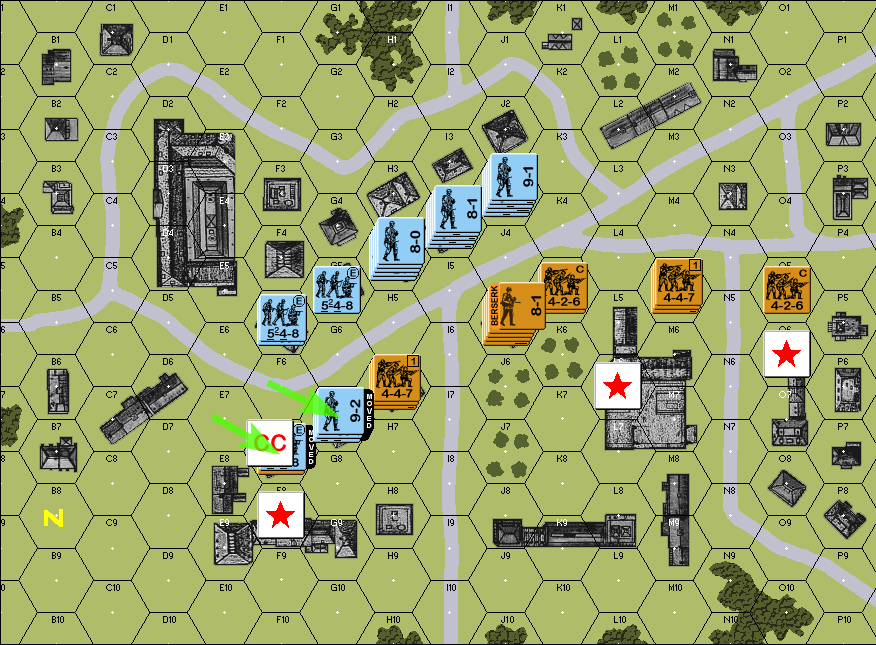 the 548 and the 9-2 leader advances to the new-empty hex in G7, while the 548 in E7 advances into Close Combat with the conscripts in F7 quote:CC in F7 The Soviets fight tenaciously despite their green status, and beat back the Germans. 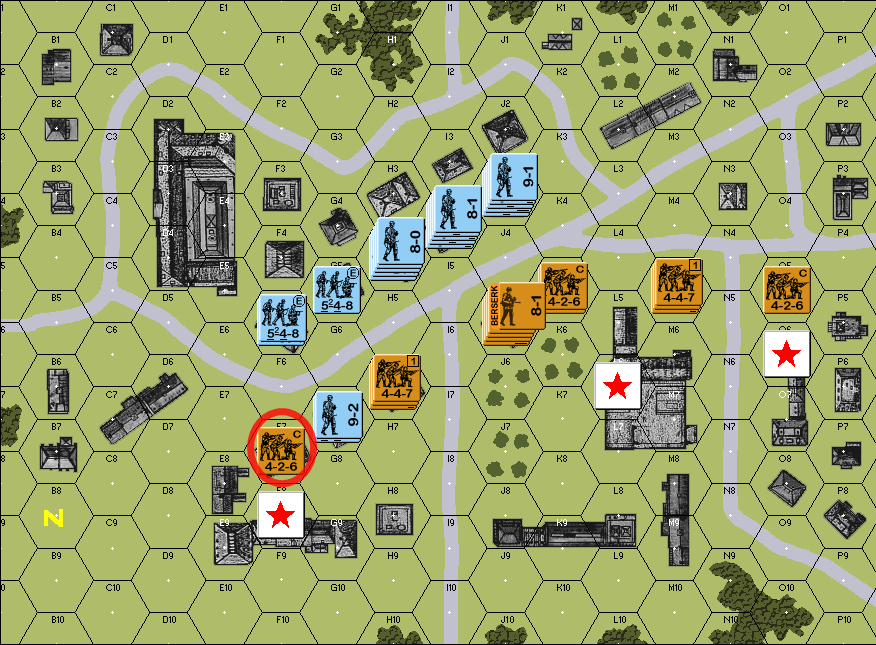 End of GER turn 1
|
|
#
¿
Mar 4, 2024 11:33
|
|
|
Jobbo_Fett posted:Curious as to why the 4-2-6 was eliminated for failure to rout. Or am I just forgetting something specific to ASLSK? it's Retro's routing rules if a unit is broken by fire, and it's in a non-open hex, or is adjacent to an enemy, it needs to rout [at the moment it was broken, as part of the fire attack's resolution] the broken unit needs to head for the closest non-open hex, within 4 MF they cannot enter hexes that would bring them closer to enemy units if they enter an open hex that is within line-of-sight and normal range of an enemy unit, they are eliminated I guess it's technically more accurate to say that the 426 would have entered G8 or H7, and then got eliminated that way
|
|
#
¿
Mar 4, 2024 13:00
|
|
|
SOV turn 1 Rally Phase nothing happens Movement Phase 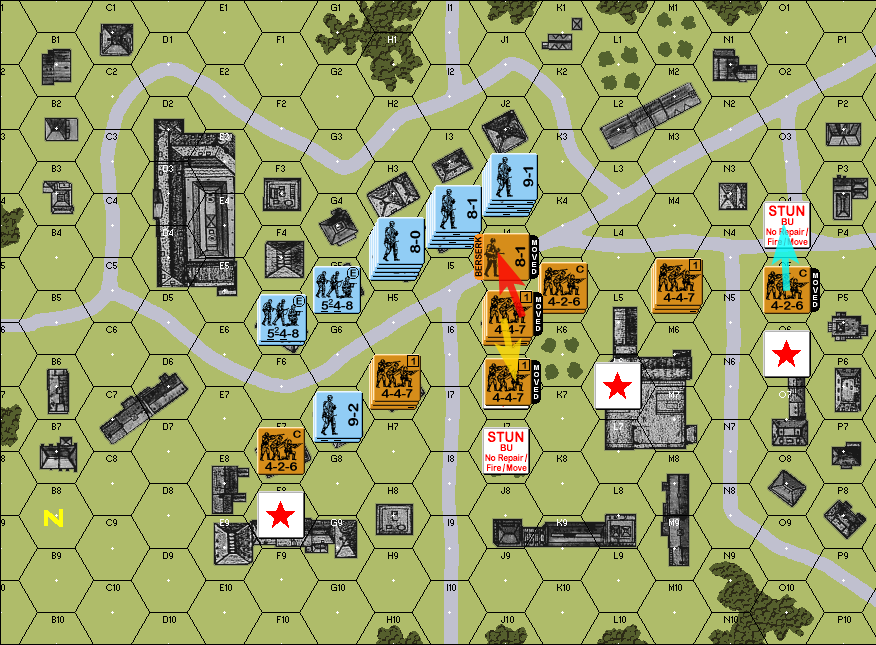 - red: the 8-1 leader, because they're Berserk, charges across the street. I still make them take a Hesitation check, but they pass to be clear, the Berserk status gained from the ELR check only applies to a single unit in the stack, chosen at random, so they weren't obliged to support the leader with all the rest of the troops as they did this. - yellow: the Soviets can sort of already see that the left-wing sweep might develop again, so they try to move squads south to block the I hex-row, but only get as far as one hex down before Hesitation holds them up. There's even another 447 in J5 that couldn't make it to J6 - teal: the Soviets also recognize the value of taking the house at the N3 intersection, so they try to move a squad there, but the conscripts are easily suppressed Fire Phase  lots of shots taken, but to no effect Defensive Fire Phase 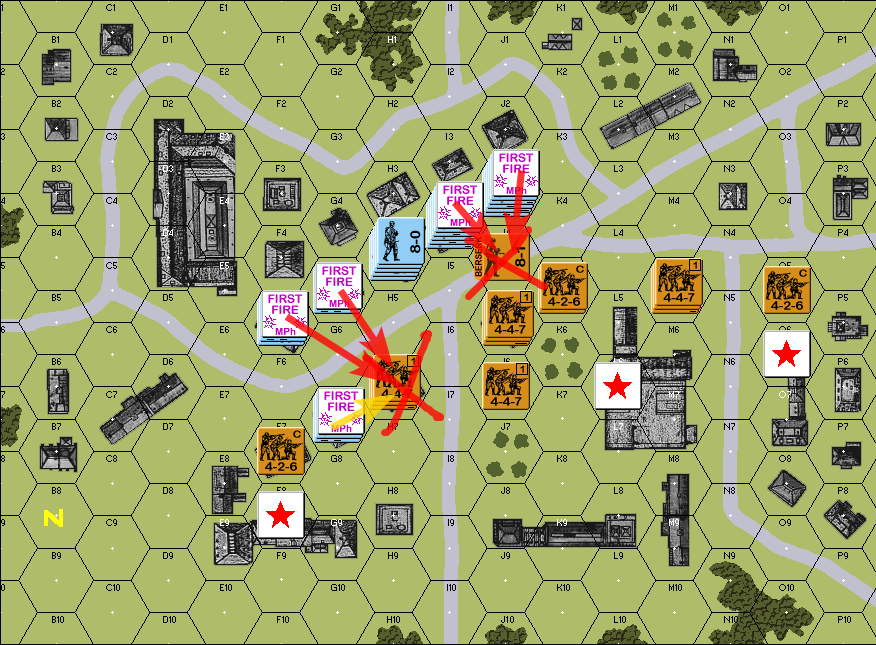 on the left, the stack in H6 breaks, then gets eliminated during the rout process (all hexes are either adjacent to enemy units, or are open hexes within LOS/range of Good Order enemies) and then the Berserking leader is just shot to pieces outright Close Combat Phase 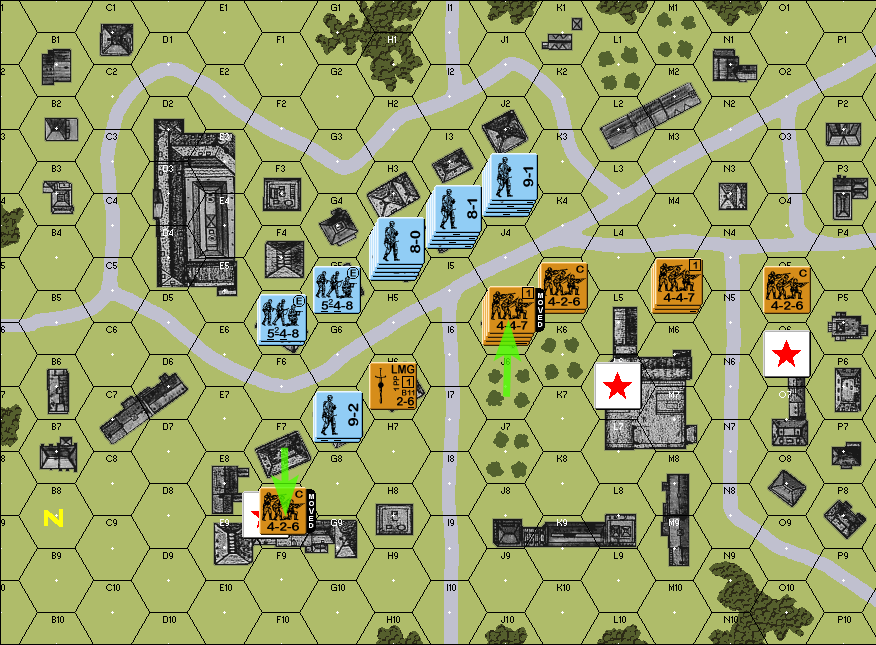 the conscripts on the left withdraw to defend the objective building directly and to break LOS with some of the rest of the Germans, while the 447 in the center thinks better of staying out in the orchards and hops back into a building End of SOV turn 1
|
|
#
¿
Mar 5, 2024 03:04
|
|
|
Jobbo_Fett posted:Is that a Retro rule thing to change the ELR happenings on a leader? ASL would see all the units with the Leader roll to see if they fail(?) the berserk check. I believe Commissars automatically force everyone to Berserk... yep 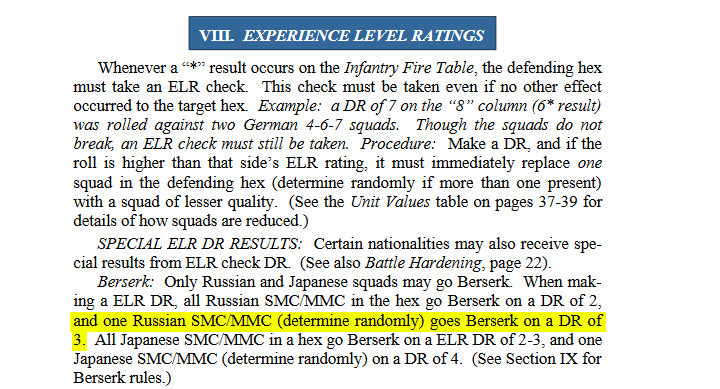 rolling a 3 is specifically what happened in this case, so only one unit went Berserk - I rolled a d4 and the result corresponded to the leader
|
|
#
¿
Mar 5, 2024 04:41
|
|
|
GER turn 2 Rally Phase 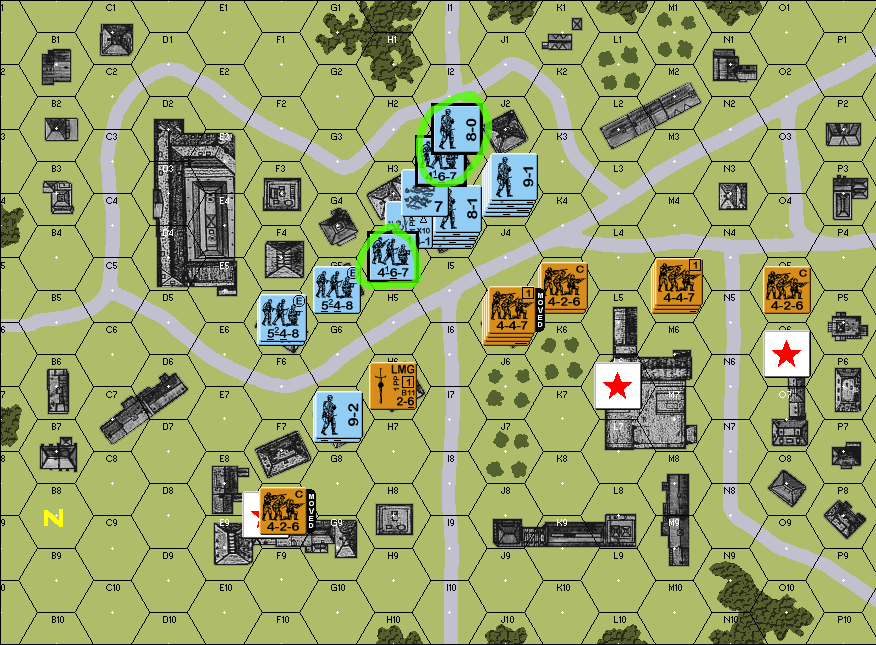 out of the wholly-broken stack in H4, the leader, and two out of the three squads successfully rally. Movement Phase 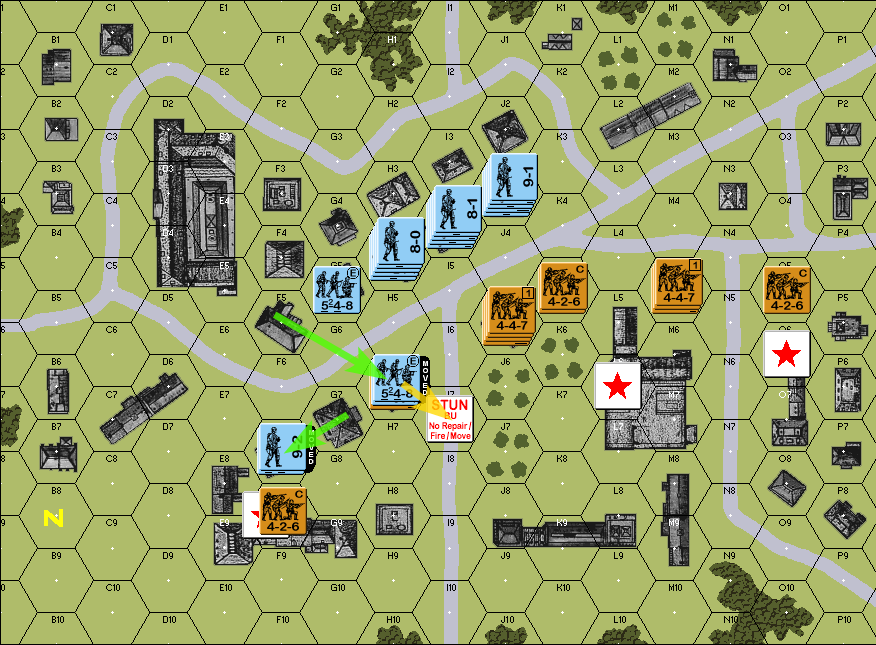 The 548 and 9-2 stack in the south moves towards the objective building, passing its Hesitation check easily another 548 from F5 dashes across the street, and tries to go for broke, but halts at the second crossing. quote:There is one more additional optional Hesitation rule, which is that a natural 6 is always a failed Hesitation check, in order to prevent "free movement" (my phrasing) in cases where Elite squads and/or leaders make it impossible to fail Hesitation checks. That would have applied to the move to H6, where the 548 rolled a natural 6, but then the -1 DRM for being Elite modified the roll to 5 and let it pass. I did not implement that rule in this play-through, but it's something to consider. In the event, the 548 did fail to get to I7 anyway.  the other 548 tries to dash across the street as well, but Hesitates at the first step quote:In this case, the Hesitation TN was 3, for an open hex within less-than-half range of an MG - the MMG in J5. The 548 rolled a 5, modified to a 4 for being Elite, which was still too high. Fire Phase 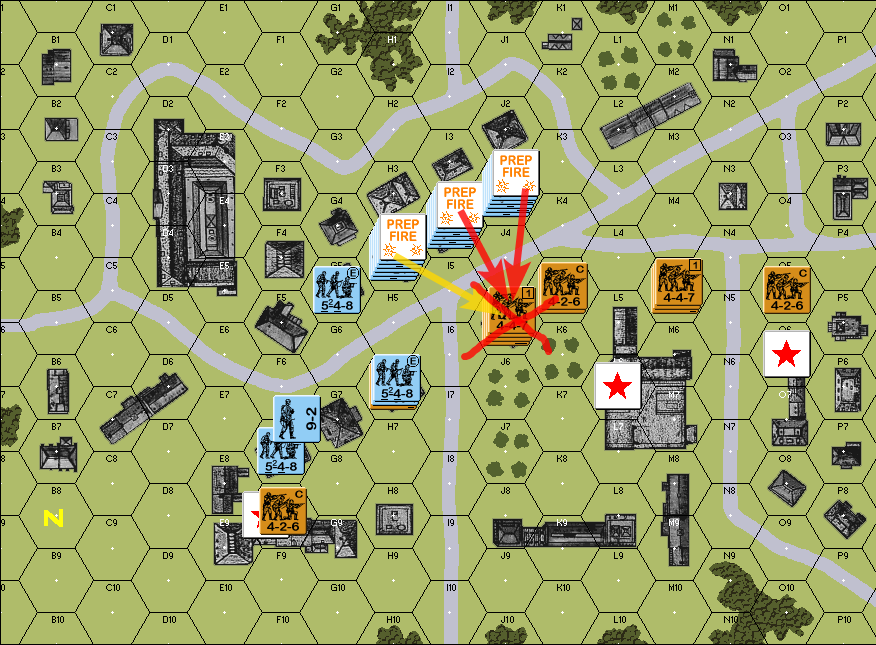 The flamethrower in H4 misses, but the 30 FP fire group across I4 and J3 rolls snake-eyes, and since it's leader-directed fire, there's no cowering. All three Soviet 447s are eliminated. Defensive Fire Phase 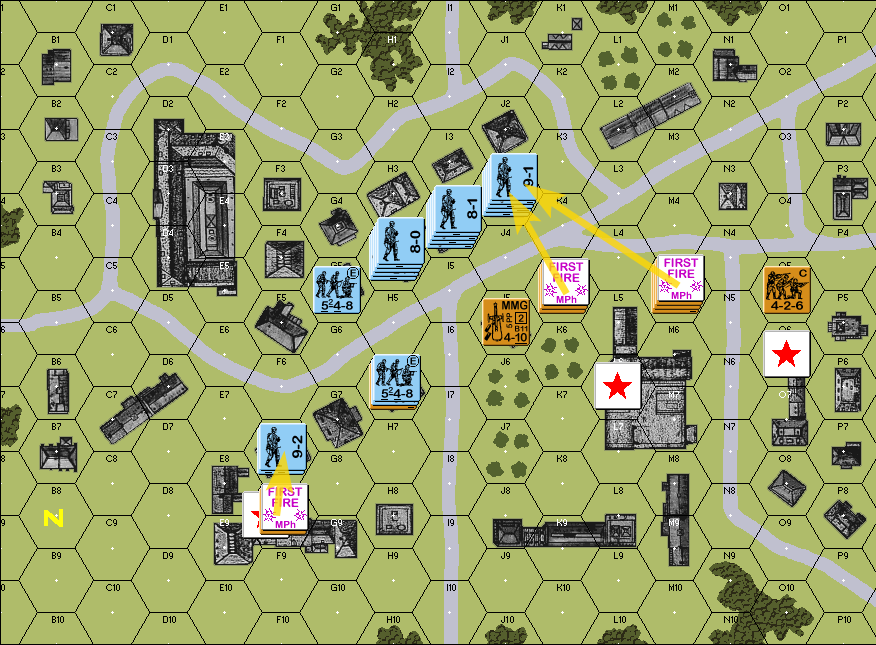 The defenders open up, but to no effect. Close Combat Phase  The 9-2 stack advances to the southern objective, and during the close combat they roll low enough to win without even needing the leader DRM. End of GER turn 2 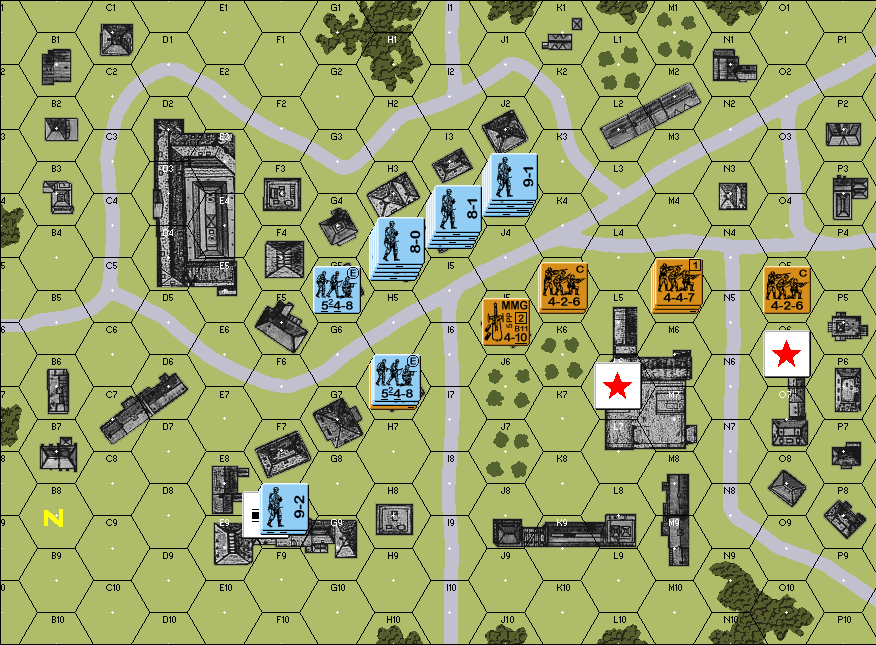
|
|
#
¿
Mar 6, 2024 04:11
|
|
|
SOV turn 2 Rally Phase The Soviets roll for reinforcements, but fail (5 on a target of < 2) Movement Phase 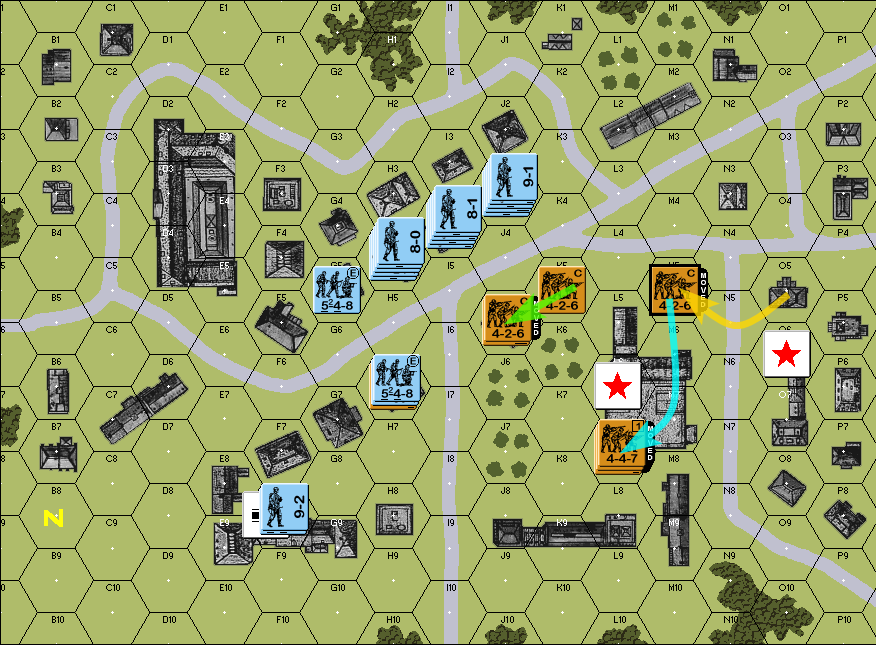 - green: one of the conscript squads in K5 jumps to the other building to man the MMG again - teal: the 447 with the LMG and its 8-0 leader moves to L7. The idea here being that the LMG is now covering the left-hand approach to the middle building - yellow: the 426 in O5 passes its Hesitation check this time, but uses it to man the position that the LMG just left Fire Phase no fire taken quote:The 426 in K5, if it had tried to shoot anything, would not accomplish anything: if they roll snake eyes, that's a final DR of 5, but also counts as a cower, and a 5 on an FP 2 attack is no-effect. If they roll a natural 3, for a final DR of 6, a 6 on an FP 4 attack is also no-effect. Defensive Fire Phase 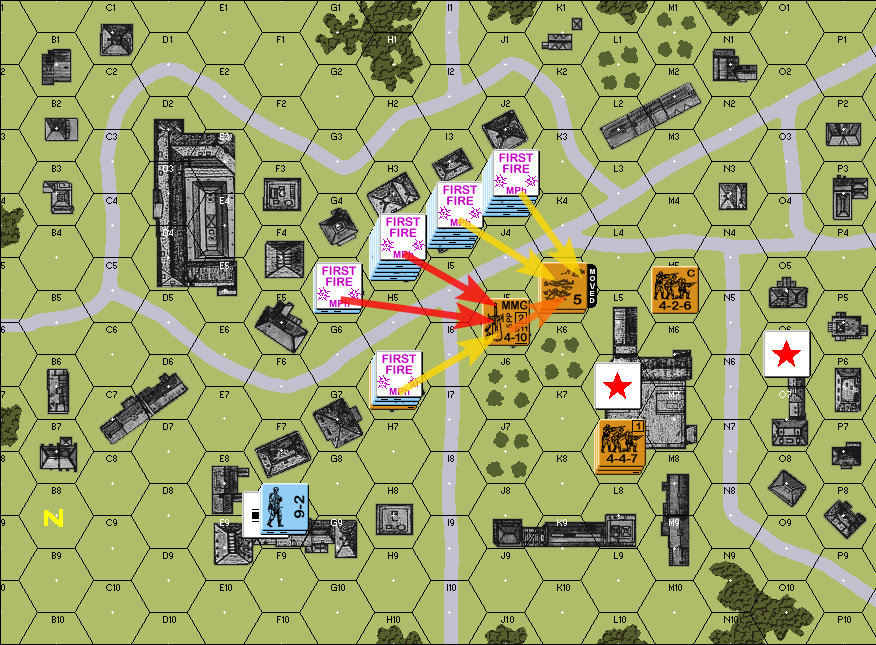 the Soviets get a storm of steel coming down on them, and their men are forced to abandon the MMG once again quote:the 30 FP fire group across I4 and J3 rolled a final DR of 12 to no effect, but the 9 FP fire group across G5 and H4 rolled snake-eyes: that comes out to a 5 + cower after the DRM, but even a 5 on the 4 FP column was enough to break 6-morale squads. The perils of working with conscripts. Close Combat Phase  the remaining Good Order 426 uses the advance to move back into J5 anyway quote:As I understand the ASL rules, an MMC has an Inherent Portage Capacity of 3 PP. The Soviet MMG has a PP cost of 5 printed on it, so that means the just-broken squad could not have brought it with them when they routed, and it gets dropped on the ground, which is why I then needed to send the other Good Order 426 into the same hex to "recover" the MMG. End of SOV turn 2
|
|
#
¿
Mar 7, 2024 02:19
|
|
|
GER turn 3 Rally Phase  the remaining 467 that missed its rally last turn, gets it Movement Phase  the 9-2 stack that just captured the southern building dashes to the orchards near the middle objective, passing three Hesitation checks in the process. meanwhile three squads make attempts to get adjacent to the Soviet MMG team, but are suppressed (i.e. they keep failing their TN 2 Hesitation checks) Fire Phase  the flamethrower in H4 runs out of fuel and has to be discarded, but the I4 / J3 fire group rolls well and gets to break their second conscript squad in as many turns quote:I'm still not really sure I'm doing routing correctly Defensive Fire Phase  the LMG team in the middle building takes shots at the incoming Germans, but to no effect Close Combat Phase 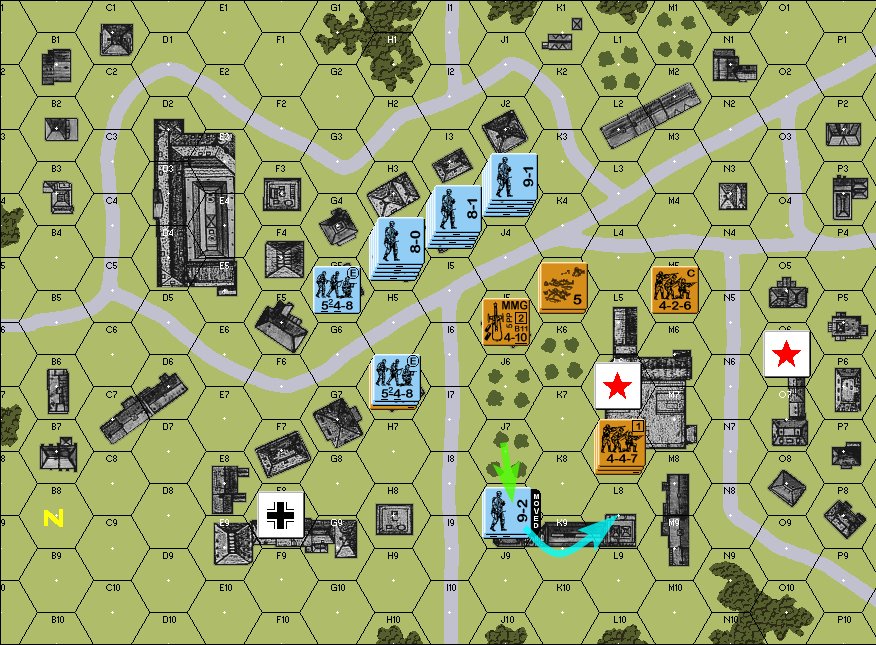 finally, that same stack moves one hex to enter a building at K8 quote:reminder that in Retro, the one-hex advance cannot be used to move into an open hex, such as K8, unless it will result in a close combat, so you cannot use the Close Combat phase to circumvent an open-hex Hesitation check that you cannot seem to pass End of GER turn 3
|
|
#
¿
Mar 8, 2024 02:49
|
|
|
SOV turn 3 The Soviets roll for reinforcements, and fail again (5 on a target of < 3) Rally Phase the two broken squads in K5 are not in reach of a leader, and so cannot rally. Movement Phase  the two remaining Soviet squads withdraw to the last objective quote:The thinking here is - the German 9-2 stack with the 548 is in J8, and they can move to K9 then L8, then advance into L7 for close combat. Because K9 and L8 are both stone buildings, the stack is going to pass the Hesitation checks. The worst-case is a TN of 5, and with a -2 DRM from the leader and a -1 from being elite, even a roll of a natural 6 is going to be a 3. Fire Phase all units moved, no fire Defensive Fire Phase while O7 is in LOS of J3 and J8, the range is beyond 3 hexes, so no defensive fire is triggered. Close Combat Phase no advances, no combats End of SOV turn 3
|
|
#
¿
Mar 9, 2024 04:41
|
|
|
GER turn 4 Rally phase nothing to Rally Movement Phase 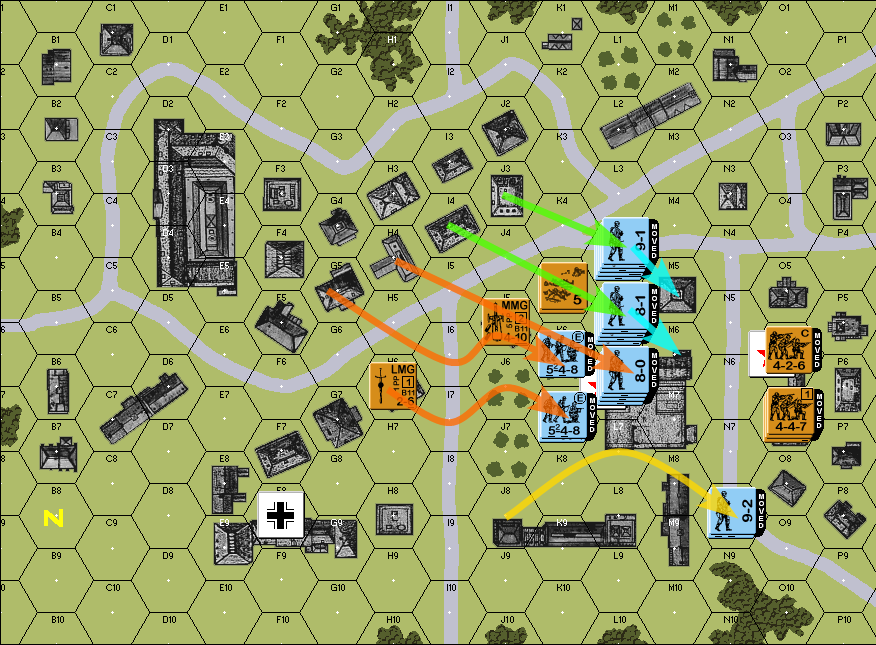 - green: the two big MG stacks move across the street and into the L hex-row, setting themselves up to move to M5/M6 during the Close Combat phase without triggering Hesitation checks (teal) - yellow: the stack of the 548 and 9-2 moves aggressively towards the last objective. They're risking fire, but they want to get a "beachhead" onto the final block of buildings before the Soviets block it with hard-to-pass adjacency Hesitation - orange: and the rest of the German squads move up as well Fire Phase all units moved, no fire Defensive Fire Phase 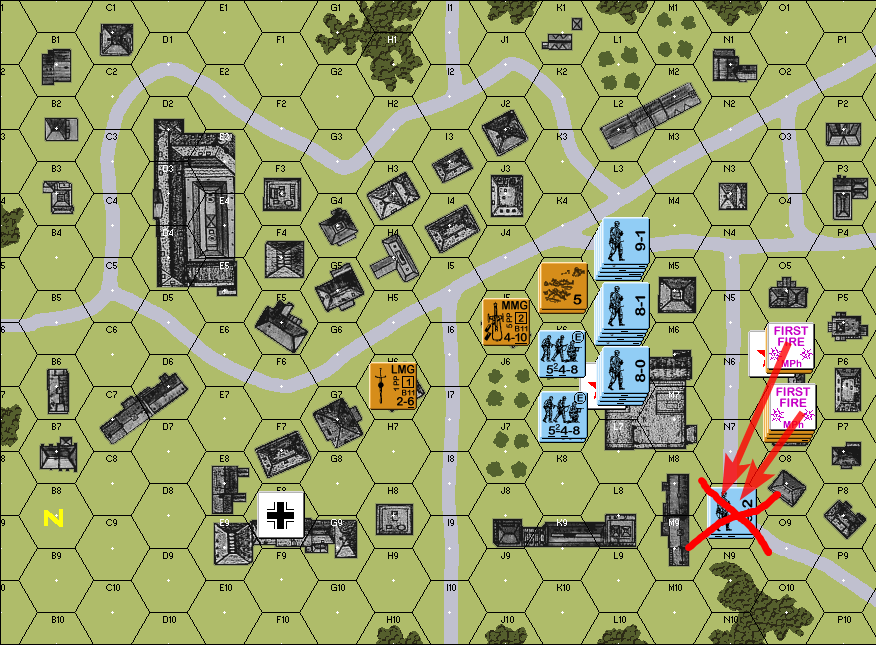 the two Soviet squads form a fire group and shoot at the Germans on the street. They roll snake eyes and eliminate them outright. Even cowering wouldn't have mattered because a 2 on the 6 FP column (instead of the 8 FP column) still results in a KIA. If the Soviets rolled as much as a 6, the Landsers could have gotten away with it, but this time the conscripts were on-target. Close Combat Phase 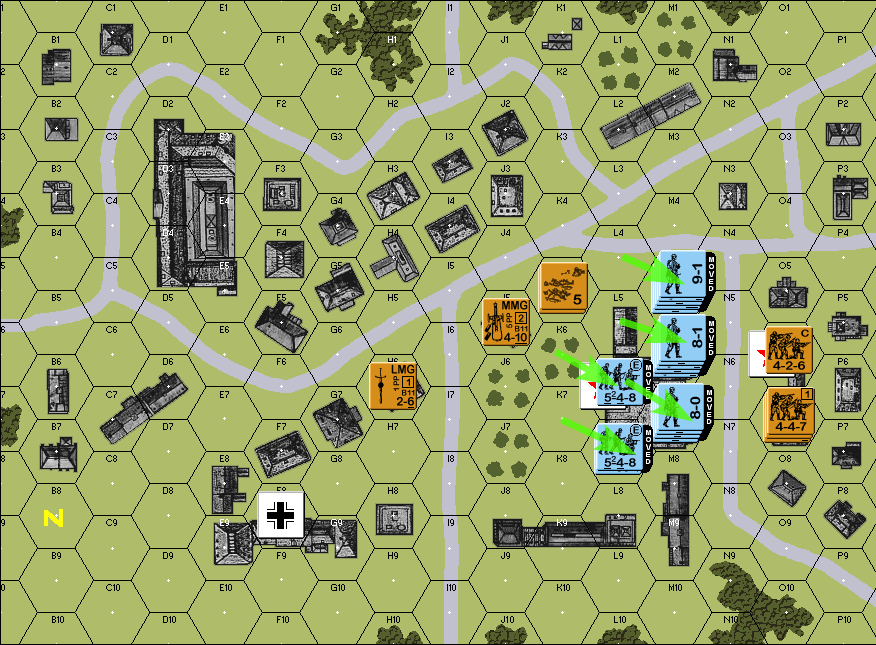 as planned, the rest of the German forces use the CC phase's one-hex movement to advance further. quote:I realize at this point that the two broken Soviet squads in K5 are still there, and the Germans just passed through them. I think that might have triggered another rout, but in any case there's no way the Soviets are getting to them anytime soon, and they might well have been eliminated due to failure-to-rout, so it's mostly inconsequential for now. End of GER turn 4
|
|
#
¿
Mar 11, 2024 03:17
|
|
|
SOV turn 4 The Soviets roll for reinforcements, and succeed (2 on a target of < 4) The reinforcements will arrive this turn Rally Phase nothing to rally Movement Phase 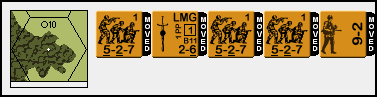 the reinforcements appear in hex O10 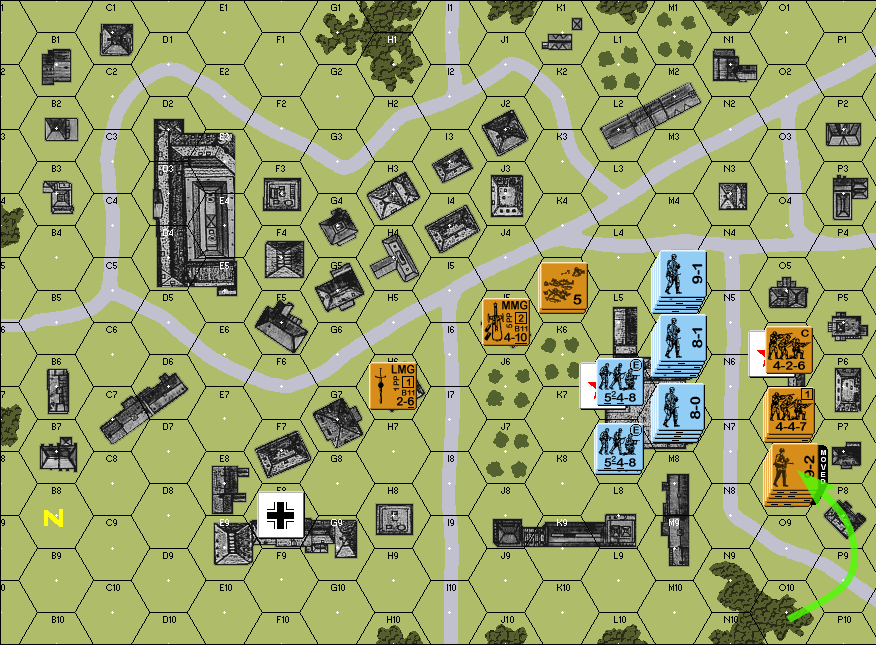 moving together as a stack, they cross the street and enter the city block where the remaining Soviet forces are holding on, passing three Hesitation checks as they do so Fire Phase 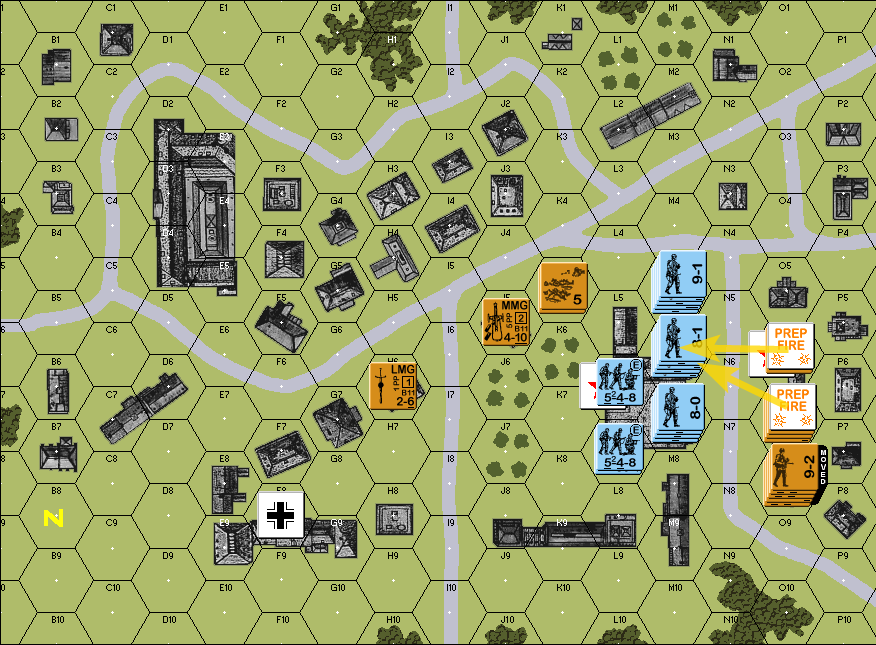 the remaining squads take their shots at the Germans, but to no effect Defensive Fire Phase 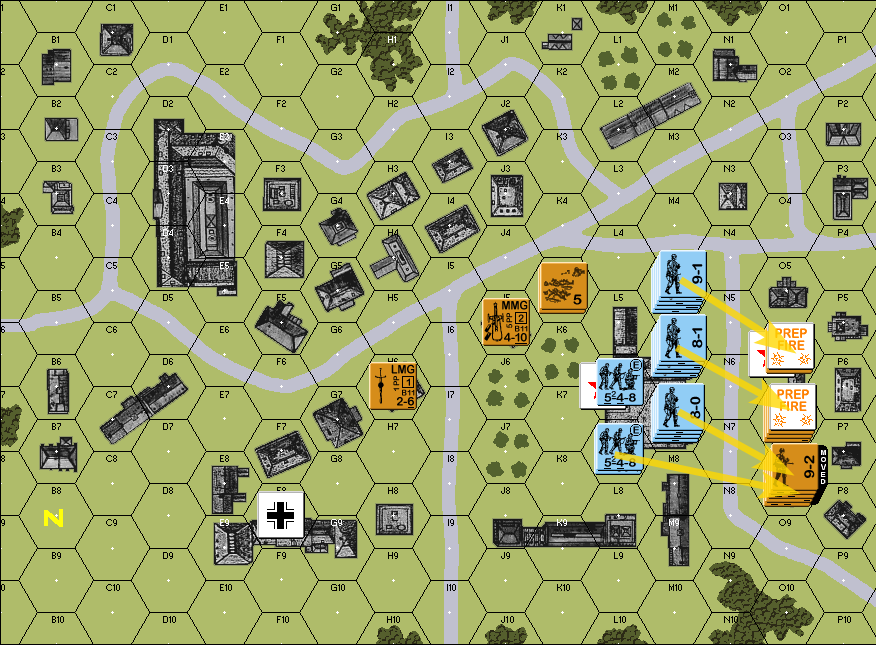 The Germans return fire, but nothing is achieved here, either. quote:In this case, the German stacks did not form fire groups, because per the rules of target selection, they were all supposed to shoot at different targets: Close Combat Phase 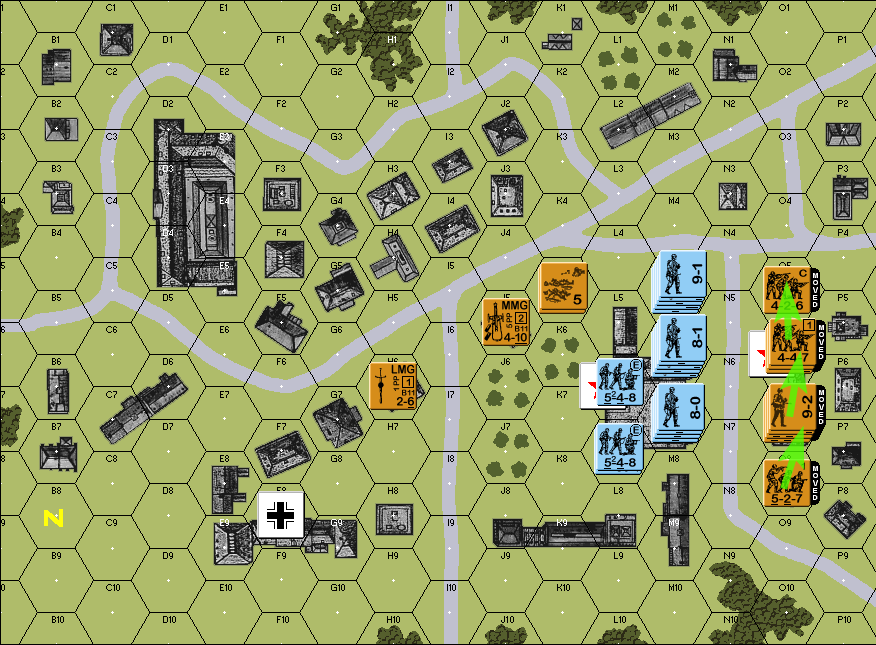 The Soviets use the Close Combat advance to rearrange their defensive positions from top to bottom, we've got: O5 - a single 426 O6 - a 447 with an LMG, and an 8-0 leader O7 - two 527s, one with an LMG, and a 9-2 leader O8 - a single 527 quote:by deploying this way, all of the street hexes along hex-row N4 to N8, plus O4 and O9, are going to require TN 2 Hesitation checks, and the Germans might not have enough time within their two remaining turns to take it slowly (which is why they tried to rush across with the 9-2 stack last turn in the first place) End of SOV turn 4
|
|
#
¿
Mar 12, 2024 02:09
|
|
|
GER turn 5 Rally phase nothing happens Movement Phase quote:Let's consider our options. Moving adjacent to an enemy unit on an open hex will cause a Hesitation check of TN 2, which means only a result of 1 (or less) will pass. 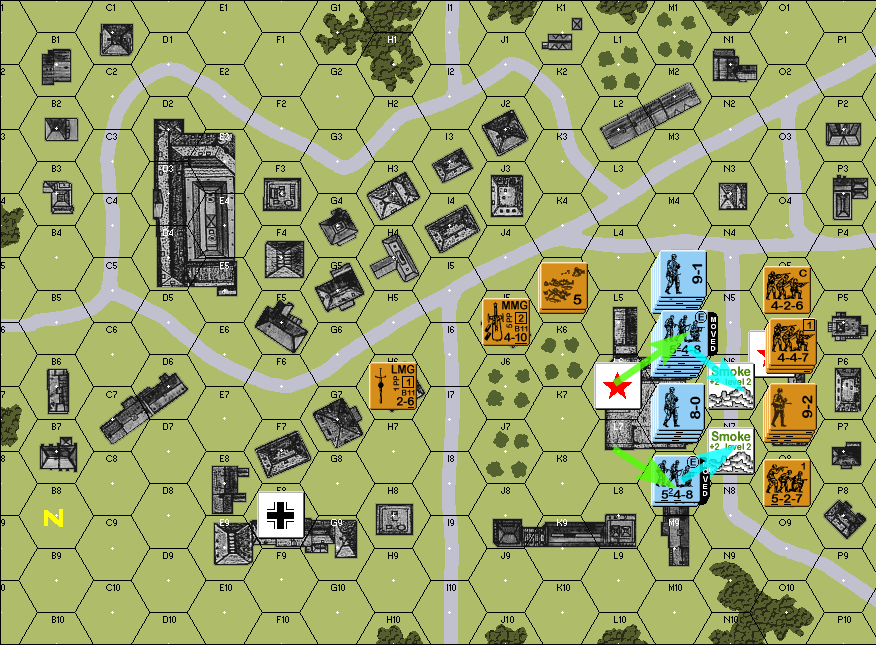 first, the 548s move up, and both them successfully place smoke on the streets (for clarity, there were already three squads stacked in M7, so the 548 in L7 had to move to M8 instead) 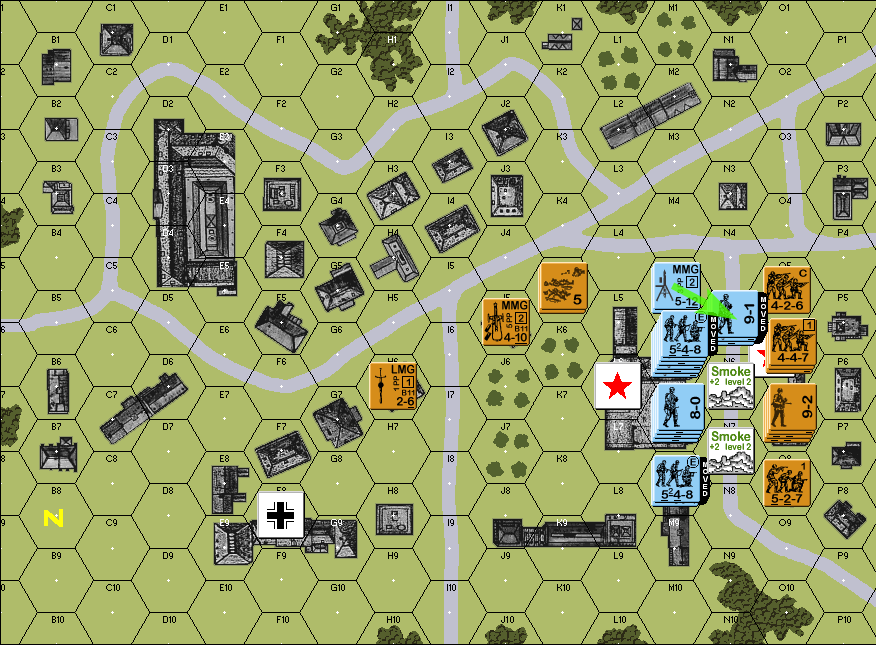 then, a 467 with an LMG, and a 9-1 leader, passes the Hesitation Check to make it to N5... 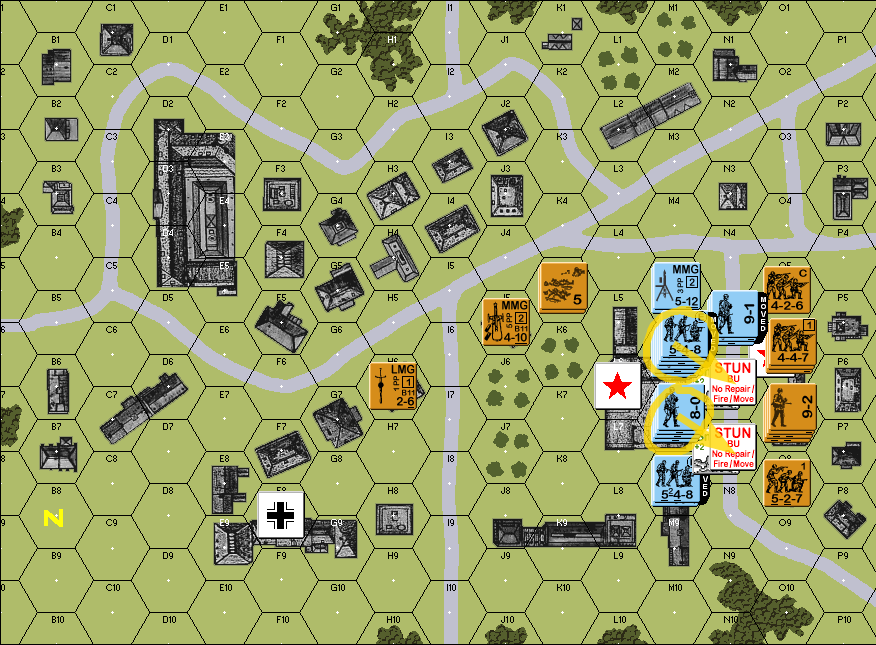 ... but nobody else does. Two 467s and an 8-1 in M6 roll a 2, and three 467s in M7 roll a 3, and halt from Hesitation. Fire Phase 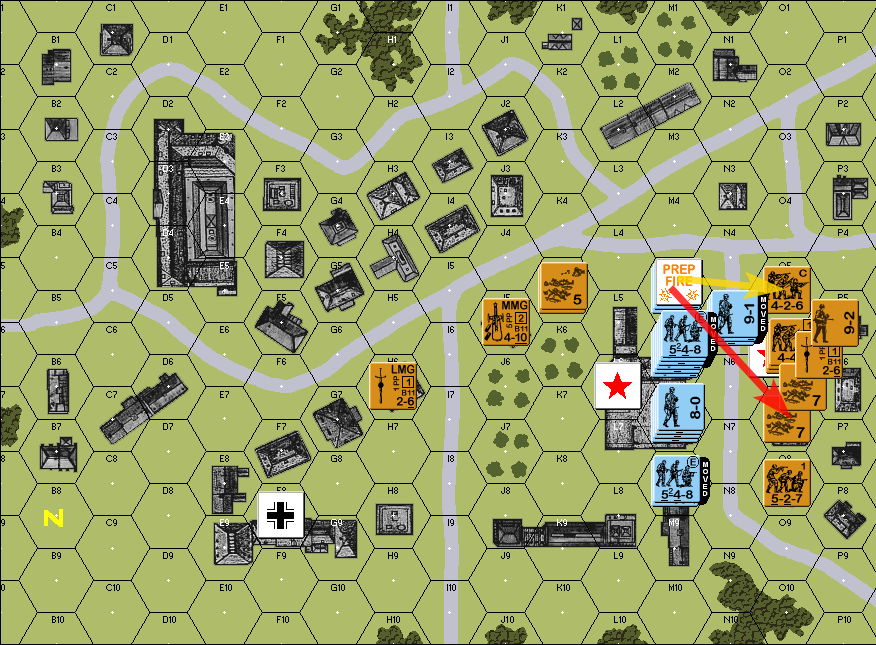 The MMG in M5 shoots at the stack in O7, and roll well enough to break the two 7-morale squads, but not the 9-2 leader. The MMG rolls ROF twice and takes shots at O6, but doesn't get anything done on subsequent shots. Defensive Fire Phase 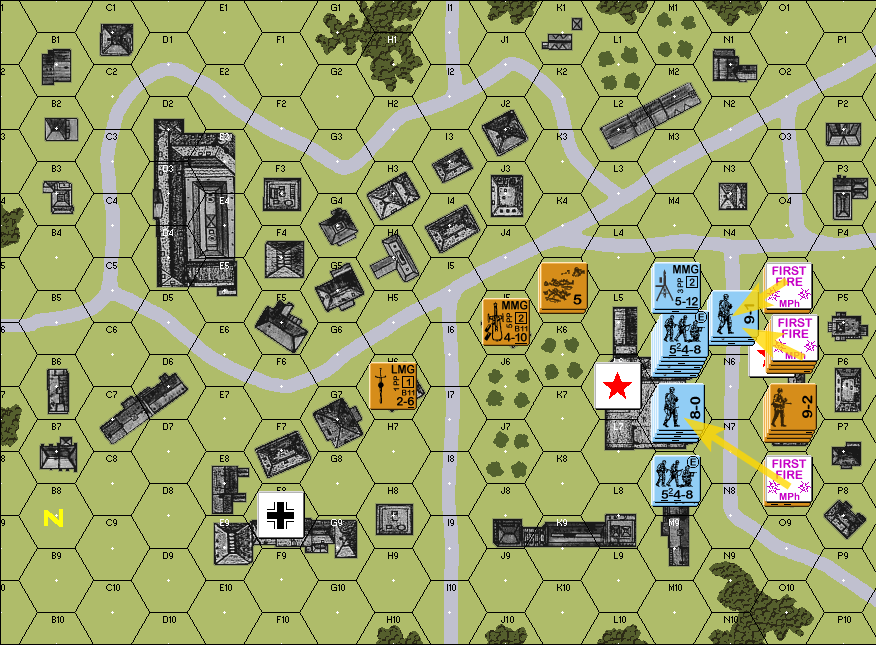 The Soviets take their shots, but the best they can manage is forcing an ELR check on the 9-1 stack, and they pass it handily. Close Combat Phase 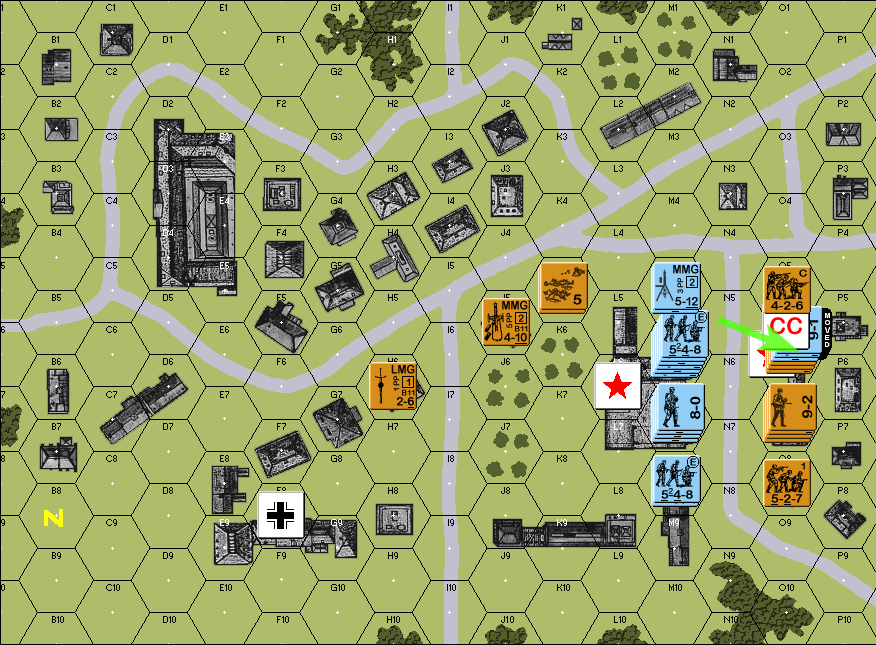  The Germans that made it onto the street close in on O6, but the melee is inconclusive at this time. End of GER turn 5
|
|
#
¿
Mar 13, 2024 02:00
|
|
|
SOV turn 5 Rally Phase 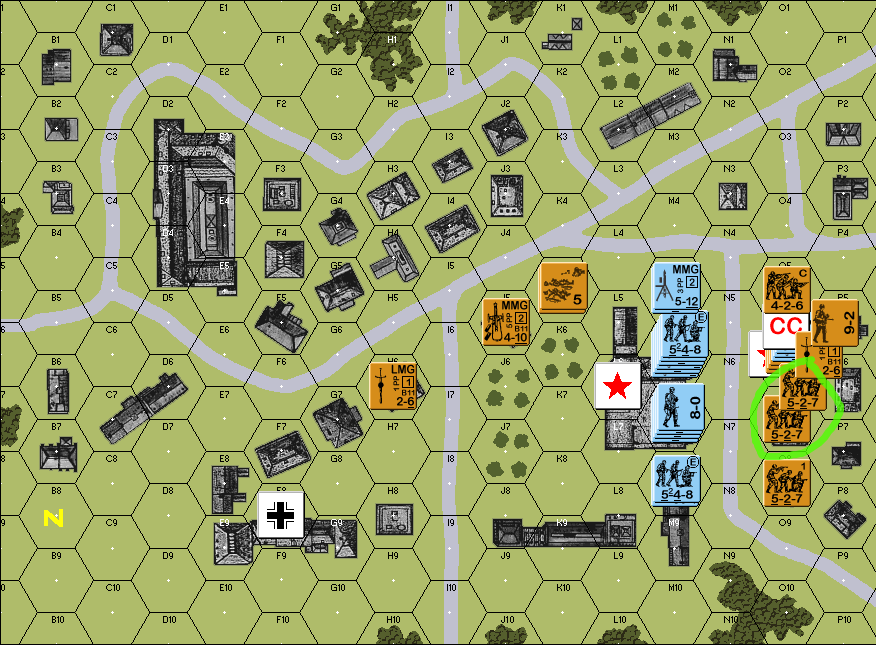 the two 527s broken by German fire last turn are rallied Movement Phase quote:Now we are going to (try to) do a little thing called skulking: during the movement phase, move one hex back, to break LOS with the enemy, so that they cannot shoot you during the Defensive Fire phase, and then use the one-hex movement during the Close Combat Phase (or the Advance Phase in regular ASL) to move back to your original position before the end of your turn. 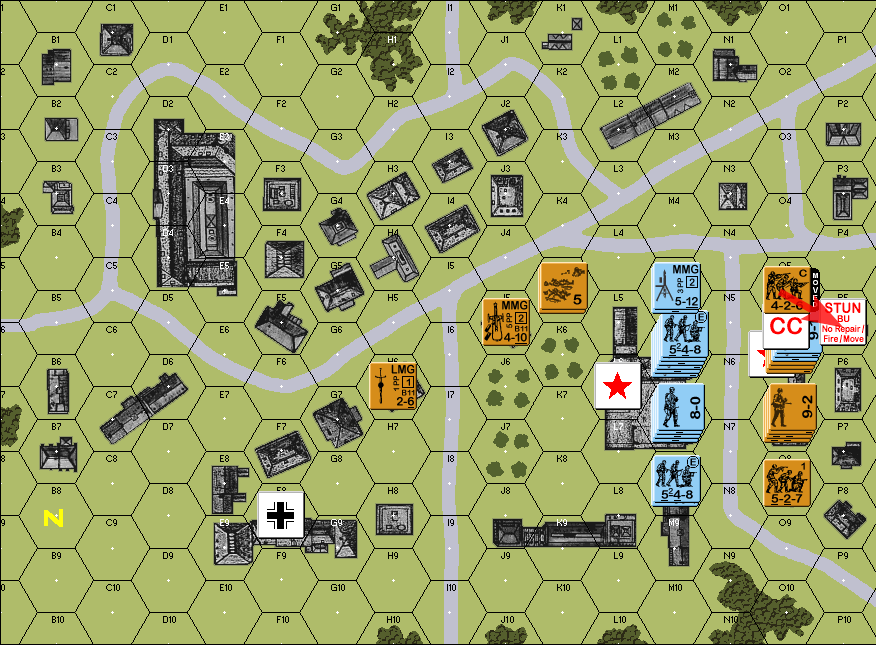 quote:426 in O5 attempts to move to P5  quote:CC in O6 the GER 467 and the 9-1 leader are eliminated End of SOV turn 5 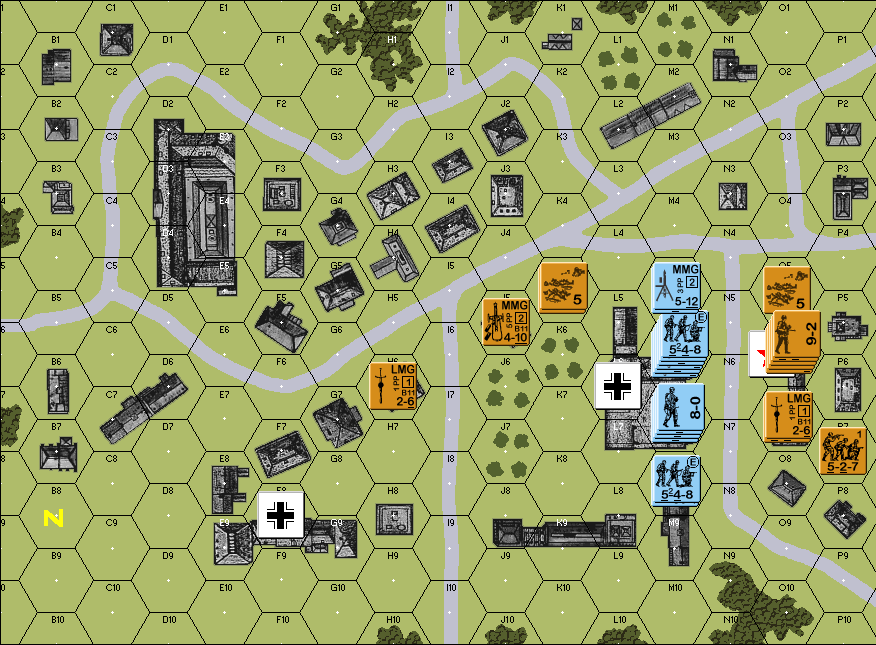
|
|
#
¿
Mar 15, 2024 03:06
|
|
|
GER turn 6 Time to go for broke. This is the last turn. Rally Phase nothing happens Movement Phase 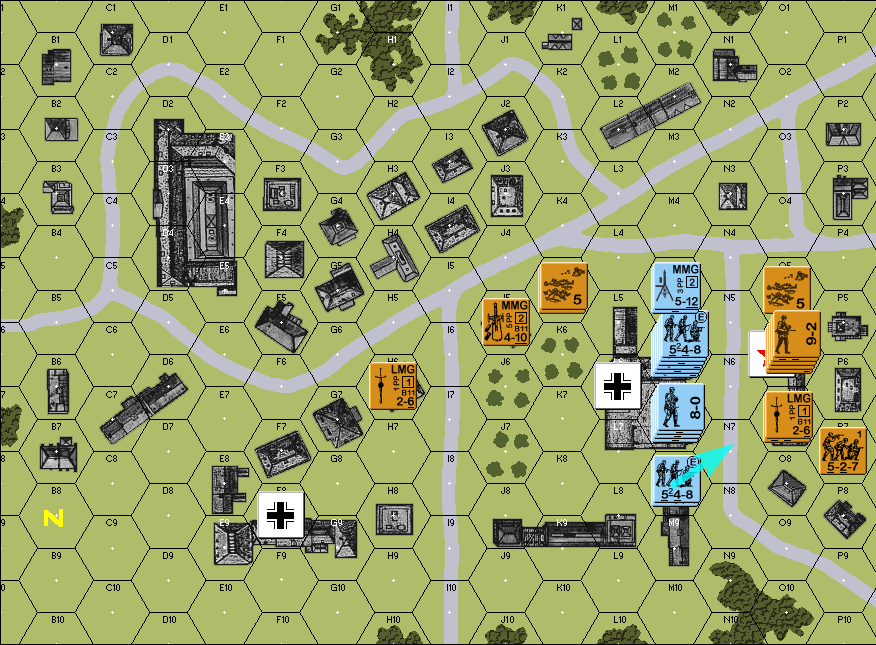 first, the 548 in M8 tries to place smoke on the street. They roll a 5, which fails. 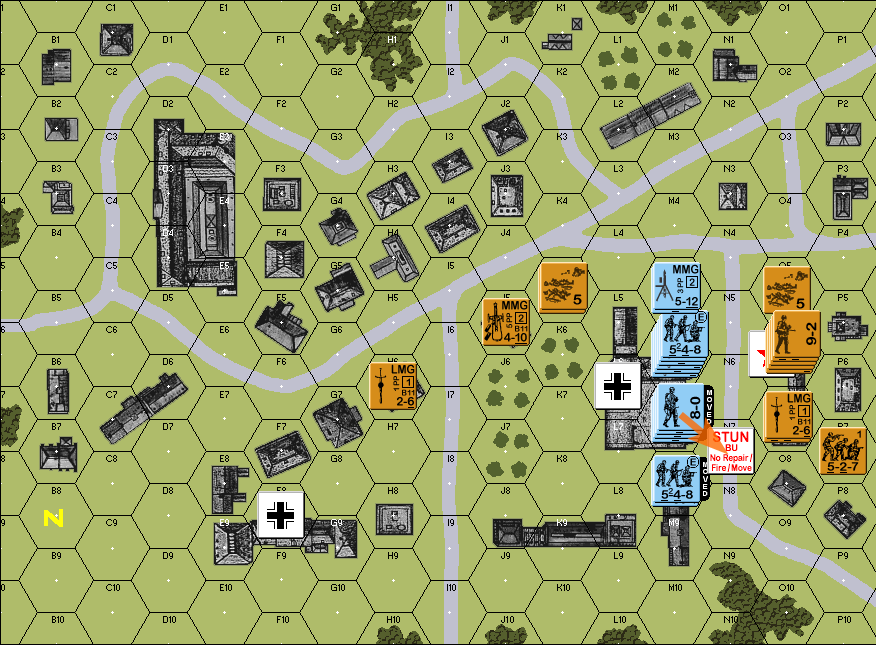 then, the whole stack in M7 attempts to move to N7. They roll a 3 on the Hesitation Check, which fails.  the other 548, in M6, actually does succeed in placing smoke in N6 ...  ... but when the stack actually tries to move into the hex, they roll a natural 5 on the Hesitation Check. This gets reduced to 3 after the leader direction and the smoke, but that's still not enough to pass the target number of 2 for moving adjacent to an enemy on an open hex. At this point, the scenario is effectively over - with a victory for the Soviets. Even if the 467 in M5 with the MMG manages to pass the Hesitation check to move to N5, and survives the Defensive Fire phase, and closes-in to Close Combat in O6, and wins the combat... that only seizes one hex of the objective building, and the Soviets would still have control of O7. This was a much closer fight than the last two scenarios we've played through, with a far less obvious outcome and a less obvious approach. The Germans could have waited one turn longer: hold the 9-2 leader back, consolidate the 548s, use turn 5 to shoot them off their positions, and surge strong in turn 6. Up next: we're going back to Vierville, using these tougher Hesitation rules again, to see how that shakes out.
|
|
#
¿
Mar 18, 2024 09:27
|
|
|
Retaking Vierville, Round 2 as promised, we're taking another shot at this scenario, but using the tougher Hesitation rules, and adding one more: a natural 6 on the Hesitation Check is always a Halt, regardless of modifiers. I did not use such a rule in the previous scenario, but will do so here.  The initial set-up. The Americans changed things up a bit compared to the first time we played this. As before, the win condition is for all four marked objective hexes to be free of Good Order German units by the end of the game. GER turn 1 Rally Phase nothing happens Movement Phase a German platoon enters from the top of the map... 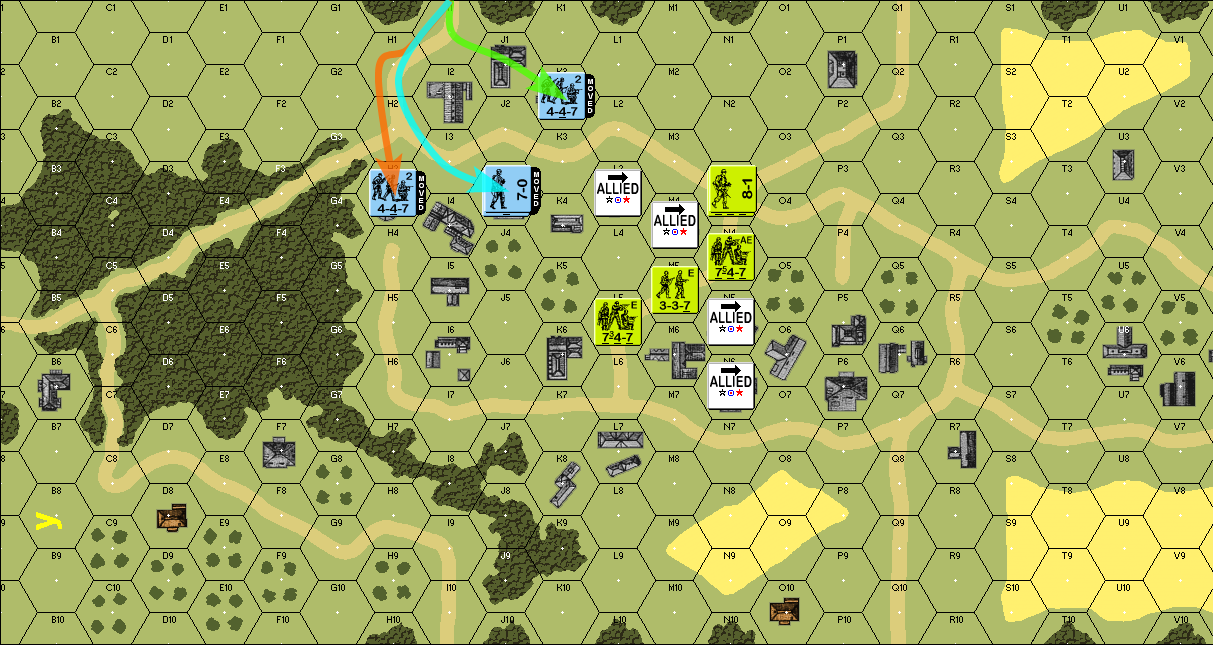 - green: a single 447 moves to the building at J1, passing a Hesitation Check as it does so - orange: another 447 moves to H3, staying out of line-of-sight the whole time - teal: a third 447, with a 7-0 leader, dashes to J3, handily passing another HC and then a second platoon enters from the bottom of the map... 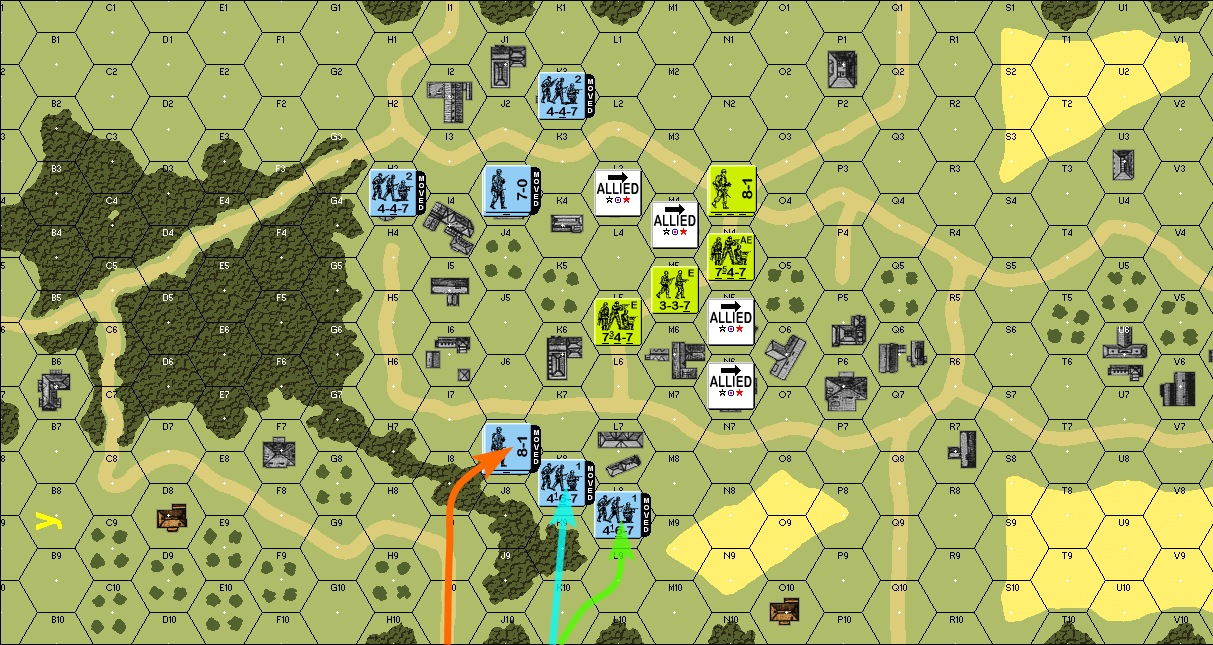 - green: a single 467 enters at K10, and moves just outside of the building at L7, stopping at L8 quote:Note: the follow-up is going to be an advance into L7 during the Close Combat phase. I bring this up because all of the other moves done this phase could have been done the same way, in order to avoid needing to pass Hesitation checks. - teal: another 467 also enters at K10, moves through the woods, and enters the building at K8, passing an HC to do so - orange: a third 467, with an 8-1 leader, enters at I10, and moves to the edge of the treeline at J7, also passing an HC Fire Phase all units moved, no fire Defensive Fire Phase 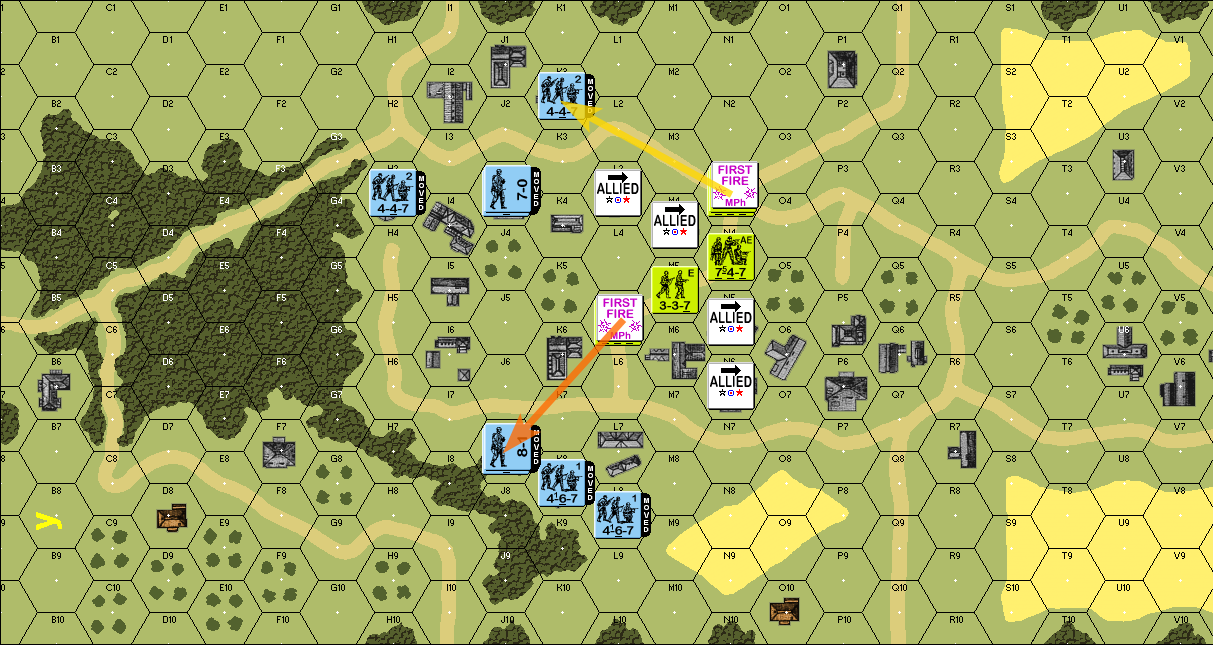 The Americans fire the first shots of the scenario. The attack against K2 has no effect; and while the Germans in the woods at J7 do take an ELR check, they pass it, so the GIs get no results. Close Combat Phase 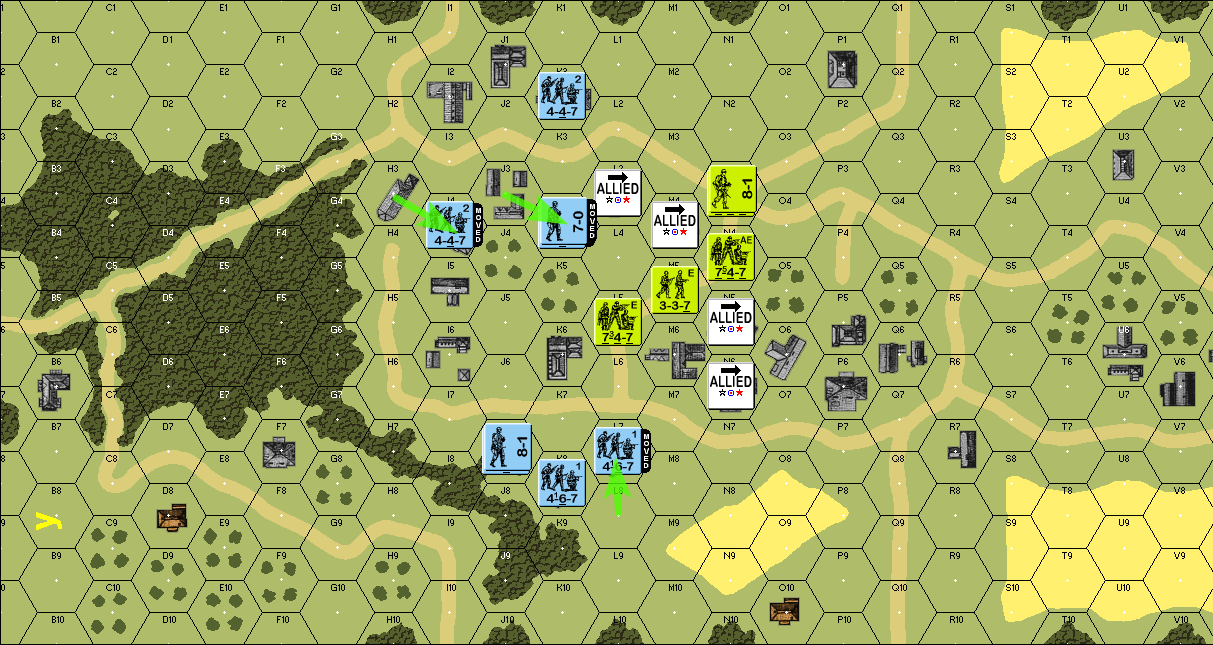 the Germans use the CC phase to make their one hex movements, creeping closer to their objectives. End of GER turn 1
|
|
#
¿
Mar 19, 2024 13:26
|
|
|
USA turn 1 Rally Phase nothing happens Movement Phase 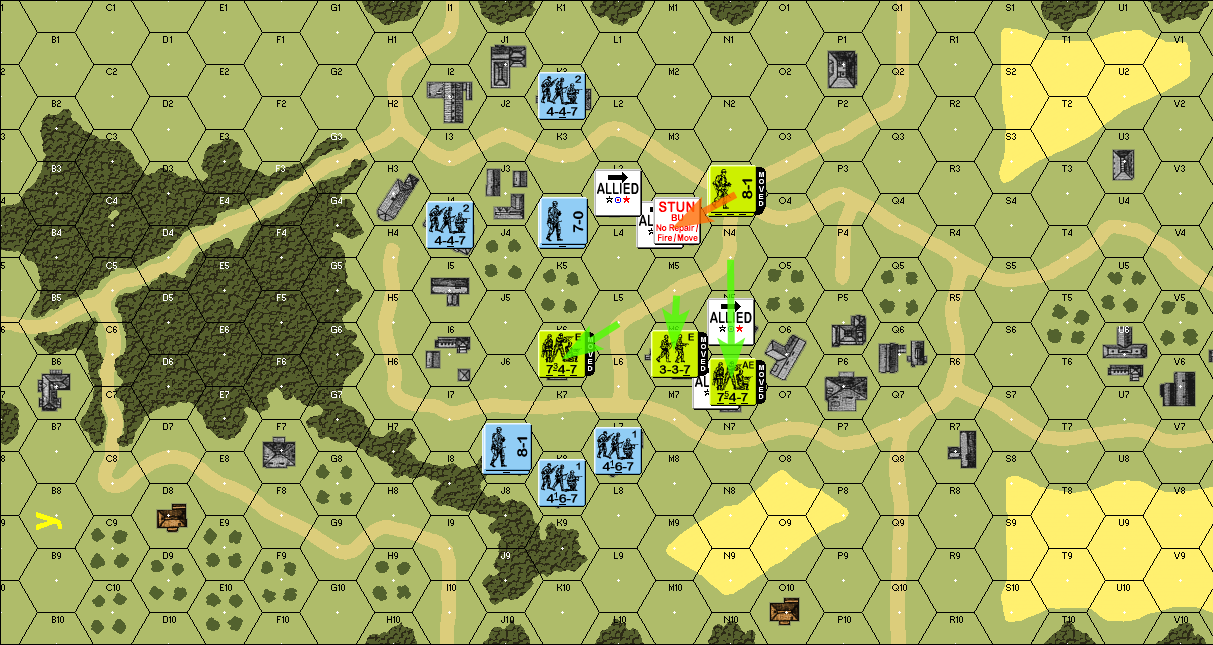 The paratroopers fan out, with an emphasis on securing good spots for the bottom-facing set of objectives. Our new rule does come into play this early, with the 747 and the 8-1 leader Halting right out in the open after rolling a natural 6 on what should have been a Hesitation Check that was impossible to fail otherwise. 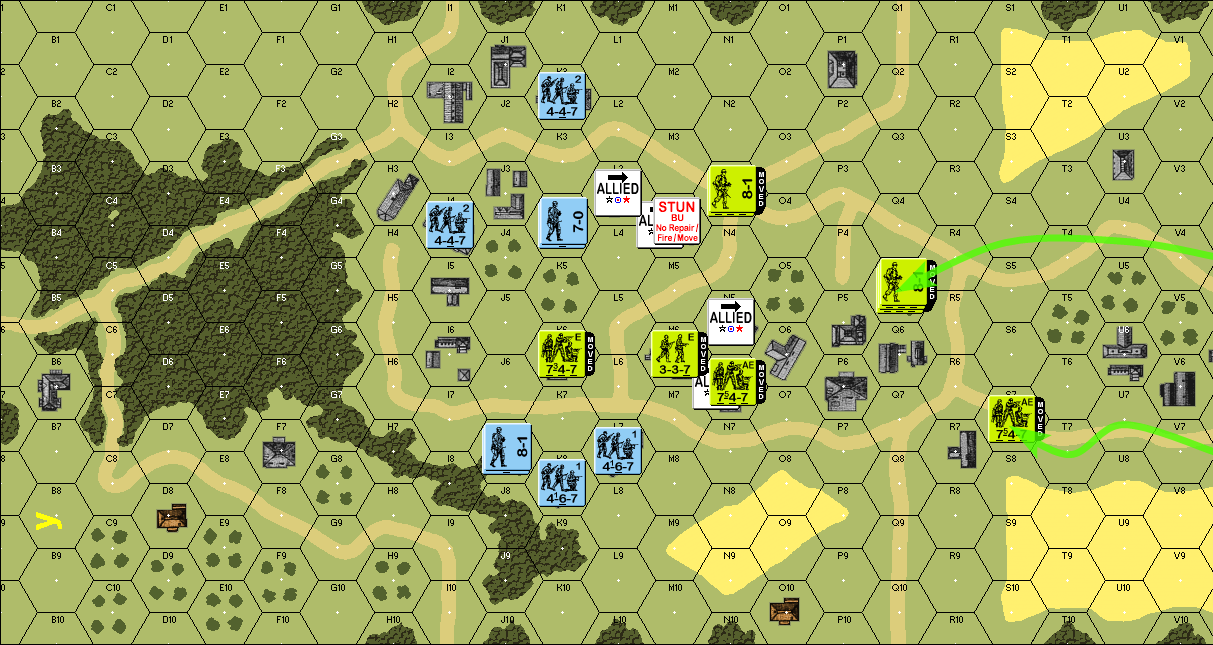 American reinforcements also arrive: two 747s and an 8-1 leader head for the orchard outside of town, while another 747 marches on over to that house at hex R7. Fire Phase all units moved, no fire Defensive Fire Phase 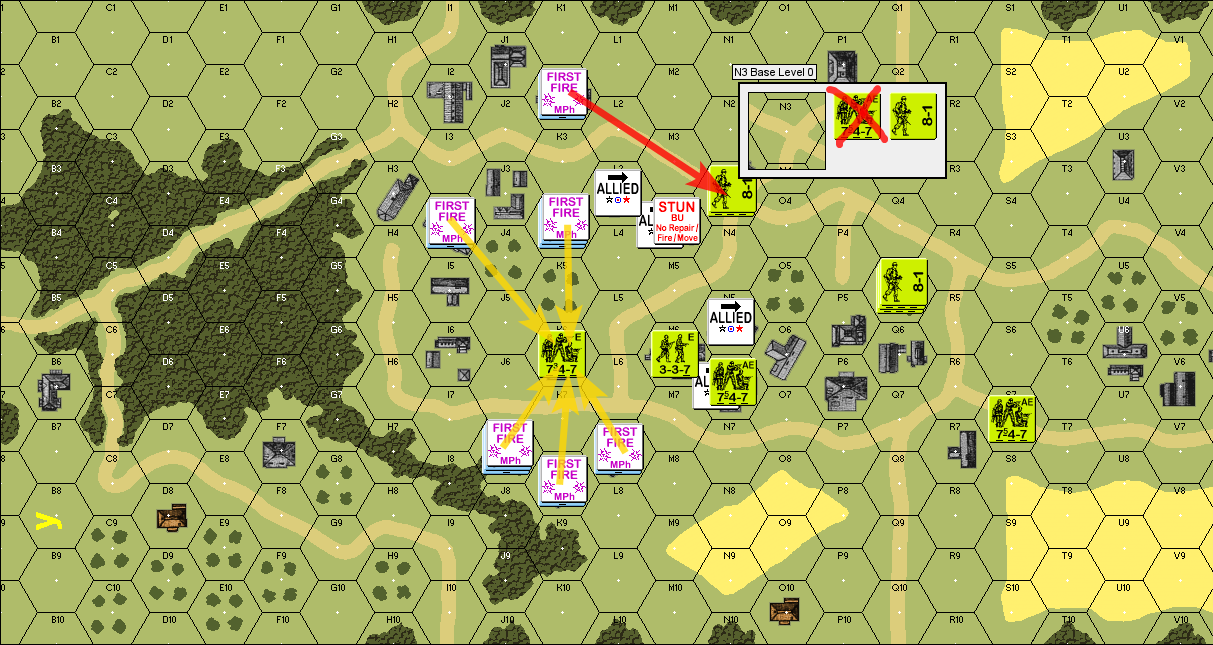 - red: the GER 447 in K2 shoots at the stack of paras out in the open. They get a "7" result, which breaks the USA 747 squad, but the 8-1 passes. The 747 is eliminated for failure to rout: M3, N2, O3, O4, and N4 are all open hexes with LOS of a Good Order Known Enemy Unit, and M4 cannot be entered despite being a non-open hex because it would bring the 747 closer to a Good Order KEU. - yellow: a storm of fire greets the troops in K6, but the house provides great cover, and nothing happens. Close Combat Phase 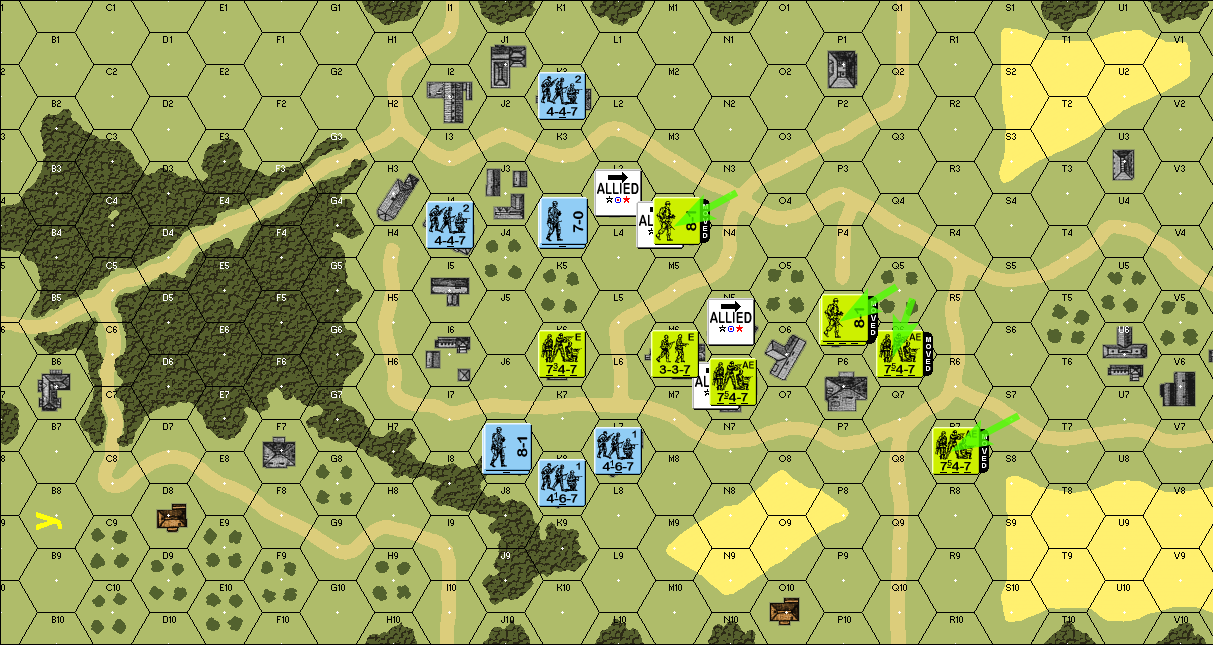 lastly, the squads use the one-hex movement to advance, though that 8-1 leader is now hanging out very close to the enemy with no protection. End of USA turn 1
|
|
#
¿
Mar 21, 2024 11:22
|
|
|
GER turn 2 Rally Phase nothing happens Movement Phase 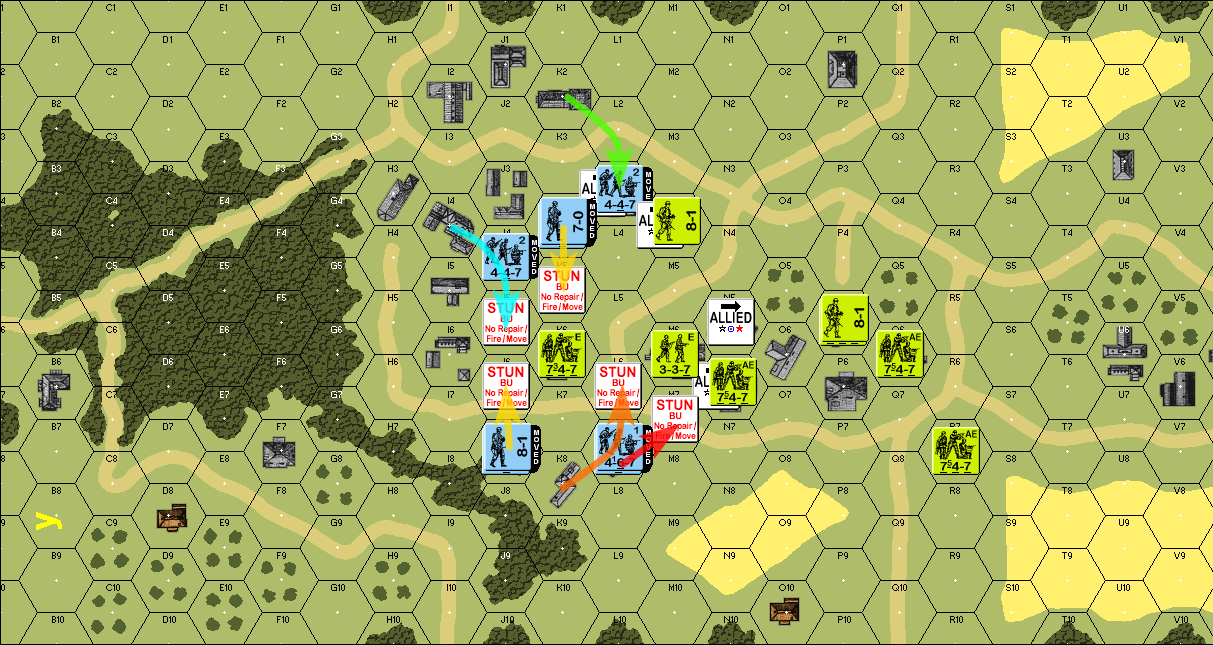 - green: the 447 in K2 moves to L2, then to the objective hex in L3, passing an Hesitation Check as it does so - red: the 467 in L7 tries to move to M7, but fails the HC - orange: the 467 in K8 passes the move to L7, but then also fails the HC trying to get to L6 quote:note that moving to L6 or M7 has a target number of 2 for the HC; the rolls in this case were 2 and a 6, respectively, hence the failures. - yellow: the 467 and 8-1 in J7 tries to move to J6, to assault K6, but they roll a 2 and fail the HC. Similarly, the 447 and 7-0 in K4 tries to move to K5, but they roll a 6 and also fail. - teal: the 447 in I4 passes the HC to get to J4 (which is an orchard with a TN of 6), but fails again at the adjacent hex J5. then, German reinforcements arrive  - green: a 548 enters at K10 and moves into the treeline at K9 - teal: two 548s and a 9-1 leader enter at S10 and pass two HCs to end adjacent to the occupied house at R7 Fire Phase all units moved, no fire Defensive Fire Phase 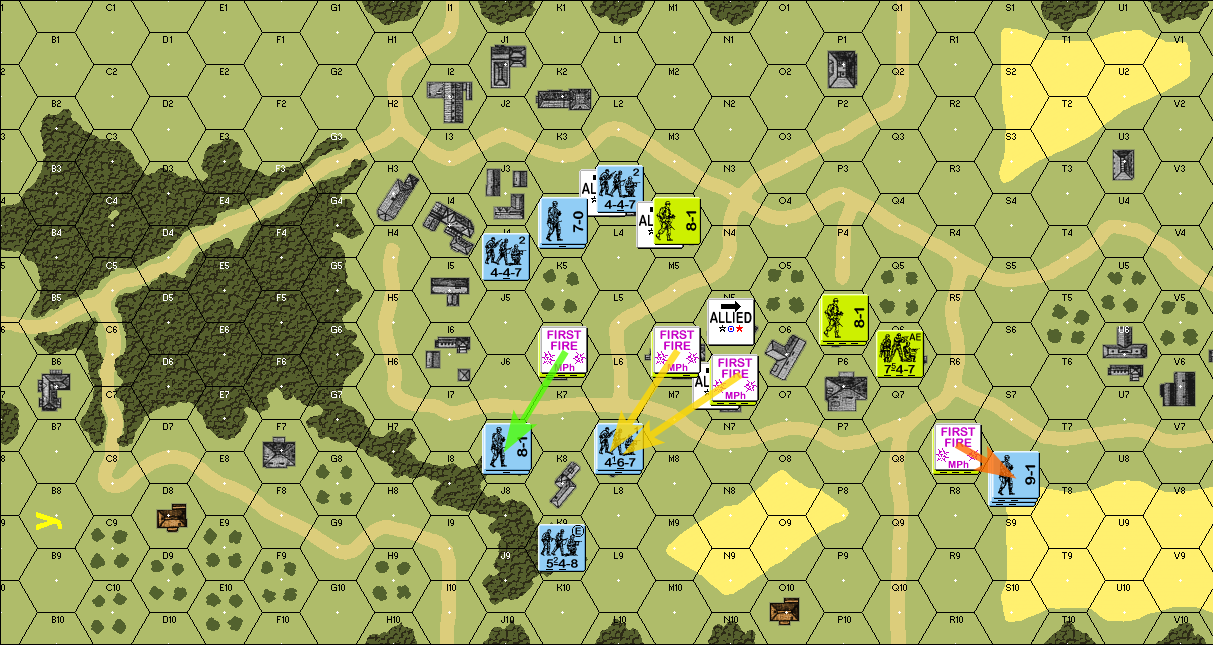 - green: quote:The 747 in K6 is equidistant from three stacks: K4, J7, and L7. And all three stacks are of similar size. As such, Retro rules state the targets should be picked randomly. This is one instance where predetermined defensive fire target selection is arguably to the attacker's benefit, since there is a 447 in J4 standing in orchard that would be a much easier shot than the three stacks, but since it's just one unit compared to the two units in each of the three other hexes, it can't be included in the target selection. In the event, random selection chose the stack in J7; the result was an ELR check, but the Germans passed it - yellow: the M6 and N6 squads shoot L7, but to no effect - orange: the 747 in the house at R7 shoots the coming platoon, and they obtain an ELR check, but the Germans pass it again. Close Combat  - green: the American leader at M4, and the squad at R7, are both engaged in Close Combat - teal: the 548 in the forest uses its advance to move to the building at K8 - orange: the 447 in the orchard at J4 moves to the building at J5. In this case, it uses the advance to slink back into the cover of a stone building. It would seem like a bad idea to stay out in the open and then pray to survive until GER turn 3. 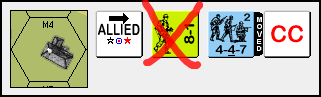 during close combat resolution, the lone American leader is eliminated (unsurprisingly, they were facing 4:1 odds), but the fighting in R7 is inconclusive. The state of play at the end of the turn: 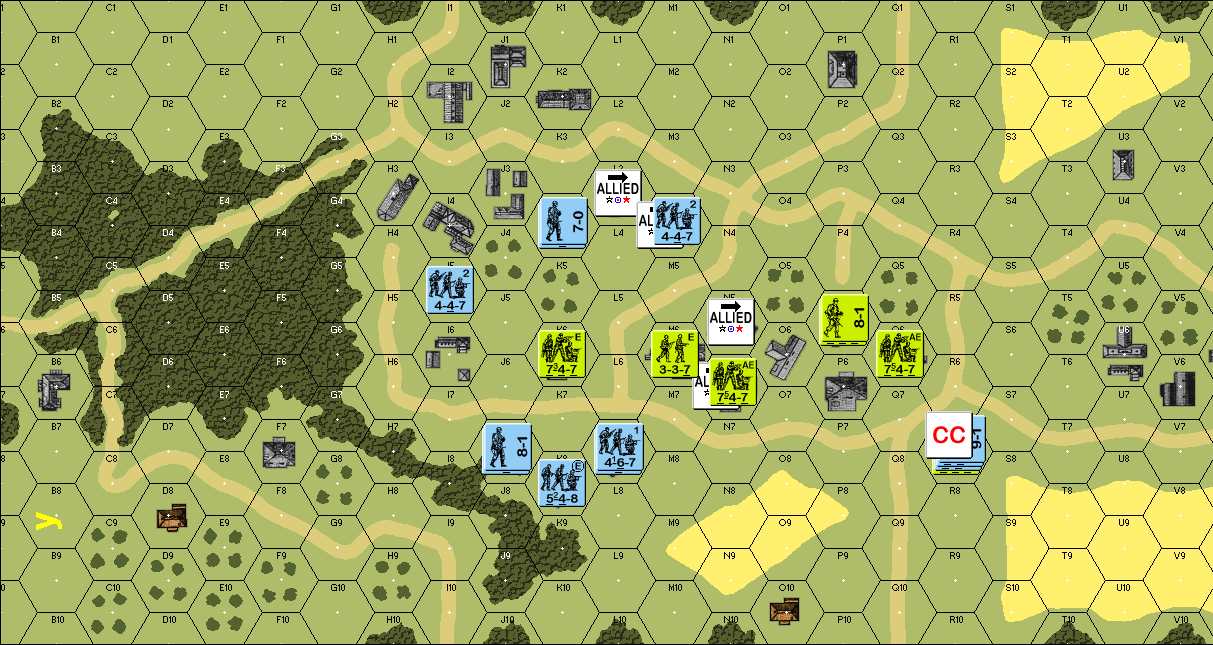 End of GER turn 2
|
|
#
¿
Mar 22, 2024 05:51
|
|
|
USA turn 2 Rally Phase nothing happens Movement Phase  two 747 squads and an 8-1 leader move out of P5 and Q6, and hustle to R6. quote:No hesitation checks here since the GER units embroiled in the CC cannot impose it, so the Americans are going to seize the opportunity to crush the squads in this hex. The thinking here is that the position in K6/M6/N6 has proven to be fairly difficult to approach so far, so the squads can hold there, and the L2/M4 sector can be dealt with later 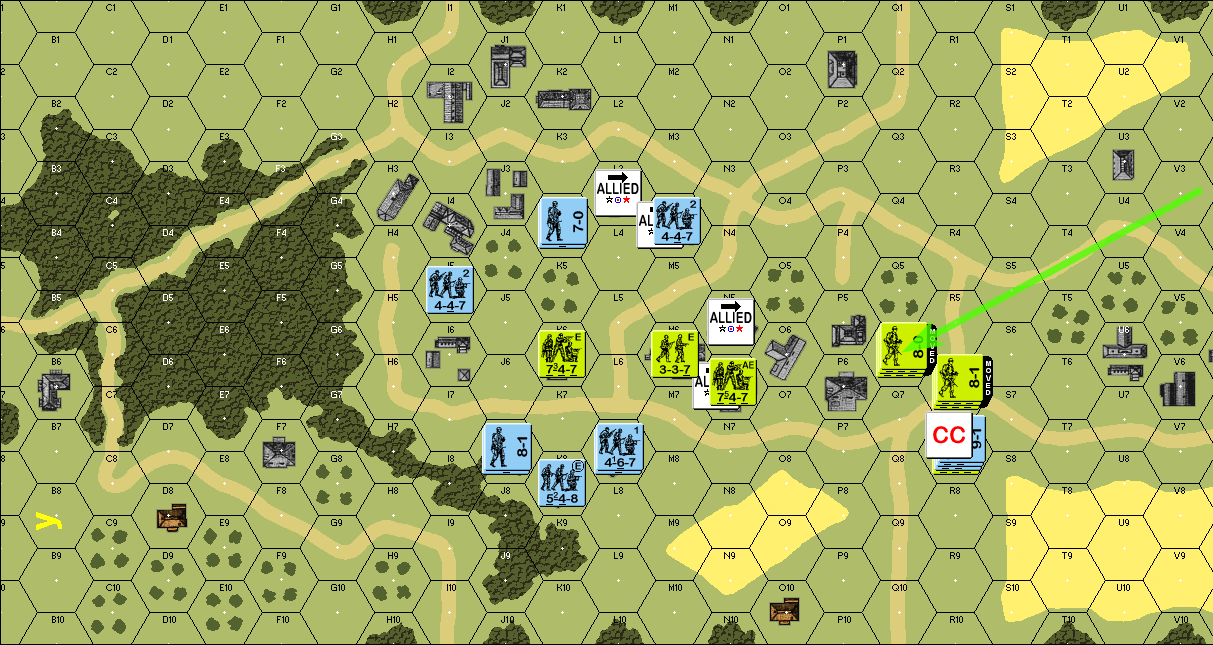 additional reinforcements arrive in the form of two more 747s and an 8-0 leader, and move to the center of the town Fire Phase  the two squads in M6 and N6 form a fire group, and they manage to break the stack in J7. then the 747 in K6 shoots at the elite squad in K8 and gets an ELR check, but the Germans pass it. It would have been nice to get even just an ELR check failure, because downgrading the 548 loses the Elite status, and thereby the bonus when making Hesitation checks. Defensive Fire Phase 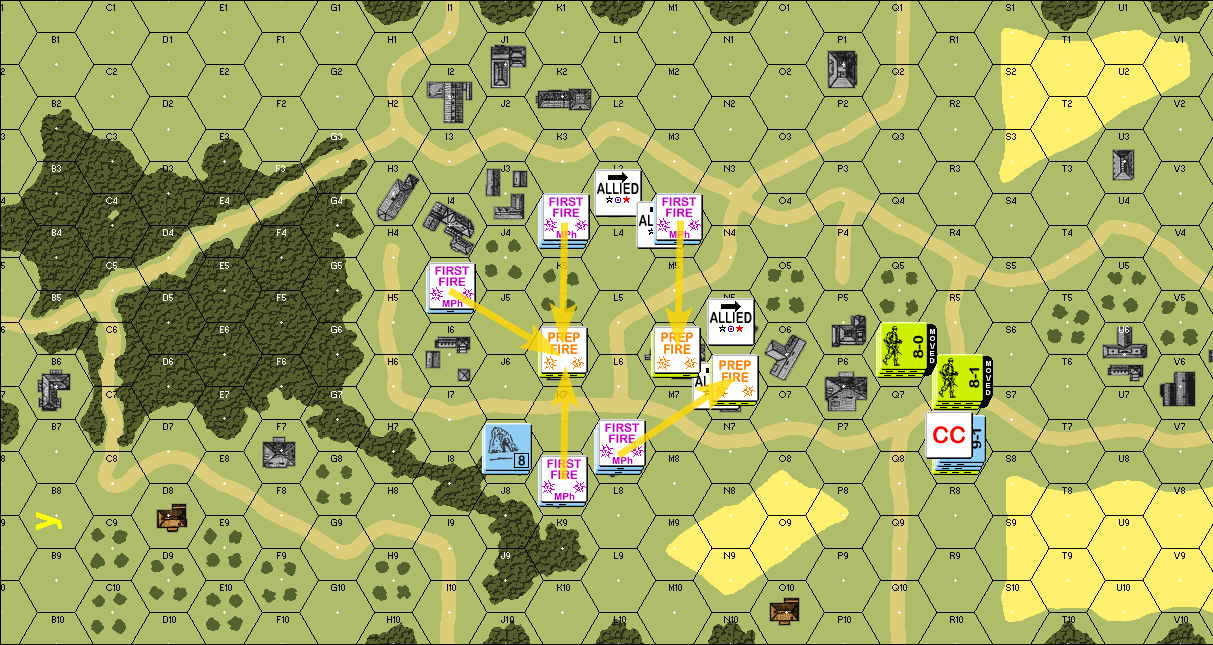 lots of fire here, but none of it makes a lick of difference. Close Combat Phase  the stack of two 747s and 8-1 move to add to the Close Combat, while on 747 and the 8-0 moves to P6, while still leaving one 747 in Q6 quote:in the event that the CC in R7 goes against the Americans, holding hexes in both P6 and Q6 gives good Hesitation check coverage for wherever the Germans might want to go next - putting the whole stack in P6 would allow the R5 hex to be out of LOS.  ... and it turns out that the Americans might need that coverage, because they rolled an 8, while the Germans rolled a 4, which means the paratroopers get wiped out. End of USA turn 2 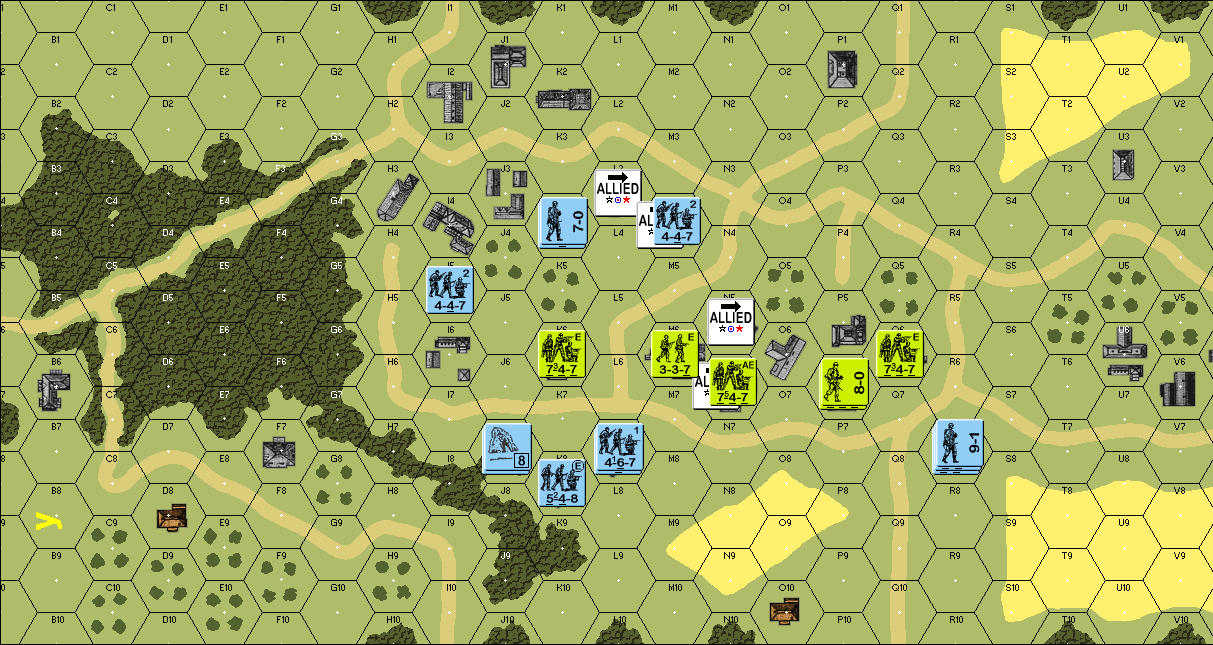
|
|
#
¿
Apr 1, 2024 12:06
|
|
|

|
| # ¿ May 11, 2024 06:38 |
|
|
GER turn 3quote:Even after crushing the American stack at R7, the German player is still in an interesting position: does that R7 stack head straight for Q7 and engage the stack at P6? Do they go around along Q8, P8, O8, then N7, aiming straight for the objective? These are elite squads with a -1 leader, so they're almost certainly going to pass the the first three Hesitation checks when they're not yet adjacent to the enemy, and then they could pass the N7 movement half the time, but that's four rolls where they're hoping that they do not get a natural 6. Rally Phase  in J7, the leader tries to rally, but gets a 9 and fails; and this means the MMC can't rally either because the leader is still broken Movement Phase 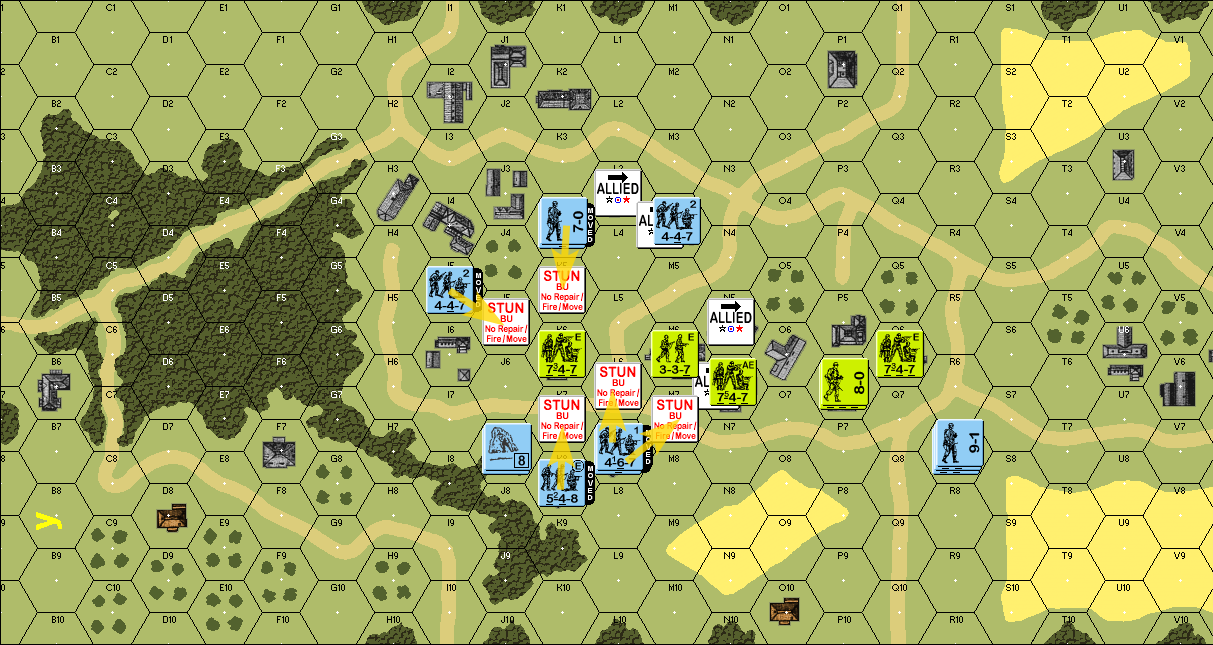 all these units try to move adjacent to the American defenses, but all they get is a bunch of Halt results 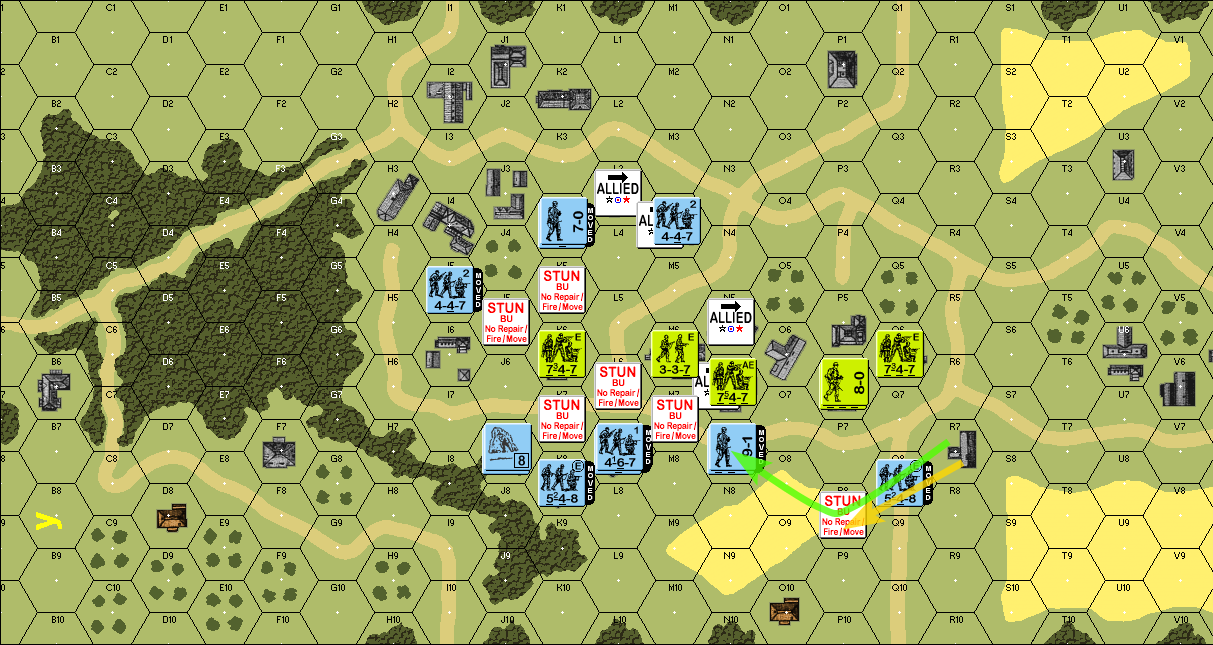 from the house in R7, one 548 and a 9-1 leader makes an end-run for the town, and passes all four Hesitation Checks to do it, even the final adjacency move the other 548 tries to follow, but fails at the second hex 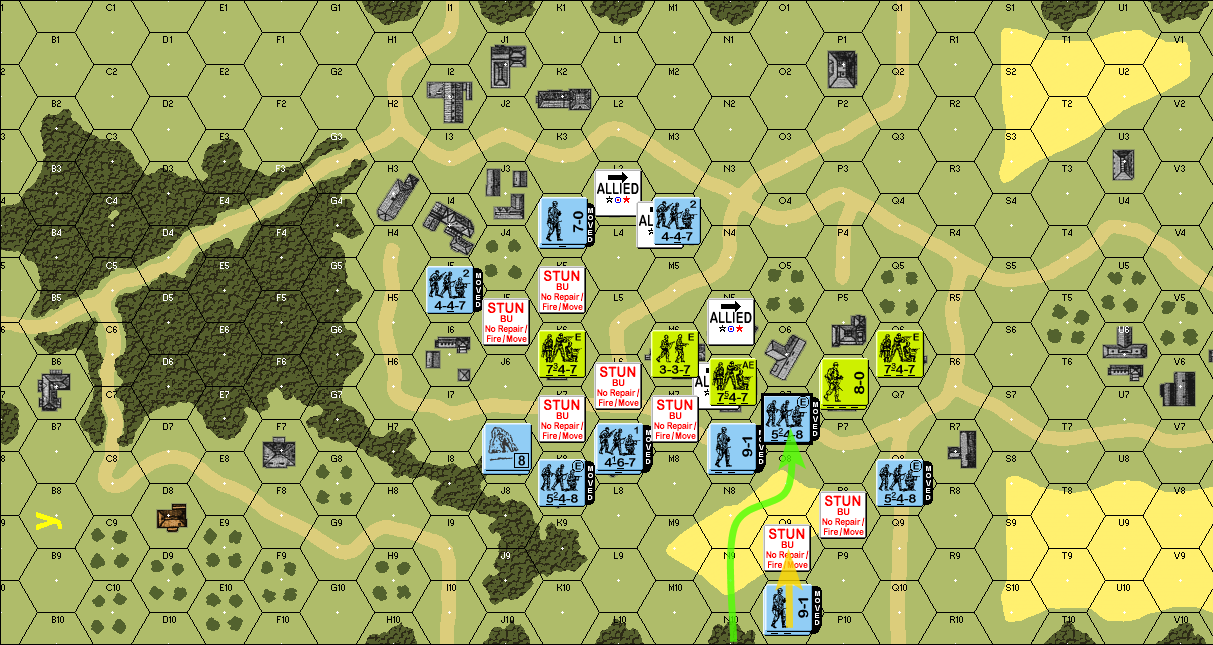 German reinforcements arrive: a new 548 and a 9-1 leader halt immediately upon trying to enter some grain fields, but a second 548 gets far enough in to enter an assault position 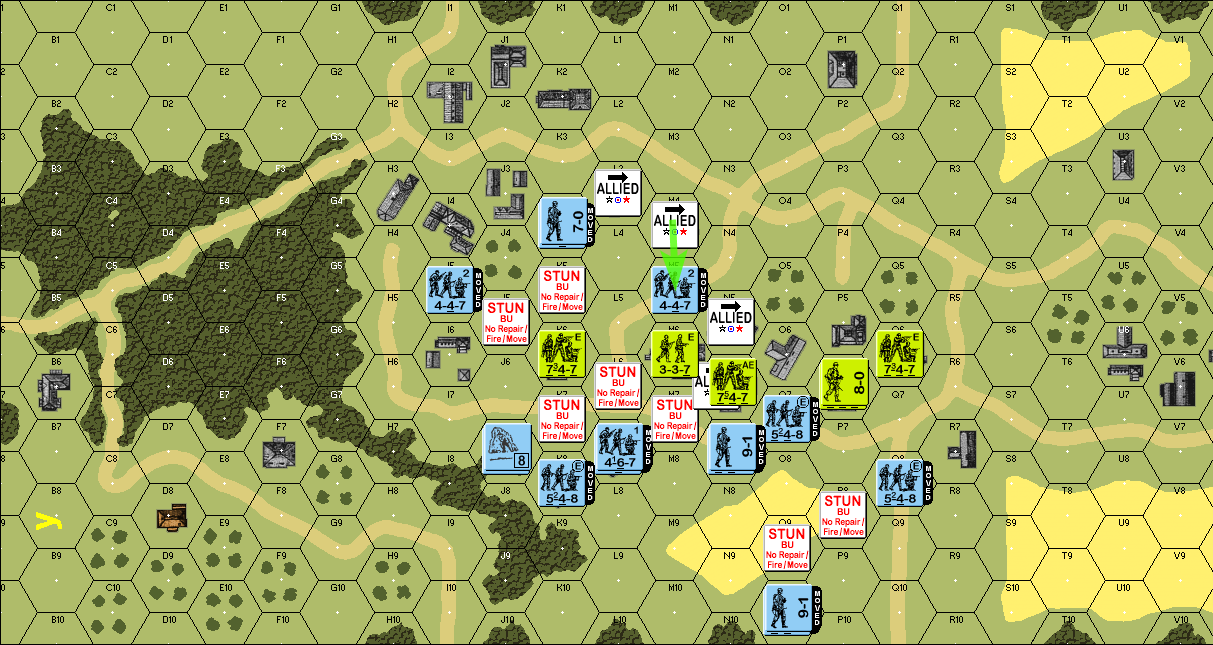 and finally, the 447 in M5 passes the HC to also get into adjacency Fire Phase all units moved, no fire Defensive Fire Phase 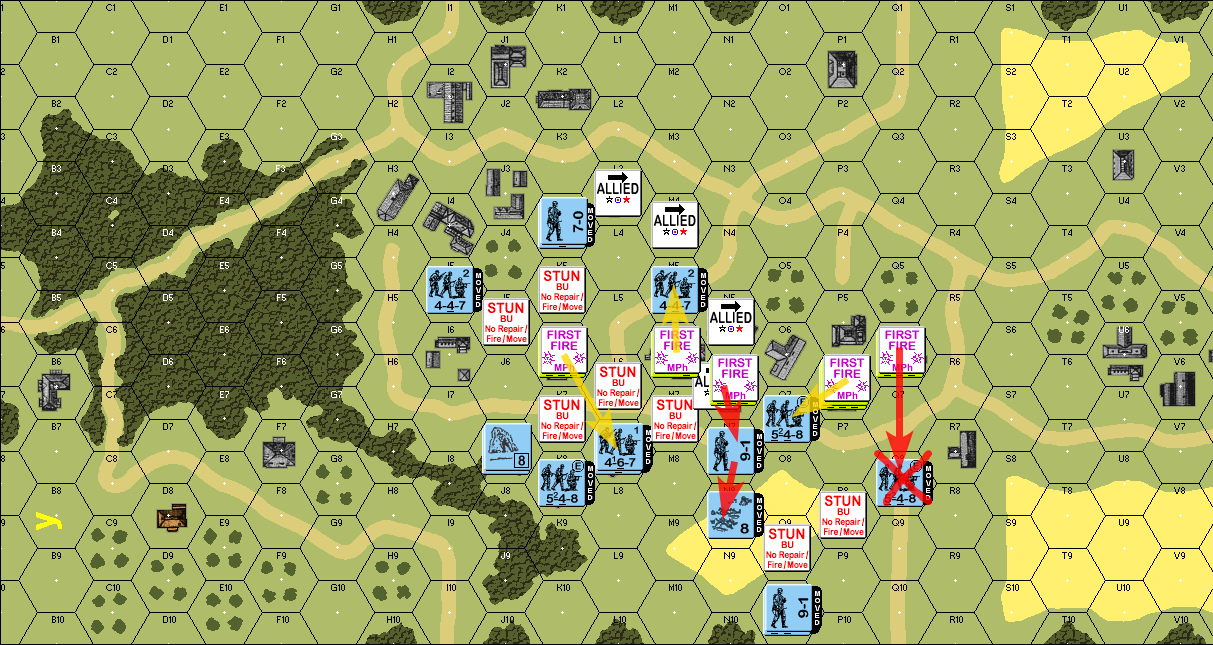 from right to left: - the 747 in Q6 rolls low and takes out the German 548 squad with a straight KIA result quote:this is maybe one of the best examples of the Hesitation rule "working as intended". You've got a squad that tries to advance into position, gets a Halt result that's leaves them out in the open, and then defensive fire tears them to pieces. That's classic, man. - the 747 and 8-0 in P6 get no effect despite the doubled FP - the 747 in N6 shoots at the stack in N7 and they get an "8" result on the attack; the 9-1 leader passes, but the 548 breaks, routs to N8 as a non-open hex, and then stops there - the 337 in M6 shoots at the German 447, but also gets no effect - and same for the 747 shooting at the building in L7 Close Combat Phase 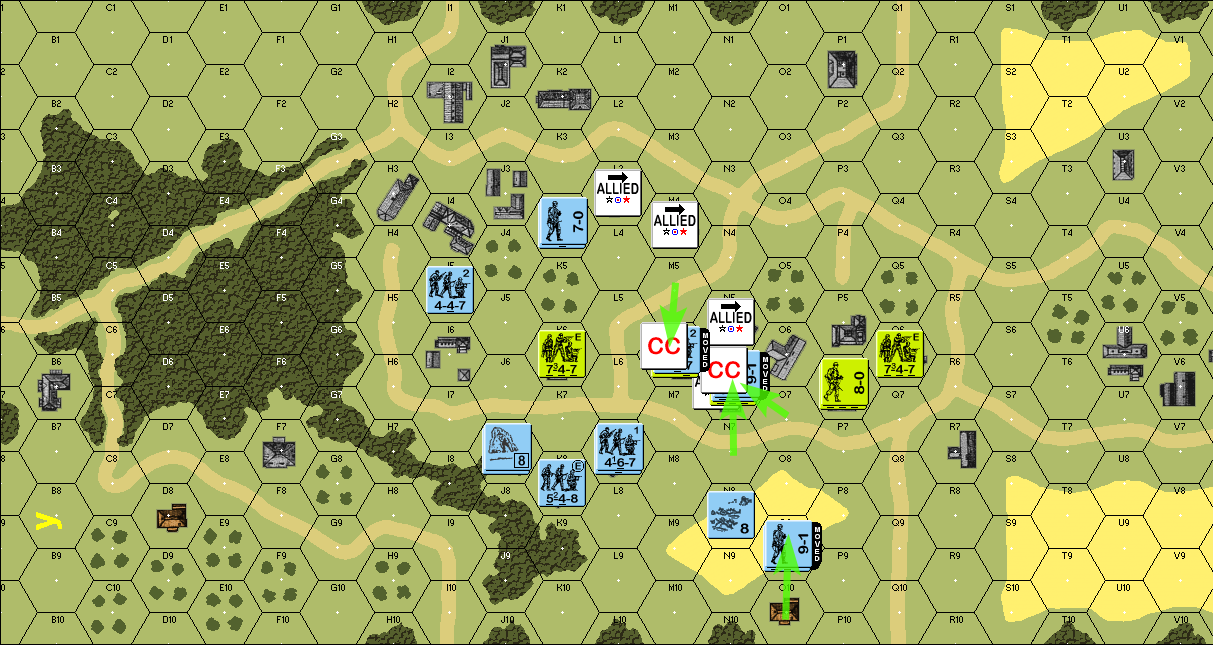 the stack in O10 uses this phase's movement to advance to the grain hex in O9 then we get two close combats developing, at M6 and N6 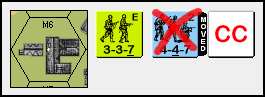  in M6, the American half-squad takes out the 2nd-line German full squad while in N6, the close combat is inconclusive as of this turn End of GER turn 3
|
|
#
¿
Apr 2, 2024 01:59
|
|