|
EOTB 5: Dwarf Plot Dump Entering the heart of dwarf territory, we immediately come upon this. Like the orc runes in level 2, these signify illusory walls. This is the only way to the rest of this level, but I'm getting some things here first.  Scale mail is not as good as chainmail, but still superior to leather armor.  There is a set of three locked doors all leading to the same room. This marks the only instance that there is not a key for every locked door, even ignoring the redundancy of these. I pick all three locks to use the key elsewhere, and go west.  The enemies of this level are more spiders. Behind a removable wall is a mage scroll of Dispel Magic, which there's no real reason to cast in this game since no enemies cast debuffs.  I go east past some stairs to level 6 and find this message. It is next to a lever that resets a puzzle to the south.  When you enter this area, pits to level 6 will open behind you after every step. Items on the ground can distract you from an optimal path, shown on this portion of the map from the GameBanshee guide: 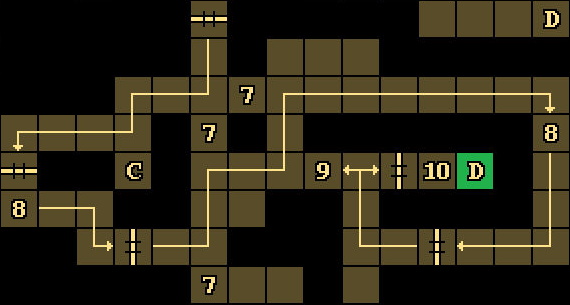 7 represents useless items, boots and two -3 weapons that luckily aren't cursed to be stuck in the character's hand. C is a teleporter to the reset lever, and 8 is for keys of a type exclusive to this area.  9 is this Ring of Feather Fall, whose wearer takes no damage from pits.  At 10 we find the best armor type and a spell to make the entire party invisible. A lock will remove this wall, revealing teleporter D to a new part of the level.  After killing some more spiders, I pass through some unmarked illusory walls to get a Wand of Frost. It casts Cone of Cold, one of the best spells in this series which causes major damage to everything in front of you. The visible path to it is blocked off by hidden teleporters, so you have to find the fake walls to get it.  North from there is a teleporter puzzle that ultimately leads to another way to level 6. Those items on the ground are unobtainable due to the teleporters.  Backing up, this plate opens up a permanent pit on the tile to its north. Southwest of it is a button that opens up a wall into the room I unlocked earlier.  The special quest for this level is putting 5 normal rations into the pantry shelf to upgrade them to iron rations. This potion will poison whoever drinks it. Things like it and the weapons from the greed puzzle have minor use as weights or for puzzles calling for certain item types.  The west side of the room has a door that must be forced.  We make our way to these stairs, which lead to a part of level 4 disconnected from the rest. I use the key from the start there to get a healing potion and a couple of scrolls. Incidentally, the transitions between levels 3 and 4 are ladders going into these stairs.  The east door of the pantry room leads us to where the dwarves actually are. Prepare for  , which you can listen to in a silly voice here along with some extra visuals. , which you can listen to in a silly voice here along with some extra visuals. We agree to find the missing prince.  We also get another companion.  In addition to all that plot, Armun also dumped some rations on the floor. Dorhum also carries two more along with a potion of healing. Like Taghor, he comes equipped with chainmail and an axe, but unlike him is the only recruit to start in perfect health. This stone medallion activates the portal in level 4. Speaking of portals we can use now:  The north wall of the pantry room has this gargoyle. They are common decorations on level 4, but this is the only one on level 5 that is not a lock. This particular one is a sneakier version of the earlier runes, marking an illusory wall.  Behind it is this portal, whose key is in a shelf to its east. This leads to a closed-off hub of these portals in level 7, next to the dagger portal to level 9. It is possible to reach the end pretty quickly when you know these shortcuts and level layouts. I'll go over things like that and more in a bonus update after the end of this game.  Several dwarf guards stand around this room. It is possible to attack them and make them hostile, but that's not a good idea right now.  The northeast corner of this room has the priest who can revive the bones we've been carrying from the sewers. On that note, the dwarves don't seem to mind much that there are three floors of excrement on top of their old civilization now.  Anya's revival is the first in-game mention of our villain. In the Sega CD version her hair is changed to black. Resurrected characters start with empty inventories. On a related subject, since we're at maximum party size, characters removed from the party will leave all their items on the ground at the spot you did that. I still prepared for this by putting things into more organized piles in the pantry room.  You can't revive multiple characters in a row. You have to leave level 5 or rest before it can be done again.  Armun will greet you every time you return, except in the Sega CD version. In that version the above two lines are replaced by cutscenes of the characters silently staring at you.  Tod Uphill's revival. He has a really dorky voice in the Sega CD version. None of these characters have anything further to say when accepted into the party, though they do have lines for rejection. Anya and Tod have theirs presented with their stats below. 
Alpha3KV fucked around with this message at 00:46 on May 21, 2022 |
| ← # ? Jul 31, 2021 03:21 |
|
Register a SA Forums Account here!
JOINING THE SA FORUMS WILL REMOVE THIS BIG AD, THE ANNOYING UNDERLINED ADS, AND STUPID INTERSTITIAL ADS!!!
JOINING THE SA FORUMS WILL REMOVE THIS BIG AD, THE ANNOYING UNDERLINED ADS, AND STUPID INTERSTITIAL ADS!!!
You can: log in, read the tech support FAQ, or request your lost password. This dumb message (and those ads) will appear on every screen until you register! Get rid of this crap by registering your own SA Forums Account and joining roughly 150,000 Goons, for the one-time price of $9.95! We charge money because it costs us money per month for bills, and since we don't believe in showing ads to our users, we try to make the money back through forum registrations.


Powered by: vBulletin Version 2.2.9 (SABB-v2.24.04)
Copyright ©2000, 2001, Jelsoft Enterprises Limited.
Copyright ©2024, Jeffrey of YOSPOS
Copyright ©2000, 2001, Jelsoft Enterprises Limited.
Copyright ©2024, Jeffrey of YOSPOS