|
I need to ask a question on vray: I'm finally playing around with this software over here and I'm mostly getting the hang of this except I can't seem to get my glass right. I've tried looking at the tutorials on the vray site and I've tried playing around with the settings but I'm only getting a "reflection" of the vray sky on this glass facade: here's the render and the glass material settings. as far as I can tell, I set it up the way vray said to with black as the diffuse, white as a refract, but I'm not getting what I thought I'd get - "clear" glass. 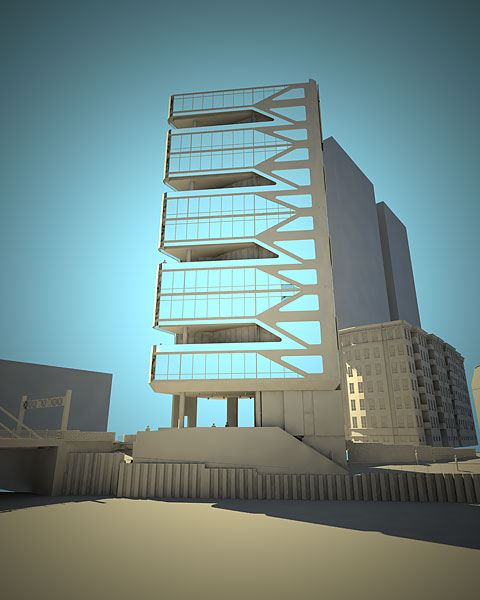 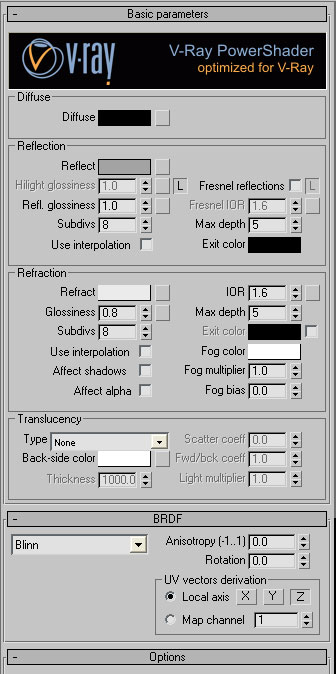
|
 #
?
Jun 30, 2008 03:17
#
?
Jun 30, 2008 03:17
|
|

|

|
| # ? Apr 19, 2024 21:25 |
|
|
I don't know Vray, but your translucency is set to None. That means it's not see through. At least it seems to me that would be the case.
|
|
#
?
Jun 30, 2008 04:01
|
|

|
Don't change any of the translucency settings, that's more SSS type stuff. Ok put a falloff in your reflect slot, and play with that. Glass looks better when it's more reflective at acute angles to the viewing axis. Black is good for diffuse, also a dirty dark green is good too. To get it to reflect something other than just sky, in the maps rollout shove an env map with it's mapping set to environment -> spherical. Another thing is that buildings in RL don't have perfectly flat glasswork. I've seen people do renders where there is a slight wavyness or distortion in the apprent geometry. Not entirely sure what they are doing half the time, maaaaybe there's something going on with the bump map breaking up the reflections. Cubicle- any ideas? Glass on a big flat plane like that is hard to get looking good... As you are finding out. also- you could try unlocking the highlight glossiness to give it an independent value. You can also nest this shader in a shellac shader, put the shellac materials diffuse to black and play with the highlight glossiness on that. This just does an additive mix, like Screen in photoshop. It's just a way to layer on more reflections and highlights to vary the boring plane look.
|
|
#
?
Jun 30, 2008 04:26
|
|

|
J-10 fighter:   started this a while ago for the Source engine, kind of hit a tough spot trying to figure out how to handle the textures exactly, got bored and forgot about it. but I'd like to finish it up sometime.
|
|
#
?
Jun 30, 2008 07:27
|
|

|
change my name posted:I blocked the basics out in zspheres, then used the low poly for the basic shape and worked my way up on the higher detail levels  This probably wont help now, but I always put in a zsphere mouth and eye sockets, and occasionally zsphere noses and ears, depending on how detailed they need to be.
|
|
#
?
Jun 30, 2008 08:45
|
|


|
ajrosales posted:here's the render and the glass material settings. as far as I can tell, I set it up the way vray said to with black as the diffuse, white as a refract, but I'm not getting what I thought I'd get - "clear" glass. What does your model look like behind the glass? can you post a shaded viewport view with the glass object hidden? Is the model for the glass a box with around 10mm thickness, or a single plane? (need to be the former, glass requires a volume to work correctly - throw a shell modifier on it if it's a flat surface) Pull your reflection to complete white, tick 'fresnel reflections', put the refraction on full white and take glossiness back to 1 (did the tutorial tell you to put it on .8? it would make the glass frosted) edit: As far as bump in the glass goes, you can just use a bump in the material or a noise modifier over it, but you need to make sure the bump doesnt continue through 2 sections of glass next to each other. What gives it the look is every pane having a different bump. Personally I tend to do it with 3/4 materials in a multisub, same glass mat but the noise bump on 3 different mapping channels and seeds, then throw a material by element over it all to randomise the multisub id's. The object needs to have each pane as a seperate element, but it's better than using different objects. cubicle gangster fucked around with this message at 14:22 on Jun 30, 2008 |
|
#
?
Jun 30, 2008 14:04
|
|

|
Heintje posted:Another thing is that buildings in RL don't have perfectly flat glasswork. I've seen people do renders where there is a slight wavyness or distortion in the apprent geometry. Not entirely sure what they are doing half the time, maaaaybe there's something going on with the bump map breaking up the reflections. Cubicle- any ideas? We subdivide the glass plane and add a noise modifier. It usually turns out looking pretty good.
|
|
#
?
Jun 30, 2008 14:10
|
|

|
Cool, I've always wondered about how you guys go about messing up a glass surface. I haaaate making reflective planes- so much harder to get looking good than curved surfaces.
|
|
#
?
Jul 1, 2008 02:46
|
|
|
Out of curiosity, why wouldnt just a simple bump map work? Or does Vray not do bump maps?
|
|
#
?
Jul 1, 2008 02:59
|
|
|
SynthOrange posted:Out of curiosity, why wouldnt just a simple bump map work? Or does Vray not do bump maps? To be honest, the method I mentioned was something we saw elsewhere, tried it, it worked and we never really bothered trying anything else after that. Ha. I'm sure you could stick a bump/disp/etc in there for similar results.
|
|
#
?
Jul 1, 2008 03:32
|
|
|
It's a lily.   Made in Max, rendered with Vray. Modeled, textured, and rendered over the course of about 5 days, working intermittently. Took about 4 hours to render at 1600x1200, mostly due to lots of nasty translucency and such going on. I'm pretty pleased with the result, though I may tweak the shader a bit still. Comments/crits appreciated.
|
|
#
?
Jul 1, 2008 08:11
|
|
|
Dang that's nice. The petals feel like they could be a little brighter, right now they feel a little dense and heavy. You might be missing the pistil of the flower, and the stem could do with a little surface variation, but it's still very nice.
|
|
#
?
Jul 1, 2008 08:21
|
|
|
SynthOrange posted:Out of curiosity, why wouldnt just a simple bump map work? Or does Vray not do bump maps? Thats way I do it though (as said in my post), vray handles bumps fine. Edit: Been creating some generic assents in a quiet period... and got thoroughly carried away. About 8 hours into it so far. 
cubicle gangster fucked around with this message at 12:44 on Jul 1, 2008 |
|
#
?
Jul 1, 2008 09:12
|
|
|
Hey guys, I've just finished sitting down all morning watching video encoding progress bars for my animation reel (for the 2nd time), so here's a web version while I figure out how the hell to send it to studios for employment. I'd love to hear feedback if you have any, although I won't be fixing anything any more in this reel as I have to send it out at some point ") http://www.puppetstring.com/tom_cannell_animation_h264.mov
|
|
#
?
Jul 1, 2008 14:51
|
|

|
cubicle gangster posted:Thats way I do it though (as said in my post), vray handles bumps fine. Looks great. Was the bloom post or what? ninjaedit: Did you do the ivy yourself? I recall someone developing a generator that everyone over at cgtalk seemed pretty impressed with. realedit: I'll soon be able to start posting some environment stuff as well; just got a huge promotion (Director of Presentation Media) so I won't be doing the basic client stuff that previously took up 80% of my time, and accounted for 98% of the soul-crushing that was my 8-5. 
Handiklap fucked around with this message at 15:11 on Jul 1, 2008 |
|
#
?
Jul 1, 2008 15:04
|
|

|
tuna posted:Hey guys, I've just finished sitting down all morning watching video encoding progress bars for my animation reel (for the 2nd time), so here's a web version while I figure out how the hell to send it to studios for employment. I'd love to hear feedback if you have any, although I won't be fixing anything any more in this reel as I have to send it out at some point Excellent work. No crits really. Excellent work, short and succint demo reel with no unnecessary fluff. Good job and good luck! I seriously doubt you'll be hard pressed to find a job.
|
|
#
?
Jul 1, 2008 16:41
|
|

|
Thanks I'll see how it goes and keep updated on any progress. However, in the mean time... Do you have a Nokia N95? Do you need motioncapture? Then you're in luck! http://teavuihuang.com/mocap/ 
|
|
#
?
Jul 2, 2008 12:01
|
|
|
cubicle gangster posted:Thats way I do it though (as said in my post), vray handles bumps fine. Very nice man, why is your lighting always perfect?  Anyway, I think i'm finally making some headway with (onyx)trees and their materials:  Maybe I should stop doing the redshift thing... also because I suck at it, and its getting a tad too common.
|
|
#
?
Jul 2, 2008 12:50
|
|
|
ok, let's see here. I'm only taking baby steps over here because I don't have enough time right now to sit here and focus on this... I followed heintje's suggestions first. I applied a falloff map to the material. Then I followed cubicle gangster's suggestions. (except for a bump map) So I now have a falloff set on the reflect map. I'm a little unsure as to the falloff type. I assumed Towards/Away because the view is sort of getting further away as you look up... Should it be fresnel even though the main material has fresnel reflection checked?? For some reason my glass looks "too" translucent with not enough glossiness or reflectivity. And I'm back to not understanding what it is that I'm doing wrong... I've included my settings again for reference.. the material settings are just as cubicle gangster recommended. 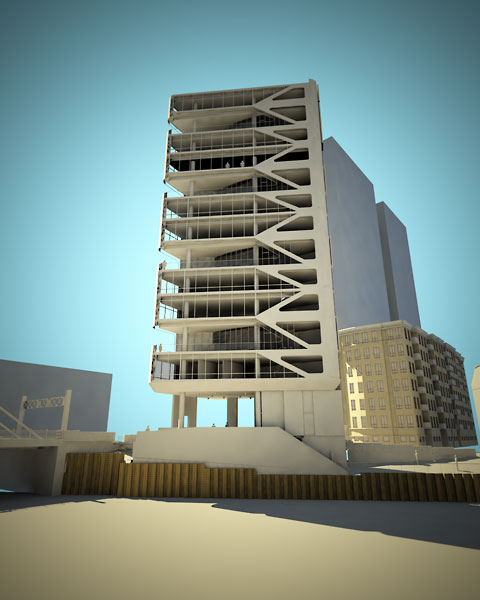 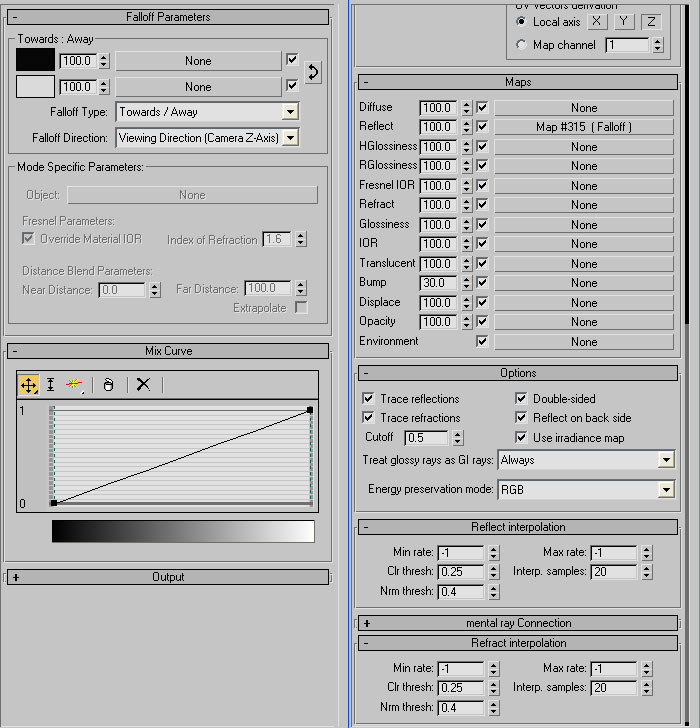
ajrosales fucked around with this message at 20:00 on Jul 2, 2008 |
|
#
?
Jul 2, 2008 19:57
|
|
|
BonoMan posted:Where'd you get a job? Whoops. Three pages later. Working as an environment artist at LucasArts. Say what you will about the company as of late, but its been a blast working here. Its insanely casual, the people I work with are both awesomely cool people plus talented as all hell, and I'm getting to see and work on some seriously cool poo poo. As for the reel, I highly appreciate the compliments from you and everyone else. Don't even worry about the plane crash thing, I'm really not at all that proud of it. The vision I had of the final project was far more epic, the plane scorching directly overhead only 100 feet or so off the ground, casting a shadow over the ground and girl, better quality of smoke trail, plane destruction, resulting explosion, plus practical effects like ground dust, camera shake, and maybe some debris like metal panels falling in the road and whatnot. So yeah, the final thats in my reel is not representative of what I had in mind, but I think it holds up "okay" and I'd be pretty pissed if I did a bunch of work on that for several months just to not stick it on there (but then again, the industry doesn't give a poo poo how long I worked on it.) Again, I'm totally glad you guys like it. I wish I had my computer here in town, because I'd still be doing hobby poo poo off hours. I've learned a crapton of technique in a very short amount of time while being at Lucas, far more than anything I've learned in school.
|
|
#
?
Jul 2, 2008 20:36
|
|

|
ElecHeadMatt posted:I've learned a crapton of technique in a very short amount of time while being at Lucas, far more than anything I've learned in school. This was my favorite thing about stepping out into the real world. It made me wonder sometimes why I even bothered with school. Three summers of interning and I would probably have learned way more than I did in all of my vsfx and itgm courses.
|
|
#
?
Jul 3, 2008 00:16
|
|
|
ElecHeadMatt posted:The vision I had of the final project was far more epic Haha, I think I've uttered these words after just about everything I've ever done in 3D.
|
|
#
?
Jul 3, 2008 00:23
|
|
|
tuna posted:Haha, I think I've uttered these words after just about everything I've ever done in 3D. Congrats on the front page plug. I almost posted with a stairs reference and then decided to not be lame.
|
|
#
?
Jul 3, 2008 00:49
|
|
|
BonoMan posted:Congrats on the front page plug. I almost posted with a stairs reference and then decided to not be lame. Heh, yeah... Have you got stairs in your showreel? Would be a bit creepy. Thanks again.
|
|
#
?
Jul 3, 2008 08:35
|
|
|
ajrosales posted:I followed heintje's suggestions first. I applied a falloff map to the material. Then I followed cubicle gangster's suggestions. (except for a bump map) Ahh, my suggestion was instead of that, I just laid down the way we do it as if from scratch - they basically do the same thing. With 2 falloffs you'd barely get any reflection. Try taking the falloff map out, If you still dont have enough reflection, uncheck the 'L' next to the fresnel reflections box and raise the number. Try going up to 2/3 to get a feeel for how much it changes. Handiklap - The bloom is with sapphire plugins in combustion, same as I use for chromatic abberattion/other crap. Some amazing bloom/glow effects in there. The ivy is that plugin - the one that came out standalone and got converted to maxscript to run inside it. International Log - thanks haha. it's all about the comptex in vray, with a sun and sky. I think I may have gone over the method before, but I cant remember. It's incredibly easy and looks really good, if there isnt one around i'll quickly write it up. I carried on with that scene, grabbing some old models and merging it all in to a full site... kinda got really carried away. Going to start on people tomorrow, guess I may aswell turn it into a showreel piece. (I really need to spend some proper time actually doing some work on that... I've been talking about it for years.) 
cubicle gangster fucked around with this message at 12:07 on Jul 3, 2008 |
|
#
?
Jul 3, 2008 12:04
|
|
|
cubicle gangster posted:
Comptex you say? No, can't say that I remember you talking about that. It would be great if you could put down some words, because I'm having a hard time getting a solid method of lighting my scenes. I often switch between "normal" lighting and vraysun/sky/cam in a scene because from one angle one method works great, but from another angle it looks crapola. Also, I'll be damned if I ever understand even one shred of Linear workflow. 
|
|
#
?
Jul 3, 2008 15:06
|
|
 comptex
|
cubicle gangster posted:I think I may have gone over the method before, but I cant remember. It's incredibly easy and looks really good, if there isnt one around i'll quickly write it up. This would be an awesome addition to the new thread. "Your renderings are hurting people's eyes. Please stop." - a vray tutorial by cubicle gangster
|
|
#
?
Jul 3, 2008 15:10
|
|
|
International Log posted:Also, I'll be damned if I ever understand even one shred of Linear workflow. Dont worry about it, if you need to use it it'll make sense and wont be an issue. You only need to use it when doing a shitload of colour correction in post and rendering to float. High end tv and film work, really. Some bright spark a year or so ago started telling people in the arch viz industry about it, who then latched onto it with an absurd level of enthusiasm for what appeared to offer next to no benefits and just complicate the rendering process further. Some even bigger spark then proclaimed that it made your renderings look better by standard, which of course had nothing to do with with people who usually put no thought into materials actually having to do something with them now, and copying someone elses scene setup exactly in a tutorial about LWF. Either way, all of a sudden LWF is this god like workflow that everyone needs to know and use and if you're not using it youre probably a dick. Basically makes the maths behind your image 'correct'. Doesnt change what it looks like at all. (well, it does... but not in a relevant way) I've got major issues with LWF. I was told the reason I didnt use it for stills (even though i'd done a big animation with it a few months before) was because I didnt understand it. And generally got slated for daring to suggest it wasnt that important. handiklap - haha. I'm not sure I can pull the title off, but i'll write it up at/for the weekend.
|
|
#
?
Jul 3, 2008 15:28
|
|
|
RE linear workflow, I don't follow it to the card, but I use this lighting setup with vray sun etc: Make a vray sun + env map Make a default vray physical camera (adjust the exposure stuff later, it should work as is). Set your rendering -> colour mapping to reinhard (sp?), set the gamma to ~2.2, bring it down if you want a bit more computery/contrasty feel. Uhhhm and that's about it, just turn on irradiance for GI, set your sampling and off you go, easy. That's a basic vray sun setup. Oh and you'll need to tone down the brightness of all your maps, in the output settings change the RGB level to .225 (in theory, play around with it though). Cubicle: what's this redshift thing I keep hearing people mention? Googling it gives me a bunch of physics about the doppler effect and SPACE. edit: Have some drilling fluids:  gently caress this was a oval office to animate. 3ds max makes me want to shoot myself sometimes when it fucks up very conceptually simple things. bleh. Heintje fucked around with this message at 16:23 on Jul 3, 2008 |
|
#
?
Jul 3, 2008 16:21
|
|
|
Heintje posted:RE linear workflow, I don't follow it to the card, but I use this lighting setup with vray sun etc: Yeah, that's what I do usually, but somehow it doesn't cut it for me (or my boss).. Redshift is when you simulate chromatic aberration by moving the red channel of your image a couple of pixels any which way. I'm sure there's loads of ways to do it, but that's the simplest. Alternatively you can use the photoshop lens correction filter, then it applies it only around the edges of your image, which will give you a more realistic rather than a stylish feel. edit uno: why Reinhard? What's so different about it? edit dos: i'm not sure i'm getting this 0.255 thing either, because when i set the output level of a bitmap to 0.255, it just fades to the diffuse color chosen.. or should that be black? International Log fucked around with this message at 17:54 on Jul 3, 2008 |
|
#
?
Jul 3, 2008 17:31
|
|
|
I am about to pull my loving hair out. Camera mapping/projections. I've never really done this so this is more R&D/proof-of-concept for me. Basic Idea: I animated scene with train in place and simple geometry placeholders for building. Scene takes place on wide open expanse so ground place extends to "horizon/infinity." Rendered out first frame and took that into photoshop to pain the matte. Now obviously I need to paint a lot bigger than the first frame's composition because the camera moves around in the "scene" and needs some stuff off camera so you don't see white edges of the matte. So I have my one camera that is animated...which means I can't use that camera for the projection obviously so I create a second camera to project the matte. The problem is I can't line it up with the original frame because there is no ability to see the projection in real time. So I move the camera to a starting point..render the frame and go from there. I can't see to ever get it though. I can get it roughly close, but then an edge shows up or something. It's ridiculous! I need projection help .
|
|
#
?
Jul 3, 2008 21:16
|
|
|
BonoMan posted:Try copying your camera, deleting the keyframes after frame 1, and using that camera as the projection. edit: by copying, I mean duplicate. PowerLlama fucked around with this message at 21:28 on Jul 3, 2008 |
|
#
?
Jul 3, 2008 21:26
|
|
|
PowerLlama posted:Try copying your camera, deleting the keyframes after frame 1, and using that camera as the projection. edit: poo poo lemme start this over (in case anyone saw the old post) I mentioned in my first post that I did have a second camera that was to project the camera. However I can't just make it a duplicate of the first camera because the matte is actually much bigger than the frame size (720p). This is because it's basically a world matte so that the camera has room to move around. So the problem is moving the projection around so that the little bit that is supposed to show up in the first frame actually matches the position of the train and buildings. BonoMan fucked around with this message at 21:57 on Jul 3, 2008 |
|
#
?
Jul 3, 2008 21:53
|
|
|
BonoMan posted:edit: poo poo lemme start this over (in case anyone saw the old post) Oh I see what you're saying. You could try setting the matte to an image plane (I don't know what this is called in Max if you're using Max), have the translation of the camera be in the same spot as the original, then using the aim control, aim it little by little in wireframe mode one way or another until things look like they may line up, then apply the projection. Or apply the projection, set your rendering mode to smooth shade with textures, move it a little, reapply the projection, so on and so forth.
|
|
#
?
Jul 3, 2008 23:14
|
|
|
Normally for a camera map what you do is duplicate your shot camera, increase its field of view (or decrease the mm of the lens), then paint your matte based on a static render from the new wide-angle camera. Don't extend the image in Photoshop or it won't line back up when you re-project it. It sounds like you kind of did it backwards. You have to set up a camera to paint from, and then stick to that size.
|
|
#
?
Jul 3, 2008 23:21
|
|

|
International Log posted:Yeah, that's what I do usually, but somehow it doesn't cut it for me (or my boss).. Ah the redshift thing sounds really easy, will have a play with it. With the RGB level make sure you are changing the RGB level value, not the Output Amount (that just fades it off and the underlying diffuse value will show through). The basic idea is- because you have a gamma of 2.2 and a vray sun (it's equivalent multiplier is about 360 vs just 1.0 for a standard omni), everything will become too bright, so you need to adjust the diffuse brightness of everything. As far as I can tell, the reason this is good is that since the light is so strong, the GI bounces appear more realistic. Couple this with the gamma and colour mapping and it looks good/realistic. There's a tutorial somewhere on the net that goes through all this in more detail so you can understand the actual theory of it, but I forget what it's called or where it is. Have a look around, it's worth it.
|
|
#
?
Jul 4, 2008 04:42
|
|
|
balistic posted:Normally for a camera map what you do is duplicate your shot camera, increase its field of view (or decrease the mm of the lens), then paint your matte based on a static render from the new wide-angle camera. Don't extend the image in Photoshop or it won't line back up when you re-project it. Yeah poo poo I was afraid of that. It was really just a "lets try it" thing. And I apparently did it backwards. The problem was the camera would move through the matte more than usual. It's a pretty big camera move and we just wanted to see if it would work. I'm afraid that even just increasing the FOV of the projection camera would probably still not work and leave me with too restricted of a move space, because it was just too large a camera move. Looks like I screwed myself from the start. Even so, I used the static render from the camera move's first frame as my matte template...and even if increasing the size of the matte was the wrong way of going about it, I still wish there was a way to do a semi-accurate real-time viz of the camera projection. Thanks for the info though! I'll probably just make it a smaller camera move, use your technique, and adapt the matte for it.
|
|
#
?
Jul 4, 2008 05:33
|
|
|
Heintje posted:Ah the redshift thing sounds really easy, will have a play with it. Hm, okay, that's at least making some sense to me. Also I viewed Lele's vraysun/sky tutorials, and know a lot more now.  Problem is, all my scenes at work and at home are too complex to make those adjustments without it taking me days. Problem is, all my scenes at work and at home are too complex to make those adjustments without it taking me days. Well, anyway, time to break up the wall of text with some imagery:    It's a villa that isn't built yet, first picture is the swimming pool in the basement. Still having some problems making the glass sheets show that encase the exercise area, somehow the reflections refuse to show (or they don't have anything to reflect). edit for info: trees are onyxtree, rendered with vraysun/sky/cam, grass done as displacement. (except in the middle image) International Log fucked around with this message at 14:48 on Jul 4, 2008 |
|
#
?
Jul 4, 2008 14:17
|
|
|
International Log posted:I think your pool has too much texture. In an indoor pool like that the water will be extremely smooth. Examples:   I know that will take away some of the images texture, but you can increase the intensity of the underwater lights or something so that you can see down into the pool. That will stop it from being a big gray hole in the image.
|
|
#
?
Jul 4, 2008 15:52
|
|

|

|
| # ? Apr 19, 2024 21:25 |
|
|
pistolshit posted:I think your pool has too much texture. In an indoor pool like that the water will be extremely smooth. I agree. The render looks like it's raining inside.
|
|
#
?
Jul 4, 2008 18:01
|
|