

|
What's the general consensus on the army painter sprays? Are they up to the job or are they a pile of shite? Might make life a bit easier but I can't see myself pulling myself away from a pure black undercoat any time soon 
|
 #
?
Dec 20, 2009 13:54
#
?
Dec 20, 2009 13:54
|
|


|

|
| # ? Apr 26, 2024 12:17 |
|
|
HardCoil posted:I also like your designs. Another disgusting real life animal is the pipa toad, which keeps its developing young in individual pockets on its back, until they emerge when big enough: This is the worst animal, if there were a single animal I would want annihilated from the face of the earth it would be this or bedbugs Just seeing that loving name makes my skin crawl
|
|
#
?
Dec 20, 2009 15:08
|
|


|
enri posted:What's the general consensus on the army painter sprays? Are they up to the job or are they a pile of shite? Army painter grey primer is awesome and frees you from the black/white primer tyranny.
|
|
#
?
Dec 20, 2009 15:33
|
|

|
Broken Loose posted:I also like the idea of rhino hooves for the back feet. I have to iron out the kinks, first. Suggestions and ideas welcome. I forgot how good you are with that poo poo. I think it looks great so far.
|
|
#
?
Dec 20, 2009 17:34
|
|

|
It would be interesting to try making it look like what would normally be a solid piece of carapace could separate to allow gaunts to exit. That way when they aren't coming out it would be protected.
|
|
#
?
Dec 20, 2009 20:16
|
|


|
 nevermind nevermind
Morning fucked around with this message at 20:52 on Dec 20, 2009 |
|
#
?
Dec 20, 2009 20:29
|
|
|
Just attach a Rhino door to the thing's rear end. If it's good enough for the glorious Astartes, it's good enough for the great devourer.
|
|
#
?
Dec 20, 2009 20:31
|
|


|
Morning posted:How did you do the whorls on the head? Just a pointy tool thing? He didnt sculpt it, it was done by that hive fleet moloch guy 
|
|
#
?
Dec 20, 2009 20:36
|
|

|
Sole.Sushi posted:Awesome as all hell guide to greenstuffing Thanks a lot for this! Putting a bit of water on it has changed everything.
|
|
#
?
Dec 20, 2009 21:46
|
|
|
Broken Loose posted:Tervigon brainstorming! This is as awesome as it is disturbing
|
|
#
?
Dec 21, 2009 02:53
|
|


|
Since, I'm pretty sure I'm not going to finish my diorama in time for Christmas, my mind's already wander on to other impossible tasks, this time for Lizardmen. One thing I definitely want to make is Tetto'eko. I don't know how great he is to use in the game, but a skink on his own palanquin like a mini-slann and able to use skinks as mini Temple Guard is a combination of  and and  that's too good to pass up. This of course has led me down the path of planning an Tlaxtlan army, and I'm sorely tempted to add in some Zombie Celts as the lobotomized human slaves that are mentioned in a fluff blurb in the army book. that's too good to pass up. This of course has led me down the path of planning an Tlaxtlan army, and I'm sorely tempted to add in some Zombie Celts as the lobotomized human slaves that are mentioned in a fluff blurb in the army book....gently caress, the more I look at that link the greater the urge to make them is, and I still have no idea what they'd count as!
|
|
#
?
Dec 21, 2009 03:05
|
|


|
I keep looking at different painting tutorials online, and getting overwhelmed. I just need to paint a few, regardless of how lovely they come out, and then get feedback on how to improve once its done. Right?
|
|
#
?
Dec 21, 2009 04:39
|
|

|
Iron Squid posted:I keep looking at different painting tutorials online, and getting overwhelmed. I just need to paint a few, regardless of how lovely they come out, and then get feedback on how to improve once its done. Really, all you need to do to improve is to practice, practice, practice. You can only learn so much through feedback. Pick a method you think will work, and just try it, eventually you can adapt it to any color you plan to use by just practicing.
|
|
#
?
Dec 21, 2009 04:46
|
|

|
Iron Crowned posted:Really, all you need to do to improve is to practice, practice, practice. You can only learn so much through feedback. This. Seriously, I had someone explain dry brushing, and basically, it took thirty Necrons before I got to the point that I did it right every time. And inking is something I just randomly tried at my last job. I know the basics, I had been reading painting techniques for a while. I tried it on some of the display models, and just had to practice a bunch before I got a handle on the basics. PVs formulas make me jealous as gently caress, though.
|
|
#
?
Dec 21, 2009 06:22
|
|

|
crosspost from main thread Still lacking internet at my new place so I've been doing some painting, full unit of 8 gutter runners completed and based. Apart from the unit champ they're actually night runner models (which in turn are just skaven mordheim sprues reboxed) because I think they look a lot cooler than actual gutter runners, the most recent ones still seem stuck in 5th "festooned with weapons and bags and items in lieu of model detail" edition. The night runners are a bit more cartoony skaven but they go better with the bulk of my army anyways    Yeah yeah I know, mold lines, but to be fair I assembled these several years ago and I just wanted them painted lol
|
|
#
?
Dec 21, 2009 13:35
|
|

|
lighttigersoul posted:PVs formulas make me jealous as gently caress, though. This brings up another point, unless you have a master's in art and/or spend 16 hours a day, every day painting, there will always be someone better who makes your stuff look amateur no matter how many hours you spend. But who cares? Do it for yourself, if you're liking it, who cares? Assuming you're playing with friends, they're not going to care if they look like poo poo. Here on the forums we'll really only make fun of you if it's obvious that you didn't put any effort into painting.
|
|
#
?
Dec 21, 2009 15:29
|
|
|
Iron Crowned posted:Here on the forums we'll really only make fun of you if it's obvious that you didn't put any effort into painting. Yeah, everyone expects your first models to be rubbish. People are pretty good at giving honest feedback and advice about how to improve.
|
|
#
?
Dec 21, 2009 15:43
|
|


|
Just paint paint paint get off the internet and paint
|
|
#
?
Dec 21, 2009 17:10
|
|
|
poo poo I am on the internet when I should be painting. Not done yet, needs more tidying, catching the missed bits and brass accents adding. Don't mind the shiny bits, there's some gloss down to protect powders and inks - the matt varnish spray I use tends to dissolve those.   Most of the freehand checks and stuff were done with those Daler-Rowney FW inks that Fix pimped. They are pretty good for small details like checks because they stay wet on the palette/brush for much longer making it easier to keep a point, and have stronger coverage than paint thinned to the same consistency. It's sorta like the out of the pot convenience of GW washes, but for freehand details.
|
|
#
?
Dec 21, 2009 20:34
|
|


|
Thats pretty much the perfect Goff wagon...great job working some warmtone into the black, and the freehand/checks and stuff look perfect
|
|
#
?
Dec 21, 2009 20:49
|
|
|
welp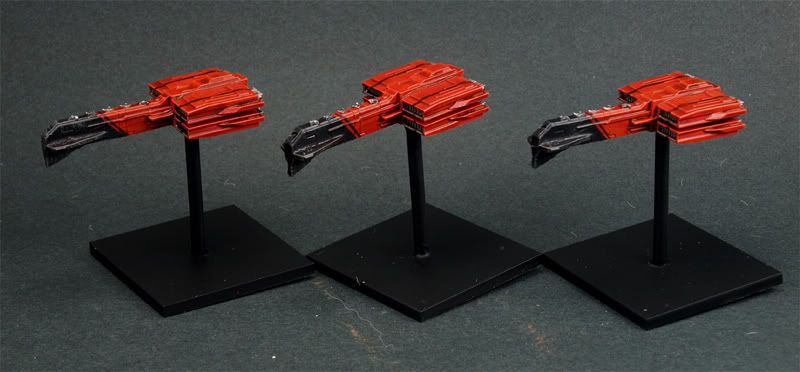 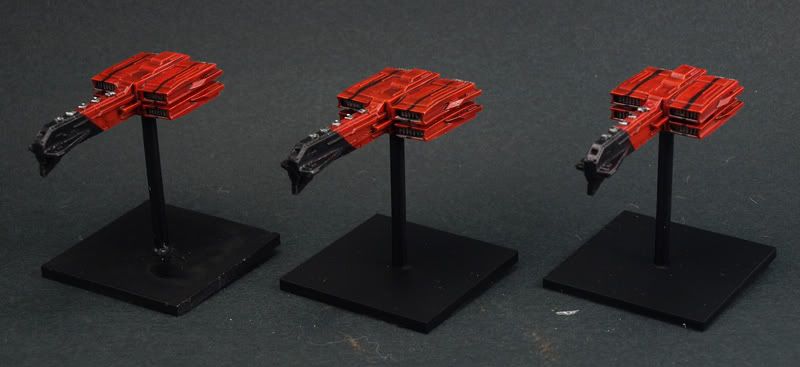 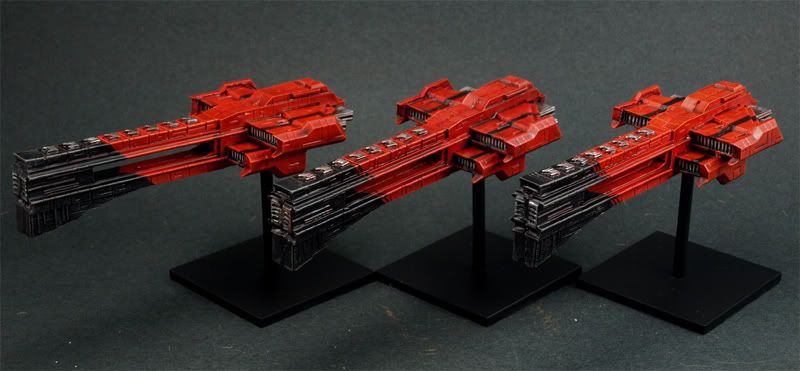 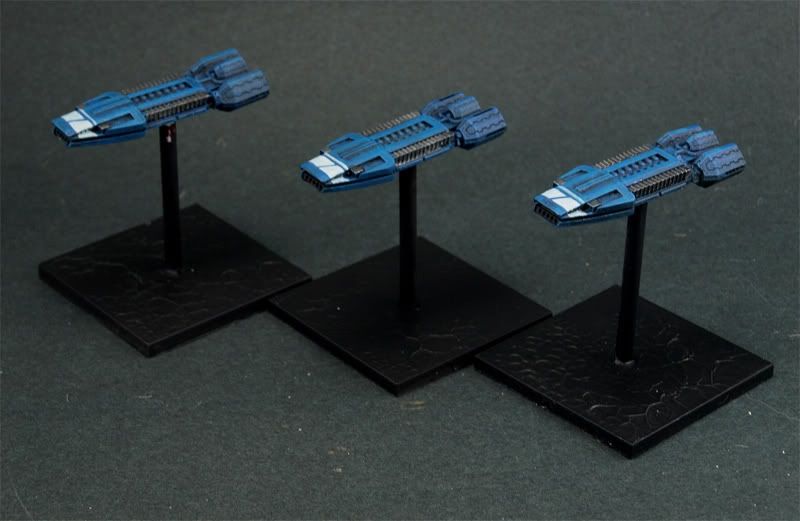 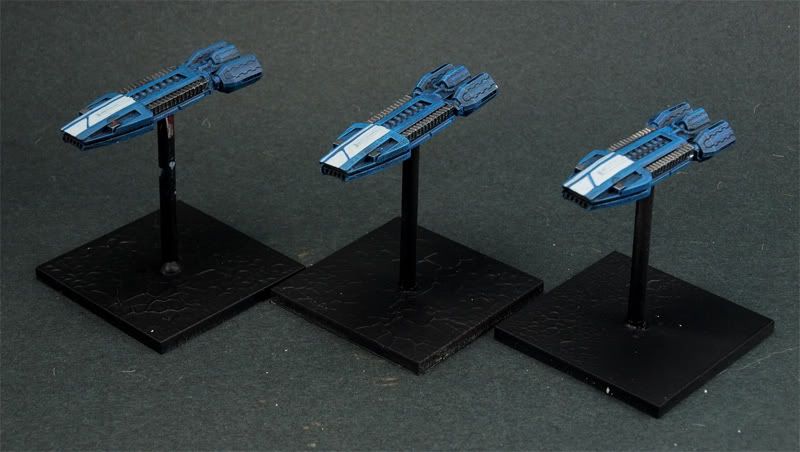 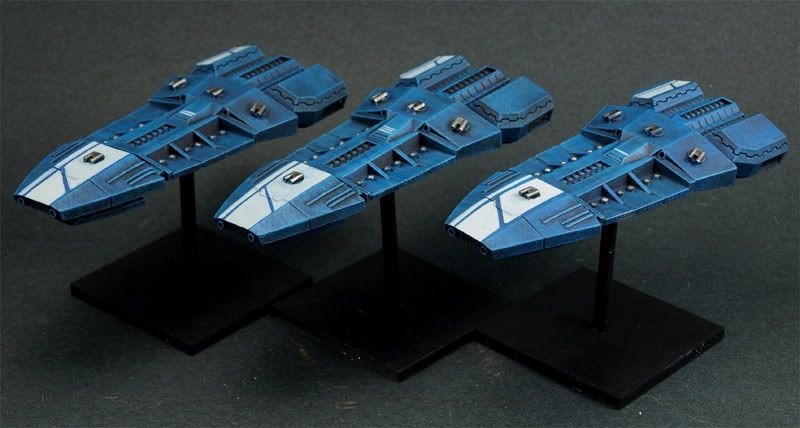 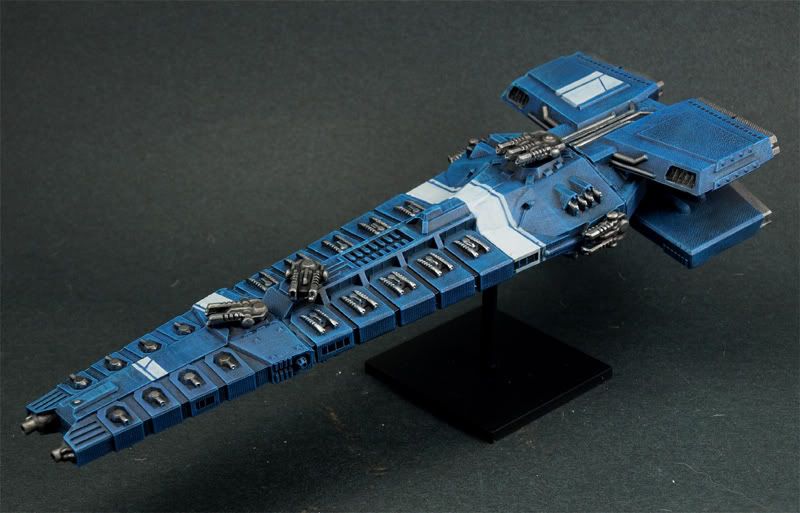 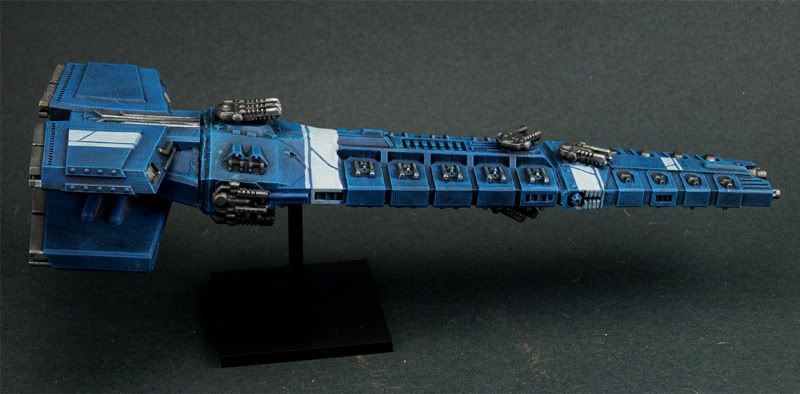
|
|
#
?
Dec 21, 2009 23:34
|
|
|
Oh yeah, did some symbols on this thing too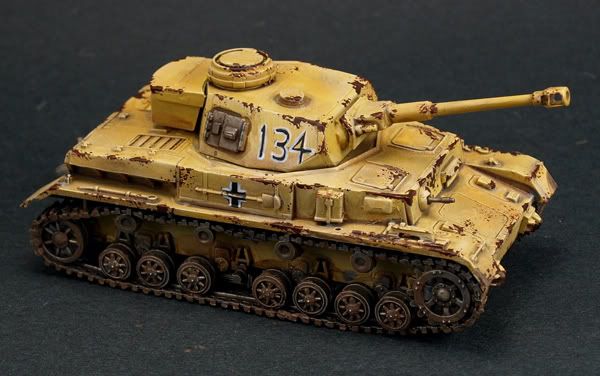 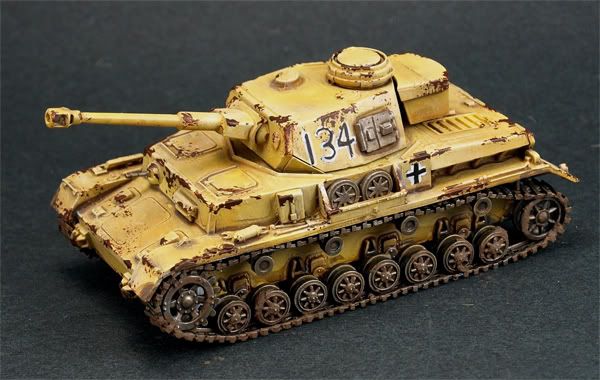
|
|
#
?
Dec 21, 2009 23:46
|
|
|
Those FA models look so much better than they do on the company's website. the dindrenzi (sp?) escort models still look kind of lovely compared with the cap ships and the rest of the races though.
|
|
#
?
Dec 21, 2009 23:48
|
|

|
sweet, sweet blue dickships
|
|
#
?
Dec 21, 2009 23:49
|
|
|
Crosspostin from the warhammer thread. Finished for now. In keeping with my 'try a new painting technique on each character' I had a proper go at Blending on his cloak. Red to black, to Purple back to black and then Blue. The Purple doesnt really show up because I kept it very dark but you can kind of see it. Was an interesting experiment, I need to plan it a bit better for next time. I'll probably fix some of the mistakes I've noticed from the photos when I do the base, which I'm thinking will be snow to brighten the whole model up a bit.  Click here for the full 1024x768 image.  Click here for the full 1024x768 image.  Click here for the full 1024x768 image.  Click here for the full 1024x768 image.
|
|
#
?
Dec 21, 2009 23:50
|
|

|
PaintVagrant posted:welp
|
|
#
?
Dec 22, 2009 01:48
|
|
|
PaintVagrant posted:Please tell me there are Basestar-looking ships in this range.
|
|
#
?
Dec 22, 2009 01:56
|
|
|
Blade_of_tyshalle posted:Please tell me there are Basestar-looking ships in this range. Not quite, but there are a pretty interesting variety of designs (6 races total) Check the thread in TGD, the pics are all on the first page
|
|
#
?
Dec 22, 2009 02:08
|
|
|
So after reading this thread and the 40k thread I've decided to unearth my old minis and start playing again. I have a ton of marines but I was never very good at painting so I ended up with smurf horrors like these guys. To try and save some  I'm gonna go for the strip it down and restart approach. After 4 years in a basement they are likely to need a bath so after a washing with soapy water what is something that can take off GW paint but not eat the mini's? I'm gonna go for the strip it down and restart approach. After 4 years in a basement they are likely to need a bath so after a washing with soapy water what is something that can take off GW paint but not eat the mini's?As expected my paint is all long gone or a solid block so what is the best bang for the buck now days? I used to use GW but I know that they overprice like hell, I was thinking Vallejo or should I go else where? Bonus Pics of what i get to do this winter.  Bonus bonus pic of titan just because a chain fist the size of a tank is cool. 
|
|
#
?
Dec 22, 2009 02:41
|
|
|
If you live in the US, go to a Dollar Tree and pick up a toothbrush and some "LA's Totally Awesome", it's piss yellow and in the cleaning supplies section. Let the dudes soak in the stuff for a day or two, then take them out and scrub under running water. The paint and most of the primer should come off, a little bit left behind isn't a big deal.
|
|
#
?
Dec 22, 2009 02:47
|
|

|
Ezekiel_980 posted:To try and save some For paints, there are a few popular choices. GW (which I use for metallics and washes), Vallejo (never used them), P3 (Privateer Press's paint line; from the few I've used I really like them and I'm replacing all my old paints with these as I need some), and other stuff like Reaper and Coat d'Arms.
|
|
#
?
Dec 22, 2009 04:02
|
|

|
I finally figured out why my paint looked chalky, I was using too much water. Almost an odd concept when trying to build up layers of paint. Simple green is the poo poo.
|
|
#
?
Dec 22, 2009 05:10
|
|
|
PaintVagrant posted:Sometimes paint can be thinned too much, could that be the case? then the pigment seperates and you get sort of blotchiness. Morning posted:I finally figured out why my paint looked chalky, I was using too much water. Almost an odd concept when trying to build up layers of paint. 
|
|
#
?
Dec 22, 2009 05:55
|
|
|
I tried lessing the water, but that didnt help it. So I tried using and even less, and viola!
|
|
#
?
Dec 22, 2009 06:10
|
|
|
There is definitely a point where paint gets too thinned and seperates, as well as not wanting to stay where you put it. If the paint isnt leaving brushmarks/glops/clumps and its applyng smoothly, youre in good shape, no need to thin it anymore unless youre making a wash or glaze
|
|
#
?
Dec 22, 2009 06:14
|
|
|
http://www.reapermini.com/forum/index.php?showtopic=32050 Thats the article that Ive mostly followed for the last little bit, and just figuring out this little thing I missed really is motivating.
|
|
#
?
Dec 22, 2009 07:01
|
|
|
By request, here's a quick how-to for magnetizing the bell kit, apologies where the pics are blurry didn't want to mess around with proper lighting and whatnot for largely unpainted bitz . Throughout the project I have used 2x3mm rare earth disc magnets. It also goes without saying that when fixing the second magnet of any pair, CHECK THE POLARITY. Then check it again. Then check it again when it's been glued in, in case it flipped. I can't stress this enough, as it's real hard to dig superglued metal out of plastic sockets. Luckily I only had to do it once, seriously, check! I used a GW pin vice to drill a hole where there wasn't a socket already available, then widened it with an exacto knife. Also apolgies for the fact that these are all after shots, I don't have any pics of what the components look like before surgery, but since you'll have them in front of you I'm hoping it wont be too hard to work out Magentizing the Screaming Bell/Plague Furnace Part 1 - Assemble the bell carriage  The main assembly of the bell carriage can be put together as per the instructions. Before beginning this assembly, take the small front platform and place a magnet towards the front-middle, basically where you want the brazier/plague priest to sit. (You should be able to see it in the above pic) Glue together the main carriage, the wheels, the bladed guard at the front and the FRONT platform only - do not glue the back platform, it is reversible for the monk crew/ogre and different on each side so this will need to stay loose. The arches can be assembled and either slotted in or glued - I just plugged them into the slots but there's plenty of give to push in the bell assembly later since it will be gripped by magnets not pegs, so if you want to glue, go for it. Part 2 - The easy bits Let get the simple magnetizations out of the way first. Glue together the other subassemblies (bell - leaving the seer off if you want to paint him separately, great censer, plague monk crew, rat ogre, brazier, plague priest) DO NOT ATTACH THE ROUND JOINTS THAT CONNECT THE BELL/CENSER TO THE ARCHES - this is extremely important as there's only one set of these, and they're also the trickiest goddamn part of the whole thing, but more on that later First magnet job, the cap of the bell should be drilled out and magnetized, I've shown the bell below but you'll need to do the same to the cap of the great censer  Then the paired magnet on the icon. Again note that the polarity on the bell/censer need to be the same so that the icon matches both of them (this is the one I hosed up first time round)  Next, the crew platforms. I opted to place one magnet on each side of the platform and one on each crew assembly, widening the socket on the platform and cutting the peg and drilling on the crew   This one's easy enough to follow since the positions are already mapped out for you by the pegs/sockets, so I haven't done close ups of the ogre and monks, but here's the monk crew, priest, and brazier magnetize (I actually cheated with the priest and just gave him a bit of pin to stick to since he's a pretty tight fit anyway, don't cut this corner with either of the crews, as they need to be anchored down properly since the chain/rope will be bearing weight from the main bell assembly and they'll just pop straight up)  Part 3 - Magnetizing the arches, bell and great censer This is the hardest part of the whole thing. First off, this bit has a lot of magnets in pretty much a straight line, plot out your polarity and make sure you don't gently caress it up! Starting from the arch there will be - arch magnet, archside magnet in round joint 1, bellside magnet in round joint 1, magnet on either side of the bell, another 2 magnets on the other round join and another magnet in the opposite arch. Yep. Firstly, the sockets in the arches basically fit perfectly to the magnets I had, I recommend the same size. Anyway, magnetize both arches, then move on to the round joints  These things are tricky but not as bad as the next section. Basically you want a magnet in each side of the round centre section of both joints, where a peg would ordinarily go. Drill this out sufficient to get the magnets in there (it should just about fit anyway, and do one at a time, testing polarity at each stage) WITHOUT damaging the little socket around the outer edge, this needs to hold a little secondary peg on the main bell assembly or the weight of the thing will drag it straight down, rotating around the magnet instead of being held up in an action pose. Anyway, once done you should have two magnets flush inside that little middle socket, one facing to pair with the arch, one facing to pair with the bell. Now for the critical and most involved bit, magnetizing the bell & great censer. Essentially, what we're doing is cutting away the peg that would normally thread through the round joints into the arch and replacing this with a magenetic joint. However, you'll notice that around the peg is a secondary raised little notch that makes it so this assembly can only go into the round joints one way. We need to cut away the entire post, both above and below this peg, but leave the peg intact. I suggest first placing the flat of your knife on top of this peg, then cut straight across to get rid of the upper post section. Then, cut straight down between the secondary peg and what remains of the main peg to the point where it's flush with rest of the round lip that's just a little bit raised out from the main body of the bell (ie, you want to retain this little lip in the next cut as it pretty much defines a good socket for the magnet, don't cut this away, this is the surface you cut the rest of the peg flush with. If that sounds confusing, it's easier to follow looking at the great censer, you don't want to cut it all the way down to the main beam, because the magnets wouldnt touch, you just want to remove the peg that is supposed to thread through the round joins into the arches). Then you can just cut horizontally from the opposite side and hopefully remove this chunk of plastic without doing any further damage to the secondary peg, which will not look a little odd standing there all by itself  ALTERNATE PLAN - If you can't do this or gently caress it up, as I did on one of the four times I had to do it, the alternative is to simply cut the whole fucker flush with the little lip I specified before, then place a short pin to replace the support peg. I found this less effective than the intact plastic sections but it will do in a pinch. Just make sure it's positioned correctly and the right length to just sit in the socket on the round join, it's only function is to stop the weight of the whole assembly rotating it around the magnetic join freely. Pray, test your polarities, and attach all the subassemblies of your chosen format. The chain/rope from the crew WILL need to sit on one of the two end pegs on the round joints, as without it it still tends to droop a little bit, but between the crew rope and the secondary pegs i've found it holds stable and stands up to being moved around the table. Now sit back and have a skavenbrew, because you've completed a hell of a project and saved yourself the cost of another bell kit  Finished magnetized bell  Finished magnetized furnace  Bonus painting pics, rat ogre crewer I finished this morning   My internet access is sporadic through my iphone but if anyones got questions I'll try and reply to them as fast as I'm able
|
|
#
?
Dec 22, 2009 07:53
|
|
|
Looks pretty sweet, dude. I don't play fantasy at all, but I can assure you our resident Skaven players will love you for years to come for this guide. At least until GW makes a different bell/furnace model.
|
|
#
?
Dec 22, 2009 09:23
|
|

|
Seriously, posts like that are the lifeblood of this thread
|
|
#
?
Dec 22, 2009 09:33
|
|
|

|
| # ? Apr 26, 2024 12:17 |
|
|
Sole.Sushi posted:A what-now blog? PaintVagrant posted:FTWs GIGANTIC LIST OF LINKS Great job on the terrans. The dindrenzi look too clean. I don't know if its the paint job, gloss, or the light reflecting on the angles. And the diagonal lines/blocks on both fleets are a very nice finishing touch. Another cool tut. Requesting more ratmen picks. Perhaps a sweet diorama of everything you have painted so far.
|
|
#
?
Dec 22, 2009 16:02
|
|

