|
Chenghiz posted:I'm not really seeing what you are trying to point out with the picture. I assume you're talking about a rough surface texture? In my experience that's what you get when you prime when it's really humid outside. Happens a lot to me in the summer (thanks Indiana) but not in other times. Yeah, the rough surface texture. I primed this dude like last week, it was definitely not humid outside.
|
 #
?
Jan 23, 2010 05:36
#
?
Jan 23, 2010 05:36
|
|


|

|
| # ? Apr 25, 2024 22:51 |
|
|
On my can it says shake for a minute after you hear the rattle balls. I just tried it and it worked fine. I only sprayed a little, but it went on flat and smooth for me.
|
|
#
?
Jan 23, 2010 05:45
|
|

|
Yeah, I had the same problem with Armory on a batch I did a month or so ago. When I went back to use that can on some more figures a week ago I shook the hell out of it for about three minutes to be sure. Three minutes is a lot longer than it seems like when you're just sitting there shaking a can, but it sure worked.
|
|
#
?
Jan 23, 2010 05:48
|
|


|
Fix posted:Yeah, I had the same problem with Armory on a batch I did a month or so ago. When I went back to use that can on some more figures a week ago I shook the hell out of it for about three minutes to be sure. Three minutes is a lot longer than it seems like when you're just sitting there shaking a can, but it sure worked. I thought this was the problem as well, but I seriously shook it for five minutes or so beforehand, because this grainy poo poo is a huge pet peeve of mine. I'll try shaking it forever again and see how it comes out on the Shoota Boyz I'm doing for February. It's gotten to the point where I wait for perfect weather before I prime. I might even start priming indoors in the spare room or something.
|
|
#
?
Jan 23, 2010 05:55
|
|
|
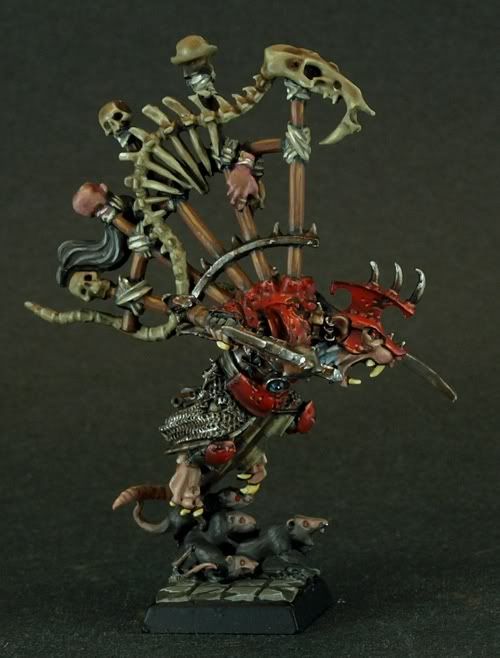
PaintVagrant posted:drat that is depressing to look at. I may have asked you before, but how did you do the bone?
|
|
#
?
Jan 23, 2010 06:17
|
|
|
Well wear a mask or something because I have a killer headache.
|
|
#
?
Jan 23, 2010 06:44
|
|
|
Phyresis posted:He looks like he's covered in felt  You might be spraying too close; I've had that happen when priming back when I was younger (stupid  ), and ended up throwing the model into brake cleaner just so I could re-prime it. ), and ended up throwing the model into brake cleaner just so I could re-prime it.And, in an odd bit to contradict myself, I've had that happen from priming too far away. Essentially, the primer particles develop a skin which then forms "grains" on the surface of the model. You can fix this by hitting your model with compressed air shortly after the primer falls onto it, but before it begins to dry. loving primer.
|
|
#
?
Jan 23, 2010 07:44
|
|


|
Sole.Sushi posted:loving primer.
|
|
#
?
Jan 23, 2010 08:00
|
|

|
Too close & the primer goes on too thick, too far away & it basically dries before it hits the model. Also, Vallejo primer, shake for 24 hours before use.
|
|
#
?
Jan 23, 2010 14:20
|
|


|
BuffaloChicken posted:gently caress. YES. Anyone know of any decent scratch building tutorials? NM. Ultrawerke's tut is wut I was looking for. (Think this has been posted before.) http://ultrawerke.blogspot.com/2007/03/scratchbuilding-tutorial-part-i.html Combaticus, are you planning on making any more trucks? I would love to see a step by step of your process. LewdMonocle fucked around with this message at 03:33 on Jan 24, 2010 |
|
#
?
Jan 24, 2010 03:31
|
|


|
Rebasing/redoing decals/touching up paint on my entire army seemed like a great idea at the time but jesus christ kill me 
|
|
#
?
Jan 24, 2010 05:18
|
|
|
So uhhhh does anyone have a good guide to painting Cryx? Googling gives me nothing but bullshit
|
|
#
?
Jan 24, 2010 05:48
|
|

|
The group I go down to Origins with is starting to get ready early this year and my current job is to help with terrain creation. Specifically I'm supposed to figure out how to make water effects for a sewer. I've done some googling but was wondering what you guys would do when it comes to water. I know most of this thread has been about miniatures but I figured this fit.
|
|
#
?
Jan 24, 2010 05:54
|
|


|
crime fighting hog posted:So uhhhh does anyone have a good guide to painting Cryx? Googling gives me nothing but bullshit I have a fair Cryx collection. Are we talking 'jacks and poo poo? To be honest, it doesn't get much better than (using p3 names here) Cryx Bane Base (CBB,) and then lightly, LIGHTLY, highlighting with Cryx Bane Highlight (CBH.) A final extreme highlight can be done with Trollblood Highlight. Much like the Khador Base and Highlight, you will not get a good effect from them unless they are used in thin highlighty waves. For metals, Blighted Gold is rockin' for any yellow metallics. For Necrotite, Iosan Green to Wurm Green to Necrotite Green is nice. Basically, the Cryx P3 paint set comes with most everything you'd want. For undead flesh, Thrall Flesh and then Badab Black wash looks excellent.
|
|
#
?
Jan 24, 2010 06:39
|
|

|
crime fighting hog posted:So uhhhh does anyone have a good guide to painting Cryx? Googling gives me nothing but bullshit I hate to recommend the PP forums for anything, but check out their painting forum, there are lots of project logs for cryx, and some of them are pretty decent
|
|
#
?
Jan 24, 2010 06:44
|
|

|
Len posted:The group I go down to Origins with is starting to get ready early this year and my current job is to help with terrain creation. Specifically I'm supposed to figure out how to make water effects for a sewer. I've done some googling but was wondering what you guys would do when it comes to water. I know most of this thread has been about miniatures but I figured this fit. You can do this in a few ways. The easiest way to do it is to make false water. False water can be made by filling your sewer with some kind of medium--clay, putty, whatever--and texture it so it's ripply and ugly looking. Adding floating debris works well. After wards, paint it up all nasty-like, then go over it with a thin coating of water effects. Like I said, it's easy, and also the fastest way to do it. The second way which produces a better effect, but is far more complicated, is to use pure water effects and dyes. Dyes can be anything with super-dense pigments. I recommend artist inks, but if you are looking for opaque colors, the foundation paints that Games Workshop makes is the way to go. Simply mix the ink or foundation paint together and spread it in a layer no thicker than 2-3 millimeters. When mixing, a little pigment goes a really, really long way, so do only a couple of drops to start, and if it's not colored enough, add more. Wait 24 hours and let the layer harden, then repeat the process. As you add more layers, thin out the colors of the pigments so that you achieve a murky, dark depth and a semi-transparent surface, as water would naturally look. Depending on the depth of your sewer, this process might take a very, very long time. If you don't give the water effect time enough to cure, it will end up looking cloudy for several weeks. A third option is to use a product by Woodland Scenics called E-Z Water which is really what it sounds like. Simply heat up the beads until they turn into a liquid, then pour into your sewer. I've never used the product, so I'm not certain if it takes well to dyes, but I assume that any heat-resistant pigment, such as non-organic inks, will blend in just fine. Just keep the product over heat while mixing in the color to assure it doesn't harden. But, the product does say that it can be re-heated, so you have that. Hope any of these solutions helps.
|
|
#
?
Jan 24, 2010 07:03
|
|
|
hirstarts has lots of tuts on water: http://www.hirstarts.com/tips14/tips14.html#fountain http://www.hirstarts.com/tips15/tips15.html#pools http://www.hirstarts.com/tips17/tips17.html#water updates on some stuff. Did a lousy job on his scepter:  So I replaced the tip with a saurus war drum stick:   Click here for the full 852x649 image. He needs more detail. Any advice? Also. Project flying thunder is a bust. Model of last gen terradon for size comparison. 
LewdMonocle fucked around with this message at 08:42 on Jan 24, 2010 |
|
#
?
Jan 24, 2010 08:26
|
|
|
His little hat seems a bit bare; do you plan to add anything Lizardman-centric to it or just a cross? Other than that he looks great!
|
|
#
?
Jan 24, 2010 08:44
|
|

|
crime fighting hog posted:So uhhhh does anyone have a good guide to painting Cryx? Googling gives me nothing but bullshit There's a lot of good stuff in the No Quarter magazines for painting guides and tutorials. Here's a crappy picture of a tutorial for rotten flesh: link
|
|
#
?
Jan 24, 2010 09:31
|
|

|
crime fighting hog posted:So uhhhh does anyone have a good guide to painting Cryx? Googling gives me nothing but bullshit Brush Thralls has some general tutorials which might help - http://blog.brushthralls.com/?page_id=1942
|
|
#
?
Jan 24, 2010 10:28
|
|


|
Fyrbrand posted:Rebasing/redoing decals/touching up paint on my entire army seemed like a great idea at the time but jesus christ kill me  Sleep = overrated
|
|
#
?
Jan 24, 2010 11:31
|
|
|
LewdMonocle posted:Did a lousy job on his scepter: Perhaps have his loin cloth actually turn into a sarong kinda thing and come down round the back of his legs and stuff? you could then freehand some details on it when it comes to painting?
|
|
#
?
Jan 24, 2010 12:08
|
|

|
Haven't posted any of my poo poo in a while because I was on a real downer for a while but I've got back into the swing of painting again, so this is what I've been up to. Trying new paints!  Finishing off a bunch of Gaunts!   Starting some Raveners!  And begun a Tervigon build. I'm going to build some horrible looking egg sacks on his torso and tail and have him (her?) propped up on some scything talons. The head will be a spare Carnifex head I converted and painted in the long long ago. 
|
|
#
?
Jan 24, 2010 12:17
|
|
|
Gravitas Shortfall posted:You are clinically insane for painting a horde army to this standard, kudos to you because these guys look absolutely crackin'
|
|
#
?
Jan 24, 2010 12:25
|
|


|
Gravitas Shortfall posted:
|
|
#
?
Jan 24, 2010 12:31
|
|
|
Fix posted:All right, so what's your take on the Montana Gold stuff? Honestly? I'm not 100% sure yet. I've only had the chance to spray that one hormagaunt, and I haven't got around to finishing his green skin yet. First impressions - it looks shiny, so much so that I wasn't sure it was dry for ages. I was worried that it was too shiny to take paint properly, but the thinned down vomit brown went on fine with no beading or anything like that - it's MUCH better than the Tamiya sprays, which have a finish so loving slick that it's almost impossible to paint over unless the paint is straight from the pot. I bought it specifically for my Trygon but I think I'll do more testing on Gaunts first. The UK winter is a bitch to try and spray in though.
|
|
#
?
Jan 24, 2010 12:57
|
|
|
Fyrbrand posted:
Well worth the no sleep man!
|
|
#
?
Jan 24, 2010 16:36
|
|
|
Sole.Sushi posted:Water LewdMonocle posted:More water Thanks for the advice that made this job so much simpler than I thought it would be otherwise.
|
|
#
?
Jan 24, 2010 17:57
|
|
|
well, this owns
|
|
#
?
Jan 24, 2010 19:15
|
|
|
PaintVagrant posted:well, this owns Those look pretty sweet. I wish there were huge player bases at local stores like GW has.
|
|
#
?
Jan 24, 2010 20:29
|
|


|
So after taking about a year off from painting minis thanks to a move, I've gotten the time now to get back into it. I did have two questions for you guys if you don't mind indulging me. I've been working slowly on a Sister's army for some time now. I was thumbing through the tutorials and tips over at FTW and I saw an article on Painting to Play; essentially painting your models fairly quickly to where you can easily play them on the table. My interest in Warhammer 40k is to both learn/play the game as well as to paint good miniatures. That being said, do you think it's better to adopt this Paint to Play strategy now, while I'm first starting to get into the game and work on better paint jobs as time goes on? Secondly, I find that as I paint my models I prefer them to be on their bases while I paint. Does anyone have a good trick for keeping the Sisters in their bases? Or would it be better to by slit-less bases and cut off the bar between the sister's feet? The idea there to be to just super glue then down to the slit-less base as you would a plastic mini (unless I've gotten that completely wrong). Thanks in advance gents. Hope to have some results pictures soon.
|
|
#
?
Jan 24, 2010 22:05
|
|

|
Browsing some BFG stuff... Hey, pretty nice scratch built cruiser. Wait, why is there an epic scale swooping hawk on an imperial cruiser? .. Hold on, is that a loving minivan on the front?
|
|
#
?
Jan 24, 2010 23:25
|
|


|
hahahahahaha
|
|
#
?
Jan 24, 2010 23:27
|
|
|
Isn't that a minivan from the board game Life?
|
|
#
?
Jan 24, 2010 23:33
|
|

|
landis posted:Isn't that a minivan from the board game Life? Only four holes, not six, cause that was my first thought. Maybe Life JR?
|
|
#
?
Jan 24, 2010 23:40
|
|

|
Posted in the wrong thread! PV how easy is wet blending to pick up and learn? Have you tried it?
|
|
#
?
Jan 24, 2010 23:42
|
|
|
That red bone has to be from something. This is a fun game--find the random boardgame bitz!
|
|
#
?
Jan 24, 2010 23:46
|
|

|
lighttigersoul posted:Only four holes, not six, cause that was my first thought. Maybe Life JR?
|
|
#
?
Jan 24, 2010 23:58
|
|
|
crime fighting hog posted:Posted in the wrong thread! PV how easy is wet blending to pick up and learn? Have you tried it? I like to wetblend my shades, sort of put the darker color on very thinly, and then using a clean brush to feather the edge so it blends in. I dont actively blend 2 colors at once on the model too often though, because acrylics dry too damned fast.
|
|
#
?
Jan 25, 2010 00:14
|
|
|

|
| # ? Apr 25, 2024 22:51 |
|
|
The Middleman posted:So after taking about a year off from painting minis thanks to a move, I've gotten the time now to get back into it. I did have two questions for you guys if you don't mind indulging me. As for securing metal models to plastic bases, superglue might not be enough, especially if you happen to bump or jostle your minis. Slotted bases would probably be your best bet. Failing that, you could clip off the tabs on the sisters' feet and then pin them to their bases with some brass rod or just a bit of a paperclip. Stick a dab of superglue and a small ball of greenstuff on the bottom where the pin comes through the base and they shouldn't go anywhere.
|
|
#
?
Jan 25, 2010 00:32
|
|