|
Fast_Food_Knight posted:Skarsnik you can pick one up in primark for �2 that's what I did. You'll have to take your craft knife to the top though and open it up, just to make things easier. nice one, will have a look tomorrow
|
 #
?
Feb 15, 2010 19:45
#
?
Feb 15, 2010 19:45
|
|


|

|
| # ? Apr 20, 2024 06:12 |
|
|
You can make a ghetto light box with just some curved white paper and some lamps. It's not quite as diffuse but it does the job.
|
|
#
?
Feb 15, 2010 19:46
|
|


|
I've posted this on EoW, but for the past couple of months, I have been plugging away at a scratchbuilt warhound titan. http://s784.photobucket.com/albums/yy128/Tector_2009/Warhound/ There's the album of it so far, I should have some more pics later today when I finish some more painting on the main hull. The camo scheme on the upper half is almost done, I'm just doing some detailing on the engineering compartment at the back. The plan is since I don't have the massive tracts of vents all over the titan (presumably for coolant systems) that the FW and other homebrew titans have, to scratchbuild some Mech Warrior style heat sinks for the legs and hull flanks. They'll get the same glow treatment as the cooling rods on the side of the plasma blastgun; I want the things to look nice and bright. I like the oranges and yellows; the warm colours contrast very nicely with the colder blues and greys that make up most of the colour scheme. I also have a Testor's Aztek airbrush arriving in the next week or so, I am really looking forward to farting around with that, especially when it comes time to do the weathering on the titan's legs. Fearless fucked around with this message at 19:56 on Feb 15, 2010 |
|
#
?
Feb 15, 2010 19:51
|
|


|
Skarsnik posted:Don't suppose you could find it on the ikea website and post a link? My photography at the moment is entirely based on the availability of the sun, and it seems to dislike Cardiff most of the time.. Can't find it I'm afraid but if you get on ebay & look for light tent you'll find what you need for �10-15. Edit I should refresh before posting.
|
|
#
?
Feb 15, 2010 20:08
|
|


|
I picked up the FW white ink, I can't wait to give it a shot.
|
|
#
?
Feb 15, 2010 20:58
|
|

|
Skarsnik posted:Don't suppose you could find it on the ikea website and post a link? My photography at the moment is entirely based on the availability of the sun, and it seems to dislike Cardiff most of the time.. Here's something else. Some of us are lazy and like to order everything at once and not have to look around for parts. It looks like it comes with a carrying case and that's cool. I would rather have something like this than what I've got now. You can probably find it somewhere cheaper. Now I've got a wooden frame covered in tracing paper. It's huge and I hate getting it out for pictures. I've also got a couple of old desk lamps that get way too hot.
|
|
#
?
Feb 16, 2010 01:44
|
|


|
Fearless posted:Scratch-Built Warhound This thing looks rather impressive, especially considering the relatively short time you've gotten it together. I think those vents are there on the Forge World models mostly to break up the straight geometry, to give a more dynamic look to the model as a whole, instead of it being a polygon with feet. If you are looking for an alternative to massive venting systems, have you given thought to simple exhaust pipes? Heat sinks might be too flashy, but with the paint idea you have going on, it might look cool.
|
|
#
?
Feb 16, 2010 05:25
|
|

|
PV, a couple of questions. A while back I recall you did some yellow marines complete with battle damage. What did you do to shade them, and how did you do the damage ?
|
|
#
?
Feb 16, 2010 05:31
|
|

|
The way I did them was pretty time intensive, and Id probably do it a different way if I did them again (not using GW washes) but it was basically white primer sunburst yellow basecoat shade with devlan in recesses shade the long areas with sepia, then devlan, blending them together paint chips are grey with white highlights at bottom of scratch 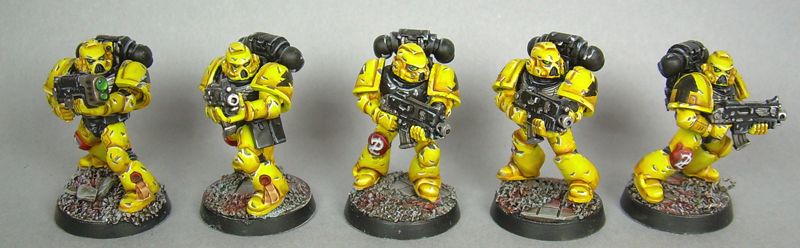
|
|
#
?
Feb 16, 2010 05:36
|
|

|
Ta muchly.
|
|
#
?
Feb 16, 2010 05:49
|
|
|
Sole.Sushi posted:This thing looks rather impressive, especially considering the relatively short time you've gotten it together. I think those vents are there on the Forge World models mostly to break up the straight geometry, to give a more dynamic look to the model as a whole, instead of it being a polygon with feet. If you are looking for an alternative to massive venting systems, have you given thought to simple exhaust pipes? Heat sinks might be too flashy, but with the paint idea you have going on, it might look cool. I haven't added the pictures yet and they may not be very visible at the moment, but there are four stubby stacks in the rear. I painted the engineering compartment today, so pics should be up tomorrow showing those and what I did to make the rear a little less boring. Glowing heat sinks will be added to the sides of the two rear "bulbs" as this will allow them to be a bright orange without being unbelievable-- if they were in the shadowed areas on the legs, they wouldn't function properly as a light source. I think some extra armour plates are in order for the legs, if nothing else to break up the lines of the polygons that form them.
|
|
#
?
Feb 16, 2010 08:37
|
|
|
Nice warhound. Working on one of those myself, and have more or less finished the legs, waist and weapons. The main hull is built, but not detailed. Here's the Vulcan megabolter I just finished: 
|
|
#
?
Feb 16, 2010 14:59
|
|

|
Alright, newbie question time. I've got some Warmachine figs I'm trying to get together and just getting through the priming stage has been a comedy of errors. So here's a couple quick questions. Do you do basing before you glue the fig to the base? What about priming? Also, I remember reading a tutorial once that was sort of a high level description of painting a figure. A lot of articles are about specific figures or specific technique, but this went over all of the basics. It explained about base coating, highlighting, priming, basically a good overview that explained what they were doing and why. Any ideas, or even something similar?
|
|
#
?
Feb 16, 2010 15:03
|
|

|
I assemble the mini as much as I can (while still making sure I can reach all places for the basecoat) before priming the individual pieces. I usually prepare my base separately from the model I'm painting and pin everything together after shading. I like to do this because after this stage I will have a model that is fieldable to a decent tabletop standard after not too much work and it gives a sense of progress. I can also see what's going to be hidden behind other stuff so I don't spend time highlighting/detailing something that will be obscured by weapons anyway. Brushthralls has pretty good tutorial on how to get a Cygnar faction box assembled and painted and goes through the basic techniques here. The P3 Painting Core Techniques DVD also covers the basics (with cheesy commentary) if you can find it somewhere.
|
|
#
?
Feb 16, 2010 16:05
|
|

|
Arlaharen posted:I assemble the mini as much as I can (while still making sure I can reach all places for the basecoat) before priming the individual pieces. I usually prepare my base separately from the model I'm painting and pin everything together after shading. I like to do this because after this stage I will have a model that is fieldable to a decent tabletop standard after not too much work and it gives a sense of progress. I can also see what's going to be hidden behind other stuff so I don't spend time highlighting/detailing something that will be obscured by weapons anyway. I think at this point assembling first and then painting makes the most sense. From the Brushthralls link, it looks like they're putting down the basing material first and then priming over that. My only question is what about white primer? It's no big deal in the tutorial because he's using black primer. If you use white primer, then you have to mask off any parts of the base that are still showing. I tried doing this last night and ended up with a mess and something I used ate through the plastic on my base. Why are primer and masking tape so volatile?
|
|
#
?
Feb 16, 2010 16:15
|
|
|
Why would you mask off the base? Just paint it last. Also, if your primer is eating through plastic you might want to switch brands 
|
|
#
?
Feb 16, 2010 16:29
|
|
|
PaintVagrant posted:Why would you mask off the base? Just paint it last. Also, if your primer is eating through plastic you might want to switch brands So you're saying primer the whole deal and then repaint the edge of the base black? Seems like that makes sense, next round I'm thinking I'll do a sand base after assembly, primer the whole deal and just retouch black on the base. I dunno what's up with the primer. I was stupid and bought the overly expensive GW primer, but for whatever reason the interaction between the masking tape adhesive and the primer made the base start peeling off in chunks.
|
|
#
?
Feb 16, 2010 16:33
|
|
|
Yeah just repaint it black, it would take way less time than masking and all of that. Also, the GW primer shouldnt be eating anything, so its def the masking tape. One of the advantages of putting the sand on pre-priming is that the primer helps make it stick down better, and it takes paint better when you get around to painting the base.
|
|
#
?
Feb 16, 2010 16:37
|
|
|
This whole primer fiasco reminds me of the enamels conversations + pictures from ages ago!
|
|
#
?
Feb 16, 2010 16:55
|
|


|
on the subject of basing. for my dragon i placed the model items on a clean base and traced around them then glued my sand / grass avoiding the outline, painted, washed, highlighted the base then glued the model parts in place. That 'kinda' worked ok but made the grass a bit sloppy obviously. Next up i tried doing some regular square bases in a similar method and they came out appallingly and i ended up scrapping the bases, redoing them and just gluing the model on top of it all which looks a bit 'odd' to say the least. so now i'm trying a third method. glue on base, dipped in sand, paint sand, wash sand, highlight sand, dab of glue in places and then i would like to dunk into my static grass... HOWEVER... my static grass seems to be in giant clumps that if i stick to a base and then try to knock the excess off it either doesnt move or i remove all of it in one big ball. Basically i'm asking if there's a good way to break up the static grass so it's not in peanut sized clumps? And secondly, how the hell to i make a good looking base?!
|
|
#
?
Feb 16, 2010 17:12
|
|

|
There's plenty of good basing resources in the OP. My personal favourite is the Hordes basing tutorial which I use for my Cygnar and Circle.
|
|
#
?
Feb 16, 2010 17:42
|
|
|
R.S. Gumby posted:Nice warhound. This is fantastic.
|
|
#
?
Feb 16, 2010 18:56
|
|

|
R.S. Gumby posted:Nice warhound. I have a megabolter for mine, but it does not look anywhere near as nice as that.
|
|
#
?
Feb 16, 2010 19:06
|
|
|
So I've just finished assembling a Doombull First up, Goddamn I hate multi part metal miniatures. It was a bitch to get together and now I've got a ridiculous amount of gap filling to do However, it does look brilliant. It is HUGE. Stands taller than a Dreadnought Speaking of dreads, got a look at the new Goff Dread. Its absolutely beautiful, everything you'd want in a big orky thing. Seems really sturdy too, despite the silly amount of bits sticking off it. Made the new venerable dread next to it look very small and dinky.
|
|
#
?
Feb 16, 2010 20:09
|
|
|
R.S. Gumby posted:Nice warhound. And this is... cereal box card? Dude, you should make this outta plasticard. (and possibly recast it...)
|
|
#
?
Feb 16, 2010 21:39
|
|

|
Flying Guillotine posted:And this is... cereal box card? Dude, you should make this outta plasticard. It's 1,5 mm cardboard, with detailing made from card, plasticard and a few plastic profiles and bitz. It isn't exactly lightweight, so I bet I'm gonna have to reinforce all the legjoints quite a bit to support the superstructure. On the plus side though, the cardboard makes it really sturdy and I get it for free from work. So far it's cost me about $20. It does however keep me from working on my drat oath...
|
|
#
?
Feb 16, 2010 22:26
|
|
|
You'll be way ahead for July's Superheavy secret ingredient 
|
|
#
?
Feb 16, 2010 22:43
|
|
|
Skarsnik posted:So I've just finished assembling a Doombull Boy, you gone done it wrong. I helped put together the store's Doombull and we only had one small gap to fill :\
|
|
#
?
Feb 16, 2010 23:10
|
|
|
You want to know frustration? Magnetize the bolter sponsons on an old land raider. poo poo was thin metal and I had to drill into BY HAND, muttering under my breath the whole time. Not a week later they announced the new all plastic versions.
|
|
#
?
Feb 17, 2010 00:29
|
|
|
crime fighting hog posted:You want to know frustration? Magnetize the bolter sponsons on an old land raider. poo poo was thin metal and I had to drill into BY HAND, muttering under my breath the whole time. Not a week later they announced the new all plastic versions. It's only fitting that this would happen to a Mean Green Tree Marine or whatever the heck your wood-chapter is called. Having to deal with frustrations, only to find out there was an easier solution down the road. Just be thankful it wasn't a scrap launcher. 
|
|
#
?
Feb 17, 2010 04:53
|
|
|
Guys, how do I paint blonde hair so that it doesn't look like being on an anime character?
|
|
#
?
Feb 17, 2010 10:26
|
|

|
http://www.dakkadakka.com/dakkaforum/posts/list/259096.page
|
|
#
?
Feb 17, 2010 10:30
|
|

|
Tarquinn posted:Guys, how do I paint blonde hair so that it doesn't look like being on an anime character? MasterSlowPoke posted:http://www.dakkadakka.com/dakkaforum/posts/list/259096.page That worth it if it's for a character. But seriously, Bubonic Brown base coat, dry brush sunburst yellow. For more muted, Bubonic Brown, wash Sepia, dry brush Bubonic Brown.
|
|
#
?
Feb 17, 2010 10:36
|
|
|
Tarquinn posted:Guys, how do I paint blonde hair so that it doesn't look like being on an anime character? If you've got decently sculpted hair you can go this route:  Click for big! My blondes (the one on the left) are sepia wash over white primer. It's surprisingly effective. Models assembled this week: 4 rhinos, 1 vindicator, 2 exorcists, 2 drop pods, 1 land raider. 
|
|
#
?
Feb 17, 2010 10:52
|
|


|
Fix posted:Models assembled this week: 4 rhinos, 1 vindicator, 2 exorcists, 2 drop pods, 1 land raider. "In local news, a Hawaii native was found dead in his home this morning. Toxicology reports indicate that his blood contained 90% glue fumes at the time of his death. Police are still investigating how such a thing is possible."
|
|
#
?
Feb 17, 2010 10:59
|
|
|
Thanks a lot, guys. That was quick. ")
|
|
#
?
Feb 17, 2010 13:15
|
|
|
 I've been working on these sternguard little by little each week but there is some progress. I will be taking a better pic with a wonderous white background upon completion, which should be by this weekend ::fingers crossed::
|
|
#
?
Feb 17, 2010 17:16
|
|

|
Not sure if this is the best place to post, but I'm looking for a miniature for my D&D character - a Goliath Warden (weilding a warhammer in one hand and a shield in the other). I play 40k and so I always convert models for my D&D figures and usually they come from GW (WHF/40k, Mordheim, LotR) or Dark Sword Miniatures, but I'm totally stuck on this one. For reference, male goliaths are large (7'2" range) and bald, which is part of what makes it so hard. Since I'm a warden, I'm wearing hide armor, so no getting guys that are decked out in plate. Any suggestions? I've been looking around for a few days and I'm at a complete loss.
|
|
#
?
Feb 17, 2010 19:48
|
|

|
http://www.reapermini.com/OnlineStore/goliath/latest/03461 This may help you.
|
|
#
?
Feb 17, 2010 20:21
|
|

|

|
| # ? Apr 20, 2024 06:12 |
|
|
Fitret posted:Not sure if this is the best place to post, but I'm looking for a miniature for my D&D character - a Goliath Warden (weilding a warhammer in one hand and a shield in the other). I play 40k and so I always convert models for my D&D figures and usually they come from GW (WHF/40k, Mordheim, LotR) or Dark Sword Miniatures, but I'm totally stuck on this one. For reference, male goliaths are large (7'2" range) and bald, which is part of what makes it so hard. Since I'm a warden, I'm wearing hide armor, so no getting guys that are decked out in plate. Any suggestions? I've been looking around for a few days and I'm at a complete loss. Have you checked out Reaper minis?
|
|
#
?
Feb 17, 2010 20:21
|
|