

|
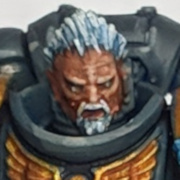
I need a little help from those of you who know your paints. I'm trying to get a skintone like the greenish one on this guy, but can't work out what colours to use.  Without assistance my GUO may end up like this, and that would make Papa Nurgle sad. 
|
 #
?
Mar 7, 2010 10:48
#
?
Mar 7, 2010 10:48
|
|


|

|
| # ? Apr 27, 2024 10:57 |
|
|
Knarloc Green with increasing amounts of Dheneb Stone would do it, I think.
|
|
#
?
Mar 7, 2010 10:55
|
|

|
Bleached bone (or off white of your choice) + Rotting flesh would be my guess.
|
|
#
?
Mar 7, 2010 10:57
|
|

|
MasterSlowPoke posted:Knarloc Green with increasing amounts of Dheneb Stone would do it, I think. I'd have said basecoat with dheneb stone mixed with rotting flesh, then wash with gryphonne sepia and thraka green, then highlight with the same stone/rotting flesh mix and start lightening it.
|
|
#
?
Mar 7, 2010 11:41
|
|


|
Dheneb Stone, some washes of purple and green and highlight of rotting flesh+bleached bone.
|
|
#
?
Mar 7, 2010 11:41
|
|
|
I just bought the boardgame Descent, and some of the pieces and bases are are a bit warped. does anybody who's worked with semi-soft plastic miniatures know if it can be fixed by putting the pieces in hot water, and trying to bend it back, like plasticard, or if I'll just gently caress the minis up.
|
|
#
?
Mar 7, 2010 14:09
|
|

|
Combaticus posted:I just bought the boardgame Descent, and some of the pieces and bases are are a bit warped. does anybody who's worked with semi-soft plastic miniatures know if it can be fixed by putting the pieces in hot water, and trying to bend it back, like plasticard, or if I'll just gently caress the minis up. Seconding this, some of the larger monsters have appendages warped enough that they won't sit flat on table top.
|
|
#
?
Mar 7, 2010 14:33
|
|

|
Meatslam posted:Did I ever mention I really like the way you paint orks? Thanks! Combaticus posted:I just bought the boardgame Descent, and some of the pieces and bases are are a bit warped. does anybody who's worked with semi-soft plastic miniatures know if it can be fixed by putting the pieces in hot water, and trying to bend it back, like plasticard, or if I'll just gently caress the minis up. Depends on what kind of plastic was used in the models. Chances are pretty likely they were injection molded, and therefore can be softened and repositioned without destroying the model. The most commonly recommended method that I've heard of is using heated sand. My fiance has a heat gun that she uses for embossing stuff, and that's been fairly effective and softening thin pieces for me.
|
|
#
?
Mar 7, 2010 15:32
|
|
|
Beer4TheBeerGod posted:That looks great. I like the rivets; what's your technique? Cutting and gluing plastic rod until I go insane from the repetitive work and the fumes. Pick thin circular rods (less than 1mm thick, I mostly use 0.5-0.7mm) for your basic rivets, and slightly larger hexagonal rods for nuts and bolts (1.5x to 2x the thickness of your circular rods). You can also get square rods to use as square bolts or washers, but it's roughly as much work to cut square bits of thin plasticard. Cut slices of rod carefully with a sharp knife. Change blades if you haven't for a while, if you're using a dull blade this kind of cutting is very prone to shearing, giving rough edges that are impossible to remove from these tiny objects. Lay the rod flat on your cutting mat and cut straight down with an even pressure. You want to get rivets as flat as you can but you don't need to be perfect, these are ork rivets. Go slowly at first, after a bit you can get a rhythm going. I find it easier to keep straight if I edge the rod under the blade for each cut rather than moving the knife. If you cut a rivet too thick don't try and cut it in half or whatever, it's a waste of effort, keep going down the rod which is easier to handle and faster. Cut at least twice as many as you'll think you'll want for the section you're working on: I guarantee you will use at least 50% more than your initial guess. Rivets tend to ping off as you cut, sometimes I put a little 'goal' made of half a blister pack next to where I'm cutting to catch the wild ones, usually I forget to dig it out and just cut next to my model. If you don't wear glasses get some eye protection: You won't blind yourself with rivet shrapnel, but you will remember it for a while! Oh, and you can also drill holes to represent rivets/bolts that have dropped out. Make sure they're in a line with other rivets so it's clear it's not a half-assed bullet hole. Some people suggest using the kind of hole-punch that's supposed to be used for making holes in leather belts and straps to make rivets to glue on. This is probably quicker and less fiddly than cutting rods, but I have yet to see a model using this technique that didn't look like it was covered in Lego studs. Can't say I'm ever likely to try it. Dunno if Cakefool or any of our other resident looney riveters have anything to add to that. Also I'm trying out weld lines on this build, which is just a thin sausage of your choice of putty laid along a joint and then stabbed into place along both edges with something pointy but a bit blunt like a cocktail stick. quote:I start with bestial brown, drybrush with snakebite leather and solar macharius orange, then flood the whole thing with devlan mud. After I ring the base with scorched brown I hit the model with dullcote, then use water effects on the base to get the final result. I was meaning more what's it made out of before painting and effects? Just sand on PVA or is there something more in there? The surface looks more smooth in some places than others so I wondered. Might just be the photo or the water effects doing that I guess. quote:My freehanding sucks, but I might try to be more adventurous in the future. I had a tentative plan of keeping the troop units a solid color, and using checks and other stylish stuff on the elites and other boyz. The problem is that the same focus that keeps the paint jobs clean also makes it impossible for me to be happy with any freehand work I do. I already spend way too much time on each model. You could also just vary weapon colours: Red boyz with all-gunmetal weapons, yellow boyz with brass bits on weapons etc. Orks tend to go best in either dingy poo poo-covered blacks, greys and browns, or bright primary colours (probably poo poo-covered too). Not sure I'd use purple unless I was trying to make some flamboyant freebooters or something like that. Rapey Joe Stalin posted:Without assistance my GUO may end up like this, and that would make Papa Nurgle sad. Greater daemon of mushy peas.
|
|
#
?
Mar 7, 2010 15:53
|
|


|
Fyrbrand posted:Ok awhile back someone here posted some badass skinks that were green with white facial paint kinda stuff going on. Anyone have pics of those, or know who it was or anything? Can't exactly wade thru all the pages in this thread. Someone should claim these because they're not mine and I'm a dummy who forgot to include who painted them in the file name.  
|
|
#
?
Mar 7, 2010 16:15
|
|

|
Shallow posted:I was meaning more what's it made out of before painting and effects? Just sand on PVA or is there something more in there? The surface looks more smooth in some places than others so I wondered. Might just be the photo or the water effects doing that I guess. The actual foundation is a combination of spackling putty and patches of sand. What I do is start off with a black base. I add a layer of spackling putty, and then dab at it with my finger to make crevices and other textures. The back of a paintbrush and other tools also help. I then put the model on it so his feet will press little indentations. After the putty dries I scrape away the material underneath the model's feet so they'll have a good plastic weld to the base. I then add dots of PVA glue to different locations and dip the whole thing in sand. Once that dries I coat the whole thing with watered-down PVA to seal everything. quote:You could also just vary weapon colours: Red boyz with all-gunmetal weapons, yellow boyz with brass bits on weapons etc. Orks tend to go best in either dingy poo poo-covered blacks, greys and browns, or bright primary colours (probably poo poo-covered too). Not sure I'd use purple unless I was trying to make some flamboyant freebooters or something like that. Yeah that's my main concern. Alternatively I could goof around with combinations of red and yellow in the other models, thus guaranteeing that I'll go crazy. I think the blue and orange squads would look okay, it's just that last squad color that drives me nuts.
|
|
#
?
Mar 7, 2010 16:18
|
|
|
The other thing you can do is get a box of fantasy orcs and go for a Snakebite mob in varying shades of brown. This will also give you some moon-hat heads you can use on your next batch of yellow/bad moon boyz. The fantasy orc boys fit together in exactly the same way as the basic 40K ones so it's just a bits swap to do this. Edit: actually you clearly already know this because you are using fantasy bits anyway, duh.
|
|
#
?
Mar 7, 2010 16:33
|
|
|
Aranan posted:Someone should claim these because they're not mine and I'm a dummy who forgot to include who painted them in the file name. Sweet, thanks dude. Hopefully someone claims it.
|
|
#
?
Mar 7, 2010 17:17
|
|

|
Shallow posted:Some people suggest using the kind of hole-punch that's supposed to be used for making holes in leather belts and straps to make rivets to glue on. This is probably quicker and less fiddly than cutting rods, but I have yet to see a model using this technique that didn't look like it was covered in Lego studs. Can't say I'm ever likely to try it. Yeah, what this dude said. Slices of rod are the way forward unfortunately. I'm going to try using a punch, not for rivets but I've had a need to punch small circular holes. I also need to try weld, I've not got greenstuff to look right, my local model shop has a plastic filler paste with a needle applicator, I'll have a go with that.
|
|
#
?
Mar 7, 2010 22:16
|
|


|
Combaticus posted:I just bought the boardgame Descent, and some of the pieces and bases are are a bit warped. does anybody who's worked with semi-soft plastic miniatures know if it can be fixed by putting the pieces in hot water, and trying to bend it back, like plasticard, or if I'll just gently caress the minis up. The D6 Generation just did a piece on this a few weeks ago. Dip in hot (just less than boiling) water, bend to shape, and dip in cold water.
|
|
#
?
Mar 7, 2010 22:18
|
|


|
I've had good results with the rod slicing technique. It's a royal pain in the rear end when you get to the small rivets, but it looks good. Another method that I'm experimenting with is to use a punch (I use a 3/16" transfer punch) to make divots in a .01" thick sheet of brass. It seems to work fairly well. I'll post pics up later when I'm done working on modeling my battlewagon.
|
|
#
?
Mar 7, 2010 23:10
|
|
|
Big mek with KFF! Crosspost! Guy is shiney because of the thraka wash, gonna dullcote him when I get off my rear end and dullcote everything else. 
|
|
#
?
Mar 7, 2010 23:56
|
|

|
Im not a huge fan of posting WIPs, but I know shavnir wants to see this. Also, there is some progress on teh SW bikers and stuff behind the stompa, but they are getting chainpainted so I wont have any good pics of them til tuesday, probably. Anyways, here it is. Missiles/orks/grots/mud on feet/some chalky looking glyphs/horns/etc still to come. Garbage flash photos, rargh.:  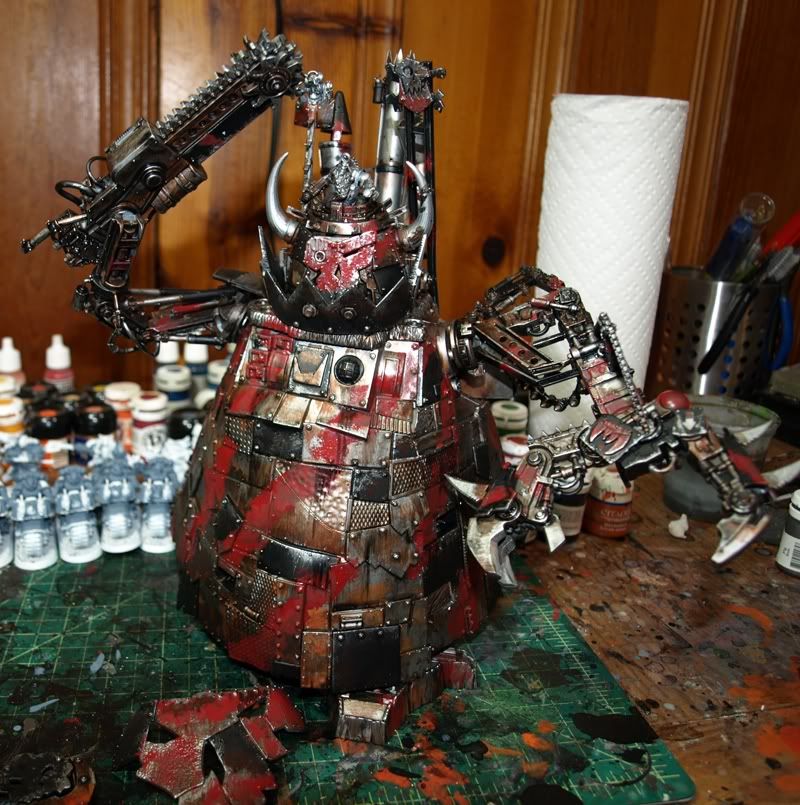  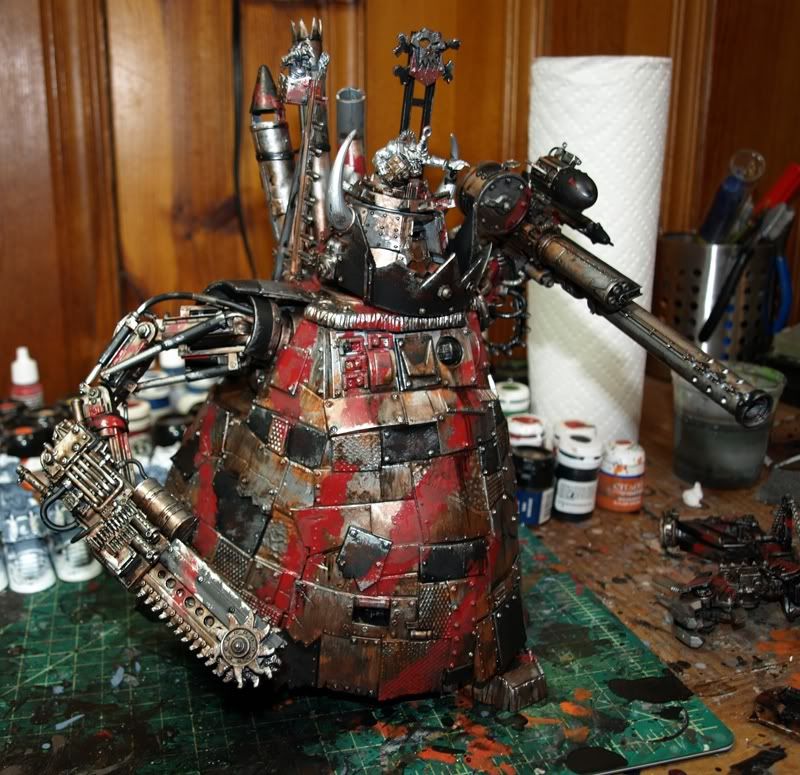
|
|
#
?
Mar 8, 2010 00:09
|
|

|
baller
|
|
#
?
Mar 8, 2010 00:37
|
|


|
PaintVagrant posted:At first I thought it was too dirty and ramshackle for your other works, but it's Orkz so v  v v
|
|
#
?
Mar 8, 2010 01:34
|
|

|
Its painted to match shavnirs other vehicles which are pretty worn and weathered looking
|
|
#
?
Mar 8, 2010 01:52
|
|
|
Crosspostin' like a bitch Ok just finished my chaos terminators, they are all magnetized and I have 5 sets of lightning claws waiting for some greenstuff and paint, so I can run nearly any combo of termies, I also have typhus and he is on my photobucket too. Click for big Termy with flamer + power weapon  Same termy with TL bolter and power fist  Group shots! yey!    Come on goons want to hear your thoughts on these, nice or not so nice. Also I should probably add another highlight to the weapons, as the matte varnish dulled it down quite a lot.
|
|
#
?
Mar 8, 2010 02:39
|
|

|
Fast_Food_Knight posted:Crosspostin' like a bitch These are awesome, I especially like the eyes/power weapon blades. Can't say I'm a fan of the guns (all metal with nothing to break it up) but they do look well done.
|
|
#
?
Mar 8, 2010 03:10
|
|
|
The Good Professor posted:These are awesome, I especially like the eyes/power weapon blades. Can't say I'm a fan of the guns (all metal with nothing to break it up) but they do look well done. This is a good point and something I was thinking about. Might rust them up a bit more and do the same green as the armour on the casing of the bolters? Y/N
|
|
#
?
Mar 8, 2010 03:13
|
|
|
Fast_Food_Knight posted:do the same green as the armour on the casing of the bolters? Y/N Voting Y. Also some of that red on them somewhere. e: maybe some bolter casings red?
|
|
#
?
Mar 8, 2010 03:16
|
|
|
Could do, wanted to keep the red minimal just to break up the green/brown/blue pattern. Too much would steal attention I think. Gonna make the modifiactions to the guns though. Thanks for the thoughts duder ")
|
|
#
?
Mar 8, 2010 03:24
|
|
|
I'm crosspostin' this WIP from the oath thread. It's my kitbashed BW with deffrolla. What do you guys think? Link for 'Uge
|
|
#
?
Mar 8, 2010 03:53
|
|
|
Beer4TheBeerGod posted:I'm crosspostin' this WIP from the oath thread. It's my kitbashed BW with deffrolla. What do you guys think? you sexy bastard
|
|
#
?
Mar 8, 2010 03:55
|
|

|
Thats loving rad. Any plans on addign any spikiness to the rolla?
|
|
#
?
Mar 8, 2010 03:55
|
|
|
PaintVagrant posted:Thats loving rad. Any plans on addign any spikiness to the rolla? Debating it. I've got a bunch of spikes from the stompa kit that I might use. Here's some more angles. Click on the pics for massive versions.     EDIT: I took your advice and added spikes to the rolla. What do you think? 
Beer4TheBeerGod fucked around with this message at 04:35 on Mar 8, 2010 |
|
#
?
Mar 8, 2010 04:02
|
|
|
Flash: Click here for the full 1000x665 image. No flash:  Click here for the full 1000x665 image. I need to get another clamp light, but I painted up this model to test it out... edit: does anyone know if clear bulbs are similar or the same as daylight?
|
|
#
?
Mar 8, 2010 04:47
|
|


|
Finished. I looked at the stompa, looked at my lightbox, and muttered to myself "we're going to need a bigger boat"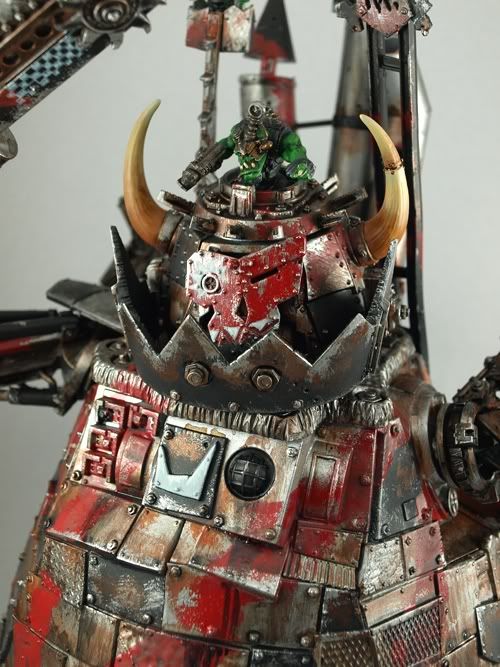 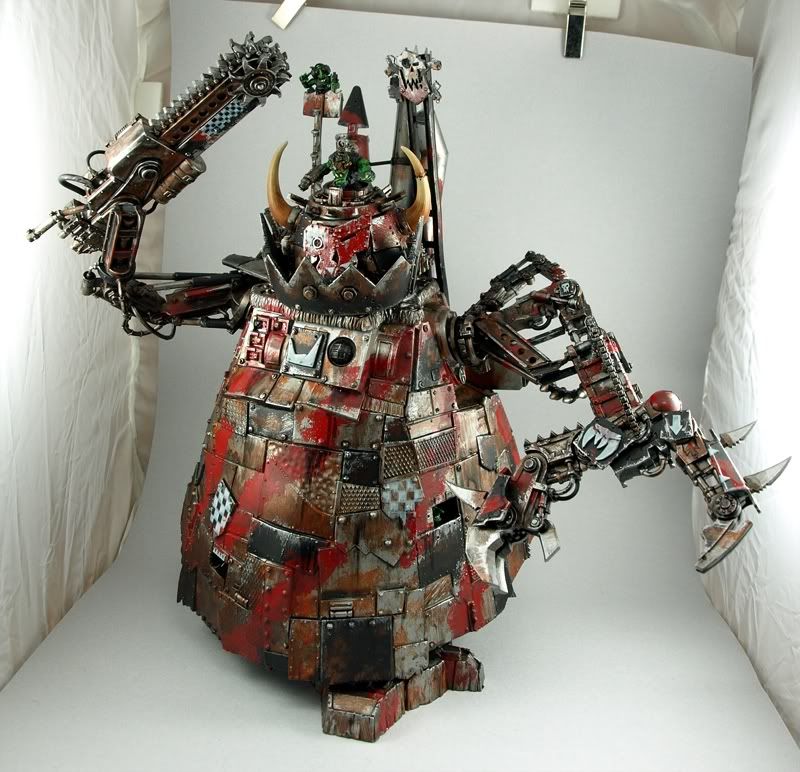  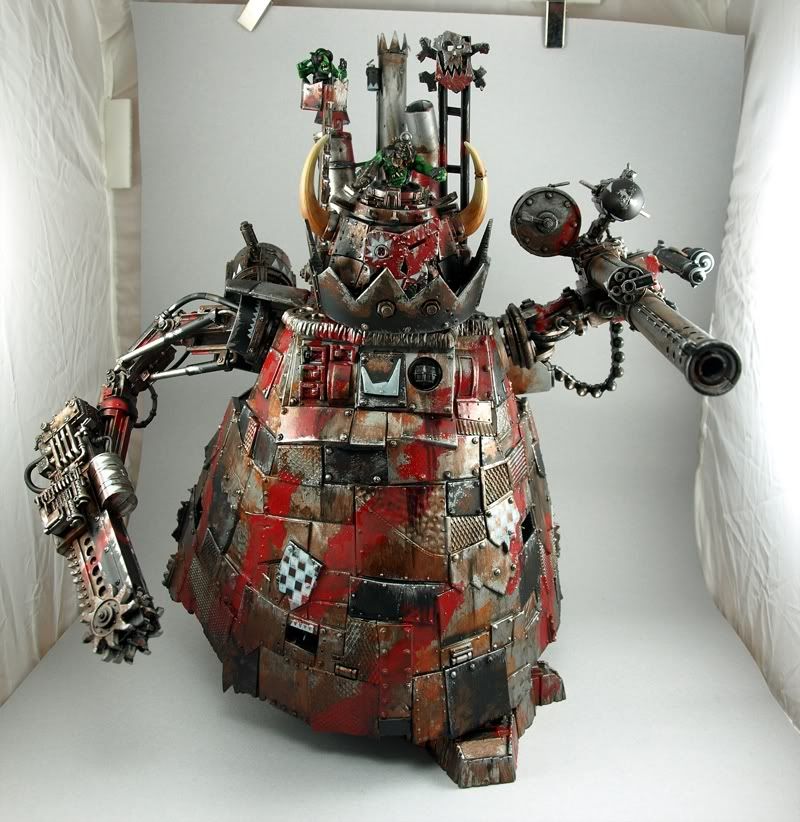 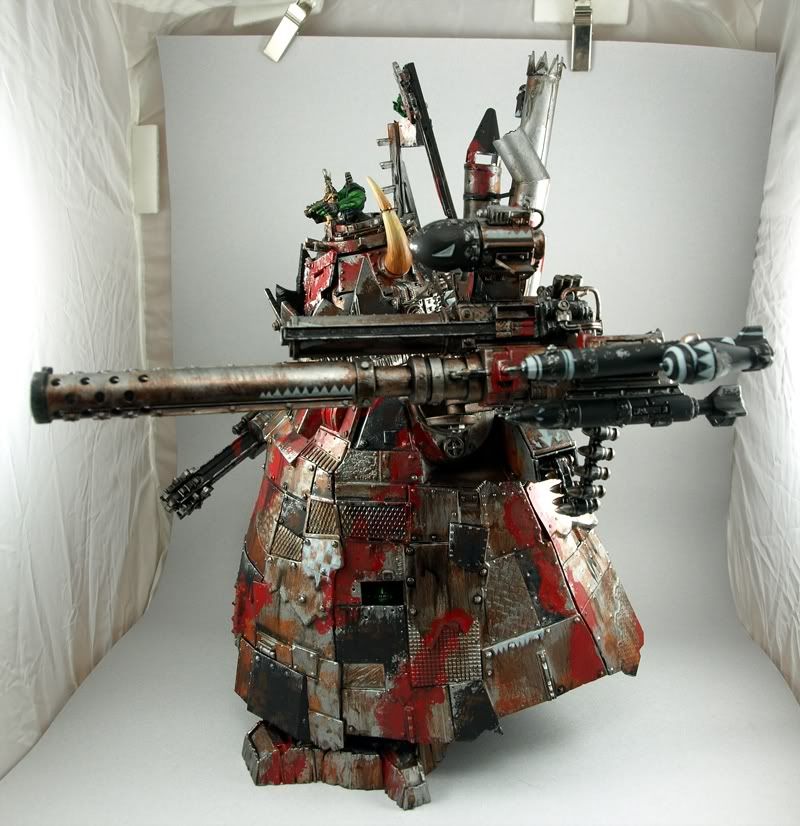 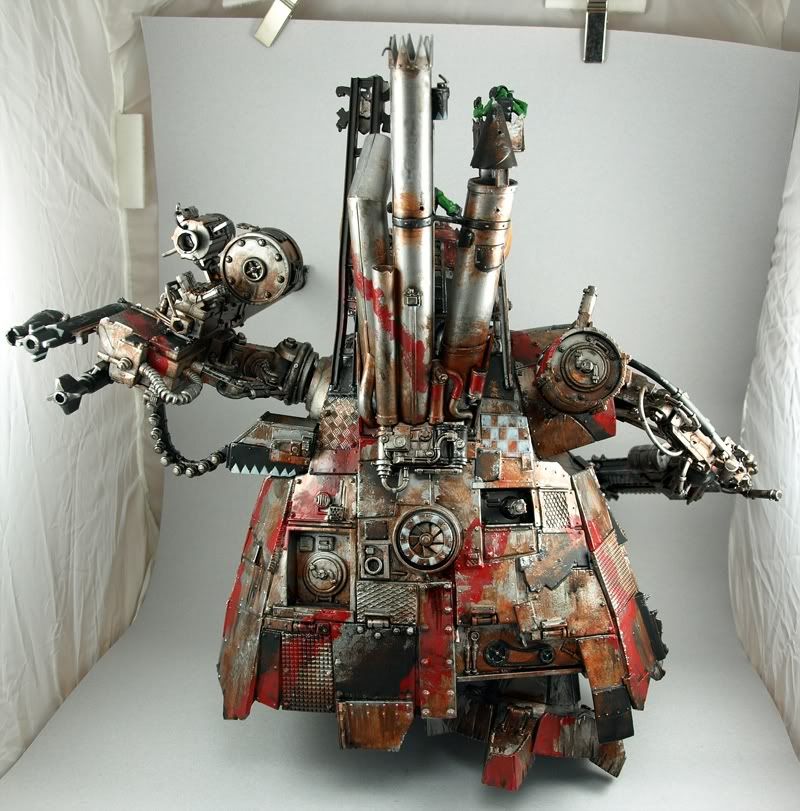 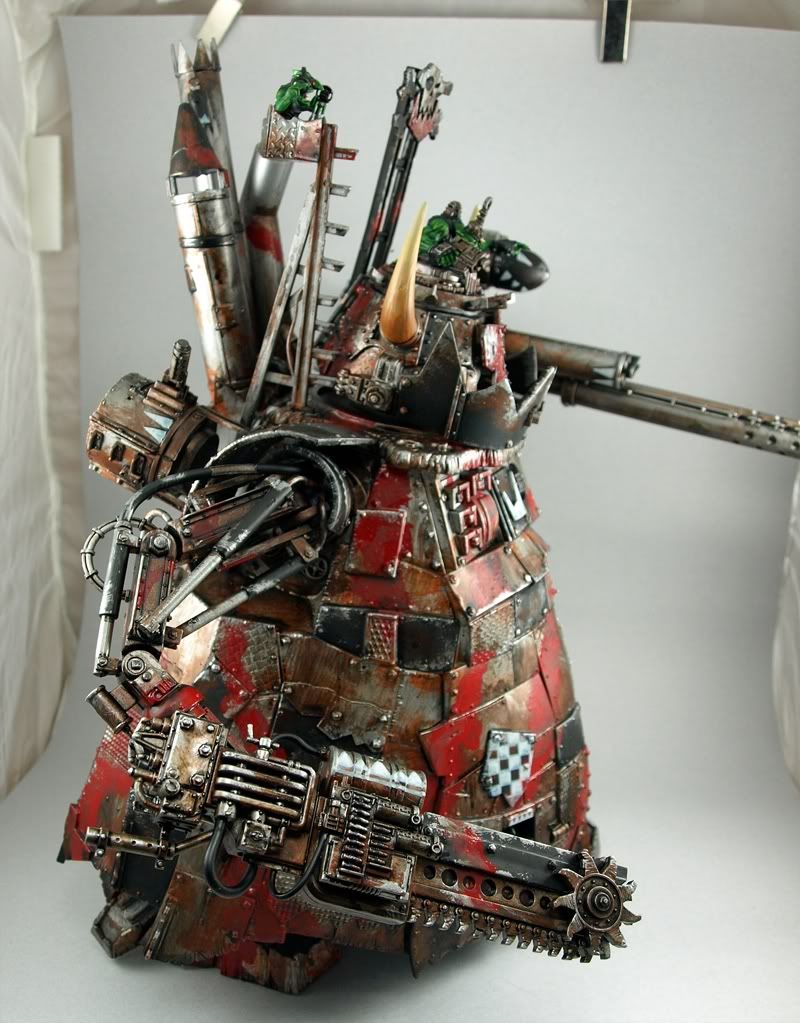
|
|
#
?
Mar 8, 2010 05:17
|
|
|
^^^ holy gently caress that is some stompa. Painted some stuff this weekend. Hive Guard for my Oath/nid army  Some Zombies I assembled a while ago but never painted. Decided to go for muted colors to give it an aged, decayed look. Used for D&D 4e tactical roleplaying. 5 down 15 to go.  A Dork Knight for one of the other players in D&D 4e. Used airbrush + Vallejo's black metallic air paint. The black looks great in person. The vallejo air metallics are awesome even for brushing on. 
|
|
#
?
Mar 8, 2010 05:19
|
|
|
PV, what did you do to get the metal looking that way? Did you start off with different base colors?
|
|
#
?
Mar 8, 2010 05:28
|
|
|
Simple green is 2:1 water correct? As an unforeseen consequence I cut myself trying to open the bottle 
|
|
#
?
Mar 8, 2010 06:33
|
|
|
Assuming you're talking about the chemical solvent, just use straight unless you're super-paranoid about melting your plastics through inattention. Should be fine for the 24 hours or so that it takes to kill your paint, in any case. A little quality time under a faucet with a toothbrush may be required, but that's the case for anything that's not brake cleaner.
|
|
#
?
Mar 8, 2010 07:06
|
|

|
Anphrax posted:Simple green is 2:1 water correct? As an unforeseen consequence I cut myself trying to open the bottle Just use outta the bottle, it doesn't hurt plastics and I've left marines in a tub of it for months just fine
|
|
#
?
Mar 8, 2010 07:09
|
|
|
crime fighting hog posted:Just use outta the bottle, it doesn't hurt plastics and I've left marines in a tub of it for months just fine I've left plastic models in it for over a year
|
|
#
?
Mar 8, 2010 07:15
|
|
|
Anphrax posted:edit: does anyone know if clear bulbs are similar or the same as daylight? Not even close, clear bulbs give a yellow tinged light, daylights have enough of a blue component to appear not-yellow, just like, well, daylight, which is yellow source with blue ambient.  I wonder if you could achieve the same effect with blue theatre filters over your lamps?
|
|
#
?
Mar 8, 2010 07:16
|
|
|

|
| # ? Apr 27, 2024 10:57 |
|
|
stabbington posted:Assuming you're talking about the chemical solvent, just use straight unless you're super-paranoid about melting your plastics through inattention. Should be fine for the 24 hours or so that it takes to kill your paint, in any case. A little quality time under a faucet with a toothbrush may be required, but that's the case for anything that's not brake cleaner. Well I didn't want to use that much so I watered it down to something near 5:1. And when I went to put them in the garage I found some minis I had put in there last summer. Popped the top off-- holy poo poo what is that smell! poo poo reeked! So I put 'em back out there 
|
|
#
?
Mar 8, 2010 07:25
|
|