


|
Noted, thanks. I understand the different colours are just colours, not grades/working time etc?
|
 #
?
Apr 2, 2010 22:06
#
?
Apr 2, 2010 22:06
|
|


|

|
| # ? Apr 23, 2024 12:47 |
|
|
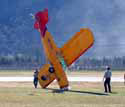
/\/\/\the white one is a finer grade than the others/\/\/\ Neuspinne buildlog #2: A head part one Decided to use my Easter holiday wisely and spend some time huffing solvents and PU-dust.  Sorry for the awful photograph, but I wanted to include it as it shows the process nicely. Visible is the profile (along the axis) sticking out in black styrene (used as a guide for shaping) and part of the internal tube skeleton poking out on the left. Unfortunately the the Sika foam I used was awful. It had several internal fractures. I shouldn't complain though as I got this block for free from a tooling company. It must have been a scrap that was kicked around the shop a lot, or something, cos this type of foam never caused me any trouble before.  A bit further along. Sanded down and primed.  After a first coat of Aves-Apoxie putty. Still a bit lumpy, but nothing some sanding can't solve. Progress will slow down a bit. It'll take several rounds of sand-putty-dry-sand-putty-dry to get it the shape perfect.
|
|
#
?
Apr 3, 2010 17:17
|
|

|
If you wanted to cast it in 2 parts top/bottom or front/back etc, you could make a 2-part mold for each half, you could make the whole thing 5mm thick or so. Far less resin, bit more work.
|
|
#
?
Apr 3, 2010 21:50
|
|
|
You can rotocast resin. Just pour it it and start hand spinning the mold. Keep moving it for 5-10 minutes until it's fully gelled. I'm assuming you'd only want to make a few extra, because this would be a PITA, all the way from the mold making to the spinning, to the cleanup & selling.
|
|
#
?
Apr 4, 2010 15:06
|
|

|
Thanks, that might be a good idea. I heard of rotocasting before but never tried it. TBH casting things is a bit of weak spot for me, I suck at it. I am already dreading the unavoidable casting of duplicate parts for the legs. Ik was kinda hoping to avoid the subject by outsourcing it eventually. We'll see. (fyi selling is a dirty word atm ") ) )Neuspotter buildlog #2addendum: A head Sand-sand-sand-sand-and-sand-some-more 
|
|
#
?
Apr 5, 2010 22:37
|
|
|
How do you apply the putty?
|
|
#
?
Apr 6, 2010 07:18
|
|

|
HardCoil posted:How do you apply the putty? I made sure the surface had some grip first to ensure adhesion, like in the second picture where the model is primed white the texture is clearly visible. Secondly I mixed a pingpong ball sized volume of putty and divided that in lots of tiny pea sized balls. I applied and flattened and blended each in turn to the surface while keeping my fingers wet. (Apply, flatten, apply second, flatten, blend, apply third, flatten, blend, etc.) No tools used but my fingers. After that is is just (wet) sanding (60 and 150 grit), measure&mark flaws in dimensions applying a bit more putty, some more sanding, measure dimensions, more putty, more sanding, rinse and repeat.... Last picture posted was after the second 'cycle'. Am now doing the forth and will hopefully finish after the sixth round of putty/sand. The whole process has a pleasant Zen like tedium to it.
|
|
#
?
Apr 6, 2010 19:30
|
|
|
alcyon posted:The whole process has a pleasant Zen like tedium to it. This is actually one of the main things I like about model building, believe it or not. OK, peeps, painting question: I have these little pieces on my current project, (an An-124) that are the front of a jet engine:  Now, the instructions and the RL version have a band of silver around the outside and inside of the jet engine. The outside is easy, but I have absolutely no idea how to mask the inside of the ring. I know I can't handpaint it neatly enough. And it's a detail that is extremely visible, so it should look right. Does anybody have any ideas? e: reference photo  Nebakenezzer fucked around with this message at 23:56 on Apr 6, 2010 |
|
#
?
Apr 6, 2010 23:53
|
|


|
This is just a thought, call it a jumping off point. Get some liquid mask material, the art store should sell it in the acrylic mediums section, put it in a deep enough dish, dip it in from the bottom (opposite the ring) dip it up to the correct height and let it dry. I don't know it is just the first thing that comes to mind.
|
|
#
?
Apr 7, 2010 01:09
|
|

|
Nebakenezzer posted:...how to mask the inside of the ring. Why can't you just mark the correct height on the inside of the ring with a pencil and use that as a guide to apply a thin strip of masking tape? Applying tape doesn't seem too difficult from my pov. The dipping in masking sol should work as well.
|
|
#
?
Apr 7, 2010 18:43
|
|
|
Bobx66 posted:This is just a thought, call it a jumping off point. Get some liquid mask material, the art store should sell it in the acrylic mediums section, put it in a deep enough dish, dip it in from the bottom (opposite the ring) dip it up to the correct height and let it dry. Slightly different came to mind, half-fill the intake with putty & pour in masking fluid up to the right point, then pull the putty out the bottom to drain the excess away. Comedy 2nd option, do you have a record turntable in your house?  Centre the intake then with it running at the slowest speed hand paint the line you need. Centre the intake then with it running at the slowest speed hand paint the line you need.
|
|
#
?
Apr 8, 2010 13:36
|
|
|
Nebakenezzer posted:I know I can't handpaint it neatly enough. And it's a detail that is extremely visible, so it should look right. Does anybody have any ideas? If you can't paint that neatly, can you draw that neatly? Not sure how fine the tip is (or how big the engine is), but you can get silver gundam markers that might work?
|
|
#
?
Apr 8, 2010 22:52
|
|


|
I'm looking at getting an airbrush in the near future but I won't be using it terribly often. What's the longest that I can leave the paints in the vials before I need to dump them?
|
|
#
?
Apr 10, 2010 13:52
|
|
|
two_beer_bishes posted:I'm looking at getting an airbrush in the near future but I won't be using it terribly often. What's the longest that I can leave the paints in the vials before I need to dump them? It depends on the paint/thinner and how well the pot seals. If properly sealed & kept upright/in the dark they should keep for weeks.
|
|
#
?
Apr 10, 2010 18:04
|
|
|
try years. (subject to a good seal)
|
|
#
?
Apr 10, 2010 19:25
|
|
|
Not sure what 'vials' meant in this context. The original container, decanters or those side and bottom loaders from large airbrushes? If it is the former: depending on the type of paint a loooong time IF properly stored. (I have some oilspaints that are way older than I am, I kid you not) If it is the latter not too long. Too many variables, need more input.
|
|
#
?
Apr 10, 2010 19:55
|
|
|
Yeah, I'm asking about the bottom loaders for the airbrush. So as long as it's sealed I should be fine?
|
|
#
?
Apr 11, 2010 00:14
|
|
|
If it's a good seal, you might be good. Just keep fastidious notes of your mixes/recipes so you're not relying on a decade-old pot to colour match.
|
|
#
?
Apr 11, 2010 08:09
|
|
|
Has anyone had any experience with scratchbuilding something in a smaller scale using an larger kit as reference?
|
|
#
?
Apr 11, 2010 12:16
|
|

|
No Pun Intended posted:Has anyone had any experience with scratchbuilding something in a smaller scale using an larger kit as reference? I've done it the other way round, no reason it can't be done your way. H w big to how small & what model?
|
|
#
?
Apr 11, 2010 13:08
|
|
|
 I want to take the omnibus from this set (1:32) and scale it down for use with proper 28mm minatures (so 1:72). Unless someone knows of a kit in that scale, it is quite a difficult model to track down.
|
|
#
?
Apr 12, 2010 07:34
|
|
|
'Proper' 28mm is closer to 1:50 scale I think, lets see: 28mm from ground to eyes, assume 5'6" ish, is 164cm. ratio between 28mm and 1640mm is 58.6. Okay, you're closer to a real scale. The way I'd do this is to buy the 1:32 kit, measure & replicate in plasticard all the flat parts (applying a scaling of 72/32=0.44) & assemble, building up a frame/armature underneath the curved areas. When you're happy with the flats, gently bend plasticard in warm water to replicate the plain curves, putty/sculpt the compound curves. Of course, you could do this in absolutely any scale you wanted, so you could use 58.6/32=0.55 for 'true' 28mm.
|
|
#
?
Apr 12, 2010 10:01
|
|
|
Thanks I was just roughly following these: http://en.wikipedia.org/wiki/List_of_scale_model_sizes http://en.wikipedia.org/wiki/Figure_scale#Scales I am probably going to cheat since I have access to a CAD package via work. Most likely sketch it up first and then transfer it onto styrene.
|
|
#
?
Apr 12, 2010 10:42
|
|
|
It may interest you to know there is a plugin for Google sketchup that turns a model into papercraft templates. I've not tried it (the plugin) myself but I've heard good things. I've successfully turned papercraft plans into models previously, allowing for material thickness. Also, google sketchup is as close to fun as CAD gets in my little mind.
|
|
#
?
Apr 12, 2010 17:09
|
|
|
No Pun Intended posted:Thanks Why the hell would you express scale as a scale foot and give the equivalency in millimeters 
|
|
#
?
Apr 12, 2010 21:55
|
|
|
Even though its not true "assemble from a kit" here is a few things I do with model railroading... Though the detailing on 1/160 can get a little crazy I enjoy it. Here is a few pictures from one of our shows that we put on for the the library in my town for a fund raiser.  Scratch building is the most fun, next to laying track, then the electronics side, the rest is blah!
|
|
#
?
Apr 13, 2010 02:36
|
|

|
BrokenKnucklez posted:Trains More trains please! When I am old and retired all of my money will be going towards this ridiculously expensive hobby.
|
|
#
?
Apr 17, 2010 09:08
|
|

|
Granite Octopus posted:More trains please! When I am old and retired all of my money will be going towards this ridiculously expensive hobby. Here is a video from the show we did in Council Bluffs, IA. Near the end we had our rather large module set up. That consisted of the Omaha N track club, plus Desmoines track and then a One-Track lay out... Total main line was about 220 or so foot which works out to be 6.5 scale miles give or take. I always run monster rear end long trains when I go to shows. to bad you never catch a picture of my beast. 3 Units, 100 mixed frieght cars. Rather fun to watch that thing snake along. Though it was fun running DCC, People had to duck into sidings as I came at them, there was no place where I could park my train. You will need a job because retirement alone will not pay for all the crap you could want. I would compare this hobby to crack. sure the first couple hits may not take hold but after a while it becomes an addiction you need to feed. http://www.youtube.com/watch?v=WO1Wp_xR_IE Edit: fast foward to 3:30 into it, thats the start of the large layout. FYI who's ever camera took this, they picked up every single noise in that hall... it wasn't that loud in there. BrokenKnucklez fucked around with this message at 19:53 on Apr 18, 2010 |
|
#
?
Apr 18, 2010 01:51
|
|
|
I don't know if this is the right place to ask but here goes: I'm looking to build one of these in 1:76/1:72 scale and I have, through my blundering "buy shiny kit in store without research" method bought one each of this and this. Later research shows that the mudguards on the second image, the Airfix Sd.Kfz 234/4, are wrong, as the surviving car in the Bovington museum has no mudguards and they just guessed it was the same as the older 8-Rads. Would I be right in guessing that I can just swap the mudguards on both kits and have a relatively accurate Sd.Kfz 232 8-Rad and fully accurate Sd.Kfz 234/4?
|
|
#
?
Apr 21, 2010 19:53
|
|

|
BrokenKnucklez posted:Even though its not true "assemble from a kit" here is a few things I do with model railroading... Tell me more. Do you buy the trains unpainted but assembled and just paint/detail them or are they partially made, or ready-painted but undetailed or what?
|
|
#
?
Apr 21, 2010 22:31
|
|
|
Danger - Octopus! posted:Tell me more. Most models come pretty much ready to run out of box. set it on the track and go. here is a prime example of what the photo looks like http://www.blwnscale.com/blwphotos/KA-AC4400-UPFlag.jpg I add other details like MU cables, grab irons, add some chalks to make it look like the real thing because when you get new, they are pretty shiny and dont look at all like the real thing. Then I add a DCC Decoder, if you are wondering what DCC is here is a nice wiki http://www.dccwiki.com/ I will take some pictures this weekend we are having a running session. BrokenKnucklez fucked around with this message at 02:02 on Apr 22, 2010 |
|
#
?
Apr 22, 2010 01:58
|
|
|
I'm hoping someone here could help me out with my search, but I'm looking for a very specific wheel for model cars, BBS RS (image below). I need to find wheels just under an inch in diameter, I think 1/24 scale. colour doesn't mater, I can paint it, but the size is important. If you'd know where I could find them or even somewhere I could call/email about it I would really appreciate it. I've searched around and haven't been able to find anything even similar.
|
|
#
?
Apr 23, 2010 06:41
|
|
|
Four Banger posted:I'm hoping someone here could help me out with my search, but I'm looking for a very specific wheel for model cars, BBS RS (image below). I need to find wheels just under an inch in diameter, I think 1/24 scale. colour doesn't mater, I can paint it, but the size is important. If you'd know where I could find them or even somewhere I could call/email about it I would really appreciate it. I've searched around and haven't been able to find anything even similar. Try Hobby Link Japan, there's a search function on the left hand side of the front page that's will get you to wheels and tires. here's a search for 1/24th scale wheel sets, seems there are some BBS wheels in there.
|
|
#
?
Apr 23, 2010 12:53
|
|
|
For adding some detail to a model that I'm planning, has anyone seen any 1/72 modern US military figures that are in poses suitable for looking like they're fast-roping out of a helicopter?
|
|
#
?
Apr 23, 2010 17:56
|
|
|
Here is a few pictures from Saturdays operation session poor quality cell phone pictures yes I know Eastbound Southern Pacific Cab Foward Steam Excursion waiting for the westbound Milwaukee Road Passenger Train  Eastbound coal crossing over in front of the Cab Foward steam engine excursion train. 
|
|
#
?
Apr 26, 2010 00:50
|
|
|
Sorry if this has been posted already, but this is a great site that stocks old/out of print model kits. http://www.oldmodelkits.com/index.php?newlist=1 I enjoyed finding the Tu-95 Bear kit I built as a kid. Also, this makes me remember that once upon a time I read in Car and Driver about a graphic designer who made model boxes for models that didn't exist, but should. Does this guy have a web site? Looking for Model boxes produces disturbing results 
|
|
#
?
Apr 28, 2010 01:23
|
|
|
Does anyone have any good sources for some space-related model kits? I've been through the local hobby shop a few times looking for anything spacey, but all I found was a pile of sad-looking dusty lunar modules and a Delta II that was a) bigger than I am, and b) a hair under $250. My budget is pretty flexible, I'm interested mostly in the golden age of space and I'd prefer glue together kits instead of snap-together. Scale is pretty flexible as well, p much as long as I can fit it in the house. Any leads?
|
|
#
?
Apr 28, 2010 13:08
|
|

|
laratron posted:Does anyone have any good sources for some space-related model kits? I've been through the local hobby shop a few times looking for anything spacey, but all I found was a pile of sad-looking dusty lunar modules and a Delta II that was a) bigger than I am, and b) a hair under $250. This tells me that Airfix (hmm...) are re-releasing a few of their old rocket kits. There's also these guys who seem to do a lot of resin kits; I've never built a resin kit, but I'm sure you can get some tips around here. You could also try http://www.oldmodelkits.com but some of their stuff is ludicrously expensive. A question: I saw a really good article somewhere about painting rusty metal textures, but I can't find it now. Anyone know of something like that?
|
|
#
?
Apr 28, 2010 15:35
|
|

|
Unkempt posted:I've never built a resin kit, but I'm sure you can get some tips around here. A quick primer on resin is just that it's a good deal more work, usually more expensive, and generally looks better once you fix all of the flaws from the molding process. I split what I build 50/50 between resin and styrene kits. I'd advise holding off on resin until you've got at least a few styrene kits under your belt since it could easily be overwhelming.
|
|
#
?
Apr 28, 2010 17:49
|
|

|

|
| # ? Apr 23, 2024 12:47 |
|
|
Unkempt posted:A question: I saw a really good article somewhere about painting rusty metal textures, but I can't find it now. Anyone know of something like that? Try this
|
|
#
?
Apr 28, 2010 20:06
|
|