


|
Molentik posted:I am looking for some tips on painting very dark skin, is there anybody that can help me out? Techniques for white skin are easy to find, but ethnic skintones arent.... http://www.coolminiornot.com/articles/1310-ethnic-skintones This is the starting point and it's good for choosing/making your colors, not so much for techniques.
|
 #
?
Jun 30, 2015 12:43
#
?
Jun 30, 2015 12:43
|
|

|

|
| # ? Apr 28, 2024 07:34 |
|
|
Pierzak posted:http://www.coolminiornot.com/articles/1310-ethnic-skintones Thanks, exactly what I was looking for!
|
|
#
?
Jun 30, 2015 15:54
|
|


|
wtfbacon posted:Anyhoo, here's why I stick to armor. Something I'm at least passable at. I did this for a group build over on reddit's /r/modelmakers. Pretty happy with the way it turned out. Not perfect, but good enough for me. Really nice work with the dirt and grime. Looks great!
|
|
#
?
Jun 30, 2015 15:59
|
|


|
wtfbacon posted:Looks pretty good from where I'm sitting, bud. I envy guys who can make aircraft look good. Every one I've tried has turned out ugly with poorly-filled seams and fiddly bits that get broken off. Filling and sanding is my least favorite part of any job. With armor, it's usually a nice flat corner that needs to be filled. With aircraft you have all these graceful curves and rivet detail that I tend to obliterate when sanding. What'd you use for the dirt/mud? Looks really great. edit-- nevermind just saw your post on /r/modelmakers. I really need to pick up some Mig pigments one of these days... Count Thrashula fucked around with this message at 16:25 on Jun 30, 2015 |
|
#
?
Jun 30, 2015 16:22
|
|

|
Nice tank! Why no skirts though? I'm sure you could do some cool mud effects with them on.
|
|
#
?
Jun 30, 2015 16:33
|
|

|
Ensign Expendable posted:Nice tank! Why no skirts though? I'm sure you could do some cool mud effects with them on. Thanks! I kinda prefer the look of German AFV's without their side skirts. Besides, historically speaking, they fell off all the time anyway.
|
|
#
?
Jun 30, 2015 19:13
|
|
|
wtfbacon posted:Looks pretty good from where I'm sitting, bud. I envy guys who can make aircraft look good. Every one I've tried has turned out ugly with poorly-filled seams and fiddly bits that get broken off. Filling and sanding is my least favorite part of any job. With armor, it's usually a nice flat corner that needs to be filled. With aircraft you have all these graceful curves and rivet detail that I tend to obliterate when sanding. Lovely looking Panther, love the cammo I've never tried a scheme like that. Excellent detailing as well. I really need to do me some kind of 1:35 AFV again as looking I've not even touched one since April 2014. Definitly next on my to do list.
|
|
#
?
Jun 30, 2015 21:40
|
|

|
big_g posted:Lovely looking Panther, love the cammo I've never tried a scheme like that. Excellent detailing as well. Thanks. I appreciate the compliments. Next on the bench is A T-34/76 from the early war period.
|
|
#
?
Jul 1, 2015 00:23
|
|
|
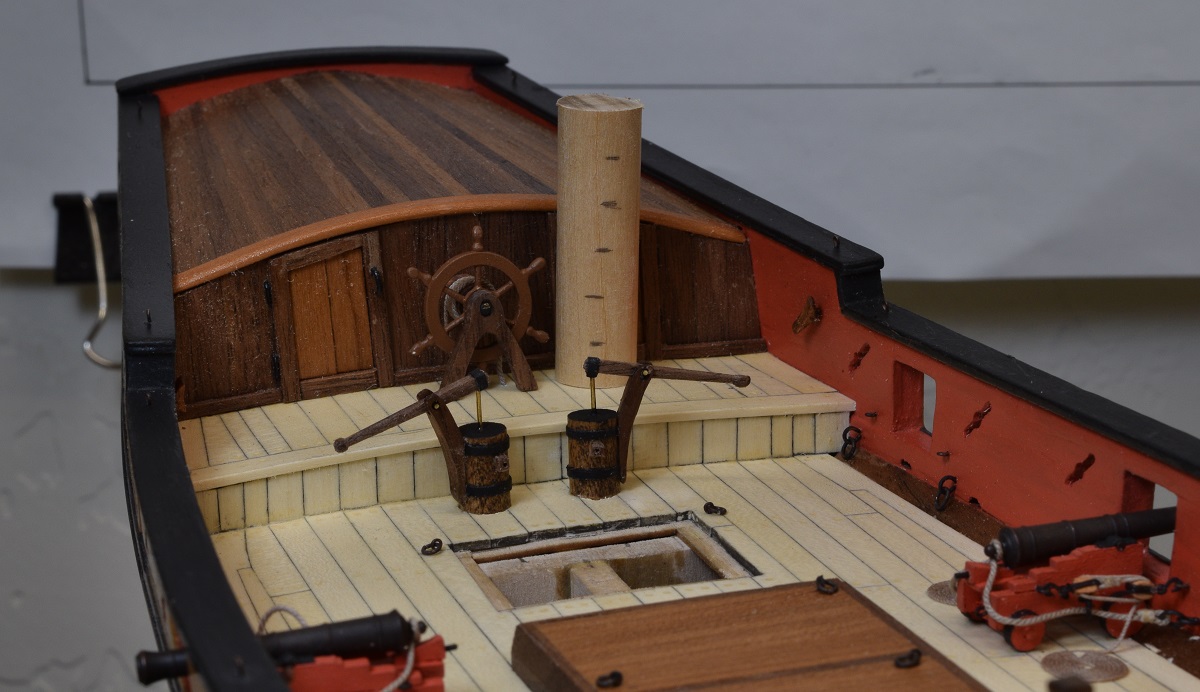
Buckled down and finished rigging all the guns. gently caress yea, glad that's done, but I think the effort was worth it. I also mounted the companionway to the deck since the pumps are in place now. Only one more large piece of deck furniture to complete, which will sit in front of the wheel on the quarterdeck, then I have to work on lots of little fittings and stuff along the railing, and get everything ready for working upwards!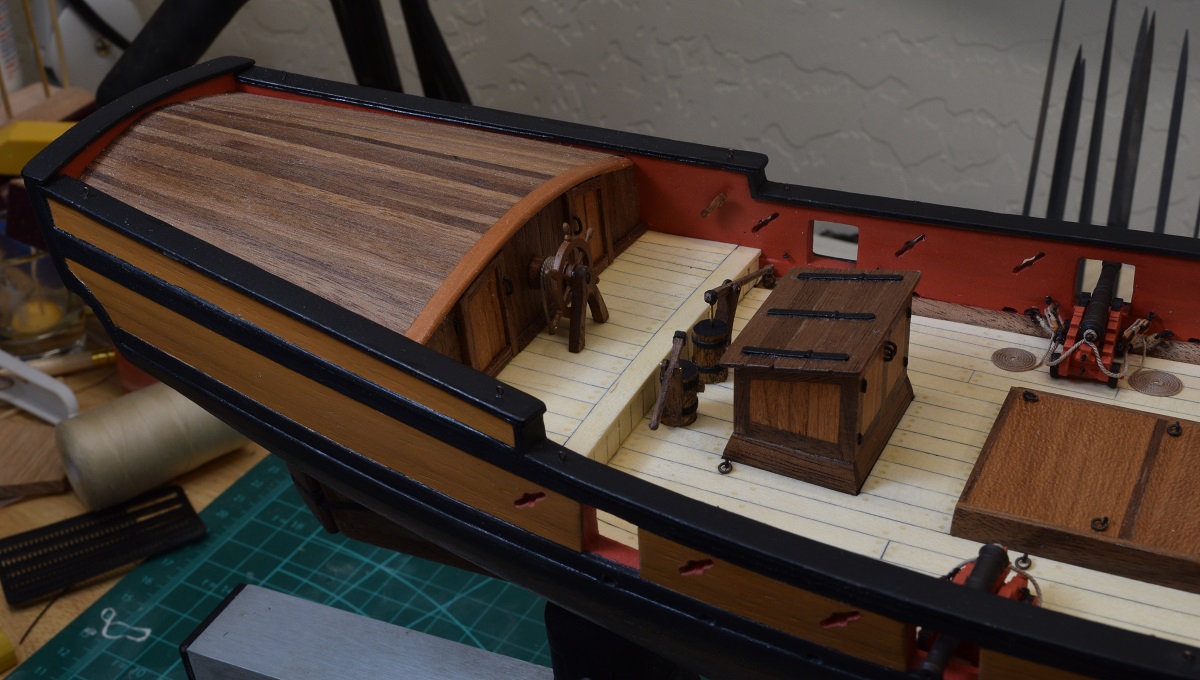   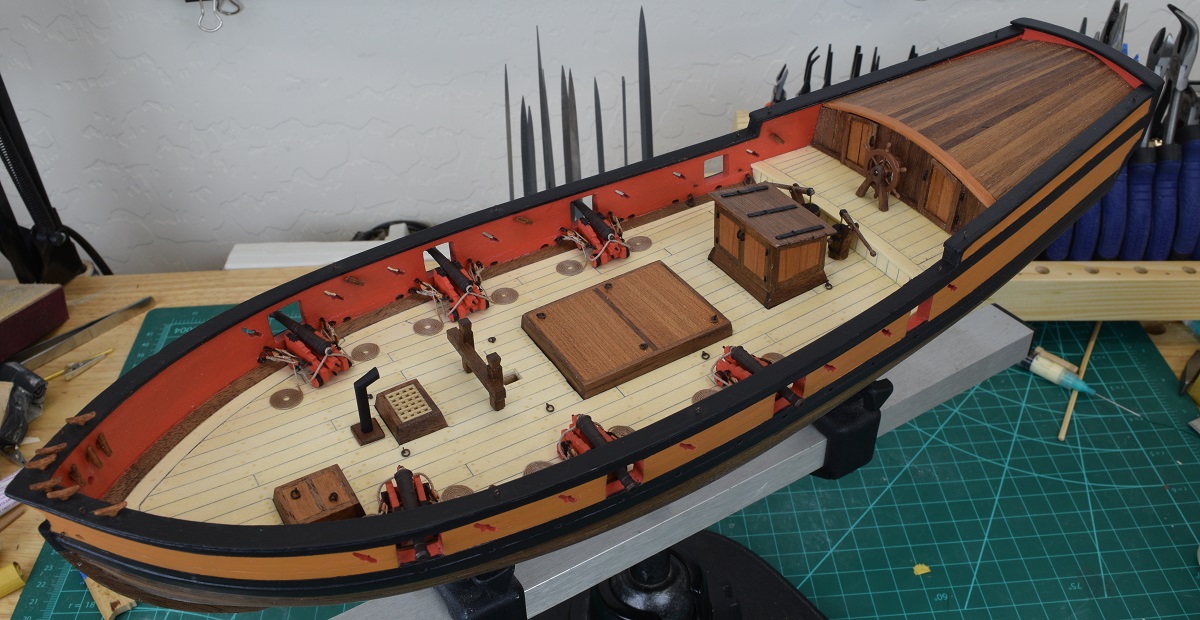 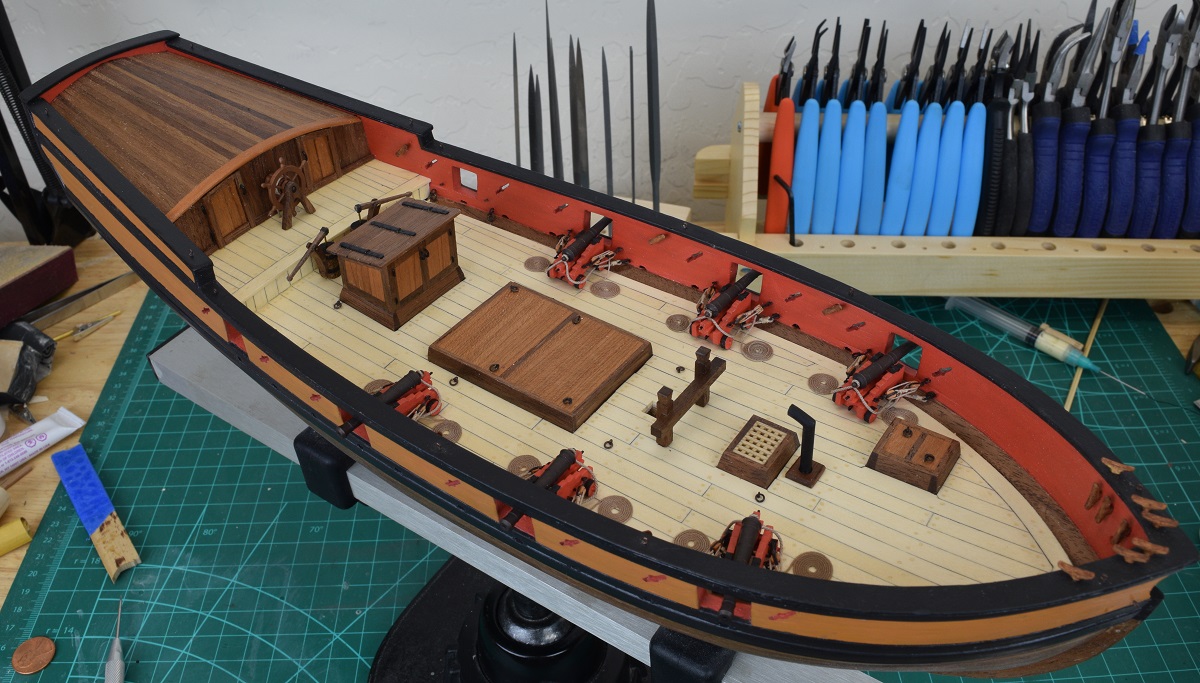 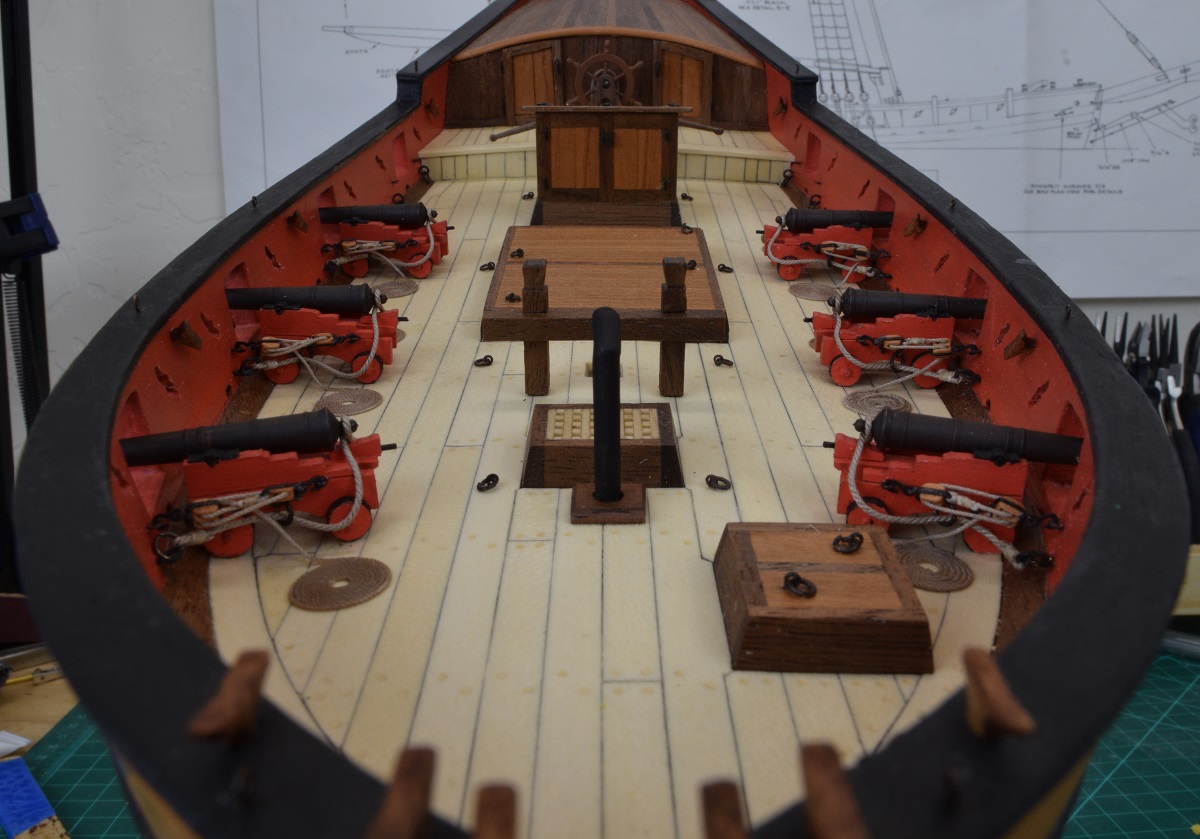 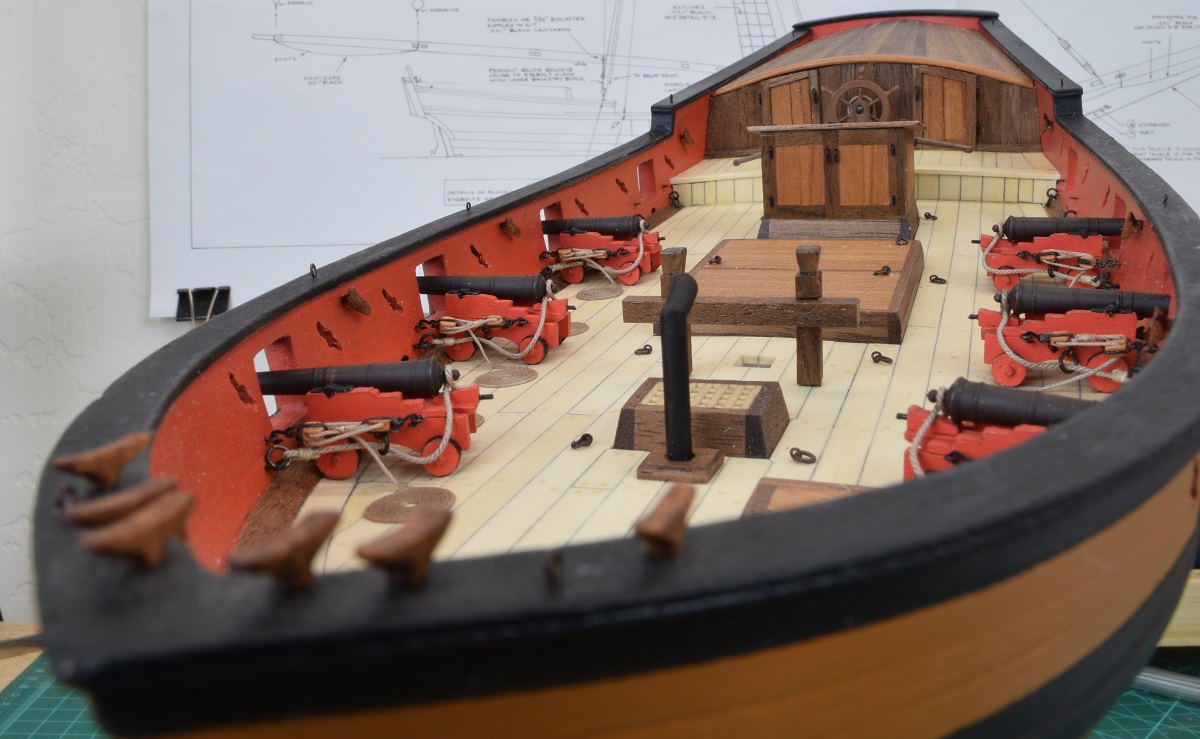 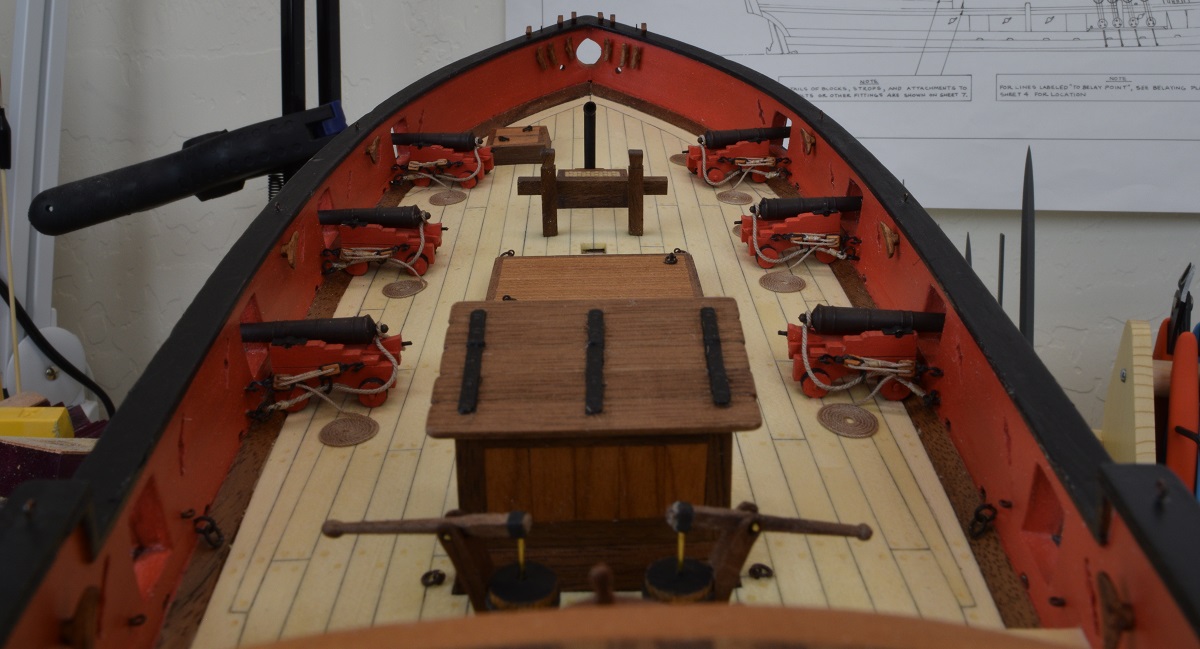 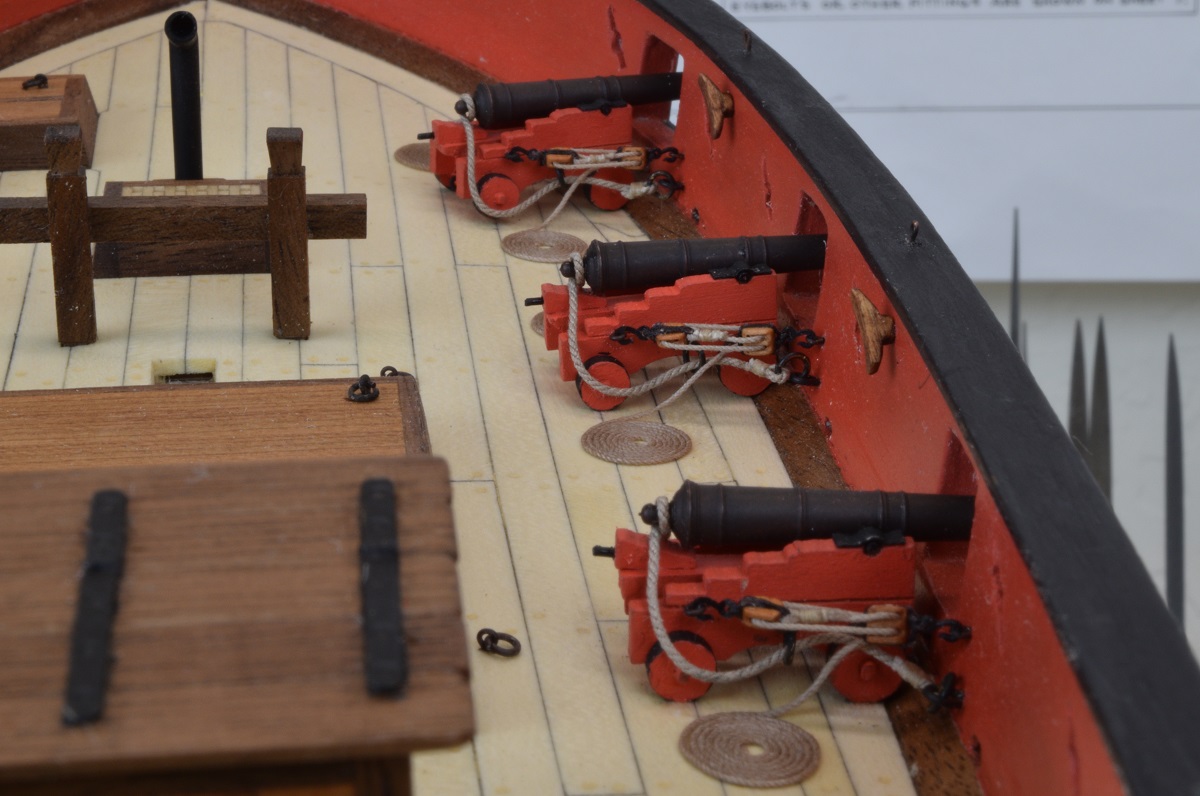
|
|
#
?
Jul 1, 2015 06:54
|
|
|
The Locator posted:Buckled down and finished rigging all the guns. gently caress yea, glad that's done, but I think the effort was worth it. I also mounted the companionway to the deck since the pumps are in place now. Only one more large piece of deck furniture to complete, which will sit in front of the wheel on the quarterdeck, then I have to work on lots of little fittings and stuff along the railing, and get everything ready for working upwards! Are the deck pumps to scale? I know you said the doors weren't quite right, and the deck pumps like cast compared to the cannons. Basically, I can't work out how big an average height�five ten, or so�guy would be, standing on that vessel. If it's not too much of a pain, and totally just to satisfy my nagging curiosity, could you take a picture with a to-scale cardboard cutout of a sailor?
|
|
#
?
Jul 1, 2015 11:18
|
|
|
Jeherrin posted:Are the deck pumps to scale? I know you said the doors weren't quite right, and the deck pumps like cast compared to the cannons. Basically, I can't work out how big an average height�five ten, or so�guy would be, standing on that vessel. If it's not too much of a pain, and totally just to satisfy my nagging curiosity, could you take a picture with a to-scale cardboard cutout of a sailor? Go one page back and look at the piece of dowel with scaled ft markings. As stated before, the average sailor then would have been much closer to 5'0 due to terrible nutrition. The elm tree pumps look like they are scaled to about 9-10" in diameter, which sounds about right. a loathsome bird fucked around with this message at 15:48 on Jul 1, 2015 |
|
#
?
Jul 1, 2015 15:45
|
|

|
Ortazel posted:Go one page back and look at the piece of dowel with scaled ft markings. As stated before, the average sailor then would have been much closer to 5'0 due to terrible nutrition. The elm tree pumps look like they are scaled to about 9-10" in diameter, which sounds about right. That sort of depends where the sailor is from and this being an American vessel, they probably were not that much shorter than most people today.
|
|
#
?
Jul 1, 2015 15:51
|
|

|
Jeherrin posted:Are the deck pumps to scale? I know you said the doors weren't quite right, and the deck pumps like cast compared to the cannons. Basically, I can't work out how big an average height�five ten, or so�guy would be, standing on that vessel. If it's not too much of a pain, and totally just to satisfy my nagging curiosity, could you take a picture with a to-scale cardboard cutout of a sailor? I have no reference point for the pumps to know how accurately scaled they are. Given that ergonomics was 'not a thing' back then, it doesn't surprise me that the sailors would have to lean over to operate them. As far as a cardboard cutout of a sailor, I don't have such a thing, and I can barely draw a stick figure. As Ortazel posted, I posted a picture yesterday (I think) with a dowel that was a scale 6' tall on the quarterdeck.
|
|
#
?
Jul 1, 2015 16:45
|
|
|
Here's the picture everyone has been talking about :The Locator posted:Here is a picture of the quarter deck with a dowel stuck on it. The dowel is 1.5" long, or 6' scale, and the marks are 1/4" (1' in scale).
|
|
#
?
Jul 1, 2015 21:10
|
|
|
Completely forgot that picture existed. That works!
|
|
#
?
Jul 2, 2015 13:31
|
|
|
Japanese train update, got the first set of driving wheels Also reading Locutors updates makes me want to build a boat, so I grabbed a complete set of issues for DeAgostinis HMS Victory part work off of Ebay. This should be very interesting. Edit: oh. And i finished this little thing, I guess. 
Greyhawk fucked around with this message at 18:01 on Jul 2, 2015 |
|
#
?
Jul 2, 2015 17:25
|
|


|
Greyhawk posted:Japanese train update, got the first set of driving wheels Victory? drat, that is seriously jumping into the deep end. Hope you like rigging cannons. Gonna take a closer look at your pictures when I am not on my dumb phone.
|
|
#
?
Jul 2, 2015 19:09
|
|
|
The Locator posted:Victory? drat, that is seriously jumping into the deep end. Hope you like rigging cannons. I'm insane enough to seriously look into individually copper tiling the underwater bottom. It's something like 4000 tiles and all I can think of is "well that DOES sound relaxing"
|
|
#
?
Jul 2, 2015 20:24
|
|
|
Anyone happen to know where I'd find a 1/72 GMC Vandura? I need it for... reasons...
|
|
#
?
Jul 2, 2015 20:51
|
|

|
Just finished the first pass on what I anticipated being a nightmare (especially given my lack of patience) - surprisingly pleasant scheme to paint.  Not a bad kit considering it only cost �35 (Revell 1/32 He-219).
|
|
#
?
Jul 2, 2015 21:41
|
|

|
porkfactor posted:Just finished the first pass on what I anticipated being a nightmare (especially given my lack of patience) - surprisingly pleasant scheme to paint. Niiiiiiiice base coats! What's next on the plan? I've been working on all the little detail parts of the 30-CWT and I thought I would do a rough dry fit tonight just to see how things are going on. Nothing here is glued or finialised. I'll attach everything last minute then do a matt varnish and final pigment weathering. I reckon I'm about 70% complete now.   
|
|
#
?
Jul 2, 2015 22:34
|
|
|
big_g posted:Niiiiiiiice base coats! What's next on the plan?  Good god that's looking good.
|
|
#
?
Jul 2, 2015 22:42
|
|
|
Arquinsiel posted:Anyone happen to know where I'd find a 1/72 GMC Vandura? I need it for... reasons... AMT once had a full kit including the decals for your.... reasons. It's in 1/25 though. https://www.scalemates.com/kits/196666-amt-ertl-31537-the-a-team-van
|
|
#
?
Jul 2, 2015 23:37
|
|
|
Greyhawk posted:I'm insane enough to seriously look into individually copper tiling the underwater bottom. It's something like 4000 tiles and all I can think of is "well that DOES sound relaxing" Individual copper tiles for the hull is pretty basic stuff in ship-building. Rigging is the tough stuff. Is this your first boat? Because Victory is definitely jumping into the deep end of boat building.
|
|
#
?
Jul 3, 2015 00:07
|
|

|
Bloody Hedgehog posted:Is this your first boat? Because Victory is definitely jumping into the deep end of boat building. Yes, first boat. The beauty with the part works approach is that they teach you that all that stuff like straking, planking, rigging, etc. step by step as you go along. The pure building instructions alone are about 700+ pages with several thousand pictures. There's also further building tutorials and diaries up on the site and they're now adding videos for every step.
|
|
#
?
Jul 3, 2015 00:46
|
|
|
Arquinsiel posted:Anyone happen to know where I'd find a 1/72 GMC Vandura? I need it for... reasons... Hotwheels is what, 1/64? They made one a few years ago that may fit your reasons.
|
|
#
?
Jul 3, 2015 00:56
|
|

|
For some mad reason the Hotwheels one I can find seems to be 1/18. The absolute smallest I've managed track down has been 1/50, and that's waaaaay too big.
|
|
#
?
Jul 3, 2015 02:13
|
|
|
Greyhawk posted:I'm insane enough to seriously look into individually copper tiling the underwater bottom. It's something like 4000 tiles and all I can think of is "well that DOES sound relaxing" I can actually understand that. It would be sort of like planking, which I find strangely enjoyable. Not sure about that kit, but a great many kits that do coppering do come with individual plates, which I think are far better than the ones that come with the copper 'tape' that you have to cut into plates. Of course to do it right, you have to make both port and starboard jigs to imprint the rivet pattern into each plate. big_g posted:I've been working on all the little detail parts of the 30-CWT and I thought I would do a rough dry fit tonight just to see how things are going on. Nothing here is glued or finialised. I'll attach everything last minute then do a matt varnish and final pigment weathering. I reckon I'm about 70% complete now. drat, that thing is looking fantastic. Can't wait to see it complete if that's only 70%! Greyhawk posted:Yes, first boat. The beauty with the part works approach is that they teach you that all that stuff like straking, planking, rigging, etc. step by step as you go along. The pure building instructions alone are about 700+ pages with several thousand pictures. There's also further building tutorials and diaries up on the site and they're now adding videos for every step. While that is true, you are still looking at a project that is likely to take *years* to complete, which is why so very few of them actually get finished. People get frustrated with some step, set it aside, and then just never get back to it. While one installment might be for example - planking the hull - in reality, if you are doing a really good planking job on a ship the size of the Victory model, that one 'step' might be several months of work depending on how fast you go, and how much time you can devote to it. My AVS is 14-3/4" long at the longest point, and the first plank of the first layer went on October 5th, and the last plank and wales went on October 28th. That was when I was devoting a lot of time to it. Then the 2nd planking, the first plank went on December 10th, and the last plank went on January 18th. So over 2 months for just the hull planking on my little boat. As long as you approach every single piece as it's own model and challenge, it's not that it's overly hard, it's that some things get tedious and repetitive, and the larger the model, the more that will hit you. Rigging my 6 guns was sort of annoying. Rigging 100+? Hell no (although I imagine that you only need to rig the top deck in a half that are exposed, so maybe 30-40?). Looking forward to seeing it though, and hope you enjoy it and stick with it to completion!
|
|
#
?
Jul 3, 2015 03:04
|
|
|
Wow, I actually made some progress on a model today, as small as it is! Pigs must be flying or something. Primed up the legs and body of the AT-ST, and the interior of the cockpit. I went with Vallejo primer to try it out, but that stuff takes a while to fully cure, so in the meantime I painted the figures. The pilots still need a wash to bring out the detail (what detail there is, these are terrible figures), but Chewy is pretty much ready to go. You can see how tiny these guys are, next to Vallejo bottles. 
|
|
#
?
Jul 3, 2015 04:12
|
|
|
Arquinsiel posted:For some mad reason the Hotwheels one I can find seems to be 1/18. The absolute smallest I've managed track down has been 1/50, and that's waaaaay too big. DAH daDAH!! Dun DUN dunnnn 
|
|
#
?
Jul 3, 2015 05:18
|
|
|
That looks about right, but due to shenanigans at that scale will end up being either way too big or way too small. It'd be a shame to repaint it too . Which I kind of sort of "need" to do, because picking impossible projects is fun!
|
|
#
?
Jul 3, 2015 06:29
|
|
|
porkfactor posted:Just finished the first pass on what I anticipated being a nightmare (especially given my lack of patience) - surprisingly pleasant scheme to paint. big_g posted:I've been working on all the little detail parts of the 30-CWT and I thought I would do a rough dry fit tonight just to see how things are going on. Nothing here is glued or finialised. I'll attach everything last minute then do a matt varnish and final pigment weathering. I reckon I'm about 70% complete now. These are both real cool. Is the camo on the plane freehand? And the seeing the car enter it's final phase from the super bright colours it started at is super cool. Another airbrush question, from me the guy who is bad at it. When doing a gloss varnish, do I want to spray it on pretty thick so it gets a wet look and then let the self-levelling do the work? I'm using Vallejo polyurethane varnish and it says for best results do 2 coats, but 1 coat was mostly not really much of anything at all. I don't want to say it was orange peel because it wasn't thick enough for that, it was just sort of rough, maybe too much thinner in the mix? Also noticing that there's not much coverage on and in corners, could that be too high pressure and the brush too close so the air current is messing it up? I've seen people say apply several thin coats of varnish and I've seen people say to lay it on thick, especially for a gloss. One thin coat didn't seem like it was going to end up doing anything even after 3 or 4 of them.
|
|
#
?
Jul 3, 2015 09:28
|
|

|
Varnish can go on in a thicker coat than regular paint, but not too thick. The technique though is the same with paint; apply until you can just detect a faint wet sheen, then stop. If you're getting a slightly rough, grainy texture, that is most likely caused by the paint/varnish partially drying in mid-air before it hits the model. That in turn is generally caused by hot, dry temperatures, and spraying too far from the model. If its temp causing the problem, you can add a drop of retarder to the paint cup to lengthen the drying time. With distance, you generally want to spray within 6 inches of the models surface. Spraying that close to the model can cause issues with thicker mediums such as varnish, or unthinned paints, which is why for thicker stuff it's best to shoot at lower pressures with a larger needle. If I'm shooting thick stuff through my H&S with a .2 needle, I need to put it up to 30psi. With my larger Paasche which has a .38 needle, I can shoot at about 20psi, which helps me get closer to the model. You can certainly thin varnishes to shoot them at lower pressures and needle sizes, but your results may vary. Some varnishes don't like thinning at all, and any thinning results in a satin finish regardless if you were using a matte or glossy varnish. Others tolerate it better, but you'll have to do some tests to find out. I always keep a few sheets of thin styrene sheet on hand, primed up and ready. I can shoot tests onto them when I'm not sure how the paint or varnish I'm using will react, and dial in the distances and pressure I will need for any given job before I bring the airbrush to the model itself. Bloody Hedgehog fucked around with this message at 10:09 on Jul 3, 2015 |
|
#
?
Jul 3, 2015 10:06
|
|
|
Bloody Hedgehog posted:Varnish can go on in a thicker coat than regular paint, but not too thick. The technique though is the same with paint; apply until you can just detect a faint wet sheen, then stop. If you're getting a slightly rough, grainy texture, that is most likely caused by the paint/varnish partially drying in mid-air before it hits the model. That in turn is generally caused by hot, dry temperatures, and spraying too far from the model. If its temp causing the problem, you can add a drop of retarder to the paint cup to lengthen the drying time. With distance, you generally want to spray within 6 inches of the models surface. That helps a lot thanks! I have a bunch of spoons for testing, but I wasn't sure what success looked like. I was worried about it being hot enough to do the drying thing, but I sprayed late at night after it had cooled off because anything more than about 15 centigrade takes me out of commission, let alone paint. I am pretty sure I was within 6 inches, I got real close sometimes to build up the wetness. I use a .35mm and I was doing this at ~20psi. Areas where I sprayed thick and wet are glossy, light misting has just come out matte I guess. I'll give 20psi and a drop of retarder a go.It's good to know checking for the wet sheen is an actual thing because my colour detection is really bad so going by "just look to see if you've put paint on it dumbass" is no good for me. 3 coats of pretty generous handbrushing got me a nice coat. I also have a straight needle now for the first time ever so maybe I won't need to thin so much or at all on this stuff that is supposedly straight from the bottle. I'm also assuming when a thing says "needle size up to .4mm" that means numbers larger than .4mm yeah? So a .5 is a nice big hole that'll have no problems but a 0.15 is a teeny tiny hole that'll struggle and need a bit of thinning? I also feel like maybe I'm pulling the needle back too far and using way more stuff than I need to, but if I don't open it up it just slowly loses spray power as needle gets all gunked up I guess, again I'm hoping an actual straight needle will help. Thanks again, I may be having limited success but I'm having a lot of fun now. I'll give it another go when the temperature cools off.
|
|
#
?
Jul 3, 2015 11:58
|
|
|
I'm not 100% sure, but I would guess they say "Needle Sizes Up To .4" they mean .4 and smaller. You can use any size needle to shoot anything, with the proper thinning for smaller needles/thicker paint, but they may mean that anything over .4 is overkill. Which is kind of true, in a way. Generally anyone should be able to get by with a needle in the .2 to .3 range, and then adjust pressure as needed. Below .2 you have to really thin your stuff to avoid spitting, and above .4 you're throwing so much paint so quickly that it a lot easier to overspray your item.
|
|
#
?
Jul 3, 2015 12:27
|
|
|
That was my first thought, that above .4 you're throwing a lot of paint out, sure obviously you can bung it in so why would they need to mention it, and "up to" implies smaller than .4 going up to .4 and going from larger to .4 would surely be described as "down to" if there was a minimum size they recommend you use. Anyway I've had no trouble with that stuff at .35. Thanks again.
|
|
#
?
Jul 3, 2015 13:00
|
|
|
Arquinsiel posted:For some mad reason the Hotwheels one I can find seems to be 1/18. The absolute smallest I've managed track down has been 1/50, and that's waaaaay too big. In the USA and Canada, there's a company called Greenlight collectables that does a nice 1/64 series. They have Dodge and GM vans from the '70s in there. e: http://www.greenlighttoys.com/county-roads.html
|
|
#
?
Jul 4, 2015 01:48
|
|


|
I'm weathering Yellow 44 and having a hell of a time making dirty, sooty exhaust stains. Oil paint is hard to use sometimes, why can't we just use...  real soot? Shaved down a chunk of a drawing charcoal and just dabbed it on with a soft dry brush. Its about the same colour as the lamp black oil paint I was using but is completely dead flat and unreflective. Looks perfect. Shame the varnish will change that, but still. real soot? Shaved down a chunk of a drawing charcoal and just dabbed it on with a soft dry brush. Its about the same colour as the lamp black oil paint I was using but is completely dead flat and unreflective. Looks perfect. Shame the varnish will change that, but still.
|
|
#
?
Jul 4, 2015 04:48
|
|

|
Will a matte varnish not keep it dead flat? If not, you could always add those soot mark as your final step. As long as your not manhandling the model after it's done, and I doubt many of us do, so the soot should stay in place without an sealer. Actually, even better yet, you can get those makeup style pigments that Tamiya makes, which have a binder in them, and you dab them on with the little makeup applicator. Those things are hard to shift once they've dried out a little.
|
|
#
?
Jul 4, 2015 05:38
|
|
|

|
| # ? Apr 28, 2024 07:34 |
|
|
Well, I redid part of my setup. As much as I liked the custom paint racks, they took up a lot of space on the desktop. They worked for some items as well, but others didn't fit, or fit poorly. The racks that held the paint horizontally were a particular pain at times, as getting a paint out was iffy if you grabbed it wrong, and the ones for the Vallejo paints weren't really sized the best, so paints kept falling inside it. So I got some Ikea Ribba Picture Ledges. $15 each ($10 in the US). They're a great size to keep everything up front and in easy reach. If anyone is interested, the depth of them just fits a bottle of Tamiya X20A thinner (with a slight nudge). 
|
|
#
?
Jul 4, 2015 07:14
|
|