|
i've been working on an assembler and debugger for the script vm used in gta san andreas it can attach to the game process, read/write vm state, and inject/reload new code. i just got a simple ruby -> native instructions -> bytecode compiler pipeline working, so now i can write scripts for the game in ruby, and have them executed as native bytecode inside the game
|
 #
?
Oct 28, 2016 09:33
#
?
Oct 28, 2016 09:33
|
|


|

|
| # ? May 10, 2024 13:26 |
|
|
Angela Merkle Tree posted:i've been working on an assembler and debugger for the script vm used in gta san andreas this is dope
|
|
#
?
Oct 28, 2016 10:18
|
|


|
Angela Merkle Tree posted:i've been working on an assembler and debugger for the script vm used in gta san andreas that rules
|
|
#
?
Oct 28, 2016 19:30
|
|


|
Marantz receiver rebuild update: First, here's some photos post-recapping and cleaning. In the process of replacing the electrolytic capacitors which dry out over time and degrade or fail I measured each original capacitor and its replacement with an LCR meter. I think I mentioned before that surprisingly, only one had outright failed and most were close to spec. I replaced all the open single-turn trimmers with brilliant blue closed 4-turn Bourns trimpots that use a wacky integral planetary gearset, they're expensive but good. I chose them mostly because they have circular footprints like the trimmers they replaced, which is a pretty dumb reason. However, 4 turns seems to be adequate.     Last night I discovered what caused the speaker protection relay to remain open unfortunately after testing every transistor (by unsoldering the part and using the diode function on a DVM) on the main amplifier board first. Somebody slightly modified this receiver, perhaps even at the factory. Although it's difficult to tell if a component is stock or not; the service manual contains pervasive errors. I have little doubt the following components are not-stock because they are installed in strange ways: smoothing (?) capacitors underneath the PCB or point-to-point soldering work in the a case of the diode and resistor in series near the protection relay.    (A little blurry, but there's a diode in series with that big resistor soldered point-to-point) The service manual parts list contains a 390-ohm resistor, R776, that I assumed was that resistor point-to-point soldered to that diode. R776 is also silkscreened on the PCB. It made sense to me at the time that the diode was some aftermarket modification. It turns out, I got it backwards. The resistor was (probably) the modification, not the diode. The PCB silkscreen and service manual parts list were erroneous. Through google image searching I managed to find clear photos of the main amplifier board taken by some French guy during his restoration project. His board didn't have the same or possibly any modifications. His board also didn't have a resistor in series with that diode. Then I checked the schematic in the service manual, R776 appears nowhere but there's a diode Q754 placed suspiciously near where R776 would be, if it existed.  (Take a look in the bottom right area, if you care to) I *think* Q754 exists to prevent inductive spikes from the protection relay coil from affecting the main power supply and I *think* somebody installed a series resistor in order to current-limit for one reason or another. One reason might be to protect Q754. The other reason might be to protect the coils in the relay. Cutting to the chase, the resistor in series with Q754 isn't 390 ohms. It's hard to see because it's heat faded, but its value is 82 ohms. I think my 390 ohm replacement limited the current to the relay coil so much that the relay couldn't engage! I put the old 82 ohm resistor back in (as seen in the photos) and the protection relay loving clicked closed! Nice! I'm going to replace it with a higher-power-rated similar resistor eventually because this little guy is pooped. Now that bad news: That rustling leaves/static sound in the left channel that motivated this whole rebuild is still there, meaning it wasn't caused by a failing electrolytic capacitor. poo poo.  Note: I mentioned previously that the signal delivered to the headphones came from the preamp. I was wrong. According to this block diagram, it's from the main amp output, attenuated. Now all stages from the selector to the filter network are suspect. I know the main amp is clean because I tested it previously separately from the preamp (it has nifty phono jacks that internally connect to the preamp until you plug something into them, which disconnects the preamp). I've already doused every pot with a firehose of DeOxit and the rustling leaves sounds persists so I'll have start probing around with a scope next time I get to work on this. Edit: Here's the French website and the photo showing the diode (Q754) where R776 is silkscreened.  http://www.audiovintage.fr/2016/08/14/marantz-2238b/ Hunter2 Thompson fucked around with this message at 21:23 on Oct 28, 2016 |
|
#
?
Oct 28, 2016 21:16
|
|
|
It's very likely a bad solder joint in the preamp/power section or one or more of those TO-92s ate it. I'm sure you've gone over it a hundred times but maybe get it under some magnification if you can. If you swapped out all the electrolytics and it's still making crumpling noises there's not much else it's likely to be. The transistors in those amps get yucky and bad with age, but good replacements are definitely easy to find. Cool project details btw thanks dude!
|
|
#
?
Oct 28, 2016 21:39
|
|

|
caps could be someones attempt at fixing some hum, audio people sometimes do strange things for no sensible reason btw you can often check transistors with the diode meter in circuit; if there's resistor in parallel with the base-emitter junction the reading will be lower than normal and you may find some reverse "leakage". if base-emitter isn't shorted hard the transistor is usually fine. meatpotato posted:Note: I mentioned previously that the signal delivered to the headphones came from the preamp. I was wrong. According to this block diagram, it's from the main amp output, attenuated. it's almost always a mechanical switch or connector, the rustling is probably the contact making and breaking combined with some DC on the output being switched in and out the diagram implies connecting a headset doesn't mute the speakers, if that wasn't the case then i'd guarantee it was the switch in the headphone jack causing it if it isn't bad joints in the PA it'll be the speaker selector, or the switch inside those nifty RCAs also, pull the cap off the protection relay and clean the contacts there
|
|
#
?
Oct 28, 2016 21:47
|
|


|
reminds me I should probably figure out why my Yamaha electric organ has analog hiss through the speakers
|
|
#
?
Oct 28, 2016 21:50
|
|
|
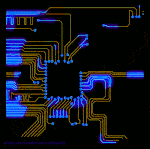
design on the tristar PA is coming along nicely, i've basically finished the routing tonight. plan is to let this bubble at the back of my mind for a few weeks and see what i want to change. core IC is a TPA3255 high power low distortion stereo BTL class D PA running off 24V, output power into 4 ohms is around 150W in that configuration. it's hidden under the red heat sink (a custom heat sink TI had ATS design for this IC, amazingly Digi-Key has it in stock at a very reasonable price). input stage is differential RX to single ended (from the preamp boards), then double inverted to get a fully complementary signal into the PA IC (this IC requires a balanced input signal to work properly). i'm using my standard melf 0204 0.1% resistors with a normal opamp instead of a laser trimmed solution since it's just an internal interconnect. those w�rth inductors were listed as the single best performer for audio quality in a very long TI app note about this IC and output filters. main reason they work so well is the very linear inductance vs. current, unfortunately they're $7 a piece and I need 12. because i'm paying for a very nice inductor i've decided to skip the post-filter feedback circuitry to save board space, the performance should be more than adequate without it (0.01% or so at 20W across the band). in keeping with the theme, i also specced 5% 450V rated C0G ceramics for the RFI caps on the output and a very nice round melf resistor for the output damping resistor (the permissible pulse load on a melf is extraordinary compared to standard thick film). blue boxes are 1�F 250VDC mkt caps which are rated for the full output swing across the audio band at 85 degrees ambient. PCB will be 4 layer, i'm not spending this amount of money on components just to ruin the performance to save $30 on two extra layers i'll need three of these boards, which is the maximum supported for proper ~multi-phase switching~ using the standard synchronization feature.
|
|
#
?
Oct 28, 2016 22:11
|
|
|
meatpotato posted:Marantz receiver rebuild update: youd be surprised, ive seen quite a few bodge jobs on stuff like that. its just how they did stuff in the 70s-80s. those weird soldered on caps could literally be how every one of them rolled off the assembly line
|
|
#
?
Oct 28, 2016 22:25
|
|


|
Thanks muckswirler and longview, those are both good suggestions. As for the TO-92s in the main section, I've removed, tested, and re-soldered them all so it's not likely a cracked solder joint but a transistor could certainly be marginal and pass diode tests. lonview, I'm glad I mentioned the fancy RCA jack thing, I didn't even suspect that could be the cause. I'll clean it and the relay contacts and report back. I've been poking around the hokey-looking diode/resistor/cap circuit and discovered what it's actually doing. It's just rectifying, filtering, and dropping the voltage of 120VAC to a noisy 24VDC for the protection relay to use to drive its coil.  This image shows the voltage present at the input of the relay coil
|
|
#
?
Oct 28, 2016 22:34
|
|
|
Once modification I desperately need to add is bleed resistors to the power supply filter capacitors. They stay energized for weeks as-is. A several hundered ohm 1/4 Watt resistor from each of the positive and negative supplies to ground will probably drain the caps in a few minutes if the supplies are about 40V, correct?
|
|
#
?
Oct 28, 2016 22:42
|
|
|
You'll want to be above a few k or so for 40V, power increases up by the square of the voltage and 1k at 40V dissipates 1.6W. Time constant for discharge is just t=R*C, after 4-5 time constants most of the voltage will be gone.
|
|
#
?
Oct 28, 2016 22:47
|
|
|
longview posted:design on the tristar PA is coming along nicely, i've basically finished the routing tonight. plan is to let this bubble at the back of my mind for a few weeks and see what i want to change. This is cool as hell! How are you designing your circuits, do you simulate original work or are you going off mostly reference designs? I'm mediocre at electronics so either way I'm very impressed!
|
|
#
?
Oct 28, 2016 22:48
|
|
|
longview posted:You'll want to be above a few k or so for 40V, power increases up by the square of the voltage and 1k at 40V dissipates 1.6W. Thanks, I forgot to square the voltage! In that case I'll probably grab two 2.2k-10K 1W resistors so I have a reasonable 5 time constants without consuming too much quiescent power. Sound right? Edit: Forgot to mention, each filter cap is 0.01F.
|
|
#
?
Oct 28, 2016 22:54
|
|
|
meatpotato posted:This is cool as hell! How are you designing your circuits, do you simulate original work or are you going off mostly reference designs? I'm mediocre at electronics so either way I'm very impressed! most of practical electronics engineering is just cut and pasting from reference designs and piecing together metaphorical lego blocks in some way or another  for this IC texas has a very comprehensive reference design and application notes on what to do and not to do, so i started with the reference design and basically just modified it here and there like adding the differential input and modifying the design to run off a 5V aux supply for the opamps since that works better for my system. i had found some filter components on my own, but looking at the specs the parts TI suggested were better so i switched to those (plus my components were chosen by the"well it looks pretty good" method and TI had a ton of measurements to back their choices). the heatsink didn't have a 3D model so i also had to model that myself to see how it would sit on the board, never tried importing my own models into the PCB software but it worked pretty well for all practical purposes i can't simulate this circuit accurately, the only thing worth analyzing that way would be the output filter, which is a well studied field and it mostly comes down to looking up some pre-made tables or finding the equations and selecting appropriate components when the actual speaker isn't known in advance. layout also matters a lot in this kind of circuit, i've even broken my general rule of "don't do ground plane splits, you moron" and added some splits on the top and bottom layer ground fill around the input circuitry to isolate it a little from the power current. there's still an unbroken plane internally of course.
|
|
#
?
Oct 28, 2016 23:08
|
|
|
Defeated for the night  Though I am fairly sure that my problem is with the front-end tone and switch board. I reflowed every solder joint on the tone and switch board with good flux then doused every pot and switch in DeOxit again. After that didn't work, I pulled out all the transistors in the left channel signal path on the board (which is pretty easy with a desoldering tool). Unfortunately, they all passed the diode test. However, I decided to do a few tests. I re-installed the left channel transistors individually, powering the system up and checking for the problem each time. I discovered a few things:  1) QE02 alone is sufficient to create the static sound issue. 2) The problem doesn't manifest when QE04, QE06, and QE08 are installed and QE02 is omitted. The left channel is silent in this case. 3) Swapping QE01 from the right channel with QE02 does not change anything. While I'm not sure, I think this means that I can focus on parts including and to the left of CE10 as sources of the problem. This leaves a handful of passives plus the volume and balance pots. Could a failing AC-coupling capacitor do this? It's probably a connector like you experienced people think, but I just can't clean the problem away!
|
|
#
?
Oct 29, 2016 08:40
|
|
|
Ok sounds like you've narrowed it down a fair bit now. Since removing QE02 "fixes" it you can ignore everything after that circuit (let's say each circuit ends at the AC coupling cap). QE04 is part of the circuit so may be related. while it's rarely happened to me, i'm suspecting it might be a resistor. have you tried scoping around the signal path on that board in DC coupled more/used a multimeter to check the voltages listed in the schematic? if those are jumping around then there's a fair chance you're near the problematic circuit. if i had to guess i'd say maybe re16 (1meg) is a problem, depending on the transistor used it could fail to a higher than normal impedance without a huge obvious effect on the circuit.
|
|
#
?
Oct 29, 2016 09:11
|
|
|
That's a good call. And yeah a coupling cap that's leaking can manifest like that cause it'll mess with the bias on the transistors. You're getting close imo lol.
|
|
#
?
Oct 29, 2016 10:58
|
|
|
my customized gotek floppy emulator arrived. it's a little chinese floppy drive box with a USB port and a 34-pin floppy connector on the back, flashed with different software that lets it read and convert just about any microcomputer disk format, even copy protected ones, and emulate a 720KB drive what this means is you can load all the ST, Amiga, or just about anything ever images onto it that you need and select the active image from up to 999 floppies for the ST, someone made a menu program that lets you select 16 A: and B: image sets to flip between. so i can load literally all of the ST warez OR legit games in history onto a USB stick and play it all installation is easy since it has holes for fitting into a 3.5" drive bay on the sides and bottom. the buttons and USB port are accessible from the drive cutout without modification transfer speed is the same as a floppy for compatibility, though there are ~ways~ to put it into burst mode and run up to 120KB/sec
|
|
#
?
Oct 29, 2016 20:05
|
|
|
Luigi Thirty posted:my customized gotek floppy emulator arrived. it's a little chinese floppy drive box with a USB port and a 34-pin floppy connector on the back, flashed with different software that lets it read and convert just about any microcomputer disk format, even copy protected ones, and emulate a 720KB drive i love this ") did you have an ST as a kid or was it ~that sweet system~ you dreamed of?
|
|
#
?
Oct 29, 2016 20:11
|
|

|
ChiralCondensate posted:i love this i grew up with a tandy coco 2, a tape player, and a canyon climber cartridge lol this made me a huge nerd for old microcomputers, i even wrote an apple 1 emulator and half of an nes emulator i posted about here a while ago my dad bought me a commodore 64 and a box of software and an ST off ebay when i was like 12 but i never had any software for it or anything. now that i make big boy money and i'm into 68k programming i've got the ST system of my dreams yeah. just need to add a hard drive and i'm all set
|
|
#
?
Oct 29, 2016 21:16
|
|
|
tried to integrate the new PAs into the 3D model of the amp this morning and quickly decided a 2U box just isn't big enough to comfortably fit everything. behold: my new 3Ux13" model  two of the PAs are stacked with the heat sink right in front of the main inlet fan, which should give it nearly optimal airflow. the power supply is somewhat convection cooled and i'm assuming there will be enough flow over it to keep it reasonably cool despite not sitting in the air flow and the heat sink fins being the wrong way. i also moved up to 120x120x38mm fans since there was room, that should work a lot better than the 60mm i had in the 2U model that grating is a random model off grabcad to indicate that some kind of guard should be there; the outer cover will be a dust filtered black plastic cover, and along the inner edges i plan to put a stainless steel EMC filter also figured out that the hammond model has some kind of protection on it so modifying the original pieces with holes wasn't possible without potentially some more work. i just made new stand-in blocks for the front bottom and rear panels in the same location that i could punch holes in to make dimensioned drawings.
|
|
#
?
Oct 29, 2016 23:24
|
|
|
^^^ Sweet pastoral render, that thing will look as over-engineered as it will sound! In my horrible world I still haven't found the offending component. I've done terrible and pointless things in desperation! Despite already convincing myself the issue was some passive component, I tried swapping transistors between the right and left channels. No surprise, the problem stayed on the left channel. Eventually, I pulled and tested all the resistors in the suspect block, RE14, R16, RE20, RE22, RE24, and RE26 with my DVM. They all read steady values, so I put 9V across them and looked for noise with my scope. Nada. Also, the schematic and the resistors disagree about some of their values. I found that RE20 is 390, RE22 is 16k, and RE24 is 3.6k. Frustrated, I removed and tested CE12, CE14, CE16, CE18, CE20 and CD22 with an LCR meter. I found a strange thing, CE12's ESR is not steady. It averaged about 1.2k, but touching it would cause it to flicker around 400 ohms. I thought for sure it was the cause of my noise. CE12 was the only ceramic cap, the others were all some type of film cap. That's a pretty high ESR for a cap, no? Perhaps my meter is having trouble since it's only 100pF (probably not, it's a high-quality Keysight meter). The ESRs of the other caps were in the low 20s to the just under 120 ohms. I'm going nuts over here since the caps are no longer an option. I think that means it's most likely a pot after all. poo poo, these pots are hard to find since Marantz decided to be extra fancy and nest one shaft inside the other.
|
|
#
?
Oct 30, 2016 09:47
|
|
|
You've buzzed out the PCB traces, right?
|
|
#
?
Oct 30, 2016 11:21
|
|

|
This EE stuff is really interesting even though I don't understand a thing of it.
|
|
#
?
Oct 30, 2016 16:04
|
|

|
just start somewhere, i started with simple arduino shields and sensors
|
|
#
?
Oct 30, 2016 16:44
|
|
|
BiohazrD posted:just start somewhere, i started with simple arduino shields and sensors i think the best way to learn anything is to have a specific goal, arduino stuff is a good way to very quickly get to where you can do useful things so i highly recommend it to anyone interested in hobby electronics of course the only proper way to learn electronics to first spend a year studying ohms law and semiconductor manufacturing processes then maybe wire up a simple common emitter amplifier after a few weeks of calculations to work out the optimal bias point then maybe on your third year you can wire up a voltage follower opamp or a 2-transistor voltage regulator
|
|
#
?
Oct 31, 2016 19:04
|
|
|
Angela Merkle Tree posted:i've been working on an assembler and debugger for the script vm used in gta san andreas woah how do you even get started on something like this
|
|
#
?
Oct 31, 2016 19:25
|
|

|
Pine Scented posted:This EE stuff is really interesting even though I don't understand a thing of it.
|
|
#
?
Oct 31, 2016 19:26
|
|


|
Pine Scented posted:This EE stuff is really interesting even though I don't understand a thing of it. saaaame I'm making it up as I go 100%
|
|
#
?
Oct 31, 2016 19:28
|
|
|
idk poo poo about ee and I have degrees and a job in it
|
|
#
?
Nov 1, 2016 04:54
|
|


|
longview posted:i think the best way to learn anything is to have a specific goal, arduino stuff is a good way to very quickly get to where you can do useful things so i highly recommend it to anyone interested in hobby electronics I get what you're saying but I really honestly disagree. Not about the arduino - go nuts. Buy 'getting started with arduino' and go to town. Everyone's different but I firmly believe the best way to learn if you're starting out is to get set up and just play. As in mentally give yourself permission to just gently caress around and maybe misuse stuff in the process. Literally Play with the tools, just to see what you can make happen. gently caress around with no real goal in mind, make some stuff happen and go from there
The Eyes Have It fucked around with this message at 05:30 on Nov 1, 2016 |
|
#
?
Nov 1, 2016 05:27
|
|

|
speaking as an educator, I think it's good to have a specific goal to work towards, even if it's a dumb simple one like "make an rgb mood lamp." when you're working on a highly technical topic, it can be really hard to structure your learning process, but having a goal lets you break it down into individual bits and follow them in sequence. it's even more important when you're self-teaching, with no instructor to help you move from step to step. i notice it a lot in CAD modeling as well. saying "i'm going to teach myself solidworks" doesn't suggest any specific learning strategy, but "i'm going to made a solidworks model of a machine gun" you have a place to start. so yeah, you don't need to have ~a lifelong passion project~ to work on with your arduino, but it can help if you at least have some little doohickeys you want to make
|
|
#
?
Nov 1, 2016 05:38
|
|


|
Bloody posted:idk poo poo about ee and I have degrees and a job in it same
|
|
#
?
Nov 1, 2016 05:46
|
|

|
I would agree with you there but I was getting a "it's something totally new to me, never done anything like this before" vibe in which case I think it's appropriate for a smart person to just gently caress around. Once you get a feel for what you do and don't know and a bit of a toe hold, then sure by all means pick a direction by way of a project. Different strokes, etc. Naturally I see this through my own lens but the value of play is often underrated imo.
|
|
#
?
Nov 1, 2016 05:52
|
|
|
i made a solar powered lamp with a motorcycle battery and an MPPP charge controller:   
EIDE Van Hagar fucked around with this message at 15:57 on Nov 1, 2016 |
|
#
?
Nov 1, 2016 06:00
|
|
|
Mister Sinewave posted:I would agree with you there but I was getting a "it's something totally new to me, never done anything like this before" vibe in which case I think it's appropriate for a smart person to just gently caress around. i've done a lot of playing around and learned a lot by doing it, it's a good way to learn but i don't think playing around is a good first step assuming you had no prior experience at the risk of sounding like a kindergarten teacher i would suggest something like structured play i think? like here's some tools and how to use them, now see what you can do with them, we suggest starting at "LED blink"
|
|
#
?
Nov 1, 2016 08:21
|
|
|
longview posted:at the risk of sounding like a kindergarten teacher i would suggest something like structured play i think? You don't learn woodworking by letting someone go nuts.
|
|
#
?
Nov 1, 2016 11:16
|
|

|
Bloody posted:idk poo poo about ee and I have degrees and a job in it
|
|
#
?
Nov 1, 2016 15:34
|
|
|

|
| # ? May 10, 2024 13:26 |
|
|
evil_bunnY posted:You don't learn woodworking by letting someone go nuts. this is me learning woodworking though
|
|
#
?
Nov 1, 2016 22:25
|
|