

|
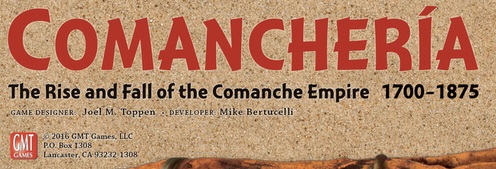 GMT Games posted:They struck with the ferocity of a thunderstorm on the open prairie. Once they were a relatively feeble tribe, dwelling in the foothills of the Rocky Mountains. Until, that is, they came into possession of horses. And so it was that seemingly out of nowhere, they emerged as an unstoppable force, the greatest light cavalry ever seen in the western hemisphere. They called themselves Numunuu, �the people.� Their Ute cousins called them Kumantsi, �someone who wants to fight me all the time.� The Spanish called them, �Comanche.� As this is a Solitaire game, posters will collaborate to control the Comanche versus the game. This game will be for the full campaign: "Rise And Fall of the Comanche Empire." I'll be using the vassal module to track the board state. I'm going to be trying some simple voting for this. If you would like to make a proposal for the Comanche's operation for a turn, please post your proposal in Bold. When voting for another's proposal, please make clear which proposal you're voting for. Certain cards and actions can be used at any time, so feel free to make proposals governing when they should be used. Also, feel free to make proposals as broad or specific as you like. I will take more discretion with broader proposals, but I will do my best to stay within their spirit. Above all else, have fun! Rulebook: https://boardgamegeek.com/filepage/140614/comancheria-rulebook
|
 #
?
Mar 16, 2017 18:54
#
?
Mar 16, 2017 18:54
|
|


|

|
| # ? Apr 25, 2024 13:44 |
|
|
Reserved.
|
|
#
?
Mar 16, 2017 18:55
|
|
|
 The Comanche start with one Rancher�a, which contains three, two-strength warbands and four horses. They also start with one, Level 1 Culture card, which are shown along the top of the map. The recommendation is to start with Horsemanship, but there is no wrong option for this. Also, keep in mind the Development cards that are in play. I'll be away for the next few hours, but I'll be doing a rules overview for those not familiar with the game when I get back, as well as a list of all of the culture cards.. Please also let me know if anything can't be read or is not visible. Please vote for which Level 1 Culture Card the Comanche should start with.
|
|
#
?
Mar 16, 2017 19:07
|
|
|
Very interested in this one after having lost repeatedly at the previous version (Navajo Wars). We are masters of the plain because we drat good at Horses.
|
|
#
?
Mar 16, 2017 19:32
|
|

|
Horsemanship is the ballin'est level 1 card, go for that.
|
|
#
?
Mar 16, 2017 19:47
|
|

|
Horsies
|
|
#
?
Mar 16, 2017 19:56
|
|

|
Not playing, just observing. What's the point of "Diplomacy"? Just a prerequisite for other cards?
|
|
#
?
Mar 16, 2017 20:16
|
|


|
Lord Frisk posted:Not playing, just observing. What's the point of "Diplomacy"? Just a prerequisite for other cards? Higher level versions (each card has a second and third level) let you dick around with the enemy AI a bit.
|
|
#
?
Mar 16, 2017 20:48
|
|
|
Lords of the Plains
|
|
#
?
Mar 16, 2017 21:51
|
|

|
Rules Overview Important Concepts    Bands - Theses are our guys. Their Strength is the left number, which helps with Raiding and Battling. Movement Points are the right number, which are used to take Actions. When a Band is finished activating, they will be flipped to their "Finished" side, marked with a F. Finished Bands lose Strength during Planning and take a penalty during Battles. Bands - Theses are our guys. Their Strength is the left number, which helps with Raiding and Battling. Movement Points are the right number, which are used to take Actions. When a Band is finished activating, they will be flipped to their "Finished" side, marked with a F. Finished Bands lose Strength during Planning and take a penalty during Battles. Ravaged Counters - These are mostly placed on enemies due to our Raids. Enemies will generally try to get rid of Ravaged counters instead of whatever else they were going to do, and are thus very important for preventing Enemy actions. Ravaged Counters - These are mostly placed on enemies due to our Raids. Enemies will generally try to get rid of Ravaged counters instead of whatever else they were going to do, and are thus very important for preventing Enemy actions.Stacking - During Operations Cleanup, the Round Spaces (i.e. most of the spaces on the board) can hold 1 Rancher�a, 1 Settlement, 1 Tribe, or 1 Band. In practice, this mostly means that bands can't end their movement in spaces with Tribes, Settlements, or other Bands. Bands in Rancher�a spaces are placed in that Rancher�a's Resource box (like the 3 Bands we start the game with).   Headmen - Each Rancher�a has two Headmen, a Mahimiana and a Paraibo. Each has a Medicine Rating, which represents their general effectiveness. Mahimianas may go with Bands and improve their Actions. Paraibos give us Headmen Actions during Planning and determine how many bands a Rancher�a may activate at one time. Headmen - Each Rancher�a has two Headmen, a Mahimiana and a Paraibo. Each has a Medicine Rating, which represents their general effectiveness. Mahimianas may go with Bands and improve their Actions. Paraibos give us Headmen Actions during Planning and determine how many bands a Rancher�a may activate at one time.    Resources - Except for Bison, these are always either held by a Band or in a Rancher�a. The Yellow Hex with a number represents pop points, which are used during Passage of Time to make new bands and make existing bands stronger. Horses allow bands to move for fewer MPs , and can be spent for more MPs. Guns are generally rare, and can be used during Success Checks to attempt to prevent Enemy APs, or Battles, to roll 2 dice and pick 1. Trade Goods can be used at almost any time to re-roll almost any die roll, or to mulligan a Success Check draw. Resources - Except for Bison, these are always either held by a Band or in a Rancher�a. The Yellow Hex with a number represents pop points, which are used during Passage of Time to make new bands and make existing bands stronger. Horses allow bands to move for fewer MPs , and can be spent for more MPs. Guns are generally rare, and can be used during Success Checks to attempt to prevent Enemy APs, or Battles, to roll 2 dice and pick 1. Trade Goods can be used at almost any time to re-roll almost any die roll, or to mulligan a Success Check draw.  Success Checks and APs - At the beginning of the game, the Success Check Draw Cup is formed from 22 counters, 10 of which are Successes. Certain actions, like Raids, will call for a Success check. A Band will draw a number of counters from the draw cup equal to its strength, with a possible bonus from a present Mahimiana. Each drawn Success will do something as defined by the action, while drawn APs will be given to the Enemy. The Enemy will preform Actions based on its APs during Operation Cleanup. Generally, Success counters drawn from Success Checks are NOT returned to the cup, while Enemy APs are. Keeping track of how many success counters are left in the cup is very important! Success Checks and APs - At the beginning of the game, the Success Check Draw Cup is formed from 22 counters, 10 of which are Successes. Certain actions, like Raids, will call for a Success check. A Band will draw a number of counters from the draw cup equal to its strength, with a possible bonus from a present Mahimiana. Each drawn Success will do something as defined by the action, while drawn APs will be given to the Enemy. The Enemy will preform Actions based on its APs during Operation Cleanup. Generally, Success counters drawn from Success Checks are NOT returned to the cup, while Enemy APs are. Keeping track of how many success counters are left in the cup is very important!  Military and Culture Points - Generally, Culture Points are gained during a Culture Operation, and may be spent to buy Culture Cards during Passage of Time or Military Points during Planning. Both of these may be lost due to Enemy Actions. If both of these are ever 0, we instantly lose the game. Military and Culture Points - Generally, Culture Points are gained during a Culture Operation, and may be spent to buy Culture Cards during Passage of Time or Military Points during Planning. Both of these may be lost due to Enemy Actions. If both of these are ever 0, we instantly lose the game.Whew, that's enough for now. Later tonight or tomorrow morning, I'll tally the votes for the first Culture Card, then go over the Sequence of Play and the Take Actions Operation, since that's probably what you'll want to do first. Let me know if there are any questions!
|
|
#
?
Mar 16, 2017 23:10
|
|
|
Warfare looks like a pretty nice card if we plan on killing all of our neighbors. I have never played before so..
|
|
#
?
Mar 16, 2017 23:35
|
|

|
I have no idea whats going on but it seems interesting.
|
|
#
?
Mar 17, 2017 11:46
|
|

|
Rules Overview Sequence of Play 1) War Column Phase - In-play Enemy War Columns will attempt to move, and then may suffer attrition. War Columns in spaces with a Band or Allied Tribe will fight a Battle. War Columns in spaces with Rancher�as will cause us to lose Military Points. If the Rancher�as have no Bands, they are destroyed. At Rancher�as with Bands, battles may be fought, or more Military Points may be lost (along with all captives) to force War Column to return to its Home Enemy Space. As Military Points are difficult to obtain, it is vital that War Columns be kept away from Rancher�as for as long as possible. 2) Operations Phase - One of the following Operations is performed: Take Actions, Culture, Planning, Passage of TIme. If the Operations Counter is on the "Must Do Passage of TIme" space, a Passage of Time Operation must be performed. If the Operations counter is not in a numbered space, a Passage of Time Operation cannot be performed. At the end of an operation, if the Operations Counter is in a numbered space, it will progress to the "Must Do Passsage of TIme" Space on a die roll, else it will move down one space. 3) Operations Cleanup Phase - Stacking rules are enforced. Bands in Rancher�as may relinquish their possessions. Counters in the Operations Marker's space are removed from the Operations track; Success counters are returned to the Draw Cup, and Resource counters are placed in a Rancher�a. If Finished Bands are in Rancher�as, Enemy may receive a free Instruction. A counter is drawn from the Success Check Draw Cup, if it is a Success counter, it is returned to the Draw Cup, else it is added to Enemy APs. Enemy will then preform Instructions based on Enemy APs. Sequence of Play is repeated until the game is either won or lost. Operations Take Actions - In one Rancher�a, a number of Bands up to its Paraibo's Medicine Rating may be activated. Each activated Band may spend its MPs to perform Actions. If the Paraibo's Medicine Rating is greater than the total number of Bands in that Rancher�a, one of those Bands may be activated to gain APs equal to the difference instead of spending MPs (e.g. A Rancher�a has 3 Bands and its Paraibo has a Medicine Rating of 5. One of those Bands may be activated to gain 2 APs, as the Paraibo's Medicine Rating is 2 higher then the total number of Bands in that Rancher�a.) APs may be spent to activate Bands, including Bands that were activated previously and Bands outside of Rancher�as. Important: Spending APs is the only way to activate Bands outside of Rancher�as. After Activating, Bands are flipped to their Finished side. Culture - 1 Culture Point is gained for each Territory containing at least 1 Rancher�a. 1 additional Culture Point is gained for each Comanche-controlled territory. Planning - All Headmen may gain Medicine Rating for Success Counters (mostly from Raids). Each Paraibo may take 1 Headman Action, or may gamble to take more, at the risk of taking none. Each dead Mahimiana is replaced. Each Finished Band is reduced in strength and is flipped to unfinished. Rancher�as may move based on the strength of their Bands. The Enemy performs a free instruction. Passage of Time - [will be done later] Actions Move - A Band may move to adjacent spaces over any connection line (the different connection lines on the map are only relevant to the Enemy) at a cost of 2MP per space, or 1MP per space if the moving Band has Horses. Hunt - A Band may take possession of a Bison present in the same space for 3MP, or 2MP if the Band has a Mahamiana. Raid - A Band in the same space as a Tribe, Settlement, or Square Enemy Space may attempt to loot it for 1MP. A Success Check is conducted. If at least one Success is drawn, the Band collects one Horses or one Captives for each success, and a Ravaged Counter is placed in the space. If the space is a Peace Space (i.e. an Allied Tribe or an Enemy with a Peace instruction), the Peace may end. Trade - A Band in the same space as a Tribe, Settlement, or Square Enemy Space may spend Horses, Captives, or Bison that it possesses to receive Food or Trade Goods for 1MP each. Non-Captives traded in non-Peace Spaces cost an additional AP each.
|
|
#
?
Mar 17, 2017 15:10
|
|
|
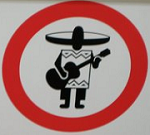
Since the Take Actions Operation is generally the most common, I'll give an example. Our current Rancher�a has 3 2-strength bands. Its Paraibo's Medicine Rating is 2, so we can activate 2 of them. When a Band in a Rancher�a activates, it may take possession of stuff in the Rancher�a. In this case I'll have our first Band take a Horses.  As shown on its counter, the Band has 5MPs. I'll have it move to Upper Arkansas 2. Since it has Horses, this only costs 1MP. I will then have it Hunt to take the possession of the Bison Counter in Upper Arkansas 2. Since the band does not have possession of our Mahimiana, this costs 3MP. 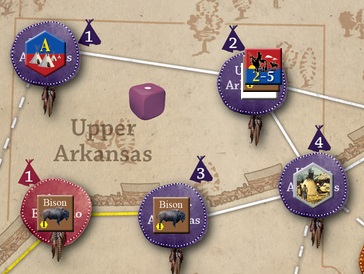 This Band has 1MP left, so I'll have him move back to Upper Arkansas 1. This is our Rancher�a's space, so I'll place him in the Rancher�a and mark him as Finished. Importantly, that Band will retain possession of his stuff until Operations Cleanup, so the other Band we will be activating cannot make use of any of it.  I want the second band to Raid the Tribe in Upper Arkansas 4, so I'll have him take the Mahimiana, to hopefully get a bonus during the Success Check. I'll also have him take the other 3 Horses counters in the Rancher�a, as I might want to make him do more then one Raid and still get back to the Rancher�a. 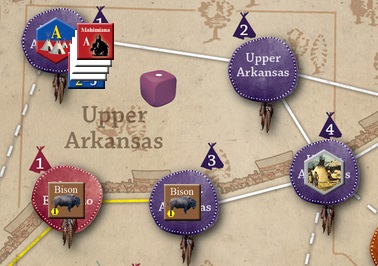 The Band will spend 2MPs to move to Upper Arkansas 4 through Upper Arkansas 2. 1MP will then be spent to initiate a Raid, which involves a Success Check. Since our Mahamiana is present, I roll a die to see if I will draw more counters. Let's say I roll a 2. This is less than or equal to his Medicine Rating, so I will draw 1 bonus counter. The Band's Strength is 2, so I will draw 3 counters total. Let's say I draw the following: Two Successes! That's pretty nice! This will allow me to take two resources from the Tribe. Since our Mahimiana is present the Successes are placed on his track, which will improve his Medicine Rating if we later take a Planning Operation. The 3 Enemy APs are placed in their box, to be used by the Enemy during Operation Cleanup.  I will have the Band take a Captives and a Horses. A Ravaged counter is also placed on the Tribe. 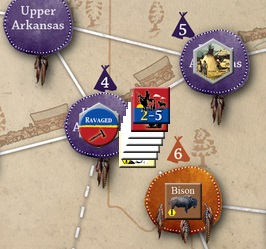 I feel pretty good about that Raid, so I will spend another MP to have the Band Raid again, leaving it with 1MP. Again, I roll a die for the Mahamiana. Let's say this time I roll a 4. This is higher then his Medicine Rating, so I do not draw a bonus counter. I will just draw 2 counters for the Band's Strength. Let's say I draw the following:  No Successes! The Enemy APs are placed in their box, giving the Enemy more APs to use during Operations Cleanup. I could try again, but I don't want to give the Enemy more APs at this point, so I'll have the Band move back to the Rancher�a. It will spend it's last MP to move to Upper Arkansas 2. Since I want it in the Rancher�a, I will spend one of its Horses to give it 1MP, which it will then spend to move to the Rancher�a. It is then marked as Finished. 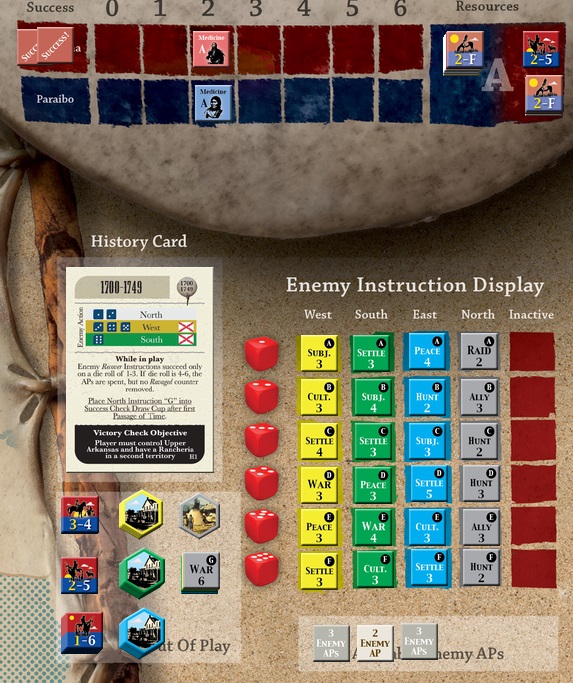 I could spend APs equal to a Band's Strength to activate it, but I only have 1AP and all of our current Bands have 2 Strength. The Operations Marker is advanced one space and the Take Actions Operation ends.
|
|
#
?
Mar 17, 2017 16:32
|
|
|
Okay, the Comanche's free Level 1 Culture is Horsemanship Level 1. You may now propose and vote on an operation, and its actions, to be executed. Taran_Wanderer fucked around with this message at 18:51 on Mar 17, 2017 |
|
#
?
Mar 17, 2017 16:39
|
|
|
Gonna vote for take actions (do you want the actions too or just the operation?)
|
|
#
?
Mar 17, 2017 18:40
|
|
|
COOL CORN posted:Gonna vote for take actions (do you want the actions too or just the operation?) Actions, too. Sorry, should have been more clear. Edit: To further clarify, you can be as detailed (or not) as you like. If you want me to do what I did in my example, you could say "Activate Rancher�a A; Use one Band to hunt a Bison and use the other Band to Raid the Tribe in Upper Arkansas 4 twice." You could also tell me to "Go Raiding," and I would probably use one Band in Rancher�a A to Raid the West Enemy Space, and one Band to Raid a Tribe. I want people that aren't entirely familiar with the Rules to be able to participate, so if anyone isn't clear about something, go ahead and post! I'll ask to clarify if I don't think it's clear enough. Taran_Wanderer fucked around with this message at 18:58 on Mar 17, 2017 |
|
#
?
Mar 17, 2017 18:49
|
|
|
Yeah, that's my designated action. I always start my games the same way as the tutorial, it works ")
|
|
#
?
Mar 17, 2017 19:13
|
|
|
Take action: Go Raiding Is there a reason we would not want to raid with everyone?
|
|
#
?
Mar 17, 2017 22:28
|
|
|
Ropes4u posted:Take action: Go Raiding It's a Risk/Reward thing. The more we go Raiding, the more APs the Enemy will have to preform actions with. Some of those actions may be wasted trying to get rid of the Ravaged counters we placed, but an enemy that wasn't Ravaged might activate instead, letting them perform a ton of actions, which can cause things to go badly for us very quickly. Of course, right now, the War of Spanish Succession Development card prevents Enemy War and Subjugation Actions from occurring, so Enemy Actions are not as dangerous as they usually are, but Bad Things can still happen to us. Also, because of the way the Success counters work, the more successful we are at Raids, the less likely future Raids will be successful, until those Success counters are put back in the draw cup. By contrast, Hunting does not reward us with a lot, but it also doesn't give the Enemy more APs to hit us with.
|
|
#
?
Mar 17, 2017 23:08
|
|
|
It looks like Take action: Go Raiding / slaughter bison is the best course of action.
|
|
#
?
Mar 18, 2017 03:00
|
|
|
Ropes4u posted:It looks like Take action: Go Raiding / slaughter bison is the best course of action. Rancher�a A is activated. First Band takes Mahimiana A and 2 Horses to Upper Arkansas 4 to Raid the Tribe. Roll for Mahimiana: 2. One bonus success counter will be drawn. Success Check: Band will take a Horses and a Captives as loot. A Ravaged counter is placed on the Tribe. I'll have them Raid again. Roll for Mahimiana: 5. No bonus success counters. Success Check:  Band will take another Captives as Loot and a second Ravaged counter is placed on the Tribe. Band will then spend a Horses to move back to the Rancher�a and be Finished. The Second Band will take a Horses, Hunt the Bison in Upper Arkansas 2, and return to the Rancher�a. Operations Counter advances one space. Operations Cleanup Our Finished Bands relinquish their possessions in the Rancher�a. Roll for free enemy instruction due to Finished Bands in Rancher�a A: 5. Nothing. Draw from Success Check Cup for Enemy APs: Success counter is returned to draw cup. Enemy will preform instructions with 6APs. Roll for Active Enemy: 5. West is the Active Enemy. Roll to flip Enemy instruction: 3. Settle 4 instruction flipped to War 4. 3APs are spent to preform Subjugate instruction. It has no effect due to War of Spanish Succession. 3APs are spent to preform Culture instruction. 1 Culture Point is lost. No West Settlements are in play, so no further Culture Points are lost. Enemy cannot preform additional instructions due to insufficient APs. Enemy Instruction Display is reset. War Column Phase No War Columns in play. Phase is skipped. 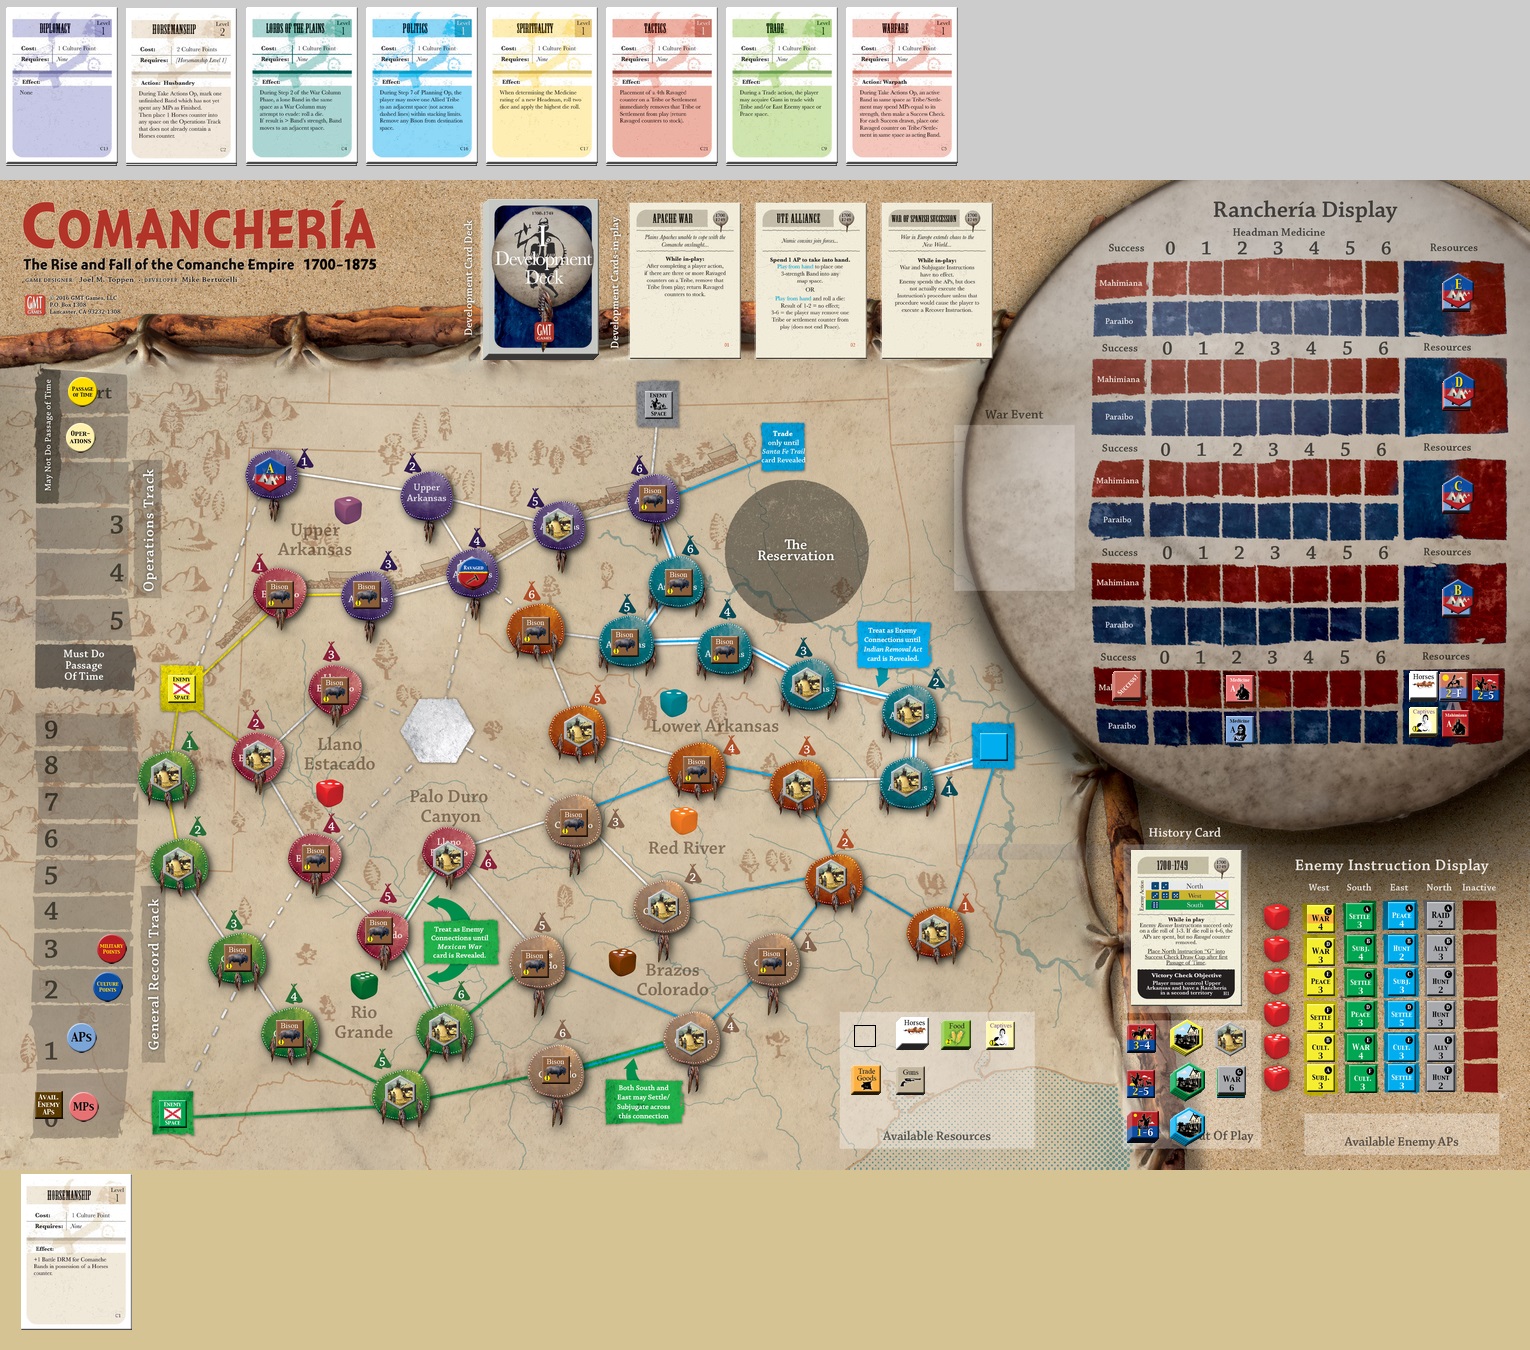 Operations Phase What would you like to do next? Let me know if I made a mistake somewhere, too.
|
|
#
?
Mar 18, 2017 15:17
|
|
|
Here are some thoughts: -Raiding the Tribes in Upper Arkansas more could allow us to get rid of at least one of them fairly quickly, due to Apache War, putting us closer to our goal of controlling Upper Arkansas. -The West Enemy space can easily be Raided a bunch, due to how close it is to our Rancher�a. -The Captives we got from Raiding can be traded to the West for Food and/or Trade Goods. -At some point, we'll want to leave a Band outside the Rancher�a in order to form a new one, so that we can fulfill the other half of our Victory Goal. (During a Passage of Time Operation, a Lone Band outside of a Rancher�a may form a new one) -A Planning Operation will allow us to use our Raiding successes to improve the Medicine Rating of our Headmen, as well as take a Headman Action, such as to pick up that nice Ute Alliance card. Our Finished Bands will lose Strength, and the Enemy will preform a free instruction, however. -A Culture Operation will only get us 1 Culture, but it won't provoke the Enemy, either.
|
|
#
?
Mar 18, 2017 17:13
|
|
|
Before I forget again, here are the Headman actions that can be taken during planning. Certain Culture Cards will also give us more options. Headman Actions Each Paraibo in play (we only have one at the moment, but each additional Rancher�a will have another) may take 1 Headman Action. We may also roll a die for each Paraibo, and if the die is less than or equal to his Medicine Rating, he will take a number of Headman Actions equal to the die roll. If the die roll is higher than his Medicine Rating, he will take no Headman Actions. 1) Collect 1AP - Lower the Paraibo's Medicine Rating by 1 to gain 1AP. This cannot be preformed if the Paraibo's Medicine Rating is 1. 2) Buy Development Card - Spend APs as listed on a Development Card to take it into hand. The card may then be played as specified by the card. 3) Return 1 Success Counter to Draw Cup - Spend 1AP to return an out-of-play Success Counter to the Draw Cup. (The Success Counters on our Mahimiana's track will be placed out-of-play as a result of increasing Medicine Ratings earlier during Planning.) This will automatically happen during a Passage of Time Operation without us having to spend APs, but this action can be used to do it early. 4) Convert 1 Culture into 1 Military - If Culture Points are greater than Military Points, 1 Culture Point may be spent to gain 1 Military Point. This is the primary way to gain Military Points.
|
|
#
?
Mar 18, 2017 17:28
|
|
|
Taran_Wanderer posted:Here are some thoughts: If we did this could we immediately play the card from hand and pick up the 3 strength band?
|
|
#
?
Mar 18, 2017 18:22
|
|
|
Ropes4u posted:If we did this could we immediately play the card from hand and pick up the 3 strength band? Sure. Generally speaking, cards may be played at any time, except during a Passage of Time Operation.
|
|
#
?
Mar 18, 2017 18:56
|
|
|
We could also try moving the rancheria- if we clear out that tribe we've been raiding we have a spot that's admittedly farther from the Spanish base but we can get closer to trading, raiding the other tribes, and potentially raiding Spanish settlements. There's no way to regain warbands other than passage of time right? It seems like you only have 6 safe actions to drop ravages on all the tribes and establish a new rancheria before all your guys attrit away to nothing e: hahahahah holy poo poo I thought that victory check triggered at the end of the first passage of time rather than the third-sixth, that makes a lot more sense StashAugustine fucked around with this message at 20:52 on Mar 18, 2017 |
|
#
?
Mar 18, 2017 20:41
|
|

|
- Action - Raid - clear the upper Arkansas - Action - trade We need to clear the upper Arkansas. I just tossed in trading because, Indians are always trading on tv / movies. But we might be better off using the headman action to pick up the Ute card so we can clear a spot or get another band of brothers, thoughts?
|
|
#
?
Mar 18, 2017 21:05
|
|
|
Alright, I'll have one Band Raid the Tribe in Upper Arkansas 4 to finish it off. If that doesn't go well, I'll have the other Band try, else they'll go Trade with the other Tribe and then Raid it. Rancher�a A is activated. All Bands in Rancher�a A are flipped to unfinished and 2 will be activated. The First Band will take Mahimiana A and two Horses to Upper Arkansas 4 and Raid the Tribe there. Roll for Mahimiana bonus: 4. No bonus success counters. Success Check: Failure. Band will Raid again. Roll for Mahimiana bonus: 6. No bonus. Success Check: Failure again! Not good. I'll have the Band spend its extra Horses to return to the Rancher�a. I'll have the second Band take our other two Horses to go Raid the Tribe in Upper Arkansas 4 again. I'll also have it take the Captives, in case I get a chance to Trade with the other Tribe. Success check: Success! Hoorah! I'll have the band take more Horses, as we're running a bit low. A third Ravaged Counter is placed on the Tribe, which then removes it from play due to Apache War. 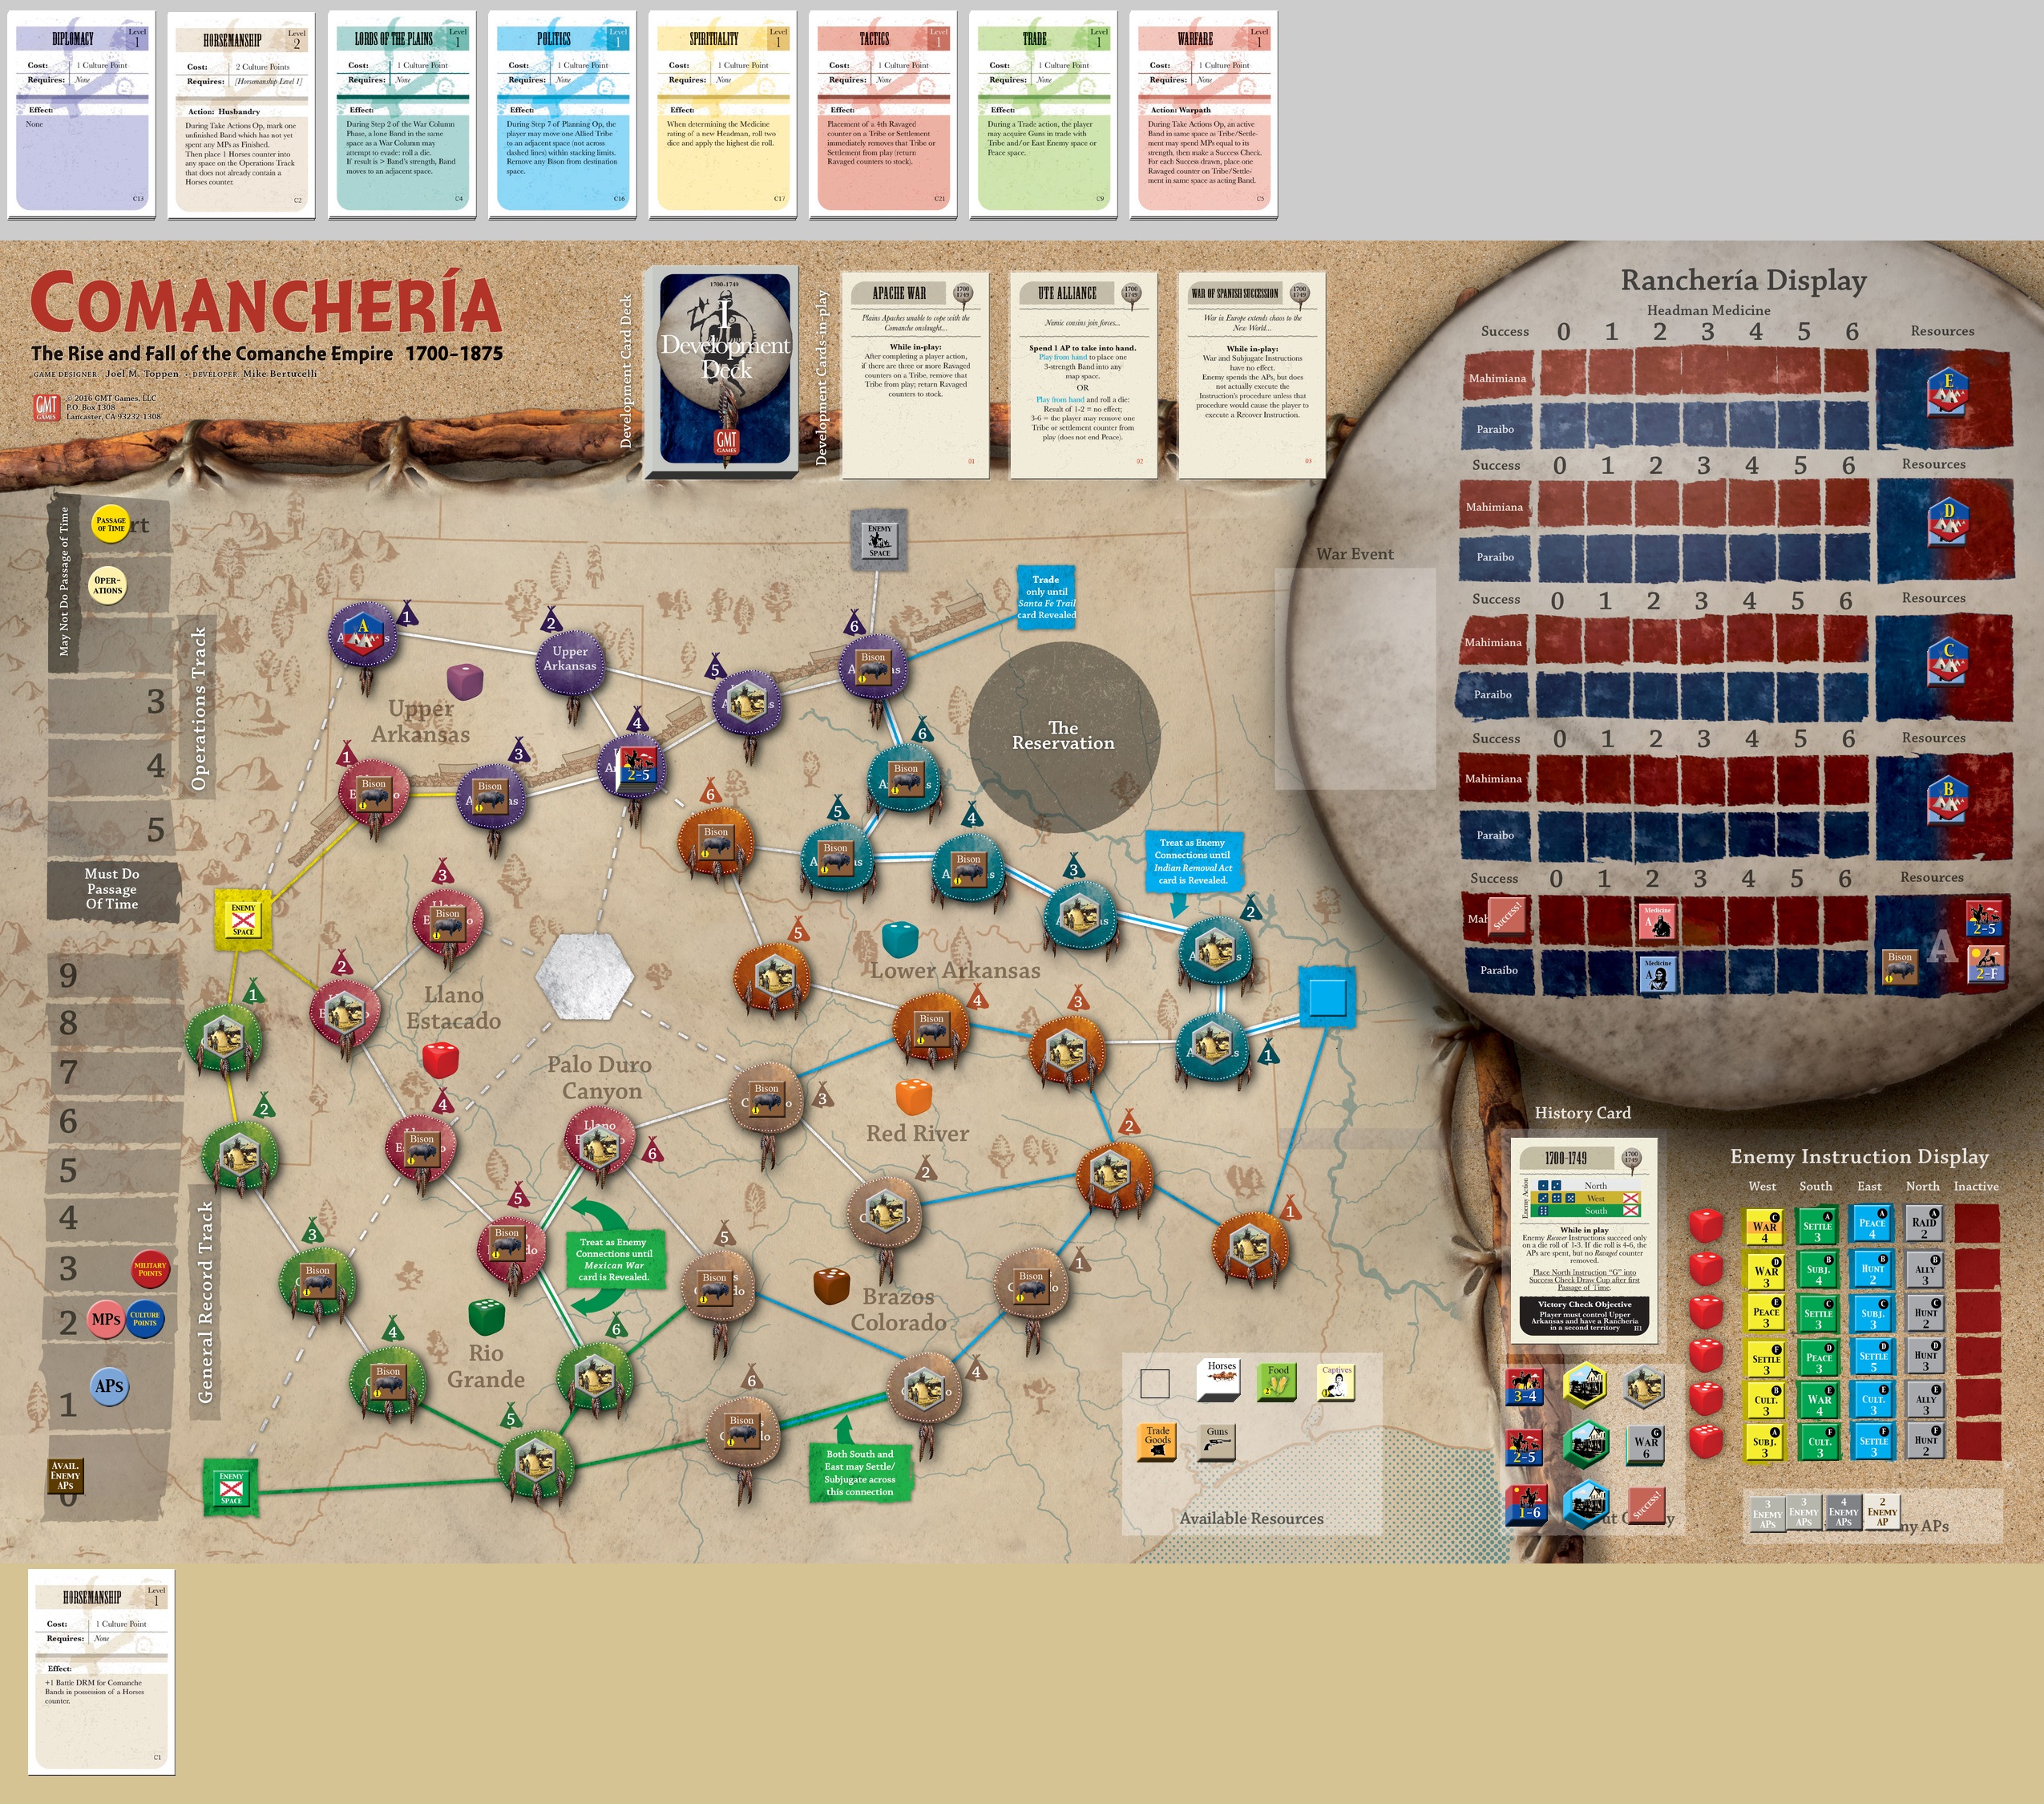 This Band now has 2MPs left. This is enough to simply return to the Rancher�a. However, we could also spend some of its Horses to Raid/Trade with the Tribe in Upper Arkansas 5. The Band could then finish its activation in Upper Arkansas 4 (or 2, I guess), and the Rancher�a could move up to retrieve it when we do a Planning Operation. We could even leave the Band where it is, or move it out to, say, Lower Arkansas 5, to form another Rancher�a later on. What should we do with this Band?
|
|
#
?
Mar 20, 2017 15:55
|
|
|
I say move it out to Lower Arkansas so we can set up a new rancheria.
|
|
#
?
Mar 20, 2017 15:58
|
|
|
I have no idea what I am doing but these sound like good options. Spend Horses to Trade with the Tribe in Upper Arkansas 5. Camp out in Lower Arkansas 5, to form another Rancher�a later on.
|
|
#
?
Mar 20, 2017 16:00
|
|
|
COOL CORN posted:I say move it out to Lower Arkansas so we can set up a new rancheria. Ropes4u posted:I have no idea what I am doing but these sound like good options. Anyone else have thoughts on this? I could also spend two of the Band's Horses to Trade our Captives with the Tribe and leave it in Upper Arkansas 6. Not exactly where we want it to be, but we can always move the Rancher�a from there after it forms.
|
|
#
?
Mar 20, 2017 22:05
|
|
|
Alright, then. I'll just move the Band over to Lower Arkansas 5. Not enough APs to activate a Band, so that ends the Operation. Operations Cleanup Roll for finished Band in Rancher�a A: 1 - Enemy conducts free Instruction. Roll for enemy to activate: 6 - South. Roll for instruction to flip: 2 - Subj. 3 to War 3. South performs Settle Instruction. South Settlement placed in Rio Grande 4. Enemy Instruction Display reset. Draw for Enemy APs: Enemy conducts 15 APs of instructions. Roll for Enemy to activate: 2 - North. Roll for instruction to flip: 3 - Hunt 2 to Raid 3.  2 Strength North War Column placed in Upper Arkansas 5.  Not sure which Tribe to Ally with here. I think I'll go with the one in Lower Arkansas 3.  North War Column moves to Upper Arkansas 2. Roll for attrition: 1 - Strength reduced by 1.  Roll for random territory: 6 - Rio Grande. Bison in Rio Grande 3 removed.  Hmm. Guess I'll Ally with Uppper Arkansas 5, now. Enemy saves 1AP remaining. Enemy Instruction Display reset. War Column Phase Draw for War Column movement: 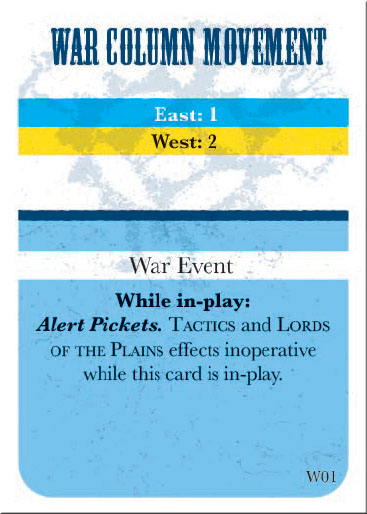 North War Column does not move. War Column Strength at 1; no roll for attrition. Draw for War Event: 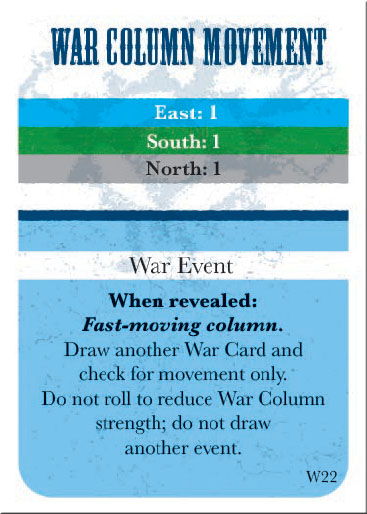 Draw for War Column movement again: 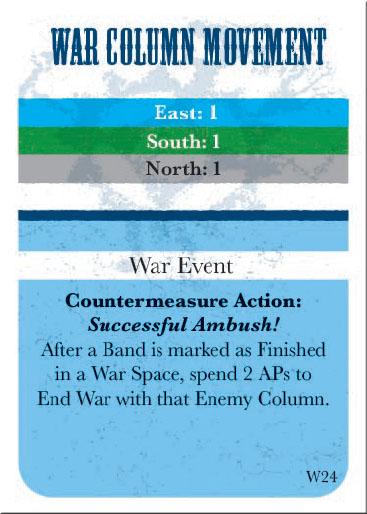 North War Column moves into Upper Arkansas 1. We lose 1 Military Point and fight a Battle. Our unfinished 2-Strength Band will take a Horses and the Mahimiana to fight the North War Column. Band Strength plus the Mahimiana and Horsemanship Level 1 gives us a total DRM of +4. Roll for Battle: 3 + 4 = 7 - Success. North War Column's Strength is reduced by 1. War Column's Strength is 0, so War ends and Mahimiana A's Medicine Rating is increased by 1.  Operation Phase Whew, lots of stuff happened there. Probably should have included more pictures. If anything is unclear, let me know. What would you like to do now? Some thoughts: -Since we are now Allied with the other Tribe in Upper Arkansas, we are considered to control the Territory, so we will get 2 Culture Points from a Culture Operation. -The Allied markers do not prevent us from Raiding the Tribes, if we want to. If we do Raid, there's a chance the Alliance will end. -The unfinished Band in Rancher�a A will retain possession of the Horses and Mahimiana until Operations Cleanup, in case we want to Perform actions.
|
|
#
?
Mar 21, 2017 15:10
|
|
|

|
| # ? Apr 25, 2024 13:44 |
|
|
Might be a good time to take a headman action to pick up the Ute card, or trade the horses and captives?
|
|
#
?
Mar 22, 2017 00:10
|
|