


|
This morning I glued on the other extra meat, then moved on to the legs. I didn't have any real dimensions planned for this, so I sketched out the maximum size of two 6/4 boards glued up and then eyeballed it against the cabinet. Way too big. So I sketched something a bit smaller and liked that size.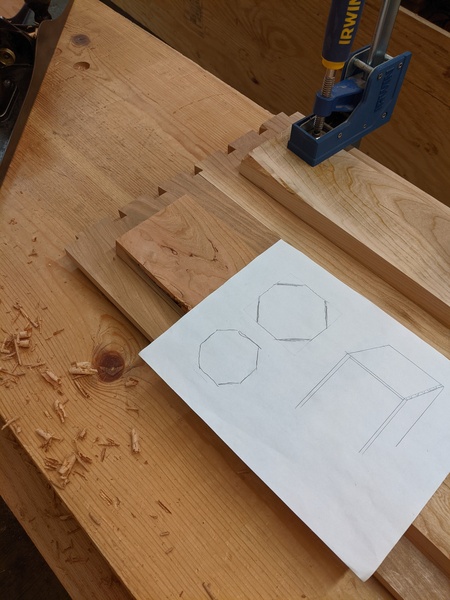 So I ripped out two pieces to glue together. If I was Chris Schwarz, and had a bandsaw, I might have done an additional cut to follow the grain. But I'm not Chris Schwarz, and I don't have a bandsaw, so I didn't. 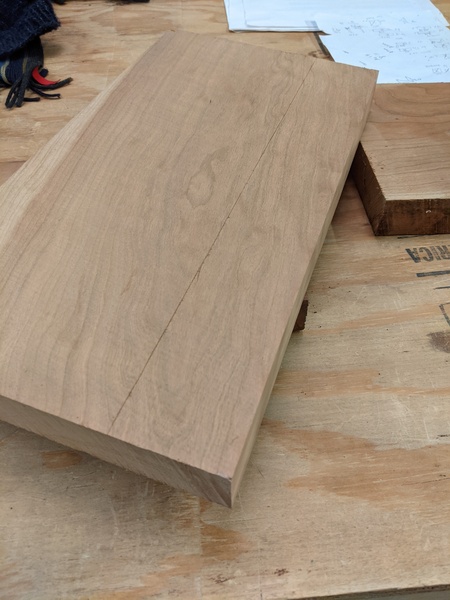 Here's a carefully staged photo where I ripped it halfway on the tablesaw, then transferred it to my vise next to this handsaw I keep around only for staged photos. The other side of the saw plate has a nice farm scene painted on. 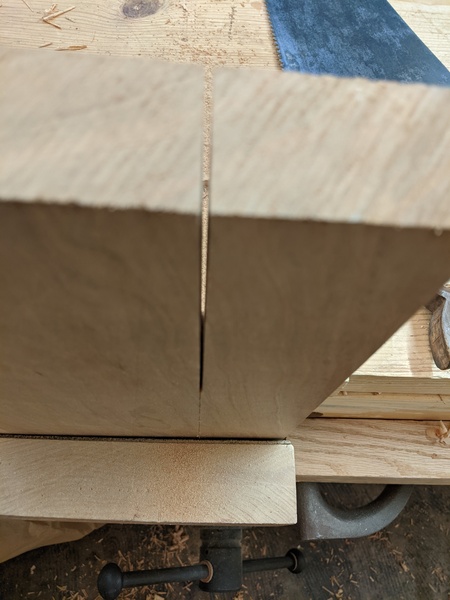 And here's the first leg glued up. I used hide glue here, since the glue line might be visible in the final piece. My plan is to take this leg all the way through to the end before I batch out the other legs, just in case I decide to change size or otherwise screwed something up. So next up will be octagonalizing it, then figuring out how to do these mortises in a way that doesn't suck. 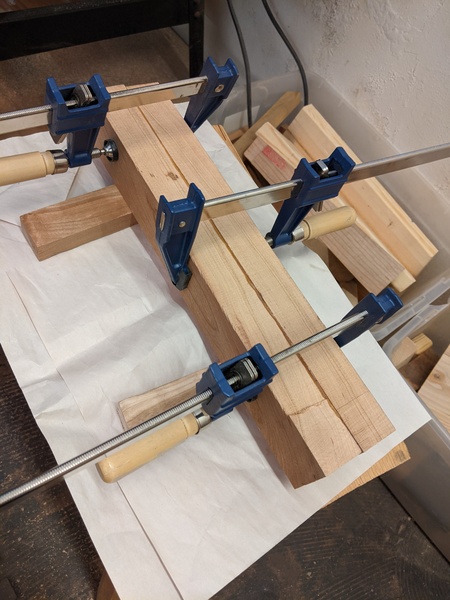
|
 #
?
Mar 2, 2021 00:03
#
?
Mar 2, 2021 00:03
|
|


|

|
| # ? Apr 24, 2024 06:45 |
|
|
Very nice morning at the shop today. I squared up the leg I glued up last time. I put in the effort to make the glue line in the center. I'm not sure if it was worth the effort, as it meant planing about 1/2" instead of just sawing it off. The glue line isn't very noticeable in the final leg, so maybe I won't bother next time. Then got started on turning it into a tapered octagon. Credit where it's due, mostly everything here came from Chris Schwarz's Anarchist's Design Book. First, find the center, then set your dividers from one corner to the center. Mark out that width on both sides of the corner. This will mark out the corners of the octagon. Really, you only need to make one mark, then set your marking gauge to that size, since it's all square anyway, but this helps visualize it for the photo. 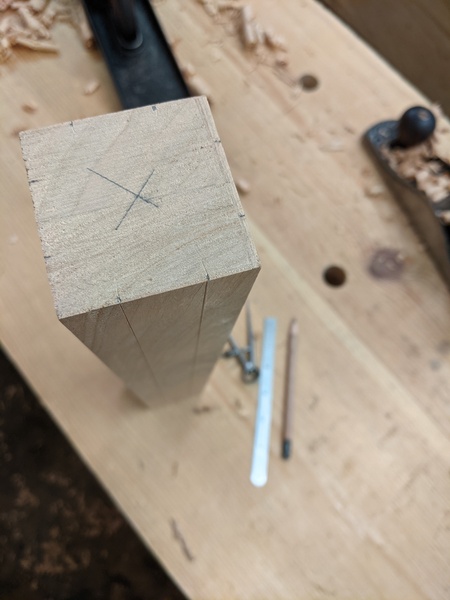 Here's the jig I use for making octagons. I think it might be the first jig I ever made. I first used it for the legs on the sawbenches. The cradle itself is made from leftover pine from the workbench. 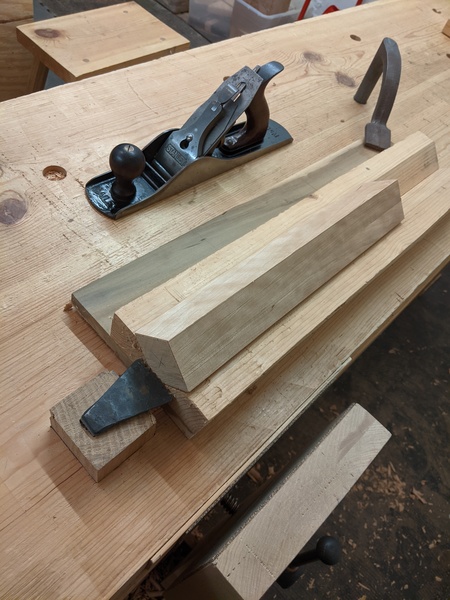 Set your jack plane to a deep cut and quickly work each corner down until the lines are nearly gone. Then use your try plane on a light cut to finish off each side. 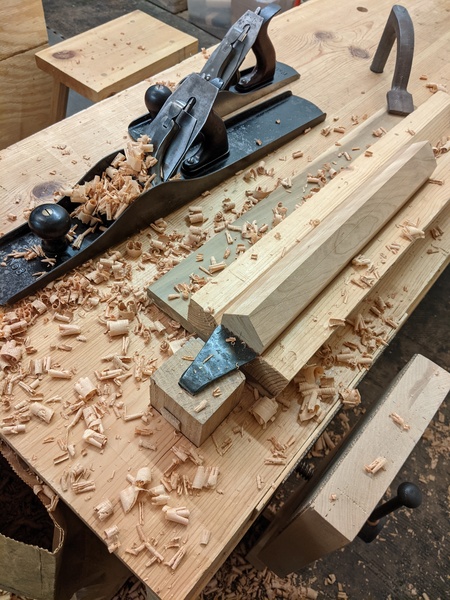 Not too much later, you'll have an octagon. 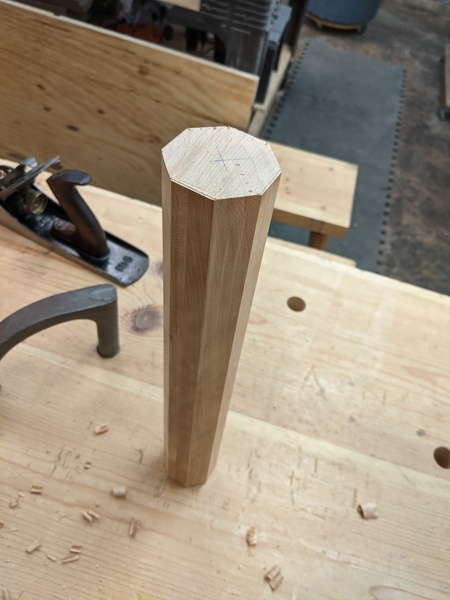 For the taper, I chose one end to be the top, which will be the narrow end. I marked a line into the end grain parallel to each edge, about 1/3 of the radius in from each of the 8 edges. The first step is to use the jack plane to take down about the first 1/3 of the leg down to that line. Be sure to reference against the flat of the octagonal face, as you won't have an opportunity to re-square things up at this point if you lean left or right. 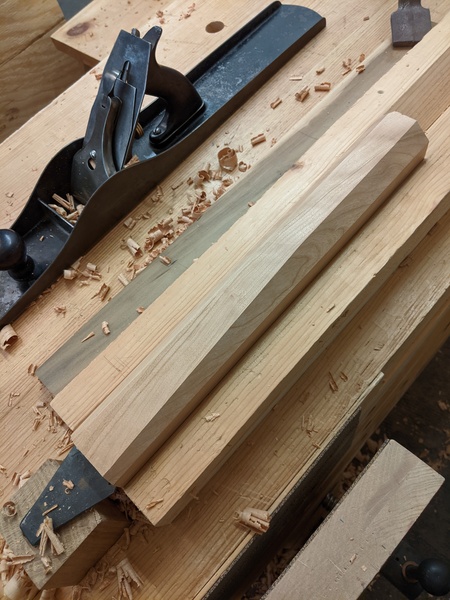 After that, work your way back towards the thick end, just taking off the "hump" left behind by the previous pass, until you run out of leg. Then grab your try plane and work down the remaining hump across the middle, checking it with your straightedge. This leaves you with a nice, flat tapered face. Repeat seven times. Then reflect on the fact that you have three more of these legs to do. 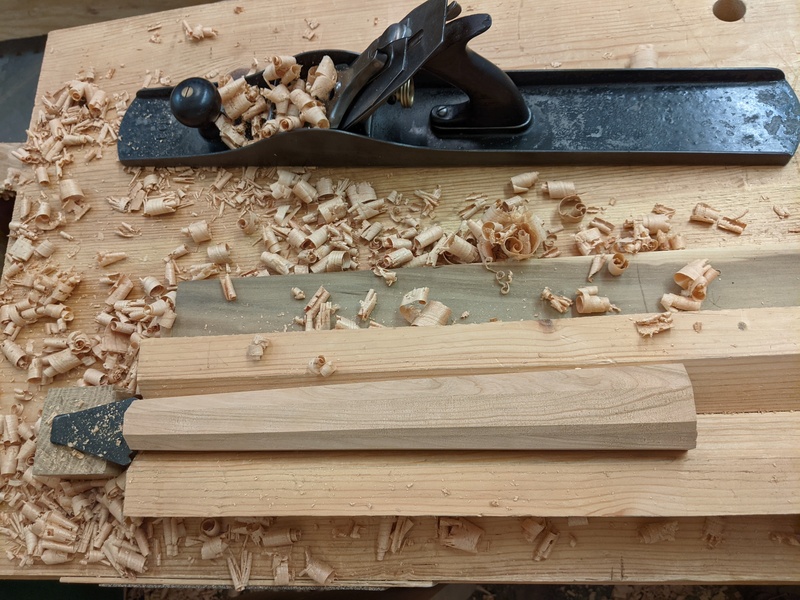 After that I put it kinda in place next to the cabinet to see how it'd look in practice. Walking around, looking at it from different angles, I tried a few different leaning angles. Anyway, I think it looks good this size. Also, if you look closely at this photo, you can see the sawbench on the left has tapered legs while the one on the right has straight legs that I didn't bother to taper. It doesn't really come across in photos, but the taper makes a huge difference. The right sawbench looks super rough and chunky, while the other one has a nice look to it. The taper is worth the effort. 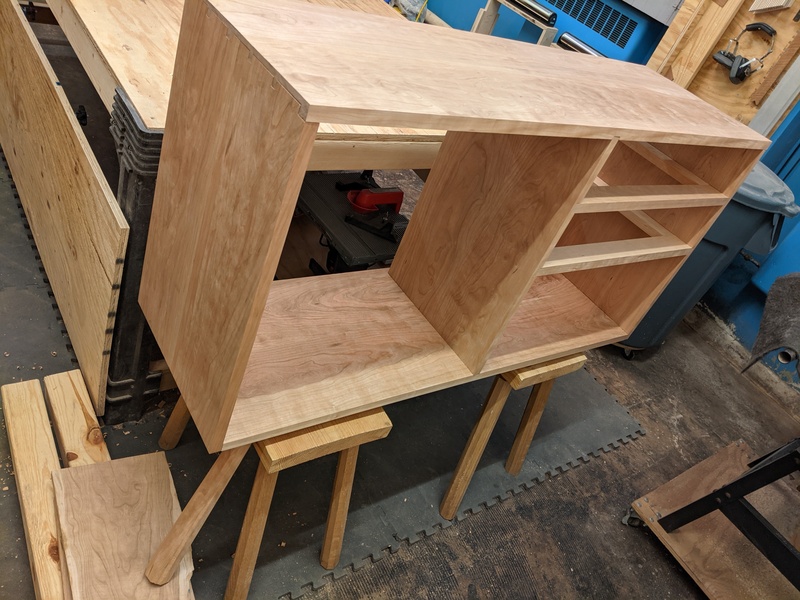 Next is to cut the conical tenon. I marked the shoulder based on the thickness of the bottom of the cabinet. I have this reference conical tenon that I cut years ago (it's actually one end of the clamp I use for sharpening saws), so I eyeballed where the cone would start and end and used the outside calipers to estimate how deep I needed to cut the shoulders.  After cutting the shoulders to depth, I use a chisel to rough out the cone shape. The grain really fought me on this one, kept wanting to dive into the meat of the tenon. Then I use the giant pencil sharpener to take it down to the final shape. 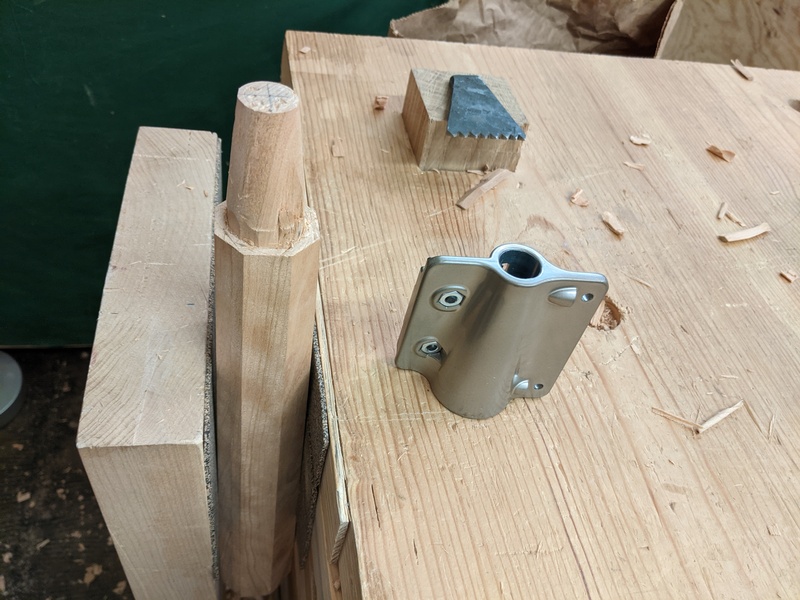 Nice leg. 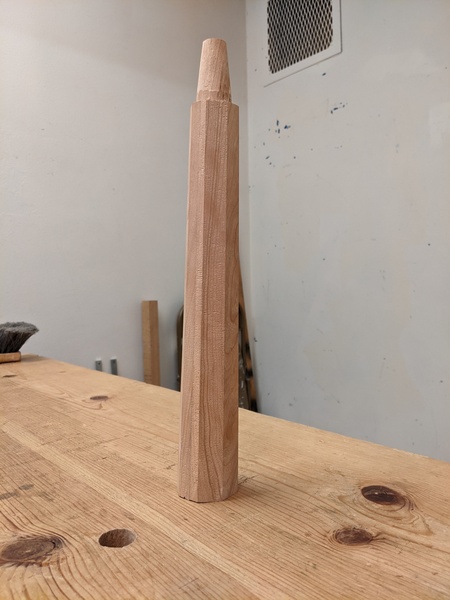 Next is the part I'm not super happy about. I've never been good at making these mortises. In theory you use the bevel gauge to guide your drilling, first the 5/8" bit then reaming it with the tapered reamer to match the conical tenon. I've tried braces and power drills and I always end up with at least one wonky leg. So here's my plan for this one. I'm cutting the mortises first into this piece of scrap wood. The first mortise turned out all right, it's at least at a good 45 degree angle to the edges, even if it's a tad steeper than I had planned. After I make each leg, I will repeatedly cut mortises into this scrap for that leg until I end up with a mortise where that leg's angles match the first leg's. Then, I'll use this scrap as a guide for the tapered reamer on the final product, hopefully reproducing those mortise angles more reliably than when I freehand it against a bevel gauge. My power drill is at home today, so I used my bit brace, but I plan to try the power drill again and see how it feels. 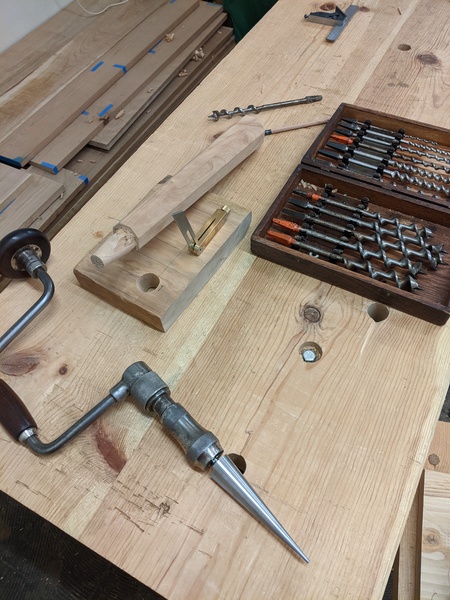 Anyway I'm happy with how this leg turned out, so I did some ripping and got the next one started. 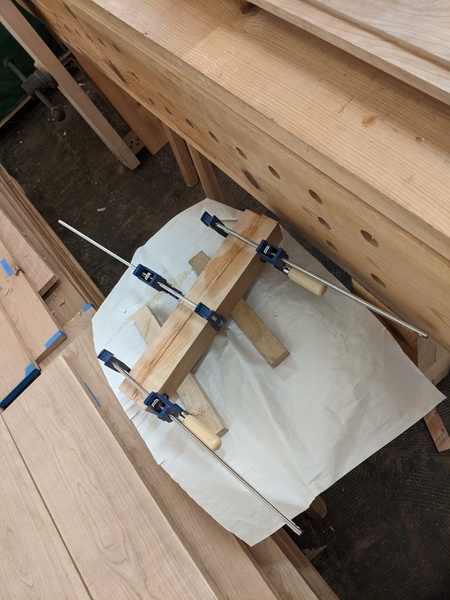 And I noticed my saw was getting a little soft, so I gave it a quick sharpen and called it a day. 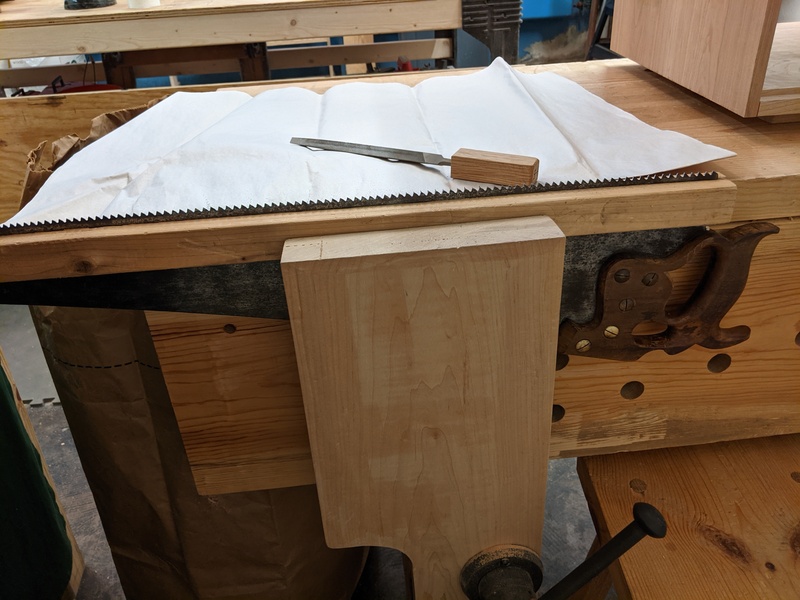
|
|
#
?
Mar 7, 2021 21:58
|
|
|
So for the tenon you hand sawed it into an octagonal tenon then used a chisel to pare that down to a rounder tapered-er thing?
|
|
#
?
Mar 7, 2021 22:45
|
|


|
Those are some big teeth on that saw, 4-5 tpi? Does the increase in teeth size make a notable difference compared to, say, a 7 tpi rip saw of similar length?
|
|
#
?
Mar 8, 2021 01:47
|
|

|
Bloody posted:So for the tenon you hand sawed it into an octagonal tenon then used a chisel to pare that down to a rounder tapered-er thing? Not quite. I crosscut the shoulder with the saw, then use a chisel to hack away most of the waste before going to the Tapered Tenon Cutter. You could use a saw to remove the waste, too, instead of a chisel. I'll take more pictures next time. Just Winging It posted:Those are some big teeth on that saw, 4-5 tpi? Does the increase in teeth size make a notable difference compared to, say, a 7 tpi rip saw of similar length? Yep, according to the stamp on the sawplate, it's 5 (TPI? PPI?). It's my only full size rip saw, so I can't give you a comparison. It does go through stock pretty quick though, and is fairly rough on the exit side.
|
|
#
?
Mar 8, 2021 13:32
|
|
|
Very neat to see how staking works in action. It's something I really want to try. Is the Anarchist's design book mostly practical geometry like how to lay out octagons fast or 'Designs Chris Schwarz Likes'? I really enjoyed 'By Hand and by Eye,' but I'm not sure Schwarz and I have the same ideas about what makes pretty furniture. Certainly lots to be learned from it either way, just curious about it before I click the button.
|
|
#
?
Mar 8, 2021 19:13
|
|

|
Kaiser Schnitzel posted:Very neat to see how staking works in action. It's something I really want to try. It is 20% philosophizing 20% aesthetics and 60% practical how-to It is my fav woodworking book ever.
|
|
#
?
Mar 9, 2021 05:53
|
|

|
Yeah, I agree with GEMorris, it's a great book. To be brutally honest, I don't really like Schwarz's furniture. But I really love his writing and philosophy. He focuses on furniture-making being accessible to everybody, not just people with thousands of dollars of power tools and rooms big enough to put them, and that really connects with me. His "Three Tables" essay from The Anarchist's Toolchest is like, the whole reason why I make stuff put perfectly into words. And the design discussions, tool techniques, and construction guidelines all apply even if you aren't using his designs specifically. If you could somehow move that Three Tables essay into the Design Book, it would be the perfect intro book to home furniture making.
|
|
#
?
Mar 9, 2021 23:21
|
|
|
"Chris Schwarz over-indexes on making his designs accessible at the expense of aesthetic refinement" is an absolutely correct take and valid criticism. His goal (especially with ADB) isn't "muh best furniture" its "you are being sold garbage, both aesthetically and materially, and the only person that will save you from that situation is you." If you look at the book in that light I think it is a masterpiece.
|
|
#
?
Mar 11, 2021 02:47
|
|
|
We are super busy at work, so I only had an hour this morning before I had to scoot. So I just got the new leg squared up and then sharpened tools and cleaned up. I was hoping to get the next leg ripped and glued, but ran out of time. I've learned the cleanup time sneaks up on you, and just leaving it for next time isn't really polite in a shared shop.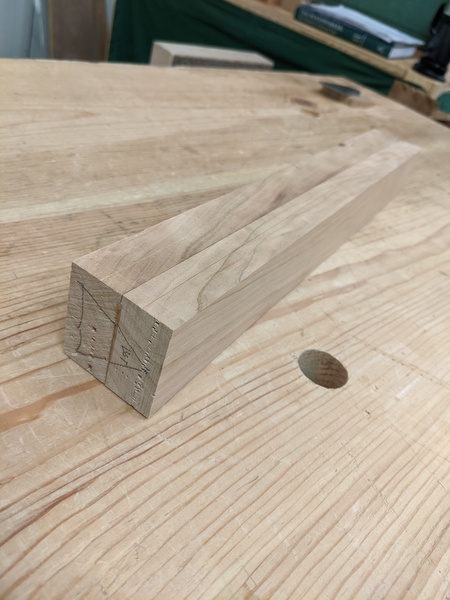 To make up for the very boring post, I will share yesterday's blog post from Chris which is extremely relevant to our conversation: Chairs & Crapitalism It touches on the same points as the "Three Tables" essay I keep going on about, but it's about chairs instead.
|
|
#
?
Mar 15, 2021 22:14
|
|
|
Let's ripping!! https://www.youtube.com/watch?v=QpU4q-6rTnA That's about 15" in 6/4 cherry. It's hard to start a cut with such large teeth, so I actually start rip cuts with my large tenon saw, first square across the board and then down the line, in order to more easily get the kerf started straight. Saws want to cut straight, so if you get it started right and then get yourself out of the saw's way, your cut will be nice and straight. Here's the waste side of that board right off the saw, just a few passes with the plane cleans up that edge and it's ready for the next rip. 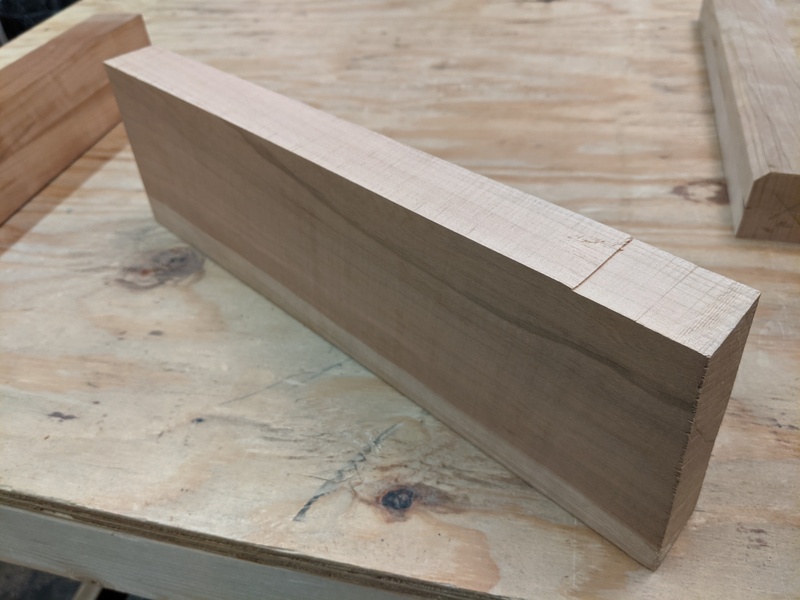 Today I got the remaining two legs ripped out and glued up, and also finished shaping the leg from last time. Still to do: finish shaping the last two legs, make tapered tenons on three legs, then cut three matching mortises.  Also I saw these HUGE WILD TURKEYS this morning and it made my whole day. 
|
|
#
?
Mar 21, 2021 19:56
|
|
|
Beware the woodworking rabbit hole that is wooden turkey calls.
|
|
#
?
Mar 21, 2021 22:18
|
|
|
Bloody posted:So for the tenon you hand sawed it into an octagonal tenon then used a chisel to pare that down to a rounder tapered-er thing? I cut another of the tenons today, so here's some more process pictures. In this first photo, the tenon I cut last time is on the right, and today's workpiece is on the left. I used the existing tenon to mark the depth of the shoulder on the sawplate and scribe the size of the top of the tenon in the end grain of the new workpiece. 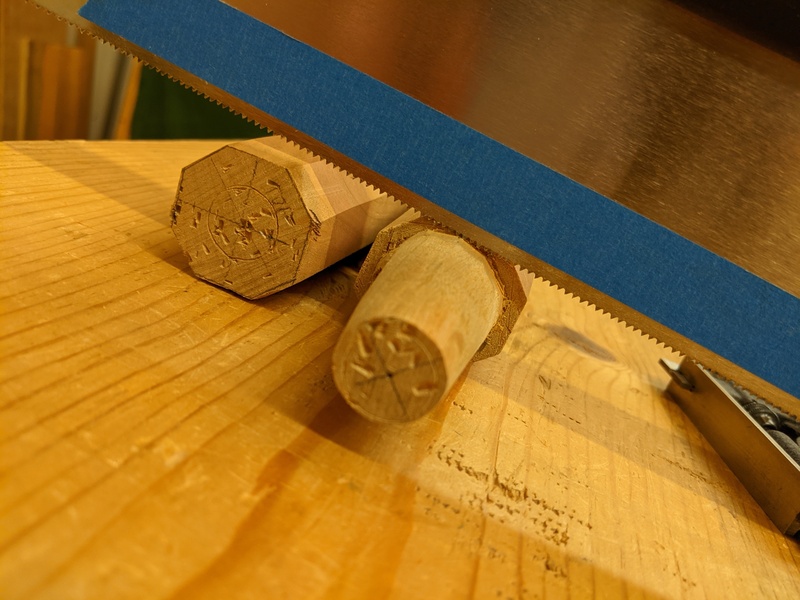 Then I cut the shoulders, parallel to the top of the workpiece. Obviously this is too large to fit the giant pencil sharpener onto, so you have to get it roughly into shape before you can use the tenon cutter to clean it up into a nice conical tenon. 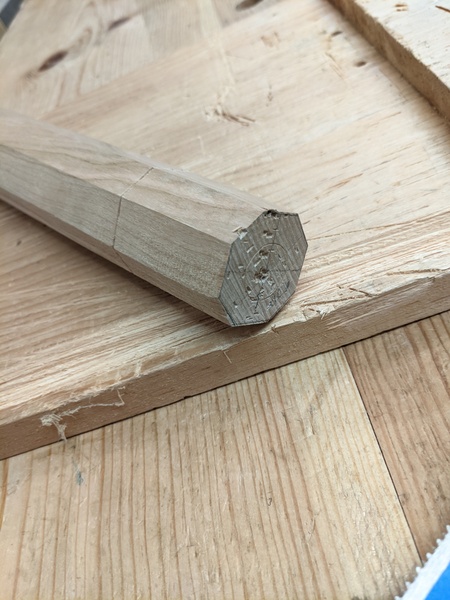 I use a chisel to hog off most of the waste. You can use the layout markings to imagine the shape of the conical tenon within the wood. In the past, I would work into the end grain towards the shoulder, but I found that always split into the actual meat of the tenon, which is bad. So this time I worked from the shoulder towards the end grain, which took a bit more effort, but gave a better result. I found working bevel-down gave good results most quickly. 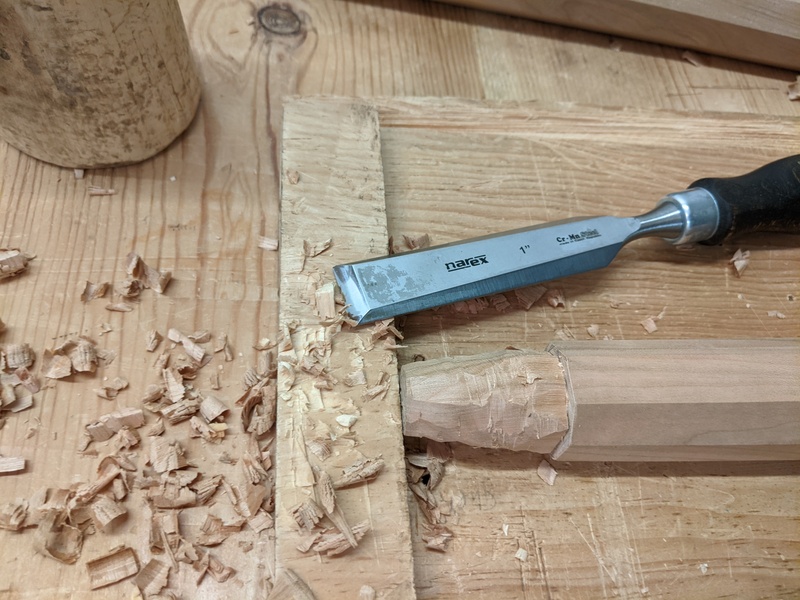 As it starts to get close to size, you can start fitting and using the tenon cutter, and seeing where it gets stuck. If you look close at this photo you can see a little black mark near the shoulder on the tenon where the tenon cutter is bottoming out before its cutter can get into place. That shows me where I still need to work with the chisel. 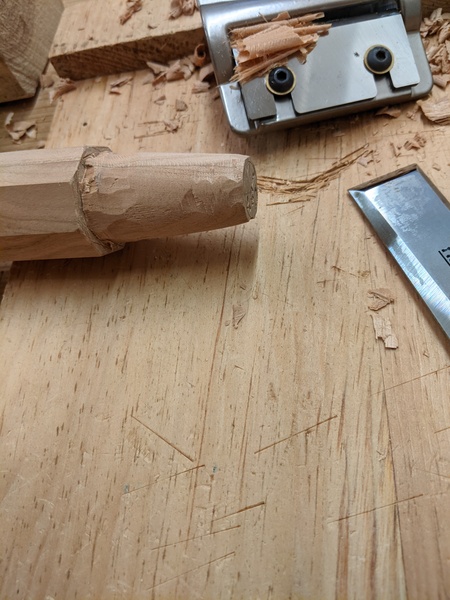 Eventually it'll bottom out against the shoulder and you're done. 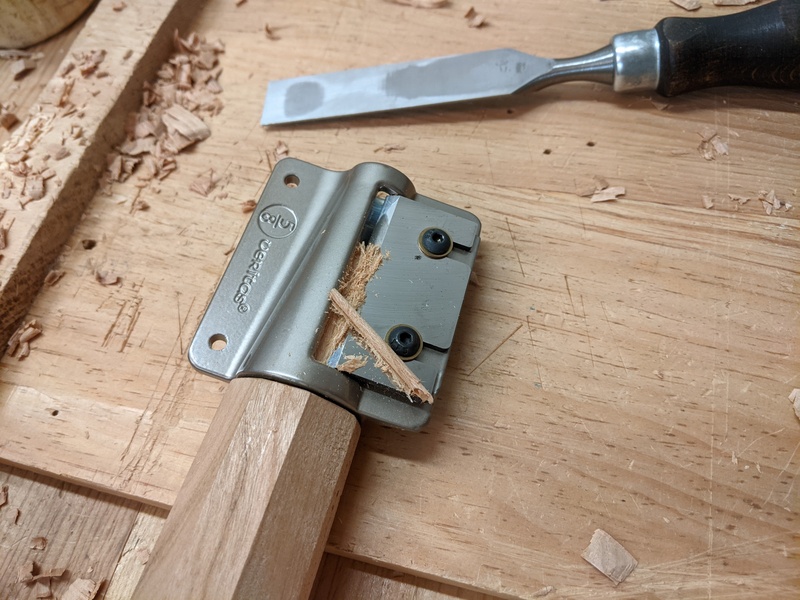 In "Design Book," Schwarz recommends doing this rough shaping on a lathe if you can, and suggests this as a backup method. You can see why. It's fiddly and a lot of work. Building a spring pole lathe is on my "maybe someday" list. 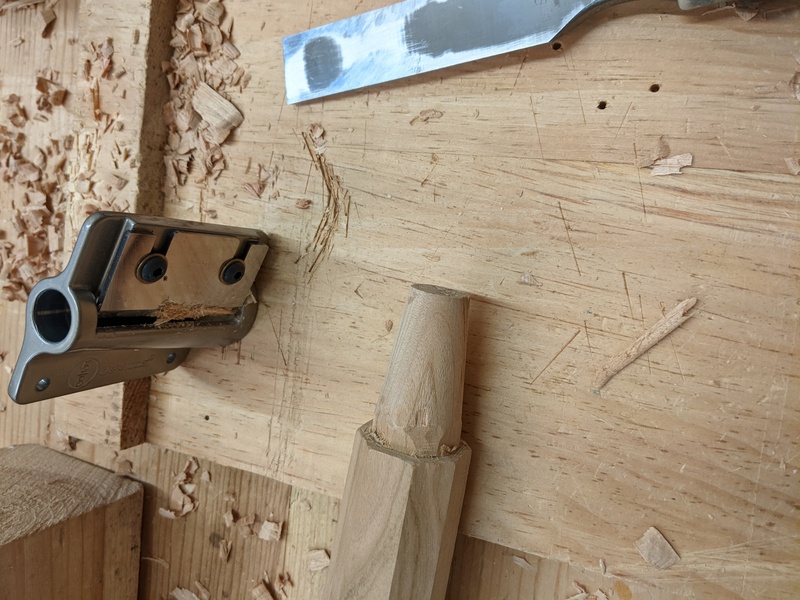 Also I thought this was a cool moment. I had one leg at each major step of the process so I lined them all up. 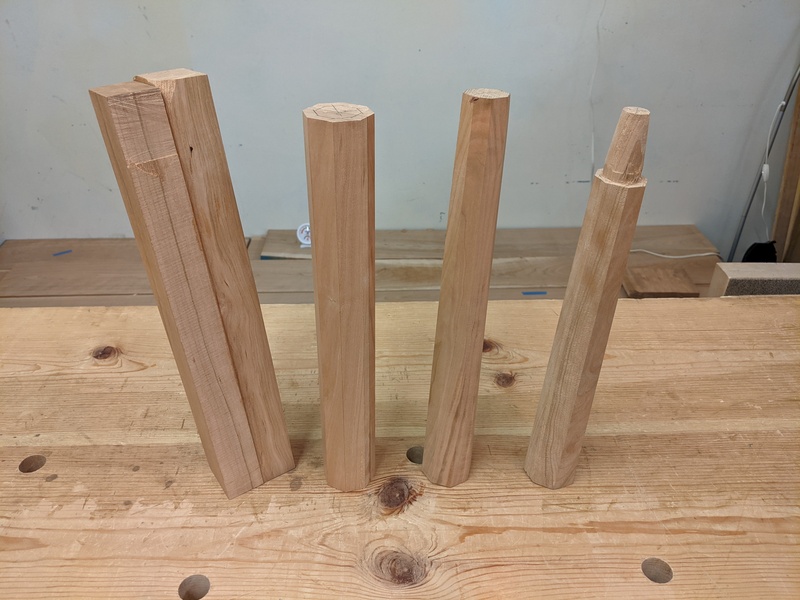 Currently I have two completed legs, one still needs its tenon cut, and the last one is still untouched from the glue-up. Soon I'll run out of excuses to keep putting off cutting the mortises.
|
|
#
?
Mar 28, 2021 23:05
|
|
|
I got the legs done yesterday. Next up is doing all the mortises, then maybe a little messing with the drawer web frames (not quite sure yet how I want to attach them at the back), then I think it's on to final cleanup tasks like smoothing and breaking edges, before it's time for glue-up. Unless I forgot something.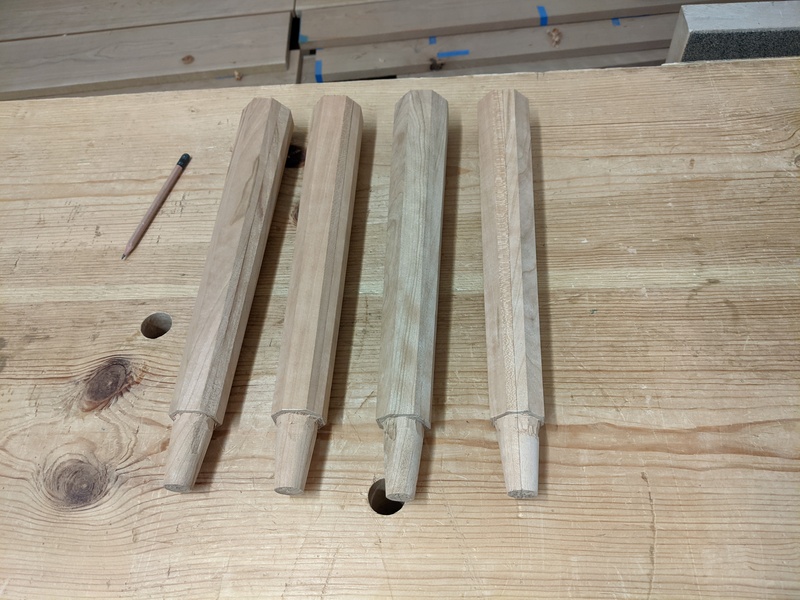 Let's talk about the design of the piece a little bit. It's mostly inspired by Christian Becksvoort's work, with a splash of Chris Schwarz. This first group of pictures below were taken from Becksvoort's Shaker Inspiration book. When I'm working on a design, I think about two things: how I want it to look, and what I'm capable of doing with my tools and skills. I look at furniture pictures mostly from woodworkers I like, but also in online image searches, until I get a picture of what I want. Then I figure out how I can build something that looks like that. Most professional woodworkers use power tools, of course, so there's usually some adaptation (boy, y'all like stopped dadoes). That's where Schwarz comes in. The last two photos below are from The Anarchist's Design Book. His designs are mostly created with hand tools in mind, so I use the techniques I learned from him to adapt others' furniture styles. In this case, I wanted to make a piece like Becksvoort. I like the simple, unadorned style. His work is inspired by Shaker designs, which date back to pre-industrial woodworking, so they're easy to adapt. He turns out really beautiful work that doesn't require a ton of specialized skill to execute. Cherry is a beautiful wood and easy to work with hand tools (I bought my big stock because of his book). I plan to copy his cool carved door design and might do the pegged corner joints. I haven't decided yet on what to do about drawer and door pulls. However, I don't have the skills to make sliding dovetails for the drawer webbing, and I don't really like those curved kickplates and I'm not sure I could make them anyway. So instead of the sliding dovetails, I used simple dadoes like Schwarz describes for his boarded bookcase. And instead of the curved kickplates, I decided to use staked legs since I'm familiar with the technique and I like the look better. The idea for the extra "meat" for the stakes to go into was taken from Schwarz's trestle table design.  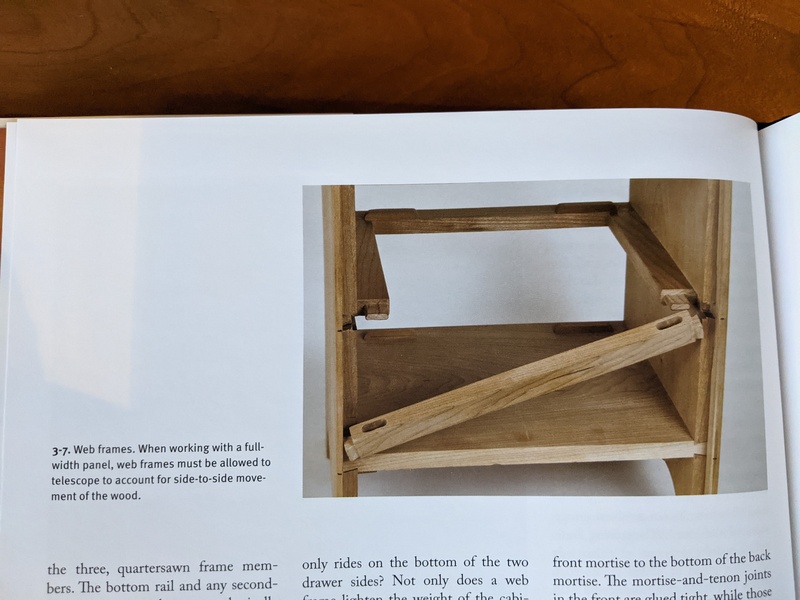    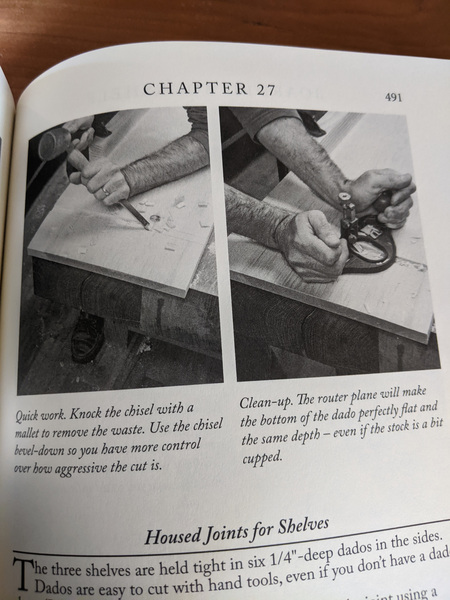 
|
|
#
?
Apr 5, 2021 13:59
|
|
|
Whew, good to get in out of the rain, it's been nonstop all week. Time to get started on the mortises and... oh no... Aggh not again. The rain doesn't drain properly off the roof of the building. In the past, it would leak through the foundation and into our room from the walls. Today it apparently came up the drain, since there was no river coming from the wall. 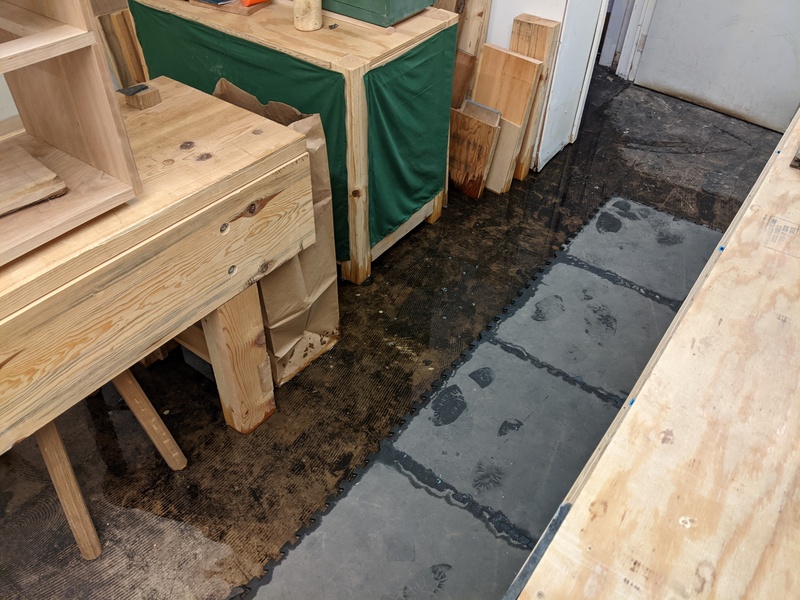 The room funnels down to the drain. At its deepest, it's over an inch of water. Most of the room is covered in about 1/2" of water. I moved stuff out of the way as best I could. There wasn't a whole lot of damage. I think the cherry stack is fine. At worst the ends of the bottom boards might be stained where the sticker soaked through, but I shoved some wedges in there to hopefully dry it out. Mostly the scrap pile got hit, so we'll probably lose a few inches off the ends of of most of the scrap boards. More annoying is the rain shows no sign of letting up, so this probably puts the workshop out of commission for at least a week or two. Sigh. After it stops raining, I'll go grab the mop bucket out of the maintenance closet and do what I can. I emailed the building management and they said they're working on the roof drainage issue. The building is under new management since last year. The previous management company just told me they'd fix it and then did nothing. Maybe the new ones will actually fix it. They have fixed other things that had been long neglected, like the broken urinal. They've also been overhauling the entire electric system across the complex. Hope springs eternal. Well, at least the rent is cheap. 
ColdPie fucked around with this message at 22:54 on Apr 8, 2021 |
|
#
?
Apr 8, 2021 22:47
|
|
|
BACK IN BUSINESS Today I got all my poo poo back where it belongs, then got to work on the mortises. This is probably the step I've been dreading the most in the entire process, maybe after fitting the drawers (never done drawers before). I did a few more test mortises in some scrap, trying out using the template I made earlier. For the initial mortise hole, I tried using a forstner bit in my power drill, but the template keeps the chips from clearing, so it clogged really quick. I ended up just using the bit-and-brace, it goes quick and is easy to control. Then I use the power drill for the tapered reamer, since that is a whole lot harder to control with the brace. After I figured that out, I laid out where the mortises will go into the bottom of the cabinet. I did the best I could to measure a 3" overhang from the ends of the legs, which will actually be a bit more once the legs are trimmed. Then I used the template to reproduce that measurement on the other four corners. 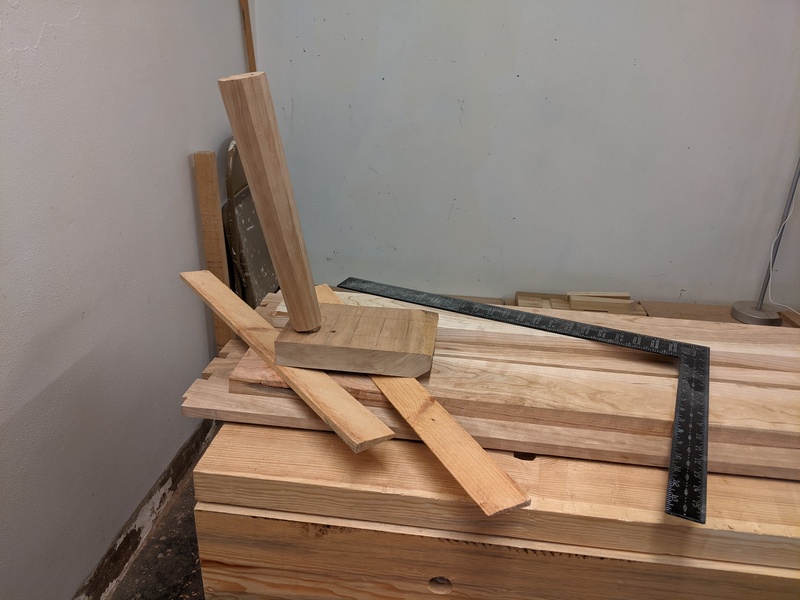 Time for surface prep with the smoothing plane, since it'll be easier to do without the holes. 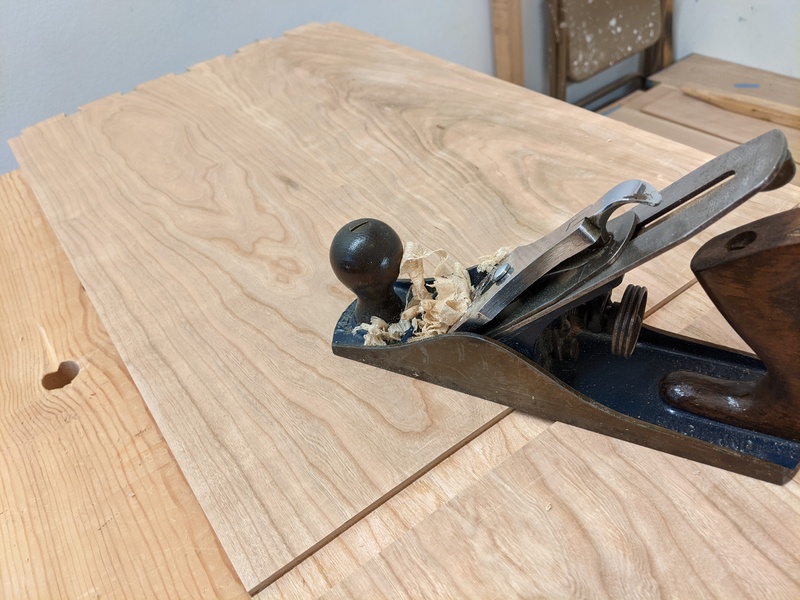 I screwed the template down to hold it in place. 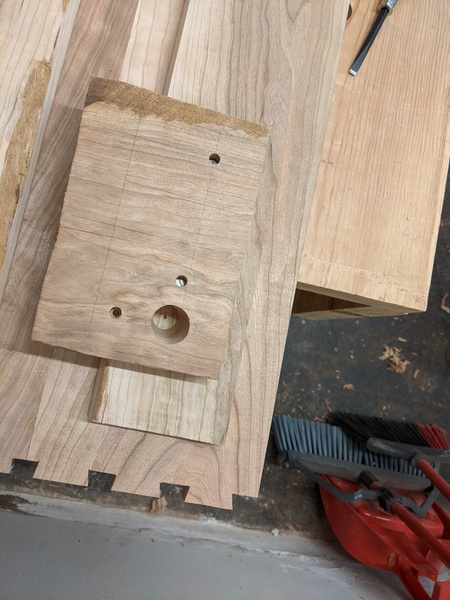 Here's the whole operation. 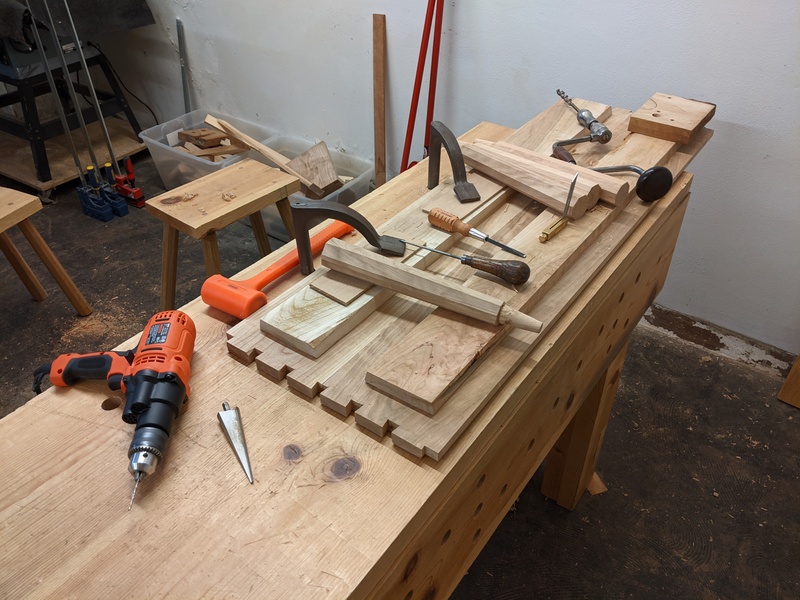 While fitting the first leg, I found the tenons are about 1/2" too short. In retrospect, I think I didn't account for the angle of the mortise when guesstimating how long to make the tenons. Correcting that ate some time. I was hoping to get all four mortises done today, but ran out of time. 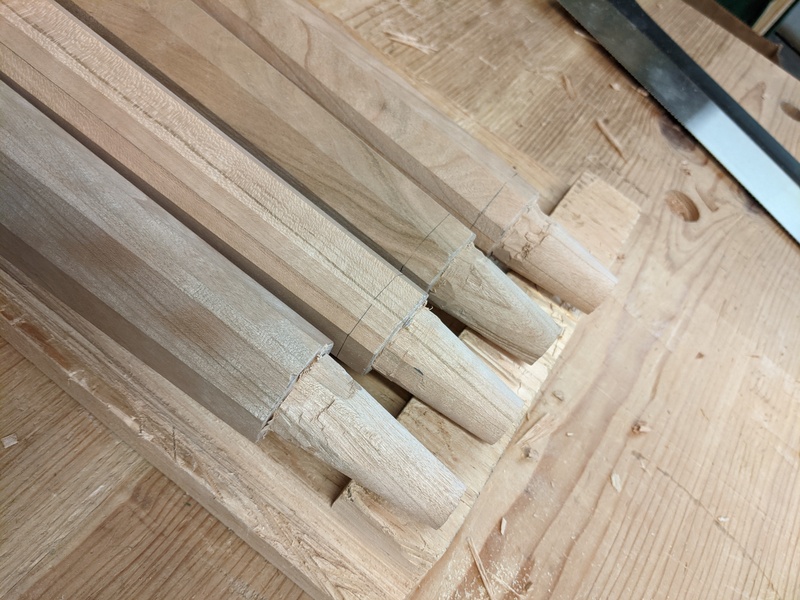 Another tip from Design Book, while you're drilling, as soon as you can feel the tip of the auger bit poking through the work, stop and flip the work over, then drill from the other side. That gives you a clean exit hole, as the spurs on the bit will cut a nice circle instead of blowing out from the pressure. I stopped too late on the first hole (bottom of this picture) and the thin material chipped out while I was drilling from the top side. 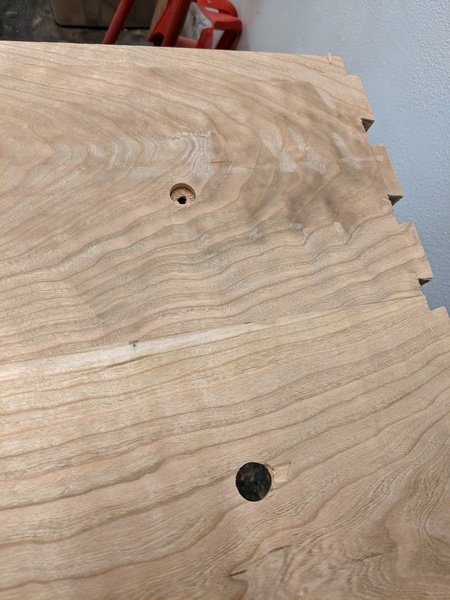 Here's the two mortises I got done today. 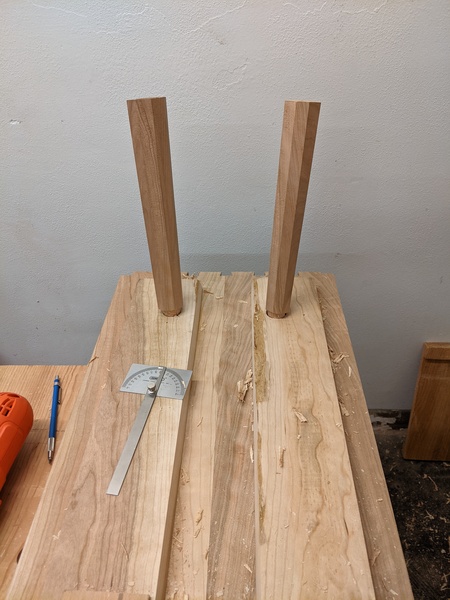 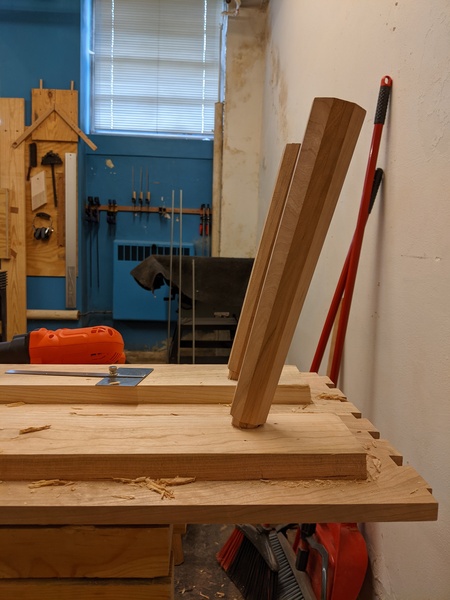 Not bad! I'm happy with that. You can see with the exit hole in the following picture that I had to correct the angle of the 2nd mortise, which led to a fairly ovular mortise. The wedge will probably close that up a bit, but it may end up gappy. I'll have to be more careful to correct early on the other two mortises. These holes will be hidden beneath the drawers, so I'm not too torn up about it. Always do the hidden joinery first! 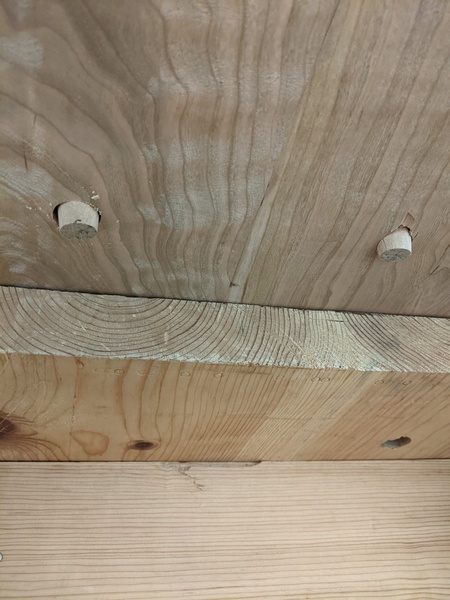
|
|
#
?
Apr 25, 2021 22:13
|
|
|
Those leg angles are looking great, loving the write-ups
|
|
#
?
Apr 26, 2021 04:28
|
|
|
I went in on Thursday morning and did a little surface prep, just smooth planing faces. This morning I got the other two mortises cut for the legs. The good news: 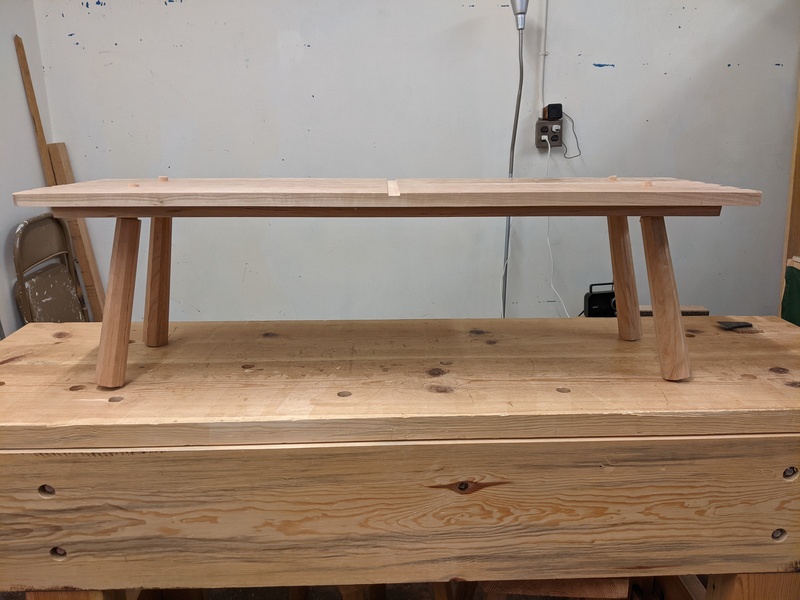 The bad news  : :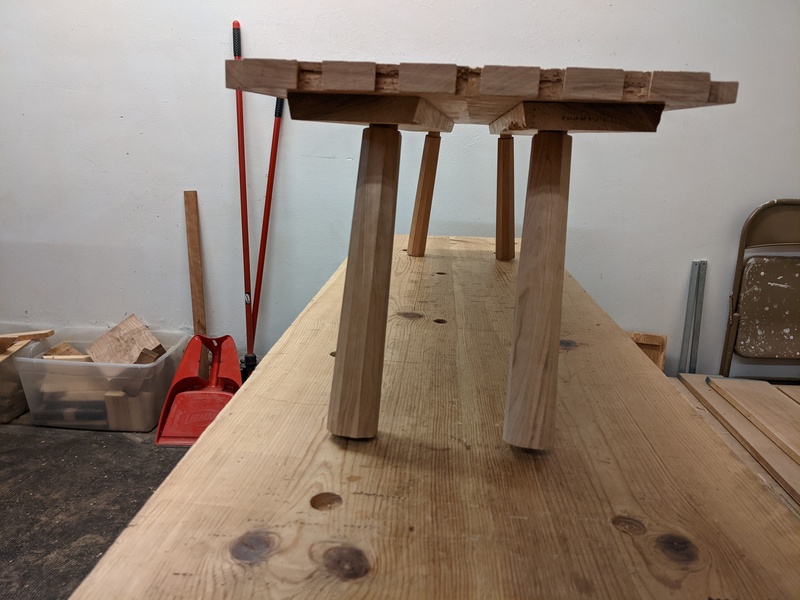 The good news again: it was just janky because it was following the original course of the hole before I corrected it. So with some shimming it should come to the right angle. The two mortises I cut today turned out perfect. 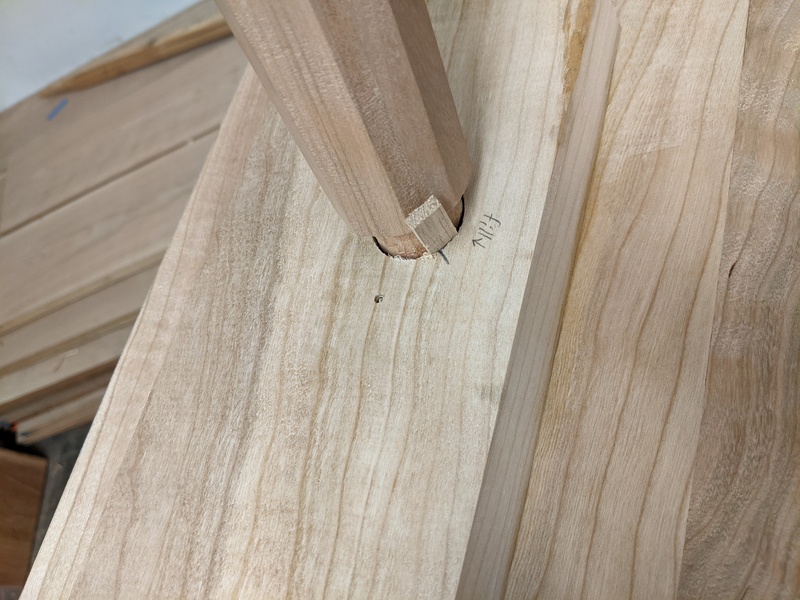 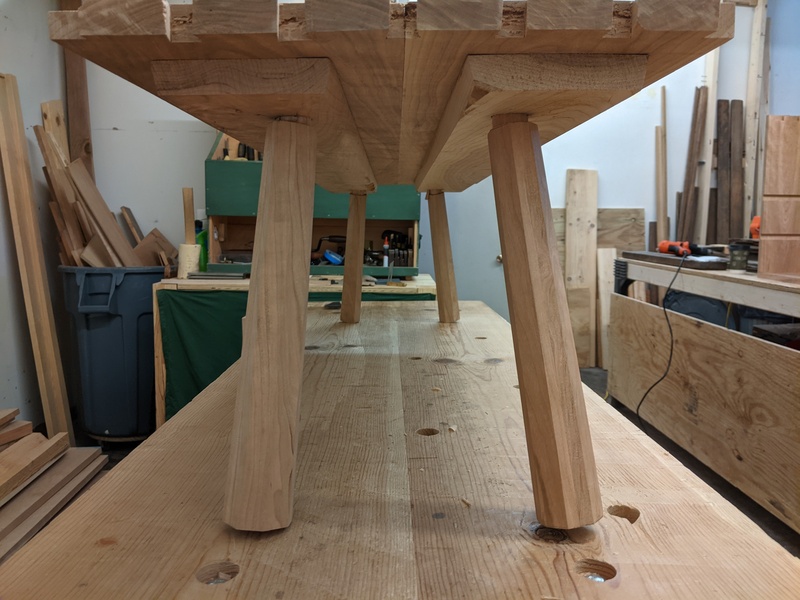 The gap:  My plan is to cut a handful of small wedges to cover in glue and drive into the top & bottom gaps, to give more glue surface and encourage it to go in the right direction. It's not a great solution, but well, it is what it is. This is the kind of stuff I wouldn't have shared in the main woodworking thread and just given the end result. Nothing to see here  Anyway up next was to drill the oval holes to secure the back ends of the drawer runners, which won't be glued for wood expansion reasons. There's not a lot of case meat for the screw to go into here, so I hope the couple of threads will be enough. I don't think the screws will get much force applied to them anyway, so probably fine. 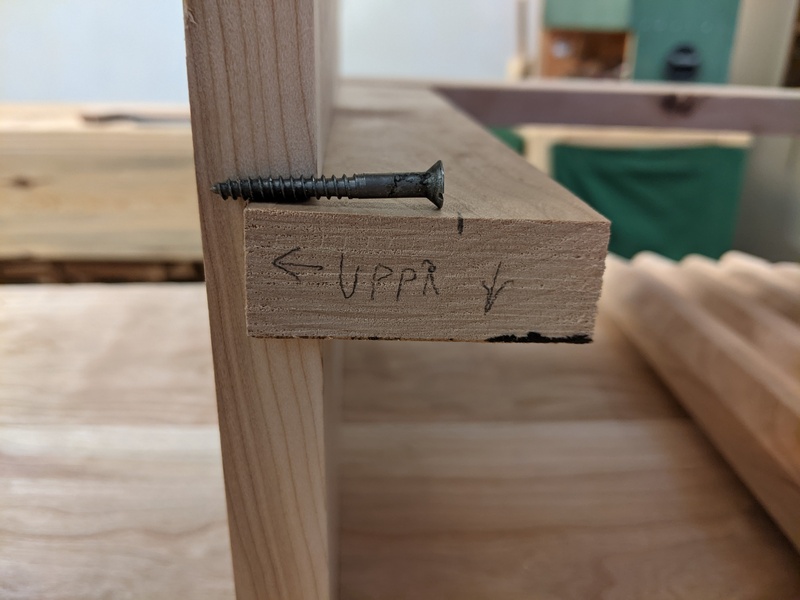 I drilled three overlapping holes and cleared them out with a chisel. After verifying the screw fits freely in the hole, I used a countersink bit and a small chisel to get the screw seated at the right depth. Then I fit them in the cabinet, marked the screw location, and drilled super shallow pilot holes for them. 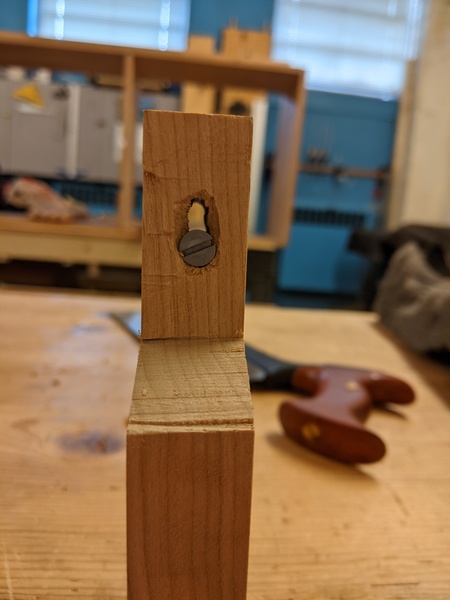 And here's everything pretty much ready for assembly. 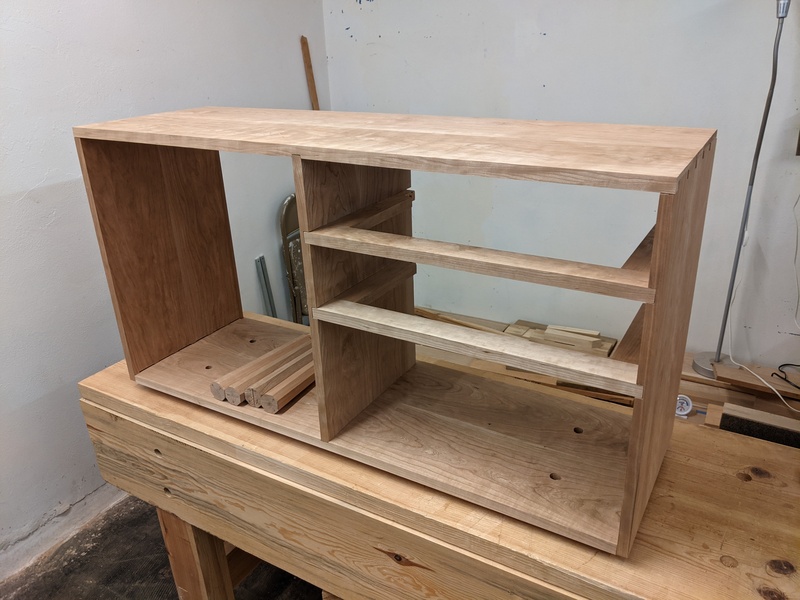 I do have some things to figure out before assembly. Surface prep is mostly done already, but I need to figure out what to do about breaking all the edges. Most of the edges have some part that should stay square where they intersect with other boards, so my typical technique of just running the smooth plane along the edge a few times is probably not the right thing to do. I was thinking maybe wait until after assembly, then use a block plane and either a sanding block or my fine cabinet rasp to get into the corners. But maybe there's a better option. I also need to decide whether to pre-finish the pieces. I usually do, since finishing after assembly sucks. But then I'd either have to spend hours applying finish in a parking lot, or bring all the boards to and from home. Since the weather's nice I'm kind of leaning just do it in the parking lot. On the other hand, there's quite a lot of joinery here, so it might be better to apply finish after assembly so I have less chance of applying finish somewhere I shouldn't. I'll also have to re-finish the areas where the legs tenons will be cut off. Or do the legs, then finish, then assemble the whole thing. Dunno.
|
|
#
?
May 2, 2021 21:34
|
|
|
The legs look really neat! Will you cut the bottom of the feet off so they are parallel to the floor or let it sit just the corner of each foot? For the loose tenons/dowels, another option is to rip a kerf (or two, perpendicular to each other) down the tenon and wedge the tenon. In a through tenon like that it might work better because you can expand the end of the tenon bigger than the hole, and you are gluing long grain wedges to long grain tenon whereas you'd probably be gluing to endgrain more on the mortice. I've also seen (and shamefully done myself, lol) slightly loose dowel tenons wrapped in fabric or paper soaked with lots of glue on antiques. It works...okay, but if it worked really well I wouldn't have had to fix it, now would I? For breaking edges, I don't think there's anything better than assembling and sanding the sharp edges after assembly. I never pre-finish stuff and it lets you be a little less than perfect with assembly and gives you a chance to plane/sanding everything flush. Pre-finishing the inside faces of everything might not be a bad idea? It's a little easier to spray the inside of a cabinet than to wipe it all. Lots of antiques are basically unfinished on the interior for this reason, or they got a quick coat of shellac and some wax, but not the full French polish the outside gets (because only servants open the drawers so who cares if it's shiny).
|
|
#
?
May 2, 2021 22:03
|
|
|
I am lightly amused you use hand tools only but mock up your designs in CAD. This is an awesome thread and awesome project.
|
|
#
?
May 2, 2021 22:55
|
|

|
I'm with Schnitzel here. Pre-finishing the inside parts that'll be mighty awkward to get to once it's assembled is something I've taken to doing myself lately, and I rather like it. Then again, I mostly make boxes where everything except the bottom is in full view, not carcasses where everything will be out of sight.
|
|
#
?
May 3, 2021 11:31
|
|
|
Kaiser Schnitzel posted:The legs look really neat! Will you cut the bottom of the feet off so they are parallel to the floor or let it sit just the corner of each foot? Yes, the case will be leveled after assembly by cutting the ends off the legs. Kaiser Schnitzel posted:For the loose tenons/dowels, another option is to rip a kerf (or two, perpendicular to each other) down the tenon and wedge the tenon. In a through tenon like that it might work better because you can expand the end of the tenon bigger than the hole, and you are gluing long grain wedges to long grain tenon whereas you'd probably be gluing to endgrain more on the mortice. Yeah, the tenons will be wedged. But this gap is huuuge so will need some extra filler. Kaiser Schnitzel posted:For breaking edges, I don't think there's anything better than assembling and sanding the sharp edges after assembly. I never pre-finish stuff and it lets you be a little less than perfect with assembly and gives you a chance to plane/sanding everything flush. Pre-finishing the inside faces of everything might not be a bad idea? It's a little easier to spray the inside of a cabinet than to wipe it all. Lots of antiques are basically unfinished on the interior for this reason, or they got a quick coat of shellac and some wax, but not the full French polish the outside gets (because only servants open the drawers so who cares if it's shiny). Just Winging It posted:I'm with Schnitzel here. Pre-finishing the inside parts that'll be mighty awkward to get to once it's assembled is something I've taken to doing myself lately, and I rather like it. Then again, I mostly make boxes where everything except the bottom is in full view, not carcasses where everything will be out of sight. All right, thanks for the feedback. I think finishing the inside shouldn't be too tough after it's assembled, as I'll have full access from the front and back. No deep corners unlike a box. Dr. Kyle Farnsworth posted:I am lightly amused you use hand tools only but mock up your designs in CAD. Thanks, always nice to hear. I do also sketch on paper a bit, both the rough design before CAD and then some specific design or joinery sketches during the building process. I'm not very good at drawing, and not really interested in learning to do nice architectural perspective sketches, so having the model in CAD lets me look at the piece from different angles and quickly try different proportions and design ideas. The process of building the thing in CAD also kind of forces you to think through every joint. Where you can just sketch a line on paper, in CAD you have to actually put the pieces together and think, how will I join these? Or it points out something you might have skipped from a front-only sketch, like how the center divider in this cabinet has to be about 1" shallower than the other case pieces to accommodate the back. I don't actually bother modeling all those details, but I use the process to form a mental plan for how it will be built an identify practical problems in the design. Here's some of the sketches. I was stuck on the idea of a sliding door, since I was concerned a hinged door would be awkward once placed in the room. The idea for the staked legs was there from the start, but I also kind of like the plinth style sketches in the bottom left. 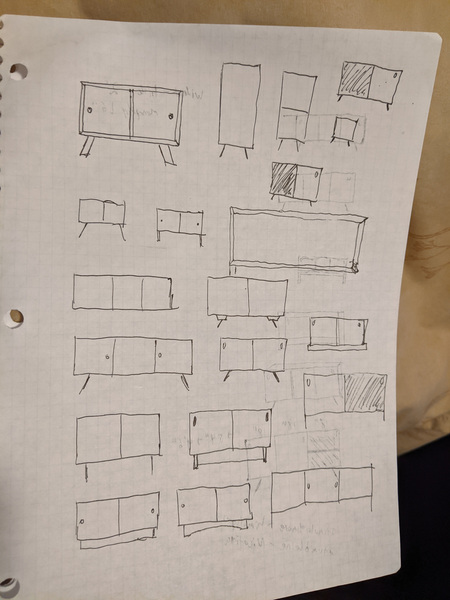
|
|
#
?
May 4, 2021 12:39
|
|
|
I got my second vaccine dose last weekend! That's exciting for lots of reasons, but relevant to this thread it means I can start taking the bus again soon, which means I don't have to work around my wife's work schedule and can probably start getting into the shop more often. Yay! Huge day today. I started by finishing the last of the pre-glue-up tasks, by cutting the slots for the wedges in the legs' tenons, and then hitting the legs with the smoothing plane. I already had a few wedges cut from previous projects, so I trimmed four of those to size and cut the rest into small wedges for filling in the awkward gaps a bit. 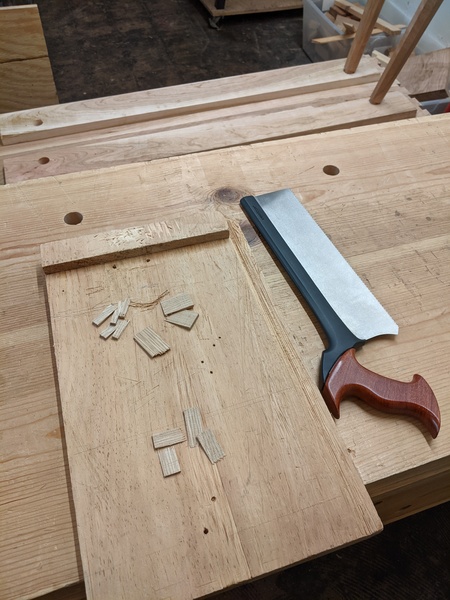 Here's the setup just before I applied glue. I used Tite-bond for these joints, as I've found from experience that hide glue is too weak for these leg joints and tends to fail after a while. The joints are also largely not visible, and squeeze out isn't a huge issue anyway, since you trim off the tenon stubs. 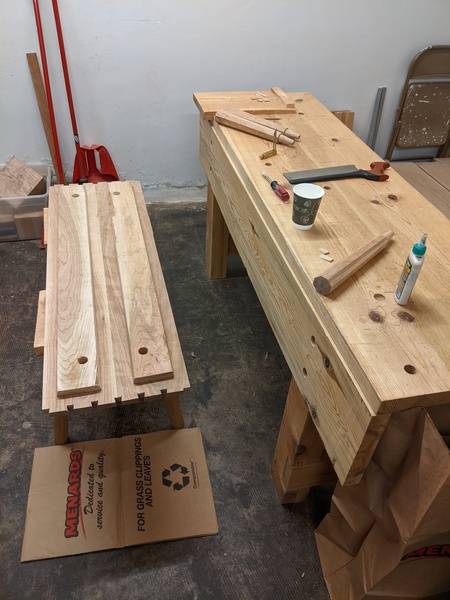 Here's the awkward filled tenons from the bottom,  And the top, 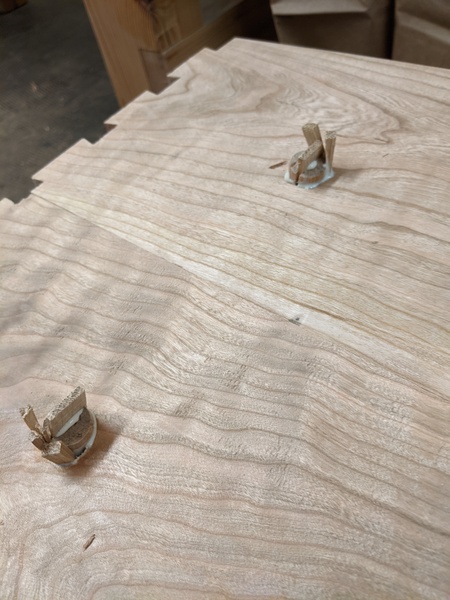 Whatever. Pencils down, let's see how it turned out. 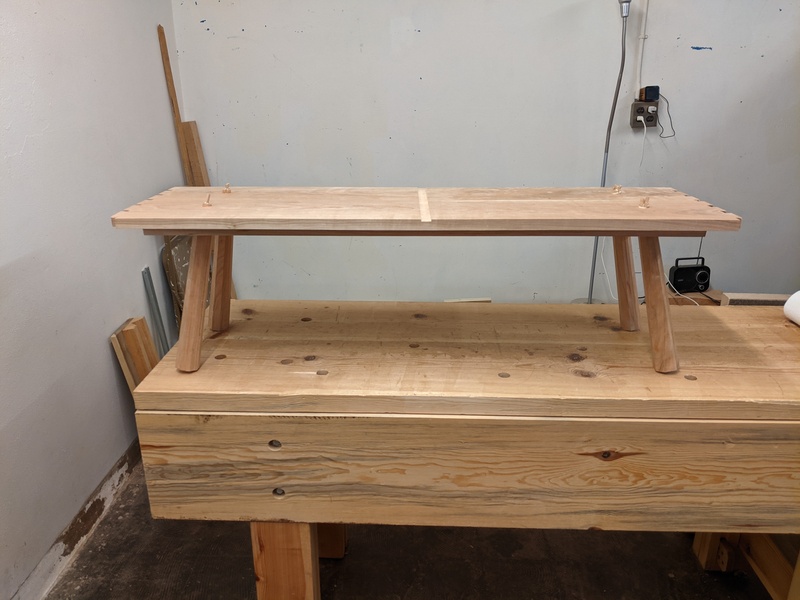 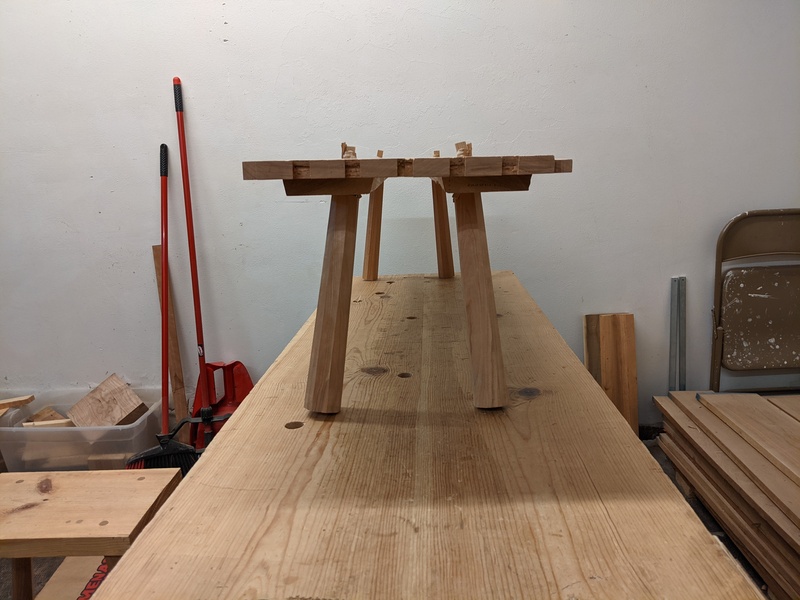 Nice! So I let that cure while I went to grab an early lunch. I wasn't sure whether I would do the full glue-up today, but it wasn't even 10 AM by the time the leg glue was cured enough to move on. So I went for it. I started with a dry rehearsal, to figure out where clamps will go, get them set to the right widths, look for awkward assembly points. 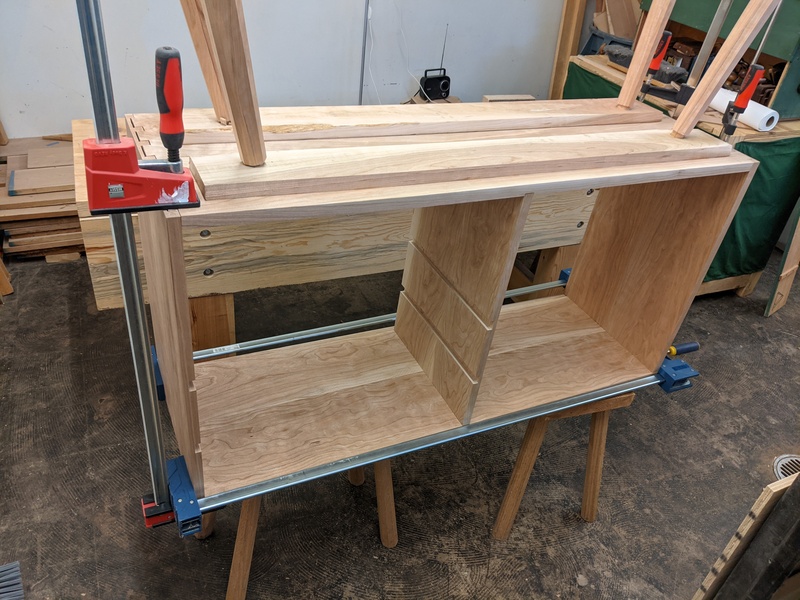 Then it was on to the real deal. Here I used hide glue on all the joints. I warm up the glue in its bottle with an electric kettle, then squeeze the warm glue into a leftover coffee cup to apply with a toothbrush. This lets me keep most of the glue in the bottle in the warm water, while periodically squeezing more into the cup to quickly apply before it cools. I had to assemble it upside-down, but I wanted to have it upright for inserting the drawer webbing and letting the glue cure, so I had to flip the fucker over, while the glue was drying, with a few clamps on, without knocking the still-drying legs around. That took a few awkward stages, but I got there. After assembly, I washed off the toothbrush and then went around cleaning up squeeze out by vigorously brushing it off with the toothbrush and remaining warm water. Here it is from the back, and front. 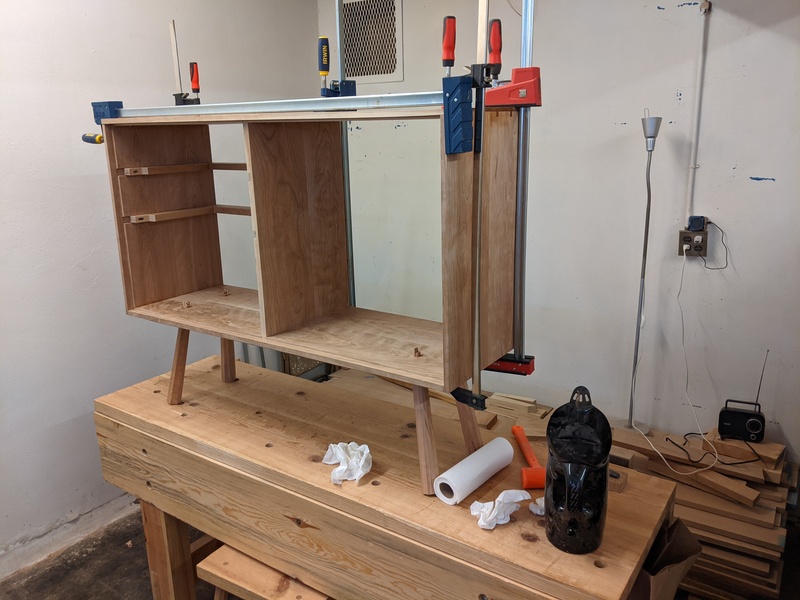 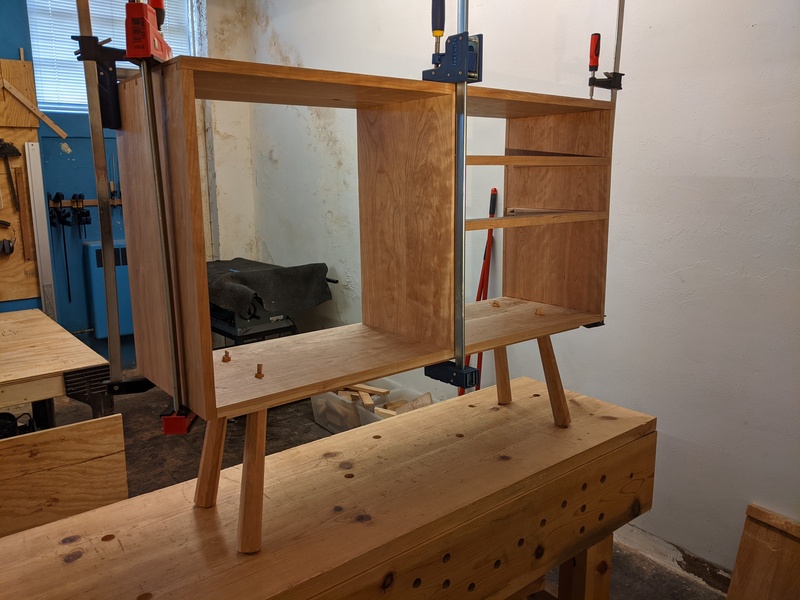 And it's sitting like that in the shop until the next time I go in. Next up is trimming and leveling the legs, cleaning up those stub tenons, and then any more cleanup like planing the dovetails flush. Then it's on to the door & drawers! Over the weekend, Matt Kenney (previously of Fine Woodworking magazine, now independent) posted a picture of himself being interviewed, and in the background I noticed this coffee table that's pretty similar in form to what I'm aiming for. I'm not sure what to do for the drawer pulls yet. I've thought about doing that open half-moon shape, like in the picture, and may just end up doing that. 
ColdPie fucked around with this message at 19:30 on May 16, 2021 |
|
#
?
May 16, 2021 19:23
|
|
|
Glue-ups are very stressful yes, to say nothing about such a big one, but it's also the point at which a pile of boards becomes an recognizable piece of furniture. Big milestone passed.
|
|
#
?
May 16, 2021 22:24
|
|
|
Busy month so not much shop time unfortunately. I did go in at the end of May but forgot to write it up. I cut off the little nubbins from the staked legs. I don't have a flush cut saw (really ought to get one of those by now...) so I just use my big handsaw with some tape to protect the wood.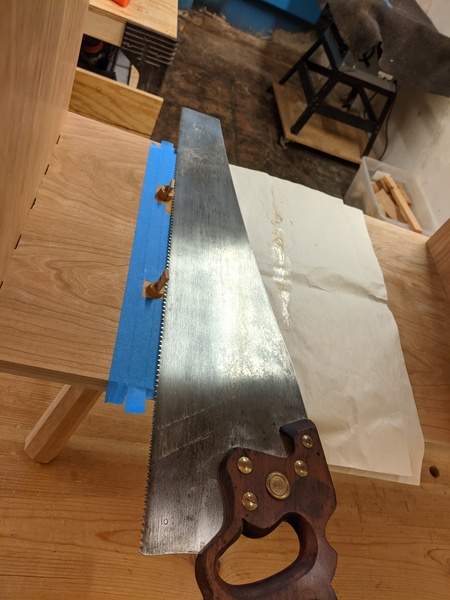 Leftover nubbins. 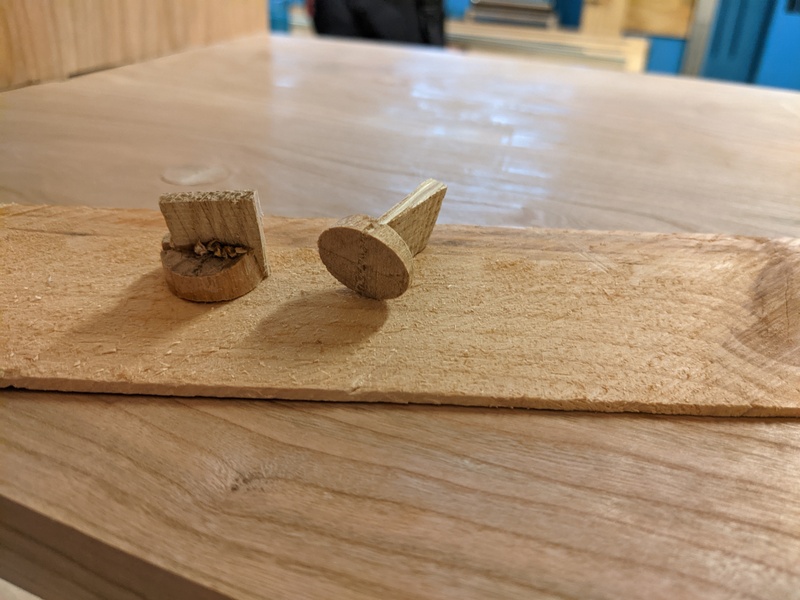 I decided I will do the drawers next, then the door last. So I dug out the board for the first drawer front from the pile and got it sized to fit. 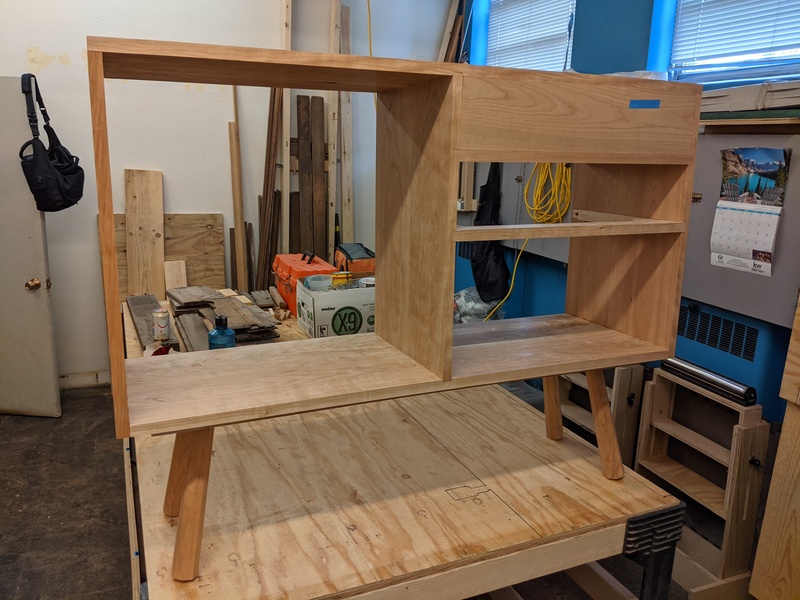 Fast forward a few weeks to today. This is my first time making a drawer. I'm following the procedure for drawer-making outlined in some of the articles from the Hayward collection. He says the drawer front should be about 7/8" and the back and sides should be about 3/8". I don't have enough scrap to make all of the backs and sides, so I dug into my 4/4 cherry pile to find some uglier boards. This guy will do nicely for the sides. The grain sucks the knot sucks that gross looking inclusion sucks. Let's turn it into something not-very-visible. 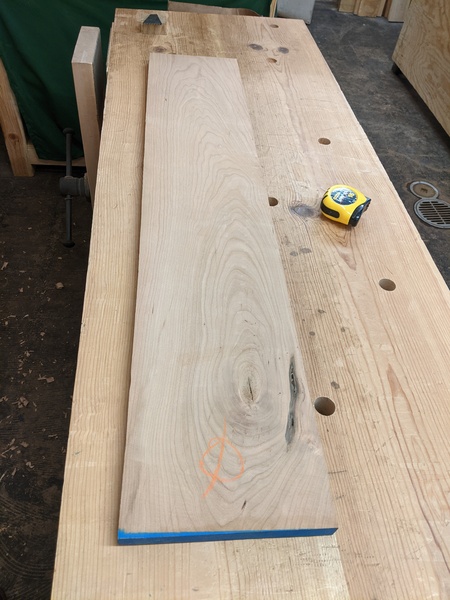 But it's 4/4 and I need 3/8". How do you get two 3/8" boards from a single 4/4 board? Resaw that sucker. 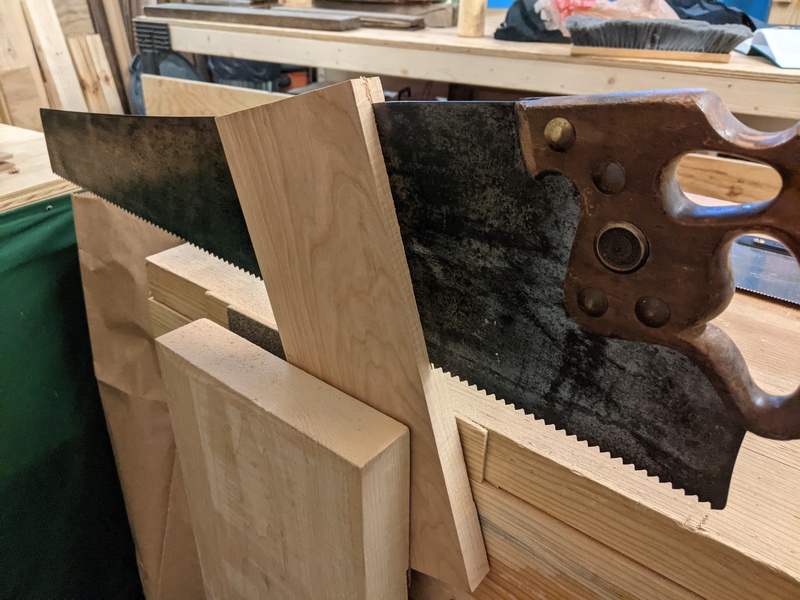 It's not as bad as it looks. Took about ten minutes, including time for water and photo breaks. Waxing the sawplate helps a lot, there's a ton of friction going on here. The resaw procedure is to place the board at an angle, as shown, and follow the guide line down the side of the board facing you. Then flip it every inch or so. The far end of the saw should follow the path of least resistance, which is the kerf on the far side, so you'll always be following the guide line as you work down each side of the board. 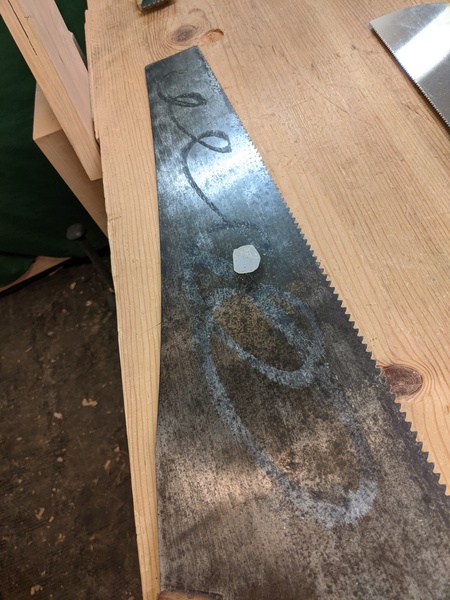 Boards. 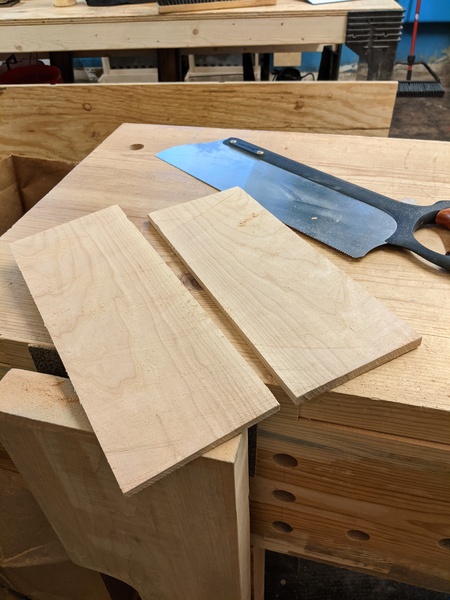 After a little cleanup planing, they're right at about 3/8". Perfect. 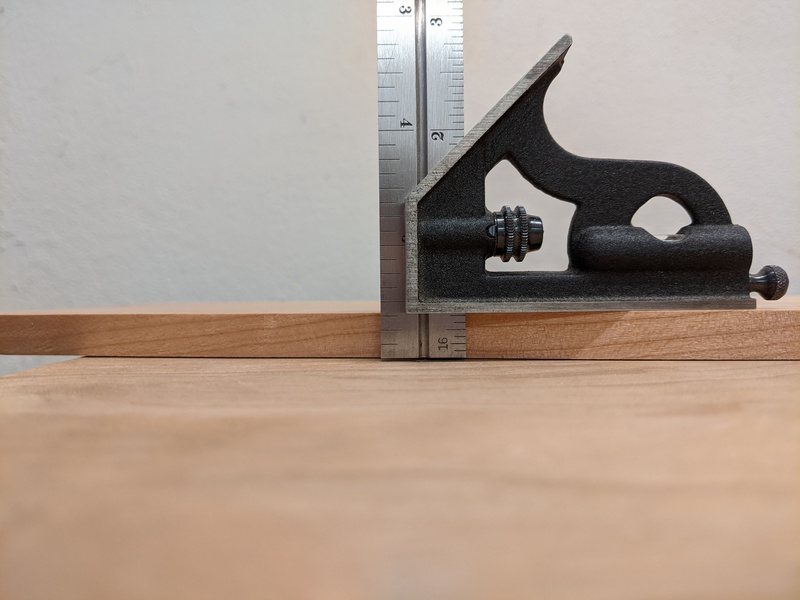 I was able to break out my shooting board to square up the ends. Most stuff I build is too big to bother with a shooting board. 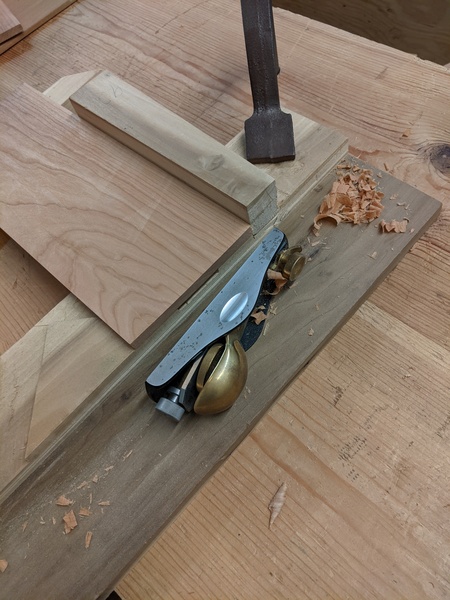 Oh, we need a back too? More resawing. Fifteen sweaty minutes later, we have some nice bookmatched boards. One of these will be the back for the 2nd drawer.  Next up, more dovetails. I'm planning to use 1/4" plywood for the bottom, which I have yet to purchase. I'm a little concerned that may not be strong enough for drawers this size (about 2' by 1'), but the bottom will be captured on all four sides, so hopefully it'll be fine? 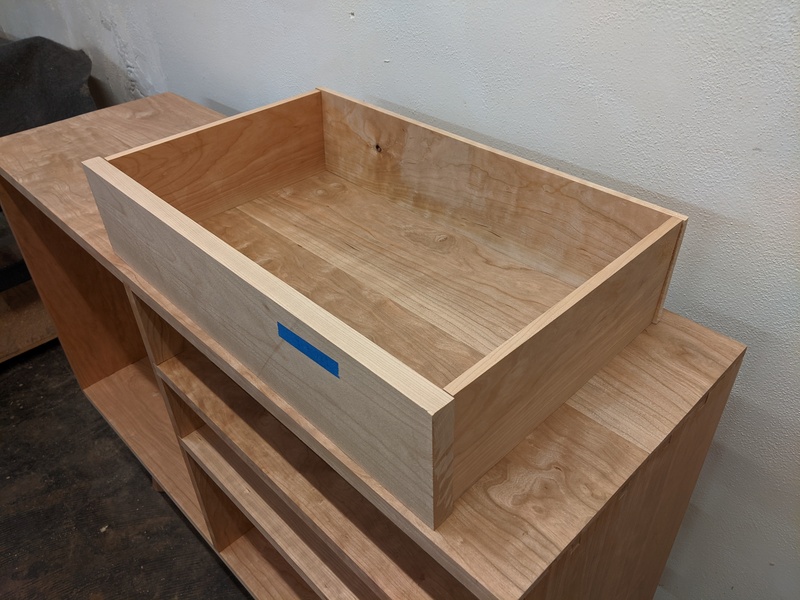
ColdPie fucked around with this message at 22:15 on Jun 13, 2021 |
|
#
?
Jun 13, 2021 21:47
|
|
|
ColdPie posted:Next up, more dovetails. I'm planning to use 1/4" plywood for the bottom, which I have yet to purchase. I'm a little concerned that may not be strong enough for drawers this size (about 2' by 1'), but the bottom will be captured on all four sides, so hopefully it'll be fine? I rebuilt the silverware drawer in our kitchen that was about 32w x 15d with 1/4� ply for the bottom and it�s held up just fine. I think you�ll be good.
|
|
#
?
Jun 13, 2021 22:25
|
|


|
I do all my resawing by hand too, but I'd be lying if I said I'm not envious of people with a capable bandsaw from time to time. I'm guessing drawer slips for the bottom?
|
|
#
?
Jun 13, 2021 22:42
|
|
|
Elder Postsman posted:I rebuilt the silverware drawer in our kitchen that was about 32w x 15d with 1/4� ply for the bottom and it�s held up just fine. I think you�ll be good. Cool, good to hear, thanks. Just Winging It posted:I'm guessing drawer slips for the bottom? Yup exactly. I'm not super good at mouldings so it'll be a challenge to get it to turn out well, but I'd like to get better at it so I'm looking forward to it.
|
|
#
?
Jun 14, 2021 01:07
|
|
|
ColdPie posted:Cool, good to hear, thanks.
|
|
#
?
Jun 14, 2021 13:12
|
|
|
Bought some plywood for the bottoms and tongue-and-groove boards for the back of the case this morning. Then went into the shop. I didn't feel like doing dovetails today, so I finished prepping the drawer pieces and then got to work on the slips. This article from the Hayward collection is the primary source I'm following. 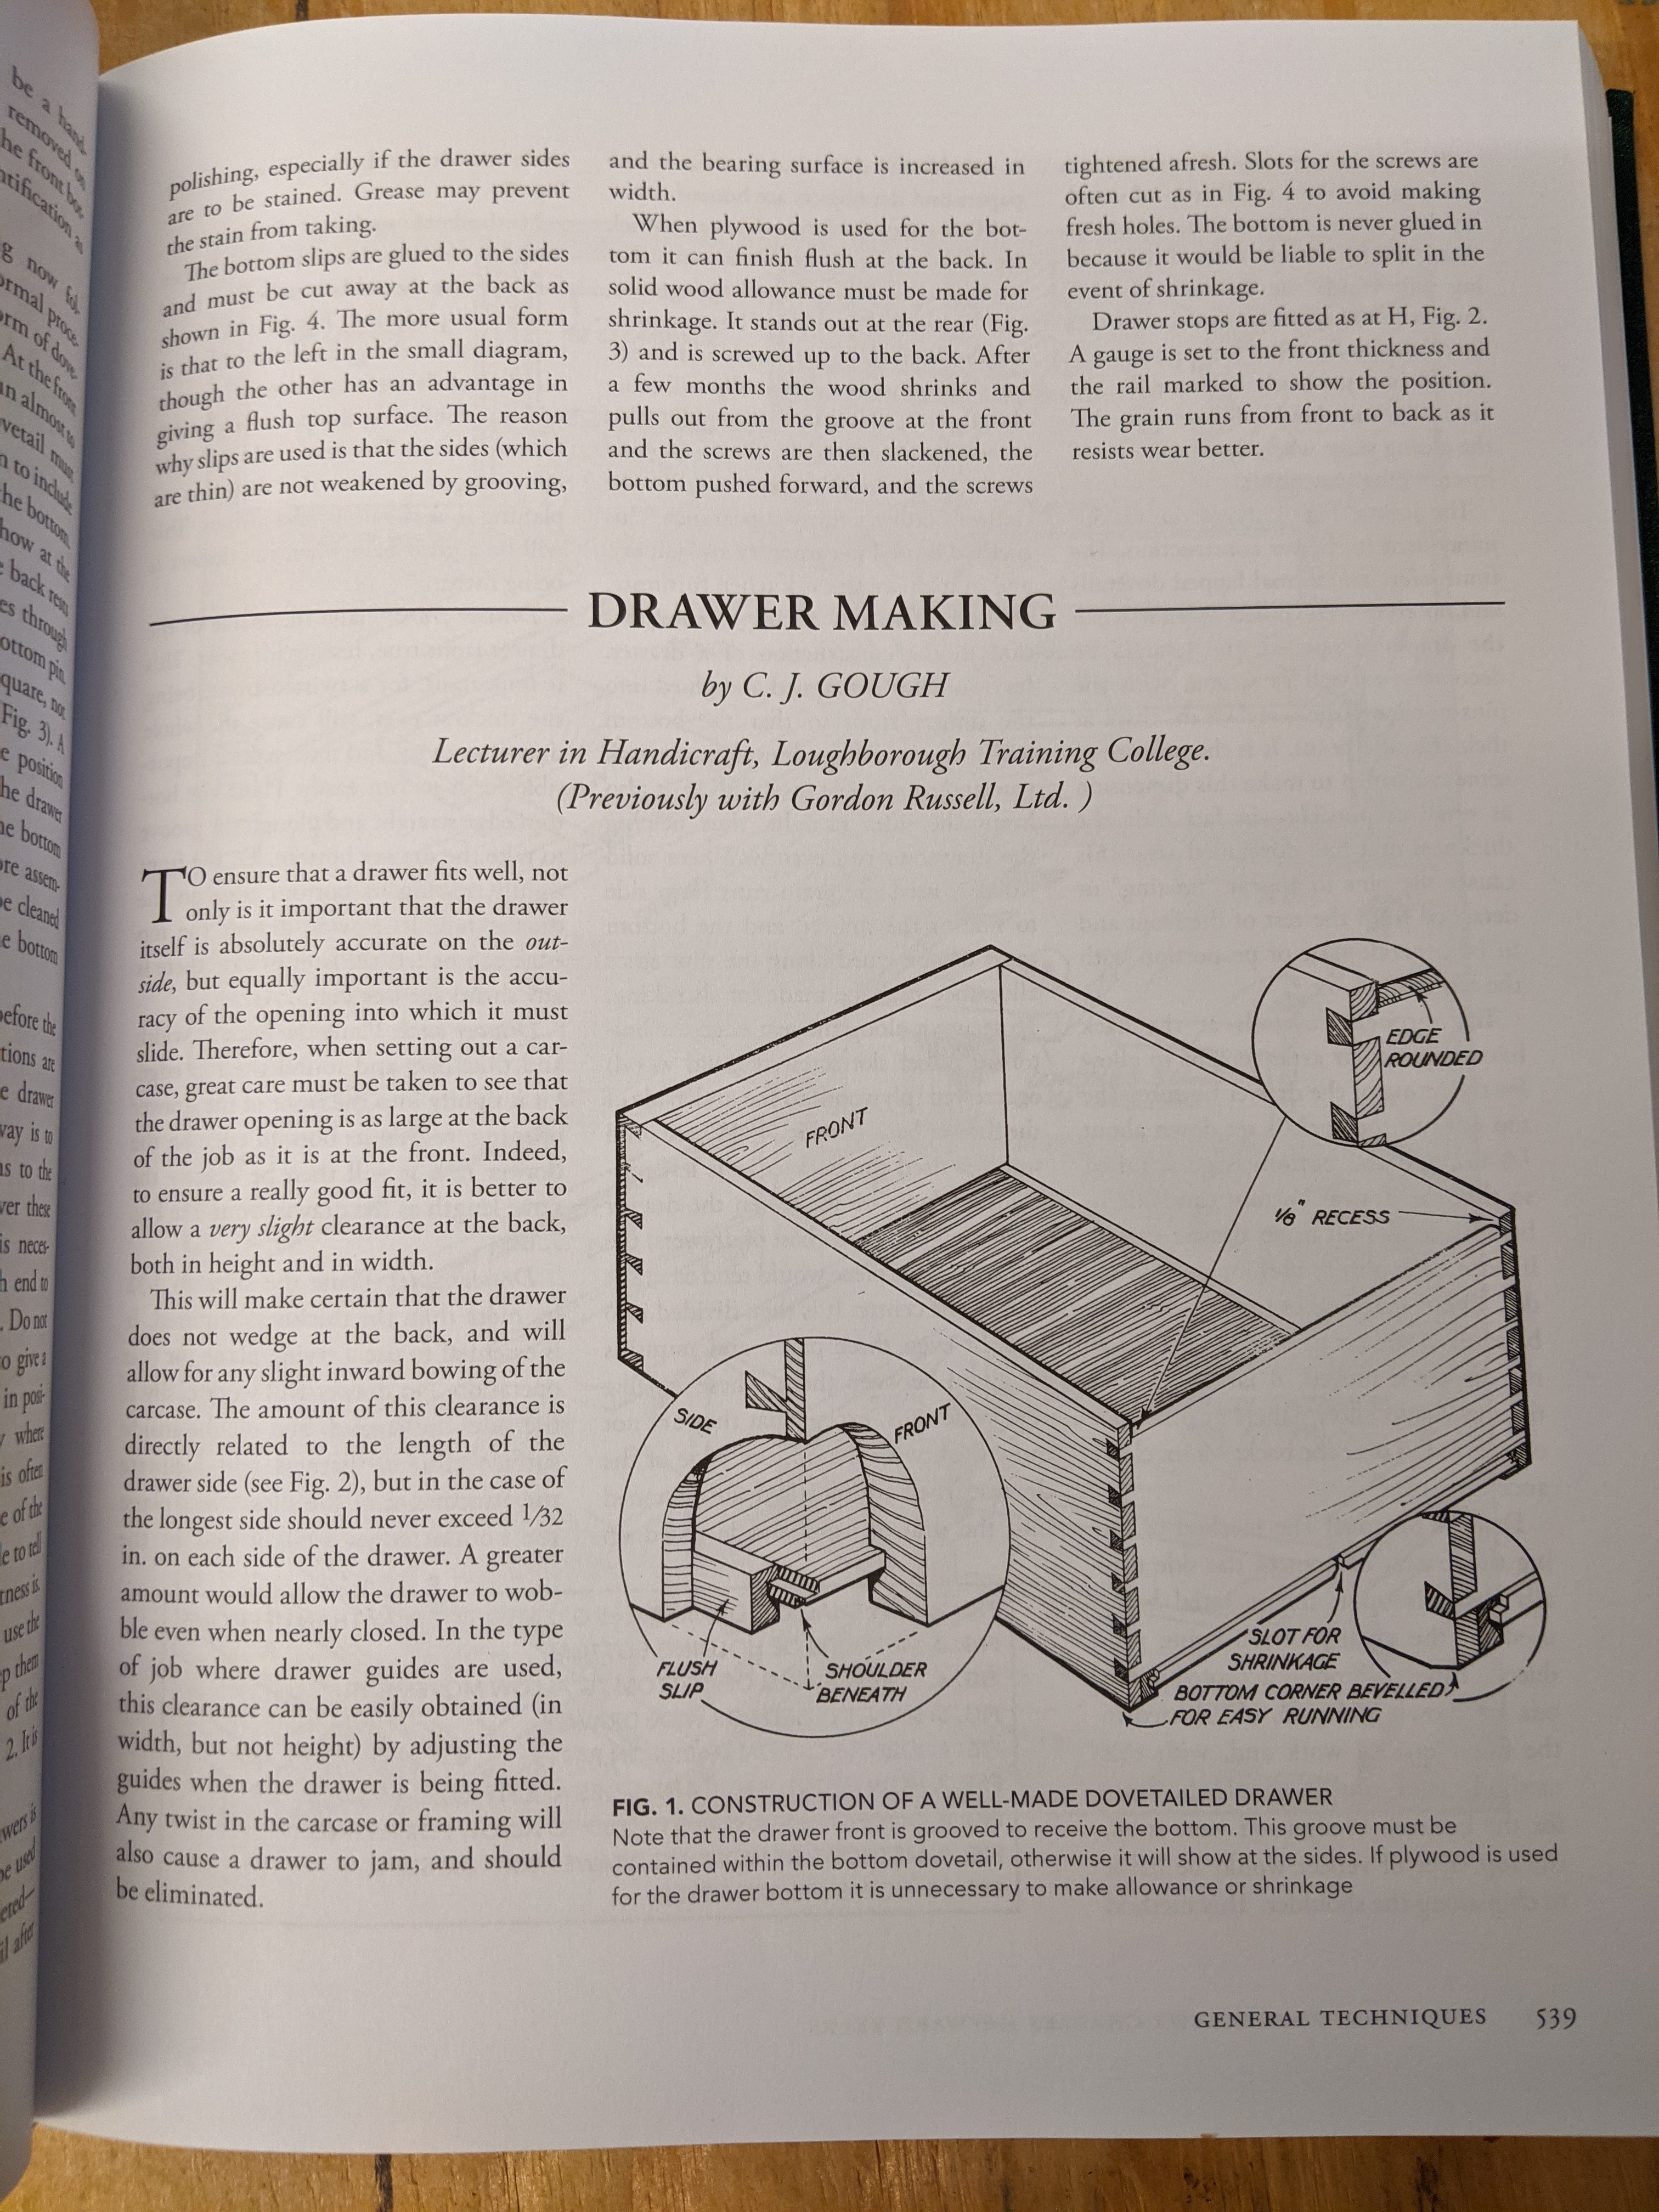 I'm following this style of drawer slips on the left side of "C" in this diagram: 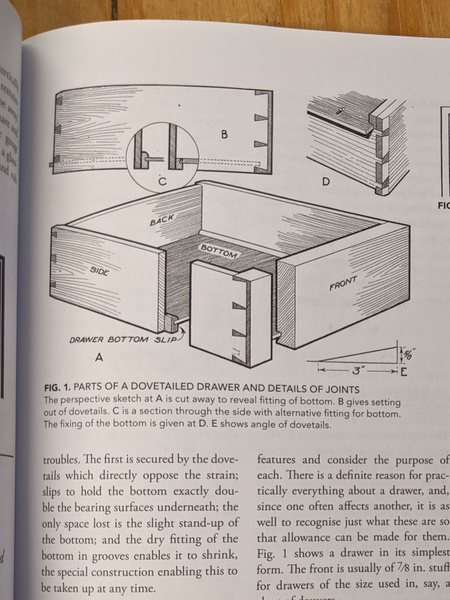 Since these parts get a lot of wear, I dug out some white oak left over from a previous project. It suffered some water damage from the flood earlier this year, and has some sapwood. Great to use for a less-visible component. For a solid bottom board, like described in the book, you let the bottom pass below the back of the drawer. But since I'm using thin plywood, I want a groove on all four sides to support the bottom, so I'm doing a slip on the back as well. That comes to about 4' of material. 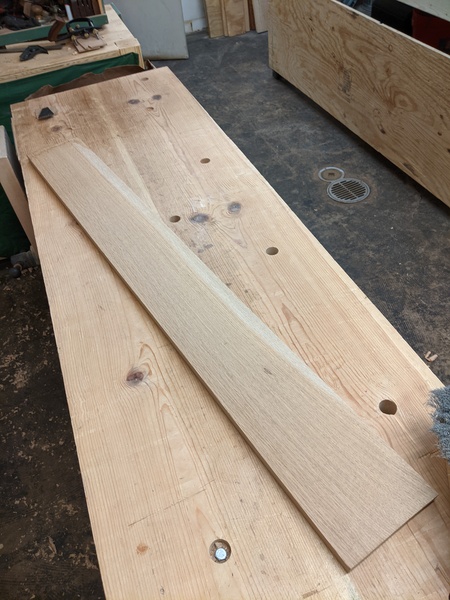 I got to bust out a moulding plane. I don't use these often since I don't really do mouldings much, and I don't really have the right tool to sharpen them. It's fun when I get an excuse to use them. The plow plane made the groove for the bottom board. 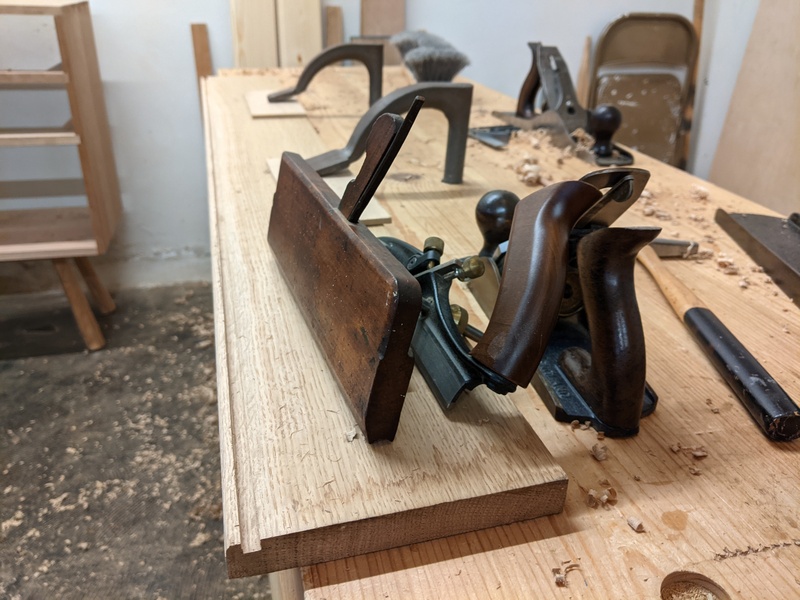 Then rip it off and we're done. For long rips without a great workholding situation, I do this benchtop overhand rip. I don't really like doing this, since you lose the benefit of gravity pulling you through the cut, but it works. 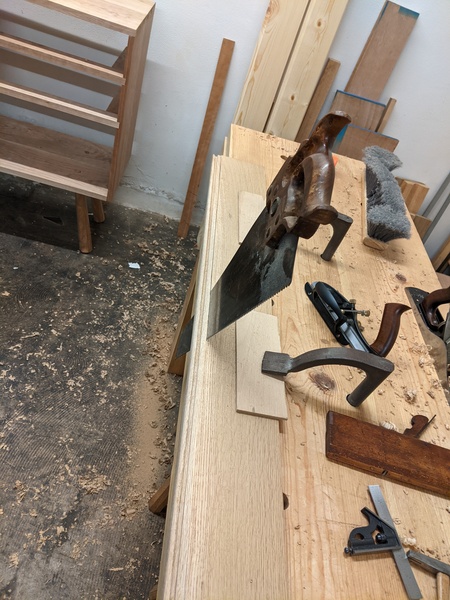 And we have some drawer slip material. It's a little on the thick side (something like 3/4") so I might plane the back down a tad after I cut it to size.  Next time: dovetails, for real this time.
|
|
#
?
Jun 26, 2021 23:12
|
|
|
ColdPie posted:Bought some plywood for the bottoms and tongue-and-groove boards for the back of the case this morning. Then went into the shop. I didn't feel like doing dovetails today, so I finished prepping the drawer pieces and then got to work on the slips. This post is insanely helpful because I finished gluing up a nice dovetailed drawer box a few hours ago and just realized I forgot to plane out grooves and put the drawer bottom in. Guess I will also be making drawer slips.
|
|
#
?
Jun 26, 2021 23:54
|
|
|
Drawer slips are a great solution for holding in bottoms, not just in drawers, but boxes as well. Especially thin walled boxes, or with through dovetails where you can't run the groove without it showing. Which isn't really surprising as a drawer is a specialized box anyway.
|
|
#
?
Jun 27, 2021 14:46
|
|
|
ColdPie posted:I got to bust out a moulding plane. I don't use these often since I don't really do mouldings much, and I don't really have the right tool to sharpen them. It's fun when I get an excuse to use them. quote:Then rip it off and we're done. For long rips without a great workholding situation, I do this benchtop overhand rip. I don't really like doing this, since you lose the benefit of gravity pulling you through the cut, but it works.
|
|
#
?
Jun 27, 2021 16:07
|
|
|
Yeah I've seen those sharpening cones, but like, they'll only be the correct radius at one point on the cone, right? I think I've also seen "wave" shaped stones, which give a variety of consistent radii, although I don't see that on Lee Valley just now. And I've heard of people just cutting an inverse profile on some wood and rubbing honing compound into that to hone against. But I don't use curved cutters enough to have needed a solution (yet) so I dunno.
|
|
#
?
Jun 28, 2021 01:18
|
|
|
I'm pretty sure this is what I have and the radius changes enough you can get pretty close. I really wish I had a smaller one because it is a little too big for most stuff. https://toolsforworkingwood.com/store/item/NO-FS76 Sticking stuff on the buffing wheel has mostly been my solution. The one time I tried to regrind one of the irons on my moulding planes was a nightmare. They are skewed irons and I couldn't get the grind to match the plane sole and so the plane basically wouldn't work. I think I eventually wound up doing something awful like wrapping sandpaper around a dowel and running the plane and iron on it with the iron in the plane.
|
|
#
?
Jun 28, 2021 01:25
|
|
|
The technique is something I picked up from an old episode of the Woodwright's Shop on moulding planes and I've been using some King waterstones to sharpen my moulding planes, which look kinda teardrop shaped from the front, and which seem to do the job. As long as they're not too far gone that is. I've got one that's rusted all the way through, and to get that back in working order I'd have to take 2-3 mm off, on a tight inside curve, and then match it exactly to the sole. So that one has been semi-permanently retired, because the odds of me pulling that off are pretty much non-existent.
|
|
#
?
Jun 28, 2021 11:26
|
|
|
How does the slip fasten to the drawer walls? Glue only?
|
|
#
?
Jun 28, 2021 19:09
|
|
|
Dovetails! I decided to try using blue tape to mask off the parts to keep. Mike Pekovich sings the praises of this technique all the time. He says it makes it easier to see, and also provides a positive thing to register the sawplate against. But I dunno, it seemed like more effort than it was worth. It did have one benefit for me here though. I cut the tails on both side pieces together, and the tape kept the pieces attached while I moved them around for various tasks which was kind of cool. I tried to do the pins smaller than I usually do, but honestly, I think I should've gone even smaller. These look kinda chunky for the drawer's height. Cuttin'. 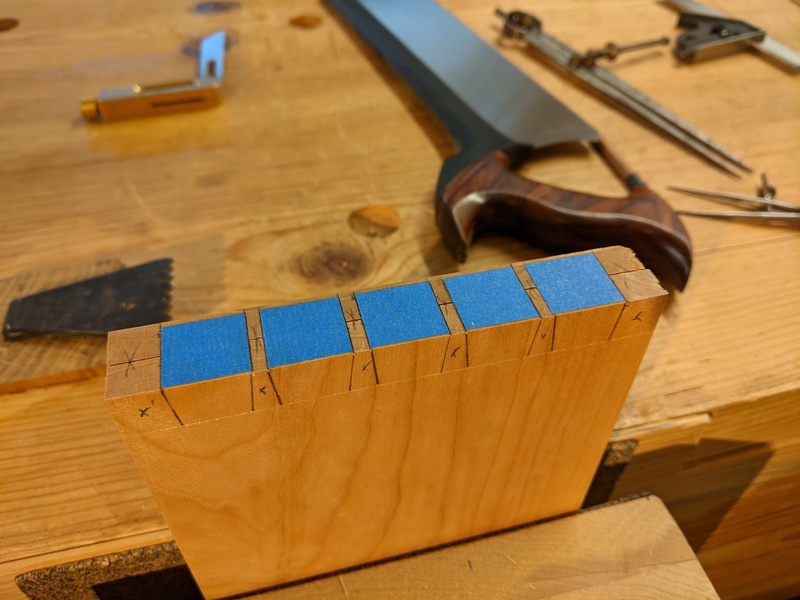 Choppin'. 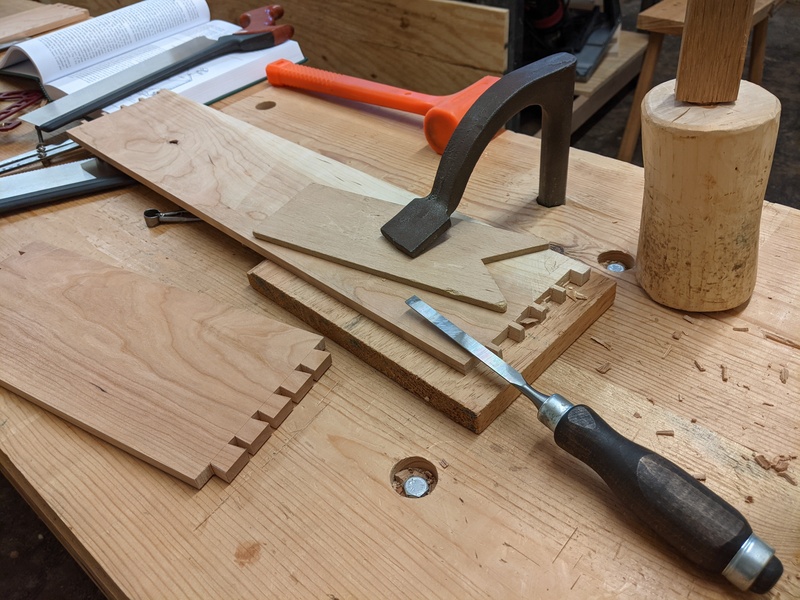 Transferrin'. 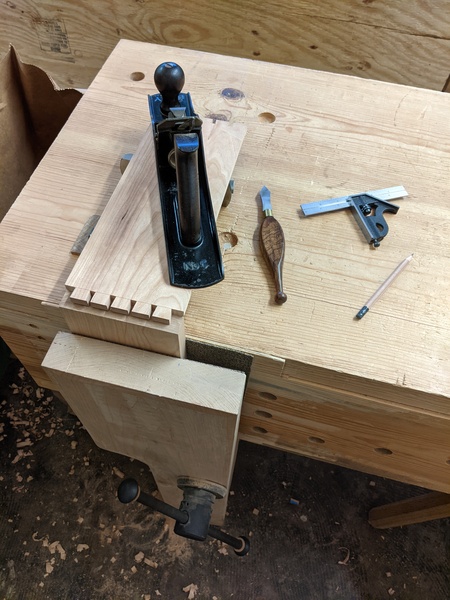 Cuttin'.  Fittin'. 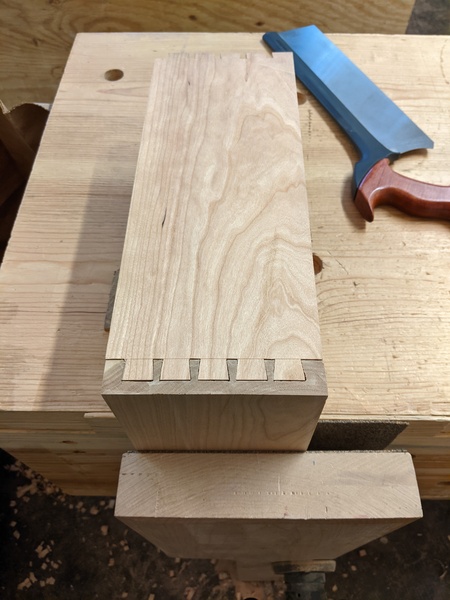 Drawer. 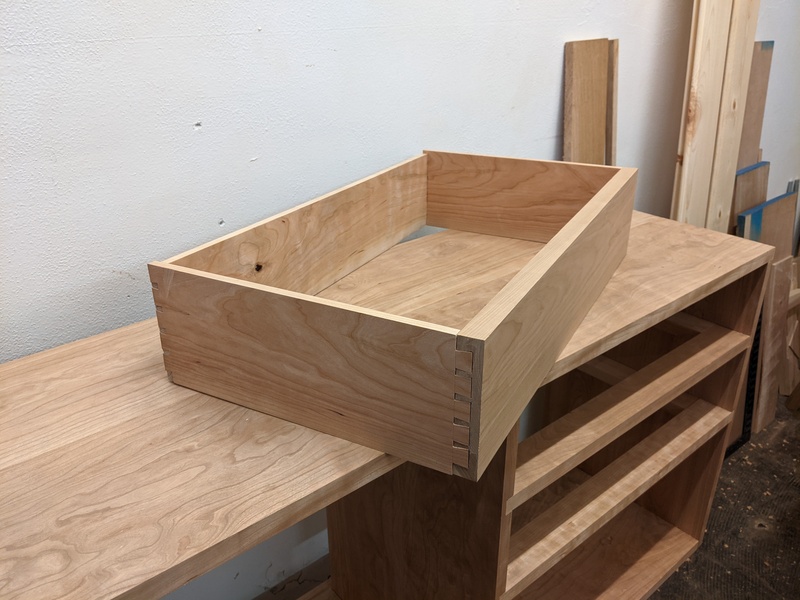 Next time I'll work on cutting the drawer slips to size. I was thinking I should apply a coat of shellac to the inside before gluing it up, so I will plan to do that as well. I made a rookie mistake while laying out the dovetails for the front of the drawer. If you haven't already guessed what it is, you'll see next time. Bloody posted:How does the slip fasten to the drawer walls? Glue only? Yep! ColdPie fucked around with this message at 23:06 on Jul 18, 2021 |
|
#
?
Jul 18, 2021 22:42
|
|
|
Unless the wood is too dark to be able to see your lines well, I don't really see the benefit of using masking tape either. If you want to keep boards aligned a clamp or two will work just fine. Edit: my guess would be that you forgot to account for the bottom's groove? Just Winging It fucked around with this message at 23:23 on Jul 20, 2021 |
|
#
?
Jul 18, 2021 23:09
|
|
|

|
| # ? Apr 24, 2024 06:45 |
|
|
The best way to remember which side of the line to cut on is to gently caress it up a few times. Then you remember. Usually. I like small dovetails, but I don't think yours look chunk. For the half blind pins on drawer fronts I aim for a little over 1/8" at the narrow end, but I leave them much chunkier on the backs-like 1/4" at the narrow end of the pin because that's as small as my jig for the router will go. I've seen late 19th- C. English antiques where the the drawer front pins are like 3/16" at the fat end and taper down to basically a saw kerf, lol.
|
|
#
?
Jul 21, 2021 01:28
|
|