


|
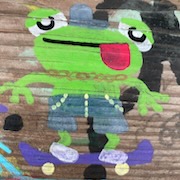
Meng egg-scale M5A1.    Bonus family photos   I need to knock it the gently caress off with the oils before I enter the realm of self-parody.
|
 #
?
Nov 3, 2021 17:00
#
?
Nov 3, 2021 17:00
|
|


|

|
| # ? May 4, 2024 08:39 |
|
|
Very cute. How did you do the lenses?
|
|
#
?
Nov 3, 2021 19:50
|
|

|
Dead simple. Light blue acrylic base, gloss, splat a little white oil paint on there at 2 o' clock for the highlight, and give it a little upward smear for the fade.
|
|
#
?
Nov 3, 2021 22:09
|
|
|
Can you take step by step pictures next time? It really pops in a nice way.
|
|
#
?
Nov 4, 2021 02:36
|
|

|
I'm building a Tamiya "Bibis" tank and the tracks are a joy. They're that squishy material like Gundam joints, and they just snap together with no pins, glue, tools, or bullshit.  It's such a relief after the trumpeter working panzer tracks I just suffered through Edit: Tamiya should sell bags of their poly caps. I know I could find uses for them even beyond the standard "where the poo poo did that go, this is a hermetically sealed clean room" situation. Blue Footed Booby fucked around with this message at 23:17 on Nov 4, 2021 |
|
#
?
Nov 4, 2021 02:44
|
|


|
getting ready for final assembly, prime and painting of my Nautilus. What do yall think for coloring? I mainly rely on the Vellejo Model Color Metals. I was thinking of gunmetal all around and then building up that rusty color with oils and pigments. Definitely going for the Disney style as much as possible here. Something like this:  edit: I also have a Vallejo light rust wash that might be useful here punishedkissinger fucked around with this message at 14:01 on Nov 5, 2021 |
|
#
?
Nov 5, 2021 13:55
|
|

|
Blue Footed Booby posted:I'm building a Tamiya "Bibis" tank and the tracks are a joy. They're that squishy material like Gundam joints, and they just snap together with no pins, glue, tools, or bullshit. Let me know how the kit goes overall. I've got a B1 I'm sitting on until I suck less at painting. Somewhat related, I just started on one of my RFM Shermans yesterday and am having a decidedly non-Gundam experience with the tracks.  This is about three hours worth of work.  RFM's workable track have a pretty clever jig system. You click the inside plate to the base, pin the whole thing in place, then click the pins into some side plates, those plug into the base track, and then glue the outside track surface down. It takes maybe five minutes to assemble one segment if you're deft-handed. The problem is that the track faces don't really mate very well. Those locator pins in the track sides don't actually touch, so you've got to get glue down on the base with the free floating pins, so you've gotta be real stingy with the adhesive. Since those are the only thing holding your pins in once you pop everything off the jig, that's kind of a problem. Reassembling the whole unit by hand takes considerably more time. I am specifically posting about this so that I have complained on the internet, and that should make the whole process go much faster.
|
|
#
?
Nov 5, 2021 17:10
|
|
|
This bullshit is why I threw away my Bronco Sherman tracks and just went with MiniArt ones. They're much simpler (track pad is cast whole, end connectors are separate) and still end up looking the same.
|
|
#
?
Nov 5, 2021 18:38
|
|
|
Slow but steady progress since my last update. The main bits that needed carbon fibring have been done and all of the main decals are done.�   I've also touched up all of the decals that cracked when being placed on the body panels and they and the carbon fibre above are ready for clear but the weather has no been cooperating with yesterday being the sunniest day all week but the humidity was high so I opted not to get the clear on.� In the mean time the chassis has been progressing along with today seeing the rear swing arm being attached along with the rear wheel. It's starting to look like an actual bike now rather than a collection of parts.�     
|
|
#
?
Nov 7, 2021 09:12
|
|
|
That's looking great! I got a Tamiya Suzuki Katana for my birthday, and I'm itching to build that. Got a pile of cars still, but finished up the Porsche 934 and am working on a Honda S600 currently.
|
|
#
?
Nov 8, 2021 00:04
|
|
|
nitsuga posted:That's looking great! I got a Tamiya Suzuki Katana for my birthday, and I'm itching to build that. Got a pile of cars still, but finished up the Porsche 934 and am working on a Honda S600 currently. The bike kits are fun cause they're no bigger than a car kit lengthwise but the details are all bigger which allows for a bit more fun. Thats a tidy looking porsche. I have both that one and the other livery built up but on one of them I put the wipers on in reverse.
|
|
#
?
Nov 8, 2021 10:47
|
|
|
Finished my Pagasus Nautilus. Incredible kit for the price! 
|
|
#
?
Nov 8, 2021 14:33
|
|
|
Love the use of the squid as a stand.
|
|
#
?
Nov 8, 2021 14:40
|
|

|
Any tips for cleaning up the windows on that model? Seems like the masking stickers left behind some gunk that isopropyl isn't taking off. I don't want to take off the paint there if possible.
|
|
#
?
Nov 8, 2021 14:45
|
|
|
Gently scrape it off with a wooden toothpick. Slow and boring, but it works.
|
|
#
?
Nov 8, 2021 16:55
|
|
|
Some very light application of Goo Gone should do the trick as well. I would test it in some leftover clear sprue first though, just to make sure there is no reaction.
|
|
#
?
Nov 8, 2021 17:00
|
|

|
Try using Tamiya tape, burnishing it down on top of the remaining adhesive and then peeling it up slowly to see if the adhesive would rather stick to the tape's adhesive than the clear plastic.
|
|
#
?
Nov 9, 2021 03:15
|
|
|
 After staring at this for about a minute I realized the gear are similar enough and the holes enough bigger than they need to be that it wasn't gonna make a difference, but for a hot moment my brain was making audible modem noises. Thanks, Academy. Not a bad kit, all considered. It's a notch above the 1:72 airfix plane kits, I think.
|
|
#
?
Nov 9, 2021 04:59
|
|
|
Blue Footed Booby posted:
D3 + d4 is the left while d5 +d6 is the right..
|
|
#
?
Nov 9, 2021 05:30
|
|

|
Yeah, that's not super clear but I think JuffoWup has got it.
|
|
#
?
Nov 9, 2021 05:44
|
|
|
Yes, it's very clear that the part numbers in parens , D5+D6, are for the right side, but then the left wing of the plane is labeled "right."
|
|
#
?
Nov 9, 2021 06:10
|
|
|
No they're for your right side. Just make sure to approach the plane from its back or else it'll all go terribly wrong.
|
|
#
?
Nov 9, 2021 06:22
|
|
|
It's correct if you're looking at it head on and it's right-side up. That's the best I got, there's no other configuration you would naturally use that makes any drat sense.
|
|
#
?
Nov 9, 2021 17:22
|
|
|
grassy gnoll posted:Gently scrape it off with a wooden toothpick. Slow and boring, but it works. this is what I ended up doing btw. Nothing else really worked unfortunately.
|
|
#
?
Nov 9, 2021 18:01
|
|
|
grassy gnoll posted:It's correct if you're looking at it head on and it's right-side up.
|
|
#
?
Nov 9, 2021 18:08
|
|
|
punishedkissinger posted:this is what I ended up doing btw. Nothing else really worked unfortunately. Yeah, it's no fun at all, but it's efficacious. Good for cleaning up where your canopy masks leaked, too. Blissfully unrelated to scraping or handedness, does Tamiya publish their reprint schedule anywhere?
|
|
#
?
Nov 9, 2021 18:52
|
|
|
Blue Footed Booby posted:Yes, it's very clear that the part numbers in parens , D5+D6, are for the right side, but then the left wing of the plane is labeled "right." Oh, I just viewed it as more labels instead of actual left and right. Could have been labeled abe and cdf for the same effect. Sorry I missed that part completely.
|
|
#
?
Nov 10, 2021 07:02
|
|
|
Friend of mine wants to paint a 3D printed model, what�s the best paint for that? Enamel or acrylic?
|
|
#
?
Nov 10, 2021 22:58
|
|
|
Either should be fine I think. I've only used acrylics myself though.
|
|
#
?
Nov 10, 2021 23:37
|
|
|
what even is the purpose of enamels?
|
|
#
?
Nov 10, 2021 23:41
|
|
|
punishedkissinger posted:what even is the purpose of enamels? Fumes and fires.
|
|
#
?
Nov 10, 2021 23:42
|
|


|
Thread title explains all you need to know about enamel paint
|
|
#
?
Nov 11, 2021 01:23
|
|
|
I've done cool poo poo with enamels in the past, but they required metal to paint them on and a furnace to set them. Pretty sure that'd have just melted my Airfix tonks.
|
|
#
?
Nov 11, 2021 01:40
|
|
|
punishedkissinger posted:what even is the purpose of enamels? Best gloss finish if you are working on cars or something like that. Enamels (and oils by close relation) are useful if you are using lacquers as your primary coats. As a plane guy, a couple specific examples are painting the base coats of an instrument panel in the detail colors in lacquer, then overcoating it all with the panel color (black, dark gray, OD green, etc). You can go in with a toothpick dipped in enamel solvent (paint thinner, turpentine, turpenoid) and gently scrape the enamel overcoat away from the detailed areas like instrument bezels and tick-marks on the indicators. It will remove the enamel overcoat without damaging the lacquer undercoat letting you easily pick out extremely fine details. That is one technique I commonly use, and a more common one is for panel lining and weathering. If your model is painted in lacquers, you can slosh on an oil wash (which is based on the same solvents as enamels) and let it dry, then go back and and work it back with Q-Tips or paper towels dipped in enamel solvent to leave the enamel/oil wash in the panel lines and in other creases to bring out the panel lines and add contrast to detailed areas. The flexibility in topcoating and weathering is why I'm such a supporter of lacquers. The other reason is how much easier it is to clean airbrushes when using lacquers vs. acrylics. I only use acrylics for small cockpit details and other very specific reasons. Other than that, it is lacquer, oil, and enamel all the way. Also, see the thread title.
|
|
#
?
Nov 11, 2021 02:47
|
|


|
They also take a little while to dry, so they are easier to blend. A lot of the weathering washes and filters out there are enamel-based for that reason.
|
|
#
?
Nov 11, 2021 04:06
|
|
|
SkunkDuster posted:That is one technique I commonly use, and a more common one is for panel lining and weathering. If your model is painted in lacquers, you can slosh on an oil wash (which is based on the same solvents as enamels) and let it dry, then go back and and work it back with Q-Tips or paper towels dipped in enamel solvent to leave the enamel/oil wash in the panel lines and in other creases to bring out the panel lines and add contrast to detailed areas. This also works with acrylics if you put down a coat of clear gloss before applying your weathering/panel lining effects. I've got a decal question. I've got a Hasegawa Macross kit and it seems like every one of the larger (more than 1cm long) decals is breaking at least once. Is there anything I can do to recondition the decals so they ren't so damned brittle, or should I just consider each one to be a multipart challenge ?
|
|
#
?
Nov 11, 2021 06:22
|
|


|
the only thing i can think of trying is putting a clear coat down on the sheet to hopefully help the decals stay together. water should still be able to lift them off through the backside of the sheet i think
|
|
#
?
Nov 11, 2021 12:43
|
|

|
Raskolnikov38 posted:the only thing i can think of trying is putting a clear coat down on the sheet to hopefully help the decals stay together. water should still be able to lift them off through the backside of the sheet i think That's the same way you're supposed to seal home printed decals so yeah that should work. mllaneza posted:This also works with acrylics if you put down a coat of clear gloss before applying your weathering/panel lining effects. Which one is it? I've just started watching the original Macross and those Hasegawa kits are looking mighty tempting.
|
|
#
?
Nov 11, 2021 14:47
|
|

|
mllaneza posted:This also works with acrylics if you put down a coat of clear gloss before applying your weathering/panel lining effects. Having built one of those recently, no, they're all hosed. Try and be as gentle with them as possible when you're removing them from the backing, but expect them to tear and fragment like nobody's business. If you can manage some paint matching, you can try and tidy up the breaks after it's dried and varnished.
|
|
#
?
Nov 11, 2021 15:07
|
|
|

|
| # ? May 4, 2024 08:39 |
|
|
mllaneza posted:This also works with acrylics if you put down a coat of clear gloss before applying your weathering/panel lining effects.
|
|
#
?
Nov 11, 2021 17:42
|
|