


|
Just a quick question: what kind of fabric is commonly used for T-shirts and other stretchy garments? I just finished my first sewing project (yay!) and while the shirt came out decent enough the fabric feels kind of coarse on skin. What should I look for on the fabric labels to know it will be comfortable when worn?
|
 #
¿
Aug 6, 2009 20:53
#
¿
Aug 6, 2009 20:53
|
|

|

|
| # ¿ Apr 27, 2024 03:14 |
|
|
I'll look for that. Thanks madlilnerd.
|
|
#
¿
Aug 7, 2009 20:10
|
|
|
Can't help you, but that's a really gorgeous dress!
|
|
#
¿
Sep 1, 2009 01:05
|
|
|
Now that I am starting to get the hang of things I feel like it's time to get working on the shirt and jacket that I've wanted for the past 16 years (sorry for the poor paste job): Click here for the full 1240x813 image. The bright blue sleeves look like regular polyester and the jacket might be jacquard? Anyone seen stuff like that recently? I checked out the fabric sites listed in the OP but did not notice anything that would come close. Cross_ fucked around with this message at 01:49 on Sep 12, 2009 |
|
#
¿
Sep 11, 2009 22:27
|
|
|
I finally finished a fall/winter dress for my wife which looks something like this : Poor photo though, in reality it's a lot more form-fitting and shimmering. The fabric is 95% rayon plus spandex- wonderful soft feel and a pain to sew. This leads me to my question: are there any good temporary stabilizers for stretchy fabrics ? I've tried cut-aways which tear out my stitches when I try to pull off the paper. With water-soluble fiber stabilizer I have lots of fuzzy fibers stuck under the seams that require tweezers to remove. Oh and one more: I am trying to make a stiff shirt collar out of lightweight fabric. Any recommendations for a sturdy interfacing to use ?
|
|
#
¿
Dec 2, 2009 01:12
|
|
|
4R7 THi3F posted:what kind of problems are you having? does the fabric shift as you try to sew it?
|
|
#
¿
Dec 2, 2009 03:38
|
|
|
4R7 THi3F posted:did you change the type of needle you were using in your machine? get a pack of ballpoint needles snd stretch the fabric as you sew (if you're using a straight stich and not a zigzag)also, we use wax paper as a stabilizer for sewing fabrics like charmeuses and chiffons (that stabilizes the fabric and stops it from getting stuck in that plate) maybe it can be used in the same manner for knits. At first tried a regular needle and then switched to a size 11 ballpoint- I did not notice any difference whatsoever. Wax paper was one of the things I tried as well as other tear-away stabilizer; they all did the job of preventing the fabric from getting stuck but then removing the paper/stabilizer from the finished seams was painful. One of my books mentions wash-away stabilizer that's not fiber-based but somehow dissolves when it comes in contact with water. Unfortunately I have not seen anything like it in local stores. quote:The only one I know of offhand is Rit, which I am scared to death of using since I expect it will run/bleed like crazy when (not if) I need to wash the thing, ruining the window squares. Is there something that is colourfast enough that will, when it bleeds, not affect the windows? This is going to be piecemeal, probably with silk and wool and synthetics and all sorts of fabrics used. Last weekend I used Jacquard acid dye on white silk twill with very good results: http://dharmatrading.com/html/eng/1344-AA.shtml?lnav=dyes.html After ~40 minutes of stove top cooking all the dye was absorbed with a pretty even distribution and the color exactly matched the sample swatch (620 Navy Blue in my case). Even after some rough treatment (hot/cold water, ironing, steaming, starching) it seems to be colorfast. Oddly enough the white synthetic fabric care label that was attached to the fabric was not dyed at all. Maybe it was pretreated or that dye simply does not take well to synthetics, either way it works great for silk.
|
|
#
¿
Dec 2, 2009 07:46
|
|
|
For your reference, I used 1/4 oz of that powder dye for 0.5 lbs of silk. The table on their webpage is for washing machine use only.
|
|
#
¿
Dec 2, 2009 22:50
|
|
|
I just ordered a refurb'ed XR9000 from overstock for $149 (incl. shipping). Costco used to sell them for $179 so I guess they discounted it a little bit. Its main selling point over similarly priced machines is the monogram feature- unfortunately it seems to be fixed-size, single-font only. The manual is available online: http://welcome.solutions.brother.com/BSC/public/files/dlf/doch000571/xr9000ug01en.pdf kanteyluip posted:Have you tried Solvy? http://www.sulky.com/stabilizers/solvy.php The Alice dress looks real nice- exactly what I'd imagine her to wear. As for the tailcoat, has anybody tried it on yet? From the picture it looks like that's a Small shirt with extra long pants. Cross_ fucked around with this message at 00:51 on Dec 8, 2009 |
|
#
¿
Dec 7, 2009 23:08
|
|
|
Sulky update: their "Ultra" stabilizer does pretty much exactly what I want. The only downside is that it takes quite a bit of scrubbing under hot water to dissolve it and get out all the stains completely- but it can be done! Next question: I am thinking about attaching a removable garment shield to a dress shirt using velcro. Instead of using the loop fastener, are there any fabrics that naturally cling to the velcro hooks? Felt? Wool?
|
|
#
¿
Dec 8, 2009 21:29
|
|
|
calcio posted:Saw at costco today a Brother xr-9000 on sale for 169. Is this a good machine and what about the price? The XR9000 is very lightweight, I don't know if that makes it less robust or not- it seems pretty sturdy but I would not use it for leather. The sewing mechanism is wonderful- very quiet and soft, like cutting through butter. Foot pedal is responsive and the speed limit slider works great. There's also a button control but for whatever weird reason you can not use the start/stop button while the pedal is plugged in; I don't foresee that button getting a lot of use. There's a reverse/reinforce button which unfortunately is a temporary switch only- not a toggle. It can be used in conjunction with the foot pedal or you just hold the button down and it will go in reverse at a slow speed. Several extra presser feet are included, e.g. buttonhole, buttonstitch, zipper, blind hem. The one thing I am missing is a quilting guide. There's a slot for it in the foot but it has to be purchased separately. While the accessories are fine, the accessory storage is not. There's a front panel section that you have to pull out and then inside there's a plastic pouch with all the goodies. You have to keep the stuff in the pouch or they'll fall out of the machine. For $0.20 more Brother could have added a proper compartment with a hinge- instead they took a very cheap and impractical storage approach. Lighting is provided by a bright but focussed white LED. I am somewhat spoiled by having a high wattage light bulb in the previous machine which lit up the entire working area. The XR9000 LED lights up the presser foot really well but that's about it. The "automatic needle threading" is not automatic, but still extremely useful (I keep missing the eye when trying to do it manually). Even though I wound 3 bobbins I still can't tell whether the machine has an automatic stopping mechanism or just slows down a lot once the bobbin is full. Either way you can run the winding at full speed for a minute and it's quite noticeable once it's complete. The bobbins are full-size and top-loading. There's a somewhat tricky part about catching a hook when loading the bobbin which is not well explained in the manual. The first time I missed that which resulted in unbalanced stitches; reloading the bobbin more carefully took care of it. Another nice feature is that you don't have to pull up the lower thread before you can start to sew. The stitch patterns are plentiful and half of them look quite nice. The other half has weird default settings where the default stitch length is too long, you can adjust that in the display but it still strikes me as odd. The monogramming feature works- it's fixed size, fixed font and does not look all that great. The XR9000 does not have any adjustable settings for presser foot height or pressure. However, the included default presser foot has some kind of spring adjustment built in which is supposed to help with thick fabric layers. I have not had a chance to try it out yet. The manual and instructional DVD are great and cover all the essentials. Summary: well worth it at <$200
|
|
#
¿
Dec 9, 2009 19:58
|
|
|
handbags at dawn posted:I have a similar machine (the 6000i - basically the same as yours but about 10 less stitches) and if yours is like mine, it doesn't stop automatically but it will slow down. (I just looked online and that is correct.) The table is included and very useful for monogramming christmas wrapping paper (I had to try it out on something  ). I only have a tiny work area so it takes up precious real estate- I will probably switch back to regular or free-arm configuration. ). I only have a tiny work area so it takes up precious real estate- I will probably switch back to regular or free-arm configuration.
|
|
#
¿
Dec 9, 2009 20:37
|
|
|
I'd be curious to see some high-res pictures of the instructions and/or patterns. Are they very similar to modern-day instructions or has the terminology and style changed much ?
|
|
#
¿
Jan 5, 2010 19:45
|
|
|
While I am still enjoying my Brother XR-9000 I am starting to think it's not me but the machine that's preventing success with blind hems. What I notice with thin fabric or when sewing close to the edge is that the fabric sometimes gets pulled to the left. So assuming the fabric edge is perfectly lined up with the right side of the presser foot it will no longer be lined up once it's travelled under the needle- instead it has drifted a few millimeters to the left. In some situations I can compensate for that by forcefully pulling it to the right behind the presser foot or by lifting the foot and placing it back down. Has anyone here run into something like that? I looked at the feed dogs and presser foot underside but did not notice anything being out-of-whack. Anything I can do other than take it to a service center ?
|
|
#
¿
Jan 14, 2010 03:24
|
|
|
I agree with handbags at dawn- that looks an awful lot like a button foot. The full metal version of this guy: And here are some instructions on using the Greist buttonholer. The little metal clips are indeed templates to be used with it : http://www.theweebsite.com/sewing/tools/buttonholer.html Cross_ fucked around with this message at 21:42 on Jan 18, 2010 |
|
#
¿
Jan 18, 2010 21:37
|
|
|
nolen posted:Wow. Thanks for the answers everyone! Now that I know what each foot is for, I can research HOW to use them on my own. Ancient machines are supposedly more robust and suitable for thicker material. There are special denim needles available - you'll probably also want to pick up some reinforced thread instead of the general purpose stuff. I just came across this website which has a nice listing of various feet: http://www.jaycotts.co.uk/acatalog/Universal_Presser_Feet___Accessories.html Cross_ fucked around with this message at 23:45 on Jan 18, 2010 |
|
#
¿
Jan 18, 2010 22:42
|
|
|
Don't have a serger but I got a URL for you that covers embroidery machine maintenance: http://www.annsultfixit.com/UltFixit.html Misaligned timing seems to be a common problem with sergers and regular sewing machines. Obviously needles will fail but they are considered disposables that are to be replaced after each project. Worn belts are a common issue with older machines, not sure about your model.
|
|
#
¿
Jan 22, 2010 03:24
|
|
|
To quote myself :Cross_ posted:While I am still enjoying my Brother XR-9000 I am starting to think it's not me but the machine that's preventing success with blind hems. What I notice with thin fabric or when sewing close to the edge is that the fabric sometimes gets pulled to the left. So assuming the fabric edge is perfectly lined up with the right side of the presser foot it will no longer be lined up once it's travelled under the needle- instead it has drifted a few millimeters to the left. In some situations I can compensate for that by forcefully pulling it to the right behind the presser foot or by lifting the foot and placing it back down. I ended up taking it to the shop and they found out that the shank was slightly angled, the feed dog timing was off and the feed dogs came up too high. It's good to know that it was not just my imagination and there was indeed something wrong with the machine. $55 for a lesson learned about refurbished machines.
|
|
#
¿
Feb 8, 2010 23:17
|
|
|
I meant to contribute this earlier, but forgot until Goldaline went on her photo safari. It provides some insight into professional apparel shooting. While you're unlikely to have two softboxes sitting around at home- the general styling approach and reflector arrangement is something that can be copied by the hobbyist : http://ir.webphotoschool.com/Shooting_Apparel_In_The_Studio/index.html
|
|
#
¿
Feb 10, 2010 22:00
|
|
|
Thanks for your show & tell, stars. I have some questions for you:quote:After french seaming 7 gores for that skirt quote:I am unhappy with the neckline and sleeve cuffs, though, they are too narrow maybe? Too tight?
|
|
#
¿
Feb 20, 2010 00:58
|
|
|
stars posted:Of course the body would, but the skirt has to have stretch too? Why?
|
|
#
¿
Feb 26, 2010 02:53
|
|
|
Collar question: I am working on a dress shirt again and the last one has taught me that I definitely need more interfacing/starch/collar stays. Any opinions on desirable width and length of collar stays ? My books here only mention that they exist; I have seen some that go all the way to the point wereas others only reaching the topstitching (0.25" from point).vaginadeathgrip posted:Spandex House gives out free swatches and is priced pretty cheap, if you want stretchy fabrics.
|
|
#
¿
Mar 1, 2010 23:06
|
|
|
But you look so sad wearing it 
|
|
#
¿
Mar 4, 2010 23:34
|
|
|
Rotten Cookies posted:Being a dude (guys having a natural aversion to this  ! I picked up sewing without any home-ec classes so it can definitely be done; a sewing machine however would be rather helpful unless you are extremely patient and want to handstitch everything (yikes!). What's the problem you are having with the lettering ? ! I picked up sewing without any home-ec classes so it can definitely be done; a sewing machine however would be rather helpful unless you are extremely patient and want to handstitch everything (yikes!). What's the problem you are having with the lettering ?v- Sure..  seamster seamster Cross_ fucked around with this message at 01:19 on Mar 11, 2010 |
|
#
¿
Mar 10, 2010 21:44
|
|
 ), no sewing machine (I don't know how much that would actually help), and only ever learning to make a pillow in home-ec in 8th grade, this is huge for me.
|
Finally finished the second shirt I was working on and took some pictures. This one's mine.. mostly silk ordered from Dharma Trading and dyed with Royal Blue. The collar came out much larger than expected, so I modified it by adding some boning and hooks: 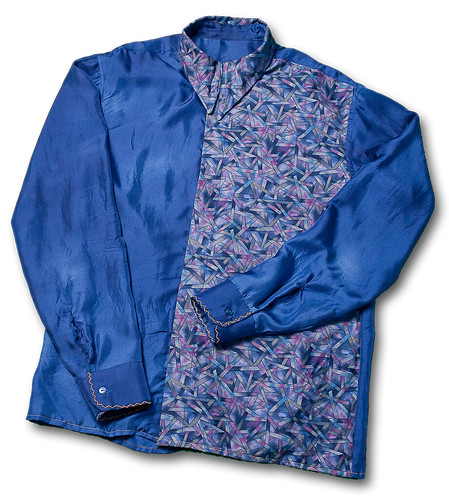 ..and here's my dad's birthday present  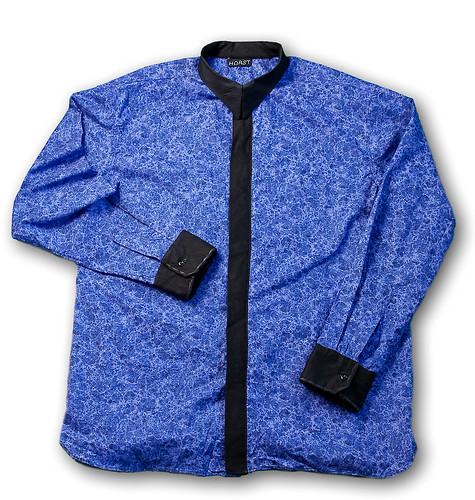 Noteworthy items: removable collar stays and nice cuff plackets. There are also cool side seam gussets but they aren't visible in these pictures. 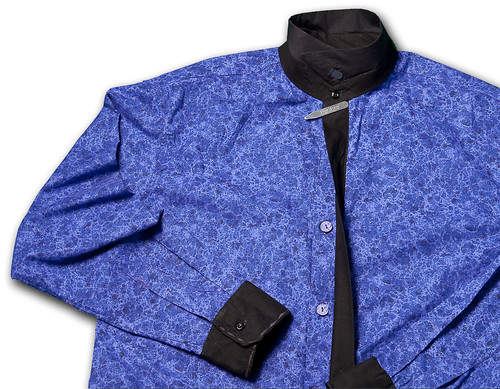
|
|
#
¿
Mar 29, 2010 01:05
|
|
|
Does anyone here know of software to turn 3d models into 2d patterns ? So far my google skills have only revealed Plushie- which is buggy and not actively maintained: http://www.den.rcast.u-tokyo.ac.jp/~yuki/plushie/index-e.html PatternImage- which looks awesome but costs $5000  http://www.livesforce.com/PatternImage.html
|
|
#
¿
Apr 13, 2010 19:24
|
|
|
I did ? I just pointed out two options that aren't really viable.  Anyway, the next two applications to try out are Pepakura and Blender. Both allow unwrapping of 3d models into 2d. Blender is free and somewhat tricky to use. After spending 4 hours last night I have a pattern but it's distorted. There's one more thing to try though, hopefully that fixes it tonight. I have not tried Pepakura/Papercraft yet and don't know how hard it would be to convince the app to use different seam allowances instead of the tiny default. v-- Oh, glad to be of service in that case 
Cross_ fucked around with this message at 22:35 on Apr 15, 2010 |
|
#
¿
Apr 15, 2010 00:59
|
|
|
Stopping by at the local Jo-Ann's I found out that they now carry pre-gathered fabric. Just buy a yard, add a side seam, straps, and hem it. Et voil� - the  summer dress: summer dress: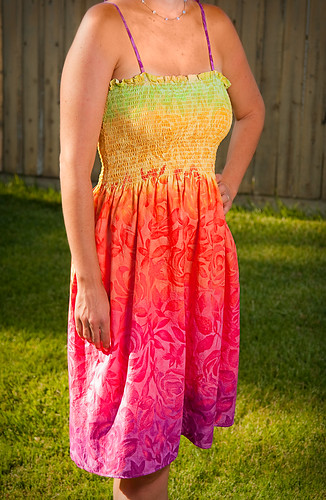
|
|
#
¿
Apr 26, 2010 03:17
|
|
|
I indulged myself this weekend and got an embroidery machine. It's even cooler than watching an inkjet put on layers of color.  So you can join the fun I thought I'd offer free (+S/H) embroidery to whoever is interested. Just shoot me an email with the desired bitmap to embroider: grubertm@@hotmail.com pepsigloworm posted:The seams are relatively straight, and the pillow-form actually fit when I was done! Hooray! ") You might want to take a look at this- it's a pretty darn good beginner's guide: Sew-Everything-Workshop-Step-Step Jo-Ann's actually has a couple of space themed cotton prints. I have been tempted to buy that stuff but don't know what to use it for. Turning this into a shirt would make you look like a pimp or Vegas high roller methinks. Cross_ fucked around with this message at 22:41 on May 17, 2010 |
|
#
¿
May 17, 2010 21:35
|
|
|
While all new machines have a plastic exterior some of them do have solid metal gears and shafts inside. $100 is reasonable for a new no-frills machine or an antique from the thrift store/craigslist.
|
|
#
¿
May 27, 2010 00:58
|
|
|
Do a google search for "reflective sew on". I don't see why you would want to add any kind of backing.
|
|
#
¿
May 27, 2010 21:25
|
|
|
Just a quick heads-up: Wal-Mart is apparently closing down their fabric sections. Several stores have 50% off sales, even on bargain bin items. I ended up with 5 yards of awesome fabric for $4.00
|
|
#
¿
May 30, 2010 00:36
|
|
|
Just turn the machine around and find a lefty to sew for you.
|
|
#
¿
Jun 18, 2010 01:43
|
|
|
Speaking of ruined machines.. I managed to break a needle in my Brother and in the process throw off the machine timing. Are there any online tutorials or generic repair books out there ? I can only find snippets on how to repair 1950s industrial sewing machines and e-book scams.
|
|
#
¿
Jun 29, 2010 22:49
|
|
|
What are you piecing together? Lace and .. ? The usual suspects: - small, new needle (size 11 or less) - stabilizer underneath the fabric (Solvy Ultra helped me with stretch fabric getting sucked into the bottom) - correct thread tension (play around with it) - expensive option: replace presser foot and throatplate with a straight stitch one, i.e. a tiny hole in both instead of the regular wide slot
|
|
#
¿
Jul 6, 2010 23:21
|
|
|
My next project is going to be a vest and the silly pattern instructions suggest putting fake pocket welts on it. We can't have that so I have done some digging for double welt construction. This approach here seems really nice so enjoy the link: http://www.fashion-incubator.com/archive/welt_pocket_construction/ Palmer/Pletsch have a different take on it which avoids the cardboard pattern and uses basting instead: http://www.google.com/url?sa=t&sour...WeltPocket.pdf& ei=nSE1TNLnCsiErAeK5NjmCQ&usg=AFQjCNHUWQoSXc4-BEcNriT8AU7QRIlEzQ
|
|
#
¿
Jul 8, 2010 01:55
|
|
|
madlilnerd posted:On a completely unrelated note- is there anything I need to worry about when sewing very shiny, slippery satin? Should I put a new needle in? It hasn't been very long since I changed the last one.
|
|
#
¿
Jul 12, 2010 21:46
|
|
|
Let's say I have a piece of fabric that's shaped like a hexagon (i.e. 6 x 30degree angles) and would like to add some trim to it. Either by wrapping tape around the edges or extending the edges. Most bias binding and mitering tutorials I have found assume 90 degree angles and in my trials the smaller folds don't look very nice. Any recommendations ?CureMinorWounds posted:So I've managed to lose the power cord to my sewing machine, and I've searched Janome's site and can't find anything even relating to my sewing machine. Is there such a thing as a universal sewing machine cord? Or am I getting my hopes up here? A photo would help. Maybe something like this is what you're looking for: http://www.radioshack.com/product/index.jsp?productId=3875429
|
|
#
¿
Jul 14, 2010 18:47
|
|
|
@coldfuse: Since it's an excellent deal I'd recommend picking up this pattern collection (Simplicity 2741-BB) which contains a 2-piece boxer pattern: http://compare.ebay.com/like/370349...4=263602_263632 You probably need to reduce the waist/width when using it for swimshorts and with stretch material. I'd also recommend using Solvy Super/Ultra as stabilizer for the lycra. All my swimshorts have full length mesh liners, I have never seen partial mesh liners and it sounds kind of weird.
|
|
#
¿
Jul 30, 2010 22:43
|
|
|
|
| # ¿ Apr 27, 2024 03:14 |
|
|
Hi there Smoogle ! I have been sewing for about the same time that you have. As for Jo-Ann's - that is where I get 90% of my fabric. It seems like the long-time seamstresses in this here thread are not too fond of the store though. From my limited experience the skirt part of your dress will be a lot easier than pants- it's fitting the bodice and setting the sleeve that can be painful. For the sleeve ruffles you could either gather with two parallel rows of gathering stitches using sturdy thread, or stitch the sleeve cap to a stretched piece of elastic. Either way is a PITA. I've also tried using a ruffler foot, but the resulting gathers/pleats have been unpredictable so it's not something I'd go back to.
|
|
#
¿
Aug 10, 2010 02:23
|
|