


|
As someone brought up costuming... I am a huge nerd, and therefore I have decided to make a Rocketeer costume - I actually knocked together a version last year, and now I'd like to take the time to do it properly. One of the hurdles on this is his jacket. Last year I solved this by simply taping a panel of leather with faux buttons to an existing leather jacket. It was serviceable, but the materials weren't matched and it was impossible to open or close. So I'd like to actually make a replica of the movie prop. I was thinking of using this pattern as a starting point, and I suppose that I will have to wing the details and differences myself. I have done a fair amount of sewing and costuming, so I feel like I'm capable, but I had some questions to pitch: 1) The pattern is for denim; one of the reasons I picked it was that this seemed closer in weight to a leather than other patterns for wool or fleece. What sort of things do I need to watch out for, being as I'm making it out of a different material? 2) What material options do I have for this? I've worked with leather before but not to actually make a whole garment. It's also expensive, and I worry about not being able to fit the whole pattern on one side and ending up with different shades. Is there a decent synthetic product that I could use? If I go for actual leather, any idea what sort of weight I should aim at?
|
 #
¿
Aug 26, 2008 17:37
#
¿
Aug 26, 2008 17:37
|
|


|

|
| # ¿ Apr 27, 2024 23:53 |
|
|
squirrellypoo posted:Leather isn't that difficult to sew, but main things to remember: quote:
quote:Are you planning on wearing this at all after Halloween, or is it just a costume? I think that should answer whether you should spend the money on real leather or synthetics... I admit that I like the jacket, but its sort of a difficult thing to wear outside of the costume without looking pretty eccentric. I also live in Georgia, so the portion of the year where its comfortable to wear a leather jacket is smallish. It's kind of a cost-balancing question; based on the pattern it seems like I'd need about 40sqft of leather (equivalent to 2 5/8yards 60" fabric), depending on how I can arrange things. I can't imagine getting a hold of enough matching leather at less than $2/sqft, so if I can find a synthetic at $15/yd it would come out on top. The problem is partly that I don't really know what would be a sbustitute; I know the OP says that Hancocks et al is crap, but would it be worth going there to actually handle some alternatives? I suppose I should check upholstery suppliers, as well. quote:So it might be worth asking a leather shop near you if they sell any seconds. I will also give this a go, maybe I'll be able to call around and get lucky with some place local. Sorry to barrage you with a whole new slew of questions, and thank you for the advice!
|
|
#
¿
Aug 28, 2008 16:01
|
|
|
Can anyone suggest a place to buy some plain grey wool fabric? I swear that I've looked everywhere I can think of and I just can't seem to find any regular, plain grey. It's really frustrating because its about the dullest and most regular thing I can think of, and no one seems to stock any. This is the sort of thing I'm looking for, but of course these guys (the only people I've found so far) are sold out and don't expect to get more. Maybe my search abilities are just terrible.
|
|
#
¿
Mar 10, 2009 17:32
|
|
|
Well I look pretty stupid now, don't I? In my defense that's how it's spelt in British English, but I apparently failed to notice the difference. It seems some places auto-correct or crosslink, which is why I was getting a handful of results but not a lot. Thank you for pointing that out!
|
|
#
¿
Mar 10, 2009 18:08
|
|
|
seriouslywtf posted:Are you specifically looking for a wool suiting (like the one you linked), or just any gray wool? What weight are you hoping to find, I guess is my question. I'm looking for wool suiting, yes. To explain, I'm trying my hand at making a suit using a pattern I rustled up. I live in Georgia, so a light or medium weight is probably best.
|
|
#
¿
Mar 10, 2009 19:27
|
|
|
seriouslywtf posted:I found these two that sorta fit what you're looking for: Thank you for the help! These look a little darker than I would like, but it can be so hard to tell from online pictures, so it's probably worth getting swatches. I appreciate you taking the time to look them up.
|
|
#
¿
Mar 11, 2009 22:32
|
|
|
seriouslywtf posted:I don't really have any name for this dress: Can I ask what tailor's dummy you're using? I've looked at a few half-heartedly, but the reviews for all of them seem seriously bipolar, when I can find them.
|
|
#
¿
May 19, 2009 21:15
|
|

|
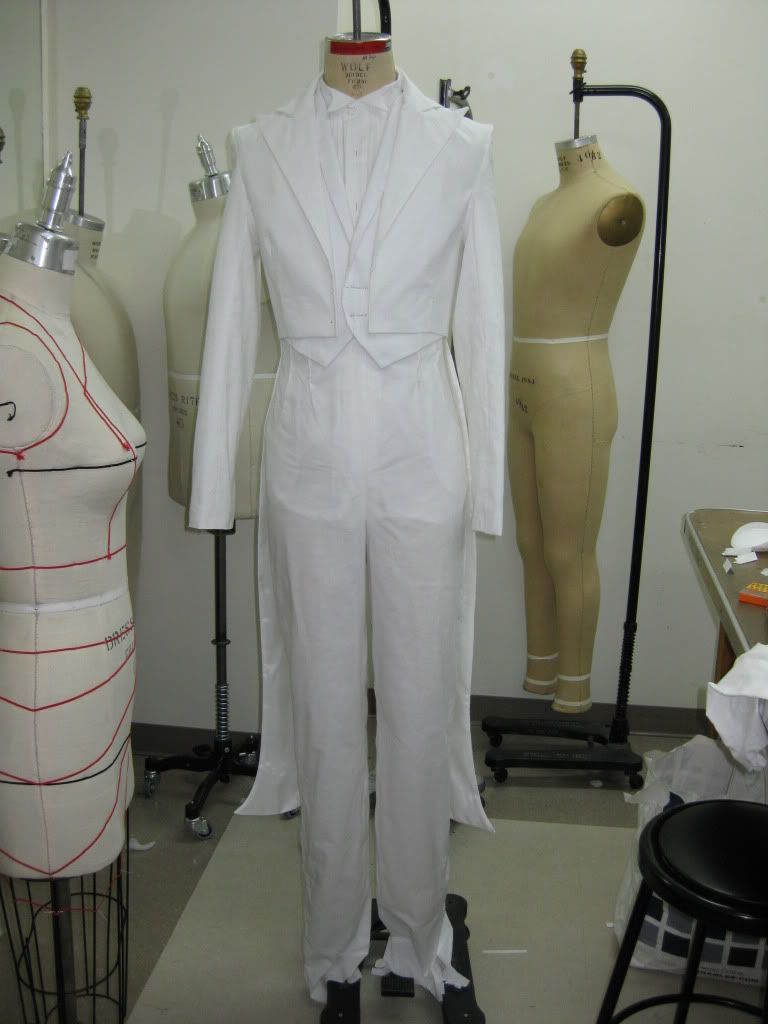
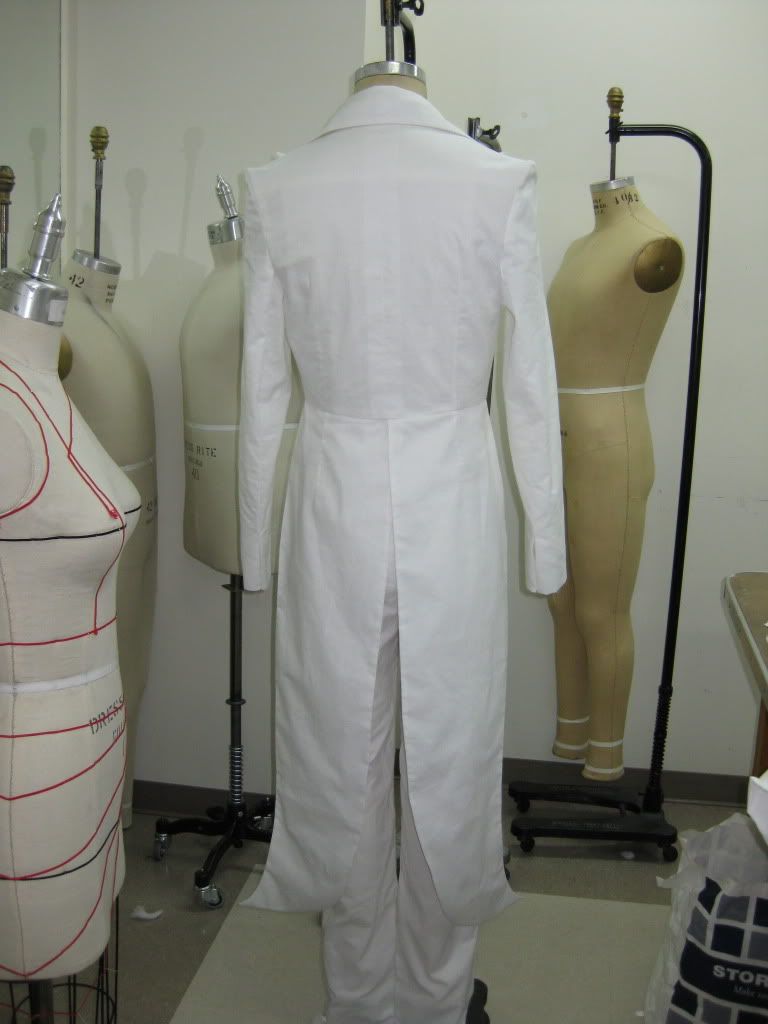
Goldaline posted:I wish I had gotten a picture of my final piece for Projects, but in all the stress, I forgot, and now it's locked up in the school building I have been working on a tailcoat, and the entire project makes me feel like a rhinoceros with spare thumbs.  Part of it is that I have ended up working from a terrible pattern that seems to leave out entire steps and sections and I have to basically bumble my way through. Part of it is that I have ended up working from a terrible pattern that seems to leave out entire steps and sections and I have to basically bumble my way through.
|
|
#
¿
Jun 18, 2009 03:55
|
|


|
vaginadeathgrip posted:I have to make a tailcoat for my senior collection, which is slightly terrifying, but I did it to myself. Did you find pattern instructions for it? I'd like to know where to get some... Yea, I had a hell of a time finding patterns to choose from. You can see the pattern I'm using here - scroll down to the bottom of the page, it's the one labeled '1890 Evening Suit'. What the heck, here's the picture:  The pattern itself is fine, but the instructions are pretty bad - for instance, a lot of the diagrams are clumsily done so they're not very helpful, and they don't shade 'right' and 'wrong' sides of the fabric in them either. The most frustrating thing for me has been that they completely left out any instructions for the lining, so I am having to work that out myself. I also have this pattern, which is a decent costume pattern from Butterick. The coat has a different cut than I wanted (I wanted the open-front) but it's been useful for reference and comparison. Zantie posted:Seconding the wish to see it when you're done, especially with all the detail you've put into it
|
|
#
¿
Jun 19, 2009 12:55
|
|
")
|
That looks like a great machine and I love the cabinet, its a shame I am nowhere near at all. I hope it goes to a good owner. I need to express how much I hate setting sleeves. All the sleeves I've done before were either part of the body, or were fine gathered. I have been battling these stupid suit sleeves all weekend, and I've tried every technique I can find online. One thread easing, two thread easing, pin easing, hand-basting, I just seem to end up with a gather or a tuck or something somewhere no matter what I do.
|
|
#
¿
Jun 29, 2009 17:18
|
|
|
kanteyluip posted:Perhaps something went wrong during the cutting and your sleeves are simply a little too big around for your sleeve-holes? I was really careful at the cutting stage, and I checked the pieces against the pattern before I started sewing, so I don't think so. I've mentioned that this pattern is a little goofy in other ways, but all the other parts have actually fit together. Even if I messed up or the pattern is wonky, I'm sort of wary about taking the sleeves in, because they're already slimmer than a typical suit. Wait, could I widen the sleeve-holes instead? Would that do anything weird to the cut?
|
|
#
¿
Jun 29, 2009 18:09
|
|
|
Acc-Risk posted:Except the vest is a little too small. It's made of deerskin and it's really soft and sort of stretchy. Someone mentioned that I could stretch it out by getting it wet. I don't want to mess this up. Do I just soak it and stretch it or do I have to have it stretched while it dries? Like hang it up and have something heavy tied to it somehow. It's a little tight from the shoulders down and probably an inch short across my chest where the bone buttons are. Once the leather is wet, you can take it out and carefully stretch it. I can't see how that top is made, but you want to be careful if there are any seams along the stretch line - soaking leather and tugging at it like this can also loosen those stitches, so if there are any seams, hold the leather and pull across the panels so you aren't straining the seam. The best thing to do is actually to put the top on while it's wet, and then wear it until it dries. This does mean you're going to be wearing a damp leather top for a few hours, but it's the best way to guarantee that it will stretch properly to fit you. You can use other methods like stretching it over a board or with weights, but you're going to run the risk of 1) not doing enough and having the leather shrink back as it dries or 2) overdoing and stretching the leather too far. Once the leather has dried, you will want to apply some sort of conditioner to it, because it can lose some of its suppleness. Neatsfoot, linseed, or olive oil are all workable if you can't get a hold of leather conditioner. Things to be careful about : Depending on how the leather was treated, you might find that it leeches a little color when soaked. I haven't had leather actually discolor noticeably, but you can stain your clothes/self as a result. Leather is pliable, but you can only get so much give from it. It's hard to tell how big that top actually is, but be careful when you're stretching that you don't overdo it and tear the leather - deerskin isn't as tough as thicker leathers. If you're having trouble getting it to stretch enough, you can try soaking and stretching it multiple times instead of going the whole way in one go.
|
|
#
¿
Jul 4, 2009 19:10
|
|
|
I'm glad that worked out for you! Leather is fun to work with, it has a lot of variety in thickness and stiffness. You basically go from leather that is like fabric (ie, cut with scissors and sewn on a machine) all the way to stuff that hsa to be sawed and riveted together. Generally the tools are simple and cheap-ish, the primary cost is always the leather itself. I started out using it for straps and buckles, and the most complicated thing I tried was shoes. There was actually a leather-working thread that never really took off, so I guess this is the best place for any questions you have. I'm sure someone besides me has messed around with it.
|
|
#
¿
Jul 10, 2009 03:35
|
|
|
Goldaline posted:So I finally made some shoes! I've been wanting to forever-never got up the courage. They came out a little wonky, but it was a good learning experience.I think next time, trying it without cording might be good, that made the sole/upper connection a little tough. I hate making shoes! These are so beautiful though, it makes me want to try again. They look really good. Are they turnshoes? Can I ask what you used for the sole?
|
|
#
¿
Sep 24, 2009 13:14
|
|

|
Goldaline posted:The uppers on them are sewn to an inner (wool) sole inside-out and then turned I should say that I am also completely uneducated, so I am not really sure if I am using the right terms myself. But by my understanding this makes it a turnshoe instead of a welted shoe, although I guess it might depend on how you did the additional soling. I was really just trying to get an idea of how you assembled them, which you explained wonderfully! quote:So it goes, starting with the fur against your foot--fur-wool-leather-wool-boiled wool-leather, and then it has a little heel piece of leather-boiledwool-leather.
|
|
#
¿
Sep 24, 2009 15:17
|
|
|
Goldaline posted:I put the whole sole assembly in a stack and hammered nails through it to make holes--there's a few pictures of the assembly on my blog (havinghorns.blogspot.com)
|
|
#
¿
Sep 24, 2009 16:52
|
|
|
You would probably do fine with the sort of boning you can get in most fabric stores like Joanns or Hancocks. It's basically a thin, semi-flexible plastic that comes in a little fabric sleeve. I'm not sure about the best way to sew it in for your purpose, though. I'll think about it and try to suggest something if no one with more experience chimes in.
|
|
#
¿
Oct 19, 2009 05:26
|
|
|
Funny enough, I spent a good long time looking for that sort of thing earlier in the year. As far as I can tell, patterns for tailcoats are like birds teeth. Fortunately the few that are out there are often tuxedo coats, because its not like anyone wearing tails is going for a more casual look. I'll see if I can dig up what I found at the time. Ok, so this was the best that I found; scroll all the down toward the bottom, theres an entry for 1890 'Evening Suit', which is about right for a tuxedo tail: If you search for 'frock coat' or 'evening suit' you might find some other patterns, but many of them are closed across the front or cut long instead of tailed. Still, you might have better luck than me. Now the bad news: this is not a good pattern. I mean it's a pattern and its ok, but it was a big headache. The illustrations are frequently poorly done or just unhelpful, and it misses a lot of stuff - it completely omits how to assemble and insert the lining, for instance, which is not insurmountable but kind of a big oversight. Also pay close attention to the cutting/laying guide, because I seem to recall that it tells you to cut things you never really need. There are also a lot of steps that didn't make very much sense to me at all in terms of technique or order. How good is the friend? I ask this because a tuxedo jacket is not an easy project. I consider myself a competent sewer, and I spent about two months struggling with this. In the end (once I had worked out the above) I still couldn't get the fit across the back quite right, and the gathering at the shoulders never worked out. I gave up and bought one. Some projects have a bit of give, but it really doesn't take much for a jacket to look simply bad - doubly a problem if they're performing. If she has someone who is capable and understands how to fit a jacket, then it might be a breeze. Ashcans fucked around with this message at 17:50 on Nov 2, 2009 |
|
#
¿
Nov 2, 2009 17:38
|
|
|
Can you even get a machine without reverse stitching anymore? It seems like even $99 machines (which I don't actually advise buying) have three times the functions of my current, third-hand machine.
|
|
#
¿
Nov 24, 2009 23:03
|
|
|
vaginadeathgrip posted:I found a pattern in a men's patterning book from the 50's, and was unable to decipher the instructions. They gave you preset measurements. I tried to make a shirt sloper from the book, and it only used three measurements (center back length, chest width, and full length of the shirt...???) of course it came out ridiculous. Tailcoat patterns are hard to come by, so I basically made a jacket sloper, looked at a lot of pictures of tailcoats, and made my own pattern. Here's how it turned out: Wow, I think that came out really well. The collar and shoulders look good, which is what totally killed my attempt. The styling on the tail is interesting, any particular reason that you decided to go with an outward flare instead of the regular cut? The outside points are pretty neat. I'd love to see the final product when you get that done - what are you going to be making it from? I have no idea why suit patterns seem to be universally so terrible. It's hard enough to find them at all, and when you do they seem to be a complete mess. It's very frustrating because I would love to be able to make my own suit jackets, but at the moment if I try I end up looking like a clown.
|
|
#
¿
Dec 6, 2009 18:33
|
|
 .
.
|
vaginadeathgrip posted:I think for you, the best thing would be to make your own patterns. Patternmaking is easy if you have a good book to follow, and will get you a much better fit than commercial patterns. I can't remember the last time I bought a pattern.
|
|
#
¿
Dec 8, 2009 02:04
|
|
|
If I was going to guess, I would say that it might be brass wire/rod that has been been coiled and clipped to make rings, which were then fitted to the loop. Its hard to see if the ringlets have any joins from that picture.
|
|
#
¿
Jul 19, 2011 15:24
|
|
|
You should know that a blazer is going to be a total pain in the rear end to do, and even if you can get the fit right there is a good chance that the first two or three you make will still look like shabby crap. Ok, I mean, maybe not. But you should go into it with that expectation. I had been sewing a variety of stuff for a couple years before I took a swing at a blazer, and it was a disaster. I have sketched and fitted my own pattern pieces for costumes and modified existing patterns without any problems, but getting a blazer to actually look presentable still escapes me. I would suggest that you try doing a dress shirt, first. It has a lot of the same challenges (cuffs, sleeves, lapels) but is more forgiving in terms of material and fit. Also it's usually cheaper to screw up with some shirt-weight cotton than suit-weight wool or whatnot.
|
|
#
¿
Sep 17, 2011 03:42
|
|
|
If I understand what you are doing, the new seamline needs to follow the cut of the fabric. Most dress shirts don't have right-angled intersections, the way the panels and sleeves are cut create a curve. So if you are just making a 90-degree turn there, it is probably part of the problem. Turn one of your shirts inside out, iron it flat, and look at the way the seam curves. You want to emulate that, just smaller. You may want to pin the new seam and check the fit a couple times before you sew it, so that you can experiment a little with the curve.
|
|
#
¿
Sep 20, 2011 14:08
|
|
|
cryingscarf posted:So basically what I am wondering is: Did I make a stupid decision in getting this sewing machine? Was it a decent deal? Do you have any idea on how to figure out what the part is that I am missing/where to find it? And lastly for when it is functional again, are there any good resources online that I can use to learn to sew using a treadle machine? As far as I am concerned this is a fantastic deal and I am extremely envious of you. The last time I saw a full table like that it was probably twice the price you paid, and not in as good condition - so I think you should feel good about your find. As for getting it working - you should check that the main mechanism is working. The simple way to do this is to grab that big wheel on the right side of the machine and slowly rotate it with your hand. Does the needle part move up and down? Rotate the wheel a few times (don't force it if it seems to stick or jam) Listen for anything that sounds like grinding, sharp clicks, or catch in the movement. Basically it should turn in a nice smooth motion and make a kind of 'shu-cah shu-cah' noise as it goes up and down. You are definitely missing the drive belt - this would have been basically like a big rubber band that would wrap around the small, covered wheel on the machine, go through the holes in the table, and wrap around one of wheels underneath. This is what lets you use the treadle to drive the machine. The good news is that even if you can't find the exact part, this is probably the easiest thing about a machine to jury-rig. Treadle machines were really popular in Kenya, and I've seen people use everything from cut-and-sewn fan belts, strips of inner tube, and lengths of surgical tubing. I would look online for what the most common replacemnt is - a lot of people will have needed to replace these, because the rubber will decay and crack if left alone, and wear out if in use. Congratulations on your find!
|
|
#
¿
Nov 7, 2011 15:52
|
|
|
The biggest issues you are going to have are attaching the antlers to a mask in a way which is stable, and balancing their weight on the mask. You can't just hot-glue the antlers to an acrylic mask, and you can't even just screw them on - they're heavy enough they will deform most cheap masks. Similarly, a simple headstrap isn't going to hold a mask in place if it has the full weight of the antlers hanging off the front. My advice is to go out and buy a cheap plastic halfmask. Almost any craft store sells these. While you are out, buy a plastic swim cap and a package of plastic-soaked gauze. You can make your own but it's a pain. Now you need a friend. Put on the swim cap, and have your friend apply the plaster over it. The idea is that you are making a thin plaster shell fitted to your head. Watch out you don't plaster into your hair! Once it has dried a little on your head, put the plastic mask on. Use plaster to attach it to your plaster cap. Let it dry enough to take it off, and then let it cure fully. Once it's cured, come back and use the plaster strips to attach the antlers to the cap, as well as do any reinforcing that you need. The weight of the plaster should do a decent job balancing the weight of the antlers, and the snug plaster cap will provide a good comfy way to hold everything in place. This setup doesn't breathe very well, but you can wear it for several hours without any problems. Edit: I recommend using a store-bought half-mask and not plastering your face like Muffy suggests because it's borrowing trouble. The plastic masks will work just fine for giving you shape and structure, and you can build up on them with plaster just fine. Plastering your face is messy and difficult and if you gently caress up it can get pretty ugly. Plus lots of people are uncomfortable with having their face plastered over. I have made full plaster casts of my face before, as well as a number of skull-caps like I described. Ashcans fucked around with this message at 21:04 on Jun 8, 2012 |
|
#
¿
Jun 8, 2012 20:36
|
|
|
I totally didn't realize this wasn't the cosplay thread when answering that question. I subscribe to all of them.  You can probably rig a headband to hold the antlers. If you check in at a craft store you can look for floral wire, which is a pretty thick/strong wire that is still very malleable. I would wrap this around the base of the antler a couple times, and then wrap it back around to make a headband. If you are feeling crafty you could probably work it into a cool-looking coronet thing!
|
|
#
¿
Jun 9, 2012 15:47
|
|
|
You need to modify the pattern to accommodate his waist, otherwise you are going to end up making him look terrible when the buttons on the vest don't close and he looks like Chris Farley. I think that the best way to do this is actually with a French Curve or a similar tool, but basic idea is that you want to re-draft the pattern connecting the chest of the 44" to the waist of 47", and create a natural curve between those two. Ideally I would make a muslin and check the fitting before moving on. On the other hand they have apparently asked you to do this with less than 24hrs notice, so I feel like you would be totally justified just making the Chris Farley vest and telling them to deal with it.
|
|
#
¿
Sep 7, 2012 16:34
|
|
|
taiyoko posted:Welp, I did my best with not having a french curve to help make the lines nicer, I just hope that since I didn't have the chance to take the measurements myself that they're actually accurate, and that this thing fits him. All that's left right now is to press the whole thing, and add the buttons and buttonholes. At least it looks pretty decent, even though I closed up the sides with a small whipstitch instead of fighting with slipstitching it. Not like anyone's gonna be looking that closely at the side seams. I am really impressed that you went from patterning to finishing touches in what, nine hours? Even when I really buckle down it takes me forever to get anything done. Pictures of your final product would be pretty cool, although I imagine at this point it's already wedding-bound.
|
|
#
¿
Sep 8, 2012 11:45
|
|
|
taiyoko posted:Good to know! I didn't have time to gently caress with it, and he was still happy with it. In fact, my friends said that if it wasn't for the lack of buttons/buttonholes and lack of a tag, they'd have thought it was bought from a store. Looks like it came out nicely, button issues and all. I seriously hate doing buttonholes, none of my machines have the function so I just have to use the zigzag stitch and something always seems to go slightly wrong. If I could I would make all clothing with laces or zippers.
|
|
#
¿
Sep 9, 2012 13:09
|
|

|
It would be a million times easier to just buy the different colors and sew some tricolor pants. I mean ok you would have seams on the legs, but on the plus side you won't take your own life in a Ritdye fueled rampage in frustration.
|
|
#
¿
Nov 19, 2012 19:23
|
|
|
Is there any reason not to just make them the same way you would a regular yoke? I mean the blog method also seems fine, I just would have suggested a yoke pattern and I'm not sure if there is a reason to avoid that.
|
|
#
¿
Nov 27, 2012 17:28
|
|
|
absolem posted:I've been cutting down pants recently, and wanted to move on to shirts. Is the only way to make the armholes smaller to put a horizontal seam across the back, thereby removing the middle part of the armhole? Are you trying to shrink the armholes without otherwise altering the fit? If you are generally resizing the shirt and bringing in the sides, I am pretty sure it will naturally shrink the armhole as a result - if you want to bring in the sides and keep the same size arms, you actually have to make an effort. If you're just resizing the armholes, it's going to be tricky because you are basically trying to make up for fabric that was removed. I don't think that the back seam you are suggesting is the best way to do it, because if I am following your plan you are going to be cutting vertical height out of the back of the shirt, which will change the fit. Also, depending on the shirt, armholes are sometimes very precisely shaped and you can't just sort of hike up one side and have it all fit. I think it's almost always easier to try and work with the side seam of the shirt - partly because it's less noticeable than when you meddle with the back or front. You could also alter it from the top, but then you would have to probably redo the collar, which can be tricky. I hate messing with arms though, maybe there is a good way to do it.
|
|
#
¿
Sep 23, 2015 22:43
|
|

|
Have you used a leather needle on fabric before? I have always avoided that because most leather needles have an actual cutting point, and I was worried that it would cut through the fabric threads instead of pushing between them like a regular needle does, leaving you with an actual hole that could unravel/weaken the fabric.
|
|
#
¿
Jun 8, 2016 16:44
|
|
|
My wife made her own wedding dress, and while she was ultimately very proud/happy with the result, it was a huge amount of time and effort; she had help from her maid of honor, and did the work at her house (as we were living together and she didn't want me to see any of it). She did a mock up of the whole thing first before making the silk version, as well. I would suggest you consider how much time you have and what else you need to do (we also made our invitations and favors, so by the big day we were ready to kill ourselves). Edit: Also, what do you mean by 'very slow'? My wife and I did a lot of costuming stuff, so we had a history of turning out full outfits for events within a few weeks. Those were generally less precise/detailed than the dress, although I will say there were elements that borrowed on the 'this only needs to last for the day' mentality we had applied in the past. Ashcans fucked around with this message at 16:43 on Aug 8, 2016 |
|
#
¿
Aug 8, 2016 16:39
|
|
|
You also don't have to throw away your scissors; there is nothing stopping you from using a circular on all the big straight lines and long curves on a pattern and using scissors for corners or close curves. I have seen people who can just run their scissors on a long line, but I always gently caress that up and either snag or veer off and do much better with circular cutters for those lines.
|
|
#
¿
Aug 9, 2016 22:02
|
|
|

|
| # ¿ Apr 27, 2024 23:53 |
|
|
Liquid Communism posted:I'm sure you could get a specific zentai to match it on amazon, but the movie version is a losely fitted homemade looking thing. Maybe go for one of the Simplicty adult-sized jumpsuit patterns? I agree with this, his suit looks less like normal hero spandex and more like a thicker/looser material made into a relatively fitted coverall. I think you'd do better making one from a coverall pattern. I might be wrong, but I think the movie version was supposed to be converted from a wetsuit, but I don't recommend you try that because they get super uncomfortable to wear running around land and you'd probably chaff/overheat quickly.
|
|
#
¿
Jun 6, 2019 15:10
|
|