


|
BigFactory posted:That�s really nice. Are you keeping the black floor tile mastic? No there will be carpet throughout eventually but we've got a load more building work to do downstairs so there's no point putting carpet down now since it would get ruined.
|
 #
?
May 5, 2021 07:06
#
?
May 5, 2021 07:06
|
|


|

|
| # ? Apr 24, 2024 17:35 |
|
|
I need to make a case for a small keyfob style remote and I was thinking back to shop class in 1994 where we made coin purses out of some kind of plastic/rubber which you would heat to turn it to liquid, dunk your mold, let cool down and cut your mold out. Bing bang boom you got a coin purse. I don't know what that plastic/rubber stuff was though and I figure nowadays there has got to be a better option, but nothing specifically for this device I need to protect. So, since I have several of these things that are busted I was thinking I could use them as a mold for a case to protect the ones that still work. What I'm hoping for is to take one of these broken remotes, dip it in rubber, silicone, whatever, let it cool/cure, trim as necessary, and use it as a case. What product am I looking for? Does my project even make sense as described? Some things I have considered: Since the remote has rounded sides and I'm not sure how flexible this case material will be, I might need to wrap the mold remote in something to give a little room and make it easier to install the case on a working remote Obviously need to plan on cutting out one face of the case so we can actually use the buttons on the remote The remotes have a lanyard attached, so I either need to slide the remote in bottom first, or if the case material is flexible enough just leave a slot for the lanyard at the top and plan on flexing the case around the body of the remote. edit: I should also mention that the main goal of this case is to actually keep the remote from actually falling apart. The internals are pretty basic and not that difficult to repair when necessary, this case will mainly be just to keep the exterior in one piece. So something really squishy or rubbery would be totally fine but not really necessary, I'm just looking to make a stupid case to keep this stupid remote from falling to pieces. It's a niche product and the manufacturer doesn't make cases for it so I'd like to make my own instead of giving them $250 every year for a new one as they go to poo poo. edit 2: Man I'm dumb, seems like I want Plasti Dip or something similar. My search terms were just way off. Any opinions on similar products that are easy to trim or tape off? Inspector 34 fucked around with this message at 09:25 on May 7, 2021 |
|
#
?
May 7, 2021 08:36
|
|


|
Plastidip is really thin and peels of fairly easily. I've only ever used the aerosol version vs the tool dip kind though. I don't see how it would do much to protect a fob though unless you get it on thick with the dip style. Given that the outside will now be rubbery, it'll catch on stuff more, btw.
|
|
#
?
May 7, 2021 14:40
|
|


|
Depending on the size of what you're trying to protect/enclose, Sugru might be your saviour: https://www.youtube.com/watch?v=RoTlG1D-T58 It's a mouldable silicone rubber. I've used it to enclose things that were either fraying (cable) or dangerous (ends of wire bundles) and they've held up great -- I'm a fan. Now, whether the size of your object will require a brick of it costing $1,000... that's up to you to figure out 
|
|
#
?
May 7, 2021 15:46
|
|


|
Inspector 34 posted:I need to make a case for a small keyfob style remote and I was thinking back to shop class in 1994 where we made coin purses out of some kind of plastic/rubber which you would heat to turn it to liquid, dunk your mold, let cool down and cut your mold out. Bing bang boom you got a coin purse. There's a lot of people with 3d printers, you might see if someone has designed a case for your item on thingiverse or something. If not it might be possible to model one and print a replacement. If you can find a model we've got a 3D printing thread and there's already some goons on SA-Mart doing prints for people. You can also do this a ton of other ways. Eric Strebel makes a lot of molds and parts so he's got a little 3 part series on duplicating parts from plastic toys by making a mold for them: https://www.youtube.com/watch?v=ieokNNpeJ4U He's also got videos on making molds of all kinds so scroll back or search for mold or resin to see what kind of stuff you might want to try. He's even got making thin walled molds from solid model and simulating blow molding to make things hollow in there. Most of the cost will be in the silicone, resin, and mold release. The rest is making a box with some hot glue or whatever as far as I can tell. edit: I forgot low temp moldable plastic which comes in a variety of ways but has sheets you could mold around it: https://smile.amazon.com/Polly-Plastics-Moldable-Plastic-Sheets/dp/B01MQMNV3P Rexxed fucked around with this message at 17:07 on May 7, 2021 |
|
#
?
May 7, 2021 16:38
|
|


|
A friend actually has a 3d printer and we've tried a few different ideas for cases or even just a different back for the housing of the remote. The problem is these things will be abused and I want something that's fairly flexible rather than brittle. I'd really like to try using whatever it was we had in my 7th grade shop class if I can find out what it was. The idea of one of those projects actually being helpful in my adult life tickles me a little bit. Suburban Dad posted:Plastidip is really thin and peels of fairly easily. I've only ever used the aerosol version vs the tool dip kind though. I don't see how it would do much to protect a fob though unless you get it on thick with the dip style. Given that the outside will now be rubbery, it'll catch on stuff more, btw. Thanks for this, I'll make sure not to use the aerosol version if we attempt to go the plasti dip route. Might give Flexseal a try as well. Inspector 34 fucked around with this message at 19:39 on May 7, 2021 |
|
#
?
May 7, 2021 19:32
|
|
|
If your friend has TPU, printing it in that would give you something flexible.
|
|
#
?
May 7, 2021 19:55
|
|

|
Inspector 34 posted:A friend actually has a 3d printer and we've tried a few different ideas for cases or even just a different back for the housing of the remote. The problem is these things will be abused and I want something that's fairly flexible rather than brittle. A TPU filament might be worthwhile if you choose to try it out, they come in a range of hardnesses from pretty solid and rubbery to stuff like ninjaflex which I used to make these RC car tires (low infill hence the squishiness): https://i.imgur.com/miZfPio.mp4 There's also really tough materials like carbon fiber nylon which, depending on the brand and amount of chopped CF in it can be about as strong as aluminum. Some of these materials can be costly and harder to print with than your average PLA or PETG, though. I'm not trying to convince you one way or another, just presenting options that you might not be familiar with. I'm a big fan of "thing broken, let's find a good fix for it that's easy and doesn't cost a lot" types of projects because I do them all of the time myself.
|
|
#
?
May 7, 2021 20:20
|
|
|
In grad school, while I was building electronics for laboratory equipment, I started heat-bending acrylic to create "enclosures" on which I could mount electronics. (They had open sides but I could mount boards and LEDs at specific angles which was my primary goal.) I actually settled on aerosol plasti-dip as the best option for keeping acrylic from sliding around on desks/lab benches. I'd unbolt my boards, mask off the area I didn't want sprayed, and then spray the plasti-dip in several thin layers with a brief dry/cure between layers. It worked very well, gave better traction than adhesive rubber feet, and allowed a flat corner to grip well enough that you could rest your hand on a rotary encoder or push your face against an eyepiece. I found it difficult to remove from any acrylic that was rough enough to get good adhesion, so I'd be wary of spraying it directly on a board that I wanted to be serviceable. (And if it doesn't need to be serviceable, the term to search for is "potting".)
|
|
#
?
May 7, 2021 22:14
|
|
|
SmoothOn sells a bunch of 2 part pourable urethanes that might work out.
|
|
#
?
May 7, 2021 22:20
|
|


|
Thanks for your help, I'll ask about TPU filament on my buddy's printer but from what I remember I don't think he's printed anything flexible, it's all your pretty standard rigid plastic prints. I'll look into SmoothOn as well. To be honest when I posted about this last night I wasn't expecting this much feedback and input, much appreciated. I'll keep you guys updated here when I'm ready to do a test piece.
|
|
#
?
May 7, 2021 22:58
|
|
|
Trabant posted:Depending on the size of what you're trying to protect/enclose, Sugru might be your saviour: Sugaru is fantastic, I used it to repair a busted vase in a style representing kintsugi, the Japanese method of repairing with gold.   
|
|
#
?
May 9, 2021 01:34
|
|


|
Wow......I'm kinda surprised. I really like that "embrace that this has been repaired" vibe.
|
|
#
?
May 9, 2021 01:43
|
|

|
I like to think of it as a way to turn mass produced things into singular works. It's def something I want to continue playing with but I also want to do it with things that break organically, not just by hanging around Greek weddings.
|
|
#
?
May 9, 2021 02:46
|
|
|
Using Sugru for kintsugi is a stroke of genius  Really awesome repair! Really awesome repair!Just start turning things on a lathe (if you're not already) and you'll have naturally broken things in no time I've had multiple bowls fly off and shatter, which I then kintsugi'd with epoxy and mica powder. Although that probably says more about my turning skills than the nature of turning itself...Edit: e.g. from earlier: Trabant posted:I messed up when turning this guy originally but kept the pieces with the intent of using a kintsugi-style repair process to fix it. I'm calling it a qualified success, even with the big chunk missing from the side:
|
|
#
?
May 9, 2021 03:06
|
|

|
That came out pretty nice! I took a file to the corners of the giraffe to give the sugaru more space to fill in and provide those thicker lines, in contrast to the fineness of your own. It's a real fun space to play in
|
|
#
?
May 9, 2021 03:12
|
|
|
I made this thing because I play the violin and the mandolin (same string progression), and that's how I mentally write music. I'm useless on a keyboard, so when I want to compose music, it's been difficult. I figured that creating a MIDI controller that works like a violin would make it easier, so I took the time to figure out the code, figure out the wiring, and after a bunch of work, I made an actual product. 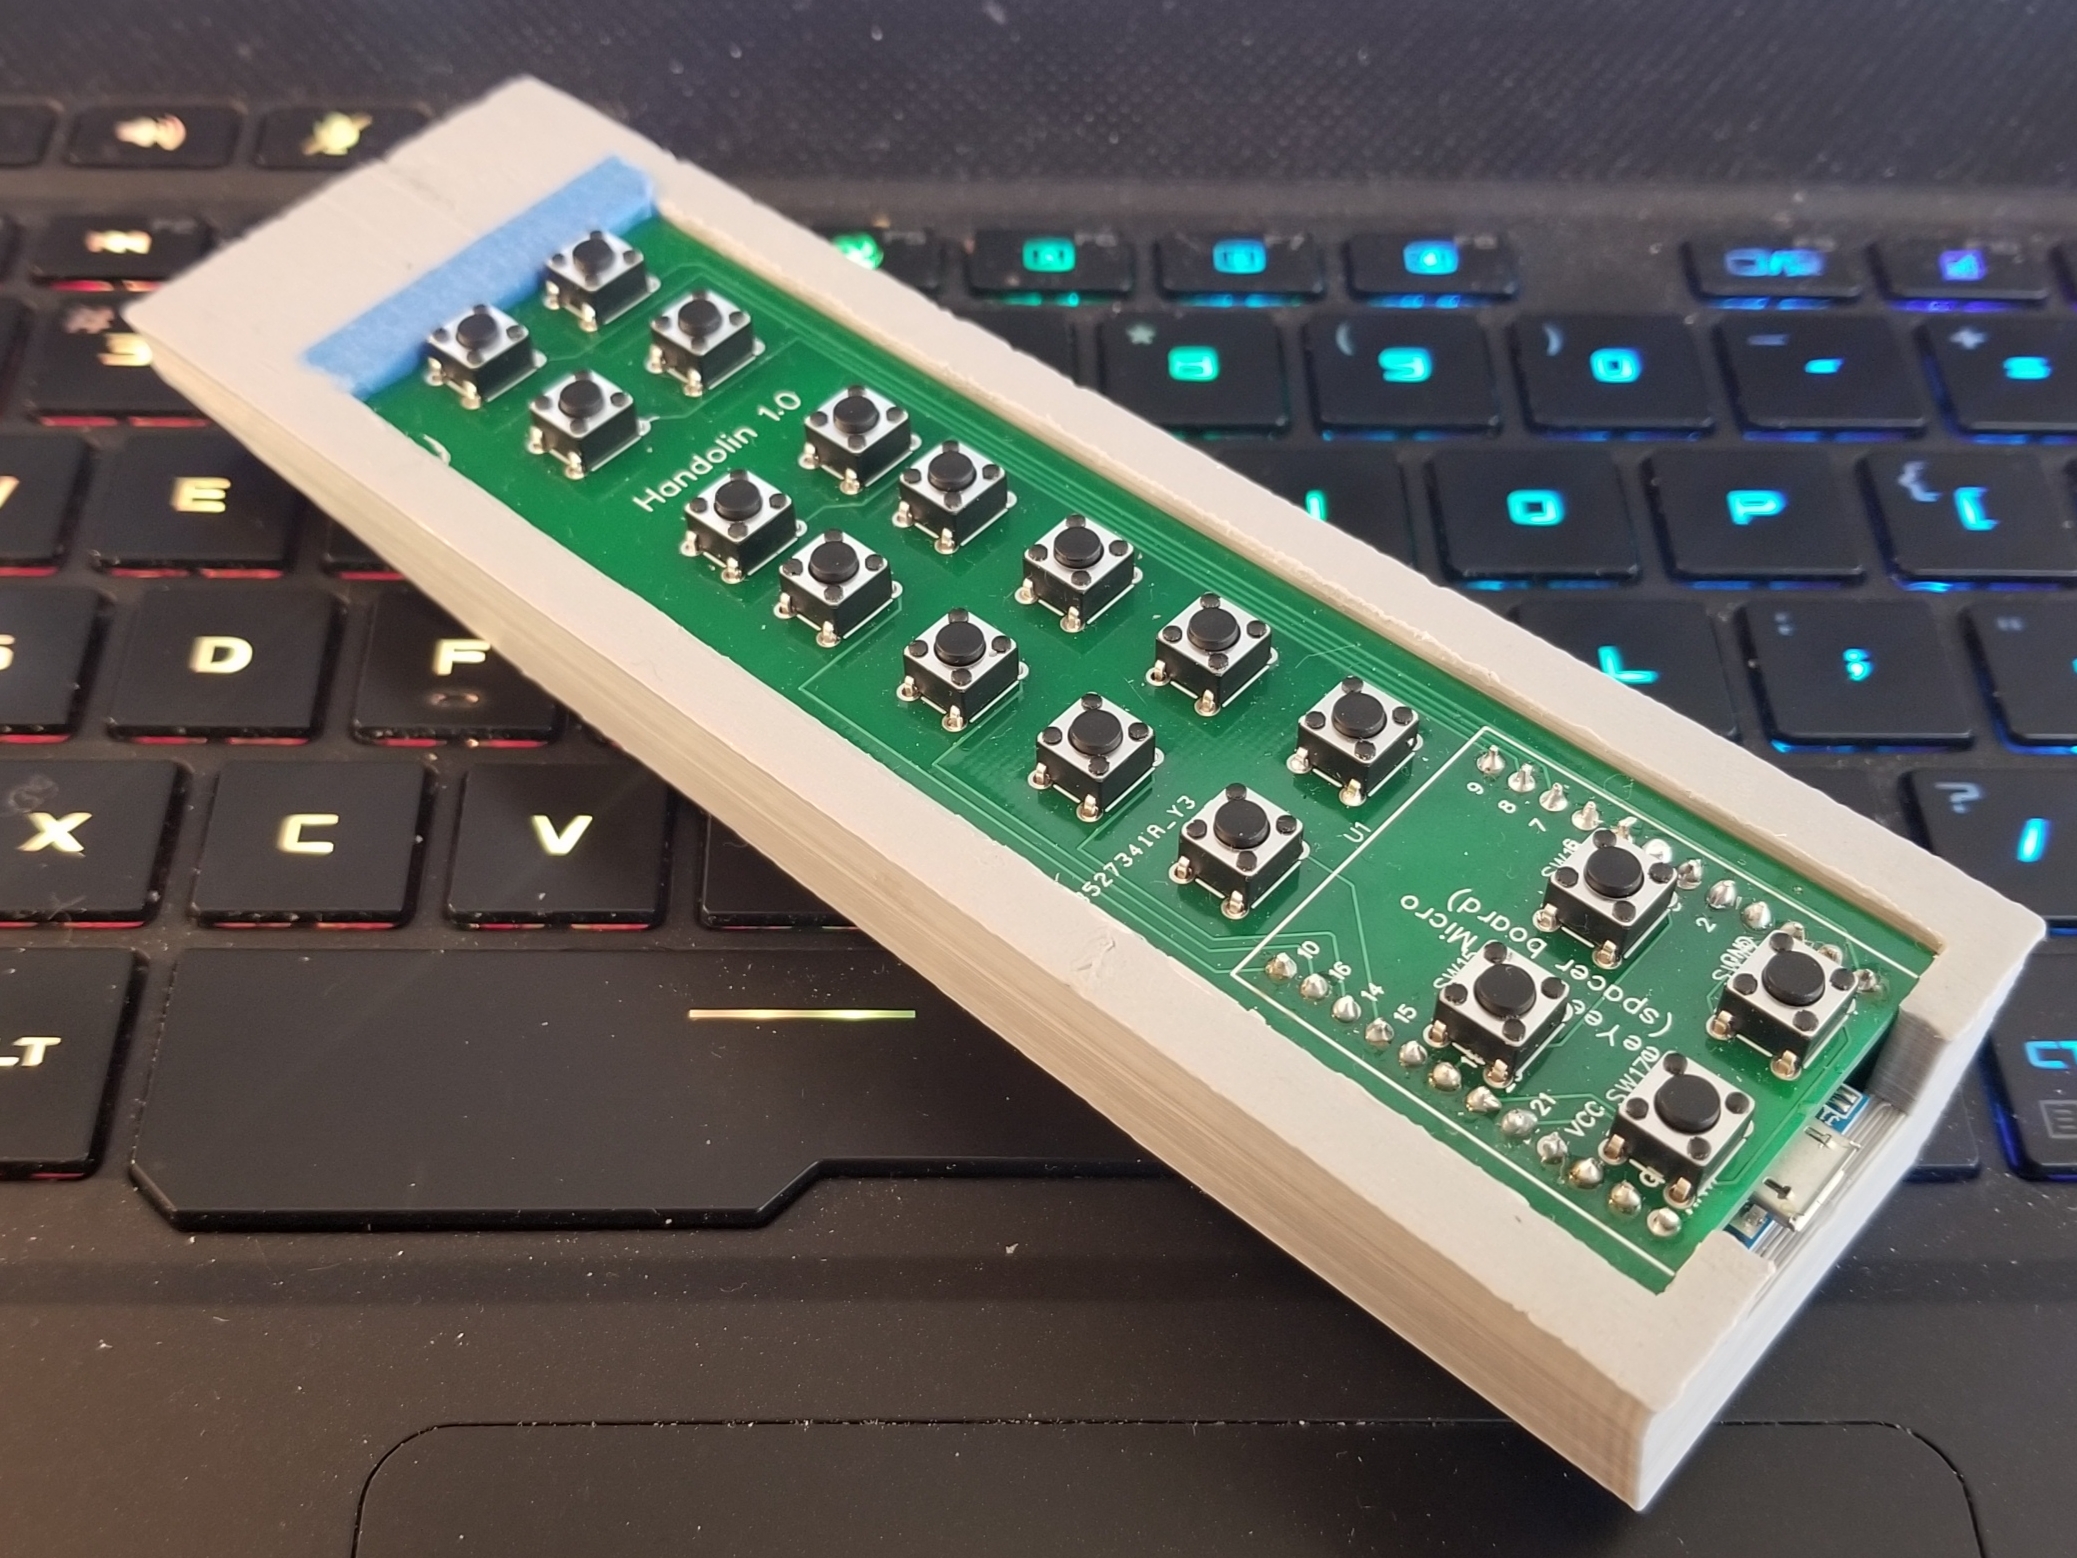 This is a handheld MIDI Violin/Mandolin controller that I've coded and assembled. I also designed the case and printed it as well. Here's is a little video of the MIDI controller in action, playing through the Reaper DAW using virtual strings: https://www.youtube.com/watch?v=d9K-EJLtjC4 Fun fact - I made a small batch of them to recoop my costs, and they sold out within 48 hours. I guess I have to make more now!
|
|
#
?
Jun 5, 2021 19:55
|
|

|
That's really cool!
|
|
#
?
Jun 5, 2021 20:03
|
|

|
Finishing up a table for a show later this month  Since it's gotta break down for transport i fitted the legs with some quick-release latches, if I make something like this again I'll build them a little tougher but they pop right off and on when you pull the tabs, and hold pretty tightly otherwise   
|
|
#
?
Jun 20, 2021 00:49
|
|

|
jovial_cynic posted:
Very, very cool. 
|
|
#
?
Jun 20, 2021 01:12
|
|

|
A Wizard of Goatse posted:Finishing up a table for a show later this month drat thats sweet. The wood grain looks like a $300 wagyu steak that is fully marbled.
|
|
#
?
Jun 21, 2021 00:45
|
|

|
Dick Trauma posted:Very, very cool. Thanks! I've had a blast with them, and I just had a request to have one tuned to a guitar. So... now I've got them set up to be able to play like pretty much any stringed instrument!
|
|
#
?
Jun 21, 2021 06:19
|
|
|
Finally got round to making a bottle cap table at the weekend. Something I've wanted to do for a long time  I've never done anything with resin before but I'm pleased with how it turned out. There are a couple of dents from bubbles that popped and one bubble that didn't pop but it's not a big issue
|
|
#
?
Jun 28, 2021 20:31
|
|


|
freelop posted:Finally got round to making a bottle cap table at the weekend. Something I've wanted to do for a long time Nice. Did you secure the caps down in some way or were they just kind of sitting in there?
|
|
#
?
Jun 30, 2021 05:42
|
|

|
drat pretty.
|
|
#
?
Jun 30, 2021 07:22
|
|

|
bEatmstrJ posted:Nice. Did you secure the caps down in some way or were they just kind of sitting in there? Hot melt glue, some of the caps weren't stuck well enough and made a break for freedom before being pushed back down. Once the air got out from those ones they stayed in place.
|
|
#
?
Jun 30, 2021 08:57
|
|
|
I finally found a base for a live edge top that I've been dragging around for years. 
|
|
#
?
Jul 4, 2021 08:34
|
|

 the Mods, they knew!
|
Quite the stump
|
|
#
?
Jul 4, 2021 11:42
|
|

|
How do you keep a cross-grain slice that thin from splitting everywhere
|
|
#
?
Jul 29, 2021 04:14
|
|
|
Dry extremely slowly, looks like it has split slightly and been filled at the 7 o'clock angle.
|
|
#
?
Jul 29, 2021 08:40
|
|


|
It had been sitting for years in the attic at my father's property.
|
|
#
?
Jul 29, 2021 12:44
|
|
|
I had an urge to do some French knitting and my workplace has a woodshop My previous experience with french knitting has been with toilet roll tubes and paddlepop sticks and I wanted something a bit sturdier Given that I built it on my lunch breaks over about ten weeks I had a lot of time to refine and do brain work I'm particularly happy with the evenness of the pegs, and the consistent bevel I put on them all Very happy with the out come, pretty much exactly what I had in mind Marking out  First fit  A bit of linseed oil and Success   
|
|
#
?
Jul 29, 2021 13:44
|
|

|
Can you post dimensions or a link to a build? That looks like a great present to batch out to the knitters in my family!
|
|
#
?
Jul 29, 2021 18:49
|
|

|
CancerCakes posted:Can you post dimensions or a link to a build? That looks like a great present to batch out to the knitters in my family! Not a horribly complicated build with the right tools Find a thick (1-3 cm) bit of ply I would use the largest hole Saw you have as your base hole dimension and then scribe a main circle about 1-1.5 cm larger than that Use some fancy geometry to scribe in intersects with a compass and ruler. you can sorta see my layout in on of the pictures. As for number of pegs, 2,3,4,6,8 and 12 are fairly easy to derive with a compass and ruler I used 8mm dowel and an 8mm drill, and that felt right for the pegs, but I'm sure you could go thinner or thicker. A pencil sharpener could also be used for the bevel maybe, otherwise a sanding disk or drill and some sandpaper. The bevel really feels necessary
|
|
#
?
Jul 29, 2021 22:15
|
|
|
I have finally finished the upholstering on my home made computer chair, From this  To this  The back rest reclines with a mechanism I got off aliexpress and the seat base angle is adjustable via an old scissor jack,  It might not be the best upholstery job but what counts is that this thing is way more comfortable than the stupid gamer chair I got given a couple of years ago. coldpudding fucked around with this message at 12:42 on Aug 1, 2021 |
|
#
?
Aug 1, 2021 10:31
|
|

|
Sometimes I also finish projects. I set aside a day to get this Plaubel Roll-Op serviced. I'd never worked on a shutter this old before (1936 Compur Rapid) and of course, every manufacturer of the Compur Rapid did it a bit differently, different components and gear trains and so forth. Chris Sherlocks video on servicing compur-rapids was invaluable. Anyway, here's some photos from the experience. Setting up  After figuring out how to remove the shutter from the body.  Getting the nameplate and the shutter speed cam out of the way  A look at some very oily shutter blades  10 even oilier aperture blades, it only took 5 attempts at setting the blades to get it right. Pain in the dick.  After cleaning and reassembly https://i.imgur.com/l8sjHdG.gifv State of the rear element before a clean with ammonia and peroxide  After cleaning, there's a little etching but you gotta get it in just the right light to see it. I don't see it effecting the final image  I also needed to replace a mirror in the rangefinder section, this is the old mirror  And this is the new mirror in place, had to cut it myself and it was the first time I'd ever done any glass cutting.  All done!  There's a couple of little things left to do. I got the front element too far screwed in so infinity is off, need to adjust that and I need to readjust the rangefinder after putting the chain that drives it back in its correct position, but those are afternoon tasks not entire days. Soon, you will have film through you again!
|
|
#
?
Aug 1, 2021 23:50
|
|
|
The guts of that machine are pretty stunningly beautiful
|
|
#
?
Aug 2, 2021 01:31
|
|

|
How did they even prototype something like ninety fuckin years ago!?
|
|
#
?
Aug 2, 2021 01:35
|
|

|
They absolutely don't make them like they used to. It's stunning to me that a camera built 85 years ago, which I'm fairly certain has never had a service in its life, is still running it's long shutter speeds accurate to a second after a clean, didn't even need to calibrate the times. The biggest issue it had, other than grease ingress, was a spring that had come unhooked and mashed around that was causing the cocking lever to not catch all of the time. It was a pain to reform and rehook but it's all accessible stuff. No magic, black boxes, just gears, cams and levers.Corla Plankun posted:How did they even prototype something like ninety fuckin years ago!? As you go back in time you can see where all the ideas for shutters came from. This style was certainly not the first, but as you dive through the history of mechanical shutters you start seeing releases, springs, retard gear trains. They stared off with 1 speed, then they figured out "more tension, more speed" so on and so forth until you get to this, which is still very similar to the last copal large format shutters made. There was more compartmentalisation with the later ones, things come off in blocks instead of individual parts, but mechanically the principals didn't change much, the shutter blades are exactly the same shape and action all the way up to the last ones made. Megabound fucked around with this message at 01:42 on Aug 2, 2021 |
|
#
?
Aug 2, 2021 01:39
|
|
|

|
| # ? Apr 24, 2024 17:35 |
|
|
I sort of missed the most interesting parts, so here's a little breakdown of the working mechanism: What you're looking at here is the shutter with the cam plate on it. The shutter is currently in T mode (this opens the shutter on one release, and closes it on the next, T for Time), you rotate the plate to select speeds so in this case, as we rotate counter-clockwise we're adjusting the speed from 1 second to 1/400th of a second. What sets the speed is the blue component. This is the retard gear train follower, as that follower lowers, the shutter speed gets longer, it's currently in a fully disengaged position for T and B modes, it's all the way up as the shutter is not cocked. The red component is what engages that gear train, it'll ride that steep slope upwards and allow the gear train follower to drop into that valley, selecting the shutter speed The orange component is the cocking lever, there's a big spring attached to it that supplies the energy to fire the mechanism, this spring pulls a ratchet against the retard gear train to, you guessed it, retard the motion of that gear train and slow it down. The gear train has to travel through it's entire range of motion before the shutter will close again. By limiting the range of motion you can set shutter speeds. The purple component is the high speed spring. Getting speeds up to 1/400th of a second is difficult, their solution, add a big ol spring that only engages for that speed, adding energy to the system to snap the shutter through as quickly as possible. The green is the shutter release lever. You can see the lever it's engaging. When you move that lever out of the way the cocking lever can release its energy. Through its range of motion it will open the shutter blades, keep them open until the time elapses, then snap them shut. e: The only other major component in that mechanism is a self-timer. It'll delay firing for 10 seconds so you can set up a shot then run out and get in the photo. It's hidden under the plate. All the other components are springs and catches to makes sure things stay in the right place, get caught at the right time and release only when intended. Under all of this is the aperture which is some interleaved blades that let you choose your depth of field and how much light you'll let through. Megabound fucked around with this message at 02:16 on Aug 2, 2021 |
|
#
?
Aug 2, 2021 02:02
|
|