|
Well they are both good to have. If you were to push a blade built like a japanese saw, it would buckle and get all squirrly - but because you pull them, they remain very true. I cut dovetails with them. Some people prefer the push saws, the gentlemen I am semi apprenticing under is a big fan of them, but he still reaches for his western backsaw to cut the dovetails. Plus, about 30$ for a japanese saw, and how much for a backsaw? Yeah.
|
 #
?
Jan 18, 2008 23:28
#
?
Jan 18, 2008 23:28
|
|


|

|
| # ? Apr 19, 2024 00:50 |
|
|
Bleep bloop this is the last prototype/test before I build my first real shell with this method (stave construction). I've build a laminated shell and a free-floating lug/hardware rig before... 
|
|
#
?
Jan 20, 2008 12:34
|
|

|
House of suicidal work load: Managed to actually get something right during the christmas holidays :  The house was built in 1920's with full timber logs and painted with red earth(?)(punamulta), covered in planking somewhere in the 1960's. Two more years to go considering that I keep in the schedule, and I can keep the relationship going("-Honey, of course I love you and you're still beautiful to me in paint covered overalls and sans make up, now sand the oil paint off the east wall and I'll give you a kiss.".
|
|
#
?
Jan 20, 2008 17:16
|
|
|
October of 2006 my parents bought a wonderful new house, with really crappy landscaping and a unmaintained patio. First thing we did was tear off out a section so we could build it strong enough to hold our hot tub. Built a three level section to aid getting in and out of the tub easily, as well as step the other side down into the yard. I didn't get a digital camera until summer, so not many in progress or detail pics of that. I also detested the project so much from the bruised lung the post hole digger gave me (I COULDN'T SURF IN MAUI!!) that I didn't do anything else until spring/summer. We used the lumber from that to replace the sagging and broken portions of the rest of the deck, and completely scrapped the railing to build a new one. At this point it was at least usable:  Borrowed a truck to get the new lumber for the rail  Planning the rails: just winging it  I was working 10 hour days in addition to helping my mom with the landscaping, and got burned out after putting up the rail  My dad had a buddy over to help, and they put up the slats  Here you can see how the hot tub is set up on the new three level section of the deck from the winter build.  Old lumber used to make another set of stairs.  You can also see the big...thing my mom had me build for privacy at our old house. This thing was more of a pain to move and reinstall than it was to build in the first place. Mom's project I helped with started with using a sod cutter to remove a huuuge area of grass to make this large garden/relaxion area adjacent the side of the house and the remodled patio  Entryway that was really fun to plan and build, luckily my mom volunteered to stain it.  Stone walkway and fire pit area that's back by the patio  I built this water bubbler for my mom on mother's day. Woke up really early to put it together, and she walked outside to find me right as it started bubbling, she nearly cried because "it's so thoughtful"  I really know nothing about gardening, my mom is a master gardener and I just do all the labor because she's 50. I really also know nothing about woodwork, but I find it pretty easy to "reverse engineer" things and copy and adapt to my needs. I have done plenty of electronics projects, too, but havn't photographed any of them :\
|
|
#
?
Jan 21, 2008 03:40
|
|
|
I gotta know, how did you bruise your lung with a post hole digger? And nice job on the patio. It looks really good.
|
|
#
?
Jan 21, 2008 06:31
|
|
|
EigenKet posted:I gotta know, how did you bruise your lung with a post hole digger? Well, it was one of the two man augers, actually. 20 degrees + clay + gravel we have here in Indiana = lots of getting stuck. Whacked me in the chest hard enough to bruise the lung, but not break any bones. http://www.alexkubacki.com/Junk/bruise.gif
|
|
#
?
Jan 21, 2008 12:06
|
|
|
UserNotFound posted:Well, it was one of the two man augers, actually. 20 degrees + clay + gravel we have here in Indiana = lots of getting stuck. Whacked me in the chest hard enough to bruise the lung, but not break any bones. http://www.alexkubacki.com/Junk/bruise.gif Oh, it was powered. See, I was picturing this kind of post hole digger, the only kind I've had the misfortune of using. It would take a very strange sequence of events to bruise a lung with one of those.
|
|
#
?
Jan 22, 2008 06:09
|
|
|
EigenKet posted:Oh, it was powered. See, I was picturing this kind of post hole digger, the only kind I've had the misfortune of using. It would take a very strange sequence of events to bruise a lung with one of those. Yeah, we had to do 14 three foot deep holes at 8 inches wide...the manual one would have actually KILLED me for that.
|
|
#
?
Jan 22, 2008 08:07
|
|
|
Made these today, they're acorn nuts for the spring shafts of a custom chopper project. (I machined the front end for it.) These are mild steel prototypes, the finished ones will be out of 316L. Made out of 1-1/8" 1018 Hex Stock tapped 1/2-20. 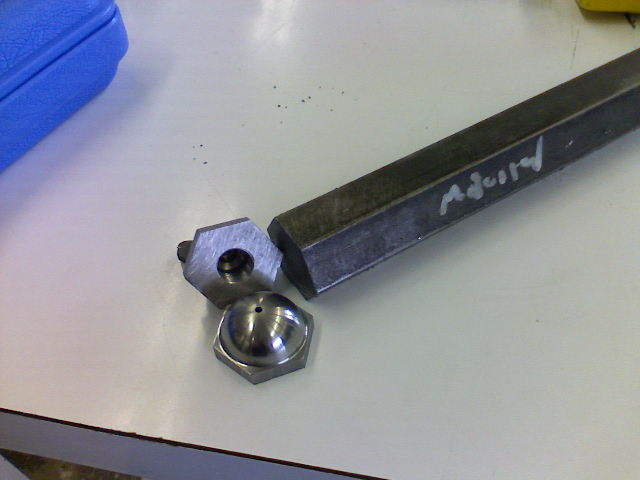  This is the front end:  I machined all these components (except the current fasteners/springs) a month or two ago so they are a little rusty. They will be sanded and clear coated soon. I also welded (err need to finish welding) the sheet metal that will be the oil tank and machined the front rockers.   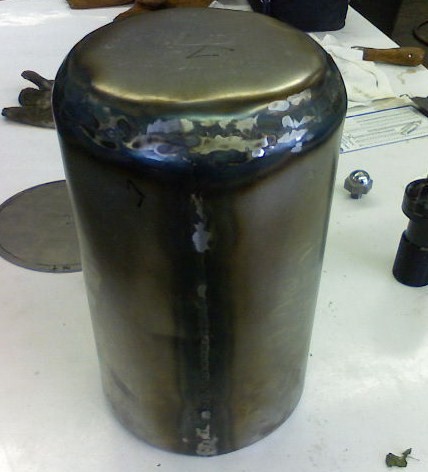 These are going on the underside of the top tree. Risers will be used for the handle bars, I think this is one design for handlebars that is completely unique. 1-1/8" Hex Stock 316L SS, 1/2-20 threads:   
AnomalousBoners fucked around with this message at 20:48 on Jan 23, 2008 |
|
#
?
Jan 23, 2008 20:45
|
|

|
My projects are no where near as useful as you guys'; I'm a toy nerd and I like goofing around making my own toy armor for my action figures. Started making mail stuff then got into hammering my own miniature armor from steel sheets. Since I'm too lazy to bother looking for special hardware and such I just make them pretty much the same way the life-size counter parts are made, hammering out each piece, joining them together with scratch made hinges, rivets, and buckle-n-straps. Here's the latest one I did. Started with hammering out the chest piece:  then to "connecting" pieces like the shoulders:  then to the limbs like these upper legs and knees:  and with the help of some scratch built hardware like hinges:  the suit is finally strapped together, rough polished, and assembled on to the figure itself:  This little project is roughly based on a 15th century Italian style and was shown at a toy show in the San Jose area last year.
|
|
#
?
Jan 25, 2008 18:29
|
|
|
That's incredibly awesome! When I was a little girl I would have KILLED for Barbie armor! You could make a lot of money selling those things to parents that like to spoil their kids.
|
|
#
?
Jan 26, 2008 01:42
|
|
|
LMAO @ calling a Barbie doll an "action figure."
|
|
#
?
Jan 26, 2008 01:44
|
|
|
Do you use that tiny anvil to hammer the tiny armor? ...because that is loving awesome.
|
|
#
?
Jan 26, 2008 02:27
|
|


|
If it has a grip, it's an action figure. If not, then it's a doll. That chick figure I used had grip, that makes it an action figure. And yeah, PipeRifle, I used a number of forms including that anvil to hammer out the armor. Started hammering things after I got tired of making mail stuff like this dude here: 
|
|
#
?
Jan 26, 2008 07:48
|
|
|
Having been involved with making stuff (oil tank and gas tank are 18ga mild steel) for that bike I can definitely respect what it takes to hammer stuff out and then smooth it nicely. When doing small stuff like that do you use a micro size english wheel? What thickness steel is that, 20G?
|
|
#
?
Jan 26, 2008 08:26
|
|
|
I make tattoo machines. These aren't the crappy homemade kind, these are the kind of machines used in shops like the shop I own. I sell these to people all over the world. I make every part of these except the screws and washers and that kinda thing. By "make", I mean grind/file/weld/cut/scrape/wind/bend/etc. There's a LOT that goes into such a little object.  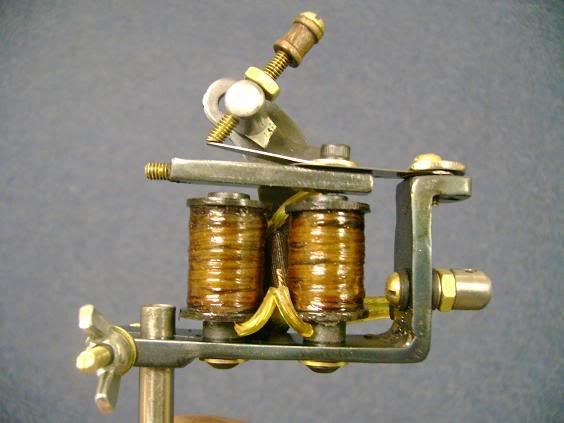 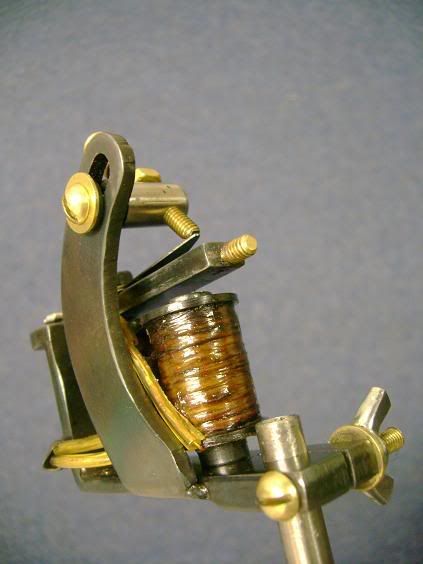 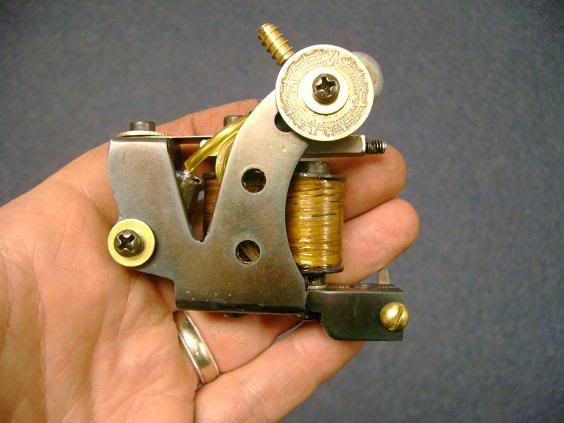 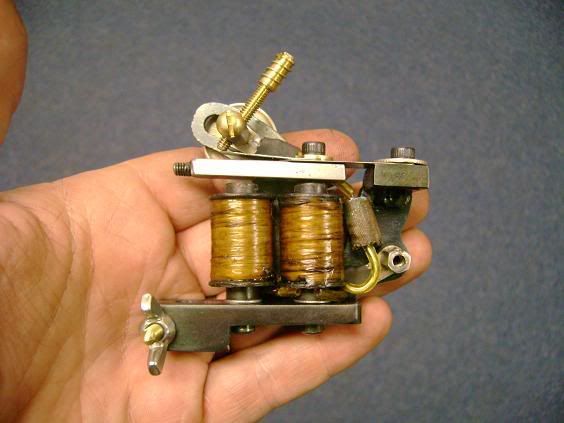 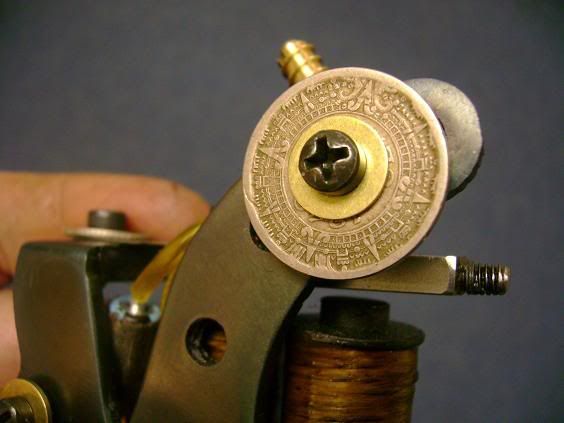
|
|
#
?
Jan 26, 2008 11:18
|
|

|
Frank Fencepost posted:I make tattoo machines. That's pretty cool, I like the detail on washer on the second one. They look like they would be fun to make. Also, could you explain what we're seeing there? Most of us don't know much about tattoo stuff. I guess that that's the part that drives the needle, but I don't know how it fits into the rest of the gun/needle (or whatever it's called).
|
|
#
?
Jan 27, 2008 00:44
|
|
|
EigenKet posted:Also, could you explain what we're seeing there? Most of us don't know much about tattoo stuff. I guess that that's the part that drives the needle, but I don't know how it fits into the rest of the gun/needle (or whatever it's called). Ditto; I think it looks cooler than hell and I know it takes a lot of work and know how but all I can do is scratch my head on how it's plugging into stuff. RealKyleH, 20ga is too thick for 12in action figure scale, bro. I'm using 30ga here (roughly 1/6 the thickness of the life-sized stuff, which is 16th ga). Don't use anything fancy like the english wheel or lathe either; I just hammer-raise everything on mini t-stakes.
|
|
#
?
Jan 27, 2008 05:31
|
|
|
Angryboot posted:Don't use anything fancy like the english wheel or lathe either; I just hammer-raise everything on mini t-stakes.
|
|
#
?
Jan 27, 2008 05:51
|
|
 Bad Angus! Bad!
|
My last mostly completed project is a 10 and a half foot skiff. (found at http://www.gsahv.pp.fi/skiff/skiff.htm ) I built it mainly as a precursor to a larger, more capable, prettier boat, namely Iain Oughtred's Elfyn. http://www.classicmarine.co.uk/details.asp?Name=Elfyn But that second boat is still years away. Too many other projects to finish first. Meanwhile there are still a few things to do on this one, such as paint the interior and the gunwales. The entire thing was built from 1/4" lauan exterior grade plywood. Not the best choice for strength or longevity, but more than adequate for this application. Paint is simply exterior grade semi-gloss acrylic. What the heck, the boat lives in the garage, it's easy enough to touch up the paint if it needs it.  That's from the second launching, which went rather well. I learned that I can't row well, and that a skeg would definitely help me move in a straight line, despite the designer's explicit instructions not to add one. It's on the list of things to do this spring.
|
|
#
?
Jan 29, 2008 04:53
|
|

|
My latest project was redoing my master bedroom. When I first moved in, this is what it looked like... From the hallway, looking in...  From the corner of the room, looking at the closet...  I wanted to frame the closet in to put in mirrored sliding doors, but the dumbass electrician that redid the wiring years ago put the main panel right in the way. I ended up framing the closet out a bit to clear the box, making it a bit deeper than it was originally. I replaced all of the baseboards and trim, installed crown molding, replaced the original door with a 6 panel door, and installed a Rubbermaid shelftrack system in the closet. It turned out pretty nice, considering how nasty it was to begin with and all of the problems I ran into along the way. From the hallway, looking in...  From the corner of the room, looking at the closet...  From the other corner, looking at the door...  I'll be putting carpet down as soon as I finish my spare bedroom since I need to do them both at the same time. The asbestos tile really isn't doing it for me.
|
|
#
?
Jan 30, 2008 01:38
|
|

|
EigenKet posted:Also, could you explain what we're seeing there? Without going into too much boring detail, it's basically an electromagnet that pulls down a bar, which brings the needle into the skin... really simple actually, but there's some fine-tuning and stuff involved that takes some time to learn.
|
|
#
?
Feb 1, 2008 07:26
|
|
|
I have a log cabin in the forest. My project was to replace a wood burning stove with a fireplace: Starting with a plan..     Couldn't find a good piece of wood for a mantle shelf, so I made one from 3 Cedar 4x4s  Since the fireplace is so big, I thought it would be wise to exploit the space it takes up by incorporating recessed shelving in the sides. I moved some electrical and venting.  I skinned the interior with real pine panelling and stained it.   Next, cover the cementboard with metal lath.  Scratch coat of mortar.  Time to lay stones..   grouting..   All that's left to do now are the hearth stones and that should be in the next two weeks...
|
|
#
?
Feb 1, 2008 19:42
|
|

|
Hey Wisdom, couple of questions for ya. First, awesome job, I love the shelves! I had been wondering how long that took to do up until this point? I was also curious if you had plans to cover the 2x4 framework on the sides?
|
|
#
?
Feb 1, 2008 21:08
|
|
|
Dewski posted:Hey Wisdom, couple of questions for ya. I did the work over a period of several months, mainly because I don't live at the location and visit every month or so. It took one day to install the framing and the fireplace insert; 2-3 days to do the shelving (there are some "secrets" in the construction too); about a day to do the mantle shelf; 2-3 days to do the masonry work. Yes, I'm going to cover the 2x4s... I'm not sure how I'm going to do that yet.. I may put a column of stone there, or I may use some kind of moulding. I haven't decided. I've been designing as I go along which is one reason why it's taken me so long. I would have had the hearth stones laid already but I don't have enough so I've scheduled another shipment to finish. By the way, I've done tile before, but this is the first time I actually laid stone like this. It's synthetic stone but you wouldn't be able to tell. It's just like regular stone but in pre-cut shapes and a little bit lighter. I opted for synthetic because otherwise I'd have to do a lot of work to the foundation to support the added weight. For research, I TIVO'd a bunch of DIY shows for several months, read a bunch of books and picked the brains of friends. It turned out nice for my first project. I will say working with the grout bag was a total pain in the rear end. I have a lot of respect for stone masons who do that stuff for a living. It's hard work. As far as the cost... I'd estimate the insert and framing install was around $2.5k, the stone and mason supplies, $2k, and maybe $150 for the wood.
|
|
#
?
Feb 1, 2008 21:25
|
|
|
Wisdom: Are you supposed to build a fireplace out of wood? To me it seems like a bad idea, but you probably knew what you were doing. Is the insulation on the pipe really enough? I'm not saying that the house will burst into flames, but the outside of the cassette will be very hot if you burn wood for a while.
|
|
#
?
Feb 5, 2008 12:00
|
|
|
forestboy posted:My last mostly completed project is a 10 and a half foot skiff. (found at http://www.gsahv.pp.fi/skiff/skiff.htm ) I've been wanting to tackle a boat for a long time. How long did it take to build?
|
|
#
?
Feb 8, 2008 07:42
|
|

|
wormil posted:I've been wanting to tackle a boat for a long time. How long did it take to build? I started it sometime in May, launched it sometime in September. But there were lots of weeks when I didn't get anything done, and I took far longer than I should have with the epoxy. With a little more dedication (and maybe a helper) you could easily finish it in a month. The smaller version on his website would be faster still.
|
|
#
?
Feb 9, 2008 16:15
|
|
|
This is not a completed project yet, but I'd like to show some pics. It's a vacuum tube headphone amplifier that's going to be used as a preamplifier too. The schematic I used is http://student.agh.edu.pl/~lnowak/fotki/sch.jpg The tubes I used are RFT ECC82 and russian military 6N1P-EW (6Н1П-ЕВ) I don't have any photos of the insides yet. This is the 6N1P and one of the sockets I'm going to use:  The cover with sockets in place  The front panel and the sides   I'll try to post some more pictures when I finish.
|
|
#
?
Feb 14, 2008 23:46
|
|

|
Not as snazzy as the amplifier on page one, but heres a little mint tin CMOY I put together to practice my soldering and casing. When I get more time I'm goin to start practicing with PCB fabrication. I'm slowly working my way up to building an EEG, but thats a long way off.
|
|
#
?
Feb 15, 2008 02:38
|
|

|
I built a bike trailer. After reading this inspiring thread I regret not taking more photographs while it was in progress. (Thanks rear end in a top hat who walked in my bedroom and stole my camera..) Anyway, I was living in Oakland these last couple years, and I hated driving, and I wanted a way to haul water, lumber, and whatever else I'd normally need a car for. I took two TIG welding classes at The Crucible in Oakland, and I spent most of the second class designing and building this. I welded the frame out of 1 1/2" square aluminum tubing, purchased the wheels, and later installed the plywood floor. The hitch I built was a combination of this and this. (Check out that last link, the guy has some pretty crazy bikes). I was really excited when I put this thing together. I hauled it home that night, and gave my housemates rides around the block on it. The next day I went to Berkeley Bowl and purchased 10 gallons of water. It was heavy as gently caress as I carried it back. I made it from Shattuck up to Telegraph Ave, and as I was getting past whole foods, only 8 blocks from my house, I hit some gnarly bumps in the pavement and the towing arm snapped off. gently caress! Luckily I still had some time to weld the thing back and re-enforce the re-enforcements so it can't happen again. Here are some pics of the last time I got to use it:   Trailer carrying 10 gallons of water plus my bag. Part of the reason it broke the first time is that I had all the weight (10 gallons weighs in at about 83 lbs) at the very front, so the milk crate helps move it back a bit. Now for a picture of one of my proudest moments:   I dumpster dived a FUCKLOAD of Lumber. The hardest part was getting going. I had to apply the back breaks and carefully balance while I leaned all my weight back just to get the back wheel on the ground. If I was five pounds skinnier I would have never gotten the drat thing to move. I hauled this load about three or four miles, and I estimate it weighed in at 300-400 pounds. The axle was about to snap, I'm pretty sure.  These pictures were taken in front of my house on December 17th, 2007. It was the last time I ever used the trailer. I was going to use the wood to build a shed in our back yard where I would have a small bicycle repair business. Before I got that lumber, I cut down a large morning glory vine to clear space for what I was going to build. Unfortunately, I guess I didn't do a good enough job of communicating my plans to my housemate, who, upon discovering his beloved morning glory cut down, did something so extreme and unreal that I choose to move out of that house, leave Oakland, and pursue an education. I now have a pickup truck, and I live too far out in the mountains for the trailer to be practical. I had it for less than a month, but in that time I hauled about 50 gallons of water (total), all the lumber pictured above, a 4' x 8' sheet of plywood, and other bicycles. What was so important about that trailer, however, is that it broke on me. It broke because I had no idea how to properly plan and design something like that. I had no idea that the towing arm would snap--I had no way of calculating where the weight should be, how the wheels should be positioned, or what areas would be under the most stress. With the combination of the trailer breaking, and my ex-housemates psychosis, I have decided to pursue a degree in Mechanical Engineering so that next time, I can do it right. I'm really sad to have this thing collecting dust now, but it's certainly had it's purpose. NoSoup4U fucked around with this message at 06:30 on Feb 18, 2008 |
|
#
?
Feb 18, 2008 06:17
|
|

|
NoSoup4U posted:did something so extreme and unreal that I choose to move out of that house, leave That looks really good. I need to learn to TIG. One of the difficulties of working with and especially welding aluminum is that aluminum welds crack like no other metal. They are very very prone to developing stress cracks over heavy use (especially vibrations, like something bouncing along behind a bike), which very quickly lead to bigger cracks, which quickly lead to broken things. Your welds have to be perfect to avoid it, and even then, it is nowhere near as strong as steel. If you ever decide to use it alot again, you might try making all the high stress points (hitch, axles, etc.) out of steel, and then bolting them to the aluminum frame so you get the strength of the steel with the light weight of the aluminum.
|
|
#
?
Feb 18, 2008 06:51
|
|

|
Kaiser Schnitzel posted:There is a story begging to be told here. You're right that aluminum doesn't like vibrations, but its really not as hard as the magic voodoo that it seems to get a reputation for being. I actually enjoy tigging steel. Its moderately paced, calm, easy to do and an ugly tig weld looks nicer than a decent arc weld. Tigging aluminum isn't these things, you move quick, it isn't as nice and quiet, etc.
|
|
#
?
Feb 18, 2008 07:20
|
|
|
I've been working on my basement for a while now (Sorry for the image quality, I don't have a nice camera handy). It will take another couple of months. So far, the mahagany bar is done, understocked, but done. The wine racks under it are close to full though, so its no huge loss.  In that last pic you can see the stereo in the mirror, thats going to be moved to the AV room right of the bar.  Its my fathers old one, Phase Linear model 3300 amp and pre amp, transiet noise eliminator, ADC split channel 10 fq EQ, and a few other toys. All hooked up to two Klipsch speakers. When I have a chance I was going to rig up a switch bored so I can hook up my old PC as an input and attach wireless interfaces in every room so that I can call up any song and play it in any room. The AV room itself still needs to be supplied with carpeting, a TV, and a couch. All its got in it is a recessed mahogany cabinent and a older french coal godan to make it cozy warm.
|
|
#
?
Feb 20, 2008 19:05
|
|


|
My entire house has really been a project, but here are some pictures of the kitchen. The first picture is how the kitchen looked when we bought it, all the other ones are current. The kitchen is really a mess in the after photos, maybe I will take some pics when it is clean later. Before:  After:  new cabinet doors:  new backsplash:  tile floor: 
|
|
#
?
Feb 20, 2008 20:09
|
|
|
Alright - you know that roll of 35mm you keep meaning to get developed? Get it done. I did, and found the following: Exclusive possession - A game of Property, Betrayal, Trade ande Backstabbing, set in thee twin Cities of Ankh and Morpork  I made a Terry Pratchett Discworld themed monopoly set for a friends wedding about 4/5 years ago, from scratch. Board, tokens, houses, money, property cards, Fate(chance), Patricians Perogative(Community chest) and my wife made a faux leather bag. The only part I didn't make was the dice, as I found a really nice pair of 1 1/2" wooden dice that felt perfect.  Character pieces were as follows - A capped pyramid, A book (lawf & Ordinancef of Ankh & Morpork), A witches hat, a Dwarves Helmet, an old boot (Bugrit!) and the luggage.   (sorry for the poor image - photo of a photo v:)v) All pieces were made from Fimo modelling clay, painted with acrylics. The board was a pair of board canvasses cut to size and joined to fold. Money was printed on coloured paper, property cards & Fate & Patricians Perogative were printed & laminated
|
|
#
?
Mar 12, 2008 11:15
|
|


|
Cakefool posted:
Goddamn that's awesome. I want an ole' timey themed Monopoly. I haven't read any of the Discworld series but I have read Good Omens, how do they compare (writing style, humor, etc)?
|
|
#
?
Mar 13, 2008 07:54
|
|
|
Cakefool posted:Character pieces were as follows - A capped pyramid, A book (lawf & Ordinancef of Ankh & Morpork), A witches hat, a Dwarves Helmet, an old boot (Bugrit!) and the luggage. That's great. I bet everyone wants to be the luggage, right?
|
|
#
?
Mar 13, 2008 12:56
|
|

|
EigenKet posted:Goddamn that's awesome. I want an ole' timey themed Monopoly. I think all his other books are better. Writing style varies so much across the Discworld series you'll find something you love. I tend to read through them in sets - witches, guards, Death, wizards etc. I want to make another set, but this would be a huge circular wooden board, inlaid or built up to create a Discworld map, with the properties around the outside. If that isn't enough, the whole board would rest on four wooden elephants, on a wooden turtle. The top of the board would hinge or lift off to reveal space for the pieces and cards. 'cause I just don't make enough work for myself  ps - I've never carved wood in my life 
|
|
#
?
Mar 16, 2008 19:40
|
|
|

|
| # ? Apr 19, 2024 00:50 |
|
|
RealKyleH posted:You're right that aluminum doesn't like vibrations, but its really not as hard as the magic voodoo that it seems to get a reputation for being. No way, a good arc weld can be beautiful! I always screw up the ends though. Actually if I had my druthers I'd weld with nothing but O/A. It takes forever but I like being in complete control.
|
|
#
?
Mar 17, 2008 19:34
|
|