


|
Yeah I'm just carting all the individual panels to the .... panel, so there's some visual stuff going on while we're talking So the idea is I'm going to just kind of dry fit everything in my garage (mostly so I can figure out how the screen is going to mount) and then knock it back down to panels when it's time to lug it to the presentation I could just screw everything together and then unscrew it and reassemble but I feel like I'm just going to be weakening my joints a bit doing that
|
 #
?
Dec 15, 2018 22:09
#
?
Dec 15, 2018 22:09
|
|


|

|
| # ? Apr 24, 2024 23:20 |
|
|
That's MDF that the cabinet's exterior is made from, right? I wouldn't want to screw/unscrew MDF too many times if it can be avoided; the stuff is already pretty crumbly.
|
|
#
?
Dec 15, 2018 22:11
|
|

|
TooMuchAbstraction posted:That's MDF that the cabinet's exterior is made from, right? I wouldn't want to screw/unscrew MDF too many times if it can be avoided; the stuff is already pretty crumbly. That photo I grabbed is, but I use plywood for everything because gently caress MDF
|
|
#
?
Dec 15, 2018 22:21
|
|
|
Maybe a couple dowel joints and just slide your blocks over / tap them in?
|
|
|
#
?
Dec 15, 2018 22:22
|
|


|
It's time for me to build the drawers for the hall table I'm working on. I've never done drawers before, but I figure this is basically four boards box jointed together (I don't trust the quality of my dovetails yet), with a face groove near one edge to fit the bottom of the drawer into. Then glue a face plate onto the front. My main question is, how thick should the walls of the drawers be? The space each drawer has to fill is about 12" deep, 11" wide, 5.5" tall. The (S2S) boards I have are 7/8" thick, which feels like overkill for this. I think more like 3/8" or 1/2" thick would be appropriate, in terms of needed strength and desired weight. Does that sound about right? If I try to resaw a 7/8" board into two boards, I'm more likely to end up with a bit over 1/4" thick. I feel like that would probably work, except that instead of making a groove to fit the base of the drawer into, I'd probably want to glue some edging onto the board walls, that the base would rest on. A bit less elegant, maybe, but stronger. I do also have a 1 3/4"-thick board which I could probably resaw into three 3/8"-thick boards, or maybe even a bit thicker. Opinions? General advice?
|
|
#
?
Dec 15, 2018 23:14
|
|
|
TooMuchAbstraction posted:It's time for me to build the drawers for the hall table I'm working on. I've never done drawers before, but I figure this is basically four boards box jointed together (I don't trust the quality of my dovetails yet), with a face groove near one edge to fit the bottom of the drawer into. Then glue a face plate onto the front. Go for dovetails! Only way to get them to the quality you want is making a ton. I like thinner drawer sides, 7/8" would look way too chunky for a hall table. Anything under 1/2" is nice, I went 5/16" for the last dresser I built because that's what I yielded when i resawed the white oak I had on hand. You are right on the strength of the sidewalls when they're thin, you don't want to groove them too deep or they'll be super weak. Look up "drawer slips" there are a few nice techniques that could be done that don't look to bad. It's best if there is some sort of groove to capture the bottom, so if it isn't perfectly fit you can't tell when the drawer is open. Also I usually make the back shorter, so that it comes down to the top of the grooves on the sides, then you can slide the bottom in and it's replacable in the future.
|
|
#
?
Dec 16, 2018 03:46
|
|
|
Hypnolobster posted:I feel like you have to be kidding, but just in case.. I had to change the battery 3 times on my Dewalt 20v driver yesterday putting together a trailer. That was driving something like 100 bolts but the point remains, batteries drained before the job was complete.
|
|
#
?
Dec 16, 2018 17:04
|
|

|
TooMuchAbstraction posted:It's time for me to build the drawers for the hall table I'm working on. I've never done drawers before, but I figure this is basically four boards box jointed together (I don't trust the quality of my dovetails yet), with a face groove near one edge to fit the bottom of the drawer into. Then glue a face plate onto the front. I usually make drawer bottoms out of 3/8-1/2" thick poplar or aromatic cedar, and bevel the underside to fit into the 5/16"w x 3/16-1/4"d groove I run in the drawer sides/front. Cut the drawer back narrower than the sides/front so you can slide your drawer bottom into the groove and screw it to the back with some small screws. Plywood is fine too if you prefer it, but it sags alot more than solid wood which can be a problem on larger drawers. I cut the drawer back 1/16" shorter than the front so there is a very slight taper in the drawer. This helps it run smoother. The front should be just a hair smaller than the drawer opening-a too tight drawer sticks and doesn't run well, but a too loose drawer will rack and bind and doesn't run well either. It's a good idea to stick the drawer into the opening while the glue dries (after you clean off all the squeeze out!). If your cabinet/drawer runners aren't all exactly square, you can make the drawer slightly out of square to fit. Its very frustrating if your drawer box is slightly out of square in one direction and the cabinet is slightly out in another and two minute errors turn into one large error. Once it is dry, plane/sand the sides as necessary to get it running well. Paraffin/candle wax on the sides and runners after it is finished really help keep things running nicely. I'd second trying out dovetails. If you're set up to make good box joints, theyre perfectly adequate too, but even a slightly sloppy dovetail is plenty strong in a drawer and is an actual mechanical joint. Practice makes perfect! I only got really good at drawers/dovetails when I had to hand dovetail all the drawers in 4 large dressers-I think it was like 300 individual dovetails. 
|
|
#
?
Dec 16, 2018 18:08
|
|

|
I would love to have that much room as you have shop-wise.
|
|
#
?
Dec 16, 2018 18:12
|
|

|
JEEVES420 posted:I had to change the battery 3 times on my Dewalt 20v driver yesterday putting together a trailer. That was driving something like 100 bolts but the point remains, batteries drained before the job was complete. First rule of cordless power tools: always own a second battery.
|
|
#
?
Dec 16, 2018 18:55
|
|
|
Kaiser Schnitzel posted:For thickness, 3/8-1/2" is usually what I do-towards the thinner end for small stuff. I've seen plenty of English antiques with 1/4" thick quartered oak drawer sides and slips that are still running fine 200 years later, but I think especially with a box joint I wouldn't go that thin. If you wind up with sides thinner than 7/16" or so, definitely use slips. They're a bit of trouble, but they do also really stiffen up the sides. Glue them in after the drawer box is glued up. I would not try and resaw 7/8" stuff. You might do okay with the 1-3/4" depending on species and stability/grain. By the time it cups after resawing and you flatten it out again it might wind up very thin, and cupped/warped drawer sides make it really hard to get the drawer running right. My lumberyard used to have 6/4 rift sawn red oak for really cheap and I would resaw it and it made wonderful drawer sides. I just use plain red oak now-I've had bad experiences with maple moving around and try and stay away from it for wood on wood drawers. Make the sides and runners from the same material if you can so they wear evenly. Poplar makes a fine drawer side too, but harder woods will run more smoothly than soft. Some solid tips here, especially letting the glue set in its opening. Before I learned that trick I would have to do quite a bit of drawer fitting post glue up, now it's next to none.
|
|
#
?
Dec 16, 2018 19:08
|
|
|
Thanks for the tips! Lots to consider there. You do some talking about how you make the drawer back a different dimension, but I'm not sure I exactly understand what you're talking about. What do you mean by making the back "narrower" than the sides/front? And you say the back is 1/16" shorter than the front; do you mean that if you look at the drawer from above, it makes a trapezoid? How does that help it slide more smoothly? I'm winging it a bit with the slides, and to be honest they have me worried. I made them myself as sliding dovetails -- hard maple for the interior/male piece, cherry (to match the cherry I'm using elsewhere) for the drawers. The frame has some stretchers that I intend to secure the interior portion of the slides to, but I haven't worked out a good strategy for making sure that it'll match up well with the drawers and thus slide freely. The cabinet frame is definitely not exactly square; everything's a little bit off. So I'll need to shim/adjust things until the slides at least are square. I plan to glue a faceplate onto the front of the drawer, mostly so that I don't have to worry about getting the dimensions of the drawer front exactly correct to make an aesthetically pleasing table. Plus it should make the drawer pulls easier to deal with, and of course add some strength to the part people will be interacting with most. I did go ahead and resaw some of my 7/8" boards, they're now .4" thick, but we'll see how badly they cup. It's remotely possible I'll get lucky and won't lose too much extra thickness. If not, I haven't wasted too much material.
|
|
#
?
Dec 16, 2018 19:31
|
|
|
Hasselblad posted:I would love to have that much room as you have shop-wise. TooMuchAbstraction posted:Thanks for the tips! Lots to consider there. You do some talking about how you make the drawer back a different dimension, but I'm not sure I exactly understand what you're talking about. What do you mean by making the back "narrower" than the sides/front? And you say the back is 1/16" shorter than the front; do you mean that if you look at the drawer from above, it makes a trapezoid? How does that help it slide more smoothly? The back being shorter than the front would make a slight trapezoid and makes the drawer work a bit easier by giving a little more clearance if it is a traditional drawer-don't bother if it's running on slides. I meant make the back narrower so that the bottom of the drawer back is at the height of the top of the groove for the drawer bottom so you can slide the bottom in and out. The way you're making your drawer boxes, you may be gluing a plywood bottom in when you glue up the box, in which case you don't need to worry about that. Are your slides mounted underneath the drawers or on the sides or what? For that size drawer and running on slides, even if the sides were a little on the thin side it would probably be okay
|
|
#
?
Dec 16, 2018 22:10
|
|
|
Hi. I have been woodworking for 2 1/2 years, built my workbench in the summer of 2017, and now, finally, have a vise on my bench for the first time.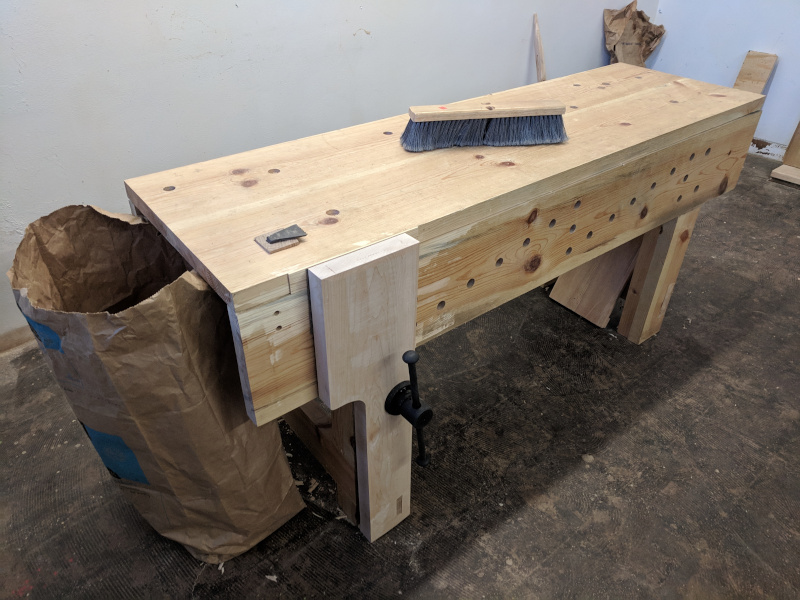 The hardware is from Benchcrafted. No crisscross, just the parallel guide with a peg along the bottom. I found the chop in the offcuts corner at my preferred lumber yard. It was >8/4 maple, nice and wide, already mostly surfaced, and I only had to cut off about two inches from one end. I'm so excited to use this thing. Cutting tenons has always been a huge chore with just holdfasts, and resawing even small pieces was effectively impossible. The top of my bench has shrunk about 1/4" since I built it, so it is no longer in line with the aprons. The first thing I used the vise for was to resaw a chunk of scrap to make a shim to even it up. So nice  For this year's cabinet project, I picked up the door pulls from the blacksmith yesterday, and now I'm waiting on my friend to finish up the glass panels. In the meantime, I'm ready to move on to some other projects. I think I'm going to try making some boxes, inspired by Matt Kenney's book.
|
|
#
?
Dec 16, 2018 23:38
|
|

|
Making boxes for christmas gifts this year and did an epoxy fill/resaw on this chunk of ash that was a wheel chock/blocking for 4 years.   Made for a preeeetty cool couple panels.
|
|
#
?
Dec 17, 2018 03:19
|
|


|
Kaiser Schnitzel posted:I misunderstood you and thought you were making traditional wood on wood drawers, but you are making drawers that run on slides (albeit wood slides), which are much easier to fit. You can disregard much of what I said. quote:Are your slides mounted underneath the drawers or on the sides or what? For that size drawer and running on slides, even if the sides were a little on the thin side it would probably be okay I put them on the sides, though in retrospect having them run on the bottom would have probably make it easier to fit and align the slides -- I wouldn't be fighting gravity while trying to get things lined up. Oh well, I'm not changing it now!
|
|
#
?
Dec 17, 2018 15:55
|
|
|
Hypnolobster posted:Making boxes for christmas gifts this year and did an epoxy fill/resaw on this chunk of ash that was a wheel chock/blocking for 4 years. what type of resin did you use? With so many out there I am always interested in seeing what people use.
|
|
#
?
Dec 17, 2018 20:33
|
|
|
JEEVES420 posted:what type of resin did you use? With so many out there I am always interested in seeing what people use. Just good old West Systems 105 resin and 206 hardener which I otherwise use as long assembly time glue. This is actually the largest epoxy fill I've ever done. I usually only fill cracks and bark inclusions (which is actually what this was), but this was fairly big. The epoxy world has definitely gotten real wild with the insane river table/slab craze. e: and TransTint dye
|
|
#
?
Dec 18, 2018 00:39
|
|
|
ColdPie posted:Hi. I have been woodworking for 2 1/2 years, built my workbench in the summer of 2017, and now, finally, have a vise on my bench for the first time. Hypnolobster posted:Just good old West Systems 105 resin and 206 hardener which I otherwise use as long assembly time glue. This is actually the largest epoxy fill I've ever done. I usually only fill cracks and bark inclusions (which is actually what this was), but this was fairly big. The epoxy world has definitely gotten real wild with the insane river table/slab craze. Those box tops look great too. Ash is really just one of my favorite woods to work with.
|
|
#
?
Dec 18, 2018 01:42
|
|
|
Kaiser Schnitzel posted:I guess the upside of live edge/slab everything is that there's a lot more information out there about doing unusual stuff with epoxy. I'd never thought of putting TransTint or similar in epoxy, but I haven't found much you cant put TransTint in. Great idea. With those little microballoons you could probably get some good fill colors for repairs/touchup. Did you put a filler in the epoxy or is that just all epoxy? Also thanks!
|
|
#
?
Dec 18, 2018 02:09
|
|
|
Kaiser Schnitzel posted:I'm super jealous of that vise. I put a big wooden screw on mine and the threads bind up all the time when the humidity changes. Was it difficult as a retrofit? It wasn't too bad, but yeah, it was a bit challenging. Probably the biggest problem was I can't work on my workbench on my workbench, you know? So it was a lot of crawling around on the floor to fit the mortises in the leg.
|
|
#
?
Dec 18, 2018 13:56
|
|
|
ColdPie posted:Probably the biggest problem was I can't work on my workbench on my workbench, you know? The one thing keeping me from making my workbench is lack of a (proper) workbench. I have to laugh when I watch youtube videos of people making awesome (and cheap!) workbenches, and the people making them have awesome benches to build them on and tens of thousands of dollars of power tools to plane/sand/join, etc.
|
|
#
?
Dec 18, 2018 18:04
|
|
|
Hasselblad posted:The one thing keeping me from making my workbench is lack of a (proper) workbench. I have to laugh when I watch youtube videos of people making awesome (and cheap!) workbenches, and the people making them have awesome benches to build them on and tens of thousands of dollars of power tools to plane/sand/join, etc.  I built my big bench using just my small bench, and I built my small bench on the ground. You can do every bit of it with a circular saw, a cordless drill, and a 3/4" chisel. The vise is a slab of 3/4" oak I glued up, trimmed, sanded off, and attached with a pipe clamp, I've got maybe $40 in it. The top is as flat as I could get it, which isn't FLAT but it's shimmed to level. All those breakdown benches have a lot of hardware you really only need if you intend to actually break them down. If your bench isn't moving, just slam it together with deck screws (though the aprons really did appreciate some proper bolts). You'll be surprised how much you can do when you start doing!
|
|
#
?
Dec 18, 2018 18:16
|
|


|
Hasselblad posted:The one thing keeping me from making my workbench is lack of a (proper) workbench. I have to laugh when I watch youtube videos of people making awesome (and cheap!) workbenches, and the people making them have awesome benches to build them on and tens of thousands of dollars of power tools to plane/sand/join, etc. I've been making that excuse too, but I need to stop and just pick up the wood for it. Mostly it's been not having a good way to get the lumber to my house, but I just need to get off my butt and rent a truck from home depot for an hour and pick up the wood from the lumber yard (that is not home depot).
|
|
#
?
Dec 18, 2018 18:30
|
|
|
An awful lot of cars can fit a few 8'-long 2x6s inside the cabin, if you recline the front passenger seat and maybe remove the headrest. Opening the front-right and back-left windows/doors can help give you the room to back-and-forth the boards until they're inside. Source: I drive a Honda Civic and routinely use it to move small amounts of lumber. That said, capacity is somewhat limited and you'll get your seats dirty unless you put down a tarp or something. My car is 15 years old and the most common other passenger is a dog so whatever. If you have a cut list, you can also just take a circular saw to the store and crosscut your pieces before loading them. You can stuff way more pieces into a car if they're only 6' long.
|
|
#
?
Dec 18, 2018 18:36
|
|
|
You can also just build your bench to fit your car. Better a 66" bench you brought home in your civic than a 72" bench you never got around to building.
|
|
#
?
Dec 18, 2018 18:40
|
|
|
Kaiser Schnitzel posted:I guess the upside of live edge/slab everything is that there's a lot more information out there about doing unusual stuff with epoxy. I'd never thought of putting TransTint or similar in epoxy, but I haven't found much you cant put TransTint in. Great idea. With those little microballoons you could probably get some good fill colors for repairs/touchup. Did you put a filler in the epoxy or is that just all epoxy? This is a rabbit hole that goes deep. I think I have spent $100 on various pigments, dyes, and additives, and close to $400 on resins. I have always loved combining different elements like metal and wood so resin casting has opened so many possibilities.
|
|
#
?
Dec 18, 2018 18:46
|
|
|
ColdPie posted:It wasn't too bad, but yeah, it was a bit challenging. Probably the biggest problem was I can't work on my workbench on my workbench, you know? So it was a lot of crawling around on the floor to fit the mortises in the leg. I bought two of these and worked on the benchtop first by clamping boards to those and planing there. Then when I had the top glued up, I've kept it across the horses and just used it as a bench, clamping other boards to the benchtop. It doesn't work terrifically well for hand tools (whenever I hit a knot with the plane, the entire setup will shift or jump) but it has sufficed for now. Plus I'm doing everything by hand, with a power drill just for installing the hardware. Surfacing/smoothing 8-foot boards has been...a lot of work. But hey, lots of planing practice. I have a Camry and can fit 8-foot boards without too much trouble, they just rest between the front seats. I've been buying wood in phases, though.
|
|
#
?
Dec 18, 2018 18:55
|
|

|
What should I use to prep MDF for painting to avoid the MDF acting as a sponge? I think i read diluted wood glue somewhere.
|
|
#
?
Dec 18, 2018 19:03
|
|


|
My problem with building a bench is finding wood that I like. Crosscut in Seattle has super nice doug fir, but it would cost like $800 for the top alone. They don't even have good stuff for the legs. I plan on checking out another lumber yard this weekend. Maybe they will have something better.
|
|
#
?
Dec 18, 2018 19:05
|
|


|
TooMuchAbstraction posted:An awful lot of cars can fit a few 8'-long 2x6s inside the cabin, if you recline the front passenger seat and maybe remove the headrest. Opening the front-right and back-left windows/doors can help give you the room to back-and-forth the boards until they're inside. Source: I drive a Honda Civic and routinely use it to move small amounts of lumber. That said, capacity is somewhat limited and you'll get your seats dirty unless you put down a tarp or something. My car is 15 years old and the most common other passenger is a dog so whatever. I can fit 8' boards up to 2x10, but I almost always have a car seat and 5 year old in the way to do more than a half dozen boards. :/ I also need a lot of stuff to build a bunch of shelves for a basement and replace a small fence, so it makes more sense to just rent a truck for an hour and pick up some stuff at the lumber yard that's only a few minutes away. Whole thing should take an hour, but I have to just go and do it.
|
|
#
?
Dec 18, 2018 19:11
|
|
|
taqueso posted:What should I use to prep MDF for painting to avoid the MDF acting as a sponge? I think i read diluted wood glue somewhere. As long as you are not using a water based paint it won't soak it up. MDF really is designed to be painted and with the right paint makes it waterproof.
|
|
#
?
Dec 18, 2018 19:15
|
|
|
Great, thanks. Finally going to paint my subwoofer. Lesson learned: If you build a sub, paint it before you start using it or your won't want to give it up.
|
|
#
?
Dec 18, 2018 19:20
|
|
|
DevNull posted:My problem with building a bench is finding wood that I like. Crosscut in Seattle has super nice doug fir, but it would cost like $800 for the top alone. They don't even have good stuff for the legs. I plan on checking out another lumber yard this weekend. Maybe they will have something better. The stuff I am using is green, sappy crap that is already shifting/moving. My possibly dumb thought is to just use it to build a bad first bench that hopefully I can get some mileage and experience out of before trying again with better wood, or at least properly dried wood.
|
|
#
?
Dec 18, 2018 19:21
|
|
|
z0331 posted:The stuff I am using is green, sappy crap that is already shifting/moving. My possibly dumb thought is to just use it to build a bad first bench that hopefully I can get some mileage and experience out of before trying again with better wood, or at least properly dried wood. The nice thing about shop furniture is it doesn't have to be nice. I have some crappy pieces that I bodged together out of scraps years ago and they're still kicking and doing their job just fine. I mean, you ideally want your main bench to be flat and smooth and (if you're doing a lot of hand planing / chiseling) heavy, but there's a huge range of useful furniture in between "is so bad it's useless" and "every cut and surface is perfect".
|
|
#
?
Dec 18, 2018 19:38
|
|
|
It�s definitely sub optimal but like a miter saw stand or one of those portable collapsible workbenches or some sawhorses and a sheet of plywood or a thrift store dining table will give you some space to work on babbys first workbench I�m slated to build my first real bench in January so right now I�m using all four of the above as various bits of workspace in my garage
|
|
#
?
Dec 18, 2018 19:50
|
|
|
I built my first several pieces of furniture, and my toolchest and workbench, on a 3/4" sheet of plywood with two F-clamps and about $500 of tools acquired as-needed over a year.
|
|
#
?
Dec 18, 2018 20:23
|
|
|
My Home Depot has great untreated dougfir 4x4x8�s for like $13 ( $1.30/bf!) that I use for bench/shop table legs, but if you glued a few of them up it would be a hell of a benchtop. A little digging in the pile and I can usually find some that are completely clear and rift sawn on all 4 faces. I recently made a big glue up table out of of two half sheets of Baltic birch plywood so it�s 30�x120� with 2x8 aprons and fir legs notched for the apron all glued and screwed and that thing is stout as gently caress. Maybe not a fancy bench, but it�s flat and stiff and you could sure use the same construction to make a plywood bench to make a real bench on. It�s easy to find reasons not to do something, but you can do an awful lot with a little.
|
|
#
?
Dec 18, 2018 20:28
|
|
|
You can do way more than you�d imagine with a few 5 gallon buckets.
|
|
#
?
Dec 18, 2018 20:30
|
|

|
|
| # ? Apr 24, 2024 23:20 |
|
|
I don't do a lot with hand tools so my benches tend to be 3/4" ply and 2x4 / 4x4 construction. Just a sturdy flat surface and when I need to pound on something I use the table top right above a leg. I am currently planning 16'x2' bench and two 4'x4' tables all with open shelves underneath for my garage shop. Pricing it out is about $250.
|
|
#
?
Dec 18, 2018 21:01
|
|