


|
I'm in the middle of a guitar build too. I posted some pics in the post your projects thread. I carved the neck over the weekend, I am about to come to a stopping point for a bit while I order hardware and such.
|
 #
¿
Apr 1, 2009 01:46
#
¿
Apr 1, 2009 01:46
|
|


|

|
| # ¿ Apr 27, 2024 01:05 |
|
|
I just did the binding on my project guitar too.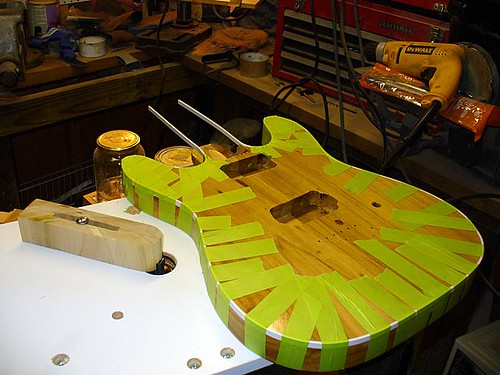 I used a router mounted in a table with a hand-made guide block/fence, adjusted to cut just the right depth/height for my binding. 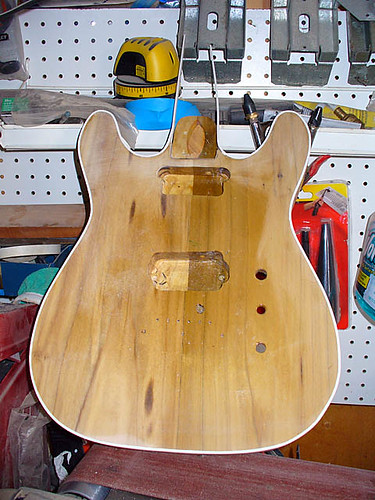 I used a cyanoacrylate glue to glue the binding itself on and taped as I went along. Then let it sit overnight and scraped and sanded the binding flush with the rest of the top. 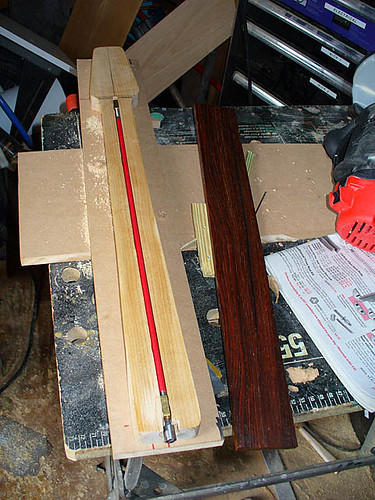 I got my truss rod channel routed last week too. I just need to slot my fretboard and glue it on and slim the headstock down a bit, and I will be ready for a final assembly before breaking it down to finish it.  I did the majority of the neck carving with a rasp, and smoothed it out with a belt sander, and finished smoothing/shaping with sandpaper by hand.
|
|
#
¿
Jun 14, 2009 16:14
|
|
|
I bought a radius block from Stewart Macdonald guitar shop, and then you use a adhesive sandpaper on it to sand in the radius. There are ways to set up a router to do it, but it would have cost just as much to buy the materials to build a jig as it did to just buy the block. I got my fret scale all laid out yesterday, I left my camera at work so no pics yet. I bought a big huge piece of maple a few years ago I have enough to do like 7 or 8 more necks. Next neck blank I cut will be about a 1/4" thinner. This neck is really fat not uncomfortably so, but noticeable compared to my other guitars. I picked up a Flying V body on the cheap that is just rough cut with no bridge laid out yet. I was considering building a baritone neck for it. I won't get started on that one until I get this one painted and hanging up to cure for the 30 days or so that nitrocellulose lacquer needs.
|
|
#
¿
Jun 15, 2009 13:23
|
|
|
Lets Play Arson posted:I've got a real silly question, but where in the UK would you recommend buying good quality wood? I don't know off hand, but if you ask over at the ReRanch forums there are quite a few guys in the UK that can point you in the right direction.
|
|
#
¿
Oct 24, 2009 22:19
|
|
|
I've been working on a new guitar build. I am planning on doing a big update to my last build thread I had in here. Thought you guys might want a sneak peek. This is the rough neck blank 5 piece lamination maple/bubinga/maple/bubinga/maple  I ripped it down to 7/8" for a neck blank Made up a sled for the table saw to cut a scarf joint for joining the headstock on   Glued the scarf joint together  It was a bitch and a half to tighten the clamps down without the joint sliding apart or out of alignment.  Here's where we sit now, some "ears" glued on for the headstock sides, the body it is going on is a flying V style. The outline here is just a rough tracing of a template. I'll cut it close on the bandsaw and then use a router bit to take it up close to the template.  Back of the neck still really rough, it will all go away when I go to carve it.  Showing the scarf joint from the side. Wheeeeee!
|
|
#
¿
Jan 8, 2010 06:06
|
|
|
To add to the cheaper wood discussion poplar can be pretty cheap, machines easily, and can have some nice grain if you don't mind a slight greenish tint to it. Though I've found a good portion of the green goes away once you put a coat of sanding sealer on it.
|
|
#
¿
Feb 10, 2010 03:39
|
|
|
Where are you located? If you can find a local lumber yard it will be cheaper if just for the fact that you don't have to pay shipping. Plus you can look through a whole stack of wood and find just what you are looking for, rather than relying on pictures. http://www.woodfinder.com/ Put your zip code in there and it will tell you the closest lumberyards.
|
|
#
¿
Feb 13, 2010 21:06
|
|
|
Bad Munki posted:Oh, two more questions: They are probably referring to the sapwood as opposed to the heartwood. The sapwood is lighter and won't get darker with age like the heartwood does. It would be really expensive to toss out all the boards that have sapwood, so they are saying they will be minimizing what is there by having it be on the back sides of the boards.
|
|
#
¿
Feb 14, 2010 19:33
|
|
")
|
It's in the grain of the wood, there's not really any way to tell from looking at an uncut tree whether or not the wood will be figured. Wiping a piece of wood with a damp cloth or some naphta can bring out the grain if you are looking at boards in a lumber yard. The technical term for it is chatoyancy 
|
|
#
¿
Feb 23, 2010 03:04
|
|
|
Titebond I or Titebond II? Titebond I you can use steam to disassemble joints. Titebond II is supposed to be water proof. Get some way to generate steam and a thin putty knife. Steam the joint good and work the blade of the putty knife into the joint, go slow and don't force anything once you heat/moisten the glue up enough it should come apart easy. If you can get the brads out first it might be easier to get the glue apart.
|
|
#
¿
Feb 24, 2010 16:16
|
|
|
MarshallX posted:Here's the glue I have: That link just goes to the main product selection page.
|
|
#
¿
Feb 24, 2010 20:31
|
|
|
MarshallX posted:Oops. You should be able to steam it apart pretty easily then, hot vinegar is supposed to weaken Titebond Original as well. Just go slow and work the putty knife blade a little at a time into the joint. The glue is stronger than the wood, so if you try to force it apart before it is weakened enough you could end up breaking something.
|
|
#
¿
Feb 24, 2010 23:12
|
|
|
I picked up a couple of Stanley planes at the Goodwill today for $3 each. Good deal or not so much? A No.5 and a No. 5 1/4. Was there a link to a guide on tuning up planes earlier in the thread? The No. 5 1/4 needs a blade and a chip breaker. The 5 should just need a new blade and a new knob on the front. I cleaned the bases up best I could, I'm going to sand down the handles tomorrow and refinish them.
|
|
#
¿
Apr 17, 2010 04:00
|
|
|
parthenocarpy posted:I should have clarified, there are only two exposed nails on both sides with practically no heads. What I want to do is remove the two outer blocks and pray there isn't a new set of nails directly pounded into the next layer, so it'll produce a nice flat edge free of metal. Don't just pray, get a metal detector and make sure there aren't any hidden things that can ruin a blade. http://www.harborfreight.com/metal-detector-97245.html?utm_source=hftusa&utm_medium=hftusa&utm_campaign=buylink
|
|
#
¿
Jun 5, 2010 13:39
|
|
|
iEatFish posted:So I built a stratocaster. I need to put a finish on the body. Its a Swamp Ash body, and I want to be able to see the grain/have it look natural. Ideally I just want to slap on a coat of oil or stain and have it be done, but after doing a bit of research looks like it will not be that simple. There are a few different products you can use to fill the grain. If you have a good woodworking store nearby (not lowes or home depot) they should carry an oil or water based grain filler. You can also use clear epoxy as a grain filler it can give the grain a sort of 3D look since you can see down into it. Tru-oil or Tung oil can be used as a grain filler too you keep the surface of the wood wet with the oil and use a fine grit sandpaper to create a slurry you force into the grain and scrap flush with the surface. Come over to the ReRanch forums and post a pic of your build they'll get you going in the right direction.
|
|
#
¿
Jun 17, 2010 20:23
|
|
|
dur posted:Is it worth spending $30 on a 9" Delta bandsaw, or should I save my money for something bigger? I have a 9" bandsaw, and with a fresh blade and some tuning it can do everything I need it to do for now. The only reason I ever pine(hurrr) for a bigger bandsaw is for resawing wood for guitar tops. Do yourself a favor and pick up a set of cool blocks for it to replace the crappy brass guides. Woodcraft will have them for sure.
|
|
#
¿
Sep 26, 2010 19:37
|
|
|
It just looks like a jigsaw mounted upside down in a table. I didn't notice the exact price, but you probably could pick up a used bandsaw on Craigslist for what they want for it.
|
|
#
¿
Oct 22, 2010 21:48
|
|
|
Cars have to deal with temperature changes that furniture doesn't. Radical temperature swings can make lacquer check(crack). I would think something like Birchwood Casey Tru-Oil would work for your panels and it will enhance the grain. It is a gun stock finishing oil originally, but I personally use it to finish guitar necks. If it can hold up on a rifle stock out in the woods I figure it can handle most anything. Application is easy too just rub it in with your fingers and buff with steel wool in between coats. It can be built up and buffed to a very high polish. I didn't build this but it shows off a highly polished Tru-Oil finish. 
|
|
#
¿
Dec 13, 2010 18:09
|
|
|
McMadCow posted:Wow, that sounds perfect. Is there a generic woodworking equivalent to the formulation of that oil? There are plenty of painting and building supply places here in the city but I'd need to go out of town to get to a gun store. I'd just get whatever the tool store answer to it. It's a proprietary formula that contains boiled linseed oil among other things from what I understand. I used to be able to pick up bottles at Wal-Mart but it seems they stopped carrying it, now I get at Dick's a sporting goods store, I would assume any other sporting goods store with a hunting/gun section would carry or be able to get it.
|
|
#
¿
Dec 13, 2010 22:17
|
|
|
Messadiah posted:To cut the slot on those, I assume you just mount it and bring the saw up from underneath, is that correct? Yes
|
|
#
¿
Jan 1, 2011 20:22
|
|
|
The Scientist posted:Is it true that sometimes people will cut the saw blade on a band saw, stick it in a hole and weld it back together so they can make inside cuts? I cut the metal parts for this guitar on a scroll saw. [img]http://img.waffleimages.com/513adb41de851641bbf2c074f845c4f5e2d4530b/SDC10896%20[/url](640x480).jpg[/img] It took me breaking a few blades before I figured out the right speed, and how fast I could feed it into the blade.
|
|
#
¿
Jan 2, 2011 02:30
|
|
|
I use rasps for roughing out guitar necks I am carving. I have a couple of crappy hand-me-down rasps right now, but I want to get one of these in the future. http://www.stewmac.com/shop/Tools/Files/Dragon_Hand-cut_Rasps/Dragon_Large_Hand-cut_Rasp.html
|
|
#
¿
Mar 17, 2011 21:09
|
|
|
If you get a nice figured maple you can dye it black and then sand it back and that will leave the black in the figure. It can leave you with a pretty decent grey/silver look.
|
|
#
¿
Apr 1, 2011 23:56
|
|
|
MarshallX posted:Anyone got some free plans for Morris Chairs? I want to make a couple out of Cedar for our deck. Found this searching google for about a second does it help? 
|
|
#
¿
Apr 17, 2011 19:23
|
|
|
For most things original Titebond is all you'll ever need.
|
|
#
¿
Apr 28, 2011 15:50
|
|
|
Titebond II and III can "creep" under load. That is even after the joint is set if it is under any sort of load say tension on a guitar neck the joint can move over time. If you need it to be waterproof and it isn't under a heavy load then II or III would be better. Gorilla glue and the other polyurethane glues foam up as they cure which can be messy if you can't clean up the joint after it is cured. I've only ever used it to laminate a skate board deck and I didn't care about the foam since it wasn't cut to final shape yet.
|
|
#
¿
Apr 28, 2011 16:23
|
|
|
The flattening agents settle to the bottom of the can, if it wasn't stirred well before hand then you would be using the full gloss.
|
|
#
¿
May 6, 2011 23:08
|
|
|
It will work somewhat, but the bearings in a drill press aren't made for that sort of side load and it can damage it over time.
|
|
#
¿
May 18, 2011 02:26
|
|
|
You could try and find a Black and Decker Workmate. The whole table top can be a clamp and it folds up when not being used. Pretty sturdy little portable bench all around.
|
|
#
¿
Jun 22, 2011 01:49
|
|
|
There is a show on PBS called Rough Cut that focuses on building projects starting from rough lumber to finished product. The host is kinda a tool but it is pretty interesting and helps illustrate some things.
|
|
#
¿
Jul 12, 2011 22:16
|
|
|
Looks nice, hope you are wearing a good mask while working with the cocobolo. The dust can be an irritant. Which is also true for most tropical hardwoods.
|
|
#
¿
Jul 23, 2011 02:40
|
|
|
mds2 posted:I've been wearing a mask for sure. Any advice to keep the cocobolo dust from bleeding into the maple when I sand it? Don't sand it use a cabinet scraper instead. You'll have to learn how to sharpen them and burnish the edge to get the best use out of them. You can use a razor blade as a scraper in a pinch. This is a good little article but they are trying to sell a sharpener through it. You can do the same thing with a screwdriver shank. http://www.stewmac.com/shop/Tools/Scrapers/Scraper_Burnisher.html?tab=Instructions#details
|
|
#
¿
Jul 23, 2011 14:10
|
|
|
Powered hand planers aren't that great honestly. The cut is too narrow and hard to control. They are really made to shave down doors to get them to fit in jambs and that's about all they are good for. If you have a router and lots of spare time and don't mind making a huge mess you can make a sled that you ride on some straight edges and slide it back and forth over the piece shaveing off a little at a time. For pieces as big as you have it would be really impractical though.
|
|
#
¿
Aug 3, 2011 16:43
|
|
|
That thing looks like it might make a nice pepper mill.
|
|
#
¿
Aug 18, 2011 06:35
|
|
|
Blistex posted:Nope. Reproduction Pioneer-Era dildo is the correct answer! Can't it be both?
|
|
#
¿
Aug 19, 2011 01:21
|
|
|
To get that grey aged look to wood you can dissolve some steel wool in vinegar and brush that on the bare wood. Then brush over it with a strong tea solution. The tannins in the tea react with the vinegar/steel wool to give it the grey weathered look. I've only really seen it used on pine and maple so not sure how well it would work on poplar, but worth a shot at least.
|
|
#
¿
Aug 25, 2011 00:14
|
|
|
MMD3 posted:
For the table, use a scraper instead of sanding. Sanding will force the dust into the pores, scraping sheers off a super thin layer It might take a little practice on scrap to get the technique down.
|
|
#
¿
Sep 20, 2011 16:34
|
|

|
Search for info on epoxies used for finishing fretless bass fingerboards. They are all after the same thing high gloss, durability.
|
|
#
¿
Oct 5, 2011 01:52
|
|
|
MMD3 posted:still hoping to find some advice on applying paste wax if anyone has any experience with the stuff I've only ever used it like you use car wax. Put it on let it sit awhile then buff it off. It could need multiple coats at first to get a good base built up, after that you should only need to rebuff it once a month or so.
|
|
#
¿
Oct 26, 2011 23:42
|
|
|

|
| # ¿ Apr 27, 2024 01:05 |
|
|
Reclining easy chair handle?
|
|
#
¿
Oct 29, 2011 22:11
|
|