


|
Hmm, I hope I didn't push that guy over the edge. I didn't mean to sound negative. Just to clarify, my philosophy is you should learn the things you find the most interesting -- use your curiosity as a compass for what you should work on next. I spent the first half of my career forcing myself to learn things that I thought I was supposed to learn, and preventing myself from learning things I actually wanted to learn, because I didn't want to spread myself too thin. I felt like I needed to focus on a specific skillset if I was going to advance my career. In reality, it ended up just making me sad (and it didn't really advance my career, either). Rediscovering the things I was most interested in, and choosing to study those things instead of what everyone else was telling me to, was probably the best decision I ever made for my own mental health.
|
 #
?
Jan 3, 2021 23:51
#
?
Jan 3, 2021 23:51
|
|


|

|
| # ? Apr 25, 2024 14:11 |
|
|
Kanine posted:it seems like houdini is becoming a tool that a lot of environment artists should learn? or is it mostly the realm of technical artists Should learn? No, manually made environments will always be a thing, but an increasing number of companies are using it for environments/DMP. I will say this about houdini, though...you really need to enjoy that kind of work.
|
|
#
?
Jan 4, 2021 00:40
|
|

|
I hope everyone managed to get some time off over the holidays, get a personal project in or a much needed break! I kept doing simulation tests - still doing 2 a week, but about 75% of them are garbage and get discarded (however, a useful learning experience) This was an experiment in growing particles out from a center point, testing for nearby overlapping particles, turning them into small cloth balls, then expanding until they collide with each other and a box - this simulation was then cached and loaded as a VDB to shrink it a touch and subtract it from the box volume - they are essentially hollow bubbles forming on the inside of the mesh. I don't think you can really tell, there are probably other ways to get the same result, but the technique is kind of fun and going from geometry particles -> cloth -> vdb subtraction is a cool workflow. I took notes and I plan to try this with a less abstract scene of bubbles rising underwater.  This is phoenix - dialing in some nice wave settings and finding a good balance of detail. I'm going to start doing some tests mixing it with tyflow over the next week or so.   The animated versions are on Instagram - https://www.instagram.com/p/CJldRXLMg8T/?hl=en https://www.instagram.com/p/CJH91WXg4B0/
|
|
#
?
Jan 4, 2021 02:56
|
|

|
Nice sim, but is that guy wearing size 17 shoes?
|
|
#
?
Jan 4, 2021 03:00
|
|
|
Ha, it's probably just distortion from being wedged right in the corner of a wide angle, perfectly flat lens. I'll measure...
|
|
#
?
Jan 4, 2021 03:11
|
|
|
ImplicitAssembler posted:Nice sim, but is that guy wearing size 17 shoes? https://www.youtube.com/watch?v=RxbfYiiBuP0&t=150s
|
|
#
?
Jan 5, 2021 00:32
|
|

|
cubicle gangster posted:I hope everyone managed to get some time off over the holidays, get a personal project in or a much needed break! Looks great, are the bubbles tyflow?
|
|
#
?
Jan 5, 2021 00:39
|
|

|
For anyone learning Blender, the blender guru guy is kind of a shithead. This thread lists a lot of non-shitheads to learn from https://mobile.twitter.com/devonko_/status/1347630835235573761
|
|
#
?
Jan 9, 2021 16:29
|
|


|
Huh, well that's interesting. I did a few of his tutorials last year and was just beginning to pick them up again to try and start the new year productively, but I'll check those out instead. I did notice some of his comments in his videos seemed like he was probably a bit politically naive, I didn't know the extent of it though.
|
|
#
?
Jan 9, 2021 17:30
|
|


|
Anyone know of any good tutorials for improving my texturing in blender? My modelling is improving, but my textures always look.... Flat. I know the basics, but need a good intermediate tutorial.  This is WIP, but gives an idea. The helmet/backpack is the main issue, the space suit is more of a placeholder texture. I downloaded the pipe and strap textures.
|
|
#
?
Jan 11, 2021 09:24
|
|

|
It looks like you have normal/albedo maps, but everything is very non-smooth, which results in getting no highlights. Which is why everything looks kind of drab. The helmet and visor should be pretty smooth. The skin of the creature would be kind of smooth if it's meant to be a real alligator, but not if it's a cloth doll. The eyes should be very smooth, whether real or marbles. You can see that the black hose connected to the helmet has some highlights on the ridges. That's because of smoothness.
|
|
#
?
Jan 11, 2021 15:53
|
|

|
So how do I make him smoother? Better modeling? UV unwrapping? Some magic in the shading nodes? Thanks for the help btw, it's sometimes hard to figure out exactly what your doing wrong!
|
|
#
?
Jan 11, 2021 16:57
|
|
|
Can you post your shader nodes? You will get probably 90% of what you want by learning Principled BDSF really well. Lower the Roughness to make things glossy, increase the Metallic, etc.
|
|
#
?
Jan 11, 2021 17:29
|
|

|
I'm not really familiar with Blender's material system, but smoothness should be a number between 0 and 1 typically, and you can probably set it for the material as a whole or as a value on a particular node.
|
|
#
?
Jan 11, 2021 18:33
|
|
|
Neon Noodle posted:Can you post your shader nodes? You will get probably 90% of what you want by learning Principled BDSF really well. Lower the Roughness to make things glossy, increase the Metallic, etc. 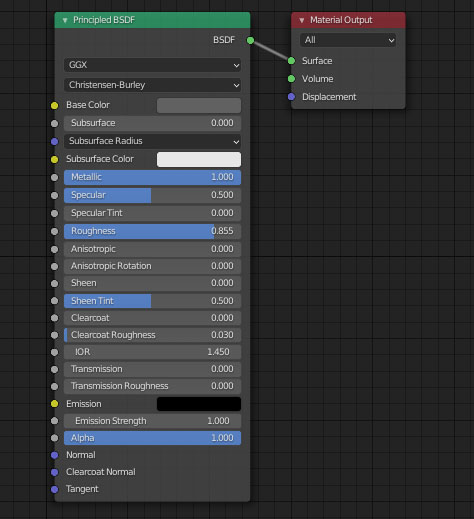 The helmet is a basic PBSF. 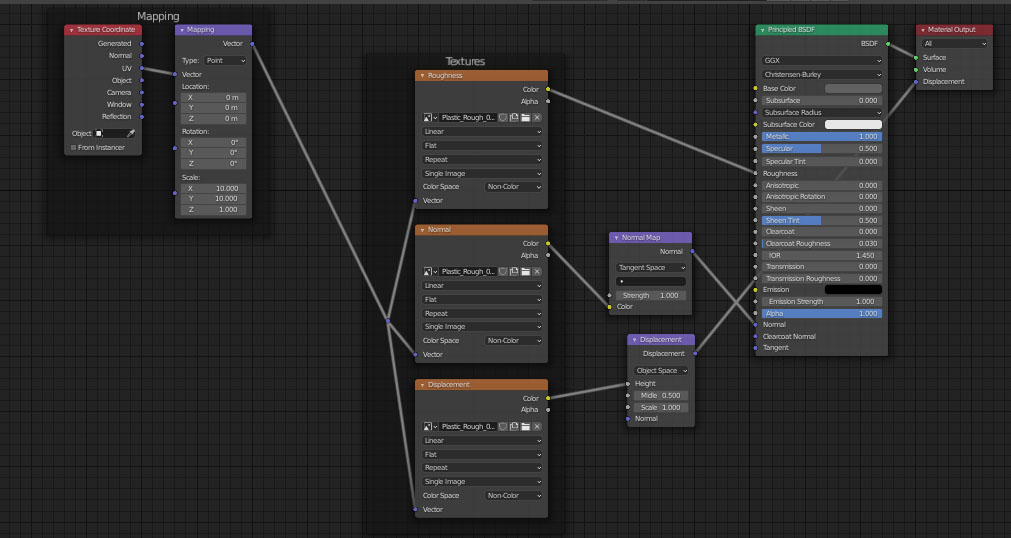 The backpack has a texure, but not the texture image as I wanted to match the grey.
|
|
#
?
Jan 11, 2021 19:05
|
|
|
I don't know how much you know but it is worth understanding how the principled bsdf works. Smoothness is roughness in blender (or the opposite, but the same slider eg smoothness 1 is roughness 0). Lighting is as important as texturing in making things not look flat. What I like to do is look on youtube for tutorials or timelapses for objects with similar materials and pause the video on the shader editor. Also looking for similar materials on blendswap and trying to understand how they work before stealing them. For example on the second page of the new releases I found this cool animated radar all done with procedual textures, maybe some material on there is similar to what you want maybe not but you can see the main material is quite smooth / non rough from the highlights at the front and back of the top from the preview image. It's definitely worthwhile figuring out why things work instead of just copying though, it won't always be the best way to do something and if you encounter a material with some mix of diffuse/glossy shaders it's likely from before the principled shader came in and there's a better way to do it now. Finally if you want to fully go down the rabbit hole of blenders procedual shader editor this video, while some of the bitching to the devs no longer relevant as things have improved and you might want to set audio output to mono if you wear headphones is the best explanation I've come across when it comes to the basics of texture coordinates and you get a fantastic wood texture out of it.
|
|
#
?
Jan 12, 2021 13:16
|
|

|
To add to that, get a couple HDRI's from https://hdrihaven.com/ and work up a set of studio scenes, where you can drop any object in and have it render well. you really can't work on materials without a scene to support them.
|
|
#
?
Jan 12, 2021 17:12
|
|
|
Hdri haven is really really good. I�m so glad it exists because domebele etc absolutely take the piss now. Does anyone know what sort of discount I should be able to get off autodesk atm? I need to renew alias and absolutely can�t be arsed spending 30 grand while the world is as it is.
|
|
#
?
Jan 12, 2021 18:22
|
|


|
Use Rhino instead, it's $995 
|
|
#
?
Jan 12, 2021 18:40
|
|


|
Indie max license is $100 and can be re-upped indefinitely if you're solo and making under 100k (no idea how they'd find out you tipped over to 120+...)
|
|
#
?
Jan 12, 2021 18:53
|
|
|
I need Alias because all my work is oem automotive. It�s such a fuckin joke
|
|
#
?
Jan 12, 2021 18:54
|
|
|
the nishita sun sky texture in blender is super good. it gives a lot of contrast and at low sun degrees like 2-5 it gives a glorious golden hour. sometimes it gives me better results than I get out of HDRI and other times HDRI are better, depends on needs obv. but the sky shader has a lot of flexibility? infinite potential for adjusting the angle etc and three sliders which adjust atmospheric conditions hence colours only desire is a good cloud environment for reflections
|
|
#
?
Jan 13, 2021 02:04
|
|

|
zhar posted:I don't know how much you know but it is worth understanding how the principled bsdf works. Smoothness is roughness in blender (or the opposite, but the same slider eg smoothness 1 is roughness 0). Lighting is as important as texturing in making things not look flat. Thanks for the links, I'm on a 2 hour default cube procedural texture tutorial. I (think) I understand the theory, but the practice hasn't clicked yet. I'll keep trying things out and watching tutorials and hopefully I'll get there. The joys of being self taught!
|
|
#
?
Jan 13, 2021 13:29
|
|
|
Bape Culture posted:I need Alias because all my work is oem automotive. It�s such a fuckin joke Just upgraded to Rhino 7 and it looks really similar to a demo video for Alias I just looked up.
|
|
#
?
Jan 13, 2021 15:34
|
|


|
Rhino and Alias are both class-A surface modelers, yes. But the automotive industry is almost entirely Alias so he's kind of going to be stuck with that if that's his field. Rhino's interface is vastly better though.
|
|
#
?
Jan 13, 2021 18:23
|
|
|
Another short marketing film in the bag! https://vimeo.com/500267609/56655d006f https://therealdeal.com/sponsored/57-ocean/realtys-new-reality-video-sells-38-million-57-ocean-penthouse-makes-virtual-debut This took forever to wrap - the original timeline was 8 weeks with the idea we'd get to shoot the time-lapses from the roof of the project 2 weeks before delivery, but the weather wasn't clearing - this was in early September, and normally we start to get real sunsets again around then. We kept an eye on the weather and went back to shoot 5 times when it looked like we'd almost have it, but for 3 straight months we did not get a single clear sunset over Miami. Every day towards the late afternoon it would cloud over, no matter how clear it had been before. Client wanted to make sure it was right, so he was ok waiting. We finally got it at the start of December.    
cubicle gangster fucked around with this message at 06:27 on Jan 14, 2021 |
|
#
?
Jan 14, 2021 02:18
|
|
|
drat dude, I�m always super impressed with your work! I dunno how y�all pull off the crispness you do, but it looks fantastic! Along a similar vein, I think I can safely post about my latest project! And maybe you�ll appreciate it? Moynihan Train Hall: Penn Station�s Half Century   It�s a permanent exhibit at the new Moynihan station in NYC. Nine ~7ft printed glass panels, arranged in a diptych/triptych setup, showing various scenes in the original Penn station, led by the amazing Canadian artist Stan Douglas. This was a huge one for me for a few reasons. First, I was given the opportunity to handle the modeling and shading for much of the architecture: all the walls, some of the floors, and some architectural props. Second, final render res was like 40k per panel, so it required a pretty dramatic change of my workflow to even manage the shading. It�s one thing to do 4K shows for Netflix or whatever, it�s totally another to do 40k for printed pieces, and I�m in awe of artists who do this regularly. AFAIK this is a permanent exhibit, so I�m hoping to make it there when COVID clears up some. Still haven�t seen the final product in-person!
|
|
#
?
Jan 14, 2021 15:28
|
|
|
Ccs posted:For anyone learning Blender, the blender guru guy is kind of a shithead. This thread lists a lot of non-shitheads to learn from the whole thread was deleted, what was the gist
|
|
#
?
Jan 14, 2021 15:31
|
|

|
Jenny Agutter posted:the whole thread was deleted, what was the gist
|
|
#
?
Jan 14, 2021 15:34
|
|
|
Slothful Bong posted:drat dude, I�m always super impressed with your work! I dunno how y�all pull off the crispness you do, but it looks fantastic! Looks awesome! It's always great to see CG being used in the visual arts! I'm guessing the environments are CG but the people are all photographed? How did you handle their lighting and shading? I remember that being one of the more difficult parts when I was an assistant on the �confetti� piece by David Claerbout.
|
|
#
?
Jan 14, 2021 16:56
|
|
|
Absolutely awesome stuff guys. I�m so jealous of arch his stuff it always feels a lot further ahead than most other industries. Speaking of art. I modelled the sculpture in the atrium here: https://www.architecturaldigest.com/story/the-worlds-largest-and-priciest-home-is-ready-for-its-close-up The artist was concerned with reflections (it rotates and has a ton of lights above it) so we treat it as a big car basically and built it all G3. Turned out great ")
|
|
#
?
Jan 14, 2021 17:03
|
|
|
Slothful Bong posted:drat dude, I�m always super impressed with your work! I dunno how y�all pull off the crispness you do, but it looks fantastic! Yeah, this is sweet! really nice work. What was the planning process like - were you involved in blocking out the scenes ahead of photography? Would love to know more about the process. We're working on all the Penn redevelopment marketing - the NYC studio is leading it. just wrapped up a 4 minute long film on a screen that's about 40ft wide. in Miami alone our team has handled about 35 of the images, and I know the guys in NYC must be near hitting 100. Standard 'this is what it will look like when it's done' images of course. The redevelopment of Penn is such a massive project. I really like that they're extending their marketing to public awareness art pieces and lifting the overall public perception of the project like that. I know they had someone hand carving the logo into limestone too. And thank you! The crispness mostly comes from lighting and materials working hand in hand and being refined endlessly - we pushed to get as close to final with the raw renders as possible. The process was to keep working on stills - we'd render one, do a rough photoshop paintover picking out nice highlights and shadow areas to make things pop, pushing the colors around, then we'd review and discuss how to incorporate those changes in 3d, then we'd implement, render, and do a fresh paintover of that new render, discarding the old one. basically kept looping through like that until there was nothing left to do. That living room shot has got about 20 additional low powered lights, doing things like emphasizing a blue cast from outside or giving the pillows a little bit of a rim light etc. Things we'd usually try to do in post using normals passes. Started looking into this method of lighting after reading the CG cinematography guide and playing the yakuza games - realizing that each character in a cut scene in those games has a rig of 10-15 lights which follow them around designed to make them really pop, in addition to the general environment lighting. I know this is pretty standard stuff for characters and people in movies, but we tried to bring this kind of thinking into furniture to help add layering to dense scenes. It's totally unrealistic, but its hard to tell. Chapters 6, 7 & 8 of this are really essential reading. Maybe 5 too. All of it is good. I think I got this link from someone posting it here ages ago. https://chrisbrejon.com/cg-cinematography/ Bape Culture posted:Speaking of art. I modelled the sculpture in the atrium here: Also super cool. nice work! cubicle gangster fucked around with this message at 18:58 on Jan 14, 2021 |
|
#
?
Jan 14, 2021 18:49
|
|
|
Neon Noodle posted:The guy's just a bit of an edgelord and a clueless white dude saying insensitive racist/homophobic crap. classic white australian
|
|
#
?
Jan 14, 2021 20:16
|
|
|
So I've been working on my Blender project for a week or so and I've been having a great time, but I'm finally at the point where I'm wrestling with UV maps and it's a slog. My problem is that I've made my meshes from one primitive and have done a bunch of beveling etc to prettify them, but now I'm kind of thinking I should have made separate meshes and joined/parented them because hoo boy, this model is messy to work with for how relatively simple it is. Is there any downside to using separate objects this way? I discovered the knife intersection tool and facepalmed when I made a better version of a clock face and found I could just slap it onto my old mesh.
|
|
#
?
Jan 14, 2021 20:18
|
|


|
Fragrag posted:I'm guessing the environments are CG but the people are all photographed? How did you handle their lighting and shading? I remember that being one of the more difficult parts when I was an assistant on the �confetti� piece by David Claerbout. By the time it got there, we had prelim CG lighting, so when they shot the people in an ice rink in Vancouver the on-set supe was able to get the lighting close enough for comp to tweak. Of course, lighting did change after that, but the incredible comp team did their magic to get the people to sit correctly. I�m sure they went through hell though lol. But the studio�s main focus is VFX, so relighting of plate elements is something they�re very familiar with. By the way, I really like that piece you linked to! Do you know if there�s any videos online of it? cubicle gangster posted:Yeah, this is sweet! really nice work. What was the planning process like - were you involved in blocking out the scenes ahead of photography? Would love to know more about the process. Thanks! My involvement started early on with a proxy model of PENN; basic stuff, just getting the floor plan and layout of the space as close to historically correct as I could. This covered most of the non-track levels of the station, minus certain side rooms and the taxi entrances. From there, it went to the layout team, who took my scene and worked with Stan to pick out angles, rough up some lighting, etc. The scale of the space and the amount of �extra� stuff modeled allowed Stan leeway to shift cameras as needed. It is his baby, after all! Then, we had a team that did a whole proxy crowd thing, working closely with Stan on the amount of people, what they�re doing, and their exact placements. Stuff like CG staircases/railing heights were measured, so when it got to photography, they were able to say �oh this guy needs to be stepping down 8 inches with his left foot�. This also allowed for proper shadows! There was some talk early on about a full VR build of the station, but I�m guessing that conversation fell by the wayside due to wildly different asset requirements for print vs VR. quote:We're working on all the Penn redevelopment marketing - the NYC studio is leading it. Haha drat, small world! Many thanks for the lighting rig tips too. I�ve always read about games using that method, but never experimented with it since I mostly stick to architectural assets. Will be cool to bring this to the studio and see what they think!
|
|
#
?
Jan 15, 2021 00:51
|
|
|
Songbearer posted:So I've been working on my Blender project for a week or so and I've been having a great time, but I'm finally at the point where I'm wrestling with UV maps and it's a slog. My problem is that I've made my meshes from one primitive and have done a bunch of beveling etc to prettify them, but now I'm kind of thinking I should have made separate meshes and joined/parented them because hoo boy, this model is messy to work with for how relatively simple it is. Apparently the way I've been doing it (One interconnected mesh from one primitive) is for people who are already good at this stuff and now I feel like a ding dong
|
|
#
?
Jan 15, 2021 01:33
|
|
|
Songbearer posted:Apparently the way I've been doing it (One interconnected mesh from one primitive) is for people who are already good at this stuff and now I feel like a ding dong Sometimes one solid mesh is good, like if you're going to bake vertex lighting. But in most cases, separate objects is perfectly fine. For realistic objects, my general rule is "Build the model the same way it's constructed." If the real thing is two separate pieces, then building it in two separate pieces is fine, too. Of course, what may or may not be the right thing to do depends on a lot of factors, but if you're just starting out, I'd just do whatever is easier to work with until you need to build it differently.
|
|
#
?
Jan 15, 2021 01:53
|
|

|
Songbearer posted:Apparently the way I've been doing it (One interconnected mesh from one primitive) is for people who are already good at this stuff and now I feel like a ding dong I think even people good at it don't use one mesh This is a good read - https://www.artstation.com/marketplace/p/dY3r/how-to-tackle-vehicles-main-steps-170pages-pdf I could have sworn it was free. He's put lots of good info out there. I quite like how all of his talks and info are a bit sloppy and haphazard but come together in the end - they mirror his style of modeling.
|
|
#
?
Jan 15, 2021 01:55
|
|
|
I always meant to post in the creativity and arts forum, and now I have a reason to! I�m a traditional miniature sculptor for tabletop games (hobbyist with some commission work, really) and I decided to take the plunge into 3D because it�s rapidly becoming industry standard for a lot of companies, plus the resin printer boom has really made it easier to make and sell models without running a garage casting business or having to hold onto stock that might never sell. I�ve started learning zBrush Core and getting some basic stuff together, but I�m wondering if there�s any recommended learning materials for making the jump from physical materials to digital ones. I can say I already appreciate being able to reuse basic stuff without having to cast my own body blanks, but the workflow is still really daunting, even with the somewhat pared-down list of options in Core. Just figuring out how to translate my sculpting process into digital is kinda weird, and the stuff that their website recommend as an introduction has been greatly helpful even if I�m still working on translating �stick little blobs on, blend, and refine� into a digital format.
|
|
#
?
Jan 15, 2021 03:08
|
|

|

|
| # ? Apr 25, 2024 14:11 |
|
|
cubicle gangster posted:I think even people good at it don't use one mesh Matthias is so loving good. He has a few talks on YouTube that more or less cover the same thing as that doc, but the $5 is probably the best $5 you'll ever spend to improve your understanding of modeling. I love how insane his workflow sounds, but it also makes tons of sense and clearly works for him. It's a shame that Pepera is no longer with us, the two of them together would probably be making some truly insane stuff right now.
|
|
#
?
Jan 15, 2021 04:09
|
|