


|
threelemmings posted:Hmmm aluminum frame airplanes to increase your available airforce are definitely more on the metalworking side than blacksmithing, can't help you there. You'll have to wait for our machining experts to check the thread. Oh poo poo, wrong thread. 
|
 #
?
May 12, 2020 00:19
#
?
May 12, 2020 00:19
|
|


|

|
| # ? Apr 26, 2024 15:08 |
|
|
Yooper posted:Oh poo poo, wrong thread. On that note, what are all the builderbabby threads that'd be useful to someone with a mechanical job or hobby? These are the 4 I'm following: Tools https://forums.somethingawful.com/showthread.php?threadid=3384038 CNC https://forums.somethingawful.com/showthread.php?threadid=3558051 3D Printing https://forums.somethingawful.com/showthread.php?threadid=3365193 Blacksmithing/Metalworking https://forums.somethingawful.com/showthread.php?threadid=2905844 (the very thread you are reading)
|
|
#
?
May 15, 2020 19:29
|
|

|
There's also a tools thread in AI. Obviously lots of car stuff, but general toolchat there too: https://forums.somethingawful.com/showthread.php?threadid=2788369
|
|
#
?
May 15, 2020 19:33
|
|

|
Is there a name for the fitting that would go on the end of an acme screw to hold it in place but let it spin freely? Right now I�m using a bronze bearing and the end of the thread just rubs against the wood, and you can feel a lump where the thread starts when rotating it. I�m thinking something like the pad on a C clamp? Or should I just grind the end of the thread to be more rounded? Pics if they help:  
|
|
#
?
May 15, 2020 21:20
|
|

|
You're looking for a thrust washer
|
|
#
?
May 15, 2020 22:07
|
|

|
Or thrust bearing.
|
|
#
?
May 15, 2020 22:29
|
|
|
If you just want to make a surface to bear against, then the mentioned thrust bearing/bushing at the tip of the acme rod (or just sitting down in the bore) would do it, or a shaft collar that bears on the bushing. If you want to actually hold the shaft in there so it can't lift out, then the only easy way is a flange bearing with a set screw (and maybe a shaft collar, depending on load and load direction)
|
|
#
?
May 15, 2020 23:03
|
|


|
Yeah flange bearing and drill all the way through sounds like the best option
|
|
#
?
May 15, 2020 23:15
|
|
|
I actually made a simple jig and ground the tip into a slight cone so it wasn't lopsided anymore. That didn't fix the problem-I think either the screw shaft is slightly bent or the nut is installed a little wonky (by far the most likely option). The screw is basically a jack to raise/lower something, and the wobble was a little annoying but doesn't seem to be majorly impacting the way anything works. Stiffening up the rest of the framework seems to have helped as well. This whole project has been 'mock it up and make sure it works, and then I'll build a real one later' and, uh, the mockup works and now I guess it's the tempermanent, cobbled together, real one. Thanks for the advice anyway! I've got plans to build a vise of some sort soon, and I'm sure I'll need something similar then.
|
|
#
?
May 15, 2020 23:28
|
|
|
I like the bronze bushing but it looks like it is a through hole and your lifting loads are going into the plywood. Here's how we do that on our machines at work: You can see the screw has been turned down to have a shoulder that delivers axial load into a bearing race. In your case, I think cleaning up the end is fine and I'd put a washer or some other metal under the screw so the wood sees lower psi contact stress and no relative motion. Consider letting your nut float around radially. I see two guides and a screw and, if everything is tight, you have 3 lines in space that need to be parallel. The two guides have defined your path so the nut is just providing the motion. It can float around to accommodate a bent shaft and any build issues. The errors from radial play are near zero with small angle approximation. Here are some other configs from googling. My 3d printer does the z axis with the first config and a loose nut. Good enough to get the job done. 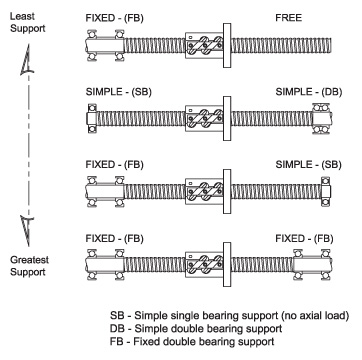
|
|
#
?
May 16, 2020 19:00
|
|
|
Anyone recognize this chuck mount?  Looking for a "new" chuck for my lathe and this chuck looked OK and a good price. R�hm. Not seen a mount like that though, usually they just got threaded holes and you screw it onto your own homemade backing plate, not quite sure what I am looking at here.
|
|
#
?
May 19, 2020 10:02
|
|

|
The fact that the studs have flats on them suggests they unscrew leaving you with your threaded mounting holes...
|
|
#
?
May 19, 2020 18:32
|
|
|
His Divine Shadow posted:Anyone recognize this chuck mount? DIN 55027 Looks like it was popular in East Germany. I believe you have a chuck and the back plate.  I can find some threads on PracticalMachinist where people run into them. https://www.practicalmachinist.com/vb/schaublin-cazeneuve-weiler-graziano-mori-seiki-lathes/another-euro-lathe-163240/
|
|
#
?
May 19, 2020 19:11
|
|
|
Duh oh yeah good catch, that is part of the backing plate and not the chuck itself.
|
|
#
?
May 20, 2020 04:29
|
|
|
Having apart the lathe cross slide and saddle for cleaning (do that now and then I find it's needed) and I removed a few parts so I could measure them and put them in CAD for replacement making. The half nuts are used for longitudinal feed on this lathe so they see alot of use. And are quite worn down now.    Planning to make a replacement in steel and to make the actual nut a separate part that can be replaced. Same thing with the cross slide nut, this is a hot dog in a hallway fit at the moment.   That replacement will also be of steel instead of a single piece of bronze. I am contemplaing using acetal as material for both screws. Or maybe I will go with cast iron because it seems to be much better than bronze. When I compare the wear on the top slide and the cross slide, the cross slide is worn on both the screw and the nut. But on the main lead screw the lead screw shows very little wear, almost all the wear is in the cast iron nuts. It clearly seems to be a working solution. I'm going to have to remake the cross slide nut entirely. And some interesting dimensions and pitch combos on this lathe (Rexvalter VF118, made in 1950s Sweden), the main lead screw is 8 TPI but 20mm diameter. The cross slide screw is 3mm pitch but 7/16ths diameter.
|
|
#
?
May 22, 2020 04:40
|
|
|
I'm about to start repairing rust on a 30 year old civic, followed by building a roll cage. I'll make a build thread in AI when I've got more content. Want me to throw my struggles with welding rusty sheet metal in here for your amusement?
|
|
#
?
May 28, 2020 00:48
|
|


|
Welding thin sheet metal is an exercise in the best of times, sounds terrible!
|
|
#
?
May 28, 2020 01:00
|
|
|
I�m trying to learn how to weld while in quarantine and have discovered that different manufacturer�s electrodes work differently. Initially I had Hobart 6013 and 6011, both in 3/32�. The 6013 worked well enough�I can light an arc and weld. Still need lots of practice, but it works. The 6011 I could not get to work on any amperage with my little inverter welder. It was really hard to light and would stick constantly, enough that I couldn�t even run a bead. Today I picked up some Lincoln electrodes, and the 6011 works totally fine. The Lincoln 6013 acted a bit different from the Hobart stuff too: seemed like the rod was a lot runnier, or at least the flux was, and the slag was easier to get off. I�d assumed, wrongly it seems, that the rods would be about the same between manufacturers.
|
|
#
?
May 28, 2020 04:55
|
|
|
Oh yes there are definitely differences between manufacturers.
|
|
#
?
May 28, 2020 07:09
|
|
|
Age/moisture is also another big factor with SMAW electrodes. New rods often weld much nicer than old stuff that's been sitting around. 6011 doesn't need an oven, and you can't bake them but if they got really wet, they won't strike for poo poo.
|
|
#
?
May 28, 2020 14:32
|
|


|
I've had some decent success heating old rear end welding rods with a propane torch before using them. YMMV
|
|
#
?
May 29, 2020 11:25
|
|


|
The rod was brand new out of a sealed package � did some searching around and it sounds like other people have the same problem with Hobart 6011 and small inverter welders  Do I need to be keeping my electrodes in an airtight container with desiccant?
|
|
#
?
May 29, 2020 14:31
|
|
|
I keep mine in a sealed plastic bag in the boiler cupboard and assume any issues are my incompetence 
|
|
#
?
May 29, 2020 14:38
|
|


|
 This is gonna be fun.
|
|
#
?
May 30, 2020 01:41
|
|
|
I'm looking at diy BBQ burner design and most designs seem to place the burner holes on top. But I have seen some that put them on the sides, and some even on the bottom. My gut feeling says putting them on the sides or bottom introduces more turbulence and makes for more even heating.
|
|
#
?
May 31, 2020 15:38
|
|
|
Welders, the movie stars of the CCCP.
|
|
#
?
Jun 2, 2020 13:01
|
|
|
Ivan there just realised how the cameraman is holding onto the lady with the microphone
|
|
#
?
Jun 2, 2020 15:41
|
|
|
His Divine Shadow posted:I'm looking at diy BBQ burner design and most designs seem to place the burner holes on top. But I have seen some that put them on the sides, and some even on the bottom. Just like a replacement diy gas burner sort of thing? I've replicated replacements for grills before and just usually patterned off a left over one the was stock before, but I personally prefer side burner holes (especially if it's not going to have a decent cover) because of gunk falling down. I'm not sure there is that much to gain in efficiency or anything on the scale of a grill, especially since some of them mix it up. The pot boiler for instance on mine at the moment is all on the side, but the grill proper is a double set on top with deflectors over it and fake rocks underneath. That said I can't imagine either would be a problem, other than perhaps the burner hole diameter itself.
|
|
#
?
Jun 3, 2020 15:10
|
|
|
Mostly it's just pure curiosity. I have a charcoal grill myself.
|
|
#
?
Jun 3, 2020 17:09
|
|
|
Not a 1:1 comparison, but: indirectly-oriented air or flame ports in forges, to bring the question home to metalthread, tend to 1) sidestep fouling from fuel fines and ash, in the case of solid fuel, and/or 2) encourage fuller fuel combustom, promote even heating & eliminate hot spots by circulating heat throughout the chamber vs. directing it towards the food/part to be heated in gas fuel setups. id think both apply somewhat to bbq design 1) preventing nozzle fouling and simplifying maintenance is the reason traditional charcoal forge tuyeres were typically of side-blast designs instead of the more intuitive bottom-blast seen in modern designs. With a cast-iron firebowl featuring an ash dump/cleanout hatch and built-in clinker breaker, managing the debris that falls down towards the tuyere isn't much of a problem, but if we're talking a monolithic earthen firebowl made from fireclay you rarely get any clean-out accommodations at all, and ash dust + clinker fines tricking down into the tuyere pipe when the blast is turned off will gradually accumulate and choke the forge off. I made an old-school clay forge like that once- which I replaced about a week later with an upgraded tuyere pipe featuring a rudimentary clean-out feature, basically just a length of iron pipe that had holes drilled in its side midway to serve as the tuyere, grille with a pipe capped end protruding out of one side of the forge. Once the airflow got bad you would unscrew the cap and use a leafblower in place of a squirrel-cage blower to evacuate whatever had fallen through the grille. in the case of 2) i designed my gas forge with a cylindrical working chamber and had the burner enter the chamber at a tangent to the inner wall; the commercial propane forges i've used had rectangular working chambers and multiple smaller burners pointed directly at centre bottom of the chamber, and although it gave excellent intense spot heat for stuff like forge welding, it wasn't great otherwise. wide workpieces heated very unevenly and had to be turned frequently, the firebrick floor in the forge bottom would wear out in just the middle prematurely and prompt the replacement of the entire firebrick slab before its time, and the firebrick walls had to heat up for several hours operated at a lower flame with just one door open before the fuel-air mix would fully combust if you opened the valves up to full. a tangentially-placed burner, located at one end of the forge chamber and canted slightly to encourage the combusting fuel-air mix to spiral along the full length of the cylindrical wall before reaching the door, is a much more efficient design if executed properly because it maximizes the time the fuel has to fully burn, extracts the maximum possible heat from the combustion process, and creates a predictable 'combustion gradient' towards the door that guarantees the stuff escaping is relatively cold flue gas- mostly carbon dioxide- and not half-combusted fuel gas, which tends to be rich in carbon monoxide and is "not great" to be venting all willy-nilly
|
|
#
?
Jun 3, 2020 18:33
|
|

|
Cutting out some brass stock out of bigger stock, getting some use out of my homemade saw arbor, making myself an ~1x1 bar in inches. First cut I went really carefully, 2nd cut I did in one pass. Just using a bottle with emulsified oil for coolant.  (edit: 2nd picture) His Divine Shadow fucked around with this message at 06:45 on Jun 5, 2020 |
|
#
?
Jun 5, 2020 04:41
|
|
|
His Divine Shadow posted:Cutting out some brass stock out of bigger stock, getting some use out of my homemade saw arbor, making myself an ~1x1 bar in inches. First cut I went really carefully, 2nd cut I did in one pass. Just using a bottle with emulsified oil for coolant. Never seen a saw used like that on a milling machine, that's amazing.
|
|
#
?
Jun 5, 2020 18:09
|
|

|
after endless steel/aluminum, switching to free-cutting brass is always such a treat. the first exploratory pass is as per usual- wow, this stuff sure cuts nice!- and then you realize you can just, fuckin, let er rip, and the finish is still great, and the machine + tool seem to treat the concept of �feed rate� and �I.P.T.� as mere suggestions
|
|
#
?
Jun 5, 2020 19:40
|
|
|
 Sheet metal is a pain. Getting better though.
|
|
#
?
Jun 6, 2020 00:17
|
|
|
To any plasma owners, do you prefer stand off tips (like with the springs or wheels or whatever to keep it constant) or drag tips? I am looking for a plasma cutter and basicallyt I got it narrowed to to very different choices. An italian made 1990s 3-phase transformer / SCR controlled unit in good looking shape 70 amps rated for 20mm (about 7/8"), weighs 85 kg Or a modern chinese generic unit (Stahlwerk, a germany company selling branded units), also 70 amps, but IGBT based and capable of cutting 25mm (1") steel with a very nice looking cut (showed to me by a stahlwerk owner). It's like old proven technology, is built like a motherfucking tank and I can probably repair anything electronic that breaks except the big transformers themselves. Same tech as in my welder. But it's not portable, not that it matters much for me it will not leave the shop. But it�s less efficient and uses consumables faster I bet, though it seems stuff is widely available still for the torch (Cebora P70). The chinese inverter is a better performer in every single respect and I saw what it did to thick steel, but if anything breaks, if the magic smokes goes out then I'm poo poo outta luck, any service means sending the unit back to germany as well.... Oh and both units are 3-phase actually. In europe that's how we'll run anything that can't be run on a 16A/230V single phase fuse. I've seen Everlast units sold here locally, some of them are not well thought out, like they are taken from the american market and fitted with a 50hz transformer and sold here, 230V single phase, requires a 32A fuse to use at full power... Good luck finding customers, or getting a lot of return. His Divine Shadow fucked around with this message at 07:03 on Jun 6, 2020 |
|
#
?
Jun 6, 2020 07:00
|
|
|
Made some hold down clamps this weekend.  Still no closer to deciding anything on the plasma cutter front. I was offered a really nice plasma cutter, a real pro machine (Stel Thor 61) but sadly it's a single phase only machine and needs an insanely large 32A single phase fuse to perform at full power. That's bigger than the main fuses of my entire house (3x25A), who the gently caress in europe can run it.... I have started eyeing my oxy-acetylene setup as well again...
|
|
#
?
Jun 8, 2020 06:30
|
|
|
Oh man some real high quality videos lately on this channel We Love Welding, but most of them are in Swedish or Danish or Norweigan. Channel: https://www.youtube.com/channel/UCh3ghd5RymWW-nt1NKt8vUw This was a real good video on oxy-acetylene safety as well as a good look in parts at the injector based welding torches work that are common here (compared to equal pressure torches), but sadly it's just gonna be bork bork to 99% of you guys. https://www.youtube.com/watch?v=HpLzFlZaN-M This is english though, about flame straightening https://www.youtube.com/watch?v=IxzV9VeUpLY EDIT: Oh wait I found an english version of the safety video https://www.youtube.com/watch?v=7vaWSczxrRA EDIT 2: And here is a playlist with all their english language videos https://www.youtube.com/playlist?list=PLjz4GylybSGBNnU_e8q-9YzQ7aSk6aJpr His Divine Shadow fucked around with this message at 05:06 on Jun 10, 2020 |
|
#
?
Jun 10, 2020 04:38
|
|
|
cakesmith handyman posted:Ivan there just realised how the cameraman is holding onto the lady with the microphone Even the best welders are in awe at that level of penetration
|
|
#
?
Jun 10, 2020 05:55
|
|


|
Oxy acetylene welding is one of my favorite techniques just because it's relaxing to me and satisfying when you hit the right heat and all of a sudden see everything just go bloop and flow together. Not really practical for most projects but I like it for fine work where I can't grind away the bead of a mig or whatever. The flame straightening video was cool, mostly reminds me of a coworker who had been a car bodywork guy back in his day and was real good at it. When we got restoration jobs involving really thin sheeting like lamp covers and the like it was incredible watching him work with just a torch, a stick of lead to rub on, and a planishing hammer. A lot of his work didn't involve touching the piece at all and was just applying the smallest bits of heat to make different parts bubble up or shrink until the whole thing was even and flat. I have a buddy who's a mechanic and he confirms that professional bodymen work black magic. threelemmings fucked around with this message at 06:06 on Jun 10, 2020 |
|
#
?
Jun 10, 2020 06:03
|
|
|

|
| # ? Apr 26, 2024 15:08 |
|
|
I worked with a guy recently who was a good gas welder, he would do a lot of stuff with it where I would just try to use stick with worse results. I mean in a normal job it would've been mindless mig glue gun bs but we only had stick and gas Edit the no filler gas stuff is SUPREMELY satisfying when it flows together shovelbum fucked around with this message at 06:09 on Jun 10, 2020 |
|
#
?
Jun 10, 2020 06:06
|
|