


|
Sagebrush posted:This video annoys me. He is really glossing over some of the important details of how the compounds differ from one another. He casually mentions once "the acid cleaners remove good metal too" but doesn't come back to it, and that is a massive problem if you are restoring something valuable or cleaning a part with close tolerancing. He doesn't discuss the neutralization steps you need to take with the acid cleaners, either. And he doesn't follow the correct procedure for Evap-O-Rust. That stuff chemically converts the rust to loose black oxide which you just brush off, but he looks at the oxide coating after soaking it and concludes that it doesn't do as good as job as the other stuff that exposes bare metal, even though once you scrub the Evap-O-Rust part it's as clean as the acid-etched stuff. And he doesn't even mention that hmm, maybe the reason the naval jelly outperformed everything else on the flat sheet is simply because the gel doesn't evaporate anywhere near as fast as the other compounds do (lol a paper towel), so whether you can immerse the part or need to brush it on makes a huge difference to your selection. And he starts with seeing how much rust disappears in 5 minutes?? That's totally irrelevant to most home shop types; yeah sure you care about speed if you're in a plant, but if you want to clean up an old wrench at home you have zero problem soaking it in Evap-O-Rust overnight. yeah idk who the video guy is or his background but he's either not really knowledgeable about how rust removal as a real-life process is actually done and why it is done that way, or else is consciously tailoring his test prototcol to get a predetermined outcome that generates more Content views and interactions, which inevitably weights Interesting or Controversial content over Mundane & Correct. finding that acid works better than evaporust certainly counts as controversial, but either cause seem commonplace in this genre of video, unfortunately. like, to pick an arbitrary grievance, 5 minutes just isn't a real-life timeframe for rust removal for anything *except* (surprise surprise) mineral acid-based derusting/etching processes. the gentlest chelating agents can take days to weeks to do their jobs in extreme cases. that does not matter because they have a radically-different appropriate use case from acid rust removal for entirely different reasons. it's like trying to compare cake recipes that are all baked at 750 degrees for 90 seconds, the outcome doesn't reflect the ostensible premise Ambrose Burnside fucked around with this message at 04:30 on Oct 25, 2021 |
 #
?
Oct 25, 2021 04:18
#
?
Oct 25, 2021 04:18
|
|


|

|
| # ? Apr 18, 2024 20:49 |
|
|
ZincBoy posted:I have had mixed success with the Ali inserts to be honest. What I have found is that the $2-3/ea inserts are really luck of the draw. The udrill inserts I got have been great but some of the lathe cnmg inserts were trash and chipped as soon as you looked at them. The biggest problem is getting the right speeds/feeds as I found they can be substantially different than the name brand equivalent. If I were doing production there is no way I would use the Ali inserts as there is no guaranty that what you got before will be the same in the next order. Follow up on my Aliexpress insert adventure. One sellers items showed up and inside the box was cheap women's jewelry. I emailed them and they said it was impossible and basically I was poo poo out of luck. So 0/1. Second package showed up today and my $20 TPG331's are in a Sandvik Coromant package. So not sure if they were stolen from some factory in China or just straight up counterfeit. The threading insert and grooving inserts are both cermet and not carbide with an iridescent coating that is probably not functional. Probably won't do that again. Once we chuck something up I'll report on performance.
|
|
#
?
Oct 28, 2021 21:03
|
|


|
Yooper posted:Follow up on my Aliexpress insert adventure. One sellers items showed up and inside the box was cheap women's jewelry. I emailed them and they said it was impossible and basically I was poo poo out of luck. So 0/1. Second package showed up today and my $20 TPG331's are in a Sandvik Coromant package. So not sure if they were stolen from some factory in China or just straight up counterfeit. The threading insert and grooving inserts are both cermet and not carbide with an iridescent coating that is probably not functional. Probably won't do that again. Once we chuck something up I'll report on performance. Sounds about right to me. Haven't had jewelry instead of inserts though, that's a new one. Use the Aliexpress dispute mechanism if you haven't already. It worked for me when I got the completely wrong inserts.
|
|
#
?
Oct 29, 2021 13:25
|
|

|
ZincBoy posted:Sounds about right to me. Haven't had jewelry instead of inserts though, that's a new one. Yeah, my experience is similar. Their dispute system is heavily buyer-weighted.
|
|
#
?
Oct 30, 2021 03:11
|
|


|
Was recently gifted a cute little anvil my husband found, and I finally had some time to clean it up. The packaging on the muriatic acid was lousy and cheap and did not inspire confidence, so I decided to plunk down eight bucks and try the gel (phosphoric + gluconic acids). Results were pretty good. 2 rounds of applying + rinsing and in an hour, almost all of the rust was removed from the work surfaces.  It even gave the metal a quick & dirty bluing. I'm going to hit with with a flap wheel to clean up the work surfaces and maybe something to knock off the rust on the bottom, but I'm pretty pleased with how it turned out.
|
|
#
?
Oct 30, 2021 07:29
|
|

|
Hey all, I'm hoping this is a quick answer. I bought these legs for a custom desk my buddy is making: https://www.hairpinlegs.com/products/hairpin-leg?variant=325861935 I totally intended to get the stainless steel ones, but I instead ordered the "raw steel" version. My two carpenter friends had differing opinions. One guy said to coat them in "ballistol", and the other said to solvent clean (acetone) and then do a urethane clear coat out of a rattle can. I don't have a preference at all. This is going to be an indoor office desk setup. Recommendations? Thanks!
|
|
#
?
Oct 31, 2021 17:02
|
|

|
LRADIKAL posted:Hey all, Spray clear.
|
|
#
?
Oct 31, 2021 17:30
|
|
|
sharkytm posted:Spray clear. It can still rust under the clear coat. It might not be an issue indoors, but people use that finish on bicycles to achieve a specific type of "patina."  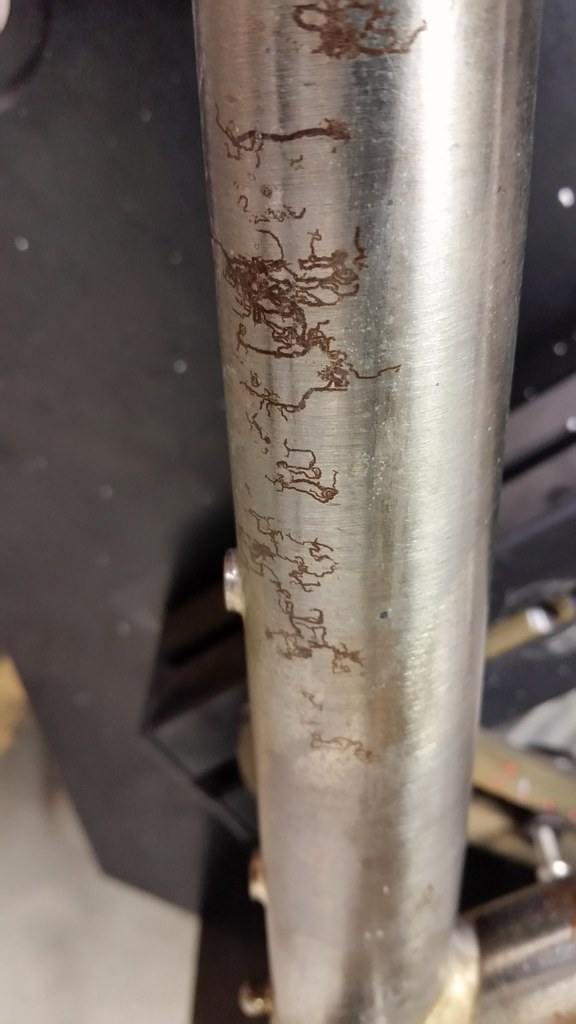 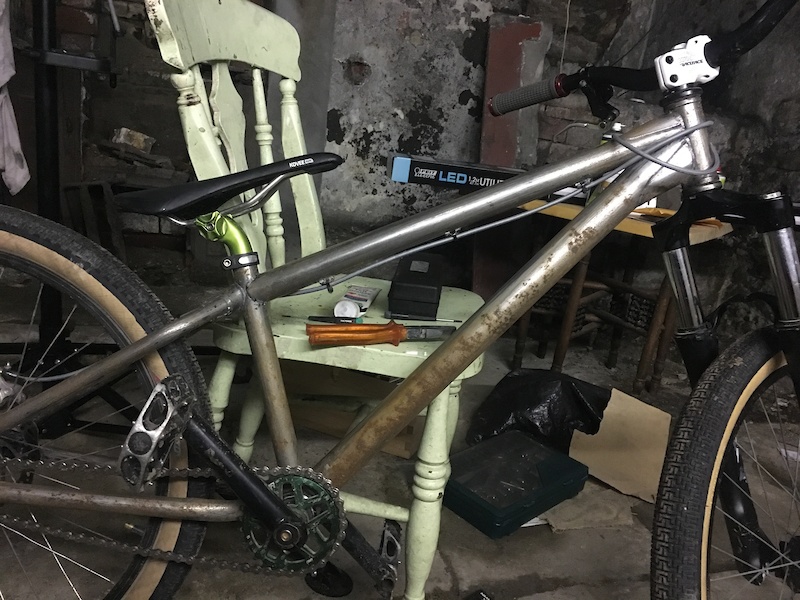
|
|
#
?
Nov 1, 2021 12:51
|
|

|
LRADIKAL posted:Hey all, Ballistol, Boeshield, WD-40 corrosion inhibitor will put a layer of long lasting oil on it to prevent corrosion. Micro-crystal wax (Renaissance Wax) works too, and lasts longer. It's what museums use. You'll want to clean off the acids from the finger prints with a solvent no matter what you decide to do.
|
|
#
?
Nov 1, 2021 13:00
|
|
|
Thanks for the additional details. I think the capillary looking patina under the clearcoat looks cool!
|
|
#
?
Nov 2, 2021 02:24
|
|
|
Non-update update. Still stuck in bureaucratic hell. I've lost count of how many forms I've filled out in triplicate, only to be sent somewhere else. And the goddamn stamps. So many stamps... There is a small chance I may be able to remove my stuff from the port tomorrow if the stars align just right, but will require a hefty cash bond  e: and it cannot be used for commercial purposes until some other authority grants some other permission, which can take upward of 120 days. fins fucked around with this message at 13:52 on Nov 2, 2021 |
|
#
?
Nov 2, 2021 13:45
|
|

|
I'm not exactly sure where to post about this, but this thread seems pretty relevant. My friend Rob is restoring an old surface grinder as part of building himself an amateur machine shop. Here's his channel if anyone is interested in watching an engineer keep himself entertained at night. https://www.youtube.com/watch?v=eLaHKzXj7yM He also is a nerd about bikes, cars, etc and documents that stuff as well.
|
|
#
?
Nov 2, 2021 22:04
|
|


|
weird question, but what's it called when you transmit force via a long channel filled with ball bearings? you can send em around corners and in loops so you can do some neat things with em, one specific application i remember is self-adjusting vise jaws, but I can't for the life of me find anything via google
|
|
#
?
Nov 3, 2021 09:09
|
|
|
Ambrose Burnside posted:weird question, but what's it called when you transmit force via a long channel filled with ball bearings? you can send em around corners and in loops so you can do some neat things with em, one specific application i remember is self-adjusting vise jaws, but I can't for the life of me find anything via google Recirculating ball?
|
|
#
?
Nov 3, 2021 12:29
|
|
|
LRADIKAL posted:Thanks for the additional details. I think the capillary looking patina under the clearcoat looks cool! That isn't guaranteed. It's something that can happen if the surface gets scratched. You usually only see it on bikes and firearms. It's generally only desirable on bicycles. On handguns it lowers the value. (In my experience)
|
|
#
?
Nov 3, 2021 13:09
|
|
|
sharkytm posted:Recirculating ball? sounds right to me, although all the results i get searching are specific to bearings vs. as a power transmission method in and of itself. here's artobolevsky's entry for it, except i've only ever seen it used in rigid machined tubes/channels where it can transmit a shitton of force without issue, never w 'flexible tubing'  in the case of the vise application i care about, iirc one or two channels of bearings run through the vise body and both 'surface' on the clamping face of the stationary jaw, such that either the final ball or a piston projects somewhat from both sides of a given run; this lets you clamp uneven or non-parallel items in the jaws, eliminating any sidethrust/wedging action by equalizing the forces across the two ends of each pair. i just dont remember how many runs is appropriate/any other fabrication details Ambrose Burnside fucked around with this message at 16:11 on Nov 3, 2021 |
|
#
?
Nov 3, 2021 15:31
|
|
|
ahhh so it's like low-res voxel hydraulics
|
|
#
?
Nov 3, 2021 22:43
|
|

|
that's... apt, yeah. one other thing im interested in using them for is orientation-agnostic power transmission in 3d printed mechanical components; the durability of ball bearings and the very large yet low-friction contact surfaces between balls and the weaker bearing race surfaces make it a super-durable and robust way to transmit power, and it seems unusually well-suited to the kind of manufacturing (resin printing) where you can just run tidy little channels anywhere inside the model and not have to think twice about if it's a manufacturable design or not. also, critically, i desperately need an application for a Four-Figure Quantity of tiny ball bearings i ordered at 3 AM for reasons im still not clear on but yeah, here's a workup of a mini compensating-jaw vise like i was talking about, the body gets fabricated as two halves so it's just a matter of milling two matching slightly-oversize half-round channels to accept the bearings. a sheet metal jaw cover with undersize holes over the bearings serves to retain them while still allowing them to protrude from either side of the run, and you can fine-tune the stickout length of the bearings once the slots are milled by replacing a couple mid-run with a cylindrical piston of a carefully-determined length. you can hold all sorts of crazy angled Dangerous-To-Clamp-Thusly poo poo between parallel jaws this way, successfully, in defiance of natural law and God 
Ambrose Burnside fucked around with this message at 23:38 on Nov 3, 2021 |
|
#
?
Nov 3, 2021 23:25
|
|
|
Progress! Permission has been granted to move the equipment tomorrow. Saw the stuff today on the port, a little more damaged than I hoped. The port fees being 10x more than advertised and all the additional "additional" fees required aside, I'm very glad that the last 5 miles of the 2800 ish mile journey is in sight.
|
|
#
?
Nov 10, 2021 01:37
|
|
|
It�s those last 4 inches from the top of the pallet to the floor that are really killer.
|
|
#
?
Nov 10, 2021 05:23
|
|

|
10 people, 9 hours, 45 phone calls, an inordinate amount of money, 2 crane trucks, countless OSHA violations and 1 angry nun later the machines are in the building. effort post tomorrow, but right now sleep is the only thing on my mind.
|
|
#
?
Nov 10, 2021 23:51
|
|
|
fins posted:10 people, 9 hours, 45 phone calls, an inordinate amount of money, 2 crane trucks, countless OSHA violations and 1 angry nun later the machines are in the building. effort post tomorrow, but right now sleep is the only thing on my mind. Congrats!
|
|
#
?
Nov 11, 2021 01:46
|
|


|
fins posted:10 people, 9 hours, 45 phone calls, an inordinate amount of money, 2 crane trucks, countless OSHA violations and 1 angry nun later the machines are in the building. effort post tomorrow, but right now sleep is the only thing on my mind. Hell yah. Sweet dreams my gentlegoon. Chips will be made in the morn. Or just fall out of the bottom of the machine and get stuck in your forklift tires.
|
|
#
?
Nov 11, 2021 01:52
|
|
|
Hello this seems to be the welding and fabrication thread? I have a couple questions for a welding project I'm doing. Working with square thin wall steel tube, I need to do some compound angle fitments and add some weld nuts, both are new to me. For the compound angle/compound miter stuff I'm not sure how to approach it, I have two ideas I haven't decided between: One is to use the cold saw in the shop, set one angle on the saw and do a sine plate or angled spacer to set the compound angle. This would control my angles and by flipping my bars right I think I could get all of my different pieces with the same angles done on the same setup. Not entirely sure how to control length, would probably lay out a cut with dykem and scribing and then eyeball to that for length and let the setup control angle. The other idea is to lay out all edge lengths with dykem, scribe the lines, then finish to length by hand on the belt sander. I did a test part this afternoon and the sanding will be time intensive but pretty easy, and with care during layout I can probably get close enough to my dimensions for it to work. Second question is around weld nuts. Googling around its all references to spot/pressure welding, I'd like to TIG as thats what I've got. It looks like I could buy https://www.mcmaster.com/90596A032/ and then drill a 3/8" pilot (or one letter bigger w/e), drop it in so the threads are inside the tube, then weld around the flange? Is this the right part and approach? All the references I can find are industrial spot/pressure welding or a random guy TIG welding a flange nut to the inside of the tube which I don't want to do. Flange thickness is the same as tube thickness so should be a easy weld. Any thoughts?
|
|
#
?
Nov 16, 2021 03:40
|
|

|
meowmeowmeowmeow posted:For the compound angle/compound miter stuff I'm not sure how to approach it, I have two ideas I haven't decided between: How thin is thin wall? How many cuts do you need to make? I would probably mark the cut and take the biggest chunk I can with a cold saw and finish with a sander or files. You're correct on the weld nuts.
|
|
#
?
Nov 16, 2021 18:01
|
|
|
.065" wall, which is 16GA? I've got 4 uprights on the corners, so 8 cuts that are the same set of compound angles. I've then got 6 cross braces, 4 of which share the compound angle but not the primary angle, the other two are doing their own thing entirely. One lovely part is the shop with the saw is across town from the shop I have space to work in, so I think I'll take your advice and cold saw the rough cut primary angle and the sand/file/grind the compound in.
|
|
#
?
Nov 16, 2021 21:01
|
|
|
I bought those exact style weld nuts for my project car and they've been great.
|
|
#
?
Nov 17, 2021 15:26
|
|
|
While we're on the topic of nuts, what are folks opinions on rivet nuts? I've used them in sheet steel and aluminum on a number of occasions but there's always a nagging worry in the back of my mind that they'll dislodge. Has anyone ever had them dual? Where wouldn't you use them?
|
|
#
?
Nov 17, 2021 17:13
|
|
|
HolHorsejob posted:While we're on the topic of nuts, what are folks opinions on rivet nuts? I've used them in sheet steel and aluminum on a number of occasions but there's always a nagging worry in the back of my mind that they'll dislodge. I used them in a previous job where we had sheet metal assemblies bolted together. Some of the larger machines had an angle iron frame, but the smaller ones were like a uni-body car. On the frameless units we switched to rivet nuts. This required a redesign of the panels, previously it was just a tapped hole in sheet metal, the rivet nut stands proud just slightly off the surface. In testing we found a big difference in rivet guns, not so much on the cheaper rivets. A lovely rivet gun would seat the rivet and it wouldn't be square to the surface it was riveted to. The more expensive ones didn't seem to have this issue. Not sure on longevity, the company was sold a few months later and Young Engineer Yooper was sent packing.
|
|
#
?
Nov 17, 2021 17:46
|
|
|
I'm also curious about rivnuts, I'm planning on using them for the smaller fasteners that'll take less load and so Id like to simplify things vs all weld nuts. Good to know about the good vs bad install tools wrt squareness of the nuts, I think I've got a good tool but will need to get new dies for my rivnut sizes. Seems like the main issue with rivnuts is them spinning out vs pullout or getting loose? I've seen you can get hex or half hex ones to improve torque, I'm planning on only using them for low torque mounting so hope to avoid any spinout. E: I was originally thinking I'd weld the frame and then add the weld and rivnuts but now thinking it makes more sense to add them when the bars are loose and I can do it flat on a table instead of in-situ. This is the way yeah? meowmeowmeowmeow fucked around with this message at 22:56 on Nov 17, 2021 |
|
#
?
Nov 17, 2021 18:32
|
|
|
We used to use them on truck bodies for water tank front support frames and to mount the cover plates over. They're great, just get the pilot holes spot on
|
|
#
?
Nov 19, 2021 14:34
|
|


|
For rivnuts? I'll be doing all my drilling on a Bridgeport with actual drills instead of a step drill so should be easy to get good clean holes where I want them. I'll do some trials for the weld nut pilot holes, the fillet they show between the flange and the tube makes it look like it needs a decently large pilot but I'd like to keep it as small as possible for good positioning. I'm gonna ask this in the CAD thread as well, but how do y'all indicate weldnuts on your drawings? I'm working in SW and usually do weldments as a multi-body part, and then add rivnuts and weldnuts etc in an assembly file. But I'd like to weld the nuts on before welding tubes together as they'll be easier to access and it bugs me a little to have my drawings separated like that. Any thoughts?
|
|
#
?
Nov 19, 2021 18:35
|
|
|
I'm putting a new wooden handle on a kitchen knife, using some 8.5mm outer diameter friction fit rivets. That's not the problem - I have a plan on that front. But last night I slapped the knife on the drill press to make the appropriate holes and found that these cheapo Canadian Tire "titanium coated" bits that came in one of those big sets of bits from Canadian Tire wouldn't actually go through the steel, at least not at any decent rate. My attempts under the bit made extremely poor progress and a lot of noise. I just gave up, assuming that I was dulling my bit rather than creating a hole. What are my options here? Do I need to hunt out a tiny carbide bit? Will any non-potato-tier bit go through? I don't really feel like spending $100+ on a bit set for the small amount of metalworking that I do. Or can I do something like kiss the steel with a torch for a few seconds where I want the holes to go to make it softer? Is there some other possibility?
|
|
#
?
Nov 23, 2021 16:19
|
|


|
CommonShore posted:What are my options here? Do I need to hunt out a tiny carbide bit? Will any non-potato-tier bit go through? I don't really feel like spending $100+ on a bit set for the small amount of metalworking that I do. Or can I do something like kiss the steel with a torch for a few seconds where I want the holes to go to make it softer? Is there some other possibility? Does a file skate on the surface? If so, you'll need to anneal. You could use a carbide bit, but I think annealing would be less troublesome. I have no issue using garbage tier bits to drill (unhardened) 1095, or O2, or whatever. I just go slow and use some oil.
|
|
#
?
Nov 23, 2021 16:26
|
|
|
You can anneal the area around the holes, but it�s going to take more than a few seconds. You�ll need to mitigate the heat traveling out of the specific area you want or it will mess up the heat treat of the blade.
|
|
#
?
Nov 23, 2021 16:27
|
|

|
Yooper posted:Does a file skate on the surface? If so, you'll need to anneal. You could use a carbide bit, but I think annealing would be less troublesome. I'll go try that later, but the bit I was using did make some progress - it was just unbelievably slow - less than 1mm every 60 seconds, I feel. By comparison I went though like 3/4 inch of railway steel last week with a 5/8 carbide bit (which I shelled out $ for because it was relevant to a different ongoing project and cheaper than the alternative solutions) and it was making vertical progress much faster. If I go with annealing, how do I anneal the relevant spots on the handle without ruining the blade's hardened edge? Do I have to worry about damaging the alloy's stainless qualities? I have propane torches and a junko toaster oven in my shop. Do I do something like clamp it with the business end of the knife in a bucket of water/snow and take the torch to the handle? e. just to clarify a bit, this is a knife that I like enough to use it as a project for funzies, and I'll be happy to have it back in my kitchen again, but it's not exactly an expensive knife that I'm worried about destroying forever, and that's why it's my test/learning knife: I got it from a Chinese grocer years ago and it's perfect for disassembling poultry. The blade and edge are still good, but the plastic handle disintigrated. I have no idea of the overall steel quality here, but it's on the harder end of things because it's a bitch to sharpen but it stays sharp once I get it there. CommonShore fucked around with this message at 16:46 on Nov 23, 2021 |
|
#
?
Nov 23, 2021 16:41
|
|
|
Ideally you anneal before you drill and drill before you harden, obviously not an option for you on a purchased knife. Factory made knives don't often have a differential temper so the whole thing is hard. Depending on your knowledge of what steel it is and tools available the ideal process would be to anneal, drill, harden, temper, resharpen the whole thing. Trying to do it piecemeal, giving the handle a softer temper with a torch isnt too hard and may help a little. Actually annealing just the handle would be incredibly difficult; you'd have to heat the handle up to critical temperature (different for different steels, usually around 1550) then let it cool down over many (usually at least over night) hours at a controlled rate without any heat conducting into the blade to ruin the temper. I'd say best option here is to either grin and bear it and just run through drill bits (use lubrication) or see if you can match the existing holes. Since the blade is good hardness and well treated the goal is to not ruin that temper. If this is truly a play project and you want to mess around you can have a go and anneal the whole thing and heat treat the blade yourself. threelemmings fucked around with this message at 17:55 on Nov 23, 2021 |
|
#
?
Nov 23, 2021 17:32
|
|
|
Put the knife in a vise, preferably with either wet cloth or copper or aluminum plates between the blade and the jaws of the vise, with only the tang exposed. You don't want to ruin the temper on the blade. Torch the tang until the areas around the holes you need to drill are mid-orange. Let it cool. Drill the holes.
|
|
#
?
Nov 23, 2021 18:36
|
|

|
ok so here's the plan 1) Gonna go hit it with a file to see what happens. 2) Gonna put some 3-in-1 oil on and just try to drill slowly with my potato bit. 3) Local hardware store near me has a good selection of affordable individual bits I just discovered, so I'll try that if the file bites but my current potato bit doesn't work. 4) I'll bust out the torch if the new bit doesn't work. thanks, all! I'll post results if I get a new knife out of it! E. The file bit the metal but this bit is making such slow progress that I can't believe it. I think it just might be dull. I've tried sharpening it a couple of times but I'm going to go get a bit from the hardware store instead CommonShore fucked around with this message at 21:51 on Nov 23, 2021 |
|
#
?
Nov 23, 2021 20:57
|
|
|

|
| # ? Apr 18, 2024 20:49 |
|
|
The tip grind is all wrong on most store bought drills. Look carefully at the cutting edge of the drill and made sure it's the high point of each flute. You might have a bump behind the cutting edge that won't let your bit bite.
|
|
#
?
Nov 23, 2021 22:23
|
|
