


|
So I've come nowhere near reading this entire thread, but I'm somewhat inspired to get back into modeling. I was pretty serious about it in my teens and early 20's, but have done nothing at all in probably 25 years now. My last model started was one of the more ambitious projects I've ever started, using a Tamiya 1/350 scale Tirpitz model that I had always wanted to do, but never had the money for ($100 bucks was a LOT of money for a model back then). I finally got it, and was going all out, but stopped at probably 20% completion on it. I used a teeny little drill to drill out the main gun barrels, drilled out all the portholes in the hull and backed them with something from the back (I don't even remember what now) to give them depth, airbrushed the hull and decks, mounted the rudders, shafts, prop and a motor (it was going to be motorized) and had one of the forward turrets completed when life happened, it all got put back in the box, and that's where it's been for the last 1/4 century. I still have the model, it's moved from location to location with me, and somehow has never gotten destroyed. So here is my question, since it's been so drat long since I've done any modeling. What would you guys consider a 'ball park' estimate of the start-up cost to get back into this if I'm doing it right? I'd need paints, glue, clamps, putty stuff, sanding stuff, x-acto's, tape? Pretty much everything required to build a model. From what I've read in the thread so far, some stuff is pretty much the same as it was before, and some things have moved forward nicely (glues look much better for example). I have a Badger air-brush somewhere packed away. Assuming I could find it, I can just run it off of my giant air-compressor in the garage, so that's not a big deal at least. Not including a work-bench and lighting, would a decent modeling setup cost $100? $500? Or am I way over thinking this entire thing and should just go slow and order what I need when I need it (sometimes I'm not a very patient person)? I'm thinking I should also buy a smaller kit to do first before I dive back into the 25 year old project.
|
 #
¿
Aug 13, 2014 23:35
#
¿
Aug 13, 2014 23:35
|
|


|

|
| # ¿ Apr 26, 2024 10:32 |
|
|
Sanguine posted:... List of stuff ... Thanks! I live a long ways from the nearest hobby store that carries anything for modeling, so I need to either purchase online, or drive 60+ minutes one-way to a store, so discovering I'm missing some key item in the evening would pretty much end the modeling session, so a list of things like this is great. Excellent advice as well. I love your paint storage racks. Did you make those or are they something the paint mfg's sell now? I'll probably need to get myself one of those big magnifying glass things on an arm, or a wearable one like you have, since my eyes aren't really very good at the close in focusing on small parts anymore. Getting old kind of sucks. The Locator fucked around with this message at 00:27 on Aug 14, 2014 |
|
#
¿
Aug 14, 2014 00:22
|
|


|
Baronjutter posted:My first attempt at working with 1/16th basswood. it's expenisve and hard to find and the biggest sizes I can find are 3x12" which is gently caress off small. Not sure if I can keep playing with it at those sizes and prices. Anyways, made a little lovely warehouse. Brick texture didn't come out how I wanted but I can live with it and Im thinking it will look fine after painting and weathering. 1/16 x 4" x 24" @ $3.89 - http://www.woodcraft.com/product/2000671/7699/basswood--116-x-4-x-24.aspx Up to 12" x 48" here - http://www.nationalbalsa.com/category_s/193.htm You can even find it on Amazon, but not in those sizes. 1/16 x 4 x 24 in 15 packs for $30 or less. That's a pretty cool looking warehouse though, at least in the pictures the brick texture looks pretty good.
|
|
#
¿
Aug 15, 2014 07:43
|
|
|
So, I umm... bought a boat. Some assembly required.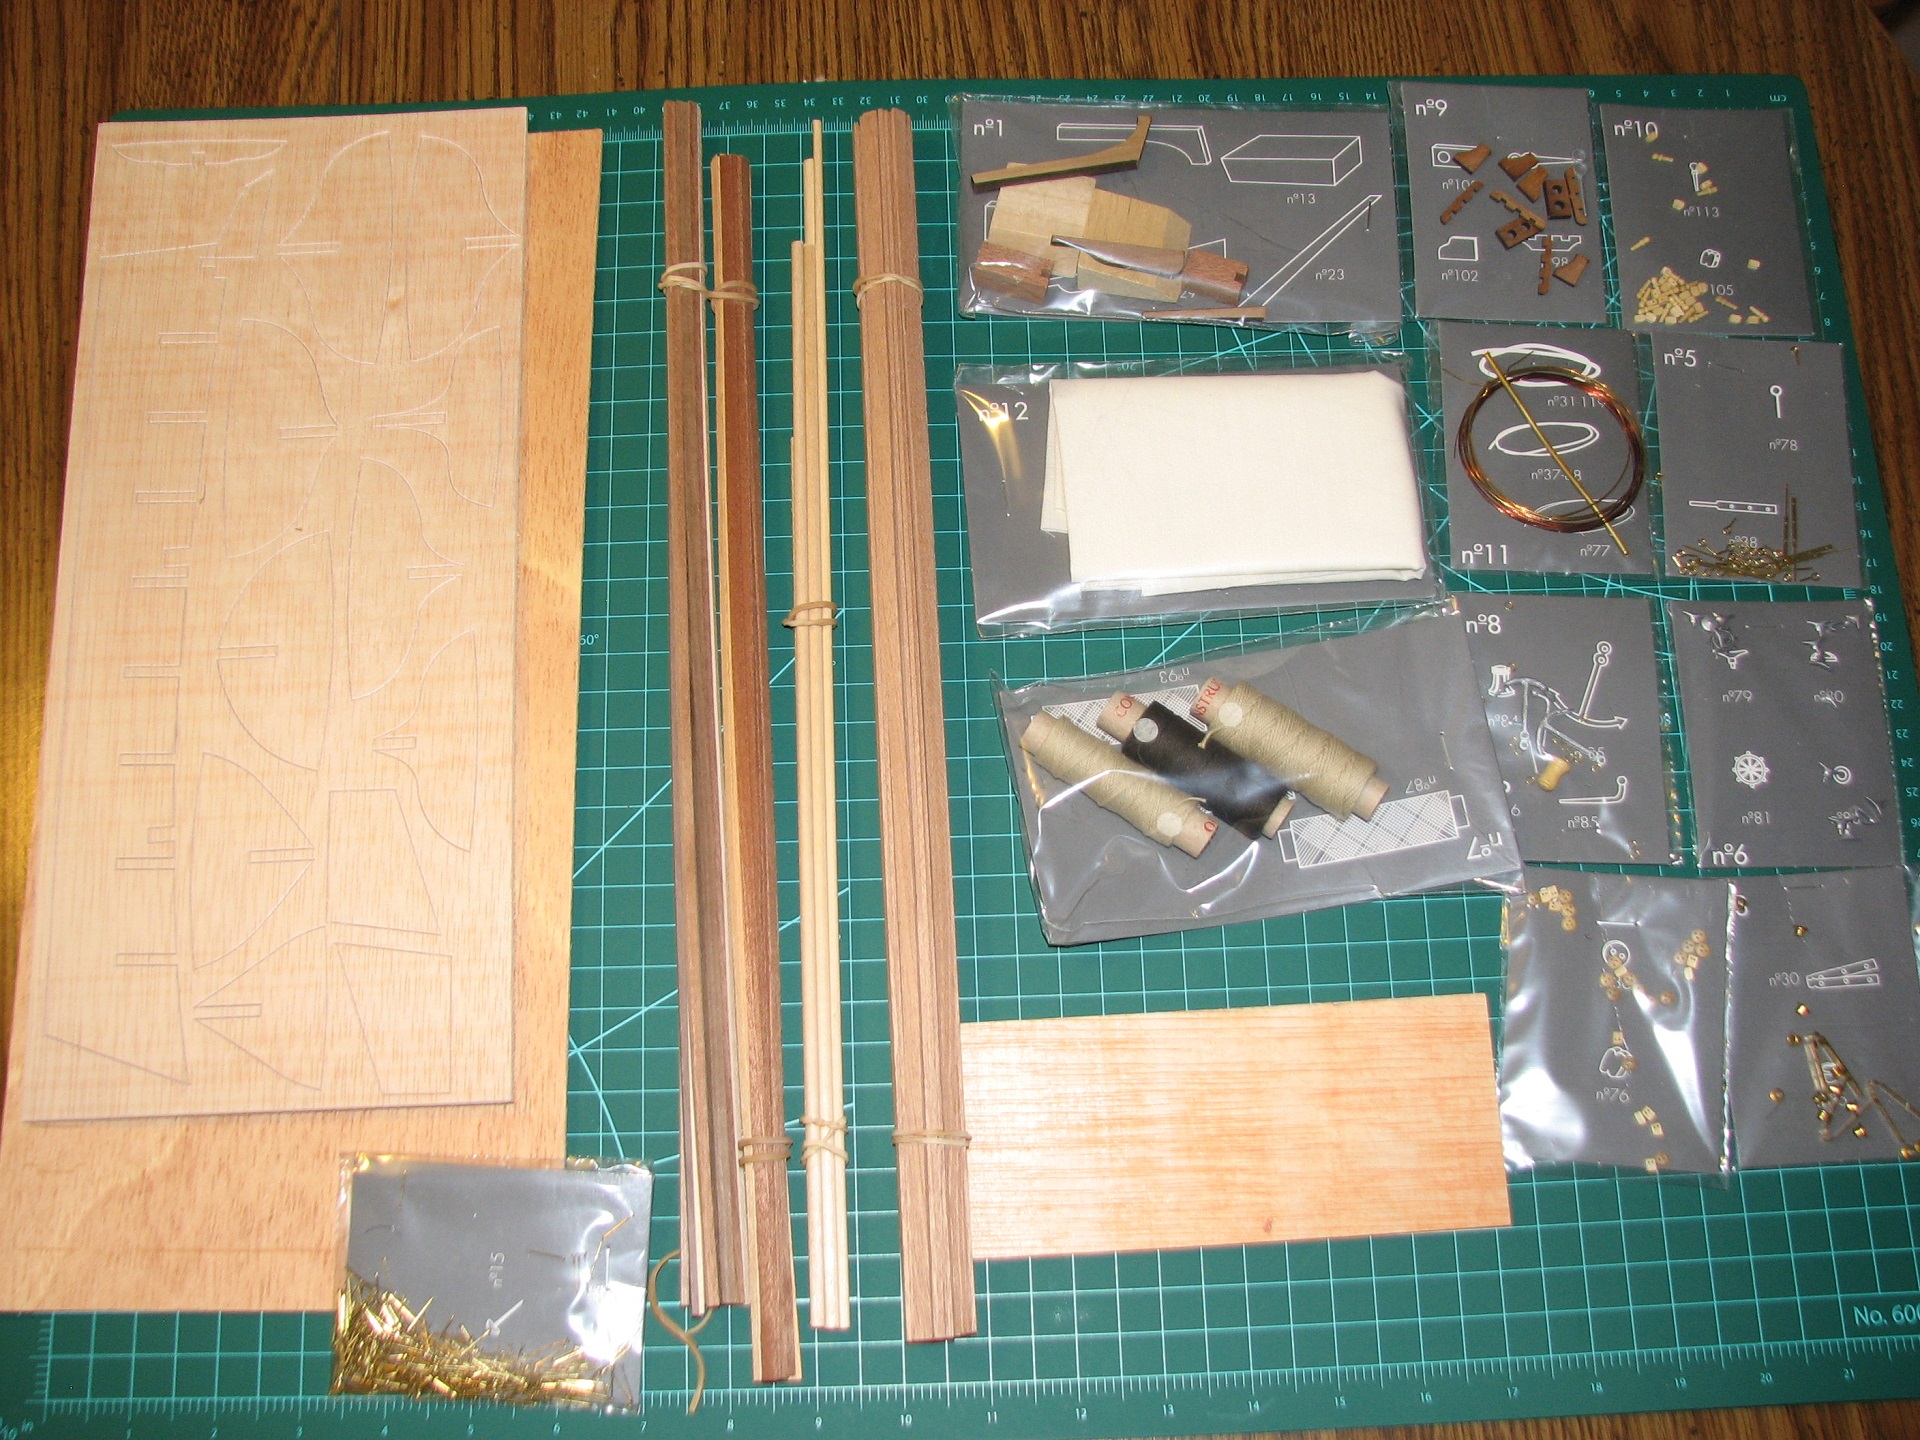 I wonder how much I'm going to regret this.
|
|
#
¿
Aug 16, 2014 06:37
|
|
|
It's a "Constructo" brand - Carmen 1850.  With no guidance other than the (mostly foreign language) boxes to go from, it looked like sort of a middle of the road choice between the really simple boats with a one-piece hull, and the crazy multi-hundred dollar square-riggers. After digging into it a bit, the hull forming looks like it will be fairly challenging, given my typical lack of patience, but we'll see how it goes. Edit: Thanks for the links Bloody Hedgehog, good stuff there.
|
|
#
¿
Aug 16, 2014 07:03
|
|
|
The hobby shop I went to has really got a nice selection in stock, ranging from very simple beginner kits (pre-made hulls and very few parts) to $600 crazy square riggers. The two brands that I noticed (didn't look at the high end stuff) were Constructo and Artesania Latina. There may have been others, but I remember those two. I went ahead and dove right in. The frames are attached to the false keel, and get to dry overnight so I can do some rough sanding before attaching the decking. I took a while and read through the rest of the instructions, mostly skimming, but reading quite a bit, and oh my god there is a ton of hand work and fabrication. Example - the deck. After the deck is laid down you plank it with individual strips, but then get to go back and based on measurements from a template, score the planks to make them look like individual pieces instead of single planks that stretch the length of the deck, and then... using a tiny punch, put in each and every nail hole where the planks would be held down. Hundreds and hundreds of tiny little holes.  All of the dowels have to be hand tapered to make the mast sections, bowsprits, etc. The sails are given as a single large piece of plain cloth, so they have to be cut out, back-stitched by hand, hemmed, and then a bolt rope has to be hand sewn to the edge. Maybe my boat will have sails. ") Every hole on the ship with the exception of the mast steps, has to be drilled. The davits are made by hand shaping a 4x4x18mm piece of wood, and then 4 tiny little holes have to be drilled in them in a square pattern for the anchor rigging to pass through. Pretty much all of the deck stuff is hand made from various small bits of wood and planking, with the shaping all done by me. This should be interesting to see how long I stick with it!
|
|
#
¿
Aug 16, 2014 09:10
|
|
|
From what I've read in the last couple days, only the really crazy builds (or insane people) take years for a build. A smallish kit like mine should be quite a bit faster, but I still expect it to take in the 'months' range, but time will tell. I'm too impatient to go for some of the crazy techniques that end up taking people huge amounts of time on these kits (like beveling each plank to fit 'precisely' with the previous one - gently caress that). I've gotten the frame built, the under deck on, have rough shaped the stem and stern, and have 1/2 the deck planking on the main deck now. I should be able to finish all the decking today, and then start on the first really tedious part, scoring the planks and making the nail holes. I think hull planking comes next, which is one of the more tricky, as well as more important parts of these boats. Are you guys interested in seeing build progress pictures on this thing? I'm not sure how appropriate that is for this thread, as I've not read nearly all of it.
|
|
#
¿
Aug 17, 2014 00:20
|
|
|
Bloody Hedgehog posted:If you're talking about the hull planks, you have to do that. The planks physically won't fit on the ship unless you alter them to fit the desired planking profile. If you just lay them down one over the other, you'll end up with planks going near vertical at the fore and aft on the hull, like in the bottom image below. You have to correctly spile the planks, and possibly put in stealers, if you want the planks to look correct like in the top image. Right, but that's not what I'm talking about. I've been reading builds where guys bevel the edges of the individual planks lengthwise so that planks that are at slightly different angles to each other don't leave any gaps at all. I'm terrible at paint, so not going to try to draw a picture, hopefully you understand what I'm trying to convey. I'll form the planks around the hull as needed to make everything fit nice, but for this first build, I'm not going to spend a day on every plank to make sure that it's just perfect. I made a couple mistakes early on in this build that I didn't realize until too late to fix (ex: the stern blocks are supposed to line up with the false keel, not the bulkheads, so my poop deck will have a warp to it - high in the middle - compared to what it should be). I'm working around them, but as a first build this is a learning tool for me. If I end up with a good looking display model, that's going to be pure bonus, but I'm not going to attempt to make it perfect when it already can't be. I was reading a build log earlier today and the guy was spending 3 days per plank forming and beveling each one 'just so'. The instructions and plans leave some pretty large gaps, that the builder apparently is supposed to just 'figure out', or know already I guess. They tell you to sand and file the stem, but only give one crappy picture sort of showing how, and there is no template, so you kind of have to figure out on your own that you want it sanded to an angle where the hull planks can 'land' on a flat surface there while maintaining the curve from the final bulkhead. They tell you to use all these little brass nails (or tacks) in various steps, but nowhere do they bother mentioning that they are apparently 'temporary' just to hold parts in place while the glue drys, so my deck has permanent little brass nails in it (not a big deal, they are under the planking), as I put them in too far to make it feasible to pull them out without screwing up the wood. I just got a tiny little punch, and a small hammer, and pounded them farther in until the heads were countersunk, and laid the planking over them. That won't work with the hull planks, so I'll have to figure out how I want to tack them in place, I may use some alternate methods I've been reading about instead of nailing them with the supplied brass nails.
|
|
#
¿
Aug 17, 2014 02:53
|
|
|
The build. Part One. All images are HUGE because I didn't resize them, instead I'll leave them here as thumbnails. All hosting is mine. I am an impatient person by nature, so of course I started the build late last night without first doing a lot of reading. Oh well, learning experience and all that, right? Anyway, first thing is to place bulkheads and reinforcements on the false keel, as seen starting here. The stem is to the left, stern to the right. That wooden block next to the stern is one of a pair that I may regret placing wrong later on in this project. 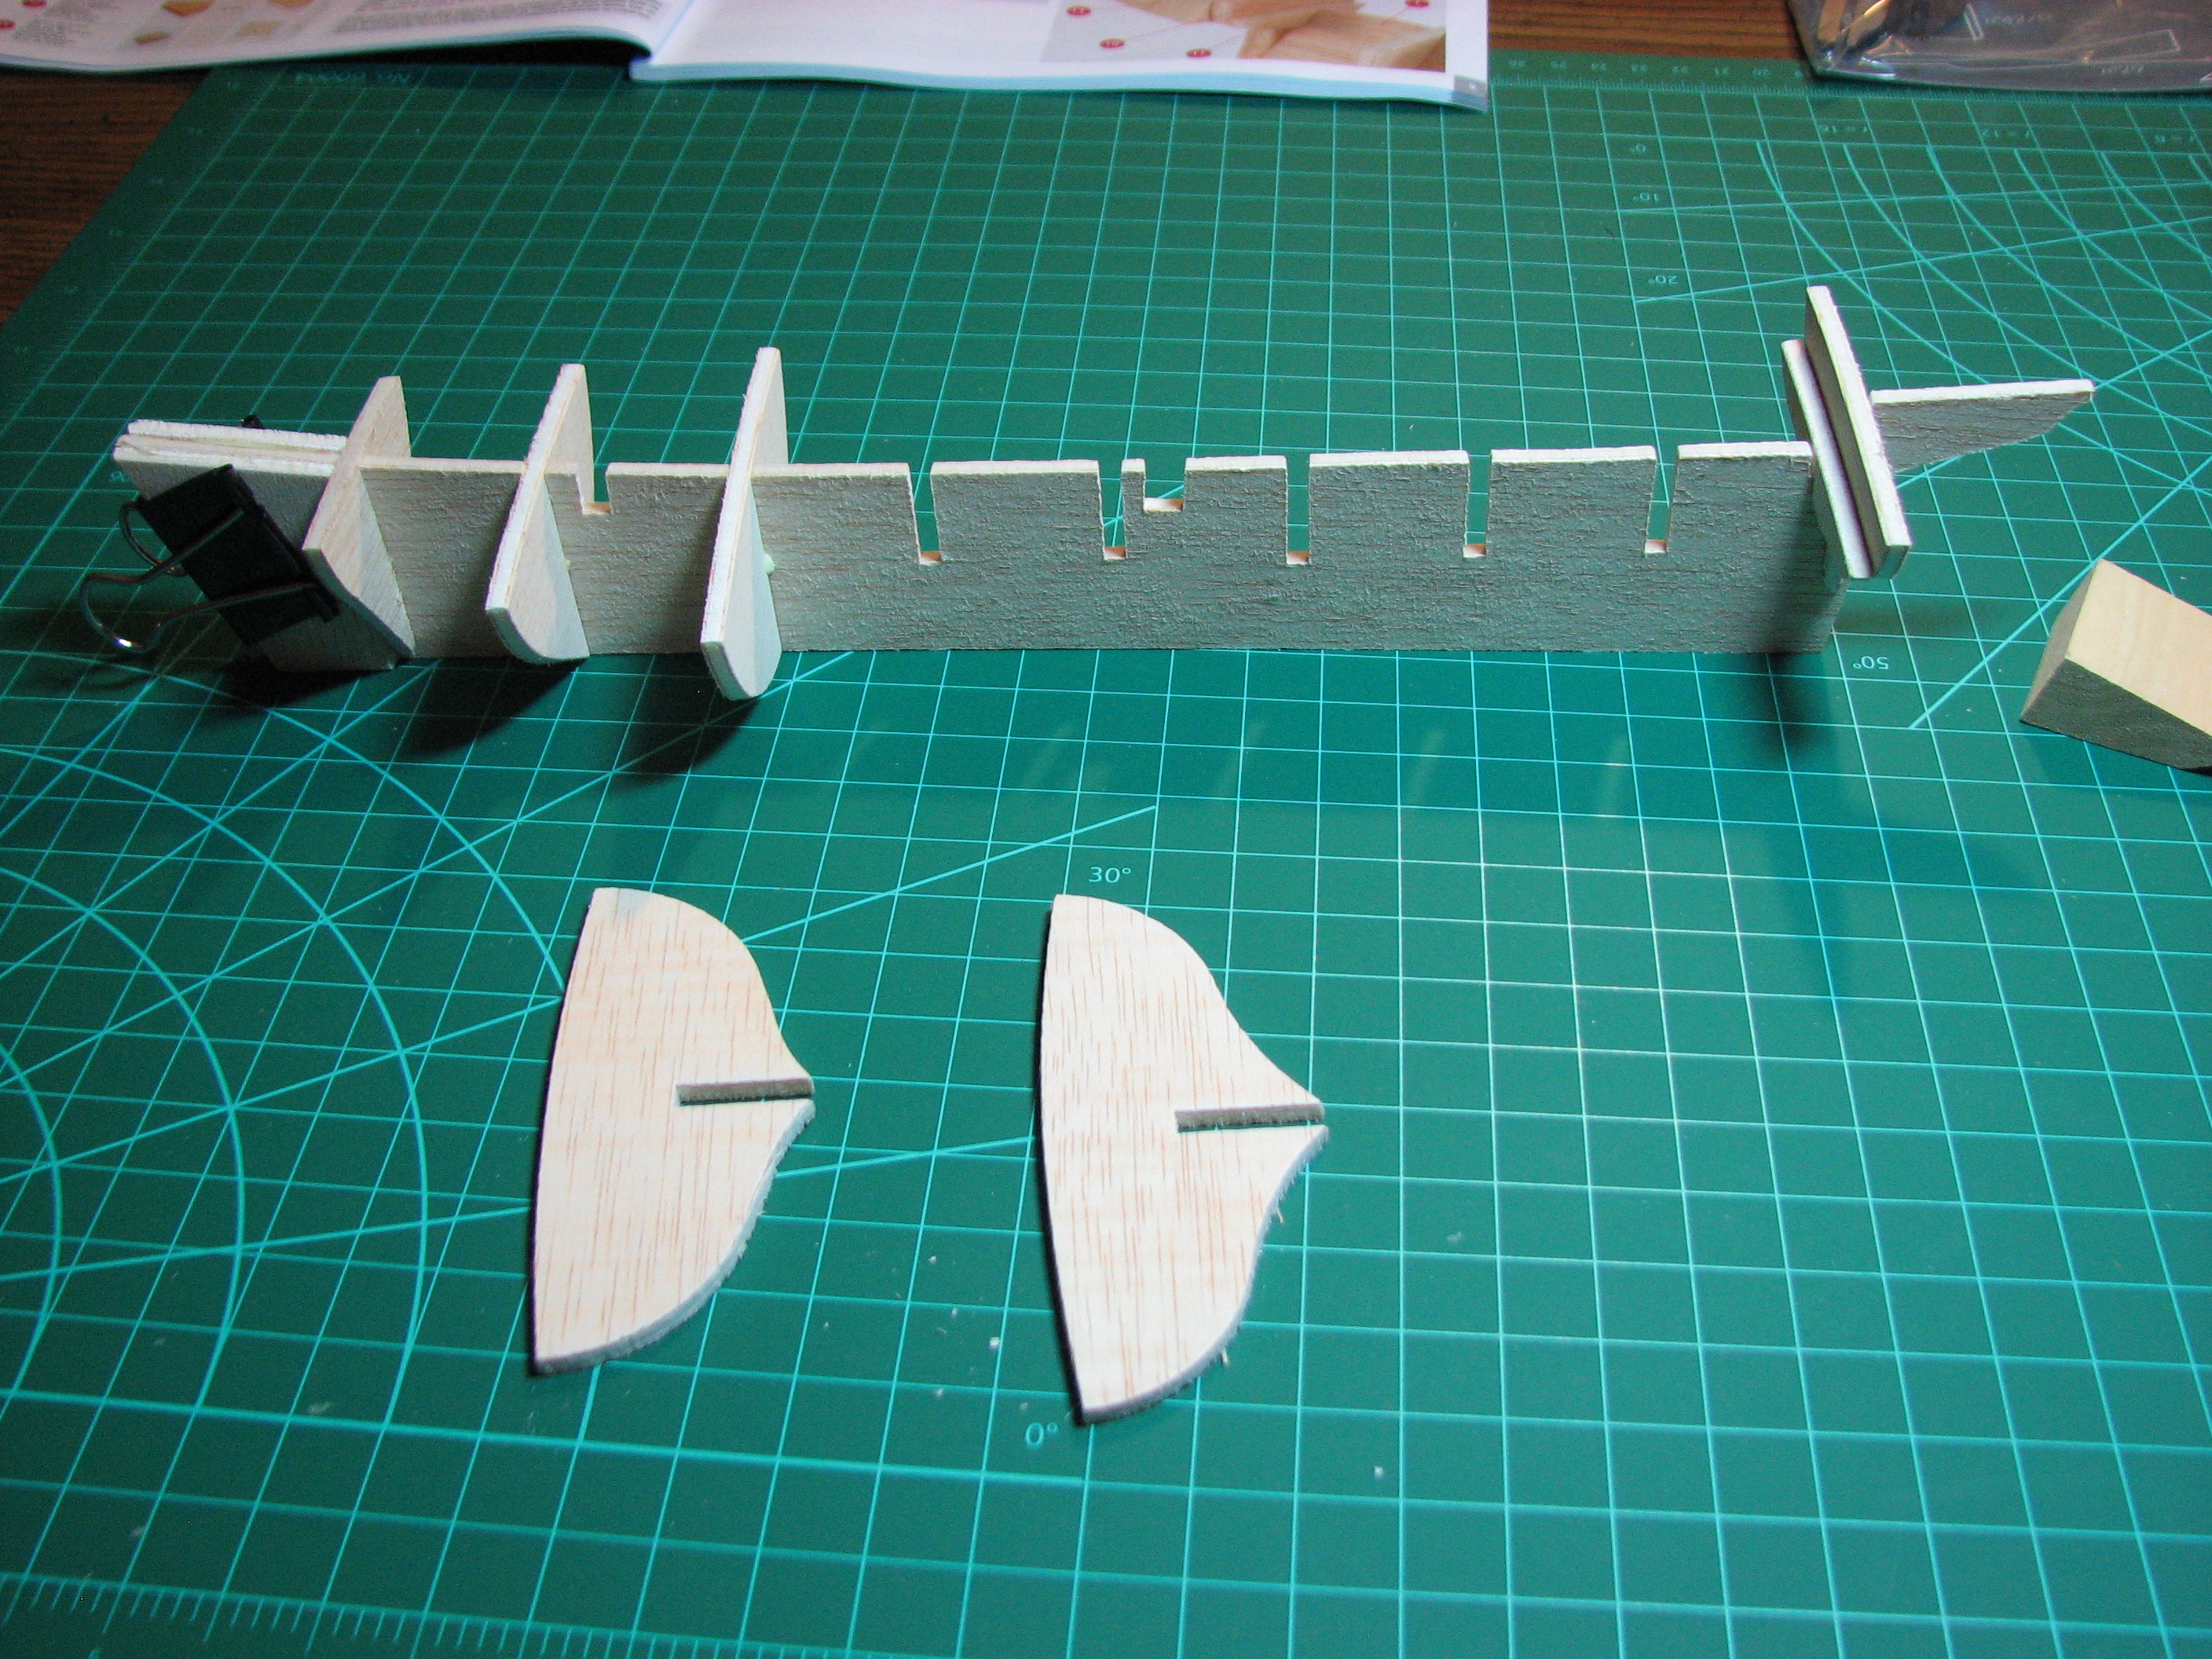 All the bulkheads and reinforcement blocks in place. Here you can see that I aligned the stern blocks with the bulkhead, instead of the top of the false keel. You can see in other pictures how that is forcing a bulge in the poop deck. 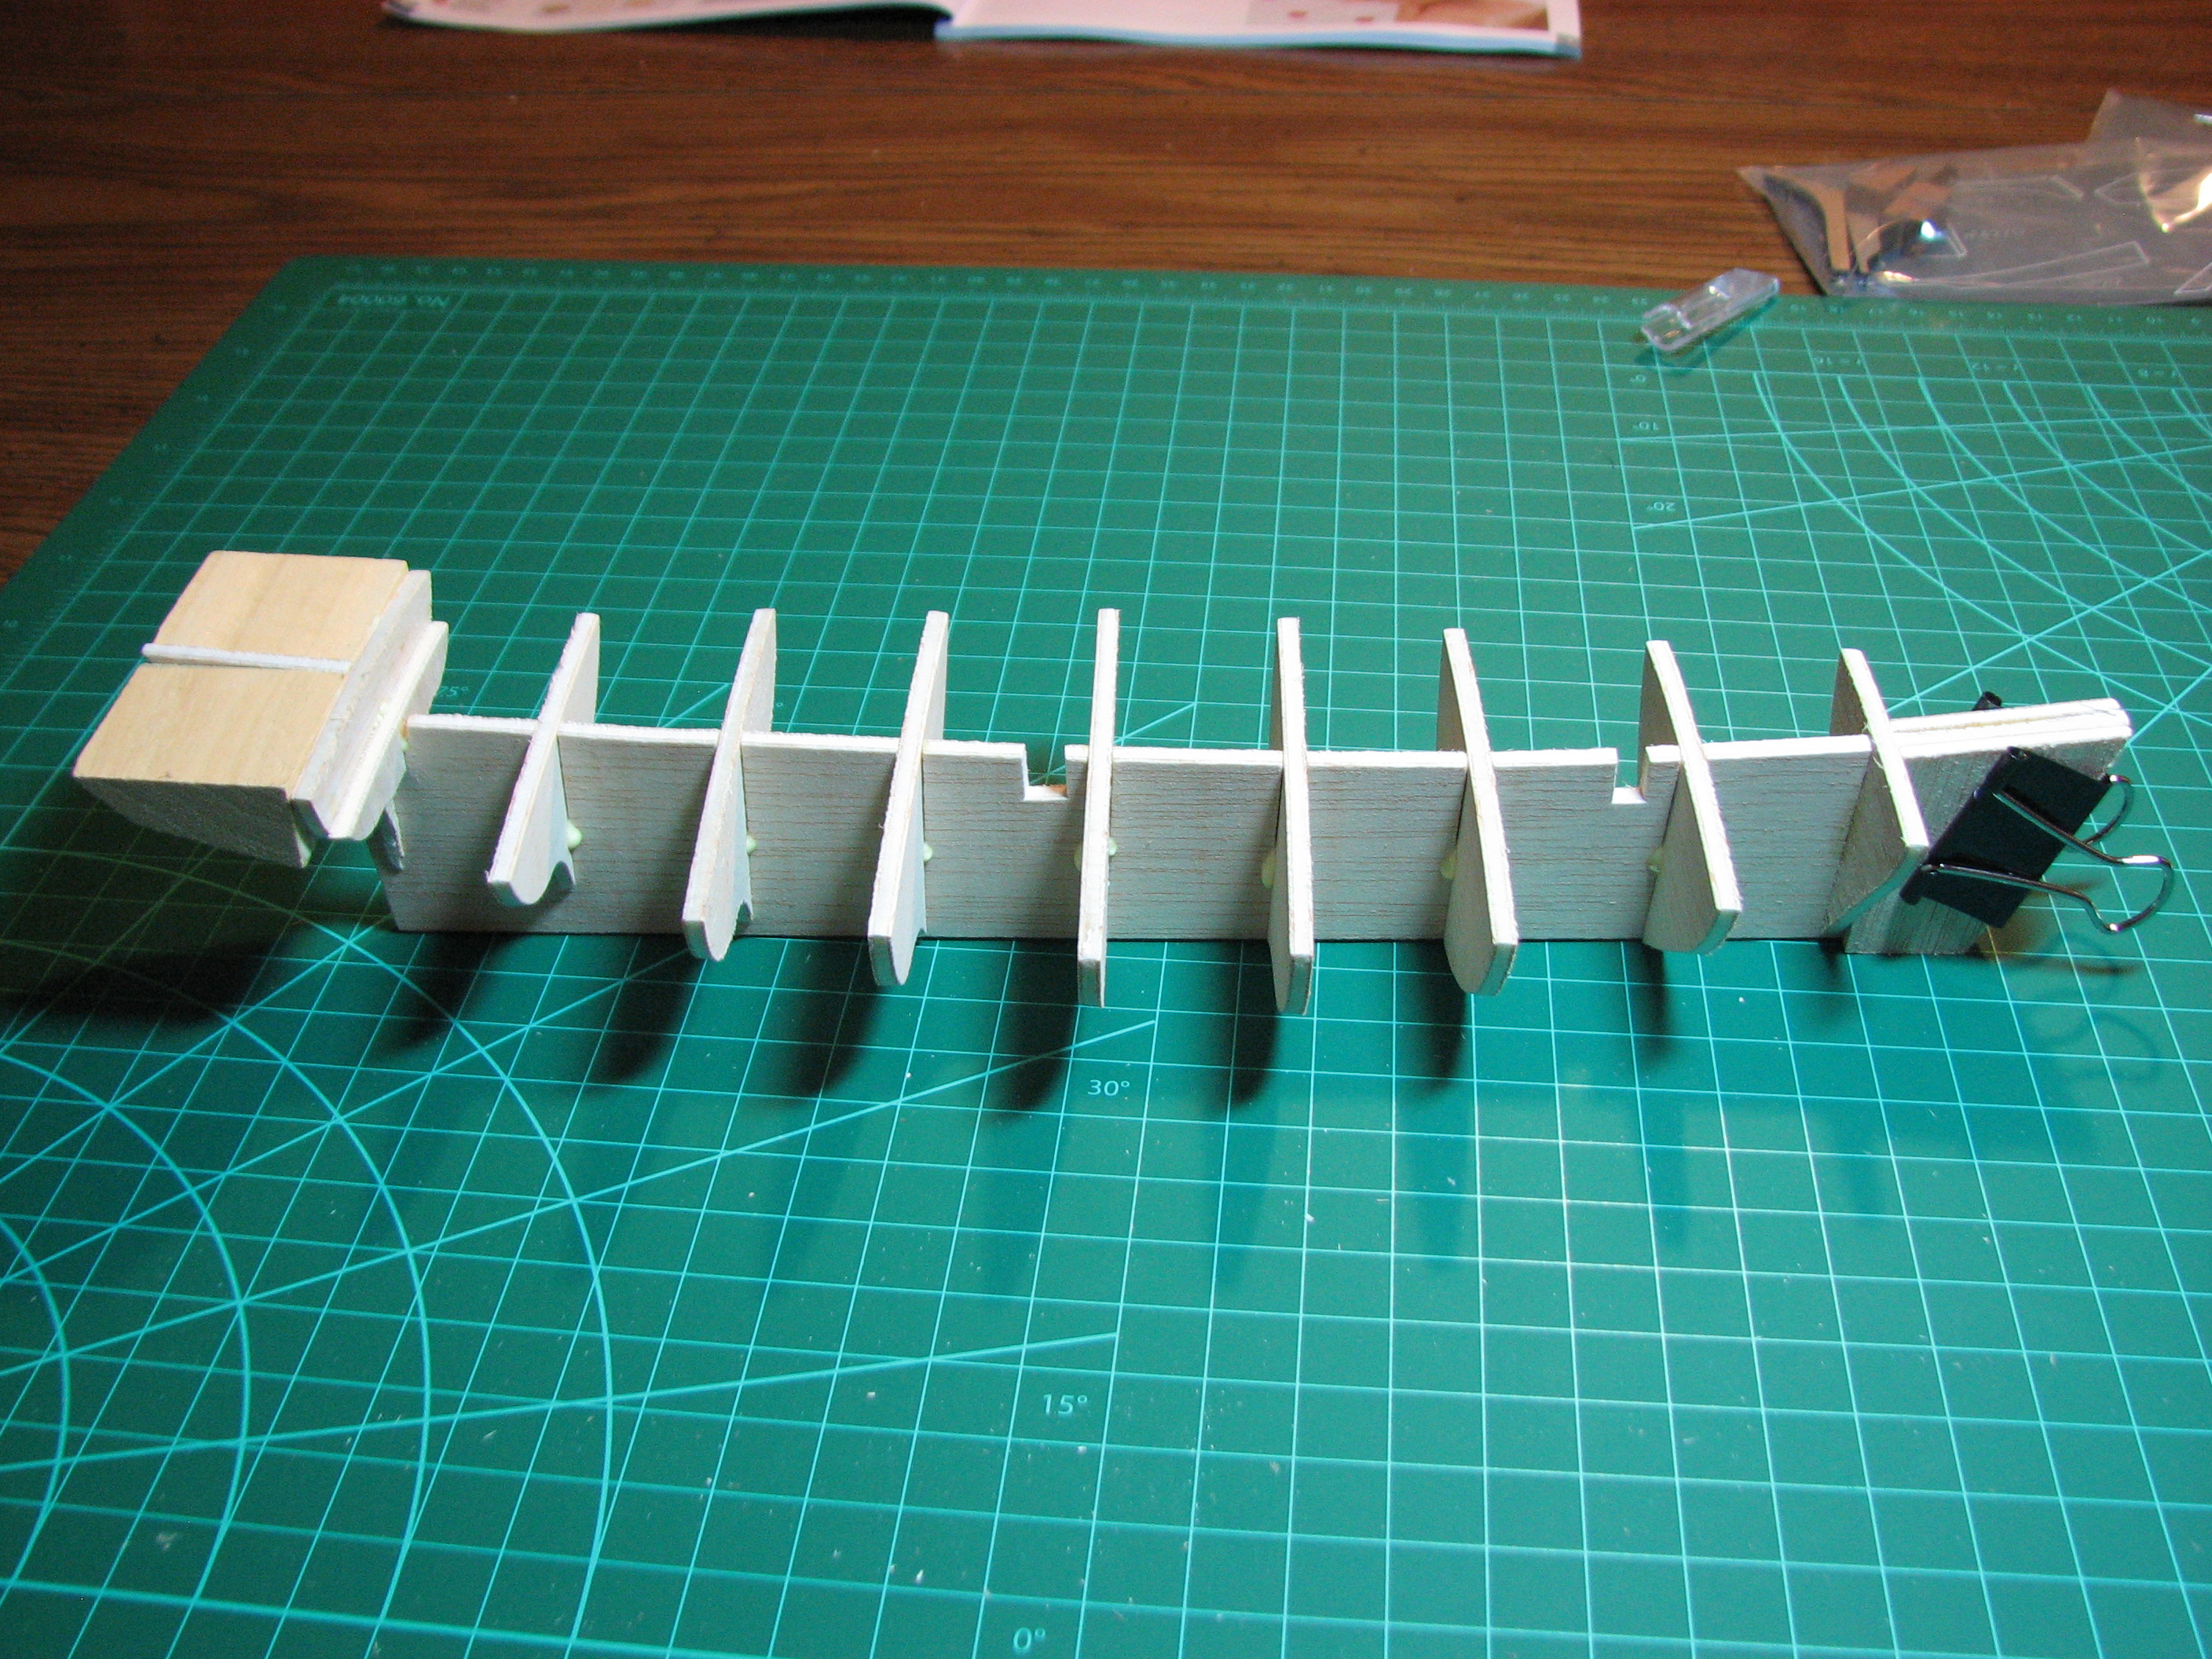 The other thing I would have probably noticed and fixed if I had done today's reading before starting, was that the false keel has a bit of a twist in it as delivered out of the box. I should have taken steps to fix that before I started. Instead, my boat will have a slight twist. I've read today where other builders have done this as well, and it's survivable since everything is laid down custom on the hull anyway, the finished hull will just not be perfectly straight. 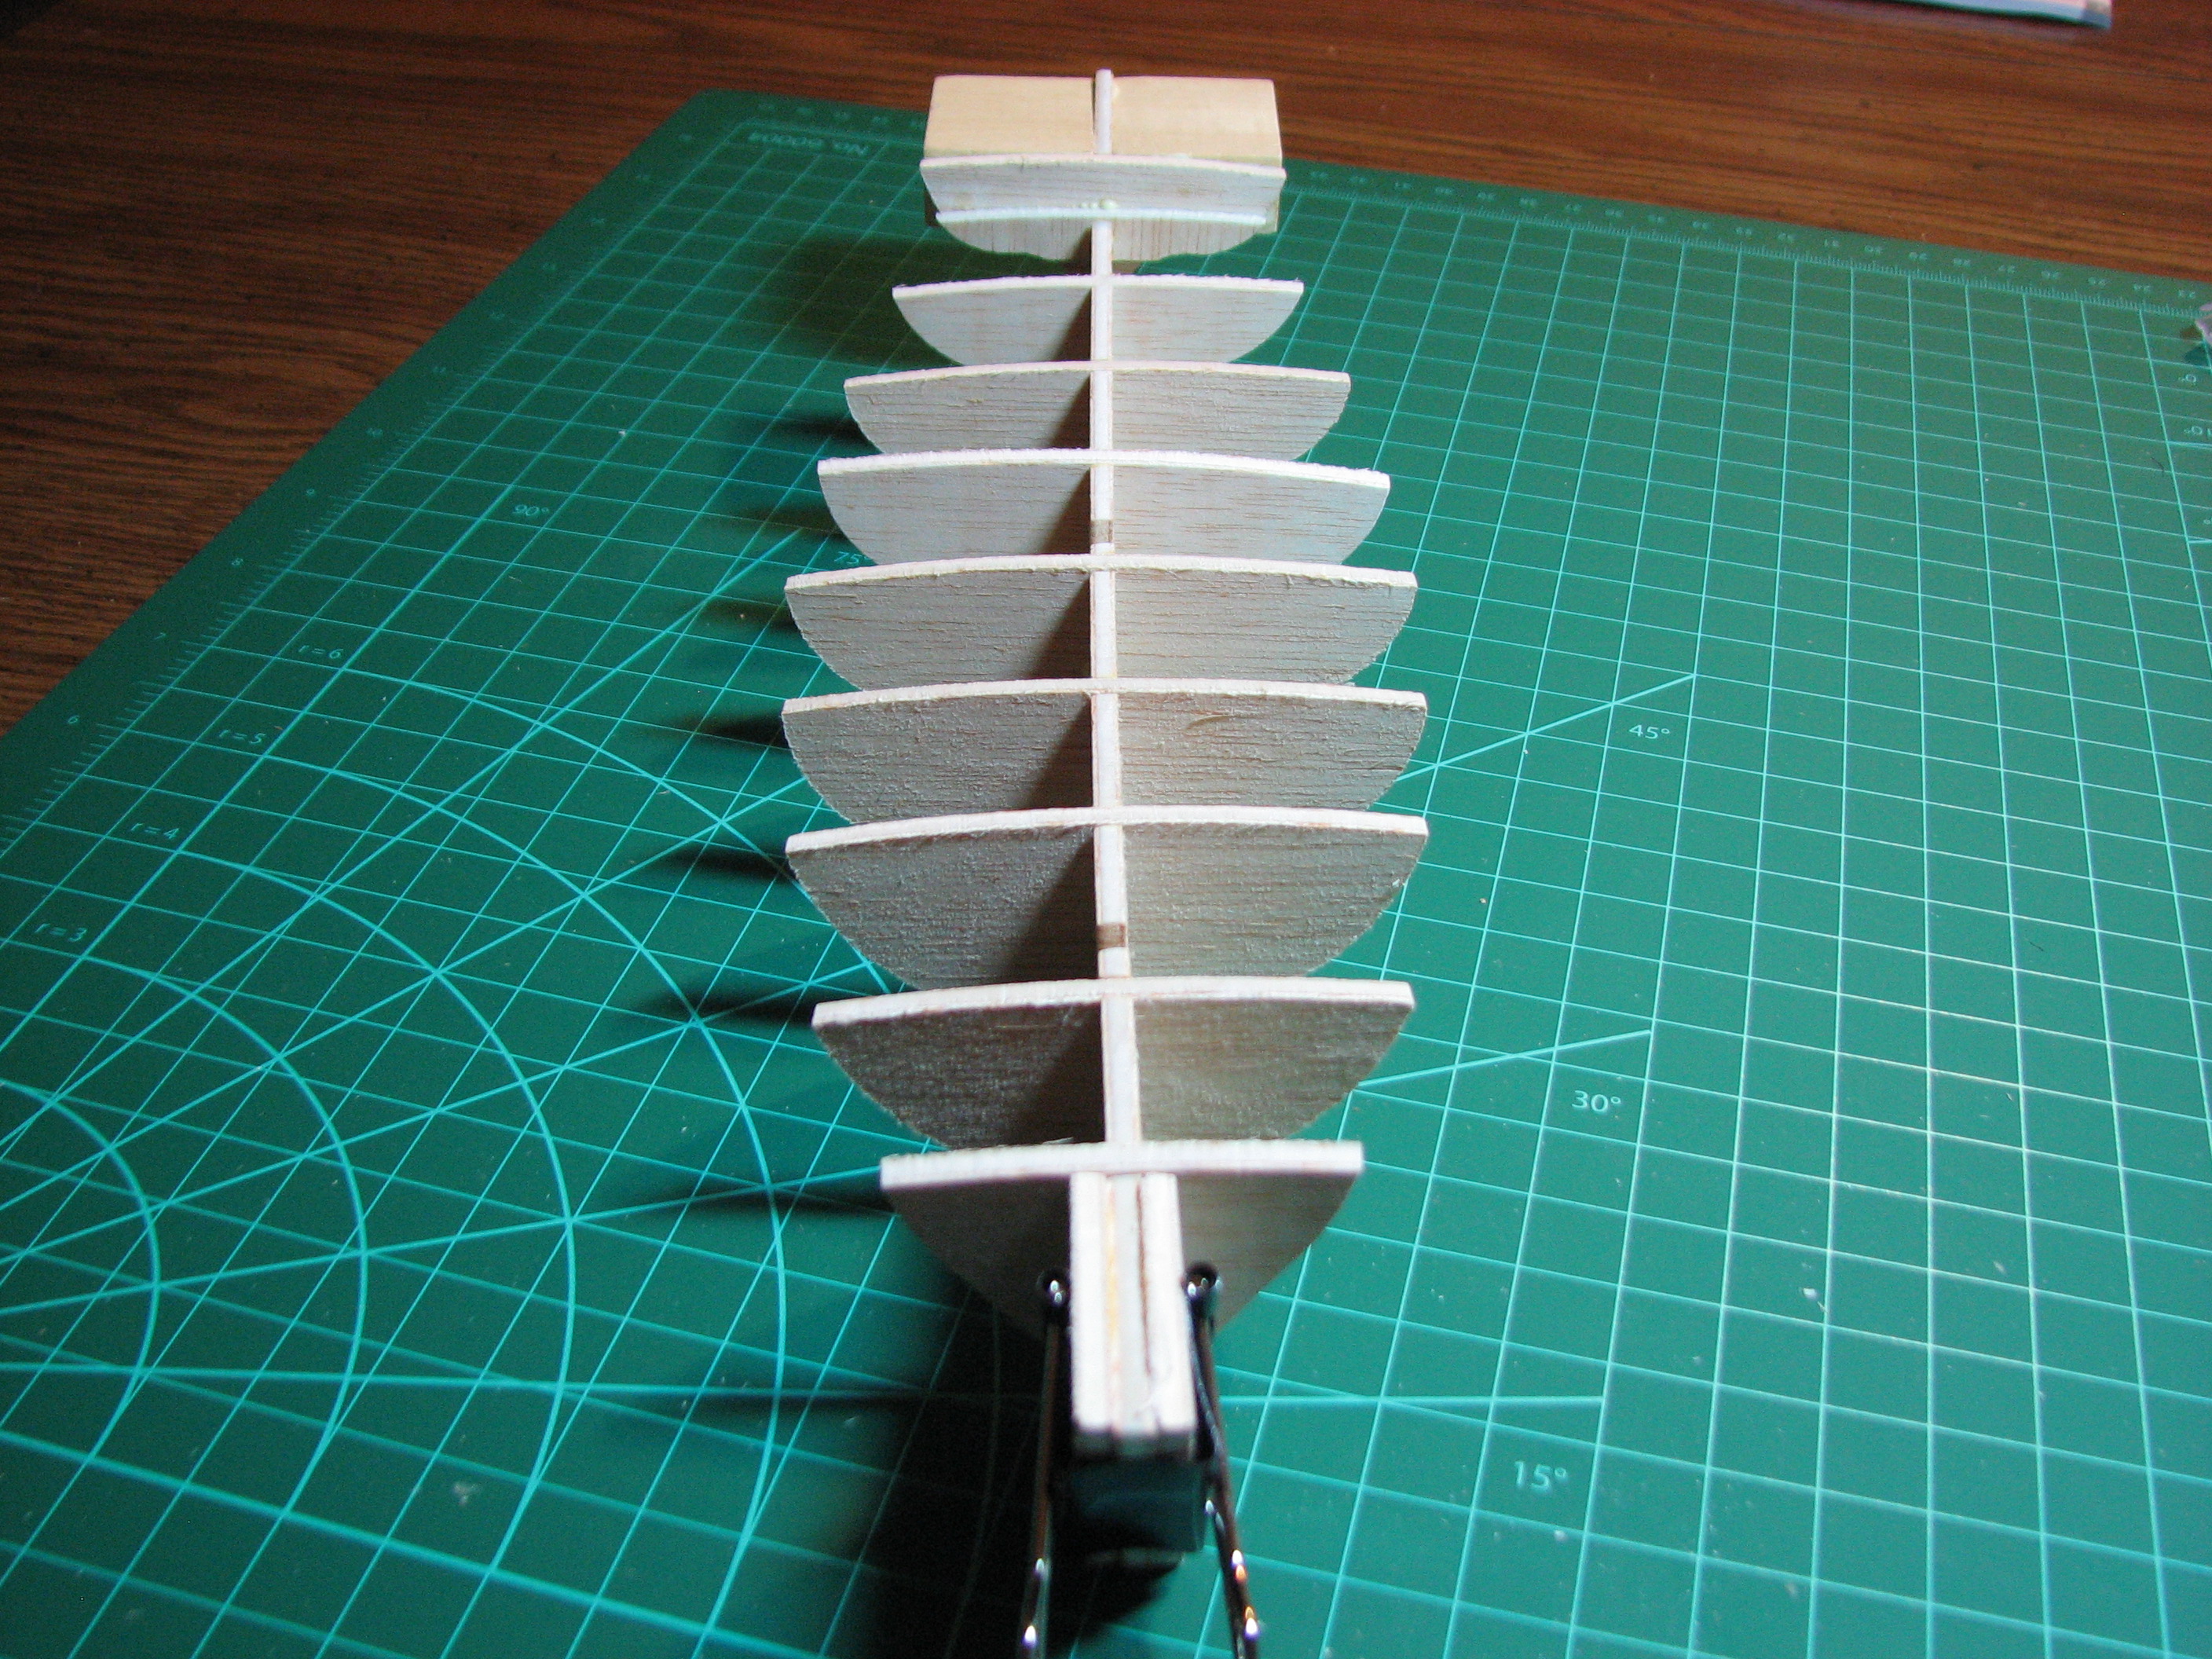 Next step, attaching the deck to the bulkheads and false keel. Didn't take any sort of pictures during this, since it's just two pieces that get glued and nailed down. Here I should have wet the wood and shaped it a bit, instead I just brute forced it and held it in place with the little brass nails and clamps. 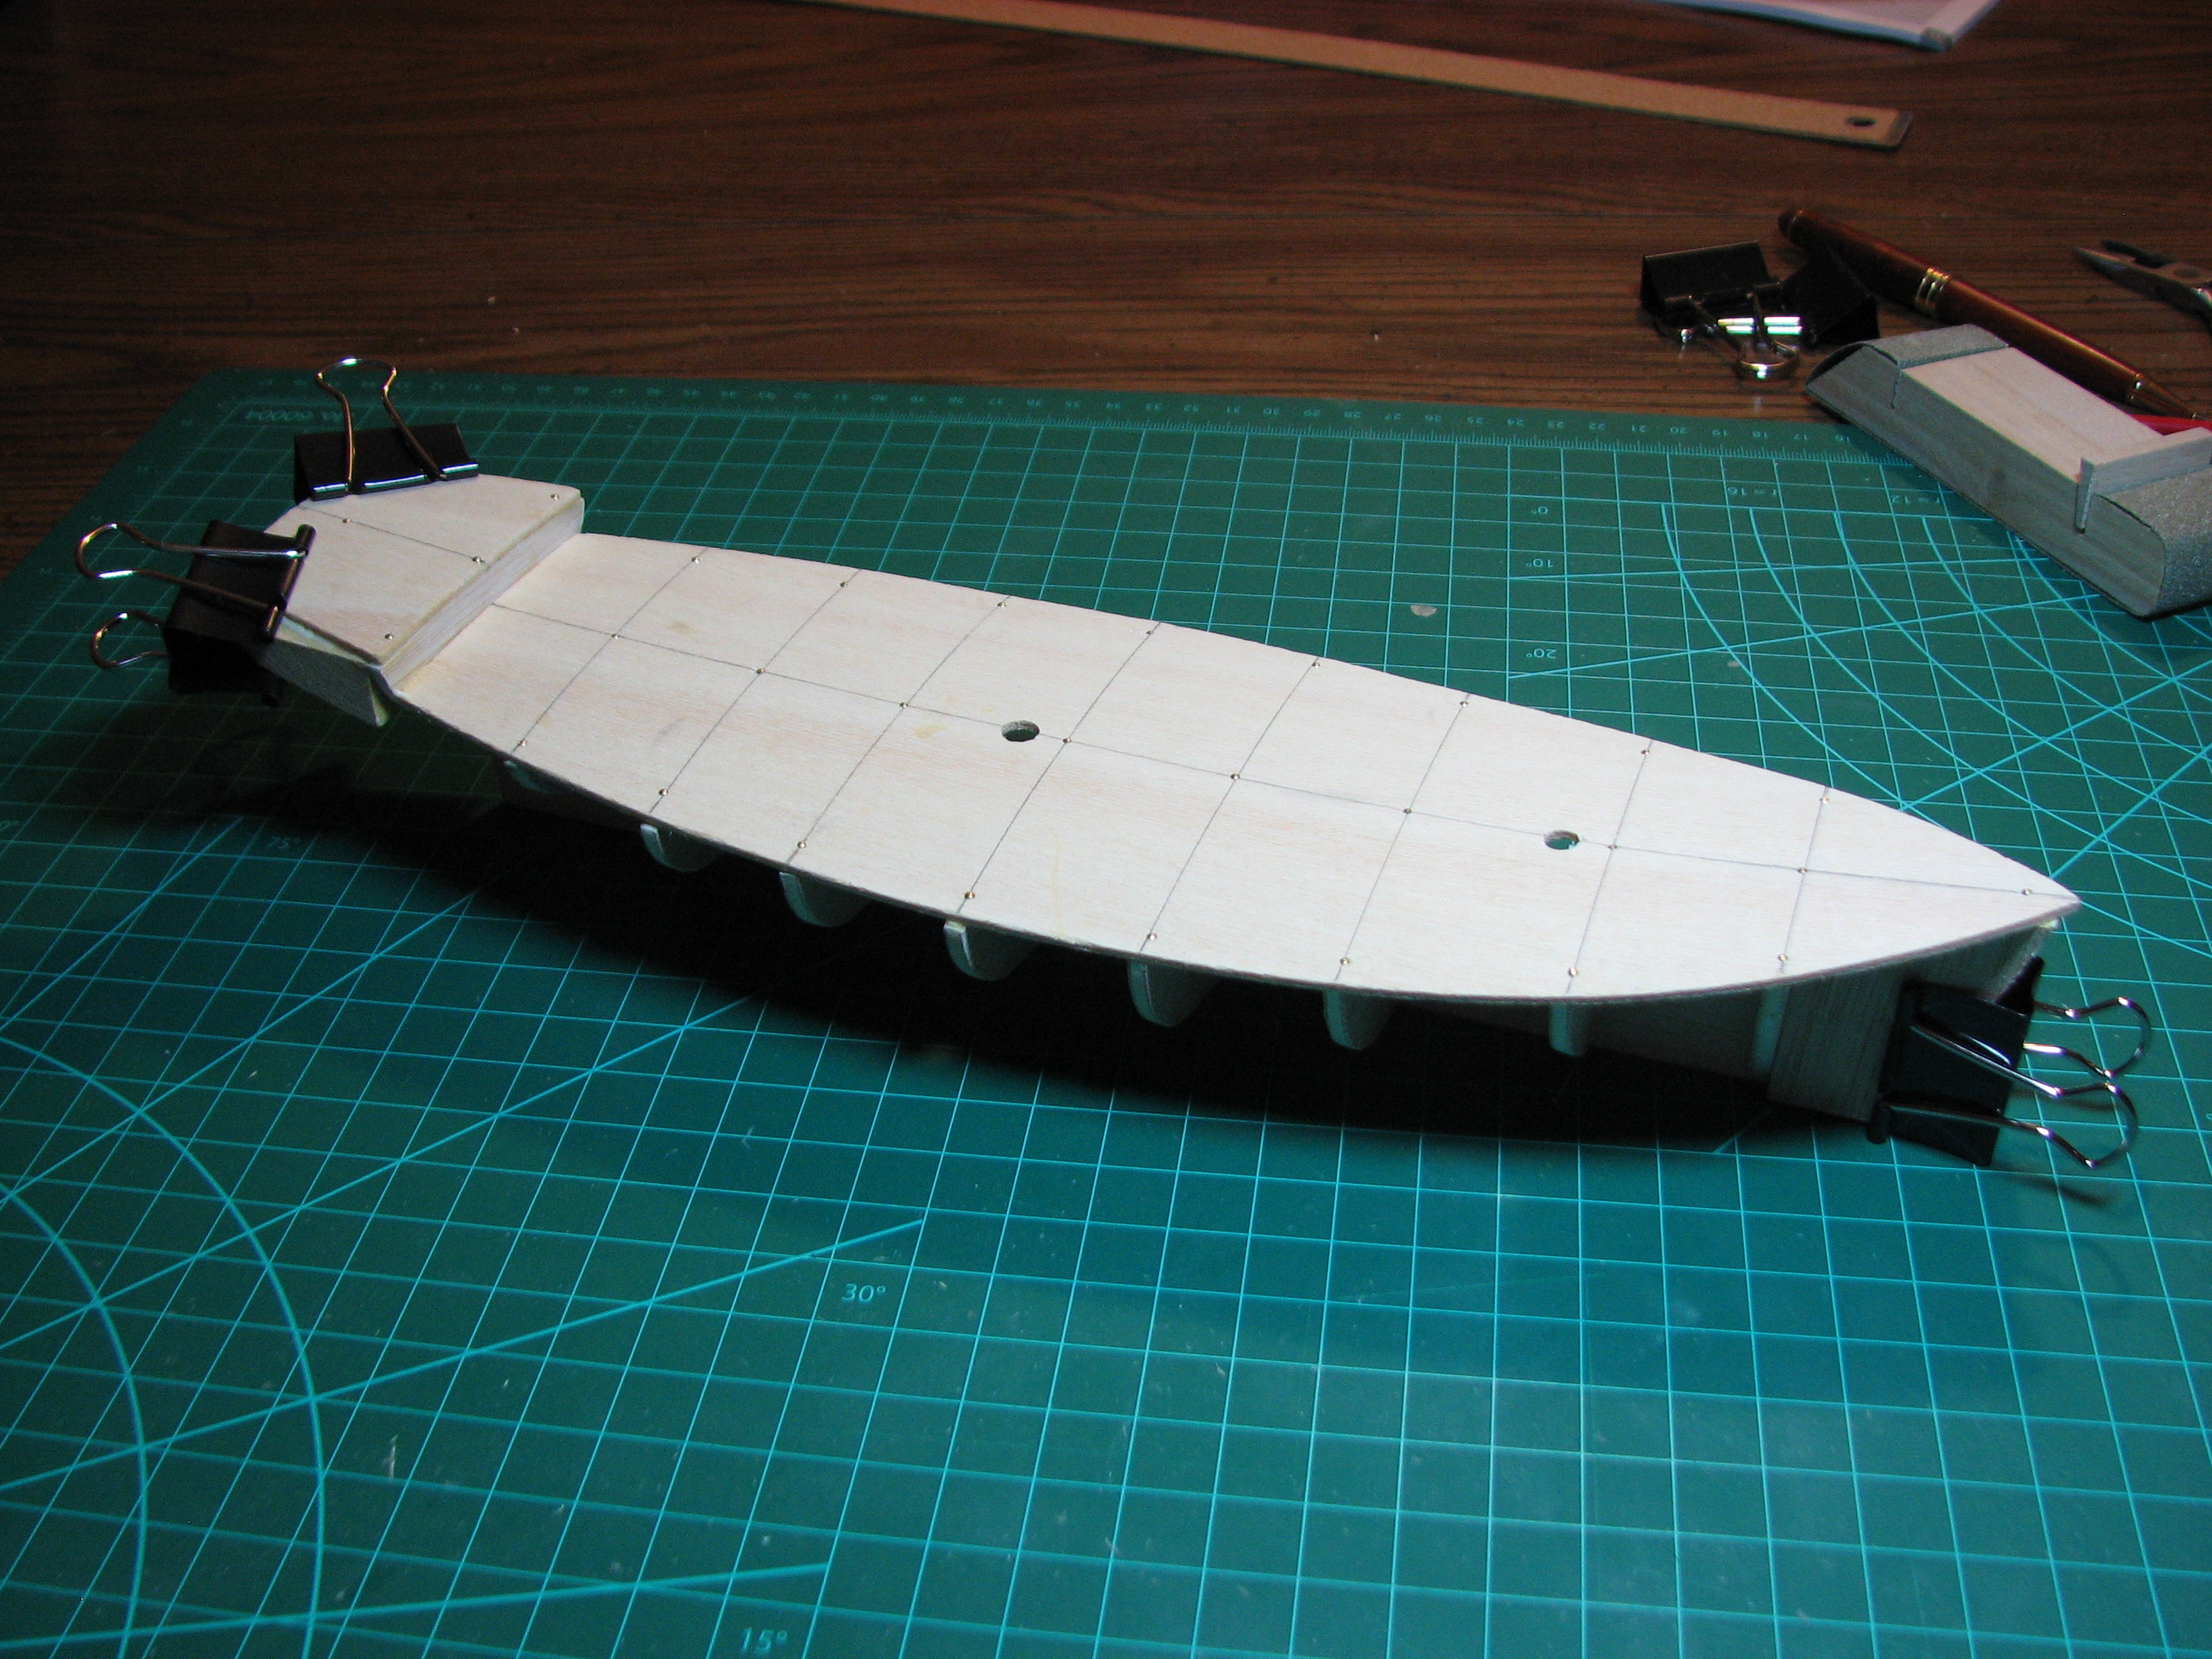 The notch in the false keel for the foremast didn't align properly with the decking hole, as seen here. I hand filed the false keel to allow the mast to step in at the correct angle later. 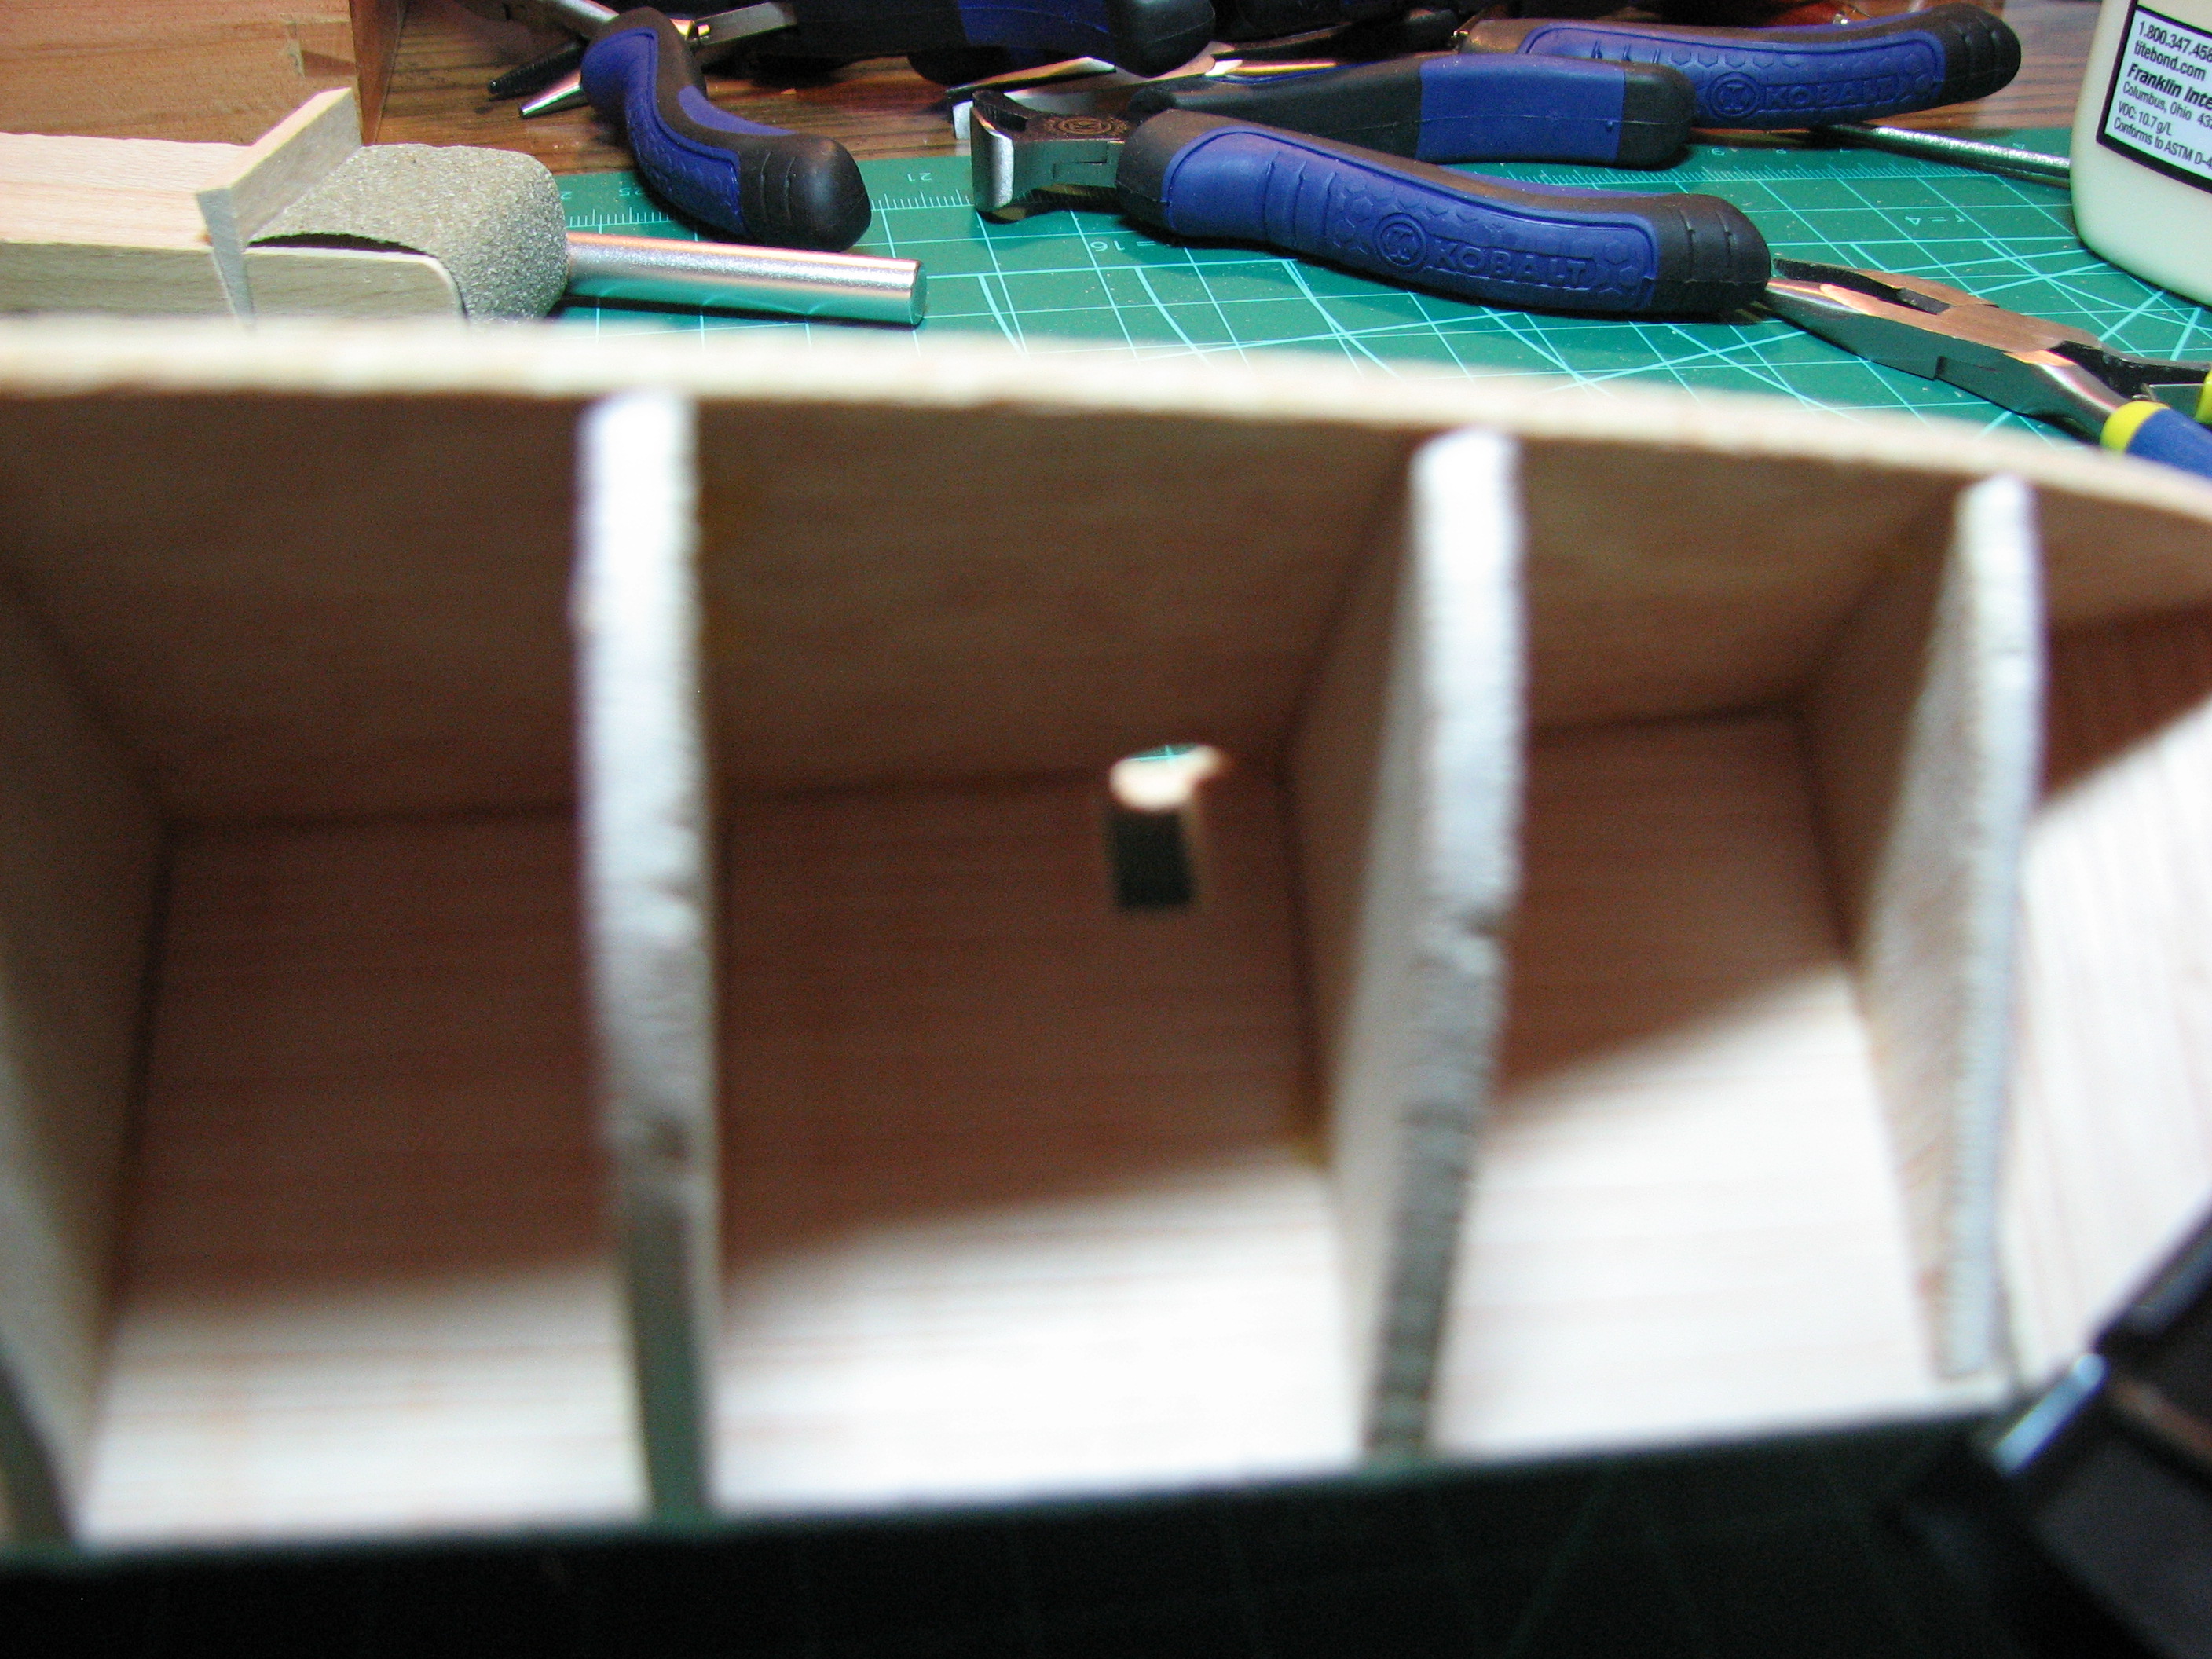 Manual labor time! Before the planking goes down, the reinforcement blocks need to be shaped. Here is the poop deck from above. As you can see the deck extends past the blocks, and the blocks extend out to the sides. This all has to be trimmed down to shape the stern. I did it all with a file and sanding block. 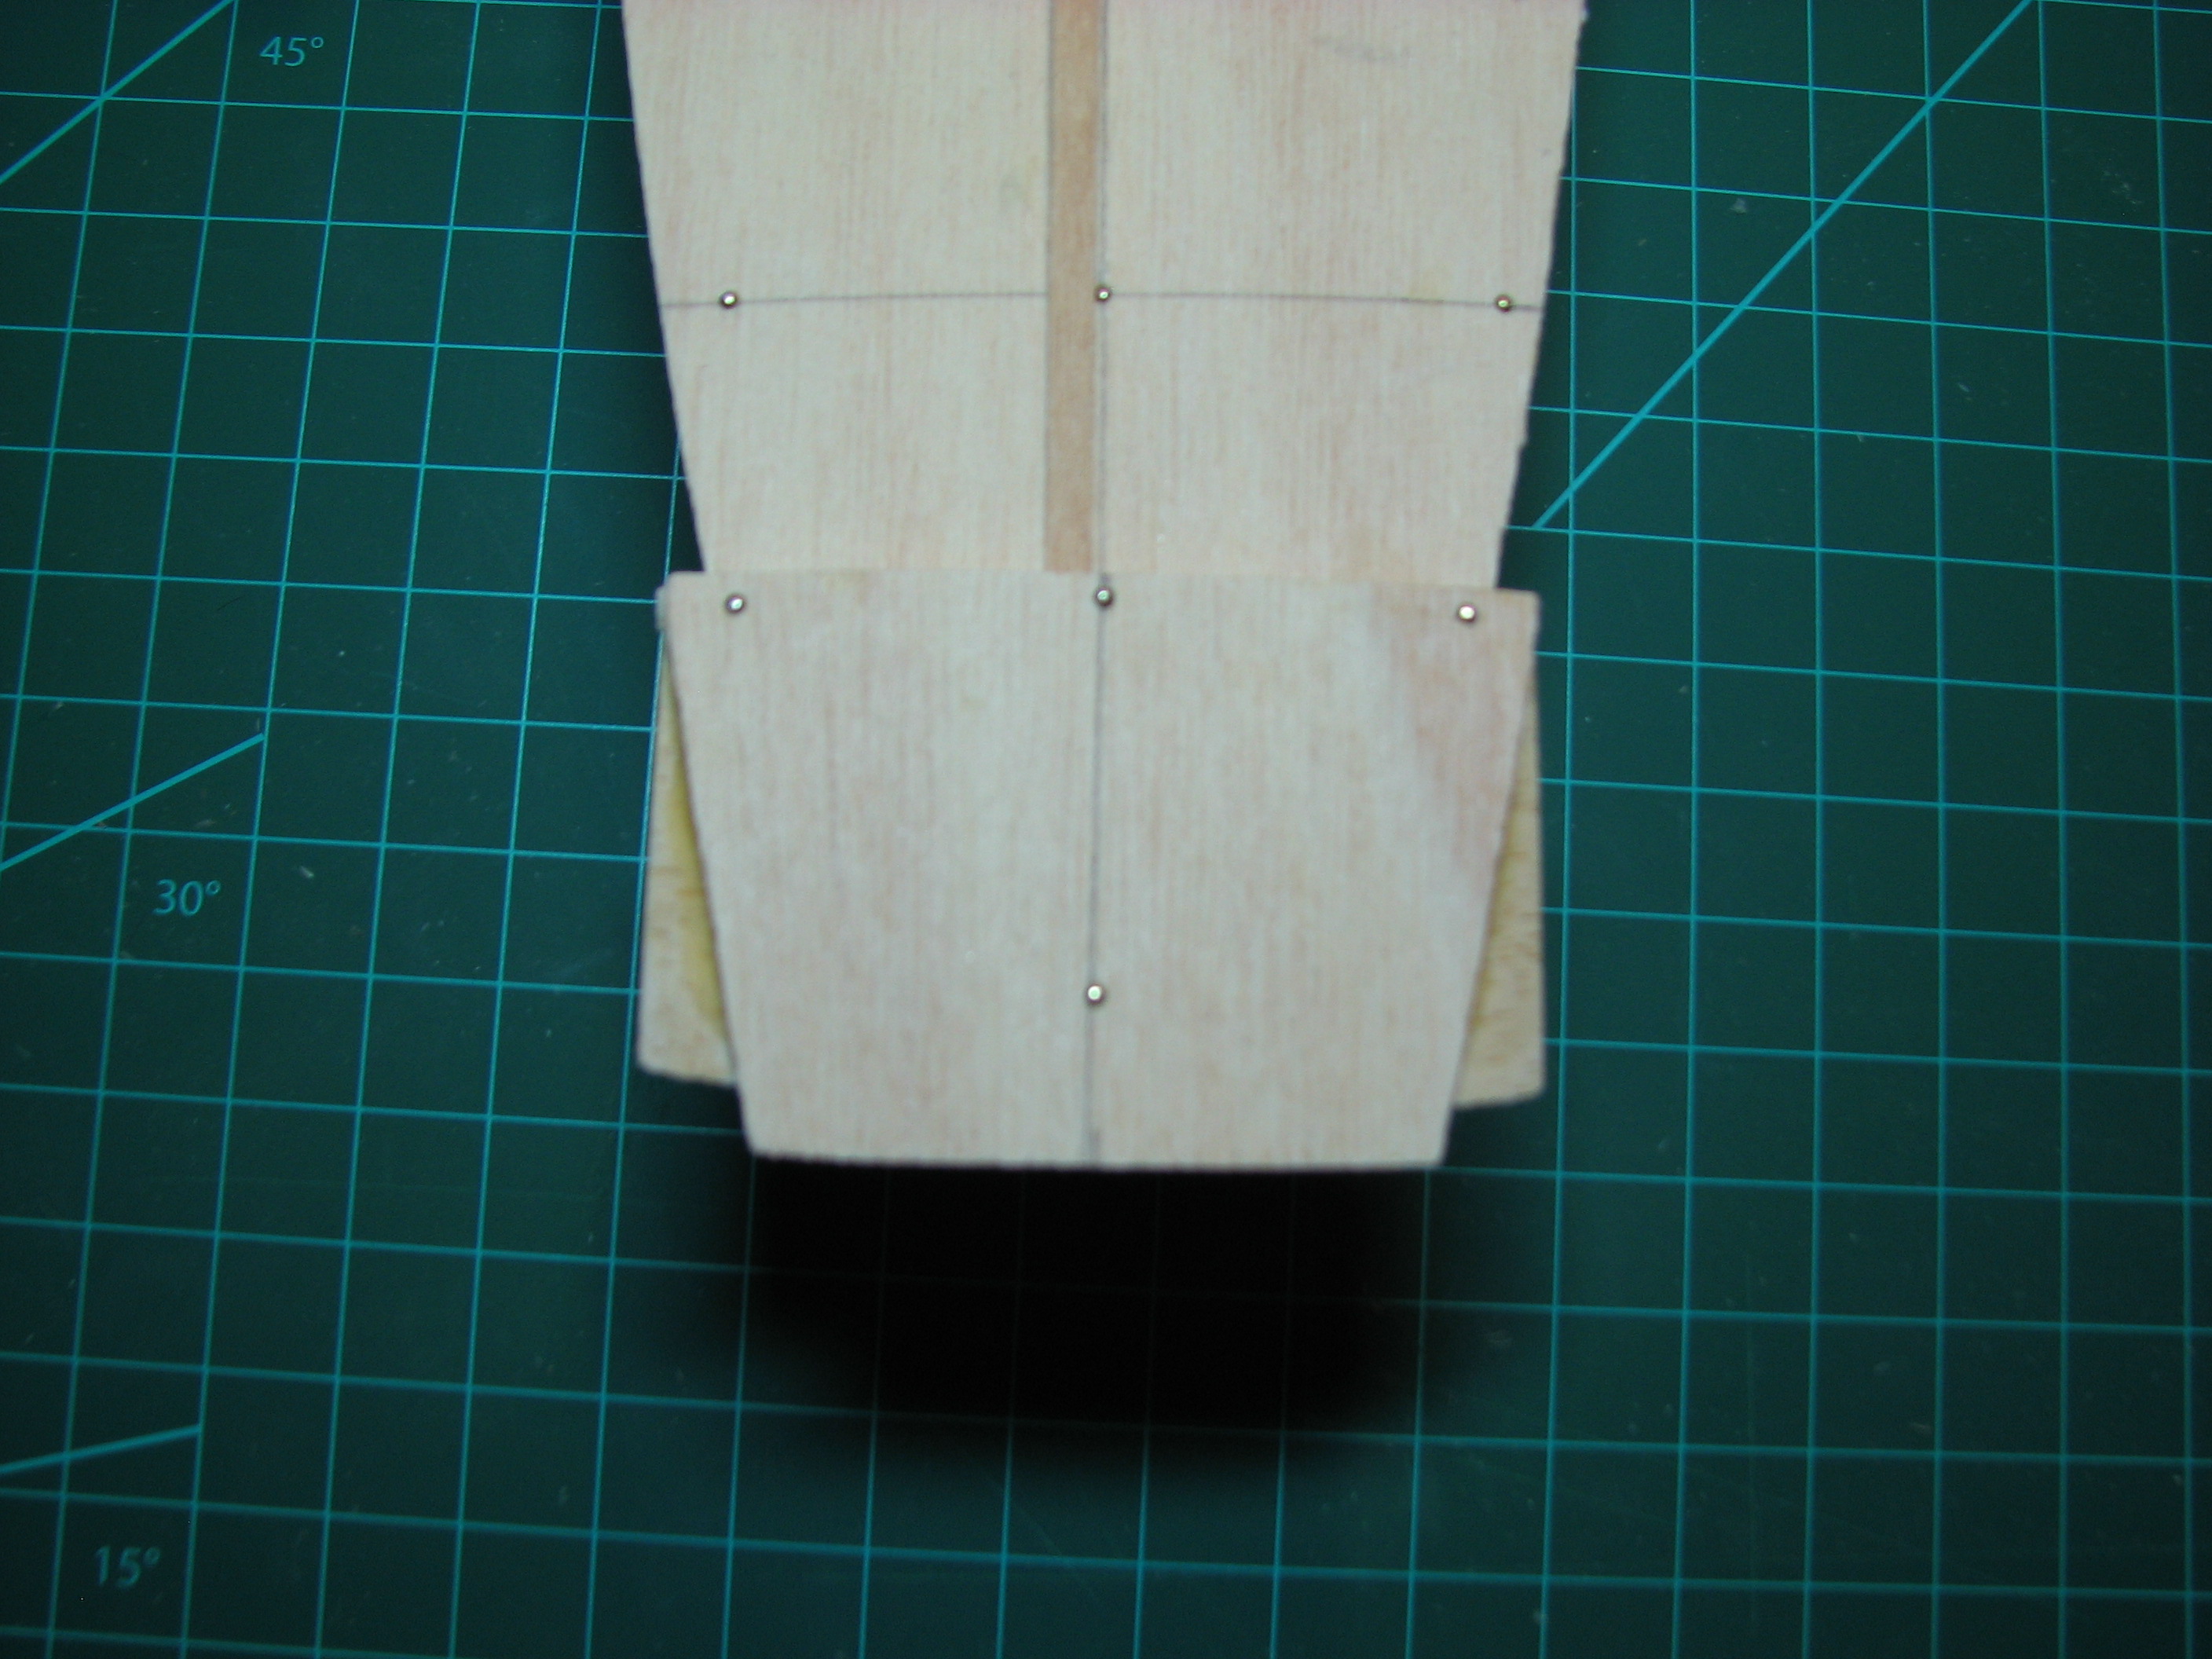 Here it is from below, sorry it's a bit out of focus, my camera doesn't want to focus in macro mode anymore. Really need to replace it someday. 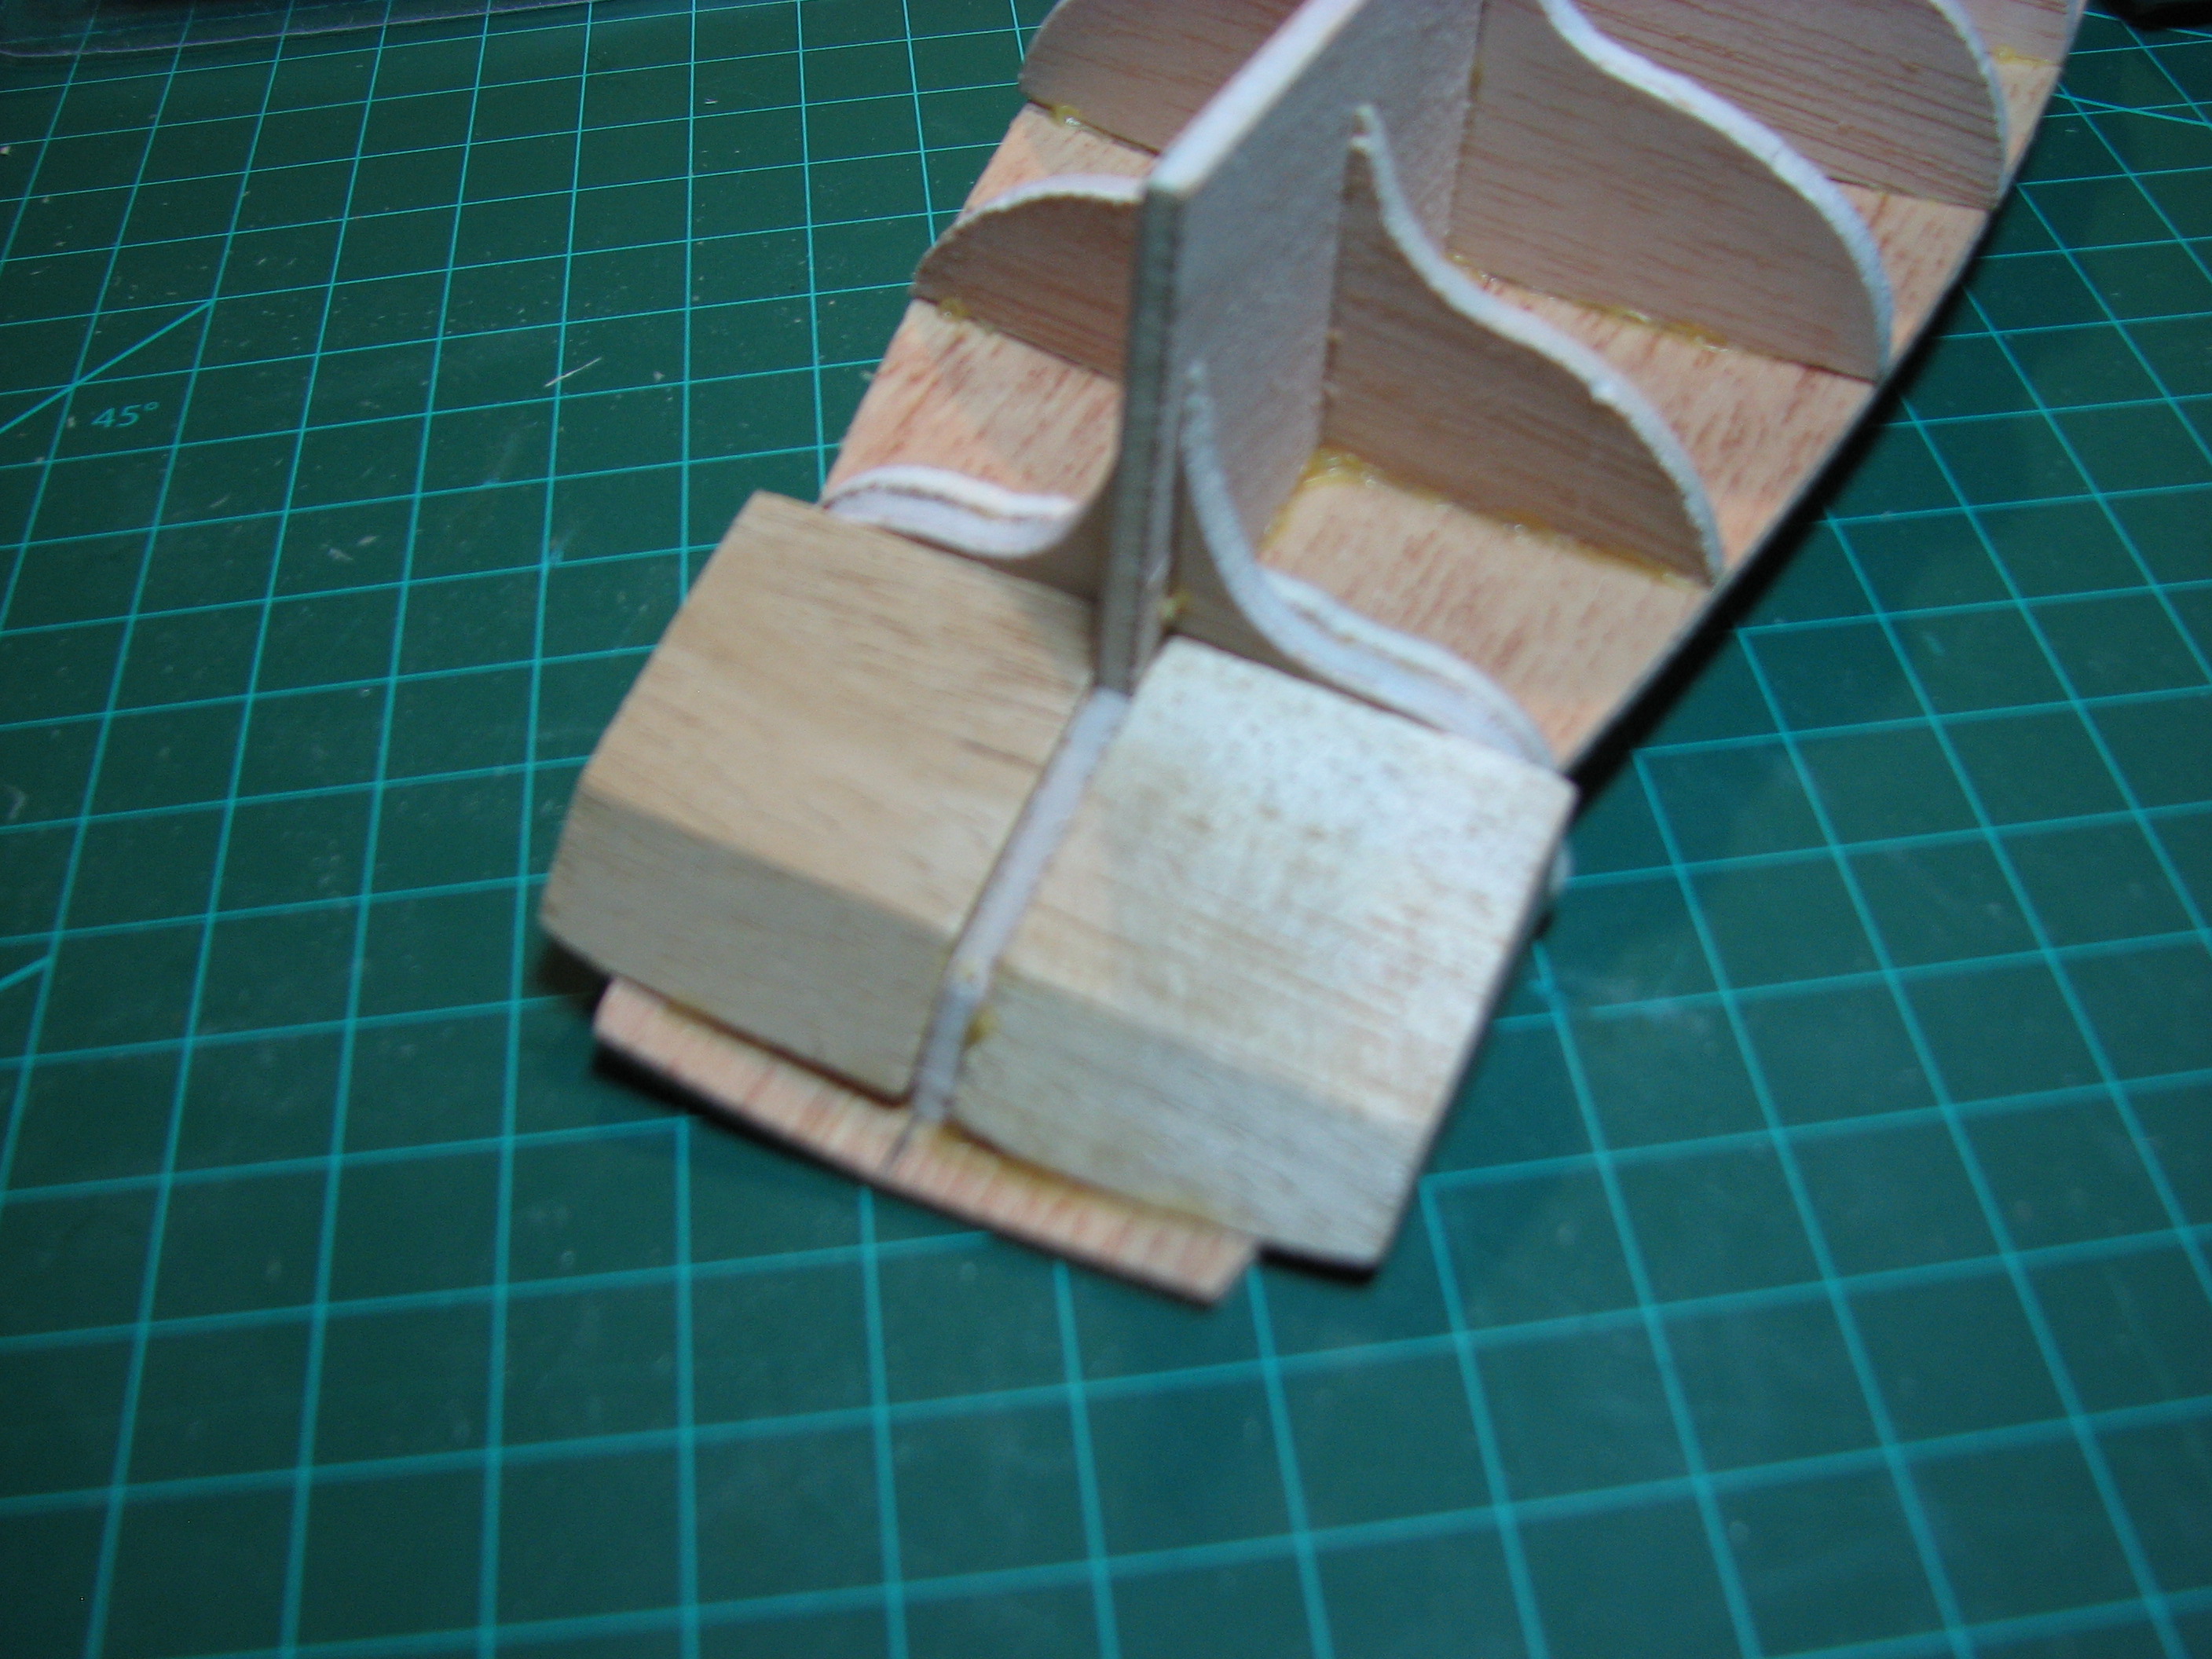 And here it is after the rough shaping. You can see the gapping between the blocks and the deck because of how I installed the blocks incorrectly. Luckily that will all get covered up by the transom planking and stuff. Same sort of deal with the stem, needs to be shaped for the hull planking to come together evenly. 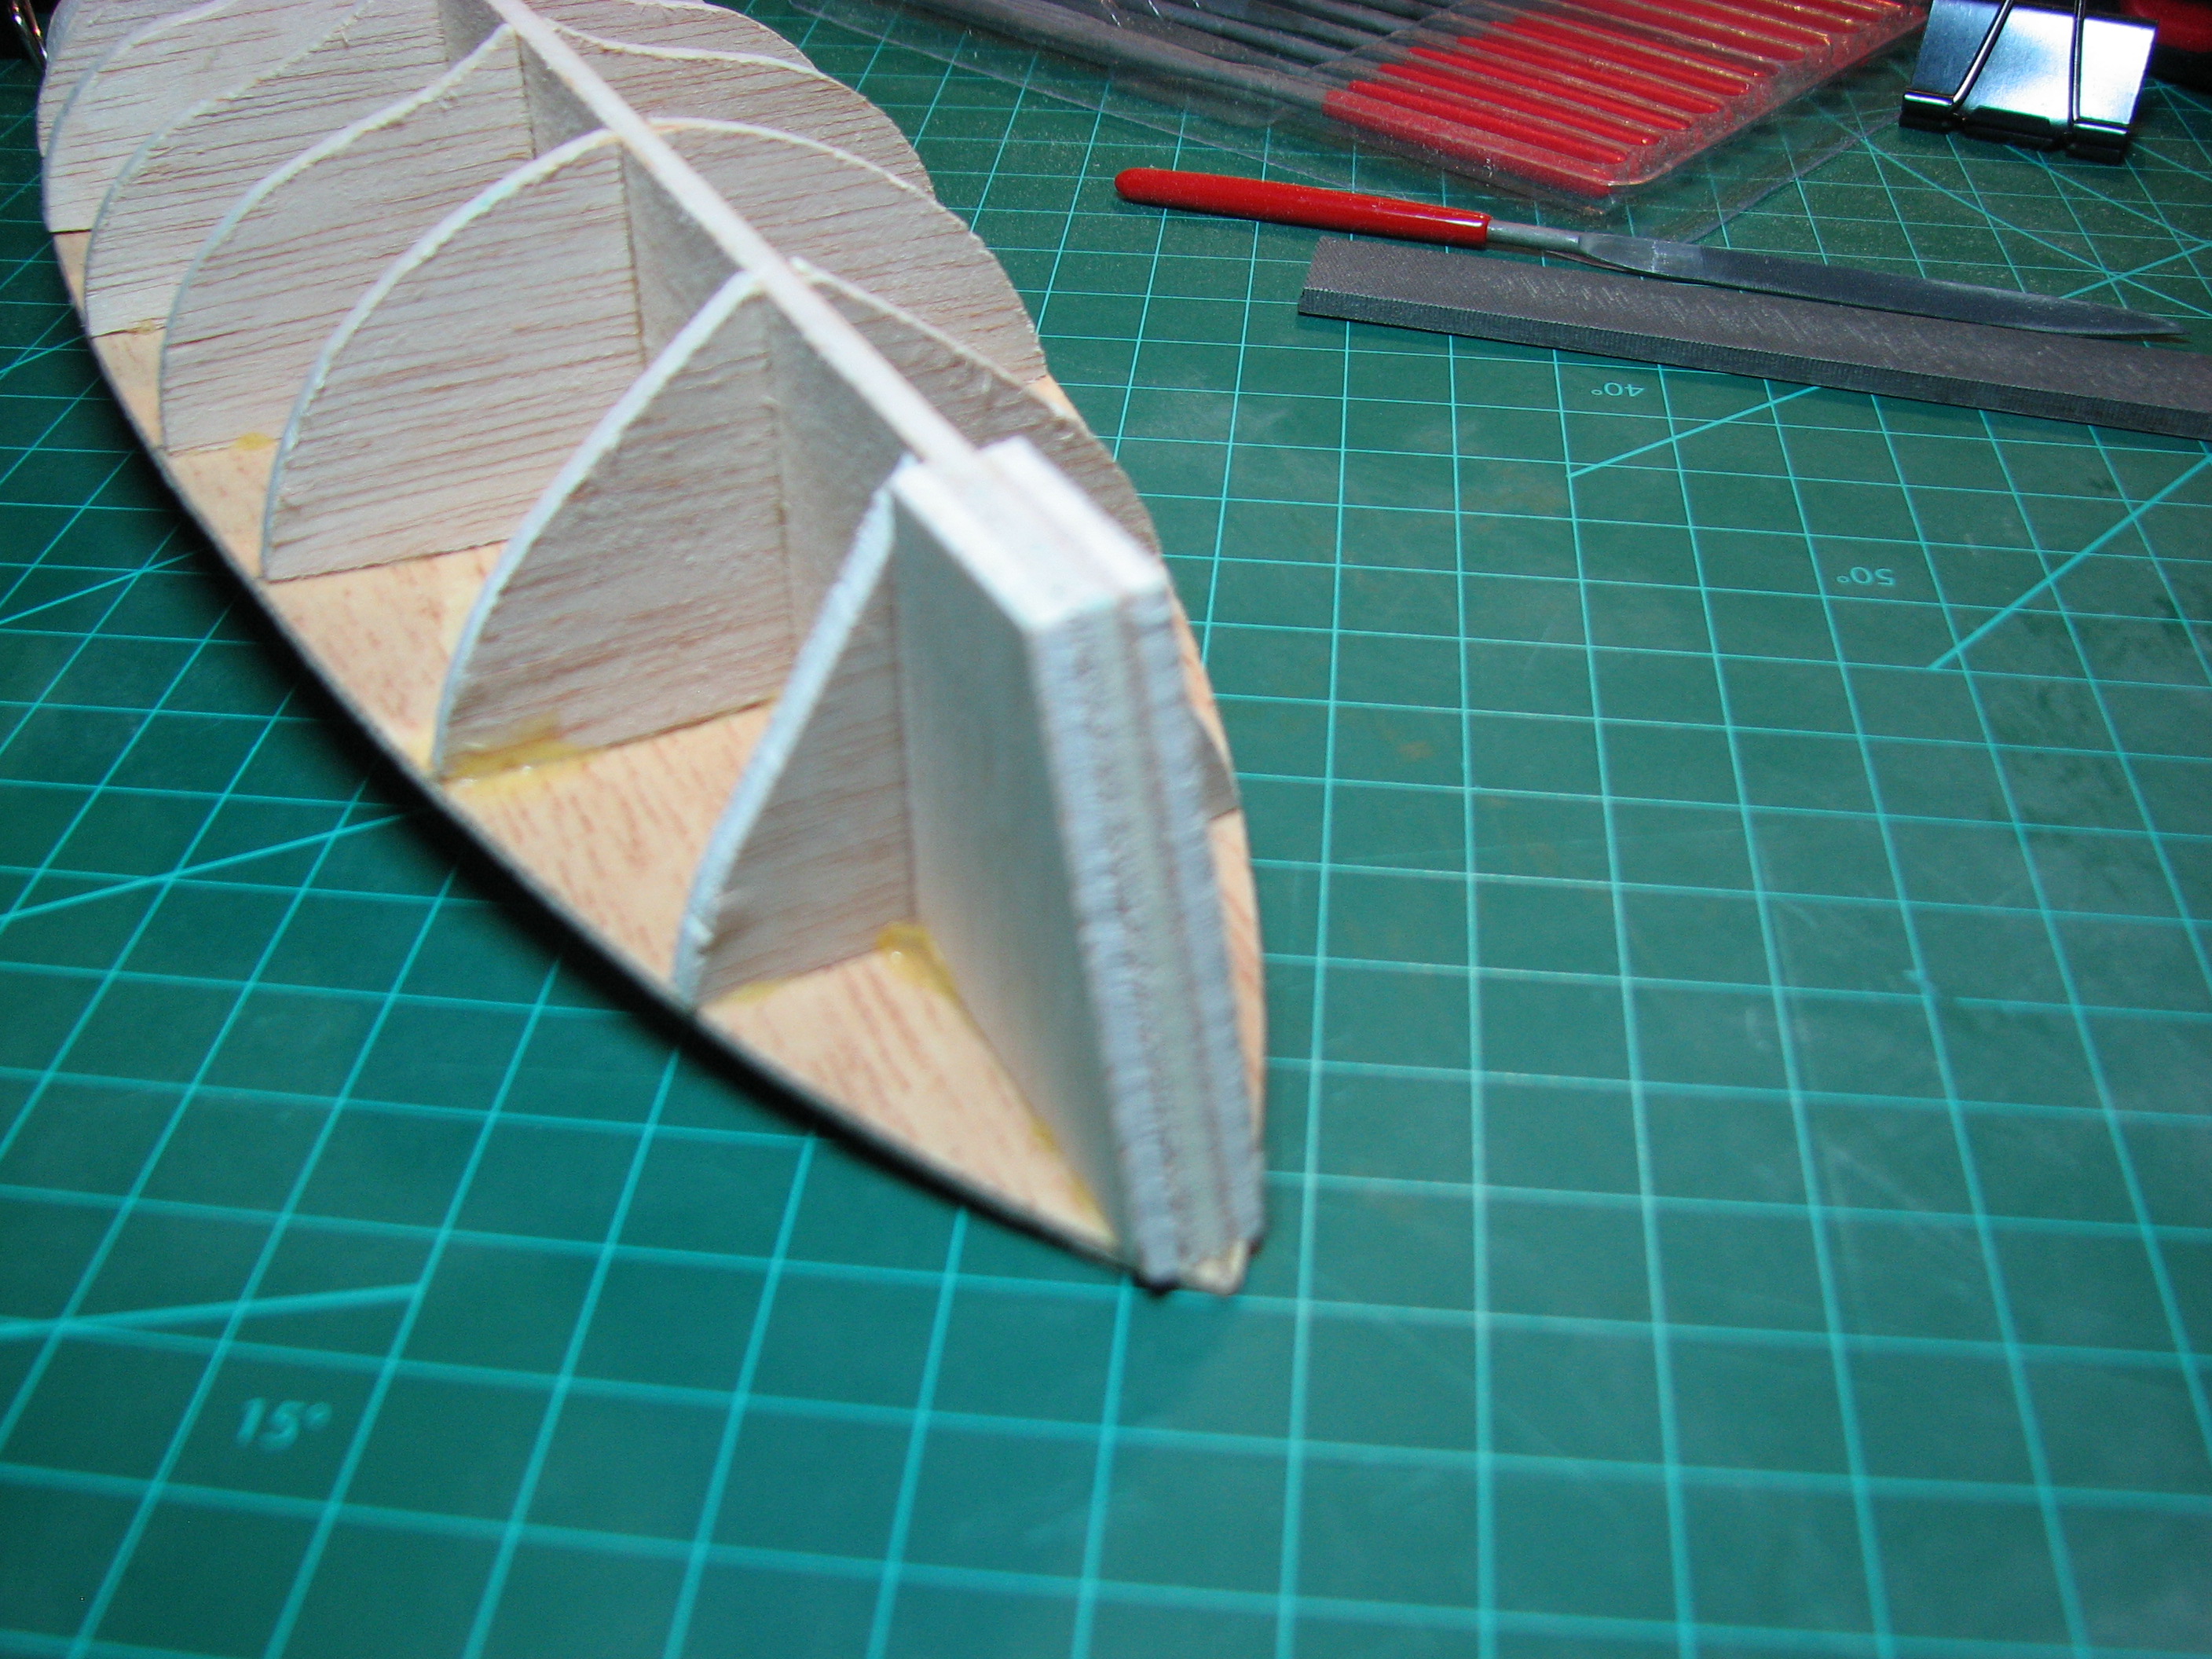 I rough shaped it and will do the fine work when I'm ready to start planking, as part of all the work that has to go into prepping that step. 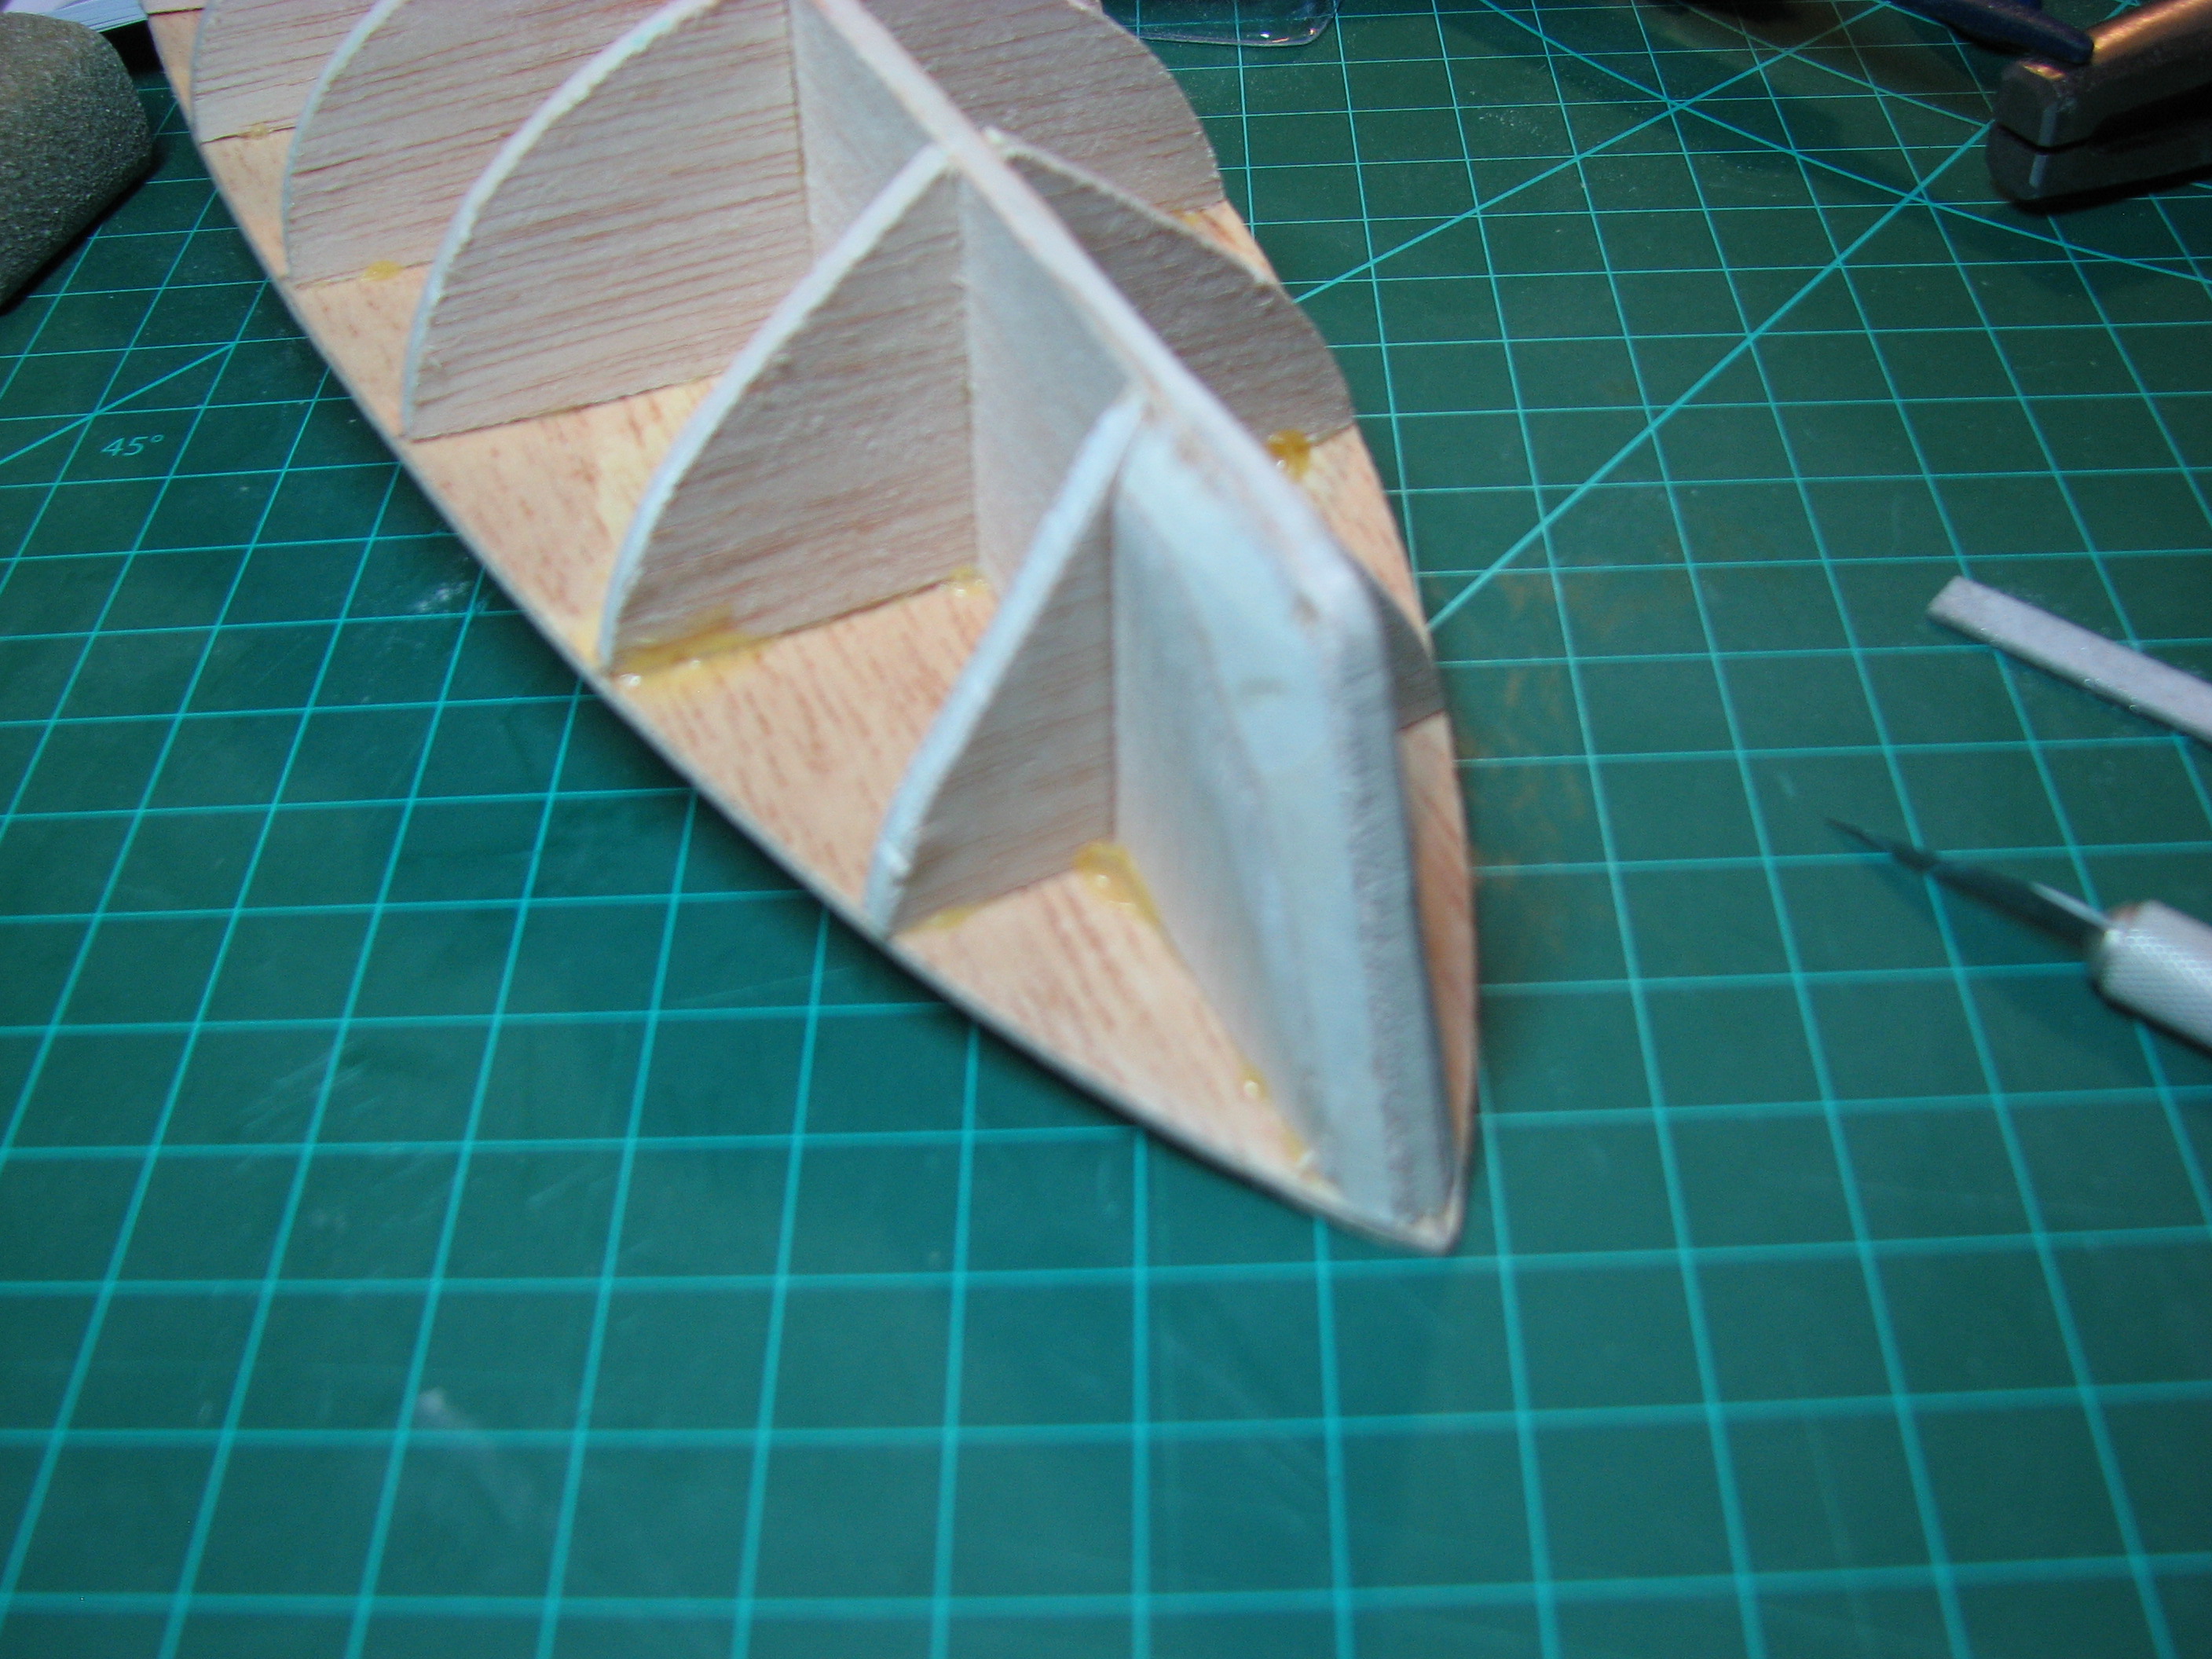 On to deck planking. Start by carefully aligning one plank with the marked center-line of the deck. That plank becomes the guide for doing all the rest of them. 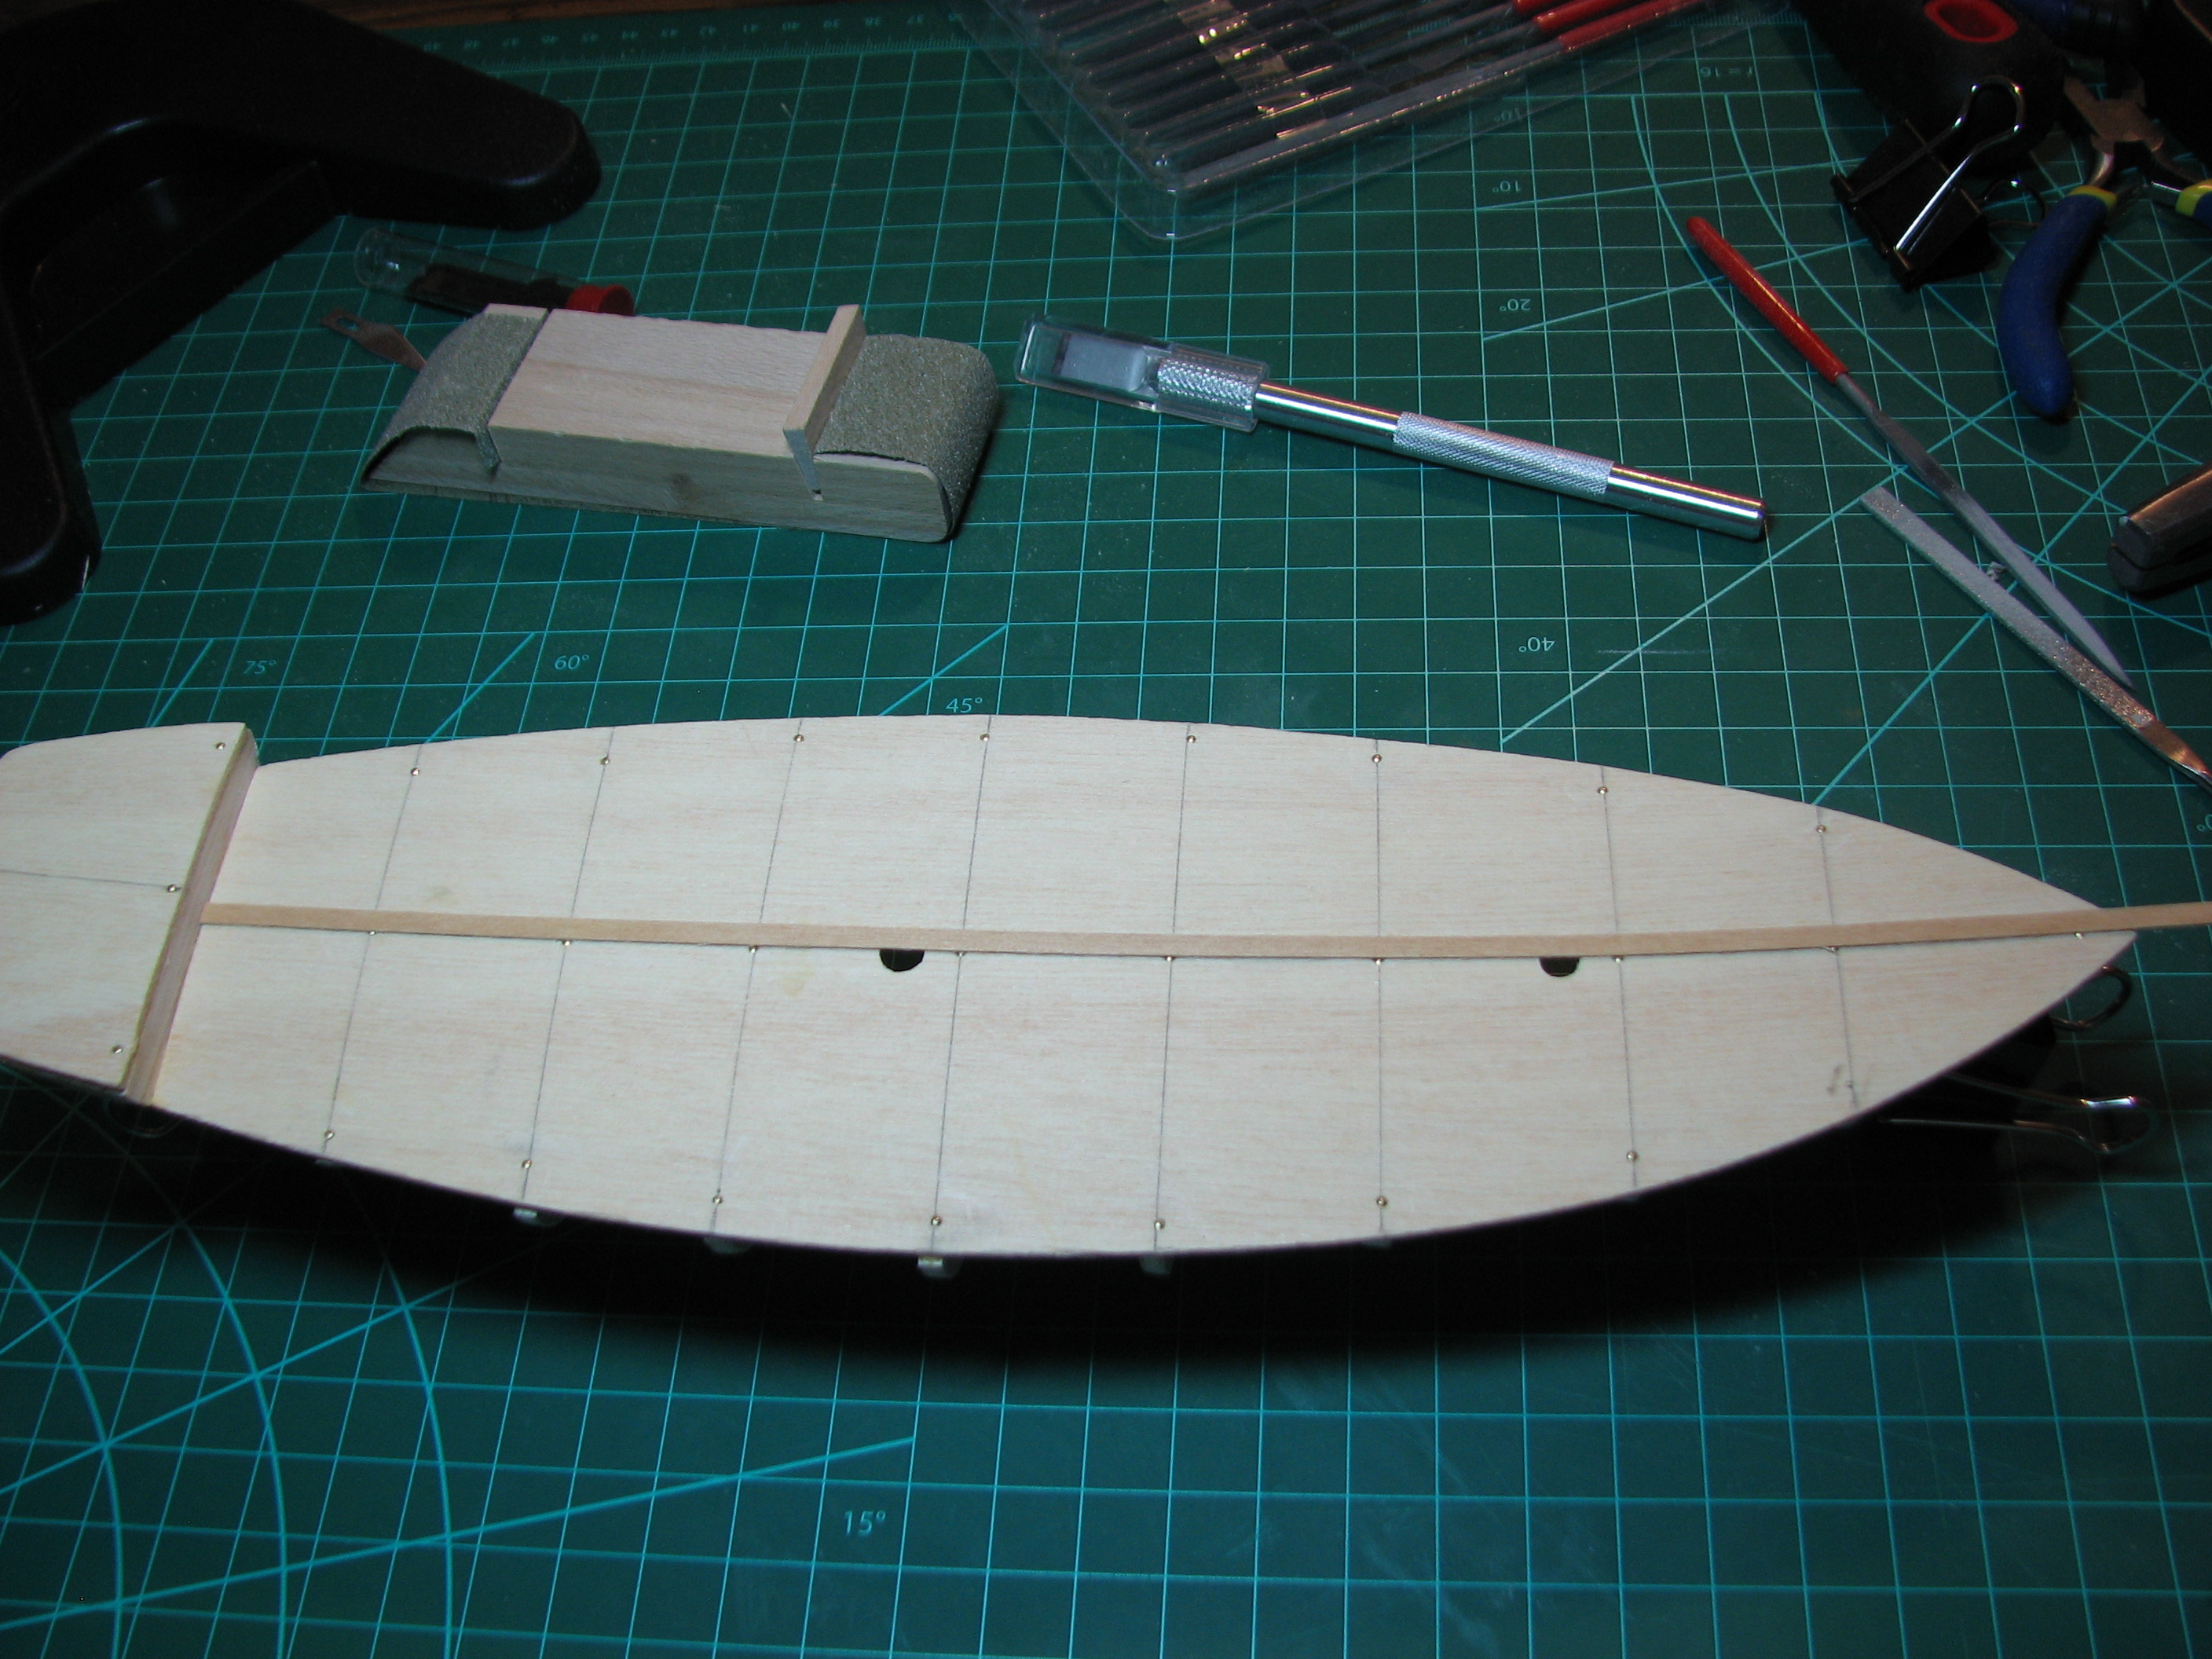 Port side main deck planking laid down, but not trimmed. Clamped the edges while drying as can be seen here. 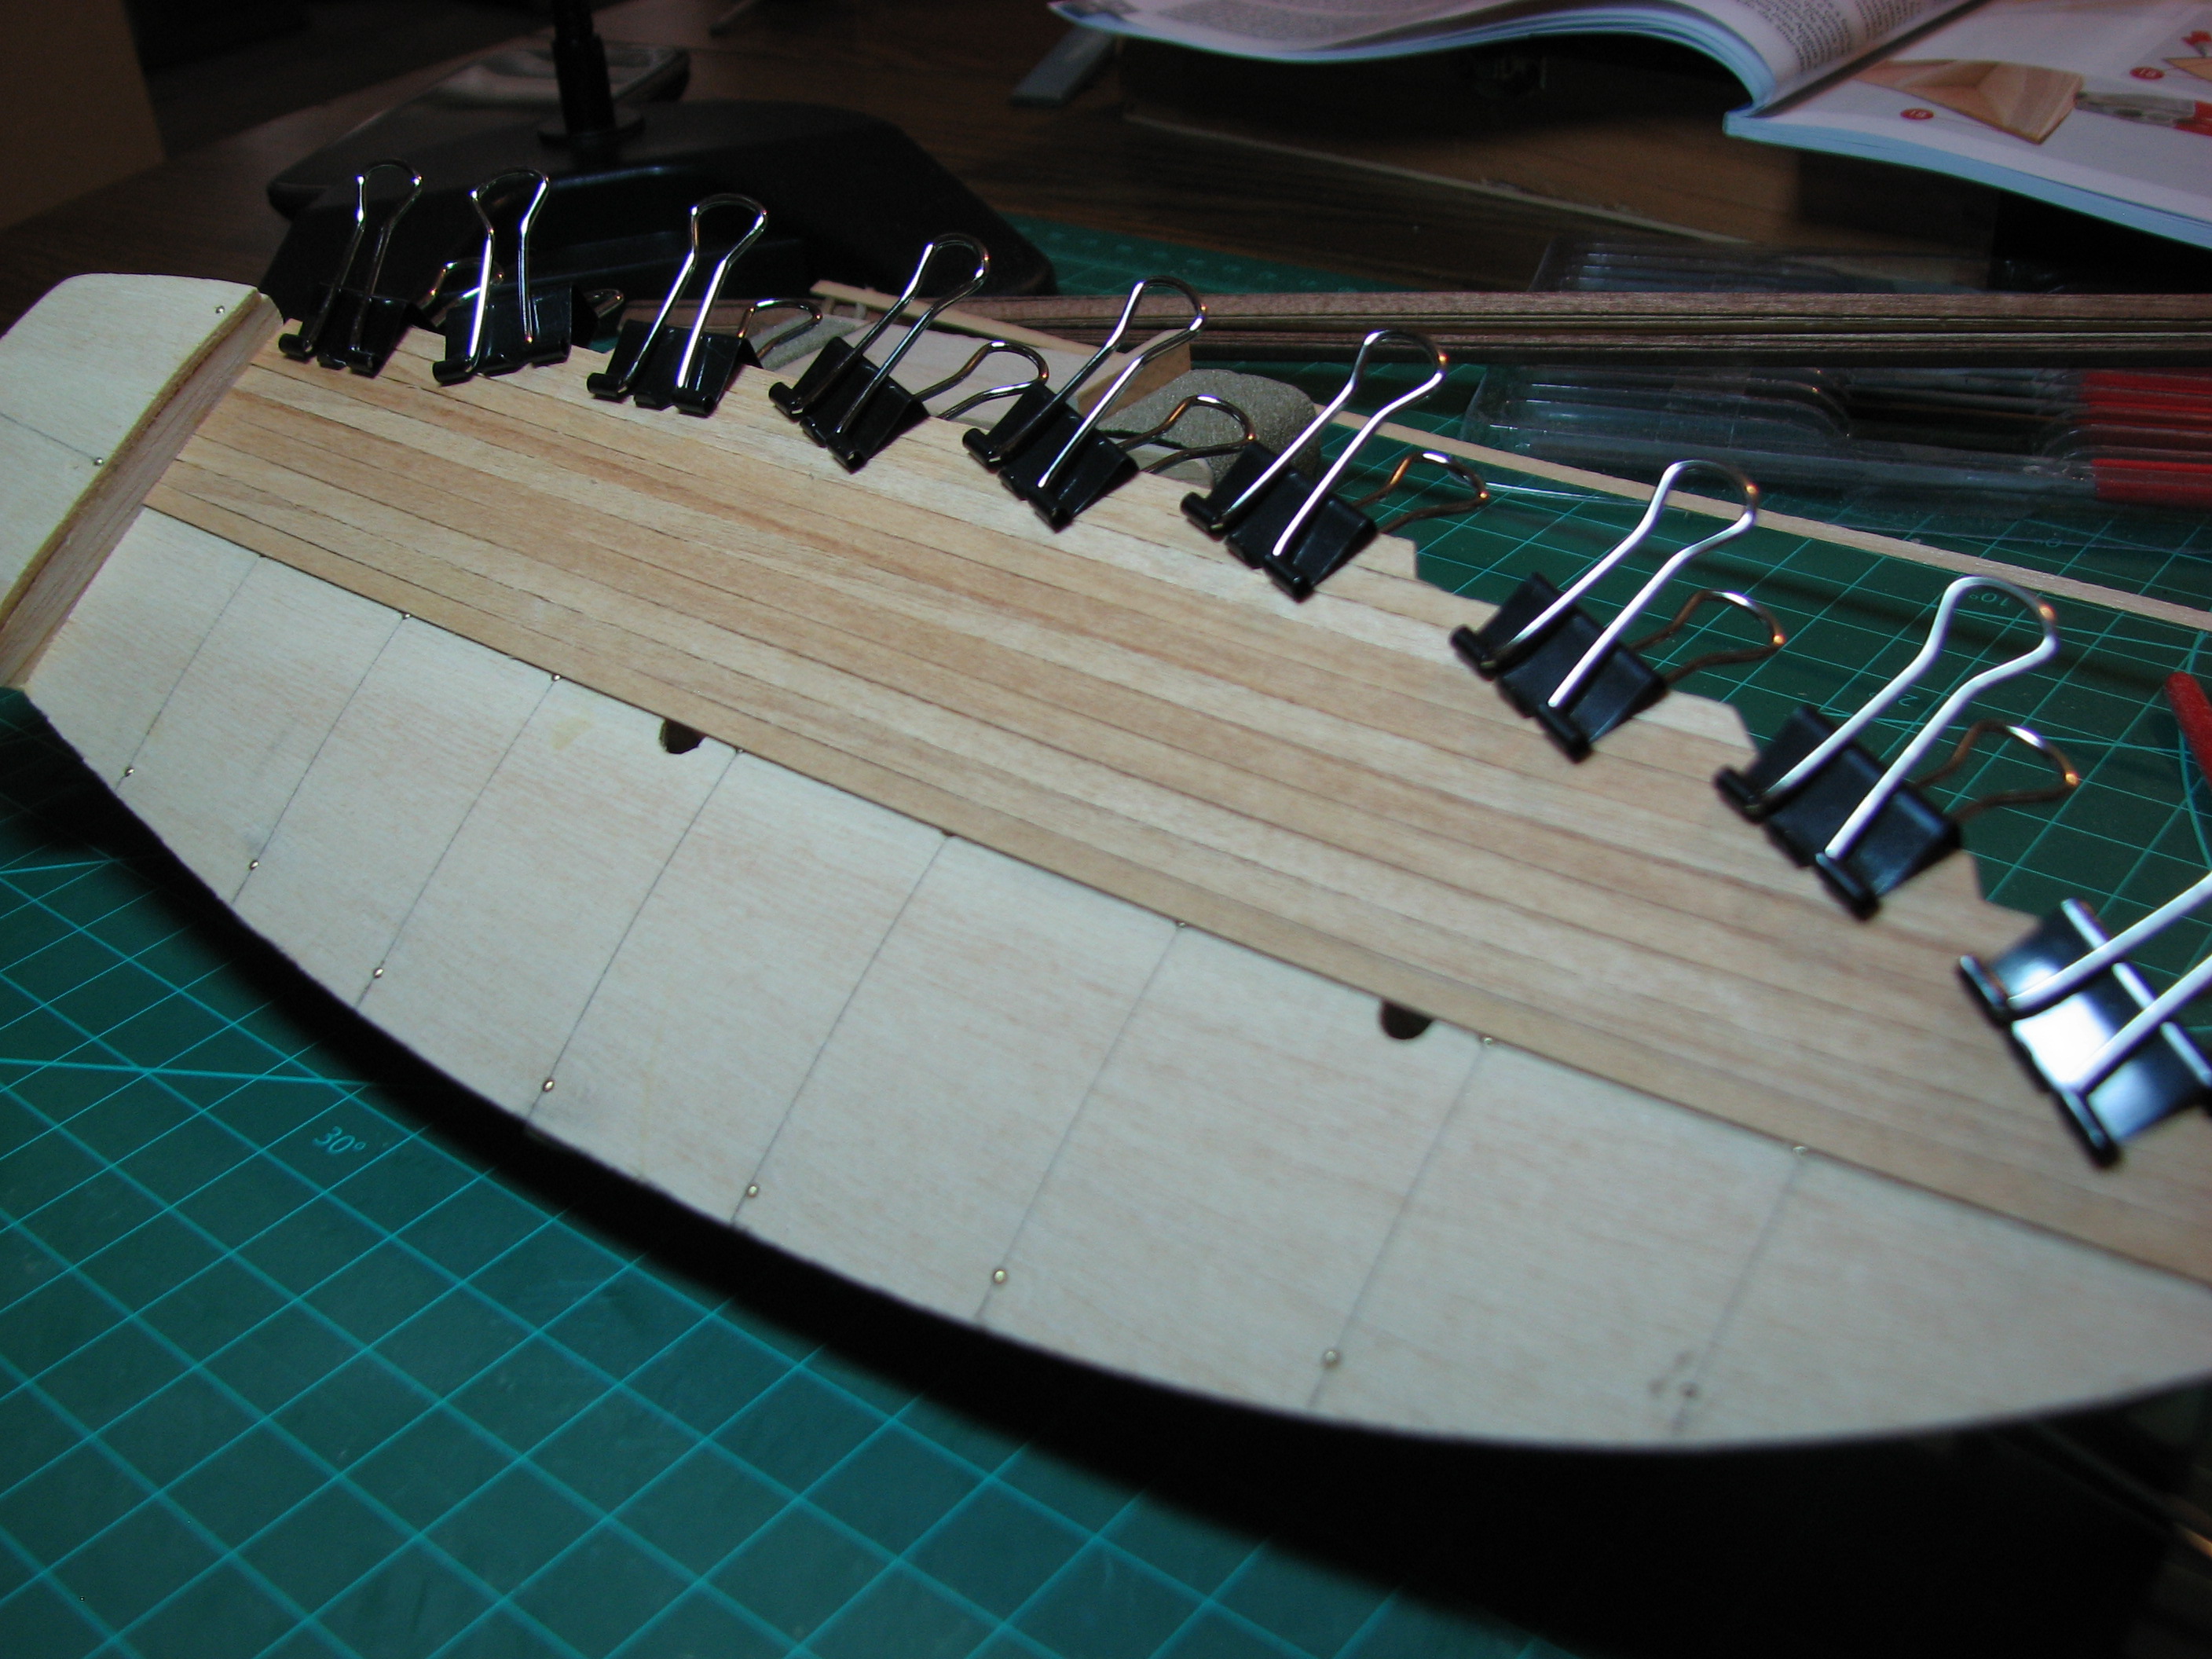 Port side main deck planking dried and trimmed. 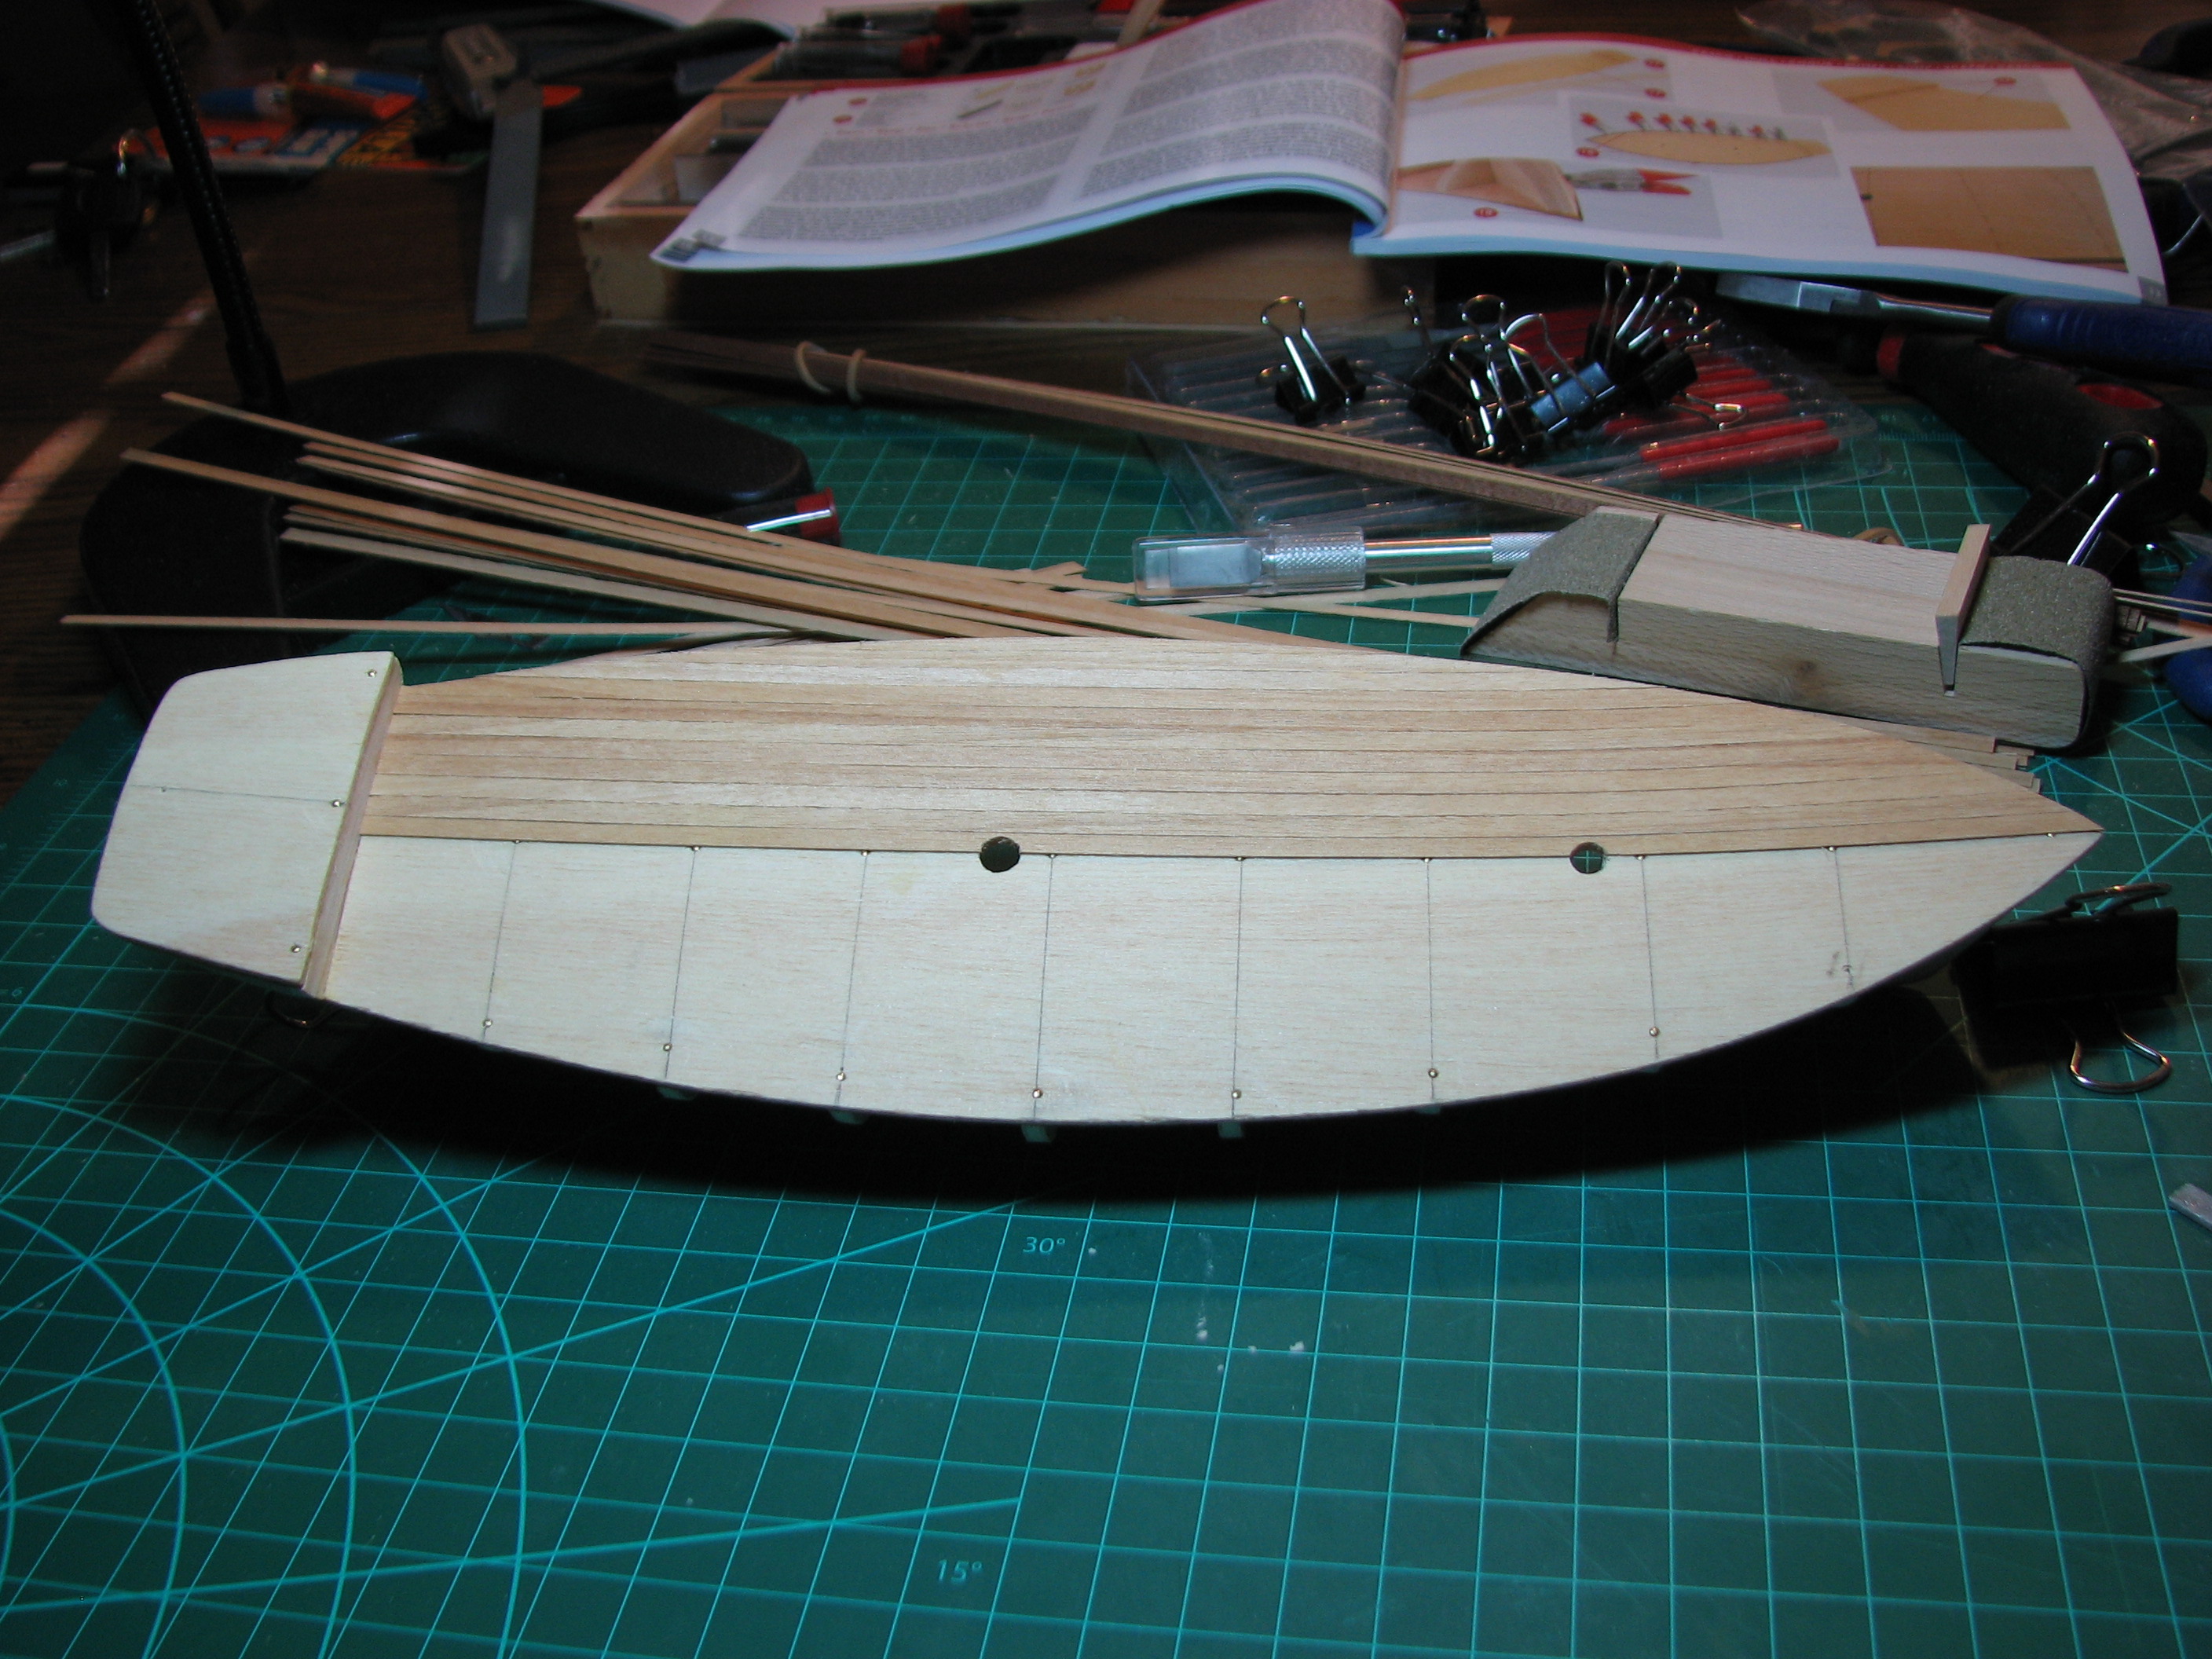 After trimming the planks where the mast holes are, I then put down the starboard planking on the main deck. 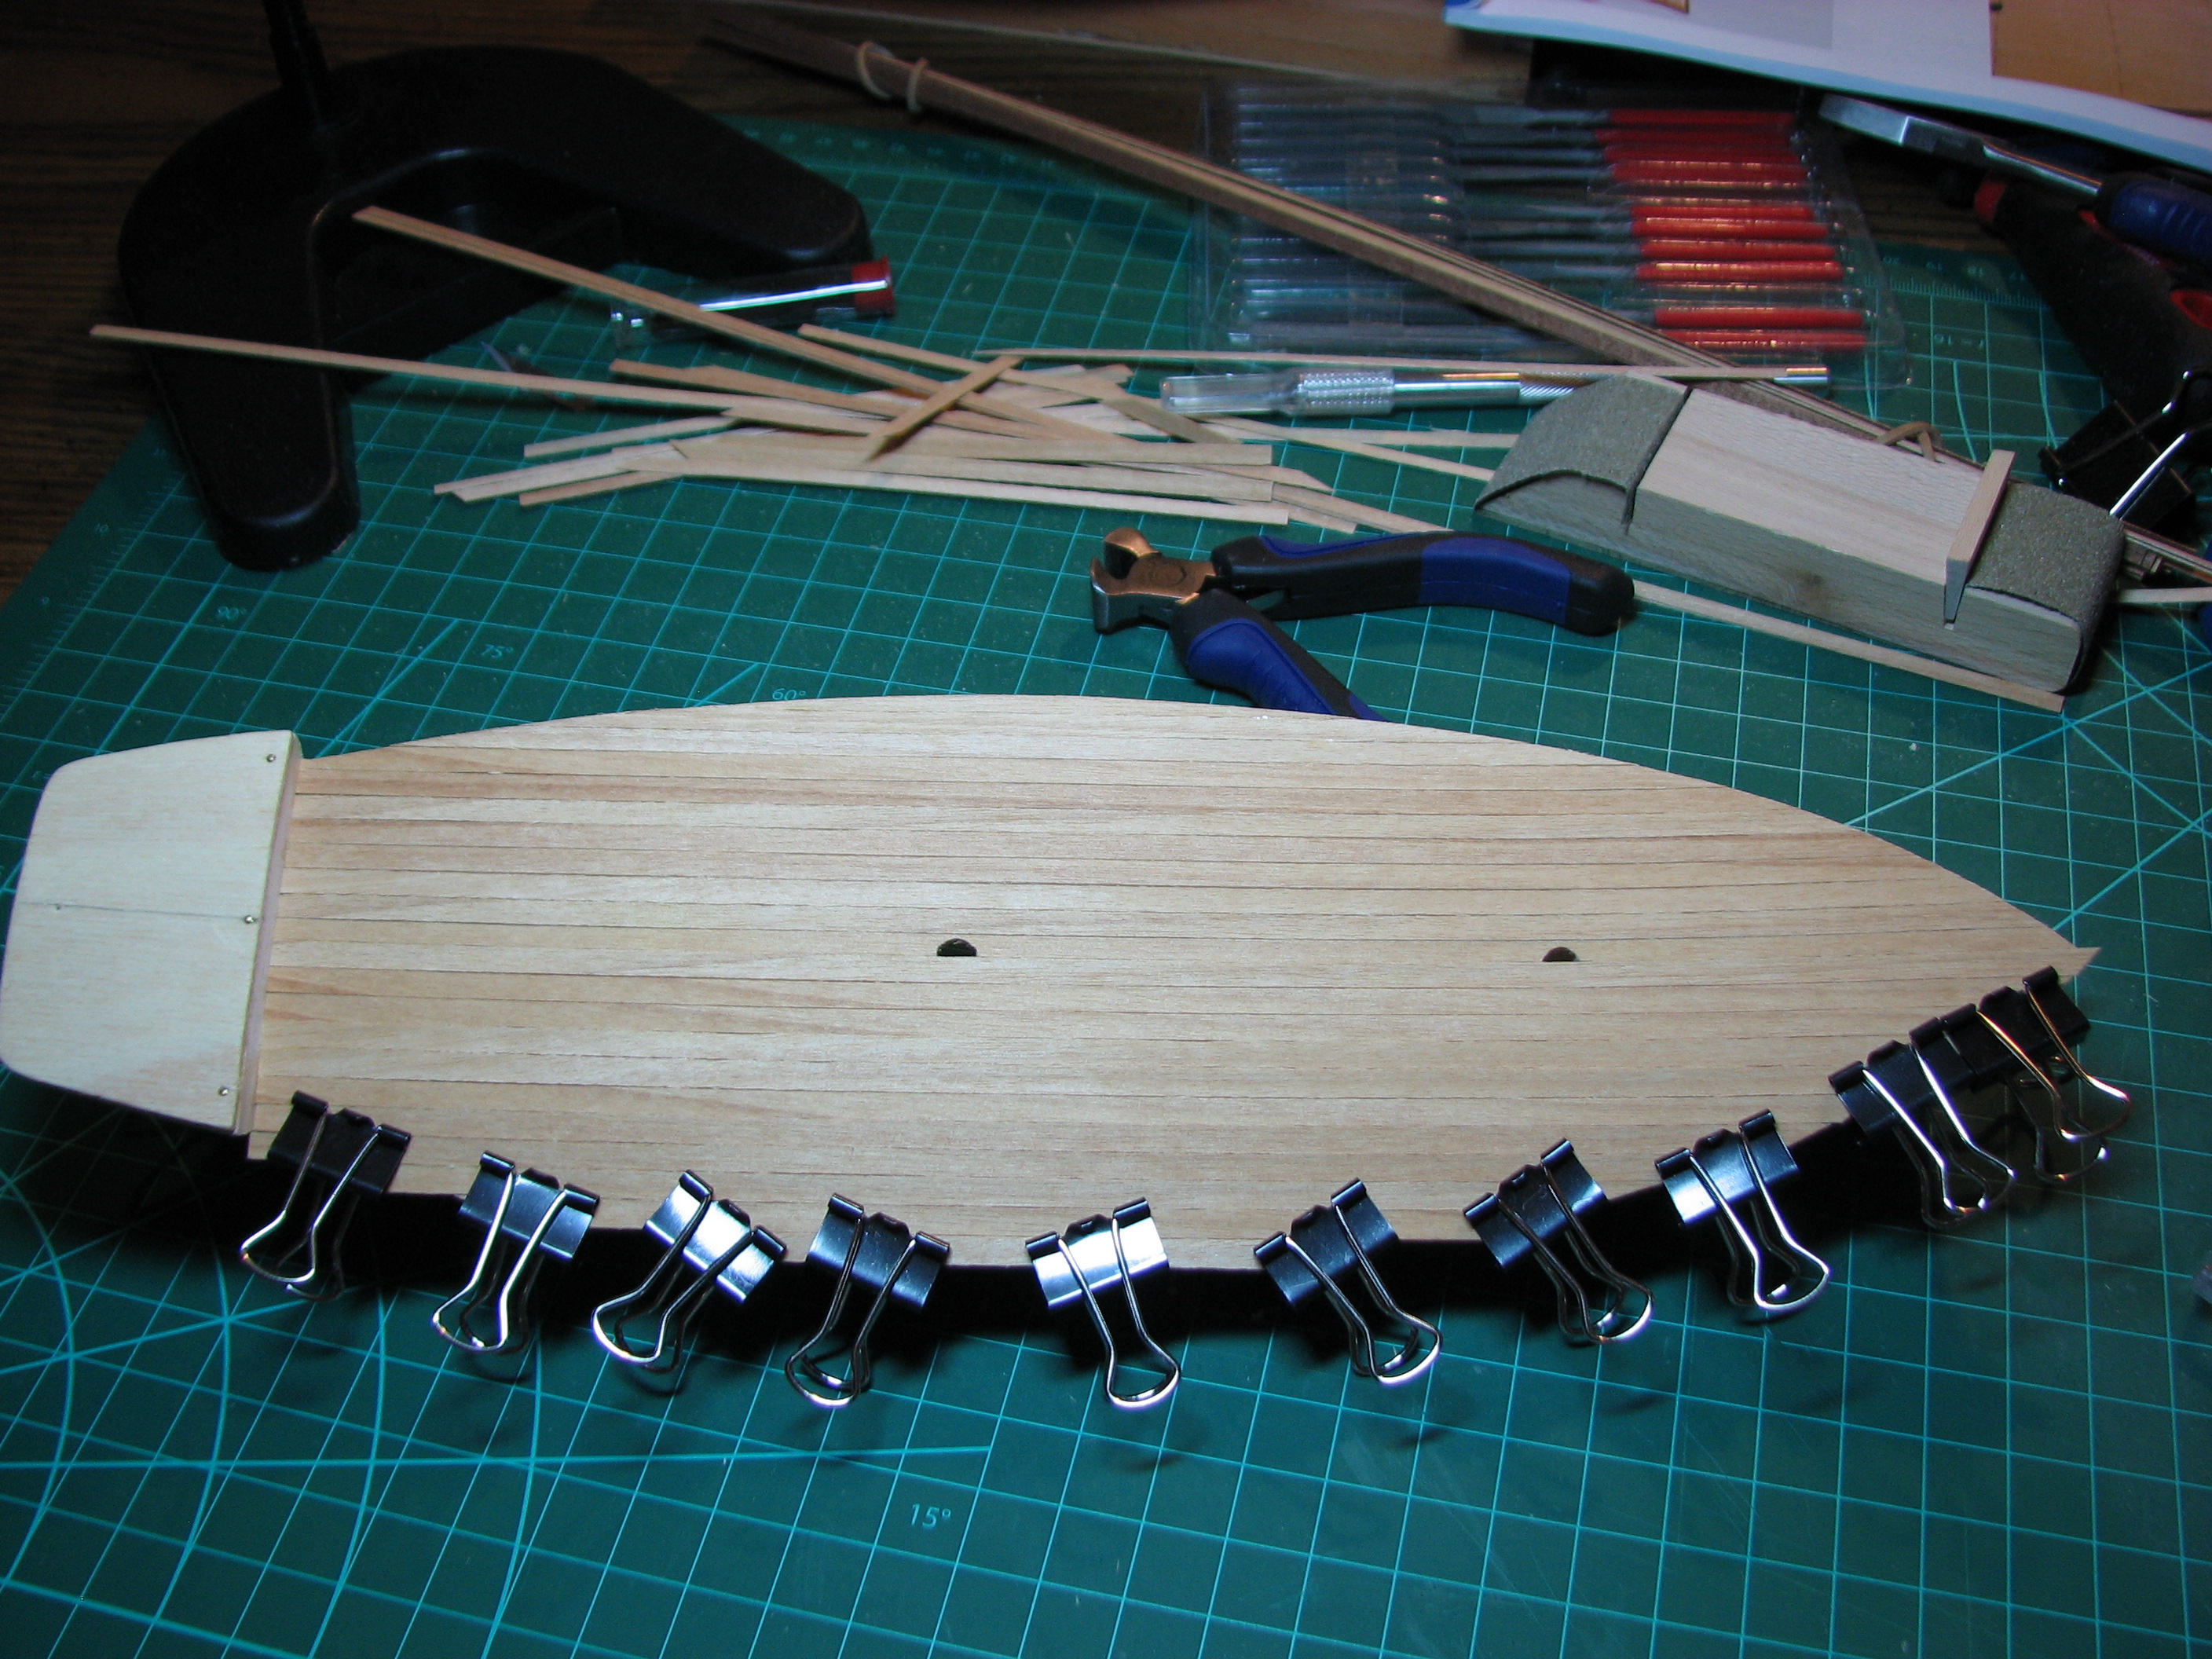 While that was clamped and drying, I moved to the step to the poop deck (whatever the proper term is for that surface). I kind of messed up on this bit, as my planks got out of alignment with the main deck. Oh well. 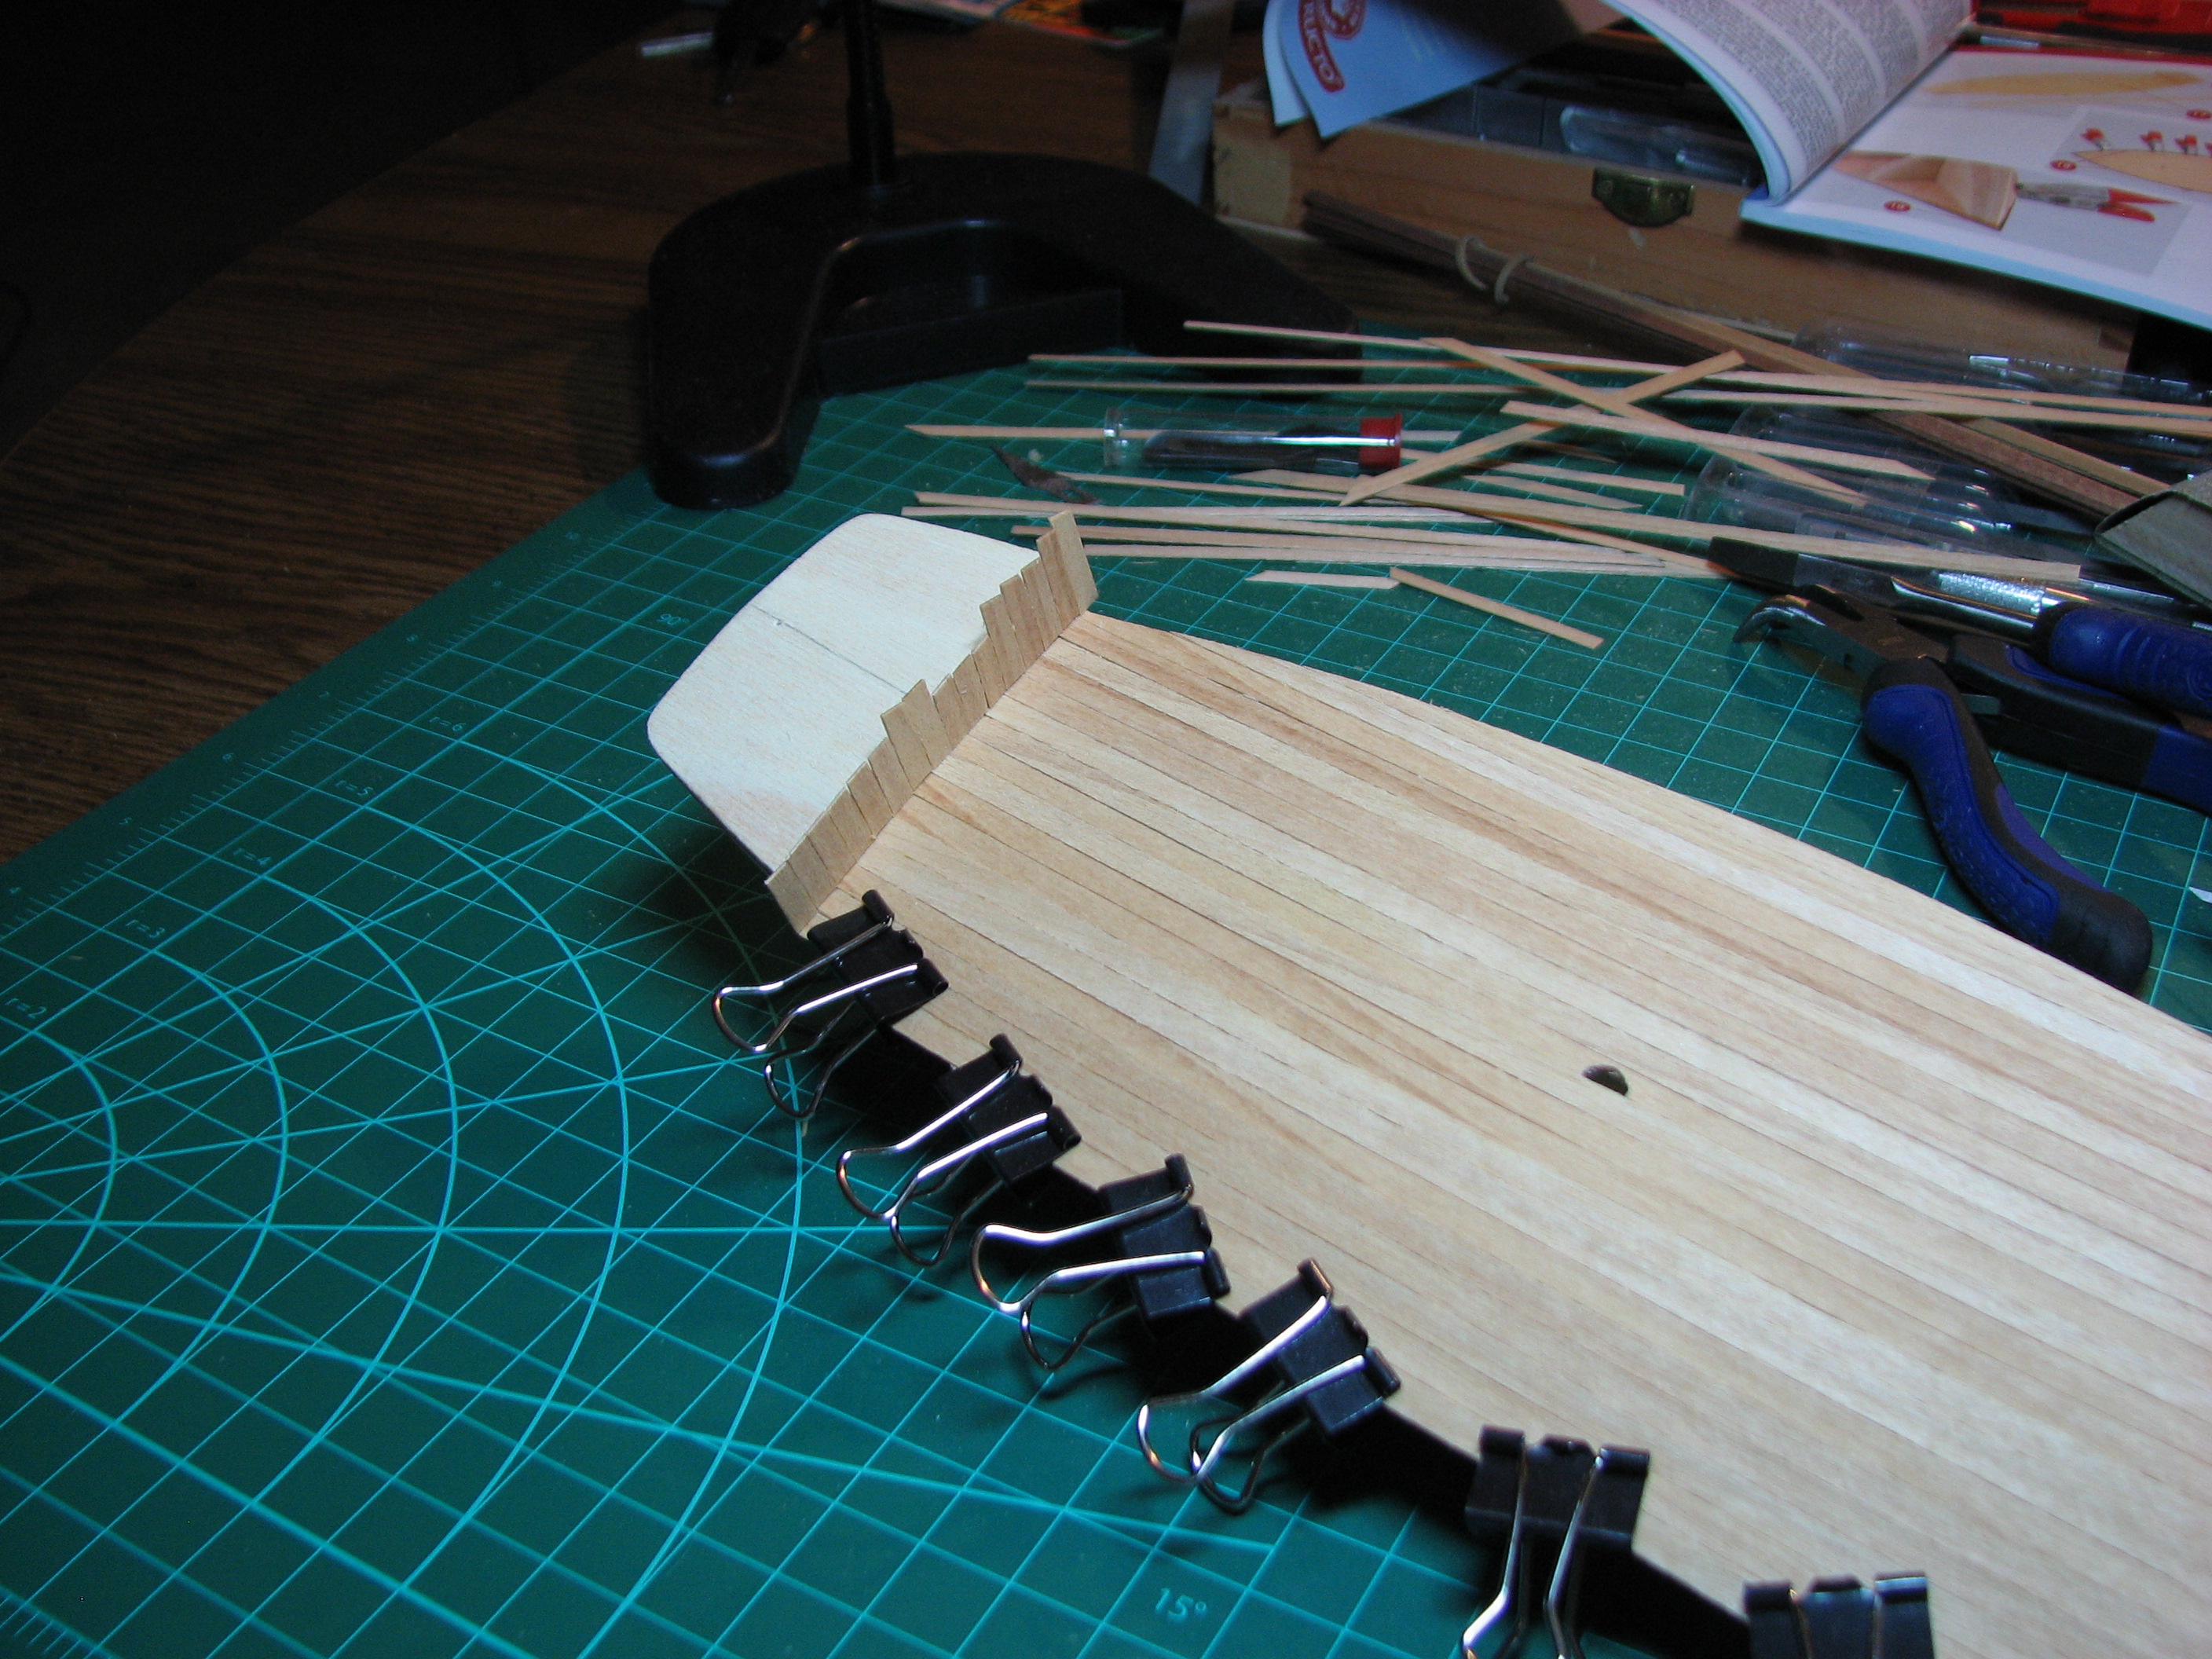 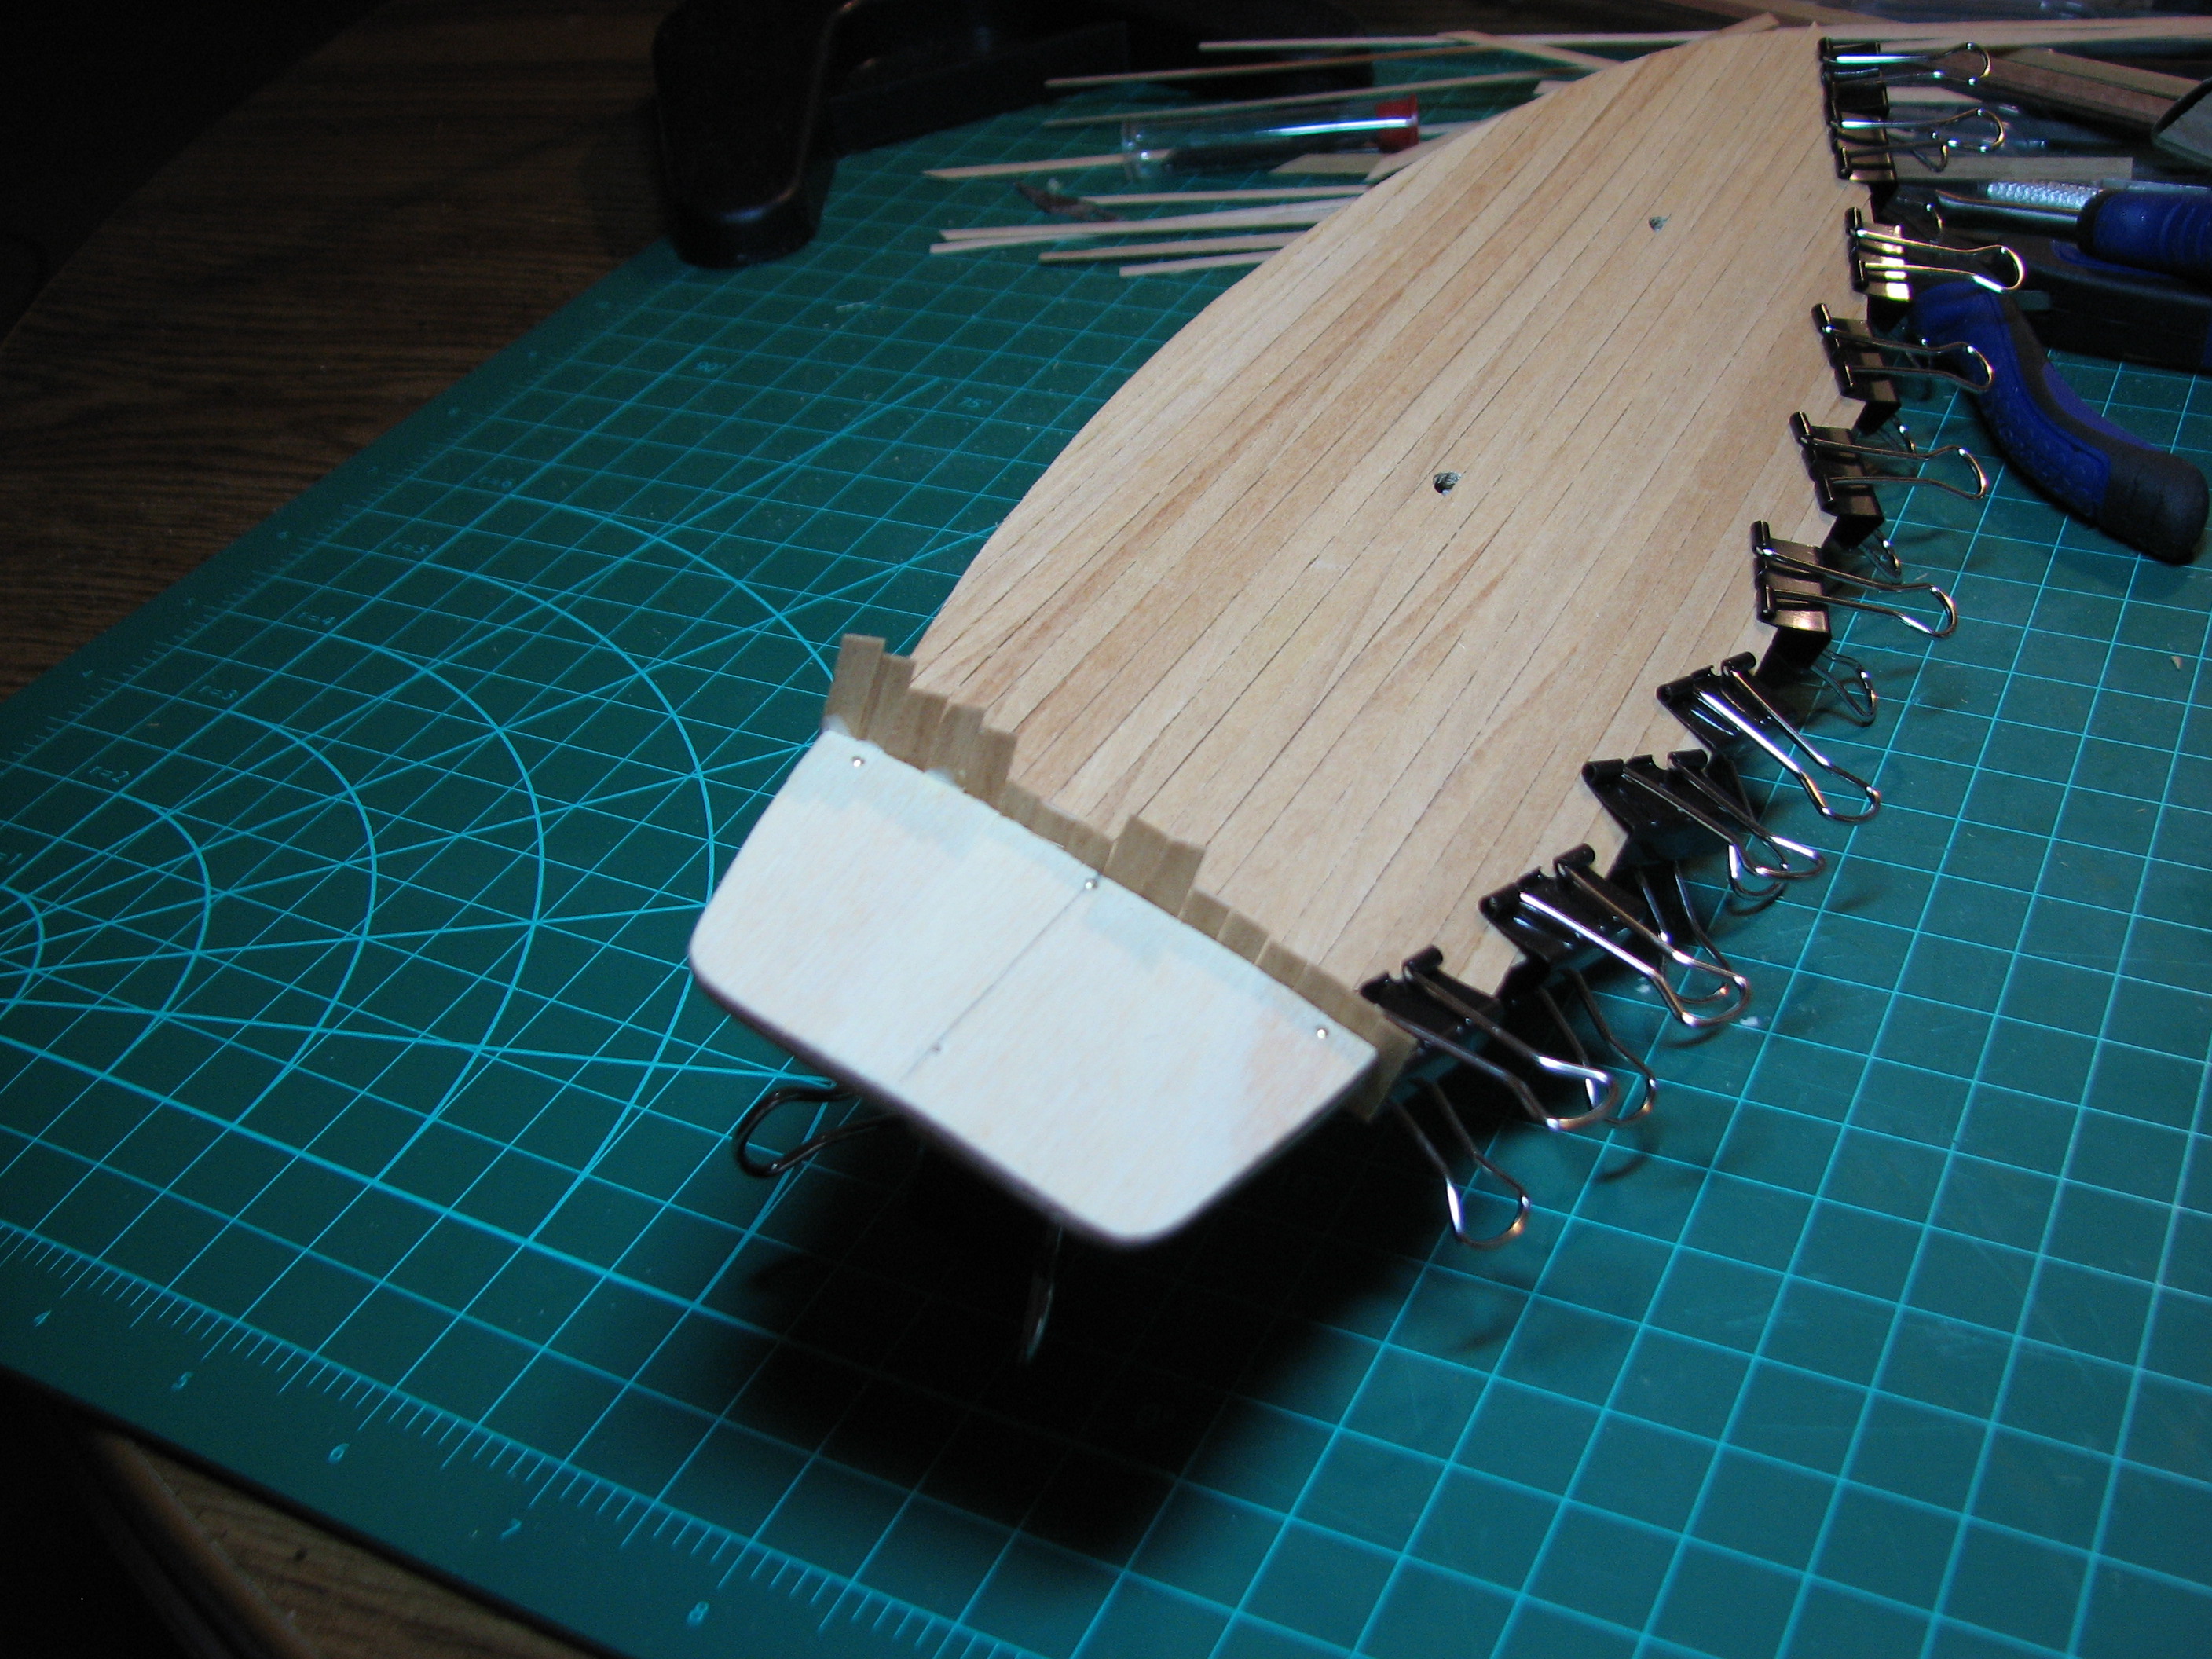 Everything trimmed up. I had one plank right on the edge crack on me during sanding as can be seen here (right above the 4th bulkhead), but luckily the edge of the decking will be covered by the stringers, so I am not going to try to repair that. 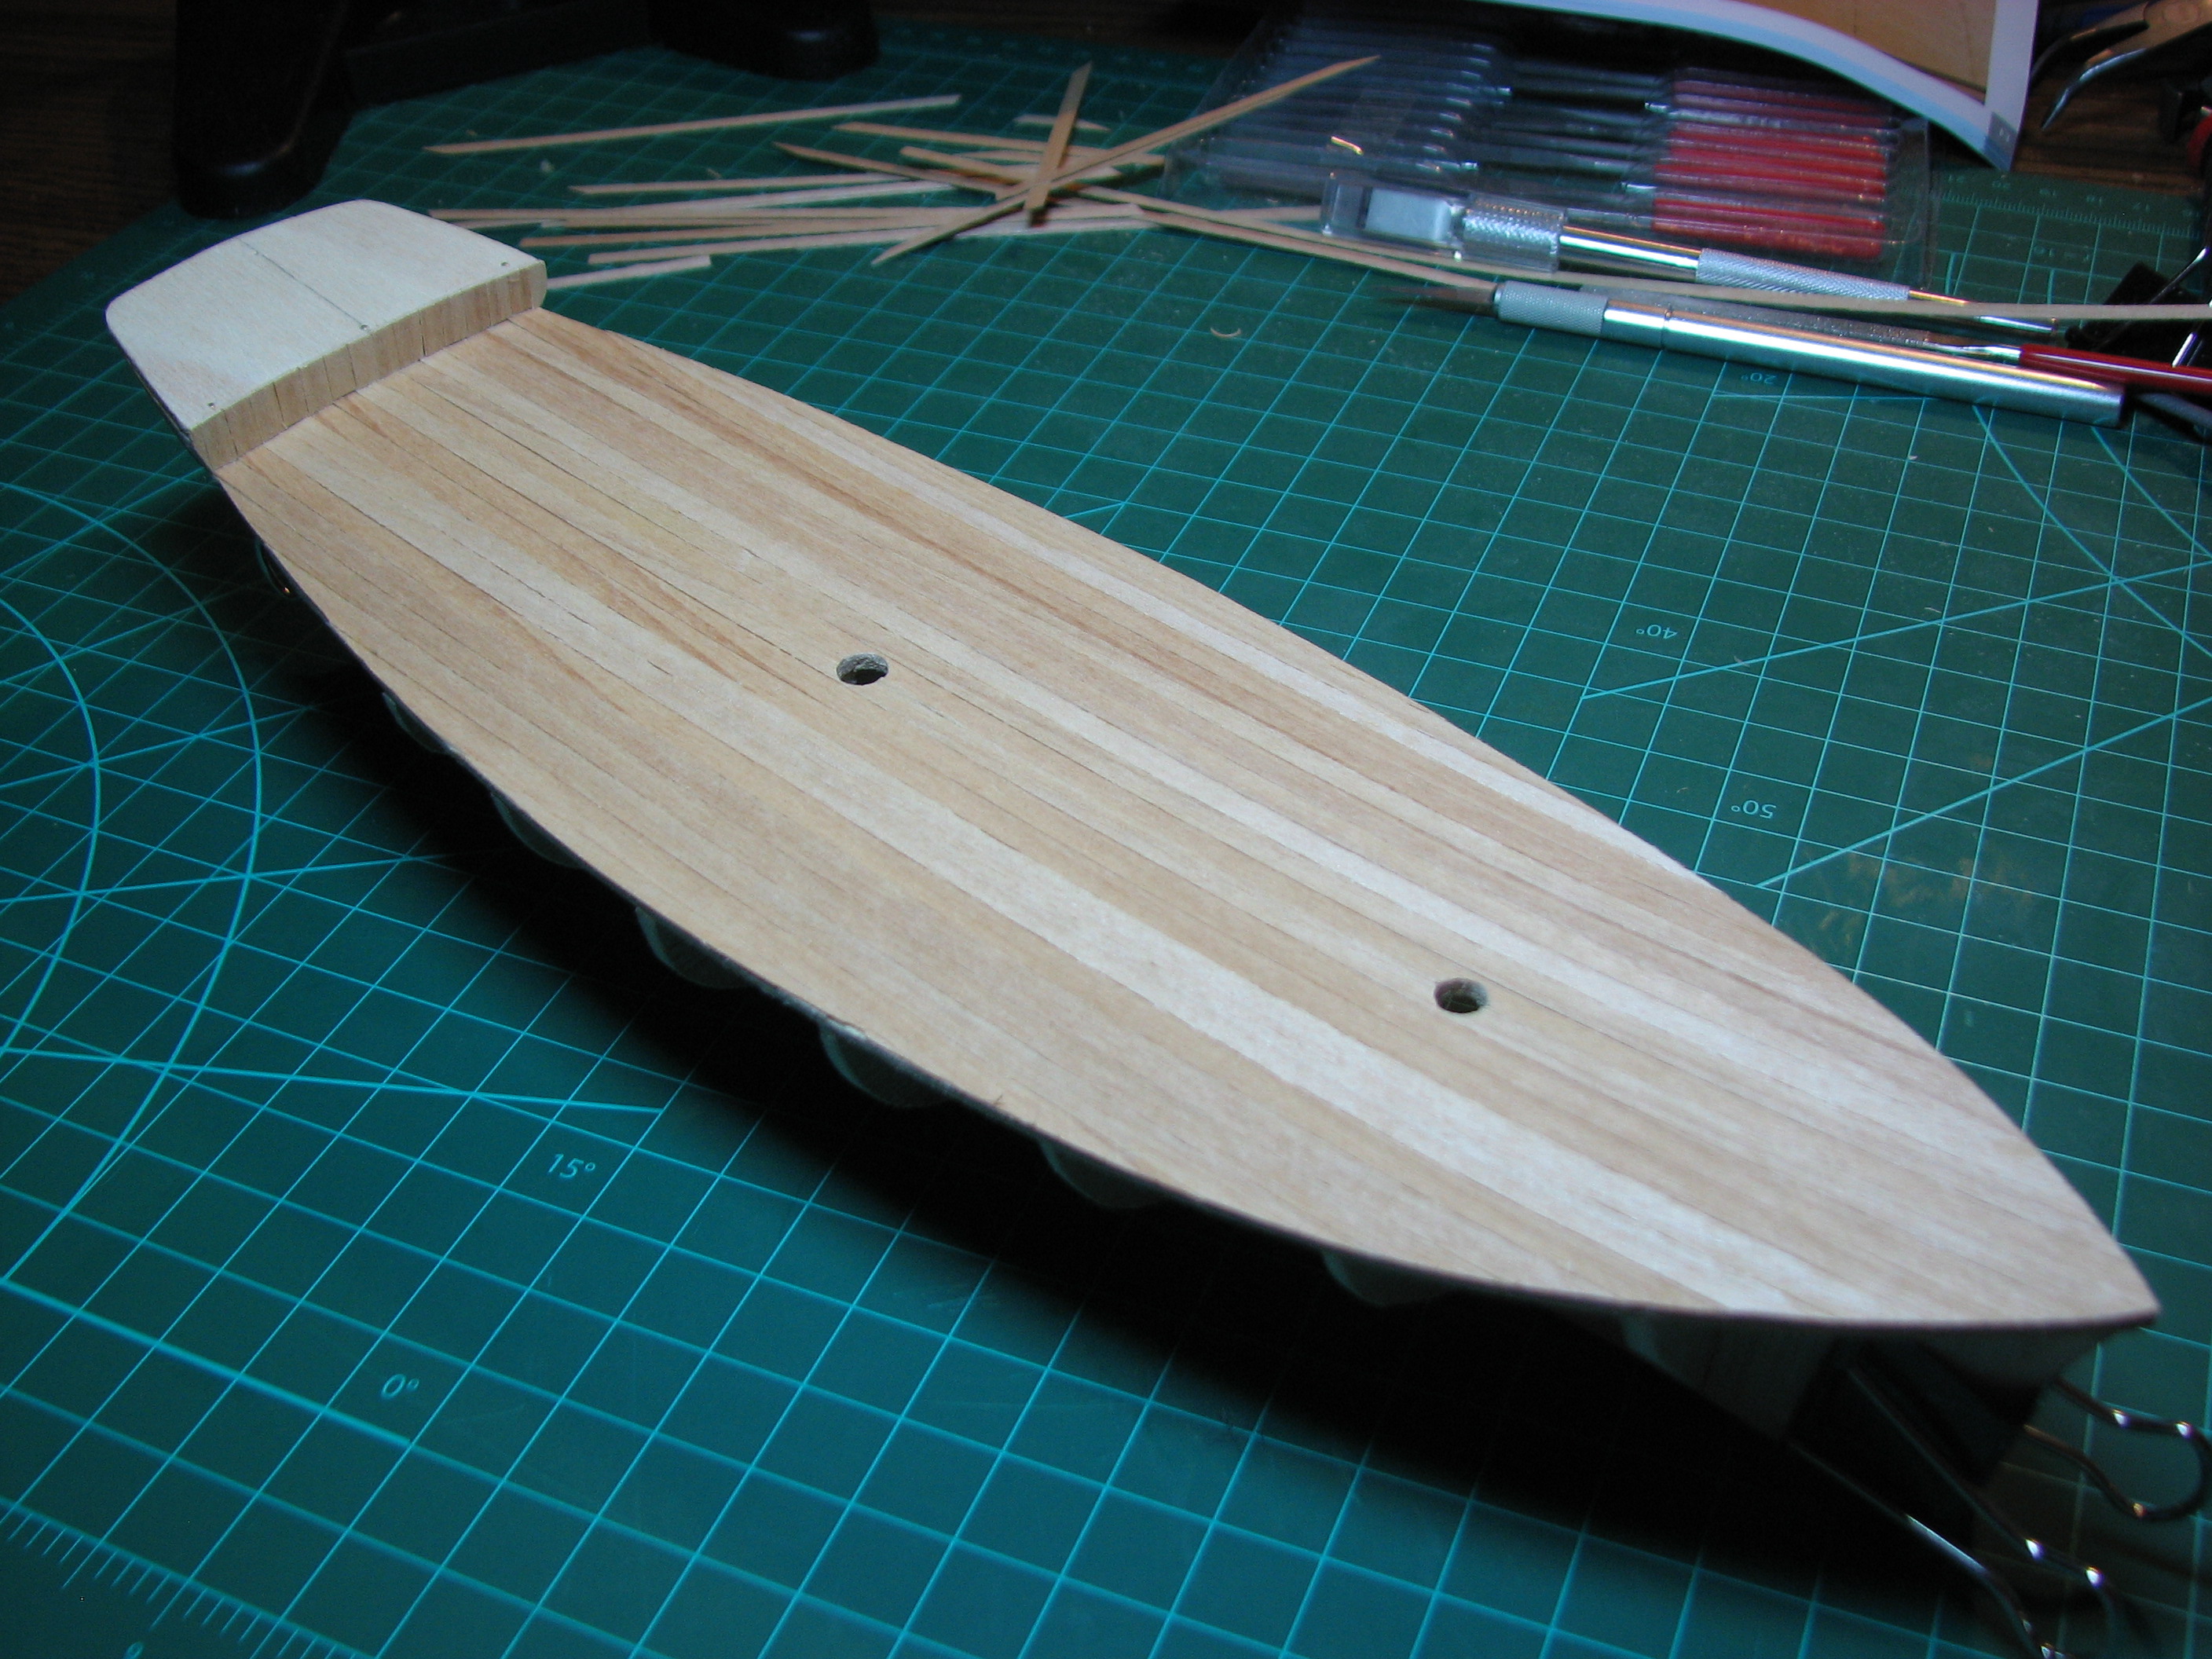 Finally, the poop deck (insert childish snicker here). Very small version of the main deck, line up a single plank on the center-line, and lay everything else off of that one. This is the way it currently sits, waiting for the planking on the poop to dry so I can trim it. 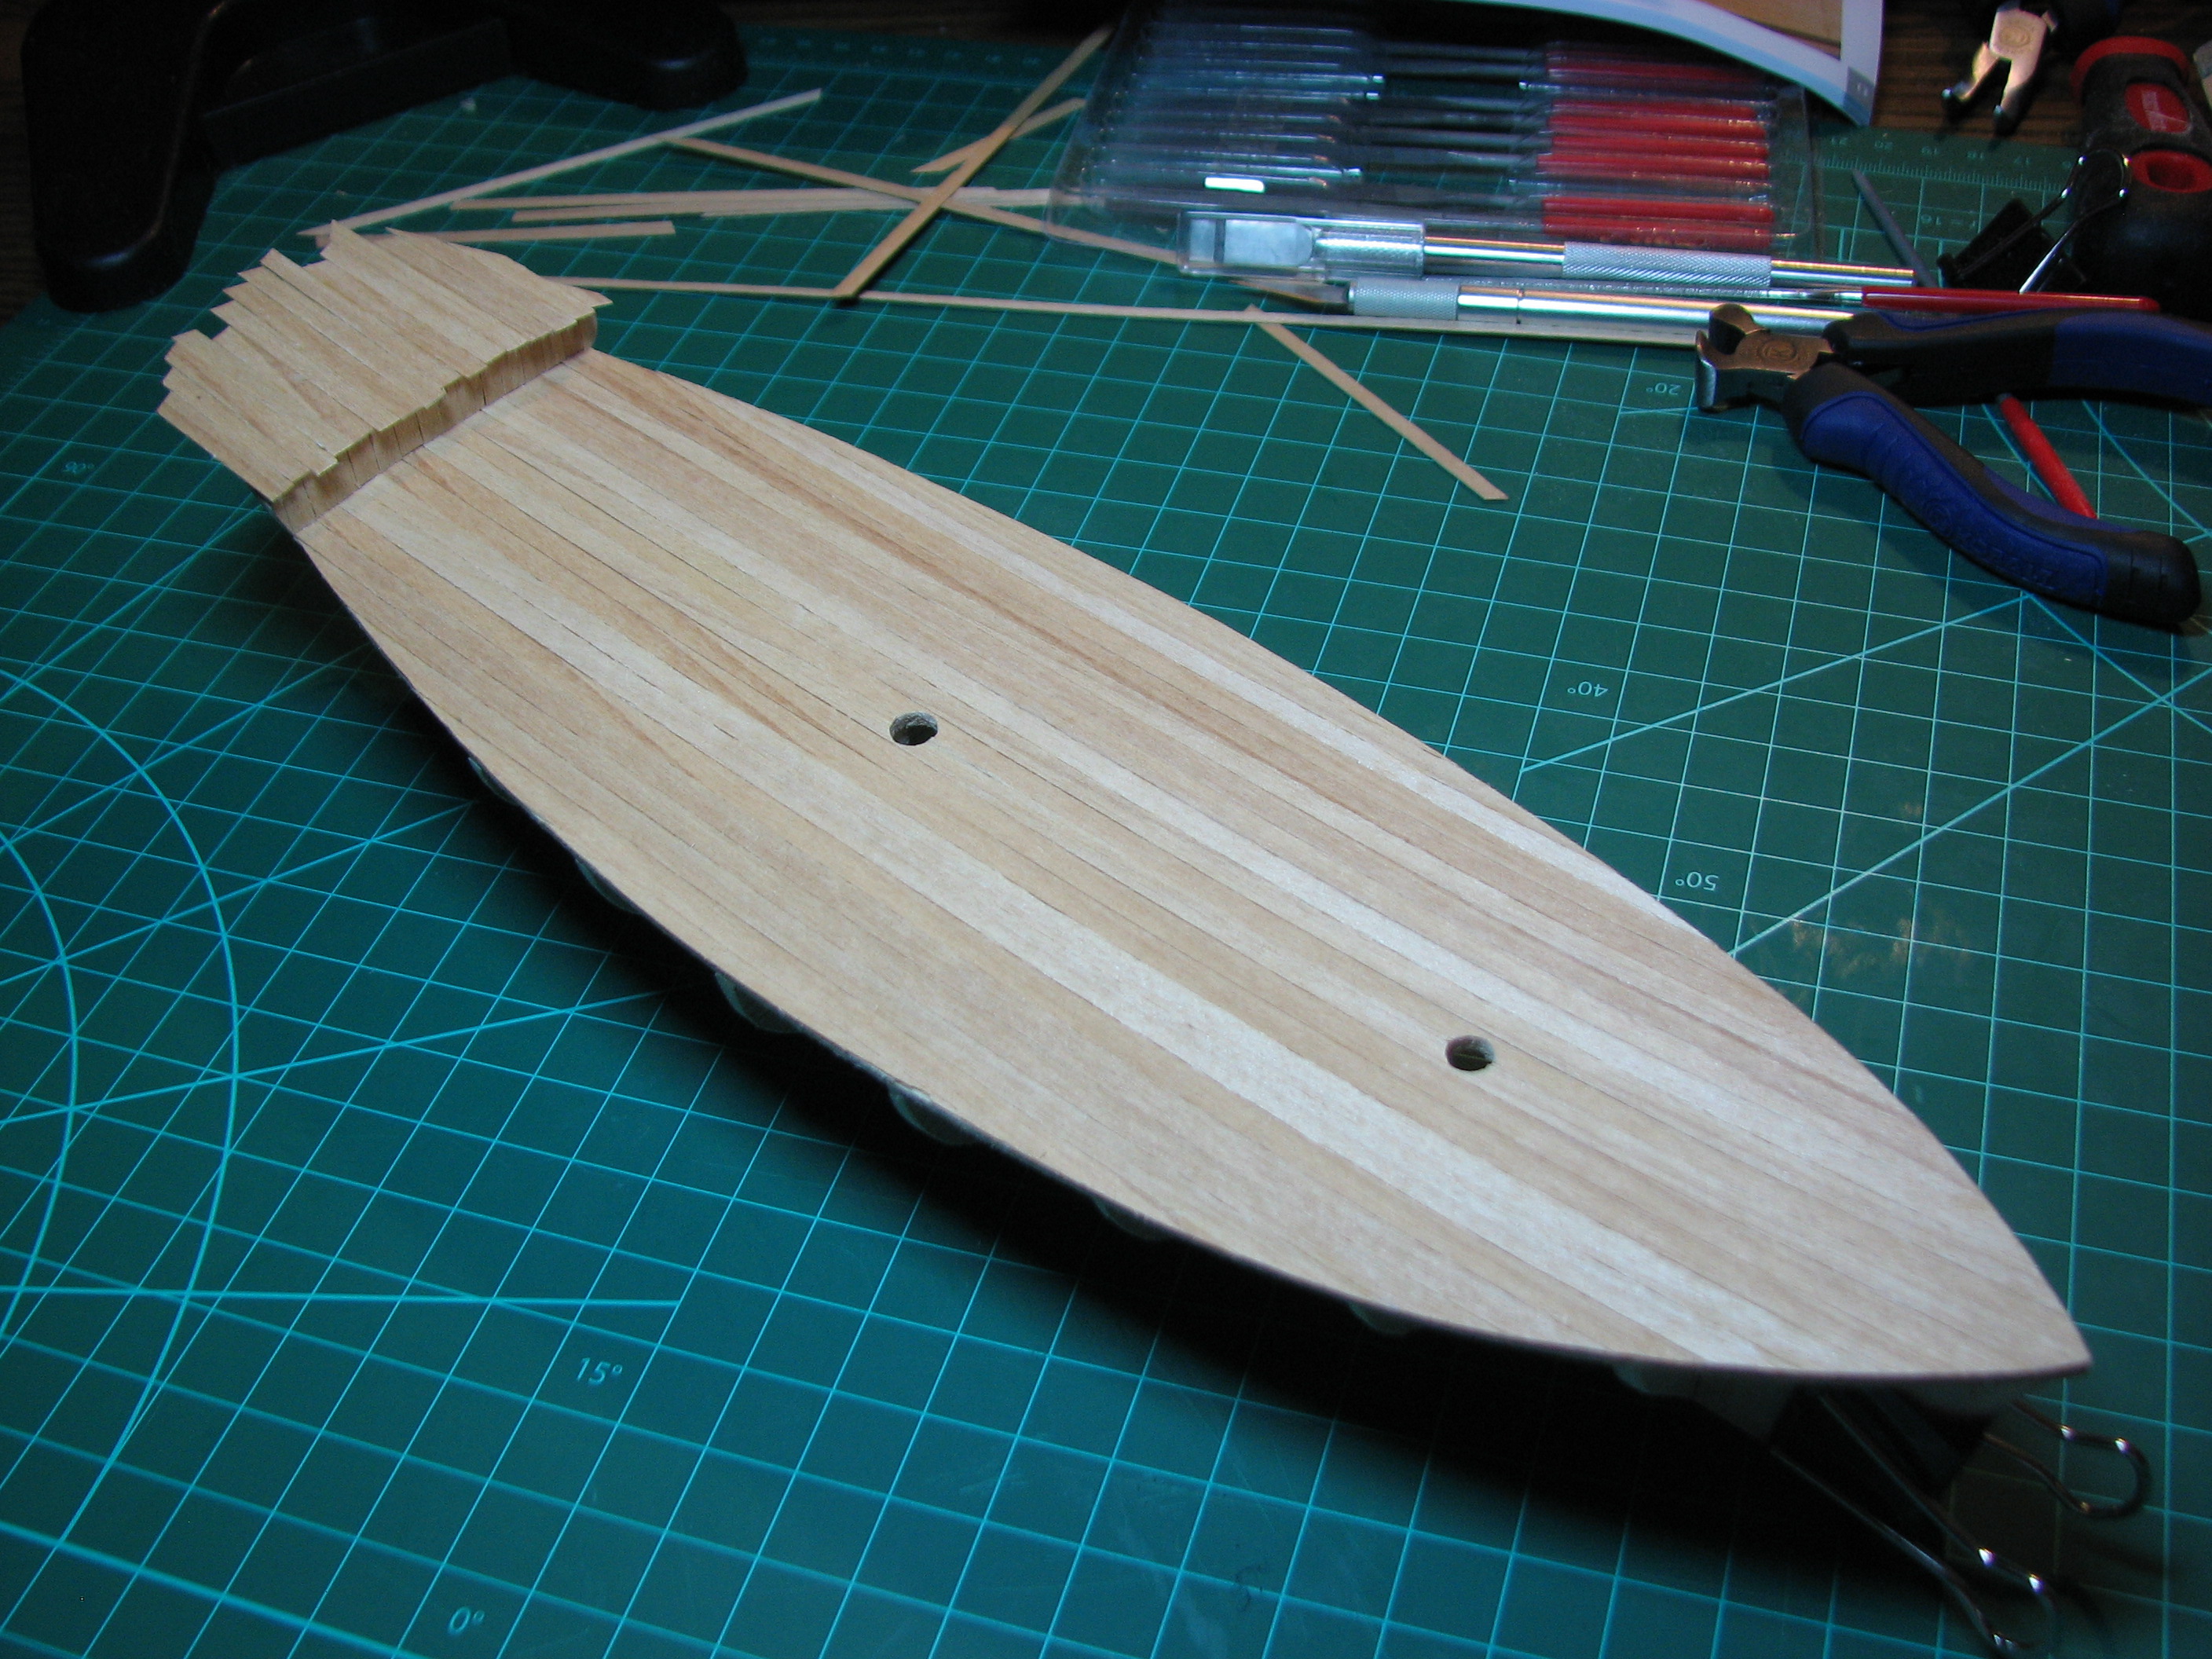 Next up is the detail work on the deck planking - every plank gets knife-cut (not through) every 70mm to simulate individual planks instead of deck length ones, and then at every simulated butt joint the end of each plank gets two simulated nails (just indents using a tiny punch), and the center (35mm from the end) gets two simulated nails. The next row is done 35mm offset, and the same thing is repeated for the entire deck to simulate alternating plank pattern. Hopefully it comes out looking as good as the picture in the instructions. After that it's time for the stringers, and they look like they'll be a bear. Definitely will need to soak and heat those pieces to make the required bends. Edit: fixed a couple links. The Locator fucked around with this message at 04:23 on Aug 17, 2014 |
|
#
¿
Aug 17, 2014 04:19
|
|
|
So picking up where I left off, trimmed the excess off the poop deck planking, sanded to the edge, and the deck planking was then complete, except for the scoring and nail holes. I used an Xacto type knife for the scoring, and a pin-punch for the nail holes. Not completely happy with the results, but they'll do for my first attempt. Note that they are terribly poorly aligned. This doesn't surprise me, as I'm unable to draw a straight stick-figure, free hand stuff is not my strength. 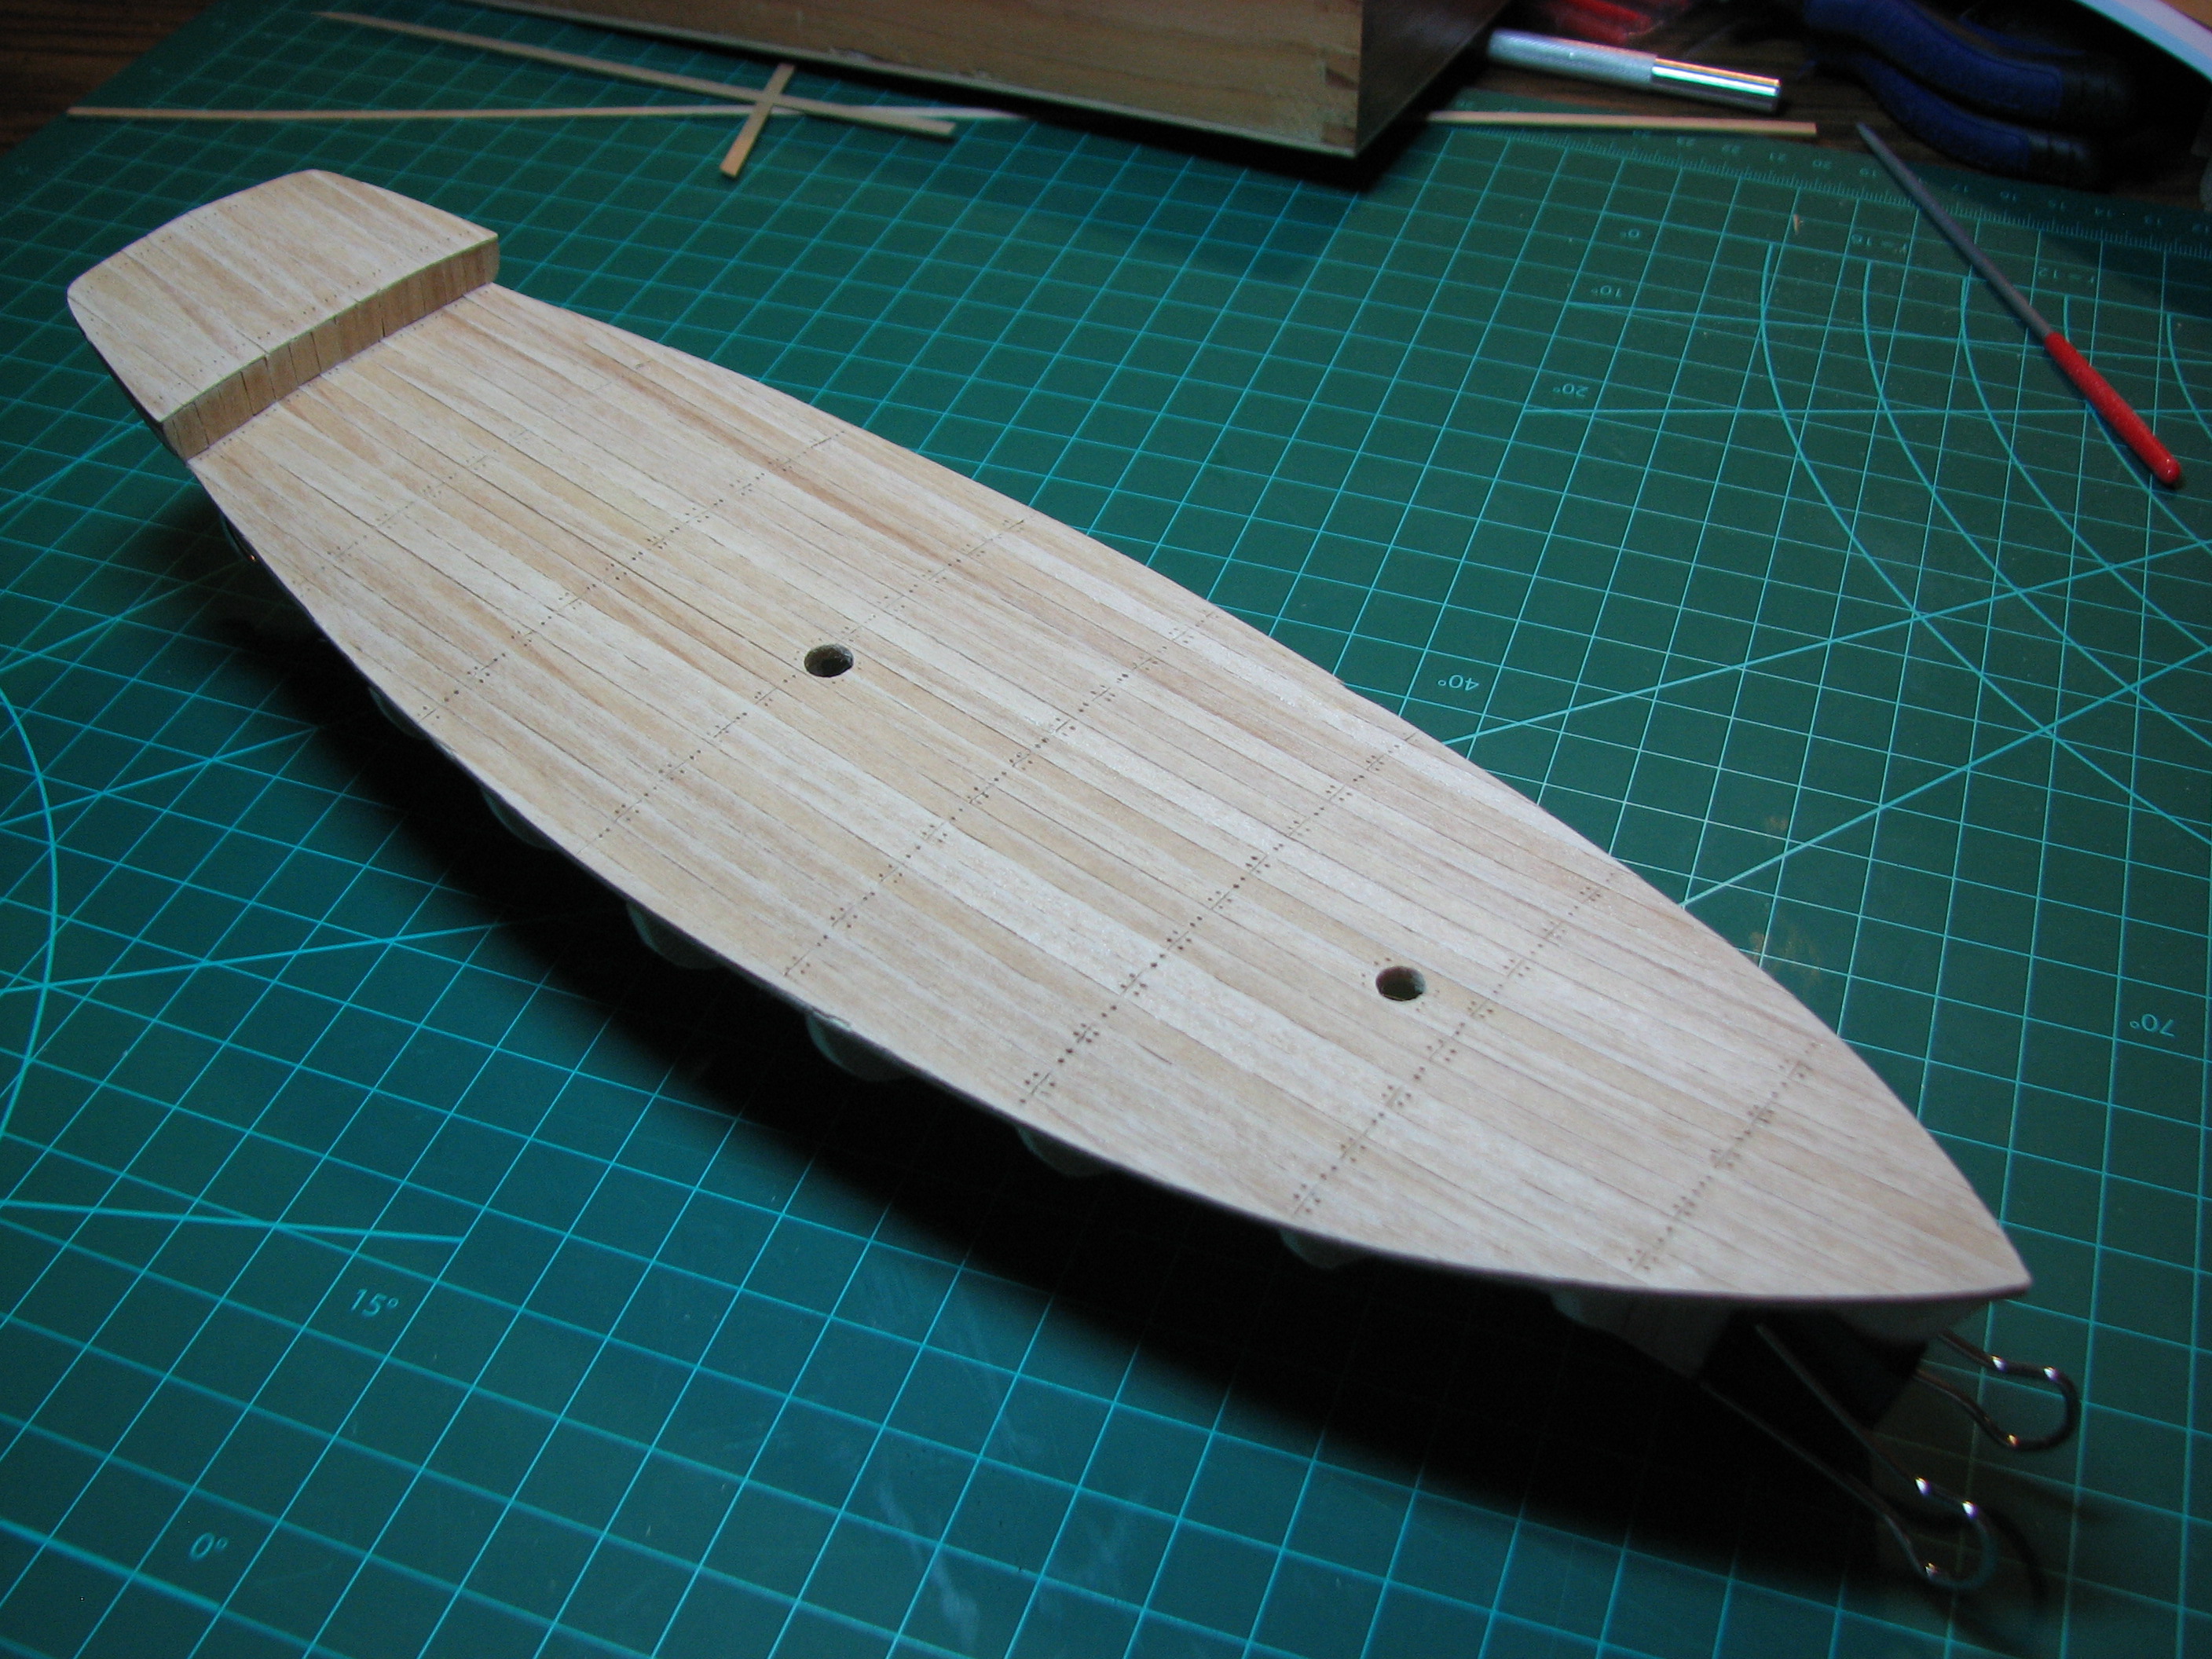 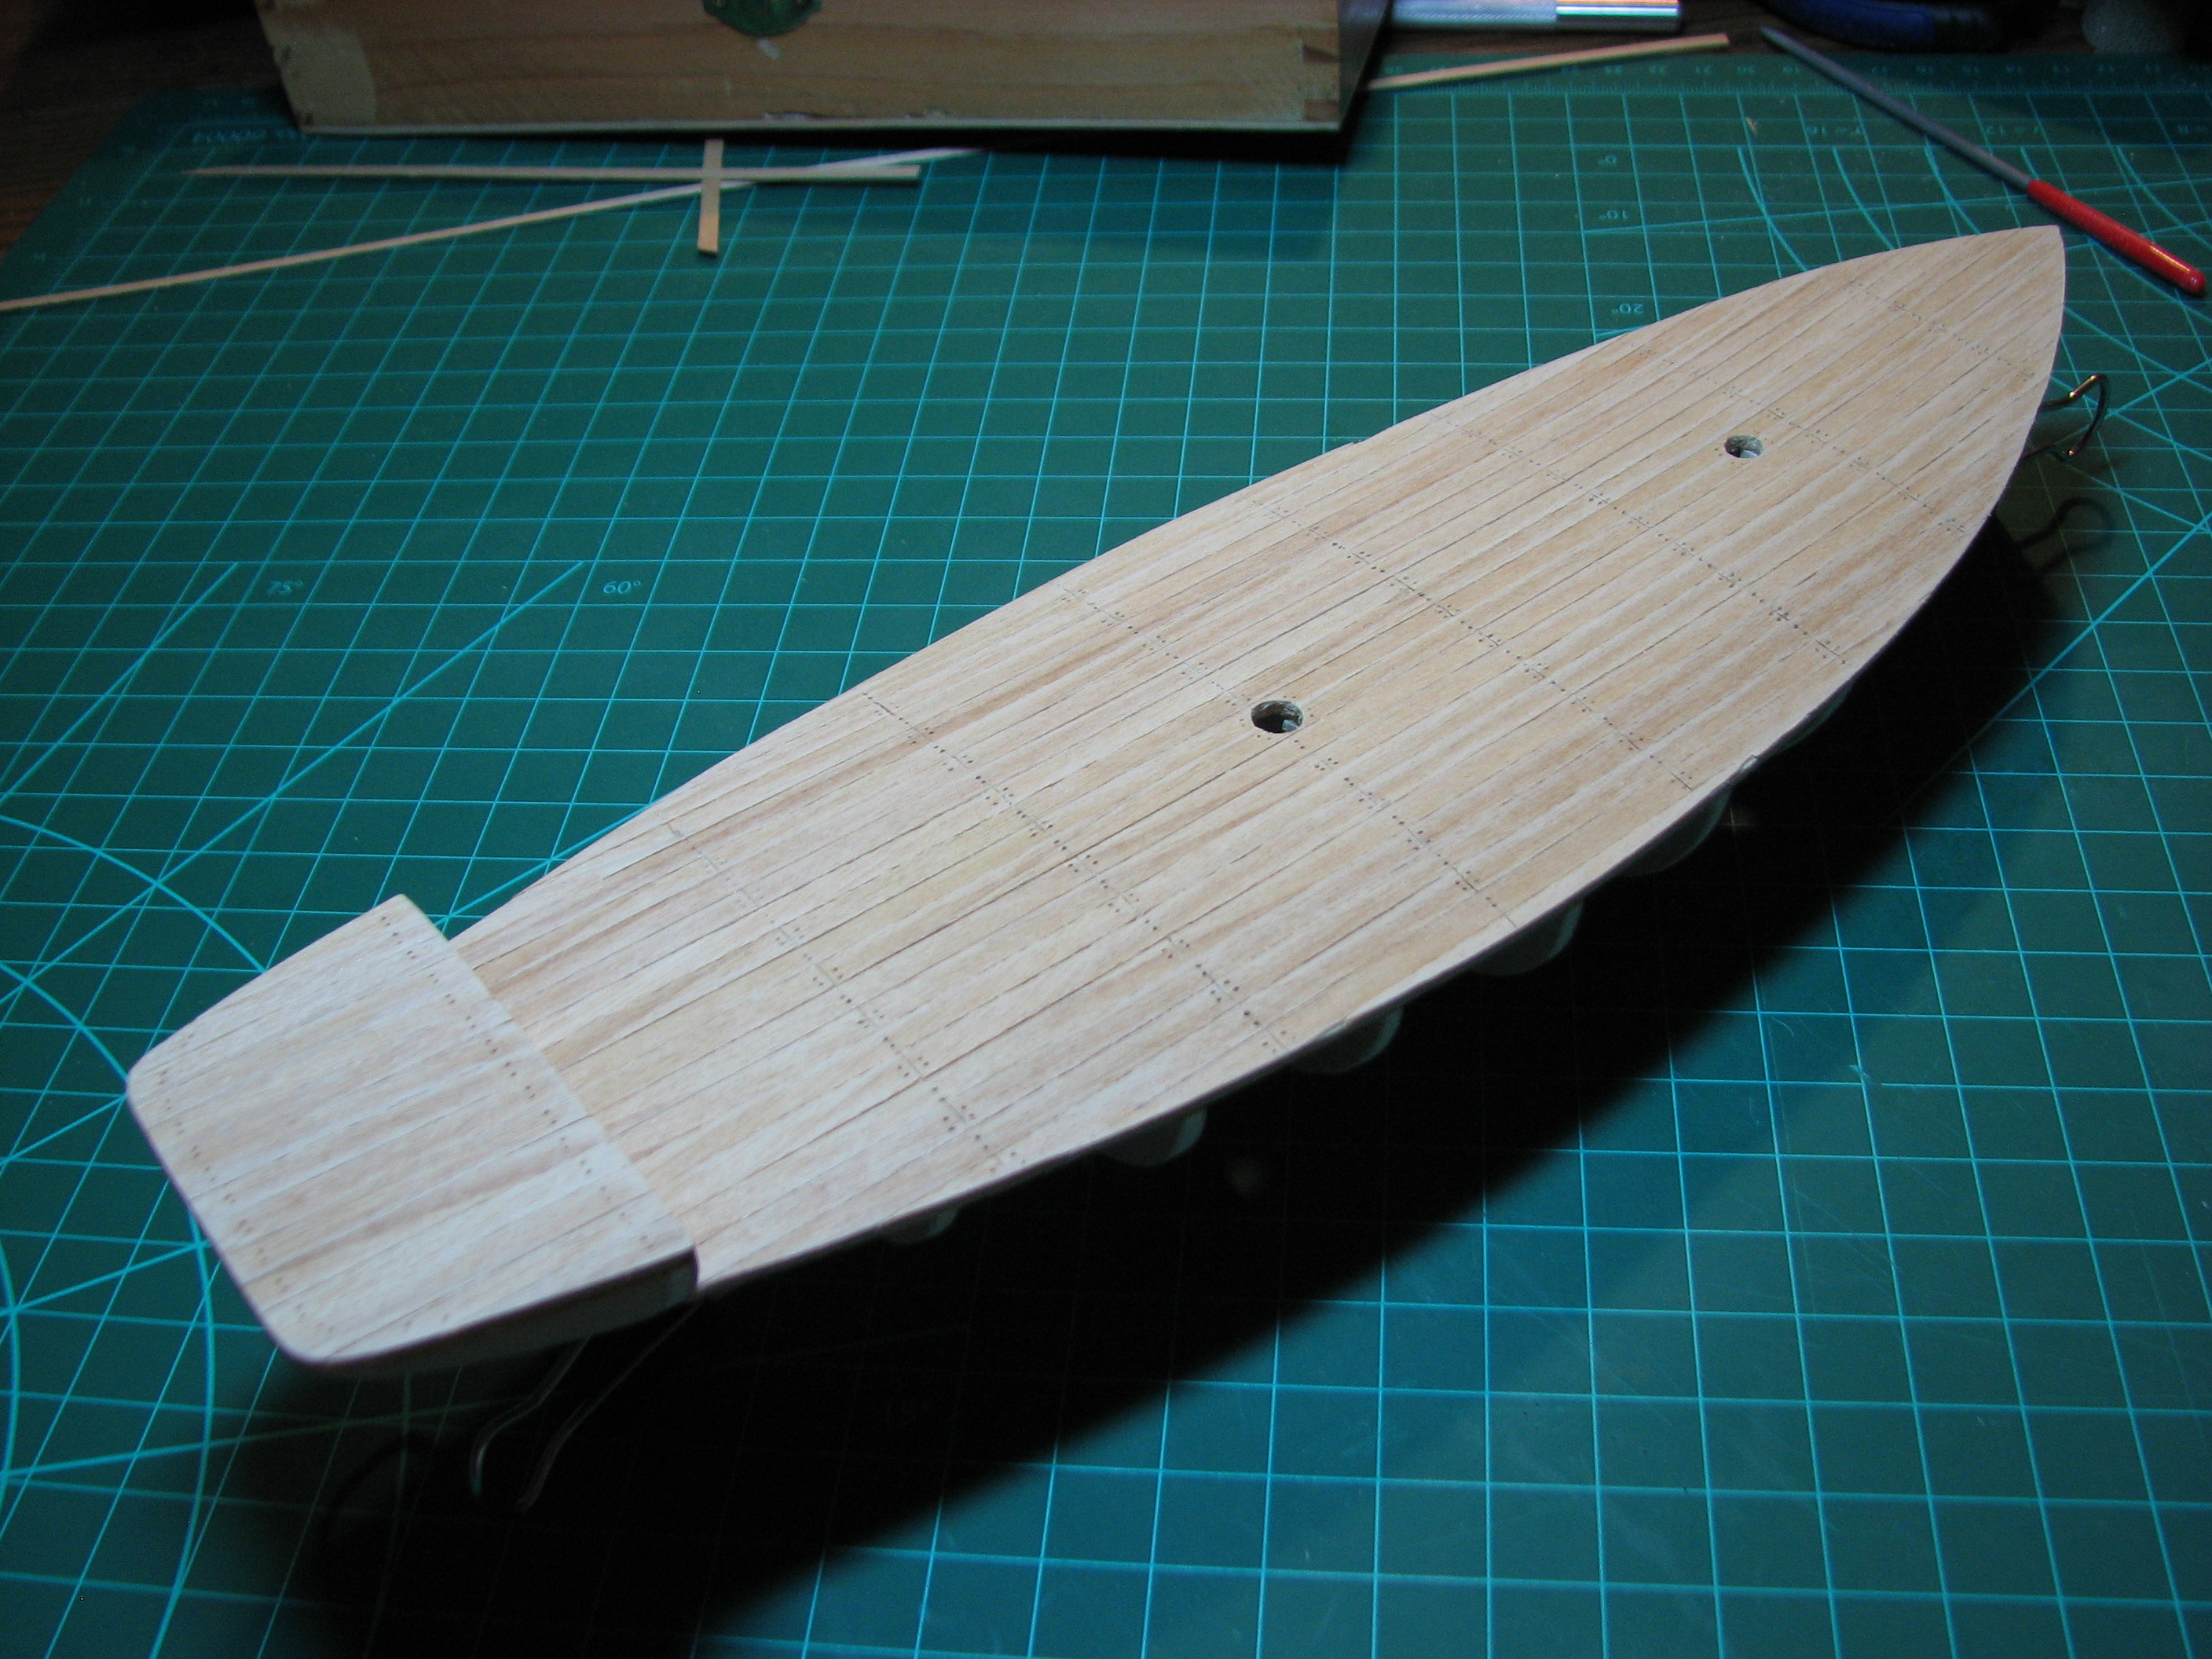 I then did some light sanding of the deck prior to starting to work on the stringers. The stringers were a pain in the rear end. They have to be bent against the thick measurement of the wood, and they *really* didn't want to bend at all. This particular type of wood is really hard and stiff. I soaked the boards in near-boiling water for 25 minutes, and they *still* wouldn't bend right at the stem. I clamped down everything but the last inch or two, and then kept re-wetting and bending/clamping over a couple hours until I finally had the bend in place except for the very ends at the stem, which I couldn't figure out how to hold in place to allow them to dry into shape. 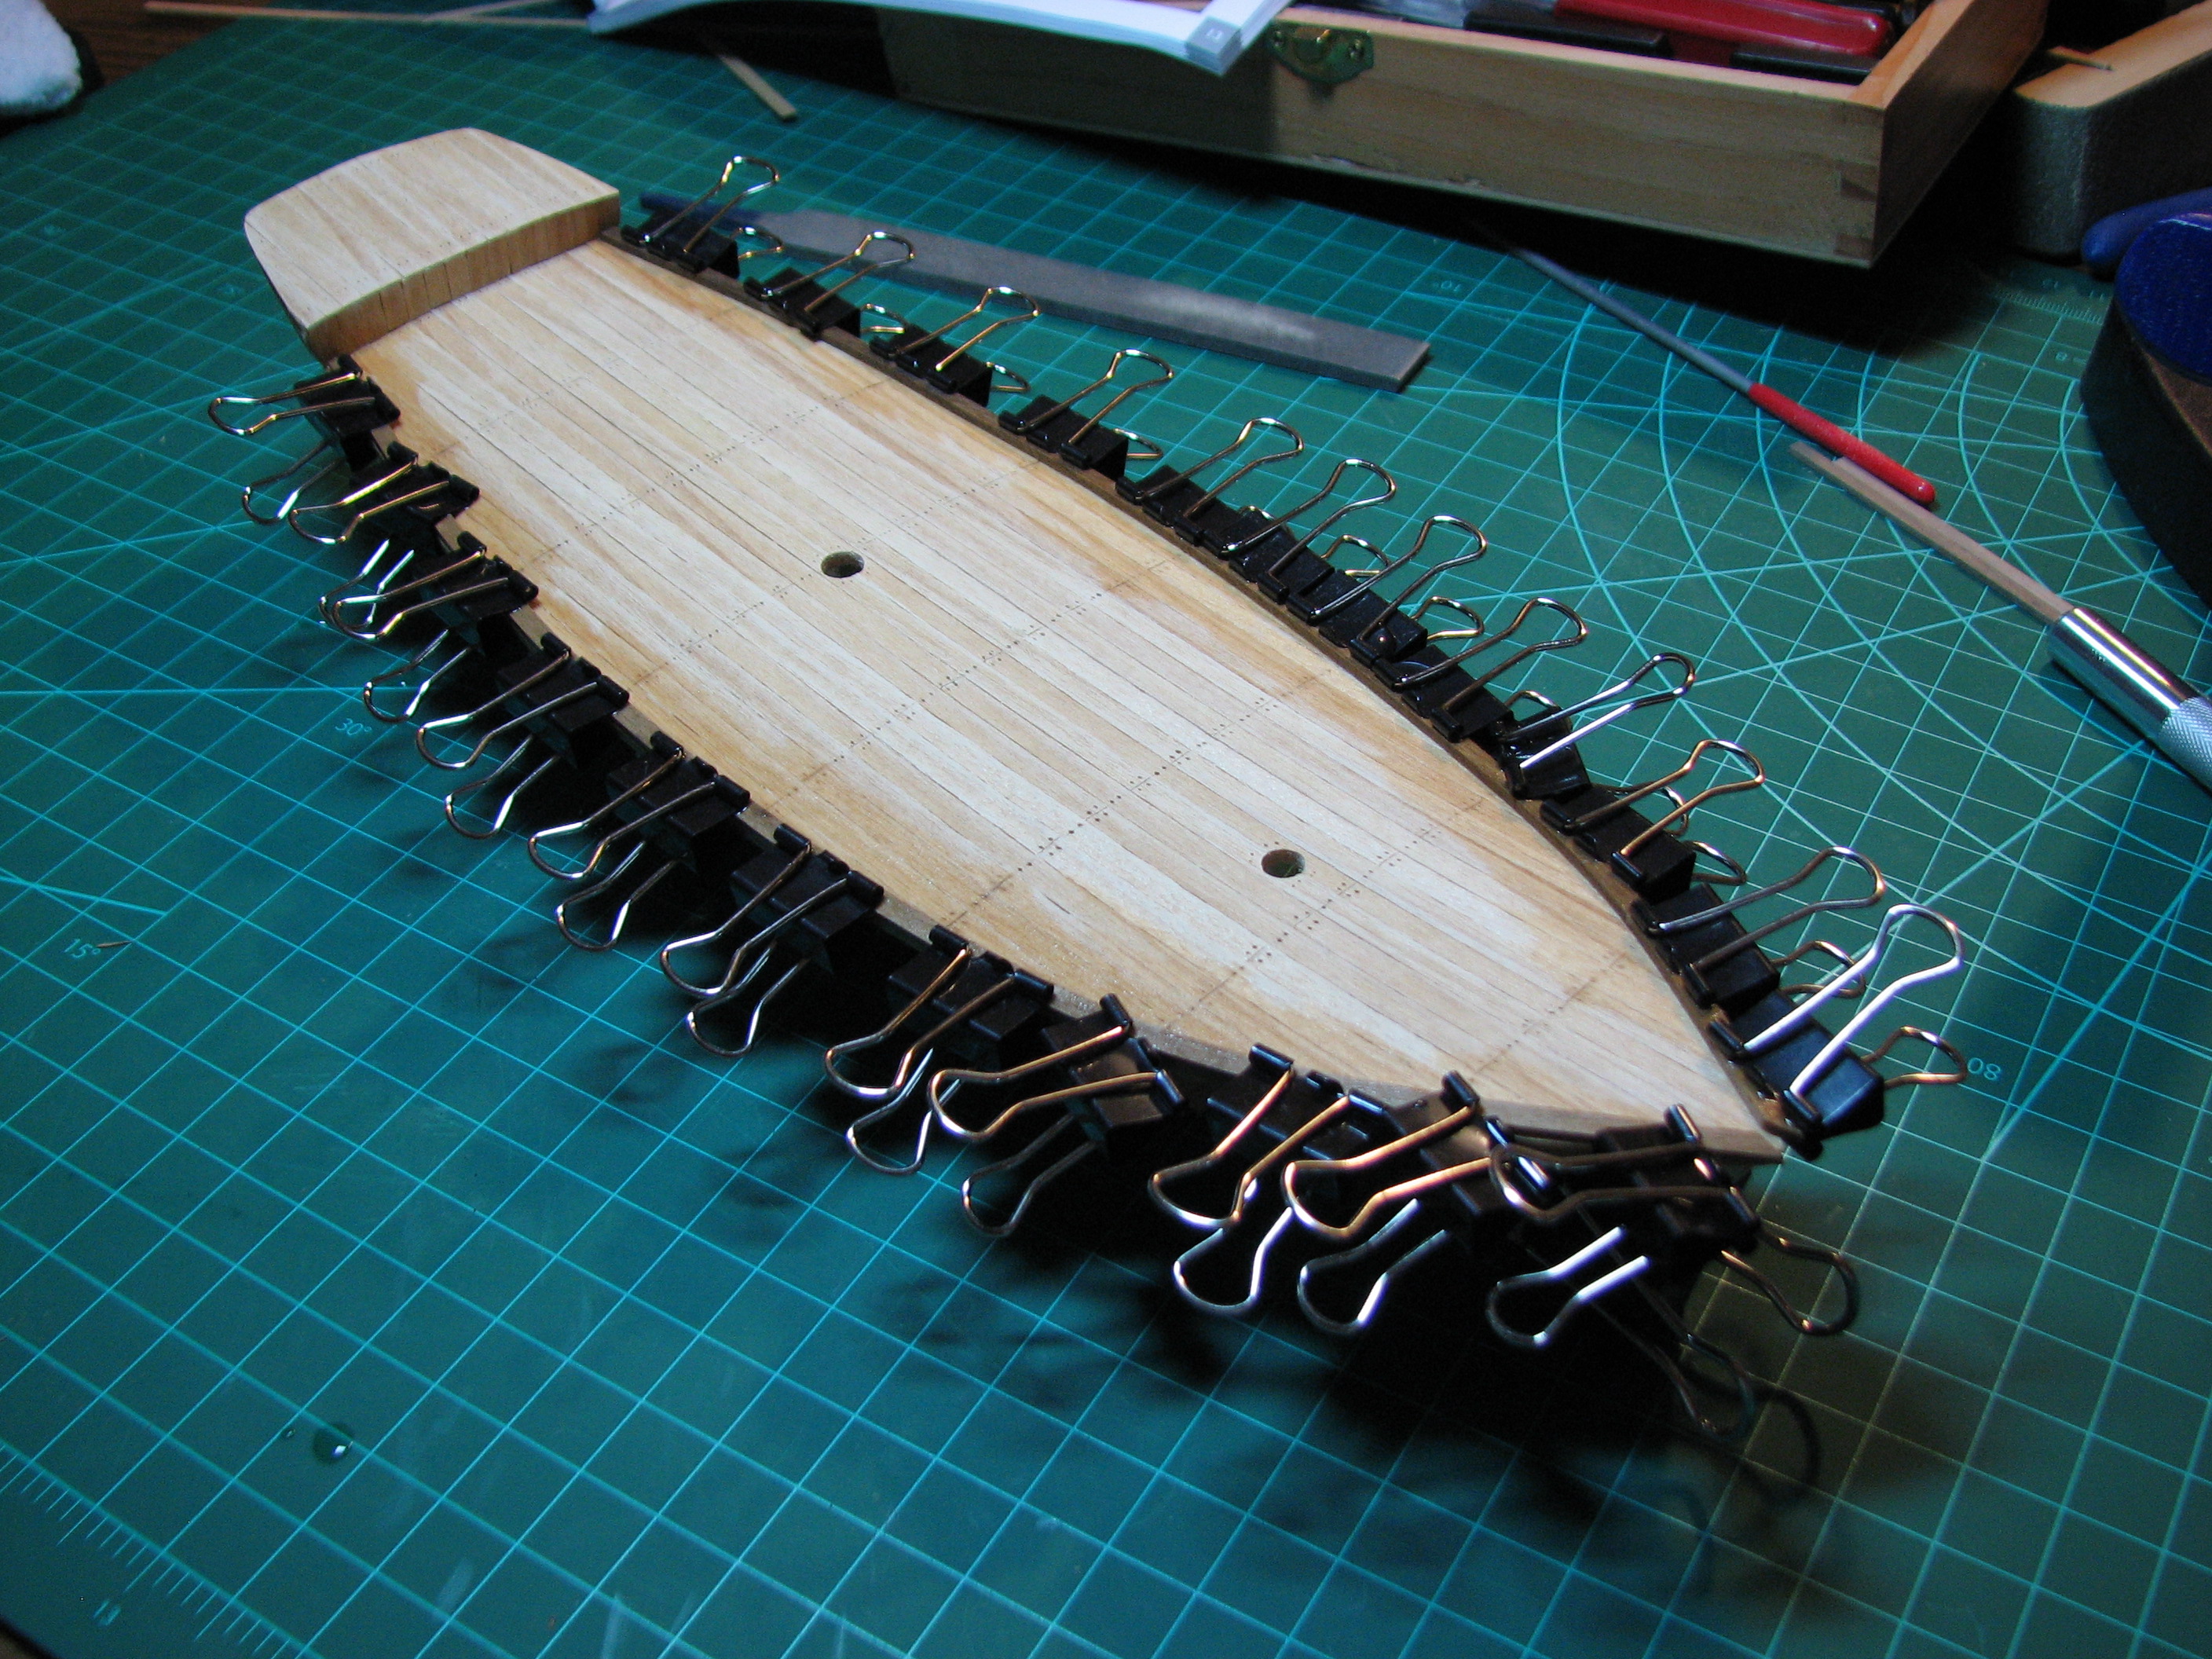 After messing around with various clamps and tools, I found that a pair of flat bladed 'square' pliers would hold the stringers together nicely, but that meant I would have to sit there and hold it for who knows how long, and I wanted to let it dry in place overnight. After messing around with all sorts of things, the actual solution was really pretty simple. Just let some rubber bands take my place on the pliers. Tada! 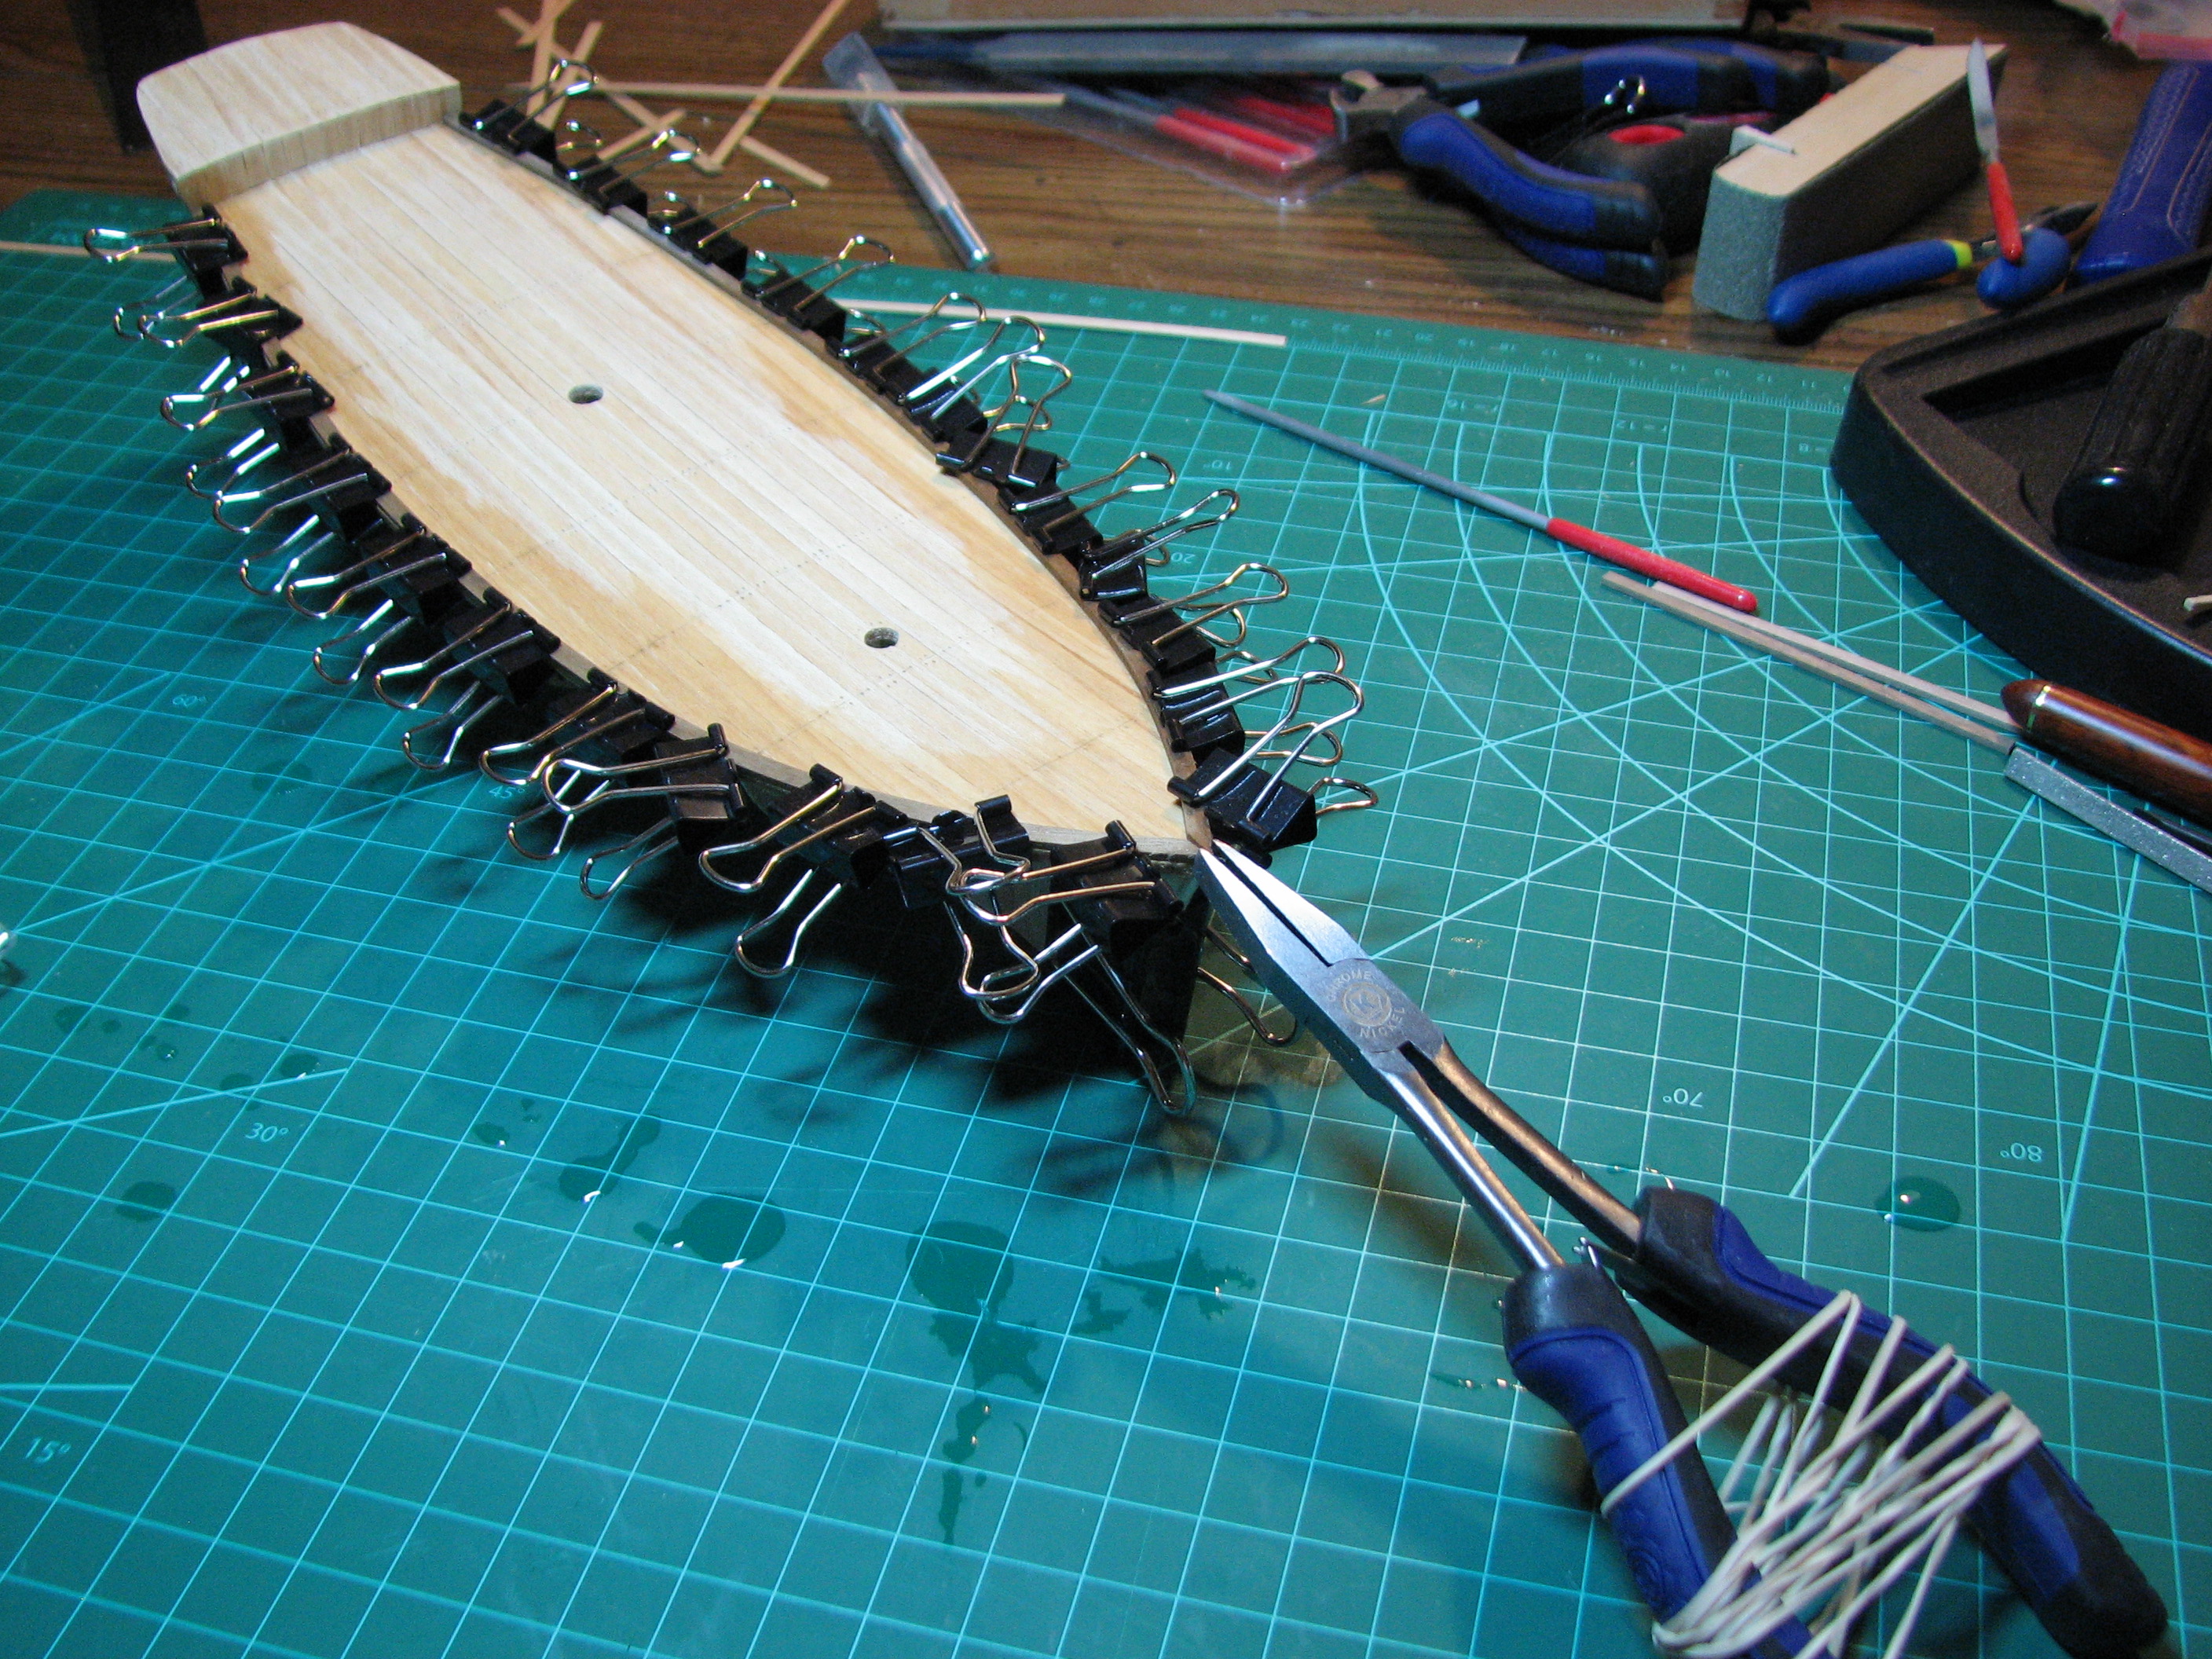 This morning, everything looked good, the stringers were dry, and everything had held in place. 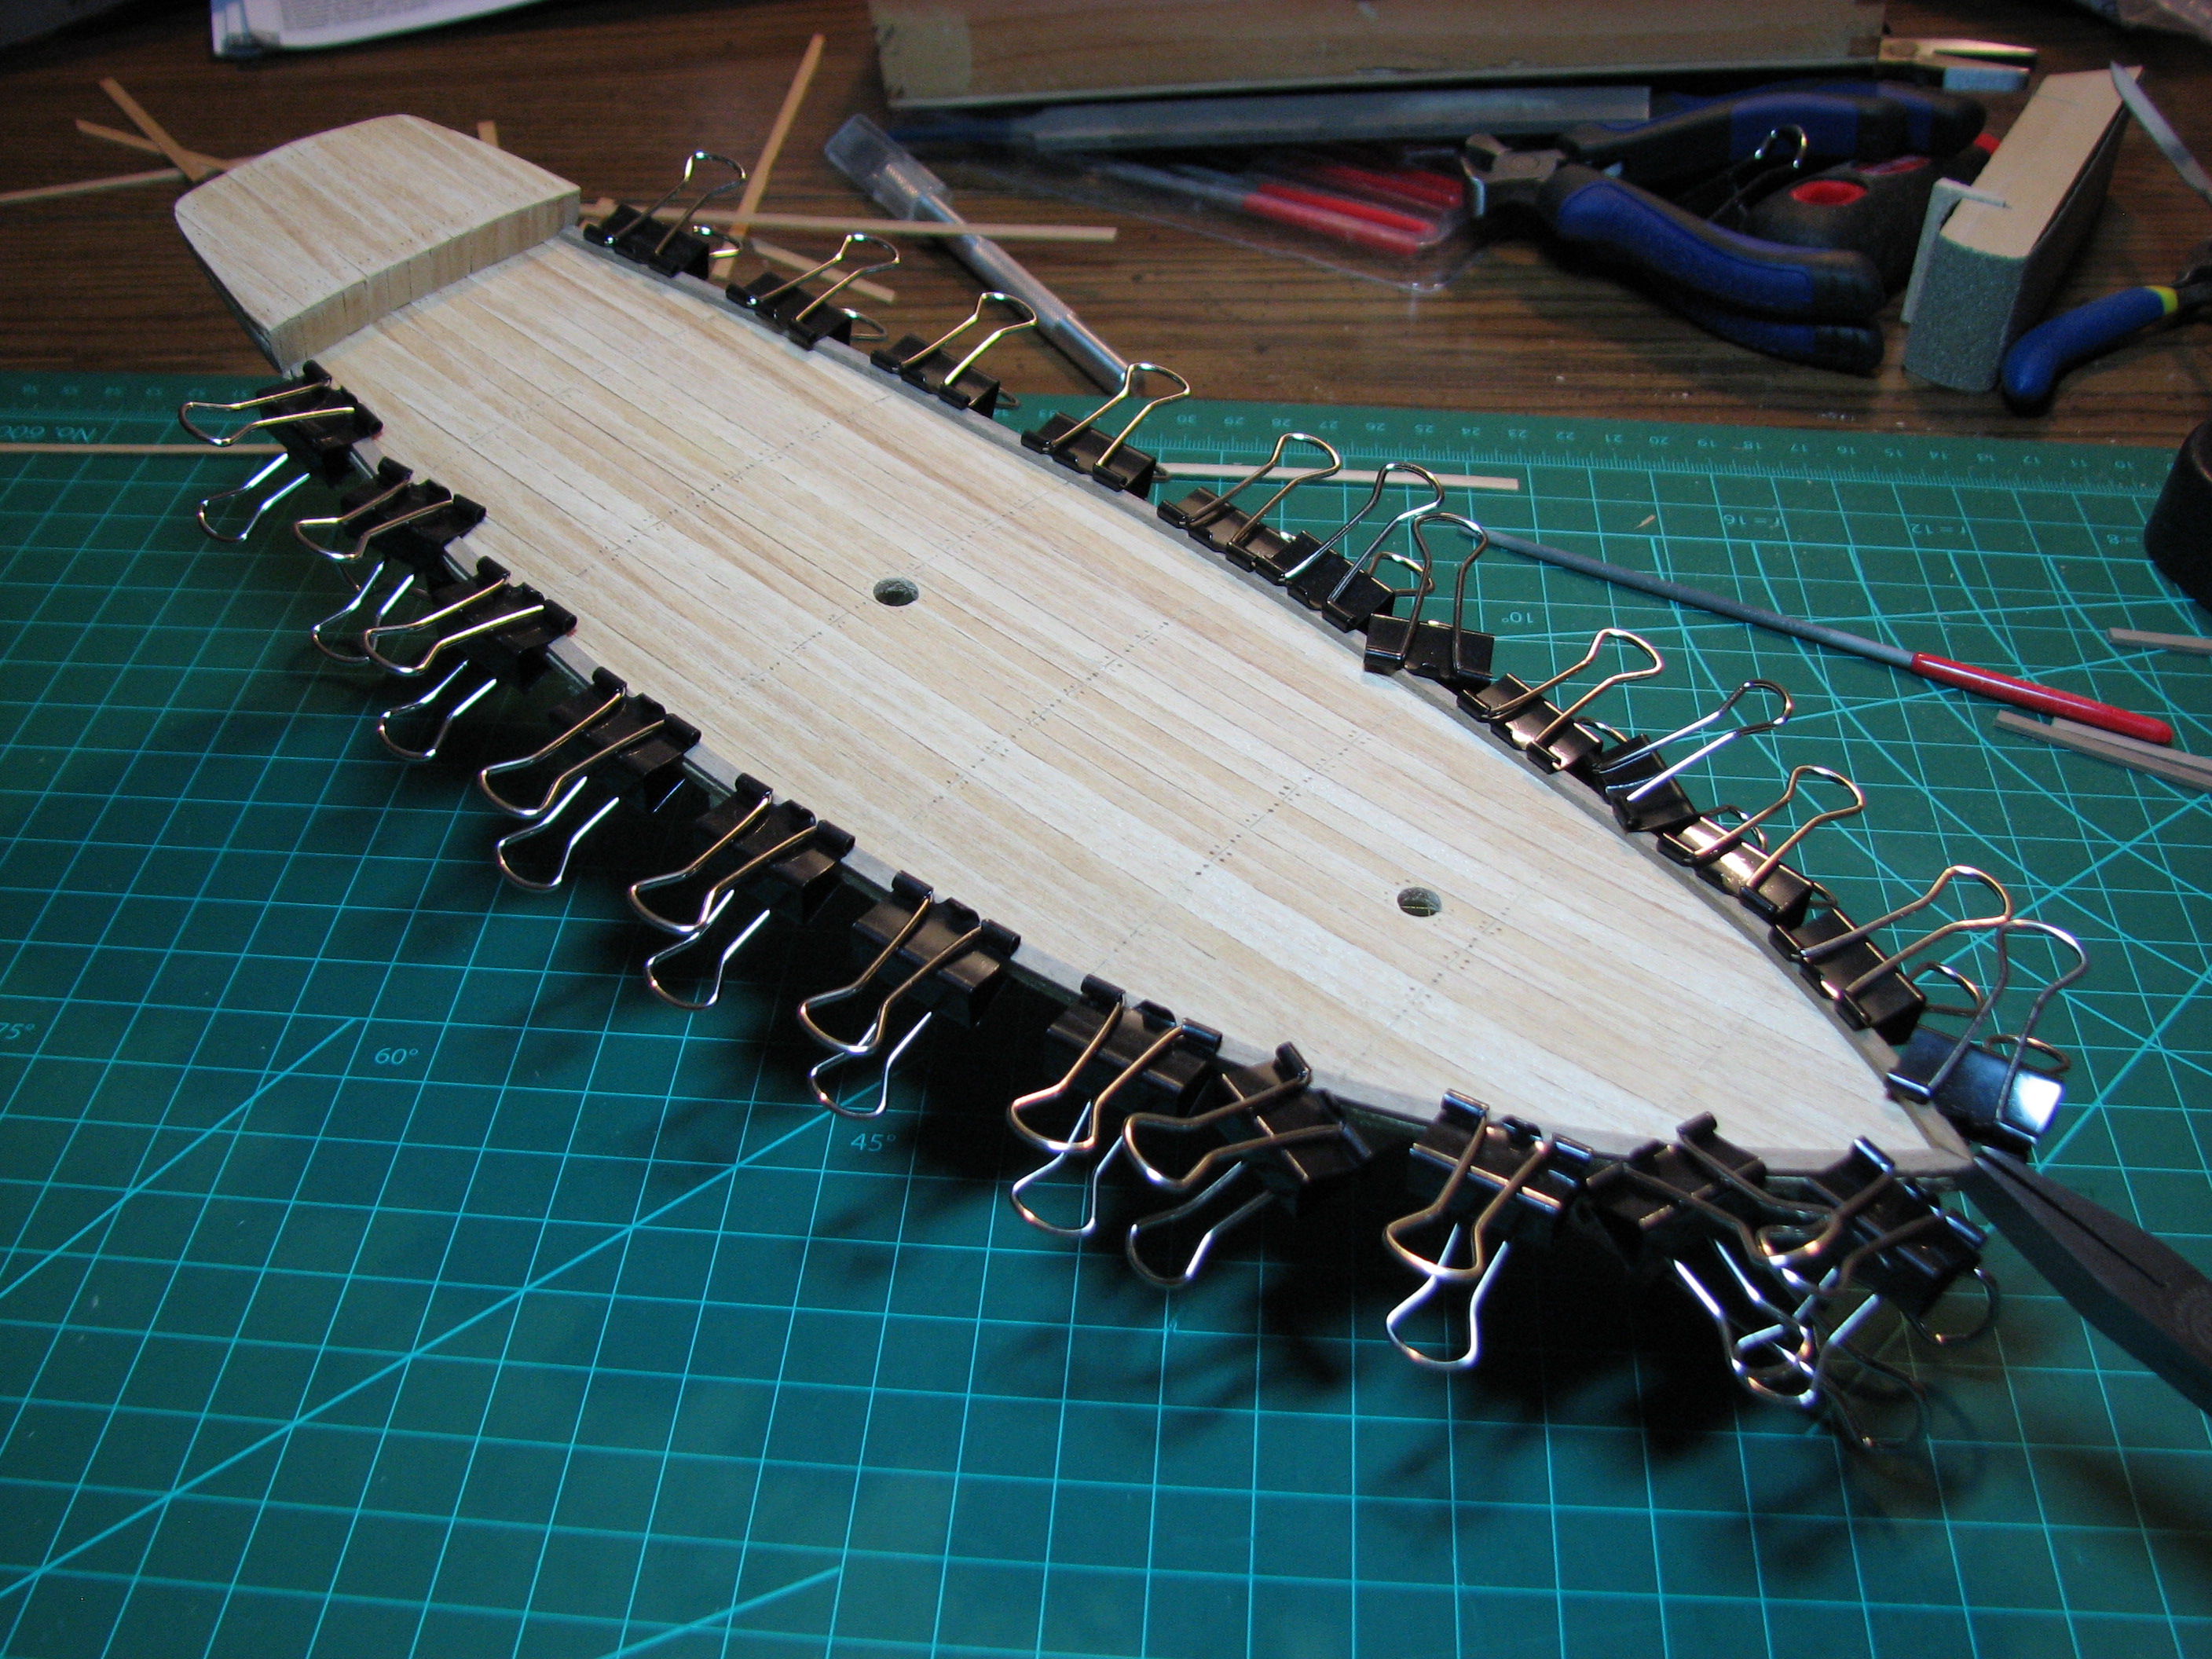 I crossed my fingers and began removing clamps. Holy crap, it worked! There is no glue holding the stringers at all here. 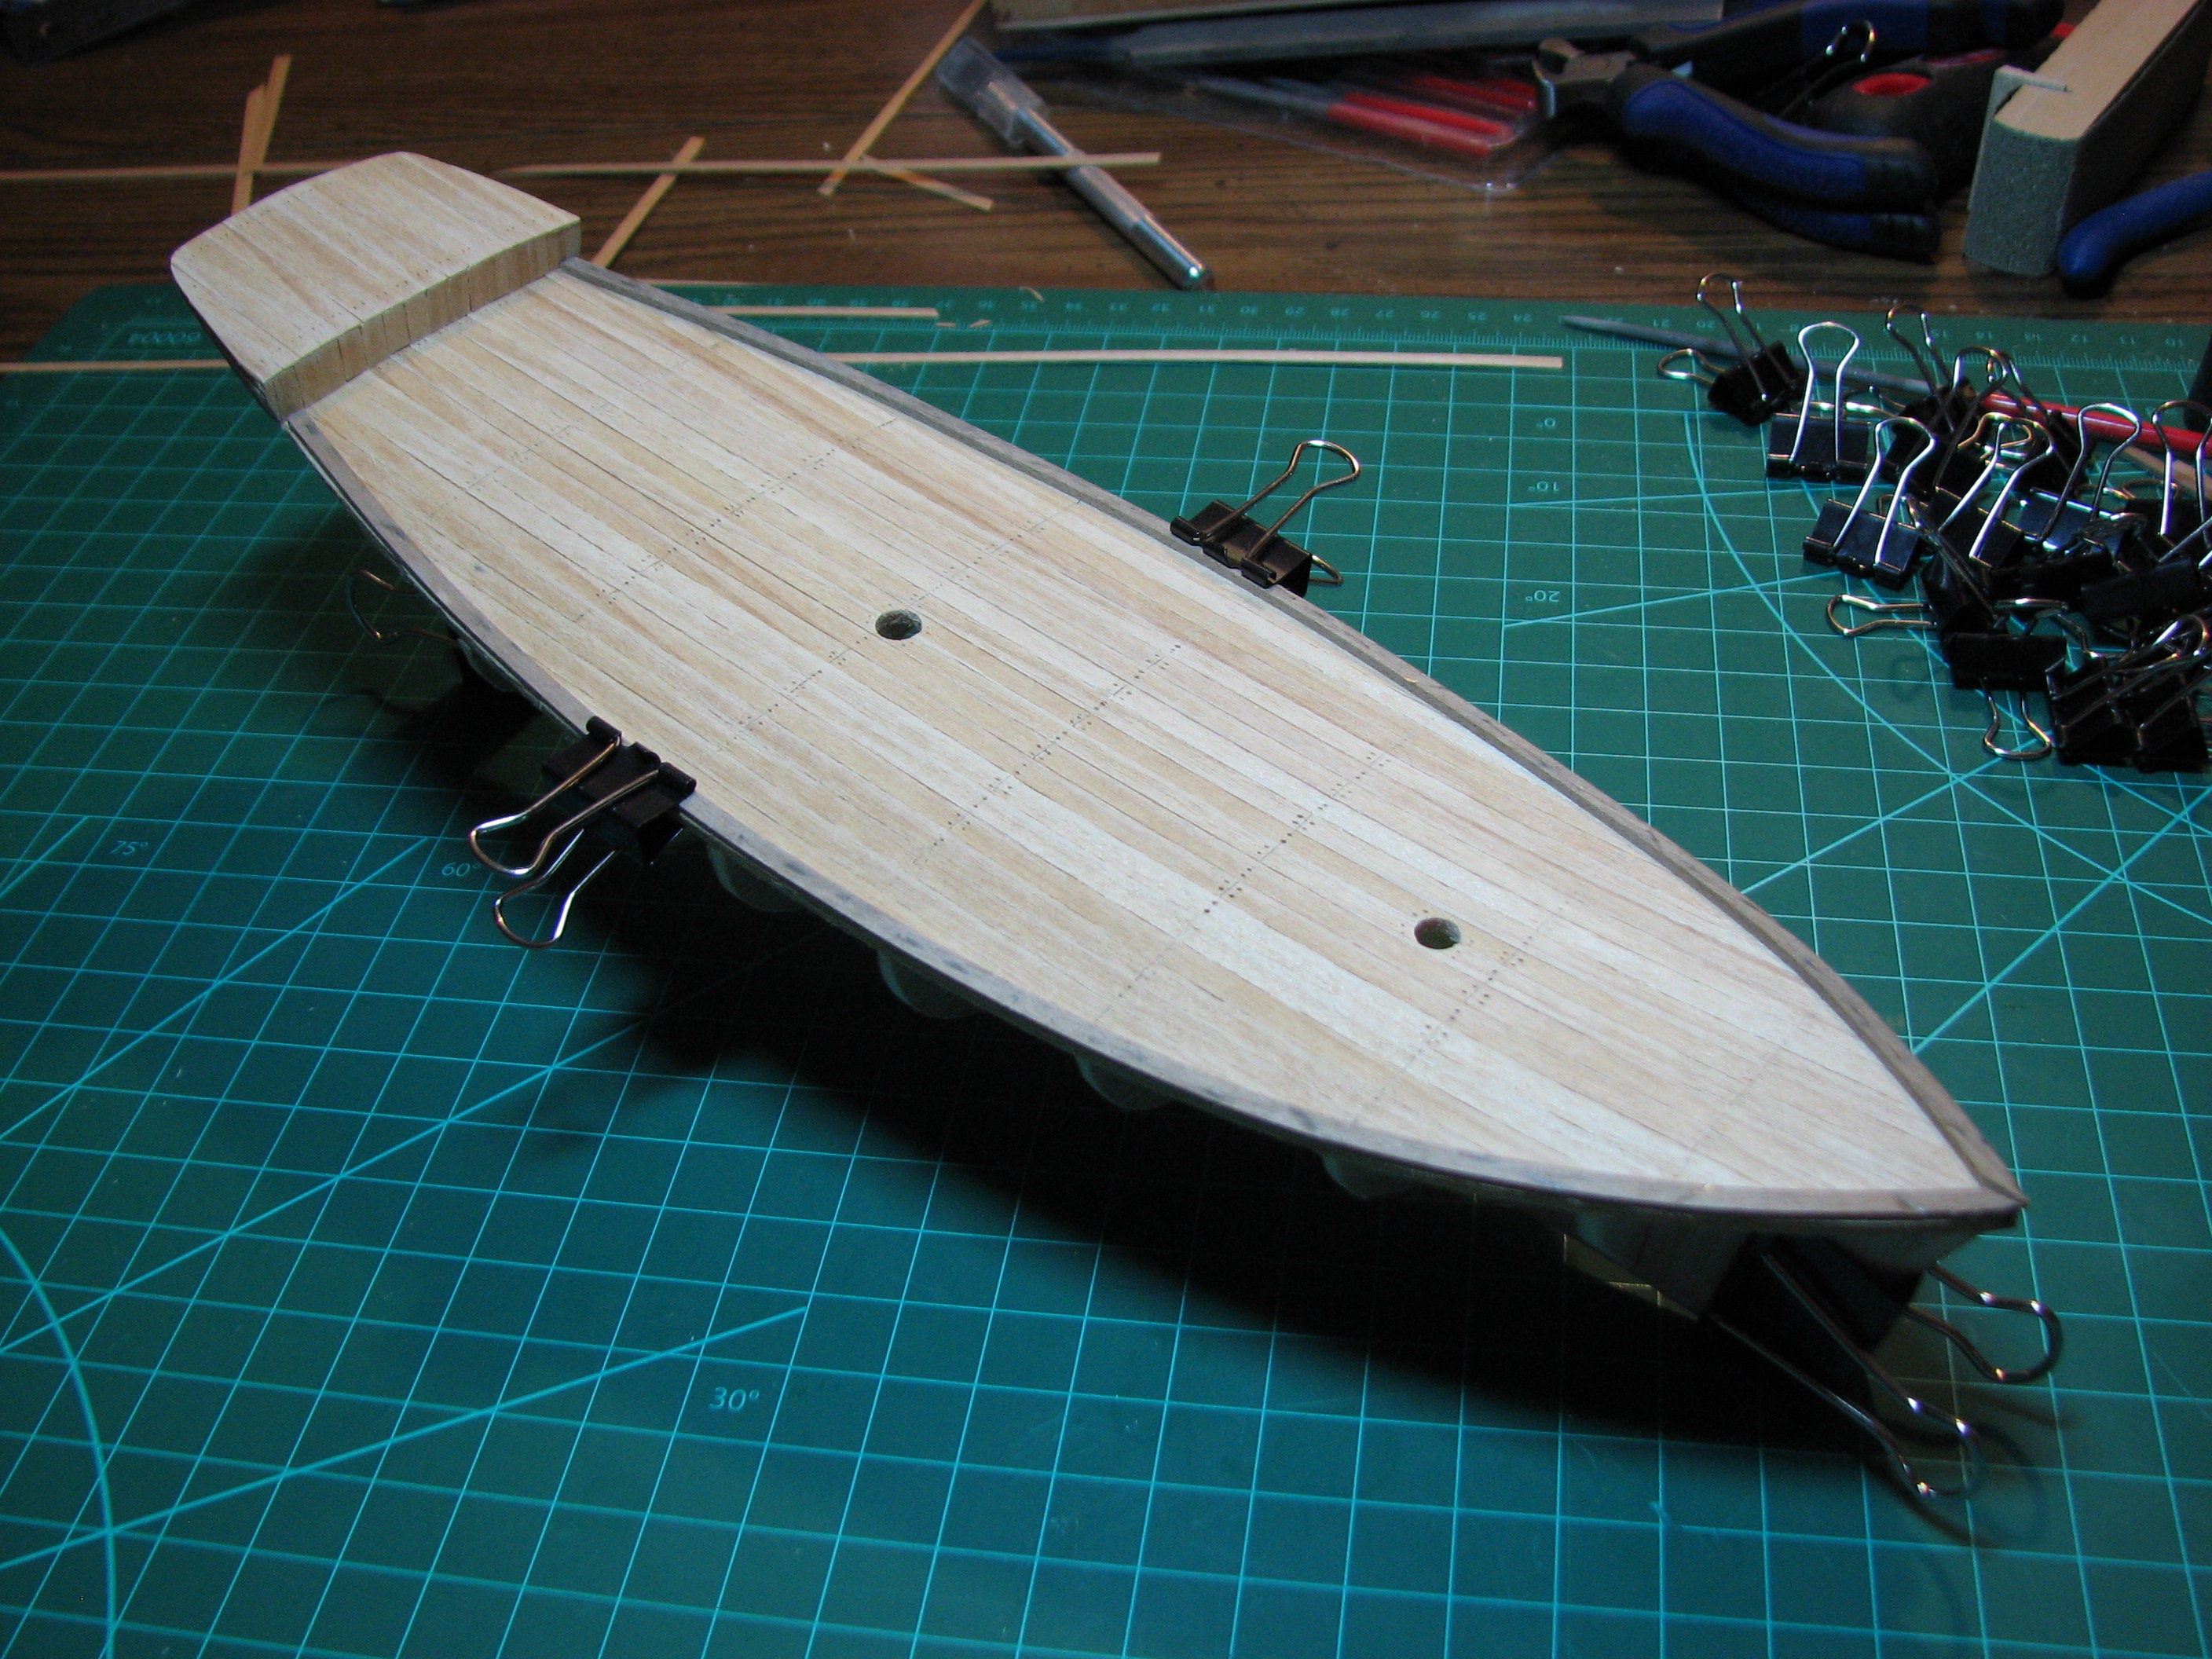 When I removed the final two clamps I found that the stringers were actually 'stuck' to the deck, and I ended up having to use a tiny blade and pry them apart. I removed a single stringer, and while the shape didn't hold perfectly, it was very close, so I went ahead and applied glue to the entire stringer, placed it starting at the stem and clamping as I worked my way towards the stern. Repeated the process on the other stringer.  At the stern, the stringers are supposed to hang off the deck about 1/2 way, this gives a surface to sand to adjust the bulwarks later on. Off to the store to get groceries and run some errands. Next the hull planking begins, and each one of those planks is the same thickness and type of wood as the stringers, but wider, so this is where I get to break out the water and heat and start hand forming things.
|
|
#
¿
Aug 17, 2014 19:14
|
|
|
Fearless posted:Don't be so hard on yourself regarding the planking and nails. Whatever imperfections exist at this stage stand out because they are the only details added to this point; when you get more features on the deck, I doubt anyone will notice. My own worst critic. I'm not really being hard on myself, so much as I'm trying to pay attention to where I can improve if I take this up as a long-term hobby. Things like the nail holes are where I should probably spend more time and care so that those little details look better on the finished product. I'm really not unhappy with how things are progressing, and think that it is looking fairly good so far, especially given how fast I'm going relative to the build logs I've read. Most of those guys would have spent the entire first weekend just getting the false keel and bulkheads perfect (or building a jig of some sort to hold it all). I've mentioned before that I am by nature, somewhat impatient and like to see things right now, so I'm unlikely to ever get to that level of methodical building. Having said that, I'm on the hull planking now, and I'm going to have no choice but to go somewhat slow. I've got the first plank in place, but the little nails the instructions say to use to hold the planks in place while building cause this wood to split, which means that if I wanted to use them I'd need to get a super tiny drill and drill pilot holes for each nail (one per bulkhead). I may have to do that as I progress, but I managed to get the first plank to fit really well by just getting it bent right to fit. That process is slow too. Pre-fit the plank and then wet a section of it, and hold a bend over a hot soldering iron until it dries. Repeat as needed to get the entire plank to fit along all the bulkheads while laying flat. Before I can even start on the plank bending, first I have to lay the plank along the bulkheads, and then sand the bulkheads to the proper angle to accept the plank 'flat', so that the glue has something to bond to. So my first plank it now on, glued, and held in place by a plethora of rubber bands, and a couple nails at the stern that I put in next to the plank and caught it with the heads. Now I wait for the glue to set, because with the rubber bands around the hull, I obviously can't work on the next plank. The planks for the hull start at the deck, and then alternate sides, because if you put them all on one side first, it's very likely to induce a twist in the hull. I need to get on Amazon and order a set of micro-drills and collet, so that if I do need to start going with pilot holes, I'll have some way to do it!
|
|
#
¿
Aug 17, 2014 23:05
|
|
|
And the first two planks are on.  The beginning, fitting the first plank when it had only minor shaping done. It's a process of test fitting, sanding of the bulkheads and/or wetting and bending the plank, repeat until it fits. 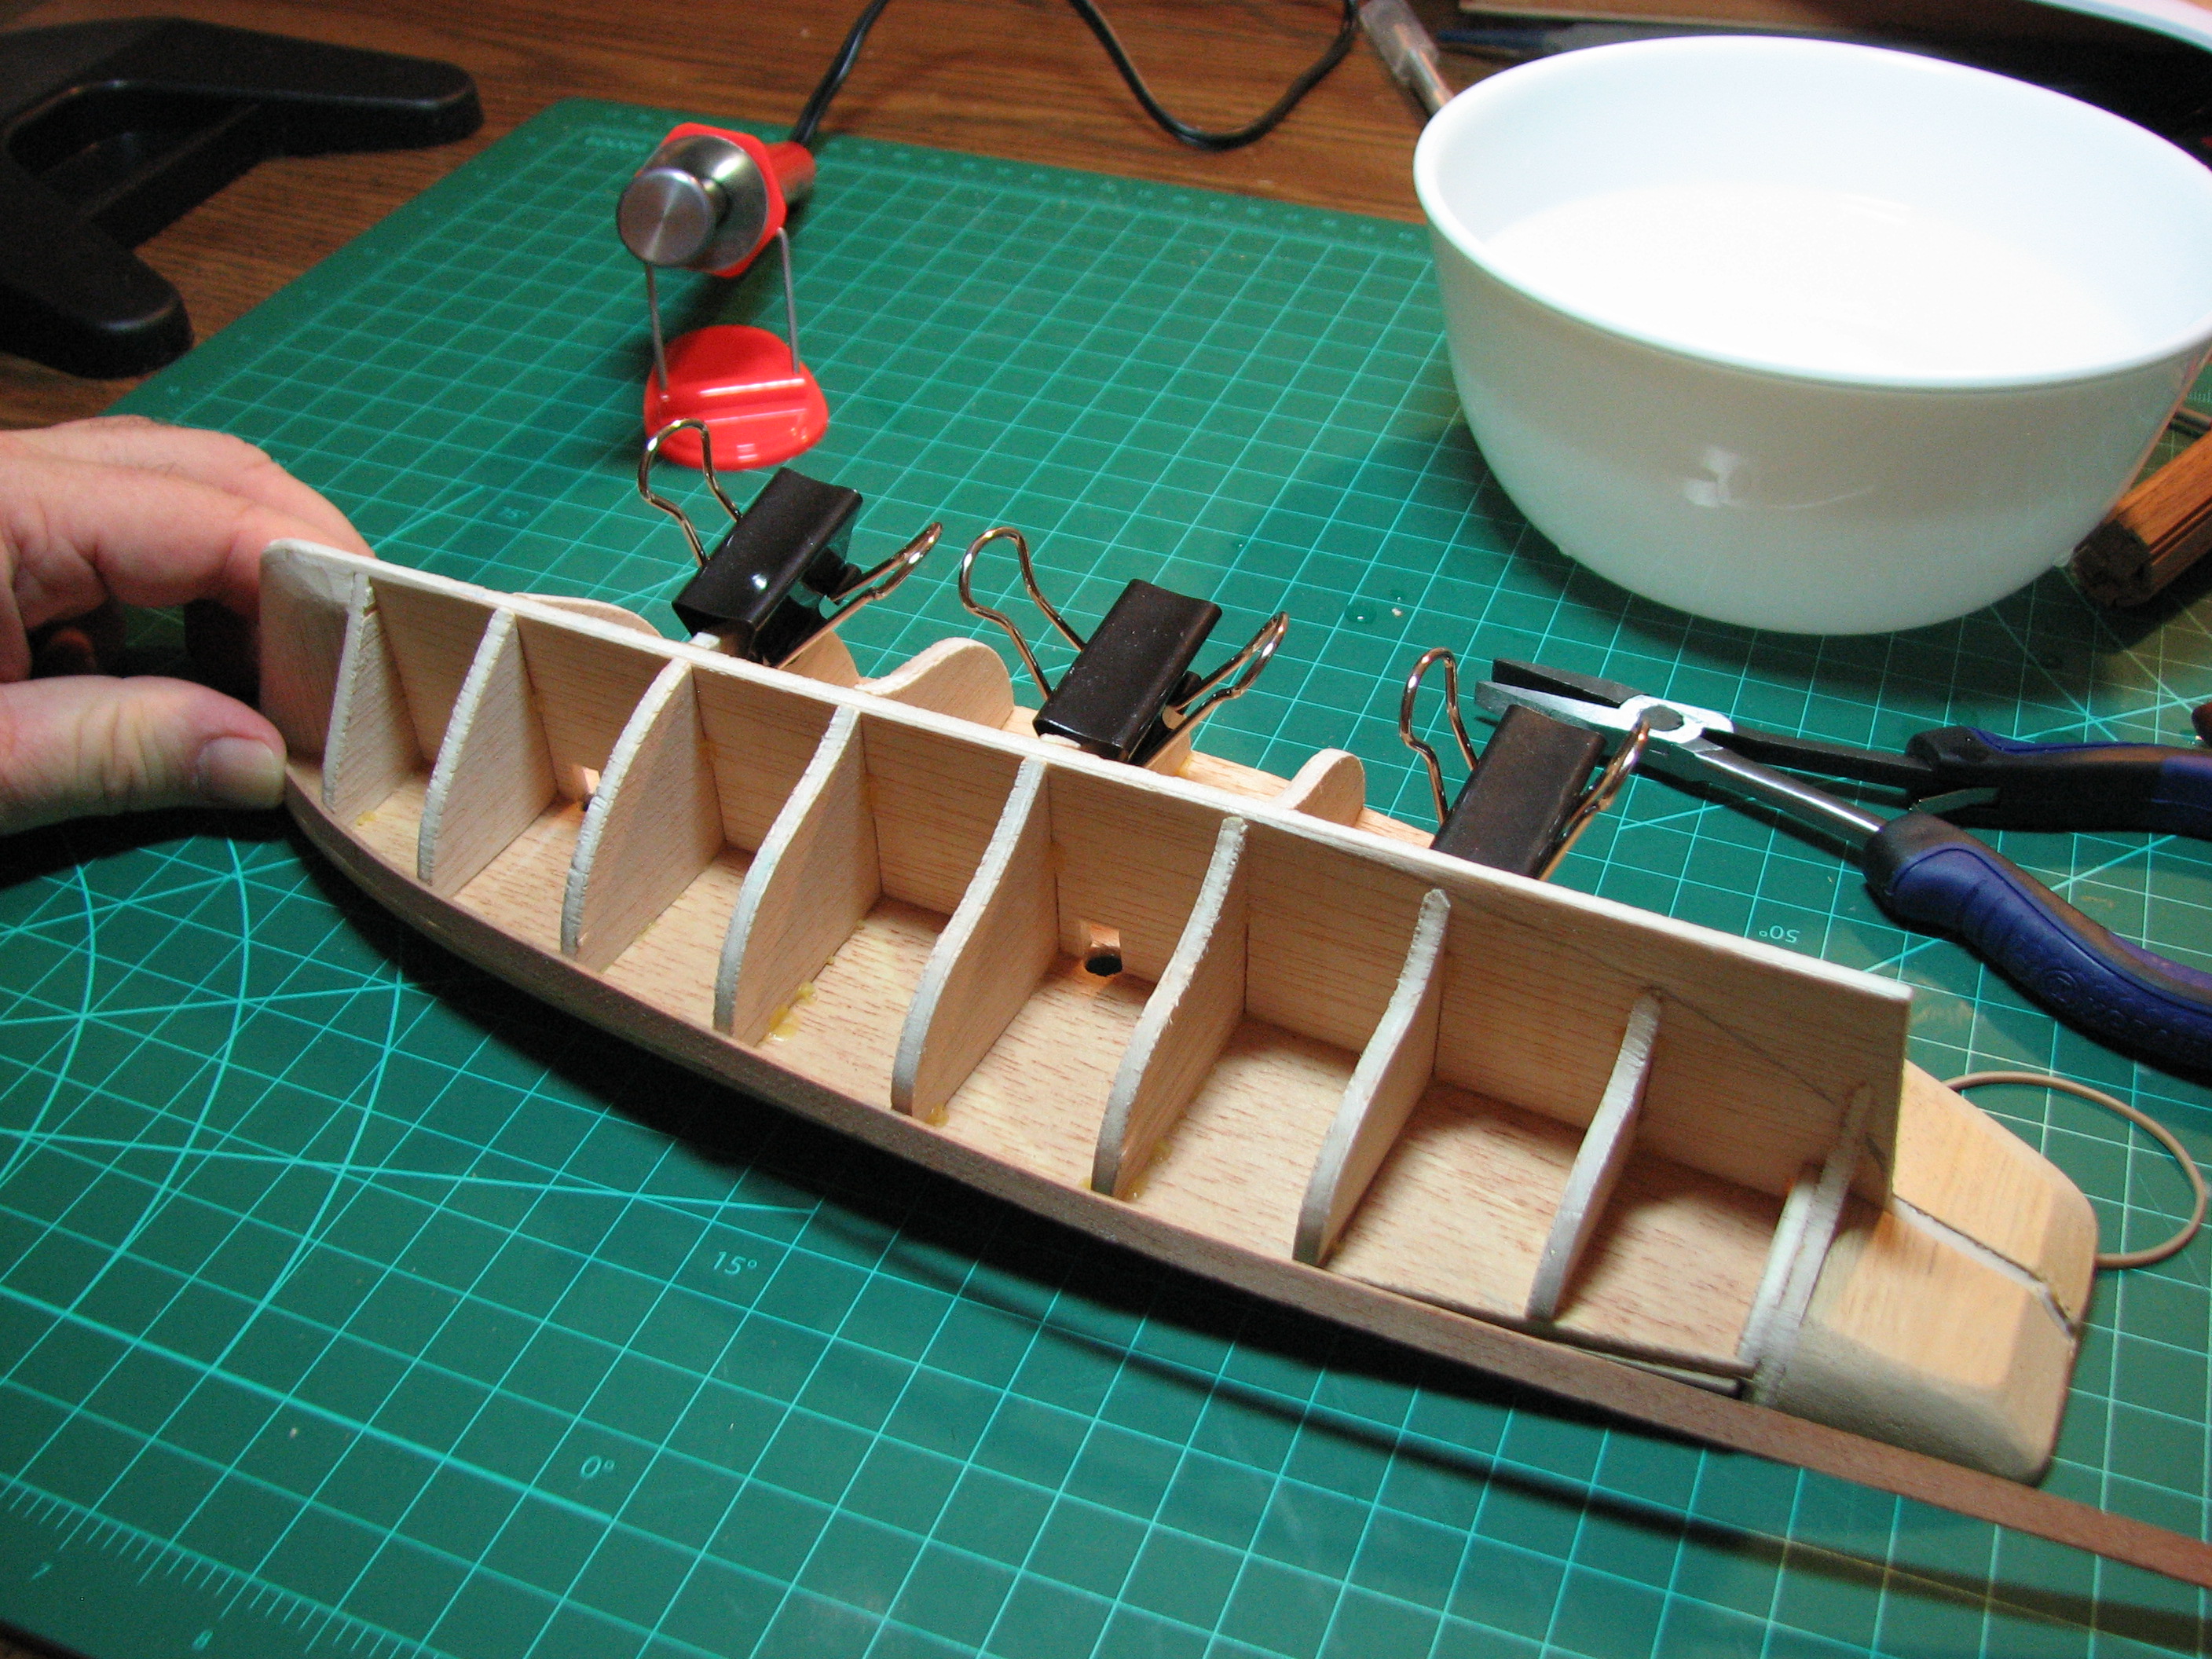 The shaping process - after test fitting, figure out where you need a bend, wet that section of the plank, then hold it over the heat source (soldering iron) and hold in place until it's heat dried. Obviously I had to use one hand to take this picture, but both hands are used to hold the bend doing this. 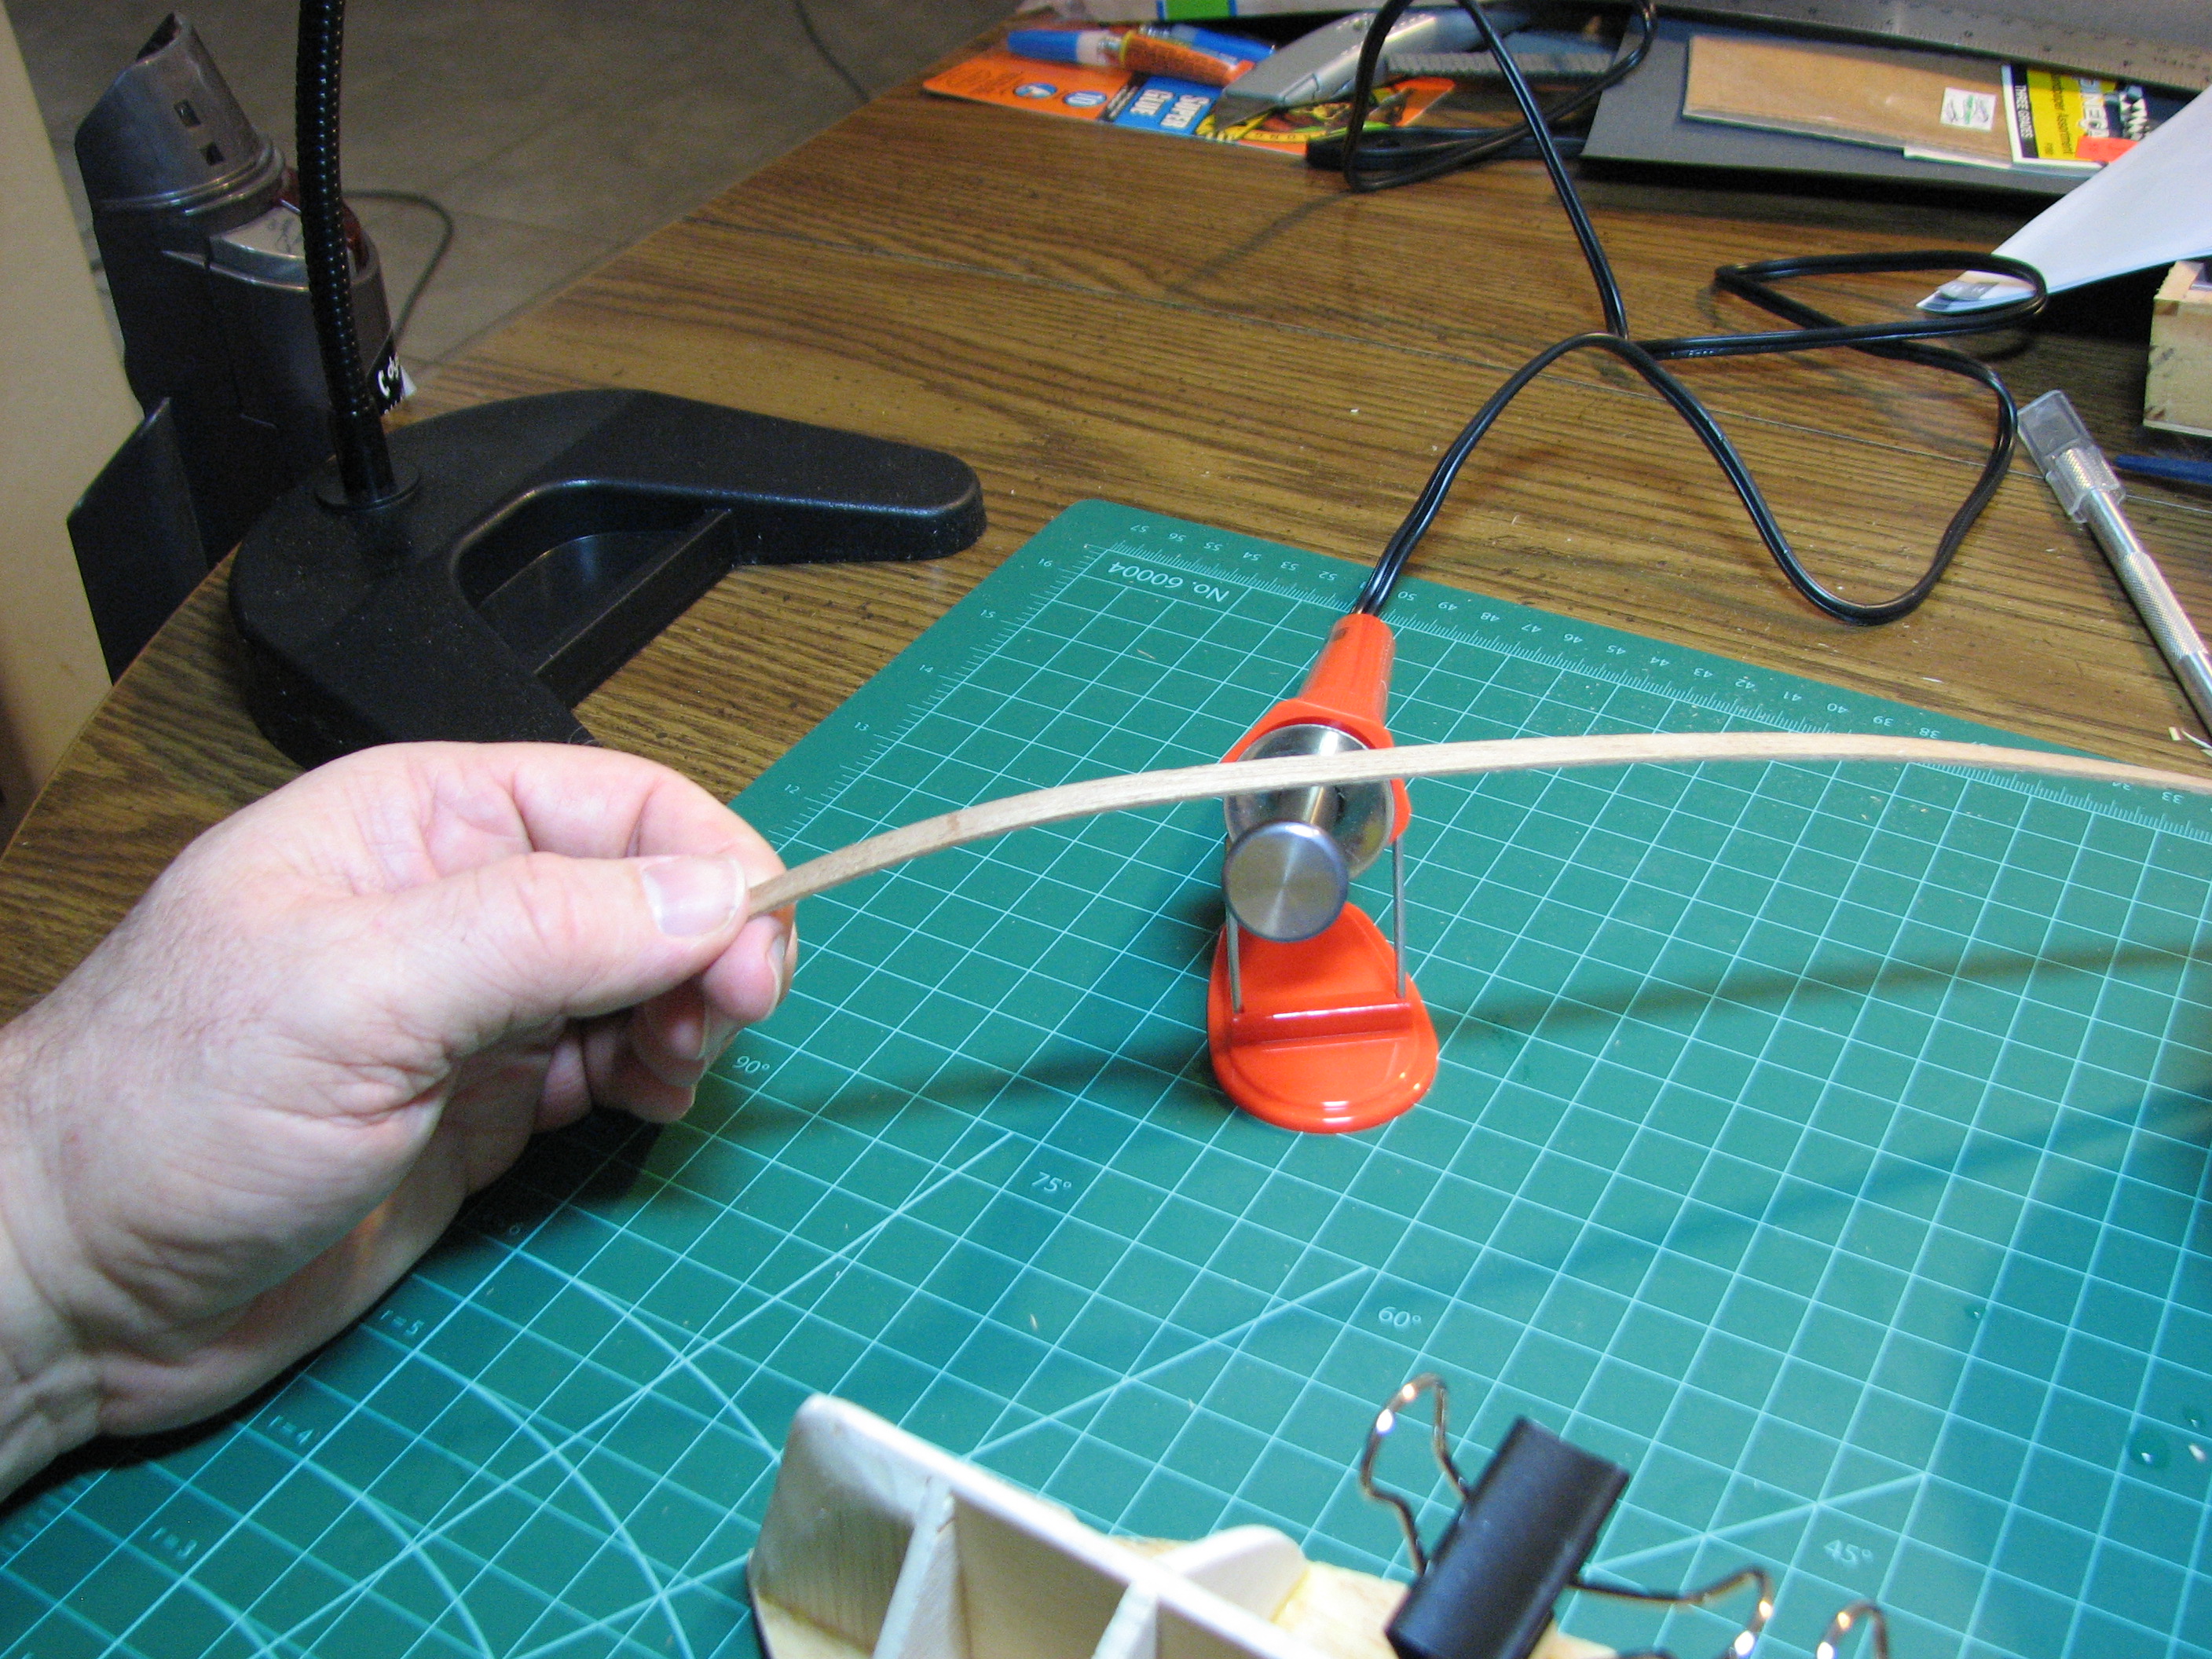 The rubber-band system in action. I used the small nails on the stern to 'catch' the plank with the nail heads, and I'll be using nails in the bulkheads to help with positioning etc, but I'm going to try to avoid using nails to hold the planks. We'll see how well that goes in a week or so when I get to the areas of the hull that I won't be able to get pressure on the planks from the bands. I've ordered a micro-drill set that will be here Tuesday or Wednesday, as I expect I'll have to break down and do it that way. 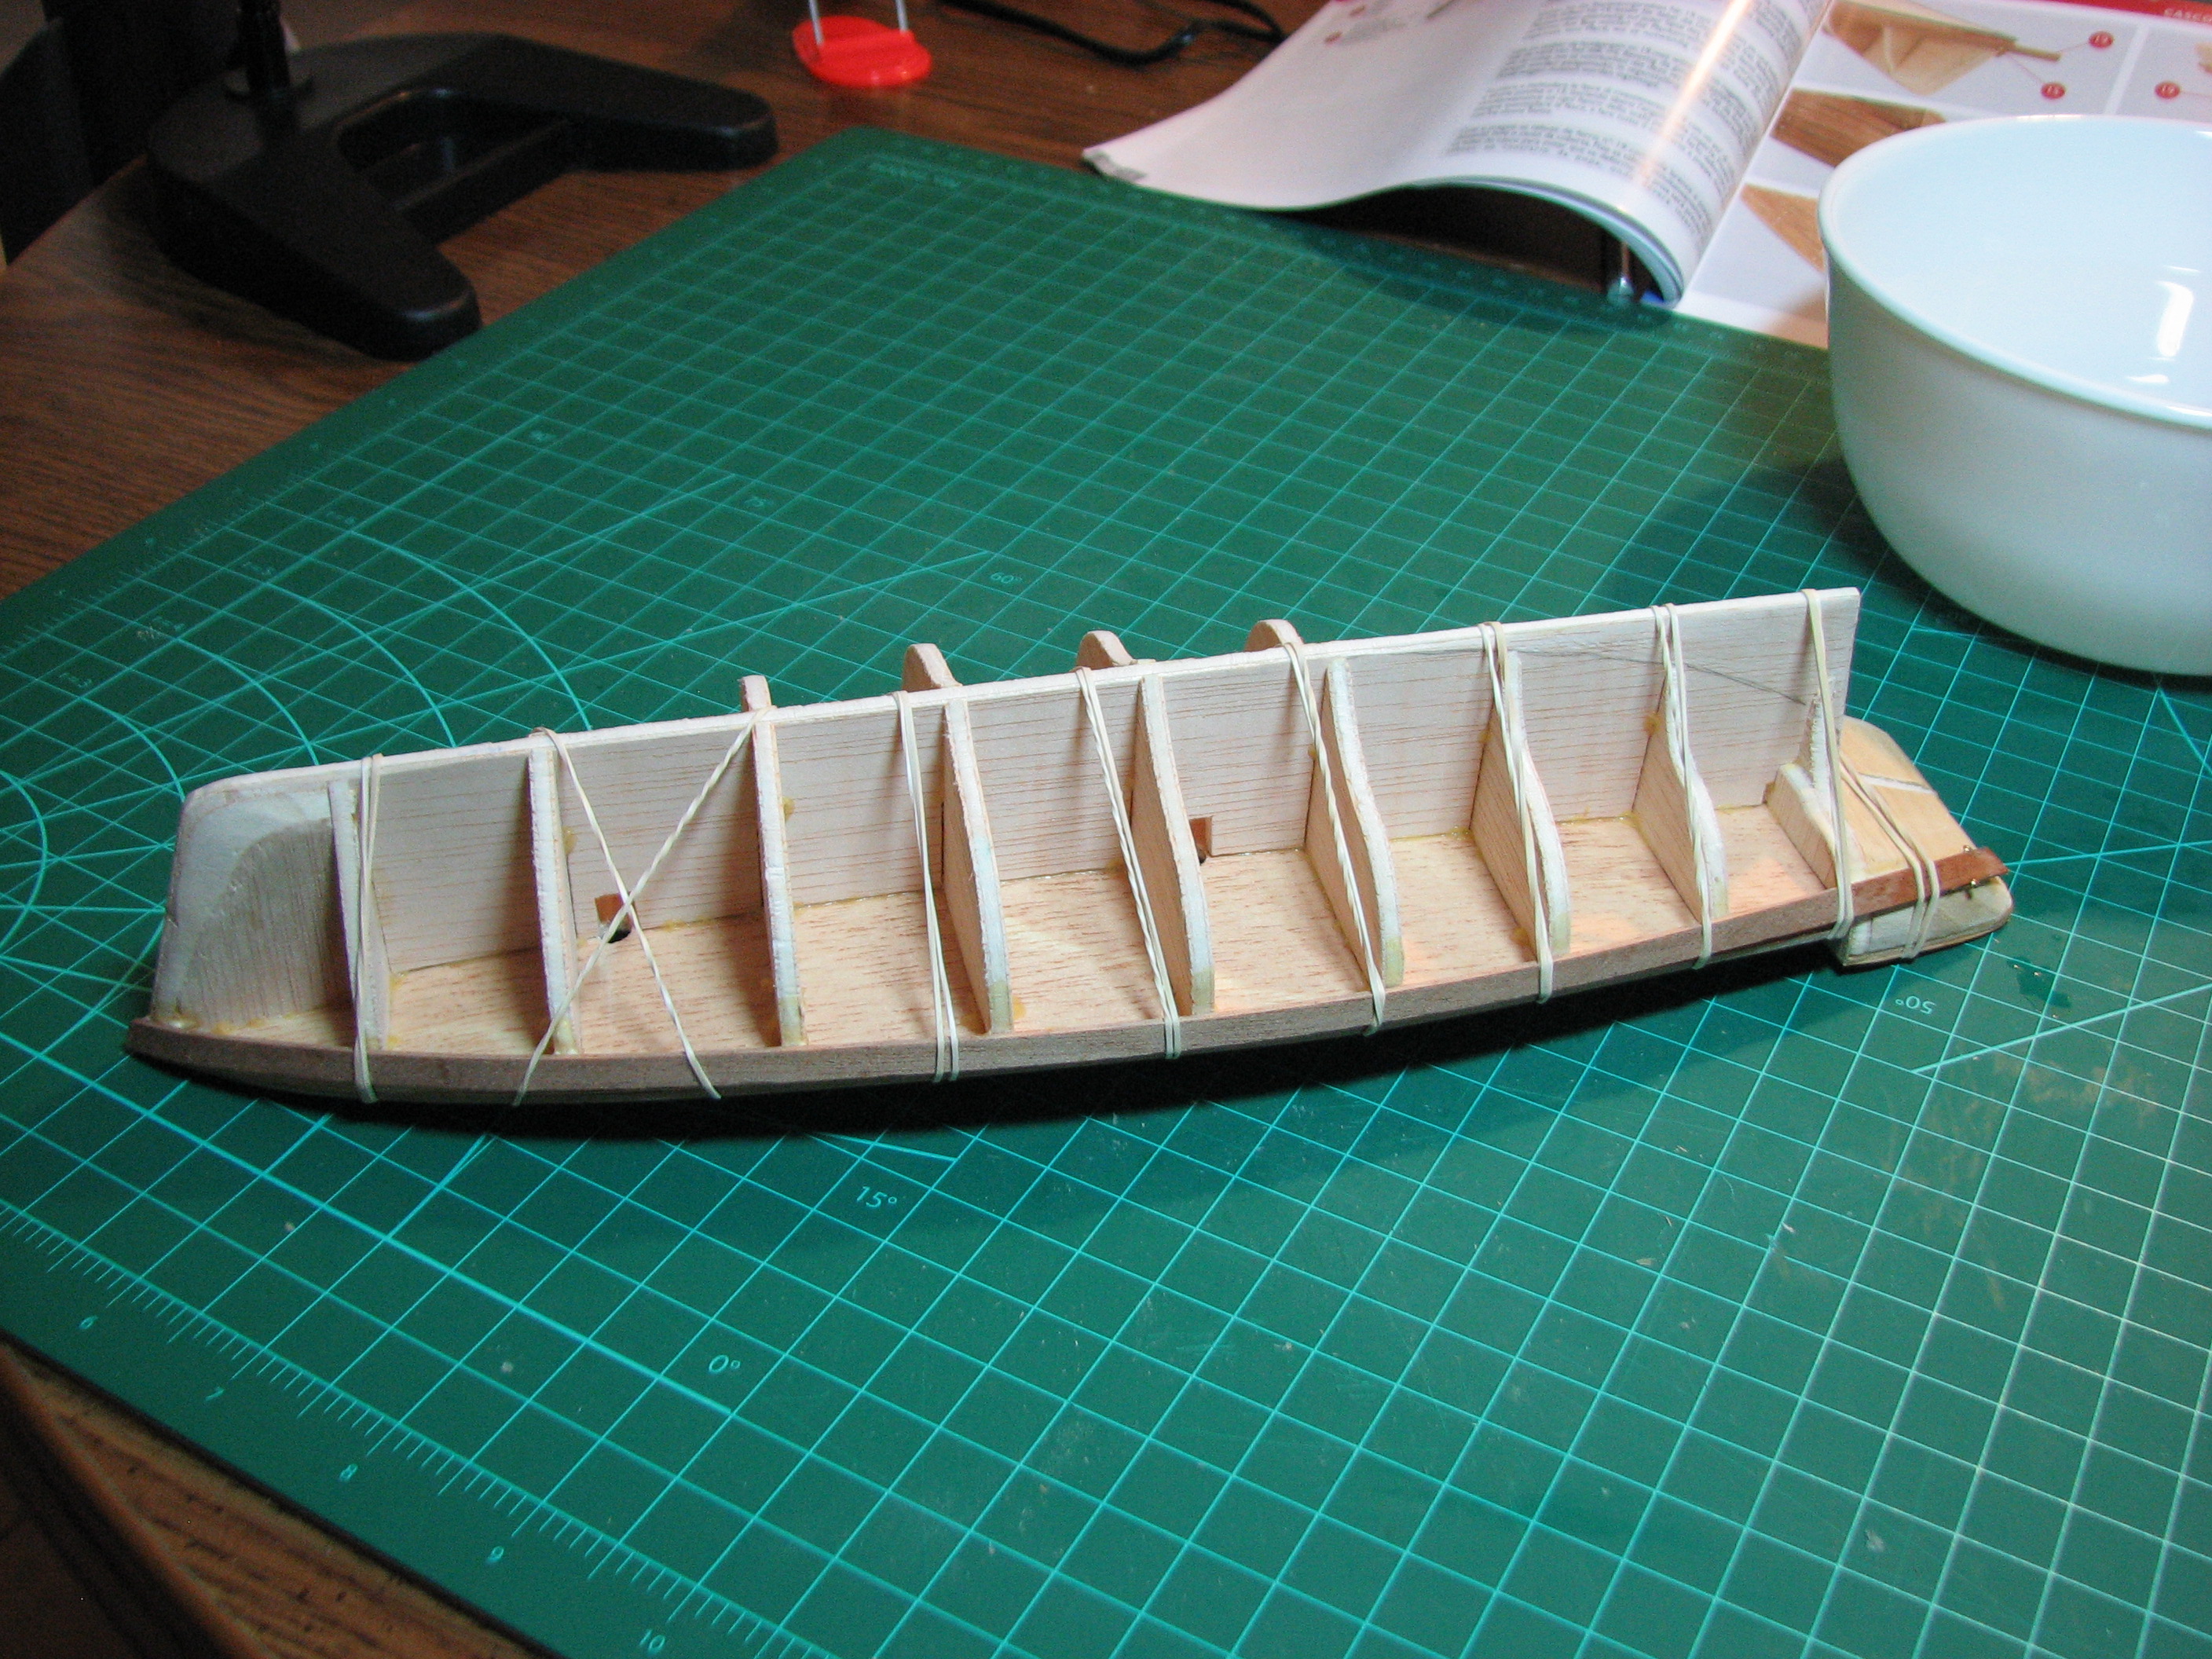 Took a picture of the first plank on the other side of the boat to give you an idea of how much bending/twisting of the plank is involved. This isn't quite complete as pictured, but it's fairly close. 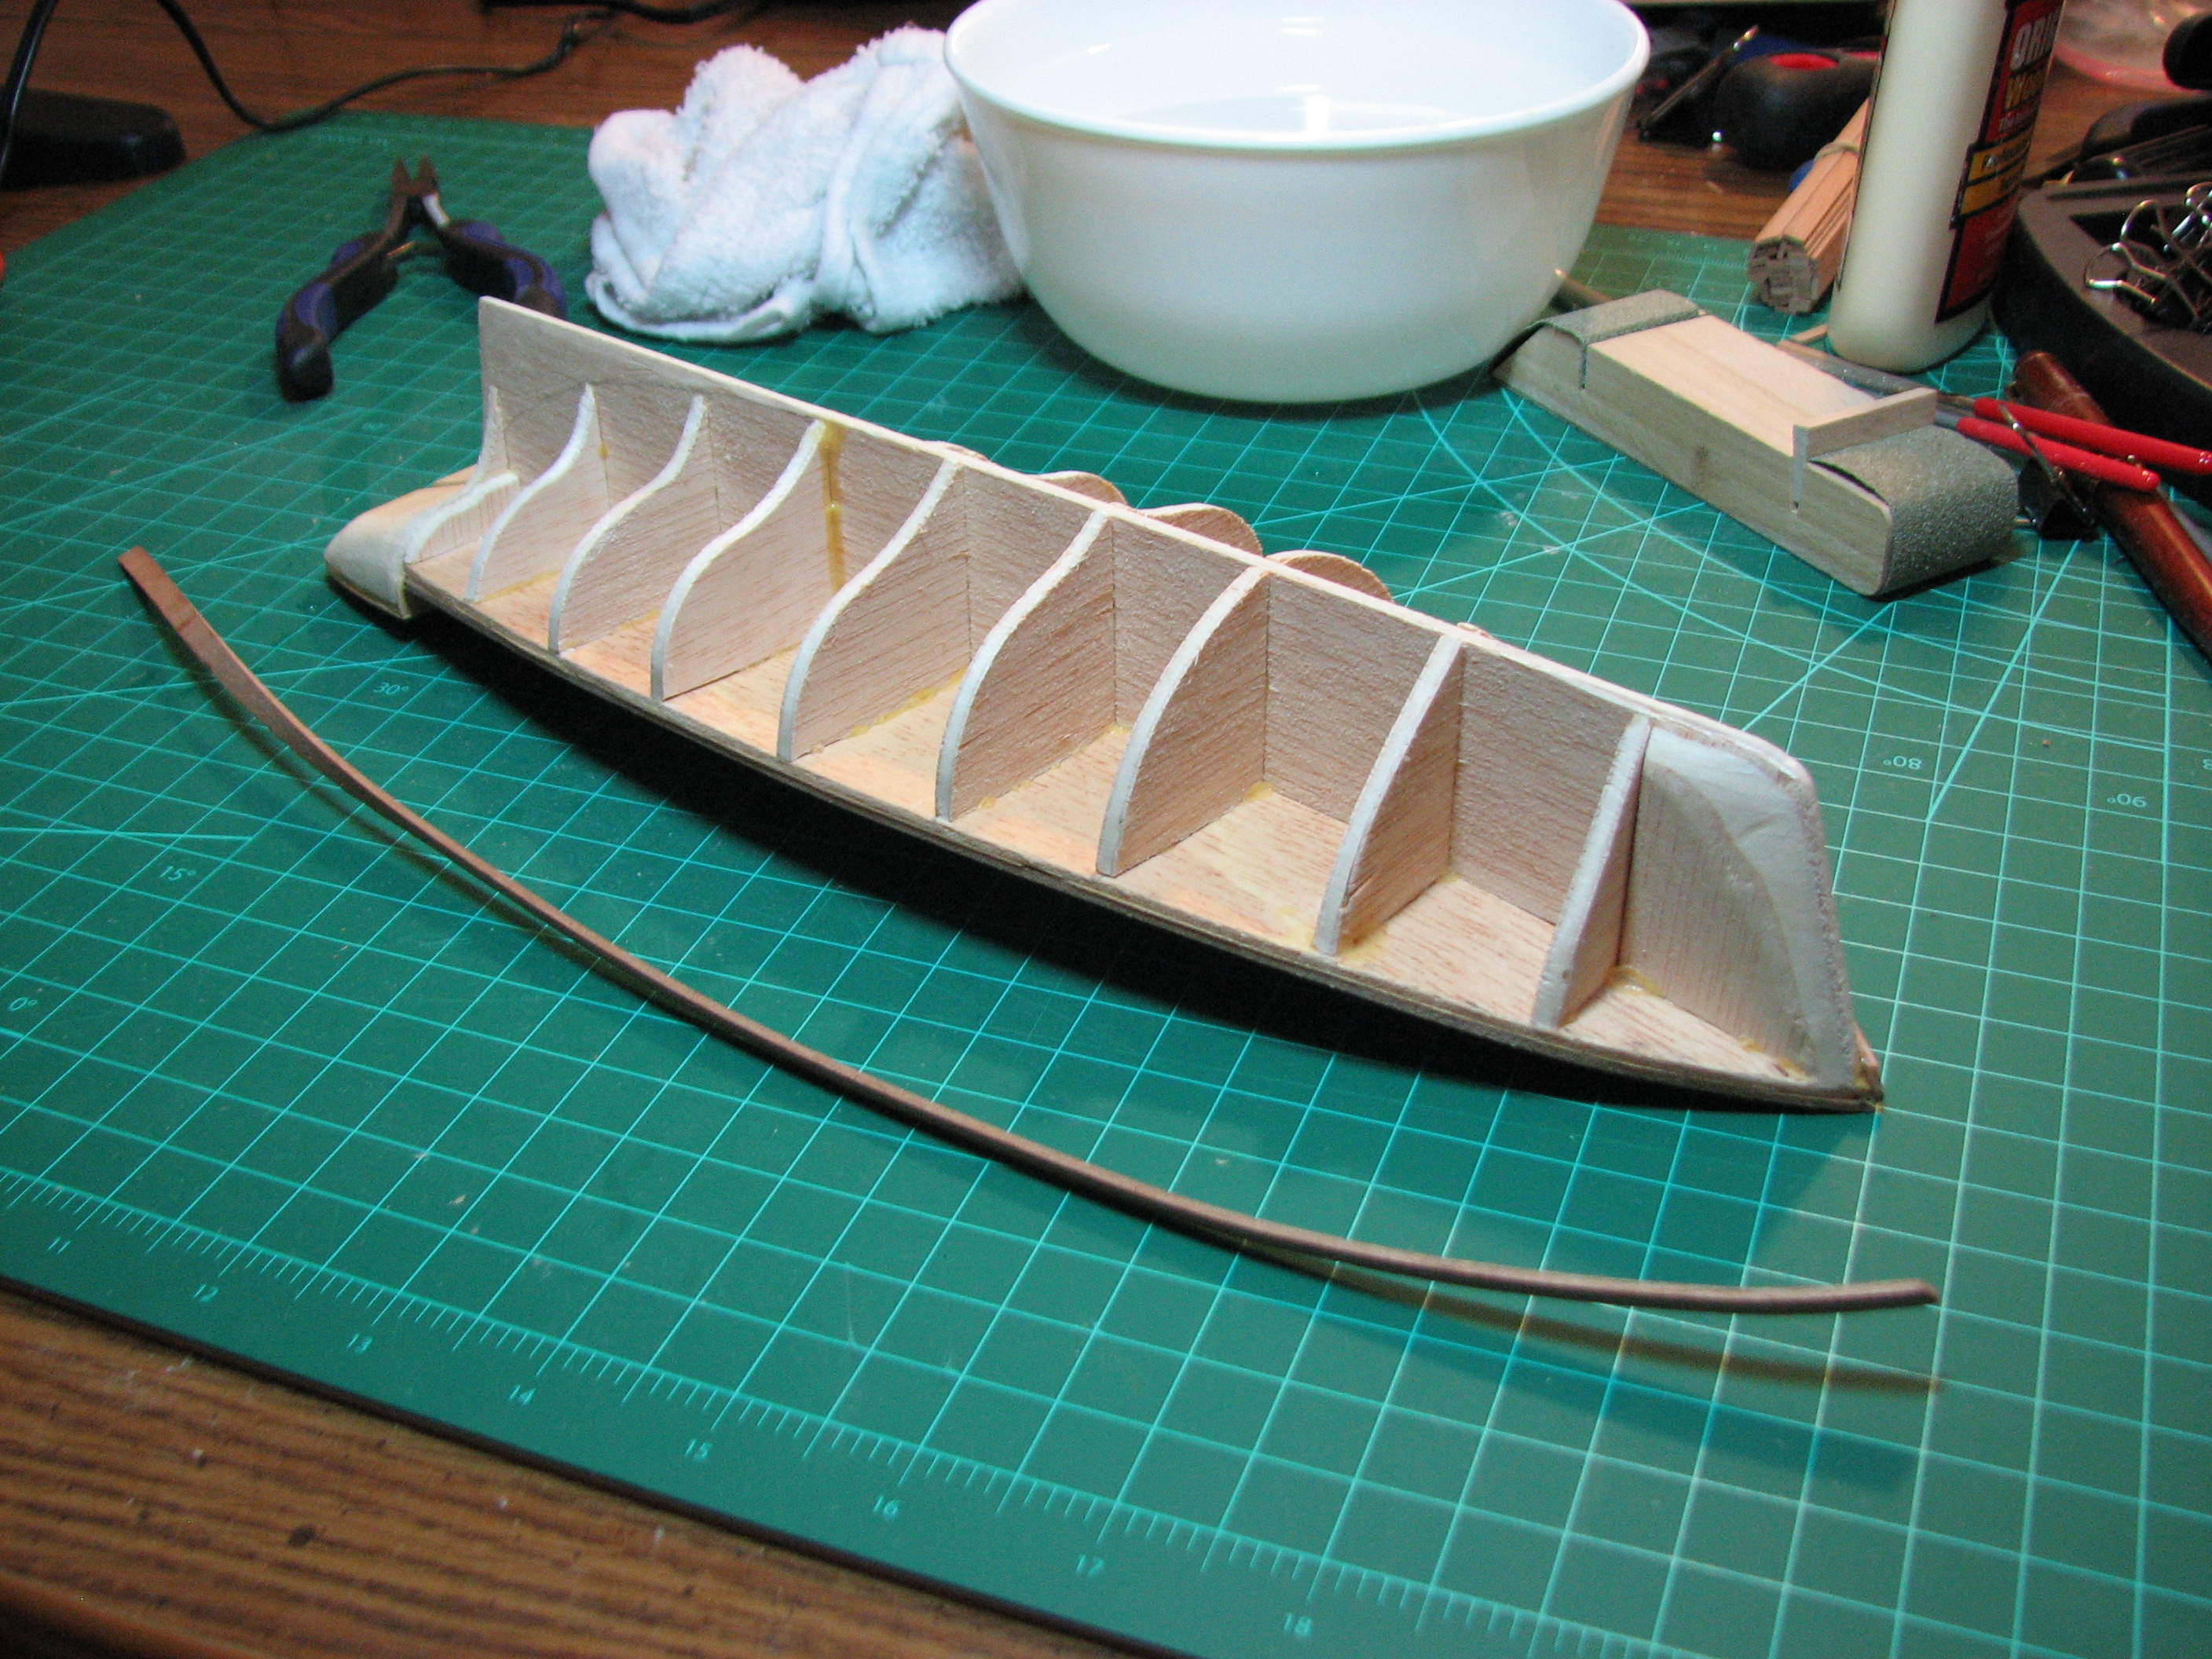 For final shaping, I tried a system I read on a build log. I rubber-banded the plank into place, using the nails to hold it in the right position, and with the bands forcing the plank into shape, applied water with an eye-dropper every 15 minutes or so for an hour, then let it dry. Worked ok, but probably would have been faster just to use the wet/heat shaping off the hull. 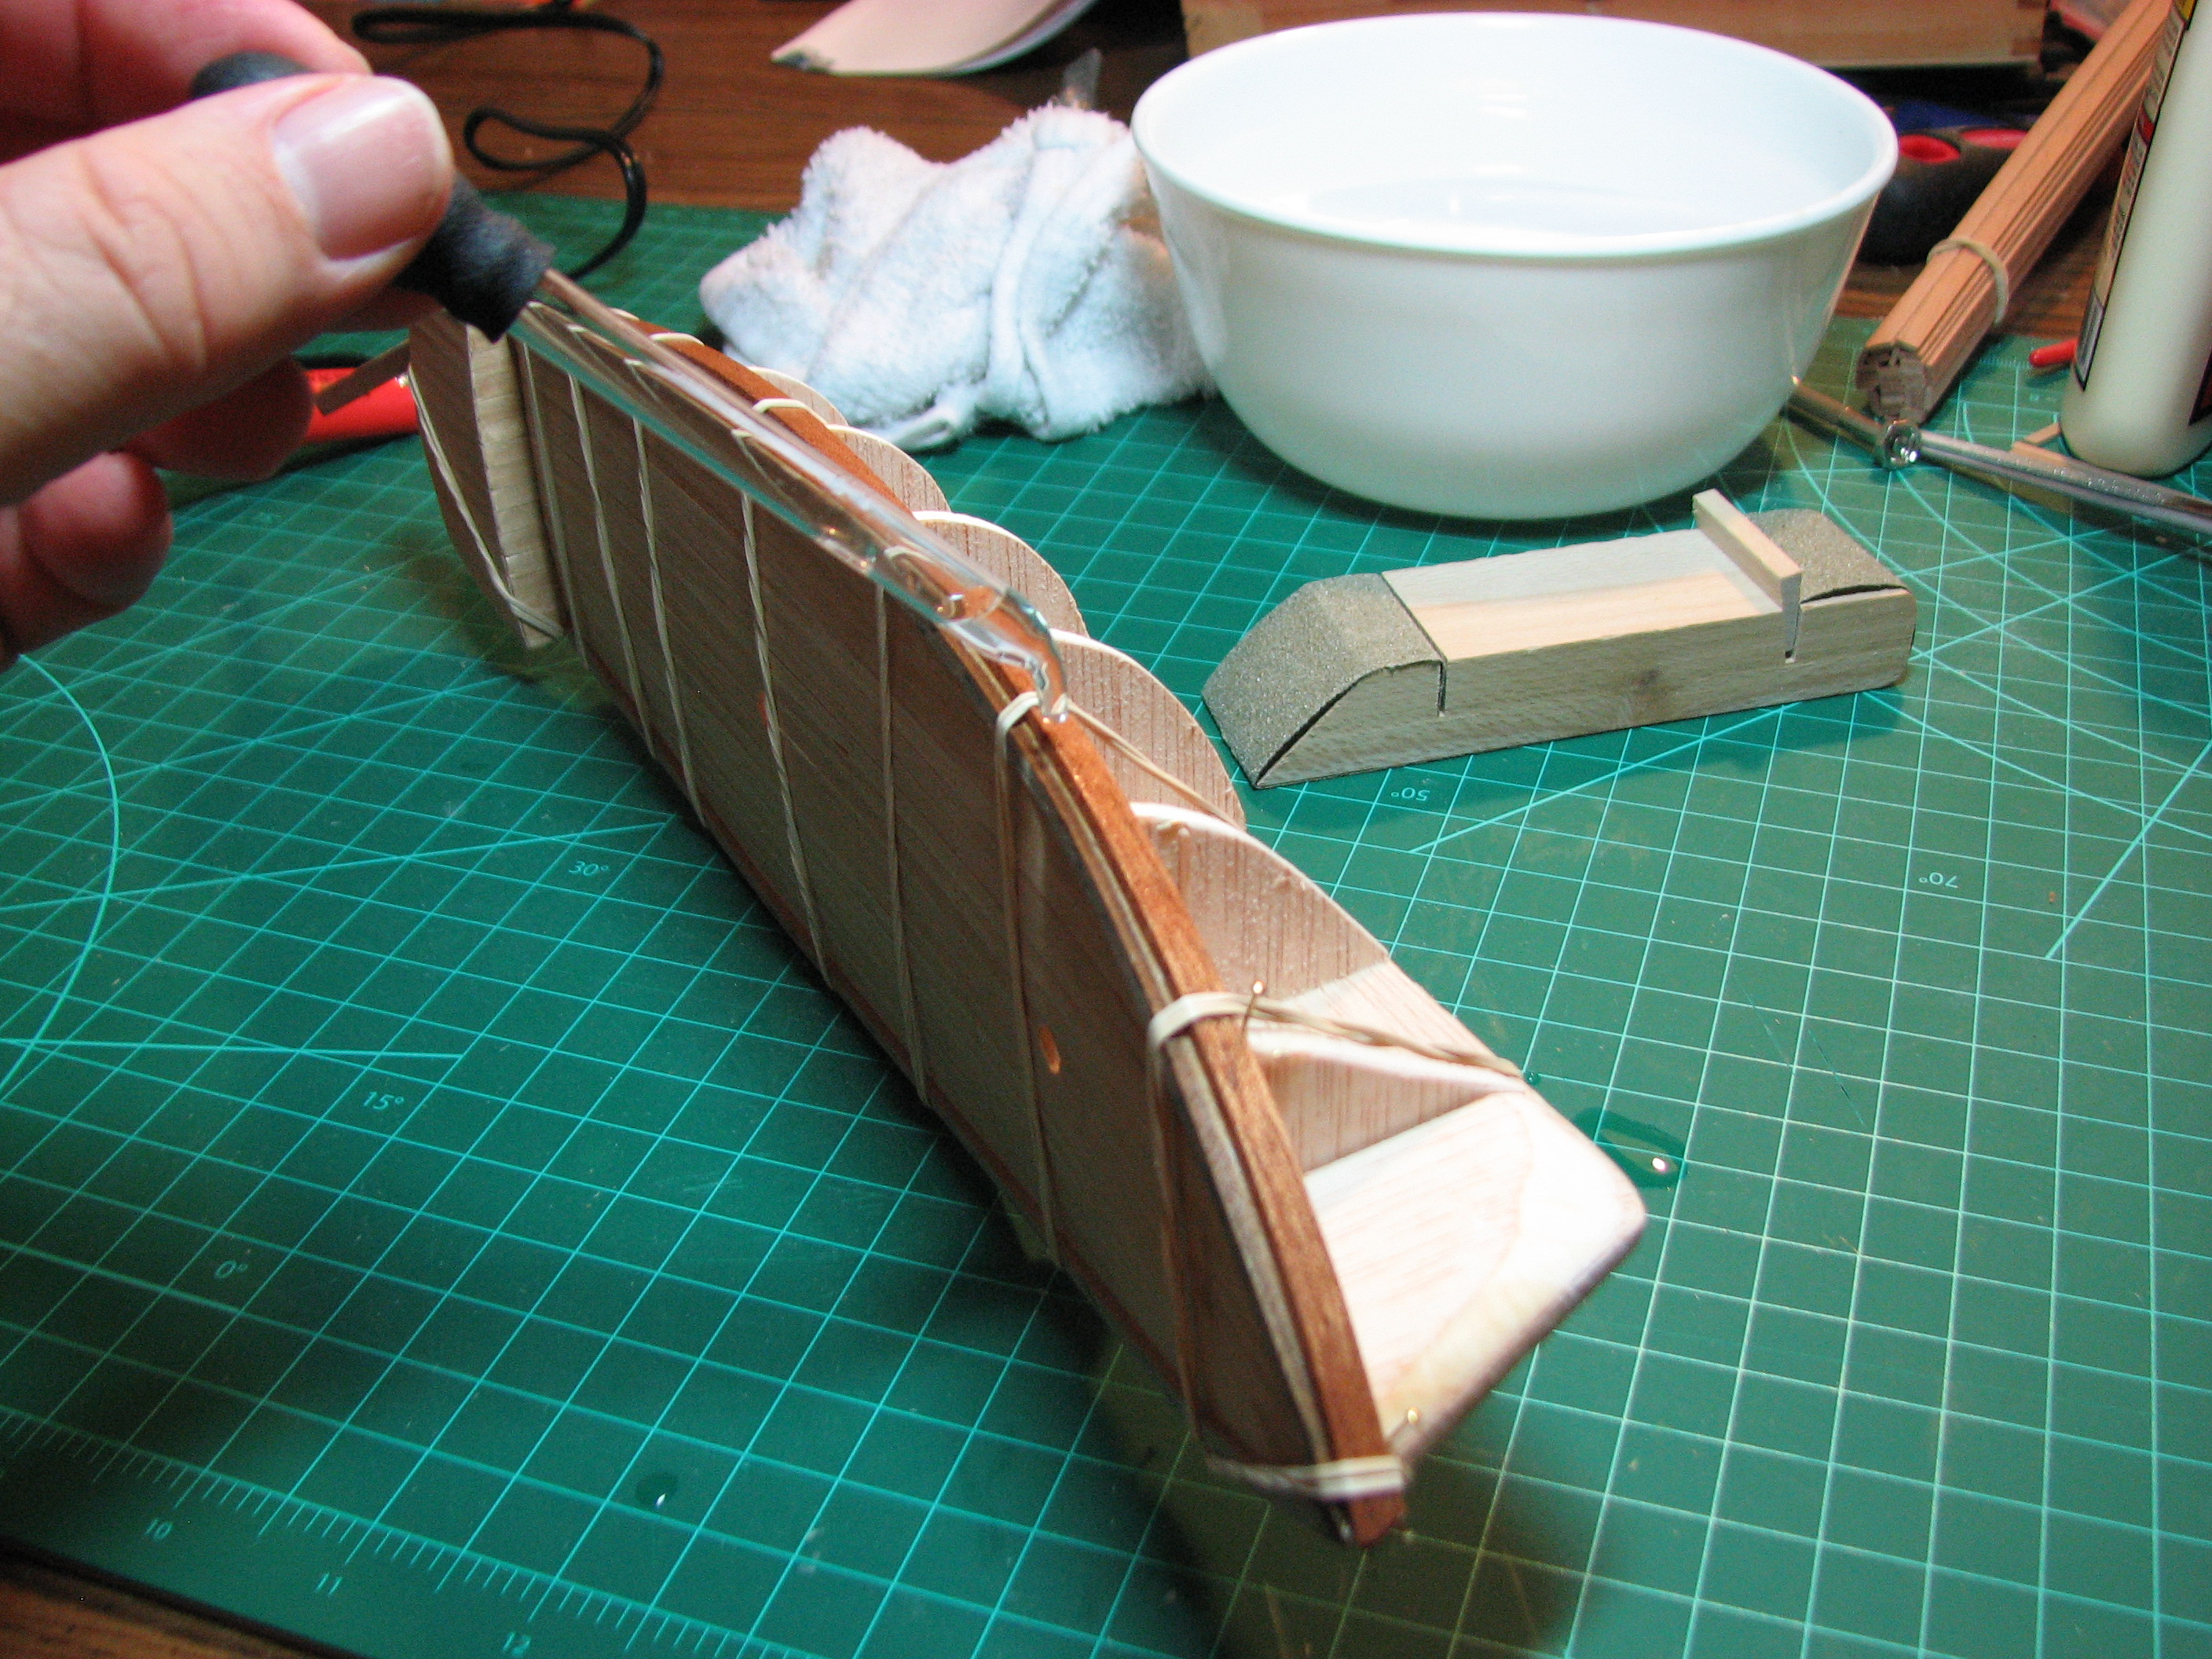 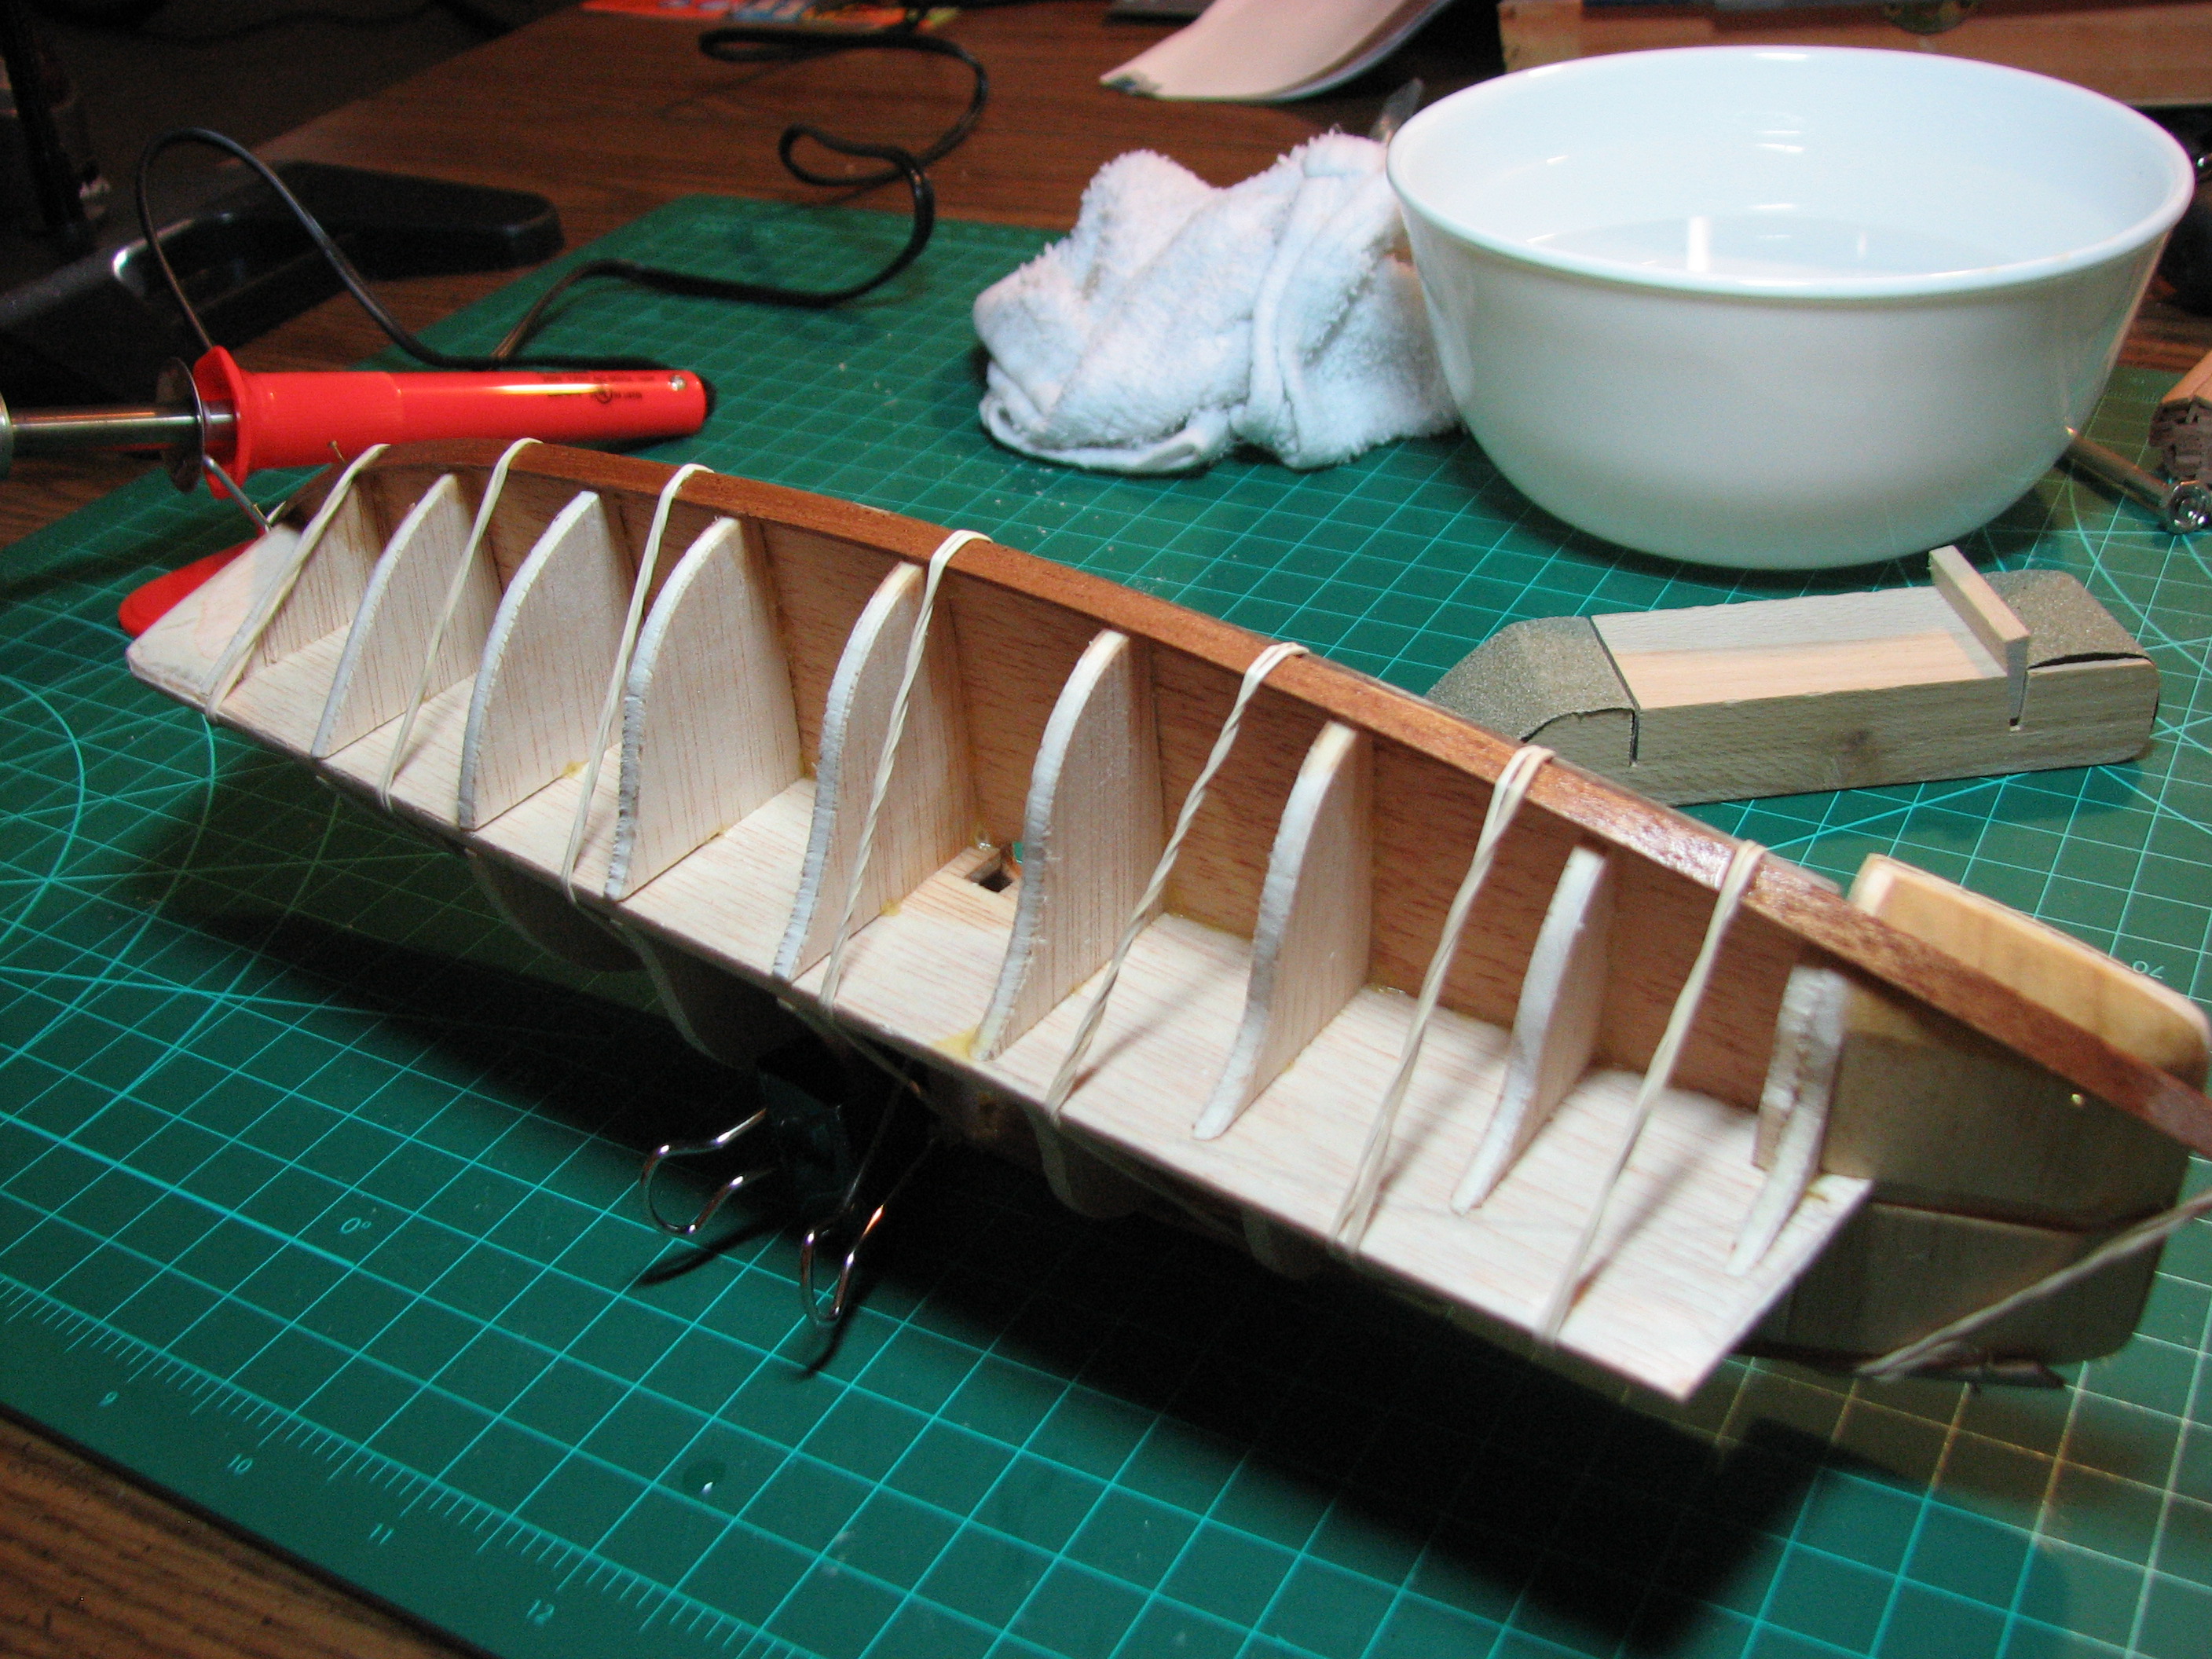 And finally, the 2nd plank glued in place and held with the rubber bands. You can see where I used some nails to allow the bands to pull at odd angles on the ends to hold the plank up against the stem and stern. 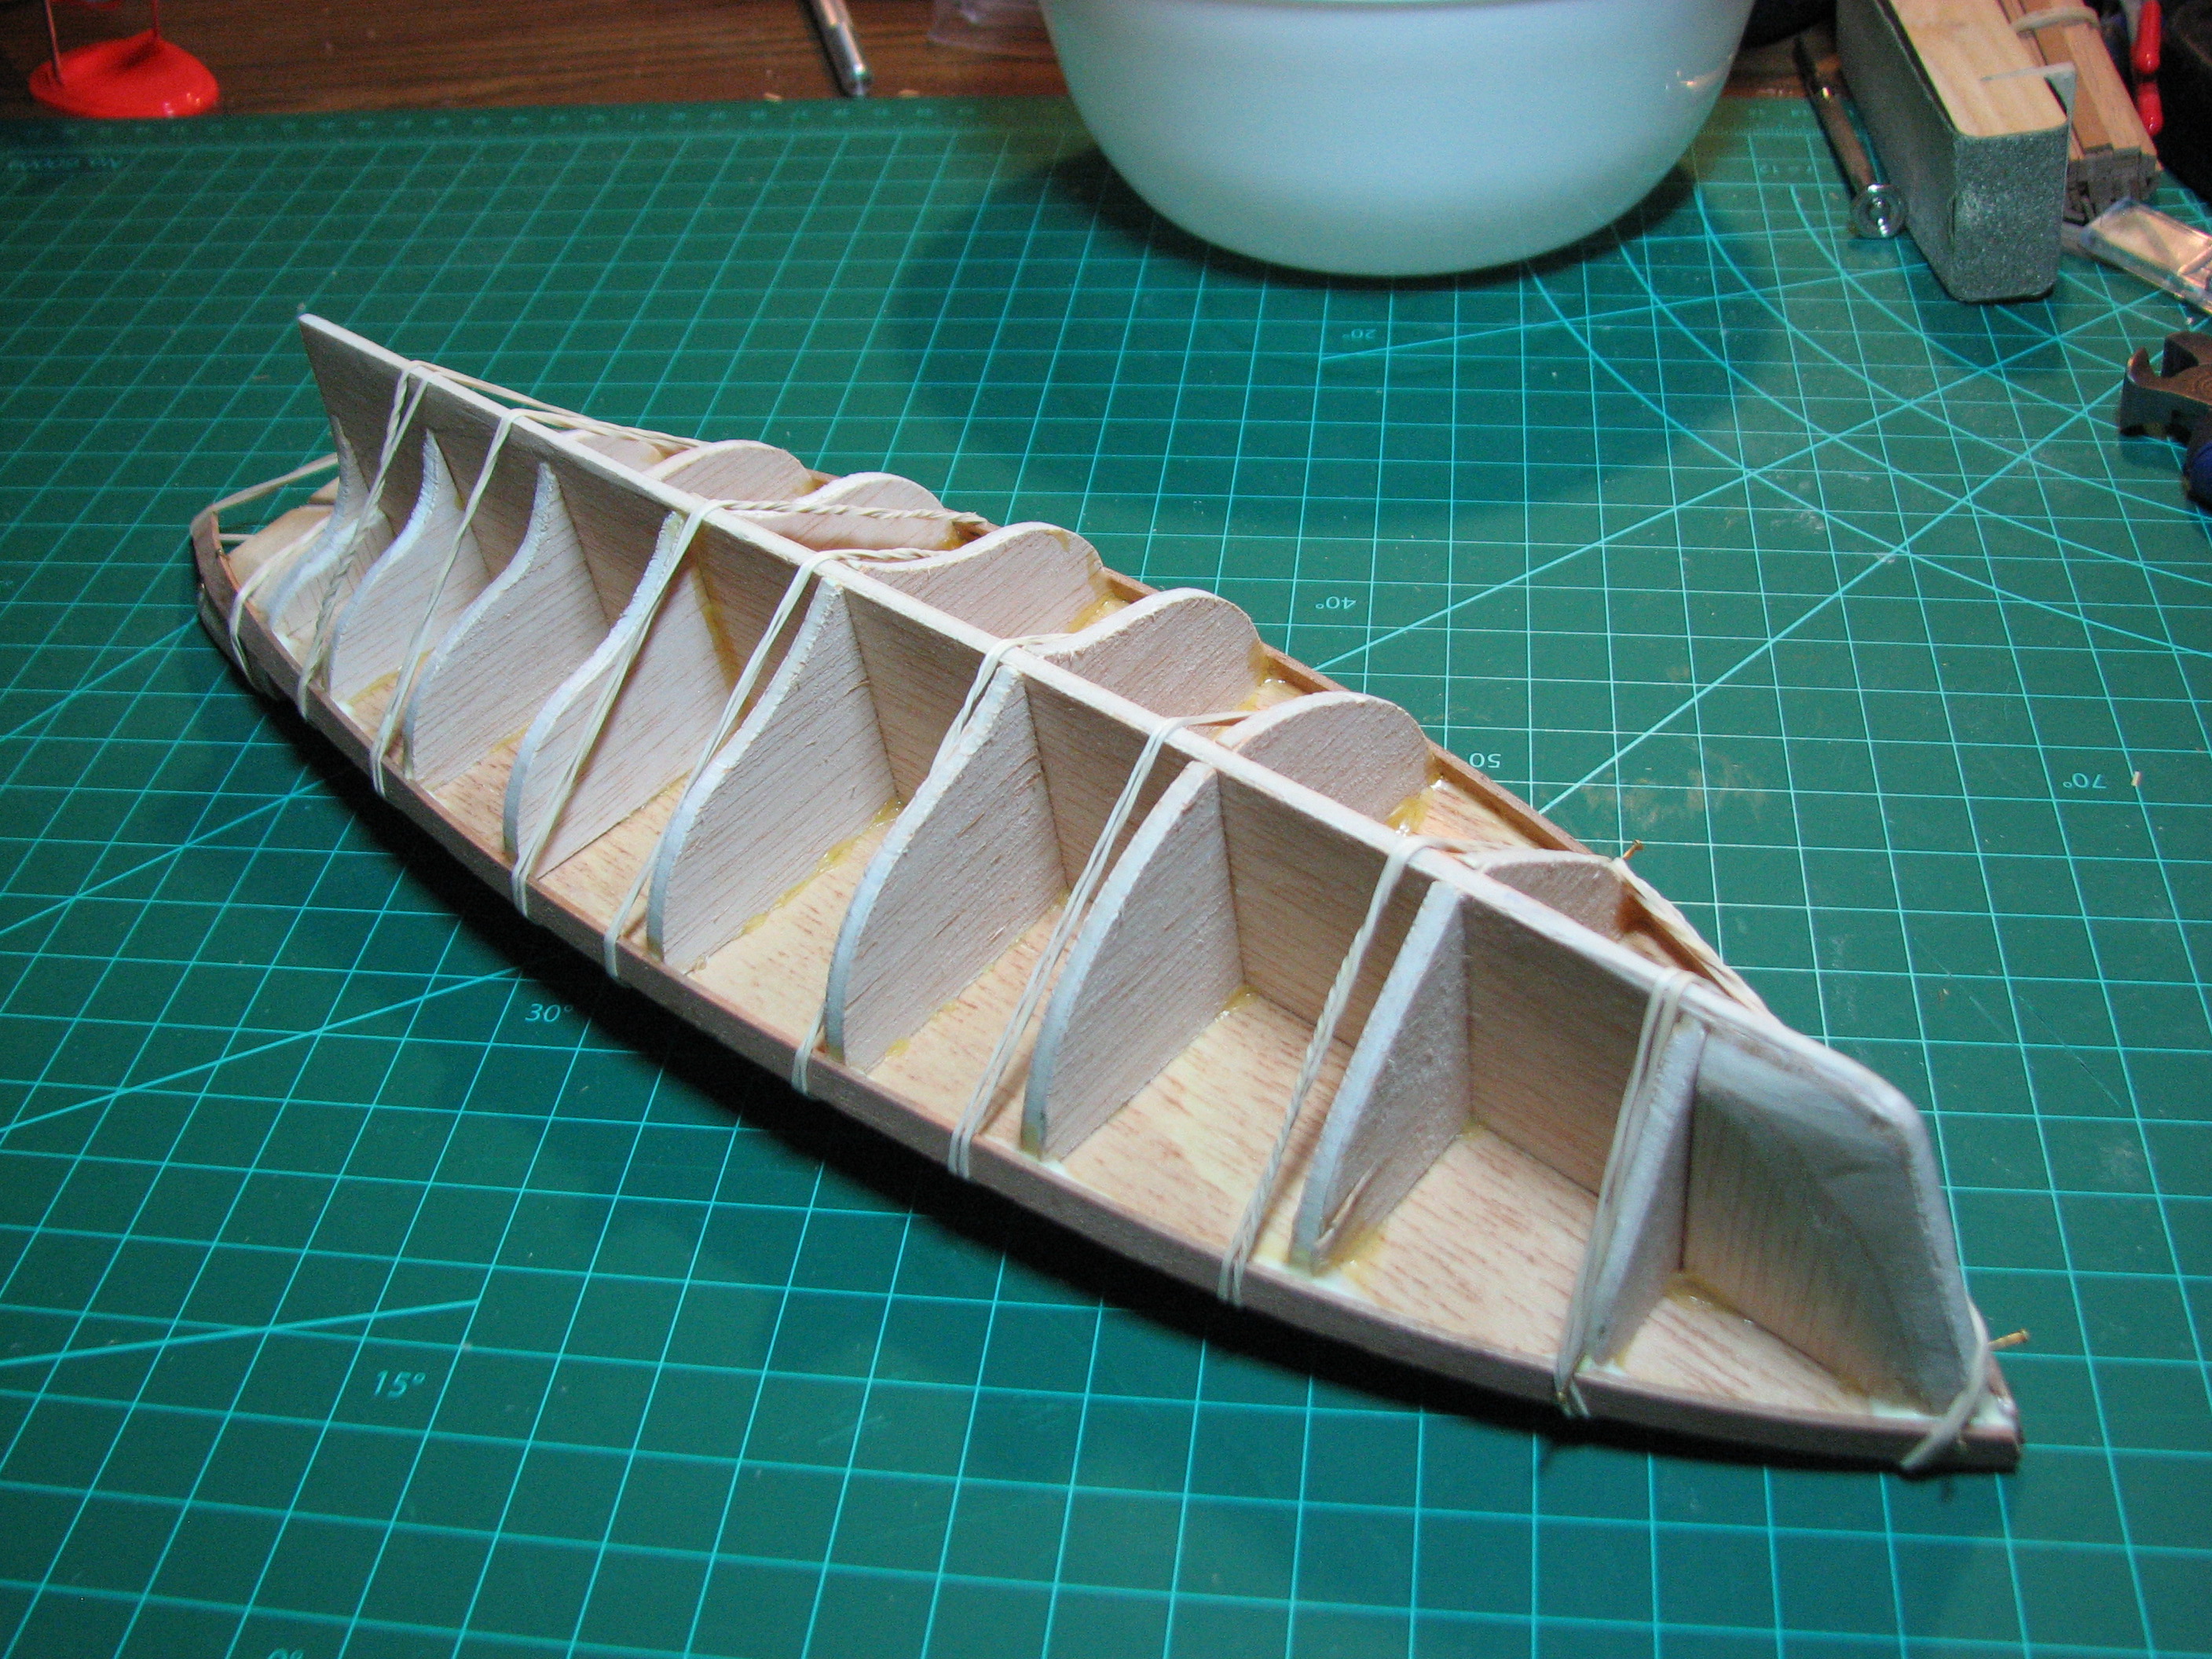 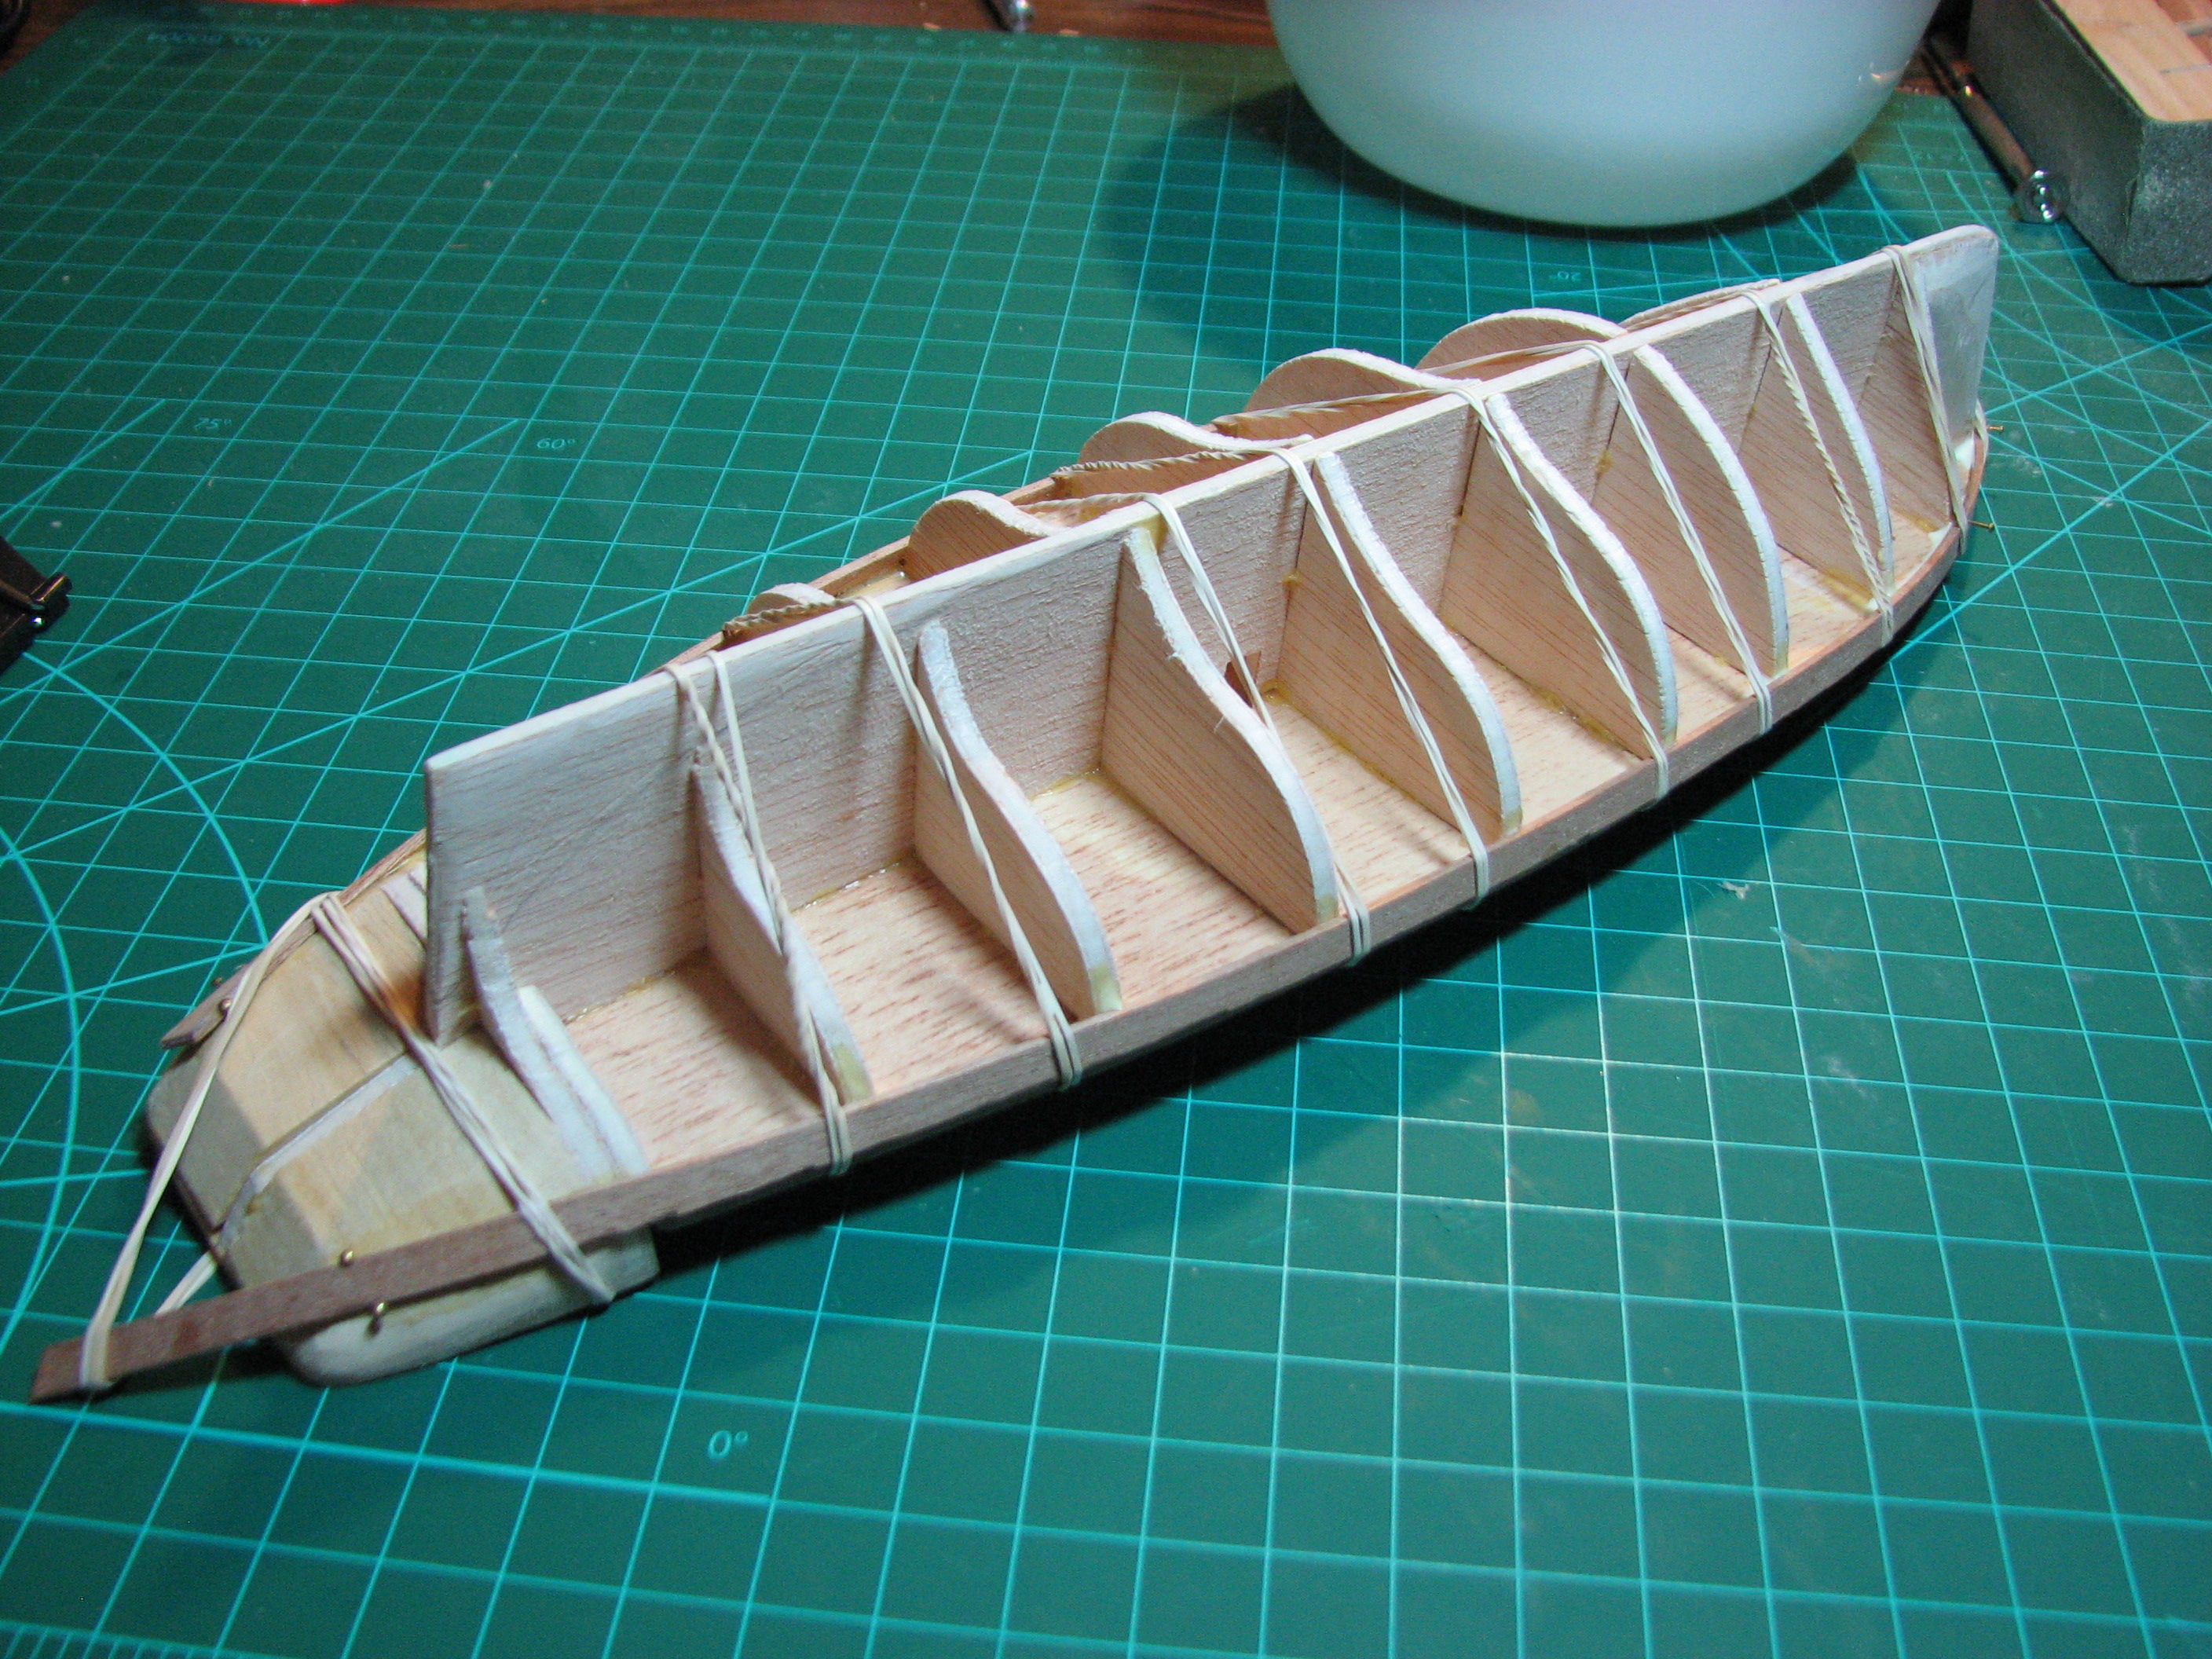 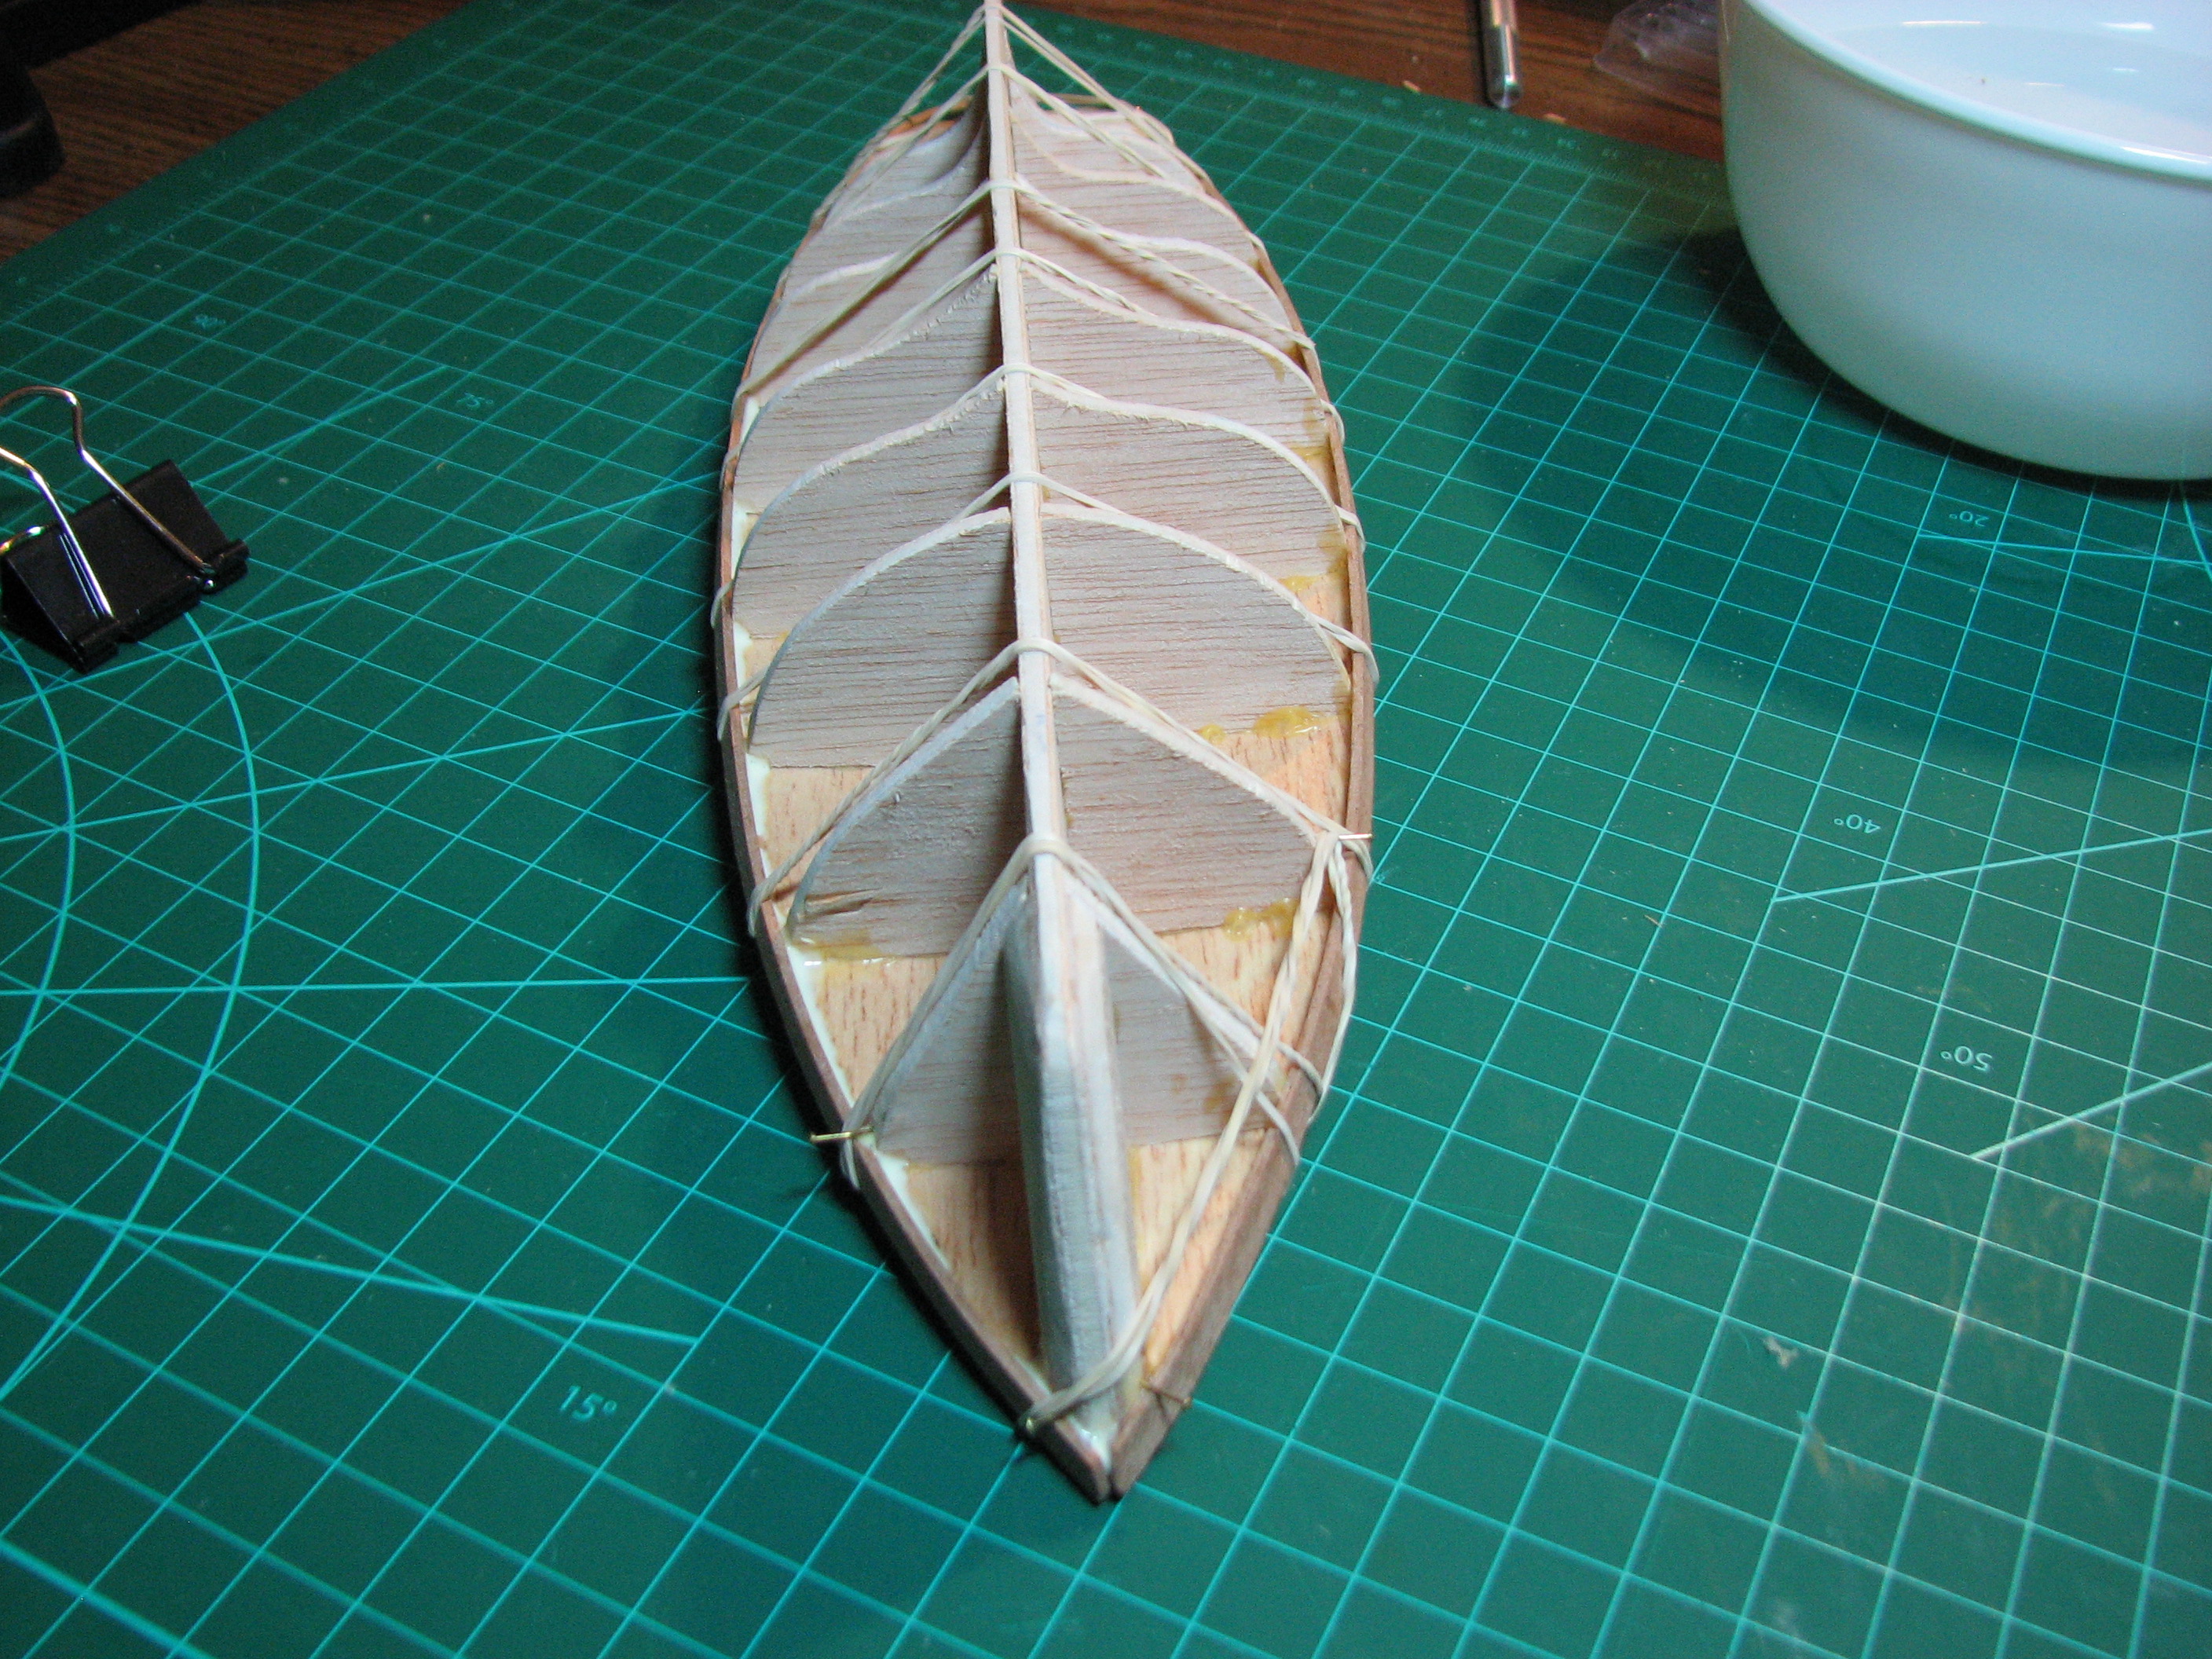 The planking will continue this way for quite a while. On a normal work-day I doubt I'll get more than a single plank on per night. Maybe two if I end up nailing instead of rubber banding. Since I've got meetings 2 nights this week, the pace will obviously be slow. It looks like there are 13 planks per side to complete, but that doesn't take into account all the trimming and inserts I'll need as the hull shape causes strange things to happen at the stern as I move down the hull. So 2 weeks? Maybe more, to do the hull planking.
|
|
#
¿
Aug 18, 2014 02:43
|
|
|
Dielectric posted:Model Expo has some nifty clamps for planking. If you're handy you might be able to replicate the general action: Those clamps are neat. I have an idea on how to make my cheapo Office Depot clamps work like this with some superglue and sticks. Edit: Ghetto clamps are bloody awesome. Took a wooden tongue depressor type stick (hobby sticks, whatever they are actually called), chopped it up into pieces, applied super glue and stuck them into binder clips. Bam.. plank clamps! Thank you so much for the link to give me the concept. 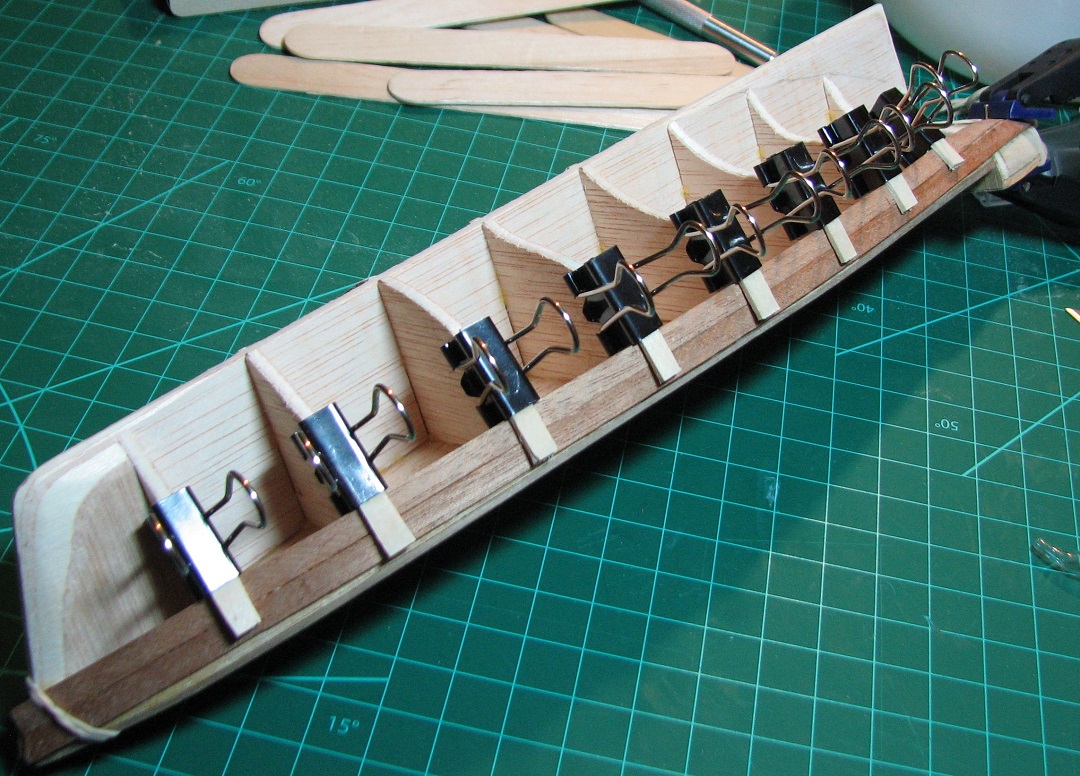 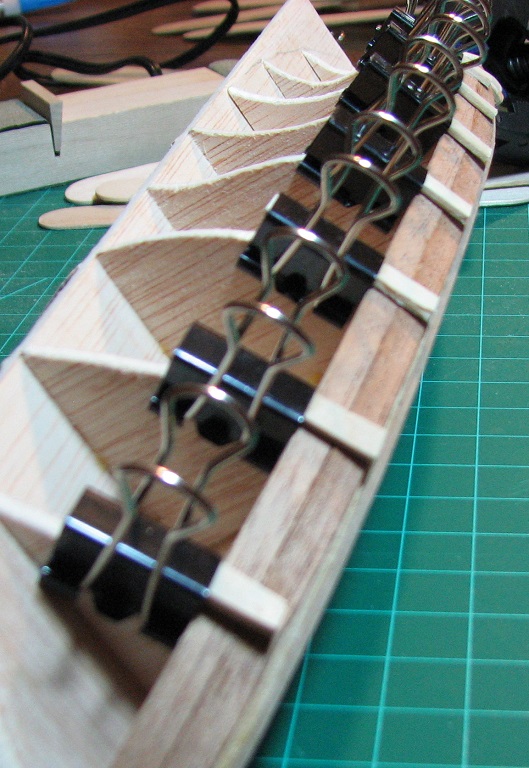 Also, what is the "CA" hull finish you mention? The Locator fucked around with this message at 04:48 on Aug 19, 2014 |
|
#
¿
Aug 19, 2014 03:14
|
|
|
T1g4h posted:Super jealous of that Fw-190, love those planes. I keep thinking it'd be fun to put together a P-38 Lightning kit, as they're seriously my favorite plane of all time alongside the P-61 Black Widow and A-10, but you guys have seen my painting skills, I'd never be able to do one justice You can make smaller airplane models (I did mostly 1/72 scale stuff) look really good at anything other than up-close inspection distance with free-hand air-brushing. If the model itself is clean, it's really hard to screw up a basic airbrush job, even if you want to do a camo pattern. Hang the model from the tail-wheel (I used bent paper-clips) and spray the top with the top color or camo pattern, then change to your under-color and paint the bottom. Even if it's not perfect, it looks great to the average person. Downside - you need an airbrush, so there is a monetary barrier to this.
|
|
#
¿
Aug 21, 2014 02:40
|
|

|
Nebakenezzer posted:I've actually seen people (in magazines) double down on this strategy - they scan the instructions, then blow them up to make them the same size as the subject. Then, they cut out the camo bits and use them as a mask. I'm not sure if that's just being fancy for no reason. Most of the camo patterns that I painted were WWII era aircraft, and they were 'soft' camo, in that the edges were all fuzzy and blended into the next color. Masking would make the pattern look wrong. Like this:  A decent airbrush can easily make the edges feathered even less than this, although I tended to go with a 'softer' edge myself. Sadly I no longer have any of the aircraft, or any pictures of them because I've never been a 'picture taker' type for whatever reason. The only masking I did was areas that weren't supposed to get the paint. Edit: Changed link to my own hosting. The Locator fucked around with this message at 05:59 on Aug 21, 2014 |
|
#
¿
Aug 21, 2014 05:56
|
|
|
So I decided that the boat project probably can't live on the kitchen table for the months it will likely take to complete, so I got a new work-bench. Took a day off of boat building and put it together and moved all the crap over to it. 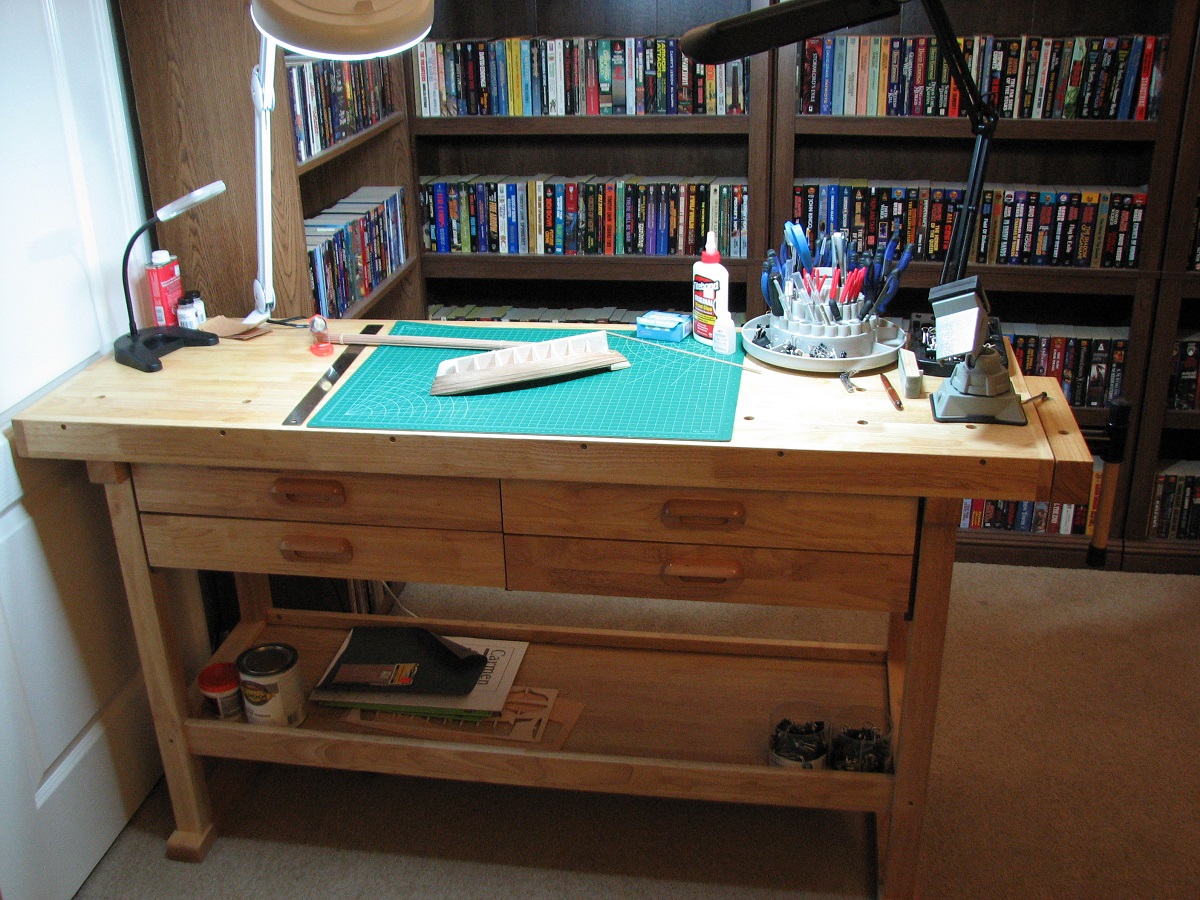 Living in the library/office for now, eventually I need to clean out the room my reloading bench lives in, and turn that room into a hobby room. Bonus is it would allow me to actually start reloading again, since right now the room is just a storage room and is too full of crap to use the reloading bench. Back to small scale wood working tomorrow. The Locator fucked around with this message at 09:53 on Aug 23, 2014 |
|
#
¿
Aug 23, 2014 09:51
|
|
|
T1g4h posted:That's pretty rad looking! What's the tower bit on the right? It looks cool. Scratch building is amazing to me. As someone who can't draw a straight line to save his life, watching that guy do the free-hand scribing of the seats was pretty much like watching voodoo or pure loving magic. The entire process of creating that thing with nothing but a photograph for plans.. just astounding to me. Thanks for linking it.
|
|
#
¿
Aug 24, 2014 04:53
|
|
|
Last stealer (plank cut to a wedge to fill a gap at the stern) set and drying on this side of the hull. Bottom half of the other side still to go. I screwed up how the planks were laid, so ended up having to do a lot of little filler planks in the middle, when that should have been happening at the ends, so it's a little rough, but I think most of it will fill and sand well and look ok when it's done. 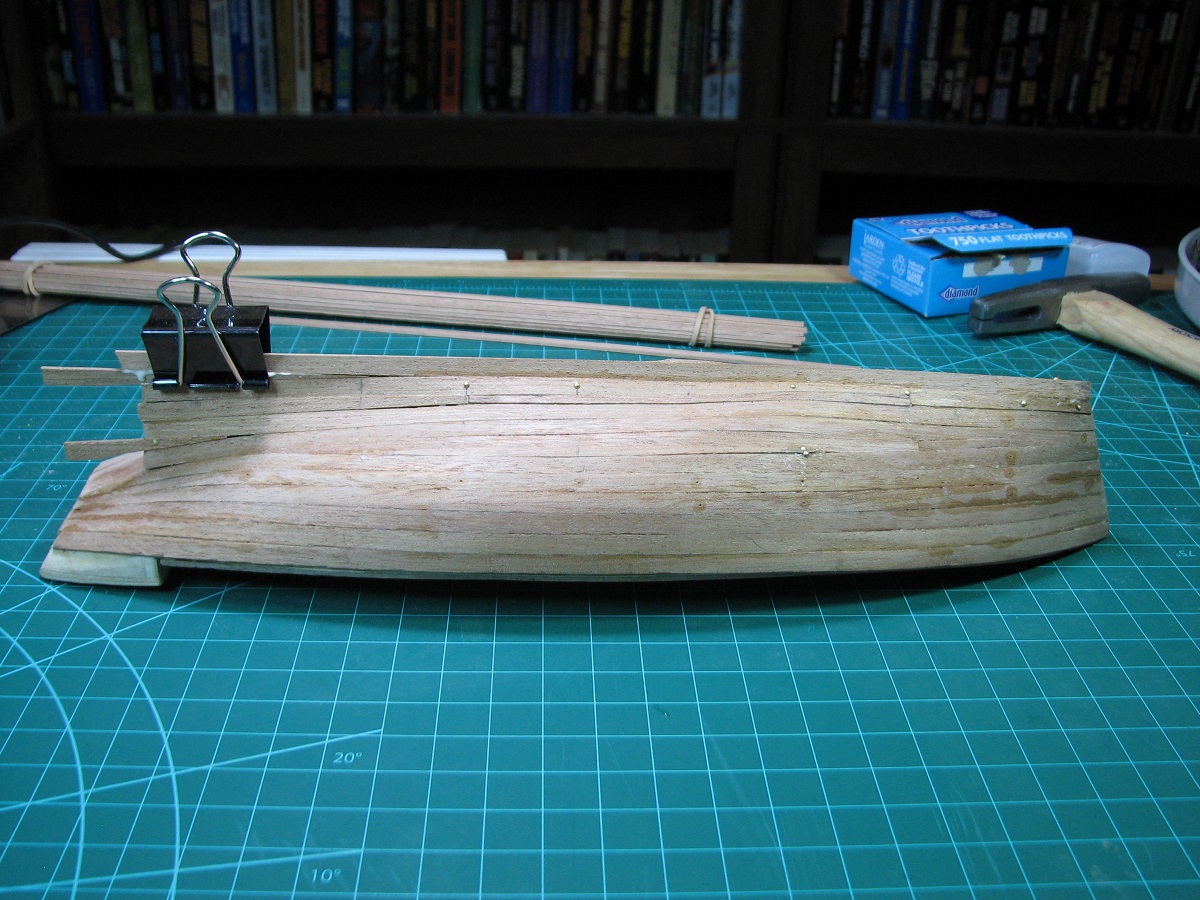
|
|
#
¿
Aug 25, 2014 05:31
|
|
|
Bloody Hedgehog posted:Looking good! The rigging scared me away from one of the square riggers for my first project. Also the guns add another layer of complexity as well. On the other hand, the small size coupled with the weird compound curve of the schooner hull has been a real challenge for me, and a larger model might actually be easier (although more time consuming due to size) to get the hull planking right.
|
|
#
¿
Aug 25, 2014 05:54
|
|
|
Boat update. This was about the point where I realized that I should have been narrowing the planks at the stem starting with the second plank, due to how many more plank widths are needed in the middle of the hull vs. the stem and stern. Woops, not nearly enough space left to fix that. Another lesson learned. 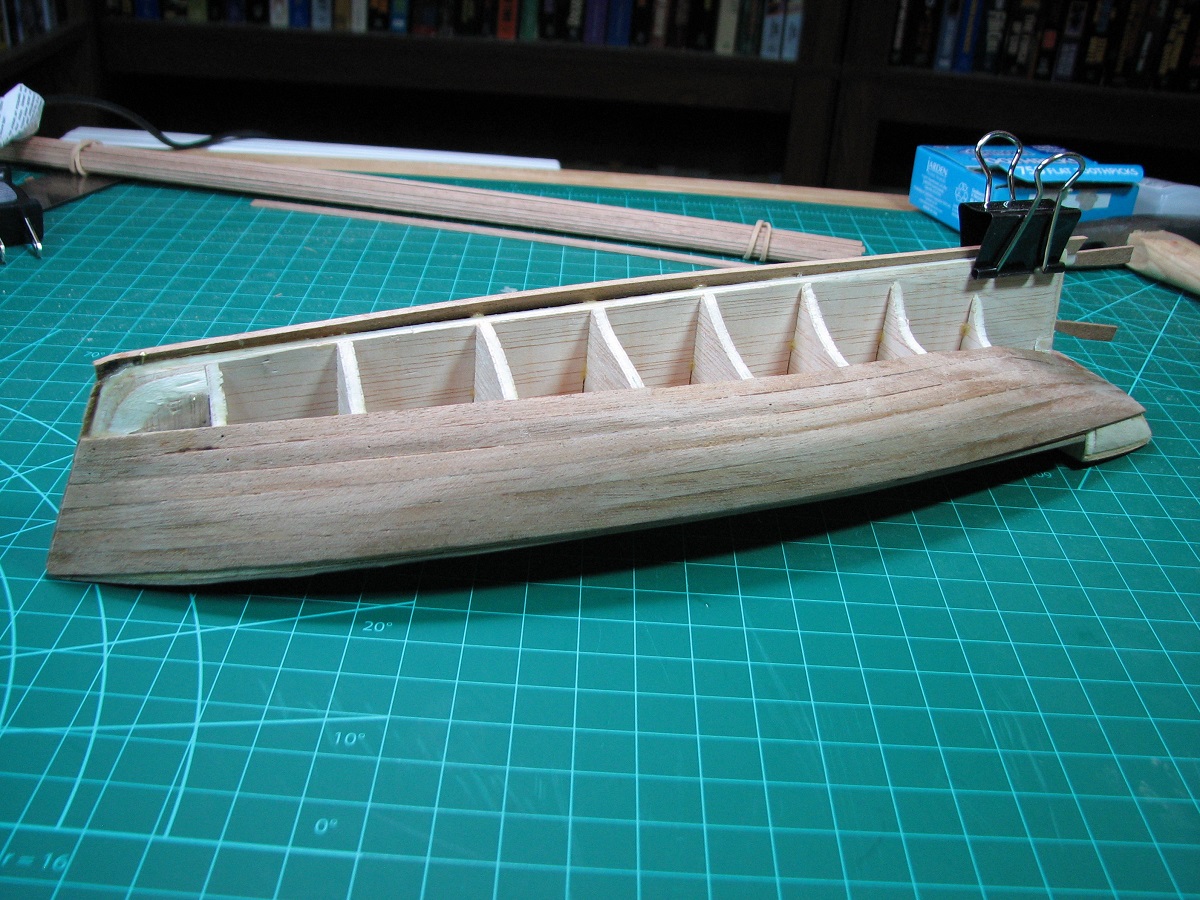 I just 'faked' it as best I could, using inserts and stealers (wedged added at the stern) until I had it all closed up. Pretty ugly, but I certainly learned a lot of things not to do when planking. Any other prospective boat builders can learn from my mess. 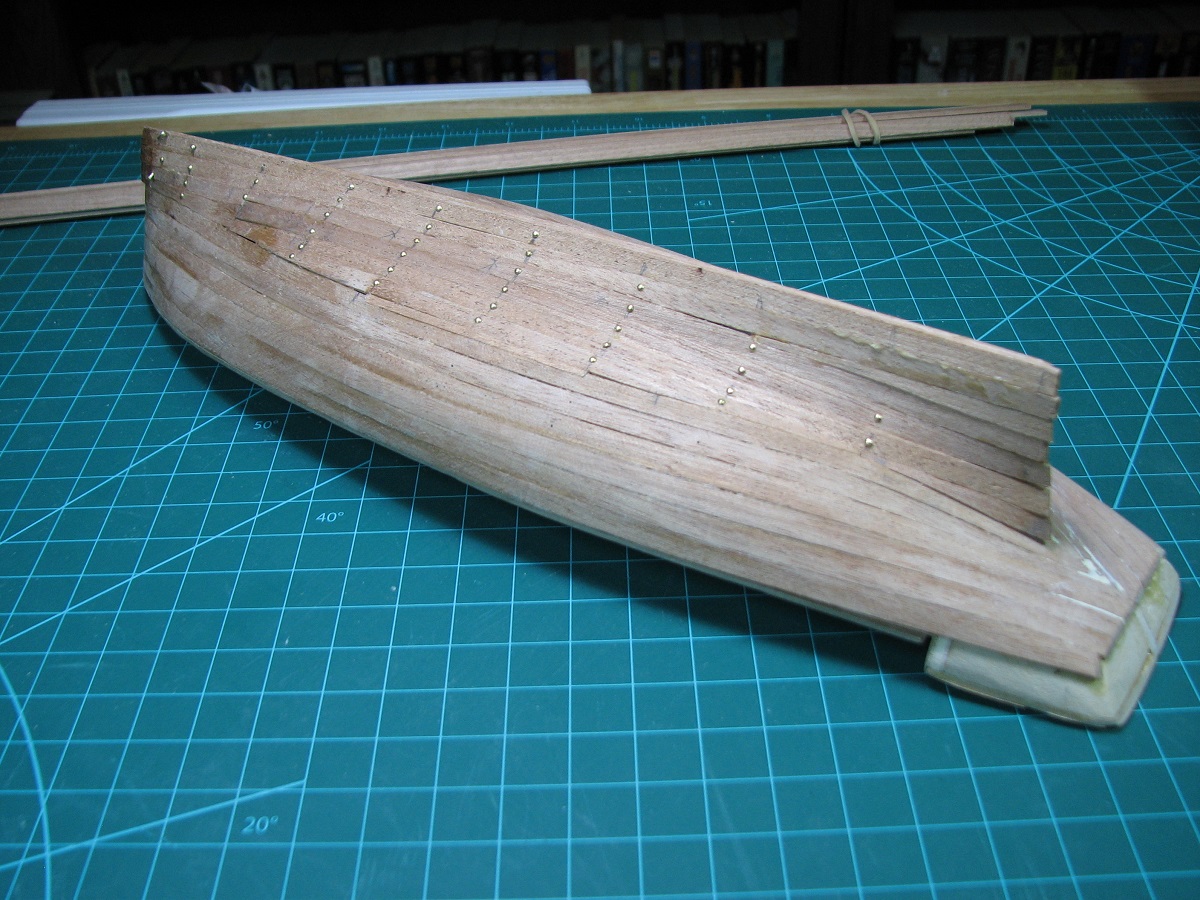 I sanded it down, used some wood putty on the gaps I couldn't otherwise fix, and sanded again. 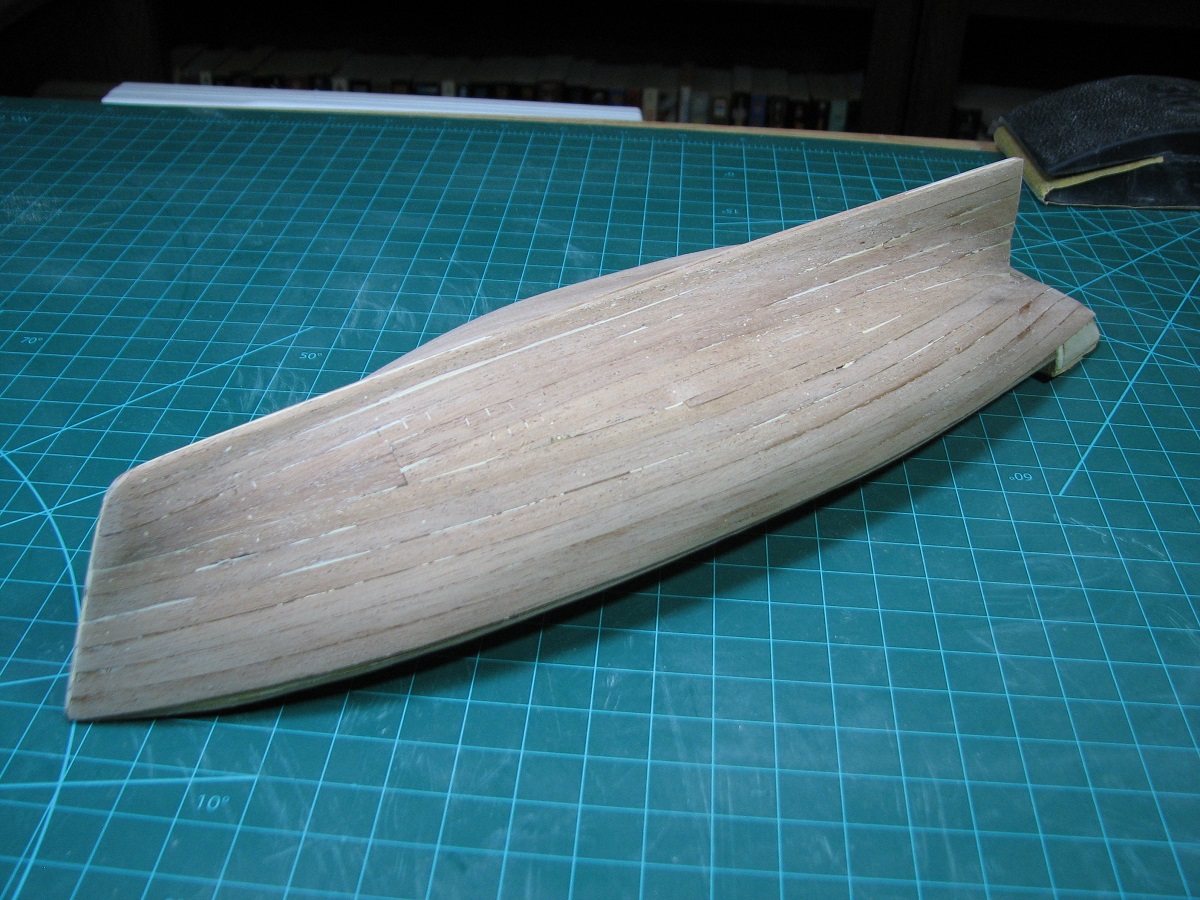 Figuring that there is no better time than the present to find out if it will work as natural wood, or will need to be painted, I went ahead and prepped it and varnished. 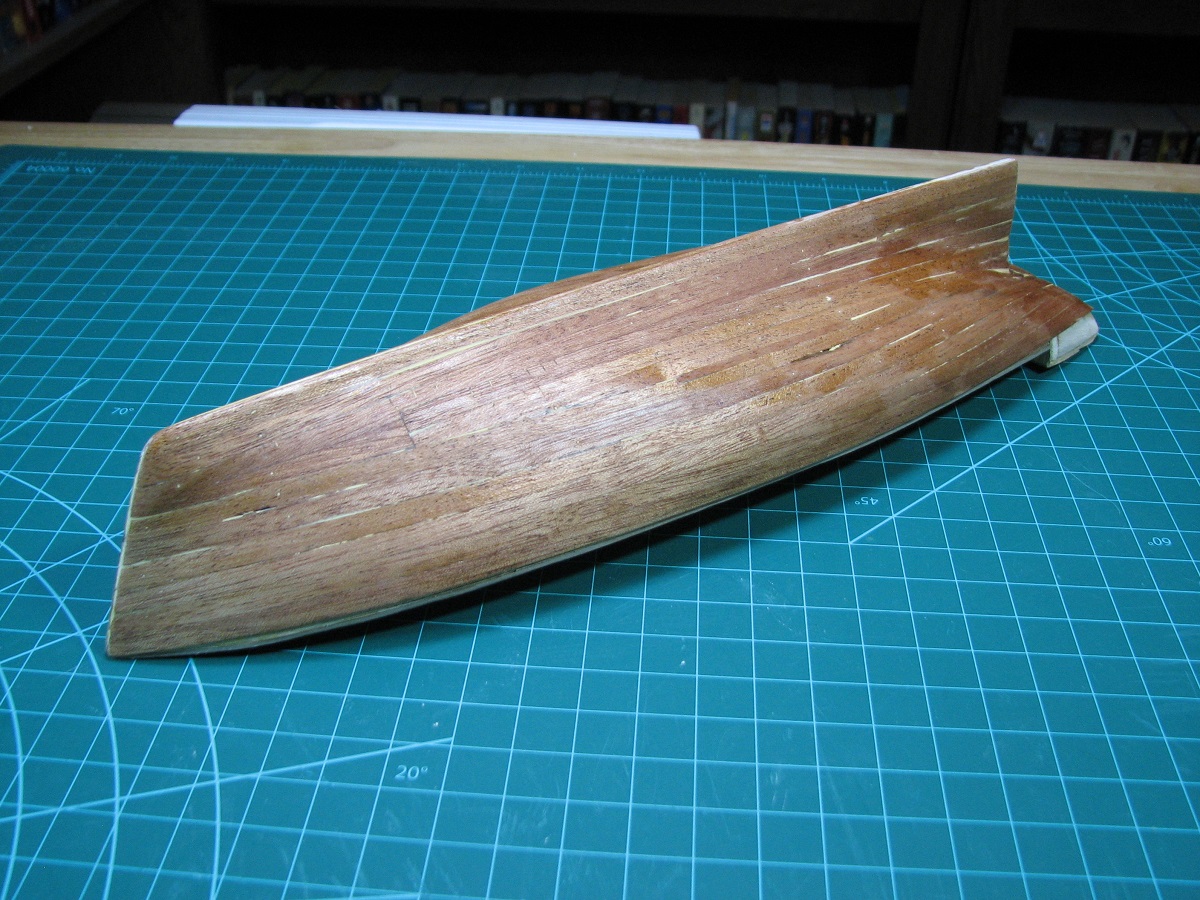 Paint it is! The wood putty I used shows up glaringly here as you can see. If it wasn't for that I think I'd go ahead and leave it natural, even with the planking blemishes, but I don't know of any way to make the putty issue go away other than sand it down and paint it. From a hull/planking perspective, I wonder if a larger model wouldn't actually be easier. While it would be more time consuming, the larger number of planks, and their size relative to the hull size would make the bends less severe, and require less spiling on each plank to make everything work I would think. The other solution of course would be to double plank it, but I think I'll just go with paint on this one, as the entire point of this project for me was to learn about the entire model ship building process, and to determine if it's something I want to take on as a long-term hobby. So far I'm certainly enjoying the process, and I think I'll just keep moving forward, blemishes and all and see where it takes me. Tackling the poor alignment of the top plank vs. the deck line for the bulkheads is next.
|
|
#
¿
Aug 28, 2014 01:02
|
|
|
Bloody Hedgehog posted:I think you should still go for the double-planking. The second planking goes much quicker than the first, since you've already figured out the layout of the planks, you're just duplicating your work. It gives you a chance to correct mistakes and make things perfect too, so they payoff in the end will be huge. It's not actually a double planked model. I'd need to order planking from somewhere, and then I'd need to figure out how to blend the extra thickness into the bulwarks. Also, I haven't really figured out the right layout for this hull, which is why it's all kinds of messed up. We'll see what happens down the road, this model is pretty simple, so there will not be anything that would prevent another layer of planking later on, I'd just need to pull the stern planking to do it which is a pretty minimal area.
|
|
#
¿
Aug 28, 2014 03:23
|
|
|
KV-5, best ramming tank.  The boat saga continues. I attached the bulwarks above the hull planking, it was pretty straightforward, although for a pre-cut piece it still didn't want to bend around the hull shape. While I was sanding, I got the hull really thin in one spot, and didn't know it, until I accidentally punched a hole in it. Oops. I filed out the entire plank for a full bulkhead span and replaced it and it worked pretty well. Then moved onto planking the bulkheads, where I found a new use for alligator clamps. 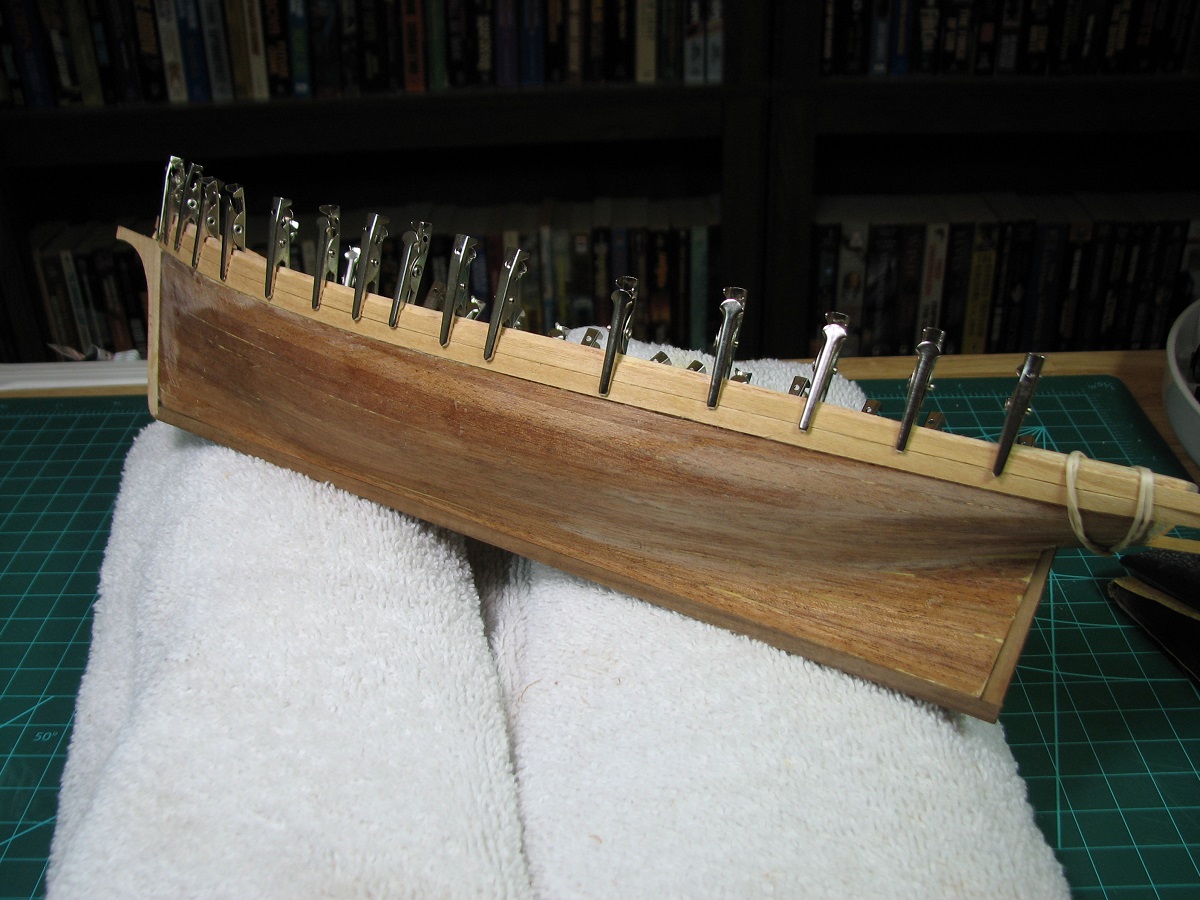  Below the bulwarks a square plank gets added. This is the guard rail. Battery clamps and rubber bands! 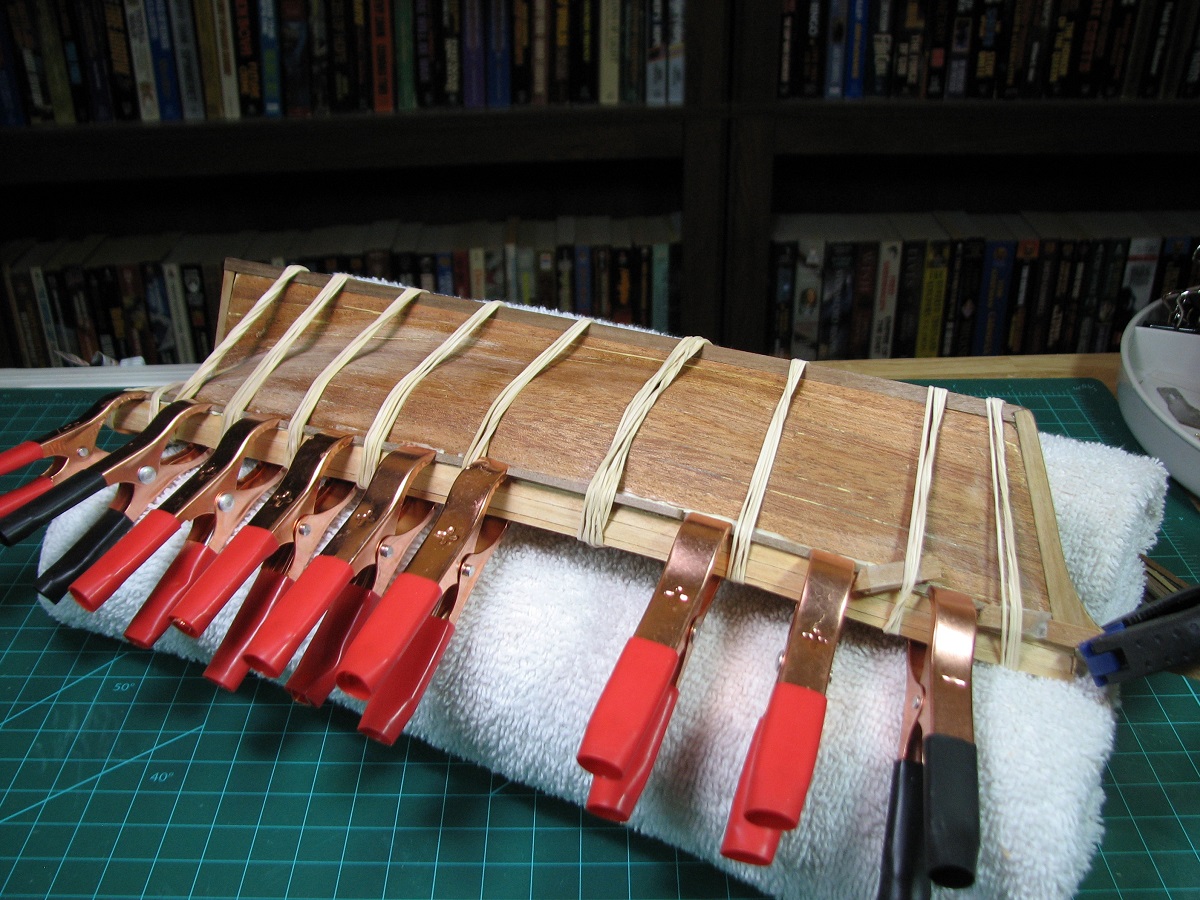 Then I got to cut out 28 'rough timber' pieces to go inside the bulwarks. These are 1mm x 2mm x 7.5mm. The spacing wasn't working out quite right and I had to re-measure the locations for these dumb things 4 times. Thank god for a digital caliper. 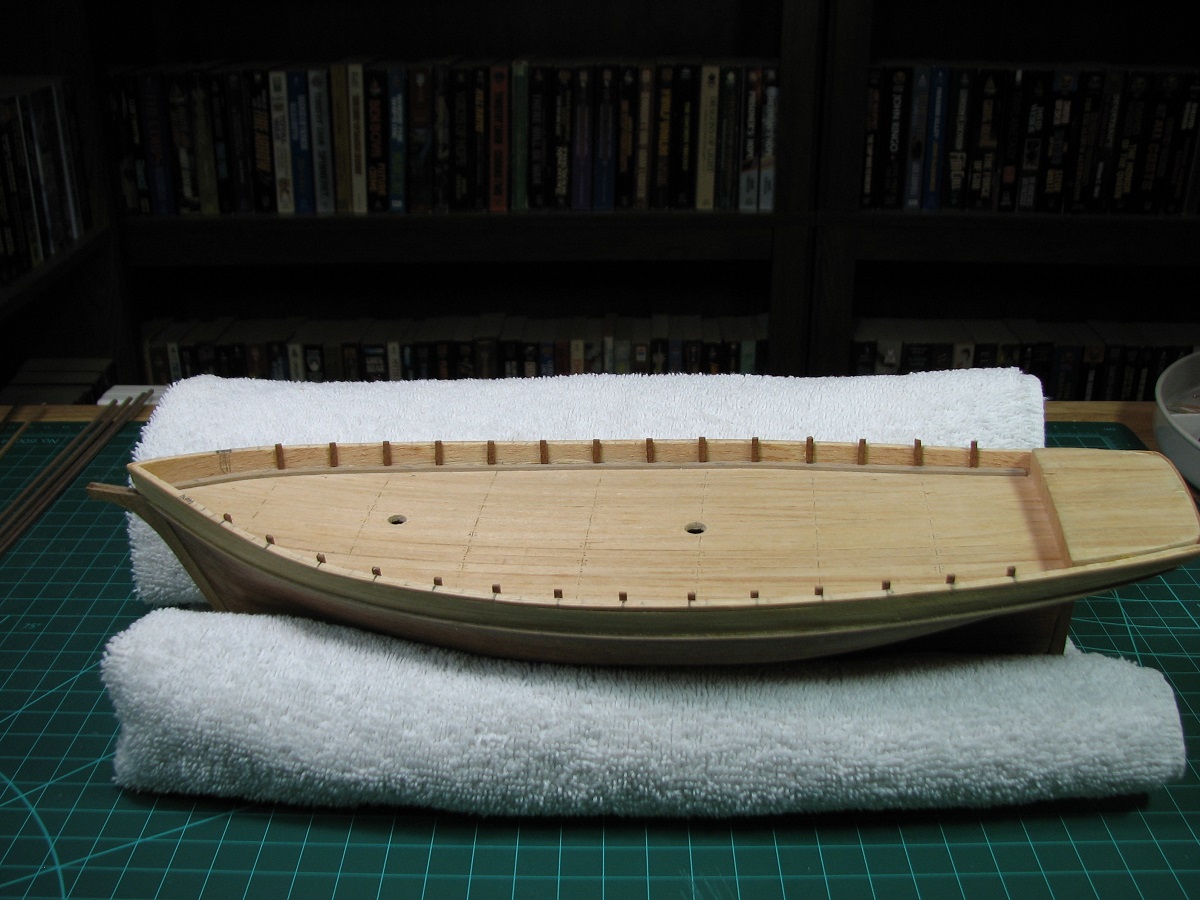 After these timbers dry, they get trimmed down to even with the top of the bulwarks. Then, a 2 piece gallant rail is placed on top of them (1 piece on top, one piece hangs outside). I was having trouble getting the bow to stay together, as I really couldn't get a good clamping there, so I 'pinned it'. First I took one of the little brass planking nails and cut the tip and head off, then cut it in half. Pins! 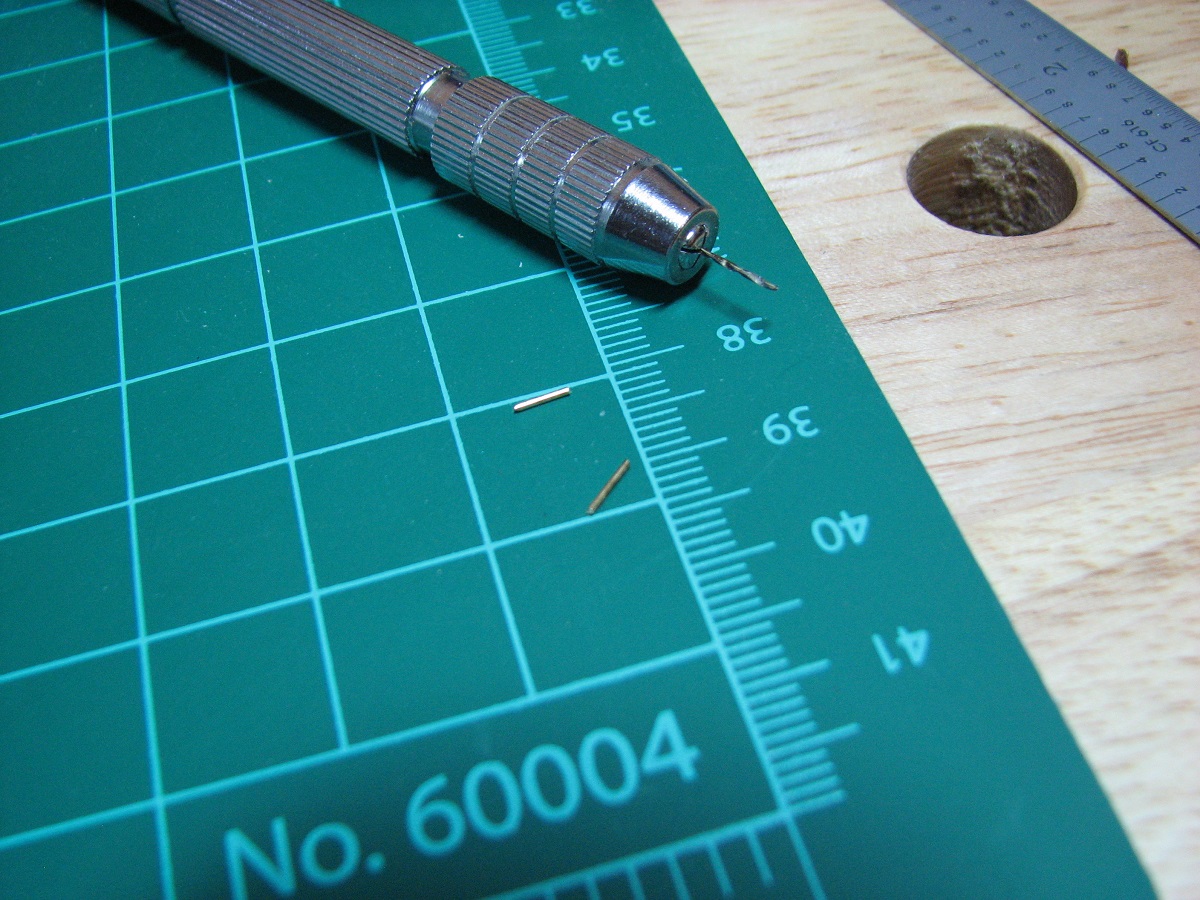 Then I used the tiny drill from that photo, drilled a hole in the bulkhead. 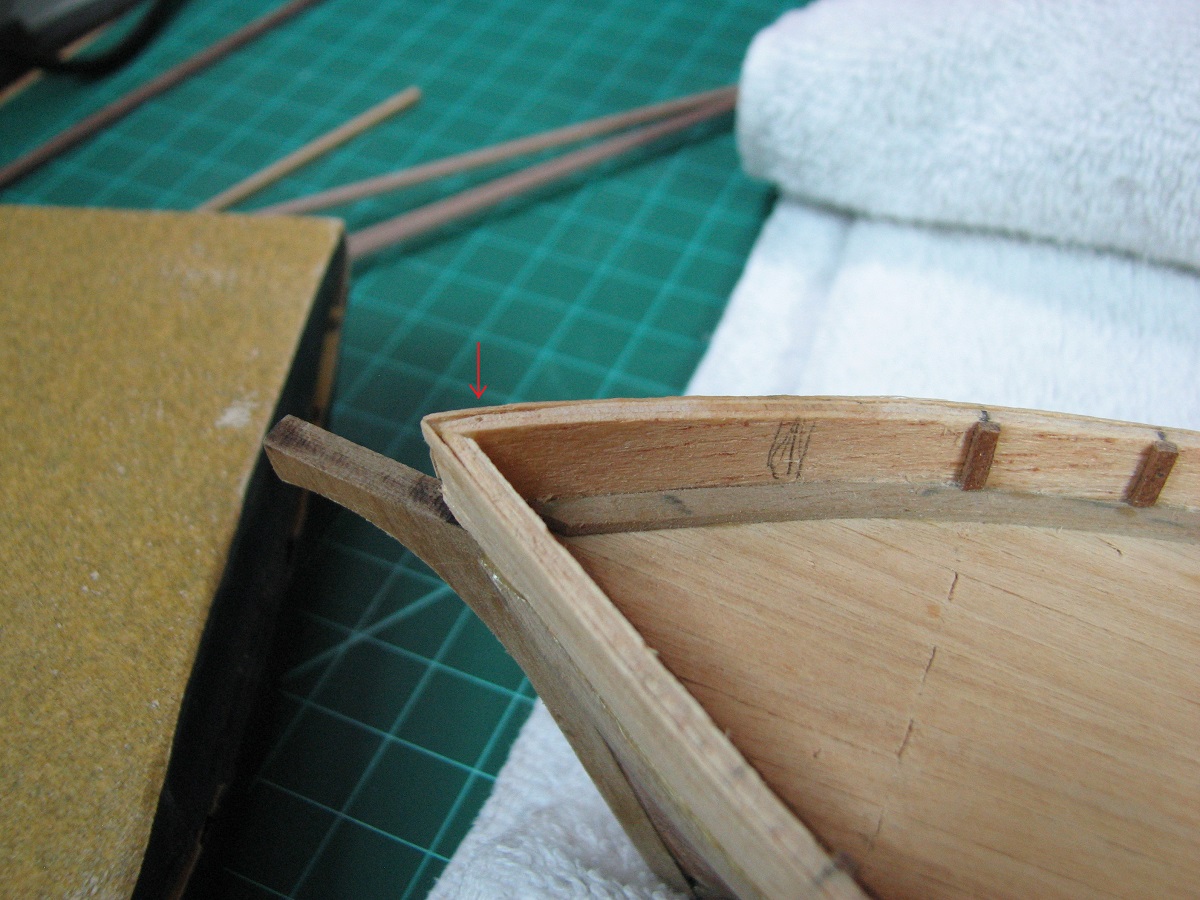 And a hole in the gallant rail itself, where I glued the pin. The gallant rail is a 2mm x 2mm plank. Fuzzy picture and I only took one. 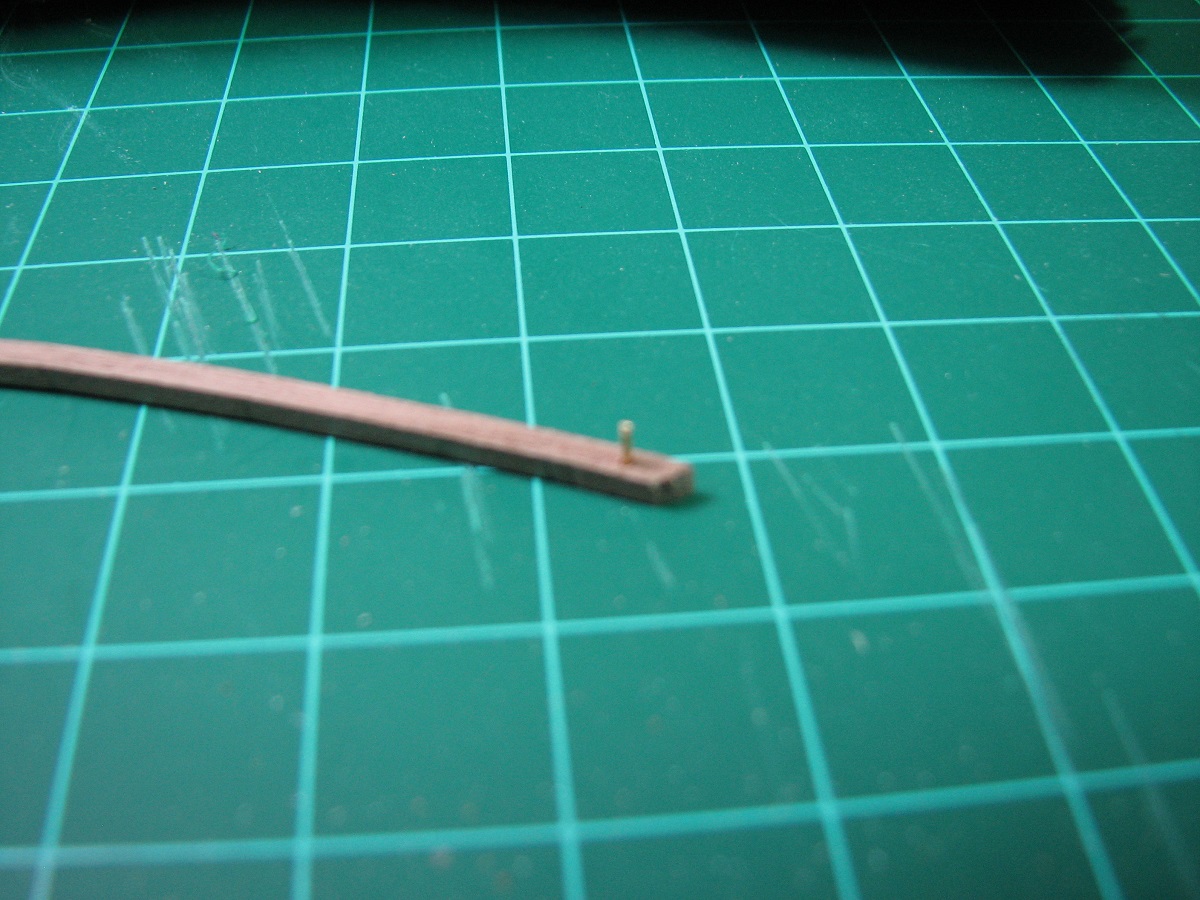 Worked great though, pins held the bow in nicely while I got the rest aligned and clamped. Here is the second 'outside' gallant rail piece attached and clamped, the inner rail is pinned. Other side still only has the first pinned rail piece. 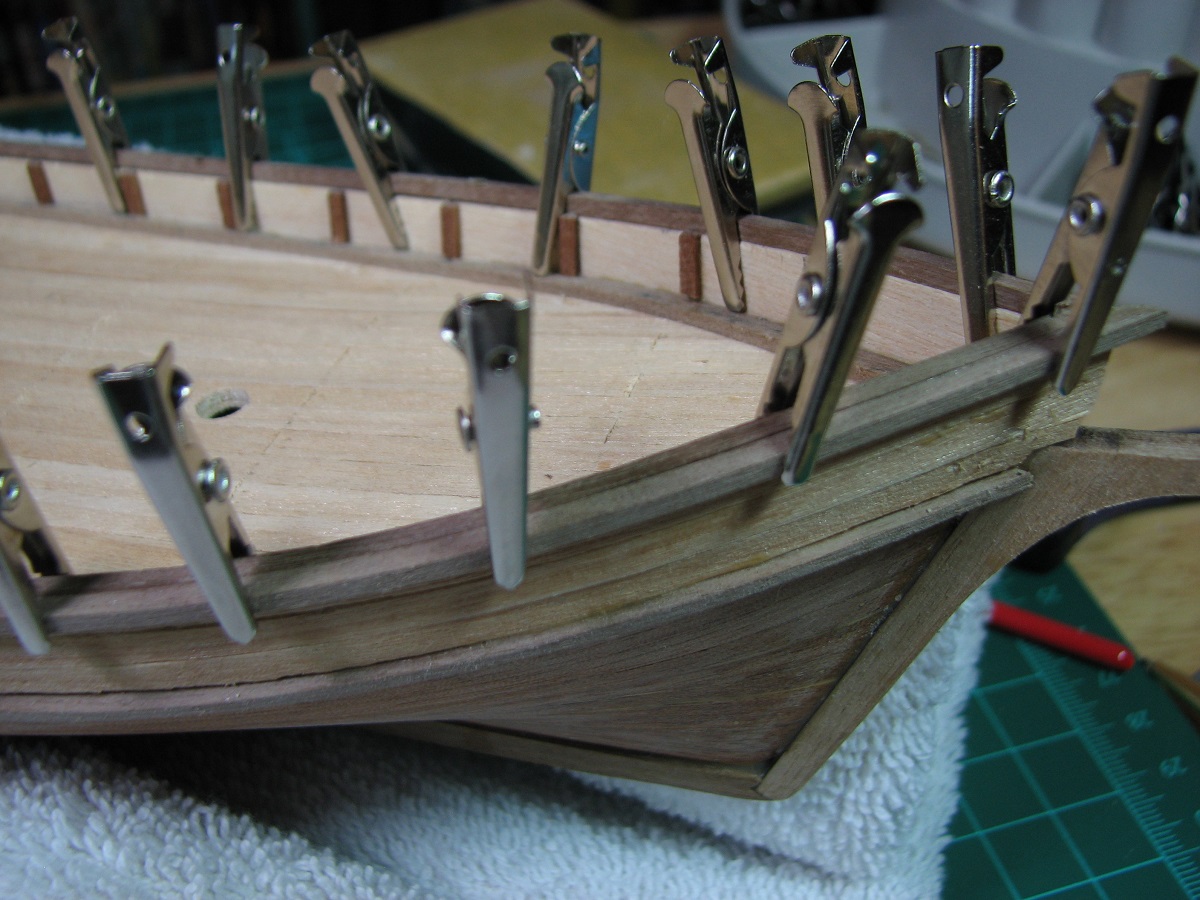 While I was doing all of the planking, I was working with the boat upside down on the green mat a lot. Never occurred to me that the deck planking was pretty fragile, but it is, and I messed it up. 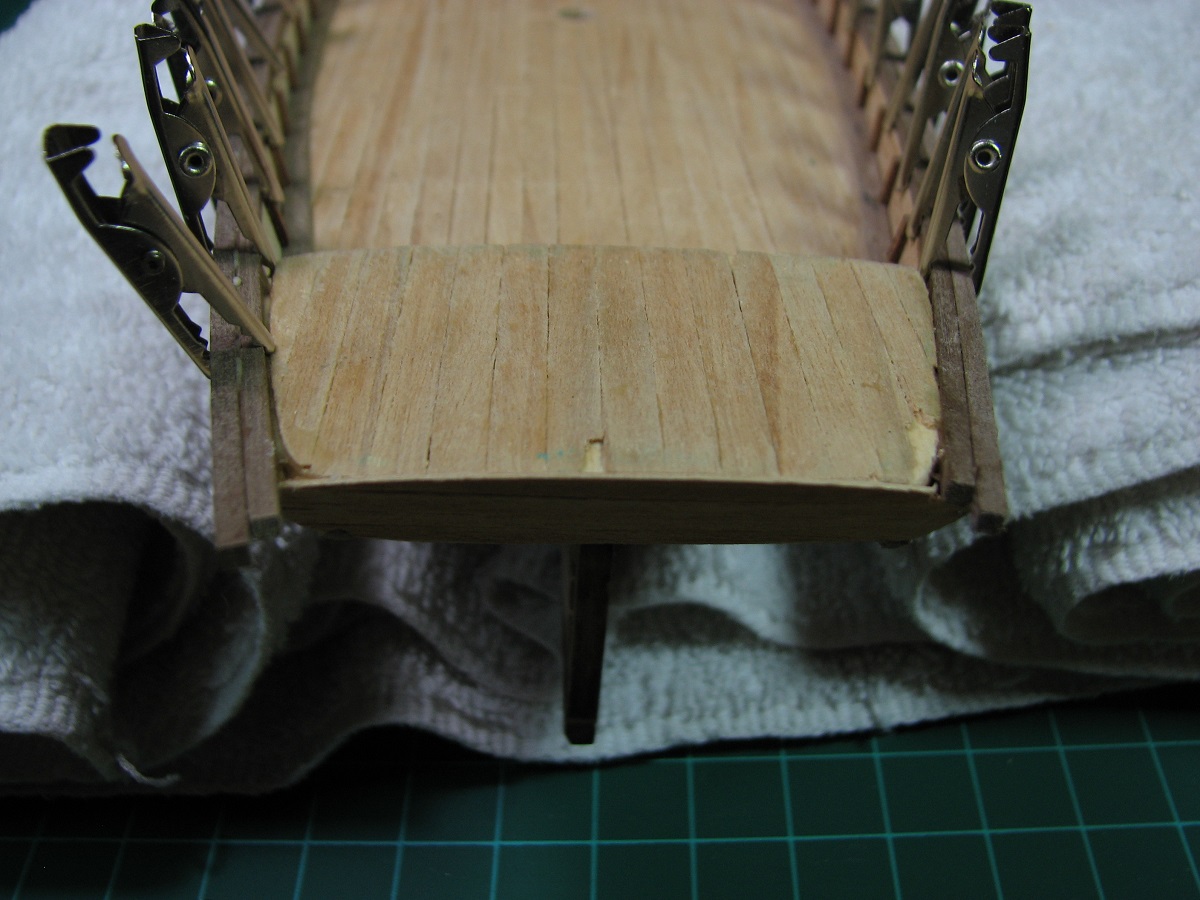 At this point it also became clear that the poop deck was misaligned, probably from my early mis-placement of the stern blocks, or because I didn't get the keel and bulkheads all aligned correctly. The left side is correct, the gallant rail extends above the deck. The right side is wrong, the deck is even with the top of the gallant rail. 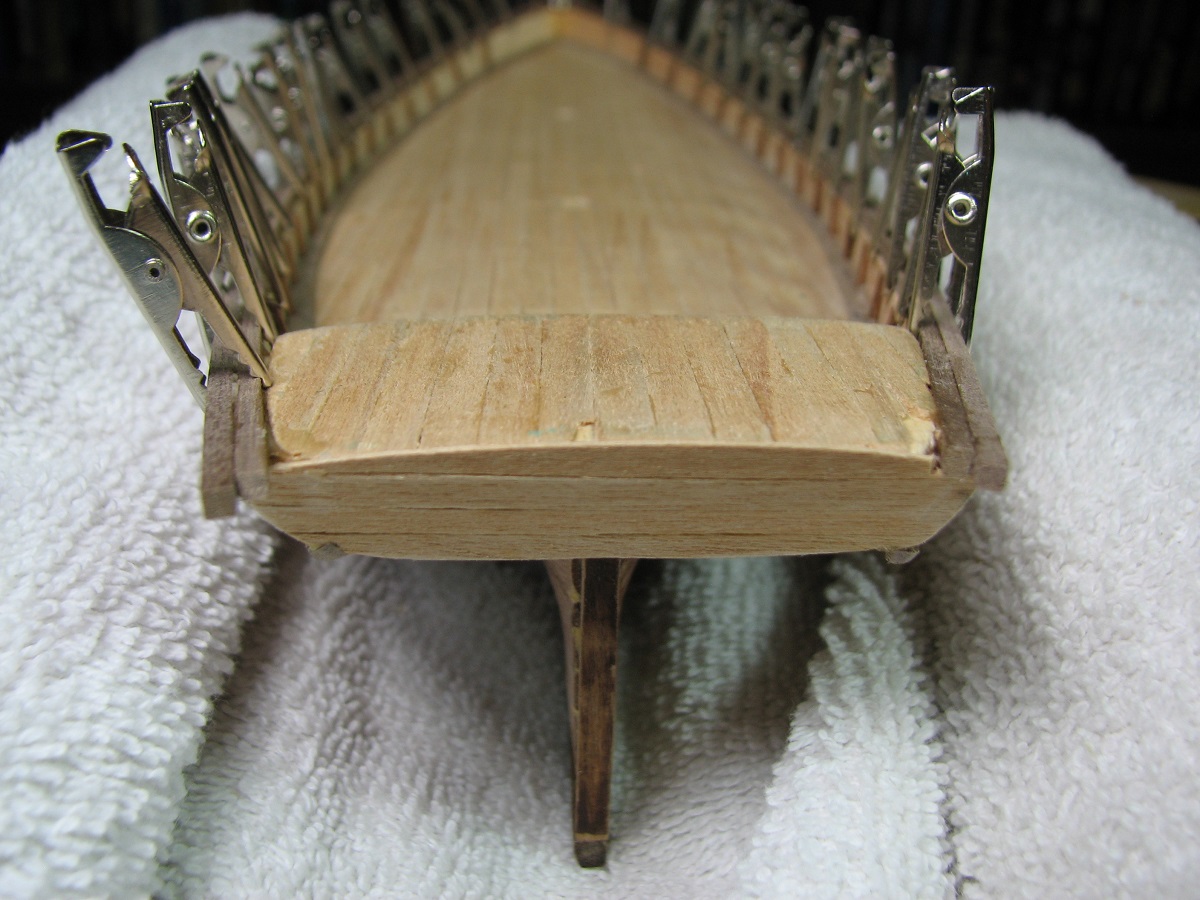 So, I figured it was time to learn about repairs. I used an X-acto chisel blade and removed the upper stern planking and a bit over half of the poop deck planking, and then chiseled away at the false deck until it appeared to be at the right level to me. I then sanded and smoothed it. 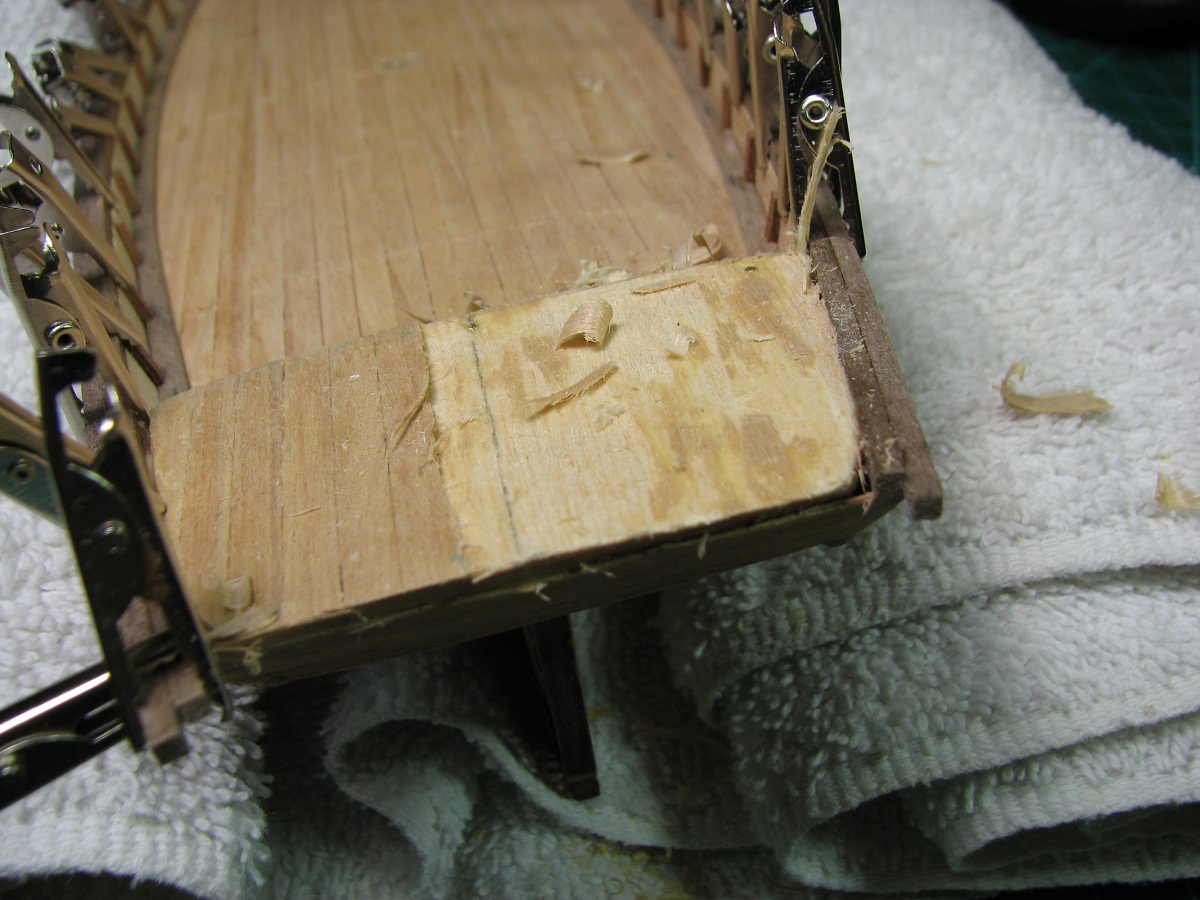 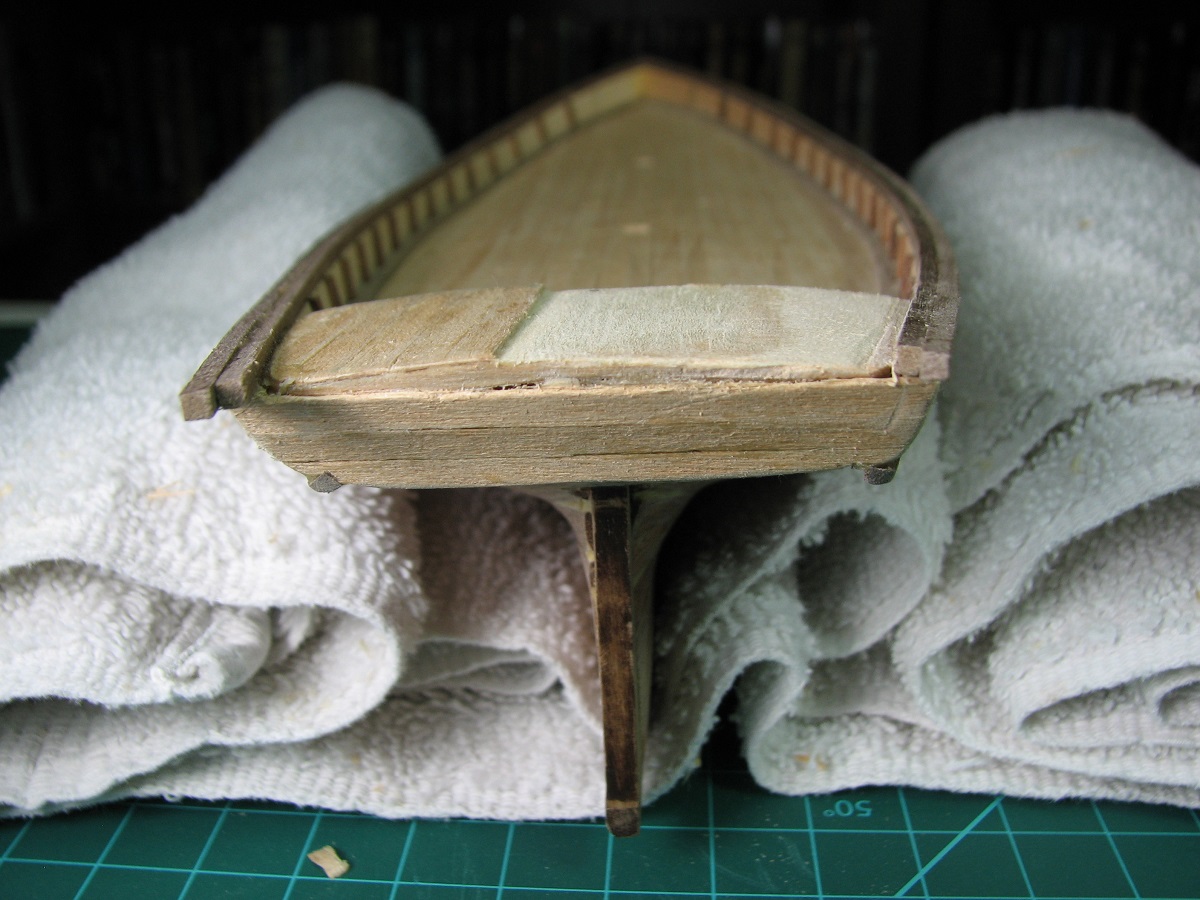 Then I re-planked everything. Came out much better than I was expecting.  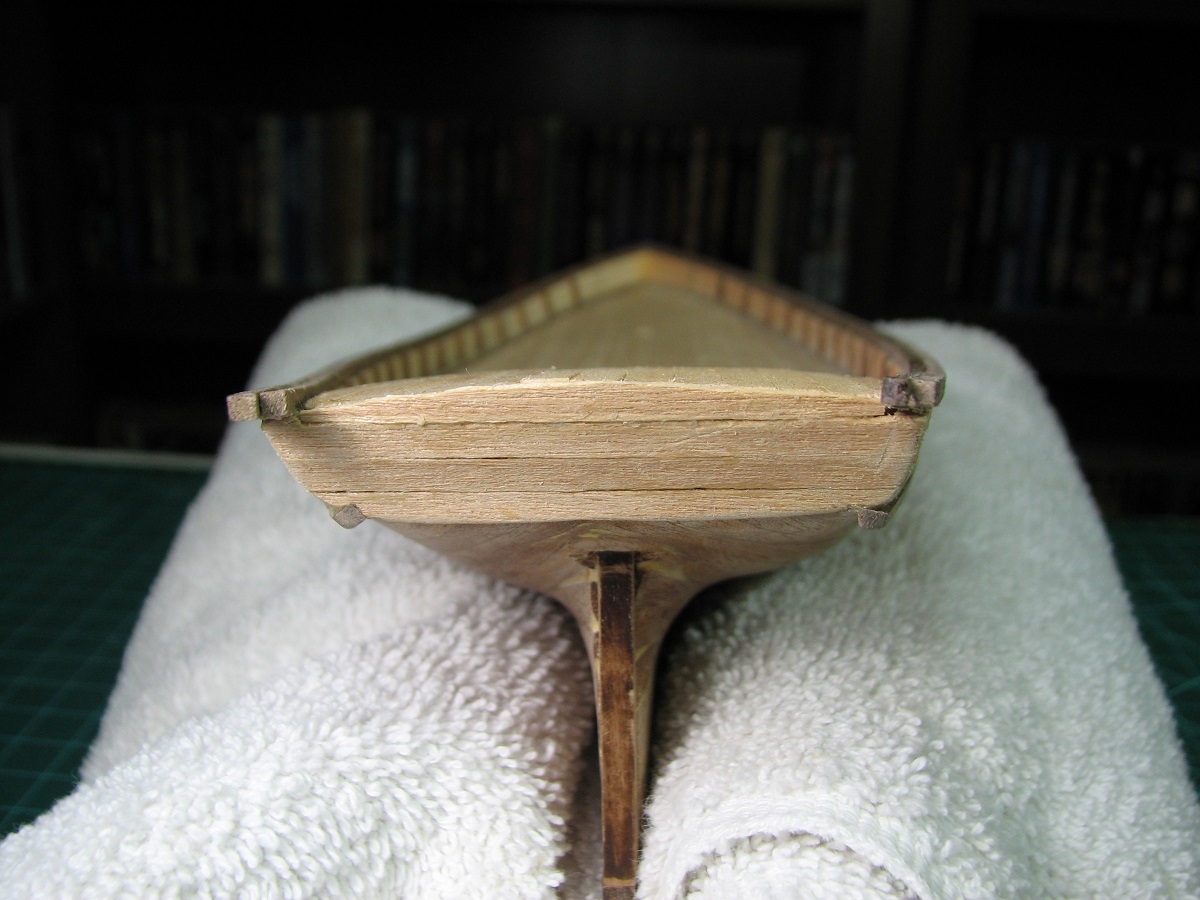 Finished up by adding the stern gallant rails, trimming them, and sanding. 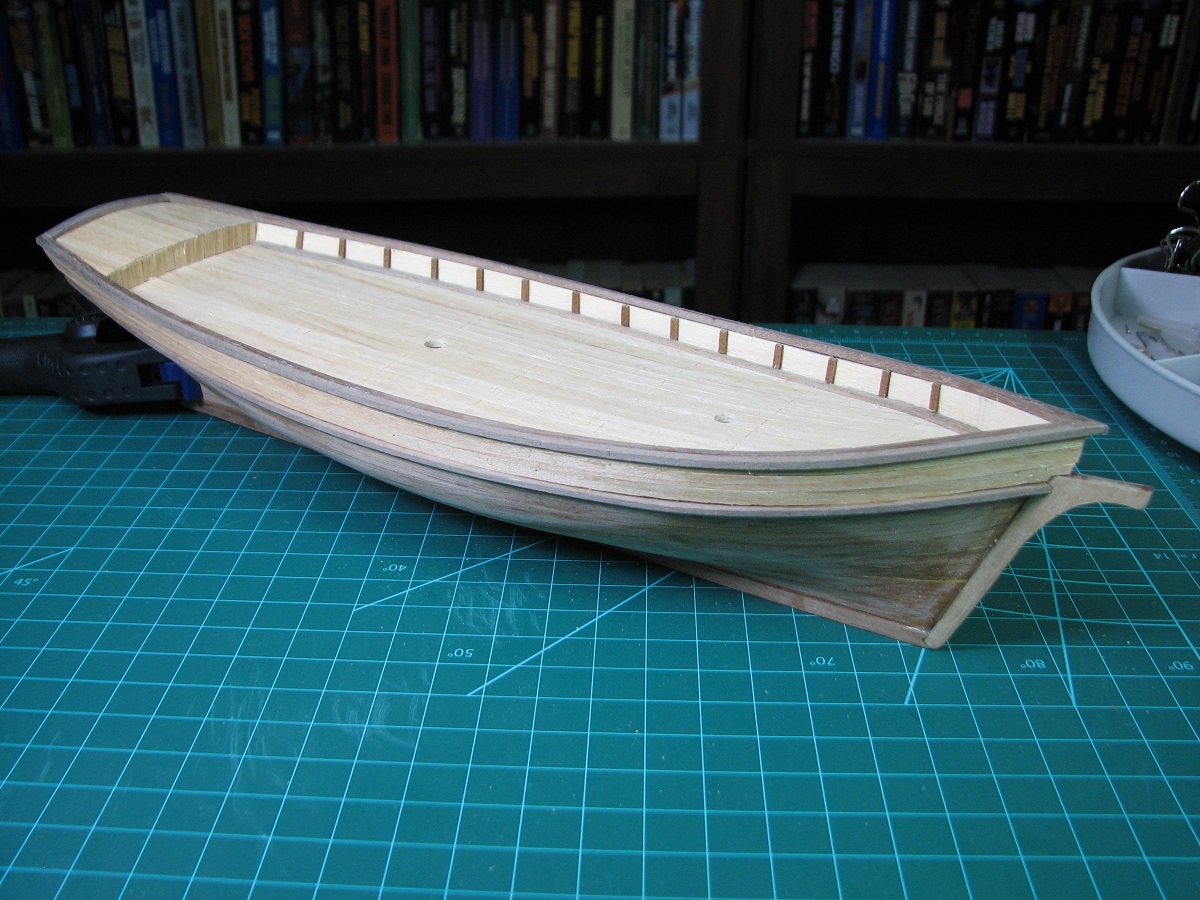 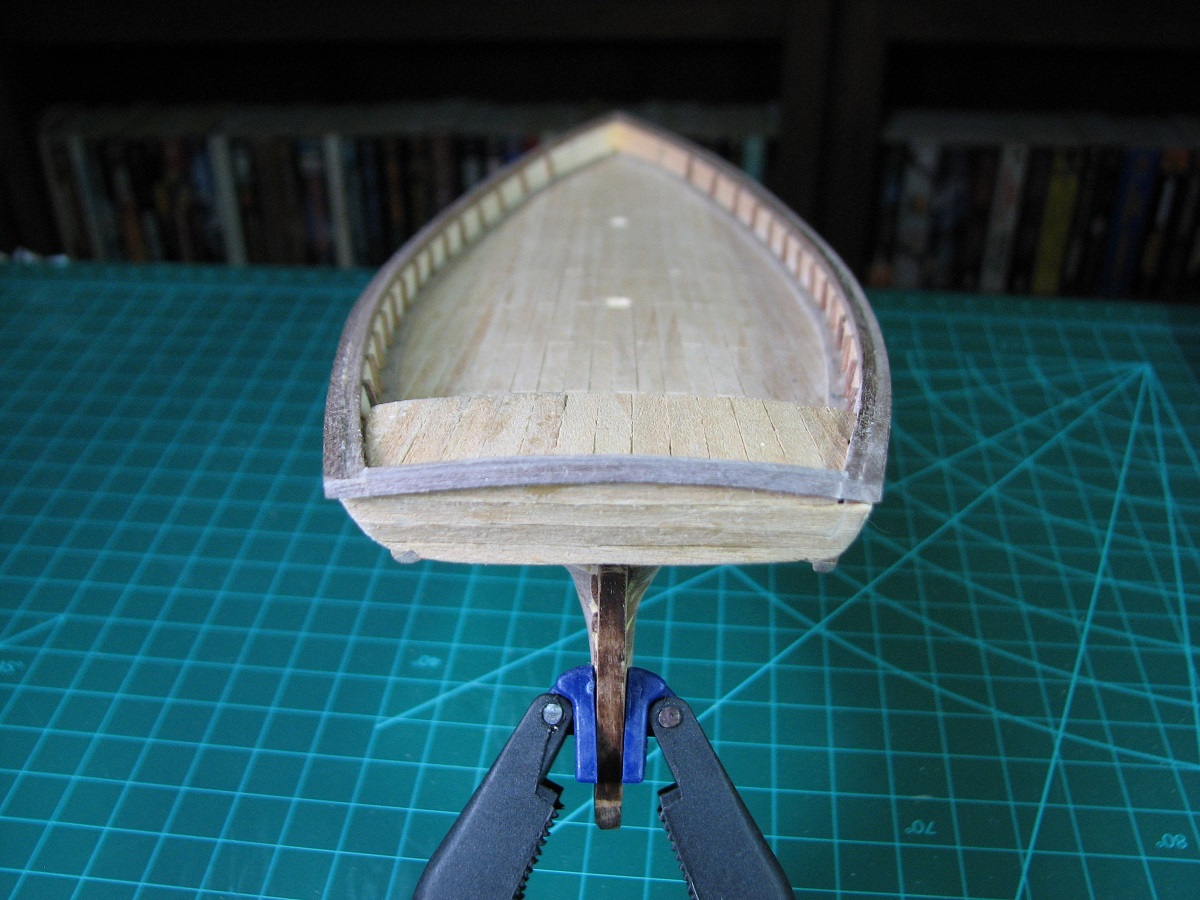
|
|
#
¿
Aug 30, 2014 08:42
|
|
|
The Spit is pretty good, and heck, the Hurricane is pretty good for something made by a 13yo. I doubt that my stuff looked that good at that age (before I inevitably crashed it or otherwise destroyed it in a fire). Nice job on the canopy of keeping it from getting foggy from the glue, that was always one of my hangups. A little decal-set on the tail number should make it blend in better so you can't tell where the edge of the decal is. I have no idea what the current product is that works best.
|
|
#
¿
Aug 30, 2014 18:55
|
|
|
Dalai Lamacide posted:That poo poo looks amazing. What kind of wood are the gallant rails made of, and how did your alligator clips not make indentation? I would be hella scared of that. I built some little wooden structures for an art project and I had to work really hard to keep from dinging it up with the clamps I had. Which I admit were likely too large and not the right type. The instruction book says it's Manzonia, but trying to look that up it appears the real name is Mansonia? http://www.wood-database.com/lumber-identification/hardwoods/mansonia/ This is a hardwood, much harder than balsa, but the clips can leave indents in the wood, so have to be very careful attaching and removing them. The grain of the wood is fairly rough though, so any small imperfections left from the clips should disappear into the overall grain, especially after sanding and sealing. If I squeezed a clamp and found it to be particularly strong, I would not use it.
|
|
#
¿
Aug 30, 2014 20:20
|
|
|
Van Dis posted:She may not look like much but she's got it where it counts Holy tiny little spaceship! Very nice.
|
|
#
¿
Sep 1, 2014 21:45
|
|
|
Also. Oh god what have I gotten myself into.. 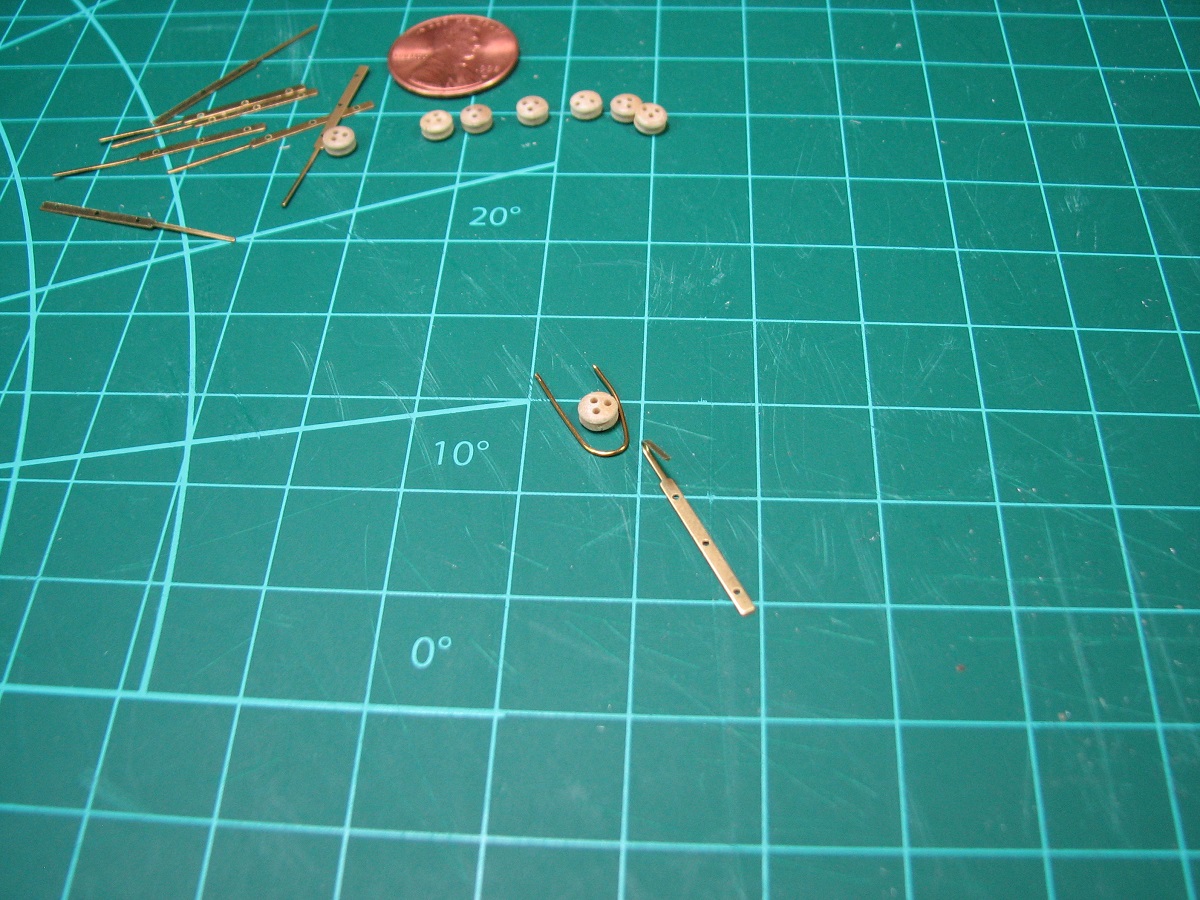 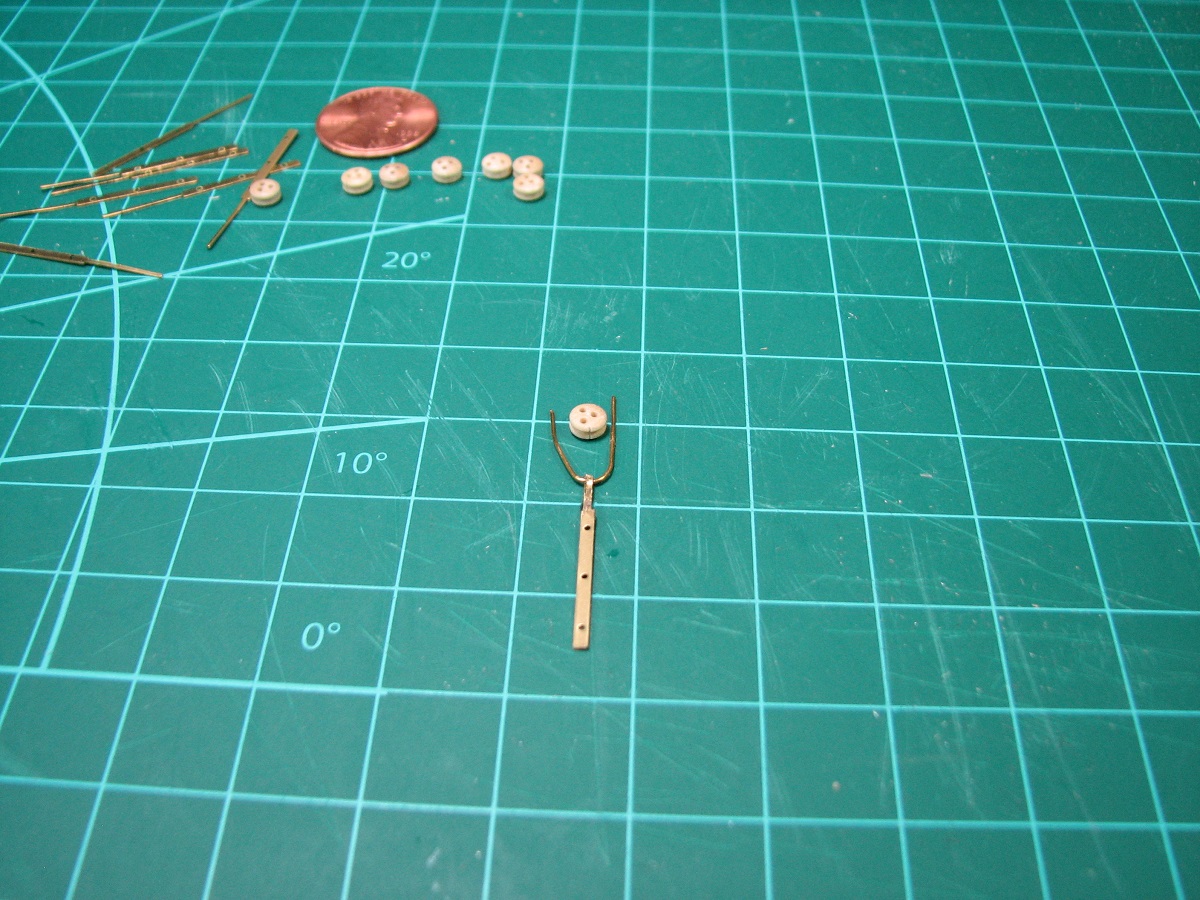 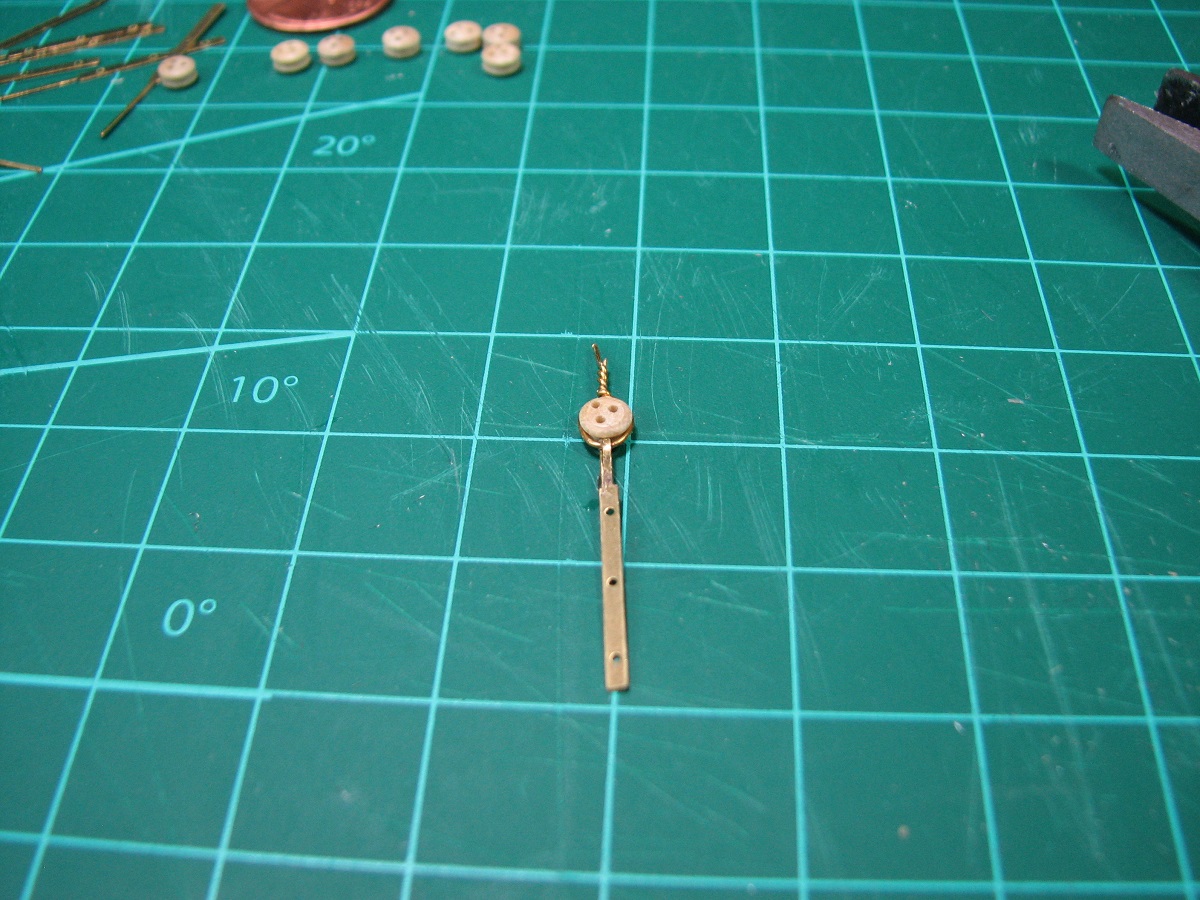 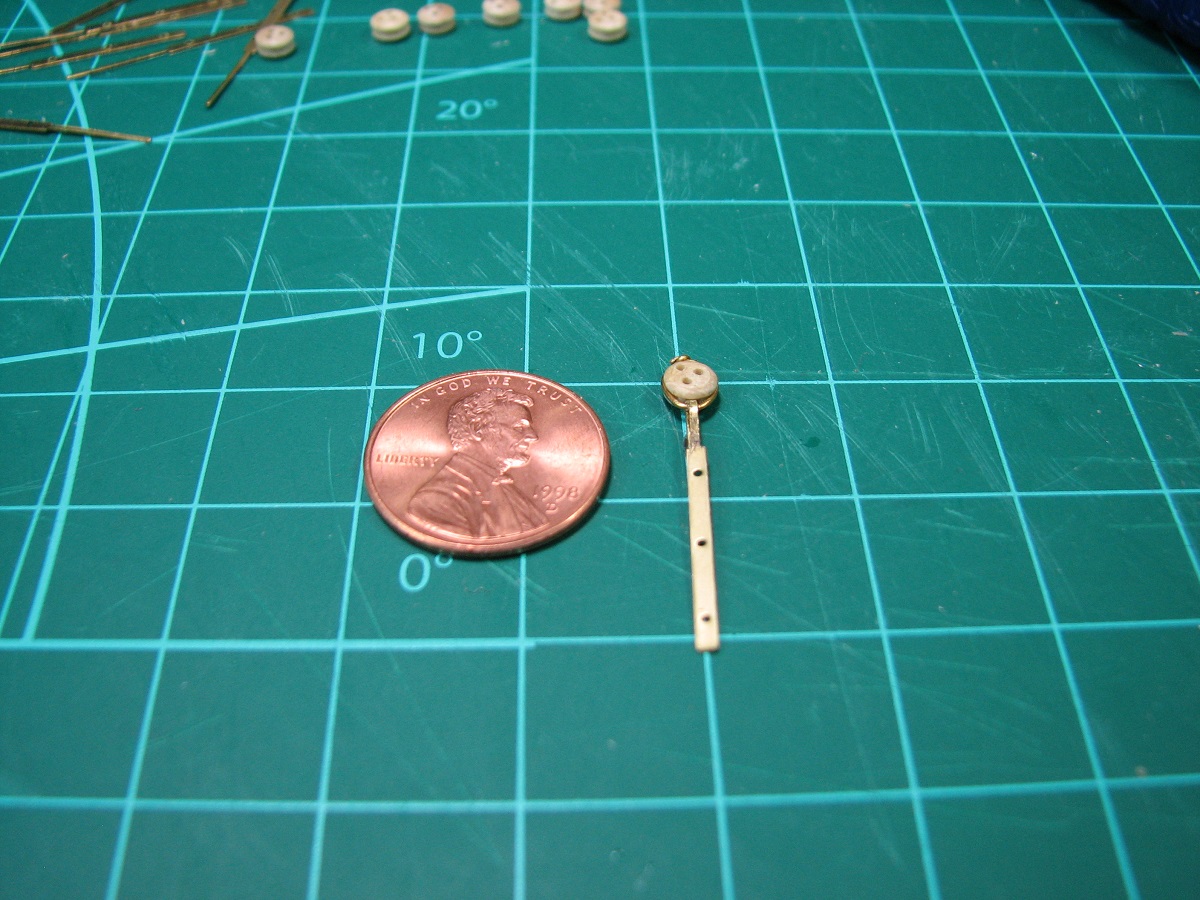 Wee...
|
|
#
¿
Sep 1, 2014 23:33
|
|
|
Epi Lepi posted:Your build log makes me want to go back to my wooden ship and simultaneously makes me want to never look at it again. I feel the same way! Various things done since the August 30th update. Rudder was constructed and mounted (it sucked, the hinges are too big for this scale model, so it was a lengthy exercise in frustration to get it finished). Bowsprit reinforcements were added, catsheads were built and mounted (how in the hell I'm going to get little tiny rigging rope through these holes later is a complete mystery to me at this point). 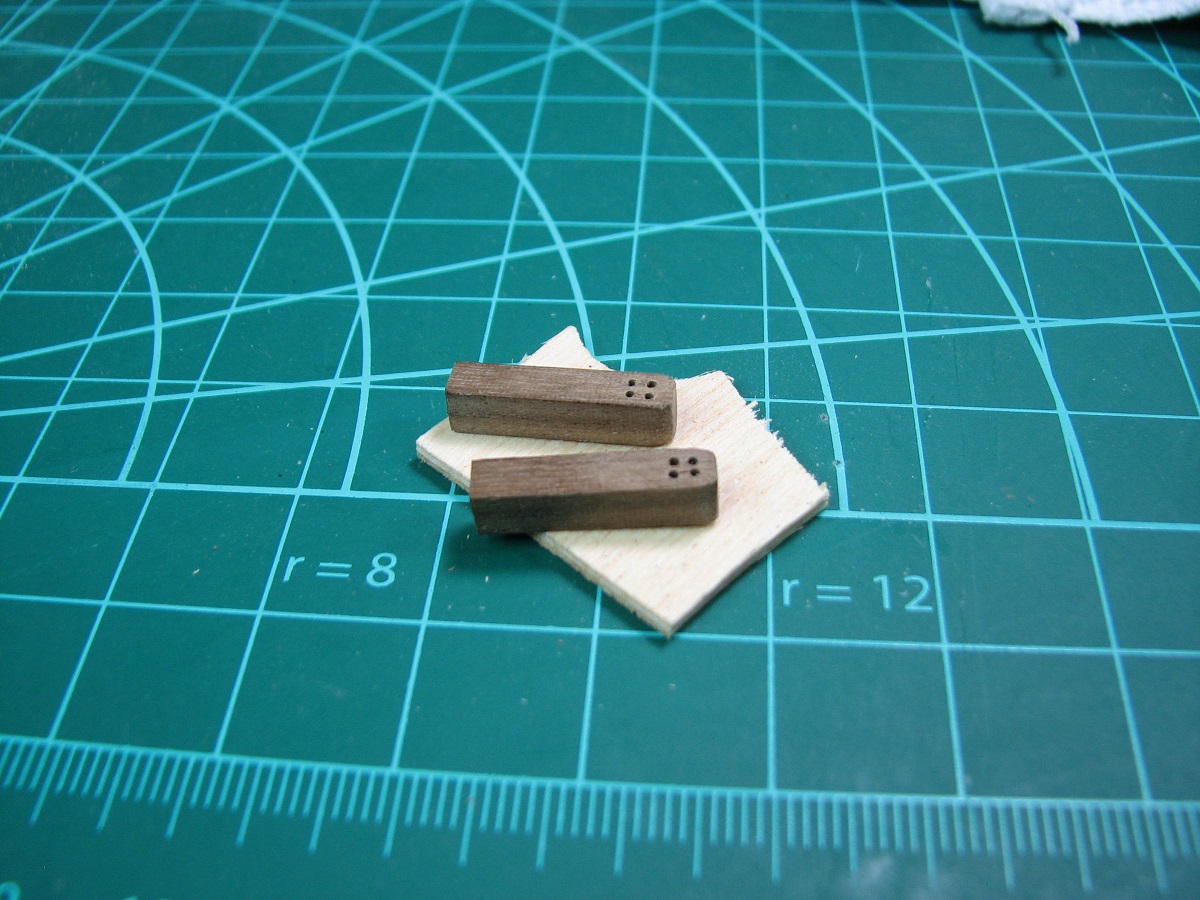 Hull was finished with a urethane sealer, sanded, re-finished, and buffed with steel wool. Instructions tell me to start drilling holes in the hull that I've worked so hard on.. aaugh... Oh well. Drilled the holes for the jib and bowsprit, and test fitted without glue. 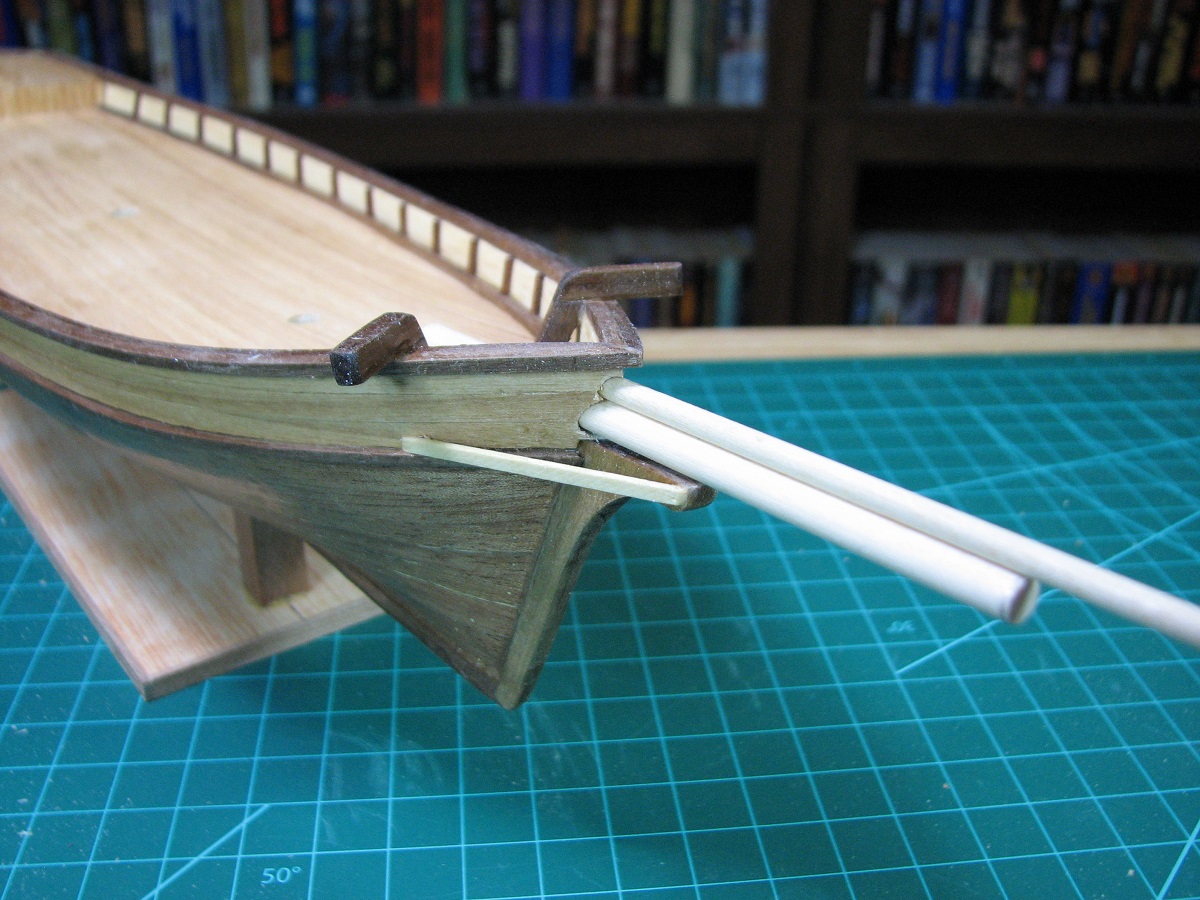 Made 8 of the chainplates as shown in the 4 pictures in my last post, and then mounted them onto the hull after much measuring and re-measuring to get the locations right. 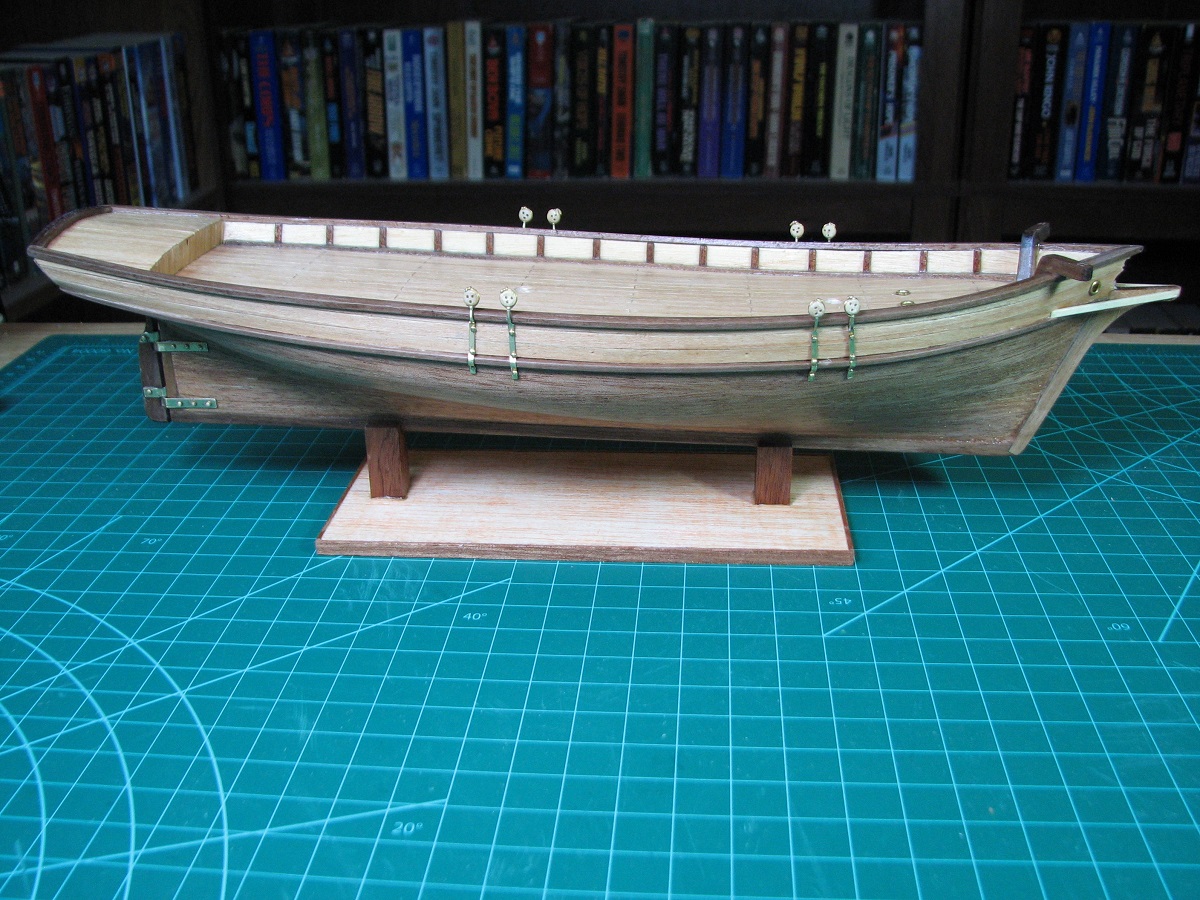 Used some really ugly bits to start building up the deck houses. 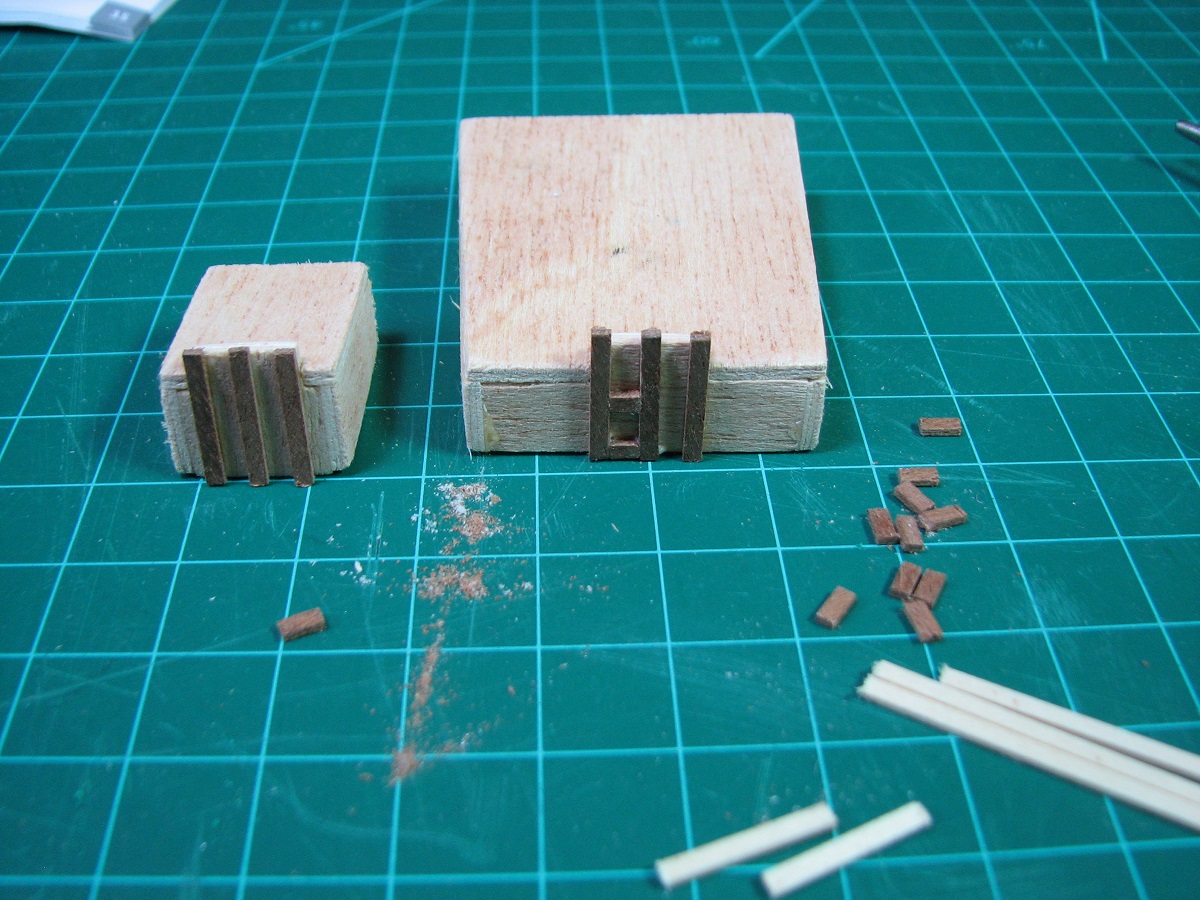 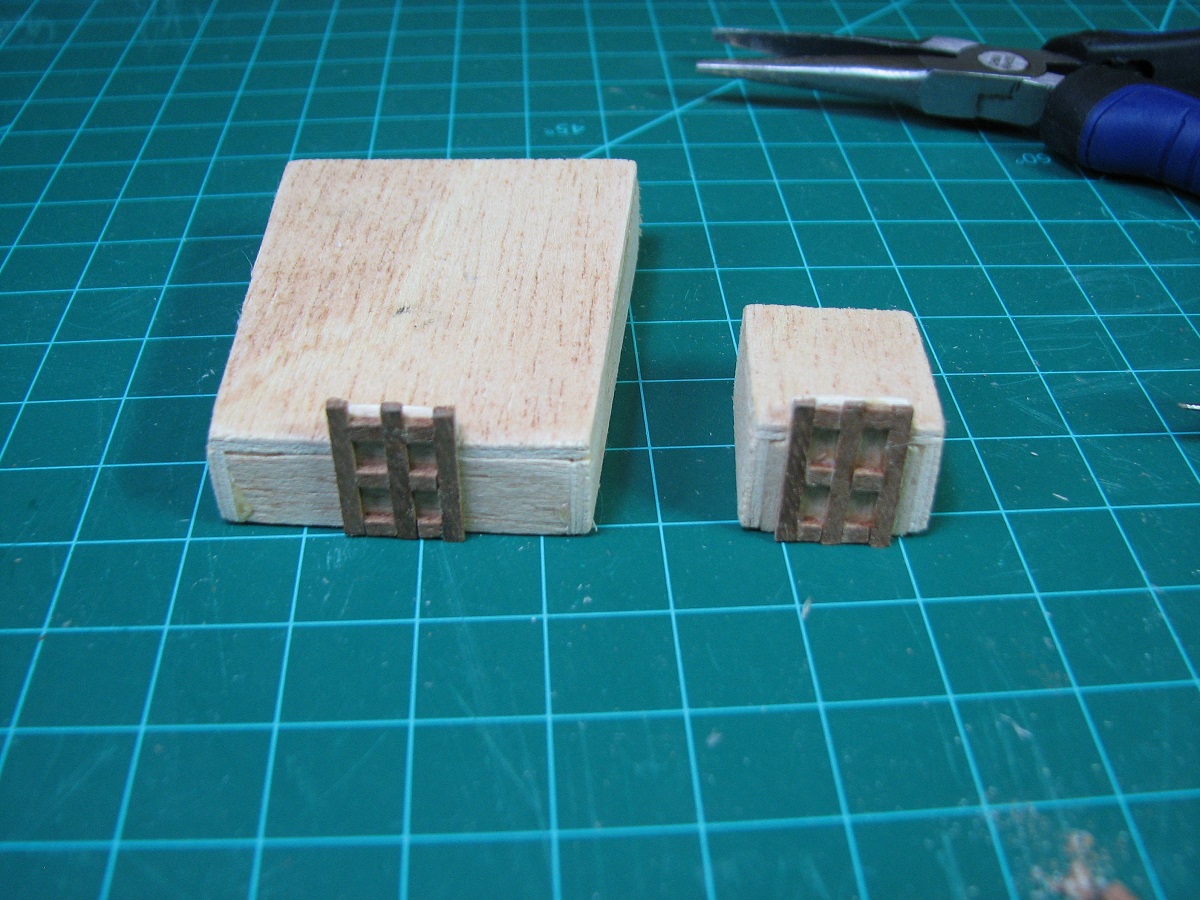 Drilled port holes into the cabins. Made the most perfect little pin-rack piece ever (left in picture)... 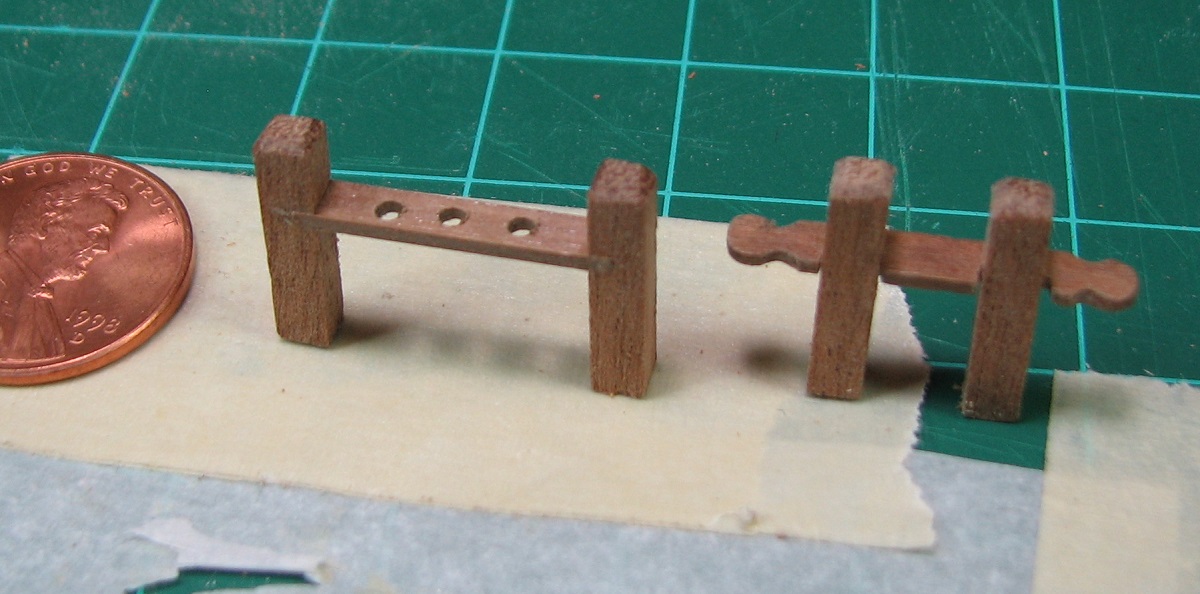 and then realized that I'd used the wrong size center piece and had to scrap it.  Finished up the pin-racks, some deck covers, and placed everything on deck to see what it looks like. Nothing is glued to the deck at this point, just mocking it up. 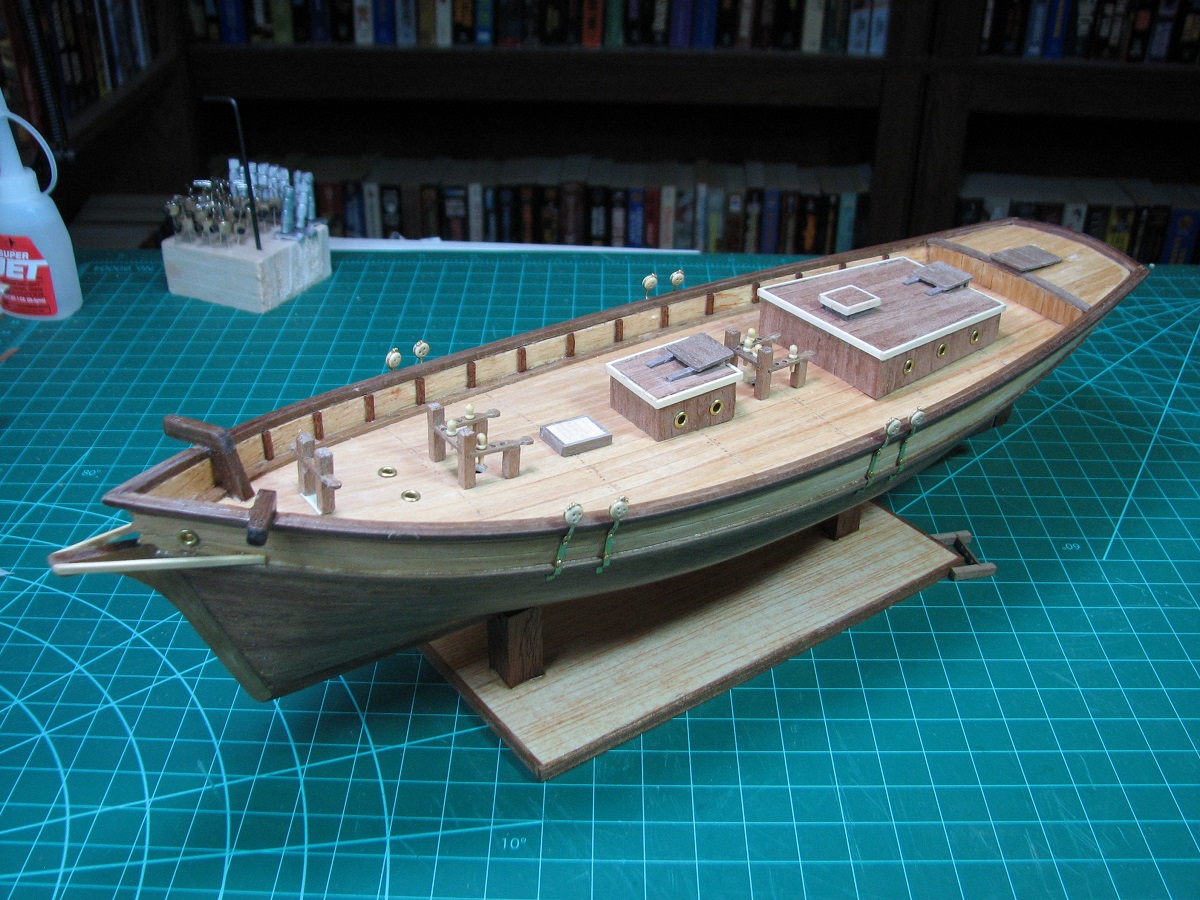 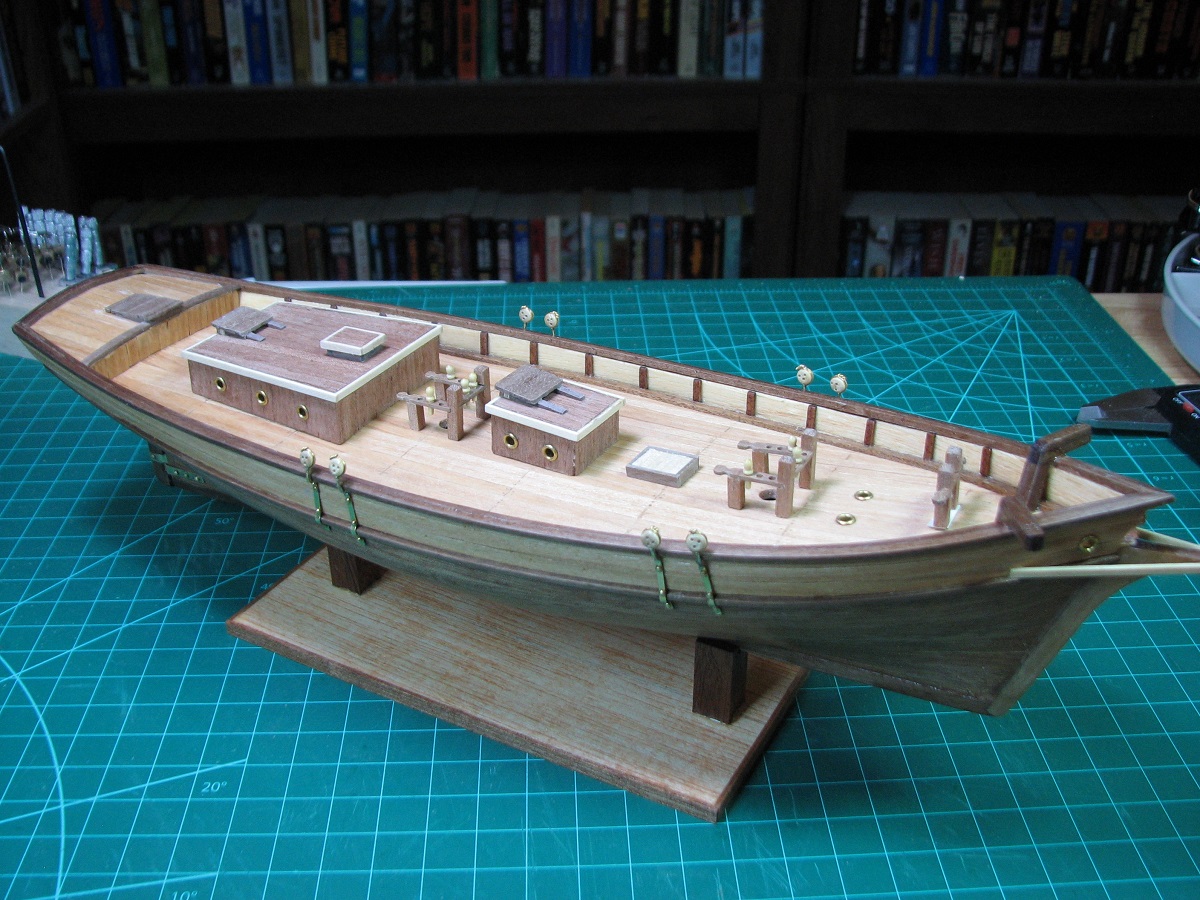 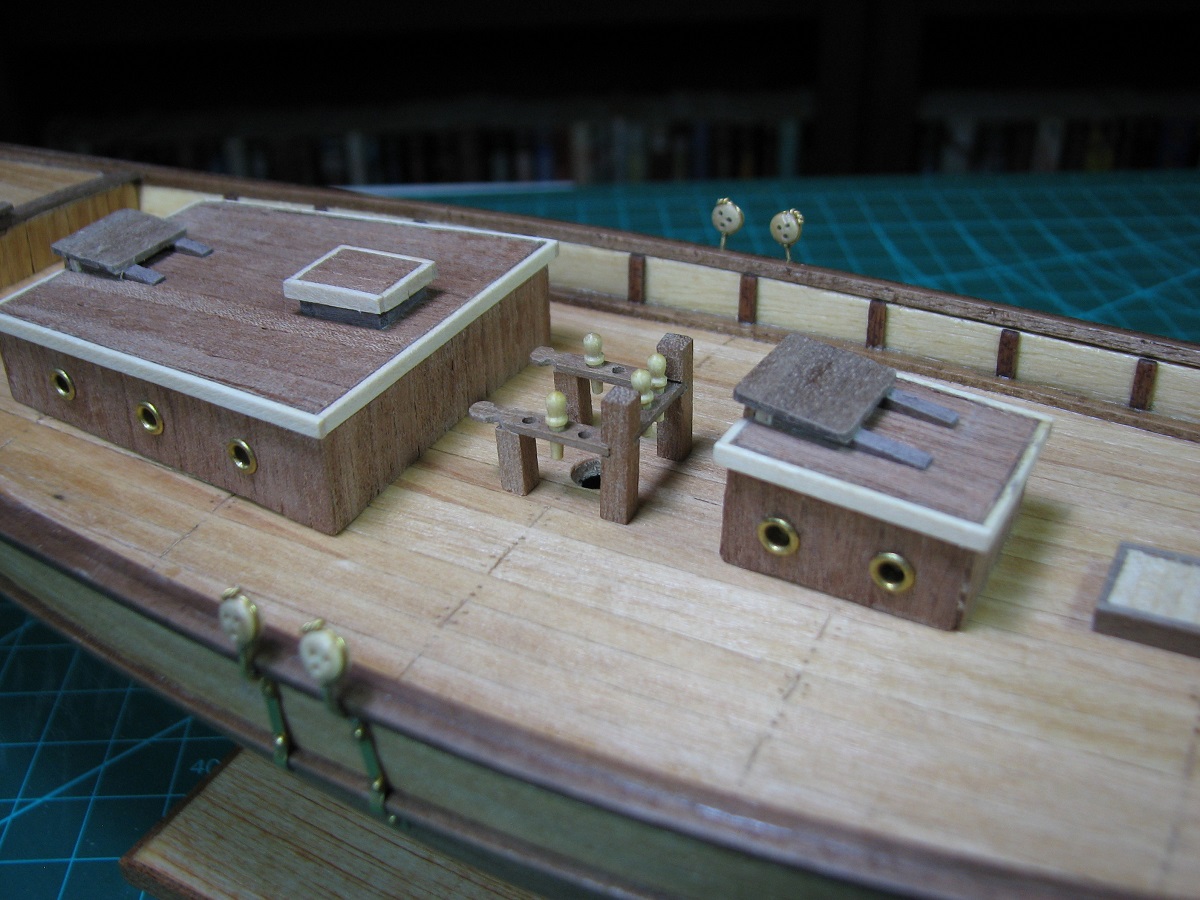  After 25+ years of not building a model, I'm still really good at using too much glue and getting it all over loving everything. Edit: Oh yea, all those bits are made out of little bits of wood that all has to be cut to length and drilled. The only 'pre-cut' pieces on the entire deck are the ugly wood that makes up the basic shape of the deck houses. Everything else is made by hand. The concept of "kit" for a wooden model is significantly different than the plastic models I used to make. The Locator fucked around with this message at 06:18 on Sep 4, 2014 |
|
#
¿
Sep 4, 2014 06:14
|
|
|
Bloody Hedgehog posted:Get a needle threader. It's a little metal tab with a fine metal loop attached. Stick the loop through the hole, thread through the loop, then pull it back through. Easiest place to pick one up is to just buy one of those tiny travel sewing kits they sell just about everywhere. They usually have a threader included. Found a three pack of those things for cheap on Amazon and ordered them. Thanks.
|
|
#
¿
Sep 4, 2014 15:35
|
|
|
CaptainBob posted:I've been talking about getting into model building for months, so a buddy of mine dropped this on me the other day. If you make that 'hinged hull' detail not work, then it would be a pretty simple model.
|
|
#
¿
Sep 5, 2014 15:41
|
|


|
Tiny 'stropped' blocks, on eye-bolts in 4 steps. Step 1 - Cut about 40mm of incredibly fine copper wire. 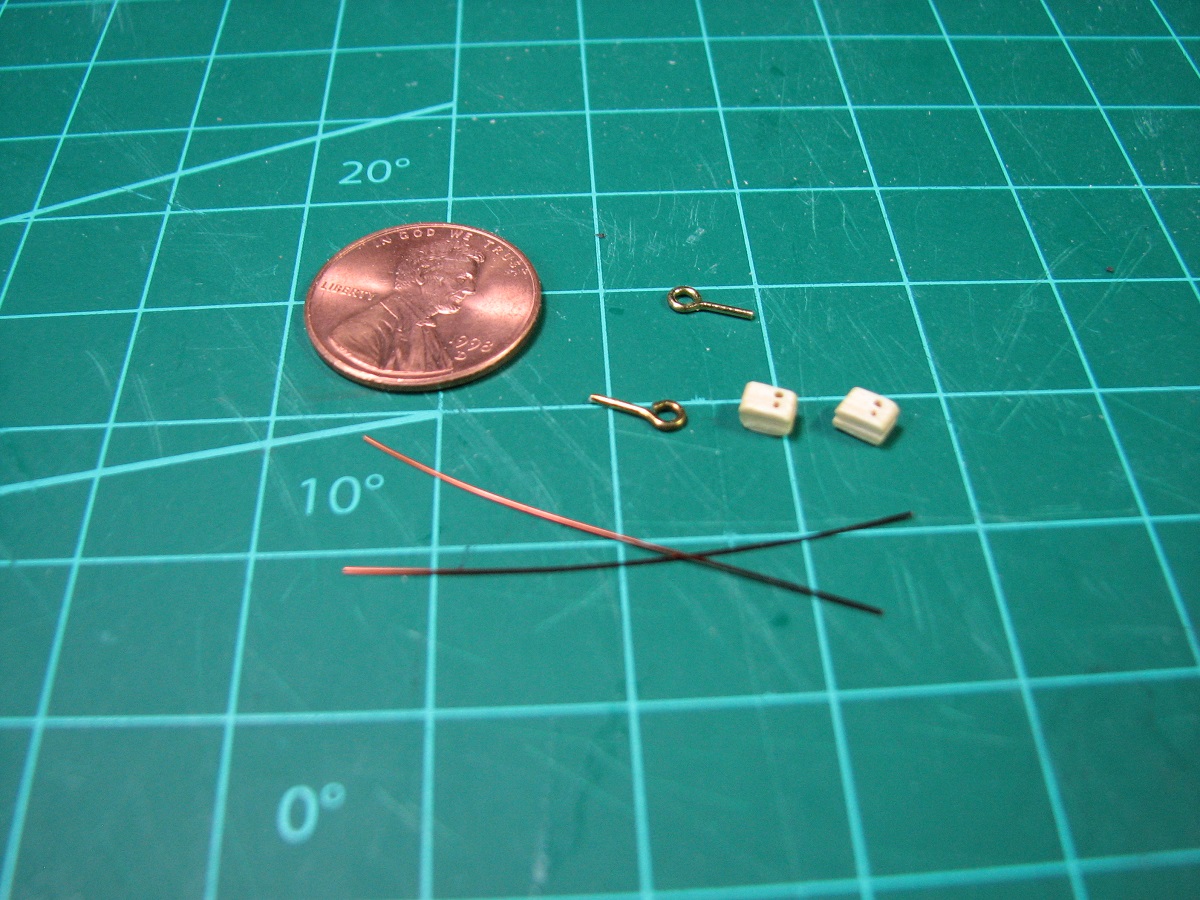 Step 2 - Form the eyelet onto the eye-bolt. 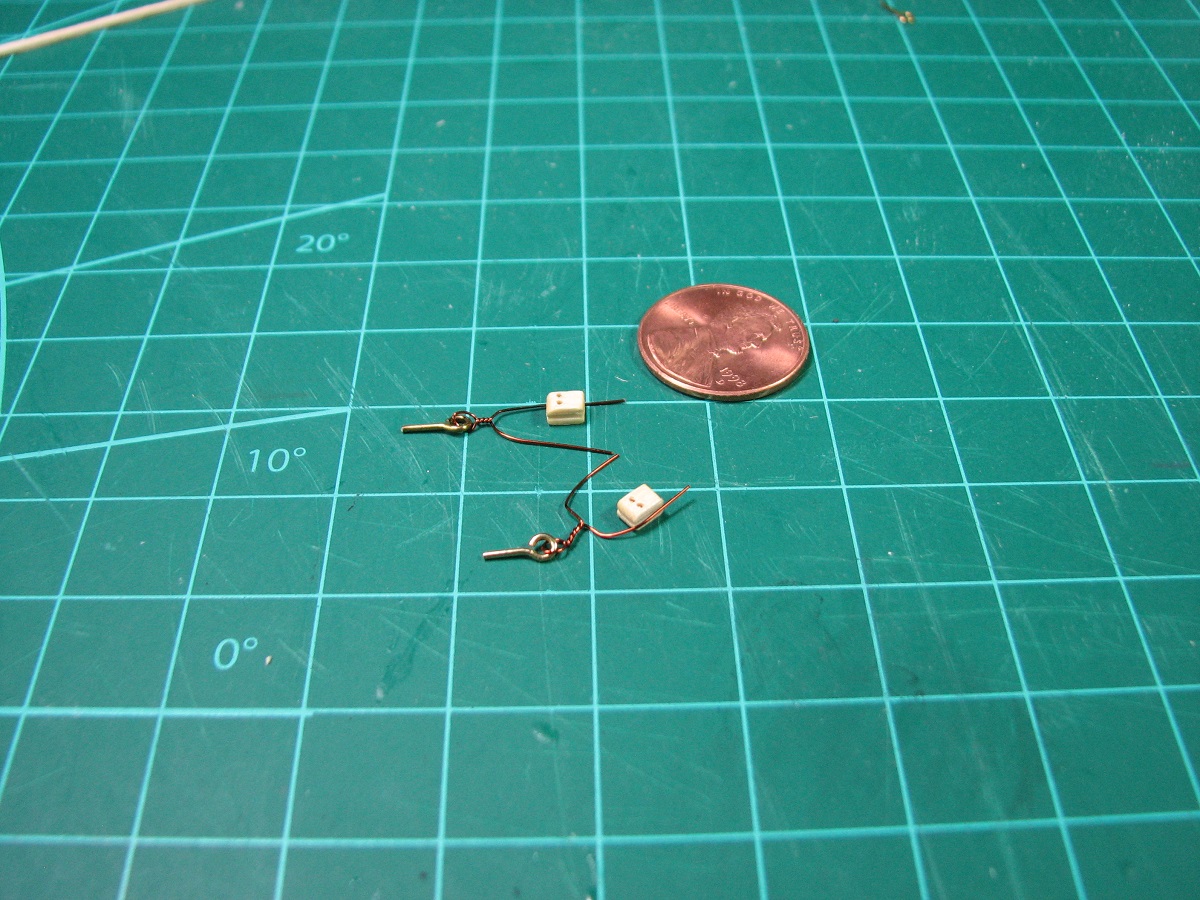 Step 3 - Convince the wire to fit around the block. 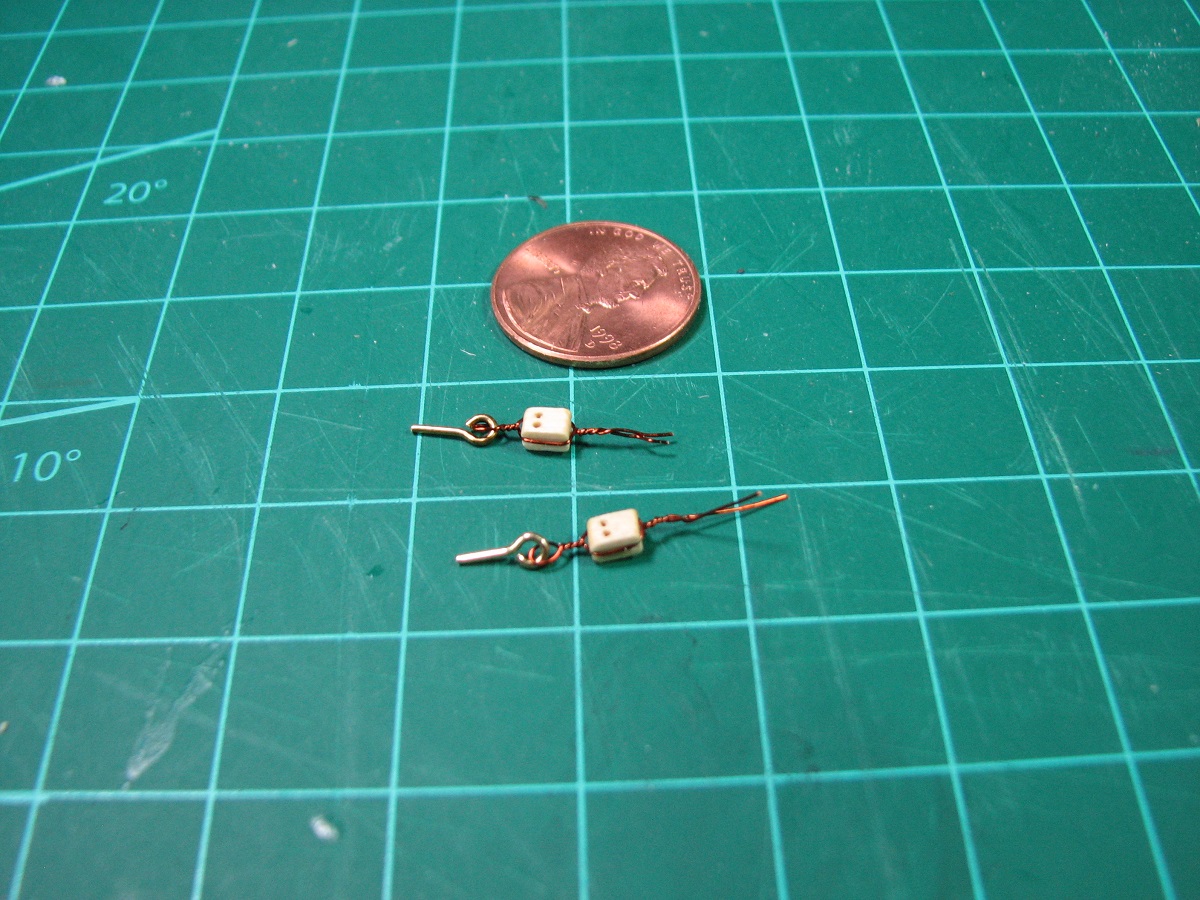 Step 4 - Tighten and finish. Adding a tiny dab of CA glue when complete to make sure it doesn't come loose. 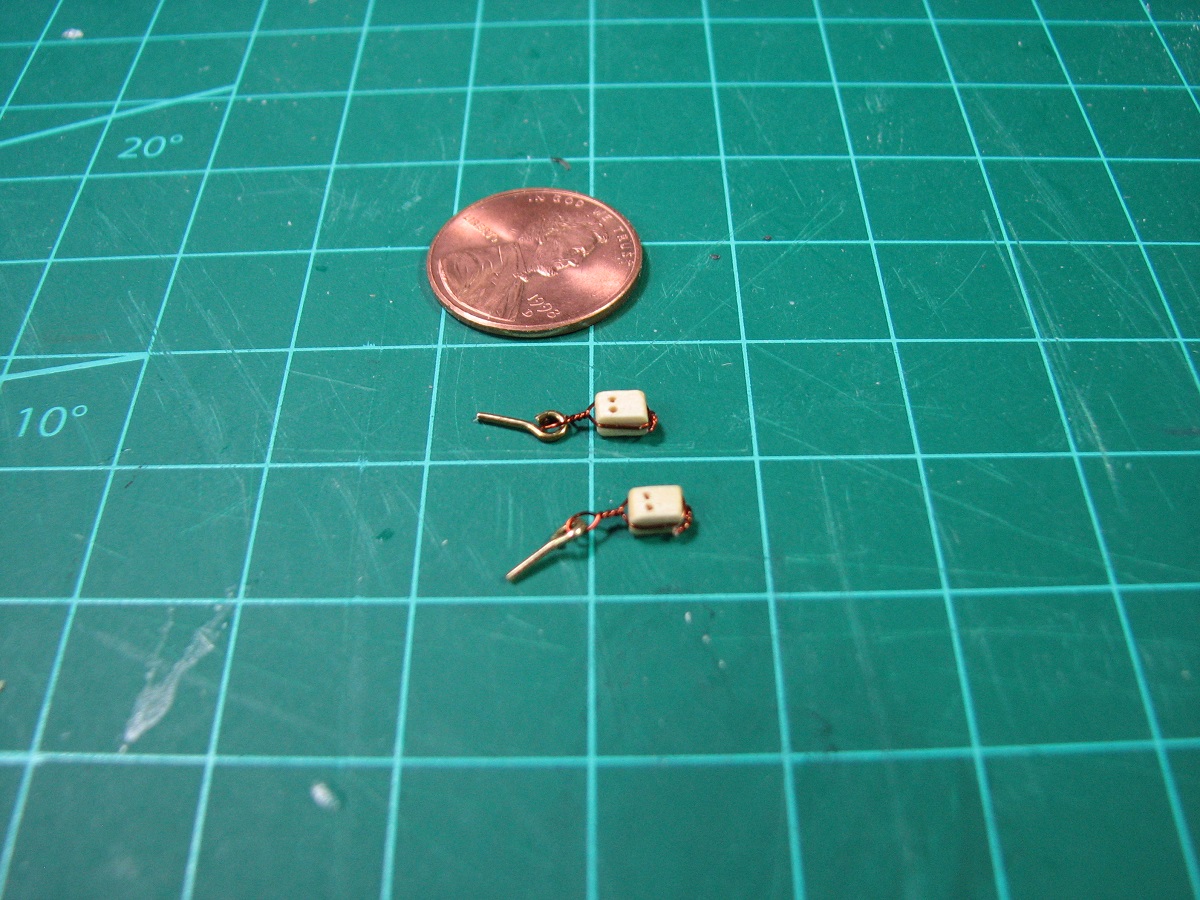 I have to make quite a few of these, and then quite a few more single blocks (half the size of these with only a single hole). This ship-building thing is really quite interesting, and requires a lot of thought and trial and error to get a lot of things done. I'm quite enjoying it.
|
|
#
¿
Sep 7, 2014 19:57
|
|
|
They even make kits where the LED's have the proper resister already built into them as a unit, and they have some that flicker to simulate candles (the flickering is random) that guys have started using to include lighting on wooden sailing ships. The boat is starting to come together now, although the rigging is pretty time consuming. I'm glad this isn't a square rigger. Put on the anchors and mounted and rigged the bowsprit. 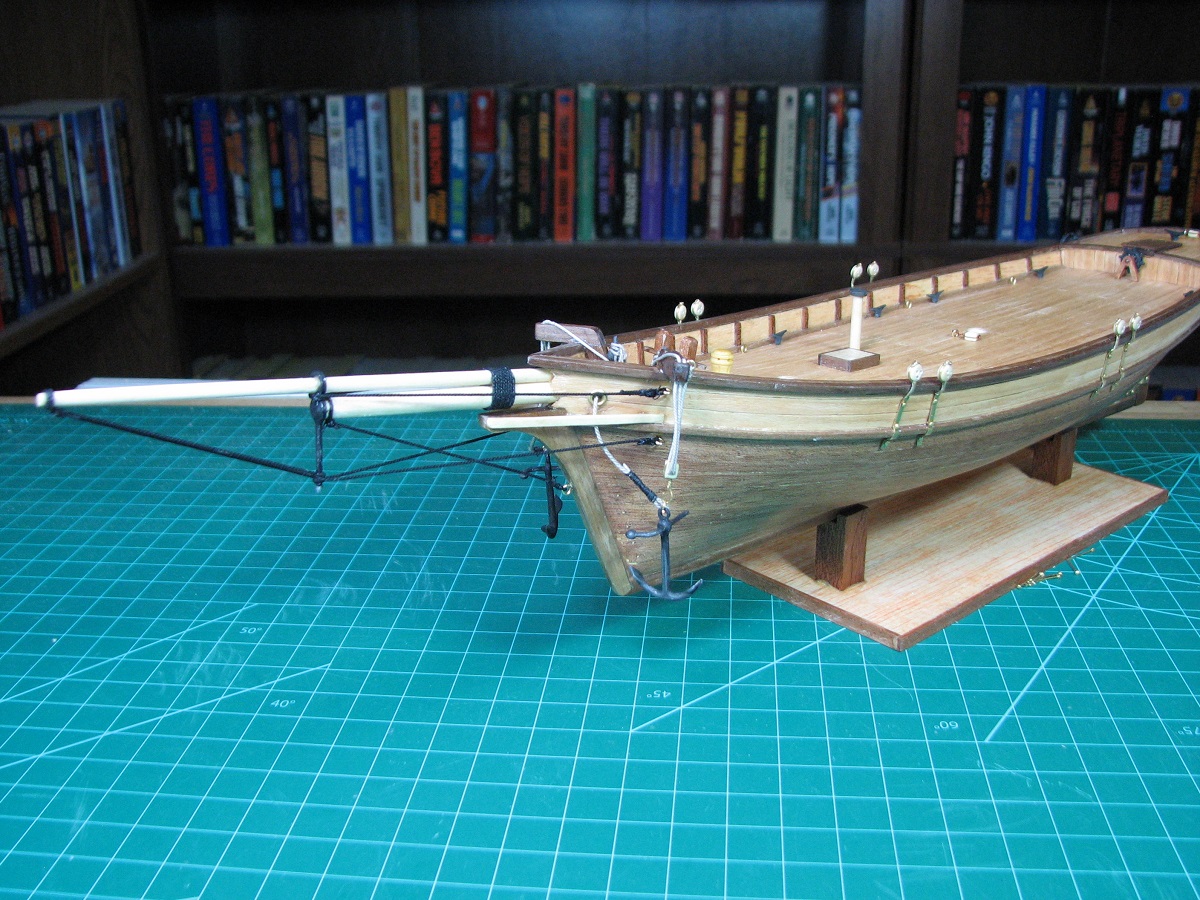 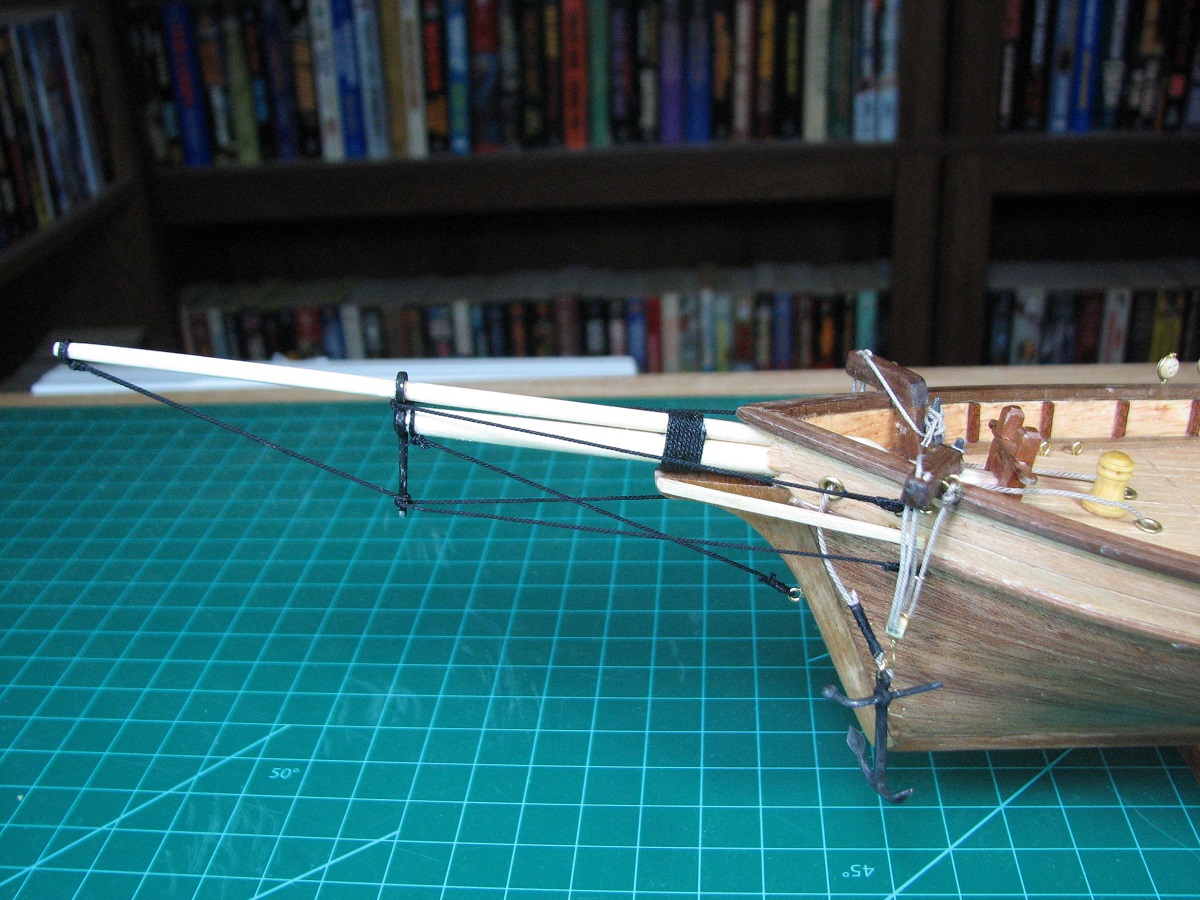 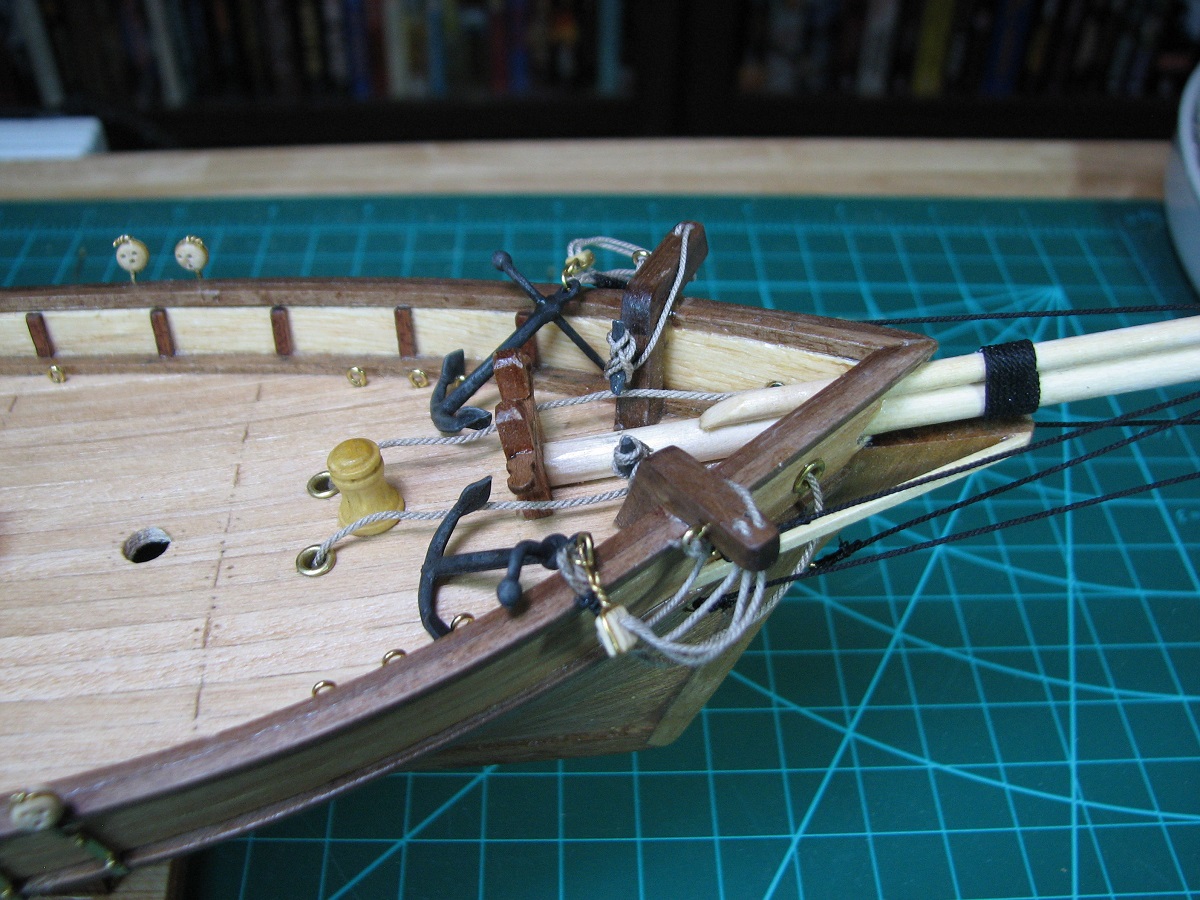
|
|
#
¿
Sep 8, 2014 07:46
|
|
|
N17R4M posted:Going to be starting 1/72 Type VII soon. Will post pictures as I go along. Its a Tamaya kit. Nice, that should be over 36" long then? Will be cool to see that. There are some amazing model kits out there now. In the 25+ years since I've done any modeling it seems that there have been a lot more 'large' kits introduced, like the Trumpeter 1/200 scale stuff. Baronjutter posted:I'm surprised the kit didn't give you a rod of iron and instructions to cast and smith the anchors. Heh, as if they'd give you instructions on how to do that (instructions in my kit are.. sparse). In all seriousness, some of the nicest models I'm seeing in the Model Ship World build logs have a stunning amount of scratch building and modification to the kit being done by the builders. I haven't even ventured into the scratch built kit section, where they work off of plans only, or in some cases do their own research and create their own plans.
|
|
#
¿
Sep 9, 2014 17:07
|
|
|
Awesome. I almost started back into plastic warship modelling when I bought this wooden kit on a whim. I may start doing plastic again after the wood bug had mellowed out a bit. Those 1/200 scale kits look really appealing to me, but I'll need to get my other room set up as a hobby room first just to have enough room for that sort of kit. ------------- On the wood kits, I have to say, that I am beginning to think the "industry" is it's own worst enemy when it comes to these kits. While in theory, an 'average' model maker could buy a kit off the shelf at the local store, and assemble it into some sort of a finished model, it is quite easy to understand why the vast majority of kits are probably never finished, and either get tossed, or placed into the back of a closet or garage, and collect dust. If the manufacturers included decent instructions (and they needn't be extensive, but should have basic things like what knots to use in different places on the rigging), and slightly different parts (correct line sizes for the rigging - not sure how including 3 or 4 sizes of line instead of 2 would change the cost by more than a buck or two), the kits would come together much better, and with much less frustration, as the kit provided line is almost impossible to thread through the blocks, and is simply the wrong size in many places. If it wasn't for the amazing resources found online at Model Ship World, and others that I've found linked from various builds and resource links on that site, my ship would be looking vastly different I'm sure, assuming that I hadn't thrown it at the wall by now. This morning I'm working on my first shrouds, and after finishing the first assembly, I thought it ended up looking like crap, so started browsing builds again, and ran across a link to some online instructions for the Syren on Model Expo. In the chapter for the standing rigging, it clearly shows (and explains!) that the lanyards connecting the deadeyes are a much smaller line than the rigging line, but the kit only has the single size of line included, so even though I was using a better quality line than the kit provided, it was simply too large. Luckily, I had purchased one package of a smaller line (.012) when I got the line to match the kits, and when I used it, even though it's larger than the lanyard line used in the Syren instructions, it instantly looked 5x better. Also, those instructions give the correct type of tie-off for the lanyard (Lark's Head) which was also huge. Other small details, like using small pieces of wire to hold the deadeyes in place for spacing and making them consistent. First try - using .025 lanyard (Syren Ship Model Company line, but same size as provided by kit to use for this). 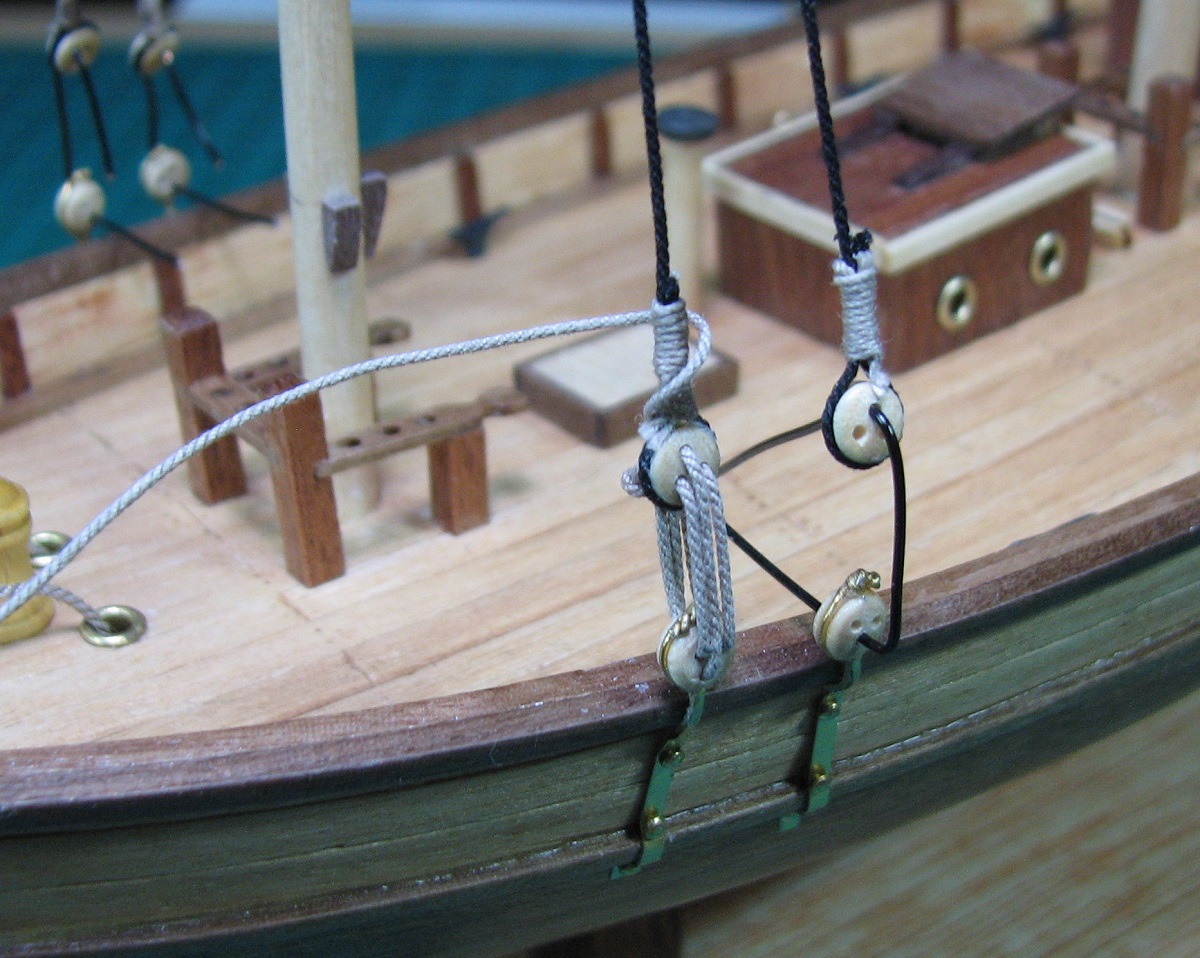 Re-do - using .012 lanyard from Syren, and the first shroud pair complete. 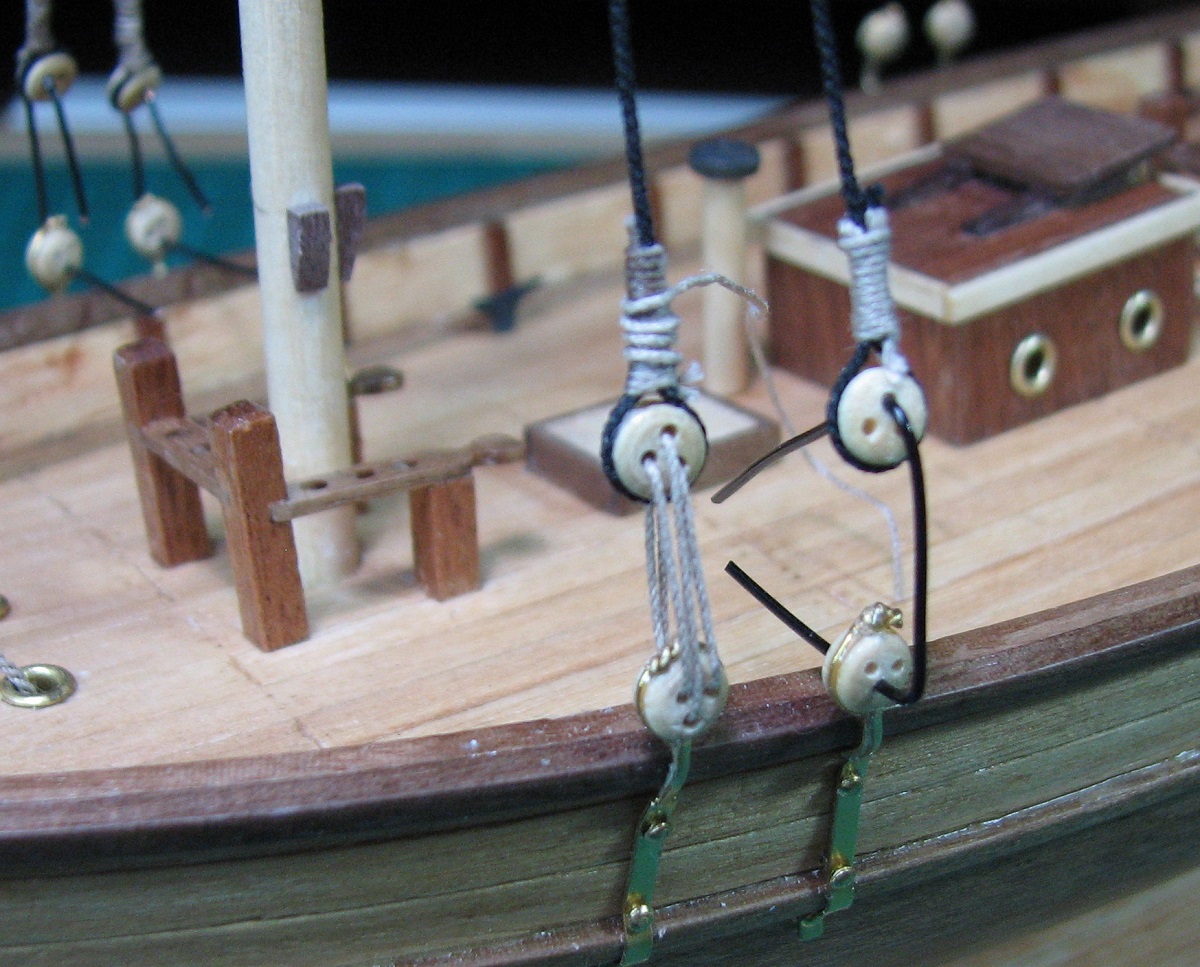 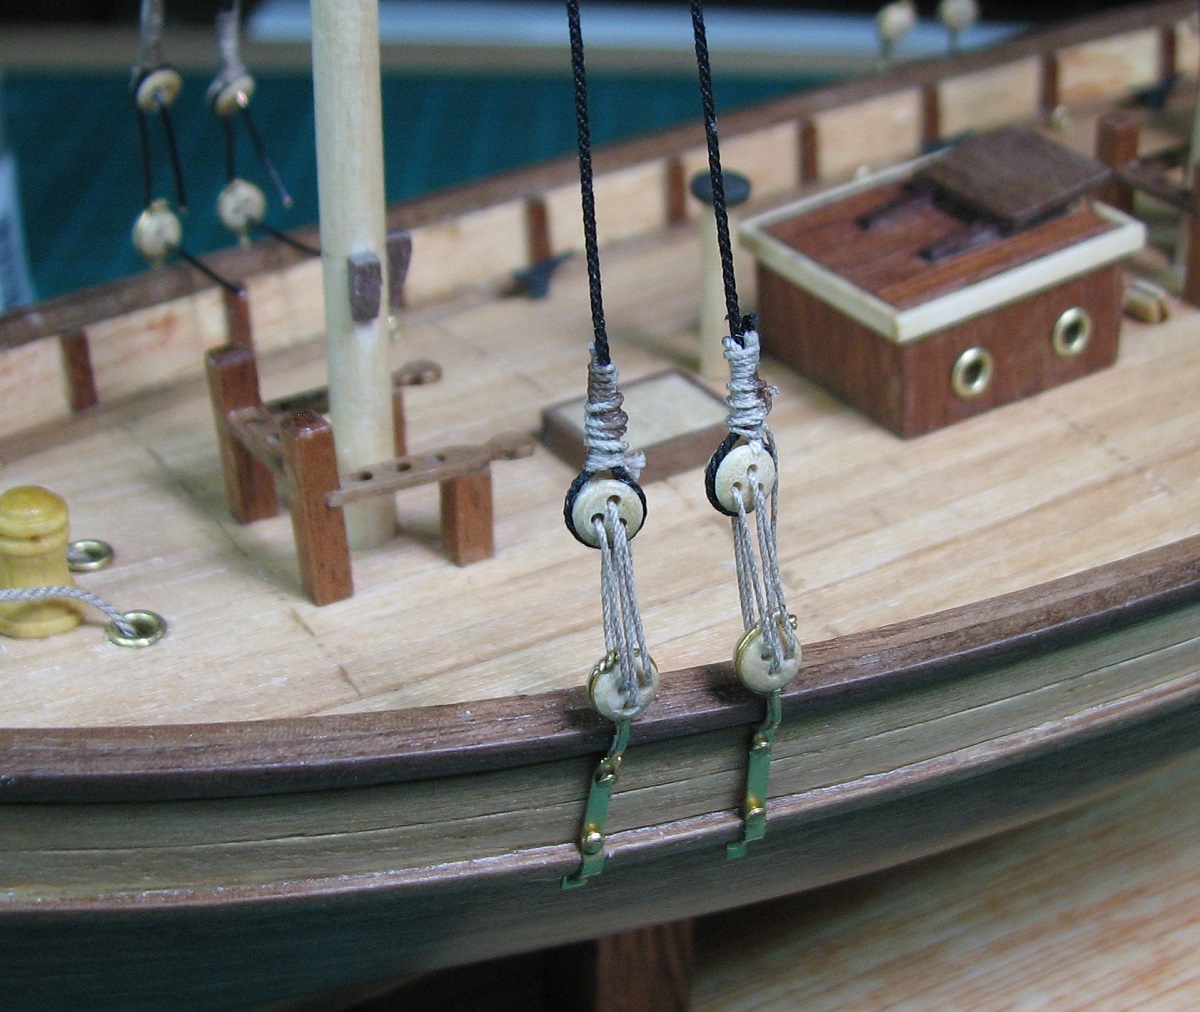 The kit instructions simply say to tie these lines off 'in a knot'. Even using the correct seizing and knots with the big line looked kind of bad, imagine it using regular old half-hitch knots on both the shrouds (the black lines) and the lanyards (the brown lines threaded through the deadeyes). If the kits were to include stuff like this, it would probably keep many more people in the hobby, rather than throwing their kits out in frustration. The goofy thing is, they would only need to 'produce' this sort of instructions once, because they are applicable to every kit that has shrouds and deadeyes, so the cost shouldn't really be an issue at all.
|
|
#
¿
Sep 9, 2014 20:17
|
|
|
Boomer The Cannon posted:I currently have about 20-25 cars in various stages of re-assembly (added weight, adjusted heights, painted wheels, coupler changes) to get my cars up to specifications for our club, for operation. With any luck, I can have them weathered, assembled and passing technical inspection by Halloween. That's a lot of cars to weather. I never was any good at that. Your first one pictured looks pretty good to me. Ship: 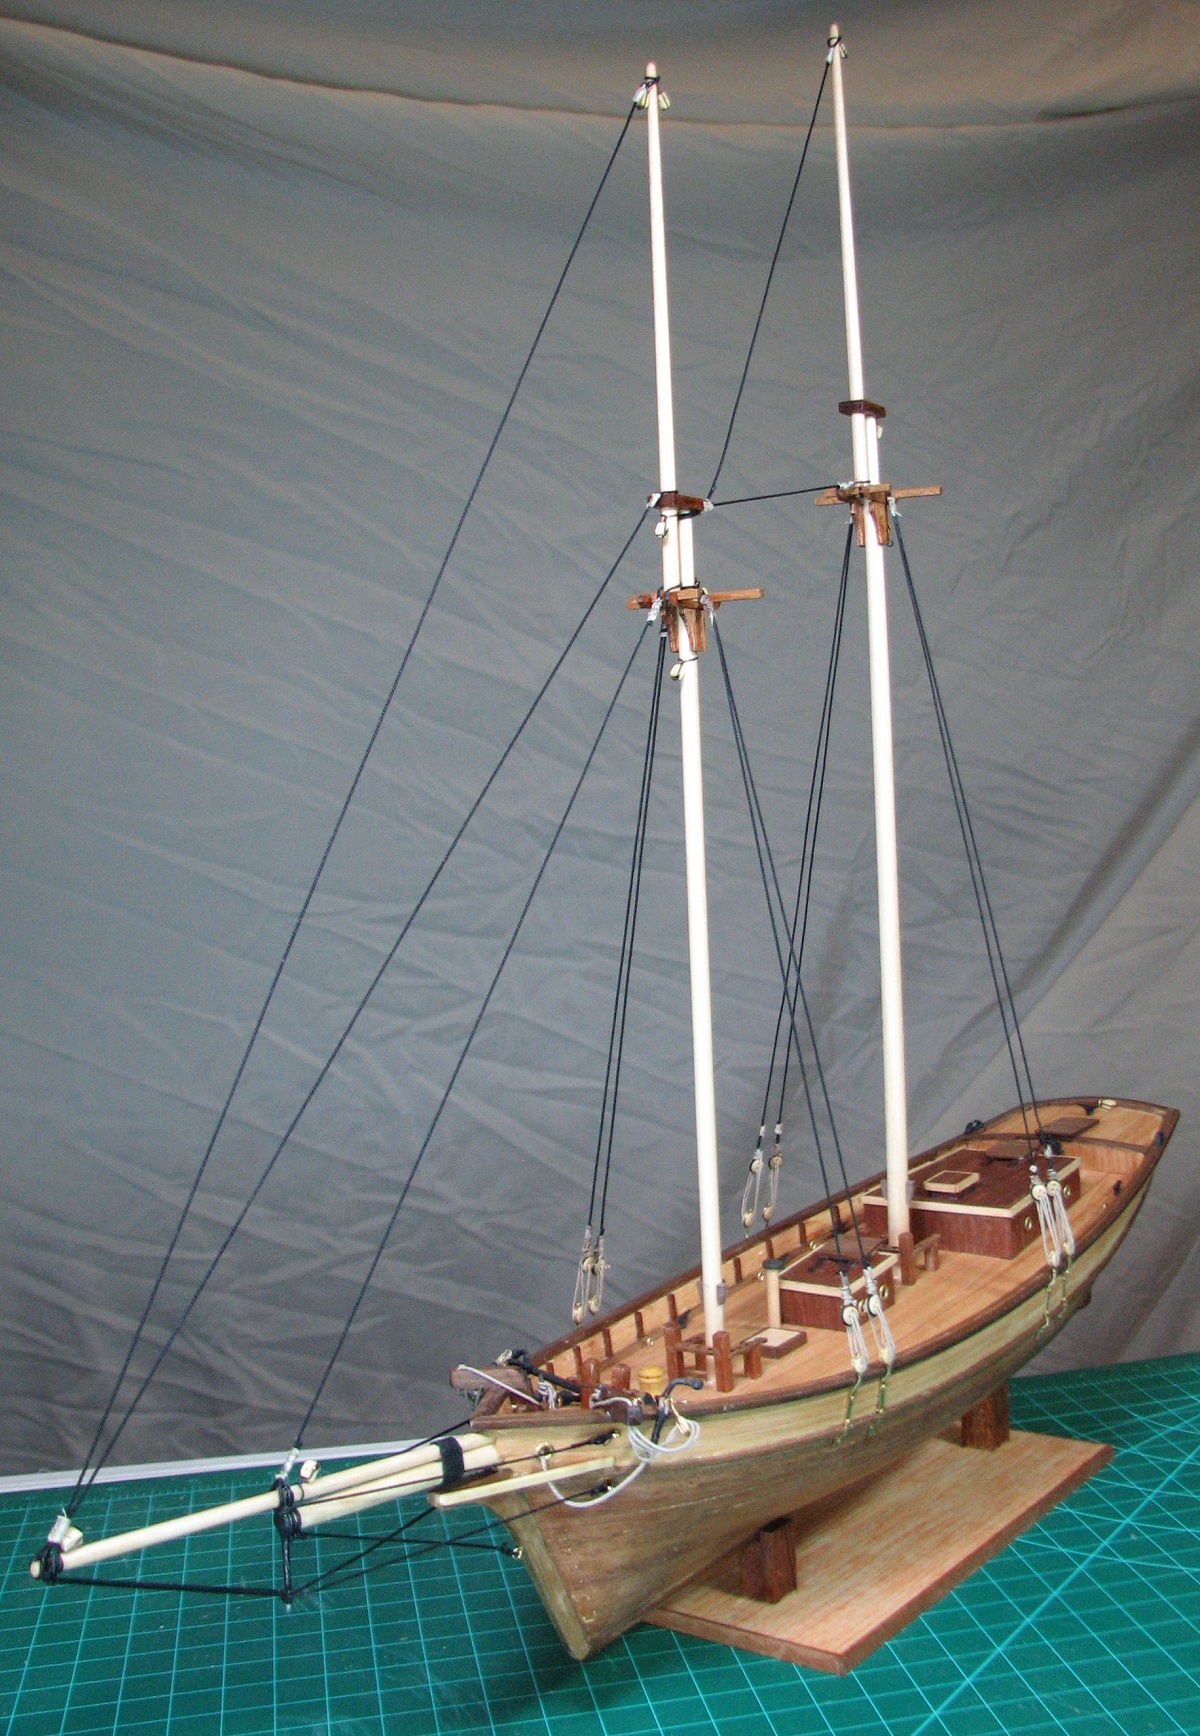 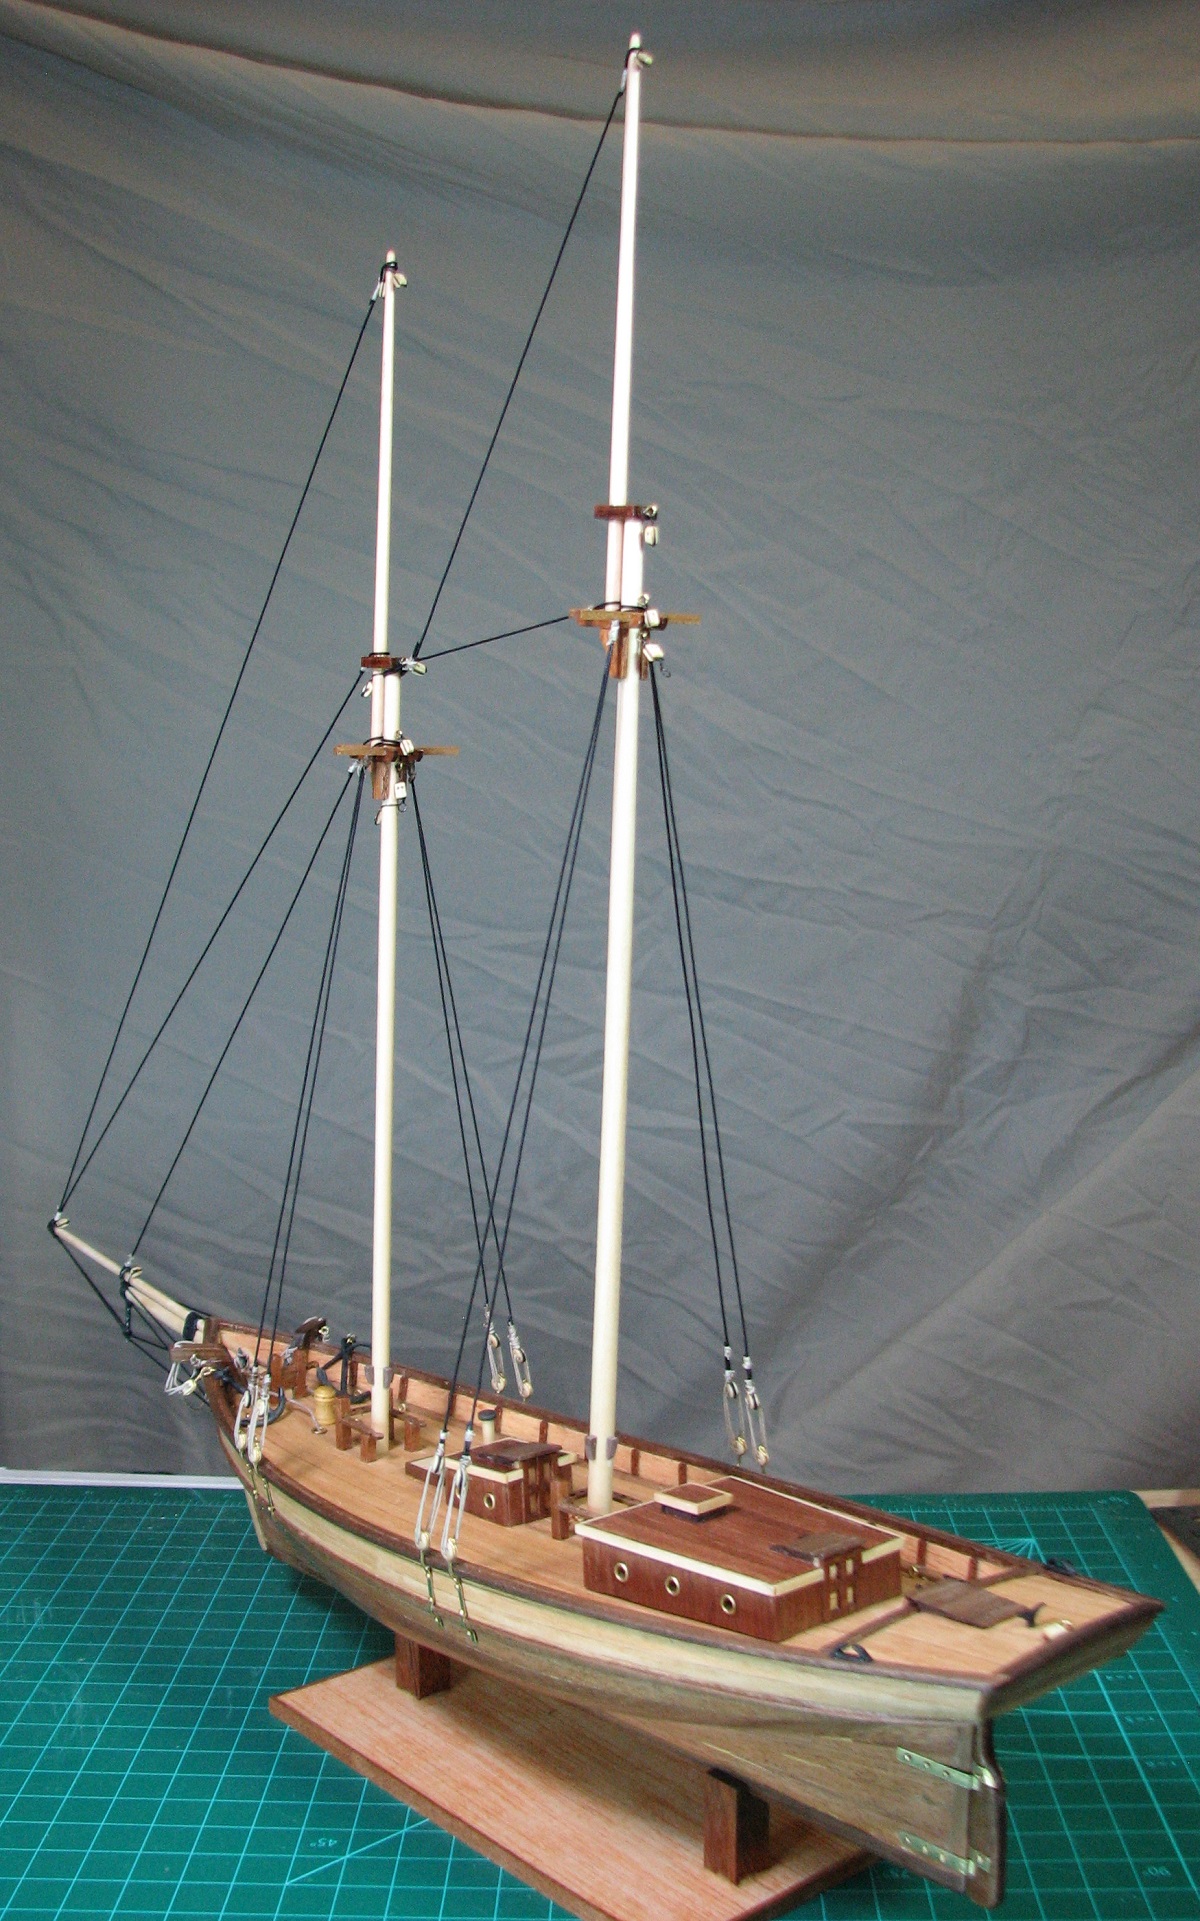
|
|
#
¿
Sep 10, 2014 06:47
|
|
|
I came very very close, more than once, to knocking the ship off of the flimsy stand that comes in the kit, so I decided I needed something better to hold the ship while I was working on it. I took a piece of basswood and an oak dowel, and made this. 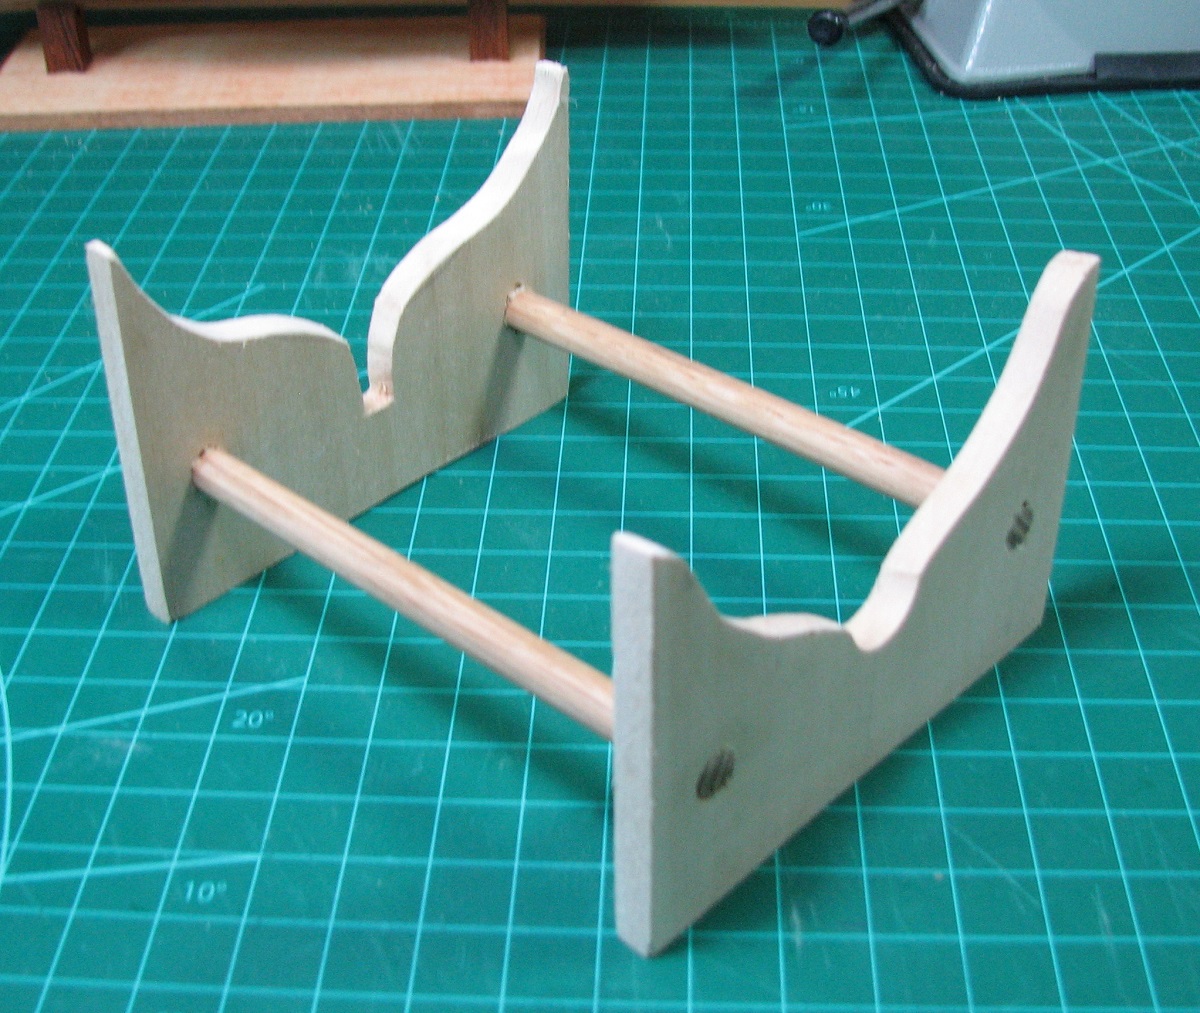 Turned out pretty well, and holds the ship really firmly. I added some black velvet, and will likely varnish this and use it as a permanent stand. Rat-lines officially suck, and I ended up cheating and just gluing them on because the rope provided won't hold a knot making it pretty much impossible to do it right. I completed the standing rigging (ropes that stay on all the time, supporting the masts, and have nothing to do with the sailing rig, which is called the running rigging). 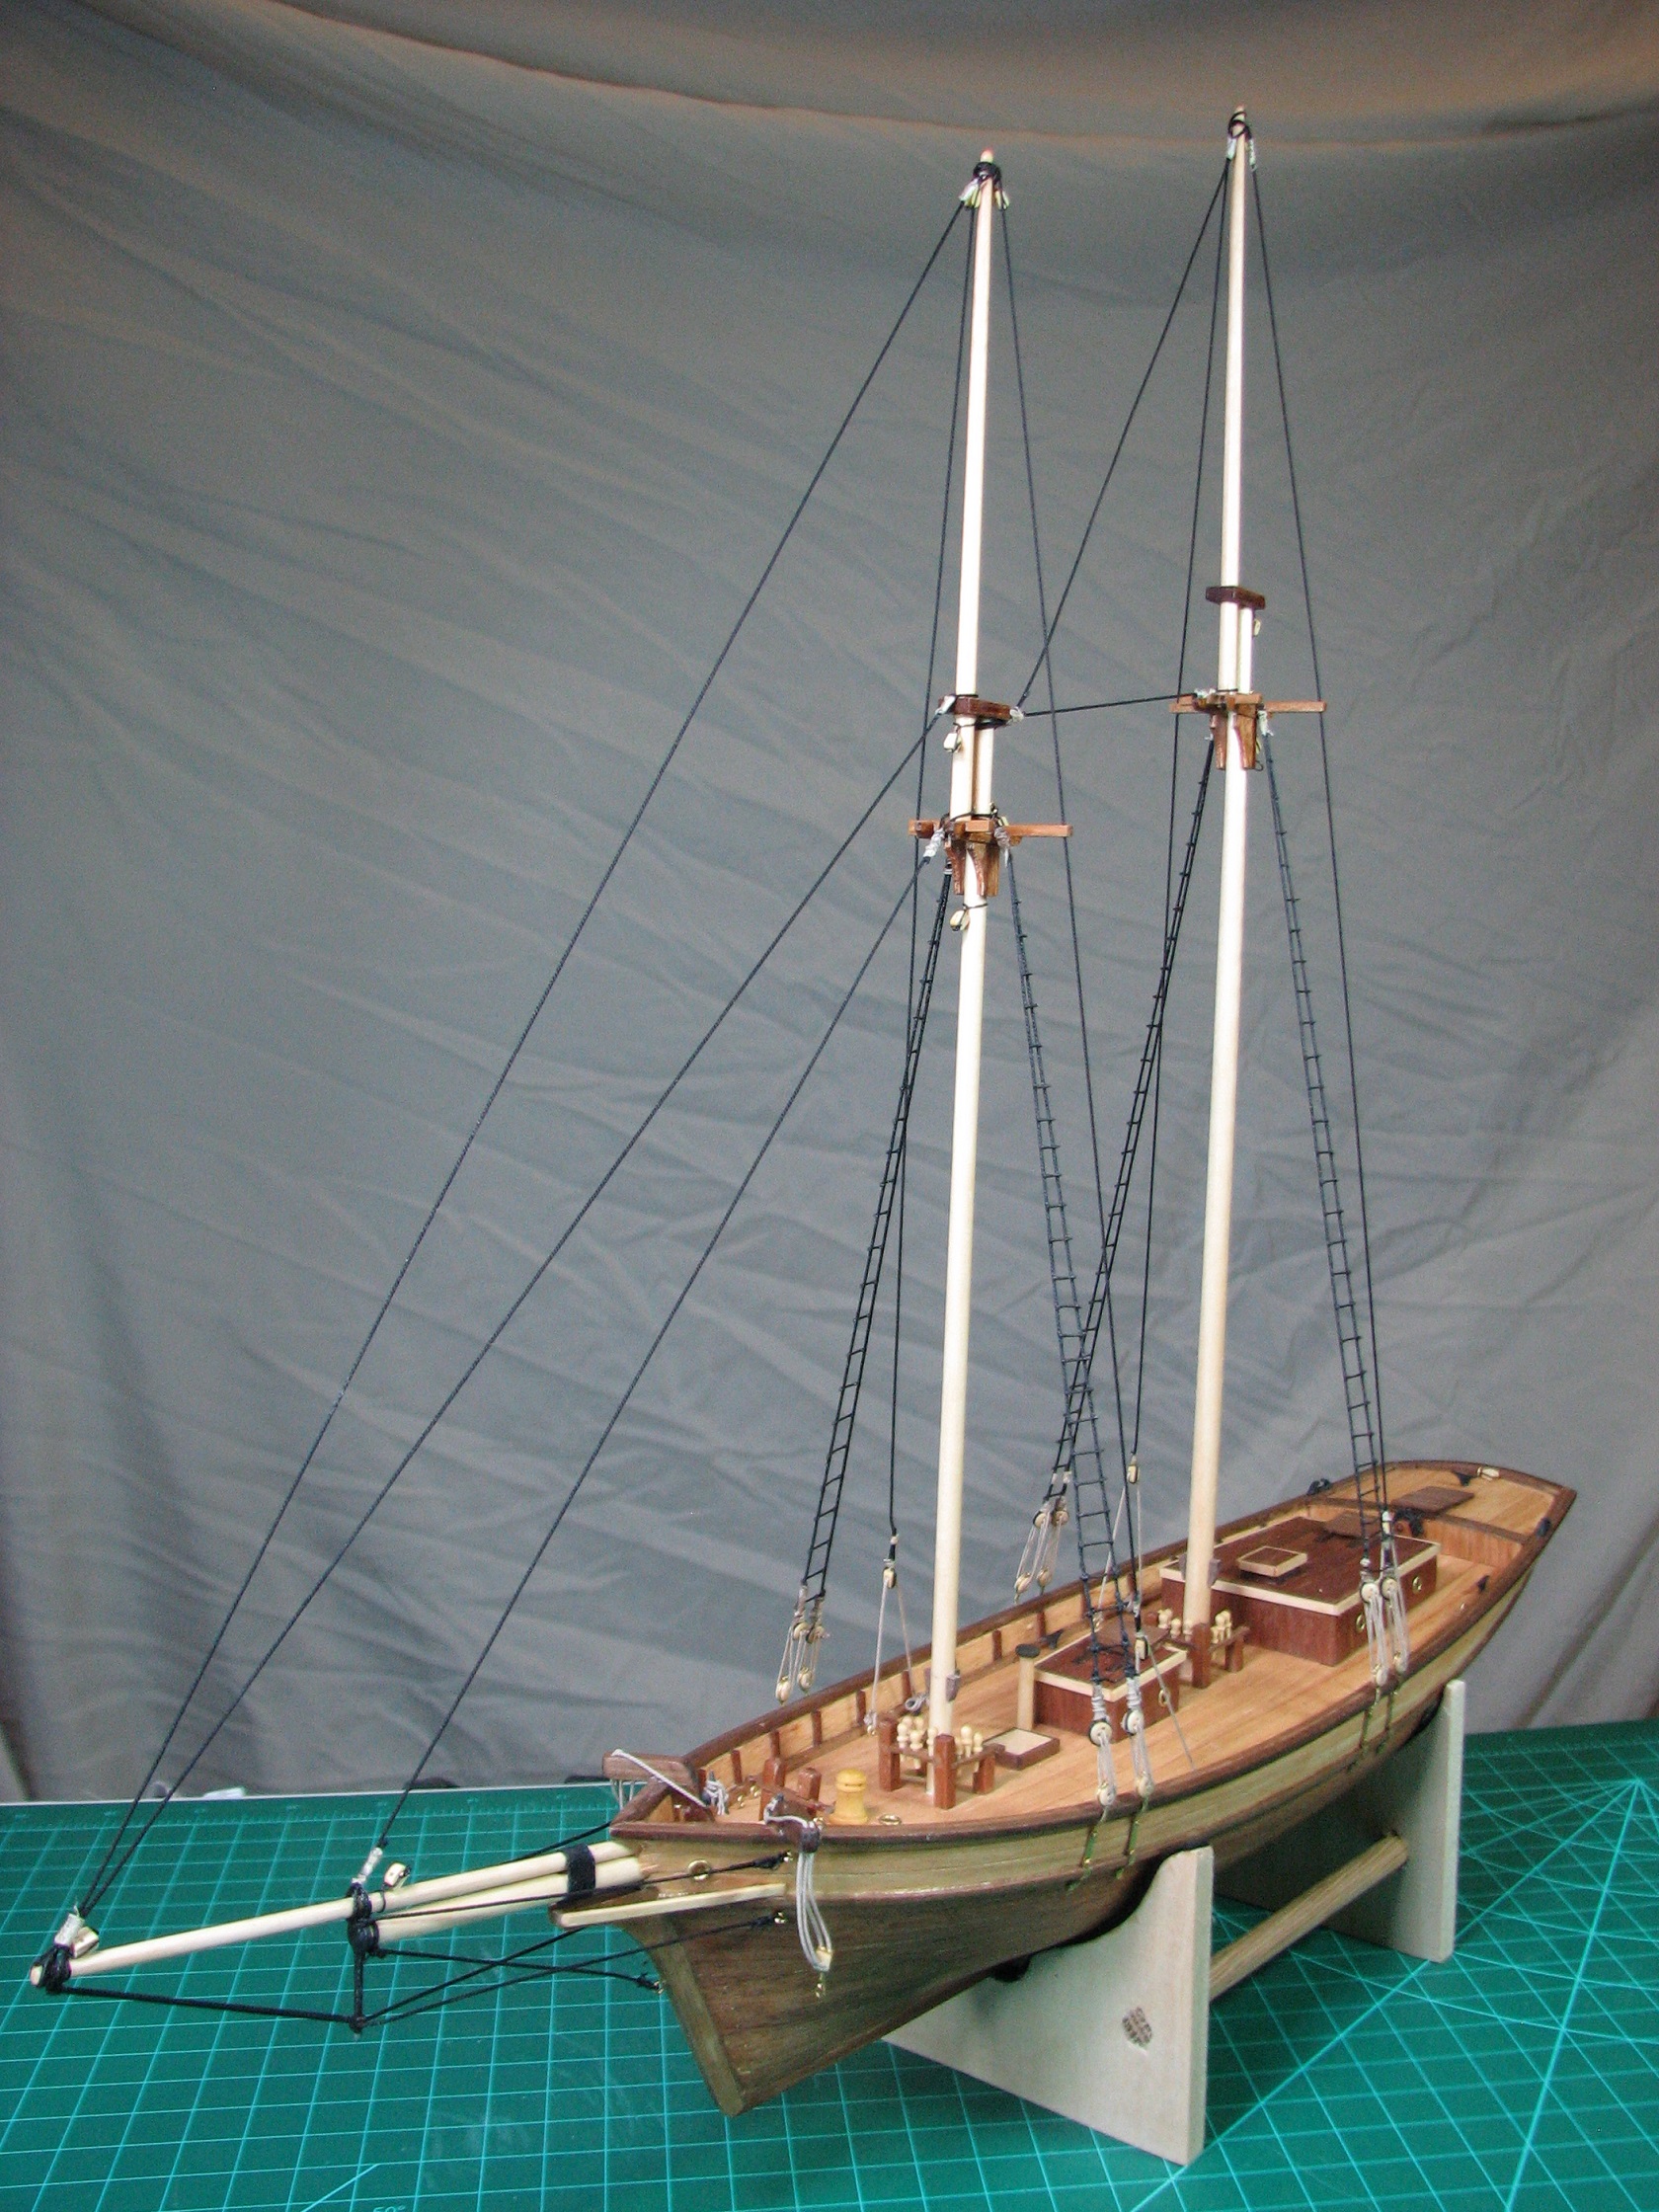 Next up I have to decide what I'm going to do with the sails, as hand-stitching them is not going to happen. Couple of rigging detail shots: 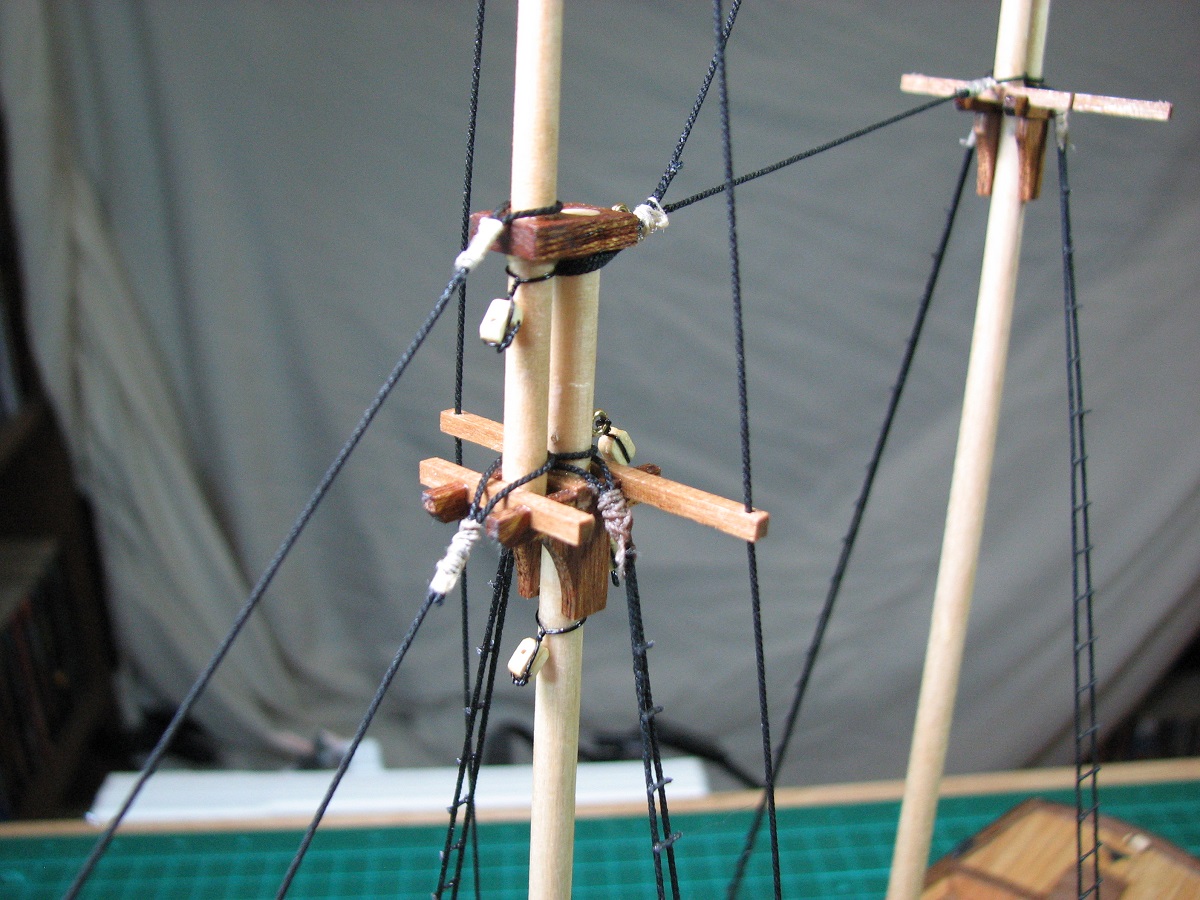 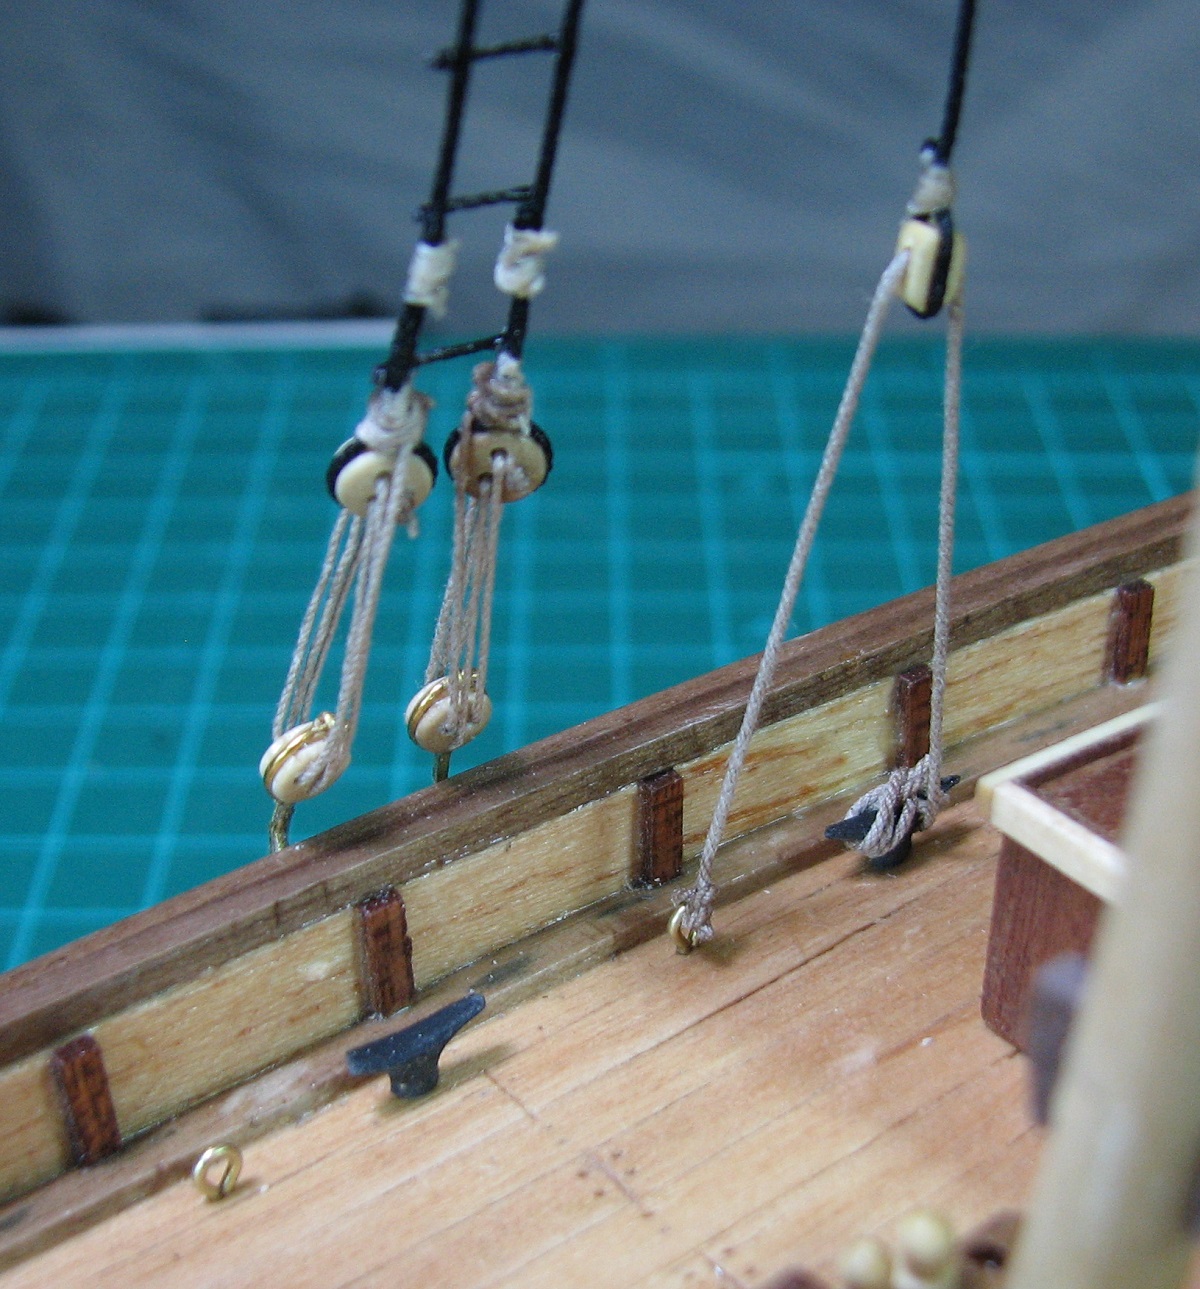
|
|
#
¿
Sep 12, 2014 04:07
|
|
|
Bloody Hedgehog posted:That's not cheating, that's actually the right way to do it. Rope this small will never hold a knot, so most ship builders will use a drop of fabric glue on each knot. Most of the really nice builds are knotted on with the correct method, but they also use a high-quality cotton rope of the appropriate size (like .005 or .008). The only rope I had available that was even close to small enough is some sort of polyester or other synthetic, and it just refuses to hold a knot. The higher quality rope I have for the rest of the rigging (.028 mostly) is holding knots just fine, but I didn't buy any of the super small rope in black, since the kit shows using the same size rope for the ratlines as for the shrouds. I tied 4 of the ratlines using the .028 rope and then cut them all back off, because using the same size rope for the ratlines and shrouds looked terrible (and is horribly out of scale, which is why it looks terrible). I probably should have used black thread, as it's actually just about the right size for scale, but I thought it just looked too small, so ended up gluing the smaller black synthetic rope into place. I have fabric glue on order from Amazon for the next kit I do, I've been using super glue on this one, and wood glue for all the wood to wood connections. Bruiser posted:Anyone have ideas for stands? My Star Trek models are just kind of laying on a shelf. They look like butt, but I'm proud of them and want to show them off. Tried building a cradle out of the left over sprue, but it didn't really hold up. I've seen people fashion space-ship stands by building an 'arm' out of styrene or wood coming from the end of a wooden base (so the arm would extend back out over the base), and then hanging the model from the arm. This of course requires that you have something to hang 'from' on the model, although I suppose you could form a sort of a sling out of the thread/line (fine fishing line) used to hang it. Another idea would be a wood base with a clear lexan rod extending up to the model. The Locator fucked around with this message at 07:00 on Sep 13, 2014 |
|
#
¿
Sep 13, 2014 06:53
|
|
|
Making the yards was fairly interesting, they required a lot of tapering and sanding to shape after attaching the jaws. Ended up ok though, actually managed to match the plan shape almost exactly. The two single blocks attached with black wire were wrong, and I didn't realize it until after the yards were mounted to the masts, so I had to cut them off and replace them with double blocks while they were on the ship, that was entertaining.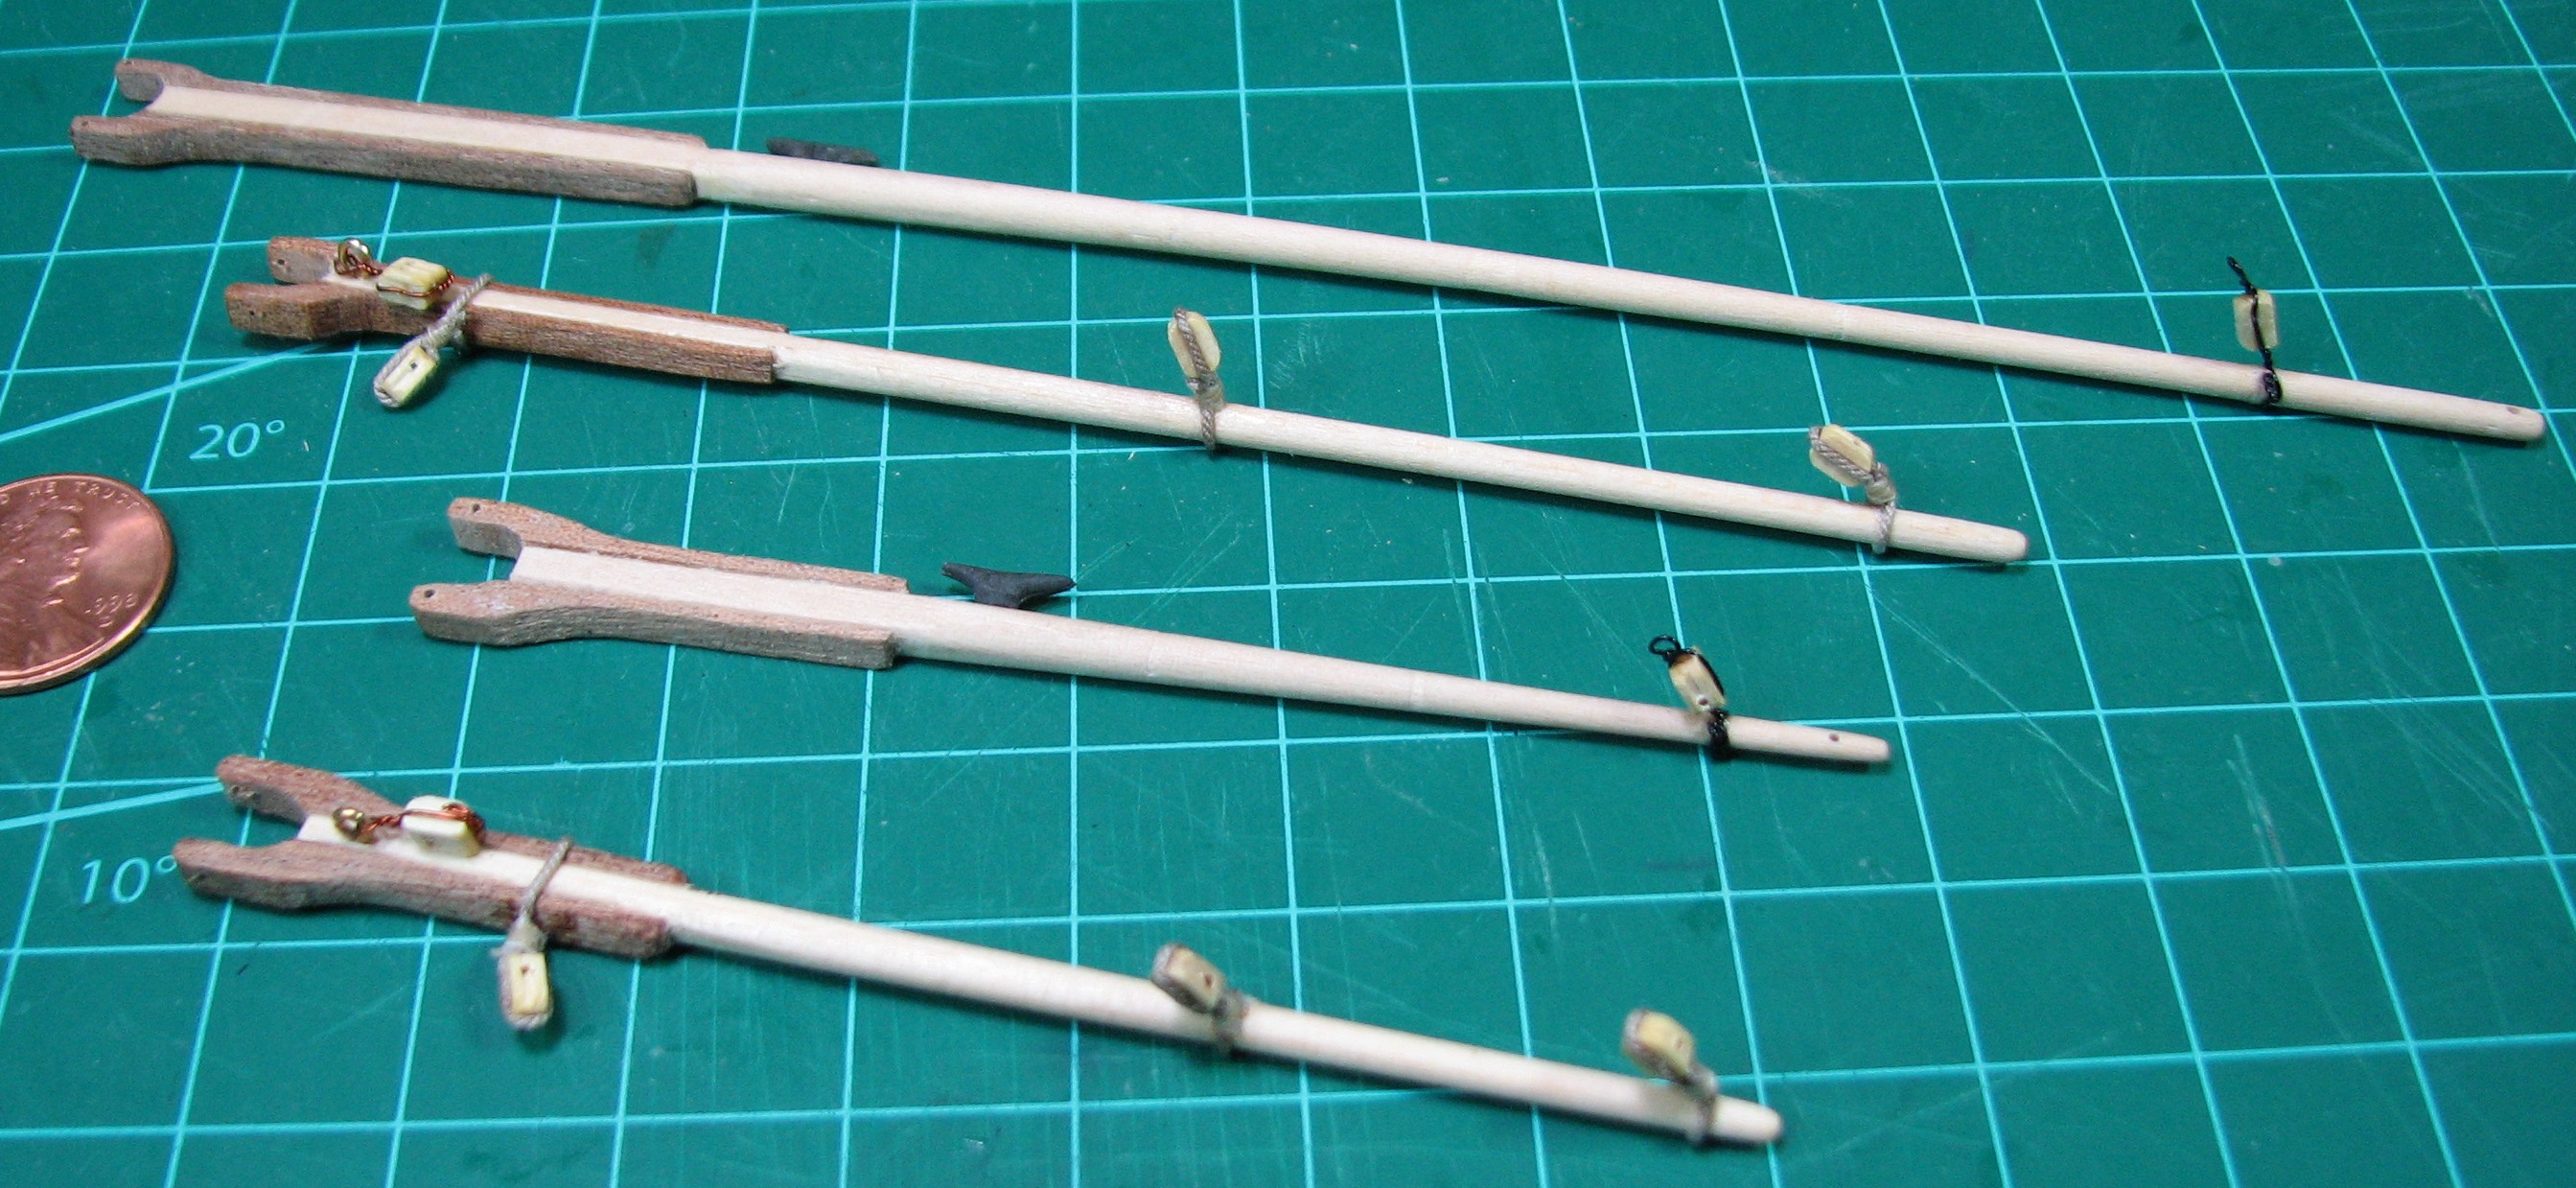 When I started test fitting the yards, I realized that getting them to hold the correct angle both side to side, and vertically was going to be a real challenge, so I drilled them for pins, and then drilled holes in the masts to receive them. 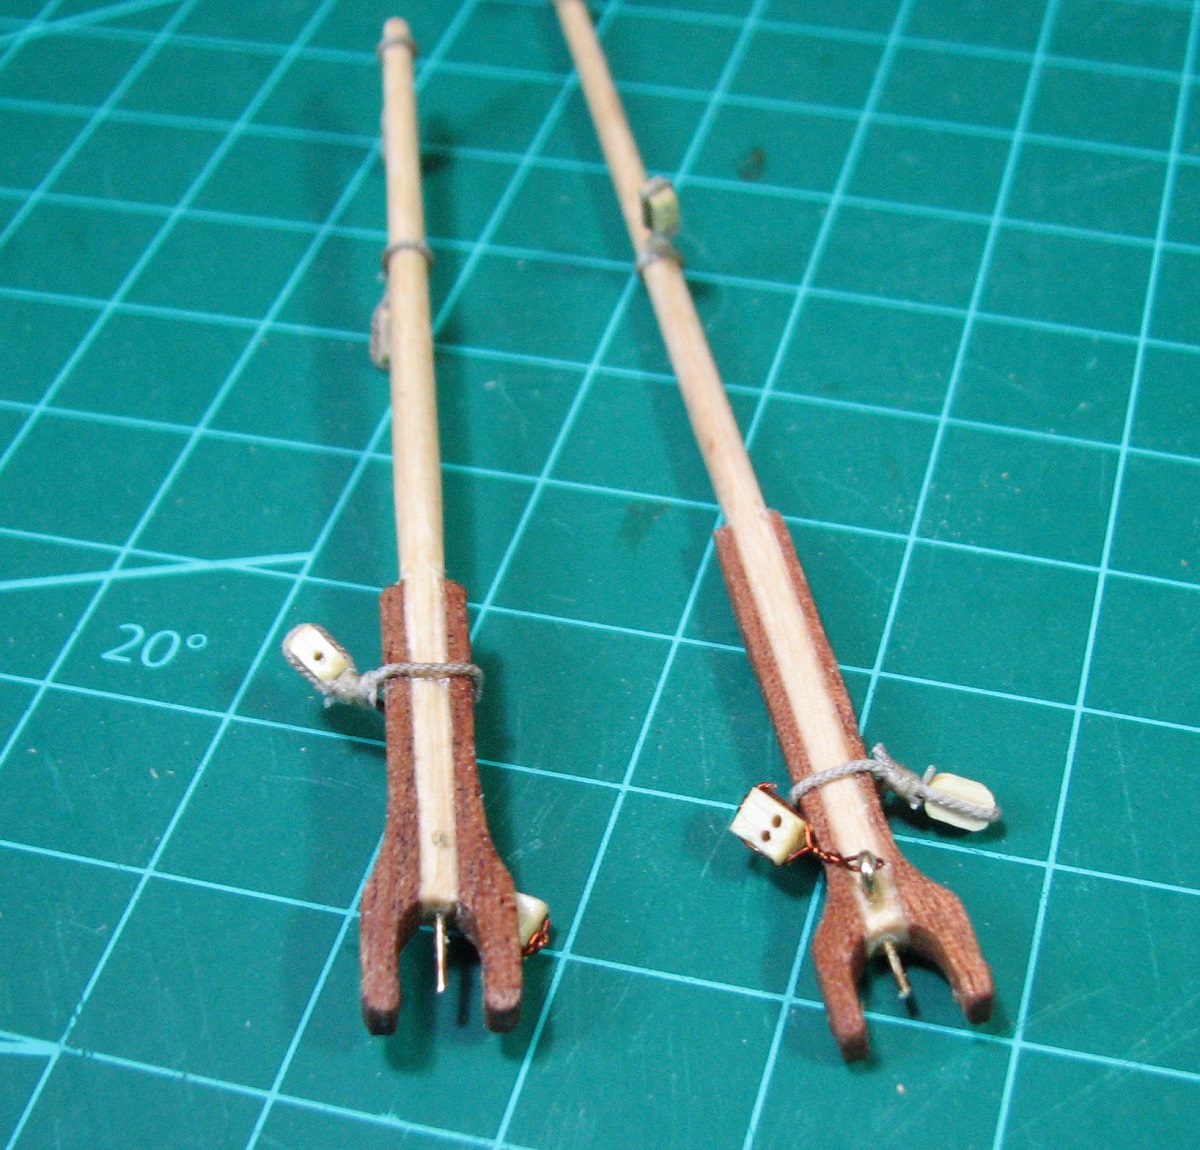 Worked really well, here they are test fit and holding in place without any glue. 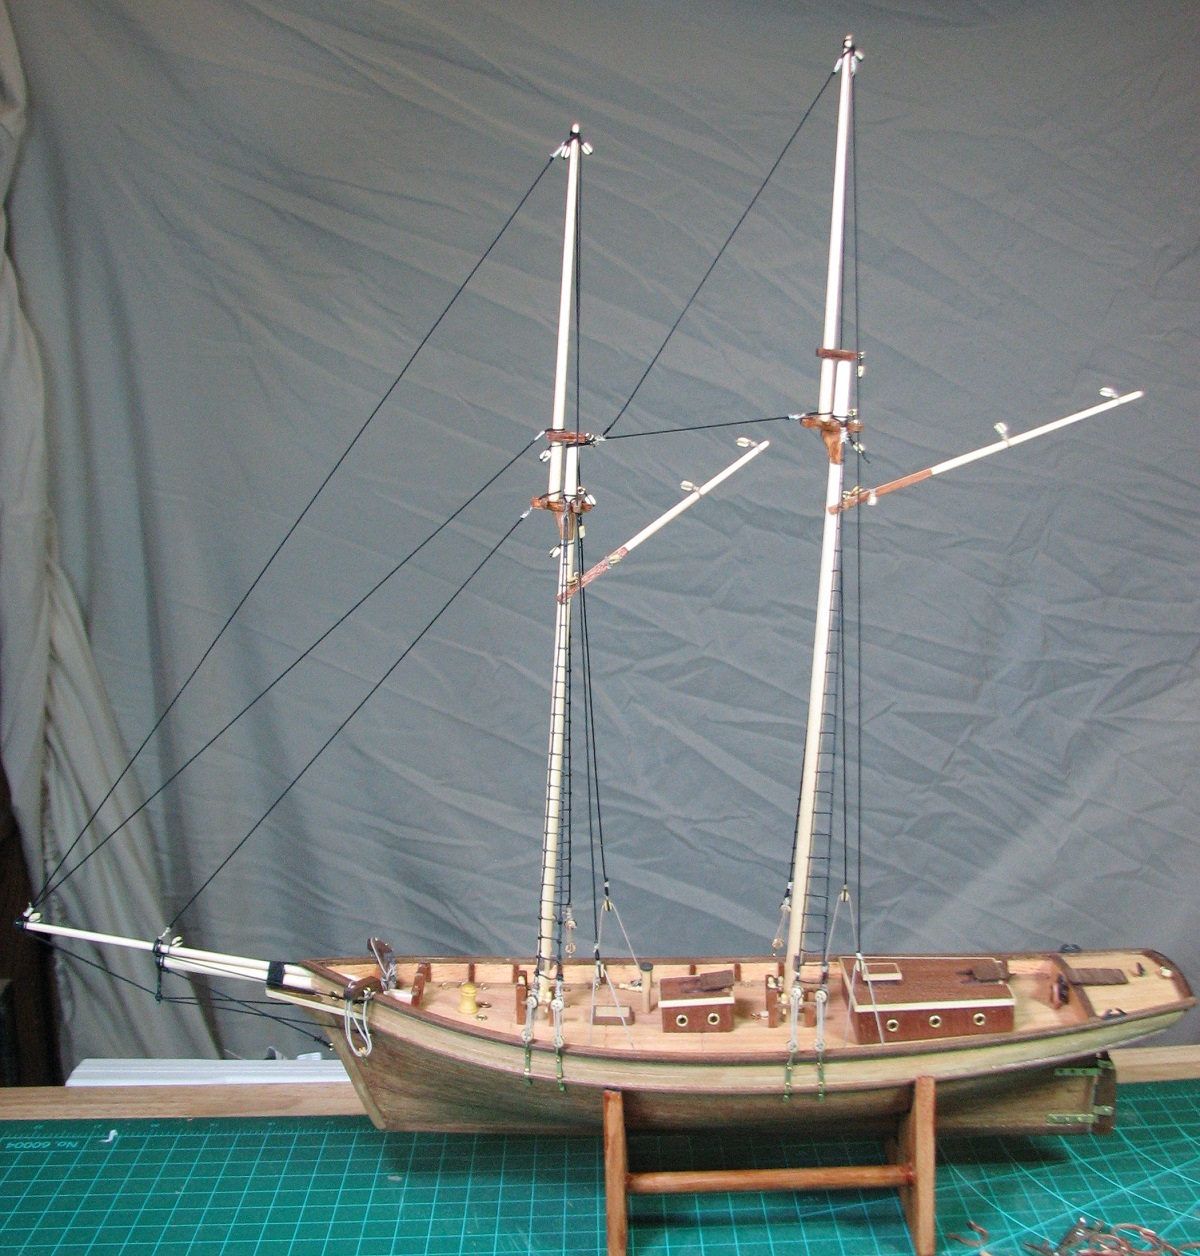 I decided to finish the ship without sails, as the stitching on them is quite extensive, and the kit doesn't have the correct blocks and rigging to actually hang them in the correct way. Tonight I went into a marathon rigging session and took no pictures at all because I forgot. However, the marathon, and the Carmen, are both complete now!  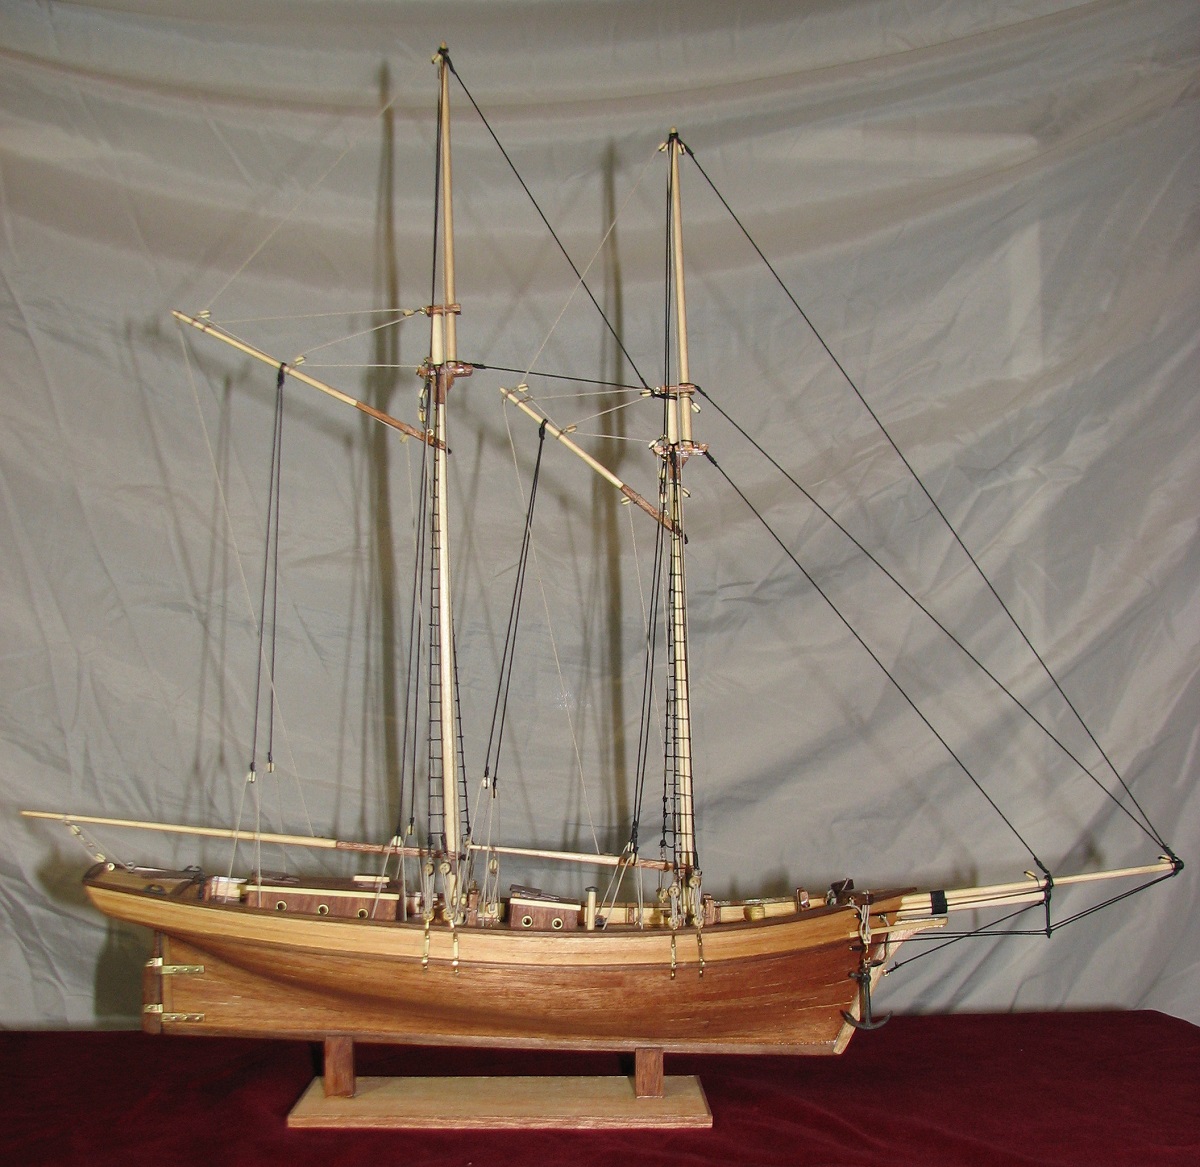 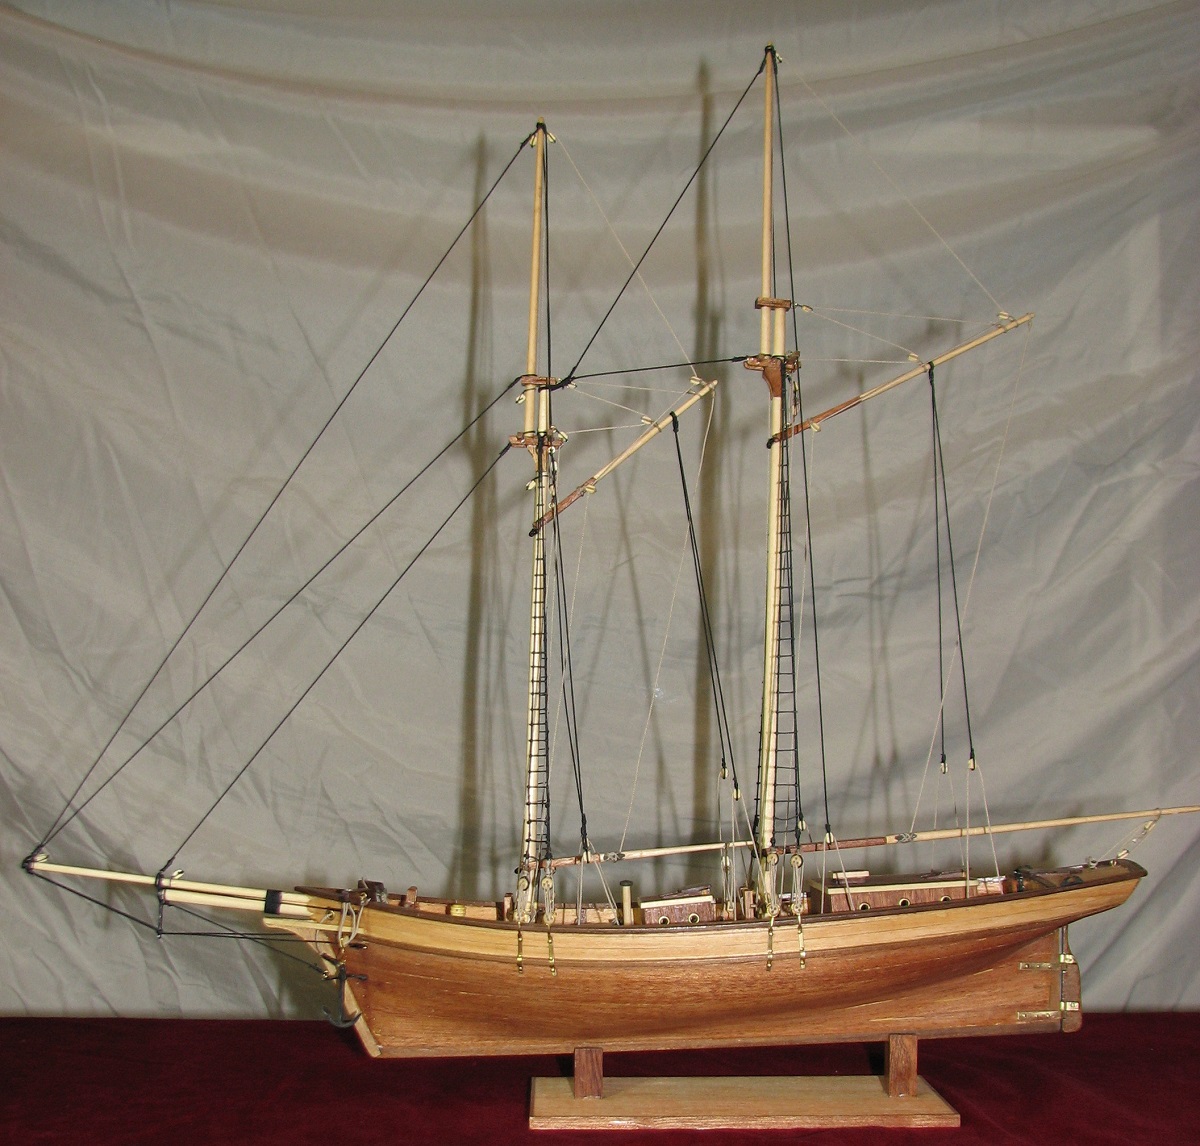 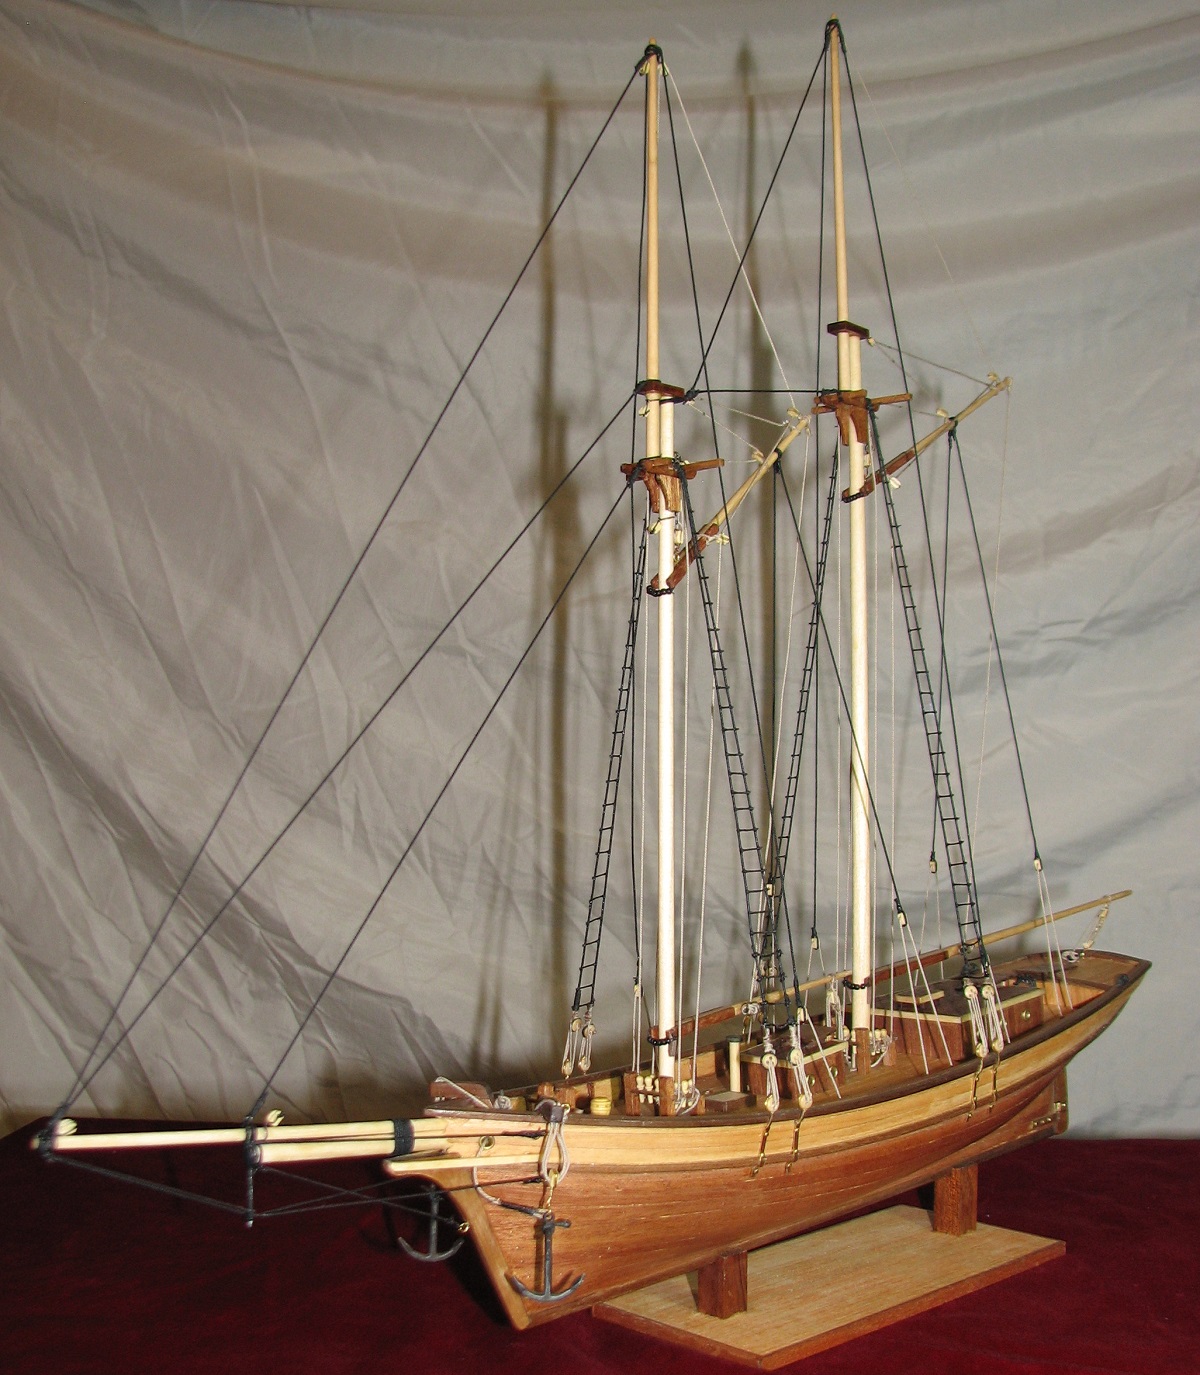 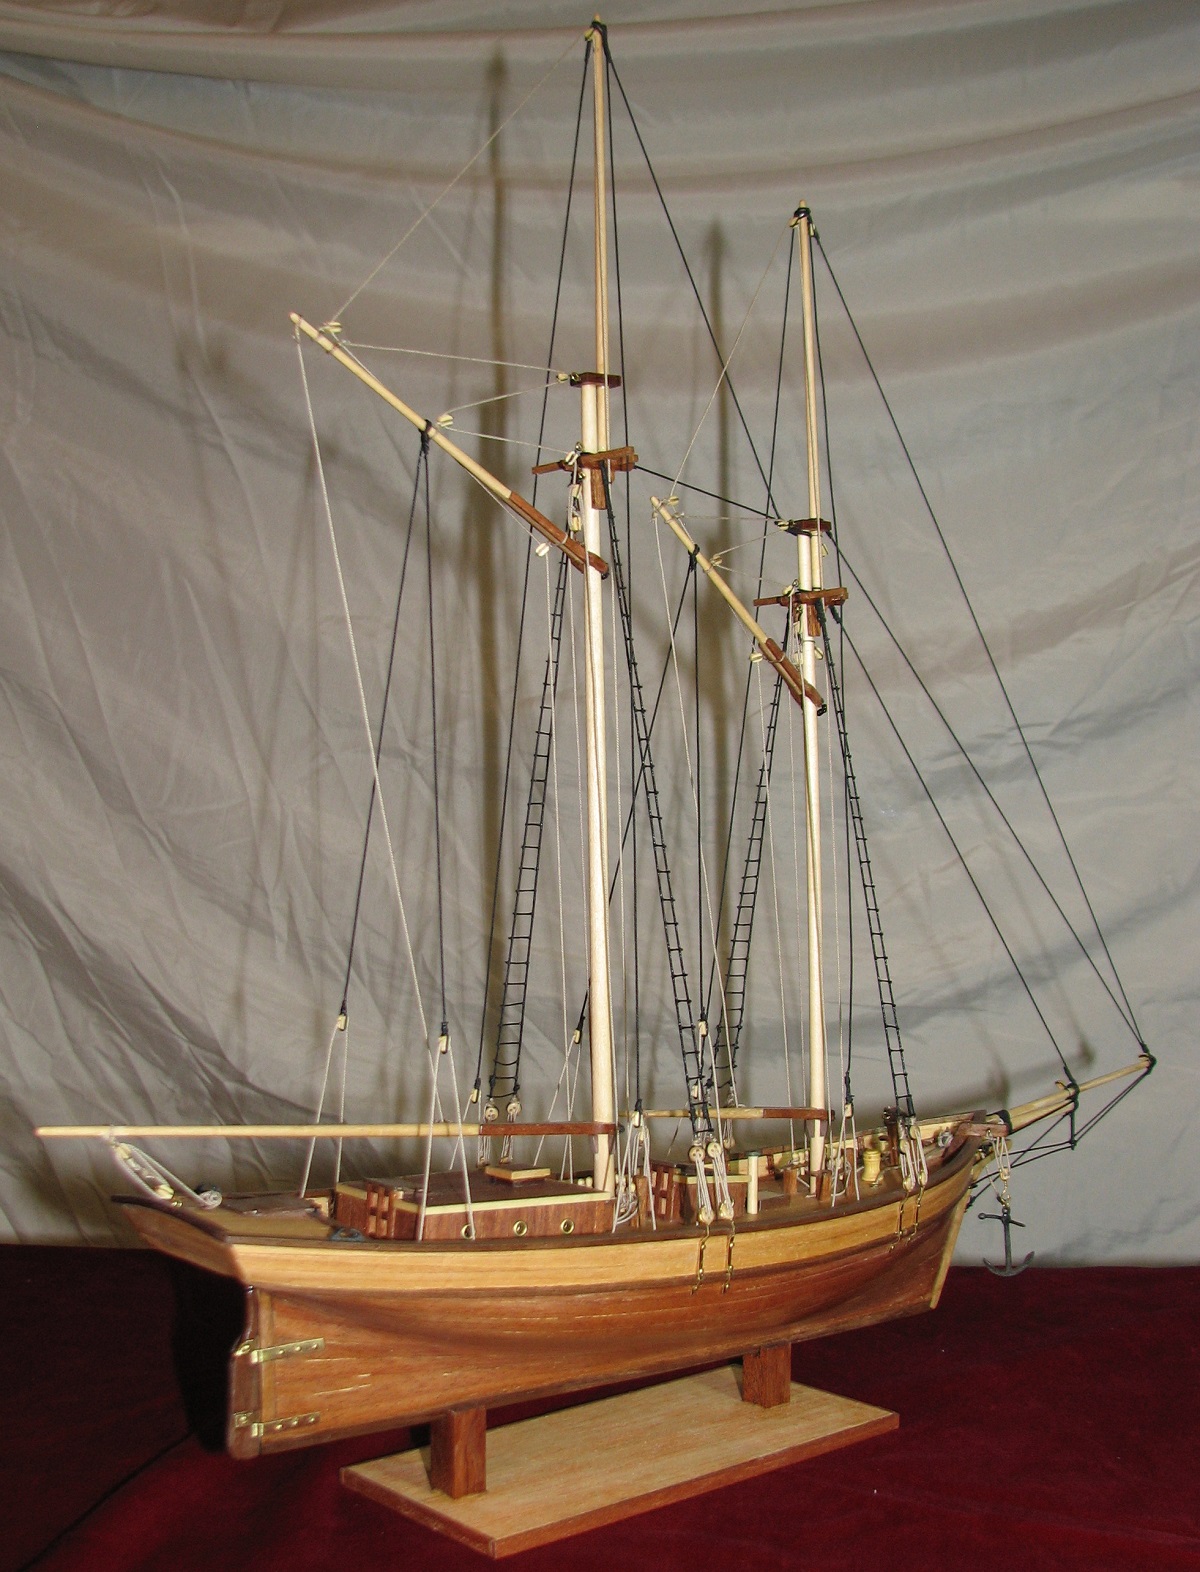 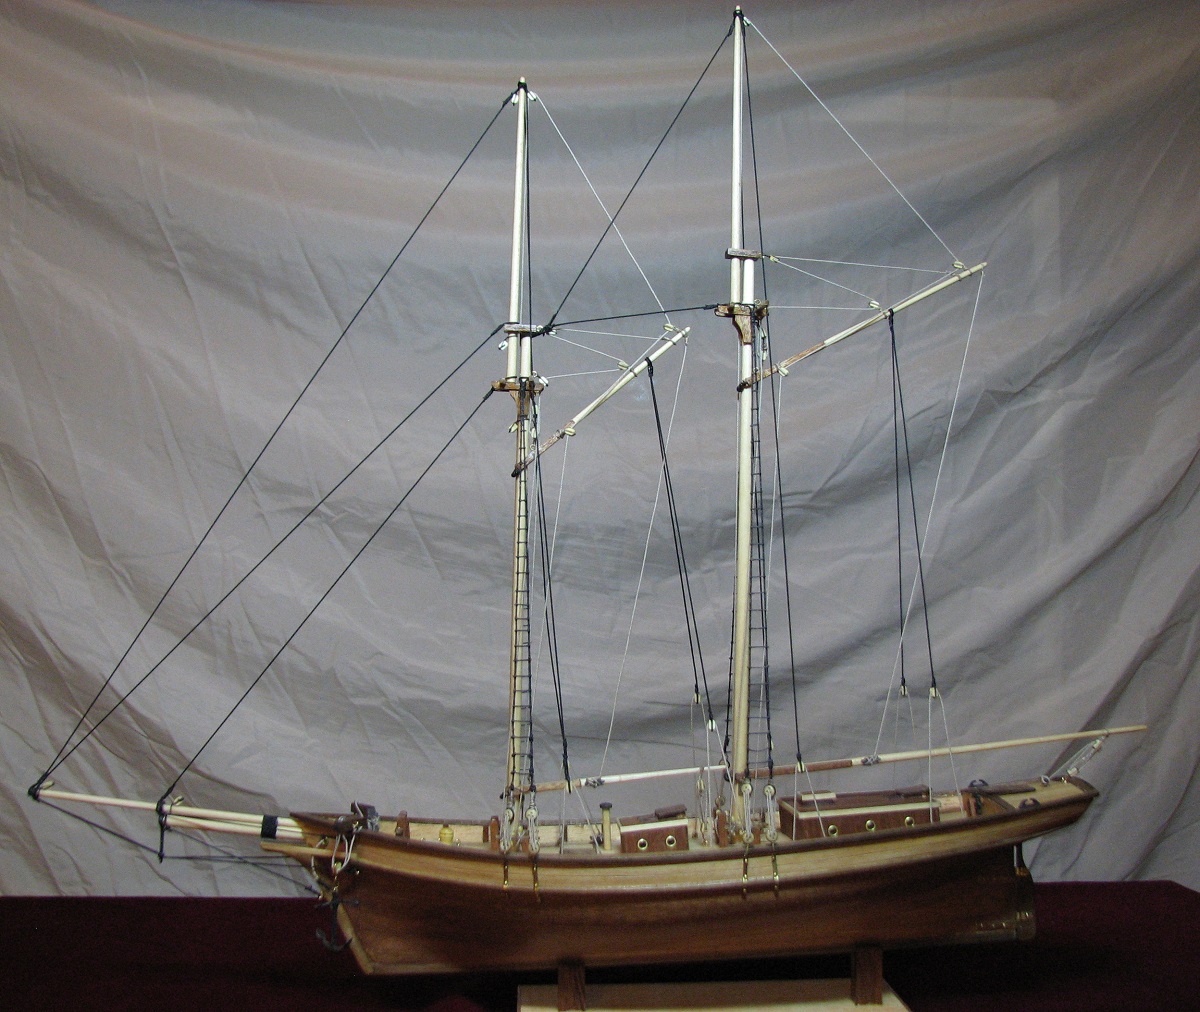 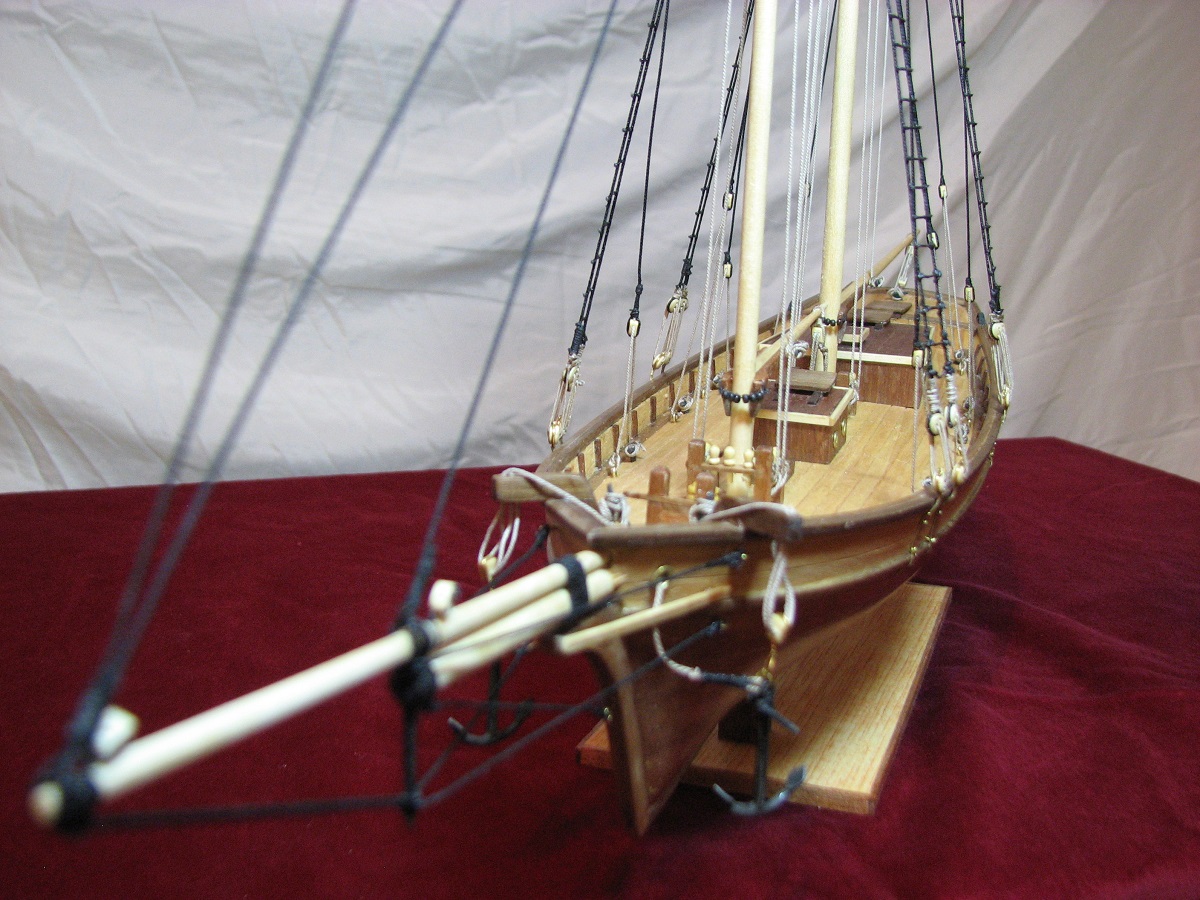 This was a lot of fun, and I learned a great deal about how these wooden ship kits work. Lots of lessons to apply to my next kit, which I have already acquired. Hope the multiple updates and lots of pictures didn't annoy people too much.
|
|
#
¿
Sep 18, 2014 08:24
|
|
|
Thanks everyone. It's certainly not perfect, but I won't be ashamed to display it. Probably going to build a shelf and put it in my office at work.krushgroove posted:I've always wanted to do one, now I have a good idea how much work it'll take! I put this together in just over a month (started Aug 15th). However, I 'rushed' it, and the details show it, especially compared to the amazing builds I've been looking at over on Model Ship World. Time investment over that period, since I have no life (guesstimating, I didn't keep any sort of a log) was probably 200+ hours (may be a conservative estimate, some days I stayed up far too late fiddling with this), not including time spent hitting various stores for tools and materials.
|
|
#
¿
Sep 18, 2014 16:35
|
|
|
Bloody Hedgehog posted:Great work on this! Despite rushing as you say, it still looks really good. What's your next ship going to be now? I'm taking baby steps, my next build is going to be the "Armed Virgina Sloop" by Model Shipways. It's only a single mast, but has more extensive and much more accurate rigging, as well as a square rig style topsail, as well as 6 cannons and 10 swivel guns, and it is also a much larger scale at 1:48 so I'll need to spend a lot more time doing detail work. The Snake is not a kit I'd take on yet personally, but if you take it slow and avail yourself of all the resources available (especially the forums at Model Ship World) any kit can be done first. For rigging, this will be very helpful for you I believe: -Link removed, found out it was pirated It downloads crazy slow - like old school modem speeds, but it's free! It's 126 pages of stuff like this: -Link removed, found out it was pirated Edit: gently caress that stupid slow link I posted, no reason for you to suffer through that too. I'm hosting it in a zip file here - 76'ish MB (right-click, save): -Link removed, found out it was pirated "Rigging - Period Ship Models" The Locator fucked around with this message at 08:35 on Aug 6, 2016 |
|
#
¿
Sep 19, 2014 00:20
|
|
|

|
| # ¿ Apr 26, 2024 10:32 |
|
|
Arquinsiel posted:Are you sure how you understand the way in which the model kit porn thread works? Well, it seemed to be mostly people posting completed stuff, not builds in progress, so I wasn't sure. I'm happy to post build updates if it's appropriate to the thread.
|
|
#
¿
Sep 19, 2014 01:41
|
|