

|
PaintVagrant posted:Journal log, Day 650 in The Land of Folded Lime Green Towels...
|
 #
?
Oct 8, 2009 23:10
#
?
Oct 8, 2009 23:10
|
|


|

|
| # ? Apr 20, 2024 00:35 |
|
|
crime fighting hog posted:Kinda unrelated but I started working on the elves I got from you way back when. Most of them stripped pretty well and I'll be priming/painting hopefully in the next few weeks at this rate. Awesome! Though I suppose it's too late for you to post pictures so I can compare the horrible-ness of my painting a year ago to how bad I am now? 
|
|
#
?
Oct 9, 2009 00:02
|
|

|
bhsman posted:Awesome! Though I suppose it's too late for you to post pictures so I can compare the horrible-ness of my painting a year ago to how bad I am now? Definitely, that poo poo went into simple green the day I got it. But it wasn't THAT bad.
|
|
#
?
Oct 9, 2009 01:27
|
|

|
crime fighting hog posted:Definitely, that poo poo went into simple green the day I got it. But it wasn't THAT bad. Oh well, hopefully they'll turn out better for you. ")
|
|
#
?
Oct 9, 2009 03:14
|
|
|
Has anyone used Vallejo's crackle medium? I bought some to try it out, but so far it doesn't seem to work. The guy I tested it on just looks very glossy, no sign of crackling after a full 90 minutes. I'm going to leave him overnight and see if anything develops, but I'm not optimistic. I'm not sure if 28mm is just too small a surface to get the crackle effect forming properly, or if I missed something. I followed the instructions on vallejo's site, put down acrylic in two layers, then the crackle medium.
|
|
#
?
Oct 9, 2009 04:52
|
|


|
Ashcans posted:Has anyone used Vallejo's crackle medium? I bought some to try it out, but so far it doesn't seem to work. The guy I tested it on just looks very glossy, no sign of crackling after a full 90 minutes. I'm going to leave him overnight and see if anything develops, but I'm not optimistic. Can you link me to the guide? I have a bottle of it laying around. No idea what I would use it on...
|
|
#
?
Oct 9, 2009 06:16
|
|

|
Does anyone have any suggestions as to how I could go about making bases like these on my own? http://www.back2base-ix.com/index.php?_a=viewProd&productId=1820
|
|
#
?
Oct 9, 2009 06:42
|
|

|
Ashcans posted:Has anyone used Vallejo's crackle medium? I bought some to try it out, but so far it doesn't seem to work. The guy I tested it on just looks very glossy, no sign of crackling after a full 90 minutes. I'm going to leave him overnight and see if anything develops, but I'm not optimistic. I tried it to get a broken earth effect on some bases but found it very hard to control. The results were varied with different sizes of 'cells', and the cracks made circular patterns that followed the edges of the base which wasn't what I was going for. In the end I gave up on it.
|
|
#
?
Oct 9, 2009 06:57
|
|
|
Aranan posted:Does anyone have any suggestions as to how I could go about making bases like these on my own? Buy the plasticard sheet with brick imprint, cut it into circles and stick it to your bases
|
|
#
?
Oct 9, 2009 06:58
|
|

|
Ashcans posted:Has anyone used Vallejo's crackle medium? I bought some to try it out, but so far it doesn't seem to work. The guy I tested it on just looks very glossy, no sign of crackling after a full 90 minutes. I'm going to leave him overnight and see if anything develops, but I'm not optimistic. I've tried crackle medium before with pretty poor results. I didn't really work at it very hard, so there might be something to it still. Are you sure you did it right? You're supposed to put down your base color, then the crackle medium, and when that's dry, apply your top color. Reading what you wrote it sounds like you put the medium on top.
|
|
#
?
Oct 9, 2009 07:43
|
|


|
Ashcans posted:Has anyone used Vallejo's crackle medium? I bought some to try it out, but so far it doesn't seem to work. The guy I tested it on just looks very glossy, no sign of crackling after a full 90 minutes. I'm going to leave him overnight and see if anything develops, but I'm not optimistic. poo poo. I was just playing with that the other day. There are two methods. One uses the crackle medium between two layers of color, which I didn't try. and one uses crackle medium on the top layer. My results were pretty crappy. I tried it out on a piece of plasticard and then on a Tau warrior that was lying around the shop. The first time I painted one layer of red paint on plasticard then painted over it with a section of crackle medium and two sections of crackle medium mixed with color. Mixing it with color doesn't really do anything. The other part had all the paint peel off. Next time, I sprayed the plasticard with red Krylon Fusion, then painted over the whole thing with a coat of black paint. Then I painted a thin coat of crackle medium over half the card and a really thick coat over the other half. Then I read this tutorial and went home to let it dry over night. I also globbed it on to a some Tau dude that was left at the shop for god knows how long. Nothing happened but I don't know what it was painted with in the first place. The second plasticard had some fair results but we couldn't really think of a use for it.
|
|
#
?
Oct 9, 2009 08:05
|
|


|
PaintVagrant posted:Buy the plasticard sheet with brick imprint, cut it into circles and stick it to your bases 
|
|
#
?
Oct 9, 2009 12:42
|
|
|
Thanks for all the feedback. It sounds like a lot of people are having trouble with it, so I guess its good to know that its not just me. It's a pain that apparently its so hard to use, I was really hoping that I would be able to make use of it on some new projects. I guess I'll keep trying and see if I can get it down. Bobx66 posted:Can you link me to the guide? I have a bottle of it laying around. No idea what I would use it on... Fix posted:Are you sure you did it right? You're supposed to put down your base color, then the crackle medium, and when that's dry, apply your top color. Reading what you wrote it sounds like you put the medium on top.
|
|
#
?
Oct 9, 2009 12:43
|
|
|
Aranan posted:Does anyone have any suggestions as to how I could go about making bases like these on my own? 
|
|
#
?
Oct 9, 2009 13:27
|
|
|
Jesus that works amazingly well and makes them look a foot bigger.
|
|
#
?
Oct 9, 2009 13:27
|
|
|
Saw this in the gibbus thread but I'm posting here to say that is quite clever (+ a great use of old sprues) and may get stolen by me at some point in the future  . .
|
|
#
?
Oct 9, 2009 13:50
|
|

|
I've realized that my biggest weakness, when painting, is that I can't blend. I can layer, I can water down paints properly, and I've got good brush control. But I can't get a smooth gradient from one color to another. I don't know if it's paints that are too thin or not thin enough or not having enough colors in between, but whatever it is, I can't get good smooth blends. Here are some armored horses I'm working on. I figured, partially because I've never tried it, partially for the challenge, and partially because I like how it looks, I'd give NMM a try. And although I understand the basic concepts, I just can't get the blends to work well enough to be happy.      Each of these horses I've tried something a little different with, to see what I do and don't like, and all I've really focused on is the blue armor. So don't be too harsh on the other parts. Does anyone have a link to a great (preferably video) tutorial on blending? And of course, critiques and comments are welcome.
|
|
#
?
Oct 10, 2009 05:13
|
|

|
CRITICIZE ME BITCHES I've been painting up Descent figurines lately, mostly as practice for when I will eventually be painting a Warmachine army that's coming in the post. I'm still very new to painting (I have now painted some 25 miniatures) but would like some feedback on what I've done so far. Yes, I am aware of the moldlines.   The three models I am happiest with so far. Two sorcerers, one skeleton. Skeleton was done before I'd grasped the whole subtlety-with-washes thing.  Holy poo poo lookit those moldlines. How the hell do you get those out?  No-flash pic of the sorcerer's cloak. I did an orange basecoat, then heavy drybrushed the top with yellow and the bottom with red, applied Ogryn Flesh (orangest wash I had), drybrushed with orange then with Burnished Gold to give a shiny look. This was my second shot at blending, the first being the other sorcerer's cloak. Thoughts? bobvonunheil fucked around with this message at 05:49 on Oct 10, 2009 |
|
#
?
Oct 10, 2009 05:42
|
|

|
Aranan posted:Does anyone have any suggestions as to how I could go about making bases like these on my own? PV pretty much already said it, but that is by far the easiest way to do it. If you look at the bases on the bloodcrushers I put up pictures for earlier, you can see the same idea, but in cobblestones rather than bricks.
|
|
#
?
Oct 10, 2009 08:05
|
|

|
Pagan posted:blend/nmm stuff 2 things right off the top that I can see are an issue: 1) youre final edge highlights are wayyyyy too thick and long, they need to be much more thinly applied 2)youre jumping too quickly up to pure white (which should almost never be used) Your final highlight should be a good deal lighter than your last blend, but youre going to white to fast Those damned horse armor panels are wicked hard to get the line highlight on, because of their shape
|
|
#
?
Oct 10, 2009 15:02
|
|
|
PaintVagrant posted:2 things right off the top that I can see are an issue: Alright, so how do I thin them? I'm already using paint that's thinned down pretty good, and lightly running the edge of the brush along the highlight. Even my finest tipped brush, were I to use the point, would leave thicker lines than that.
|
|
#
?
Oct 10, 2009 15:41
|
|
|
Pagan posted:nmm Of course it might be more complicated, maybe you only blend the dark to mid then the mid the light, but when you are done there should be a gradient, not a distinct division between color 1 and color 2. For your darkest color you might consider something a bit less saturated since areas that get less light reflect less color, but that's not really super important. The second horse from the right looks really good. If you can manage to clean up the paint work, I think you can push that one pretty far. It might also be what PV said: that horse looks like it has the most "inbetween" tones before the final highlight.
|
|
#
?
Oct 10, 2009 15:43
|
|

 blending
|
Well, I would say get better brushes, but Im not sure what youre using. When its a raised lip like that, I usually run the side of the tip of the brush down the edge of it. Try to keep the line as thin as possible e: also, when I say thinly applied, I dont mean thin the paint with water, I mean the actual line needs to be thinner in width, just to clarify
|
|
#
?
Oct 10, 2009 15:44
|
|
|
Pagan posted:Alright, so how do I thin them? I'm already using paint that's thinned down pretty good, and lightly running the edge of the brush along the highlight. Even my finest tipped brush, were I to use the point, would leave thicker lines than that. Paint flow control. You need to just practice getting super even lines with a brush. It's hard and not super rewarding unless you want to do detailed work like this. It's not an issue of brush size as much as being able to modulate how hard or soft you apply the brush, which correlates with how much pigment you leave behind. A good practice is to draw a checker pattern on a flat surface and color it in. When you can do that evenly try it on a curved surface. It's hard and I have never really mastered it, but it's good practice for this sort of stuff.
|
|
#
?
Oct 10, 2009 15:45
|
|
|
!amicable posted:It also does not look like you are blending as much as layering. I can see the distinct boundary where you layed down each color. Blending means you lay down your high mid and dark on the miniature, then feather them together. True, I am layering, because I can't for the life of me get paints to blend smoothly, and consistently. I've tried wet blending, but I don't have a flow retardant, so the paint dries pretty quickly. Or if I try thin layers, I get "tidal pools" where the pigment ends up in wierd places. I want to get better. Help me obi-wan ke-forums, you're my only hope!
|
|
#
?
Oct 10, 2009 15:45
|
|
|
Just set blending aside for the moment. I see lots of painters that try to blend too much without having the fundamentals in place first. The biggest issue with layered highlights is the value (lightness and darkness) "jump" between layers. Its the hardest thing to figure out, but the most rewarding thing when you do. If you jump too far in value between layers, they are very noticeable, if you dont go up in value enough, they barely differentiate.
|
|
#
?
Oct 10, 2009 15:48
|
|
|
Also, youre trying to blend/layer with some of the hardest colors to blend with: enchanted/ice/skull white. None of those pigments are transparent at all, so you dont get any of the natural blend with your layers that you do with other colors. They also photograph like poo poo, so the layers pop out even more. Try your layering with some other colors in addition to trying new techniques
|
|
#
?
Oct 10, 2009 15:50
|
|
|
I just thought I would drop in an update on my battle with Crackle Medium. I found this discussion on using it, and so I tried four different layers: paint, paint, medium; paint, paint, pva, medium; paint, paint, pva, medium, paint; and paint, paint, medium, paint. The PVA didn't seem to make any difference at all - I still didn't get any crackle on the first two, and both of the last two crackled equally. The crackle effect is actually not too bad, but the final, cracked layer is very fragile. I tried to apply a wash on one to emphasis the cracks and ended up destroying it, and I tried drybrushing the other but the differential between the 'plates' and 'cracks' isn't enough for that to work. I'm kind of stumped on how to use it, because the only way to get the crackling visible is to have a dark color under it and a light color over it (or, I suppose, the other way around). The problem is that you can basically only paint one layer over the medium - if you try putting another layer, you will basically destroy the cracks. This means that you can either put down one thin layer which doesn't completely hide the darker layer beneath, or a thicker coat that risks detail and brush strokes. For what its worth, this is the look I am trying to emulate. I think it might be a lost cause, but I'll try anything people can suggest: 
|
|
#
?
Oct 10, 2009 18:09
|
|
|
Have you tried gloss coating the crackle after before painting the top layer?
|
|
#
?
Oct 10, 2009 18:40
|
|

|
Ashcans have you read the WIP of that one giant marine? He uses the crackle medium for the off white areas of the armor. http://www.coolminiornot.com/forums/viewthread.php?tid=31535 He starts using the crackle on page 4 but uses a different company.
|
|
#
?
Oct 10, 2009 19:19
|
|


|
I bet crackle on top of gloss, as MSP suggested, would work well. When I was in art school I did a bunch of paintings that I would seal with watered down PVA, then apply gloss acrylic varnish on top of that. The gloss would crack and it would look rad
|
|
#
?
Oct 10, 2009 20:18
|
|
|
MasterSlowPoke posted:Have you tried gloss coating the crackle after before painting the top layer? Zarkov Cortez posted:Ashcans have you read the WIP of that one giant marine? He uses the crackle medium for the off white areas of the armor. PaintVagrant posted:I bet crackle on top of gloss, as MSP suggested, would work well. This does seem like it would be very work intensive to apply to a whole army. If I can get it working I will probably still have to restrict it to characters/vehicles/special models.
|
|
#
?
Oct 10, 2009 20:43
|
|
|
I dunno man, Id just try poo poo until something works, Ive never used an effect like that on models :\
|
|
#
?
Oct 10, 2009 20:50
|
|
|
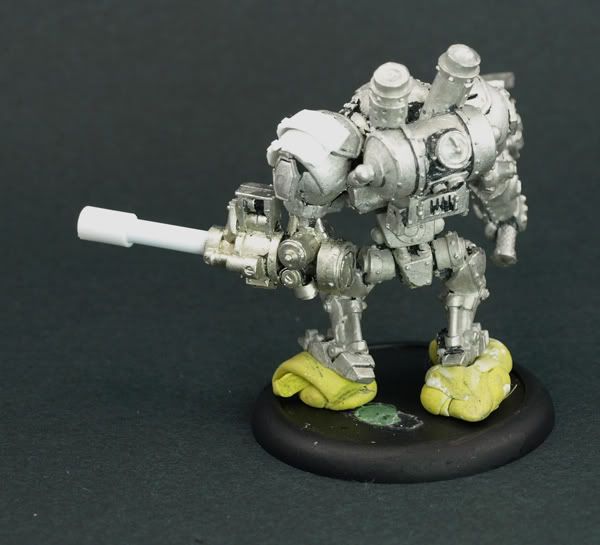
Buddy of mine gave me a free set of TH/SS so I've been magnetizing a set of shooty terminators I stripped a few weeks ago. Been planning to use them in next week's campaign game. Turns out he neglected to give me the arms for the shields. Thought I'd be poo poo out of luck since who the hell is gonna sell/trade just the arms to a storm shield? Turns out the new Space Wolf terminator box comes with a few arms with different weapon options, and said arm also fits the weird tab thing on vanilla storm shields. AND my usual ebay guy even had a bunch in stock. Really what I'm trying to say is I take back all the poo poo I've talked on Space Wolves because the new box just saved my rear end. 
|
|
#
?
Oct 10, 2009 23:12
|
|

|
Ok, so I did some homework and tried doing blending on flat areas. I even invested in some Liquitex Slo Dri Blending Medium I'm pretty happy with the slow dri, I mixed a little in with the water I paint with, and it does make the water much "wetter." I also picked up my first Windsor And Newton, a 00, and I'm almost afraid to take it out of it's little plastic tube. But, I'm still running into the same problems I've always had.  In a nutshell, I get brush strokes in the paint no matter how thin it is, because the water / paint "bulges" underneath the brush. So wherever I lift the brush from the surface, I end up with a droplet of paint underneath the brush. And when this dries, this ends up leaving tidal marks and blotchy.  Here are some various areas I experimented with, and none of them are good gradients. If anything, the closest to what I want is the black to white blend, which I did by putting down Pure Black and Pure White next to each other, and just worked them together. The blue is the second best, because I slowly added the light color to the still damp dark color on the pallet and tried to blend them in. But none of it's perfect. I'm hoping one of you experts can see what's going wrong and give me some advice. I also apologize for hogging the thread with my personal painting problems.
|
|
#
?
Oct 11, 2009 00:38
|
|
|
Not at all, your problems are the same problems plenty of painters here have/had. I would say if your egetting that "bubble" the paint is TOO thin. However, I think another thing may be at work here, which is that you might have way too much paint on the brush. I always dip, then spin the brush gently against my palette to take almost all of the paint off. With very thin paint, this is especially key. You can use really watery paint, but it has to be applied in super thin (in terms of amount of paint applied) layers
|
|
#
?
Oct 11, 2009 00:53
|
|
|
I like to wipe the brush along a bit of tissue to take off the excess when I'm using thin paints. You can see some of the paint that comes off, and a much larger area of moisture that would have caused the puddling.
|
|
#
?
Oct 11, 2009 01:03
|
|

|
I'm glad you guys don't mind helping. While I'm in the mood to practice . . . What other skills are important? PV, you said I was probably tackling blending too early. I did try a small checkerboard pattern on my practice piece, and that came out alright. You mentioned thin lines; how thin is "thin" ? What else should I try?
|
|
#
?
Oct 11, 2009 01:38
|
|
|
Rapey Joe Stalin posted:I like to wipe the brush along a bit of tissue to take off the excess when I'm using thin paints. You can see some of the paint that comes off, and a much larger area of moisture that would have caused the puddling. Oh, and heres what i'm working on:  Camera died after one picture so I can't show off the slapdash and lazy bionic arm  Oh, and the gun barrel has been drilled and he's primed now, any ideas what colour to do the power weapon to go nicely with green armour?
|
|
#
?
Oct 11, 2009 01:45
|
|


|
|
| # ? Apr 20, 2024 00:35 |
|
|
Here are some examples I dug out of my photobucket of decent edge highlights. You can make pretty big jumps in value at the final highlight, but you HAVE to keep the edge highlight thin Disregard the fugly NMM on that last model, I was never good at NMM haha 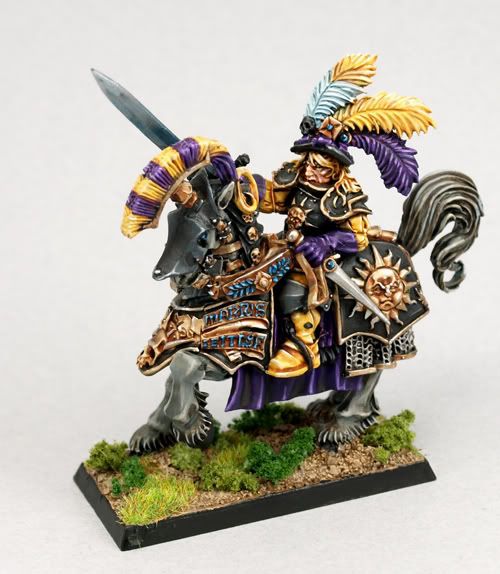 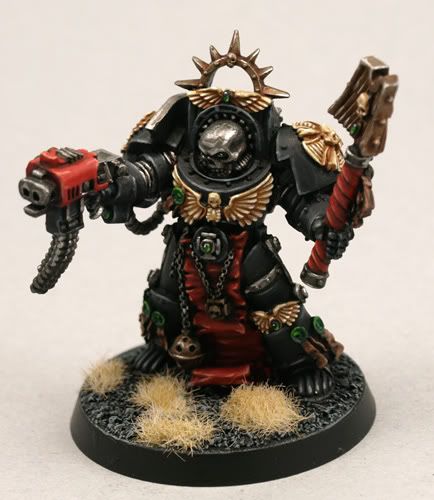  
|
|
#
?
Oct 11, 2009 01:54
|
|