Register a SA Forums Account here!
JOINING THE SA FORUMS WILL REMOVE THIS BIG AD, THE ANNOYING UNDERLINED ADS, AND STUPID INTERSTITIAL ADS!!!

You can: log in, read the tech support FAQ, or request your lost password. This dumb message (and those ads) will appear on every screen until you register! Get rid of this crap by registering your own SA Forums Account and joining roughly 150,000 Goons, for the one-time price of $9.95! We charge money because it costs us money per month for bills, and since we don't believe in showing ads to our users, we try to make the money back through forum registrations.
 
  • Locked thread
PaintVagrant
Apr 13, 2007

~ the ultimate driving machine ~
:siren:PAINTING MEGATHREAD BOOYAH:siren:

(56k get out)


After the reasonably good success of the Tales thread, I've decided to make a newer, all inclusive thread for the craft of miniature painting and modelling.

I felt that the rules of the tales/oath/etc thread were a bit restrictive and keeping a lot of great posters from participating.


So, that being said. Here's the "rules"

1. Post with content. Feel free to find badass new miniatures online, nicely painted stuff on CMON, stuff on other forums like warseer (lol), etc. and post them here. POST YOUR MODELS ALL OVER DIS BITCH (crosspost like a mofo from the wh thread, we dont care, we just want pics!)

2. Dont be a babby about critique. If you cant handle it, dont post. That being said, be constructive in your critique of others.

3. No images wider than 1000 pixels.

4. No posts about wargaming rules/etc. at all. Just modelling and painting.

5. At my discretion, I will post finished models (only stuff that you have painted since this thread started) in the OP. I will also post links to painting resources in the OP.

PaintVagrant fucked around with this message at 09:29 on Aug 5, 2012

Adbot
ADBOT LOVES YOU

PaintVagrant
Apr 13, 2007

~ the ultimate driving machine ~
PHOTO HELP LINKS
http://www.miniaturewargaming.com/index.php/wiki/Photographing_Miniatures_From_Wee_Toy_Soldiers/]

GENERAL PAINTING LINKS

FTWs GIGANTIC LIST OF LINKS
http://fromthewarp.blogspot.com/p/archives.html

B&C Space Marine Painter Tool
http://www.bolterandchainsword.com/smpbeta.php

PAINTING TUTORIAL LINKS
Biel-Tan Eldar Tutorial
http://www.whmpg.com/?page_id=76

A SHITLOAD OF BASING LINKS
http://www.necrotales.com/necroTutorials/tut_base_plants01.php
http://archive.brushthralls.com/basing/back-to-bases-1-textures-2.html
http://archive.brushthralls.com/basing/back-to-bases-2-cork-and-snow.html
http://archive.brushthralls.com/basing/back-to-bases-3-protectorate-basing.html
http://thepaintingcorps.blogspot.com/2009/05/friday-quick-tip-cork-basing.html
http://blog.brushthralls.com/?page_id=3381[/url]
http://www.necrotales.com/necroTutorials/tut_base_rock01.php
http://salmondworks.com/blog/?p=156[/url]
http://www.bolterandchainsword.com/index.php?autocom=ineo&showarticle=146

Snow Bases:
http://www.belloflostsouls.net/2008/12/tutorial-snow-basing.html
http://www.games-workshop.com/gws/content/article.jsp?categoryId=cat1290202&pIndex=0&aId=4400036a&start=1
http://www.games-workshop.com/gws/c...mes+Workshop%29

SCULPTING LINKS
B&C making "scaled" cloth/etc guide:
http://www.bolterandchainsword.com/index.php?showtopic=180116

INSTAMOLD/ETC QUICK CASTING LINKS
http://cgi.ebay.com/Oyumaru-Clay-Creative-toy-Reusable-Mold-Making-Kit-/300535222492
http://www.youtube.com/watch?v=vz8FwUEFMzY
http://forums.somethingawful.com/showthread.php?threadid=3210214&pagenumber=344#post391368435

SUPPLY PURCHASE LINKS
Winsor and Newton Series 7 Brushes:
http://www.dickblick.com/products/winsor-and-newton-series-7-kolinsky-sable-pointed-round/
http://www.dickblick.com/products/winsor-and-newton-series-7-kolinsky-sable-miniature-brushes/

Modeling:
Brass Rod Weapon Hafts: http://salmondworks.com/blog/?p=278
Greenstuff Icon Molds: http://swchq.co.uk/minus_ts_guide_to_greenstuf.php
Greenstuff Tips and Tricks: http://www.dakkadakka.com/dakkaforum/posts/list/242387.page
Greenstuff to disguise joins: http://blog.brushthralls.com/?page_id=1696
Make a Foamcore Rabbet Cutter: http://www.terragenesis.co.uk/infopages/page381.html
Pinning: http://archive.brushthralls.com/modelling/pinning.html
Pre-Heresy Terminator Shoulder Pads: http://fromthewarp.blogspot.com/2009/01/pre-heresy-terminator-shoulder-pads.html
Resin Casting Tutorial: http://ultrawerke.blogspot.com/2007/02/resin-castig-tutorial-part-i.html
Scratch Building Tutorial: http://ultrawerke.blogspot.com/2007/03/scratchbuilding-tutorial-part-i.html
Sculpting 101: http://blog.brushthralls.com/?page_id=1666
Sculpting 102: http://blog.brushthralls.com/?page_id=1875
Sculpting Chains: http://www.dakkadakka.com/dakkaforum/posts/list/242226.page

Painting:
Object Source Lighting: http://blog.brushthralls.com/?page_id=1916
Painted Horses: http://thepaintingcorps.blogspot.co...inting+Corps%29
Female Eyes: http://www.reapermini.com/TheCraft/12
Female Faces: http://www.jenova.dk/Faces.htm
Female Faces (another): http://www.minizilla.com/sintricat/painting_faces.html
Playing with Fire: http://archive.brushthralls.com/painting-techniques/playing-with-fire.html
Rust Effects (with real rust): http://www.wideopenwest.com/~tinweasel/rust_tut.html
Sepia Gold: http://thepaintingcorps.blogspot.com/2009/04/friday-quick-tip-sepia-gold.html
Skintones: http://www.jenova.dk/Skintones.htm
Sponge Painting Damage: http://i41.tinypic.com/2qvggtx.jpg
Step-by-Step Chaos Warrior: http://www.jrn-works.dk/tutorials/tut.php?tut=chaosWarriorIntro&lan=eng
Tank Weathering: http://thepaintingcorps.blogspot.com/2008/03/here-is-old-tutorial-from-old-painting.html
The Painting Clinic: http://www.paintingclinic.com/MainClinic.dwt.htm
Painting Leather: http://fromthewarp.blogspot.com/2010/01/painting-leather-quick-way.html

Photos
Homemade Light Box: http://www.studiolighting.net/homemade-light-box-for-product-photography/
How to Make a Light Tent: http://digital-photography-school.com/how-to-make-a-inexpensive-light-tent

Terrain:
Books & Scrolls: http://www.terragenesis.co.uk/infopages/page562.html
HirstArts: http://www.hirstarts.com/index.html
SalmondWorks: http://salmondworks.com/
TerraGenesis: http://terragenesis.co.uk/
Terrain Thralls: http://www.terrainthralls.com/Tutorials%20folder/Tutorials.html

Airbrushing

HKR's airbrush post: http://forums.somethingawful.com/showthread.php?threadid=3210214&pagenumber=100#post374381003


Chat
irc.synirc.net #tinypewtermen

MORE
General/multi-topic, full of tutorials, occasional poor english (most authors on the site are German): http://massivevoodoo.blogspot.com/2009/10/tutorial-overview.html
Useful forum with a large number of outstanding painters posting (Australia focus): http://www.mainlymedieval.com/ozpainters/index.php
Sand-casting foam terrain: http://www.reapermini.com/TheCraft/48
Process behind a nice resin display base: http://www.reapermini.com/TheCraft/49
A couple decent tutorials/step-by-steps from an excellent painter: http://volomir.blogspot.com/

PaintVagrant fucked around with this message at 18:45 on Feb 12, 2012

PaintVagrant
Apr 13, 2007

~ the ultimate driving machine ~
:siren:HELP ME IM A TOTAL NOOB WHAT DO I BUY/DO!?:siren:

stabbington posted:

Prepare for :words:. Helpfully divided into supplies, prep, and painting sections for your convenience.

Supplies
Universal: You're going to need some glue. If you're putting together GW plastics, get plastic glue (GW will sell you some, I personally like Tamiya Extra Thin Cement, other people swear by Revel Contacta Pro, it doesn't matter that much). For anything else, a gap-filling superglue is good (Zap-a-Gap, purple-label BSI Instacure, loctite gel, etc).

You'll also want an xacto knife. You can buy them pretty much anywhere that sells art supplies or tools, just make sure it's the kind with replaceable blades. Optionally, you can also pick up a pair of clippers. Xuron makes the best ones and Privateer Press resells them under the P3 label, or you can buy from GW or whatever your hobby/game shop has on the wall.

Finally, you'll need a jar to keep paint water in (empty pasta sauce, salsa, or pickle jars are my favorite, because they are difficult to mistake for the glass I keep drinking water in) and some paper towels. Some newspaper to keep paint off your desk/table is nice but optional.

Minimum additional cost (~$25), moderate-high effort option: go to an art store and buy some cheap synthetic watercolor brushes, round size 2 and smaller (starting with a 0 or 1 will probably be better if you've never painted anything before), with a 3/0 (occasionally seen as 000) being your smallest. Princeton is a decent brand name for this (their Series 6150 watercolor brushes in particular). While you're there, find a cheap multi-well plastic palette tray (optional if you're really on a budget).

Next stop, walmart or whatever for a can of Krylon flat black spray paint.

Finally, paint. What colors you need depends on what you want to paint, but you can't go wrong buying a white, black, red, yellow, and blue - using these 5 colors, you can mix pretty much any other hue. If you want to stay cheap, I recommend Delta Ceramcoat, it's by far the best cheap craft paint out there.

Moderate cost (~$35), low effort: Go to a GW store. Buy this thing or one of its equivalents if you like the colors in the other ones better.

Buy the aforementioned Krylon flat black.

High cost, high effort: Why is this even an option? This is all poo poo you'll end up wanting eventually if you stick with the hobby and want maximum results, so you save yourself some money in the long run by just buying in at the start.

Go to an art store. Buy a Winsor & Newton Series 7 or Raphael 8404 Size 2, 1, 0, and 3/0. Buy the aforementioned plastic palette. Pick up some brush soap for those nice brushes while you're there. A dropper bottle of some sort wouldn't hurt, either.

Krylon flat black returns, on account of being both cheapest and best in the black primer field (if you can get to an car shop more easily, Duplicolor Sandable Black Primer is as good and slightly more expensive). White primer can wait, and is a whole pile of controversy all on its own.

Paint: Find a hobby shop, buy GW black and white, boltgun metal, mithril silver, gryphonne sepia, devlan mud, badab black, along with P3 Menoth White Highlight, and whatever brand's colors you think are relevant to your project.

Prep
You've just opened your first box of plastic man-dollies, and they're all on this weird plastic thing (called a sprue) looking something like this:

Take your knife (or clippers, if you bought them) and trim the parts off. Make the cuts a bit away from the model so you don't accidentally chop off details. Now that you've got your pieces roughly chopped off the sprue, go back and trim the leftover bits off carefully. Always cut away from yourself, that knife is sharp as gently caress and will go through your fingers and hand no problem.

Once you've got everything trimmed, look for mold lines - these will appear as seams in the plastic, and are a nearly unavoidable relic of the model casting process. To remove them, scrape your knife along the line with the blade perpendicular to the surface, producing a small tuft of plastic shavings that is easily rubbed off.

Glue everything together, then glue it to the base.

Take your can of black spray paint, shake it well, and basically follow the instructions and advice in this article until he starts doing complicated stuff with multiple colors.

Wait a few hours.

Holy poo poo are we Painting Yet?
This is not the only way to paint, and it isn't always the way I paint, but it is a way to paint, and works well for beginners because it's relatively easy.

Getting paint onto your palette and thinning it: Pot-style paint (GW, P3): Take the non-brush end of your brush, get some paint on it, scrape that paint off onto your palette. Add a bit of water (figuring out the right ratio is a personal thing and varies a lot between individuals and paints, but you're looking for something that flows well and doesn't leave brushstrokes, about the consistency of heavy cream), then mix the two together.

Dropper bottles (Ceramcoat, Vallejo, Reaper): put a drop of paint on the pallete (you may need to run a needle through the dropper head if it doesn't flow immediately). Add water to achieve proper consistency (see above).

Basecoat: Get some paint on your brush, being careful not to let it get into the metal part (the ferrule - paint drying up in there is the number one cause of brush destruction). Roll your brush against a paper towel while pulling it back towards you to remove a bit off the water and reshape your brush into a point, then apply it to the area of the mini that you want to be that color.

Repeat this process with your various colors for the entire model, rinsing your brush in your water pot occasionally, and whenever you want to change colors.

Troubleshooting: If you get big blobs of it, you either have too much on your brush (solution: place your brush against the paper towel and let some of the excess seep off before trying again), or your paint is too thin (solution: add more paint to your paint/water mixture). If you see brushstrokes or your paint clogs details, your paint is too thick, add more water.

Simple Shading: Cover your model (or the parts you want shaded with that particular color) in a thin layer of a wash like GW's Badab Black or Devlan Mud, or a similar dark tone that you've made yourself (a simple shading wash can be made with a paint color darker than the base coat and enough water to make it relatively translucent), making sure that any pooling that happens is limited to recesses. Making sure your wash doesn't pool is important for preventing unsightly rings from forming on your model.

Simple Clean Highlighting: Using a lighter shade of your basecoat color (made by mixing that basecoat with a a lighter tone if necessary, see below for suggestions) , and making sure your brush has very little water on it (the paint should still be thinned, hold your brush against a towel to wick away excess water), carefully paint the portions of the model that would catch the light - upper surfaces, edges, etc.

Messy Highlighting (Drybrushing): Take a brush you don't care about. Get some paint (of your highlight tone) on it straight from the pot, then rub it against a paper towel until each stroke leaves only a small amount. Picking a direction that will cause your brush to not enter areas that should stay shaded, run your brush over the model, causing it to deposit small amounts of paint where it passes. Repeat as needed until the color feels acceptable. Works great for metals, not as awesome for things like cloth.

Highlighting Hints: Most colors are easy to mix highlight colors for using a white or off-white (P3 Menoth White Highlight and VMC Ice Yellow or Ivory being perennial favorites around here). Oranges, reds, and purples aren't, unless you're painting a creamsicle or something pink. Oranges and reds both benefit from a bright yellow being added to them. Purples generally want a red or orange. There's a bunch of technical reasons behind this, but that's the end result.

Hope that helps!

PaintVagrant fucked around with this message at 16:31 on Mar 16, 2012

PaintVagrant
Apr 13, 2007

~ the ultimate driving machine ~
So Ill start this off with some poo poo ive painted recently, as well as some miniatures I have boners for:

My stuff:


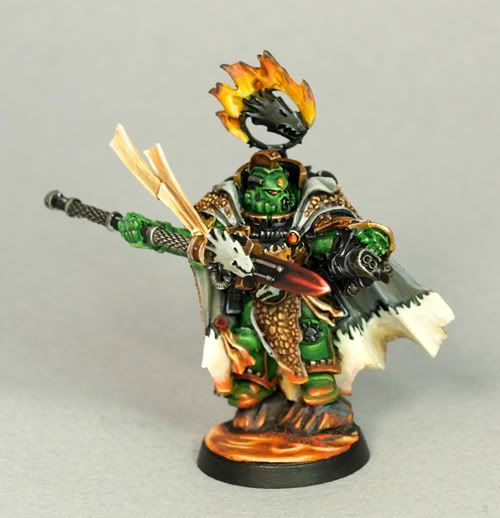
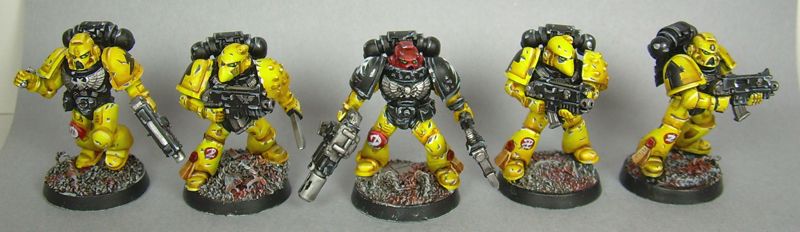
Stuff I have boners for:


PaintVagrant
Apr 13, 2007

~ the ultimate driving machine ~
Post some painting tutorial/etc links up in dis

PaintVagrant
Apr 13, 2007

~ the ultimate driving machine ~
This thread is all about teaching you new stuff, so feel free to post your wips and stuff and we will help you :)

That guys stuff looks nice, If youve already got all the cool mini paintign tools and paitns you need, it might be worth taking a swing at one of his DVDs.

PaintVagrant
Apr 13, 2007

~ the ultimate driving machine ~
Post your new rad sculpts duder

PaintVagrant
Apr 13, 2007

~ the ultimate driving machine ~
ork landspeeder buggy :3:

PaintVagrant
Apr 13, 2007

~ the ultimate driving machine ~

Arlaharen posted:

pureblood warpwolf

Its very nice man. If the photo had a bit more light to it we could see some of the shading/highlighting better, but it looks really nice and cleanly delineated.

The base is sexy.

e: holy poo poo this rules

PaintVagrant fucked around with this message at 04:50 on Oct 4, 2009

PaintVagrant
Apr 13, 2007

~ the ultimate driving machine ~
I assume she meant colors, because she had to use white and black in addition to those two colors, right?

There seems to be some warm and cool transtions, which implies more than just 2 total paints...

PaintVagrant
Apr 13, 2007

~ the ultimate driving machine ~

Big Willy Style posted:

I have heard of those hard core european painters doing it, but it is a bit extreme otherwise.

I use my old s7 brushes for metallics, and my new ones for non-metallics. Metallics are very harsh on brushes :\

PaintVagrant
Apr 13, 2007

~ the ultimate driving machine ~
Yeah, the imagespam will slow down after another page or so. Also, if you want to track progress, POST YOUR NEW BA'S :clint:

PaintVagrant
Apr 13, 2007

~ the ultimate driving machine ~

crime fighting hog posted:

PV you gonna tell me how you did the grey for those plague marines/death guard?

nope :d:

PaintVagrant
Apr 13, 2007

~ the ultimate driving machine ~
Just to elaborate, the client paid quite a bit for this army and Im not giving the recipes because its

a - hard to replicate because it uses a lot of funky glazing technique
b - I dont want any copycats of them out there :)

But anything else I paint Ill hand out recipes/help, just not these.

PaintVagrant
Apr 13, 2007

~ the ultimate driving machine ~

Fast_Food_Knight posted:

recipe us up your ahriman, I remember it being poo poo hot and I have a hard on for chaos still

What colors are you interested in? Im not going to try to remember every single color, but if there is a certain part or something that you would like to repeat Ill try to figure out what I did

PaintVagrant
Apr 13, 2007

~ the ultimate driving machine ~

Fast_Food_Knight posted:

The whitish blue on his robes was great, and any tips for blending too?


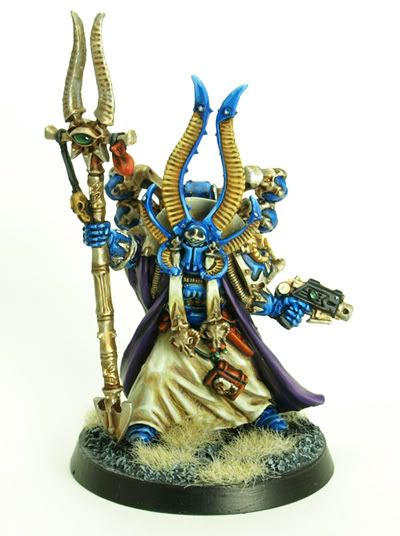
what whitish blue?

The robes was probably a bleach bone or equivalent, plus thinned shades of snakebite leather built up in the recesses. White mix for highlights.


If you could post a model that youre having trouble w blending, I could tell give you some advice :v:

PaintVagrant
Apr 13, 2007

~ the ultimate driving machine ~
It looks like the armor is more cool, and the pants are maybe a warmer grey. He definitely went to a sharper, lighter highlight on the armor.

Aranan: paint up a test model!

PaintVagrant
Apr 13, 2007

~ the ultimate driving machine ~

Fast_Food_Knight posted:

so er, PV, why was i remembering blue? gently caress knows! but thanks :)

i have trouble with blending in general but lack of camera and moving house = no examples. do you ever use a feathering technique or just build up successive layers?

Generally both. What I would suggest is mastering layering and how that works before you worry about blending the layers together

PaintVagrant
Apr 13, 2007

~ the ultimate driving machine ~
Amicable, those conversions/painting are really unique and sweet. I love that orangey duder on the rock :3:


e: im adding that CMON guide to the OP, please post any links you have for good tutorials, stores to get supplies cheap, etc.

PaintVagrant fucked around with this message at 21:47 on Oct 5, 2009

PaintVagrant
Apr 13, 2007

~ the ultimate driving machine ~

link removed from OP, Id probably edit your post invictus

PaintVagrant
Apr 13, 2007

~ the ultimate driving machine ~

KingMob posted:

Well lookie what was waiting on my front steps.


So much for finishing up some more terrain.

Oh poo poo son.

PaintVagrant
Apr 13, 2007

~ the ultimate driving machine ~

MasterSlowPoke posted:

Your image doesn't work.

They work for me. I like em, Id say work the colors a bit lighter via some sort of highlighting.

Even if you just did it to the base surface they would pop more

PaintVagrant
Apr 13, 2007

~ the ultimate driving machine ~
The colors on the horse in the pic are very warm, and the colors you chose for the model are very cool. Instead of highlighting the black using blue, try a warm brown (snakebite?) and for the white areas, start with a warm white, like skull white w a little snakebite/iyanden/etc in it

PaintVagrant
Apr 13, 2007

~ the ultimate driving machine ~
This might be the most useful thing Ive found on the internet:

:siren:IT COMPARES/SWATCHES/ETC EVERY MINI PAINT LINE:siren:

http://colors.silicon-dragons.com/full_line.php

PaintVagrant
Apr 13, 2007

~ the ultimate driving machine ~
Added to OP :D

PaintVagrant
Apr 13, 2007

~ the ultimate driving machine ~

Illandriel posted:

Well, someone made off with my DSLR camera last night from my car. So no Picture updates from me for a while. :(

drat :\

PaintVagrant
Apr 13, 2007

~ the ultimate driving machine ~

Pagan posted:

I've had that happen too. Do you have renter's or homeowner's insurance? They should cover it.


I redid the mane and hooves, and they look great; I started with bleached bone and built up to pure white, and it looks much better. But I'm at a loss to doing the black with warm colors. Could you post some pix so I can see? It just seems like brown doesn't mix well with black; it just turns a muddy grey when I try to darken it.

I dont think I have pics of anything Ive used the technique on. I would experiment with various warm colors you own until you get something that works. You might not want to start w pure black, instead start with a black youve already warmed up a bit

PaintVagrant
Apr 13, 2007

~ the ultimate driving machine ~
I still have yet to see an entire army of truescale marines, the cost is so prohibitive and its SO much work...

But drat.

PaintVagrant
Apr 13, 2007

~ the ultimate driving machine ~
I think youd pretty much have to cast your own poo poo to make that really feasible

PaintVagrant
Apr 13, 2007

~ the ultimate driving machine ~
So Ive decided that I want a more pronounced "style" to some of my minis. I feel like Im good enough now to be a little more bold with how I paint.

Im not sure if any of you gents look at dark age minis, but their painters have a really unique, chromatic style that Im thinking about "stealing" some things from:


PaintVagrant
Apr 13, 2007

~ the ultimate driving machine ~

rzal posted:

I just started painting again. Forgive me for breaking into your warhams discussion. One night while checking out CMOT I saw that spyglass was being shut down and snatched up some of my favorite sculpts even though I didn't have any paints or what have you. Later he would reopen as a 54mm only and resale this mini cast in resin, but whatever.

So, I bought a $10 set of craft paints and then had to go and buy some citadel flesh tones, but I think it's a pretty decent job so far. I need to base it, but I don't have anything to use for grass yet. What do you think?


After I get some basing stuff, I'm thinking of checking out some of those flow extenders and some new brushes. The ones I have are already worn out.

Solid. You seem to really have the base/highlight/shade/lining thing down, which is 90% of miniature painting.

What I would suggest is try to get your paint to lay smoother. Getting "real" miniatures paint will help, as will practice with thinning and keeping your paint consistency correct :v:

Welcome to the thread. Also, its not for warhamming, we make no distinction between games or whatever, this is just for miniature painting as a whole

PaintVagrant
Apr 13, 2007

~ the ultimate driving machine ~
deathguard wip:


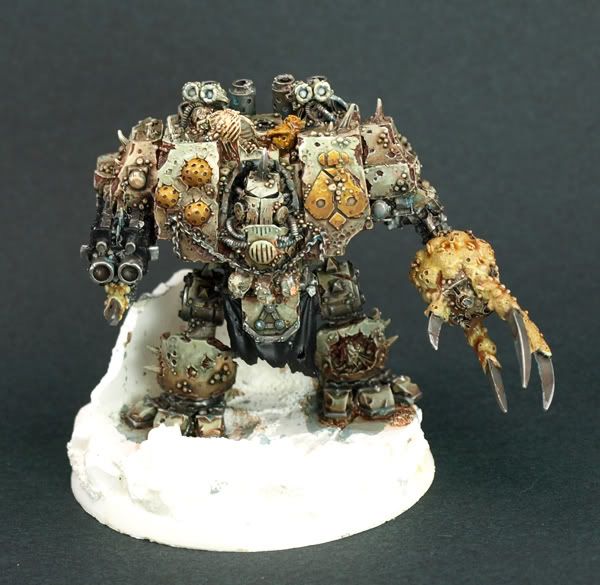
My cygnar defender, my whole army will be really weathered/repaired. I want them to look like they have been out in the field a LOOONG time.

I reposed the arm w/new piston, converted the gun so its not so chunky and more like the concept art:
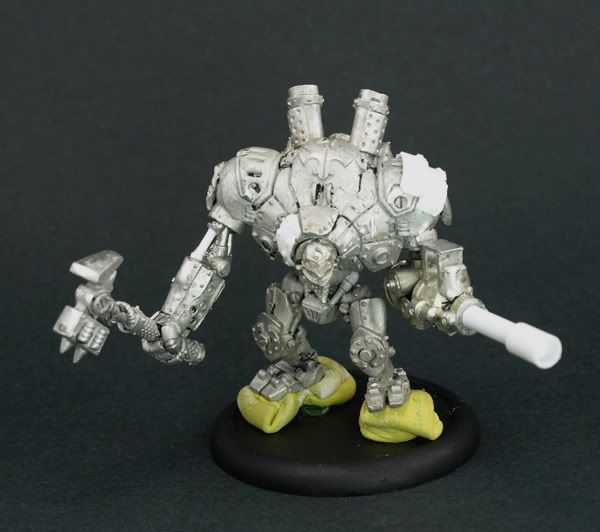
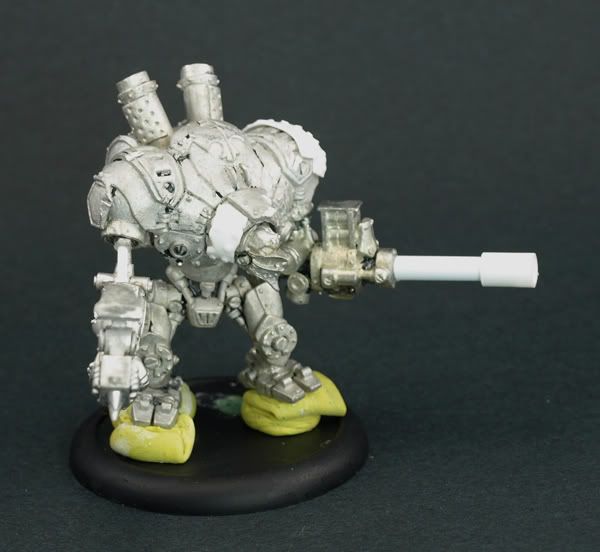
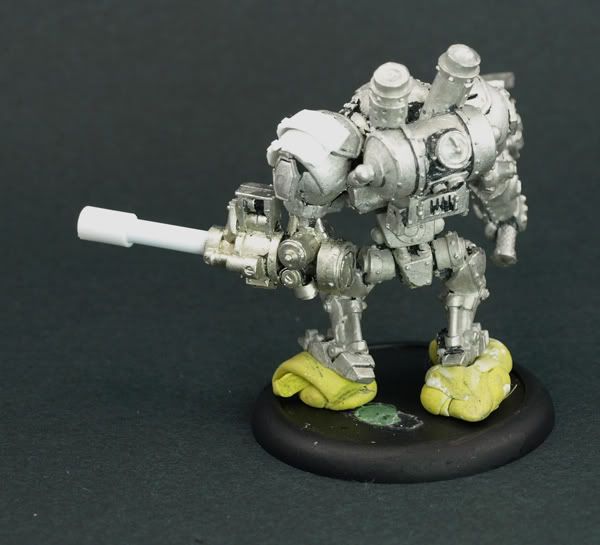


PaintVagrant
Apr 13, 2007

~ the ultimate driving machine ~

Aranan posted:

Does anyone have any suggestions as to how I could go about making bases like these on my own?


http://www.back2base-ix.com/index.php?_a=viewProd&productId=1820

Buy the plasticard sheet with brick imprint, cut it into circles and stick it to your bases :)

PaintVagrant
Apr 13, 2007

~ the ultimate driving machine ~

Pagan posted:

blend/nmm stuff

2 things right off the top that I can see are an issue:

1) youre final edge highlights are wayyyyy too thick and long, they need to be much more thinly applied

2)youre jumping too quickly up to pure white (which should almost never be used) Your final highlight should be a good deal lighter than your last blend, but youre going to white to fast


Those damned horse armor panels are wicked hard to get the line highlight on, because of their shape

PaintVagrant
Apr 13, 2007

~ the ultimate driving machine ~
Well, I would say get better brushes, but Im not sure what youre using.

When its a raised lip like that, I usually run the side of the tip of the brush down the edge of it. Try to keep the line as thin as possible

e: also, when I say thinly applied, I dont mean thin the paint with water, I mean the actual line needs to be thinner in width, just to clarify

PaintVagrant
Apr 13, 2007

~ the ultimate driving machine ~
Just set blending aside for the moment. I see lots of painters that try to blend too much without having the fundamentals in place first.

The biggest issue with layered highlights is the value (lightness and darkness) "jump" between layers. Its the hardest thing to figure out, but the most rewarding thing when you do.

If you jump too far in value between layers, they are very noticeable, if you dont go up in value enough, they barely differentiate.

PaintVagrant
Apr 13, 2007

~ the ultimate driving machine ~
Also, youre trying to blend/layer with some of the hardest colors to blend with: enchanted/ice/skull white.

None of those pigments are transparent at all, so you dont get any of the natural blend with your layers that you do with other colors. They also photograph like poo poo, so the layers pop out even more.

Try your layering with some other colors in addition to trying new techniques

PaintVagrant
Apr 13, 2007

~ the ultimate driving machine ~
I bet crackle on top of gloss, as MSP suggested, would work well.

When I was in art school I did a bunch of paintings that I would seal with watered down PVA, then apply gloss acrylic varnish on top of that. The gloss would crack and it would look rad

PaintVagrant
Apr 13, 2007

~ the ultimate driving machine ~
I dunno man, Id just try poo poo until something works, Ive never used an effect like that on models :\

Adbot
ADBOT LOVES YOU

PaintVagrant
Apr 13, 2007

~ the ultimate driving machine ~
Not at all, your problems are the same problems plenty of painters here have/had.

I would say if your egetting that "bubble" the paint is TOO thin.

However, I think another thing may be at work here, which is that you might have way too much paint on the brush. I always dip, then spin the brush gently against my palette to take almost all of the paint off. With very thin paint, this is especially key. You can use really watery paint, but it has to be applied in super thin (in terms of amount of paint applied) layers

  • Locked thread