

|
Jives posted:I found some zombies that I painted aged 13 yesterday! I only painted about half the regiment then, so I figured I may as well start painting up the rest. I love younger teenage paintjobs. SPLOTCHES OF BLOOD EVERYWHERE! Of course I did the same.
|
 #
¿
Jun 20, 2011 21:44
#
¿
Jun 20, 2011 21:44
|
|


|

|
| # ¿ Apr 25, 2024 12:18 |
|
|
crime fighting hog posted:So just tear up small chunks and lay em out? I can try that too I suppose. I went with the other way just now and it worked but not as well as I hoped. I needed something to break up the brown dirt, brown skinned model so I thought some fall orange-red foliage would help. I'll take a couple shots tomorrow after I dullcoat em I use a small scissor, as the threads that keep the foliage together tends to become visible if you tear it by hand. Some types more than others, though. For tiny amounts you can glue it right on with PVA glue, but for bigger things like bushes etc. I will use a branchlike bit of metal wire to keep it from falling off on contact. I find it easier to work with several pieces, like layers, than to just dump a big lump of it on the base. Example with metal wire: 6mm stuff  54mm stuff  Lately I've been giving them a wash in the recesses and some highlighting drybrushes, and it helps a lot to keep it from sticking out compared to your miniature.
|
|
#
¿
Jun 25, 2011 08:20
|
|
|
Wayland games stopped retailing finecast after making a sample of their orders, and finding a 55% rate of miscasts. Guess it's a good way to keep online retailers from selling GW stuff.
|
|
#
¿
Jun 25, 2011 18:16
|
|
|
I've made a bunch of historical terrain before, but this is my first attempt at sci-fi terrain. Forum member Fyrbrand won a custom terrain piece in the last oath thread, and this is the result. It was a real head scratcher as I found myself in the challanging situation of making an Imperial plant that has been overrun by Orks, with almost no Imperial or Ork bitz in my entire house! Two scavanged lanterns from the Imperial plastic terrain sets and an old Goblin command sprue had to do. And a ton of balsa, some cardboard and some cans, of course. Here are the results, an Imperial chemical plant that has been looted by Orks and turned into a brewery/drive through centre for fine greenskin dining: I wanted the original Imperial sign to be visible but mostly covered by Ork graffitti. Unfortunately it was a bit too small for that effect, and in the end it's almost entirely covered. The door is made of green stuff, plasticard, and some spare pieces from a Chimera kit!  The silo needed something to distract from the loud expression of "HELLO, I AM A PRINGLES CAN!". A big glyph had to do.  In a similar vein, this side look horribly bland, flat and boring. I couldn't get it to work at all, until I planted a big ol' Ork face on it. It really saved the entire terrain piece, the difference was huge.  Fyrbrand got to choose the name of the pub. I felt bad that I had no actual squigs, so the thematic sign was the least I could do. These wooden parts also looked incredibly bland at first, until I figured out to scribble checker patterns and dags on them to break it up visually.  Finally, I didn't want this piece to be a useless lump on the tabletop. The basic idea when I started out was to make something big enough to hide a sizeable unit from line of fire. The roof is big enough to serve as a good position for a small unit of heavy support, while also being risky since they are left with not so much cover. It's also climbable from both sides. Hopefully it will be practical to use, not just thematic. There are still small pieces to dab at, and I might work a little bit more on the snow. The second layer improved the snow a lot, but there are still parts that look a bit weird (first layer looked like seagull droppings, so it's an improvement!). Feedback is welcome as I'm about to ship it out to Fyrbrand this week. Overall it was fun and a learning experience, but next time I'll scavange a lot more bits from people around me before I try to make something similar!
|
|
#
¿
Jul 12, 2011 19:52
|
|
|
Fyrbrand posted:my mind = blown I got nervous when I checked your paint scheme and noticed that you don't use checkers on your orks, but I kind of needed them to spruce things up.  Oh, and if you email me your address I'll ship it as soon as I find a box with proper proportions.
|
|
#
¿
Jul 12, 2011 20:12
|
|
|
Combaticus posted:He's on AIM quite frequently. The rubber magnets I buy from Litko works well for my 15mm infantry and cavalry, but just barely for even 15mm elephants. It should be enough for infantry sized plastic models, but I don't know about metal miniatures and larger pieces.
|
|
#
¿
Jul 12, 2011 20:30
|
|
|
Ashcans posted:The way to do it is to get ferrous sheeting for the trays, and use REM on the bases of the miniatures. I think it was in this thread that me and Tadhg did some back and forthing on it, and it works really well. Yes, I personally think that rubber magnets works best for small scale historical games (and maybe Epic), where you have large bases with several miniatures on each. This makes for a really large area of magnetic rubber, so it's not a big deal if it is not that strong. It is also easier to just attach a large flat area at the bottom of the base than to try to drill holes into the bases or something fiddly like this: with the hollow bases of most 28mm wargames this is much less of a bother. e: like these, just ready to be plopped down in a cookie jar from easy transport, something a bit more difficult if they were 28mm metal miniatures. Since I buy them the same size of the bases, it's a 5 min job to magnetize an entire army. 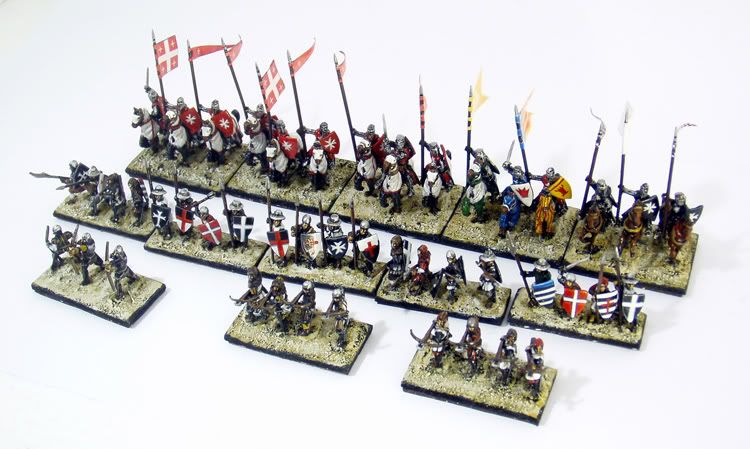
lilljonas fucked around with this message at 20:42 on Jul 12, 2011 |
|
#
¿
Jul 12, 2011 20:39
|
|
|
The display board really pushes it above and beyond, great work.
|
|
#
¿
Jul 22, 2011 13:32
|
|
|
Darksaber posted:Thanks for the advice so far! Could someone suggest some nice brushes? I don't even know what I'll be looking for. I think I've heard the name S7 batted around before, but honestly starting from scratch like this, I have no clue. I figure I need a regular brush and a drybrush at least, but hell I've never even used a palatte before. Windsor & Newton Series 7. But basically anything with real sable hair is nice, brand doesn't really matter except that I have yet to have a happy experience with GW brushes. Just buy proper sable brushes from any art shop and you should be fine. Don't overthink it if you are a beginner, as you are likely to ruin brushes as you learn the hobby. Hell, I still ruin brushes all the time because I treat them like poo poo. Buy something that is not the cheapest crap, but is not so expensive that it will break your bank if you have to buy a new one. This of course means different things to different people, depending on your hobby budget. You want one detail brush and one bigger brush, and maybe an even bigger brush for drybrushing. Drybrushin is really tough on brushes and doesn't really require a good brush, so you can be a bit cheap on this one. Actual sizes for detail brushes and "standard" brush varies from person to person, I usually use 0 and 00 size brushes for pretty much everything but drybrushing. E: This just in: it is a bad idea to get so excited about a project that you sit down and start painting away wearing a brand new white shirt. Especially when you are doing sloppy coats of black Gesso. Bye bye new shirt. 
lilljonas fucked around with this message at 21:46 on Aug 7, 2011 |
|
#
¿
Aug 7, 2011 18:07
|
|
|
Dominion posted:I hear people badmouth Citadel brushes a lot, and with the older brushes that's warranted. But it seems they have switched to Kolinsky sable for their newer brush line. Are those still terrible? It seems like they should be decent, and the prices are on par with other sable brushes (S7, Raphael, whatever). After badmouthing the GW poo poo brushes a while ago, someon told me to give them a new chance as they were all brand new and real sable hair and yadda yadda. So I bought their detail brush. After putting some paint on it, for the very first time, the point more or less exploded into a random assortment of hairs pointing in all directions. lovely, lovely brush for the same price as a good brush. e: Ironically I still use it, just more as a generic basic brush for things that are not near "detail" work. It's still a brush, it just can't hold a point if its life depended on it. lilljonas fucked around with this message at 22:20 on Aug 9, 2011 |
|
#
¿
Aug 9, 2011 22:14
|
|
|
Combaticus posted:Any suggestions for paint stripping other than pinesol and simple green? Don't think I'm able to get those brands here in Denmark, right now I'm using acetone, it works pretty well, but there's still some pesky bits that won't really come off. Also was Smelly primer some kind of super paint? the undercoat seems especially hard to remove. Try Brun s�be for a cheap and safe remover that smells nicer. Just dunk the miniatures in a glass jar, close the lid, and let it rest for several days. Then brush that poo poo off with an old toothbrush.
|
|
#
¿
Aug 14, 2011 08:50
|
|
|
WIP from the samurai scenario table I'm building with a mate for a convention in three weeks. Right now I'm working on the buildings, the actual houses are mostly painted though I haven't built the roofs yet: The spaghetti Samurai movie feel is gradually being realized: 
|
|
#
¿
Aug 14, 2011 17:35
|
|
|
Torabi posted:That looks gorgeous! Can't wait to see the finished thing. Thanks! Adding roofs will improve it a lot. Oh, and I spent my vacation abroad, and so my wife thought I wouldn't do anything hobbywise for three weeks... ...little did she notice the green stuff and sculpting tool I snuck into my luggage. Which means that I now have roughly 200 handmade details for the village, ranging from ovens and pots to sandals and vegetables. Terrain building truly is playing dollhouse, but for men.
|
|
#
¿
Aug 14, 2011 18:20
|
|
|
TheCosmicMuffet posted:You got epoxy putty on an airplane, or did you mean you snuck it into the checked baggage? Checked baggage. I don't want to explain to the security staff why I bring sharp metal dentist tools with me.
|
|
#
¿
Aug 14, 2011 19:01
|
|
|
Yeah, when I get to painting my Skorne I'll definitely try it out, Skorne (and Warmachine in general) should be good for blending with all those big chunky miniatures with huge armour plates.
|
|
#
¿
Aug 15, 2011 21:59
|
|
|
Gravitas Shortfall posted:I'd paint your base in simple shades of dark blue. Basecoat black, heavy drybrush Necron Abyss, then maybe a light drybrush of Ultramarines blue or similar. Might want to avoid grass unless you want to soak them in some watered down paint or ink. This is a good way to do it, you can also add shades of purple if you think that only blue will be boring. Example:  Combine deep shadows and sourced highlights from above on any stuff on the bases like rocks to make it glowy.
|
|
#
¿
Aug 16, 2011 18:43
|
|
|
Recursive Expanse posted:I've been putting together some ideas before I decide on a theme for quote:I found this old smithsonian crystal growing kit, has anyone been Never heard of it, but it never hurts to try things. This hobby is entirely based on trial and error. The ingredients for dipping was around for decades, but it wasn't until some weirdo tried to splatter it on a miniature that it became a global boom. quote:A question about chariot bases, I'd like to base the entire chariot. I'm pretty sure the GW chariot base is 50mm x 100mm. If you can find something called "plasticard", you can make your own. Plasticard is used for making signs and stuff, and the advantage for hobbyists is that it doesn't warp as much as cardboard or other materials, especially when you put paint or glue on it. quote:For a different project, I want to give an old Grom and Niblet a custom Just go with it, and use a coherent colour scheme. That is, use two or three colours to tie the army together, colours that are prevalent on all units in your army. It should turn out great, as gobbo armies are usually cool as hell. Good luck!
|
|
#
¿
Aug 17, 2011 18:39
|
|
|
Kibner posted:Do you guys have any advice on applying base to a 40k plastic model in a high humidity climate? The most humidity tolerant base I could find at my FLGS is only rated up to 60%, however, I live in south Louisiana and it is rarely below 75%. Is there a certain basing paint I need to purchase or should I apply the base at a certain time of day? I do not have a garage. Black gesso is the way to go if your weather sucks for spraying and you can't do it inside a garage or something. Where I live it's usually raining, snowing, humid or too windy for sprays, so I do most of my priming with gesso. It's not perfect, and I do spray now and then when the weather allows it, but I wouldn't get anything done if I waited for better weather conditions. Gesso can be found in art shops, and it is normally used for preparing canvases. You paint it on quite roughly, and then it contracts as it dries. Be careful not to pool too much of it in recesses, as it can get kind of goopy. It has more tooth than most sprays, which some people doesn't like. It is more fragile, especially on metal miniatures before you get a layer of paint on top of it, so be sure to seal your miniature with some vanish after you paint it. While gesso has all these disadvantages, it kicks rear end for people dealing with crappy weather. It's also super cheap when you compare it to sprays, my tub of gesso has lasted for several years, a couple of armies and a ton of terrain projects. smokmnky posted:Hey guys, just a quick update on my progress. I had a few hours last night and with my new paints went to town on this guy. So far I'm really liking the way everything turned out, the gun metal I think looks pretty cool and I like the way the gold turned out as well: Nice, now you should start to see the immense difference of getting paint on all parts of the model instead of having to stare at all that primer. Do you have some washes? Hitting some washes in the borders between the parts will make them stand out more and make the details more visible. lilljonas fucked around with this message at 19:55 on Aug 17, 2011 |
|
#
¿
Aug 17, 2011 19:50
|
|
|
thespaceinvader posted:
Screw caps were the worst, and would dry up in weeks. The old hexagon shaped ones from the 80's-90's were sooo good, I still have some and they haven't dried a single bit. True story: the Dead Sea Scrolls survived because they were sealed in old hexagonal GW paint pots.
|
|
#
¿
Aug 17, 2011 20:09
|
|
|
Hal Gill username posted:When you say "horrible", do you mean it's hard to work with or difficult to clean up or what am I getting in for, here? Gesso is notorious for leaving small spots uncovered once it dries, due to it shrinking a lot. This happens all the time if you paint metals: some of the most elevated parts, places where you want to highlight later, will be exposed as the paint shrink away. This is not a great problem IMHO as a quick brush-up on those parts with more gesso will fix it. Mind you, spray also does this to a certain degree, as you might find to cover some deep crevasses, from below and such. When I spray I usually have to go over the model with a brush anyway, as I miss stuff. Both methods are likely to need touch-ups. But yeah, don't use a nice expensive brush for gesso, a crappy dollar brush will do. This is less of a problem than it sounds like, as you don't need to be very exact when you paint it on. Gesso is rough on the brush, and I find it to be little bit harder to clean up than normal acrylics if you get it on textiles, wood and stuff, so make sure to put some newspapers on your painting area. lilljonas fucked around with this message at 05:23 on Aug 18, 2011 |
|
#
¿
Aug 18, 2011 05:20
|
|

|
T minus 1.5 weeks: We worked with spackle, spackle and more spackle. The board is actually quite close to ready for painting, water effects etc. Here's an older picture with the layout of the houses, of course those houses are almost painted now:  Biggest remaining item for me is to finish the roofs and paint them. And finish the bandit gangs. And maybe paint up some townspeople and samurai. And write the rules and scenario. But that's ok, we have 1.5 weeks left. ") e: and yes, we are going to highlight every single line on it with a thick border of Skull White, because that's how pros roll. lilljonas fucked around with this message at 19:41 on Aug 22, 2011 |
|
#
¿
Aug 22, 2011 19:38
|
|
|
Fix posted:Dayum. What game are you playing with that setup? We call it Samurai Night Fever. Basically a diorama game for a diorama convention, where points based games are banned. We plan on using a slightly watered down version of the LotR skirmish game, it seems really quick and easy and should handle both bands of worthless bandits and samurai heroes alike. But we plan to mod it by throwing out some rules and adding random events drawn from hanafuda cards and all sorts of nonsense. Which will work since the game has a GM: "Oh no! You drew a... poetry scroll of the month of chrysanthemums? A rowing band of ninja appears!". And there's always the odd game of Japanese Mordheim, which we made our own home-made mod for. Other than that, it's the perfect proportions for Warmahordes, which is increasingly popular around here, so it might serve for that as well. The hills will be a complete death trap for metal jacks though, tumbling to their doom as they explode into piles of metal pieces and chafed paint. lilljonas fucked around with this message at 21:37 on Aug 22, 2011 |
|
#
¿
Aug 22, 2011 21:32
|
|
|
Fix posted:Think you could modernize up some of those buildings? Do some sci-fi with the asian feel? You'd be pretty well kicking everyone else's rear end who is trying to do Yu Jing stuff for Infinity. Yes, the actual board will be quite generic actually, so it would not be too hard to make additional buildings to switch things up, or even alternative roofs etc..
|
|
#
¿
Aug 23, 2011 04:39
|
|
|
Torabi posted:So my imperial guard guys are a million pieces. Is it better to paint the pieces individually and then glue them together? I usually assemble everything before painting, with some exceptions such as working with 54mm metal miniatures or vehicle kits with interiors.
|
|
#
¿
Aug 27, 2011 16:47
|
|
|
T-5 days. We gave the board a basic coat of dark brown, so now it looks horribly depressing: I finished the normal roofs, and gave them a first coat of, guess it, dark brown:  Tonight will feature hours and hours of drybrushing browns.
|
|
#
¿
Aug 29, 2011 06:04
|
|
|
T-4 days, a.k.a we're making a fuckin' rice field:   Remaining now are various greenery, water effects, touchups and a ton of work on the houses, miniatures and scenario.
|
|
#
¿
Aug 30, 2011 05:40
|
|
|
Indolent Bastard posted:Your skill, dedication and speed disgust me. I couldn't ever be that fast & skilled; my fast would look sloppy, my skilled takes forever. I hate you. Good work. We are two people working on it  but thanks! Oh, and today I ordered materials from the States for the last time. First I got shafted as they only let me choose the most expensive insured postal service, and then it got stuck in customs. So I'm looking at 70ish dollar S&H for 50 dollar of products, and I'll have to go all the way across town tomorrow to pick it up. Ungh! but thanks! Oh, and today I ordered materials from the States for the last time. First I got shafted as they only let me choose the most expensive insured postal service, and then it got stuck in customs. So I'm looking at 70ish dollar S&H for 50 dollar of products, and I'll have to go all the way across town tomorrow to pick it up. Ungh! Gotta drybrush the poo poo out of some roofs as anger management.
|
|
#
¿
Aug 30, 2011 17:57
|
|
|
Fix: high five terrain brother! Looking good!  So I didn't post any updates yesterday since I had obligations preventing me from doing hobby stuff, which meant we had one hectic evening of work to finish things before we head off to the convention today. Some details had to be neglected, but overall we're looking good. I just have to pretend to do proper work today as I furiously construct secret mission cards. The idea is to have a few players taking on the role of heroes against one or two villain players, but everyone will have secreet missions: maybe the hero next to you is a bounty hunter, who is only in it to kill the bandit captain, not save the village. And is the loot actually in the storehouse? Hopefully it will work. Anyway, I'll take better pics at the convention, but here's some snapshots:  Overhead view  The inn to the right is the only building we re-used from my older terrain stuff, since it was the best and added the most variety. The rest was not really good enough to use. I added a lot of more stuff to the base though.  Finally pouring the resin water. Will it look good when it dries? Who knows! lilljonas fucked around with this message at 05:22 on Sep 2, 2011 |
|
#
¿
Sep 2, 2011 05:19
|
|
|
Lethemonster posted:I love the overall paint job but what really catches my eye is how nice your base is! I love the paint job on the floor, you've gotta give up how you did that sometime! I find that the absolutely simplest way to make anything with a large area of grass more intersting is to apply tufts. As in the Silflor stuff: http://www.sceneryexpress.com/departments.asp?dept=1040 You just peel them off, attach them, and your lawn suddenly turned into wilderness. I just bought the Leafy Tufts for the first time and they are really cool. This could improve the last base, where the log kind of sticks out without much context.
|
|
#
¿
Sep 7, 2011 04:29
|
|


|
Refind Chaos posted:I was rumaging my house and found some old D&D miniatures and began painting them, but found I didn't enjoy it. I really lost myself painting the Battletech figures I've posted, but for some reason the fantasy miniatures just didn't do it for me. Is this common amongst miniature painters? Absolutely. Some people love certain manufacturers that other people simply loathe. Sometimes it's because of interest in a period or a genre. I couldn't care less about painting post WW2 troops, but I like painting medieval miniatures. I like tank kits more than I like airplane kits. There's no logic behind that, just personal preference. On top of that, some miniatures suit your painting style better than others. Some painters really like exaggerated "heroic" miniatures where the head is unproportionally sized to the body, simply because facial details are bigger and easier to paint. Others like Orcs because they like to paint green skin but not normal skin. Maybe you like miniatures with lots of texture, such as barbarians dressed in fur, since you can get good results with drybrushing. Sharp corners compared or organic shapes, lots of details or many flat areas, 15mm scale or 54mm scale, the list goes on and on why some miniatures might suit your style better than others. One example: I have a 15mm Sassanid Persian army that I theoretically love. Tons and tons of cataphract cavalry, clad in heavy armour. I just simply can't get myself arsed to start painting it, it has waited primed and ready in my wardrobe for a year now. Ugh. Then a friend dropped a bunch of 6mm British Napoleonics on my table this month. I've never cared for Napoleonics in my life, but now I'm finding myself researching regiment banners and trying to differentiate all those hats they kept changing around. According to everything I know about my preferences I would be painting the Sassanids, but this hobby works in mysterious ways. lilljonas fucked around with this message at 19:54 on Sep 30, 2011 |
|
#
¿
Sep 30, 2011 19:47
|
|
|
Oxford Comma posted:I need some advice on improving my painting. Below is a zombie I painted for Ambush Z. Aside from a few FoW minis, this is my first attempt at painting. Its not awful. I think it'll work as part of a teeming horde of the living dead. But it could be a lot better. I think it is because you lack highlights. Washing provides shadows, but you need highlights to make the details stick out. Adding plain white works, but it is not perfect. I prefer to add some bleached bone, you can try that if you have it. Otherwise go with the white, it's your first attempt, and for a beginner it looks pretty boss already. Drybrushing on highlight on something like the zombie's skin or shirt is actually quite hard. It is a technique that is much better suited for things like chainmail and fur, where you have a highly textured area. Put the model under a strong light source and see which parts are brighter than the others. Paint those areas with the lighter shades. lilljonas fucked around with this message at 20:16 on Oct 4, 2011 |
|
#
¿
Oct 4, 2011 20:13
|
|

|
Oxford Comma posted:Thanks. So I should take whatever color I'm using as a base layer, add some Bleached Bone and then drybrush? Sounds good, but as I edited in my reply, be careful if you try to put on highlights with drybrush, as it can be surprisingly tricky to make it look good if you are not working on surfaces like fur or chainmail. If you dare, try to paint the edges where the light lands if you hold the mini under a lamp. Then do this with the skin on its face and on the bandana thingy. I think you should try your idea of painting the torn holes in the shirt with a dark wash, it sounds like it should do it.
|
|
#
¿
Oct 4, 2011 20:20
|
|
|
Baron Bifford posted:I saw a bunch of those tools on sale in my local GW. Now I'll have to buy those too. Money, money, money. No need to buy GW tools, I do 99% of my hobby work with a simple box cutting knife that you can find for a dollar, tops. Add a no-brand pin vice and a wire cutter and you can do pinning as well. Then some cheap jewelry files from e-bay if you feel like you prefer filing to just scraping stuff off with your box cutter.
|
|
#
¿
Oct 13, 2011 18:25
|
|
|
Oxford Comma posted:
To expand on 1), you might hear the words wash and ink alot. Those two are separate things. Inks usually have a lot more pigments in them, so you have to be a little more careful. They are also usually a bit glossy, while washes are matte. This means that washes are less risky to use, but you won't get as dramatic an effect as when using inks. A good wash will not "pool", so you can apply it quite liberally over an area. Inks however, tends to pool, and will leave big sploshes and lines if you use it like that. So inks are more useful when you want to really define a line between two areas, or make a very dark shadow. This would often take many layers of a wash. But really, for most people these days, only buying washes is enough. lilljonas fucked around with this message at 18:34 on Oct 16, 2011 |
|
#
¿
Oct 16, 2011 18:28
|
|
|
Oxford Comma posted:Is there anything I can use for basing material that's cheaper than GW's overpriced stuff? I use sand from sandboxes or beaches, twigs from the forest and scraps from broken items at home. Can't get cheaper than that. As for static grass, tufts and flock, the stuff that GW and other miniature brands sell is usually the stuff that train model companies such as Woodland Scenics and Silflor sell, but for three to ten times the price. So buy from hobby shops aimed at model trains, like https://www.sceneryexpress.com if you are in the US. E: Galeforce Nine is a perfect example of a miniature brand taking stuff out of train model brand packages, dividing it in two bags, and selling it for more than each bag was to begin with. Same with Army Painter. lilljonas fucked around with this message at 18:41 on Oct 16, 2011 |
|
#
¿
Oct 16, 2011 18:38
|
|
|
The Saddest Robot posted:mycetic spores A clubmate did exacltly like this: green stuff and cocounts, really simple and cheap mycetic spores: http://thetyranidhive.proboards.com/index.cgi?board=converting&action=display&thread=26374
|
|
#
¿
Oct 20, 2011 20:01
|
|
|
I'm mostly a Gesso guy, which is because a) I live in Sweden where it is either wet, cold, windy, humid or everything above most of the year, and b) I don't have a garage to spray in when the weather is bad. Gesso is not all that bad, but it is not perfect. I use Liquitex black Gesso. It's not dark brown, it's black, and it is not that much chalkier than spray. The big drawbacks are that if you are too sloppy it can form thick blobs, and it is easier to rub it off while handling the model, at least before you get a second layer of normal paint on top of it. On the other hand it is easier to cover the entire model, but when I spray it is often the case that parts like the belly of cavalry is not covered. Even if you do the initial coat with spray, gesso can be a useful tool to go over these uncovered parts after the spray has dried, and get the best of both worlds. But hey, I can't spray for poo poo 95 days out of 100, so I don't care. On the plus side I can use a 30 dollar tub of Gesso for several entire armies, while spray primer is quite expensive here (around 15-20 dollar/can) and such a can would not last that long at all.
|
|
#
¿
Oct 22, 2011 19:58
|
|
|
WhiteOutMouse posted:I always hear people talk about humidity and moisture as problems for spray priming but I have never had a problem. If you live in Florida you do not know the meaning of the word cold, and spraying in cold can be a bad idea as the paint might turn really chalky and flaky. This means that spraying is pretty much a no-no here during the colder months. The absolutely cheapest auto sprays here are around 10-12 bucks, GW sprays around 20, and the local auto shop doesn't even have black primer.
|
|
#
¿
Oct 22, 2011 20:42
|
|
|
Yup, simple green is fine. The problem with used plastics is rather that the bond formed by plastic glue means that the parts are melted together, so it is trickier to pry them apart if some 11yo put them together all wrong.
|
|
#
¿
Oct 23, 2011 16:56
|
|
|

|
| # ¿ Apr 25, 2024 12:18 |
|
|
Torabi posted:Can anyone give me some tips on how to start doing the bases of my first models? I apply static grass by painting the parts of the base I want static grass on with watered down white glue (PVA), and then sprinkling on a liberal amount of static grass. Then turn the miniature over and carefully shake it to make excess grass fall off. After that I gently (gently!) blow across the applied static grass slightly from beneath to make it stand up while drying. Imagine lifting the model up a bit and blowing upwards. But remember to apply and paint the sand before applying the static grass. If you have some cash and want something more wild for your Catachans, consider tufts. These are patches of grass that looks a bit more interesting and lifelike than just static grass IMHO, and they can either be used alone or to spice up your static grass. Example: http://www.sceneryexpress.com/products.asp?dept=1232 lilljonas fucked around with this message at 06:09 on Oct 26, 2011 |
|
#
¿
Oct 26, 2011 06:02
|
|