


|
Ambrose Burnside posted:But yeah, at first I made a lot of trinkets and toys when the novelty of one-touch manufacturing was still fresh, but I’ve tried to cut that out as much has possible. These are good criticisms. As with all tools, using a resin printer for purposes within its wheelhouse are gonna give the best results overall. These days I use mine for bespoke miniature stuff, because if I need something loadbearing or whatnot I'm nearly always better off just carving or making it out of nearly anything else. That niche is fantastic, though! If I had the capability to injection mold or vacuform I suspect I'd be able to expand into proper rapid prototyping, but for the moment I'm just a nerd who likes making and painting dumb things for people, like a small cup of fries for my Peter B. Parker action figure to be lazily webbing from across my desk. The alternatives for detailed models or head sculpts or custom accessories just don't make sense when I've got this stinky headache right here. And, if I'm being fair, if that's what you want one for, it's kinda perfect for that.
|
 #
?
Apr 4, 2021 17:11
#
?
Apr 4, 2021 17:11
|
|

|

|
| # ? Apr 20, 2024 01:58 |
|
|
I need to tear down and clean up/adjust my CR-10S. Since I'm doing that, I'm also considering converting it to a CoreXY style setup. Has anyone here done this? I've seen a couple on the creality groups, but not a whole lot.
|
|
#
?
Apr 4, 2021 17:19
|
|


|
AlexDeGruven posted:I need to tear down and clean up/adjust my CR-10S. How much of the original do you keep? The hotend?
|
|
#
?
Apr 4, 2021 18:30
|
|

|
AlexDeGruven posted:I need to tear down and clean up/adjust my CR-10S. Seems like it would be easier to just buy an Ender 5
|
|
#
?
Apr 4, 2021 19:10
|
|


|
If I wanted to print for maximum strength, would I be better off going for the highest layer height my printer can reliably do with the material to minimise the amount of layer transitions and so potential places to break or going for a much lower height so the layers are likely to be much less susceptible to underextrusion? I already have the component designed so most of the stresses will be along, not perpendicular to, the layers. (This is more of a thought experiment than an actual question, the .4mm height draft I used to check fit is already more than strong enough for the purpose so I'm going to just go ahead and use it, I was just wondering for future reference)
|
|
#
?
Apr 4, 2021 19:31
|
|

|
Less, thick, hot layers.
|
|
#
?
Apr 4, 2021 19:40
|
|


|
Yep, thicker layers are stronger both just because the plastic traces are larger, and because the additional thermal mass lets each layer stay hot longer and fuse more deeply into the other ones. You don't want to go much more than 75% of your nozzle diameter, but 0.3mm on a 0.4mm nozzle is fine and will be nice and tough. If you can tolerate the stringing, going a few degrees hotter also helps things fuse together better. Also, it seems logical that increasing infill density would make the part stronger, but most of a part's strength actually comes from its perimeters. I use 3-5 perimeters for parts that need extra strength, depending on geometry. Also consider the print orientation, of course. Some parts are very strong when printed in one orientation but will just split in half when printed in another.
|
|
#
?
Apr 4, 2021 19:47
|
|


|
It's also advantageous to increase the extrusion width if you can. Cnc kitchen found improved strength all the way out to 200% of nozzle diameter. Some of this is just more material, but a single .8mm line is stronger than two .4mm lines. It's also faster and bonds better. https://www.cnckitchen.com/blog/the-effect-of-extrusion-width-on-strength-and-quality-of-3d-prints
|
|
#
?
Apr 4, 2021 20:22
|
|

|
CNC Kitchen testing on layer height did not seem to suggest an improvement in strength with thicker layers. The ratio of layer height to nozzle diameter was more important, with a pretty sharp drop off starting when layer height exceeded half the nozzle diameter. https://www.cnckitchen.com/blog/the-influence-of-layer-height-on-the-strength-of-fdm-3d-prints
|
|
#
?
Apr 4, 2021 21:15
|
|


|
Mostly an excuse to post more photos of new prints, but here is the build pad coming up with the PLA And here is a vanity shot of random octopus 
|
|
#
?
Apr 4, 2021 21:17
|
|


|
Hadlock posted:The bed was cool to the touch, room temp so I think it was ok. The bed had been sitting for at least 20 min before I started trying to remove it. I did the "scratch the paper" test with a premium thickness post-it note as the feeler gauge so I dunno, maybe that was still too close Go spend a few bucks on proper feeler gauges and use those for calibration. Why we're still doing 'the paper test' in 2021 is beyond me, given a good number of posts (even some of mine) are about first layer adhesion due to bad leveling. PLA is usually pretty forgiving about all but the worst first layer calibrations, but other materials aren't so.
|
|
#
?
Apr 4, 2021 21:34
|
|

|
Doctor Zero posted:Seems like it would be easier to just buy an Ender 5 Probably, but A. I'm a pathological tinkerer B. I already have the 10S and a partially functional i3 clone sitting around
|
|
#
?
Apr 4, 2021 21:45
|
|
|
snail posted:Go spend a few bucks on proper feeler gauges and use those for calibration. You already have paper. The actual distance is a red herring that you won't know ahead of time. To actually dial it in you need to dial it in with a first layer test. At best a feeler gauge will easily get you back to a value that you know works.
|
|
#
?
Apr 4, 2021 22:05
|
|
|
Aurium posted:At best a feeler gauge will easily get you back to a value that you know works. This is huge though
|
|
#
?
Apr 4, 2021 22:14
|
|

|
SchnorkIes posted:This is huge though I don't really agree. Once you know what you're doing dialing in a nearly working printer is easy, but this misses my big issue. It won't help you for the first time, which is when someone who's having problems is going to need the most help. Adding a feeler gauge to the process still doesn't help a new person with things like how a feeler gauge should actually feel. They'll get it wrong just as often as someone they go how hard should the paper be pinched, only now they've stopped what they're doing, went out to buy a new thing, and wound up in the same place. The end point is the same, dial in your first layer with a first layer test. Does it look wrong? It is wrong. E: The common and obvious instruction of dialing in your z to the gold standard a piece of paper is not the end. It is the start. A feeler gauge might give a better start (you know, if you know a reasonable thickness), but telling someone who's having first layer issues with an almost working printer to go out and buy a layer gauge won't get them a working printer. Explaining how a first layer test goes and how it should look will. Aurium fucked around with this message at 22:37 on Apr 4, 2021 |
|
#
?
Apr 4, 2021 22:28
|
|
|
Aurium posted:You already have paper. What do you mean not know ahead of time? There's a whole ritual about nozzle widths, materials and first layer heights, and there's a mountain of empirically developed knowledge of what to use. If I instruct my slicer to run a 0.3mm layer on the first layer, I expect 0.3mm, not some value that could be up to 30% off. We spent all this effort chasing e-steps and x/y calibrations and then hand wave the Z, wondering why the first layer isn't going down. Having accurately measured many paper types, the variance even among the same types of paper is huge. Calibration from a single origin point was something always drilled in when I was learning to lathe metal parts. If every axis of movement is accurate against that origin point, there's never a surprise of the produced part not being accurate.
|
|
#
?
Apr 4, 2021 22:36
|
|
|
Aurium posted:Adding a feeler gauge to the process still doesn't help a new person with things like how a feeler gauge should actually feel, Ah, I see your confusion. You should not 'feel' the feeler gauge, it either clears or it does not. You're not trying for a resistance test against an uneven surface. Within the single step distance of common z screws, you're going to be well within the margin of acceptable error for many filaments.
|
|
#
?
Apr 4, 2021 22:39
|
|
|
It's happening, Ambrose. Pretty soon we're gonna rename this thread Popular Makerinist. We're going to asymptomatically approach Old Machinist slap fights. In a few years' time we're going to be discussing the virtues of buying a clapped out Stratasys machine instead of a Prusa XL as a first multi material printer.
|
|
#
?
Apr 4, 2021 22:47
|
|


|
snail posted:What do you mean not know ahead of time? There's a whole ritual about nozzle widths, materials and first layer heights, and there's a mountain of empirically developed knowledge of what to use. Strictly speaking, I'm generalizing more that necessary here. For something like pure PLA from a reasonable toleranced vendor, and a not poo poo cold end with .4mm nozzle, we could probably call out a thickness gauge that will work for 99%+ of people. If someone grabs some plastic out of the dumpster and shoves it into a nozzle they drilled out to ~1.1mm who the gently caress knows. snail posted:If I instruct my slicer to run a 0.3mm layer on the first layer, I expect 0.3mm, not some value that could be up to 30% off. We spent all this effort chasing e-steps and x/y calibrations and then hand wave the Z, wondering why the first layer isn't going down. By that you should be using a 0 thickness feeler gauge. You're unless you're explicitly compensating the thickness of your gauge somewhere in your slicer (z-offset, or some custom gcode are the most probable) or firmware(sooo many place you could) you're already hand waving the thickness of your gauge. If you are compensating for it. Well, good for you, and I mean it. Some of the nicer prosumer printers supply little thin strips of pei of some defined thickness and consistent surface quality to gauge against. It's a better thing. But if you are hand waving it, you'll need to tune in your first layer. Or pick gauges until you find one that works, which is equivalent. snail posted:Ah, I see your confusion. You should not 'feel' the feeler gauge, it either clears or it does not. You're not trying for a resistance test against an uneven surface. Now have that conversation with every new person who goes out to buy a feeler gauge because they also need to learn how to use it.
|
|
#
?
Apr 4, 2021 22:58
|
|
|
My leveling: Paper on all 4 corners. Print leveling pattern (5 squares) Check that each square removes easily and is one solid piece Adjust Repeat. Typically takes less than 30 min and lasts until I see things not sticking properly. Eventually I'll upgrade to better bed springs and lock nuts, but the inconvenience hasn't pushed me to it yet.
|
|
#
?
Apr 4, 2021 23:16
|
|
|
You can try to use paper/feeler guage all over the bed as you fiddle the knobs, or you can just print a damned single layer calibration test and look at it. I have a set of feeler gauges and I used them on my printer exactly once, when I set it up. Then I printed a calibration test and adjusted accordingly. Now I just eyeball the skirt as it goes down and give a knob an eighth of a turn or whatever if it needs it. Just print the drat test and learn what "right" looks like. It's not that hard and it'll make your life a thousand times easier.
|
|
#
?
Apr 4, 2021 23:21
|
|

|
Is this peak "just get a prusa"? because it sure feels like it 
|
|
#
?
Apr 4, 2021 23:24
|
|

|
What's everybody's calibration pattern? Links please My print bed cracked down the middle and it's been amusing wasting half an hour trying to level a bed held down by two clips that's also in two pieces and each half has its own warp characteristics. I'm just going to wait for the new print bed to arrive tomorrow
|
|
#
?
Apr 4, 2021 23:36
|
|
|
Wibla posted:Is this peak "just get a prusa"? because it sure feels like it A prusa is going to give you parts with an out of square first layer right
|
|
#
?
Apr 4, 2021 23:46
|
|
|
Hadlock posted:What's everybody's calibration pattern? Links please I just put down squares in the slicer where I want to look. Near the screws, maybe near the center, etc. I like prusa's model, a nice long tail so you can see if your bed is consistent, and a square to check for plowing. It's not as useful for manually leveled printers as it's harder to tell what's going on with a single line than a few next to each other. Though you can compare the flat top near the square vs far away. Someone has pulled the gcode back out, but I'm not super stoked about running gcode on a different machine, but read though it and it seems fine to run on anything. They also include a stl, though with the disclaimer that it's just there as a thumbnail, so I don't know if it's fit for purpose/the right size/how it would slice. Also. yikes/lol. Wibla posted:Is this peak "just get a prusa"? because it sure feels like it Well, they do use a bed sensor to skip the whole paper bit with the sensor and skip straight to how the first layer looks, along with building the test print into the firmware, and a few other nice automated things.
|
|
#
?
Apr 5, 2021 00:51
|
|
|
Is there a cheap flexible bed upgrade for the ender 3 series, can I just strap whatever Prusa are using on top on my glass plate
|
|
#
?
Apr 5, 2021 01:06
|
|
|
Hadlock posted:Is there a cheap flexible bed upgrade for the ender 3 series, can I just strap whatever Prusa are using on top on my glass plate There are, just search "ender 3 flexible build plate" I have no experience with any. What I can say, and why I'm posting anything (cause otherwise this would be a let me google this for you post) is that the prusa holds its bed on with an assortment of small Neodymium magnets embedded into the carriage, where as most of the upgrade kits use some of the stick on refrigerator magnet mat stuff. I think the prusa solution works a little better, as it doesn't stick another layer between the heater and the build surface, but the mat style is much easier to retrofit.
|
|
#
?
Apr 5, 2021 01:16
|
|
|
SchnorkIes posted:A prusa is going to give you parts with an out of square first layer right No. Why would it do that? this is the only correct opinion on bed leveling btw: armorer posted:Just print the drat test and learn what "right" looks like. It's not that hard and it'll make your life a thousand times easier. Trying to start out with specific numbers and feeler gauges and poo poo is pointless. When I still used printers with manually adjustable beds, my methodology was: - adjust each corner so the nozzle is the same distance above at each point (doesn't matter what the distance is, any thin material is fine) - run a big square outline print and watch to see if it's squishing the right amount - babystep in real time to tweak the first layer offset value so the squish looks good - if it's properly squished in some areas but not others, adjust leveling accordingly - call it a day. 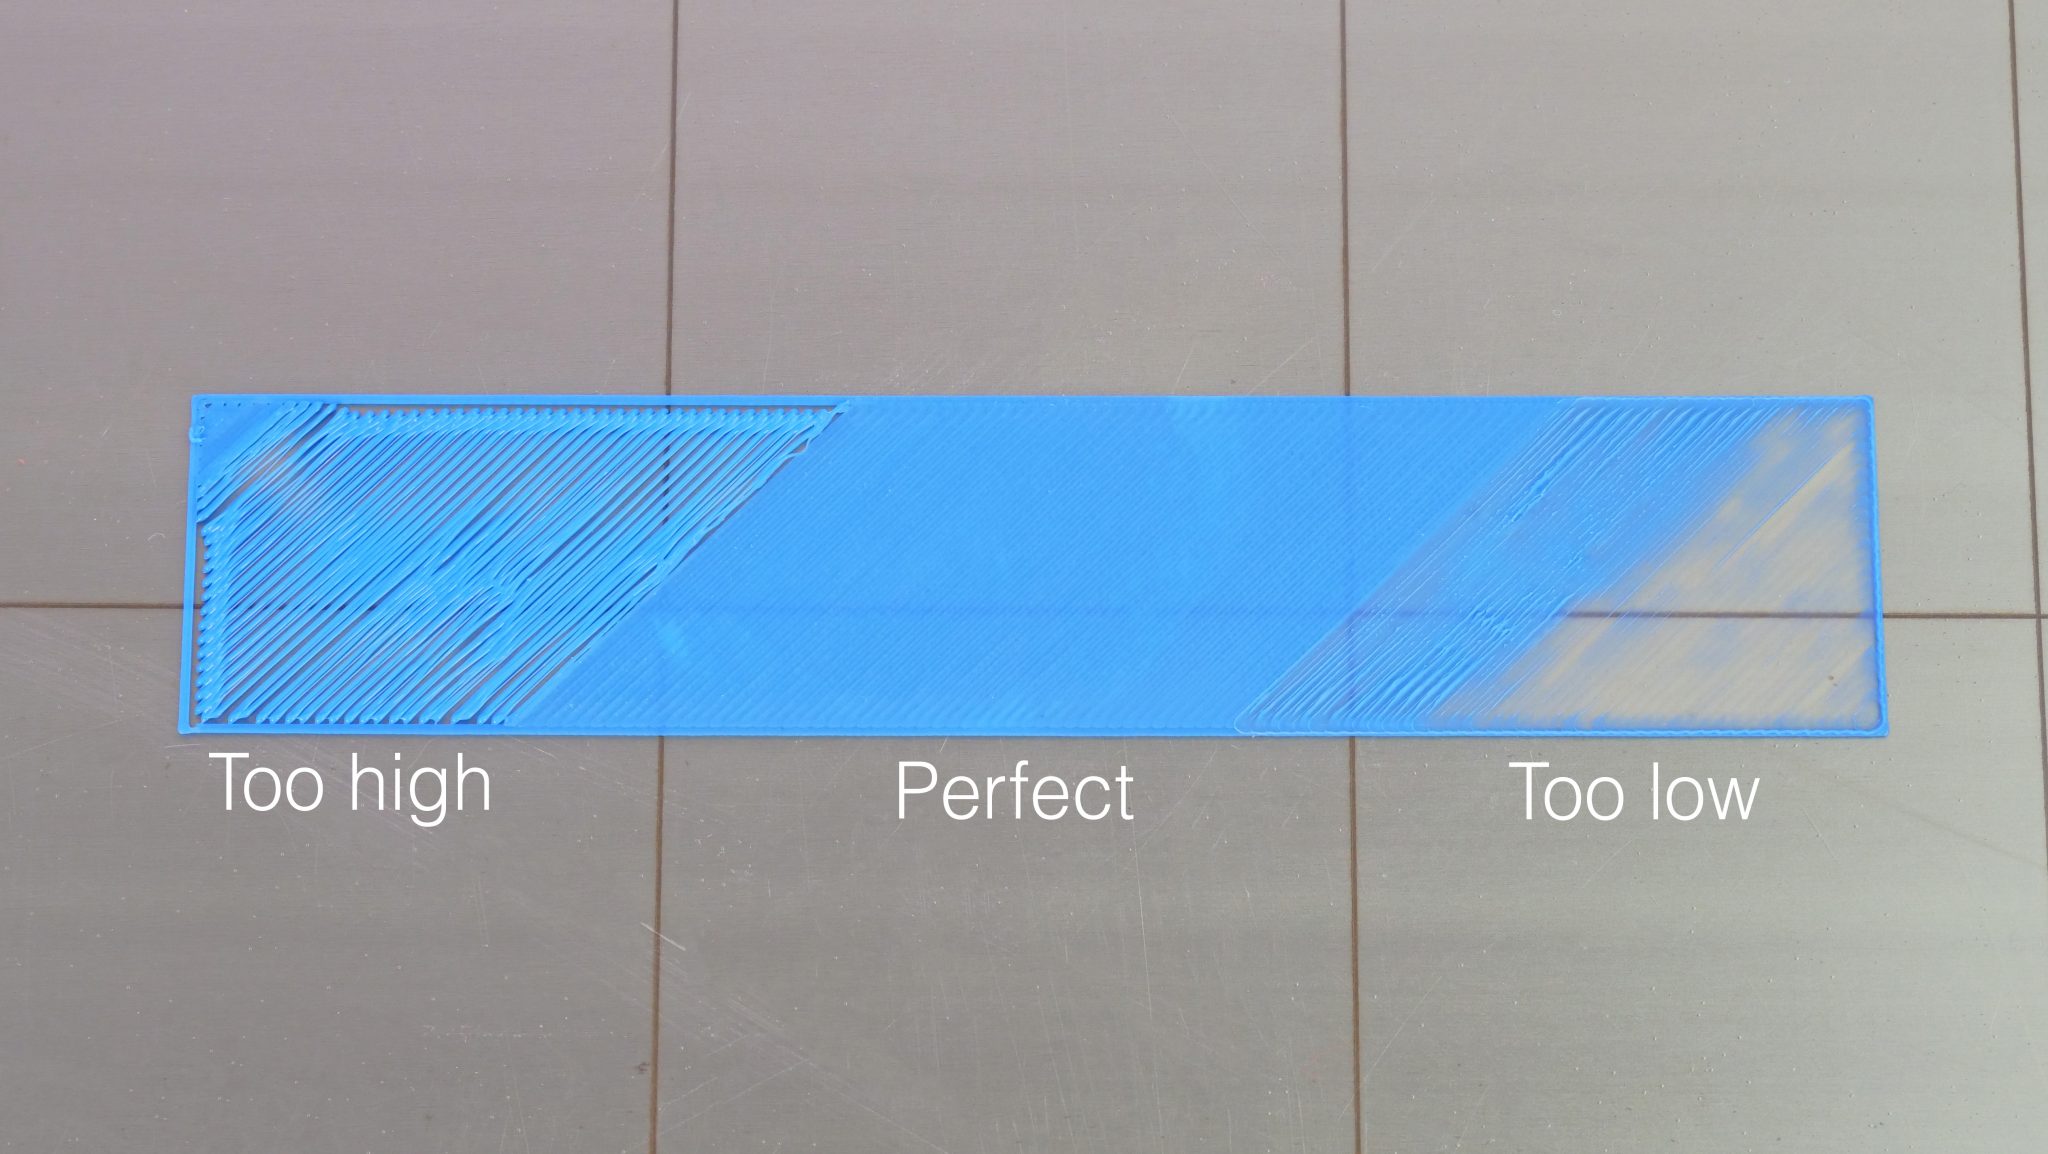
|
|
#
?
Apr 5, 2021 01:21
|
|
|
I'd like to take a 2d/3d printer that exists out there and modify it to do whatever I want. I'm thinking like custom printing heads for pancake batter, pens/markers, etc. What do yall think if I start with something like this? https://www.3dprintersonlinestore.com/twotrees-laser-engraver Are there better kits?
|
|
#
?
Apr 5, 2021 01:26
|
|

|
Hadlock posted:What's everybody's calibration pattern? Links please I can't seem to find the one I use the most on thingiverse right now but this one's popular for the Ender 3: https://www.thingiverse.com/thing:3235018 Oh wait, the one I use most is this one I set to 200x200 at 0.2 in the customizer (or openSCAD): https://www.thingiverse.com/thing:215386 Hadlock posted:Is there a cheap flexible bed upgrade for the ender 3 series, can I just strap whatever Prusa are using on top on my glass plate Flexible can mean a few different things, but the most popular ones are usually a giant fridge style magnet that adheres to the bed (instead of the glass) and a spring steel or other embedded magnetic sheet that goes on top, usually with flat or textured PEI on it. Wham Bam's flexible build system is probably the biggest name in third party plates but they can be pricey. I'd look at Creality's own stuff or maybe a knock off like Trianglelab on aliexpress (it may take weeks to arrive but they make decent clones of open source stuff). people seem to dislike this creality flexible sheet: https://smile.amazon.com/Creality-Flexible-Removable-Magnetic-235X235MM/dp/B084YSZFXL/ but they like the spring steel one alright: https://smile.amazon.com/Creality-Magnetic-Flexible-Platform-235x235mm/dp/B0899TTBCL/ Here's Trianglelab https://www.aliexpress.com/item/33008374363.html+https://www.aliexpress.com/item/33015063641.html
|
|
#
?
Apr 5, 2021 01:27
|
|

|
I had to print a 3x3 inch test file to get it right, don't like the built-in pattern on the mini+ much beyond initial "get the nozzle close enough" stage. I've printed a lot of white PLA lately, and it seems like the mini+ wants a cold pull every 20ish hours or so, is this related to the pigment used? Grey seems more forgiving, and the translucent red flash forge filament clogs it up in no-time (<2 hours), to the point where the extruder skips. My mk2.5 doesn't seem to care what PLA I run through it, I did a cold pull on it the other day, and it was clean, no indication of underextrusion either.
|
|
#
?
Apr 5, 2021 01:33
|
|
|
Wibla posted:I had to print a 3x3 inch test file to get it right, don't like the built-in pattern on the mini+ much beyond initial "get the nozzle close enough" stage. I'm going to guess heat creep, which some people have reported with the prusa mini. https://www.reddit.com/r/prusa3d/comments/l3jgpa/guaranteed_fix_for_your_prusa_minis_extrusion/ You could try pointing a fan at your printer. The goal is to keep the heatsink, and thus the heat break, cooler. The hotend can easily compensate for the additional thermal load, though the print itself could suffer. You could also try printing faster, as a continuous supply of cool plastic would also keep heat where it belongs. Just printing cooler could help as well, as less heat will transfer up. This assumes that the pla will still print. Ironically, most of these suggestions will make other sources of jams worse.
|
|
#
?
Apr 5, 2021 01:49
|
|
|
huhu posted:I'd like to take a 2d/3d printer that exists out there and modify it to do whatever I want. I'm thinking like custom printing heads for pancake batter, pens/markers, etc. What do yall think if I start with something like this? https://www.3dprintersonlinestore.com/twotrees-laser-engraver The Z axis can be handy for these kinds of things, so an actual cheap 3d printer like the cheapest ender 3 you can find could be better, or even a cheaper one if you're going to mod the heck out of it. That said, the plotter you linked might not be a bad choice if you do want to laser stuff. I see these kinds of projects regularly on channels like Homofaciens and RCLifeOn. RCLifeOn did: Printing onto a shirt with a mostly stock CR-10 Chocolate with a special third party extruder on an Ender 3 pro Nutella and batter and PB&J with a syringe based extruder on a Zmorph Clay extrusion on a CR-10 Max Homofaciens did: pen plotter with a pen changer with Zonestar P802Q Direct plastic granule extruder on the Zonestar V2 of his direct granule extruder on the Zonestar Controlled an inkjet print head on a CR-10 as an experiment that ends up in an art installation printer in a later video.
|
|
#
?
Apr 5, 2021 01:52
|
|
|
Aurium posted:I'm going to guess heat creep, which some people have reported with the prusa mini. https://www.reddit.com/r/prusa3d/comments/l3jgpa/guaranteed_fix_for_your_prusa_minis_extrusion/ I'm going to investigate this a bit. Already not a fan of the bowden type extruder, and now that I yanked the mmu2 off my mk2.5 it's frankly easier to deal with, I might just keep the mk2.5 and sell the mini... E: noise was also a factor, but it looks like modding the mk2.5 to use better drivers for the X/Y axis is less than $100, heh. Not like my mk2.5 is stock to begin with (it has linear rails), so why not go whole hog? I'll try printing a bit colder on the mini+ as well, I'm mostly running at 215C for PLA, but the temp tower I ran earlier indicates I can probably go down 5-10C. Wibla fucked around with this message at 02:21 on Apr 5, 2021 |
|
#
?
Apr 5, 2021 01:57
|
|
|
Sagebrush posted:No. Why would it do that? Because the bed isn't actually flat/square, it's just compensating with Z and extrusion per the mesh, right? Your bottom will be the shape of the contour of the bed, but your top will be flat
|
|
#
?
Apr 5, 2021 02:41
|
|
|
In theory that is true, yes. In reality the beds are still very flat and the compensation the printer does is almost unnoticeable. I've stuck a dial indicator on the machines before just out of curiosity, and the beds are generally square to the machine's movement axes to +/- 0.003" or so across the entire travel. So the maximum deviation from one end to the other will be on the order of 0.006" or 0.15 mm. It's true that that isn't completely dead flat, but I doubt very much that having your 2-inch-wide part be unsquare by 30 microns (roughly the diameter of a hair) is going to be a real dealbreaker.
|
|
#
?
Apr 5, 2021 03:15
|
|
|
Their beds are as flat as pretty much anyone else's. They are aluminum core pcbs though, so you could do flatter yourself if you had a milled metal one. For other printers without compensation with similar quality beds it would depend a bit on the molten plastic dynamics. I would expect that the molten plastic would still flow down to the bed copying the contour, with far places having less squish than other locations, leading to a variable first layer thickness and patchy bed adhesion. For sufficiently tilted or warped beds without compensation would simply not print. I'll leave it as and exercise for the reader under what circumstances this is an improvement. Compensation can allow you to print with extremely flawed or tilted beds, though I know that the firmware will warn you about at least some of them. For xy skew the printer warns above .12� and calls above .25� skew severe. That's not this though. You can also get a report on the mesh, and thus quality/tilt of the bed and physically adjust it.
|
|
#
?
Apr 5, 2021 03:20
|
|
|
How do I go about getting cut 2020 and 3030 extrusions. I have no loving clue what I'm doing and the only stuff I can find is big lengths
|
|
#
?
Apr 5, 2021 03:29
|
|


|
w00tmonger posted:How do I go about getting cut 2020 and 3030 extrusions. I have no loving clue what I'm doing and the only stuff I can find is big lengths Chop saw
|
|
#
?
Apr 5, 2021 03:44
|
|

|

|
| # ? Apr 20, 2024 01:58 |
|
|
w00tmonger posted:How do I go about getting cut 2020 and 3030 extrusions. I have no loving clue what I'm doing and the only stuff I can find is big lengths Misumi ships cut to size I think
|
|
#
?
Apr 5, 2021 03:51
|
|