

|
As Retrogaming has been getting sort of a thing in the last few years, many people got the idea to resurrect that old Amiga/C64/286 (or if you were unfortunate, Atari) they had in the attic for the last two decades only to find out they have no idea how to hook up the system to anything recent in screen technology. A few quick 'bouts of googling and maybe ordering some overpriced cable off some dude from eBay usually takes care of that problem. Then you sit there, with your old floppy disks, a pizza and 80s one-hit sensation "Men without Hats" Safety Dance on your cassette deck only to be greeted by a very disappointing blank screen or garbled display when you hit that power switch. You check the cables once, if you are the desperate you check them twice but everything is hooked up correctly. The computer just doesn't work. What now? Maybe that wasn't even your situation, maybe you read something about retrogaming, decided you wanted to see what it is all about, got something from somebody off eBay who swears up and down it worked the last time he turned it on in 1992 and now sadly can just not find the time to help you with your problem after you paid the money. Documentation usually is not that hard to find, but not rarely has an schematic attached it just sort of expects you to understand. People bought that very expensive piece of hardware after all in a time where most people simply still couldn't be bothered or would gain a use out of it, so they must be technical people. Forums are around for that kind of stuff too but not rarely information is sort of contradictory (and sometimes even plain wrong) and lots of it is not newbie friendly. Often people also simply don't know how they could help you or expect you to have an electronics lab at home to even diagnose the problem. Computers changed a lot in the 20-30 years after all. While computers nowadays are usually idiot-proof (they sort of have to be) and operating systems and even hardware expansions are more or less intuitive to install and use, the old computers we will talk about usually are very user-unfriendly. Plug that (non-keyed) cable or that (non-keyed) expansion card in in the wrong way and *poof*, magic smoke escapes out of some chip without warning. My personal background is that I got an Commodore Amiga 2000 in it's introductory year of 1987. I saw a C64 (and Choplifter) at a friends house and really wanted to have one of those computer-thingamajigs all to myself. This was no usual thing back then, and the prices sort of reflected that. The C64 was a low-price computer in my home country of (then still west-)germany that was wildly popular and took kids' bedrooms and adults living rooms alike by storm in the 80s. "Computers for the masses, not for the classes" was Tamriels motto and the C64 certainly reflected the "masses" part in it's manufacturing quality and generally high failure rate at introduction. Still, they were the first guys who really got into producing computers on such a massive scale. Would there even be a market for it? But of course there would be. It was a huge success and one of the things that built the world we are living in now. Commodore then bought Amiga Corp. (formerly Hi-Toro), a US-based company that worked on a games console (called "Lorraine", which later would turn into the Amiga 1000) which was light years ahead of everything else at that time. I saw all the 32 colors at once years later (more in the weirdo-screenmodes) and just knew - I don't want a C64, I want that thing. I drove to the electronics store, wide-eyed, the paper catalog in hand with the wish of buying the considerably cheaper Amiga 500, but got swayed by the salesman (probably wearing a corduroy suit and having a mustache) by the expandability of the Amiga 2000. This later proved to be a mistake as the expansions were difficult to acquire and very expensive compared to the ever-growing "IBM-Clone" (PC) Market. I left the salesman with a sum which would probably buy you two and a half i7s these days, and took a computer with an Motorola 68000 CPU (@~7 Mhz), 1 MB of RAM and 13" color (this was a feature) CRT home. No hard drive yet, that didn't come by default. I had a lot of fun years with that computer and learned a lot about computing. A bit later on I got a 4 MB expansion/IDE Controller (rare, SCSI was the standard for Amigas) and a ~130 MB hard drive for the computer+a 14 Mhz "Accelerator" card, again for a sum which would probably buy you a very nice gaming notebook today. Around those few years I would see the Berlin wall fall and my country reunite, Freddy Mercury would die of AIDS, Roxette and Phil Collins would be in the Charts, and soviet hardliners would try to pry away control from Michael Gorbachev in a failed coup attempt and last stab at saving the "socialist revolution". While some of you guys got born, I stopped having nightmares of nuclear war and then I got a PC like a normal person in around '92-'93. Commodore declared bankruptcy, the "home-computer" era was over and you probably know the rest of that story. Fast forward to today, my 1987 Amiga 2000 still works, sitting besides the screen I type this on. When I use it, it can look like this:  I did have to do some maintenance after getting it out of my basement after almost ten years. The power supply was neither safe to use nor working correctly, the battery for the clock had leaked all over the mainboard, the drives were full of dust. A very common failure in computers of this age and across architectures is leaking batteries. While modern computers have Lithium coin-cell batteries for BIOS settings and the clock which are dry and therefore can't leak, old computers have NiCd (Nickel-Cadmium) Batteries which while rechargeable and relatively uncomplicated, are very prone to leaking with age. NiCd is very toxic and corrosive, and is banned for use in consumer products in the EU. It will corrode copper traces right off PCBs, in bad cases it looks like this:  (Amiga 2000, the green part is corrosion from the battery)  (A600 RAM-expansion, this is considered "light damage") (Both units got repaired and work fine now) In this thread, I want to address the right way of approaching such damage. Another very common failure in old Computers is capacitors. This has nothing to do with the Capacitor plague of the early 00s as most of these computers are considerably older, it mainly affects SMT capacitors, again across all architectures which already used this "modern" technology. Damage to components due to corrosion can be just as devastating as with NiCd. In future posts I want to address what the best way of replacing capacitors is, the plethora of options regarding replacement types, and why THT capacitors usually don't need to replaced while SMT capacitors should almost always be replaced. My main focus is mostly Commodore and I know most about Commodores lineup of systems. To a lesser extend I also know about PCs of that time. There are very common failures, especially in C64s, and common remedies I want to address. I can and will also address other expansion hardware as necessary and also talk about maintenance that can be done by everyone with a soldering iron and some skill. I would also like to use this thread to talk about old applications, operating systems and some computer history and I also invite everyone else to do the same and help me create a knowledge base people can use to keep their old computers running and to keep this knowledge alive. If you want to talk about old console hardware, that is fine too. What I would like to avoid talking about is games, as there's already a great thread about that here. Some of you might know me from that thread, I decided to stop talking about old Hardware there as I thought it just wasn't a good fit and sort of killed that thread. If you need assistance with fixing your old hardware, please try to at least have a multimeter at hand. You don't need one of the high-end Flukes or something, a cheap $5 hardware store one is perfectly fine and can be an immense help in diagnosing your problem. If you have a problem with a non-Commodore system, try to link schematics if existent and possible, or at least make good pictures of the mainboard. I will try to help. Again, I invite everyone else to do the same. Also always post hardware porn, as I will do now. Homegrown hardware porn is the best. Some of the Retrogaming thread regulars might have seen all these pictures, but there will also be new ones.  (Motrola 68030 CPU)  (68882 FPU, around these times, the FPU was often a dedicated chip)   (Another FPU, 8087 intel, look at all that gold)   ("Merlin" Graphics card for the Zorro II/III Bus, Commodores answer to ISA/PCI. ET4000W32 graphics chip)  (486 Industrial board, Sporting a Cyrix 5x86@100 Mhz)  (early ceramic version of the "Denise" and "Paula" Amiga chips, used in the Amiga 1000)   (VB880, east german reverse-engineered, unlicensed version of the Z80 in an GDR-produced computer, I will talk more about this system)  (Amiga 1200, Commodore nicknamed some Amigas after B-52 Songs, in this case "Channel Z". The Amiga 600 was named "June Bug", the Amiga 500 "Rock Lobster" You can see the CPU in the upper left corner. Cooling of CPUs wasn't a thing then.)   (Early "Rev 4" sometimes named "Braunschweig" version of the Amiga 2000, produced in Germany. AFAIK these were never sold as Commodore deemed the multi-layered design too expensive and they also had a few problems)   (Peggy+, a rare german-produced hardware expansion for Amigas which allowed you to watch VideoCDs, remember those kids? Decoding via CPU would not have been possible.) Police Automaton fucked around with this message at 12:42 on Oct 27, 2014 |
 #
?
Oct 27, 2014 07:42
#
?
Oct 27, 2014 07:42
|
|

|

|
| # ? Apr 19, 2024 04:26 |
|
|
Reserved just in case.
|
|
#
?
Oct 27, 2014 07:48
|
|
|
I am a big fan of your work in the retrocomputer thread in the Games forum, and will follow this thread closely too!
|
|
#
?
Oct 27, 2014 09:12
|
|

|
PA's an extremely knowledgeable dude and I'm excited for this thread. EDIT: For an actual question: What's the best way of getting that green corrosion off a board? My Apple IIe had a clock board whose battery leaked onto parts of the mainboard and while it works fine now I know it's not good to just leave it like that d0s fucked around with this message at 12:17 on Oct 27, 2014 |
|
#
?
Oct 27, 2014 12:10
|
|

|
Yes, Police Automaton is the best actual-robot posting to the Something Awful forums today. I have a lifelong mortal fear of damaging computers (with some justification) but he is so thorough and encouraging that I have ALMOST considered trying to fix my 5.25" floppy drive in my MS-DOS machine! Almost. I have so many disks I want to check one last time 
|
|
#
?
Oct 27, 2014 20:33
|
|

|
Quarex posted:Yes, Police Automaton is the best actual-robot posting to the Something Awful forums today. I have a lifelong mortal fear of damaging computers (with some justification) but he is so thorough and encouraging that I have ALMOST considered trying to fix my 5.25" floppy drive in my MS-DOS machine! Almost. I have so many disks I want to check one last time By fix do you mean disassemble the drive or just replace it? You can buy a tested 5.25 drive for a PC on ebay for ~$30 shipped. I don't know your tech level, but even if it is low its easier than assembling a lego set.
|
|
#
?
Oct 27, 2014 22:00
|
|

|
keyvin posted:By fix do you mean disassemble the drive or just replace it? You can buy a tested 5.25 drive for a PC on ebay for ~$30 shipped. I don't know your tech level, but even if it is low its easier than assembling a lego set. Nah, if you gently caress up the alignment of the disk drive you're in for a nasty surprise. You can only read disks that the drive itself wrote and calibrating it requires an oscilloscope. If you are careful you can get in and clean the head which is what causes problems most of the times.
|
|
#
?
Oct 27, 2014 22:47
|
|

|
keyvin posted:By fix do you mean disassemble the drive or just replace it? You can buy a tested 5.25 drive for a PC on ebay for ~$30 shipped. I don't know your tech level, but even if it is low its easier than assembling a lego set. And this makes it sound like it is obviously a software issue or something, but we had not used the drive in years either, so I have no idea. I really should at least give it a shot, because like, is it really going to hurt me if I mess up the drive MORE than "not working?"
|
|
#
?
Oct 27, 2014 22:51
|
|
|
I can't believe I can't find a PCI or PCI-e floppy controller card. Anyone know if they make such a beast?
|
|
#
?
Oct 27, 2014 23:33
|
|
|
d0s posted:PA's an extremely knowledgeable dude and I'm excited for this thread. People approach this in many different ways, I think there's just one way to do it properly, but it's also the slowest and most expensive one. But first, let's talk about what the PCBs really are. I'm not going to dig too deep into that because frankly, I think it's not that interesting, even though you could certainly write books on it. I'll also stick to what was en vogue back then and not go into manufacturing. The board (substrate) itself usually is made out of a polymer, (epoxy) reinforced with fibre. (There are also other materials though, even Paper is possible! But you usually won't find them in Motherboards of these computers) While it's certainly possible to scratch and otherwise damage it, it is rather sturdy and not that easily damaged, it also doesn't really degrade with age. Most boards of that time are dual layered, simply meaning they have copper traces on both sides. There are also Multilayered boards, although you'll find that this is rather rare with old computers, as the manufacturing was quite expensive (still is!) and you often could pull of the entire design with a dual-layered board. Multilayered boards in computers as old as this have the advantage that a dedicated power and grounding plane (4 layers, which is the most usual configuration you will find if the board is multilayered) really helps to keep the signals clean and the noise down. With slower computers like the Amiga 2000 with it's ~7 Mhz CPU you can get away with dual layered, but when you enter the realms of 25-50 Mhz and everything this entails from pin-count to signal integrity, you usually want to start having a multilayered board. Electrical noise being something engineers had to fight a lot with back then, as you often couldn't put all the function into a few chips, but needed lots and lots of dedicated circuity to achieve results. The formula here is quite easy, the more complicated everything gets, the higher and more complicated the power requirements, the more traces, the more crazy signal noise you've got going on, the more grounding you need. An 128D I have (you can see it here) has it's mainboard sitting in a big, sturdy metal cage. This is not only done to keep electrical interference in, (although this certainly was a reason) but also to keep electrical interference out and provide additional grounding. This mainboard has a design so noisy that it'll not work properly when I remove it from it's metal cage. Modern mainboards can be a lot more complicated. It's probably not wrong or too far off when I guesstimate that the i7-based Computer I type this on has a Mainboard with 12-18 layers, signal integrity being a lot more critical in modern computers mainly because of the high speeds. The Materials used in the substrate itself usually are not susceptible to chemical damage by NiCd or leaking capacitors. It's just not that reaction-happy and doesn't degrade in such "tiny" timespans as 20-30 years. Lets go back to the usual dual-layered design in the old machines. On top of your substrate you'll find copper, the traces. These are laminated as planes onto the board, with the excess basically being chemically etched away till you have your trace layout. (Not incredibly accurate, but as a one-sentence explanation how they get there, this will do) The copper "layer" is very, very thin. We are talking �m here, or for americans - thousands of an inch. copper is pretty reaction happy, so it'll oxidize and corrode happily when exposed to the elements, like normal air. Just look at the Statue of Liberty for that. Copper is also rather soft and with the thickness we are talking here, very easily damaged. The copper traces are very susceptible to a leaking NiCd Battery and not rarely, you'll find lots of interrupted traces on boards damaged that way, which literally were just corroded away. On top of that you'll find everything sealed up with a fine layer of paint-like polymer to protect the copper, (and with SMD, preventing of shorting out pads and traces that are close together with tin) the solder mask. I will not go into detail about how this is applied as it's not very important for us and lots of things changed here since back then which makes this layer a lot more resistant to damage than it was twenty years ago. Then you'll have the silk screen, which is the print labeling the components and sometimes things like names, graphics and company logos. Usually white or yellow with this old stuff. Generally relatively scratch resistant stuff (depending on the manufacturing quality) and it'll protect you from the elements, but I wouldn't try too much. Leaking NiCd batteries and electrolyte from capacitors will eat through this layer also no problem. With some very old mainboards (especially the C64 in our case) you have that the manufacturing process was reversed and the tin for the soldering of the components was applied before the soldering mask, which means you'll have globs of tin below the soldering mask. It looks funny and because of that people are often like "oh no, my C64 has somehow melted away" but it really is just a cosmetic thing and has no bearing on the function of the computer, quite the contrary. The tin protects the copper additionally. Such a board looks like this:  (Looks alarming, but is absolutely harmless) On cheap homebrew boards or sometimes eastern bloc computers you'll find that they didn't bother with a solder mask and instead just tinned the copper, as soldering tin (old soldering tin is basically just lead and tin) is quite resistant and also not very reactive to the elements. In power supplies and other (relatively) high power environments the soldering mask sometimes is intentionally left out and the copper traces get reinforced with tin to be able to conduct better. (No lead in those anymore, though) --- The case you have usually when a NiCd Battery has leaked is that the paint layer basically turns into an ineffective but still "somewhat adhesive" and kind of toxic goop that doesn't protect the copper below anymore and lets the leakage (and the elements) touch the copper, which makes it corrode. It still might look somewhat fine but you are correct in your assessment that it shouldn't be left this way. There are different levels of damage and in many cases, you can just wipe the paint off. Many people keep it just like that because they sort of want to keep the original look, but it's not a good idea. I had the unfortunate experience that even after the battery has been removed, the trace amounts of the leaked stuff are enough to further damage traces. There's also this legend going around that you can neutralize the NiCd with vinegar, as it's a base while vinegar is an acid. Please don't put organic acids onto your mainboards, this will in the best case do absolutely nothing and in the worst case cause further damage. A through cleaning with alcohol and water after removing of the damaged paint is enough. I heard of many methods removing the paint, most of them really dangerous, people go at it with sanding paper, or even a screwdriver. If you read all the stuff I just wrote, you know now that's not a good idea and there's a non-zero chance to damage copper traces in the process, the best way to remove damaged paint is with a fiberglass pencil. This:  (2mm fiberglass pencil) The upside of these pencils is that they scratch just hard enough to remove the paint and tin, but not hard enough to remove the copper. They come in different sizes, and the fiberglass gets used up with scratching and can be replaced, also pictured. the imaged one is 2mm. I recommend to have at least one 2mm pencil and one 4mm. They are very cheap. Just let the fiberglass out a little bit at the tip, don't push it all the way out because it'll just break off. This sounds weird now but when you have such a pencil, what I mean becomes clear pretty quickly. Be careful what you buy as these exist with steel too, this will scratch your copper right off. Also you might want to wear latex gloves if you have little practice in doing this, it's no fun having fiberglass embedded in your fingers. What you do with the pencil is just scratch the paint until you can see the bare copper, it's not any more complicated than that. I recommend careful, circular motions. Practicing this on a junk board is never a bad idea and I always have a junk board lying around for practice. You should always remove the damaged parts and "then some". If you want clean, squarely removed solder mask, then you can take scotch tape and cover the solder mask around the area you want to remove. When you are finished, it can look like this:  Clean looking isn't it. As you can see I removed quite a bit of stuff around the affected area. It is a good idea to remove components that have "green" on them, as there's a non-zero chance these components got damaged by the leaking battery and will fail eventually if they haven't already. Hunting down such problems is never fun and usually it's easy enough to replace the components and doesn't cost much. Of course, also use your head. In the case of this A2000 Mainboard here, there was already some corrosion on the Pin of the 68k CPU. What you do in such a case is not throw the CPU away, but remove the corrosion carefully with your pencil and then re-tin the leg. On a resistor or 74xx logic chip or something, of course this isn't worth the work. Decide by case. Afterwards you have two choices. You can either apply soldering flux to the copper, and then tin the copper which needs some practice and is not easy around the parts where there still is soldering mask (and also has the danger of burning copper traces if you are not skilled in this) or you can apply new Lacquer. There are roughly two different kinds of Lacquer. One with which you can solder through with your soldering iron, and one with which this isn't really possible. The first one really is not appropriate in such repairs, as it's really not something that's long-term resistant against the elements and is more for prototype boards. It'll become all gooey with air moisture over the years and stuff. The second one is more resistant, polymer based but sometimes alcohol-soluble, so be aware of that when you go shopping. In the picture up there I already have applied the Lacquer. Its transparent. You might say now: "but why didn't you use a green one, wouldn't it look better?". The answer is, usually no. The thing is that you'll never get it applied the same way it was before and the place where you removed the mask will always be visible, so you might as well go all out and make it look vastly different. In my experience, it's more irritating to the eye if it's just looking "somewhat" different. This is just my advice, so your mileage might vary. The exact paint I have used it is Plastik70 by Kontakt Chemie. This is a german product, so I can't guarantee it's available where you live, but you'll probably be able to buy something equivalent. Often these come in spray cans, but sometimes also in bottles. I advise to buy a bottle and then apply it with a brush, if possible. If you absolutely only can get spray cans, then spray it into a plastic cup and then apply it with a brush from there. Much easier.  Now you can solder your components in. I made a mistake here which is easy to spot. Can you spot it? Look around the resistor in the lower half, there's no tin on it. The reason for this is that i accidentally covered the solder eyes with the Paint, so of course they would take no tin anymore when I soldered from the other side. I could have removed it again, remove some of the paint, and then solder in the component again but ehhhhh, in this case it did really not matter as it's firmly soldered to the board from the other side and just for current limiting to the keyboard anyways, no critical signaling stuff. Just be aware of this. Sometimes you'll make mistakes and that's fine, just always try to take something away from them. Peeew! I hope this answers the question how to approach battery- and capacitor damage somewhat. EDIT: Fixed some bizarre typos, it's getting late 2nd EDIT: Fixed some more typos, I should really not write those after a full day of work 
Police Automaton fucked around with this message at 08:35 on Oct 28, 2014 |
|
#
?
Oct 27, 2014 23:42
|
|
|
Quarex posted:Well I ... oh look, a new response! I certainly have opened computers hundreds of times and uninstalled/installed things, though nothing more complicated yet than RAM, a hard drive, or a video card (except the time Gateway 2000 shipped bogus modems and sent me a replacement chip I had to use this awesome hooky tool to ... wait this is unimportant). But I guess I just assume that since I have not been able to figure out why it does not work ever since my friend and I reformatted it in 1998 to go from Windows 95 to DOS 6.22 that I probably would not be able to get a different drive to work, either. As I have the feeling the topic of dissassembly and cleaning of drives will come up more often, I think I'll dissassemble both a 5,25" and 3,5" drive down the road and show some maintenance tricks. Of course you could also always get a new drive, but I always approach it from this way - A lot of this old stuff is not produced anymore and will only become more rare as time drags on. I think as long as you have the money and the time, everything is worth fixing if possible. keyvin posted:I can't believe I can't find a PCI or PCI-e floppy controller card. Anyone know if they make such a beast? There is no such thing, I have searched too. There are USB-based drives though. There's also the Kryoflux which is neat if you want to write disks on the PC for your retro systems, but way too expensive otherwise. Police Automaton fucked around with this message at 00:47 on Oct 28, 2014 |
|
#
?
Oct 28, 2014 00:20
|
|
|
Goddamn, I had an A200+ with the 80MB HDD and I loved that thing. Late 90's i had the same issue, battery corrosion caused it to no longer work and it ended up getting chucked out a couple of years later. I wish I'd known then that it would've been repairable
|
|
#
?
Oct 28, 2014 04:27
|
|

|
theperminator posted:Goddamn, I had an A200+ with the 80MB HDD and I loved that thing. What I didn't cover yet is fixing of the traces. The unit in the pictures up there had just very light battery damage that caused barely any damage to the copper as you can see. Often there are quite a few interrupted traces which makes the whole thing a bit more complicated. I also didn't cover what to do when vias got damaged. I have an Amiga 2000 that got hit by battery damage much worse and I'll document it's repair a bit down the road. Sadly I have a lot of projects right now. I'm also experimenting with creating replacement soldering pads in case they got damaged bad enough by leaking capacitors that they lifted/fell off. There are repair kits for that but these are usually very expensive and hard to get. I'm convinced it's possible to McGyver those and have it look fine. There's almost never a reason to throw an old computer away. They are almost always repairable. If you don't trust yourself with doing such a repair, just chuck it on eBay and someone else will. Just please be honest about the condition of the unit. Police Automaton fucked around with this message at 08:29 on Oct 28, 2014 |
|
#
?
Oct 28, 2014 08:17
|
|
|
I happen to have an old TI laptop lying around, it's an Extensa 560CDT. Still works, but I only have the optical drive(which actually reads CDRs and CDRWs so I can still get data on there) Don't have much use for the floppy drive since I don't have one in my regular desktop anyway. Both batteries(BIOS and the NiMH battery pack) are entirely dead though, which means every time I fire it up I have to configure the BIOS. Any sense in fixing it up a bit, or would I be better off tossing it out? I mainly keep it around because it's kind of a time portal back into the mid 90s and I have it running a few classic games with their original disks. No ethernet on-board so I can't experience the modern web with old IE either.
|
|
#
?
Oct 28, 2014 08:51
|
|


|
Smoke posted:I happen to have an old TI laptop lying around, it's an Extensa 560CDT. Still works, but I only have the optical drive(which actually reads CDRs and CDRWs so I can still get data on there) Don't have much use for the floppy drive since I don't have one in my regular desktop anyway. This depends. We are in the Pentium era here. You might already have a Lithium coincell battery in there (then probably soldered in on soldering fins, these are replaceable though) but it is more likely that you still have a NiMh CMOS battery, attached to the Mainboard via cable. (Doesn't shake loose that way as easy) NiMh has the advantage that it lives quite a bit longer as opposed to NiCd Batteries, as long as the current requirements aren't as high, it does have a higher self-discharge rate when not in use. It's still inferior to lithium. The normal thing with these CMOS batteries is that they get recharged when the computer is running. Old-school NiMh is as susceptible to leakage as NiCd is, the insidious thing here is that the very low current the SRAM (where the BIOS settings are stored) and the clock chip need are great to discharge the battery in a way where the cells get damaged when the notebook isn't turned on regularly or for a long time. There might be mainboard damage from leakage, but there might be not. You'd have to check that out. It's also possible if not likely that you have one of these chips where the clock/SRAM and the battery is integrated in one package. These are replaceable too, although they can be a bit costly. A rechargeable Li-Ion replacement is not as straightforward as Li-Ion is very touchy regarding recharge and has relatively strict requirements, while NiCd to a big degree and NiMh to a lesser degree don't care nearly as much. Basically often just apply some voltage somewhat carefully and bob's your uncle. You could also get a non-rechargeable Lithium replacement in there with some tinkering and soldering, but I'd have to see the unit from the inside to give advise here. You can probably still get the fitting NiMh-Battery replacement packs but you'd have to open up the unit to find out what you have exactly. Same with the Battery pack. The interesting thing about these Battery packs for notebooks many people don't know is that usually their outer shape is the only custom thing about them. Inside them there is often just some bog standard battery supervisory circuit (which checks for overheating, overvoltage and thelike) and often standard form rechargeable NiMh Battery cells with soldering fins, which you can buy and easily replace. The difficult part is usually cracking the Battery pack open in a way in which it can be put together properly again. Often they don't have any screws, sometimes they are just stuck together, sometimes though they're also glued together. If it's worth it I can't tell you, this depends on you, what you can do and what the computer is worth to you. I wouldn't throw it away though, you can probably find a buyer for it.
|
|
#
?
Oct 28, 2014 10:09
|
|
|
That kind of confirms what I already managed to figure out on my own. I've already opened up the battery pack once and discovered the insides were just bog standard AA cells that have died at least a decade ago(and it's fairly easily opened up) As for the BIOS battery, from what Google shows me(there is a plethora of replacement parts available) it looks like three coincell batteries in a package with a little wire to the mainboard, so it's a separate package deal rather than being integrated in some form. My soldering skills are good enough to replace, clean leakage and rewire if needed, but it's kind of a hassle to open up the machine itself due to the way it's constructed, and the screen hinge is a bit floppy. Overall I just like that it's a machine that's of drinking age in Europe, and it's remarkably clean as it hasn't been used in years. It even still has the original Win95 installation on there(With Internet Explorer!) If I ever get around to fixing up the batteries, I'm gonna use it to confuse people with. Hell, it has VGA out so I can even hook it up to a projector whenever I need to give presentations.
|
|
#
?
Oct 28, 2014 10:21
|
|
|
If you ever feel like tinkering, you could probably put a CR2032 coin cell in place of the NiMh-Pack. Just add a Diode, cathode to the mainboard so that the voltage can pass from the diode to the circuit, but not the other way around. Diodes have a voltage drop, but you can get away with something bog-standard like the 1N914. The Voltage drop here is relatively high with about 0.7V, meaning with a 3 Volt cell the circuit will just get about 2.3V but that is usually enough and lithium coin cells are relatively voltage-stable and only drop their voltage relatively late in their lifetime, basically when they're about to be empty anyways. If you feel very strongly about this you can also use a low-drop Schottky diode (e.g. 1N5711, ~0,2V voltage drop) or a germanium diode (~0,3V voltage drop) whatever you can get where you live, really. As we are in the Pentium era whatever chipset your notebook has probably doesn't have dedicated circuity for that clock/BIOS stuff anymore and has this functionality already integrated into the chipset itself, the cutoff voltage here usually is around 2V for standby of these functions. But don't take my word for it, look in the appropriate datasheets if available. Also adding a resistor of about 1-1.2 kOhms can't hurt to prolong the life of the coin cell battery. What the most elegant way to install all that is of course completely depends on how your notebook is put together, but it's worth a thought. Another thing I want to mention as I have seen it several times, unrelated to this - People often like to replace the NiCd battery in old computers with NiMh or even Lithium-Ion rechargeable batteries to retain that functionality, if it wasn't clear from my last post: Don't do it. The recharge properties of these Batteries are different (enough) and most NiCd recharging circuits on these old mainboards are beyond primitive. You will probably have a severely limited lifespan of your batteries with everything besides NiCd, and I'd not use NiCd again for obvious reasons. EDIT: If there was somewhat of a thought-jump in my explanation I apologize, with NiMh pack I mean what the computer uses for the BIOS/Clock, not the NiMh Cells in the external battery pack. Police Automaton fucked around with this message at 11:33 on Oct 28, 2014 |
|
#
?
Oct 28, 2014 11:07
|
|
|
A quick one because I have recently seen it again. Somebody sent me his A2630 Accelerator card for the Amiga 2000. (some pictures in my first post were of one) Accelerator cards are an interesting feature of some of the old 68k-based computers you don't see nowadays anymore. Basically, they're usually boards where there's a faster CPU/FPU (and usually some RAM and sometimes a SCSI/IDE Controller) than on the mainboard. You plug them in, bam, your old computer is somewhat or a lot faster, depending on the card. Pretty nice feature if you think about it. It allowed my A2000 to be equipped all the way from a measily 68k@~7Mhz CPU with 1 MB of RAM on the Board to an 68060@~50 Mhz (roughly "early Pentium" equivalent performance-wise) with max. 128 MB RAM. An Accelerator card and CPU which came out about eight years later. Not bad at all! As you can imagine, these cards are very sought after nowadays and fetch premium prices, but basically always are still a fracture of the cost they were back then. These cards always work by disabling the CPU on the board first, technically "taking the Bus away from it" and just never giving it back. Most of them have toggles where you can fall back to the original CPU of the board, for compatibility reasons for example. This can be a physical switch you have to install somewhere or a key you have to hold down while the computer is booting. You often have it, especially in the 68k architecture, where later-generation CPUs just plain aren't 100% compatible to earlier generations. Stuff is either missing or works completely different, which of course can cause software in which programmers didn't take such things into consideration to go absolutely haywire. Intel/the x86 architecture CPU makers actually did a great job with staying compatible to their roots over so many different CPU generations and types (it is actually a feat that does require some work) and you could really say that was a feature of them, other architectures didn't necessarily do that or rather achieved binary compatibility only with software emulation, which always causes a performance hit you usually want to avoid. Granted, some of the compatibility problems especially in the 68k sector are caused by what I like to call "excessive cleverness of the programmers" where programmers took shortcuts and did things not exactly according to the norm which would make stuff sometimes work better and faster but could cause unforeseen problems down the road which in all fairness they were usually warned about in the appropriate literature. A lot is also plain sloppy programming with little care about the future thrown in, only around the early 90s programmers started to get the idea that technology will rapidly change a lot in the near future. You know this phenomenon from the PC world, were old software sometimes just runs too fast on newer machines because people didn't really think a lot about how much faster more modern PCs could be. Remember, we are still far away from even somewhat usable higher level programming and efficient compilers and stuff like JIT and platform-independent code is still some fever dream of crazed madmen. We're really talking getting really into it, assembler, directly working with chipset registers of specific models etc.. Heavy stuff. With a home computer like the Amiga, where lots of things are set in stone, lots of things were dependent on the chipset. With the Amiga the chipset did some very advanced stuff like fast block copies in memory, sprites, sound, communication to devices like disk drives etc. etc.. Lots of it in a way where the CPU didn't even needed to get involved at all. As you are aware when you read all I wrote in this thread, the early Amigas had a 68000 CPU running at ~7 Mhz (depending on if the system was NTSC or PAL the CPU ran at different speeds, more on that maybe in another post). While this CPU can be roughly compared (comparison across architectures so vastly different is never that easy, even if you just take raw MIPS into account) to a 286 minus a few nice features, it already wasn't a great and new CPU when it ended up being put in the Amigas. It already was somewhat vintage in fact, the 68000 CPU was introduced in 1979 after all. That the 68000 was a late 70s product always surprises people when they hear it, maybe it surprised you too. Look it up! I'll wait. It wasn't even the fastest 68k-architecture CPU Motorola offered at that point. No, the strong point of the Amiga (and many other home computers) was the chipset, which took a huge load off the CPU doing a lot of advanced and complicated (for that time) things so the CPU didn't have to. It's a bit like with modern computers and when you play games on them. It doesn't really matter how fast exactly your CPU is often, a faster graphics card will often give you a better gaming experience than a faster CPU. This was a big problem with the clones early on. The architecture was very open, you had your graphics cards, your various controller cards, even your sound cards etc. but a lot of them were rather primitive compared to some of the chipsets in something like the Amiga, also a lot of them depended on the CPU to do the muscle work. Programming for such (in Hardware) possibly vastly different systems also required a more thought-out approach from the operating system and standards, you couldn't/shouldn't just customize your software around a specific mainboard chipset, CPU and graphics card. (Although yes, such things did happen to lesser extends here and there) This big strength computers like the Amiga early on had would eventually turn into their biggest weakness. For the PC, everyone and their grandmother developed Hardware, new graphics cards, new sound cards.. all with exciting and new features. You wanted to have them, you just bought them and plugged them in. Suddenly your old Computer could display 16 bit color in Win 3.11 instead of only 256 colors and this also would work with many applications. Very flexible architecture. For the Amiga, not so much. There was only Commodore. The technology kept evolving, the chipset remained largely the same. Even worse, software would be written and optimized to work with the chipset and in many cases only the chipset. Hardware expansions came around for the big boxes, graphics cards, even sound cards, usually made by small companies around chips designed for the PC and adapted to the custom Amiga bus. There were problems with them though. First of all, they were (even back then!) quite rare and expensive, but mostly, they were just not as usable as their PC-equivalents. The reason for this was simple: Software. Let me give you an example, I have this graphics program on the Amiga I really always loved and thought is better than the, in my eyes, overrated Deluxe Paint (from EA when they weren't evil yet), Brilliance. It's a brilliant (pun intended) program to make sprites, and other "retro-esque" graphics, even today. In my Amiga I also have a graphics card, a card with S3 ViRGE Chipset and 4 MB of graphics RAM. Quite advanced '95-'96 vintage tech. Advanced enough to do 720p resolutions at 256 colors and also advanced enough for 24 bit and 16 bit color. Still, with my favorite program Brilliance, I can only use the Amigas original maximal palette of 32 colors in low-res. Why is that so? It's because Brilliance was written in a way where it directly talks to the chipset and ignores everything else. It wouldn't even matter if I had a different/better graphics card in there. Brilliance doesn't know how to work with it and can't utilize it. It's not even an API problem or something, it's really that Brillance works with the chipset registers at a low level and bypasses the operating system almost completely. Adapting it to the graphics card via patch is impossible, akin of just rewriting the entire program. I can't even have the graphics output at the graphics card, but I have to get it directly from the video connector. It's like the card isn't even there! This was a massive problem with most of the application software and pretty much all of the games in existence for the Amiga. From the Software developers standpoint this makes a lot of sense. Think about it, if you were a software developer, would you write your software in a way it works with the few people who have that specific piece of expensive graphics hardware but more poorly for everybody else, or would you write it to work well with all Amigas? Exactly. The other problem was that Commodore didn't really support 3rd party hardware in their OS, although they always promised they eventually would up to their bankruptcy.Another 68k-based computer platform which was around at that time and very similar to the Amiga, the line of Apple computers, approached this differently. While Commodore was pretty open, they put a lot of effort into making the 68k Macs closed machines where you'd have to do everything through the OS. Development on Macs just had to be very OS friendly. I sadly do not know much about 68k Macs even though they're nice machines and I have one, maybe somebody can enlighten with a few more details about this particular "feature" of them, although I have the impression nobody seems to really know much about them. While Apple struggled to survive in the 90s and almost declared bankruptcy themselves, software remained forwards compatible to more modern hardware innovations Apple actually delivered. This wasn't the only problem though. Let's come back to accelerator cards. I can have a Pentium-esque CPU and some nice RAM on my bitchin' Blizzard 2060 Accelerator Card, but if I wanted to do anything, it still has to talk to the Chipset, running at 7 Mhz. If there's something that just needs to be done by the Chipset before my fast CPU can proceed, that CPU will just have to wait. Even worse, the RAM the Chipset uses (In the Amiga world, called ChipRAM) can also only be accessed at this original speed and only if the Chipset is ready for the fast CPU to do so. The other way around, The Chipset can't access the RAM of the Accelerator card (in the Amiga world, aptly named FastRAM) because only the CPU of the Accelerator card can "see" it. So you see, you have both sides of the computers communicating through a tiny window. There's a reason that Cards' manufacturer gave me the possibility to put RAM on the card and also put a SCSI controller there, as that way these functions can bypass the slow rest of the Amiga and work quickly locally, in their own microcosmos. Without RAM on the Accelerator card, the CPU would always have to wait for the dinky slow ChipRAM to make RAM accesses. It would still be faster than the original 68000 CPU because it has an internal cache, but honestly? Not by much, and most of all, not always. Caches back then were comparably rudimentary to what we have now. There's a thing that was just as true back then with the 68060 as it is now with the i7: Both CPUs will ever only truly have as much performance as the RAM they're attached to. Slow RAM access = slow CPU. In the case of the Blizzard 2060 there's something even worse, because of all these complications the access to the ChipRAM from the 68060 CPU running at 50 Mhz is slower than it would be for the original Amiga 68000 CPU running at 7 Mhz. Games heavily rely on ChipRAM to work and often don't utilize FastRAM at all, so actually, most games run more slowly on the 32-bit 68060 CPU than on the 16-bit 68000 CPU. Let that one sink in for a bit. Talking to a potential graphics card also only happens via the 16-bit, 7 Mhz Bus, you can imagine how fast that is. It's like driving a Ferrari in 1st gear everywhere. Later Amigas with AGA Chipset were somewhat faster in these regards, (but honestly, not enough to really matter, even back then) but I'll not get into them now.   (a Blizzard 2060, still grubby and with heatsink from the former owner. The heatsink is removed now. I have a story to tell about that one some other time) One hardware developer tried to bypass the problem by directly connecting a specifically designed graphics card to the accelerator card so it wouldn't have to talk over the bus but hey - if you design custom hardware with CPU, RAM-Interface, SCSI Interface and even an attached graphics card, you sort of have already built your own computer and the price will reflect that, and still there will be no software supporting all that! Not many people bought that one.    (an A2630, and yes, I also have an anti-static mat) Well to come back to the card sent to me and to make a long story short, the accelerator card just plain didn't work. With it plugged in, the Amiga would not boot. I fixed it in about 20 minutes without a normal eraser. How I did that I'll cover in the next post, but I gotta run now! (To the retrogaming-regulars: I know I've repeated myself a lot today, but I sort of think all this information belongs in this thread in a somewhat compressed form. There will be new content!) Police Automaton fucked around with this message at 01:18 on Oct 30, 2014 |
|
#
?
Oct 30, 2014 01:15
|
|
|
Sorry for the lack of updates, I'm currently swamped in work and while I enjoy posting about old computer crap, it doesn't pay the bills. I will get back to the A2630 later on but I feel the need to go into detail about something I've posted here, and that's this here: I should have probably not posted this picture without going into detail about that resistor, because these current limiting resistors that act like fuses is something you see a lot in old hardware like this and also in new one (if it's correctly built). The idea behind limiting the current to devices that are connected externally is a simple one - safety. When you design a Mainboard or something you have absolutely no idea whatsoever what the User will do. They might stick nails into the ports for all you know. While on external ports of computers, we are not working with dangerous voltages (+5V for modern-day USB for example) when we offer power we have to make sure in some way the amount of current that flows will be limited if we have some kind of problem externally, might it be wrong usage of the port or stuff like mice or keyboards simply breaking or shorting out in some unpredictable way. If we don't limit that current, the power supply will just happily pump more and more current into the faulty device, which in failure mode will probably just be turned into heat, which in worst case scenarios can lead to all kinds of stuff, from melting cables to evaporating traces on the mainboard to scary, scary dark smoke. That's why we limit the current on ports like USB or even this ancient Amiga keyboard connector - we make sure there's enough current for the devices connected to the ports to work, but not much more to avoid potentially dangerous situations. This stuff with port protection went through an evolution of sorts, in early C64 or C16 models for example you don't really see this in any way whatsoever. There was also no port buffering whatsoever, you'd have traces go directly from keyboard ports or joystick/mouseports to expensive and hard to replace custom ICs. There might be a ferrite in between somewhere that'll catch some edges and that was IT. Someone just needed to do some fun hotplugging or just touched the ports and had some static charge built up and bam, the computer was broken. There also was no current limiting (if the ports offered current) on many old computers and the designers just sort of trusted the power supplies' safety circuits/fuse to trigger if something went really wrong. Not safe enough for modern sensibilities. The Amiga 2000 here is exemplary in safety that besides the current limiting on the ports, it also has a dedicated rail just for the +5V on the Ports that can't even deliver that much current and is disconnected from the +5V main rail of the system in case something goes really, really wrong. Very thoughtful design for that time you don't even have on modern ATX Power supplies. Here's also something I wanna mention about modern hardware: I recently was seeking an USB 2.0 PCI card to retrofit an old Pentium 3 with USB 2.0. This is sort of obsolete tech already and I am aware of it, but it's still something you can get new in stores. I was absolutely flabbergasted how many, many, many USB cards have no current limitation whatsoever just to save a few bucks in manufacturing and just deliver the +5V of the System to the USB port directly with nothing in-between. In many cases, the place for fuses is even there, there's just nothing or an 0-ohms resistor soldered in. That all maybe to save a few cents. Modern PCs also don't have a dedicated 5V user rail like the A2000 has and can supply a lot more power, so you have a fault on such an USB card on one of the ports and that (maybe) cheap-o ATX power supply will just happily pump Amps until the traces on your mainboard evaporate and it becomes a question of which part will give out first. The overcurrent protection or even mains fuse in the power supply won't even kick in as supplying that kind of power is nothing unusual for the supply. That being said, ATX supplies do have cirucity that sense such sudden increases in power consumption and then cut the power off, and some power supplies are even really "trigger-happy" regarding that. But you see, it's just shoddy engineering to hope that some device "up the chain" will catch the problem and you just have the right combination of cheap poo poo and there's your dangerous situation. I also have seen such things on many Pentium-era Mainboards at the integrated Ports, as competition in the late 90s was harsh and many companies tried to shave off pennies in their designs wherever they could. Just didn't think this was still a thing to such a massive degree. Anyways, back to our old resistor on the old Keyboard port up there. When there's current limiting in such old machines going on, you'll often see a thick resistor on the trace supplying the power that'll look somewhat different from other resistors on the mainboard. That's usually not any old resistor, but a so-called fusible resistor. What's special about them is that, if the wattage just gets too much to bear, they'll burn and open up in a way that's pre-defined by the manufacturer and relatively safe. While you have to replace them after the fault event, there's usually no dramatic damage to the mainboard. You see them in lots of old stuff from that era but they're completely obsolete nowadays. Later revision A2000 mainboards and other stuff already relied on so called "pico-fuses" who look a bit like resistors too but are like normal fuses, i.E. quickly trigger at very specific currents. These you have to replace too if they burned out but they're a lot more well defined in when they'll trigger. The resistor you see up there is neither, it's a normal metal film resistor which is not the correct part for this application, as they can burn quite spectacularly, with flames and all that. It was just a stop-gap measure by me. Now you might wonder why you never had to replace or hear about USB-fuses on your modern mainboard. Well, technology kept evolving in this regard too and nowadays we have a thing called the polyfuse (actually they go under many different names depending by the manufacturer, but I'll call them this). What's interesting about the polyfuse is that it's "self-healing" - it resets itself. It works in the way that it has a current at with it starts to heat up and trigger increasing it's internal resistance, until a pre-defined cut-off current where it's completely open until it cools down again, where it again conducts normally. The big advantage of this is of course that you don't have to replace them if they got triggered because of something. The downside of polyfuses is that this process is not almost instant like with a picofuse, in fact it can take several seconds for a polyfuse to "open up" completly. This is sort of offset by the fact that the increasing electrical resistance of the fuse with heat already limits the current going through the fuse by itself. The polyfuse is also not temperature-stable, it's triggering point is somewhat dependent on the environmental temperature, although usually not to a dramatic degree and not significant in the usage scenario of a computer. The PC 97 standard (which also defined PS/2 keyboard connectors being purple while ps/2 mice being green) recommends that a User should never have to open up his computer to fix something which saw an increase of use of such fuses in proper designs at various computer technology-related devices. They are also used in many not-directly PC related things. That all being seid, I kind of lied to you and your modern PC probably doesn't have polyfuses anymore either. There are fancy ICs nowadays that have all that jazz with current limiting integrated and even report to the USB host controller when there was an overcurrent event and all that jazz. But, this thread is about old hardware, so lets not get into that. There are also other ways in engineering to limit a current, but hey, let's not get into that either as it isn't important for us. In old computers like that, I usually like to replace the fusible resistors with polyfuses, "just in case". I also did on the pictured machine eventually. Well, I hope this was somewhat interesting to some of you. If some old computer of yours has a port that doesn't work or stopped working, you might want to look out for these things before you go swapping chips and cards. Police Automaton fucked around with this message at 11:55 on Nov 5, 2014 |
|
#
?
Nov 5, 2014 11:47
|
|
|
Police Automaton posted:
Commodore actually did push writing clean, chipset independent code from very early on. There was always libraries to call. The problem was that the Amiga inherited the Commodore 64 programming mindset where silly things like "the operating system" is just in the way. This actually pissed commodore off enough that they straight up refused to release programming information on the AGA chipset and stated their intent to deliberately build it's replacement to be incompatible. It's not as bad as you think, though. Most software after the very early years (after Workbench 2.0 shocked people into common sense) runs absolutely fine on a graphics card. Most graphics cards work by just replacing the gfx.library with one that can talk to hardware drivers, it's transparent to the actual applications in the same way as ATI vs Nvidia is on a PC. The reason this never happened on the macintosh was because the mac basically only had a framebuffer. If you wanted any graphics done at all, you used Quickdraw, the OS library. It was possible to do your own graphics routines but it was absolutely pointless. Later the Mac got accelerated graphics cards, and they hooked into the system in exactly the same way the Amiga ones do. I don't really see it as much of a failing of the Amiga's hardware design as it is a failure of the programming culture it was born into. Once they started realizing "wait, maybe it's easier to use the OS's toolkit to draw the ui than roll my own" the problem went away.
|
|
#
?
Nov 5, 2014 20:25
|
|
|
HorseLord posted:Commodore actually did push writing clean, chipset independent code from very early on. There was always libraries to call. The problem was that the Amiga inherited the Commodore 64 programming mindset where silly things like "the operating system" is just in the way. This actually pissed commodore off enough that they straight up refused to release programming information on the AGA chipset and stated their intent to deliberately build it's replacement to be incompatible. The graphics card solutions still never were as elegant and as compatible as they were on the IBM clones at that time from a user standpoint. And lots of even very late software still straight up didn't work properly on graphics cards for one or the other reason, or had to be forced by means of other 3rd party software where you then still had problems like GUIs being hardwired to the native resolutions/color depths of the chipset and not really taking advantage of possible higher ones, or specific program functions still being implemented by "dirty" direct bit-banging, while others moving through the appropriate libraries, which let to seemingly bizarre program behavior with some functions, while others worked fine. This was never as clean and as transparent as you make it sound and also never worked as well or as practical, even later on. It was the fault of the Programmers though. What wasn't the fault of the Programmers was Commodore dragging their feet with the OS support. One interesting example was the last version of Deluxe Paint, Deluxe Paint V. Deluxe Paint V (an absolute killer app on this platform once) was meant as an true 24 bit color application. It was delayed again and again by EA as Commodore couldn't come up with proper native RTG 24 bit color support (while you could already have hard/software doing such stuff on the PC for years) and EA was understandably more than reluctant to support 3rd party system solutions by tiny companies, which also really only got mature years later as commodore was long gone and the amiga was economically irrelevant. The result is that deluxe paint V didn't and doesn't work properly with graphics cards and almost didn't even see the light of day as EA lost interest. Graphics cards in the Amiga were always kind of the red-headed stepchild of the hardware collection. The 3rd party support (back then) was often horrid, there were countless driver problems with pretty much most cards and also usenet-slapfights between developers you can still read about when you dig through google to find the appropriate posts. While I agree that this wasn't the fault of the Amiga hardware architecture per se, Commodore could've done a lot to work closer with Hardware developers and also give a hand to software developers by offering them better approaches regarding 3rd party hardware expansions and using their more advanced capabilities properly. It was not only a problem of the programmers culture. I have no idea how apple approached this, but I'm certain they at least didn't drag their feet on the OS. Police Automaton fucked around with this message at 22:04 on Nov 5, 2014 |
|
#
?
Nov 5, 2014 22:00
|
|
|
I told you how apple approached this. The mac did everything in software using Quickdraw. Applications talked to Quickdraw, Quickdraw talked to whatever hardware you happened to have. This was entirely it until 3D hardware showed up and they hit openGL. They never had problems with programmers hardware banging because there wasn't any hardware to bang. I can't honestly say I've had much problems with software and RTG compatibility, the software that behaves badly is mostly targeted at low end machines, or games, again from the C64 mindset. I don't bother with the old stuff on a newer machine. Perhaps your perspective is different because by the looks of your screenshot your software setup is really very old even by amiga standards. I'll give you DPaint 5 as a late example, but that was still EA's fuckup for not being OS clean, merely being able to detect and request an available screen-mode in no way needs knowledge of any future changes to the graphics system, first or third party. It's been a thing since workbench 2. Commodore couldn't do more than lead the horse to water. HorseLord fucked around with this message at 22:53 on Nov 5, 2014 |
|
#
?
Nov 5, 2014 22:39
|
|
|
We talked about this a little while ago in IRC, but I finally pulled my Amiga 3000UX out of storage with the intent of pulling the battery. I don't remember the machine being quite this beat up before - the case is dented in a few places and the floppy drive is missing. Luckily for me, the battery doesn't seem bulgy or leaky - I took a look around the board for the telltale signs of battery acid and all the traces look fine and the texture is right. The massive amount of dust bunnies inside the case may have helped absorb a few of them  The problem is that the battery won't pull out. Is it actually designed to be freely removable by hand, or do I have to cut/desolder the little prongs that it's fitted into? I'm a little afraid to put anything more than "gentle pressure" on it for fear of pulling up a trace. I gave it a few passes before bed with isopropyl alcohol and deoxit to see if that would help with any corrosion, but haven't had a chance yet today to go back and try and tug the battery out. Most of the guides for installing a battery holder say to cut it, but I'm not interested in replacing the battery - just getting rid of it. I'm guessing it is in fact soldered to its little legs and I should just chop them. If this works out well, I'll have to pull my A2000 out and see if its battery has already been removed. Seat Safety Switch fucked around with this message at 16:50 on Nov 21, 2014 |
|
#
?
Nov 21, 2014 16:42
|
|


|
Just cut the legs off with some wire cutters or similar.
|
|
#
?
Nov 21, 2014 17:13
|
|
|
Sorry, fell off the Face of the forums for a bit as I have a lot of work like usual for this time of year. That's why I'm not good at maintaining megathreads. At least I didn't forget about this though. In the last weeks since my last post I have been repairing yet another A2630 accelerator card. Still greets me with a green screen (which means memory error [maybe]) and reset loop but I'm sure I'll get that one under control too. In that time I also whipped up A2630 .JED files I'm sure which will be soon all over the internet so you can replace the PALs on your A2630 Rev 9 card with GALs. The sources on the Dave Haynie are there but they not rarely have bugs:code:--- Regarding the battery, you can just bend/roll the battery side to side until it snaps off, this isn't dangerous and I've never seen somebody who managed to damage the PCB (further) that way. It's not supposed to be taken out but it's soldered in. I usually recommend this to people over wire cutters when I'm not sure how they approach it with the wirecutters as people often mange to damage the PCB in the process if they use them. There are wirecutters which bend at a 45 degree angle on the tip (I have no idea what the correct term for them is in english and google translate fails me here) I can only recommend to have something like that in your toolbox. Also buy an expensive precision one, else you'll be full of regrets. When you remove the battery wash your hands and put it out of the reach of childern or pets, as that stuff is quite toxic, even more so than the normal batteries you are used to. The Amiga 3000 is often not easy to repair as the battery leakage damages lots of Vias (and uses them to wander all over the mainboard) and all the passive and active components around it. Take some pictures if you can and I can probably tell how bad it is. A3000s are the only Amigas where I ever gave up on repairing because they were too far gone. The cramped component layout doesn't help. Even if you don't want to replace the Battery with a modern lithium equivalent I will mention that a lot of replacement guides for Batteries for these old Systems recommend a diode but don't recommend a resistor. It doesn't cause any damage but it's not the entirely correct way to put in a replacement. These small lithium coincells really hate when they get shorted out or have a too big current draw and will respond with a severely shortened lifespan. If you do a coin cell replacement on a board which had a rechargeable, you also want to put a 1 - 1.2 kOhm Resistor in series. Then you are inside the margin of what the CR2032 3V coin cell (the usual type of battery used) manufacturers recommend for maximum current draw and your battery might thank you with a longer lifespan. It's not strictly necessary, but it is the correct way to do it.
|
|
#
?
Nov 21, 2014 21:35
|
|
|
I took some pictures now that the board is a little cleaner and I've gotten rid of the majority of dust bunnies. I haven't tried to attack this gunk with a q-tip yet, in case it's relevant. It looks a lot worse with the help of a flash, holy poo poo. The case has a huge dent in it which probably helped introduce a lot of dust and other airborne stuff inside the machine while it was running. I'm most worried about this brightly coloured gunk near the bottom, it does indeed look like it's popped. All of the resistors look alright though, and the pins around it are clean. A bunch of non-electronic surfaces are also covered in the same dust. 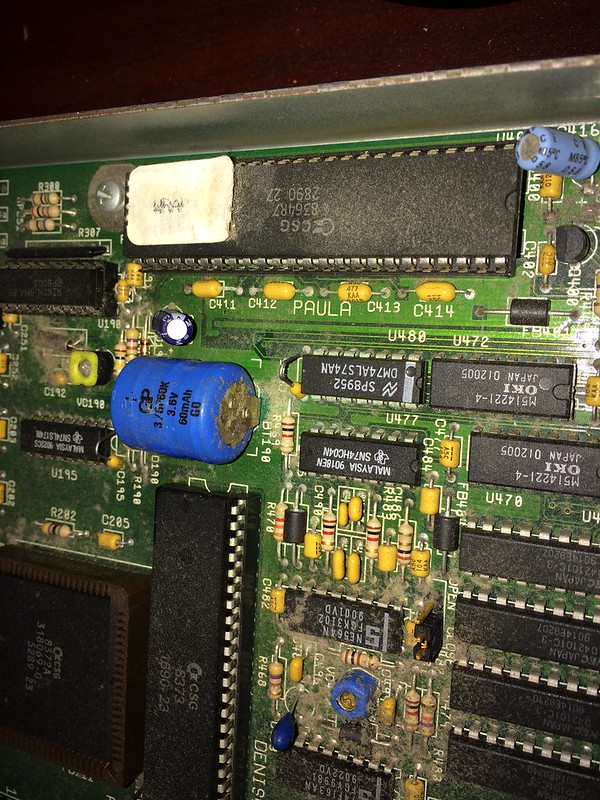 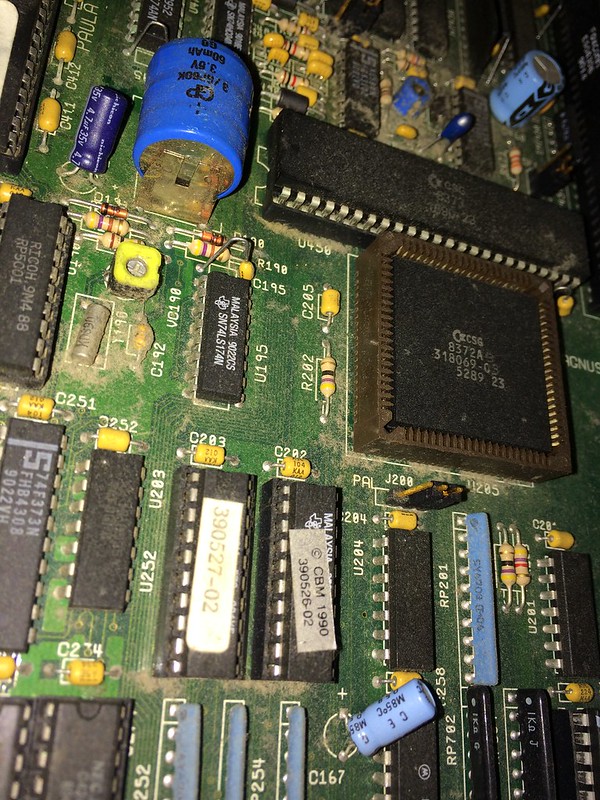   Note that I've never tried to run this machine before. I got it last year in a box of parts and it sat in my closet until I got around to the bottom of my project queue. I figure I'll get the battery out before I introduce power to it. Think it's even worth trying? I've got a Newton 2100 with a much worse corroded board than this. Seat Safety Switch fucked around with this message at 02:40 on Nov 22, 2014 |
|
#
?
Nov 22, 2014 02:26
|
|
|
These pictures aren't very good and you really need to clean there (take a brush and just clean the board in that area there throughly) as dust has the tendency to stick to the paint/battery gunk but at first look it doesn't seem like you have any significant battery damage, U480 seems to be discolored a little on the pins but that could be the camera, the same for the Paula socket. You could try to take Paula out of the socket and take a closer look. The best way without the proper tool to do this is to take the largest (yes) screwdriver you have, carefully work it under the socket between IC and Socket and then twist the screwdriver about twenty degrees to the left and right, then when the chip loosens push slightly down on the chip with your other hand and push the screwdriver farther under the chip. If you do this carefully and properly you get a chip without bent pins and an undamaged socket as reward. DON'T use the screwdriver as a lever, this might damage both socket and PCB. You have to do this with a very slight touch, just only as much force as really absolutely necessary. If the chip is really deep in there it might be necessary to take a smaller screwdriver fist. There are also tools to remove these kinds of chips and they're more ideal, but in a pinch a screwdriver will do. You might put a dent into the socket though with lacking practice, it's rather easy to do, they're made from very soft plastic. This is not a NiCd Battery, this is a NiMh Battery, which can leak too but you can get lucky with those, and I've observed that the damage usually tends to be smaller if they leak. They're also not quite as toxic. I've only seen them once before in a different A3000 which made me believe that the battery was switched aftermarket as late 4000s tend to even have coin cells, but apparently Commodore did use them for some A3000s as this battery is exactly the same type. Interesting! These batteries have a holder that's a bit more robust and you won't get far with bending or wirecutters, I'd advise to desolder that battery properly, then you can also take a look at the mainboard from below. When the battery has leaked you usually can see this from below very well too. That's what bad battery damage in an A3000 looks like:  Still was fixable though, so always worth it. Amiga 3000s are quite rare machines and if it wasn't for the incredibly cramped design and the less than great +5V layout I'd even say they're more nicely designed than the A2000s. They also support Zorro III which can be quite useful with the proper (expensive) graphics card and (expensive) accelerator card. Zorro III is basically commodores answer to PCI even if not quite nearly as fast in practice. I'd really like to have an A3000 for myself but didn't have the time to organize one yet. If you take the board out to remove the battery (I really would not wait any longer) then you can clean it easier and also take better pictures, then I can say more. But currently it doesn't look bad. Police Automaton fucked around with this message at 05:26 on Nov 22, 2014 |
|
#
?
Nov 22, 2014 05:20
|
|
|
It looks much better than that, your example picture is the level of corrosion that I have on my Newton ROM board from an exploded battery. I'd know that right away. This is just dirt and grime, I believe. Interesting to hear that it's an aftermarket or revision-B battery, I've also seen pictures of an A3000 with a similar one while I was looking this stuff up. I haven't cleaned with a q-tip or a small brush yet, that's my next step. I think I might still have a chip puller in one of my electronics toolkits, but the pins on the Paula chip don't seem discoloured to me at all. I'll pull the board and desolder the battery holder and see where we get to. Thanks a lot! I'll have to inspect the A2000 I found in the same box as well. e: After cleaning around the battery with a q-tip and IPA, both it and the area around it look immaculate. I'm still going to pull the battery, but everything looks pretty nice here. It's a version 7.1 daughterboard, and 8.9 motherboard. Seat Safety Switch fucked around with this message at 06:21 on Nov 22, 2014 |
|
#
?
Nov 22, 2014 05:51
|
|
|
Seat Safety Switch posted:Interesting to hear that it's an aftermarket battery, I've also seen pictures of an A3000 with a similar one while I was looking this stuff up. No like I said, it probably isn't, I just thought they were. Sorry if that wasn't clear. If you aren't feeling queasy about it I'd just pull all the chips that can be pulled (and remember where they belong) desolder the battery, and then just throw the entire mainboard into the dishwasher with some detergent and a mild program. Good enough for fine wine glasses, good enough for PCBs. The temperature in the dishwasher isn't nearly as high as what the components had to survive when the entire thing was manufactured, so you don't need to be worried about that either. Stickers etc. naturally will be gone, some people put value in that, I don't really. Yes, the moisture in the dishwasher isn't that great but you're not likely to do this again in the next 30 years and you'll store it dry afterwards, so it doesn't really matter either. If you don't have a dishwasher or don't feel comfortable about putting a mainboard where your eating dishes go, the shower works too. Just make sure to dry it properly afterwards and it'll look factory-new and also smell nice. I do this all the time and it's perfectly safe. If you want to remove the Agnus (big quadratic chip) many people use these cheap PLCC-Pullers from China and then proceed to scratch the Agnus to hell with it, (every time you see an Agnus on eBay with scratch marks, it was some dude with one of those pullers) damage the socket and maybe even bend the pins of the Chip(which is very dangerous with these PLCC-Chips as they snap off like nothing when they get bent) as these pullers were made for small Chips (like EPROMs) and not for big 84-Pin ICs. With many mainboards there's a hole on the backside where you can push the chip out, but the A3000 Mainboard sadly doesn't have this. I had more luck here with small hex wrenches, using them as levers from both sides of the chips where the grasper of the Puller is meant to go, but this again needs a very slight touch to not break the socket and I really cannot recommend this in general as it's a bad way to do it. There are also proper universal PLCC extractors for bigger chips that can be adjusted for size but they're rather costly. Don't use the cheap ones eBay is swamped with at any rate, they're fine for small chips and nothing else. There's also something in-between specifically for 84 pin PLCC I use, this: http://www.amazon.com/Piergiacomi-PLCC-84-Socket-Extractor-84-Pin/dp/B00MR8B65G It's a bit pricy but worth not destroying ancient hardware in my opinion. Police Automaton fucked around with this message at 06:38 on Nov 22, 2014 |
|
#
?
Nov 22, 2014 06:24
|
|
|
Seat Safety Switch posted:e: After cleaning around the battery with a q-tip and IPA, both it and the area around it look immaculate. I'm still going to pull the battery, but everything looks pretty nice here. It's a version 7.1 daughterboard, and 8.9 motherboard. You have a rare thing there, an intact A3000 Mainboard. A3000s are not that common to begin with, ones without battery damage even less so. Another thing I just remembered, the PALs (programmable logic) on the A3000 (that row of long ICs you have on one side of the computer, those in the sockets) really like heating the entire computer and sometimes even dying as a result, a GAL replacement (GALs draw less power and don't really get warm) is recommendable. There's some dude on eBay and I think Amibay selling a set for like thirty bucks but that's an absolute ripoff. The kind of GALs you need here cost nothing and programming them with a $30 USB-Programmer is like 2 mouse clicks in Windows. If you plan to use the computer regularly you can drop me a PM and I can send you a GAL replacement set, would just cost you whatever a letter to your place costs and whatever I paid for the chips (I think like, 3 bucks) if I even can remember and find some in storage. Just drop me a PM.
|
|
#
?
Nov 22, 2014 07:22
|
|
|
Can this just be the general old hardware thread? Such a thing doesn't seem to exist outside of Games, and these things aren't just for games. I work at an electronics recycler and rescue (and sell) a wide variety of things. The saddest thing is an early Amiga 1000 with no Kickstart disk.
|
|
#
?
Nov 24, 2014 11:08
|
|

|
I'm not the police of you, but of course.  I'm assuming you're american because most people here are. How's the law regarding recycling over there? Here in many places it has become pretty much impossible to take anything away from the recycler as they're not allowed to give people anything or even take home stuff themselves. I'm not sure why it is that way but the best explanation I've gotten so far is that apparently metal scavengers and other types like this liked to just take junk, pick it clean of whatever they wanted and then just dump the rest somewhere in places where it doesn't belong, like forests and lakes. That sounded sensible enough to me, but I know it wasn't always like this and some places even had sales some years ago where they'd just put everything they found and believed to be nice enough up in a room and you could just go through it and shop there. There were quite a few nice things and it seemed more "green" to me, especially given that recycling is nowhere near a perfect process that gives you a 100% return. Police Automaton fucked around with this message at 00:58 on Nov 25, 2014 |
|
#
?
Nov 25, 2014 00:56
|
|
|
Well most cities/counties won't allow it because it causes problems for them if they do. Also when it's collected it's often going right into container awaiting fill up before transport, and you don't want people climbing into that stuff and getting hurt. But it's rarely against the law in itself.
|
|
#
?
Nov 25, 2014 01:17
|
|
|
Police Automaton posted:I'm not the police of you, but of course. We're a for-profit business, so we don't have any sort of regulations like that. We take stuff, rescue/refurbish/sell what we can, and sell the rest of it to recycling companies that do the actual recycling.
|
|
#
?
Nov 25, 2014 04:30
|
|
|
Police Automaton posted:You have a rare thing there, an intact A3000 Mainboard. A3000s are not that common to begin with, ones without battery damage even less so. I'm getting ready to pull the board (the case for this poor A3000 has been beaten up throughout the years, so it's a little more complicated than a normal extraction). Am I correct in thinking that I have to pull the jackscrew hex studs for each of the D-sub connectors on the back in order to free the board from the case? It looks like Commodore made them thread through the case metal to retain the ports to the case better. That's a weird design choice if so, can't think of any other late-80s/early-90s consumer machine that did that. I don't have a hex driver that fits so it might be another couple of days until I get back to this. But it's going well! This machine is half brilliantly designed and half idiotically designed, like a German car. Edit: You can see the case damage pretty well in this picture: 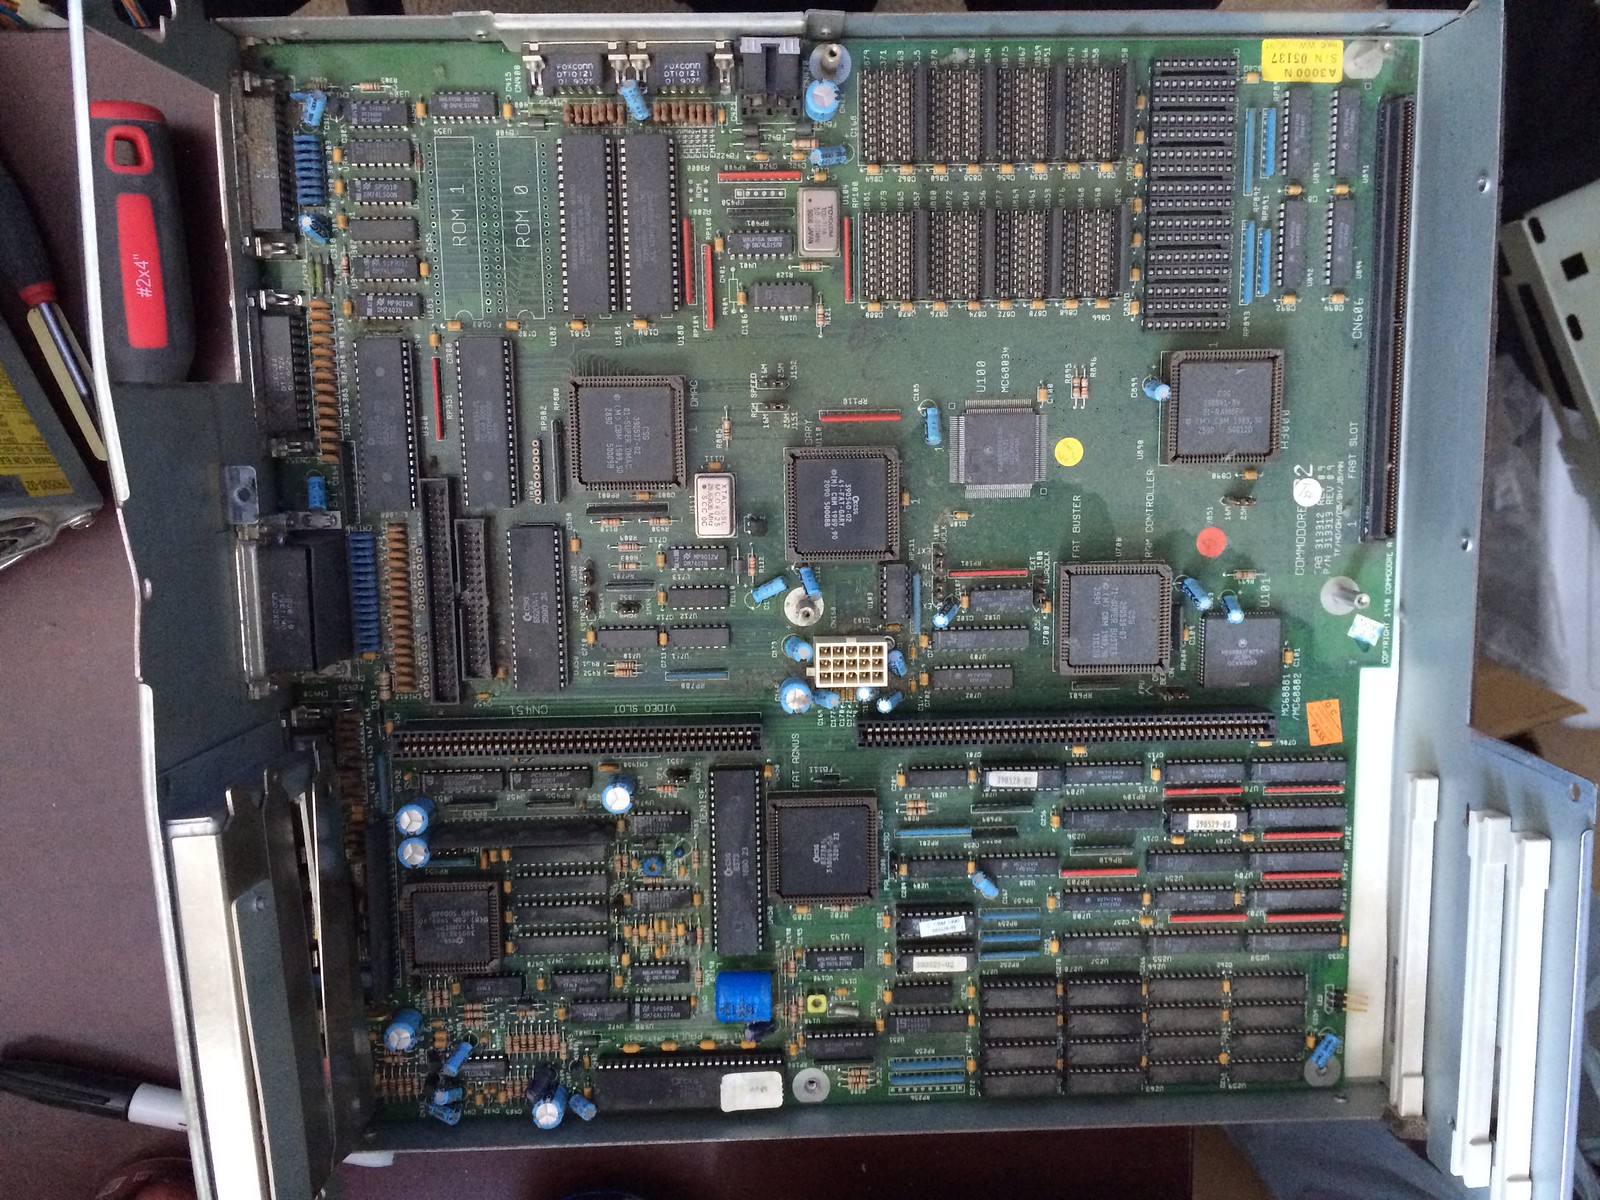
Seat Safety Switch fucked around with this message at 22:06 on Dec 7, 2014 |
|
#
?
Dec 7, 2014 21:52
|
|
|
Seat Safety Switch posted:I'm getting ready to pull the board (the case for this poor A3000 has been beaten up throughout the years, so it's a little more complicated than a normal extraction). That's how it is. It's actually the best way to design this in this case, it will grant additional stability to the connector and will prevent cold/broken soldering joints to form from the force applied by connecting/disconnecting. They are not that uncommon on D-Sub connectors who are "standing free" after a few years of medium to heavy usage and cause all sorts of funny effects, depending on the hardware. Seat Safety Switch posted:I don't have a hex driver that fits so it might be another couple of days until I get back to this. But it's going well! This machine is half brilliantly designed and half idiotically designed, like a German car. They should be 4,5 mm hex nuts off the top of my head. You can get these little sets with small hex nut drivers that are incredibly cheap but just fine for this application. Search for "hex nut precision set" or some such, you'll probably find something in that range for a few bucks. Seat Safety Switch posted:Edit: You can see the case damage pretty well in this picture: It looks like the entire side is slightly bent, I have seen worse though. Commodore used really thin metal on these cases and I once had to buff out an A2000 case which became the victim of transport damage, where the bent was a bit sharper than here. Generally speaking, the sharper it is, the more the paint will be ruined by buffing it out. It's certainly doable though but really requires a slight touch and just the right amount of force. If you leave it this way you will not be able to get expansion cards in there, if you ever get any for that computer. Don't force them in at any rate. There's also a plastic holder missing on the other side. You might be able to source a replacement case as quite a few A3000 mainboards have been declared beyond repair because of battery damage, but it might be difficult to find one as the A3000 generally is pretty rare. Be very careful with taking the board out, they're heavier than you think. Also be careful not to scratch it, the solder mask is not even close to the robustness of todays solder masks. The good thing with metal is that it's at least easy to repaint. I wouldn't bother with normal paint on computer cases like some people do, as that stuff will get scratches from looking at it funny, let alone opening and closing and inserting/removing cards and all the other normal computer stuff. Powder coating is the ideal thing to do with computer cases as the coating is a lot more robust (they use this technique for bicycle frames for example, so it has to be) but this pretty much needs to be done by a professional alone already because of the tools required. It's not very expensive to have it done though and certainly in the realm of the hobbyist budget. The biggest problem I had in case of the A2000 is that nobody really knows what kind of color the original case is, a RAL color it isn't. I wouldn't be surprised if it's the same for the A3000. My main A2000 who got a bit scratchy and also a bit rusty (yes, that's a problem with these old cases) will get a powder coating next year, I'm curious how it's going to look like. I wrote a big post about two days ago about the A600 with some pics of an almost naked A600 PCB, (as I'm repairing one currently) about cheap ways to improve performance without buying an accelerator and about what you can do application-wise with an non-accelerated Amiga (turns out, quite a lot) and then I forgot to save the text. I hope I can get it rewritten this week, work is slowing down a bit.
|
|
#
?
Dec 8, 2014 05:07
|
|
|
I'd love to get an accelerator/RAM board for my A1200, but those prices
|
|
#
?
Dec 9, 2014 23:21
|
|


|
Could be worse, you could be looking at the accelerator board for a Power Mac 7200: http://www.everymac.com/upgrade_cards/sonnettech/crescendo_g4_pci/crescendo_g4_7200_400.html
|
|
#
?
Dec 10, 2014 00:43
|
|
|
Nintendo Kid posted:Could be worse, you could be looking at the accelerator board for a Power Mac 7200: http://www.everymac.com/upgrade_cards/sonnettech/crescendo_g4_pci/crescendo_g4_7200_400.html I bought one of those brand-new from NewerTech eight years ago when they were closing them out - $39.95. I had no idea they were that pricey originally.
|
|
#
?
Dec 10, 2014 02:09
|
|

|

|
| # ? Apr 19, 2024 04:26 |
|
|
JnnyThndrs posted:I bought one of those brand-new from NewerTech eight years ago when they were closing them out - $39.95. I had no idea they were that pricey originally. That pricy, and in order to use it you had to have bought a - frankly quite awful - matching computer in 1996 or 1997 when they were made, and then kept that thing until the cards came out in 2000. Now, the card actually makes the computer quite fast. But you could have just gotten a much better Mac in the first place.
|
|
#
?
Dec 10, 2014 02:14
|
|