


|
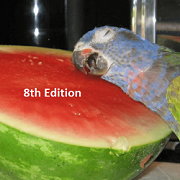
Dr. VooDoo posted:As a new comer to the world of painting tiny plastic mans should I try learning zenithal priming as soon as possible or just get used to things primed in one color then try my hand at zenithal priming? My opinion? Learn how to prime zenithal. First of, it's pretty darn easy. Second, if you want to have a nice consistent army you don't need to repaint, I'm of the opinion that you should spend a little more time up front to get a firm technical footing before going hog wild. Grab 5 cheap tac marines or whatever and work on them 1 at a time from start to finish. Each time try something new, push yourself, and get better. It's how I went from this: 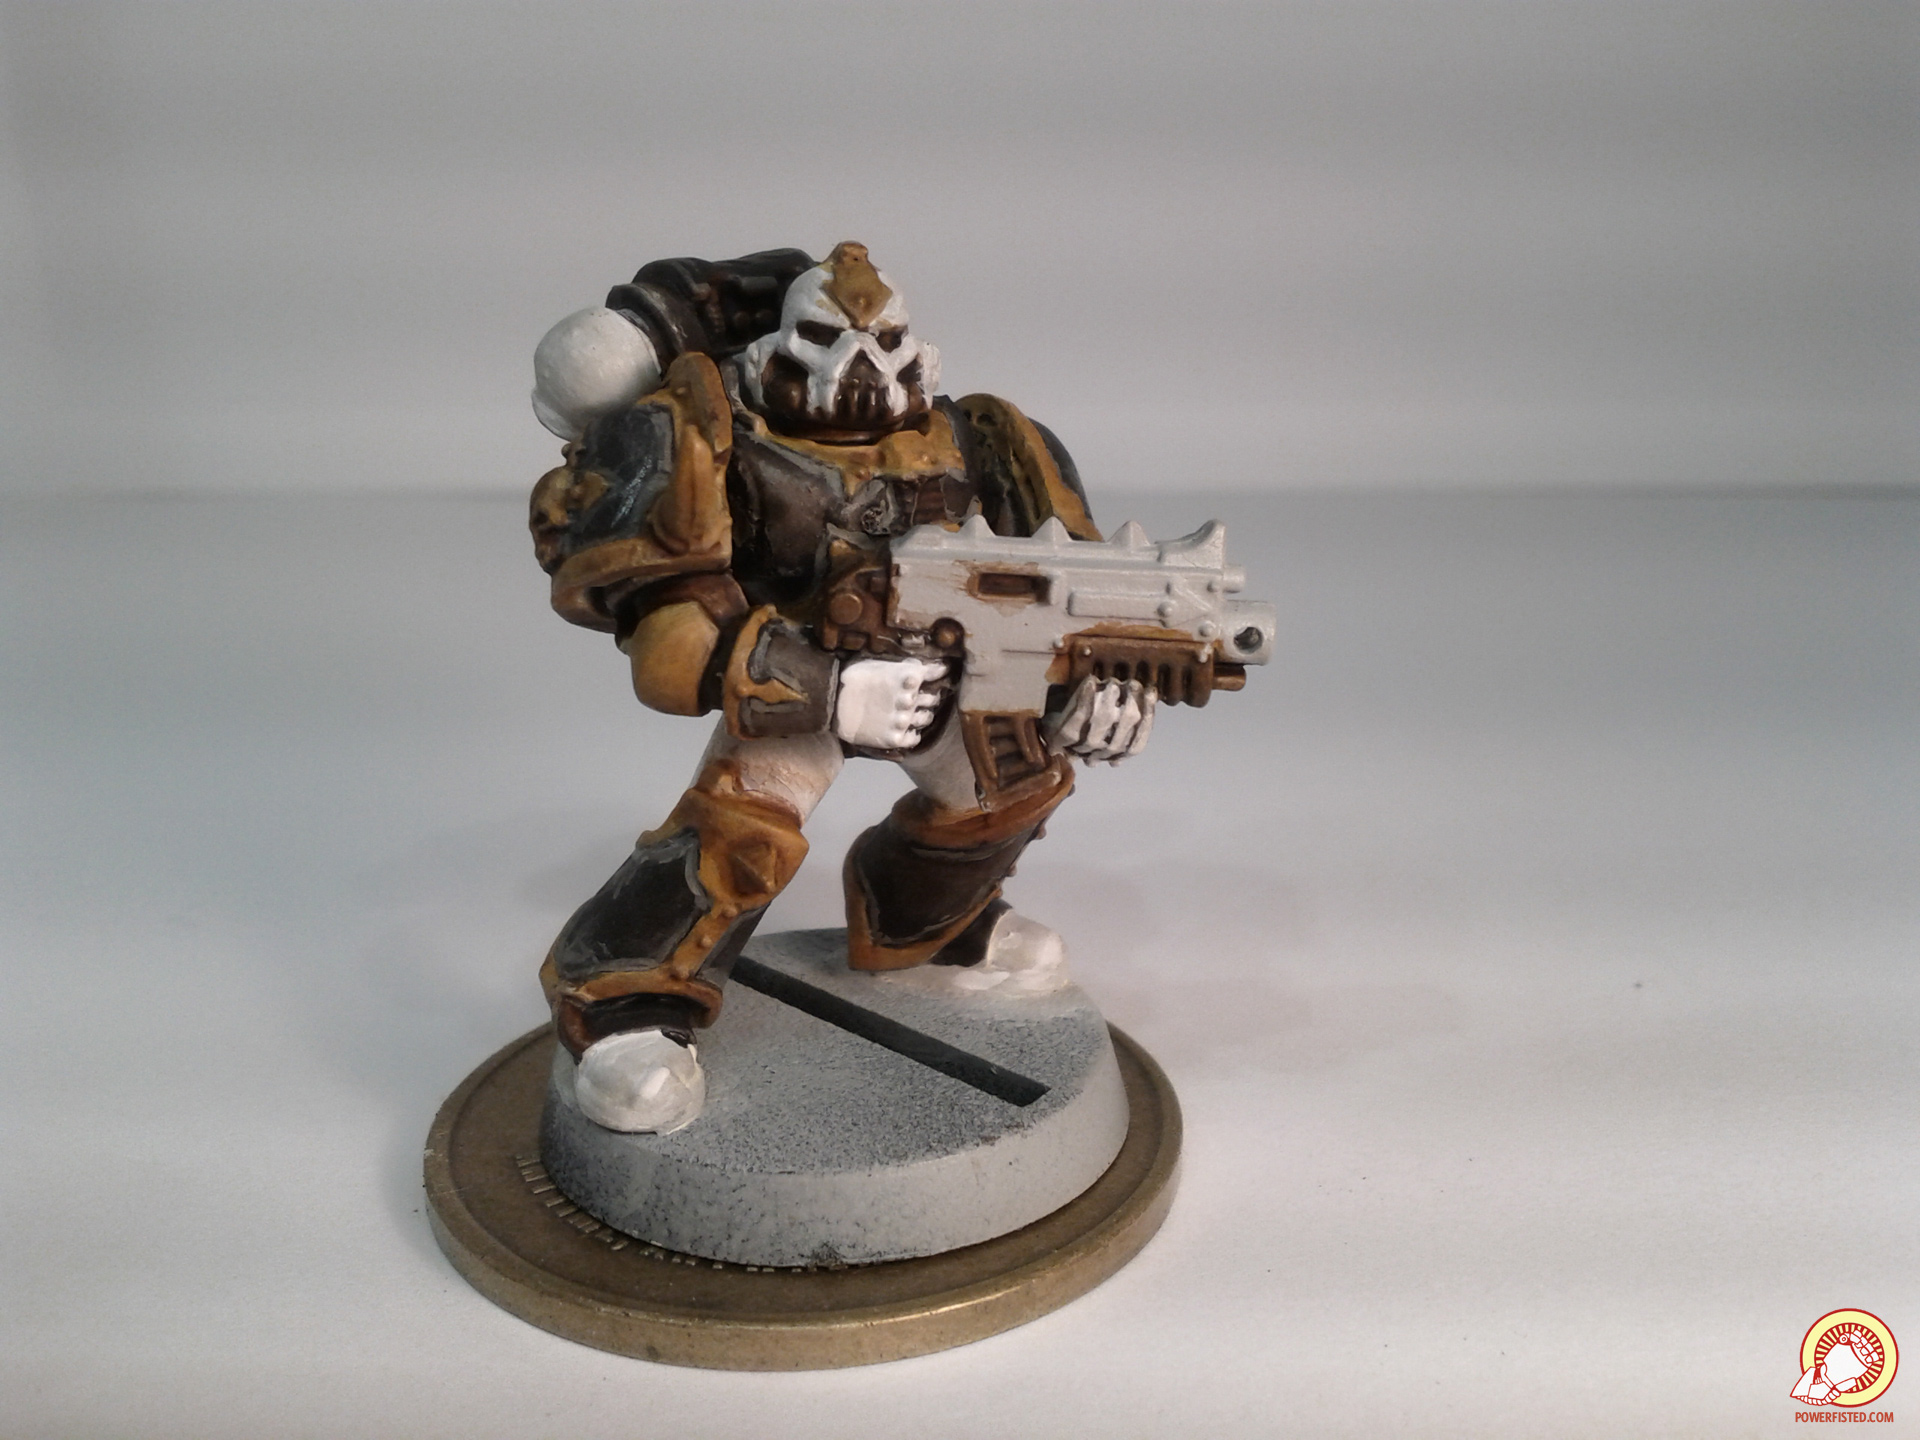 To this: 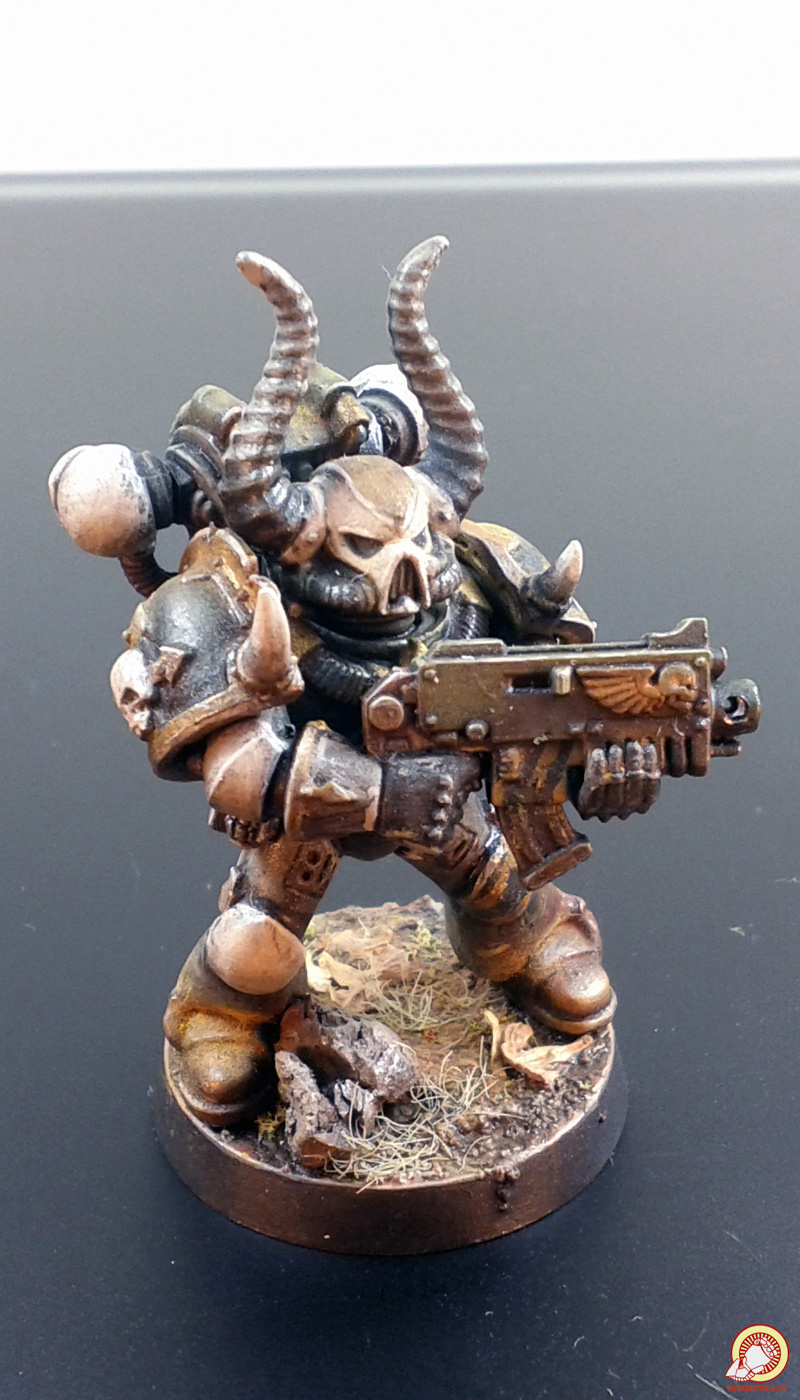 and then to this: 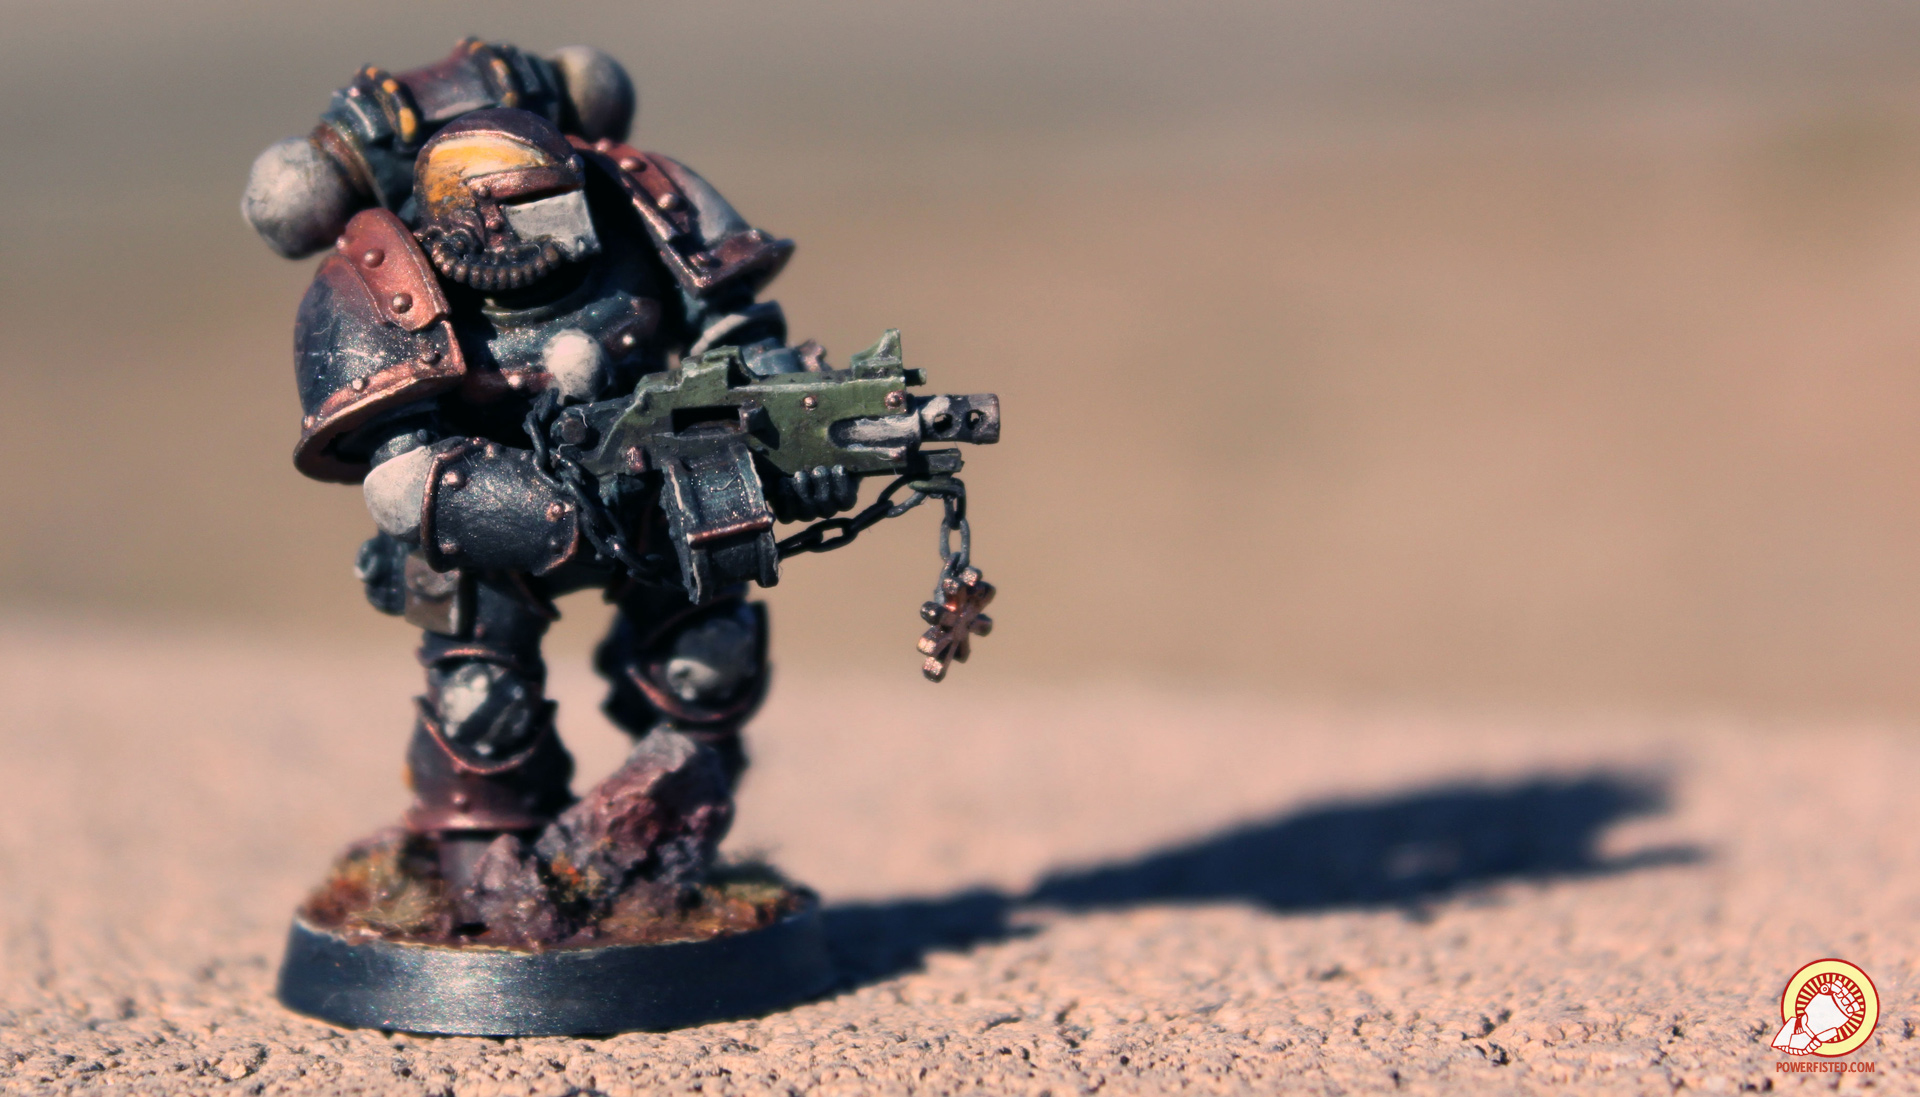 I went a little crazy with my own process and it took me about a year, but you can really up your game over the course of a month if you're not a slow as gently caress painter. If you want to see step by step how it played out for me, I wrote about it on my lovely blog: http://www.powerfisted.com/?p=19 http://www.powerfisted.com/?p=22
|
 #
?
Aug 25, 2015 02:20
#
?
Aug 25, 2015 02:20
|
|


|

|
| # ? Apr 29, 2024 15:08 |
|
|
Dr. VooDoo posted:As a new comer to the world of painting tiny plastic mans should I try learning zenithal priming as soon as possible or just get used to things primed in one color then try my hand at zenithal priming? I think it depends a lot on your ultimate goals. Do you just want an army that doesn't look like butt, or do you want to paint the prettiest drat models on earth? I'm more of the latter, so I'm prioritizing learning how to glaze and get better at wet blending and such.
|
|
#
?
Aug 25, 2015 02:45
|
|

|
Avenging Dentist posted:Does anyone have any recommendations for an alternative to brown stuff? Based on the description, brown stuff is exactly what I want, but the manufacturer doesn't make it anymore. I've heard complaints about Milliput in comparison, and then there are options like ProCreate or Privateer's putty. Specifically I'm looking for something harder than green stuff. Miliput won't do a hard edge (and hold it without snapping) like what brown stuff can do...but you can mix Miliput and green stuff together (after mixing both putties) to get a different substance that should be harder than green stuff, able to keep an edge and because it's Miliput it'll be easier to sand than pure green stuff.
|
|
#
?
Aug 25, 2015 08:55
|
|

|
Dr. VooDoo posted:As a new comer to the world of painting tiny plastic mans should I try learning zenithal priming as soon as possible or just get used to things primed in one color then try my hand at zenithal priming? It depends. If you're doing loads of mooks/filler/cannon fodder I would say just prime black to start with, then maybe try grey primer. If you're painting smaller numbers of models (for a game like Frostgrave or Malifaux) or larger models, zenithal will help speed things up and get you shading gradients at the same time. You can do zenithal easily with just cans of black, grey and white primer, though. Spray all over with black (including and especially from underneath), then stand the models up and spray from above at a 45 degree angle with grey, then from directly above with white if you want additional spots of light color. This does the job and works fine for large numbers of troops too. e: didn't mean to double post but welp
|
|
#
?
Aug 25, 2015 08:59
|
|
|
How do you paint over zenithal priming without the paint you apply immediately covering the prime? Is it just a case of using inks?
|
|
#
?
Aug 25, 2015 09:41
|
|

|
hooman posted:How do you paint over zenithal priming without the paint you apply immediately covering the prime? Thin your paints  No really, just use a thin coat, maybe two.
|
|
#
?
Aug 25, 2015 10:08
|
|
|
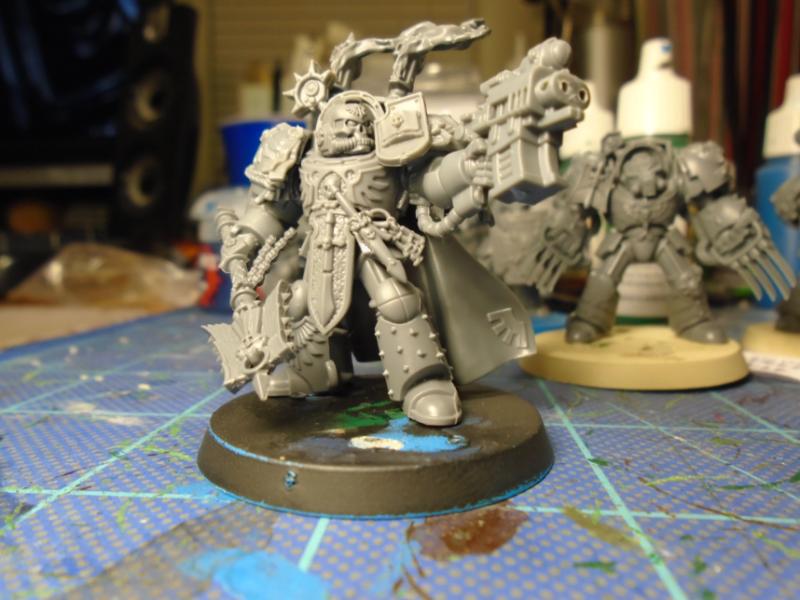
I like this guy's pose - he looks like he's casually walking across the street, all the while putting HE rounds into the grille of the *Thunk* *Thunk* *Thunk* *Thunk* BOOM! (Rhino flips onto its top and skids toward him, finally coming to rest mere feet from the guy.) Very John Reese from Person of Interest.
|
|
#
?
Aug 25, 2015 15:48
|
|
|
berzerkmonkey posted:I like this guy's pose - he looks like he's casually walking across the street, all the while putting HE rounds into the grille of the The drum magazine just makes it look that much more like he's using a streetsweeper.
|
|
#
?
Aug 25, 2015 15:51
|
|

|
berzerkmonkey posted:I like this guy's pose - he looks like he's casually walking across the street, all the while putting HE rounds into the grille of the As someone who has the played against Bulbasaur's army I can say that even the pictures do no truly do them justice.
|
|
#
?
Aug 25, 2015 16:42
|
|

|
The Sisko posted:As someone who has the played against Bulbasaur's army I can say that even the pictures do no truly do them justice. As someone who has also played against BULBASUARS's army, can confirm. They look really good piled up on the edge of table by turn 3
|
|
#
?
Aug 25, 2015 17:17
|
|
|
Avenging Dentist posted:Does anyone have any recommendations for an alternative to brown stuff? Based on the description, brown stuff is exactly what I want, but the manufacturer doesn't make it anymore. I've heard complaints about Milliput in comparison, and then there are options like ProCreate or Privateer's putty. Specifically I'm looking for something harder than green stuff. Privateer Press's version of brown stuff is pretty nice. I'm no professional sculptor, but I've used it to good effect making weapons and stuff. It is certainly harder than green stuff.
|
|
#
?
Aug 25, 2015 17:23
|
|

|
berzerkmonkey posted:I like this guy's pose - he looks like he's casually walking across the street, all the while putting HE rounds into the grille of the Leaked script from Saint's Row V.
|
|
#
?
Aug 25, 2015 17:27
|
|

|
So I soaked some minis in Simple Green to strip them, and it worked- but now they reek of Simple Green. Is there an easy way to un-funk them?
|
|
#
?
Aug 25, 2015 18:38
|
|

|
Unzip and Attack posted:So I soaked some minis in Simple Green to strip them, and it worked- but now they reek of Simple Green. Is there an easy way to un-funk them? Wash them off with soapy water, prime them when they're dry, and just wait, the smell goes away in time.
|
|
#
?
Aug 25, 2015 18:41
|
|
|
Unzip and Attack posted:So I soaked some minis in Simple Green to strip them, and it worked- but now they reek of Simple Green. Is there an easy way to un-funk them? Urine. SRM posted:Wash them off with soapy water, prime them when they're dry, and just wait, the smell goes away in time. Sure, that works. I guess. Honestly, I wouldn't bother with the soap. Just rinse with more water, maybe mixed with a little baking soda. Maybe if you have hard water it won't help. Or soft water? I forget which is the one that makes this more difficult. In any case, don't eat a bunch of asparagus beforehand.
|
|
#
?
Aug 25, 2015 18:52
|
|

|
Floppychop posted:Privateer Press's version of brown stuff is pretty nice. I'm no professional sculptor, but I've used it to good effect making weapons and stuff. Cool, I'll give it a shot. Thanks! If anyone has any other recommendations (especially for sculpting from scratch), I'd be interested in hearing them.
|
|
#
?
Aug 25, 2015 18:57
|
|
|
If it weren't for that base, this would look like it was a still from a movie.
|
|
#
?
Aug 25, 2015 19:30
|
|
|
Star Man posted:If it weren't for that base, this would look like it was a still from a movie. Crop the image at the his knees, add some flying shell casing and muzzle flash, make it black & white and you have a Forgeworld picture.
|
|
#
?
Aug 25, 2015 19:39
|
|


|
Unzip and Attack posted:So I soaked some minis in Simple Green to strip them, and it worked- but now they reek of Simple Green. Is there an easy way to un-funk them? Bask in the sweet pine scent instead of trying to get rid of it
|
|
#
?
Aug 25, 2015 19:40
|
|


|
Star Man posted:If it weren't for that base, this would look like it was a still from a movie. Cooked Auto posted:Crop the image at the his knees, add some flying shell casing and muzzle flash, make it black & white and you have a Forgeworld picture. 
|
|
#
?
Aug 25, 2015 19:52
|
|
|
I think I did a pretty good job
|
|
#
?
Aug 25, 2015 20:01
|
|
|
That's back when I was a games industry slave. Had to give beers to the mocap dudes so I could borrow a DSLR camera and take pictures of 'something very embarrassing'The Sisko posted:As someone who has the played against Bulbasaur's army I can say that even the pictures do no truly do them justice. Hixson posted:As someone who has also played against BULBASUARS's army, can confirm. They look really good piled up on the edge of table by turn 3 I have the best friends
|
|
#
?
Aug 25, 2015 20:04
|
|
|
SRM posted:I think I did a pretty good job This needs to be turned into the next episode of Guardsmarine Quest. 
|
|
#
?
Aug 25, 2015 20:06
|
|
|
So, I haven't painted poo poo since I was like, 14, and all my friends were into warhammer and we sloppily heaped paint on our dudes to avoid the shame of unpainted armies. I've been getting into ImpAss recently, and want my mans to be a little more visually appealing than just 'grey' or 'tan'. I watched some of Sorastro's youtube stuff the other day, my plan is to straight up copy his guide/schemes in the short term until I've got a better idea of what I'm doing. I've read through the OP a couple times over, but any more specifics about what tools/supplies I should have on hand to get started, knowing it'll all be for imp-rear end? For what it's worth, I have maybe six brushes of varying size and about 30 paint pots (citadel I believe) from my teen-warhammer days that were pretty well cared for & sealed, are these potentially salvageable or should I just start from scratch? Any reason I shouldn't just buy the exact products Sorastro uses/names in his videos? Any other videos/blogs/whatever that I should check out before getting started? Lastly and only tangentially related, any good storage solutions for painted minis belonging to a board game? Currently all the dice & tokens are in a plano in the bottom of the game box, terrain tiles are in ziplocks next to that, (unpainted) minis are jumbled in the bags they came in on top. Ideally something that could fit inside the game box. edit: also, any other ideas about basing, given that the game takes place on 3+ visually distinctive tilesets? I think Sorastro just clips them all off and replaces them with clear bases, but I'm wondering if there might be another approach. Hauki fucked around with this message at 20:16 on Aug 25, 2015 |
|
#
?
Aug 25, 2015 20:12
|
|


|
Pierzak posted:This needs to be turned into the next episode of Guardsmarine Quest. SRM Quest
|
|
#
?
Aug 25, 2015 20:13
|
|
|
SRM posted:I don't think it can be emphasized enough how much cool stuff you can do with modern plastics: I don't know if you or anyone else cares, but the power armored hand holding the crozius is noticeably smaller than the terminator hand with the storm bolter. It's a pretty easy fix with one of the spare mace hands from the Deathwing kit though. I have done this myself. 
|
|
#
?
Aug 25, 2015 20:14
|
|


|
Safety Factor posted:I don't know if you or anyone else cares, but the power armored hand holding the crozius is noticeably smaller than the terminator hand with the storm bolter. It's a pretty easy fix with one of the spare mace hands from the Deathwing kit though. I have done this myself. I thought about it, but I don't actually have any spare mace hands! I figure once the thing's painted it'll all look fine anyway. I didn't want to cut up the Crozius hand. BULBASAUR posted:SRM Quest
|
|
#
?
Aug 25, 2015 20:24
|
|
|
Hauki posted:any more specifics about what tools/supplies I should have on hand to get started, knowing it'll all be for imp-rear end? - brushes - size 2 and/or 3 for normal painting, size 0 for details like eyes. - paints - get washes. Army painter has cheap and good GW-equivalents, def grab the Soft/Strong/Dark tone triad plus any extras you might need - e.g. a bit of blue added to the normal black wash will do wonders for shading white, like say, imperial stotmtroopers. Also get glaze medium, that poo poo's amazing and helpful. - modeling knife with disposable blades - don't file FFG mold lines, they'll only get worse on soft plastic. Instead shave them with a sharp knife (I use the triangular blade type) - primer - spray preferred - varnish - see above quote:30 paint pots (citadel I believe) from my teen-warhammer days that were pretty well cared for & sealed, are these potentially salvageable or should I just start from scratch quote:Any reason I shouldn't just buy the exact products Sorastro uses/names in his videos? quote:any good storage solutions for painted minis belonging to a board game? Currently all the dice & tokens are in a plano in the bottom of the game box [...] Ideally something that could fit inside the game box.  what I'd recommend is: plan for the inevitable expansions because FFG, use the main box for terrain/rules/dice/tokens (grab a GMT counter tray or several for tokens), and use foam-lined boxes for minis. Alternatively get some flat pizza-like boxes and make grids from bubblewrap, that works too but doesn't withstand as much wear as foam. what I'd recommend is: plan for the inevitable expansions because FFG, use the main box for terrain/rules/dice/tokens (grab a GMT counter tray or several for tokens), and use foam-lined boxes for minis. Alternatively get some flat pizza-like boxes and make grids from bubblewrap, that works too but doesn't withstand as much wear as foam.
|
|
#
?
Aug 25, 2015 20:24
|
|
|
Avenging Dentist posted:Does anyone have any recommendations for an alternative to brown stuff? Based on the description, brown stuff is exactly what I want, but the manufacturer doesn't make it anymore. I've heard complaints about Milliput in comparison, and then there are options like ProCreate or Privateer's putty. Specifically I'm looking for something harder than green stuff. Procreate and magicsculp is what I use for hard edges. Magicsulp is the harder of the two I feel. You can mix both with greenstuff for varying results
|
|
#
?
Aug 25, 2015 21:05
|
|

|
Pierzak posted:Those are Descent-type minis? Same design, same plastics? If so, you'll need: quote:If they're really old - as in, white soft plastic caps on hex/cylindical pots, they might last ages if properly closed and are good & worth revitalizing - buy acrylic medium (I'd go with miniature paint-specific e.g. Vallejo, but others might point you to a cheaper alternative from art stores). The newer Citadel pots are utter poo poo and seem actually designed to seal badly so they dry faster. Rule of thumb: if the paint's not sollidified (it might be a gooey mass but still very dense liquid) it might be saved by adding medium, if it's solid just close the pot, put a blob of blu-tac on it and use it as a miniature holder (seriously, those things help a lot) quote:No idea who Sorastro is, but I'd guess price would be one reason. Also, don't give money to GW, they're a poo poo company that sells the worst poo poo at the highers prices. quote:No, stop looking, you won't find one, I'm telling you this as a Descent player Anyways, thanks for all the info. so far, I'm psyched to get these painted up. edit: no idea what's going on with that link, but hopefully it works now? also whoops, I guess he just paints the bases grey, or grey with a red outline for elite unites which seems kind of boring to me. Not sure where I saw the clear bases, but that still seems like the most elegant solution so far. Hauki fucked around with this message at 21:53 on Aug 25, 2015 |
|
#
?
Aug 25, 2015 21:24
|
|
|
SRM posted:I thought about it, but I don't actually have any spare mace hands! I figure once the thing's painted it'll all look fine anyway. I didn't want to cut up the Crozius hand. I swear that despite my similar offer today in the 40k thread, I am not trying to be weird about sending you bits. This is purely coincidental.
|
|
#
?
Aug 25, 2015 21:26
|
|
|
SRM posted:I don't think it can be emphasized enough how much cool stuff you can do with modern plastics: What head did you use for this?
|
|
#
?
Aug 25, 2015 21:33
|
|

|
Hauki posted:Uh, some dude someone linked to in a different thread specifically regarding imperial assault painting. He had a tutorial series on those figures in particular. https://www.youtube.com/user/Sorastro/videos for reference. Fair enough though, I'm sure I can find analogous colors etc. I'm about to paint up ImpAss next month. I watched a couple of that guys videos. He's got a lot of bad habits: overloaded brushes, not taking colors to opaque/ poor basecoat, haphazard washes, that glazing... Yikes. Those poor sable brushes. If you really want, watch a couple of dr. Faust painting clinic or something. Somebody probably has some good youtube recommendations. Mostly though just paint. Litko sells clear bases for ImpAss in all the different sizes you need. There are cheaper places, but that's the most convenient.
|
|
#
?
Aug 25, 2015 22:04
|
|

|
Safety Factor posted:I have a few of them if you want one. It's pretty easy to cut off the crozius while preserving the entire thing. I cut away most the hand, but left a small remnant on each end of the crozius. I carefully shaved that away and filed it down a little, no detail lost. I then pinned both ends in place on a mace hand. It looks so much better, but that sort of thing really gets to me. I know no one else will notice it, but I'll still know. I appreciate the offer, but I've already got him primed and don't feel like futzing about with that sorta dealie. I'm happy with how it looks, even if you'll always be there, judging my failings PantsOptional posted:What head did you use for this?
|
|
#
?
Aug 25, 2015 22:05
|
|
|
I am planning on getting some bones minis for Frostgrave, but how can I tell what the size the minis are before I buy them?
|
|
#
?
Aug 25, 2015 22:54
|
|

|
Not a viking posted:I am planning on getting some bones minis for Frostgrave, but how can I tell what the size the minis are before I buy them? If you look on the right of each photo of a model, they have these two pewter tabs glued on a base. It's roughly a scale to how tall a model is compared to others.
|
|
#
?
Aug 25, 2015 23:16
|
|
|
Hauki posted:one of the minis was already broken off it's base when I opened the box, are loc-tite superglues suitable for gluing it back assuming the same plastics? I think that's all I've got in the house, but if that won't work I'll need to pick something else up. quote:also whoops, I guess he just paints the bases grey, or grey with a red outline for elite unites which seems kind of boring to me. Not sure where I saw the clear bases, but that still seems like the most elegant solution so far. I forgot about washing: if you wash the minis (warm water, dishsoap, brush) before priming (let them dry ofc) the primer holds better because new minis are covered in mold release agent. Also, if any of your minis are bent (they probably are), hold them in very hot water for a few seconds, take out, bend them to desired shape and put into cold water so they solidify back in the right position.
|
|
#
?
Aug 25, 2015 23:27
|
|
|
Superglue: I have heard both things on this. Does it eath through paint and primer to form a bond, or do I need to chisel away some paint when super glueing painted parts together?
|
|
#
?
Aug 25, 2015 23:44
|
|
|
Not a viking posted:I am planning on getting some bones minis for Frostgrave, but how can I tell what the size the minis are before I buy them?
|
|
#
?
Aug 25, 2015 23:47
|
|
|

|
| # ? Apr 29, 2024 15:08 |
|
|
Speaking of my painting, here�s another long overdue tutorial: Tutorial: Making your own interesting bases, painting them, adding skulls to your skull throne Every so often I get questions about how exactly I base my models. I figure the easiest way to explain it is to put together a quick tutorial on the steps that go into it. Despite the amount of materials and steps nothing here is complicated or time consuming. Each step is quick, simple, and leads up to an interesting result. It takes about an evening to throw together 20 of these bad boys. I find the process really fun and rewarding. I hope this inspires people, just like other people�s tutorials inspire me, to try new things and push myself forward as a painter. 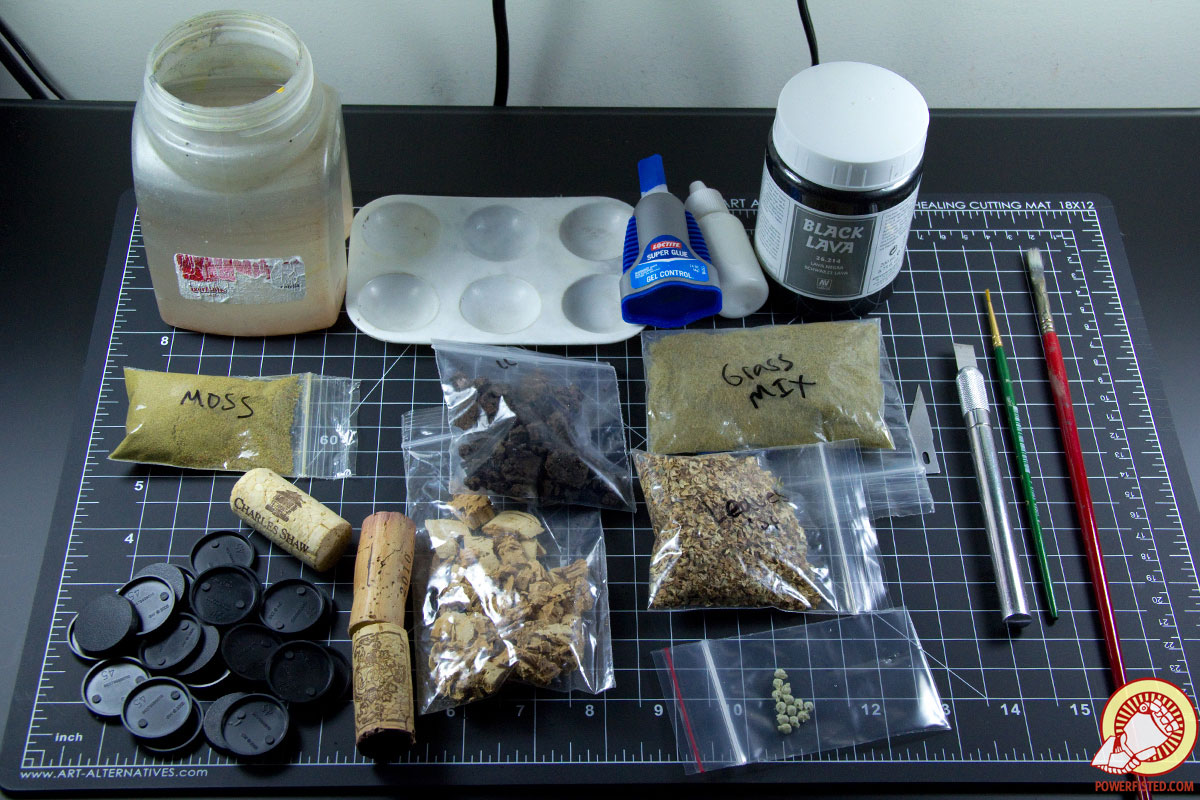 Each painter has their method of modeling bases. I�m no different- I model and paint mine separately from the models. I use a number of things along the way:
 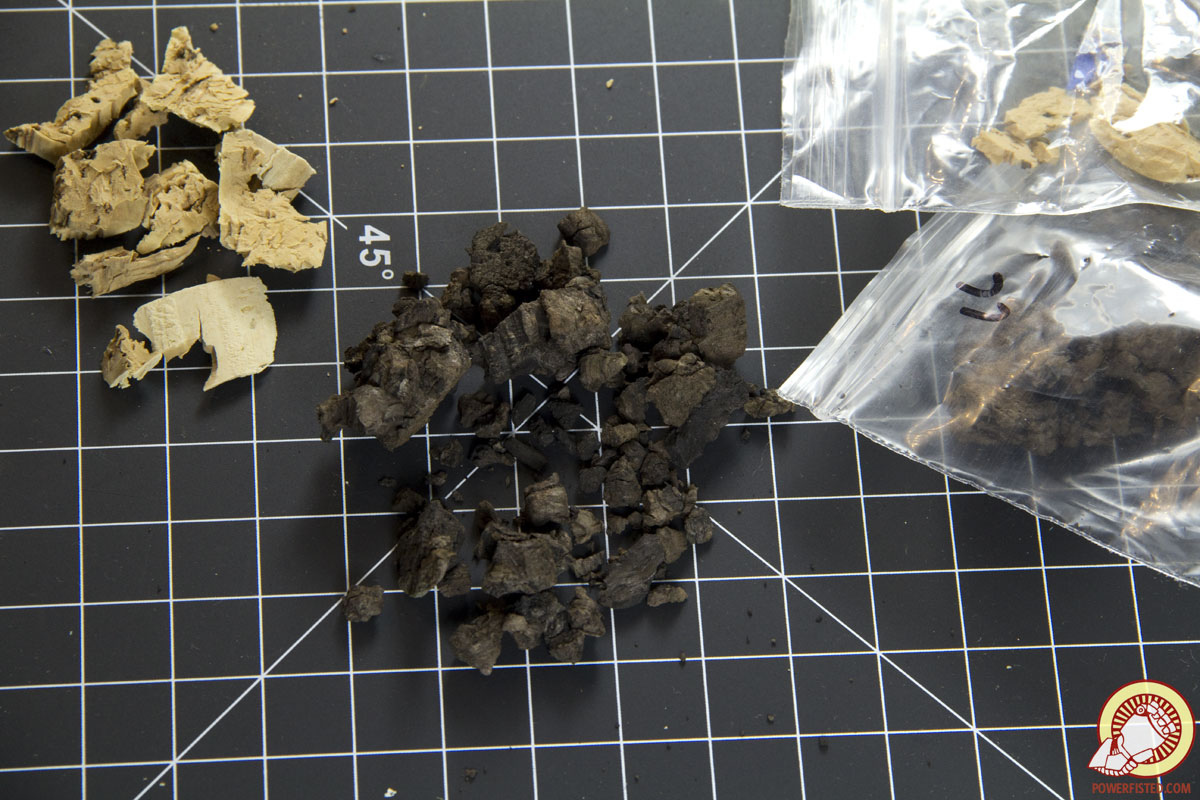 The first step is the cork. I use two types: yellow from wine bottles and dark from wall tiles. Dark Cork in wall tiles is naturally crumbly, thick, and perfect for things like rocks. Yellow cork is more spongy and holds a shape better. So it�s great for chopping up into interesting rock outcropping shapes. I combine the two as the foundations for each base. 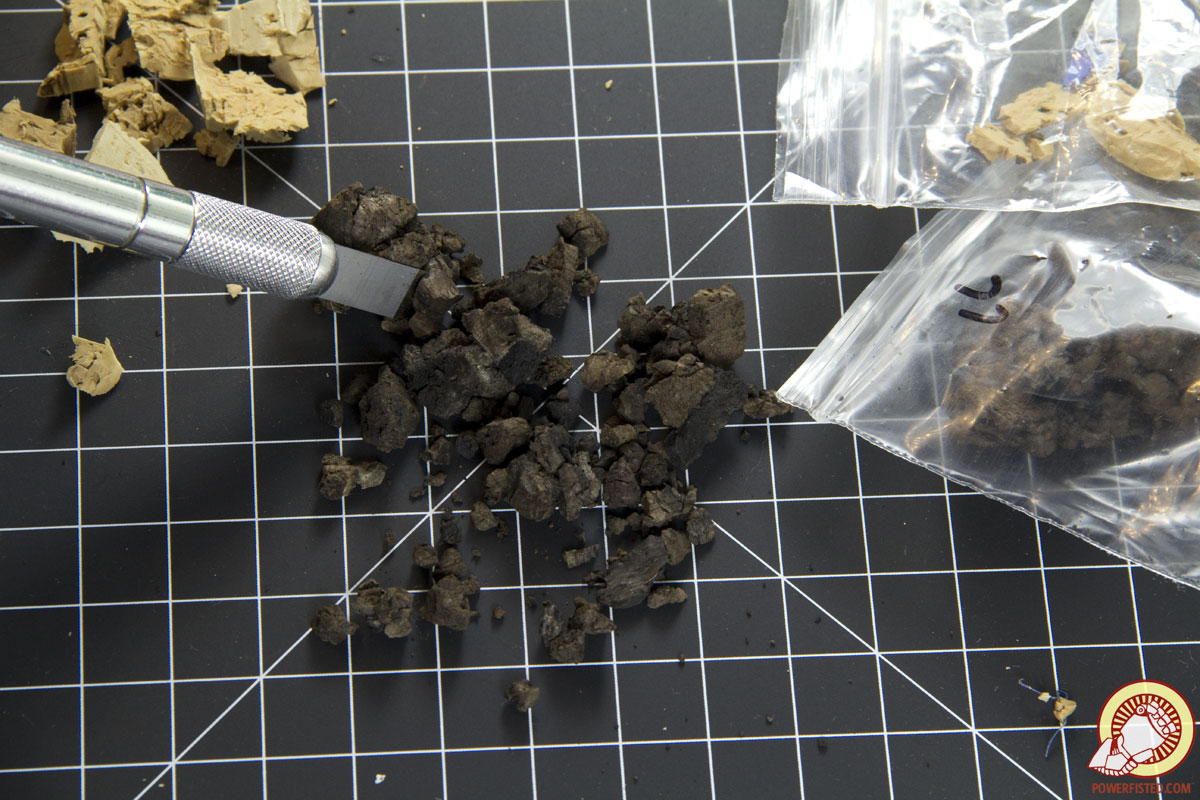 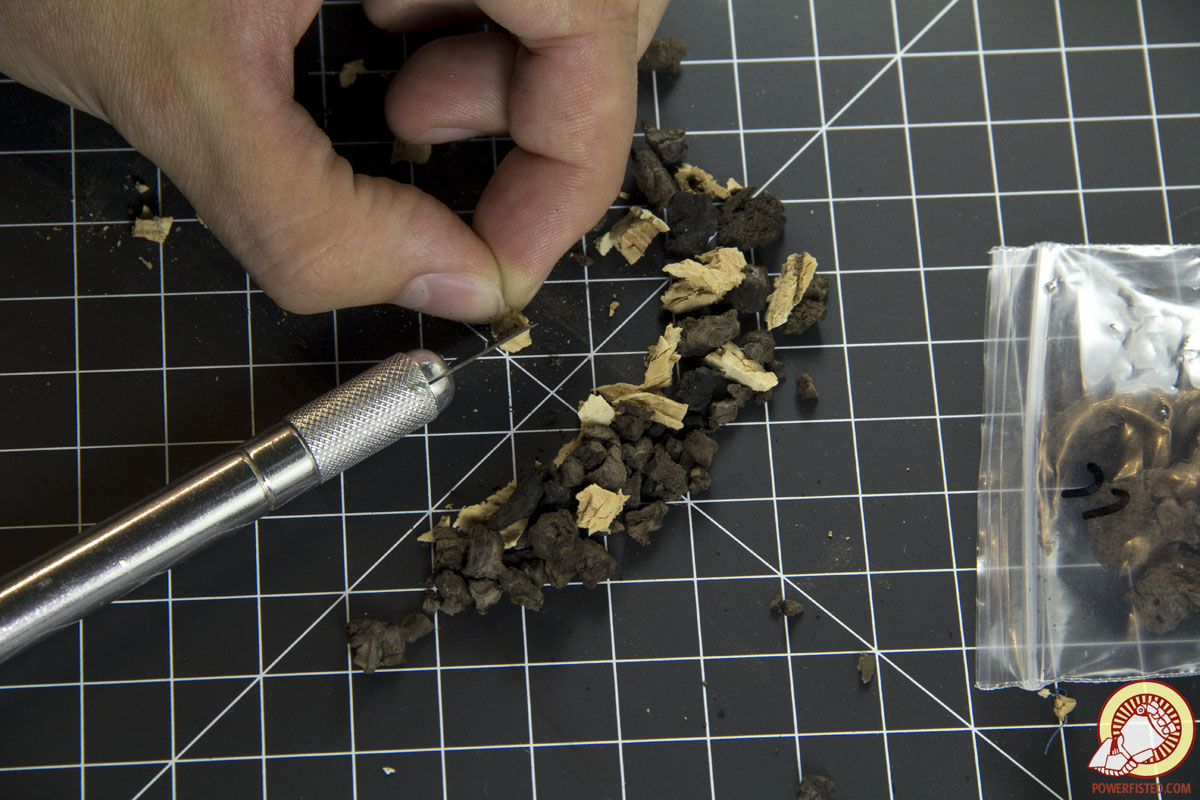 I use a chisel blade to chop up the pieces into a verity of small interesting shapes. 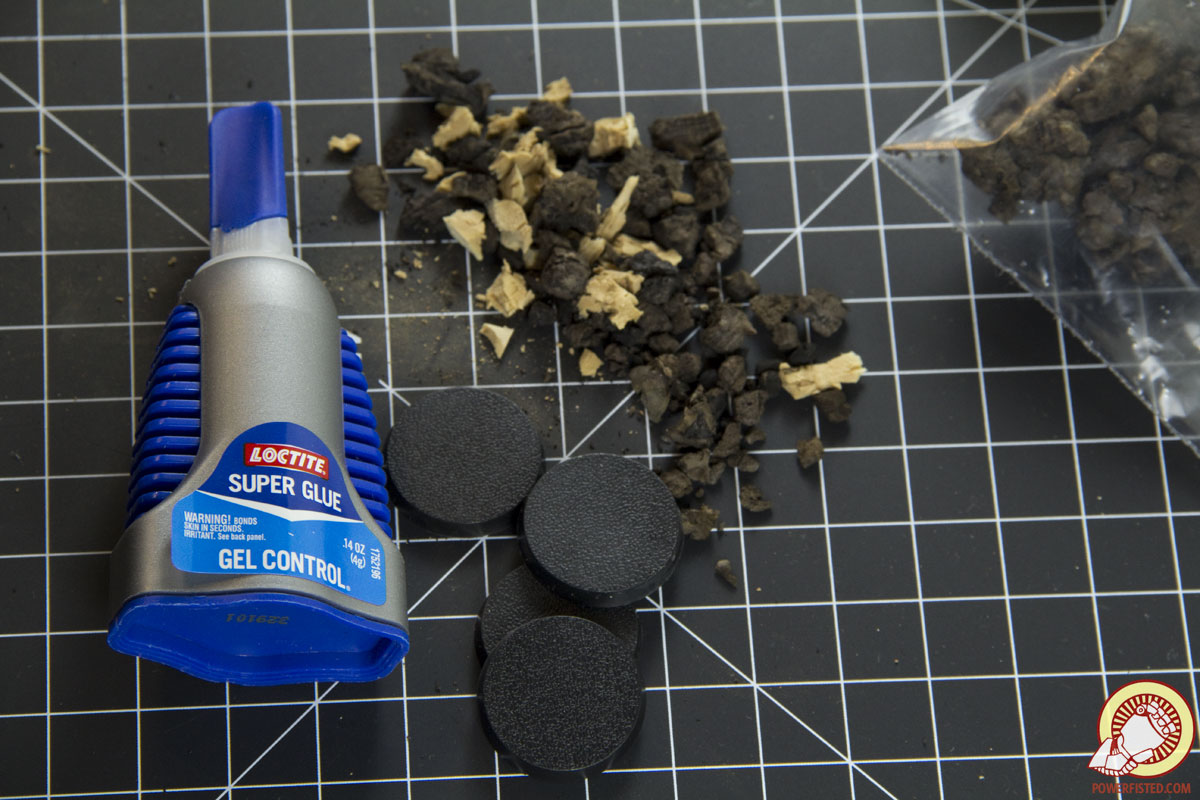 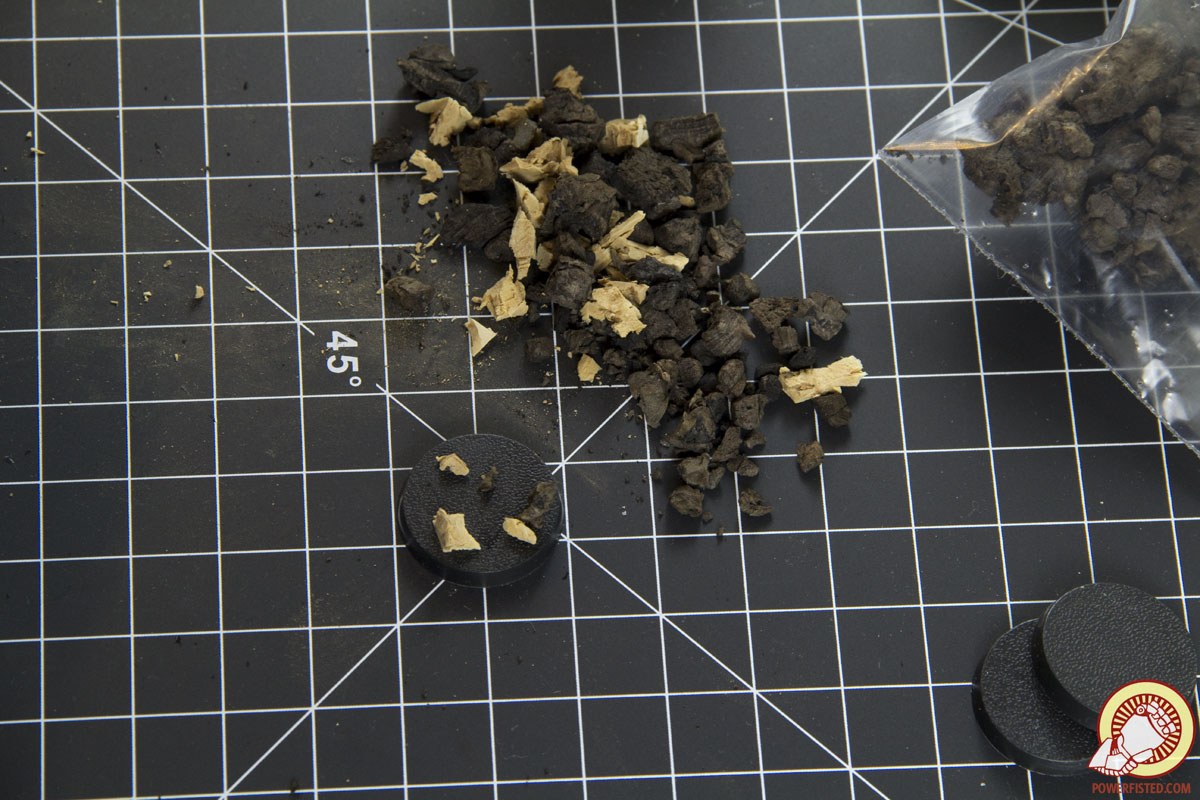 Once I�m happy with what I have to work with, I super glue an assortment onto each base. I try my best to make interesting and organic shapes paying really close attention at how much space is between each rock. This is to make sure my models have a flat place to be anchored down into once the bases are finished. 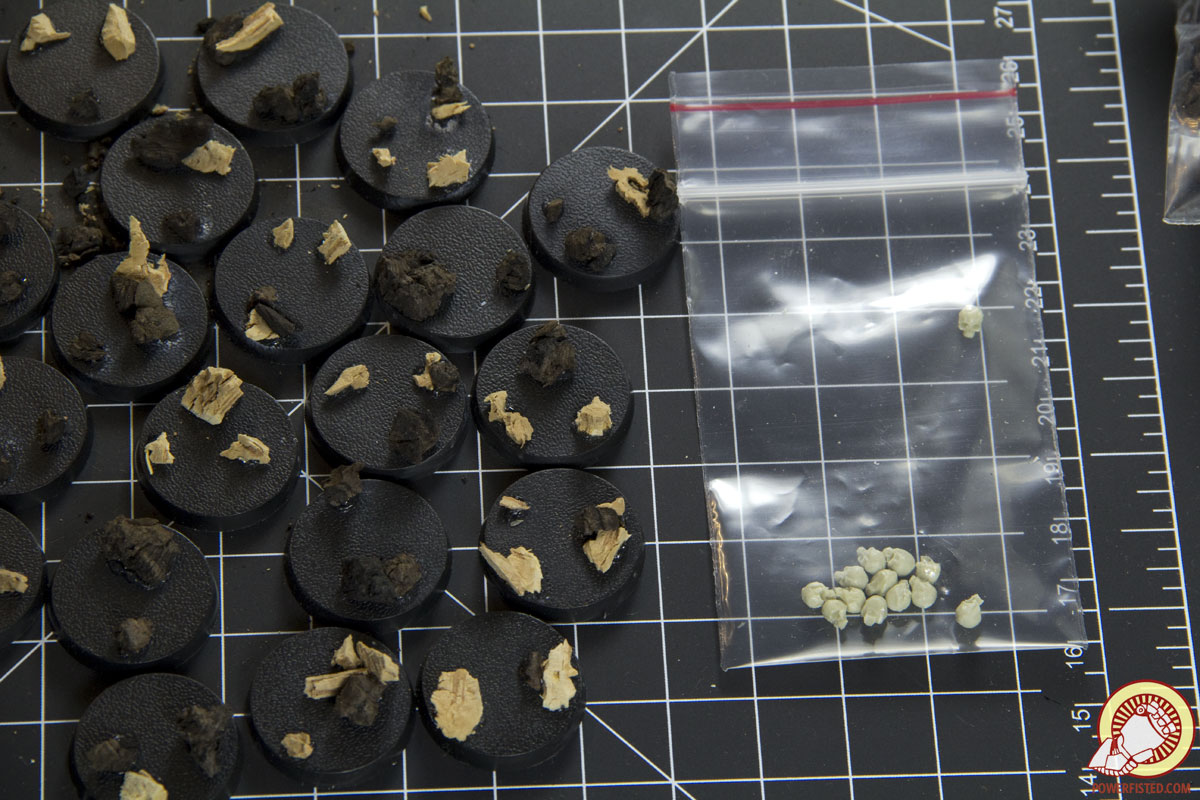 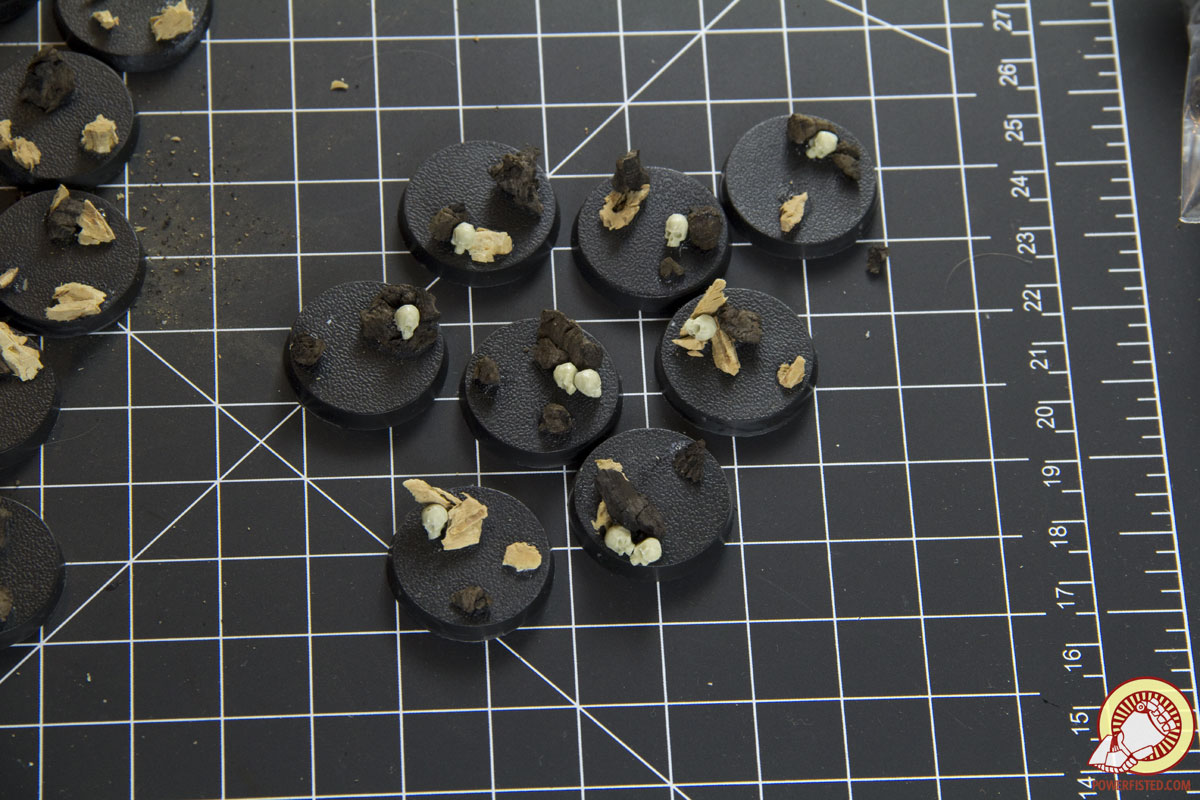 Up next are skulls. As these will be part of the terrain it�s not really important how high quality they are. I�ll glue these down on a few of the bases to make them a little more interesting. You can use any form of rubble- the goal here is to break up the base with something besides �rock�. For me the answer is clear- skulls absolutely everywhere. 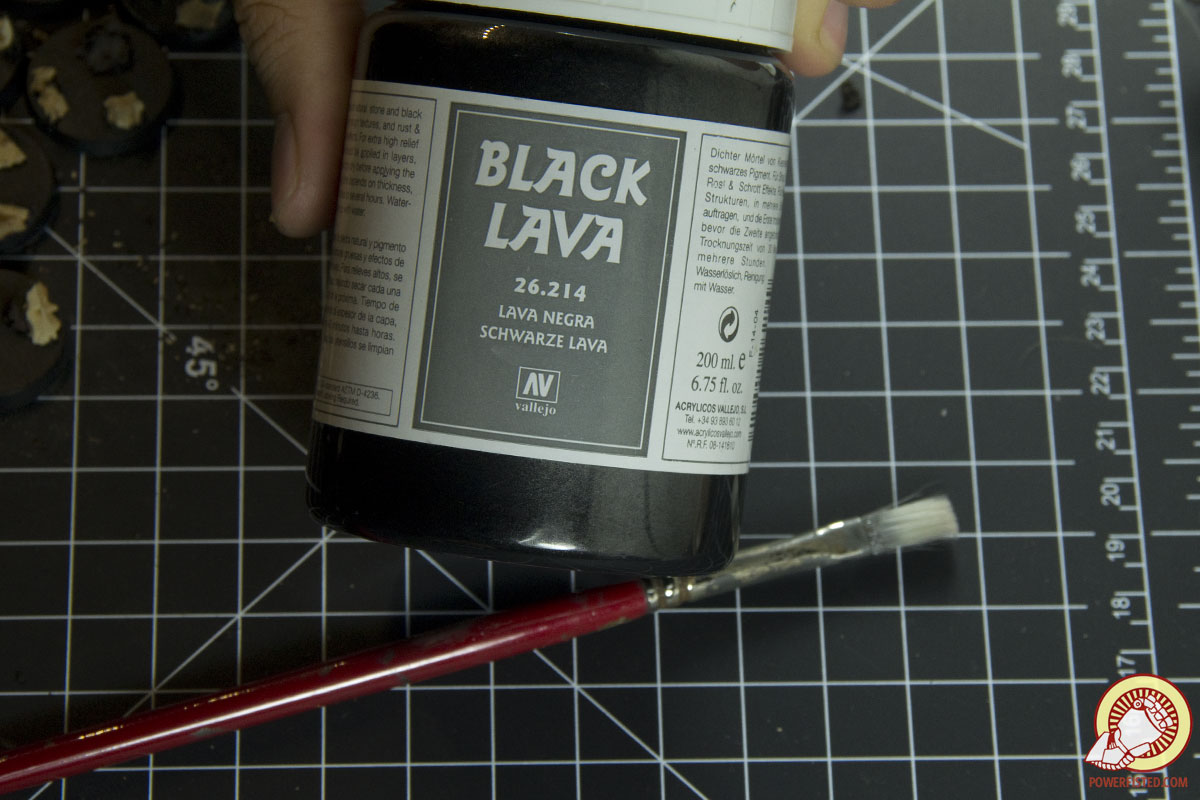 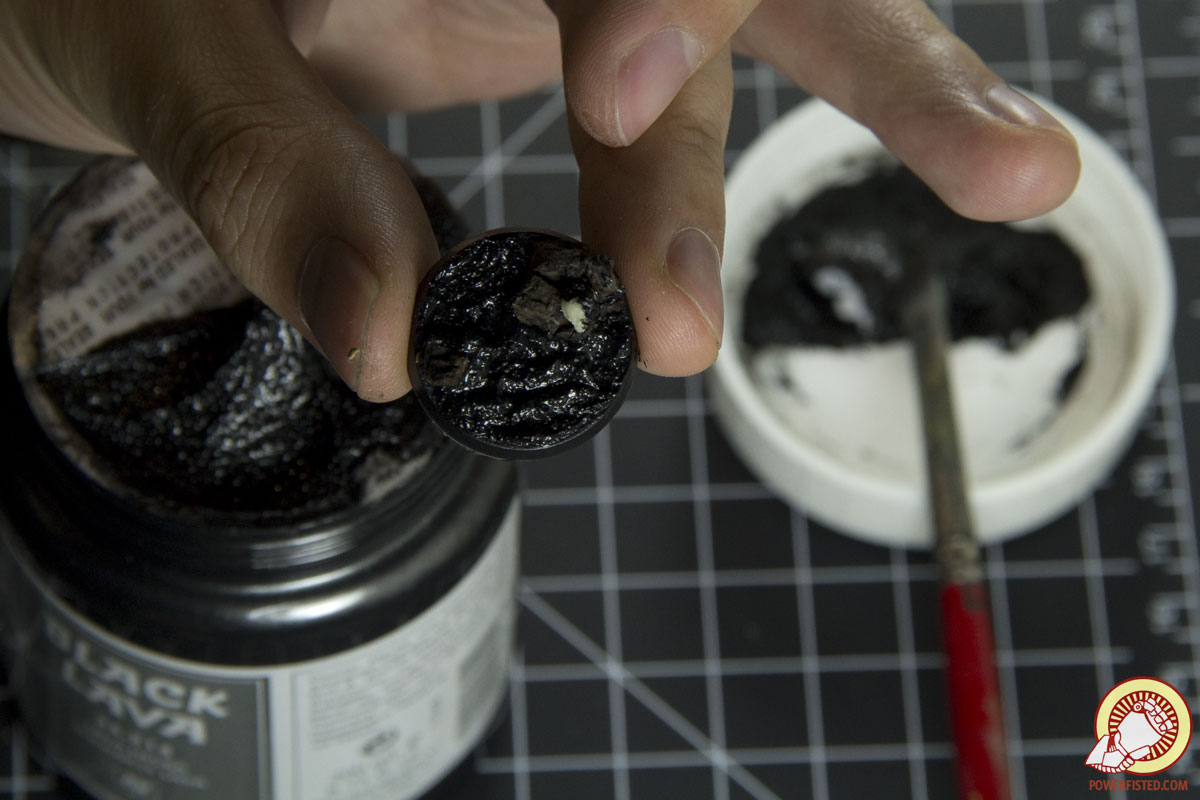 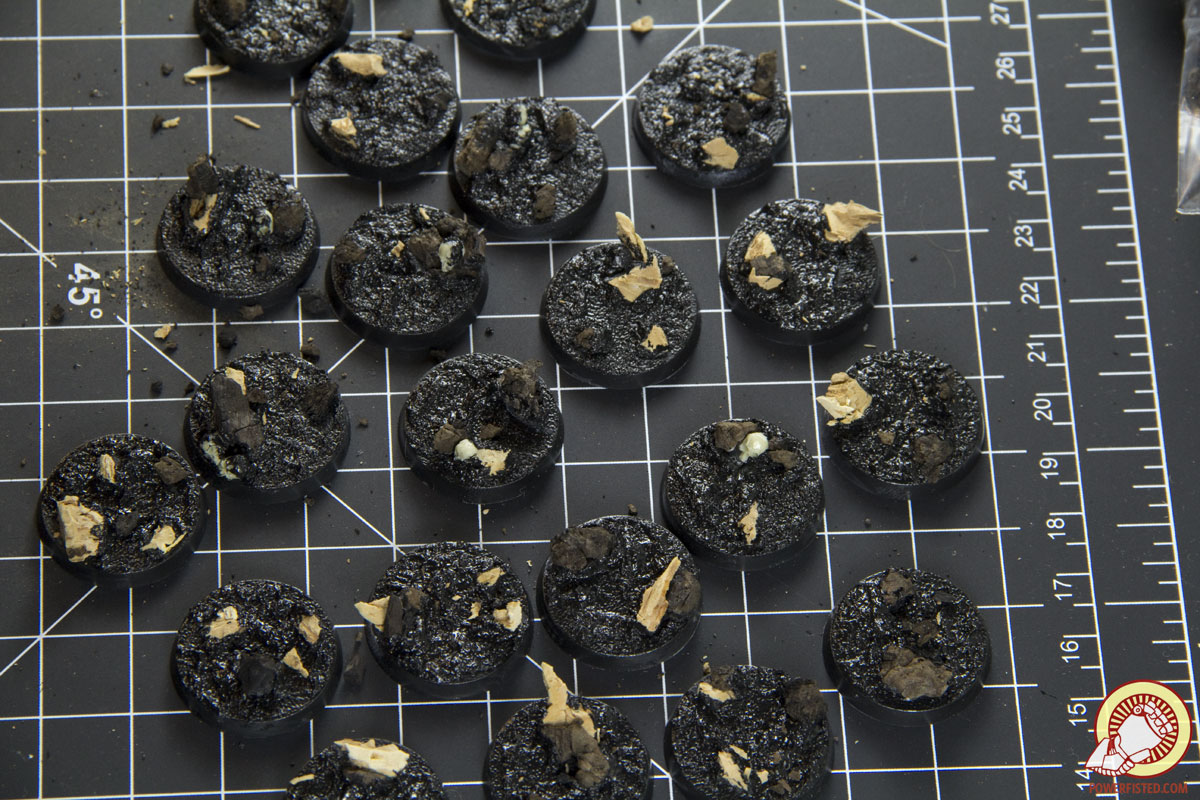 Next up is Black Lava. This stuff is a fairly inexpensive black speckled gel with small chunks of substrate floating around inside of it. When applied to a surface it dries solid and leaves behind a gravely texture. Because it�s acrylic, it�s easy to wash, and dries in about ten minutes. I apply it to all my bases and make sure to cover up all surface areas besides the rock shapes. I glob it on thick with an old brush and use the bristles to create wavy organic shapes. This way everything looks more natural when dry. 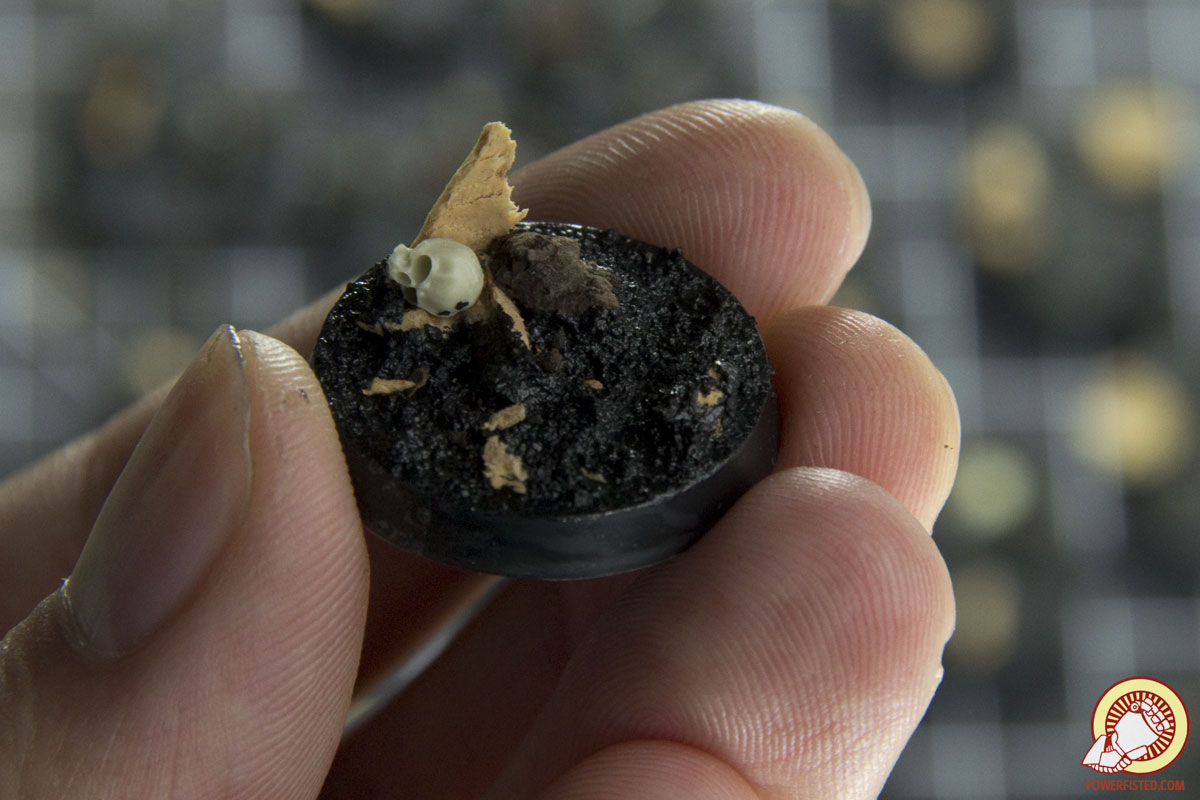 The result: an interesting base with texture, rocks, outcroppings, gravel, and� skulls? Not bad for about a minute of work for each base. 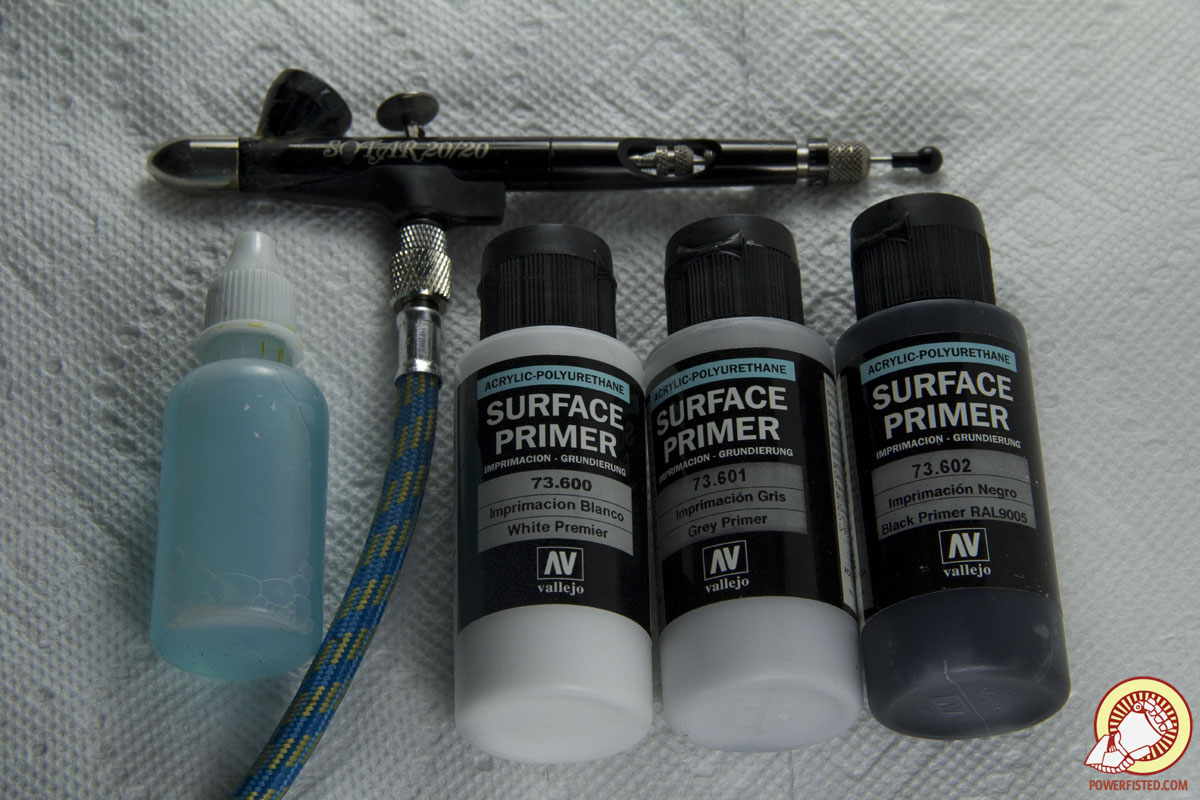 From here the base is ready to be painted. I use a Zenithal Priming to bring out the natural shadows and highlights of each base: spraying the entire base black, then the upper parts grey, and then the upper most edges with white. You can use this technique on your regular models too. 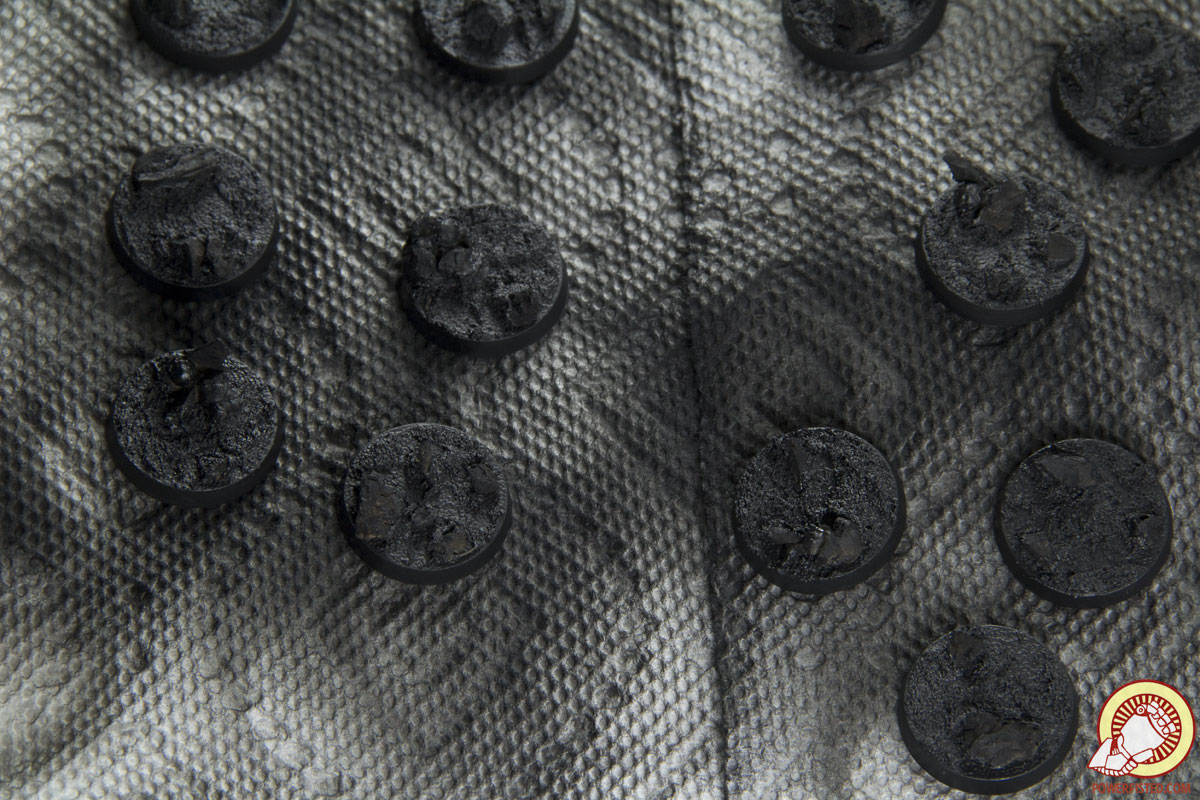 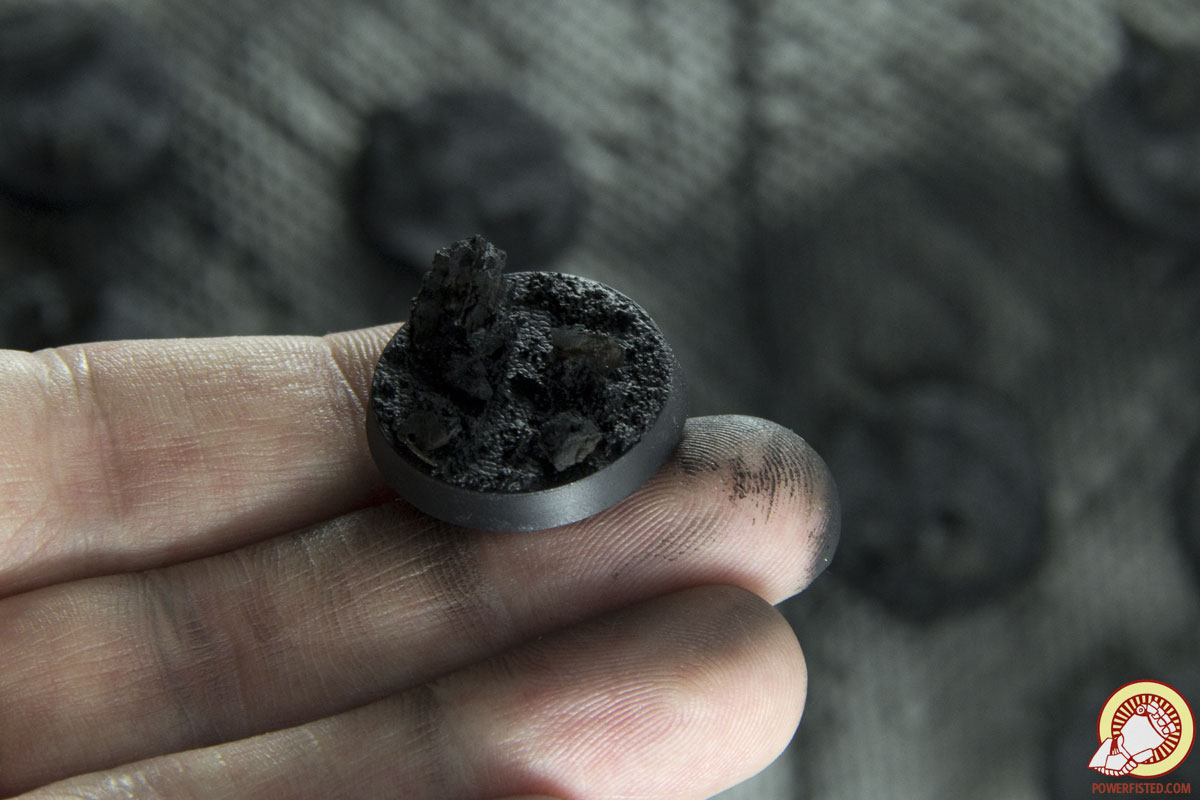 The black primer goes on first and covers all surfaces. In the second image you can clearly see how the Black Lava has given rich texture to the base. 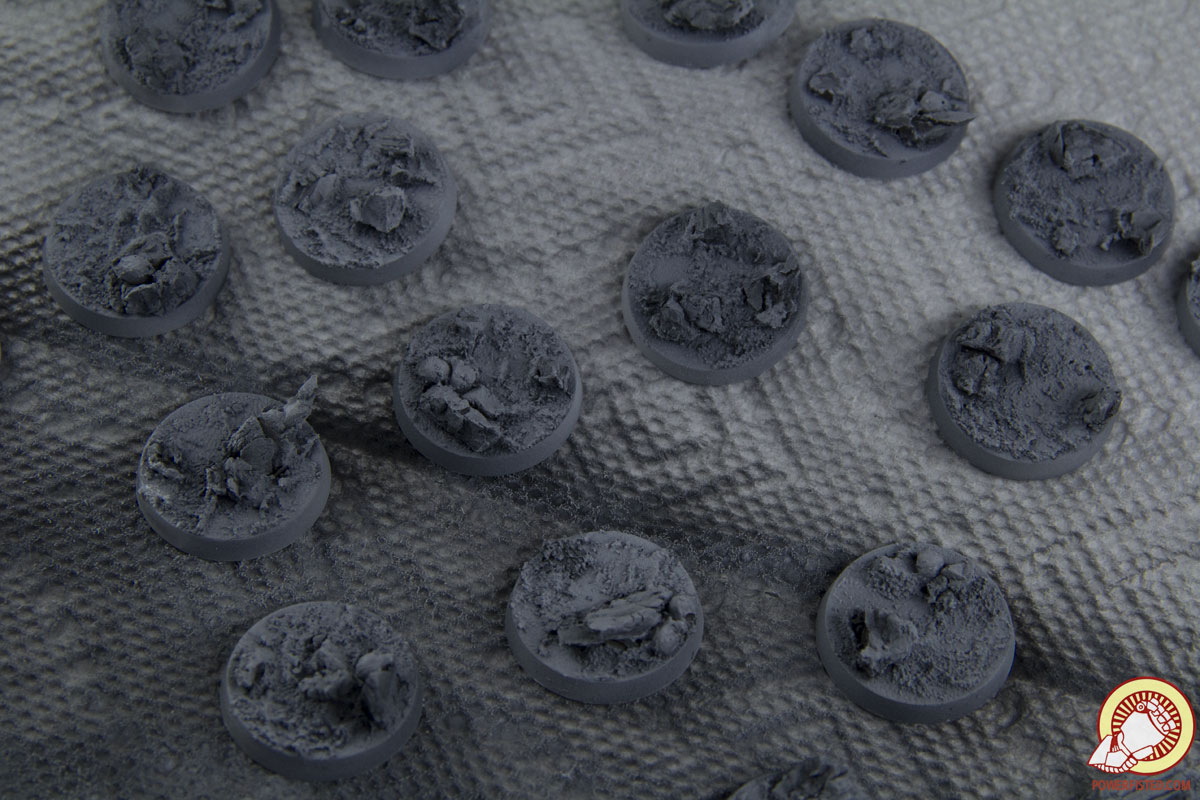 I then give a quick spray of the upper parts with a grey primer. This starts the Zenithal effect. 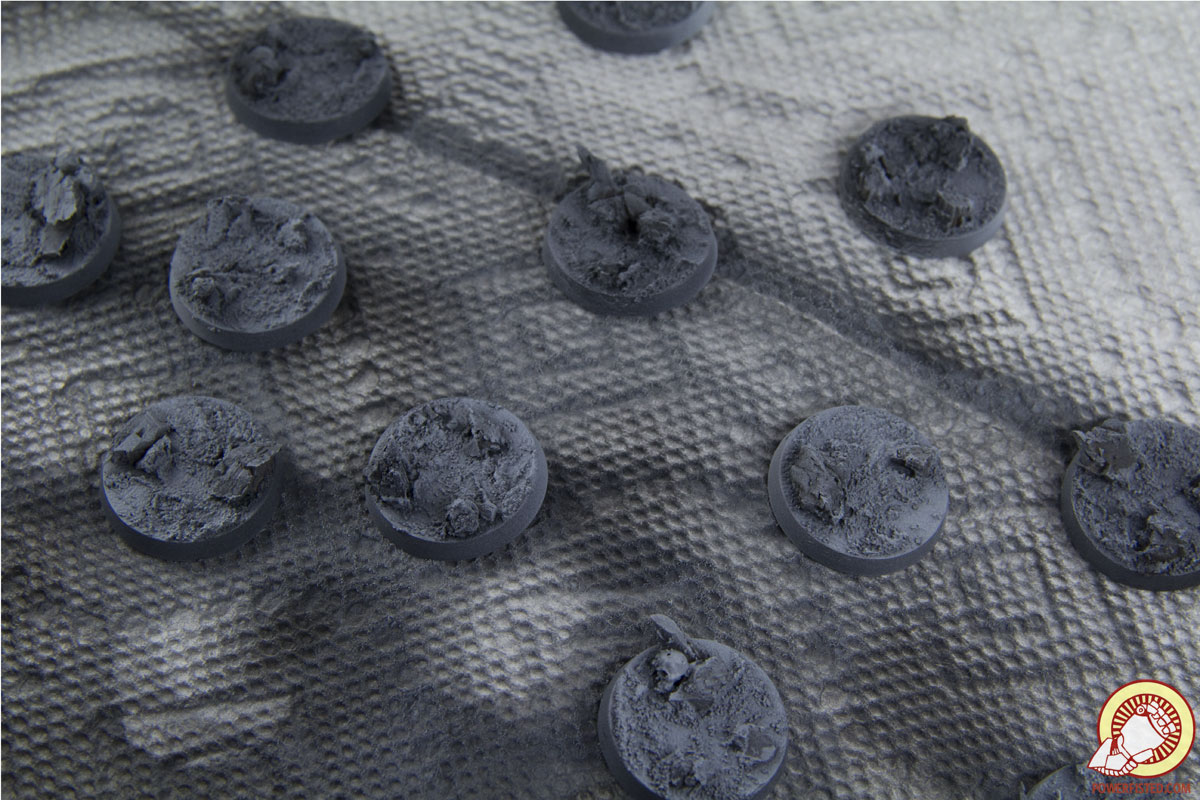 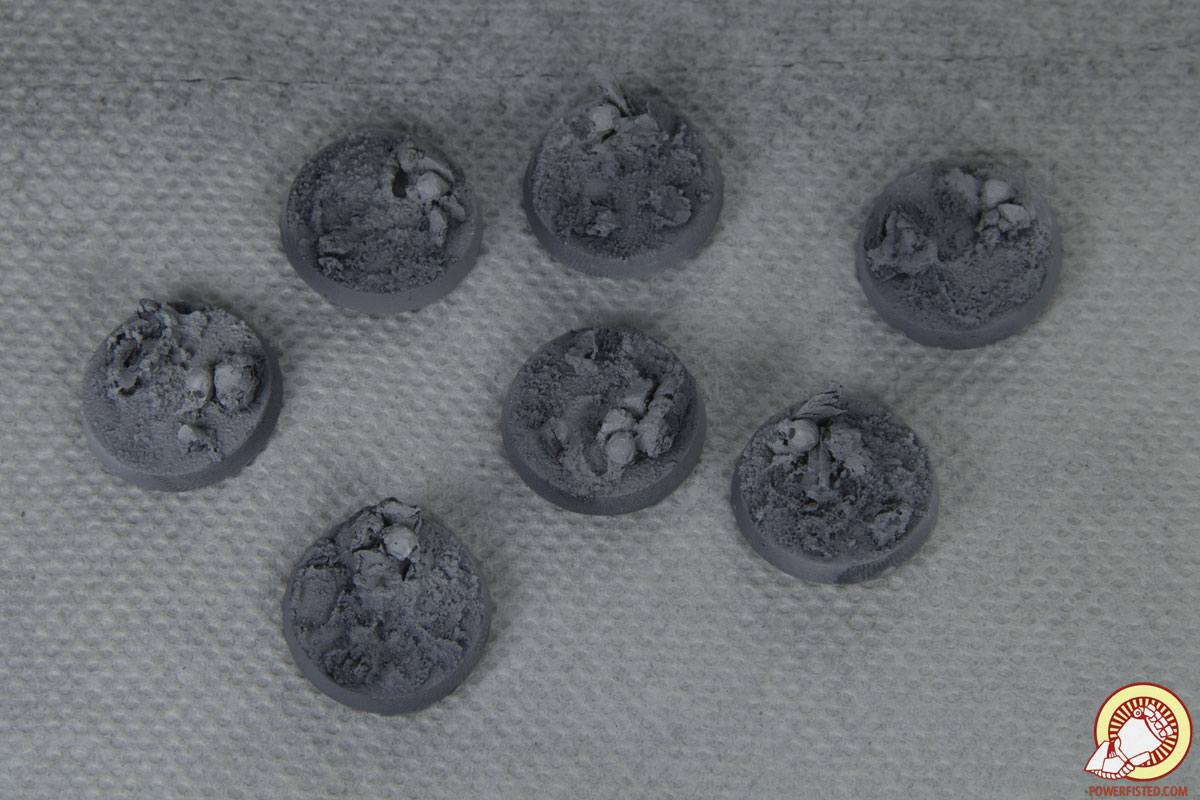 I follow up with a dusting of the white primer on the very top edges of the base- using very little from a very upwards angle. This gives the effect of light coming directly from above the base. I also give any skulls a quick spray which will help them pop as I color in the rest of the base. 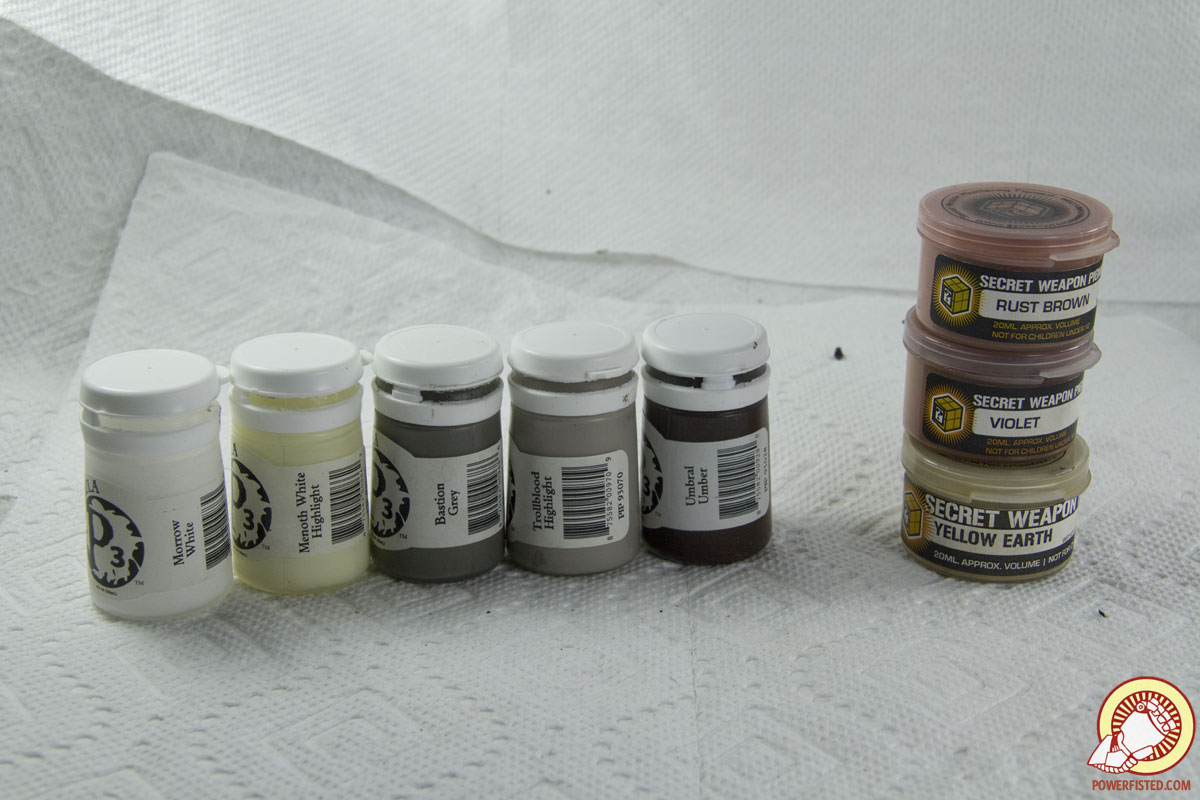 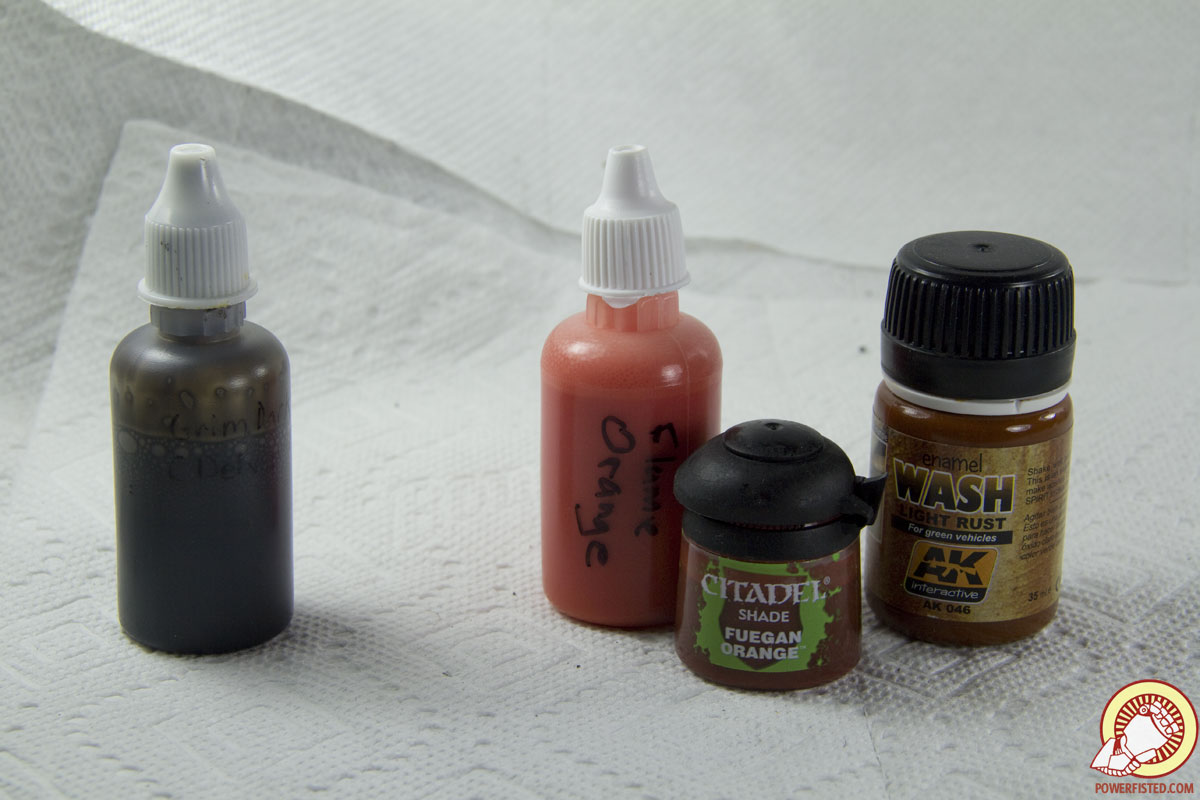 From here the bases are primed and ready for painting. To achieve the colors I want, I�ll use 3 washes to color the ground, 5 paints to highlight the rocks, and 3 pigments to tie everything together. You absolutely don�t need to use this many paints, but more layers of color will give you the richest results. 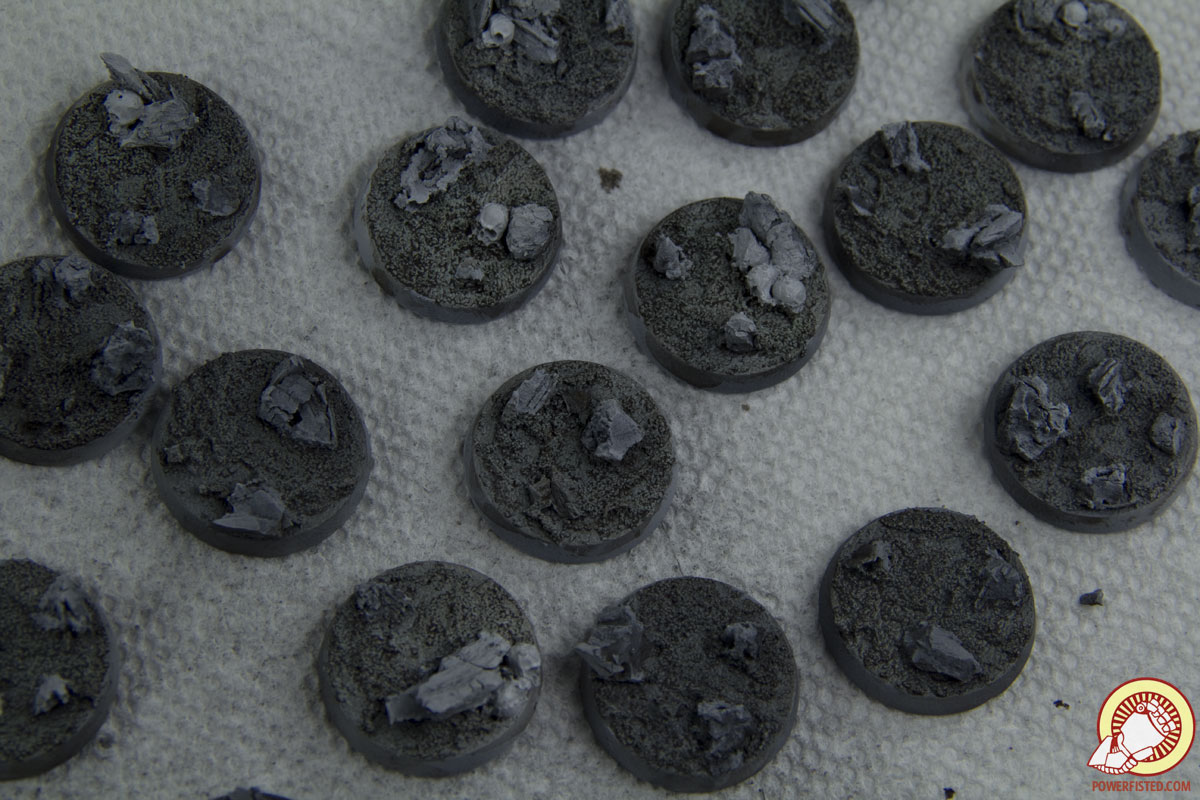 I begin painting by glazing P3 Umberal Umber over the gravel areas. A glaze is just a really thin paint- I dilute the Umber color with water at a ratio of about 3:1 water:paint. If you don�t have Umberal Umber, you can use something like Citadel�s �Devlan Mud� instead. No big deal. 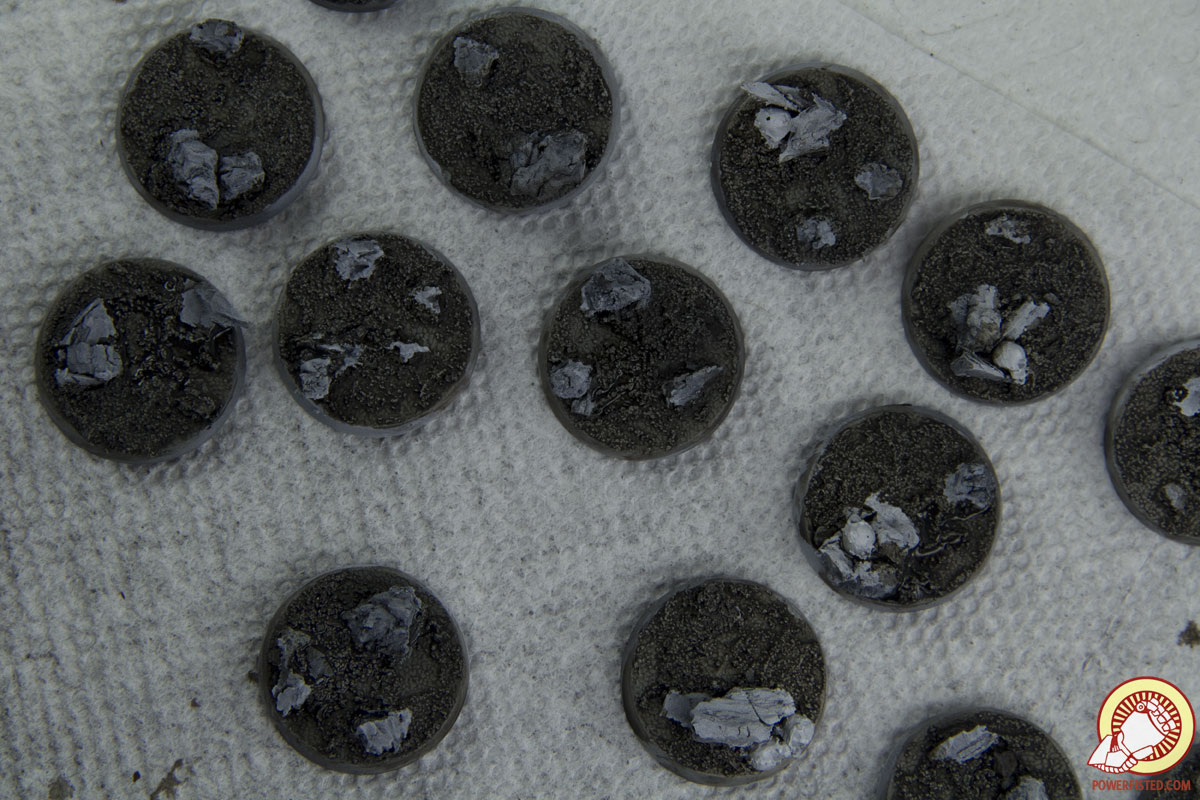 Following the glaze I wash the areas where I expect deeper shadows (like underneath rocks, skulls, etc) using a color I call �Grim Dark�. This is my own wash recipe, but it�s similar to Secret Weapon�s �Armor Wash� or Citadel�s �Nuln Oil�. In a pinch you can just glaze a black color like P3 Thamar Black over these areas or skip the step entirely. 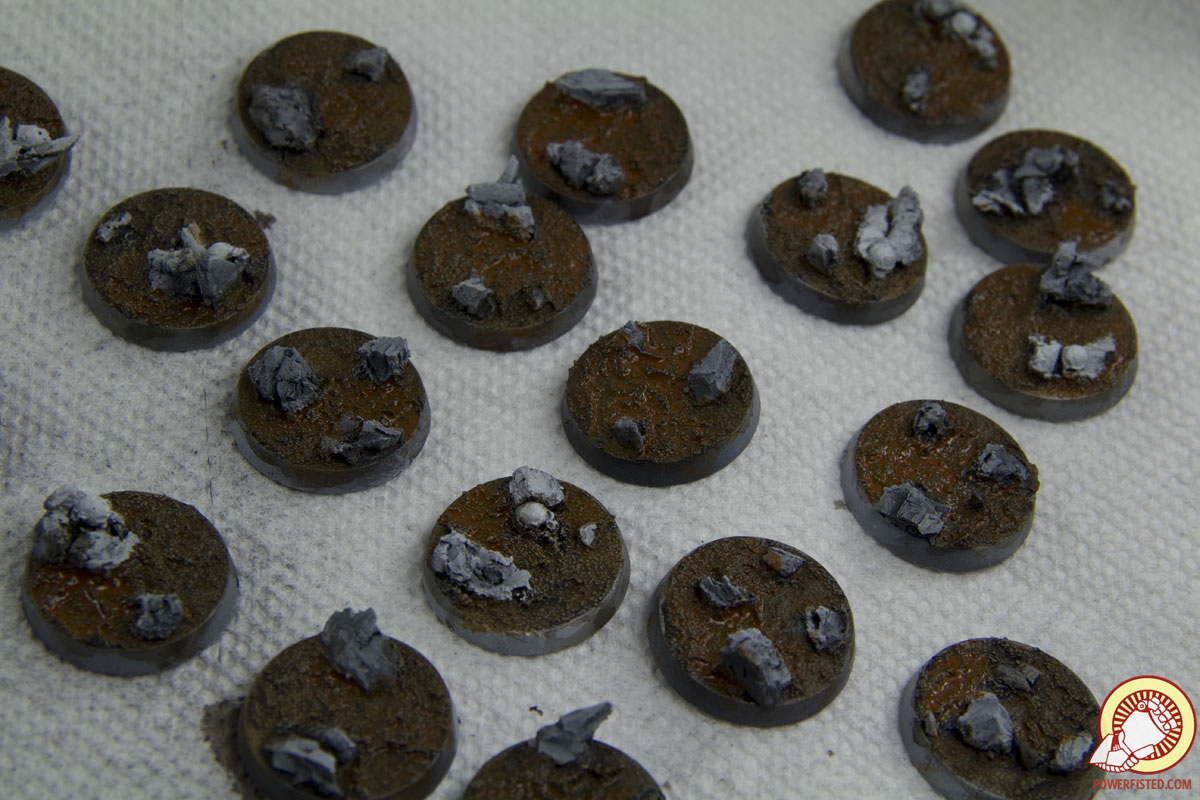 After the wash is dry to the touch, I follow up with a wash of A&K Interactive�s �Light Rust�. This is an enamel based wash which leaves the ground a dry, dusty, deep reddish brown color. It�s hard to get the same results with an acrylic, but you can absolutely substitute one if you need. Drying time for enamels is about an hour to touch, but 24hours for a full cure. I don�t wait that long and work on the other steps while I wait for it to fully dry. 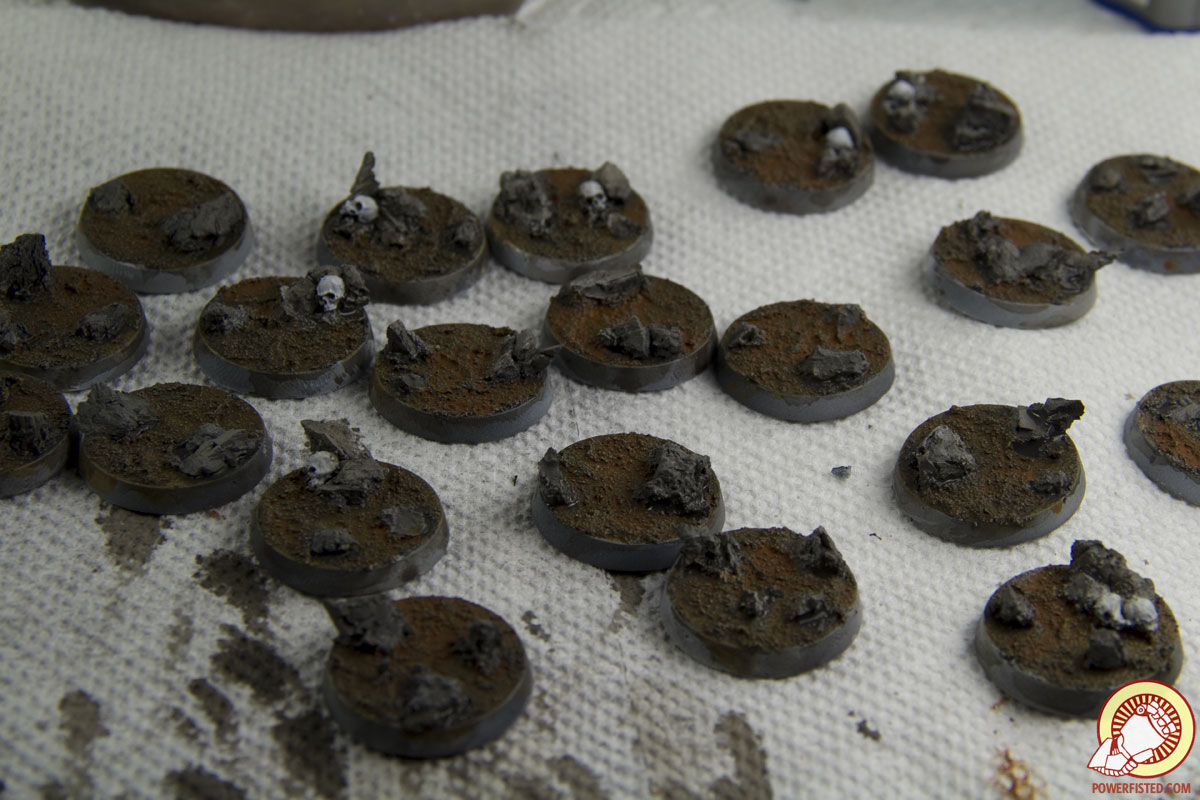 Time to rocks. Using an old brush I dry brush P3 Bastion Grey over each and every rock shape. I make sure the layers are thin enough that the Zenithal effect is still visible. The skulls now look really bright as they are the only things left showing white primer. 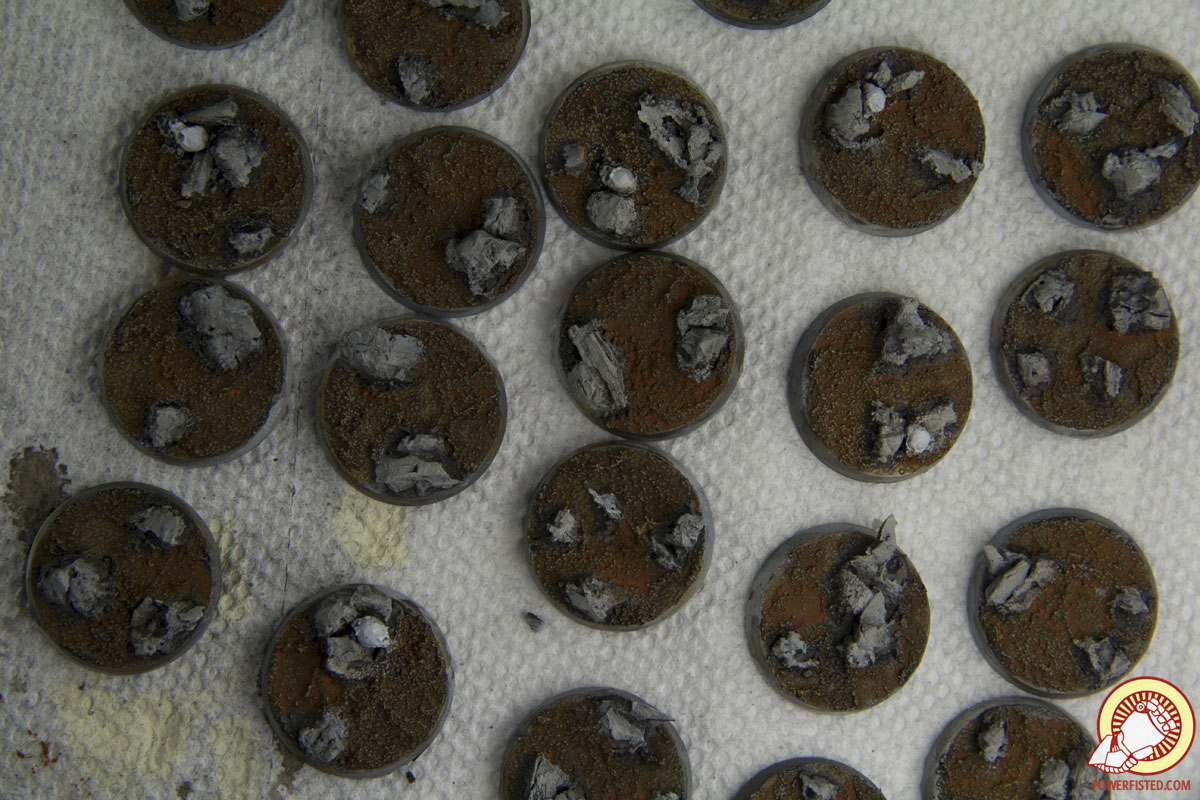 I follow the Bastion Grey with a dry brush of P3 Trollblood Highlight over the same rock shapes. I use less of this color and only on the upper parts. This once again reinforces the Zenithal effect. 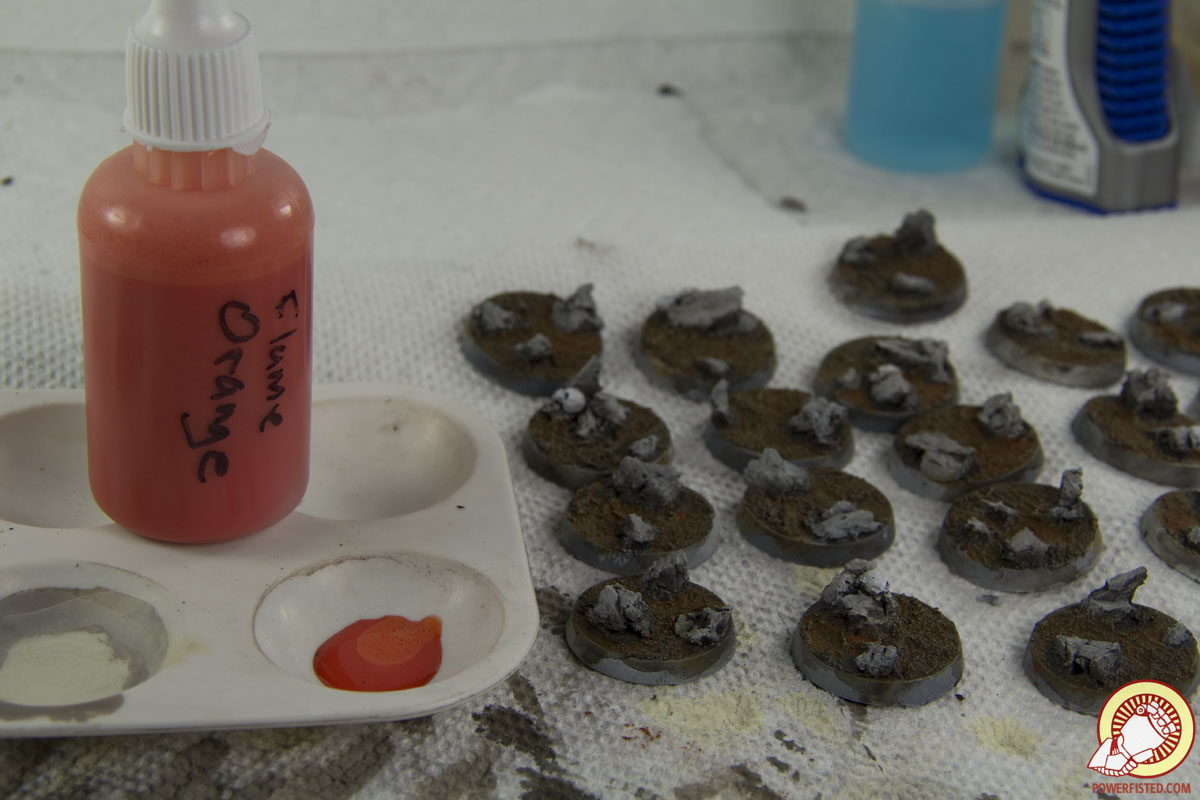 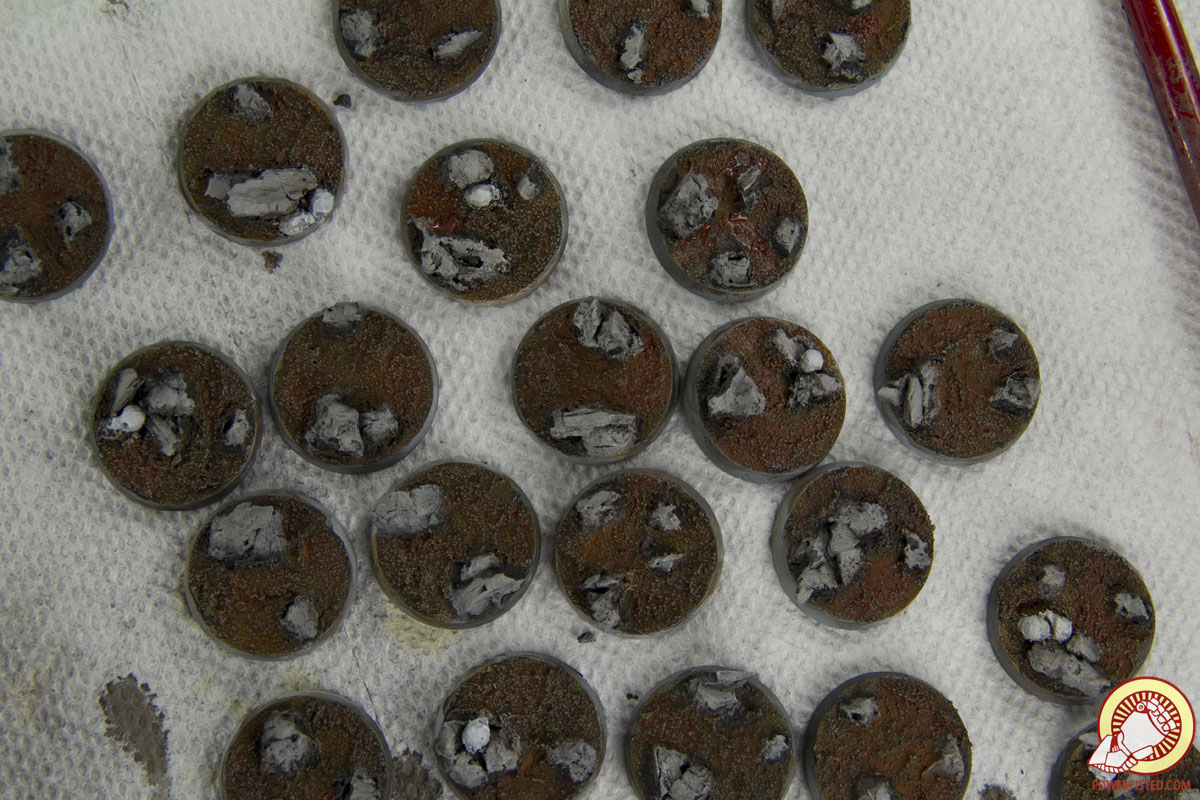 With the oil wash dry to the touch by the time the rocks are drybrushed, I wash the base a final time using a color I call �Flame Orange�. This is, again, my own recipe, but it�s very similar to Citadel�s �Fuegan Orange�. I don�t cover the entire base with this wash- rather I blot it onto parts of the gravel where I want the red color to be more saturated. Again, this is an easy step to omit as the effect is subtle. 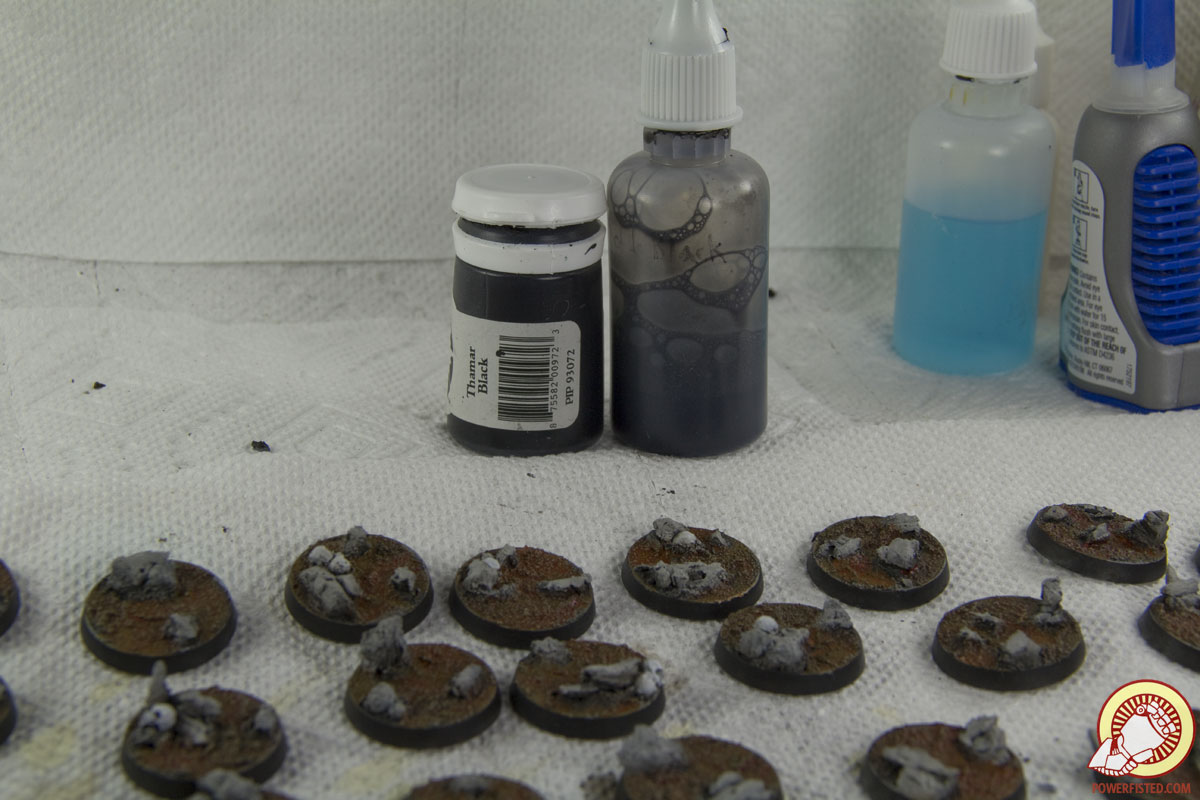 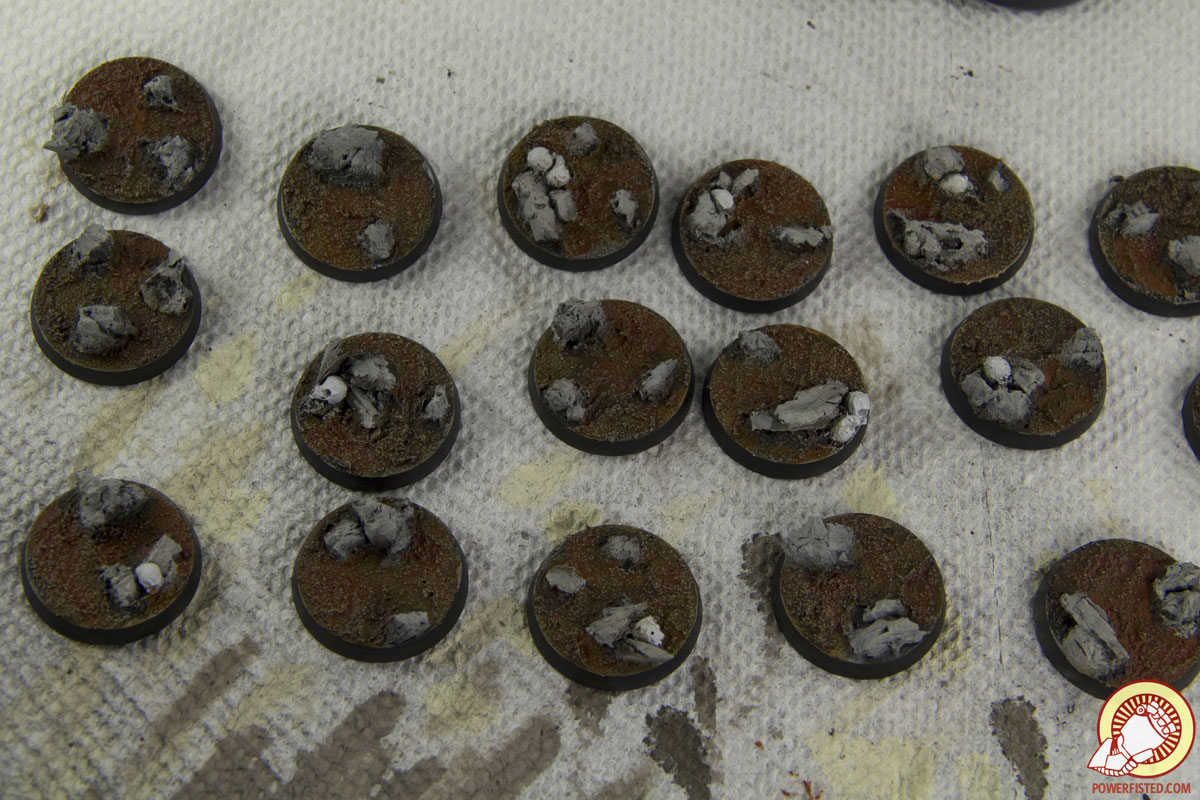 Now that I�m done with the washes, I use P3 Thamar Black and a Black Wash to paint the rims of the bases black. It usually takes a few thin layers to get a nice even coat. You can use another color for your rims, but black is the best color given my color scheme.   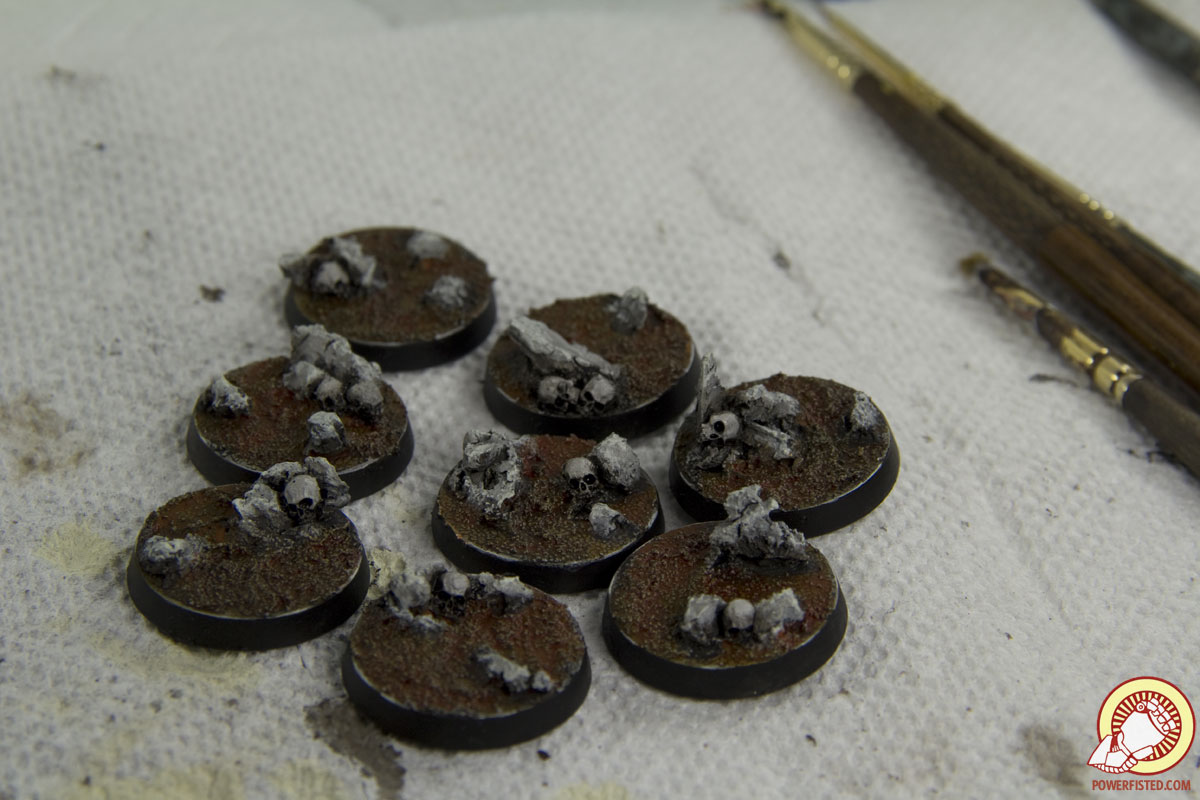 Time for highlights. Using fine detail brushes and a small drybrush I highlight the lips of the base, rocks, and skulls using P3 Trollblood highlight and then P3 Menoth White Highlight. You don�t need to hit every single raised edge, but just enough to catch the eye and draw attention to the base. The star of the show is the model, after all, so the base should be interesting but not detract from what you�ll put ontop of it. Once done I consider my bases �painted�- they have an interesting high contrast desiderated look and could work like this without anything else. As for me, I like to go hog wild, so I�ll add some flock and pigments. 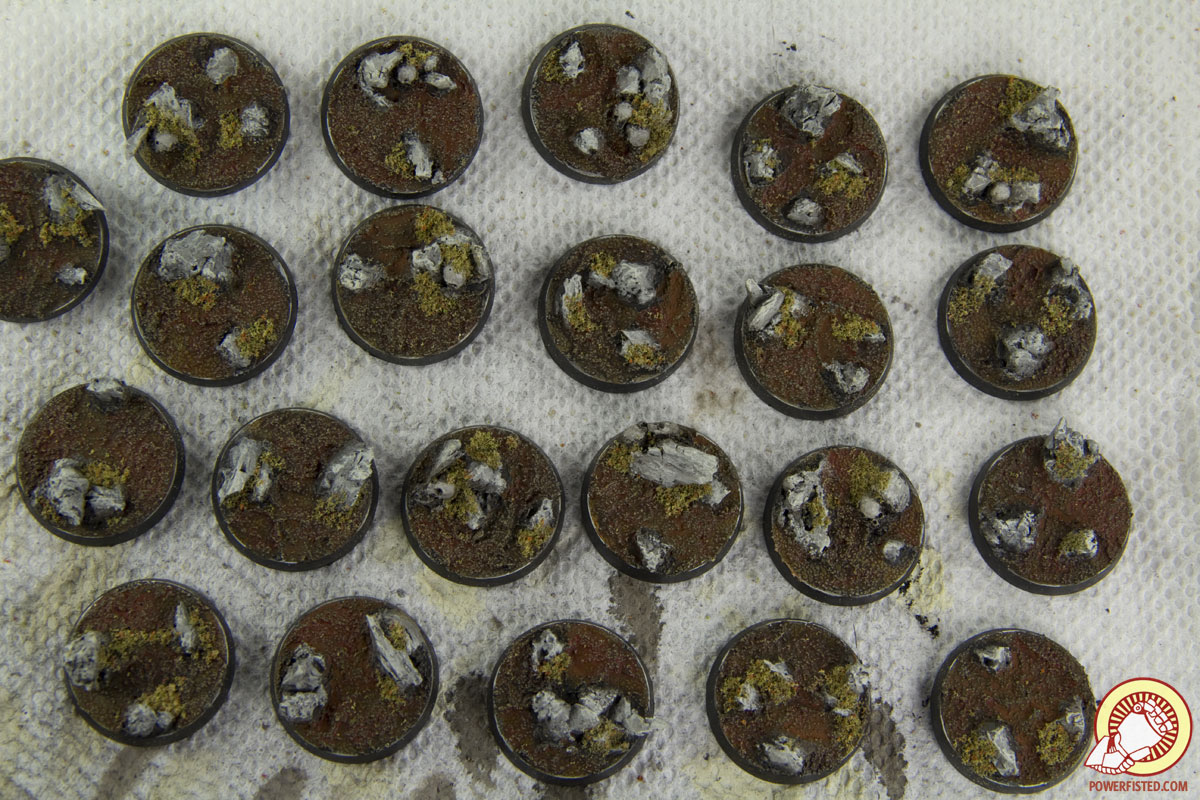 I flock first, before I use pigments. First up is a small mossy looking flock. I use an old brush and PVA glue (watered down 1:1 with water) to stick the flock into cracks in the rocks and places where I think there would be enough moisture for plants to grow. The effect gives the bases some color and an even more believable organic look. 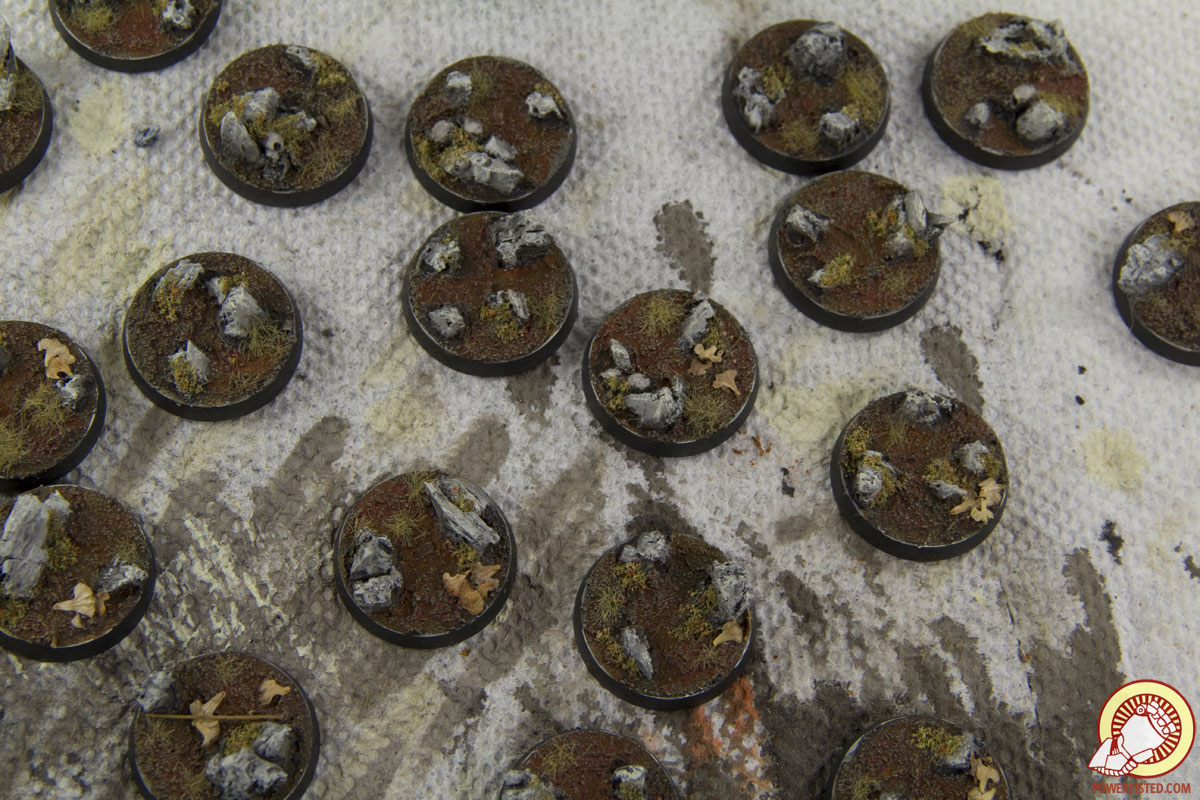 After the �moss� I add leaves and a few tufts of greenish yellow grass. The leaves are tiny pieces from the cone-like seedlings some birch trees have. You can go outside and grab some yourself, but if you don�t have any nearby, companies like Secret Weapon Scenics sell them online. The grass itself is from the same company, but the brand really doesn�t matter provided it compliments your colors. 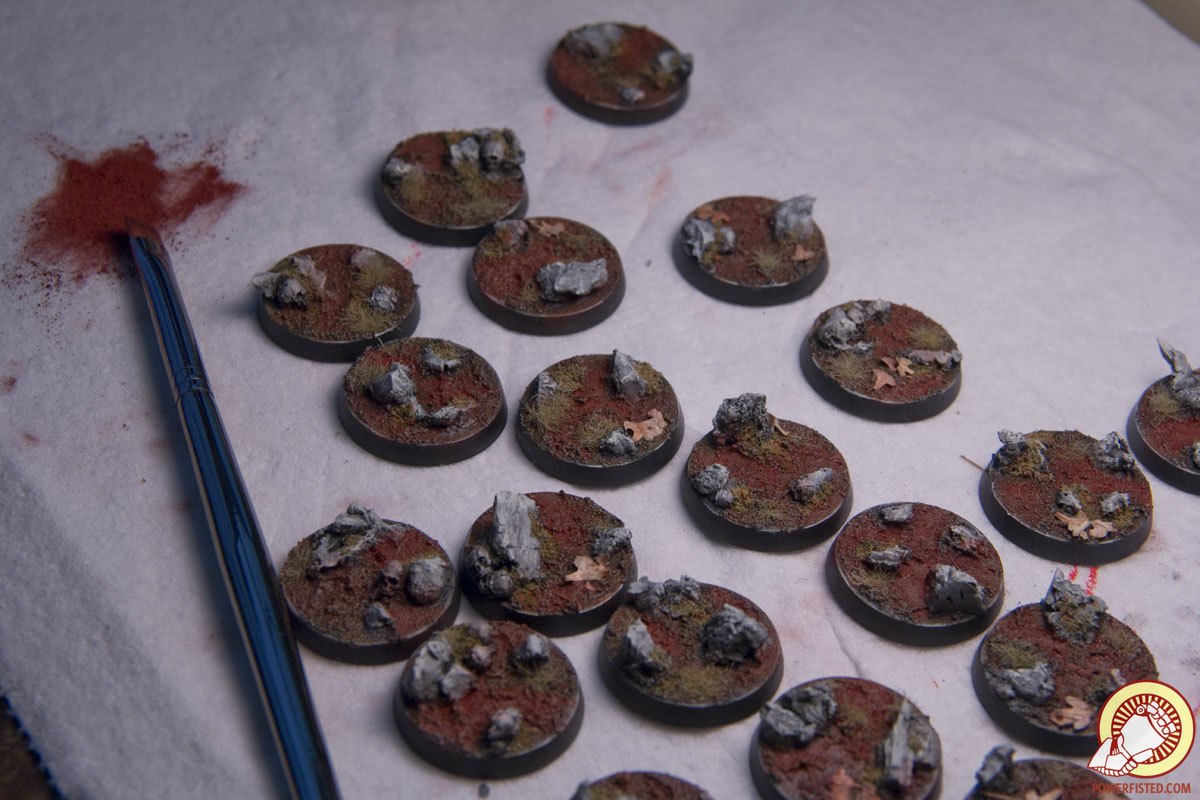 Now that everything is flocked, it�s time for the pigments. First I use Rust Brown, applied with a dry brush, over the tops of any exposed ground. The color warms up the ground even more. Never apply directly from the pot- put some on a paper towl, rub it into your brush, and then transfer it over to your base. 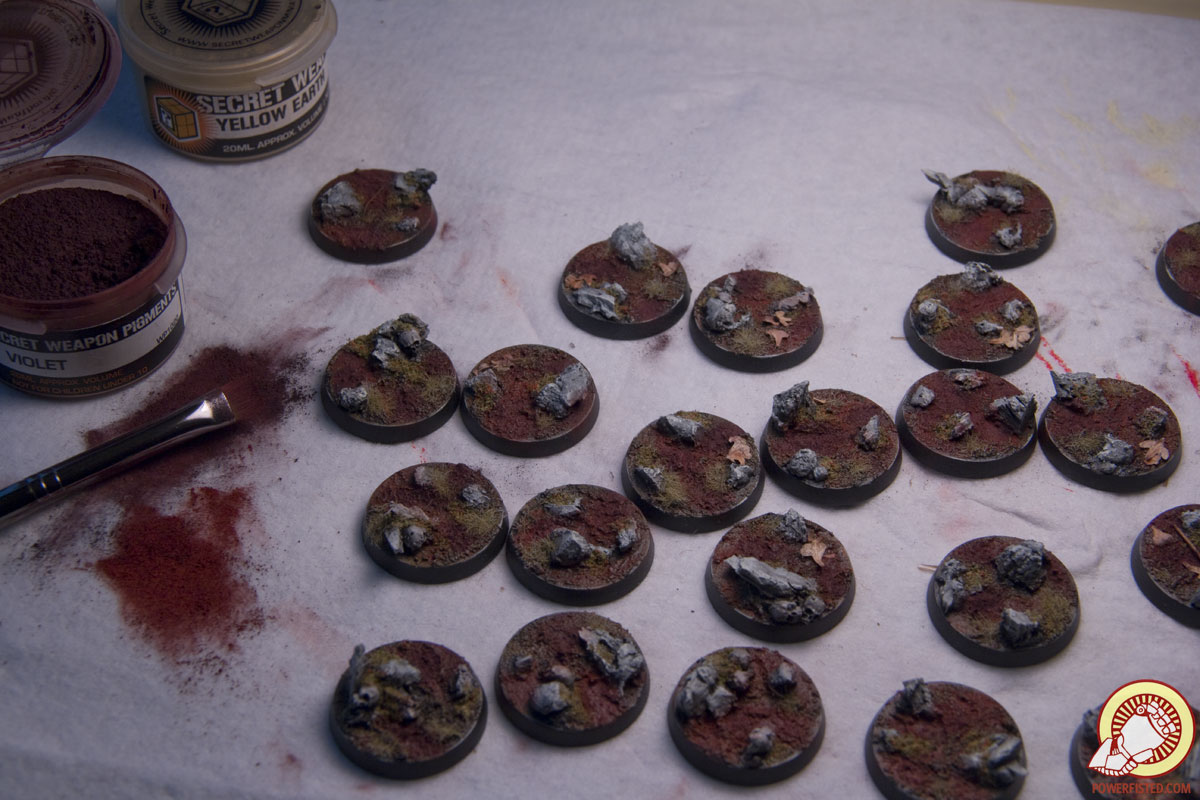 Violet goes next, making sure some Rust Brown still visible. The two pigments blend well together to create a nice rich color. 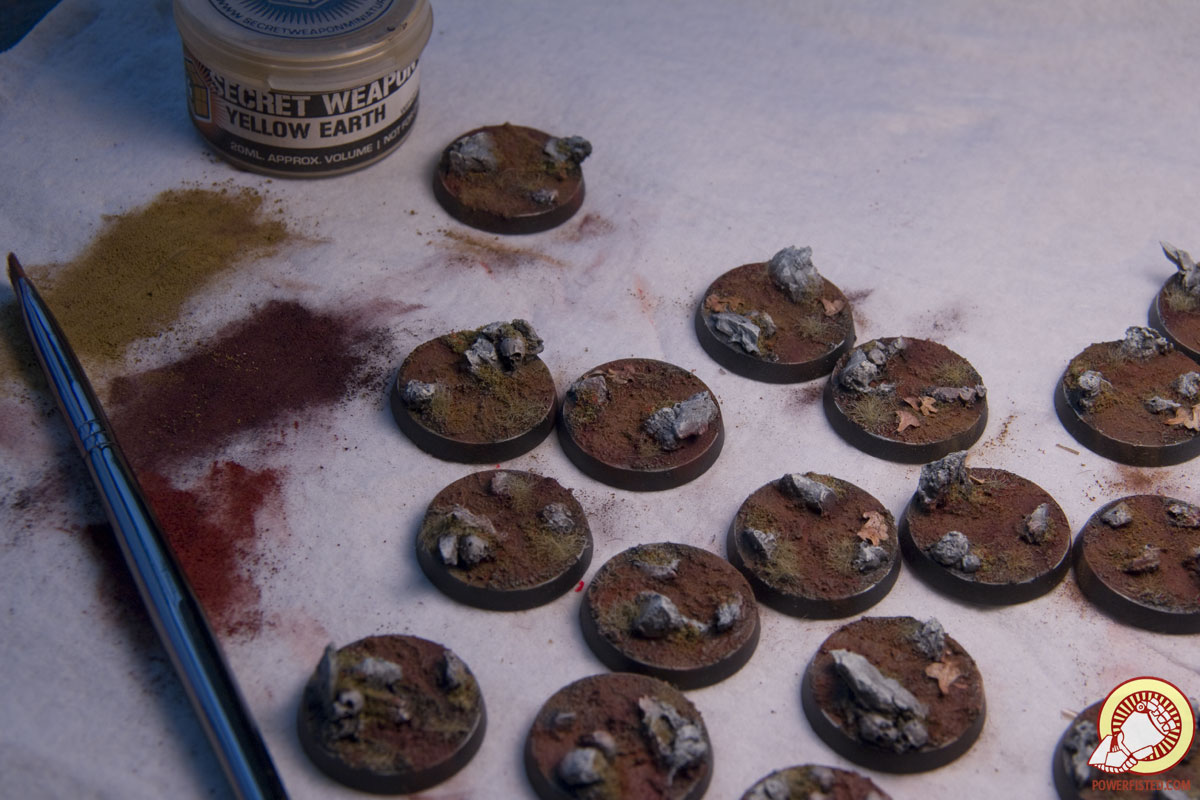 Finally, I apply Yellow Earth into a few spots. Again, I leave areas with Rust Brown and Violet visible where possible. The colors will go on dusty and bright, but once sealed loose much of their variance. 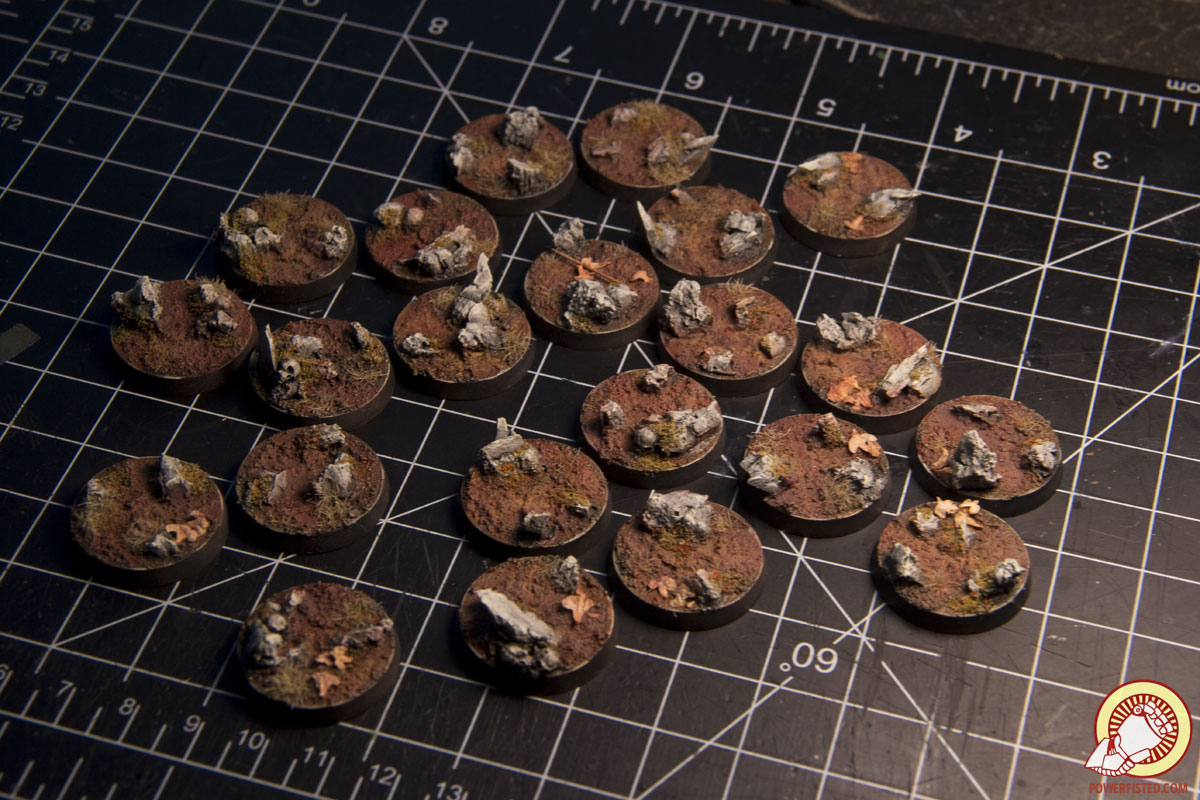 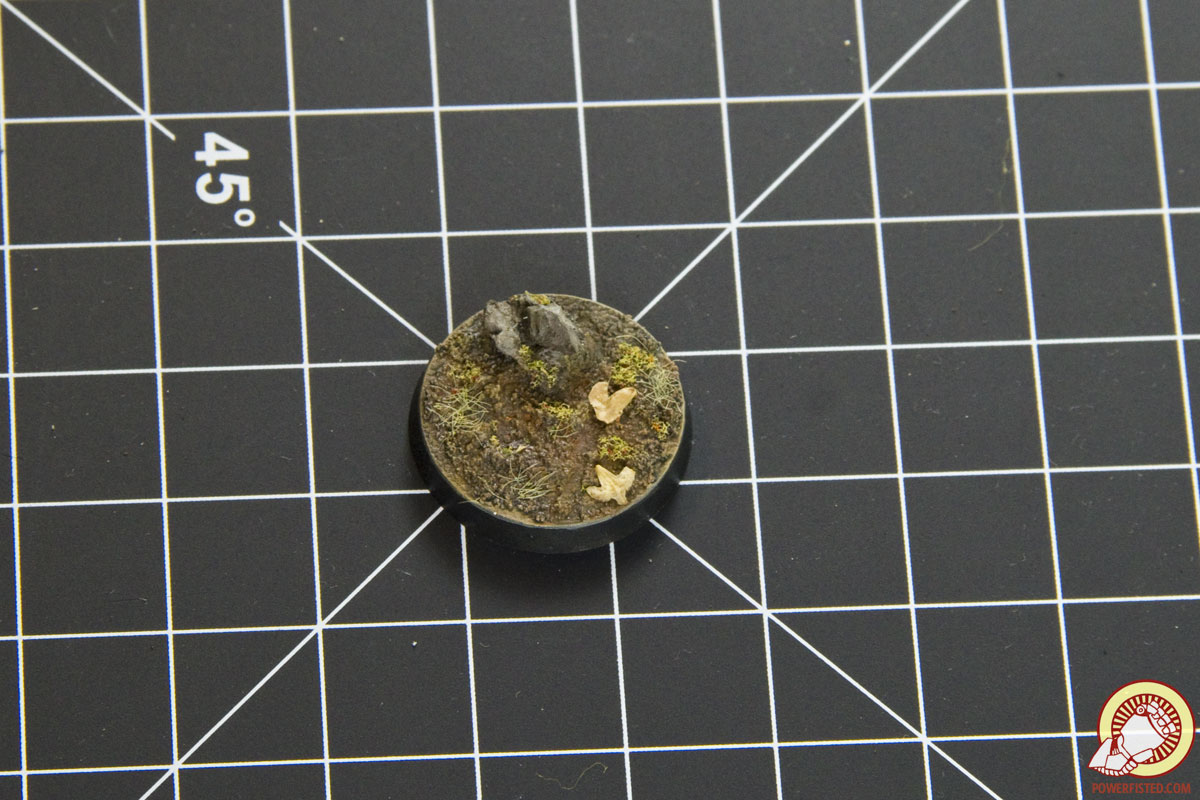 Almost done! From here all that�s left is to glue on your model, varnish, and hit both the base and model one last time with your pigments. You can either drill a pin into the legs of your model or just super glue it right ontop of these bases. As for varnish, I swear by using Testor�s Dullcote through an airbrush, thinned with mineral spirit 2:1 (varnish:spirit). As the varnish dries I go over the surfaces of the based model with the three pigments from above: Rust Brown, Violet, and then Yellow Earth. I focus only on areas where I expect dust would naturally collect. Why do I do this? Seems like overkill, right? Well, the purpose has a very clear effect- by dusting the colors of your base onto your model you are effectively bringing it into the same world as your base, thematically speaking. This last step ties your model to your base. If you look closely you can see how the effect is all over my models: 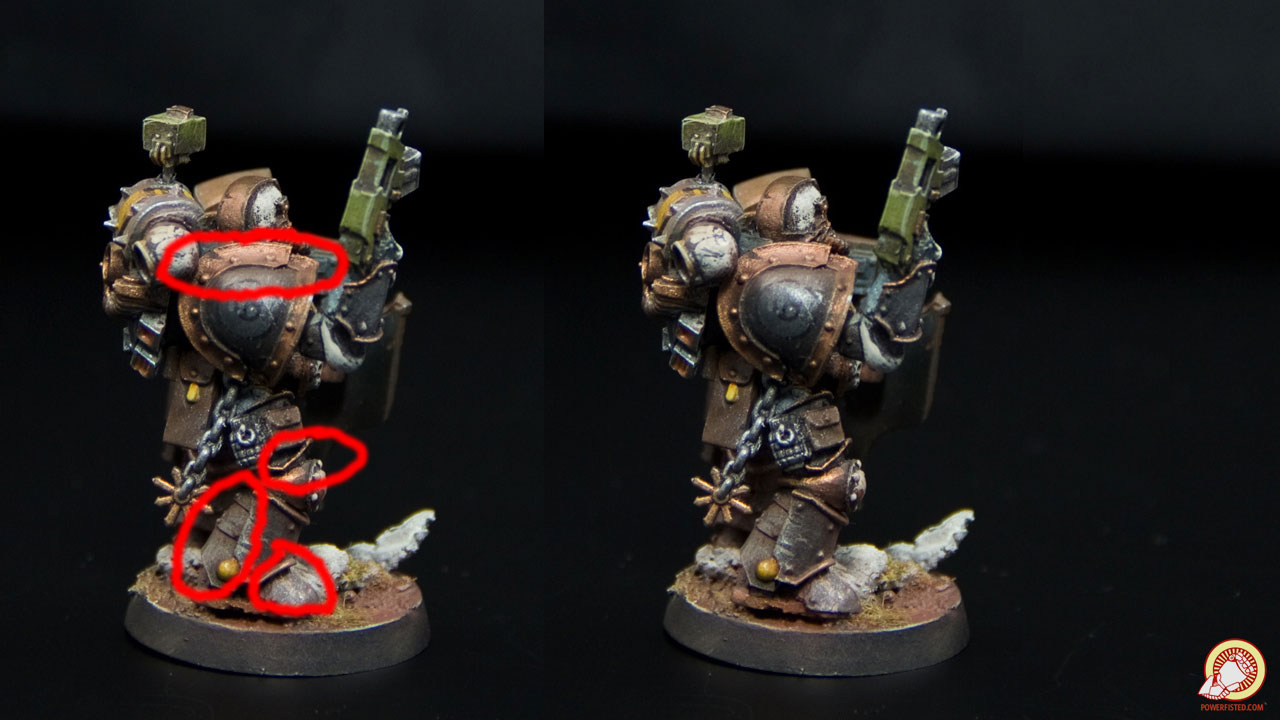 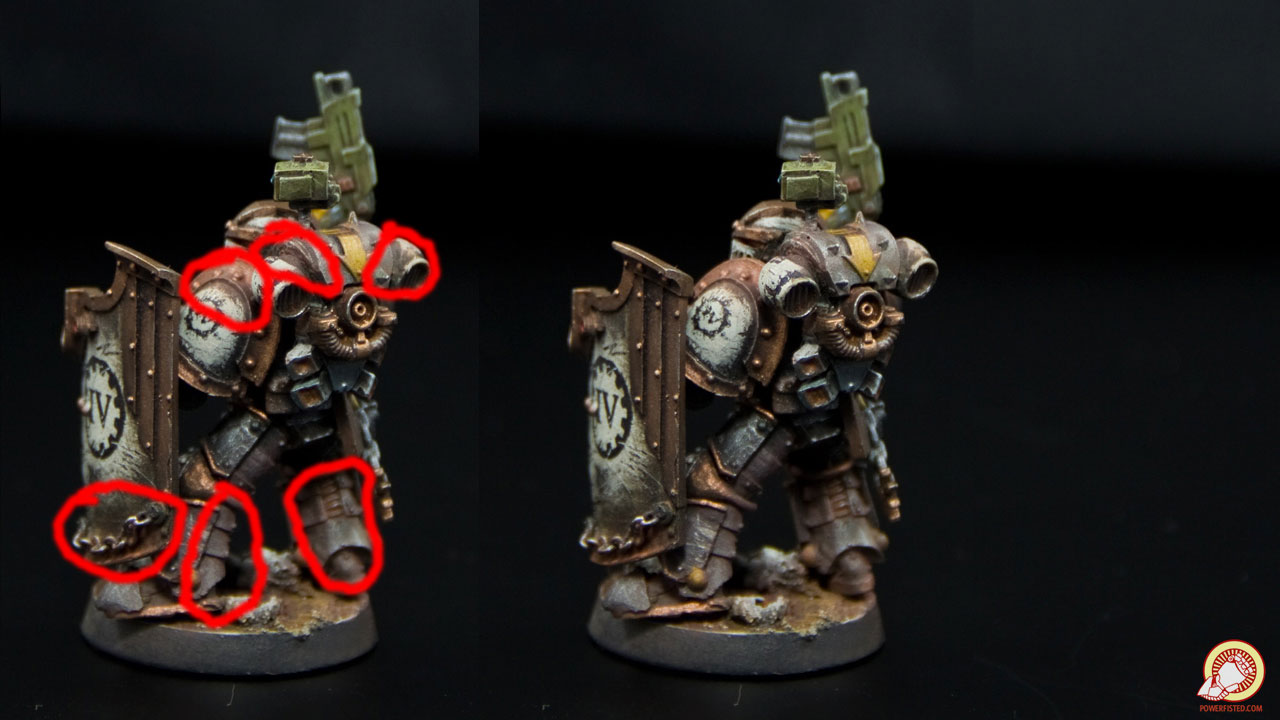 
|
|
#
?
Aug 26, 2015 01:26
|
|