

|
As I understand it, basically all CPUs are RISC "under the hood" these days due to the performance benefits it conveys. Intel CISC chips actually do a runtime conversion of each CISC operation into a set of RISC operations -- like having a runtime interpreter for your code, implemented at the chip level! For example, the CISC command "load parameters from these addresses X and Y into registers A and B, calculate their sum, and store that at address Z" could be translated into a sequence of four RISC commands:
|
 #
?
Aug 1, 2016 20:16
#
?
Aug 1, 2016 20:16
|
|


|

|
| # ? Apr 25, 2024 22:16 |
|
|
TooMuchAbstraction posted:As I understand it, basically all CPUs are RISC "under the hood" these days due to the performance benefits it conveys. Intel CISC chips actually do a runtime conversion of each CISC operation into a set of RISC operations -- like having a runtime interpreter for your code, implemented at the chip level! For example, the CISC command "load parameters from these addresses X and Y into registers A and B, calculate their sum, and store that at address Z" could be translated into a sequence of four RISC commands: Sort of. That's an adaptation to a much later model of computing described as superscalar. I'm not sure how to describe that without getting both very technical and very off topic. In the very short version, modern CISC machines break the instructions down and then do multiples of them at the same time on the different components of the microprocessor.
|
|
#
?
Aug 2, 2016 03:04
|
|
|
From the reading I was doing on the chips to make that timeline, it also seems that doing it without that split was common at the time too ("microcode"), but that one of the reasons the 6502 was so efficient was that it didn't use that technique. The 68k did. The 6502 was also said to be "pipelined" but I can't map what they must have meant by that to any notion I learned in my Computer Organization and Design class. The 6502 instruction set is actually pretty RISCy on its own. The x86, meanwhile, has instructions like rep movsw which:
The next "real" update should be relatively soon. I got about 20 minutes of captures and converting it into a coherent narrative and introduction of mechanics has been slow going.
|
|
#
?
Aug 4, 2016 07:08
|
|

|
ManxomeBromide posted:From the reading I was doing on the chips to make that timeline, it also seems that doing it without that split was common at the time too ("microcode"), but that one of the reasons the 6502 was so efficient was that it didn't use that technique. The 68k did. The 6502 was also said to be "pipelined" but I can't map what they must have meant by that to any notion I learned in my Computer Organization and Design class. The 6502 instruction set is actually pretty RISCy on its own. That's a long winded way of saying what they tell a PhD candidate and what actually gets committed to silicon are naturally going to be hard to rectify. And those same professors definitely think the NES is an example of RISC coding. I think most people ask whether there's the ALU/Immediate+memory instructions in drawing the RISC CISC line. ManxomeBromide posted:The x86, meanwhile, has instructions like rep movsw which: That's what I mean when I talk about what a work of art this programming is on Solaris. The hardware left a huge amount in the hands of the programmer, and the programmer made advances that are unthinkable now. Like, ponder the difference between early and late PS2 games. Big graphics difference, sure. But compared to the difference between Pong and Solaris? It's a testament to the power of human ingenuity. ManxomeBromide posted:The next "real" update should be relatively soon. I got about 20 minutes of captures and converting it into a coherent narrative and introduction of mechanics has been slow going.
|
|
#
?
Aug 4, 2016 19:54
|
|
|
Part 3: Process of Elimination OK, new game. Last time we cleared out this sector and flew south. That didn't end well. Let's just fly straight east this time. Sorry, home sector, you're on your own for a bit. We have to fly through a minefield to go east, but we can manage that without any great difficulty.  We're trapped in a little nook in this new sector, but we can see a new encounter type off on the other side: Meanwhile, there is a Zylon planet here. We've fought off a raid, so let's go return the favor, shall we? We couldn't reach the last one we saw.  These look a lot like repelling raiders from Federation homeworlds...  But there are waving dudes on the ground here. These are hostages, and we're supposed to pick them all up.  Load-bearing hostages. After we rescue them the entire planet explodes. This scores us a healthy chunk of points and also gives us an extra life. That's really all we can do over here, so let's go back to the Blue Sector and try heading West this time. We'll blast our way through some Star Pirates to get there, and then...  ... well. It looks like this map isn't simply a grid, is it. At least we're in a solid position to clear away the fleets threatening the Federation world here. I stop to refuel partway through that, though, and something interesting happens:  After I finish refueling, there are some enemy ships that I engage before returning to the scanner. I haven't seen this happen before, I don't think, and I'm not sure what causes it. No invasion was in progress, and the closest fleet was two sectors away. Once we've finished taking out the trash, we can go check out the Corridor.  These start out like any other planet, but with these tank-like enemies called Guardians. According to the manual, they're actually neutral and will leave you alone unless you fire upon them. Unfortunately for them, they are in our way and worth points. We can then find a docking bay, but going into it doesn't refuel us, and instead...  We enter the Corridor. Corridors are probably the most high-tension parts of the game to play, but the raw mechanics are pretty close to planetary combat, still. You're flying over the surface fighting Guardians but you are doing it much, much faster than usual. There's one other detail, too.  There are force fields that block us, and we're supposed to pick up these keys to get through them. The keys have an annoying tendency to swerve at the last minute, and if you don't swerve in sync with it... 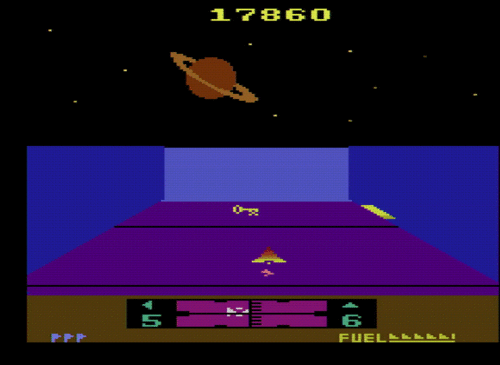 ... it doesn't end well for your ship. This does, however, get you through the force field just fine, and once you've made it through the corridor, the whole planet explodes and you get a big whack of points. Seriously, what is up with this Galaxy. Planets around here blow up at the slightest provocation. At least we've marked down two more planets as Definitely Not The Lost Planet Solaris. To finish systematically checking Blue Sector, we need to go north. We head up, and...   That is a ton of dudes. Worse, we have a new symbol here, and the bad news is, it's not an enemy:  This is a wormhole. Warping here will take us somewhere entirely different in the same Quadrant. This is a wormhole. Warping here will take us somewhere entirely different in the same Quadrant.Wormholes also block your transit, so it's cutting us off from the Federation world and the fleet threatening it. And since wormholes aren't enemies, they can't be destroyed. We're just going to turn this ship right back around. Once we get back, it turns out enemies have started actually gotten close enough to threaten the first Federation world. We clear out the rest of that first sector and head south. There was some stuff we hadn't actually engaged down there in the previous game. Let's go check them out too. 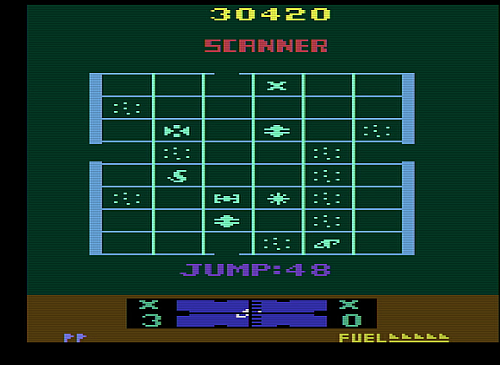 I'm actually surprised this planet is OK; enemies move even when you aren't in the sector, but they don't seem to be consistent. These guys were apparently slacking. We clean out the immediate threats, and then move in to the final enemy type: The Cobra Fleet. These guys are the absolute most dangerous enemies in the game: 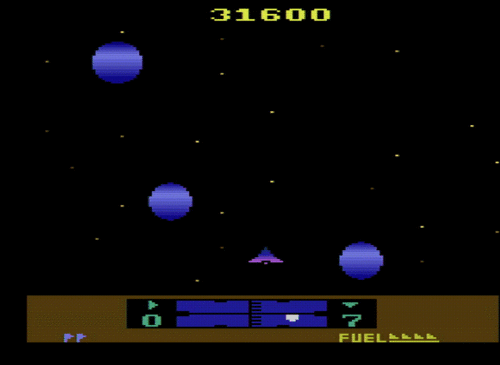 They weave, they shoot a lot, and they aim when they do. I manage to defeat them without dying, but I'm not exactly unscathed: 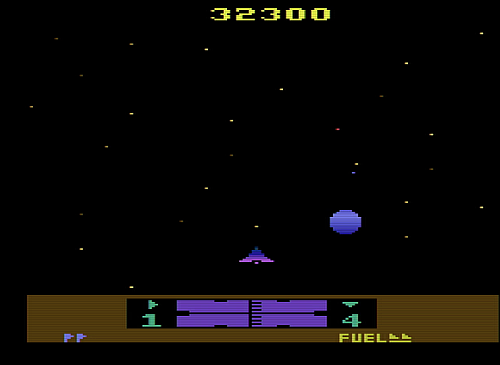 I pick up a quick refuel and repair. 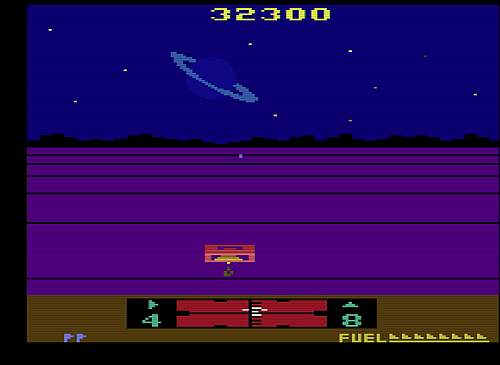 That's a Raider on the horizon there�once again, we see a post-repair half-raid. I even miss one this time but nothing bad seems to happen. The rest of the sector's threats fall without incident. Well, I get my ship destroyed once, but we got an extra one from blowing up that Zylon planet, so that doesn't really count. Let's go west from here! Let's start filling out that map.   It would appear that going South and West takes us to the same quadrant as going North. On the other hand, that also puts us in a part of the map that isn't accessible from the just-go-north route. I'm beginning to understand how it is Solaris became Lost in the first place. Also, that enemy fleet is a whole lot closer to the Federation world than the last time we were in this sector. Let's get over there. First, we'll have to clear out this minefield that's in the way. 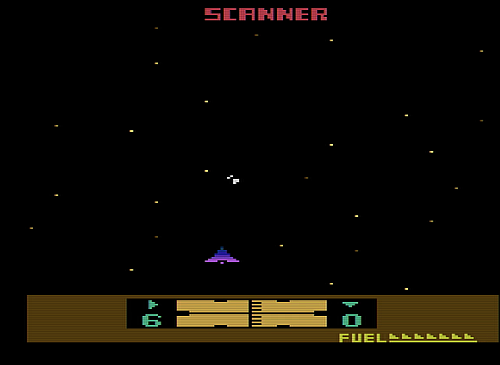 Unfortunately for us, the attack begins while we're navigating it. We have made a crucial error here, too. Once we clear out that minefield... 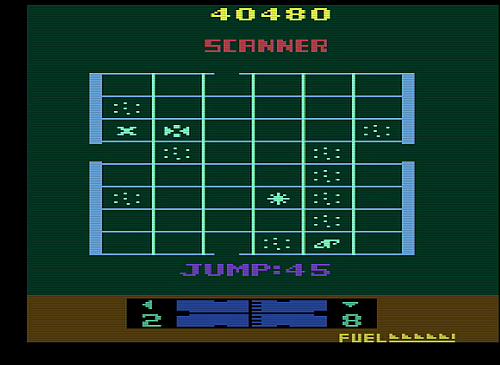 ... it takes us back to our previous quadrant, because that was an exit sector. We warp back, but it's too late. The Federation system has been destroyed, and not only can we no longer refuel or repair here, it has become a Red Zone: 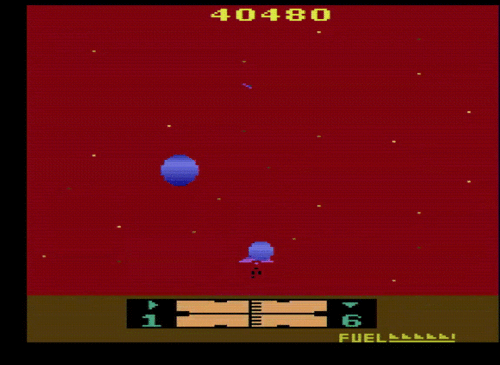 In addition to looking hideous, there are also constant flashes of lightning and your controls are reversed. You really don't want Red Zones. We could try to murder that task force in retaliation, but I'm not feeling incredibly confident in that so let's see where the wormhole goes. 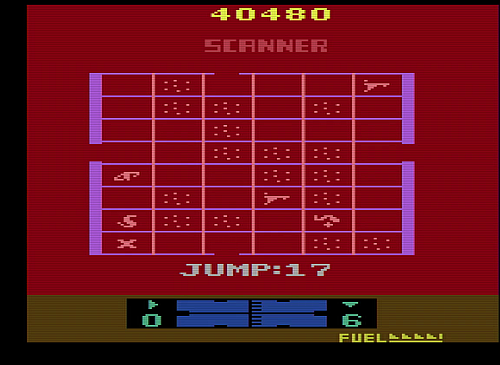 Off into the corner on the other side. Okay then. Let's clean up this sector. 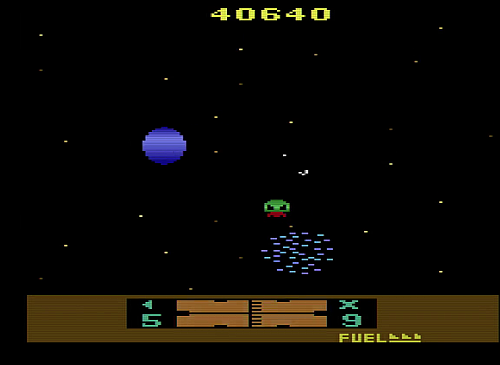 That ends about as well as you'd expect. Still, that's a decent score and if I were doing score attacks this would have counted as a pretty solid run. VIDEOS: Here is the full playthrough, but it's over ten minutes long. That gets tedious pretty fast, so I've also created a highlight reel which shows just the new mission types and the Red Zones. Also, at this point we've really seen all the gameplay that this game has to offer. If you're just interested in racking up points, or killing a little time and a lot of aliens, these first three posts have shown you everything you need to know. But, our secret orders to the contrary, we aren't in this just to kill a lot of aliens. NEXT TIME: We begin our search for Solaris in earnest. ManxomeBromide fucked around with this message at 06:38 on Aug 27, 2016 |
|
#
?
Aug 5, 2016 05:59
|
|
|
I've started collecting the links and discussions surrounding the 2600 and its old works in the second post of this thread. We should have a very nice little "for further reading" section at the end of this.
|
|
#
?
Aug 5, 2016 06:15
|
|
|
ManxomeBromide posted:
I have seen that before, but I thought it only happened if there was an enemy about to attack the planet. 
|
|
#
?
Aug 5, 2016 08:22
|
|


|
Tech Post 3: The Quadrant Scanner Let's turn our eyes back to the map screen. 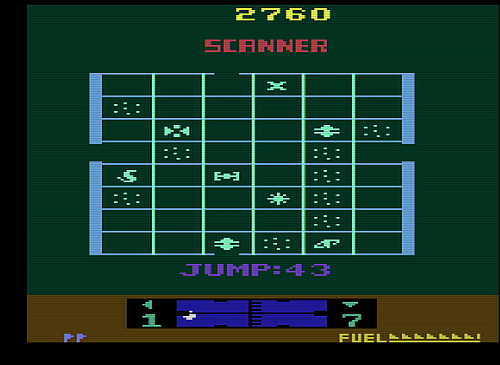 Last time, we discussed how to get a 48-pixel-wide sprite out of an Atari display. That technique is used to display the score, but also to display the SCANNER graphic, and the time-to-jump timer under the map itself. These also all line up. It turns out that Solaris is using a single subroutine for "display me some centered 48-pixelness, please" and just calls out to it with different graphics pointers as needed. Today, we will discuss how the rest of the map is drawn. This map is a 6x8 grid of symbols, with a graph-paper sort of effect over them. Also, some of the edges are special and have gaps in them. The Symbols In principle, we've solved this already: this is just like the 48-pixel sprite trick, but you don't have to actually do any trickery with it. That is, instead of interleaving the sprites 010101... You can just set them up to be 0 0 0 1 1 1. The empty spaces give you time to actually load the next values. Then you just alter the graphics as needed. That does require a bit of care, but this mostly means keeping your timing precise. Examining the drawing code shows that there are occasional instructions that do nothing, or that are slower than they "need" to be (that is, there are other instructions you could write that do the same thing faster). Those are to make sure that graphics aren't overwritten too soon. One of the Atari developers at the time described the process of working out how to fit in the work of the display between the timing of the graphics updates as being like solving an acrostic. I've dabbled in 2600 coding, and I think that's a pretty fair comparison. The Grid The grid is, if anything, even simpler. Except for the north and south exits, everything about the playfield grid is symmetrical. The horizontal lines and the thick lines on the left and right edges are a straightforward symmetric playfield with no hacking done at all. The north and south exits are a fairly trivial hack where you rewrite the middlemost part of the mirrored playfield at a specific cycle count after horizontal sync, getting you two playfield pixels worth of asymmetry. The thin vertical lines, on the other hand, are not the playfield. They are the missiles. It turns out that missiles are replicated alongside player replication; this means, all else being equal, when replicated players fire their missiles, they fire in synchrony with each other in both time and space. It's primitive but cheap and effective. Here, we're already replicating images for each unit, so placing the missile graphic between each copy means that you get equally evenly spaced lines. "Closely spaced" is 16 pixels apart in each case, so if you magnify the screen and count, you can see that there are 4 pixels of empty space on either side of a map icon. The Tile Engine So far, everything's been very clean and simple. The tricky remaining question is this: how do we figure out which graphics to draw? This world is built out of 8x8 tiles, but we need to manage six of those, a line at a time, and keep the grid coherent too. 76 cycles per scanline is less tight timing than we saw doing the sprite trick, but it's not exactly luxurious. There's also the issue of the map changing in realtime and thus needing to be kept in RAM. At 128 bytes of RAM we can't be profligate there, either. However, looking at the code run, it appears that there isn't anything unusually tricky going here. One simply has to be careful, not clever. There are 12 different kinds of things that can be in a sector, and we've now seen all of them: Nothing, you, a Federation planet, a Corridor, a Zylon planet, a Blockader, a generic attack group, Kogalon Star Pirates, a Flagship task force, a Cobra Fleet, a wormhole, or a starfield. Round that up to 16 and you have four bits per sector and 48 sectors per quadrant. 24 bytes can be loaded into RAM to represent the current state of the quadrant, and we can update that as we need to, which is only going to be every few dozen frames. Map update logic is banished to the vertical blanking period, completely out of scope of our investigations. At some point before the drawing of a new row of symbols, the three bytes corresponding to that row are consulted and turned into a series of addresses mathematically, stored in memory locations $92-$9D. The 16 possible values each correspond to 8 bytes in the $F100-$F17F range, so we have a one-stop shop for map graphics. That takes a pretty significant amount of time, but it has over one full scanline to do that work between rows (the divider line basically draws itself once you write the playfield graphic into place). The first row isn't as lucky but it doesn't have to be; we've got like eight blank lines of prep time between the end of SCANNER and the start of the map grid. A Brief Digression: Addressing Modes, aka, "How does data get from places to other places?" We haven't actually talked about how data moves around in the 6502. CPUs do all their work in special chunks of logic called registers. These can be read and updated at, for all practical purposes, the speed of light. Values stored within them can influence what address is read or written in memory, and they are usually what hold the data read from or written to memory. Registers also usually are the only things that can truly have math operations done to them. RISC chips like ARM or MIPS have several dozen registers and the vast bulk of them can use almost any register for any purpose. It is only systemic convention that makes certain registers mean certain things. The 6502 has a similar focus on register operations, but it only has one register that can actually participate in mathematical operations. That one register is the one that basically does all the work. Such a register is traditionally called an accumulator, and the 6502 is thus an accumulator-based architecture. (For comparison, the x86 series started out as an "extended accumulator" architecture; it had quite a few registers and most could do math, but many registers were nevertheless uniquely privileged to be part of other instructions. With the advent of the 386, these restrictions and privileges evaporated and the architecture became another general-purpose register system.) In addition to the accumulator (or the A register), the 6502 has the X and Y index registers. These can read and write memory, but you can't do real math on them and you normally use them to help work out where in memory you plan on reading or writing. There are a bunch of ways the registers interact with instructions to get an address. Here's the important ones from a 2600 standpoint:
There turns out to be enough time in each scanline to use the indexed-indirect mode to load all the graphics, which means that six pointers (2 bytes each, so 12 bytes total) hold the locations of the tables to use for each sector in the row. There isn't enough time to do that and still respect the drawing timing constraints, though. Solaris solves this by loading one of the graphics during HBLANK instead of mid-line and just stuffing it into RAM where it will take nine pixels of time to load instead of fifteen. This takes more time, total, to actually do, but with 228 pixels worth of time per line, it turns out this isn't that cramped. That means the total memory cost for drawing the map is:
 There's the Corridor, the Blockader, and the generic Attack Group, right there. Sharp-eyed readers, however, may notice something odd about these graphics: they are upside-down. This, it turns out, is a speed hack. You see, any time you do anything that alters a value, a bunch of status flags are set. These record information like whether the operation overflowed, or whether the result was negative, or whether it was zero. To compare if two values are equal, for instance, you subtract them and then check to see if the zero flag was set. This is so common that there's actually a set of commands CMP, CPX, and CPY whose job is to do that subtraction (and with any register, not just the accumulator!) but not trash any registers while doing that. So, if you want to loop eight times, you could write something like this: code:code:Conclusion There's a lot of balls in the air in this system, but this is actually a pretty straightforward display kernel, in the end. I'm a relatively proficient 6502 assembly language programmer�albeit more for the Commodore 64 than the Atari�and the only part of the code here that looked at all out of place was the no-ops it needed to keep the display stable at appropriate times. Refreshingly sane, really. NEXT TIME: We study the status window, and "refreshingly sane" becomes a thing of the past. ManxomeBromide fucked around with this message at 09:04 on Aug 6, 2016 |
|
#
?
Aug 6, 2016 08:00
|
|
|
This LP is absolute gold - please keep updating! ")
|
|
#
?
Aug 6, 2016 18:59
|
|


|
ManxomeBromide posted:There's the Corridor, the Blockader, and the generic Attack Group, right there. Sharp-eyed readers, however, may notice something odd about these graphics: they are upside-down. This is beautiful 
|
|
#
?
Aug 7, 2016 11:11
|
|

|
This is an interesting set of mechanics they've got going here. It seems really complex for a game you're probably not going to see that much of.
|
|
#
?
Aug 8, 2016 23:14
|
|


|
Part 4: Armed Reconnaissance No fancy flying this time, I'm afraid. This time we're going to be brutally abusing savestates and game resets to map as much of the Galaxy as we can reach. We've encountered four Quadrants, so far: Home Quadrant This is where we start. We've explored every exit from here. Teal Quadrant  South of Home Quadrant. Loads of guys here. The East exit is blocked and we don't know how to reach it yet. We haven't explored the South exit yet. Red Quadrant East and west of Home Quadrant. We have access to the North and South exits but we haven't checked those out either. Crimson Quadrant 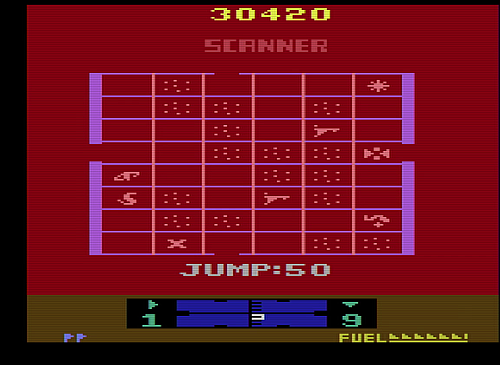 This quadrant is divided in two, and we've made it to both halves, but never fully traversed either. The wormhole is reachable from either half but warps us to the middle of the lower half. This is where we stopped our exploration, last time. Let's go back there, skip the wormhole, and head north. Brown Quadrant  Another split quadrant, like Crimson. There's a nice juicy Zylon planet to raid and we can refuel here if we want. In so doing, we can discover that the Wormhole in the upper half actually moves back and forth. If we want to traverse the upper path we may need to wait around for the privilege, because it will occasionally block the way. Fighting our way through the Kogalon Star Pirates and Cobra Fleet, though, reveals that flying west from Brown Quadrant dumps us back in Home Quadrant. South, West, North, West is thus a loop. This also means that it's a solid bet that the wormhole in the upper half will take you into this useless lower half. Feh. Let's go check the other exit in Crimson Quadrant we can reach. North from Home Quadrant takes us to Crimson and gives us easy access to the west exit: Grey Quadrant 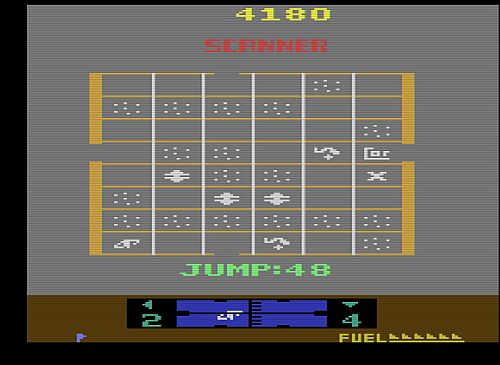 From here we can fight our way through three Flagship fleets, or try our luck with the wormhole. Turns out the wormhole dumps you in the upper right sector, which means you have a clear shot to the west exit... ... which takes you to the Eastern section of Teal Quadrant. Nothing there but a Zylon Planet, and now you have to slog all the way back through those Flagship fleets as your only way back. You'll probably end up losing the life you earned just to fuel issues on the way back�the Federation worlds in Teal and Crimson are inaccessible on this route and Grey doesn't even have one. You have to go all the way back to Home if you want to refuel. So that's a sucker's game. So, for that matter, is going south from Teal, which dumps you into the Northern section of Grey Quadrant, where the only thing you can do is turn back. That leaves the North and South exits from Red Quadrant. It turns out those both lead to the same place. Lime Quadrant  There are a ton of enemies here and we can't actually reliably defend the Federation world, because Federation planets block your passage just like wormholes do, which means that it's blocking our path to the fleet that is the greatest threat to it. Our best hope is to wait around for the assault and then rescue it. Fortunately for them, that's pretty likely to happen as we fight our way to the next exit. North and south exits here lead back to Red Quadrant, and we can't reach the east exit because the wormhole's in the way. West from Lime is our only option for progress. That actually puts us in the upper part of Brown Quadrant. We've got some fights here, and we also may have to wait for that wormhole to get out of our way, since it does, in fact, rocket us back down to the lower half. That done, however, we can head north to somewhere new. Purple Quadrant  This quadrant is the worst. We arrive from the south, which is inoffensive enough. The Wormhole leads to the upper part, which is also fine, because it turns out that we're going to need to go east from here to proceed. But to get to that eastern exit, we have to blast through the Zylon world and the Kogalon star pirates, and both of them are on exits that will throw us out of the quadrant into the west and north exits, both of which are dead ends. (The west exit leads to Lime Quadrant East, and the north one leads to Grey Quadrant South.) Both have a Zylon world to raid for a 1-up, so that, at least, is nice. We can top up on lives. Well. Grey Quadrant South isn't quite a dead end. It's got a wormhole that will dump you into the central meat grinder of Grey Quadrant, far away from refuel or repair and with a massive gauntlet of enemies to endure to have a prayer of reaching them. We've already seen that Grey Quadrant isn't where you want to be. But it's our last chance to remain in this half of the game. There's a solid wall of asteroids isolating us in the upper half of Purple Quadrant, and in going east we cross the Galactic Rubicon. Cobalt Quadrant  This truly is the point of no return: the western exit is blocked by a starfield, and every entrance in the known galaxy has already been accounted for. The only way back to the stars we know will be if one of these quadrant exits happens to dump us in an earlier area the way Brown Quadrant West did. There is no longer time for doubts, and no longer any use for second thoughts. Solaris awaits.
|
|
#
?
Aug 9, 2016 07:20
|
|
|
ManxomeBromide posted:No fancy flying this time, I'm afraid. This time we're going to be brutally abusing savestates and game resets to map as much of the Galaxy as we can reach. I did my best to map this all out: 
|
|
#
?
Aug 9, 2016 09:07
|
|
|
Going west from brown takes you to the home quadrant, but going back through the sector exit (now east) takes you to the red quadrant. That doesn't make any sense.
|
|
#
?
Aug 9, 2016 18:59
|
|

|
Carbon dioxide posted:Going west from brown takes you to the home quadrant, but going back through the sector exit (now east) takes you to the red quadrant. That doesn't make any sense. Maps not making sense was kind of a thing back in the day.
|
|
#
?
Aug 9, 2016 19:07
|
|


|
Interesting. So how many possible sector background colors could we be working with, anyway?
|
|
#
?
Aug 9, 2016 23:53
|
|
|
Part 5: Theory to Practice We have now completely mapped half the game. The first eight quadrants are all connected to each other and the only way to leave them is by flying east from Purple Quadrant into Cobalt. The fastest route I can build from what we've seen, then, is this:
We have a plan. But we've been missing out on something lately: the part where I suffer for your amusement. Let's fix that!  Videos Videos Here's the first half of our "real" Solaris run. It's almost 20 minutes on its own, and the total capture time was nearly twice that thanks to needing to reset a ton. The main highlights on that are in Lime quadrant, where I take out the Cobra Fleet, figure I don't need to save before taking on the Flagship fleet next to it, die, restore, and spend four minutes unable to repeat my initial trivial blast-through. The most interesting cut content�probably more interesting than the "successful" run, really�is my attempt to get to the Cobalt Quadrant Federation planet to refuel and repair. Cobalt Quadrant introduces an absolutely massive difficulty spike. There's quite a bit of time where the game seems to have noticed that I haven't died in a while and is just in maximum  mode. mode.
|
|
#
?
Aug 10, 2016 04:50
|
|
|
ManxomeBromide posted:The most interesting cut content�probably more interesting than the "successful" run, really�is my attempt to get to the Cobalt Quadrant Federation planet to refuel and repair. Cobalt Quadrant introduces an absolutely massive difficulty spike. There's quite a bit of time where the game seems to have noticed that I haven't died in a while and is just in maximum That is brutal. 
|
|
#
?
Aug 10, 2016 07:07
|
|
|
Tech Post 4: The Status Window Are you getting tired of this screen yet? I kind of am. Let's finish it off. The only remaining component is the status window�the brown part at the bottom of the screen. The Radar I'm paying no attention to how the radar decides what to draw, or which numbers or directions it decides to draw. I'm just going to focus on how it actually draws what it draws. First things first: Notice that, except for the line down the middle of it, the black parts of the radar display are symmetric. This is again mostly playfield work. There's one cute trick here which is that on the line before and the line after the radar display, the playfield color is set to the same brown as the background. This gives us hundreds of cycles worth of wiggle room to actually configure the playfield the way we want. Once it's been configured, the playfield color is set to black and altered as needed to produce the little pips around the edges. Meanwhile, the background color is changed from brown to blue and back to brown again over the course of each scanline to make the body of the radar. If the radar is damaged it picks a random color to display and then that's it for your radar. That does leave the vertical line and its little pips. That, as it happens, is the Ball. The Ball is placed once as part of the preparation for this display and then the little pips on the display are constructed by altering the Ball's horizontal expansion. Graphically, the Ball is treated as an extension of the playfield, so we don't have to worry about things like color divergence, and when the playfield is made the same color as the background, the Ball follows suit. Very convenient. The object in the radar is played by Player 0. This is actually the first time in this entire investigation we've encountered a player graphic that hasn't been set to "three copies, closely spaced." There's no real surprises there, but we do see a feature of the 2600 we haven't looked at yet: you can configure whether the player and missile graphics are above or below the playfield. So that the "crosshairs" of the radar are superimposed over the tracked object, we've set them to "under the playfield" priority. And since the Ball is considered equivalent to the playfield, that works for the vertical bar, too! That leaves the arrows and the numeric display. These are portrayed by Player Sprite 1, in the "two copies, widely spaced" configuration. Wide spacing starts the two copies 72 pixels apart, for 64 pixels of actual blank space between them. That's plenty of room for the radar display in the middle. Easy, right? Well, no. There's something wrong with my description. With everything I've described so far, the radar numbers should be invisible, buried underneath the playfield. After all, we've set the playfield priority to supercede the player and missile graphics, right? The solution is almost traditional at this point�alter the priority value as needed, mid-scanline. This is another comfort afforded us by the playfield chunks being broad enough to hold a complete sprite; it lets us alter both the screen background and sprite priority without either effect showing up too soon. We just barely have time for two writes before and after the radar display before we're back to what needs to be blank, brown background. The background color is changed on the outer write, then the priority is changed on the inner write. The end result juggles each piece of the display for just long enough to produce the visual effect they wanted. With me so far? Great, because now the gloves are coming off. Fuel and Lives This is a fairly complex display. We've got a series of flags on the left and then a fuel gauge that decays pixel by pixel. Pixel level operations are always a nightmare, but studying the player graphics as they are drawn over time confirms two things: the flags and the gauge are both drawn with player graphics, with 0 and 1 next to one another, and they're actually always drawn completely (that is, a full gauge and four flags signaling five lives). This also means, since the fuel gauge is the same 8-bit pattern repeated four times, that you don't need the 6-digit score trick�you're only actually doing two writes during the sprite display and then you can leave it alone from there on out. Now, that alone gives you an incorrect display, but we've actually got a bigger problem here. Four flags at two per sprite, two sprites to spell out FUEL, and then four sprites worth of fuel gauge is eight sprites. Even with player replication we only have six! What gives? When I went digging into this I expected to find that the player sprites were somehow being repositioned each scanline. But no; the Player sprites are firmly placed with their leftmost location as the start of their respective halves of the word FUEL. However, once the gauge is drawn, the replication parameter was changed from "three copies, 16 pixels apart" to "two copies, 72 pixels apart." Apparently the replication logic inside the Television Interface Adapter isn't tracking what it's already drawn�man, what a waste, why would you do that�but is instead checking to see "well, given where it is, has it been the right number of pixels worth of time since then to start drawing?" And it is, so it does. But the fuel gauge is so far to the right of the screen that the "second" (actually fourth, but who's counting? Certainly not the Atari) sprite has wrapped around and is on the left side of the next line. Which means we then need to ask an additional question: what's a "next" line? The Atari only knows about one line at a time. So once you've placed the sprite and set up this replication strategy, you're just loading graphics into place exactly as if you had eight sprites spread out over each scanline. Awesome. Now there's just the issue of how we don't always have five lives and a full tank. The key insight here is that each life flag, and each complete unit of fuel, is four pixels wide. So is each unit of the playfield. So the playfield color is set to the background color, given priority over the player graphics, and then each time you die or burn a full unit of fuel an additional brick is added to the playfield. That's all you need for lives, but fuel needs pixel level control. So, what's like the playfield but can be independently positioned with pixel accuracy and also might be expandable out to four pixels in length? Yep, it's the Ball. With the Ball covering any fractional fuel use, and the playfield covering any entire unit consumed, you can block drawing the right-hand side with pixel precision. NEXT TIME: We start cracking the secrets of the flight screen. ManxomeBromide fucked around with this message at 06:57 on Aug 27, 2016 |
|
#
?
Aug 12, 2016 05:17
|
|
|
Wow. Never thought it'd get so complicated just to track a decreasing gauge, but it's a nice effect.
|
|
#
?
Aug 12, 2016 05:38
|
|
|
For some of these explanations, all I can understand is <insert deep magic here>, and occasionally, <insert deeper magic here>. Holy poo poo the Atari was bonkers to code for! This game still actually looks kinda good... the art aesthetic amazingly still holds up. I'm *really* impressed by what they managed to do with it.
|
|
#
?
Aug 12, 2016 05:54
|
|

|
Reading this breakdown of how those old things worked makes me wonder about the true potentials of each console generation thereafter. I'd imagine the NES and SMS were mastered, and maybe the SNES and Megadrive too., but anything after that? I have doubts...and nowadays a console doesn't "live" long enough to reach maximum potential. Or at least, that's how I feel. I'm certainly no expert.
|
|
#
?
Aug 12, 2016 21:58
|
|

|
Consoles through the PS2 era were taken right to the edge of their limits by their end-of-life stage (don't forget that support for a console tends to keep on for a few years after the successor is released, as there's already a huge install base and a large number of people that decide now is the time to adopt since prices have gone so low), and most modern consoles use the same hardware as a PC. Moreover, as time went by there was not only less need for tricks like this due to much greater capability (stuff like this is mostly useful on marginal hardware), but generally less capability as well.
|
|
#
?
Aug 12, 2016 22:09
|
|


|
Yeah, starting with the PS2 era or so, you were largely able to realize whatever your creation vision was, and the hardware just determined how pretty it was. This is a bit of an oversimplification, since some creative visions rely on e.g. having hundreds of individual AI routines (Dwarf Fortress) or other CPU-bound stuff where hardware is still a major limiting factor. But the vast majority of genres became readily implementable without having to go to extreme measures. People would still find special tricks to get prettier games, but it wasn't like the Atari here where hardware tricks were required just to get the game to work.
|
|
#
?
Aug 12, 2016 22:53
|
|
|
Seiren posted:Reading this breakdown of how those old things worked makes me wonder about the true potentials of each console generation thereafter. I'd imagine the NES and SMS were mastered, and maybe the SNES and Megadrive too., but anything after that? I have doubts...and nowadays a console doesn't "live" long enough to reach maximum potential. Or at least, that's how I feel. I'm certainly no expert. Check out this retrospective on the making of Crash Bandicoot. Naughty Dog pushed the machine to extents that Sony started getting suspicious of industrial espionage.
|
|
#
?
Aug 13, 2016 22:46
|
|

|
Tendales posted:Check out this retrospective on the making of Crash Bandicoot. Naughty Dog pushed the machine to extents that Sony started getting suspicious of industrial espionage. I heartily recommend this article and I feel I particularly need to call out this part: quote:Andy had given Kelly a rough idea of how we were getting so much detail through the system: spooling. Kelly asked Andy if he understood correctly that any move forward or backward in a level entailed loading in new data, a CD �hit.� Andy proudly stated that indeed it did. Kelly asked how many of these CD hits Andy thought a gamer that finished Crash would have. Andy did some thinking and off the top of his head said �Roughly 120,000.� Kelly became very silent for a moment and then quietly mumbled �the PlayStation CD drive is �rated� for 70,000.� As far as I know there aren't any tricks for the 2600 that run it that ragged. 
|
|
#
?
Aug 14, 2016 03:32
|
|
|
ManxomeBromide posted:As far as I know there aren't any tricks for the 2600 that run it that ragged. Am I understanding correctly that they're claiming that playing Crash Bandicoot all the way through, once, would put more wear on the drive than Sony expected it to receive during the console's entire lifetime?
|
|
#
?
Aug 14, 2016 05:04
|
|

|
Yes. To be fair, though, what the disc drive was rated for and what they usually actually did were miles apart.
|
|
#
?
Aug 14, 2016 05:10
|
|

|
Part 6: Shenanigans Actually, Solaris can wait for a little while longer. Let's cover some of the weirder mechanics, and the glitches that I'm not using in the main run. NON-OBVIOUS MECHANIC #1: FAILED SORTIES When we left off last time, we'd entered Cobalt Quadrant: That Corridor is placed in an interesting way. It's in a position where running it will take us east. But what if we don't bother? 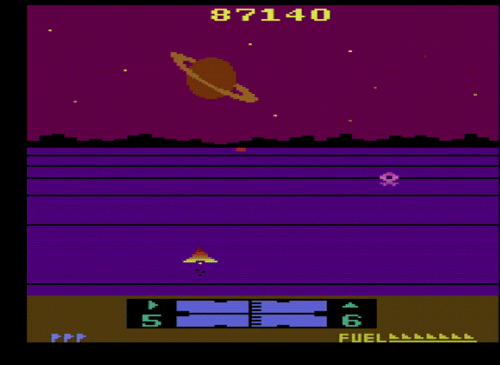 This dumps us right back in the same sector, none the worse for wear but also not advancing anywhere. Sorties against Corridors are one of three kinds where you can just kind of fail to accomplish anything:
In each case, you end up in the same sector on the map, with nothing accomplished. You don't get partial credit, either; if there are three hostages that needed rescuing on a raid, and you miss the third, there will be three to rescue when you come back. This means failing on defense is the most troublesome, because the doomsday timer keeps counting and you're very likely to end up having the planet explode underneath you while you attempt to repair your mistake. NON-OBVIOUS MECHANIC #2: BLOCKADES  This is a starfield. You can't enter these. I'm not talking about them. The more interesting cases are actually plentiful right on the first map of the game: This is a starfield. You can't enter these. I'm not talking about them. The more interesting cases are actually plentiful right on the first map of the game: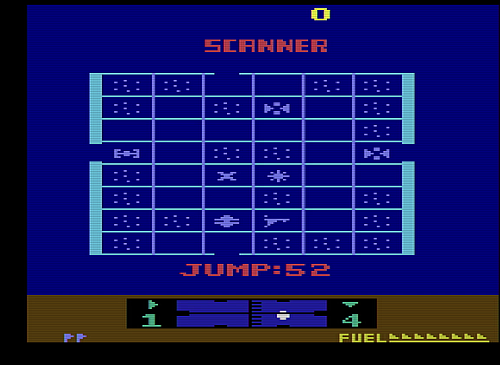 Almost every feature of this map can be encountered from one of two directions; the Federation planet from west or east, the Star Pirates from east or north, the eastern Blockader by west or south, and the northern Blockader from south or east. However, you can't turn corners through them. The rule here is that if you move into an occupied sector, you can only leave in the direction through which you entered. So if you need to get past it, or turn a corner (like we would need to do to head north from Cobalt sector through the Corridor, up at the very top), we need to actually clear it. Failed sorties won't count, either; we must succeed. NON-OBVIOUS MECHANIC #3: PLAYER TWO NAVIGATOR If you have a second controller plugged in, you can swap between the quadrant map and combat mode at any time with the second controller's fire button. This is usually only a curiosity. If you swap into combat mode from the map screen, it's basically like warping to an empty sector. If you swap to the map screen in the middle of combat, your cursor is frozen, so you can't do much. The only legitimate uses of this capability are to quickly swap back to the map screen after a victory, so that you don't have to bother waiting for the map screen to show up on its own, or for jumping back out somewhere else before combat actually begins if you realize that you warped to the wrong sector. GLITCH #1: OVERLAPPED BLOCKADES You can have multiple things that aren't you in the same sector. The map screen flickers between then when this happens, so Doug Neubauer pretty clearly knew what he was up to here: Blockading works just as we described, but there's a small bug here. When you win your mission against the enemy fleet, your motion is no longer blocked, and you can leave the battle sector in any direction. This ignores the fact that you might still be blockaded by the other object in the sector. And that allows our first trick. TRICK #1: THE SAVIOR'S PASSKEY Enemies don't usually overlap other enemies. What they do usually overlap are the Federation planets that they are attacking and that you must defend. Let's have a look at Lime Quadrant again: There's a nice juicy Zylon planet behind the Federation world, but we can't get to it because the Federation planet blocks us from getting there. At best we have a raid as a consolation prize if we fail to defend the Federation world. But. If we let that attack group move in and assault the Federation world, then once we rescue it we can leave in either direction. That leaves the Zylon planet ripe for the taking! 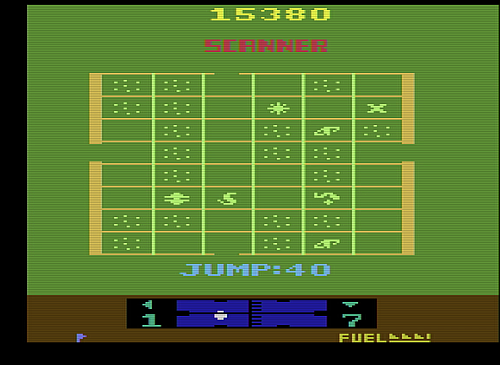 This does, however, leave us with the sticky question of how exactly we plan to get back out. For that, we'll need a second glitch. GLITCH #2: THE NAV GLITCH When you successfully complete a sortie, various things happen. The enemy you defeated vanishes from the map. Your freedom of motion is restored. And you exit the quadrant if you're at an exit sector. But there's a bug here. "Where you're at" for the purposes of these effects is not where you actually are. It's where your cursor is pointed on the nav screen. The enemy goes away no matter what, but if your cursor is somewhere else, the effects are likewise displaced. To trigger this glitch, you need to be relatively nimble, but it's not hard:
TRICK #2: TUNNELING When you successfully complete a sortie, any obstacles to your motion are lifted. That happens with respect to where your cursor is, thanks to the nav glitch. So if we used the Savior's Passkey to get into the northeastern corner of Lime Sector, we can use the glitch to get out. First, we warp to the Zylon Planet. Then, the moment we land, we kick up the nav screen and get the cursor back on the Federation planet. Then we complete the raid. Even with the nav glitch, it does remember that it was the Zylon world that explodes and not the Federation one. But it has forgotten that it was the Federation world and not the Zylon one that was blocking us. We can then proceed west and head back out into the Galaxy at large with nobody the wiser. But it gets better. Let's pick a fight with some enemies that are of no real interest to us. And THEN!   We breeze right through that wormhole as if it weren't there�because thanks to our victory over those other chumps, the game thinks for the moment that it isn't. We can fly east.  Which kicks us right into the middle of Purple Quadrant. We've skipped about a third of our main route just with this. But we can do better still. TRICK #3: QUADRANT CONTROL Much like blockades, the game decides whether or not you change quadrants by looking not where the battle happened, but where your cursor is. So when we fought through multiple forced detours in Purple Sector, we could have skipped every last one by cutting to the nav screen right at the start and retreating the cursor a single sector before the battle was joined. That saves us several hyperwarps. In the specific case of Purple Quadrant, we kind of wanted to take those detours anyway to get our life count up, but a sufficiently daring player would save time with the retreat. Likewise, if our route from Cobalt Quadrant took us north or through the wormhole, retreating from the Corridor before running it would spare us some time. You can also do this trick in reverse, moving your cursor onto an exit quadrant and blasting free of the quadrant without fighting the exit guardian at all. However, this trick is of limited utility�you're having a fight either way and if you can reach the exit with the trick, you can reach it without it. You really might as well just engage the exit guardian directly in the first place. With these tricks, we can pare down the shortest route to the halfway point from nine steps to five:
|
|
#
?
Aug 14, 2016 21:15
|
|
|
Tech Post 5: The Flight Screen So, how about that part of the video game where we are actually playing a video game? 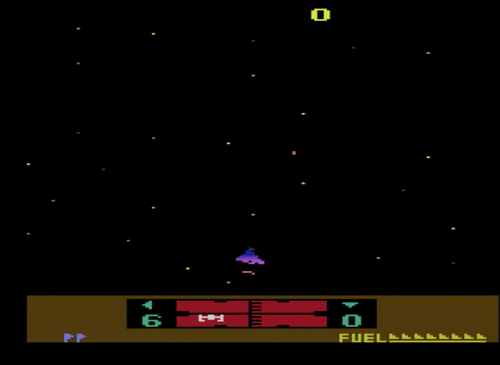 You're at the bottom and shoot up. Your foes are all over the place and shoot down. Shots also stay roughly at the bottom of the screen. Since we need complete control of the X location of all the game objects, this means that, hilariously, we can cover a major chunk of this update with two observations:
First off, why are you Player 1? Surely, as you are the only player, and 0 is the first counting number, you should be Player 0. Well, no, because Player 0 and Missile 0 are drawn on top of Player 1 and Missile 1. And we want to be able to do this:  Second, if you count closely on that image, you will notice that your ship is actually eleven pixels wide. That's too wide to fit in one sprite without expansion, but too precise a result to get with expansion. It turns out that Missile 1's purpose in the flight display is to be the right third or so of your ship. It got passed over for the role of your actual missiles because your missiles have too much detail and thus require a player sprite. And since they have to coexist with any enemy ship you miss, that means all shots are Player 1 and all shootable things are Player 0. Now then. I did mention some exceptions. Here's one: When a Cobra Fleet warps in, they kind of phase in from both sides of the screen at once. That effect requires both player sprites to work. Even when I try shooting past it, I think it just makes sure that your shot and the warp effect won't interfere. The other case is planets with rings. With those, Player 1 is the planet itself. This makes it easier to draw the ring over it without needing special planet graphics that have cutouts for the rings. A fun side effect of that is that when a ringed planet shows up in space and is headed on a path towards the player... 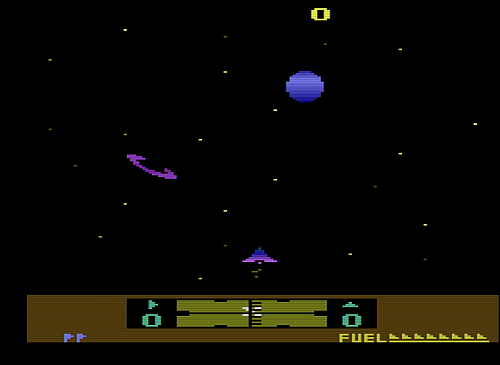 ... only the ring (represented by Player 0) exists. And that actually covers pretty much everything that involves geometry moving around and crashing into each other, in terms of assigning game entities to sprites. The only thing it really needs is a way to efficiently place the sprites and shift that around a lot. That, as we covered briefly in the very first tech post, is kind of tricky. The decorative aspects are even trickier in practice, so let's take a quick detour to look at sprite placement in more depth. SPRITE PLACEMENT Each sprite has two registers associated with its location�RESET and MOVE. RESET is a "strobe" register�when you read from or write any value to it, the sprite it corresponds with is placed at whatever point on the scanline the CRT's electron gun is pointed at. MOVE is a more normal register, and you write a four-bit signed value (-8 to +7) to it. There's an additional, global register called HMOVE. You can strobe this reference once per scanline, right at the start. When you do, the leftmost 8 pixels on your scanline turn black, and every sprite is moved left a number of pixels specified by their MOVE register. (Negative values mean you move right.) Between RESET, MOVE, and HMOVE, you can place sprites at any point fairly simply. You need all three, though. RESET isn't enough. In the best possible case RESET only grants you three-pixel precision, and in more typical cases you're limited to 15-pixel precision. Why three, and why fifteen? Well, the CPU and the pixel counter are locked together on the 2600, so every CPU cycle is three pixels worth of time. If you write your code with perfectly tuned timing, then that means you can select the exact cycle to write the sprite-placement register, which gives you the 3 pixels of optimum precision. Otherwise, you can imagine using a simple and cheap loop to place it. This is the fastest and simplest non-infinite loop on the 6502 chip: code:With fifteen-pixel precision, and an ability to set MOVE to -8 to +7, you can place every sprite into roughly the right position, one per scanline, and then nudge every single sprite into the proper location, with pixel perfection, with a single HMOVE strobe. That's great, as long as each sprite only appears on your screen once. If you're going to hit HMOVE more than once in a frame�and Solaris hits HMOVE literally every scanline�you'd better make sure that all your MOVE registers are zero. Except when you want to be sneaky. PLANETS Take a closer look at that image from before: The ring and the planet up at the top are each clearly detailed at the pixel level, from line to line. But they're also sixteen pixels across�these are double-sized sprites. If you add one pixel to the right side of your double-sized graphic, and then nudge it a single pixel to the left, the end result is to expand the graphic by one pixel on both sides. That works great for these planets. (Hilariously, it doesn't work for the player's ship because the each line of the player's ship has an odd number of pixels.) That trick isn't restricted to player sprites either:  The big ringed planet in the upper left there has a double-width Player 1 for the planet, and a single-width Player 0 sprite for the ring. The top left and the bottom right ring graphics both do this, and it gets nudged from one side to the other over the course of several scanlines. But if you look right in the middle, you see a few lines where the ring becomes a 2-pixel-wide diagonal line slashing across the planet. That's actually Missile 0, width-expanded and filling in for Player 0 while Player 0 gets nudged into place, and then while it waits for the ring to get close enough that it can close the gap on its own. This trick generalizes: with a missile that's multiple pixels wide, and with a MOVE register for the missile set to a value less than its width, you can turn the missile on and hit HMOVE every line and get a clean diagonal line. That's a good trick. We can push that trick even further. THE CORRIDORS The floor of the corridor is just empty space. The black lines are simply the result of changing the background color from purple to black every few scanlines. Most of the perspective effect is handled via clever sprite placement and choice of where to put the black lines. As far as the rendering mechanism is concerned, we need to get it to draw us a trapezoid. The solid blue bits here are mostly a symmetric playfield, starting out with only one unit of emptiness and then pulling back one unit every four scanlines until there's nothing left. To get the smooth slope, the Ball and Missile 0 are configured to be four pixels wide, put on the edges of the playfield, given MOVE values of +1 and -1, and then just left to their own devices. They retreat a pixel every scanline as part of the per-scanline HMOVE strobe, and as long as the playfield retreats in synch, everything works out perfectly. But you don't have to take my word for this. See those stripey bits going down the right side of the screen? That's Missile 0 and it's not supposed to be there. It's there because the Guardians are Player 0, and each missile always has the color of its corresponding player. If you blow up Guardians, their stripe disappears. Similarly, there is a yellow stripe for the key, another Player 0 object. I'm pretty sure the way this works is that the Force Field doesn't kill you as long as there's a P0/P1 collision happening, since that means that the ship is flying on top of the key. Well, actually, blink and you'll miss it, but:  You're actually flying under the key. Player 0 is drawn on top of Player 1, remember? The last corridor-specific thing is the force field. This is pretty much just short-circuiting the normal corridor draw routine: when the force field is being drawn, the playfield, ball, and missile are pre-placed and the process starts further down than usual. For the field itself, the playfield and background are switched. I think this is so that it doesn't have to remind itself not to draw the enemies behind it, since it can just make the playfield take precedence. There's one other trick it allows too. Once you actually need to fly through the force field, the display mechanism changes.  This isn't a glitch of the recording. The bottom half of the force field is missing, but the very last line is there. This is so the game logic can tell if you've crashed. I haven't reverse-engineered the disassembly to make sure, but I'm almost positive the logic here is that you reset the collision detection just before you start drawing the player ship, and then, if the ship collided with the playfield but not also player zero, then that's a crash. This gap means that once you make it past the the field, you can't crash into it again just because it was overshadowing you. Not doing something like that can be pretty terrible. You'd fall into pits just because the camera saw you occlude it, not because you had fallen in. (Indeed, those of you who read the Fixing E.T. article linked early on will recognize this problem�it's the same problem, and the same solution.) That's it for Corridors. While we're at it... PLANETARY SURFACES  The differences between surfaces and the Corridor is that it isn't doing the diagonal path trick, there's a mountain range on the horizon, and there are occasional craters. That mountain range is just the Playfield sitting there, and the craters are Player 0. "But wait," you say. "The craters will interfere with enemy shots if they're both Player 0." You're right. Craters only appear on peaceful worlds. THE STARFIELD Most screens have a nice starfield in the background. That's actually the Ball. It's placed at a specific location each frame based on where the topmost visible star on the screen is. At that point it sets the ball's MOVE register to -8 and leaves it there for the entire rest of the frame. It turns it on for one scanline every few lines to make a star. It varies the playfield color to make the stars twinkle. The Ball gets used for other stuff, too, but in all of those cases but one, the stars are on the top of the screen and the effects that use the ball are on the bottom. We only need one spare scanline to do the setup, and that's not tough. What's the exceptional case, you ask? THE WARP WAKE  Let's zoom in on that effect in the debugger. It looks kind of familiar... 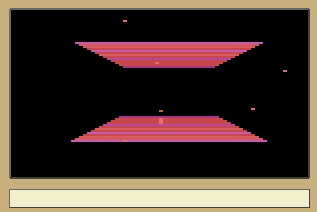 In fact, this is exactly the corridor trapezoid trick, just done backwards first. Which raises our first question: we need the Ball to make the Trapezoid, so how do we get a nice consistent starfield? The answer turns out to be boring: use Missile 1 instead. But that raises a new question: don't we need Missile 1 to draw our own ship? The answer here is boring too: by the time the warp effect is extensive enough for that to matter, the ship has blasted far enough into the distance that it no longer requires assistance from Missile 1 to render. It's just a plain 8-pixel-wide sprite. And that's the last of the effects we see in the flight screens. ManxomeBromide fucked around with this message at 07:27 on Aug 27, 2016 |
|
#
?
Aug 20, 2016 06:06
|
|
|
That's pretty much it for the tech strand. We've covered every screen and made general sense of how the game squeezes its graphics out of the Atari 2600's incredibly limited palette. I've also finished the playthrough for the main strand, and I think there are two more posts left there. I've got one more post that I want to use to conclude the tech strand, but before I do that, I figure I'll open it up to the thread here: are there any topics about how Solaris does things or how the Atari in general makes stuff work that you'd like me to cover first? With two main posts left there's room for a Q&A post.
|
|
#
?
Aug 20, 2016 06:09
|
|
|
While your explanations are clear, it's all still deep magic to me. It must've taken a lot of trial and error to come up with all of those tricks. What I do wonder is how the programming went back in those days. Did they write in some higher level language and compile that to the Atari instructions or did they write those instructions directly? Did they have anything resembling modern debugging tools?
|
|
#
?
Aug 20, 2016 07:42
|
|
|
Here's a question: when does the actual game logic happen? Are you constantly racing the beam, ducking away for a dozen cycles to handle controller input or something, and then ducking back to adjust sprite positions so the right thing gets drawn? If so, I can't fathom how anyone could possibly manage to write a game of this level of complexity. 
|
|
#
?
Aug 21, 2016 04:00
|
|
|
Part 7: Plight of the Navigator OK, digression over. Where were we again? Oh right. Cobalt Quadrant One of the reasons I interrupted the run to talk about glitches is that we needed to cover the mechanics the glitches interact with to start really making sense of late-game maps. We start to see that right here. Thanks to the way blocking rules work, once we clean up the immediate threats to the Federation world here, we have to take on the Corridor next. Furthermore, thanks to where it's located, that means we're also off to the next quadrant. Periwinkle Quadrant 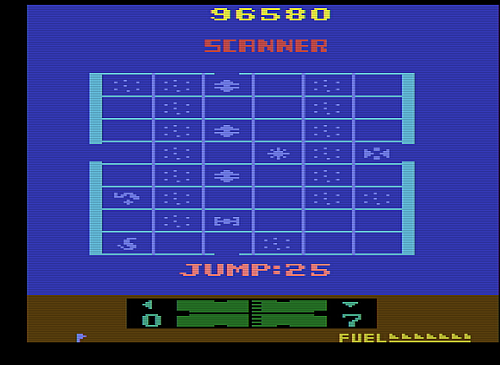 This is a weird one. The quadrant is divided into three mutually inaccessible regions, with a threatened Federation world under attack in the central region. The wormhole, however, ends up taking us over to the right-hand region, which means we blast over to... Green Quadrant 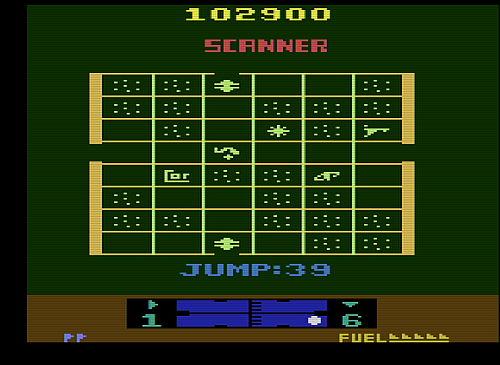 We're isolated on the southwest half here. The wormhole blocks access to the north and east and if we take the wormhole it puts us back down in the southwest corner. If we're staying glitchless, our only real option is to go south. That actually takes us back to Periwinkle Quadrant, into the northern side of the middle region. It is extremely difficult to fight through the Flagship fleets in time to rescue the Federation world, so you'll probably end up with a Red Zone sooner rather than later. Oh well. Proceeding to the south, we find a new area. Magenta Quadrant  A lot of mobile enemies here, and a Federation world that is under attack from both directions and also blocking our way. This isn't the real run, so I permit myself the Savior's Passkey trick to get through the Federation world and see what's on the other side. I'll be able to use the Zylon world on the other side of it to get back with Tunneling. Proceeding to the west... wait, are my scanners correct? Omega Quadrant  They are. This is the lost Omega Quadrant, and that blinking planet down there is the Lost Planet of Solaris. Apparently it got lost because we blockaded the entrance with a Federation world. We've also got a Zylon planet here, and I'm not sure how lost that one is. We're blocked in here by the starfields, though. We'll have to go back to Magenta sector and make our way out with the tunneling glitch. It's interesting. Lime, Green, and Magenta Quadrants all have a Federation world that blocks passage and all three of them are under attack from both directions and have a Zylon world nearby for easy deployment of the tunneling glitch. My initial theory was that those planets were there to be unlocked as a consolation prize if you failed to defend the Federation world, but I have to wonder if the Savior's Passkey wasn't completely intentional. No matter. When I said I wanted to beat it glitchless, I'm including the Passkey. That hasn't mattered yet, at least, because the far side of these worlds are all dead ends. An amusing diversion, at any rate. Let's go east and see what there is to see. Aqua Quadrant 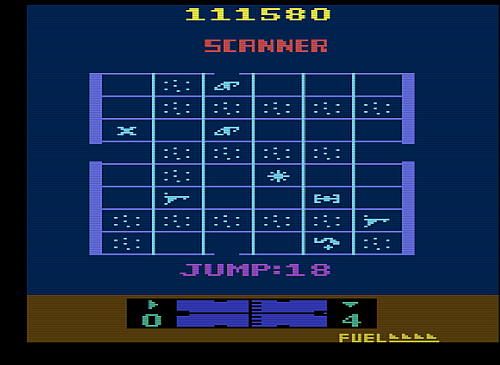 Another three-region quadrant, kind of like Periwinkle turned sideways. This one's got a Zylon planet to raid and three fleets to keep off the Federation world. The enemies here are significantly less vicious than the ones in Cobalt Quadrant were. I'm not sure what the deal is with that, but I'm sure not complaining. Aqua and Magenta Quadrants will make a fine home base for our remaining explorations. Only one way to go, which takes us east to... Ochre Quadrant 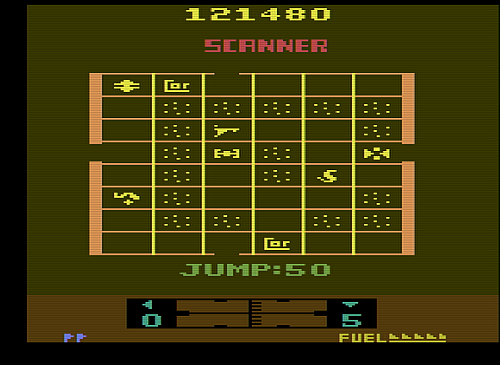 The wormhole takes us to the northeasternmost sector, so without the tunneling glitch, our only option is to go north. At least the wormhole means we can do that without a fight. Unfortunately, that takes us back to the southern part of Cobalt Quadrant. There's a Zylon planet to raid there, but otherwise we have to turn back and fight our way through those guys the wormhole let us skip. Oh well. We have to keep backtracking; our next stop is going to be going south from Magenta. We arrive with a crash of lightning to a blood-red cosmos. Cyan Quadrant 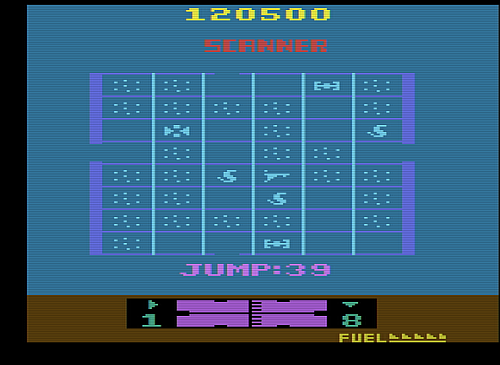 Cyan Quadrant is rigged. It's always a Red Zone by the time you get there. It is also the fifth quadrant whose background is some shade of blue. Seriously. That is over a quarter of the game. Seems like an odd choice, especially given a palette of 128 colors. Color choices aside, the quadrant is divided in two in what is becoming a wearyingly familiar scheme. It's also the last one. All we have left to find are interconnections. Heading east... Omega Quadrant 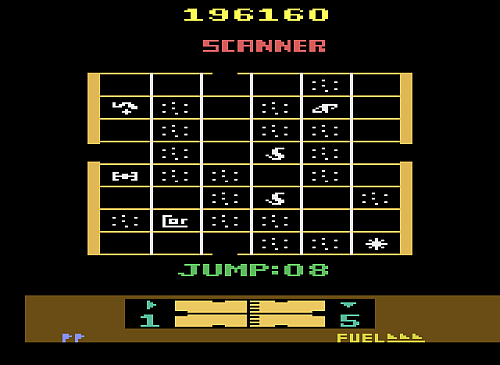 ... well, if we were permitting ourselves the tunneling glitch, then the game would be already as good as won. By tunneling through the wormhole with the help of those Kogalon Star Pirates, we'd be on a direct path to Solaris. In what is also becoming wearyingly familiar, that wormhole puts us deeper into the part of the quadrant we already know how to reach. Well, off we go to the south. ... which takes us back to Cobalt Quadrant. We've catalogued a huge set of glitches that would let us go to other places, but whenever we take the exits that are available glitchless, we've almost invariably only had one choice and those choices lead us in a loop the size of the entire second half of the game. We are being trolled. But have we been thwarted? Must we give up our quest for a glitchless run? The dream isn't dead yet. We've still got a few tricks left.  Keep the faith. Watch the skies.
|
|
#
?
Aug 21, 2016 06:19
|
|
|
This thread is absolutely fascinating, thank you for doing this.  I don't think I would have been able to code in this manner, it seems absolutely insane (128 bytes of RAM, are you serious). Also I had no idea that 2600 was supported all the way into the early nineties.
|
|
#
?
Aug 21, 2016 09:11
|
|

|
ivantod posted:This thread is absolutely fascinating, thank you for doing this. You still see examples of this level of optimisation sometimes, nearly always through either a jam or necessity. Three good examples would be Rick Dangerous 32K (of Hard drive space, not RAM, dropping the original's filesize by about 4/5ths), Wipeout 64 (Yes, it may have re-used tracks, and the music wasn't very good, but the music was highly compressed, leading to the hilarity that is what appears to be loading times on a cartridge... It's actually decompressing the music and sounds before each level), and FAST Racing (The first one, because it's a game of stupidly high quality for the Wii... On the Wii-store. Wii-store size limits are... About 48Mb.)
|
|
#
?
Aug 21, 2016 11:18
|
|

|
This thread is extraordinarily interesting, although I admit that I'm more interested in the technical discussion than in the actual game. I think I definitely need to read Racing the Beam this year.
|
|
#
?
Aug 21, 2016 18:44
|
|


|
Seconding the technical discussion being fascinating. Old computer architecture stuff is like wizardry to me, and I still don't understand how it all fits together. I'm only good at Rails 'n poo poo. 
|
|
#
?
Aug 22, 2016 00:46
|
|


|
Tech Post 6: Q&A We've covered the screens of Solaris, so I opened up the thread to questions for one last survey before the final wrap-up. Since these are often more questions of research than of software engineering, I've had to give myself a bit of a crash course in these things along the way. I mostly ended up using my copy of Racing the Beam, the Stella Programmer's Guide, various Wikipedia articles and some threads on the AtariAge forums. Any errors are my own, either for misunderstanding what I read or trusting the wrong people.  TooMuchAbstraction posted:Here's a question: when does the actual game logic happen? Are you constantly racing the beam, ducking away for a dozen cycles to handle controller input or something, and then ducking back to adjust sprite positions so the right thing gets drawn? If so, I can't fathom how anyone could possibly manage to write a game of this level of complexity. Short answer: there's 70 scanlines worth of time between each frame, and the program logic happens there. This is kind of backwards from how its successors and even its contemporaries did it, and this is kind of cool because it leverages abilities that the Atari provided that its contemporaries and even its successors did not. Long answer: Let's start by stepping back a bit and looking at what makes up a television signal. I'll be restricting my discussion to the NTSC standard, the 60fps television standard that is universal in North America. Some of the general ideas, including the parts that are relevant to TMA's actual question, generalize to other regions' standards, but the details vary widely. A standard-definition NTSC television broadcast is made of scanlines. At this point that needs no introduction, but I start here because old televisions don't really know anything else. They are much more analog devices than one would expect. As a result, television signals include synchronization information that can be used to tune the beam so that the picture stays stable. Everything else in the signal is either part of a scanline or interpreted in terms of it. The first few scanlines of a frame are called the vertical blanking period, or VBLANK for short. No video data is actually transmitted during this time. During the VBLANK signal, the TV's cathode ray is turned off completely. One might think that starting VBLANK would be enough to tell the television that it's time to re-aim the cathode ray back up to the top left for the next frame. But that would require making the circuitry more complicated. The reset command is actually a signal independent from VBLANK, called vertical synchronization or VSYNC. The VSYNC signal is mixed in with the first three scanlines of VBLANK. What there is for vertical, there is also for horizontal: those are called HBLANK and HSYNC. The HSYNC happens in the middle of the HBLANK period, and the segments before and after it are referred to as�seriously�the "front porch" and the "back porch". The back porch also includes a reference signal called the color burst which tunes the receiver to pick color information out of the signal. There's one last kind of hilarious piece to this story, though. Apparently, even in the late 1970s, television displays were of sufficiently variable quality that you couldn't really rely on the picture entirely fitting on the screen. So in addition to not putting anything important at the bottom of the screen, there might also be a few more scanlines that were never intended for display at the bottom. That region was called the overscan. This all added up to huge headaches for everybody. For the most part, TVs ran their images at about 60Hz because that was the frequency of the AC power circuit. But to get a stable picture you'd tune that oscillation a bit, and then there were other, much faster oscillators to handle the requirements of the scanlines and the color display. But the intent was that they'd sync to the signal, and the signal had a ton of fudge factor in it. VBLANK only really had to be long enough to let the cathode ray re-aim, and there wasn't really a requirement on that either. So you ended up kind of splitting the difference between what the TV's own oscillators demanded and what the signal commanded. Atari's recommendation to its own developers�and this was widely respected by other companies as well�was to have 40 lines of VBLANK (of which the first 3 were also VSYNC), 192 lines of actual picture, and then 30 lines of overscan, for a total of 262 scanlines. Their electrical engineers had determined that this was the safest way to ensure that a picture would actually appear in its entirety on basically every TV you'd hook the VCS up to. Some of those TVs were probably older than the moon landing. The 2600's successors up through the Playstation 2 also had to contend with this, but basic standards of television quality improved; they gained vertical resolution first by getting to assume that overscan would always be visible, and then by getting to assume that VBLANK doesn't really need to be 40 scanlines long. Modern SDTV is canonically 240 scanlines of picture at 60 fps, or 480 interlaced at 30. 480i is the shorthand. Programs for most consoles never had to care about any of this. Their system had a vertical resolution, and the GPU would handle all the syncing and blanking signals on its own and send a separate signal to the CPU when a new frame began. Games would organize themselves around waiting for the new-frame signal (usually sent with the start of VSYNC), setting up the graphics for the frame about to be drawn during VBLANK, and then doing the work of computing the next frame while the GPU did the rendering of the frame itself. The 2600, on the other hand, has to do it backwards; since the CPU is so intimately involved in working out the details of the display, it can only compute the frame to come during the VBLANK period. Fortunately, thanks to the overscan convention, it gets nearly twice as much time to do its work as an NES or C64 would have had. Unfortunately, the Television Interface Adapter only handles HBLANK, HSYNC, and the colorburst on its own. VSYNC and VBLANK are under software control. (Interestingly, despite offloading so much of the usual graphical work to the CPU, it is in fact more hardcore about color and horizontal synchronization than its successors; the 2600 is the only system I know of that has the "pause the CPU until the very start of HBLANK" primitive, and the reason it has 160 pixels of horizontal resolution is because this is the smallest resolution you can display while guaranteeing no color distortion.) Now, it would still be an impossible nightmare to get anything done if you had to manage the overscan and VBLANK signals the same way you handled the display. The CPU and the TIA are not, alone, really up to this task. But the Atari 2600 has three chips in it. The third is variably called the PIA or the RIOT. It's what has the 128 bytes of RAM, and it's what wrangles the two I/O ports. (The latter is where it gets the name PIA�it's the Peripheral Interface Adapter.) But the RIOT also has four programmable timers, which is where the name RIOT comes in (RAM/Input/Output/Timers). The RIOT can be programmed to count down from any number from 1 to 255, counting down one unit every cycle, every 8 cycles, every 64 cycles, or every 1024 cycles. A scanline is 76 cycles long, so the 64-cycle counter is eminently well-suited for counting down the overscan or VBLANK periods while doing the true work of the game logic. Once the work is done, you just keep checking the timer value until it's zero, and then do one last sync against HBLANK, and you are in cycle-exact, solid position in the frame, ready to go once more. Carbon dioxide posted:What I do wonder is how the programming went back in those days. Did they write in some higher level language and compile that to the Atari instructions or did they write those instructions directly? Did they have anything resembling modern debugging tools? Short answer: They had specialized debugging hardware, and devices that were the 80s equivalent of a flashcart programmed and powered via USB. By 1982, personal home computers were powerful enough to build Atari games and control the flashcarts. Major companies had access to compute servers to do their work on; they'd have been the equivalent of a single Unix workstation powering a whole office. But that's plenty when you're building a game that's capping out at 16K. Long answer: More "finding rumors and interview snippets on the web" here than usual, so keep your salt shakers handy... Let's start by acknowledging that Stella's debugger is phenomenal even in comparison to modern debugging tools for modern systems. But the toolkit available to an embedded software developer was very different back then, too. Remember how the Television Interface Adapter doesn't know anything about VBLANK or VSYNC? You could very easily hook the output of the chip to an oscilloscope and tune it to the length of a scanline, and then see what one line repeated looks like over and over. That'd make it very obvious that tricks like the lives/fuel trick really worked. A manually-steppable clock circuit would also let you "cycle count" with impossible-by-modern-eyes precision. I don't know if those tricks were used. However, Racing the Beam notes that Parker Brothers figured out how make its licensed Atari games purely by reverse-engineering. They took the cap off the graphics chip and photographed its components, and had two electrical engineers study that while other engineers studied the code from ROM dumps. They got good enough results to make games that are still respected parts of the 2600 canon, too, so it certainly seems to have borne fruit. I think it's reasonable to say that people programming the earliest home computers were as much electrical engineers as they were programmers. As for software development... the Atari would have been programmed almost entirely in 6502 assembly language. The way the graphics chip works requires cycle-accurate timing to produce an accurate or even a stable display, and that level of control is only available when you're selecting every last addressing mode of every last instruction. That's not really as bad as it sounds. 6502 is one of the easiest assembly languages to work with, and even in 1977 a wide array of powerful symbolic and macro assemblers would have been available. In the earliest days, or at the largest companies, you would use a timesharing minicomputer like a VAX or a SPARCStation. By 1982, all the most popular home computer models would be powerful enough to run decent if not excellent assemblers. The assemblers would be easy to come by, too, since all the most popular home computer models used the same chip family. (This would also mean that you could test the correctness of your non-graphics logic on the computer, before ever feeding it to the console; the chips were slightly different models, but they all spoke the same machine language.) By 1986, when Solaris was released, 6502 assemblers good enough to meet 2016 quality standards would be available for cutting-edge home systems. The 68k-based Mac Plus, Atari ST, and Amiga would all be available and well-established, and you'd also have 386es running DOS 3.2 on the IBM side. And in the extreme... well. Steve Wozniak wrote much of the Apple II's core software in assembly language on pen and paper and hand-assembled it into machine code that he then entered into RAM with a hex editor. 6502 assembly is actually simple enough that this is a semi-reasonable thing to do�the cheat sheet with all the information you need to do this will fit on a single sheet of paper with normal printing size. But you wouldn't do that for the Atari, because the Atari doesn't have a built-in hex editor. You need to get it into a cartridge or something very like one. So how would you do that? Well, battery backed RAM (think NES cartridge saves) would have been a reasonable technology at the time, and EEPROM chips (the precursor to modern flash drives) might be reasonable too but they weren't invented until shortly after the Atari 2600 went to market, and they were super expensive anyway. It appears, however, that specialized equipment was used�a ROM emulator that downloaded programs through a serial port and kept alive for as long as the computer feeding it data kept it powered. That makes the barrier to entry by 1982 pretty low. Apple IIs, Atari 8-bit, and Commodore 64 computers were all available and more than powerful enough to create programs on the scale of Solaris with a symbolic assembler, and could also drive ROM emulators through their expansion ports. One last funny story on this: there was a short-lived expansion for the Atari 2600 called the Starpath Supercharger. This was a RAM expansion cartridge (6K! Triskadecuple your RAM! Over triple the RAM of an NES!) that could be loaded with programs off a cassette tape. Starpath apparently did all its dev work on Apple II-series computers, and tested it by just writing stuff out to tape and loading it up in a Supercharger. That's pretty much the closest anyone at the time got to programming the 2600 the way a small team would have programmed more typical 8-bit machines. NEXT TIME: We conclude the tech strand with a duel of legends. ManxomeBromide fucked around with this message at 07:39 on Aug 27, 2016 |
|
#
?
Aug 23, 2016 07:21
|
|
|

|
| # ? Apr 25, 2024 22:16 |
|
|
This was a good post. Thank you for the explanation! I remain amazed at how important careful time management is to games of this era, but at least it seems humanly possible now.
|
|
#
?
Aug 23, 2016 16:43
|
|