

|
Important: Discord invite (if it expires let me know) https://discord.gg/wtWNw3 After randomizing, the players in this game, and their houses, are: Stark: ETB Lannister: Bottom Liner Baratheon: Pththya-lyi Greyjoy: FACKER Tyrell: Mikey Purp Martell: The General No, this isn't the card game. No, it's not the Cosmic Encounter clone either. LOL no this isn't the mini-based tactics game either.  Rules Comprehensive summary and reference What is this? Some of you may be aware of the board game Diplomacy. While it has some historical value, and can generate uniquely exciting experiences, these days many people would agree that it's not a fun gameplay experience. It can take a full day, and has some questionable design decisions. At some point someone figured out that the political and backstabbing nature of that game fits well into the Game of Thrones universe, so they made a board game out of it. That game has later on undergone a fairly major revision, and now we have Game of Thrones 2nd edition, which we will be playing in this thread. I will add a rules summary in the next post. For now I'm just opening recruitment. Some important details Tekopo was kind enough to make us a channel on the TGD discord. Since this game involves politicking, and the need to message me for secret actions, it is required that you join the discord. COs are encouraged. Please feel free to spam me on discord with as many contingency plans as you like. When actions are not secret, declare your actions in the thread using boldface. Talking smack, commenting, or giving advice, by the players or the audience, are all entirely okay. This will be a full 6 player game because I want to see more politics and backstabbing. Newbies are welcome, but be aware that the rules overhead may be slightly overwhelming. I'll do my best to help in that case. Recruitment will be open for one and a half days, after which I will randomly select players and House assignment. So, I'll randomize things around Wednesday morning (in EU) Try to check in at least once a day, though obviously multiple times would be even better. (thanks to Stelas for ideas and advice) Dancer fucked around with this message at 14:15 on Aug 23, 2017 |
 #
¿
Aug 21, 2017 16:56
#
¿
Aug 21, 2017 16:56
|
|

|

|
| # ¿ Apr 28, 2024 14:47 |
|
|
(rules summary that was previously here has been moved to this post) Breakdown of House cards: House Stark: [4] Eddard Stark: 2 Swords [3] Robb Stark: If you win this combat, you may choose the area to which your opponent retreats. You must choose a legal area where your opponent loses the fewest units. [2] Roose Bolton: If you lose this combat, return your entire House card discard pile into your hand (including this card). [2] Greatjon Umber: 1 Sword [1] Ser Rodrik Cassel: 2 Fortifications [1] The Blackfish: You do not take casualties in this combat from House card abilities, Combat icons, or Tides of Battle cards. [0] Catelyn Stark: If you have a Defense Order token in the embattled area, its value is doubled. House Lannister: [4] Tywin Lannister: If you win this combat, gain two Power tokens. [3] Ser Gregor Clegane: 3 Swords [2] The Hound: 2 Fortifications [2] Ser Jaime Lannister: 1 Sword [1] Tyrion Lannister: You may cancel your opponent's chosen House card and return it to his hand. He must choose a different House card to reveal. If he has no other House cards in his hand, he cannot use a House card this combat. [1] Ser Kevan Lannister: If you are attacking, all of your participating Footman (including supporting Lannister footmen) add +2 combat strength instead of +1. [0] Cersei Lannister: If you win this combat, you may remove one of your opponent's Order tokens from anywhere on the board. House Baratheon: [4] Stannis Baratheon: If your opponent has a higher position on the Iron Throne Influence track than you this card gains +1 combat strength. [3] Renly Baratheon: If you win this combat, you may upgrade one of your participating Footmen (or one supporting Baratheon Footman) to a Knight. [2] Ser Davos Seaworth: If �Stannis Baratheon� is in your discard pile, this card gains +1 combat strength and a sword icon [2] Brienne of Tarth: 1 Sword, 1 Fortification [1] Melisandre: 1 Sword [1] Salladhor Saan: If you are being supported in this combat, the combat strength of all non-Baratheon Ships is reduced to 0. [0] Patchface: After combat, you may look at your opponent's hand and discard one card of your choice. House Greyjoy: [4] Euron Crow's Eye: 1 Sword [3] Victarion Greyjoy: If you are attacking, all of your participating Ships (including supporting Greyjoy Ships) add +2 to combat strength instead of +1. [2] Theon Greyjoy: If you are defending an area that contains either a Stronghold or a Castle, this card gains +1 combat strength and a sword icon. [2] Balon Greyjoy: The printed combat strength of your opponent's House card is reduced to 0. [1] Asha Greyjoy: If you are not being supported in this combat, this card gains two Sword icons and one Fortification icon. [1] Dagmar Cleftjaw: 1 Sword, 1 Fortification [0] Aeron Damphair: You may immediately discard two Power tokens to discard Aeron Damphair and choose a different House Card from your hand (if able). House Tyrell: [4] Mace Tyrell: Immediately destroy one of your opponent's attacking or defending Footmen units. [3] Ser Loras Tyrell: If you are attacking and win this combat, move the March Order token used into the conquered area to resolve again later this round. [2] Ser Garlan Tyrell: 2 Swords [2] Randyll Tarly: 1 Sword [1] Alester Florent: 1 Fortification [1] Margaery Tyrell: 1 Fortification [0] Queen of Thorns: Immediately remove one of your opponent's Order tokens in any area adjacent to the embattled area other than the March Order token used to start this combat. House Martell: [4] The Red Viper: 2 Swords, 1 Fortification [3] Areo Hotah: 1 Fortification [2] Obara Sand: 1 Sword [2] Darkstar: 1 Sword [1] Nymeria Sand: If you are defending, this card gains a fortification icon. If you are attacking, this card gains a sword icon. [1] Arianne Martell: If you are defending and lose this combat, your opponent may not move his units into the embattled area. They return to the area from which they marched. Your own units must still retreat. [0] Doran Martell: Immediately move your opponent to the bottom of one Influence track of your choice. I've been doubting whether I should do this, but I guess it's fairly useful information to have. Here's a breakdown of the three Westeros decks as well: Westeros I Cards 3 � Supply: Adjust supply. 3 � Mustering: Muster units. 2 � Thrones of Blades [W]: Holder of the Iron Throne chooses Mustering, Supply, or no effect. 1 � Last Days of Summer [W]: Nothing happens. 1 � Winter is Coming: Reshuffle the deck and draw a new card. [W] = Wildlings increase in power Westeros II Cards 3 � Clash of Kings: Bid power tokens on influence tracks. 3 � Game of Thrones: Gain power tokens. 1 token for each power icon in controlled areas, and also for each controlled harbor with at least one ship present, with no enemy ships in adjacent areas. 2 � Dark Wings, Dark Words [W]: Holder of the Messenger Raven chooses Clash of Kings, Game of Thrones, or no effect. 1 � Last Days of Summer [W]: Nothing happens. 1 � Winter is Coming: Reshuffle the deck and draw a new card. [W] = Wildlings increase in power Westeros III Cards 3 � Wilding Attack: Bid power tokens to fend off Wildling Attack. 1 � Sea of Storms [W]: No Raid orders can be played this round. 1 � Rains of Autumn [W]: No March+1* orders can be played this round. 1 � Feast for Crows [W]: No Consolidate Power orders can be played this round. 1 � Web of Lies [W]: No Support orders can be played this round. 1 � Storm of Swords [W]: No Defense orders can be played this round. 2 � Put to the Sword: Holder of the Valyrian Steel Blade chooses Rains of Autumn, Storm of Swords, or no effect. [W] = Wildlings increase in power Dancer fucked around with this message at 11:38 on Aug 23, 2017 |
|
#
¿
Aug 21, 2017 16:57
|
|
|
That shouldn't be a big problem. This game doesn't rely on politics quite the way Diplomacy does. If you check in at least once a day it should be doable.
|
|
#
¿
Aug 21, 2017 18:08
|
|
|
Okay I didn't expect it to be so easy to find people  . I'm gonna shorten the recruitment from 3 days to one and a half. It's probably not hugely likely that some people found the thread and thought "I'll decide over 2 days if I actually want to do this or not". . I'm gonna shorten the recruitment from 3 days to one and a half. It's probably not hugely likely that some people found the thread and thought "I'll decide over 2 days if I actually want to do this or not".
|
|
#
¿
Aug 21, 2017 18:56
|
|
|
Hey, quick straw poll, if we get twelve people, would you rather play in teams, or separate into two groups? I assume you'd rather not play by committee but... maybe a few extra obstacles to efficient communication make it all the more fun . My workflow is fairly easy (drag symbols around in gimp -> crop -> upload), so I should be able to run two games. Only thing I need to do differently is pre-shuffle the decks (4 decks with 10 or 9 cards, not exactly an administrative nightmare).
|
|
#
¿
Aug 22, 2017 13:41
|
|
|
I tend to agree, but not everyone may like it... if anyone says they'd really rather not (which I understand), I won't push it.
|
|
#
¿
Aug 22, 2017 15:10
|
|
|
Yeah, please don't worry, I 100% understand how annoying it can be to have to do this with another person. There will be no teams.
|
|
#
¿
Aug 22, 2017 18:24
|
|
|
Rules explanations Part 1: Because the game has a fairly high rules overhead, I will try to summarize the most important points in this post. Robert Baratheon is dead, and 6 Great Houses of the land are preparing for political and military conflict with the purpose of seizing the Iron Throne. Here's the starting situation: 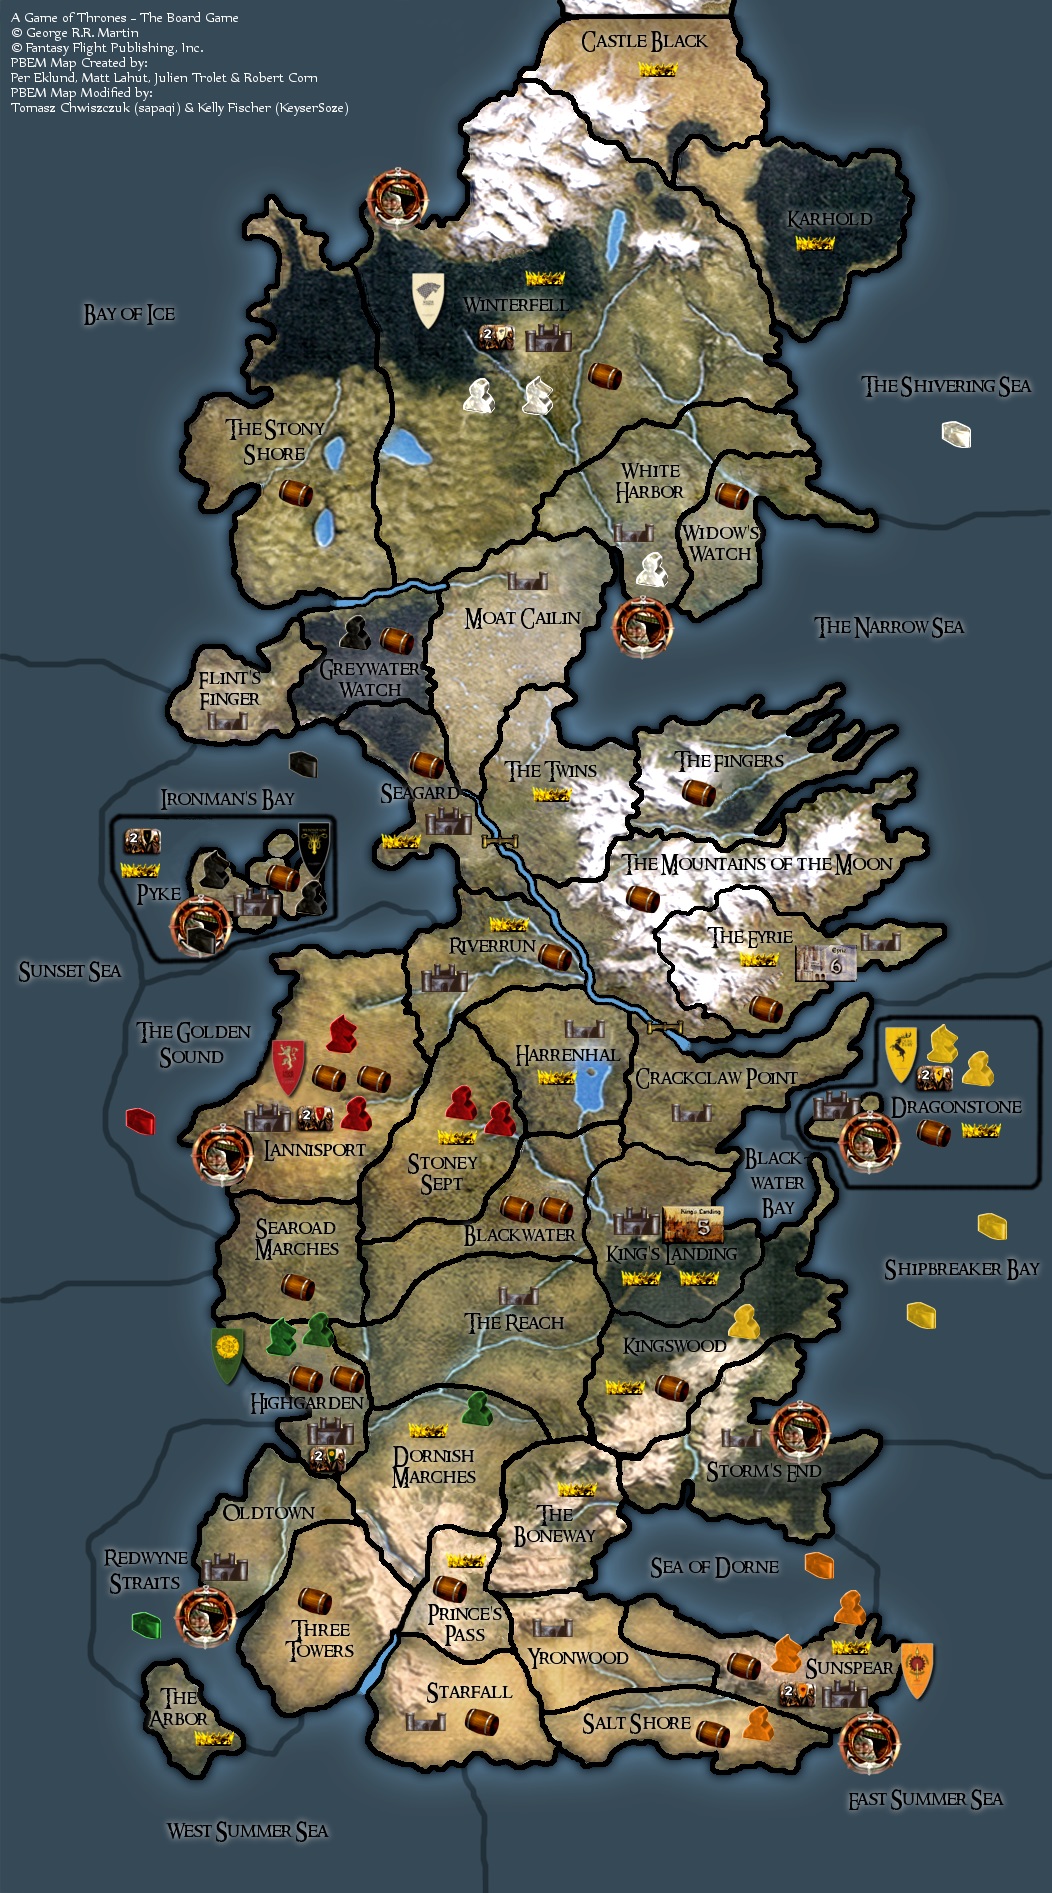 (those of you who know the game may notice the extra Lannister Footman in Stoney Sept. Lannister is underpowered, and Greyjoy is overpowered, and they're basically forced against each other at the very start of the game. This is one of the simpler ways to counteract that). You can see the continent of Westeros, separated into various land and sea regions. Land regions can have several features: - the little golden crowns you can see are Power icons, primarily used to gain Power Tokens, which represent the various sources of soft strength that Houses can acquire (material riches, political influence, goodwill of their supplicants). - the barrels are Supply icons. The exact way this works is a bit more complex, but the amount of Supply a House has is directly connected to the size and amount of armies they can field. - smaller and larger buildings (Castles, like in Harrenhall, ironically, and Strongholds, like in Riverrun). These are the primary win condition, as well as places where further units can be mustered. The game is won by the player holding most such buildings at the end of the tenth round, unless a player manages to control 7 at some point, whereupon the game immediately ends. - harbors, at the edge of some coastal area. They are a bit weird. In some ways they act as their own region, in other ways they are directly dependent on the corresponding land region. We'll get to them later. - there are three rivers with solid black borders. These block unit movement, unless a bridge is present. Currently present on the map are 3 of the 4 unit types in the game. Footmen have a combat strength of 1, Knights have a strength of 2, and are limited to land regions. Ships have a strength of 1 and are limited to sea regions and harbors. The final unit type is the Siege Engine, limited to land. These have a strength of 0, except when they are involved in attacking a region containing a Castle or Stronghold, when they have a strength of 4. Each round consists of three phases: - the Westeros Phase, where three cards are drawn from the three Westeros piles, representing certain global events. These sometimes trigger political rearrangements, or wildling attacks, and sometimes modify the types of actions that players can take in the rest of the round. - the Planning Phase, where players secretly place order tokens on each region where they have units present. - the Action Phase, where the previously placed orders are executed. Noteworthy things that can happen during the Westeros Phase: - wildlings can attack. When this happens, all players secretly "donate" a number of Power Tokens to the war effort, attempting to match or beat the current wildling strength. In case of a win, all Houses get a benefit, with the highest donor gaining a stronger benefit. The exact opposite happens in case of a loss. - Clash of Kings. This represents general intrigue and plotting happening without military involvement. There are three influence tracks. In order, the players secretly bid for positions on these tracks, using Power Tokens. Pictured below is the state of the three influence tracks at the start of the game: 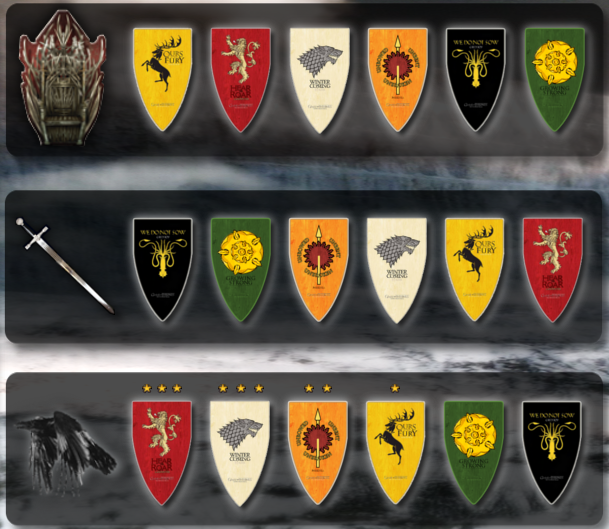 The first is the Iron Throne track. During the action phase, this indicates in what orders players will resolve order tokens. Furthermore, the player at the very top of the track breaks any ties that happen during the game, except for combat ties. The second is the Fiefdoms track. Whenever players are tied in combat, the player higher up will win. Furthermore, the player at the very top of the track has the ability to give himself a +1 combat benefit once per game round. Finally, at the bottom is the King's Court track. This indicate the number of Special Order tokens that each house may play during the Planning Phase. Special Orders will be explained later. The House at the very top of this track also gets a special benefit at the end of the Planning Phase, after all orders have been revealed. They may either replace one of their order tokens with an unplayed token, or they may look at the top card of the wildling deck, detailing the possible gains and losses of a wildling attack. They may then either re-place this card on top of the deck, or at the bottom of it. - Re-supply. Pictured below is the Supply Track at the start of the game: 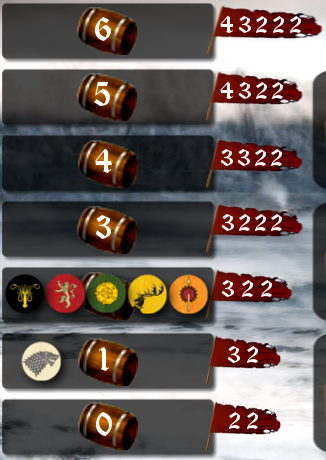 This track indicates what size armies the Houses can field, as a result of the number of Supply Icons they control on the board. Note that a single unit does not count as an army and does not count against the House's supply. Thus, at the start of the game, House Stark can field one stack of 3 units in a region (regardless of combat strength), one stack of 2 units in another region, and any number of single units in other regions. All other Houses can field one further army of 2 units. This limit cannot be passed under any circumstances. If a player ever finds themselves above their supply capacity, they must immediately disband units to fix that. A further important note is that this track is only updated when the re-supply card shows up in the Westeros phase. If the Stark player were to gain control of regions with further Supply icons, they would still have the 3/2 limit until the card showed up. - Mustering. This card allows players to generate new units wherever they are in control of a Castle or Stronghold. A Castle generates one "mustering point" (MP), whereas a Stronghold generates 2. One MP may be used to generate a Footman in the region, generate a Ship in the region's harbor OR an adjacent sea area that does not contain enemy units, or upgrade a Footman to either a Knight or a Siege Engine. Important note: all units are component-limited by design. The limits are: 10 Footmen, 5 Knights, 2 Siege Engines, 6 Ships. Power Tokens are also limited at 20. - some cards that can show up in the Westeros Phase that I won't detail entirely can gain a player Power Tokens (this is usually the number of Power icons in controlled regions + number of friendly harbors with at least one Ship), or can limit the orders that players may place in the next Planning Phase. Now to explain the orders. A player has 15 order tokens, in 5 types, with each type having a Special Order Token that's stronger, but can only be used if the player qualifies via their position on the King's Court track. - March orders, with strength -1, 0, and +1 (special order) These orders are what allows you to actually move armies into new regions. When resolving a March order, they owning player may move any number of the units in that region to adjacent regions (* with an exception, see below). Units may be split up this way, with the limitation that only one target region may contain units of another house. If this does occur, then combat is triggered, and the modifier on the March order is applied to the attacker's combat strength. When a region is left empty, the player marching away may choose to place one of their Power Tokens in it to establish control. That region is considered to belong to that House until units by another House move in. * Land units may be also moved across sea, to a region not directly adjacent if the player can complete a full path between the two regions, using sea regions in which the player's ships are present. - Defense orders, with strength +1, +1, and +2 (special order) These orders grant a combat strength bonus if the region is attacked. If multiple attacks occur against the region in the same round, this bonus is applied to all of them (though it is obviously lost if the region is lost) - Support orders, with strength 0, 0, +1 (special order) These orders allow units stationed in that region to support in battles happening in adjacent regions. They may be used multiple times in a round, and they can be used to support other Houses (though the other House must agree to receiving the support). Ships may support in land battles, but land units may not support in sea battles. - Raid orders, 2 normal, one special Regular raid orders may be used to remove one Support, Raid, or Consolidate Power order token from an adjacent enemy area. Special raid orders may also remove a Defense order. Ships may raid land regions, but land units may not raid sea regions. - Consolidate Power orders, 2 normal, one special Regular Consolidate Power orders will grant the owner 1 Power Token, plus one further Token for each Power Icon in the region. Special Consolidate Power orders may be alternatively used to muster units in the region, if a Stronghold or Castle is present. Consolidate Power orders in sea areas are wasted, but they may be used in harbors. During the Action Phase, orders are generally resolved one at a time in player order. First all Raid orders are resolved, followed by March orders, followed by Consolidate Power orders. A player may choose to discard an order instead of resolving it. I will not go into detail regarding Combat right now. The general flow is: Calculate total strength from units and modifiers -> Each player secretly chooses one of their House cards -> apply House card effects -> calculate new strength -> If one of the two combatants is at the top of the Fiefdoms track, they may apply the +1 bonus -> units either rout into a connected region (I got this wrong the first time, retreats can also happen via ship) or are destroyed (depending on some factors) Finally, some notes regarding harbors. If a player controls a land region with a harbor, they automatically control the harbor also, and all the ships therein. If the land region is conquered, all ships present are converted to the conquering house. The flipside is that harbors cannot be invaded. Part 2: First, a few mistakes I made while typing up the earlier post (already fixed, just clarifying for those who read it before): - Retreating from combat can occur via ship - When mustering ship units, they can be placed in the region's harbor, or the sea area adjacent to the port, providing no enemy units are present there. (note that the rulebook is slightly ambiguous on this: "Ship units may only be placed in a port connected to the mustering area or in an adjacent sea area". "Adjacent" might mean adjacent to the land area, or the port. I choose to interpret it as the port, partially because it also makes more sense in my head). - In the action phase, Raid orders are resolved, followed by March orders, followed by Consolidate Power orders. - If you have multiple Consolidate Power orders, including the special one, I will assume you are resolving the special order last (so as to leave your opponents in the dark as to whether you are mustering units or not). - If you are marching units, and leaving a region empty, I will assume that you are leaving a power token there to establish control, unless you state otherwise. - An omission regarding Raid orders: A Raid order used to remove an enemy Consolidate Power order will gain the raiding player 1 power token and make the raided player lose one power token, if possible. - This may be self-evident, but still something I omitted: if units march into a region containing another House's power token (used to maintain control of the region), then the token is removed, and is not returned to the original player. Of course, this doesn't happen if there are units present that successfully defend the region. Next, a few more details regarding wildling attacks. There is a wildling threat track, going from 0 to 12, in steps of 2. At the start of the game, the threat token starts on the 2 position. Some of the cards that can show up in the Westeros Phase have a wildling icon. Each of these cards that shows up moves the threat token one step up. An attack is triggered immediately when the token reaches the 12 position, or it can be triggered at any threat level when the specific "Wildling Attack" card is resolved. The value of the threat is the number of power tokens that the players need to contribute to defeat the wildling attack. In case of a victory, the wildling threat level is immediately reset to 0. In case of a defeat, the threat level simply moves 2 steps lower. On the map, you might have noticed some little rectangular tiles with a number on them. These come in two types. Firstly, each House's home region has a garrison token. This token acts kind of like a strength 2 unit... that does not count against supply, cannot ever move or support other regions, and cannot receive orders. If the region is attacked, whether other units are present or not, the garrison contributes its strength, and combat occurs using normal rules. If the defender loses the battle, the garrison is permanently discarded. Secondly, there are two regions (King's Landing and The Eyrie) with neutral force tokens. These do not trigger combat, but act as a "force gate". A House needs to achieve that level of combat strength (using units, March and Support orders) to enter that region for the first time. Once this has happened once, the token is removed. An explanation of combat will follow. After a March order is completed (note: if the march involved splitting units into multiple regions, the entire march is completed first), if a region contains units from two different Houses, their forces will battle. The two battling players are not obligated to ask for support, but for the purposes of expediency, my default will be to assume that all support is welcome, unless stated otherwise. Players eligible for granting support (that is, players with a placed Support order in a directly adjacent (not connected via shipping) region) will declare in turn order whether they support either of the parties. The total combat strengths of attacking and defending forces are added up. Next, the two players directly involved in the battle secretly play a House card each. Each House has its own specific deck of 7 cards. The played card will be discarded, and if it was the last one the player was holding, they will then pick up all their other cards back. The card that has just been played remains discarded. Every House card will have a combat strength, that is added to the forces' strength. A card may furthermore have sword icons, fortification icons, or a special effect. Each sword icon means that if that player wins the battle, then the opponent must choose one of their unit to be removed from the board instead of being allowed to retreat. Each fortification icon prevents the effect of one sword icon. There are a variety of different special effects, that I will list at the bottom of this post. Finally, any surviving units on the losing side may retreat, with certain limitations: - If the attacker loses a battle, the units will retreat to the original region they attacked from. - If the defender loses a battle, the defender may choose an adjacent region that contains no enemy units or power tokens to retreat to. This cannot be the region that the attack came from. Furthermore, the defender must choose a region that will cause them to lose the minimum possible number of units as a result of being over supply. - Siege units cannot retreat and are destroyed when losing a battle, nor can they be chosen as casualties to resolve sword icons. Any units that have retreated are routed until the end of the turn. Routed units have a combat strength of 0 and cannot retreat, nor can they be chosen as casualties to resolve sword icons. If an army with routed units loses a battle, those units are simply destroyed by default. Finally, routed units may not move (it is possible that a unit retreated to a region where a march order was present), though they do technically fight. If a territory containing only routed units is attacked, the the entire combat process will occur (with the units contributing 0 combat strength). The one other way in which routed units may be of use: routed ships may be used for transporting troops. There is a weird and awkward rule in the book about how to deal with a player having units in more regions than the number of valid order tokens he can place. We don't need that while playing online. Some regions will just end up without an order in this case. Since I genuinely believe I've exhausted all other rules in this game (discounting various edge cases, for which I will direct you to the official FAQ), here's the breakdown of the end of game tiebreakers. If, at the end of the last round, multiple players are tied for numbers of Strongholds + Castles, the tiebreakers are, in order: - number of Strongholds - position on the supply track - number of power tokens owned - position on the Iron Throne track Dancer fucked around with this message at 16:49 on Aug 23, 2017 |
|
#
¿
Aug 23, 2017 02:26
|
|
|
Okay folks, recruitment closed, and randomizing done. I wish you all good fortune in the wars to come. Game 1: Stark: ETB Lannister: Bottom Liner Baratheon: Pththya-lyi Greyjoy: FACKER Tyrell: Mikey Purp Martell: The General Game 2: Stark: MisterBear Lannister: blackmongoose Baratheon: Captain Rightful Greyjoy: Gutter Owl Tyrell: Fat Samurai Martell: nimby Note: MisterBear is the only person I'm aware of who's entirely new at the game. I consider Stark to be one of the (relatively speaking) easier houses to play, because they have so few neighbours, so I would've swapped him in there even if the randomizer hadn't done it for me .My apologies to AJ_Impy! It feels rather mean to have exactly one person end up left out. If I run some game again after this, I'll make sure to give you a slot. Of course, with so many people, there may very well be a drop-out you can jump in for. So, step 1, I will get busy making a new thread, and cleaning up a little. While that is happening, can all of you please confirm in the Discord that you're participating, and start thinking about your round 1 orders. Round 1 shouldn't need a huge amount of diplomacy, since people are still far apart, so try to send me your orders on Discord in the next 24 hours. I won't be harsh about deadlines (at least not yet). And Gutter Owl, would it be possible to add another channel for the second table? By the way, I think I did omit to point out a rule, that's actually rather important at this point: Players start with 5 power tokens on hand. Here's a reminder of the situation at the start of the game: 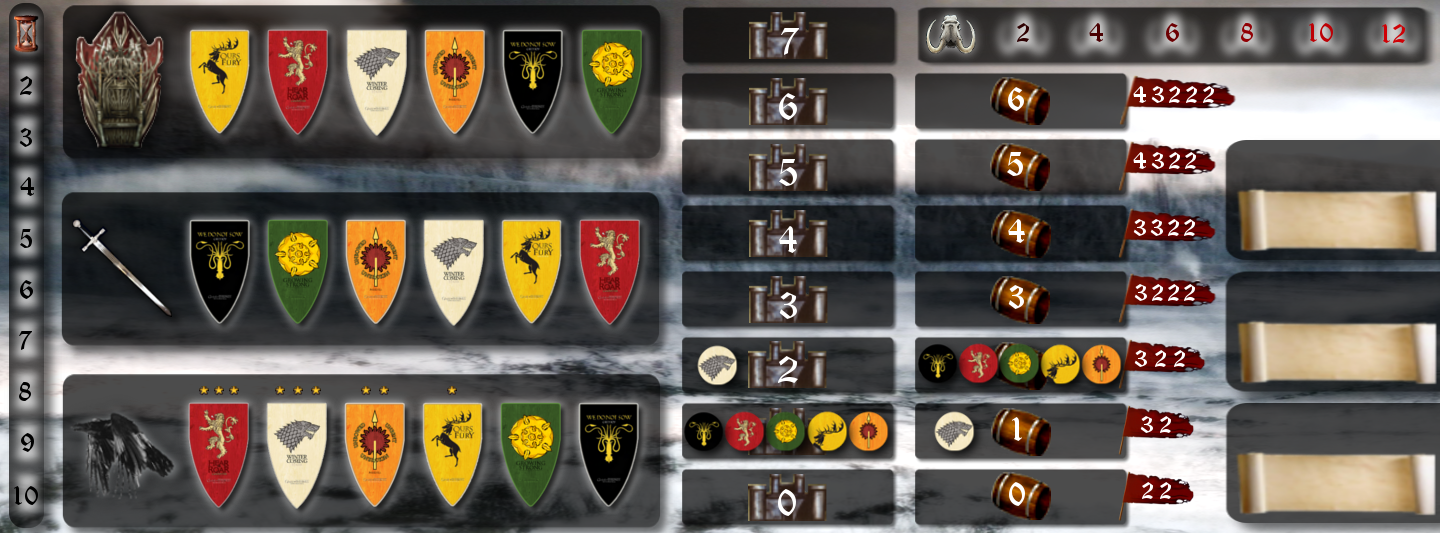 (please ignore the scrolls in the second image, they're an artifact of the massive gimp file I'm using for this) Dancer fucked around with this message at 14:19 on Aug 23, 2017 |
|
#
¿
Aug 23, 2017 10:43
|
|
|
Pththya-lyi posted:Can we only muster ships where the region has a port then? I'm used to playing the other way, but I'm not saying it's definitely correct. That's my interpretation. Rules say ships may be placed "in a port connected to the mustering area or in an adjacent sea area". I see "adjacent" as meaning adjacent to the port itself, not the mustering area.
|
|
#
¿
Aug 23, 2017 11:10
|
|
|
Yeah, you poor Welsh with your... massive tracts of fertile land? 2nd thread is here btw: https://forums.somethingawful.com/showthread.php?threadid=3831474
|
|
#
¿
Aug 23, 2017 11:14
|
|
|
Fat Samurai posted:I'll have you know I can easily find something to be oppressed. Huh... Yeah, that's a fairly useful link to have . Here's a discord invite link for everyone to use: https://discord.gg/wtWNw3 . It will only be active for 1 day (it's either that or permanent, and I'm being overly cautious just in case), but I can generate a new one if needed.
|
|
#
¿
Aug 23, 2017 12:20
|
|


|
It has just been pointed out to me that I have made yet another rules mistake. Consolidate Power orders do not work in sea areas but they do work in ports (exclusively for the gaining of power tokens, not for recruiting units with the special order token). This made me check port rules again, and here are the details on how some orders work: - Defense orders do nothing (since ports cannot be attacked) - Ports can raid adjacent sea regions and vice versa. Ports cannot raid land regions, and vice versa. - Ports may support adjacent sea regions, but not land regions.
|
|
#
¿
Aug 23, 2017 16:53
|
|
|
I guess that has to be the right interpretation then. So let's allow it. Mustering of ship units can happen in any adjacent sea region, or port.
|
|
#
¿
Aug 23, 2017 21:59
|
|
|
Bottom Liner, please check Discord when you can, the orders you submitted aren't complete.
|
|
#
¿
Aug 24, 2017 21:53
|
|
|
Turn 1 orders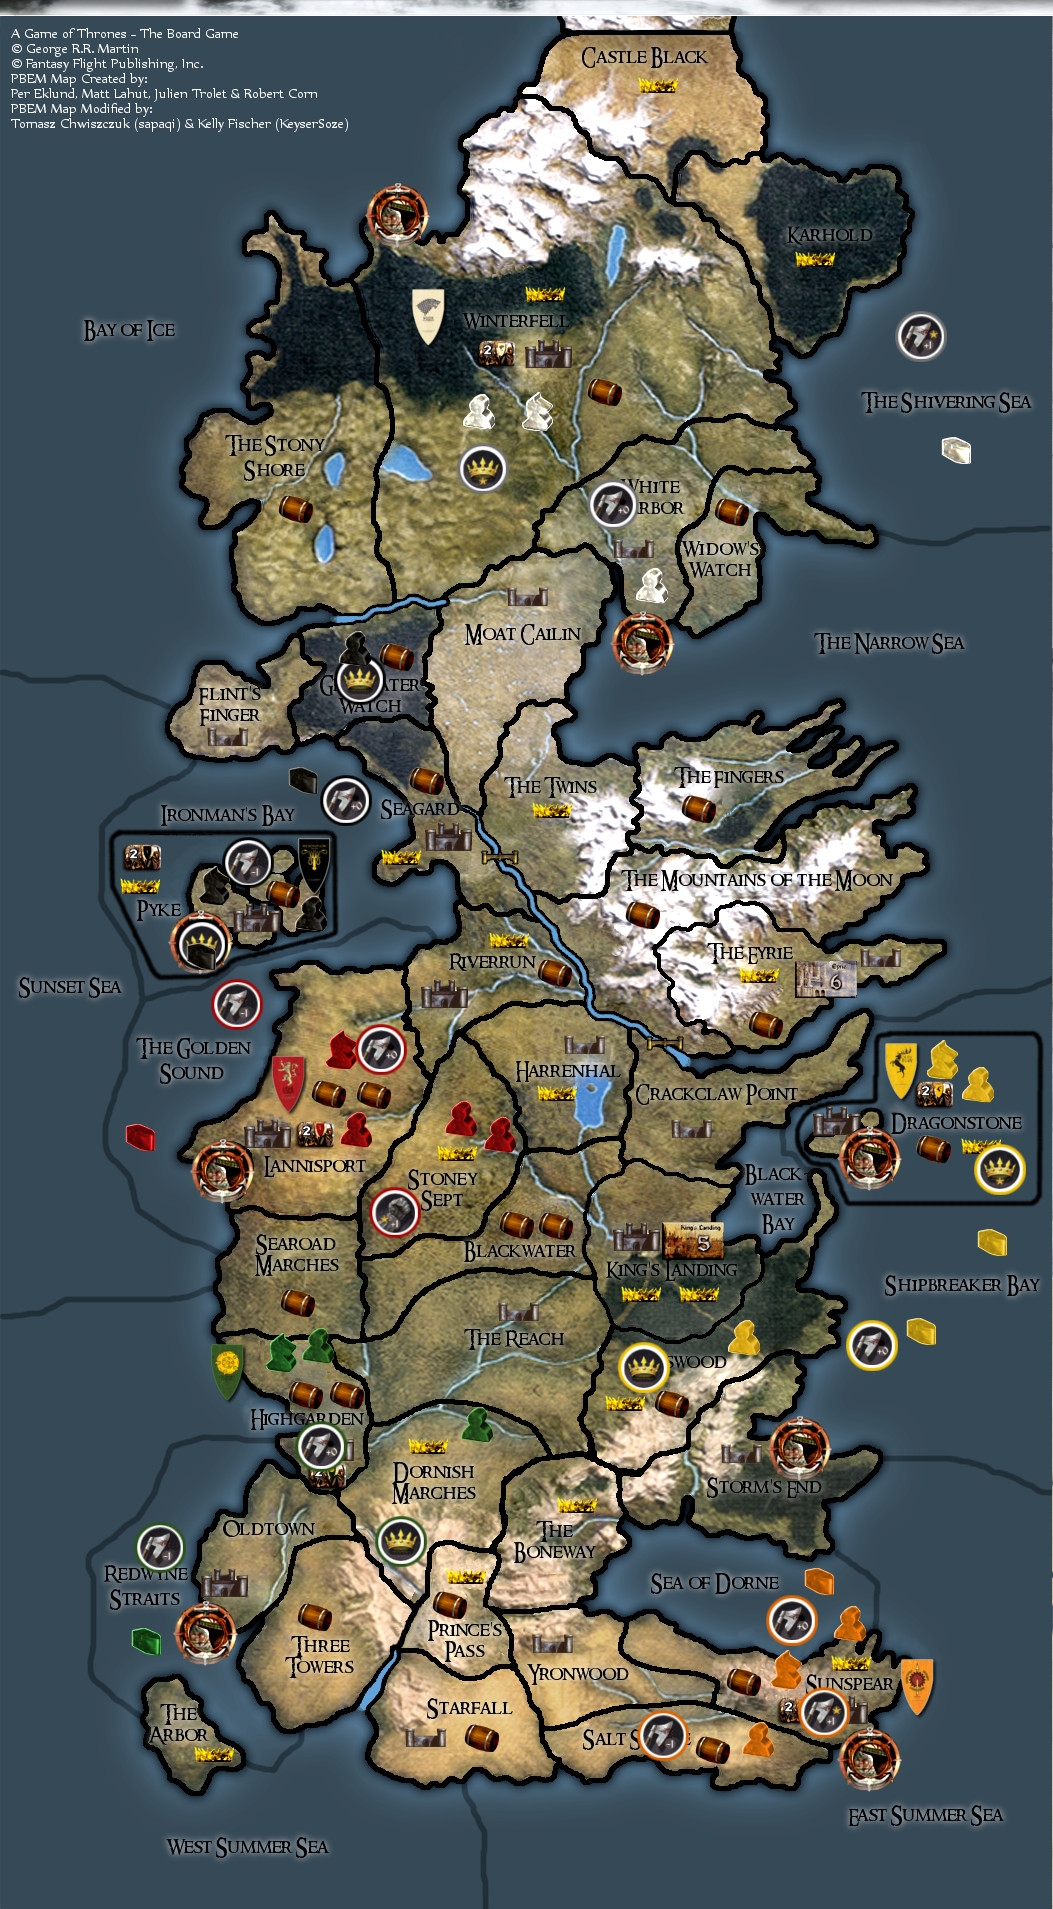 Influence and other tracks: Everyone, as before, has 5 power tokens, and still has all House cards. Bottom Liner gets to either replace one order, or may ask me about the top card in the Wildling deck. After that, since there are no Raid orders, we start marching, beginning with Pththya-lyi. Btw, are we going to use player's names, or shall we switch to Lord/Lady [House name] instead? Might be amusing ") . .Edit: Apologies, Tyrell Support on Redwyne Straits should be a March -1. Changing the file asap Edit: fixed. For real. Dancer fucked around with this message at 23:53 on Aug 24, 2017 |
|
#
¿
Aug 24, 2017 23:47
|
|
|
For now, I really don't mind, but it might be a bigger deal later with possible retreat areas. Also, if Martell is figthing, the Doran card might mess up turn order.Mikey Purp posted:Knight to The Arbor and footman to Oldtown, and I don't need to leave a PT behind, right? That's correct. Map Update After all the moves that have been announced, we've run out of March orders. Now we resolve Consolidate Power orders: - Baratheon gains 2 PT from Kingswood - Lannister has no CP orders - Stark must choose 2 PT or mustering in Winterfell - Martell has no CP orders - Tyrell gains 2 PT from Dornish Marches - Greyjoy gains 1 PT from Greywater Watch - Baratheon must choose 2 PT or mustering in Dragonstone - Greyjoy gains 1 PT from Pyke Harbor 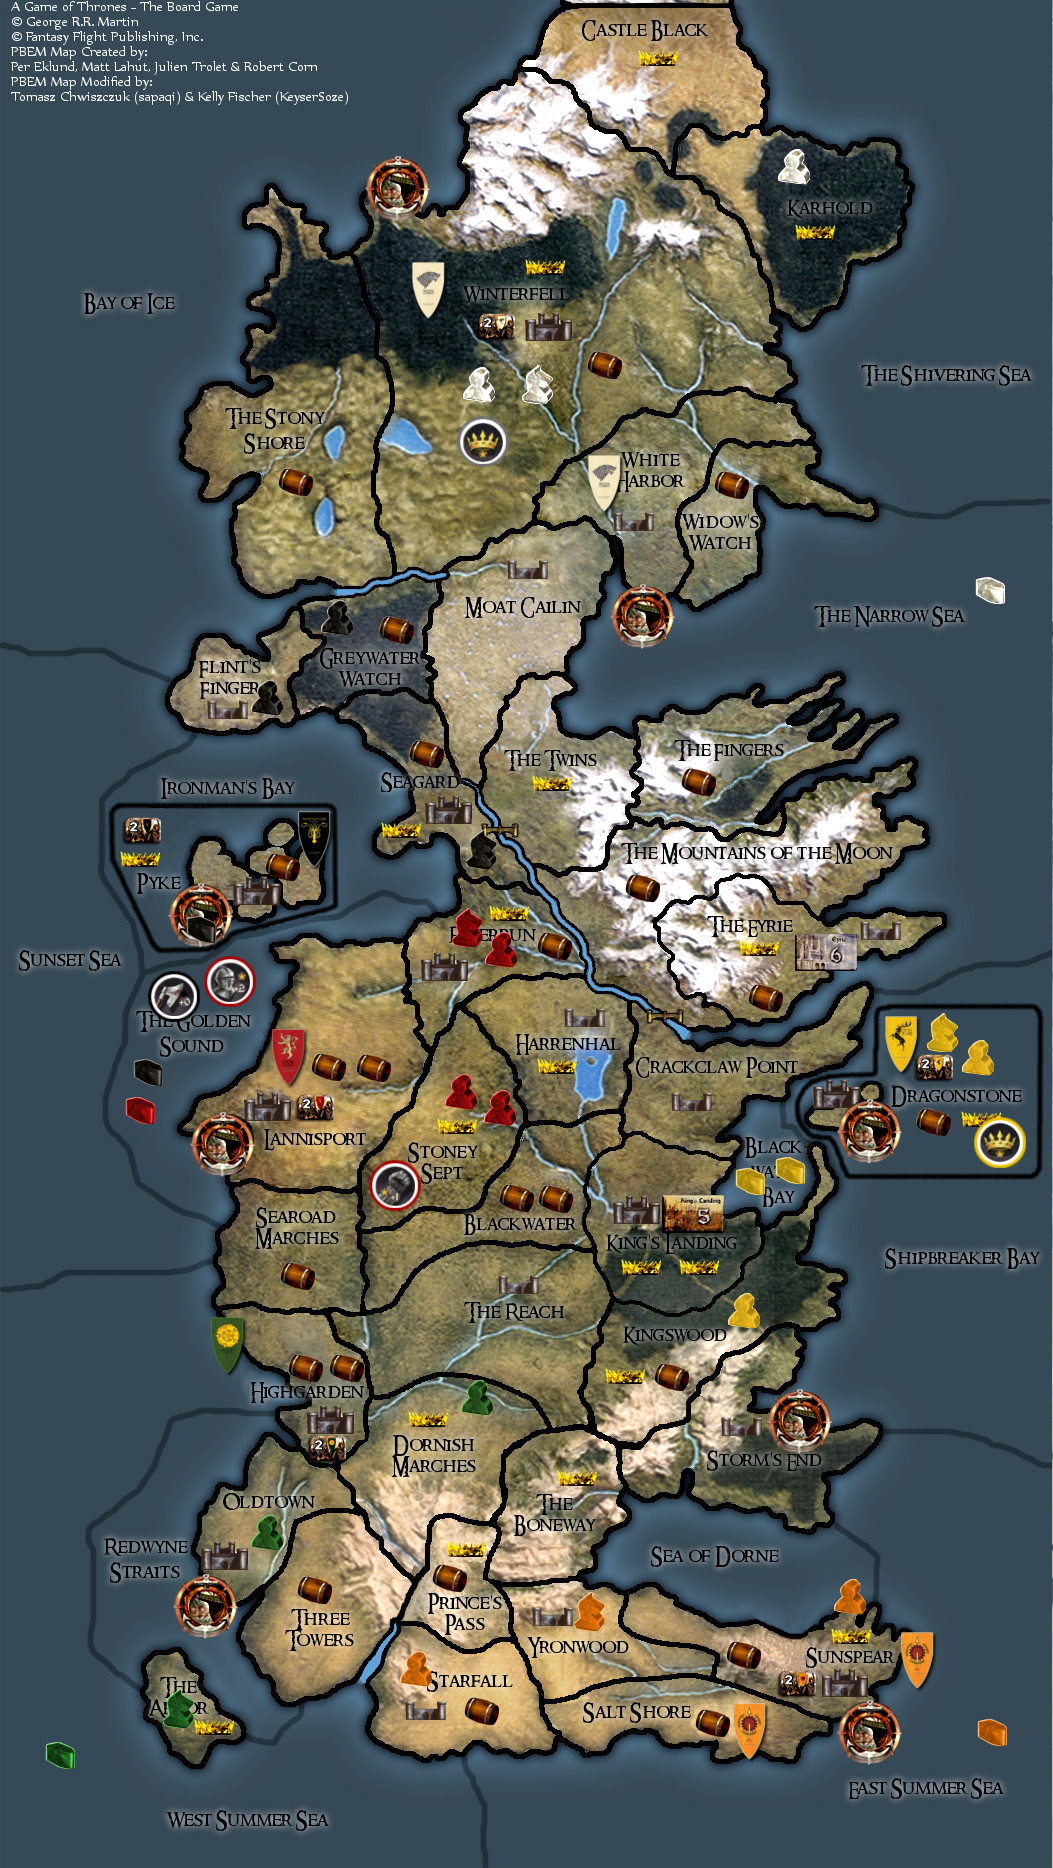 We're currently in the middle of a fight in The Golden Sound. Greyjoy fleet with strength 1 vs. Lannister fleet with strength 3. Once I get Stark and Baratheon decisions on their CP orders, and Lannister's House card for the battle, turn 1 will be over. Finally, I've been having a thought about how we should run battles to ensure they don't become a slog. I think it's a reasonable step to say, it's on the players to ensure that whoever might support you actually declares support before the proper fighting happens. When both players have submitted House cards, I will assume they're both satisfied that they won't be able to get more support than has already been declared.
|
|
#
¿
Aug 25, 2017 11:37
|
|
|
Greyjoy plays: [0] Aeron Damphair: You may immediately discard two Power tokens to discard Aeron Damphair and choose a different House Card from your hand (if able). For a combat strength of 1 Lannister plays: [2] The Hound: 2 Fortifications For a combat strength of 5 If the fight were to end this way, Greyjoy would retreat, and no units would be lost on either side. Greyjoy player may activate Aeron and/or the Blade for a +1 bonus. Reminder that Fiefdoms track position breaks ties.
|
|
#
¿
Aug 25, 2017 13:35
|
|
|
Stark uses CP order to muster one ship in Shivering Sea and one ship in Bay of Ice. Baratheon to muster or collect power tokens in Dragonstone.
|
|
#
¿
Aug 25, 2017 14:19
|
|
|
I believe that with that move, turn 1 is now complete! I'm at work so I can't give a proper update for a few hours, but I can give you the Westeros cards. Resupply (everyone gets to adjust their position on the supply track) Clash of Kings (bid for the three influence tracks) Wildlings Attack Resupply resolves first. Here are everyone's new positions on the supply track: Tyrell - 2 Martell - 3 Baratheon - 2 Lannister - 3 Greyjoy - 3 Stark - 1 We bid for tho Iron Throne track next. Everyone please send me your bid via Discord. Remember that Baratheon will break ties on this bid, and the player holding the Iron Throne after this will break ties in the following bids. Dancer fucked around with this message at 16:02 on Aug 25, 2017 |
|
#
¿
Aug 25, 2017 15:41
|
|
|
Power Token counts, unless I'm mistaken (I'm on phone) Martell and Stark 4 Lannister 5 Everyone else 7
|
|
#
¿
Aug 25, 2017 15:50
|
|
|
Bids for the Iron Throne track: Martell - 0 Baratheon - 0 Tyrell - 3 Greyjoy - 0 Stark - 0 Lannister - 0 Baratheon decided the 5-way tie. The new order is: Tyrell - Lannister - Martell - Stark - Baratheon - Greyjoy Bids are open for the fiefdoms track. Tyrell decides ties.
|
|
#
¿
Aug 25, 2017 19:10
|
|
|
Bids for the Fiefdoms Track Greyjoy - 4 Lannister - 2 Everyone else - 0 Greyjoy keeps the Blade. Tyrell must break the tie for places 3-6. Everyone can send me bids for the King's Court track. Updated PTs on hand: Baratheon - 7 Martell - 4 Stark - 4 Tyrell - 4 Lannister - 3 Greyjoy - 3
|
|
#
¿
Aug 25, 2017 20:46
|
|
|
Final Fiefdoms track: Greyjoy - Lannister - Tyrell - Baratheon - Stark - Martell Bids for the King's Court Track: Baratheon - 4 Stark - 4 Tyrell - 4 Greyjoy - 2 Martell - 1 Lannister - 0 Tyrell breaks ties: Tyrell - Stark - Baratheon - Greyjoy - Martell - Lannister Tyrell takes the Messenger Raven token. Updated PTs on hand: Baratheon - 3 Martell - 3 Lannister - 3 Tyrell - 0 Greyjoy - 1 Stark - 0 Accepting bids for the upcoming Wildling attack.
|
|
#
¿
Aug 25, 2017 22:16
|
|
|
Wildling attack bids: Martell - 2 Baratheon - 1 Lannister - 1 Tyrell - 0 Stark - 0 Greyjoy - 0 Night's Watch Victory, with Martell having the largest contribution. The Wildling Threat goes down to zero. The Wildling card reads: Rattleshirt's Raiders Wildling Victory - Lowest Bidder: Is reduced 2 positions on the Supply track (to no lower than 0) - Everyone Else: Is reduced 1 position on the Supply track (to no lower than 0) Night's Watch Victory - Highest Bidder: Is increased 1 position on the Supply track (to no higher than 6) I think this would've been a particularly amusing one to lose at this point in the game . Alas, we get something boring like Martell having just slightly increased supply.Start of turn 2 planning phase 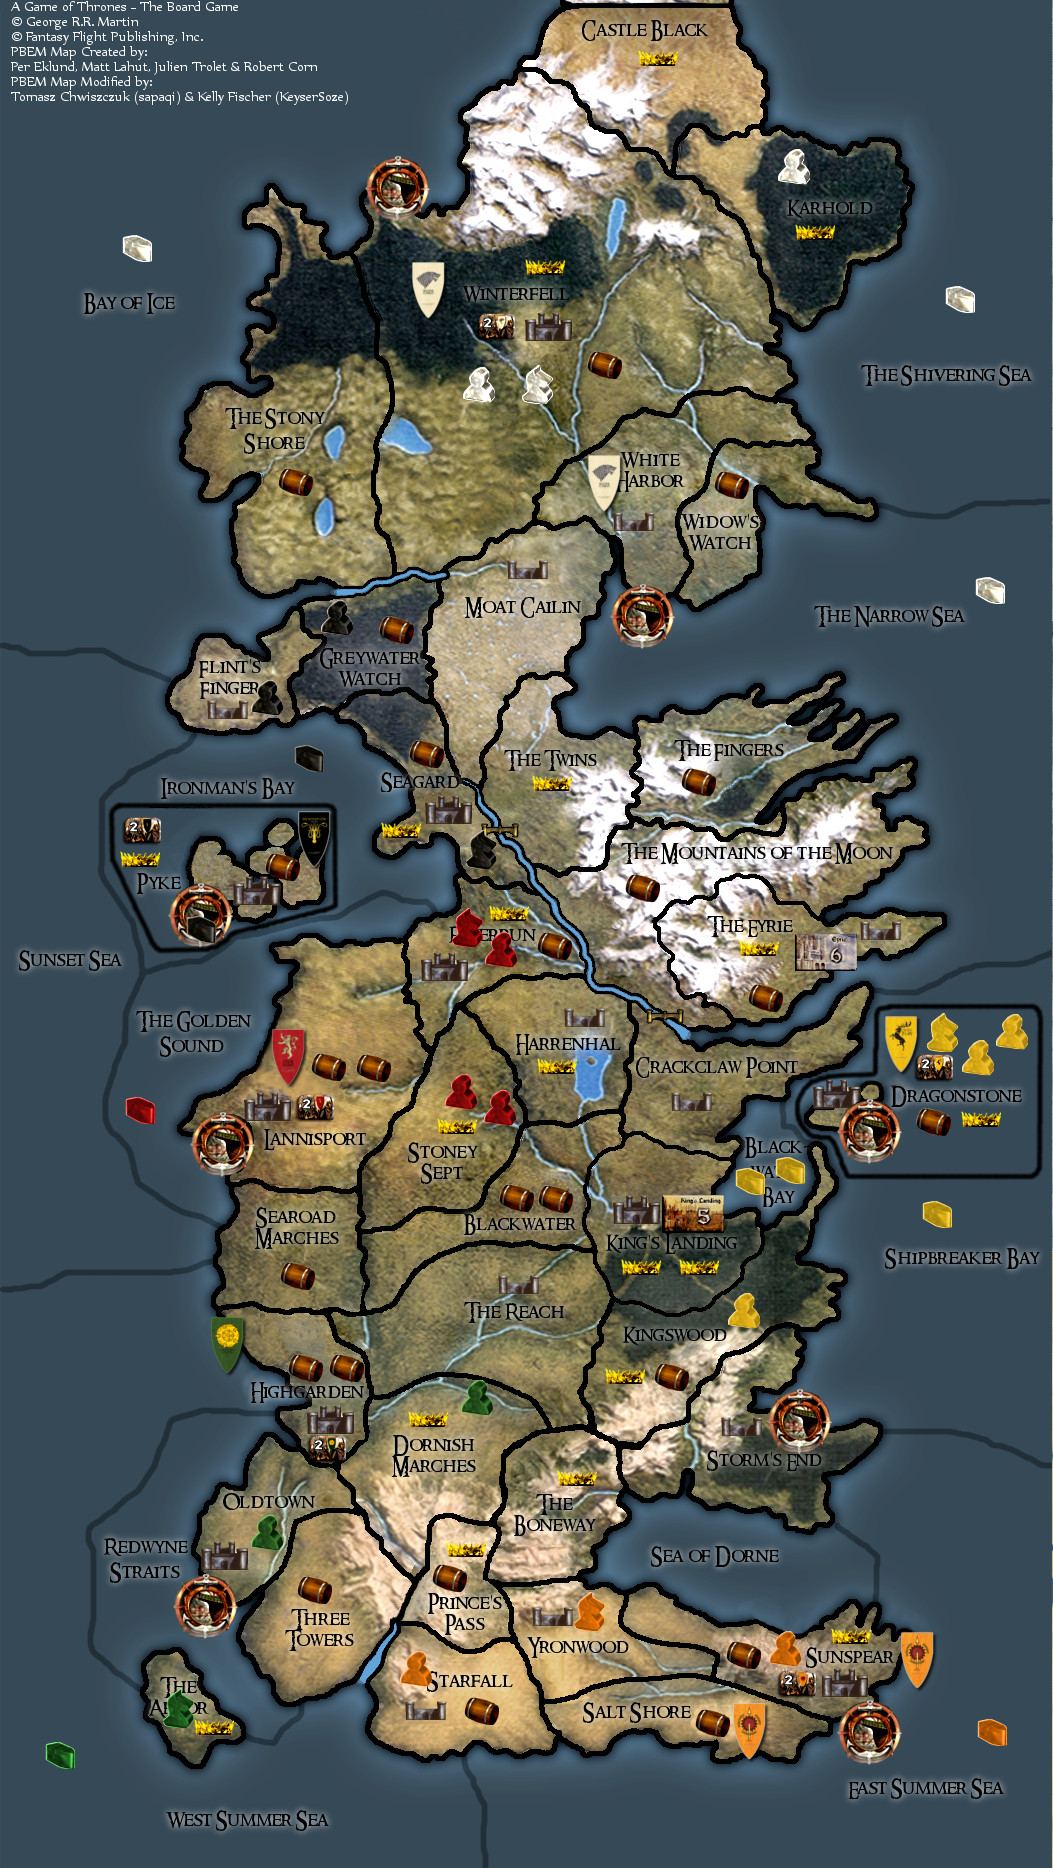 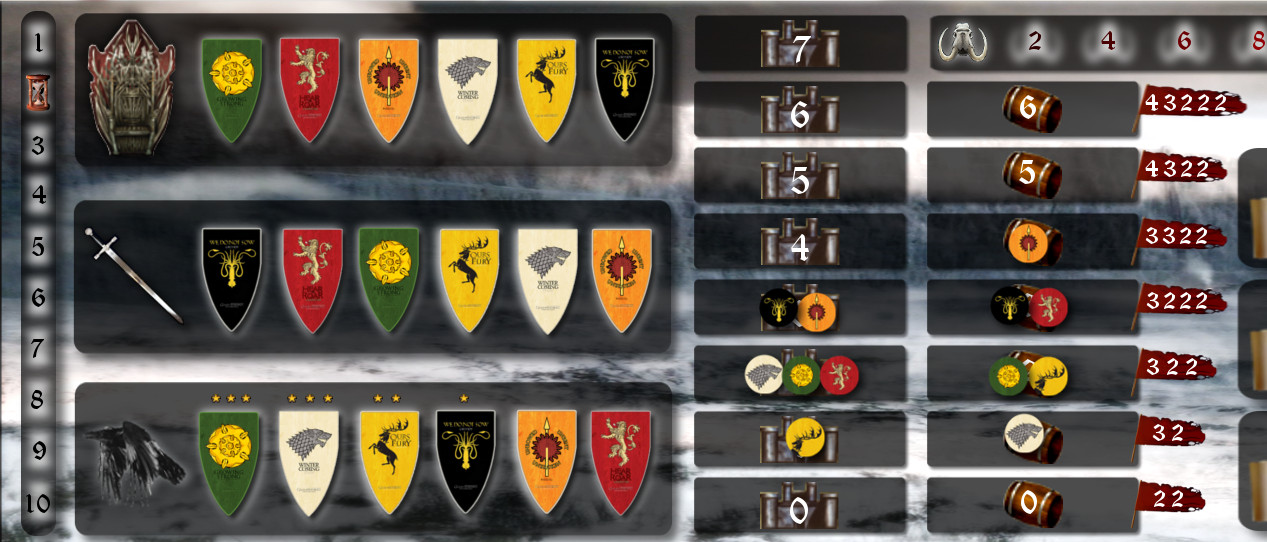 Power Token counts: Baratheon - 2 Lannister - 2 Martell - 1 Greyjoy - 1 Tyrell - 0 Stark - 0 Discarded House cards: Greyjoy: Aeron Damphair Lannister: The Hound Dancer fucked around with this message at 16:02 on Aug 26, 2017 |
|
#
¿
Aug 25, 2017 22:43
|
|
|
Turn 2 orders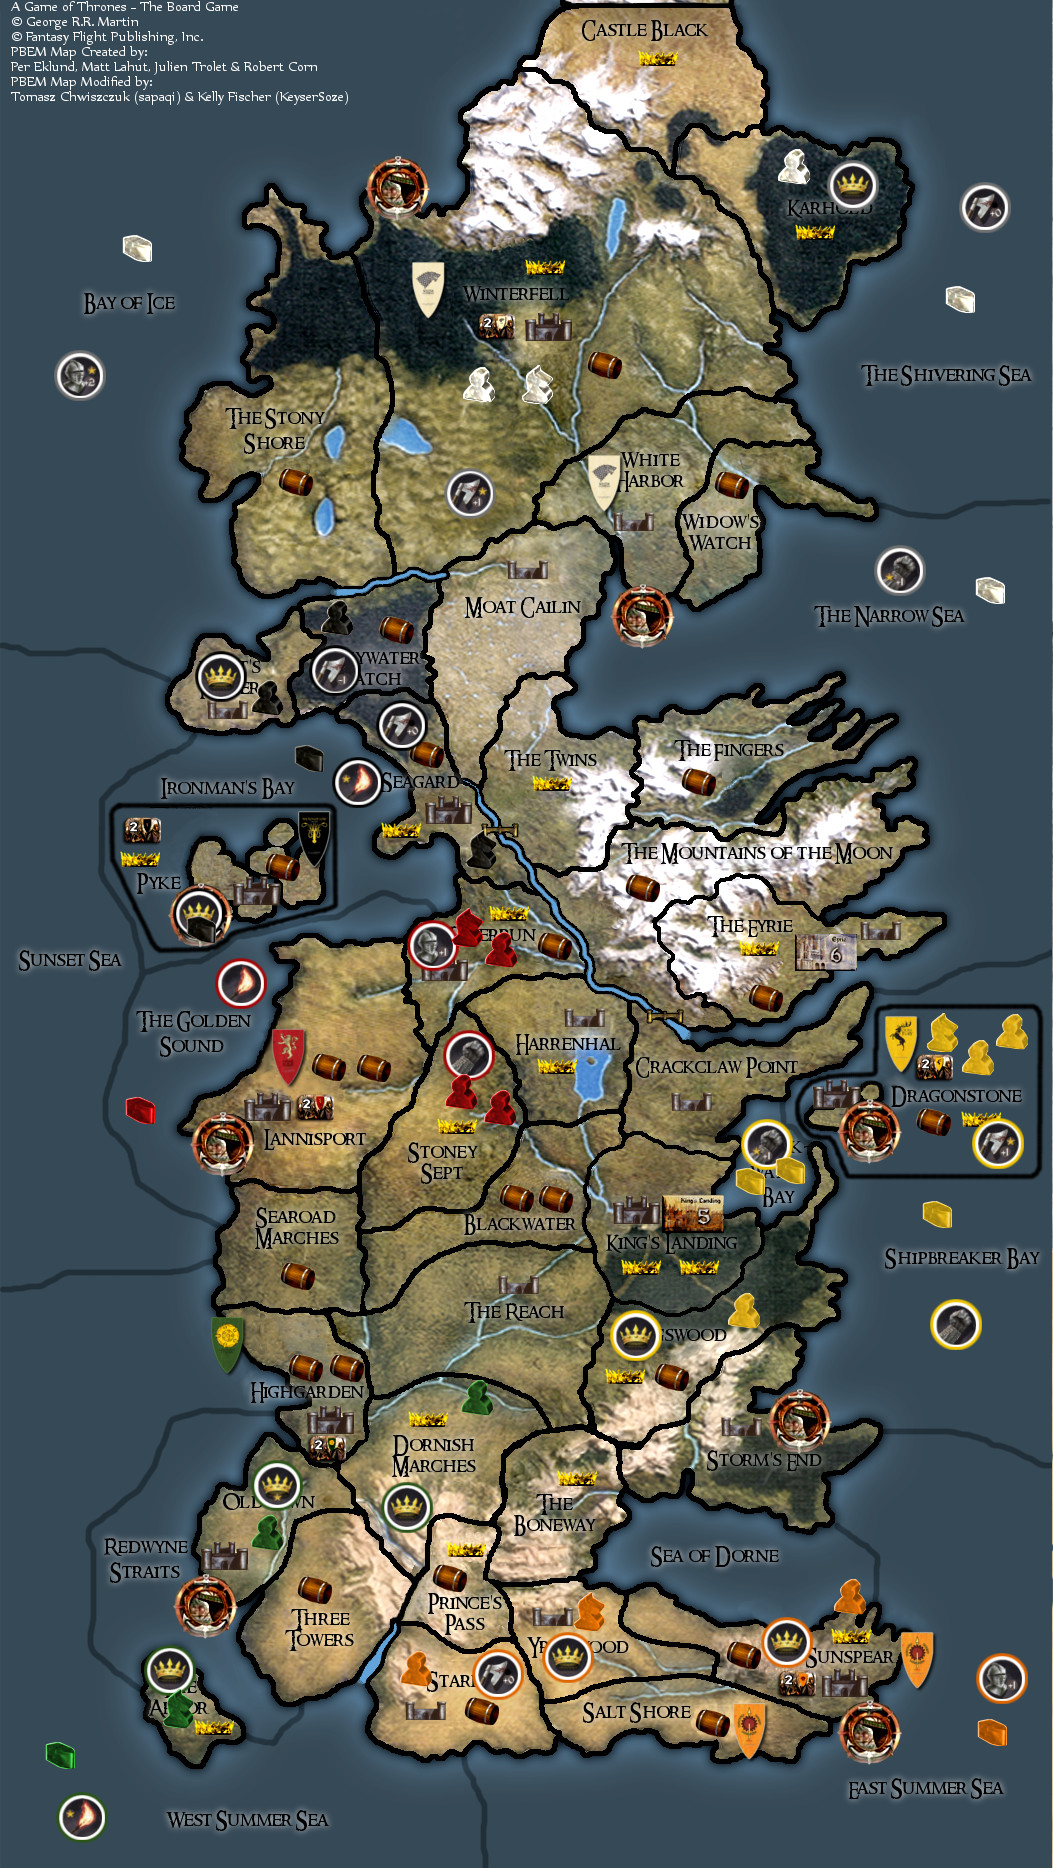 Tyrell may use the Messenger Raven to replace an order, or check the top Wildling card. If we move to the Action phase as is, there are 3 Raid orders to resolve: - Tyrell's Raid can't remove any order - Lannister's Raid can only remove the Greyjoy Raid - Greyjoy's Raid, if still there, could remove the Lannister Defense. After that come March orders. Small edit: I missed that the Tyrell raid is also adjacent to the defenst in East Summer Sea. That's raidable (though it won't really achieve anything) Dancer fucked around with this message at 03:34 on Aug 26, 2017 |
|
#
¿
Aug 26, 2017 02:51
|
|
|
Let's, in this case, just assume the Lannister raid takes its only valid target since that one can only raid a Lannister token. Tyrell and Lannister have no Marches, so it's Martell's turn to play.
|
|
#
¿
Aug 26, 2017 14:56
|
|
|
Tyrell used the Messenger Raven to look at the top card of the Wildling Deck, and re-placed it back on top.
|
|
#
¿
Aug 26, 2017 16:02
|
|
|
By CO, Greyjoy moves a Footman from Seagard to the Twins Quick note (not because I think you guys are doing it wrong, just to double check that everyone is aware): if you don't explicitly tell me to *not* leave a PT behind when you vacate an area, I will. So Martell and Greyjoy both left them behind, and now have 0 PT on hand. For this time I'll still let you take them back. We now move on to Consolidate Power orders: - Tyrell gains 2 PT from Dornish Marches - Martell gains 2 PT from Sunspear - Stark gains 2 PT from Karhold - Baratheon gains 2 PT from Kingswood - Greyjoy gains 1 PT from Pyke harbor - Tyrell gains 2 PT from the Arbor - Martell gains 1 PT from Yronwood - Greyjoy gains 1 PT from Flint's Finger - Tyrell may gain 1 PT or muster units in Oldtown. New PT totals: Baratheon - 4 Tyrell - 4 Martell - 3 Greyjoy - 2 Lannister - 2 Stark - 2 Dancer fucked around with this message at 12:59 on Aug 27, 2017 |
|
#
¿
Aug 27, 2017 12:53
|
|
|
Yeah, I won't bring it up again, (and you don't need to mention it per se). Was just making sure everyone's aware.
|
|
#
¿
Aug 27, 2017 13:43
|
|
|
Tyrell musters a ship in Redwyne Straits and a Footman in Oldtown Turn 2 is over! Westeros cards for turn 3: Mustering (w00p w00p) Game of Thrones (gain power: 1 for each friendly port with at least one ship and no adjacent enemy ships, and 1 for every power icon controlled) Put to the sword (holder of the Blade chooses: no Defense orders, no March +1 orders, or no effect) (none of the cards have a Wildling icon, threat remains at level 0) 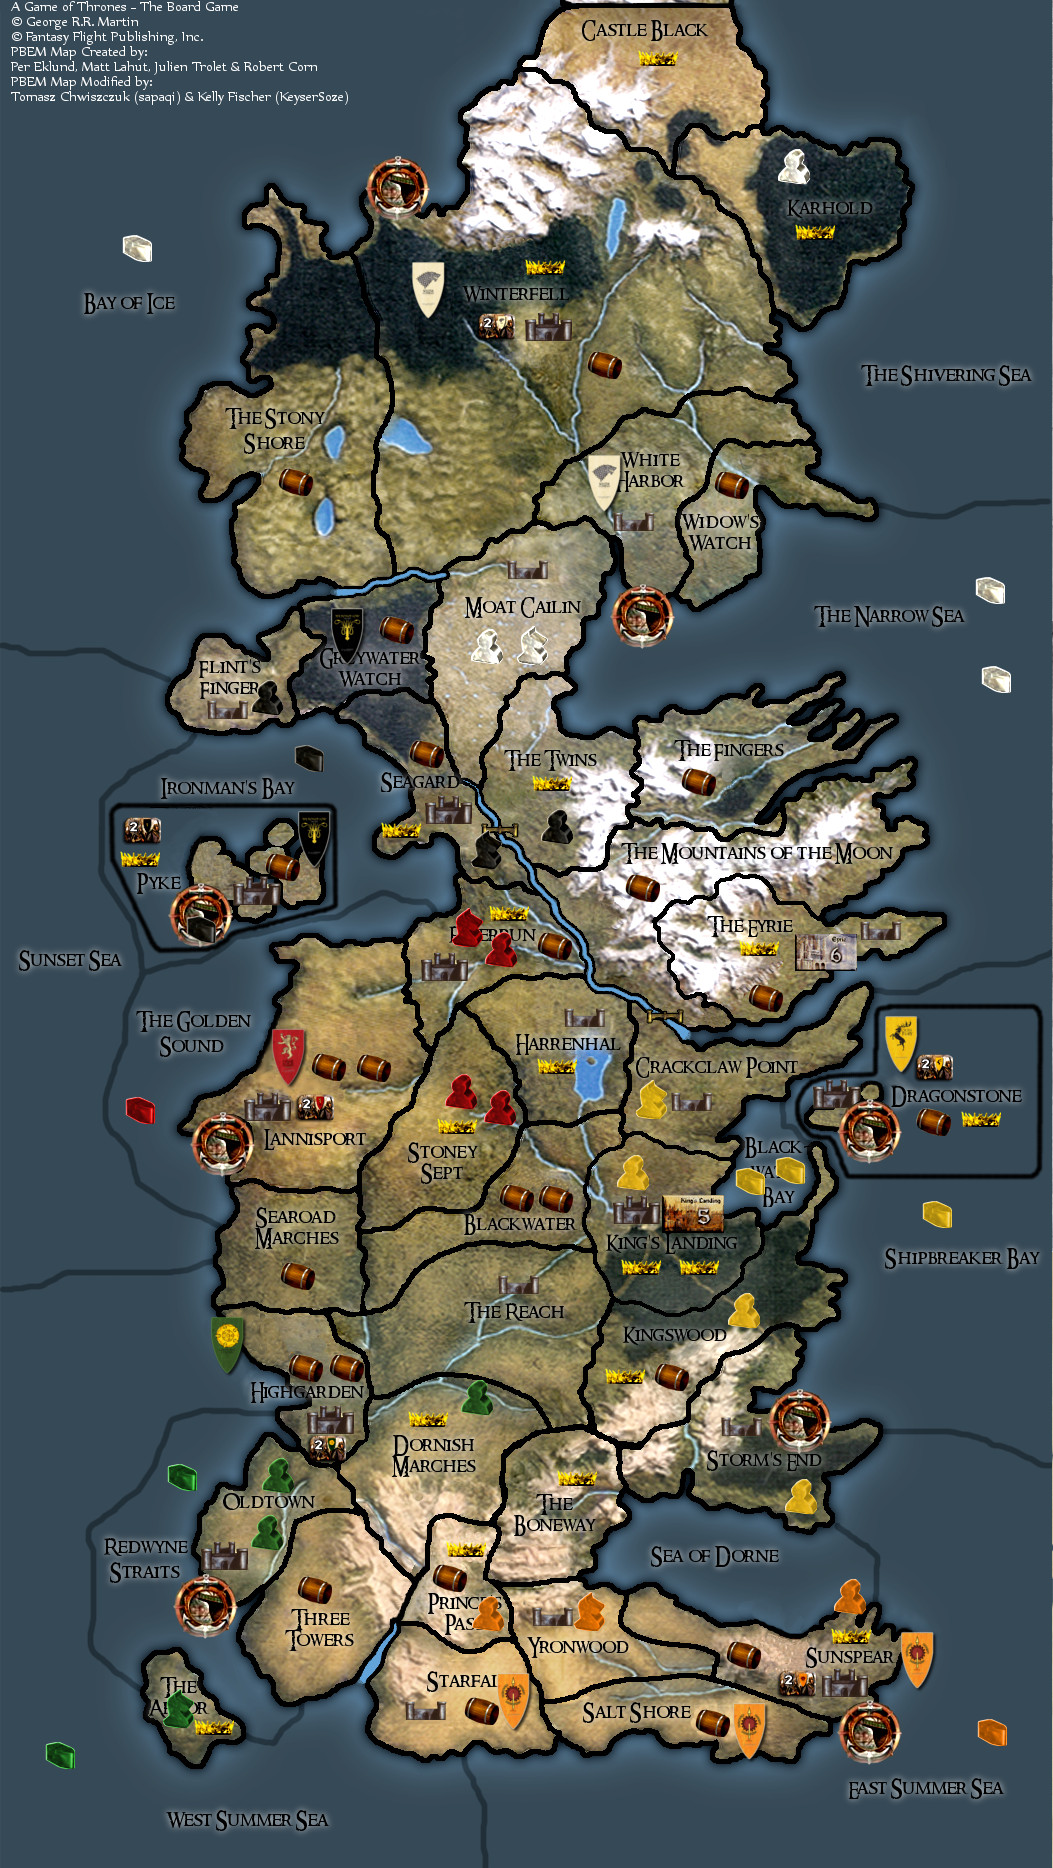 Please post, in Iron Throne track order, what units you want to muster. Dancer fucked around with this message at 15:07 on Aug 27, 2017 |
|
#
¿
Aug 27, 2017 15:03
|
|
|
.
Dancer fucked around with this message at 17:21 on Aug 27, 2017 |
|
#
¿
Aug 27, 2017 16:59
|
|
|
Bottom Liner posted:Damnit I checked my orders with Dancer multiple times before posting! But also I would only have 3 in each so that's fine right? Or are you saying 3 in one place is the issue? Sorry, I got confused with all the changes. When you came up with the last ship addition I failed to notice that the Sound had 3 ships in it. To sum up, you can have - one region with 3 units - 3 regions with 2 units - any number of regions with a single unit
|
|
#
¿
Aug 27, 2017 17:43
|
|
|
Game of Thrones card PT gains: Baratheon +4 -> 8 Tyrell +3 -> 7 Greyjoy +4 -> 6 Martell +2 -> 5 Stark +3 -> 5 Lannister +2 -> 4 The holder of the Blade (Greyjoy) decided: No defensive orders this round Start of panning phase  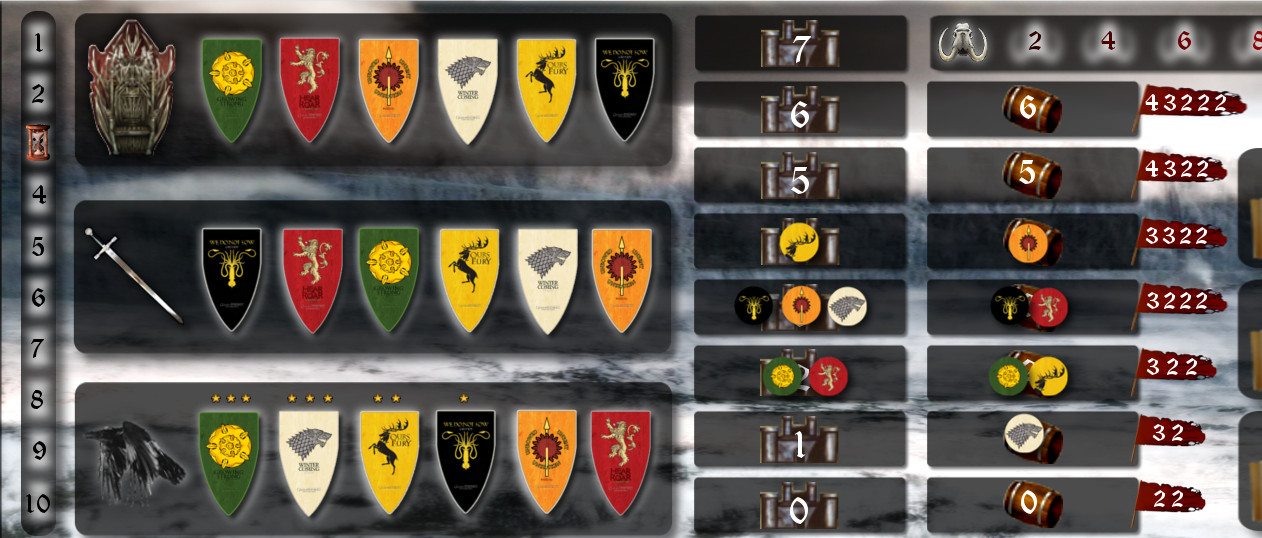 Available House cards: House Stark: [4] Eddard Stark: 2 Swords [3] Robb Stark: If you win this combat, you may choose the area to which your opponent retreats. You must choose a legal area where your opponent loses the fewest units. [2] Roose Bolton: If you lose this combat, return your entire House card discard pile into your hand (including this card). [2] Greatjon Umber: 1 Sword [1] Ser Rodrik Cassel: 2 Fortifications [1] The Blackfish: You do not take casualties in this combat from House card abilities, Combat icons, or Tides of Battle cards. [0] Catelyn Stark: If you have a Defense Order token in the embattled area, its value is doubled. House Lannister: [4] Tywin Lannister: If you win this combat, gain two Power tokens. [3] Ser Gregor Clegane: 3 Swords [2] Ser Jaime Lannister: 1 Sword [1] Tyrion Lannister: You may cancel your opponent's chosen House card and return it to his hand. He must choose a different House card to reveal. If he has no other House cards in his hand, he cannot use a House card this combat. [1] Ser Kevan Lannister: If you are attacking, all of your participating Footman (including supporting Lannister footmen) add +2 combat strength instead of +1. [0] Cersei Lannister: If you win this combat, you may remove one of your opponent's Order tokens from anywhere on the board. House Baratheon: [4] Stannis Baratheon: If your opponent has a higher position on the Iron Throne Influence track than you this card gains +1 combat strength. [3] Renly Baratheon: If you win this combat, you may upgrade one of your participating Footmen (or one supporting Baratheon Footman) to a Knight. [2] Ser Davos Seaworth: If “Stannis Baratheon” is in your discard pile, this card gains +1 combat strength and a sword icon [2] Brienne of Tarth: 1 Sword, 1 Fortification [1] Melisandre: 1 Sword [1] Salladhor Saan: If you are being supported in this combat, the combat strength of all non-Baratheon Ships is reduced to 0. [0] Patchface: After combat, you may look at your opponent's hand and discard one card of your choice. House Greyjoy: [4] Euron Crow's Eye: 1 Sword [3] Victarion Greyjoy: If you are attacking, all of your participating Ships (including supporting Greyjoy Ships) add +2 to combat strength instead of +1. [2] Theon Greyjoy: If you are defending an area that contains either a Stronghold or a Castle, this card gains +1 combat strength and a sword icon. [2] Balon Greyjoy: The printed combat strength of your opponent's House card is reduced to 0. [1] Asha Greyjoy: If you are not being supported in this combat, this card gains two Sword icons and one Fortification icon. [1] Dagmar Cleftjaw: 1 Sword, 1 Fortification House Tyrell: [4] Mace Tyrell: Immediately destroy one of your opponent's attacking or defending Footmen units. [3] Ser Loras Tyrell: If you are attacking and win this combat, move the March Order token used into the conquered area to resolve again later this round. [2] Ser Garlan Tyrell: 2 Swords [2] Randyll Tarly: 1 Sword [1] Alester Florent: 1 Fortification [1] Margaery Tyrell: 1 Fortification [0] Queen of Thorns: Immediately remove one of your opponent's Order tokens in any area adjacent to the embattled area other than the March Order token used to start this combat. House Martell: [4] The Red Viper: 2 Swords, 1 Fortification [3] Areo Hotah: 1 Fortification [2] Obara Sand: 1 Sword [2] Darkstar: 1 Sword [1] Nymeria Sand: If you are defending, this card gains a fortification icon. If you are attacking, this card gains a sword icon. [1] Arianne Martell: If you are defending and lose this combat, your opponent may not move his units into the embattled area. They return to the area from which they marched. Your own units must still retreat. [0] Doran Martell: Immediately move your opponent to the bottom of one Influence track of your choice. Get to planning!
|
|
#
¿
Aug 27, 2017 21:34
|
|
|
Turn 3 orders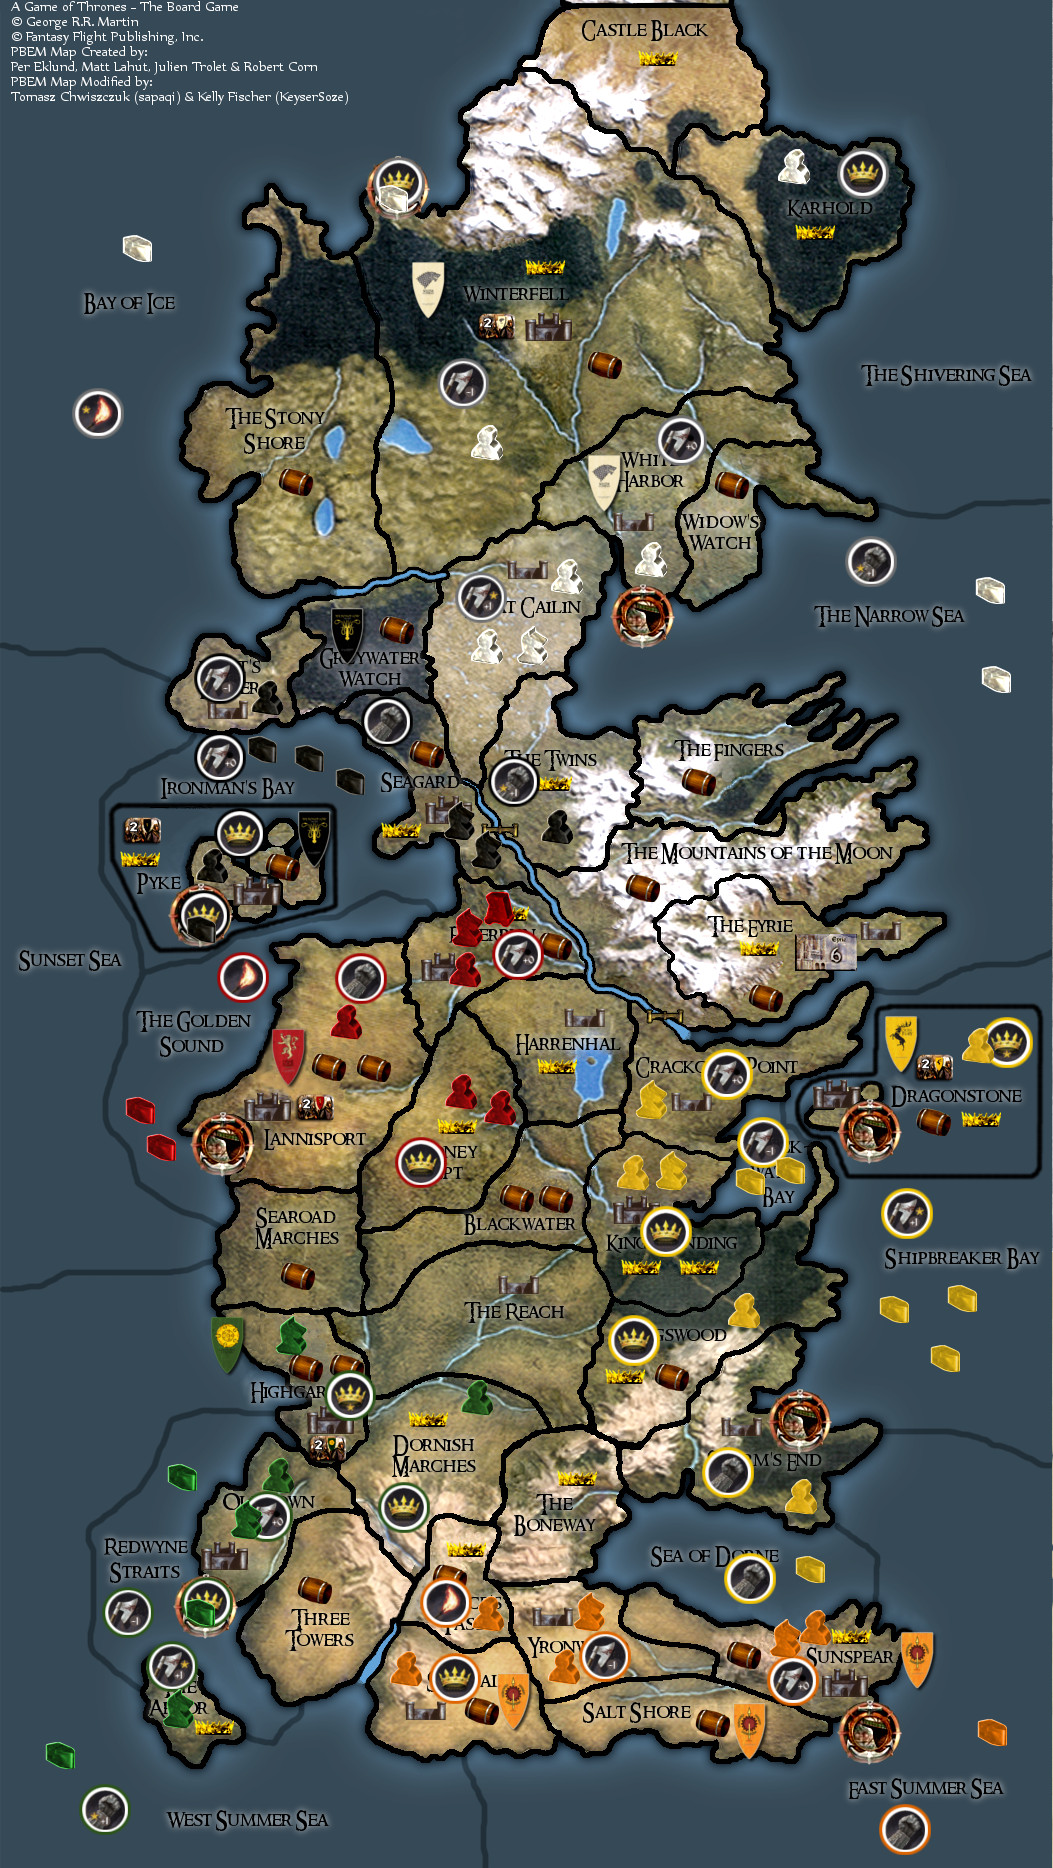 Available House cards are a bit higher up. Tyrell may change an order or see the top wildling card. Stark and Lannister raids have no valid target. Martell raid can target Dornish Marches. Dancer fucked around with this message at 01:49 on Aug 28, 2017 |
|
#
¿
Aug 28, 2017 01:47
|
|
|
Tyrell changes Dornish Marches to a raid, and raids Princes Pass No valid raids remaining. Tyrell marches both units in Oldtown to the Arbor
|
|
#
¿
Aug 28, 2017 01:56
|
|
|
Combat strength 7 vs. 6. Lannister plays: [4] Tywin Lannister: If you win this combat, gain two Power tokens. Greyjoy plays: [4] Euron Crow's Eye: 1 Sword Greyjoy activates the Blade. Final strength 11 vs. 11, Greyjoy victory. Lannister loses the Siege engine (cannot retreat) and loses 1 Footman to the sword icon. The Knight in Riverrun is routed. Martell to play.
|
|
#
¿
Aug 28, 2017 02:31
|
|
|
Martell plays: [3] Areo Hotah: 1 Fortification Baratheon plays: [0] Patchface: After combat, you may look at your opponent's hand and discard one card of your choice. Final combat strength, 6 vs. 2, Martell victory. Baratheon may use Patchface special ability, and must retreat. Stark to play.
|
|
#
¿
Aug 28, 2017 09:51
|
|
|
ETB posted:March the 2 Footmen at Moat Calin to The Eyrie. Fun fact: in the fan made 7th player as house Arryn expansion, Littlefinger is one of their house cards
|
|
#
¿
Aug 28, 2017 10:37
|
|
|

|
| # ¿ Apr 28, 2024 14:47 |
|
|
Baratheon Fleet attack against Stark at Narrow Sea. Strength 4 vs. 2 Baratheon plays: [2] Brienne of Tarth: 1 Sword, 1 Fortification Stark plays: [1] Ser Rodrik Cassel: 2 Fortifications Final strength 6 vs. 3. Baratheon victory. Stark ships are routed and retreat to the Shivering Sea. Greyjoy to play.
|
|
#
¿
Aug 28, 2017 13:40
|
|