


|
two_beer_bishes posted:We're taking down the drywall and adding insulation and a window to a room my brother in law is staying squatting in. He's doing most of the work since this is the kind of poo poo he usually does. The window we're putting in is a leftover from a previous renovation my neighbor did, but it matches our house perfectly. Since we're going through the effort and expense of adding the insulation, is there a way to tell if the window my neighbor gave me is better or worse than buying something at a big box store? I'd rather buy something useful rather than install something that's going to be drafty and lovely. Double pane are standard now because of the benefits to both insulating the house and as a sound barrier. If your neighbor gave you single pane windows--the big box stores windows will be better. If the windows have blown seals--the replacement cost for a sash is going to be about the same as a big box window. You mentioned insulating so I'm thinking you are opening enough of the wall to cut the old window out of the rough-in framing and put in a replacement--measure. Don't guess at your rough in opening--measure it. You can fix slightly smaller windows in a larger rough-in opening, but going to have a hard time going the other way.
|
 #
¿
Oct 23, 2020 19:53
#
¿
Oct 23, 2020 19:53
|
|


|

|
| # ¿ Apr 24, 2024 14:41 |
|
|
two_beer_bishes posted:I don't even want a window to begin with. My jackass brother in law doesn't need a 3rd window "for air flow" when his room just smells like farts so at this point unless he does the work and pays for the new window, it's not getting installed. I really appreciate everyone's input on this; it's given me the info I need to make a proper decision on this project. ")
|
|
#
¿
Oct 24, 2020 17:20
|
|
|
Dunkelbrau posted:Dumb plumbing question: what the hell is in my overflow elbow? Went to snake a slow drain and found this. I can�t seem to twist or pull it out.
|
|
#
¿
Oct 28, 2020 17:26
|
|

|
Bad Munki posted:Do y'think it's hooked up? What you don't want to do is drop the knockout into the drain--that would be the suck. 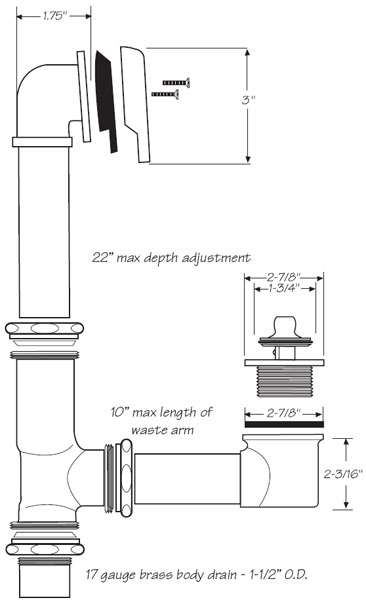
|
|
#
¿
Oct 28, 2020 17:36
|
|

|
Dunkelbrau posted:Oof, good job flippers I bought this place from. Thanks! Bad Munki posted:Now I'm genuinely concerned that it's not hooked up. Proceed with caution. The fact your tub is draining slow now, leads me to believe the overflow is connected. Easy enough to test. Fill your tub half way. Make sure the overflow rough-in cap has been removed. Pull the plug. Your tub should drain much smoother. If the overflow isn't connected when you pull that plug you'll hear the geyser happening on the other side of the tub instead of the gurgling drain. If you do hear the geyser--stuff the drain back in the tub quick and get some buckets. But if you have used this tub at all in the past--and have not gotten water on the ceiling below--I'd think your drain lines are intact. Leaving out sections of drain pipe is rare. Forgetting a knock-out isn't so rare. I've had a toilet get installed with the knock-out left in place. (A test flush immediately after the install uncovered the problem--but still a fun story.)
|
|
#
¿
Oct 28, 2020 19:54
|
|
|
nwin posted:So I tried that, with as little as one shim, and it kicked the center out too much. The pet of the door where the lock meets the door jamb was hitting. It�s like I need to pull that part in. One trick is to remove the center screw on the top hinge and replace it with 4" long screw through the jamb and into the studs holding the door frame. You can get a better bite with the longer screw than the standard short hinge screws. Tighten the 4" screw enough to pull the jamb into plumb and that should also level your door. The punt option is to shave the door. If everything is level and plumb and/or the 4" screw trick doesn't work, bust out a wood plane and go to town. Just remember it is very easy to take wood off a door, but not so easy to put it back on. i.e. if you shave a door and then level everything, you've got a chance of getting light gaps because your door is longer a rectangle.
|
|
#
¿
Oct 30, 2020 20:23
|
|
|
dangling pointer posted:I tore out the crumbling concrete steps on my porch and plan on replacing them with wood ones. Two steps. The ground is zero. The first step is at 6". The second step will be at 12". And the top step will be walking on to the slab 18". Meaning you only need to build two steps.
|
|
#
¿
Oct 31, 2020 02:18
|
|

|
Toebone posted:My house has a dining room built-in with a couple drawer holes and no drawers. Anyone have tips or a guide for cobbling together a couple replacements? for example: https://cabinetdoorsnmore.com/products/drawer-box There are dozens of places across the country, that thanks to the internet, will do all the heavy lifting and send you what you need. Our local cabinet builders only build boxes and do custom finishes now--all the drawers and fronts can be had online for great prices and great quality**. There are a mind numbing number of options--slide types, wood types, styles. Do a lot of measuring and reading reviews, don't be afraid to call and make sure you get good feels. Heck you can buy drawer fronts now and drawers later if you want.
|
|
#
¿
Nov 3, 2020 18:57
|
|

|
Christoph posted:
Green board is for moist/humid environments. Green board holds up great to the hot shower steam and splashes from washing your hands/brushing your teeth. Green board will crumble/degrade in a wet environment. The core of the green board is the exact same as regular drywall. The paper is considered water resistant--not water proof.
|
|
#
¿
Nov 23, 2020 18:20
|
|

|
The Slack Lagoon posted:You can see the water coming off the supply on the top, and going into the washer on the bottom. It's a compact stackable set, so there's a lot going on back there, but I think the main limiter to moving the machine back is the supply line.
|
|
#
¿
Dec 2, 2020 19:18
|
|

|
Jose Cuervo posted:Lacking a pickup truck (I only have a 1998 Toyota Camry), is the safest way to get a 16 foot piece 2x6 from Lowes / Home Depot to get it delivered? Would suck getting one board delivered--$10 for the lumber and $60 for delivery. Tying to front and back bumper works--just make sure it can't bounce up and down and you'll be fine.
|
|
#
¿
Dec 3, 2020 17:18
|
|
|
Kashwashwa posted:Looking for ideas on what to do about sewer smell in my house... You also mentioned: "A couple months ago I had the stack cleaned out from the toilet down." How old is your house? How many bathrooms? Did you have the smell before the cleaning? The problem with a clogged sewer pipe isn't the smell, its that your pooh has no where to go until it starts pouring out of your lowest drain. For you to smell the sewer gas--the gas has to be getting out somewhere where water can't also get out. The thought being you would notice the water. And if it isn't a trap, that leaves you vent stack as a suspect. If the smell wasn't there before a plumber started running snakes through your pipes and now there is a smell--I'd be thinking something in my vent lines got cracked or punctured. e: I take a long time to post... 1894--yikes!!!
|
|
#
¿
Dec 8, 2020 16:49
|
|
|
Rhyno posted:So, back to this for a moment. My basement doorway is a fully finished frame ) and it looks like that is a 2x6 wall supporting the stairs? The door next to the opening looks like a steel exterior door? Do your other doors match the trim and jambs? i.e. Are your interior doors solid wood and stained?If your other doors are solid wood--my vote would be to get a raw door and mortise in the hinges. Check the hinge side of the jamb and see if it is plumb. If it is, there is no reason to tear everything apart. Plus, you don't want to replace your trim--it is really nice. If your market is big enough, your big box will stock solid wood doors. https://www.lowes.com/pd/ReliaBilt-...0-in/1001860512. Grab a door, three hinges that match your others--and here is where it gets dicey--either a template and a handheld router or a nice set of sharp chisels. If you are going to DIY the project and have never worked with either set of tools--you'd better practice on both a horizontal and vertical pieces of scrap before showtime. If you screw up the jamb with a wayward router, the worst case is having to tear everything out and install a pre-hung. Hang on to that receipt for the solid wood door! If you do go for the pre-hung door--I'd recommend staying away from the off rack doors. They are typically one step above cardboard and good for closet and utility rooms. If the door is going to be visible in the main part of the house and/or used frequently--spend the money on a nicer door. Think "special order" in a big box store or head to your local builder's supply. If those are 2x6 walls holding up the stairs--you're going to need to special order to get a 6 1/2" jamb versus the 4 9/16 jamb used for most 2x4 walls. And since it is a basement door, if you are special ordering and it is not a solid wood/stain grade door, 100% make sure it is solid core and spend a little extra on upgrading the fire resistance--45min to 60min door between your basement and living space is nice piece of mind.
|
|
#
¿
Dec 8, 2020 19:13
|
|


|
best bale posted:Not sure where this question should go so I�ll ask here: I bought a shipping container to use as a workshop and don�t know if there�s anything I should be doing to it now to make life easier in the future. It�s a basic 20� triton container built in 2012, retired October of this year. Body and interior have intact paint but the 4 corners have light surface rust. Do I take care of the corners or take the opportunity to repaint the whole thing? And if so, any paint recommendations? Located in the southeast so humidity is ever-present.
|
|
#
¿
Dec 8, 2020 19:19
|
|
|
LlamaTrauma posted:I found some water in the basement dripping down the corner masonry blocks during a recent heavy downpour. Headed outside to see if a downspout had popped loose or something, but didn't see anything obvious, so I started poking around and whoa... a hole in the house. Somehow in two years in this house we never notices this 3/4"-ish wide gap in the wall letting anything in: bugs? rats? obviously water. TacoHavoc posted:I would get some backer rod and use a polyurethane caulking. I love that stuff. https://smile.amazon.com/PC-Products-92507-PC-Xtreme-Elastomeric/dp/B008DYN6BK
|
|
#
¿
Dec 28, 2020 19:44
|
|
|
Final Blog Entry posted:All the polyureas I know, including the one you linked, are self leveling for horizontal surfaces and won't hang well on op's vertical joint. A one-part polyurethane such as Vulkem, Sonneborn NP1, or Sherwin Williams S1/H1 over backer rod would do well and is probably what the other poster was suggesting. You are right! Have loved the stuff when used in the past, but I only use it on expansion joints. I imagining that stuff flowing right down and curing in seconds--it would be a disaster...
|
|
#
¿
Dec 28, 2020 21:20
|
|
|
What kind of cuts are you making? Edge cuts? For the drop in sink? Both? Use clamps, a straight edge, and the circular saw to cut the edges. Depending on how good you are with the circular saw, plunge cut the straight runs and use the jigsaw on the curves for the sink. Or drill starter holes near the corners and jigsaw out the sink drop in--the sink flange will cover less than perfect lines. Tape all your cuts to prevent chipping--shipping tape is nice and flat with the bonus of being able to see through it.
|
|
#
¿
Jan 4, 2021 23:17
|
|
|
Blackchamber posted:I bought a house last month and a couple of the outlets only half work. I got a socket tester and they read as being 'open hot'. I had a few other larger electrical issues I had an electrician take care of but I was hoping this was something small enough to do on my own. I'm mostly wondering if I'd be better off just buying new receptacles and replacing them rather than (if it is indeed the issue) just re-attaching a loose wire. When you say the outlets 1/2 work--is the bottom outlet working and the top outlet not working? If that is the case--your house is wired for window lights. There is a switch somewhere that controls the top outlets. The idea being you put the Christmas candle lights in each window during the holidays and when you go to bed, you have one switch to control all the lights. Here is a video talking about open hots. https://www.youtube.com/watch?v=ZrWZ-d8By5k
|
|
#
¿
Jan 6, 2021 17:10
|
|
|
Blackchamber posted:Well that sucks about the usb outlets. Not always having to have a dedicated charger for the bedroom would have been nice.
|
|
#
¿
Jan 6, 2021 20:33
|
|
|
Chainclaw posted:I've been laser cutting some mylar sheets and generally liking the results. The only problem is how quickly these sheets pick up fingerprints. Is there anything I can coat these with to keep them looking nicer, longer?
|
|
#
¿
Jan 11, 2021 17:48
|
|
|
Sherwin Williams Emerald Urethane has turned into the only paint I use on trim, doors, jambs, etc--I love the stuff. All the stuff that makes wood work look grimy over time wipes right off. We tend to have muddy dogs that will lay against the baseboards. A wipe with a damp cloth and the baseboards look like fresh paint even after a a few years.
|
|
#
¿
Jan 16, 2021 22:01
|
|
|
The water can dry and leave mineral deposits from the water droplets themselves--but that shouldn't be damaging/permanent unless there is something caustic involved to get through the powder coating. tl:dr think drying your car after washing it...
|
|
#
¿
Jan 31, 2021 20:41
|
|
|
A lighter (especially a nice long, grill lighter) is a great tool to figure out how bad of draft you have. Put the flame in front of the area with the draft and watch--if it blows out you got big issues. If it flickers, not so bad. But you get the idea--just don't burn anything. As Tezer mentioned--if you are getting a draft at floor level, you'd really want to figure out from the outside of the house how it is getting though. But if it is just cold flooring. Is it concrete/slab? Expect some thermal dissipation in the concrete closest to the outside walls.
|
|
#
¿
Feb 3, 2021 20:04
|
|
|
Xenix posted:On the topic of lighting, I have 10 sconces that I thought had LEDs in them. One burned out and it turns out they were 150w halogens (cue the realization they are likely the cause of our recent higher electrical bills). I found LED replacements, but as soon as I remove the last halogen in each of the 2 circuits, the LEDs all turn on at a very low intensity. I now have 1 halogen in each circuit to keep this from happening. The LED packaging had some broken english on it about needing LED as opposed to incandescent dimmers. Is that correct? Do I need to swap out my dimmers to finish my light bulb replacement? There are few fixes if you don't want the lights glowing. Installing a non-LED being one of the easier remedies.
|
|
#
¿
Feb 8, 2021 19:39
|
|
|
Most half pans, across brands, appear to be 19x16x10mm/0.7x0.6x0.4inch; Capacity: 1.6ml. Some are 9.5mm high.
|
|
#
¿
Feb 9, 2021 20:36
|
|
|
AFewBricksShy posted:I'm mainly an office shlub, but need work boots if I go to a job site. Those days are long gone. gently caress paying $200 for a pair of boots. I go to walmart and buy the boot one up from the cheapest---they never cost more than $50 and most the time are right around $35. I care more about the sole of the boot than anything else--will it clump up with mud/hold rocks/etc... (But if I'm working inside I have switched from boots to steel toed clogs.) I've got three pairs of WalMart boots--a clean pair, a truck pair, and a work pair. They are all between three to five years old--so holding up pretty good for costing less thant one pair of Timberlands that never would have made it three years--especially with daily use.
|
|
#
¿
Feb 12, 2021 17:42
|
|
|
porkface posted:Nothing in the circuit breaker box. Here's everything I can see: Do not make a double ended extension cord. They seem like a really great idea at the time. Don't do it. The generator setup you have is 100% jury rigged and not up to code. You want to connect your generator to an "Inlet"--not an outlet. And you'll want a bit better power transfer switch... Think something like: https://smile.amazon.com/Reliance-Controls-Corporation-31406CRK-Generators/dp/B000BQN4T2
|
|
#
¿
Feb 17, 2021 00:30
|
|


|
DELETE CASCADE posted:we gotta replace a retaining wall on the side of a hill, it's about 22 feet long and 3.5 feet high, made of wood. the contractor we called (sf bay area) wants $10k. is that insane, or am i insane, who is insane in this situation? Three and half feet tall is a short retaining wall. In our area, you wouldn't need to pull any permits to take the old one down and put up a new one. Permits don't need to be pulled until the wall is over 60". A wall that small should be a max three day job. And you'd only need a third day if you found some horror tearing out the old. Any reason you are going back with wood instead of a stone? 22' x 4'--(start a course below grade) is about 150 versa-lok blocks. Going with the nicer belgard the job would be about $4,500 total in our rural podunk area. But it would be a simple french drain--not the fancy mira drain.
|
|
#
¿
Feb 20, 2021 04:42
|
|
|
DELETE CASCADE posted:this property is on the side of a steep hill in brisbane (if you know the area, you know what i'm talking about). the house is at the bottom of the hill, and the backyard goes up. there's a tree at the top, and i bet the roots of that tree are holding the whole operation together. there are actually several of these wooden retaining walls along the hillside. the one closest to the house is failing, and we're worried that a collapse during a rainstorm could damage the house. the contractor we talked to is legit and will do things the right way, but we didn't realize just how much this would cost. i think my mother in law (the owner of the property) would rather just sell it than pay $10k. you should see all the other problems it has. but it is inexplicably worth over $1 million. welcome to the bay area!
|
|
#
¿
Feb 20, 2021 07:54
|
|
|
Xenix posted:In the bay area, most jurisdictions require a permit for walls that are retaining 4' or more of soil, which includes the height of the footing (for a conventionally footed wall, which modular block walls are), so after the footing and the half buried first brick, you're over 4'. Modular block wall engineering done by the manufacturer also generally only accounts for level backfill. As a result, you'd likely need to install geogrid reinforcement, which would mean excavating a lot more slope than installing a drilled pier wall. Mira drain is not fancy. It's a run of the mill drain panel and will cost less than a rock curtain subdrain since there's no disposal of soil or import of gravel.
|
|
#
¿
Feb 20, 2021 08:07
|
|
|
Late night posting...but, I was agreeing with you. Apples and oranges. Our walls tend be on the decorative side and if for some reason they fail its an angry phone call and a 1/2 day restacking. (Owners doing stupid things with pickups tends to be the failure point.) None of the extremes you see out west. If there was a risk of the wall failing and taking out a house--it would be more than $4,500. Just looking at the equipment you need to use--getting that stuff on site with an operator is never cheap.
|
|
#
¿
Feb 20, 2021 17:38
|
|
|
The biggest issue with tankless is there aren't repair parts on the truck, so to speak. If your hot water tank goes out on Saturday night at 6PM--you have several options for getting hot water before Monday morning. Everything from call out an emergency plumber that will have the parts and/or an entire unit to replace. Or head to Lowes yourself and buy the stuff. With tankless--you aren't going to find the parts unless you are in a large metro area with a few good supply houses. Any of the Rinnai parts I have ever needed for repair take a few days to order unless they are under warranty. (e: And a Saturday warranty issue is still a Tuesday morning at the earliest part that still needs to be installed.) I've been tankless since 2005. And electric tankless at that... When I got my first unit, the recommendation was to buy two. And just leave the 2nd one sitting in a box until it was needed. 2016 is when the 2nd box got opened. I have yet to buy a 3rd box... But now that I have told the internet and Mr. Murphy that I have electric tankless, I'd better get a spare here sooner rather than later.
|
|
#
¿
Feb 25, 2021 23:40
|
|
|
Lot of pot filler hate itt. Pot Fillers are popular because they are literally the cheapest of all the dodads you can do when your building/renovating your kitchen. Have yet to hear of any in wall leaks, but walking away and overfilling pots seems to happen to everyone once. No real difference than when a pot boils over, well, except for the whole water isn't hot enough to scald you. The reason they are popular in renovations and new builds is because there is no backsplash to worry about and you have access to the stud bays. You can have PEX and electrical wiring in the same stud bay--you'd want to position them in the center of the stud and use nailing plates to protect the electrical and plumbing from errant fasteners holding on drywall/siding/etc. Of course it always nice to have plumbing and electrical in different stud bays--keep the trades from blaming each other--but not always possible. What I have seen happen is the weight of a badly installed pot filler cause the pot filler to shift. So what used to sit level starts to sag, and depending on your backsplash is really obvious and looks like crap.
|
|
#
¿
Feb 26, 2021 17:34
|
|
|
Fozzy The Bear posted:My dad gave me his 30-40 year old plug in electric drill/screwdriver. Get an impact driver. Something like https://www.lowes.com/pd/DEWALT-20-Volt-Max-1-4-in-Variable-Speed-Brushless-Cordless-Impact-Driver-2-Batteries-Included/1001009086
|
|
#
¿
Mar 7, 2021 02:44
|
|
|
alnilam posted:See this row of cabinets? If the grout is attached to the cabinets like it appears to be, an oscillating multi-tool would probably work better than a grinder. (Little too cramped for the grinder.) The existing edge trim looks like a variation on https://www.lowes.com/pd/Schluter-Systems-Rondec-0-375-in-W-x-98-5-in-L-Aluminum-Tile-Edge-Trim/3772497. Unless you find matching tile/want to do a lot of work--you won't be able to install the edge trim correctly. More than likely you'll have to figure out how to cut it cleanly and glue it.
|
|
#
¿
Mar 7, 2021 03:21
|
|


|
Are you posting from inside or outside the house? Assuming you unlatched the door. You now need to get a new entryway knob. The quickest and cheapest way would be to head to Lowes/Home Depot and spend $40 on a Kwikset SmartKey lockset. Not all keys work with the Smartkey stuff. The next best route is to order a lockset that matches the other doors and get it keyed to match--takes a few days longer and will cost from $40 to $200 (or even more if you have crazy locks.)
|
|
#
¿
Mar 10, 2021 02:16
|
|
|
If you are still outside. I think you made my day brighter. Two things--you need to pull the latch out of the door frame. Normally when you twist the lock, the twist motion moves the arm along the top edge between the brass sides holding everything together. As that arm moves toward the opposite side of the latch, it pulls the latch out of the door. Looks like maybe you need to reach in there with needle nose pliers to pull back the arm? Second, if you're not in the house--can you post a picture of the strike plate/latch area? And is there a dead bolt?
|
|
#
¿
Mar 10, 2021 02:23
|
|
|
melon cat posted:Had a roof leak last season that caused paint bubbling and peeling in my bathroom ceiling. Tried peeling off the entire ceiling's layer of paint but couldn't, so I've decided to throw wainscotting on the ceiling (it would match the bathroom walls, which have 3 foot high wainscotting). Decided against repainting because the peel seems to creep outward slowly, which will gently caress up any repaint efforts. If it was my bathroom I'd figure out which way the joists are running. Once you know that--mark your lines in the middle of the joists and cut out all the damaged area between those lines. The idea being the existing ceiling drywall uses half of the joist for attachment points and your new patch will use the other half. You might need to span more than one joist bay. With the drywall removed you'll have a much better view into the area where the water penetrated. Hopefully there aren't any surprises. Once everything behind the drywall is cleaned up, get a 1/2 sheet / patch size of green board. (Moisture resistant wallboard tends to be called green or blue board depending on the region/supplier.) That is looking like a large patch. California patch would be rough to pull off, so you'll need to tape, mud, and sand. Over your head and first time--will probably look horrible... But if you wanted to beadboard--now would be the time to beadboard over your cruddy mudding. (Mudding looks way, way easier than it actually is.) Anyhow, if the mudding gets to an acceptable level, you'd repaint the ceiling and viola! Done without home's next owner using your name in vain when they remove the beadboard... HycoCam fucked around with this message at 23:26 on Mar 18, 2021 |
|
#
¿
Mar 18, 2021 23:21
|
|

|
lol internet. posted:Ughh soo.. I bought this The measurements for that particular item are: 86.6 in. x 25 in. x 1.5 in. quote:The Acacia solid hardwood kitchen countertops, island tops and food prep stations add a touch of warmth and drama to any kitchen. Acacia has inherent oils, the same as teak, suitable for use in wet conditions, which gives it outstanding water resisting properties. Plantation grown in Vietnam and FSC (Forest Stewardship Council) certified as a sustainable resource Acacia is the most used hardwood for wet environments including kitchen countertops, garden furniture, outdoor furniture, deck tiles and decking world-wide Acacia is a hardwood that is extremely heavy, hard, strong and tough with a density of 600 kg/m3 comparable to Teak with a density of 655 kg/m3. Butt-Edge and Butcher Block Construction Panels glued with a class D4 glue, suitable for outdoor use, with no formaldehyde. Oiled with a proprietary plant-based Food-Safe Hardwax Oil free of any peanut-based products, uniquely approved for contact with foodstuff.
|
|
#
¿
Mar 30, 2021 00:01
|
|
|
|
| # ¿ Apr 24, 2024 14:41 |
|
|
One thing that will cause voltage drop/flickering...loose wires. Electrons flow and vibrate...which can cause the wires to loosen at the lug terminal on the breakers. Happens with the higher Amp more frequently. Turn off the breaker! Make sure the wire is seated. Tighten. Turn breaker back on.
|
|
#
¿
Jun 10, 2023 02:18
|
|