


|
As I am getting ready to start doing rigging stuff, one thing I did was to assemble the "Syren Serv-o-Matic". This is a serving machine to allow me to 'serve' the ropes in the rigging where that is appropropriate. "Serving" is something they did to protect ropes that were likely to be rubbing against the sails or other rigging in order to extend their service life and reduce fraying/wear. The process on a real ship is fairly detailed and multi-stepped, but the final visible step is to wrap small rope around the large rope being served so that the small rope which has no tension on it (because it's wrapped around like the threads on a screw) is what gets worn/frayed and not the large rope that is carrying the load. The "Serv-o-Matic" is pretty simple, it's got gears connected by an axle so that I can take a piece of rope and have it be turned at both ends at the same time while controlling the feed of a large spool of thread onto the rope, wrapping the thread around it. To secure the thread at the end of the 'serving' I would use a needle and run the thread through the rope being served. Here is the assembled "Serv-o-Matic". After sanding the char off the laser cut cherry parts, it fit together pretty much perfectly, and it's simple to use. The two gears closest to the camera are where the rope to be served goes, the holes in the center go all the way through and the rope is simply secured to the metal nails sticking out of the wood on the outside of the frame, all of which is turned together by the gears. Simple and effective. 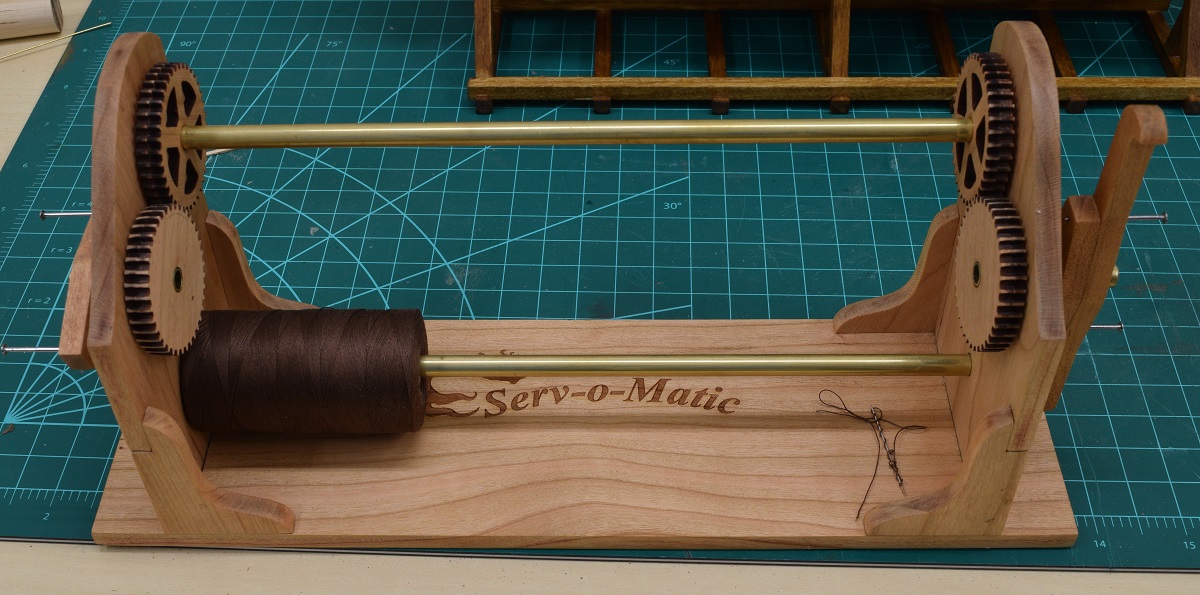 Also finished the stand, got it stained and a coat of poly on it. For some reason the lighting in this shot makes the horizontal pieces almost glow gold. Doesn't look like that to the eye. Odd. 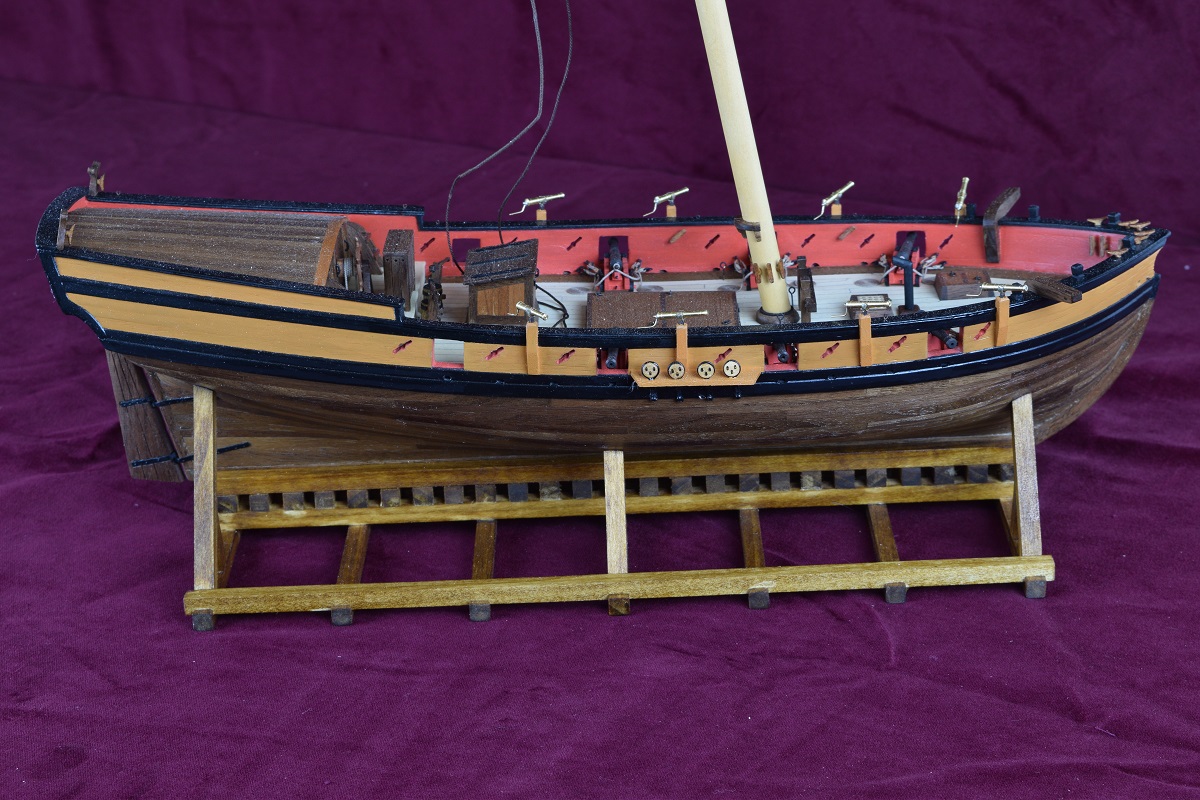 Next I put the Serv-o-Matic machine to work, and served the first set of shrouds. There isn't any real tension on it in these pictures, just a couple binder clamps to keep them sort of in the right position (not clamped to anything, just laying on the table top). The shrouds are the main rigging that holds the mast in place, with two pairs of shrouds on each side of the mast. Shrouds are the things that have all the 'ladder' ropes attached that you see on sailing ships from the era where the crew all climbs up in to the rigging. 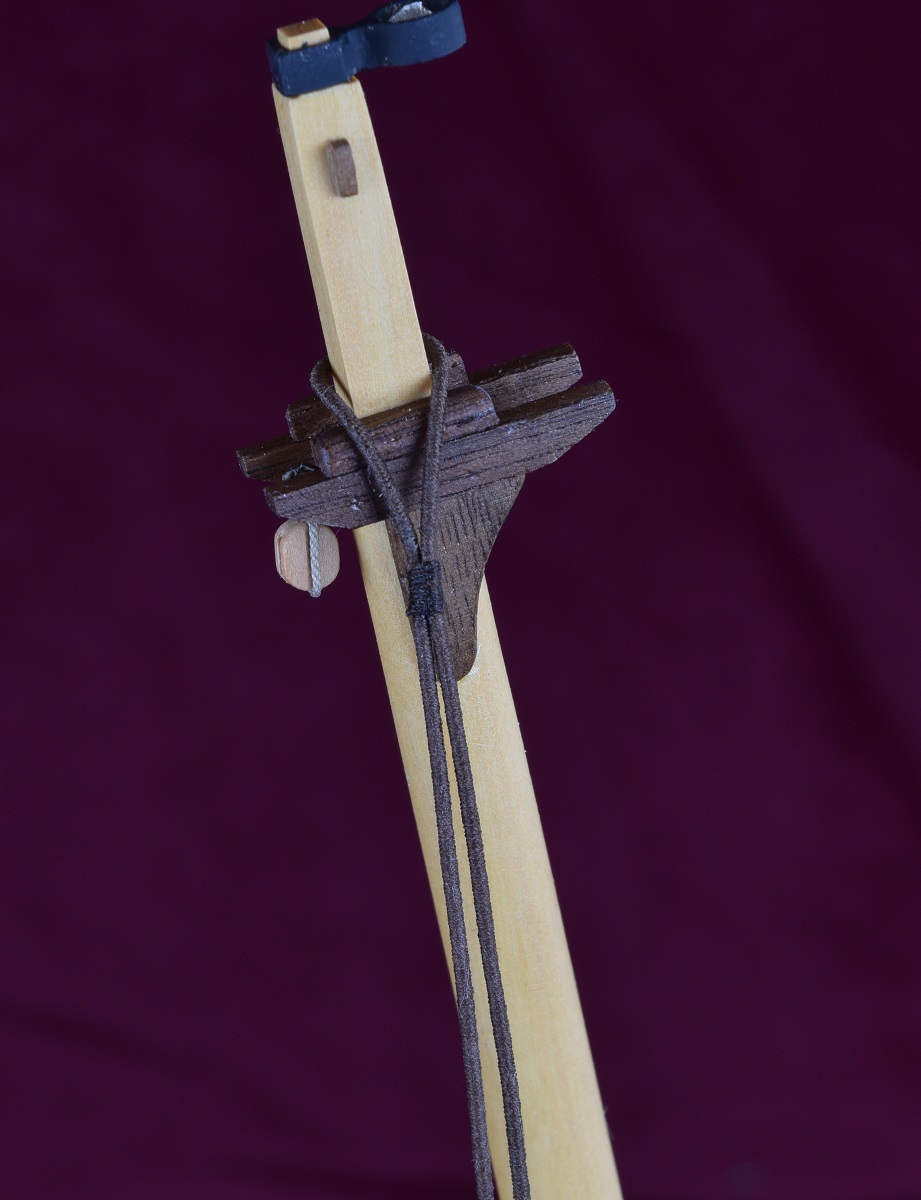 And a shot of the forward shroud of the pair where it transitions to non-served. The aft shroud of this pair (the rear-most shroud) is fully served all the way down. This is because the shrouds would be served where they wrap around the mast, and where the sail might rub, which on this gaff-rigged sloop is the entire length of the shroud closest to the sail. This shot really shows the difference between the large rope used for the shroud, and the 'served' part of the rope where the small thread is wrapped around it. The shroud is Syren .035" line, and the thread is #50. 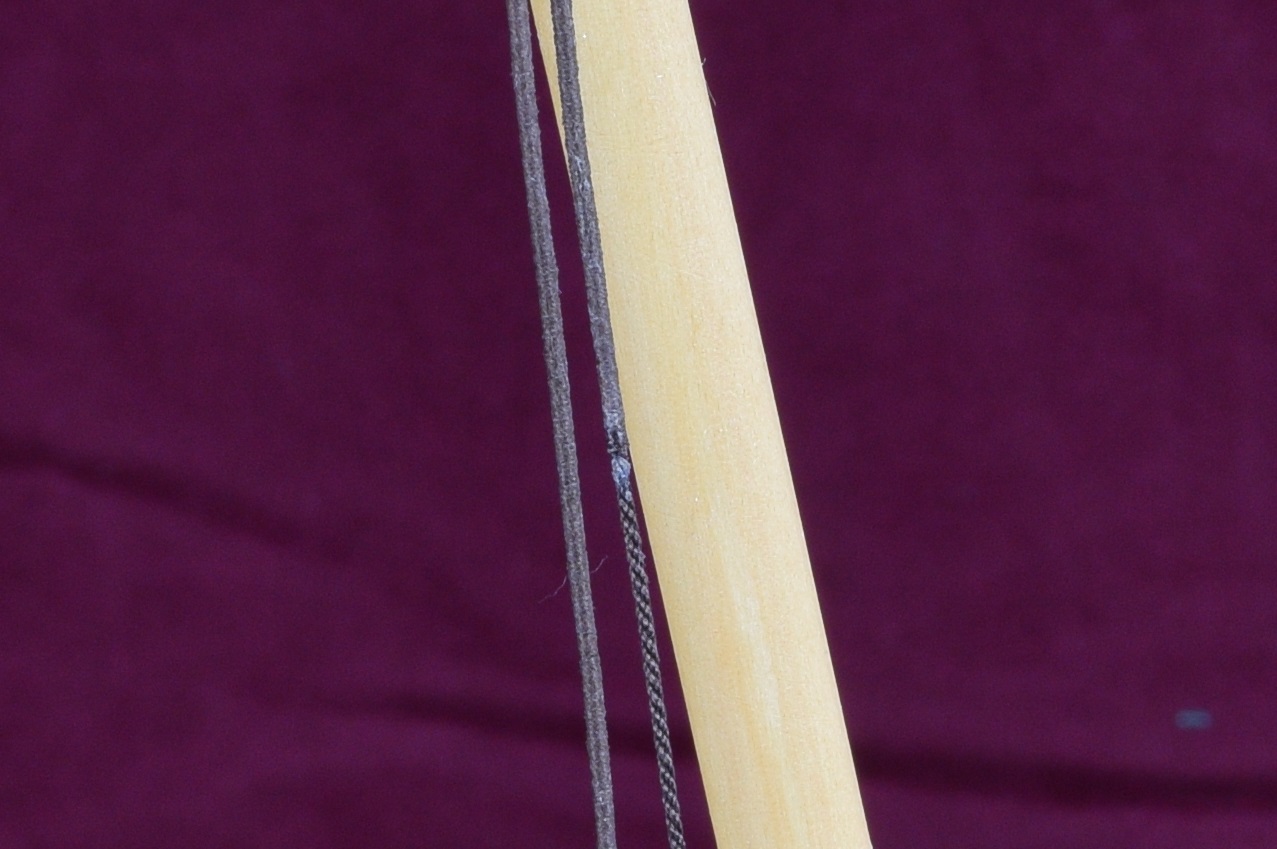 ---------------------- I have actually started on the rigging, finally! Not just messing around with serving and making a test shroud, but actually rigging! Started by attaching some blocks to the bow that will hook to the bowsprit when it's installed. I'm putting that off as long as possible, it's so long, and thin at the end that I'm afraid of breaking it while turning the model around to work on it. 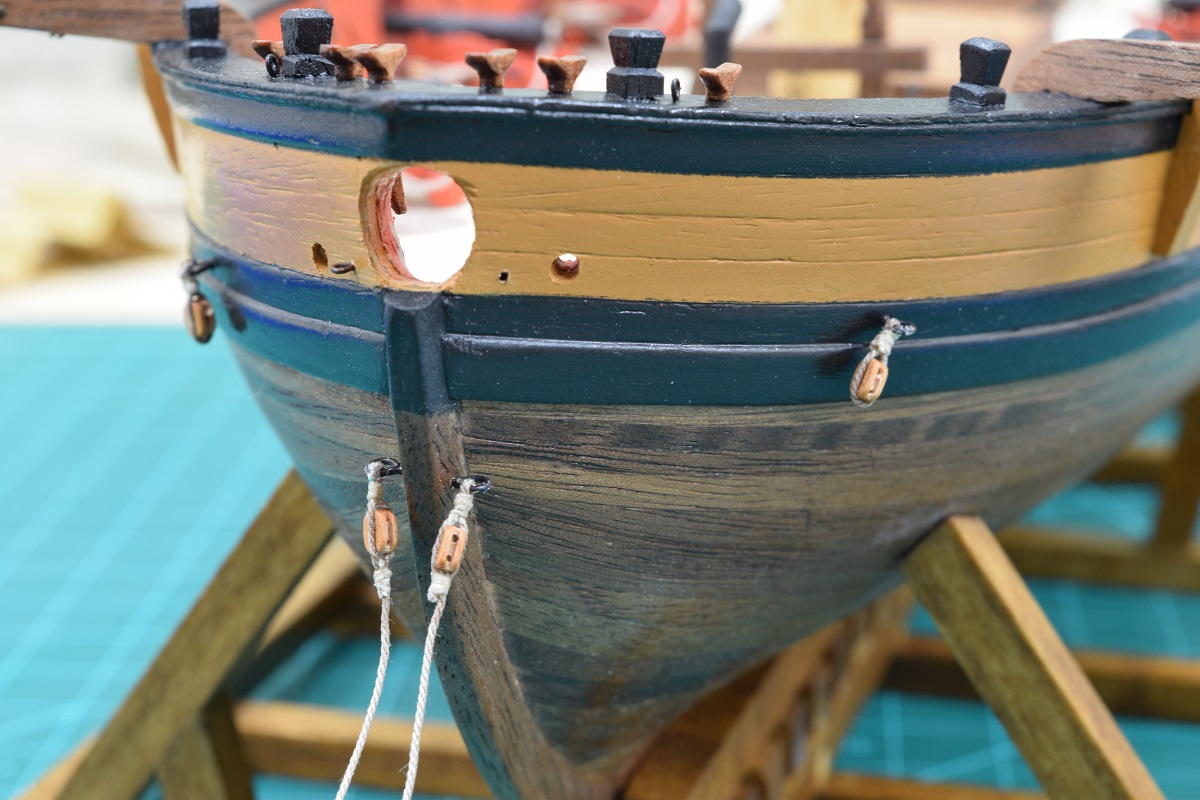 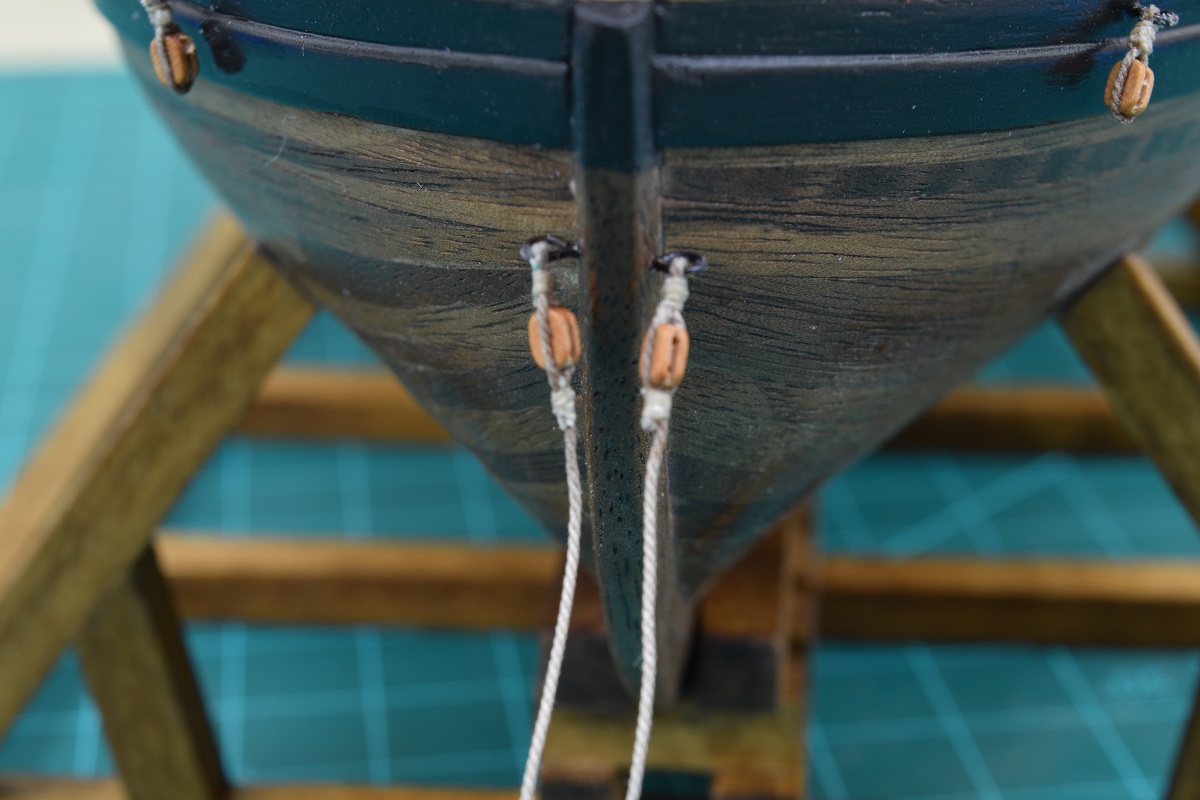 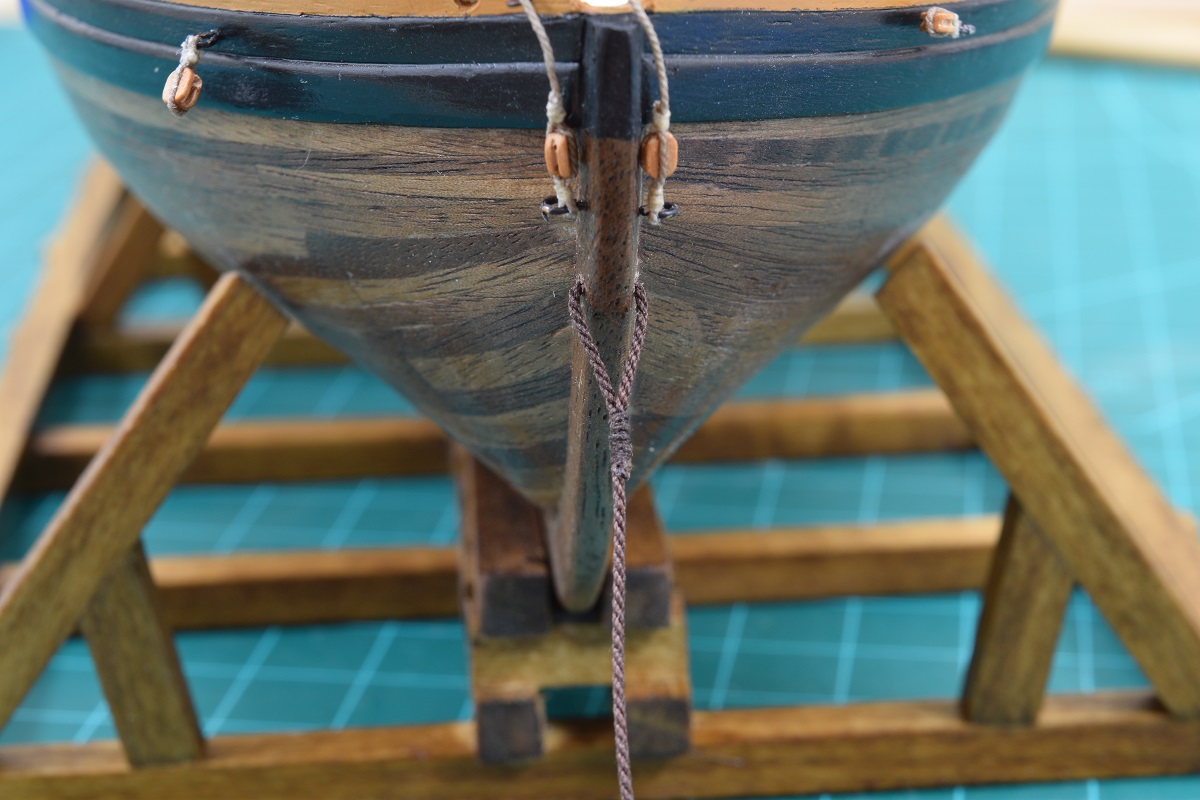 Unfortunately, there is very little I can do on the bowsprit itself before it's installed to the ship, so I moved to the main mast, which while it will be sticking up, it won't be sticking way outside of the hull to the front, so I think it's a lot safer to have in place for a long time, and it's also much thicker and tougher than the bowsprit. First thing was to figure out a way to make the shrouds all line up properly at the bottom where they will tie into the dead-eyes that were mounted in the channels earlier. I ended up using a thin piece of wood, and drilling holes into it to hold the upper dead-eyes with soft copper wire, so that I will be able to attach the shrouds to them while they are held in position. I made a line to align them vertically, and then held the shroud lines down in the position that they would run in order to orient them to be in a straight line when the shrouds and lanyards are all rigged. You can see the pencil lines I made by holding the shrouds in front as shown here. 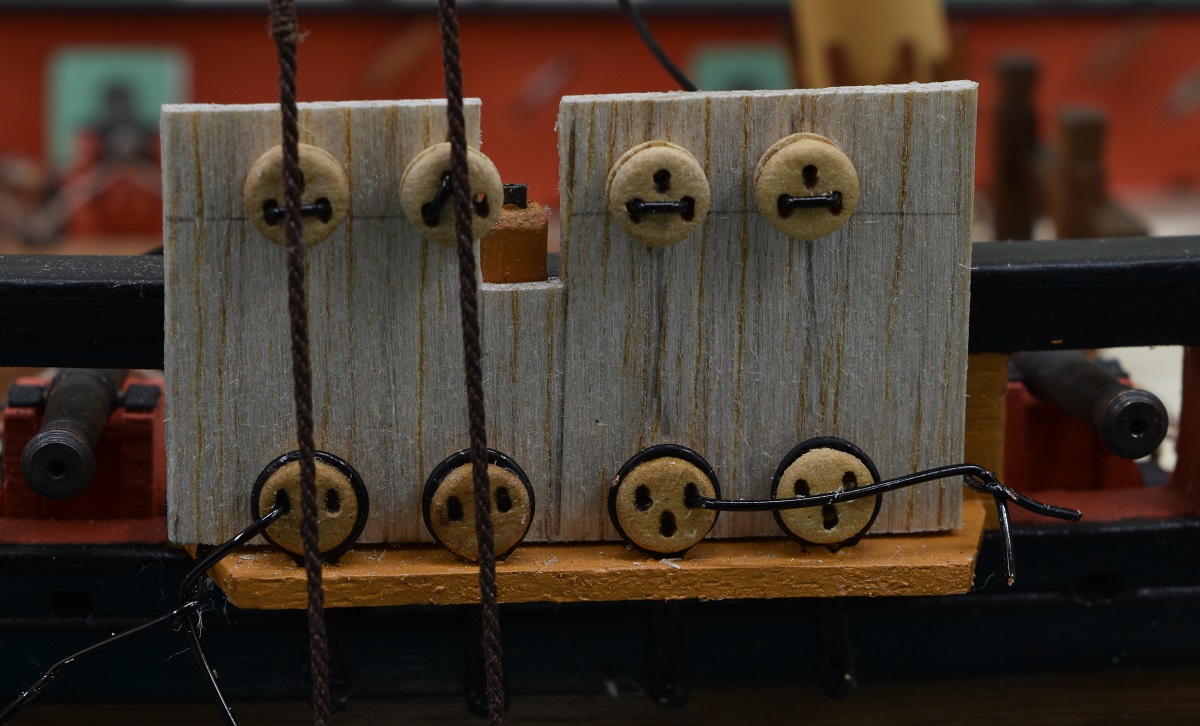 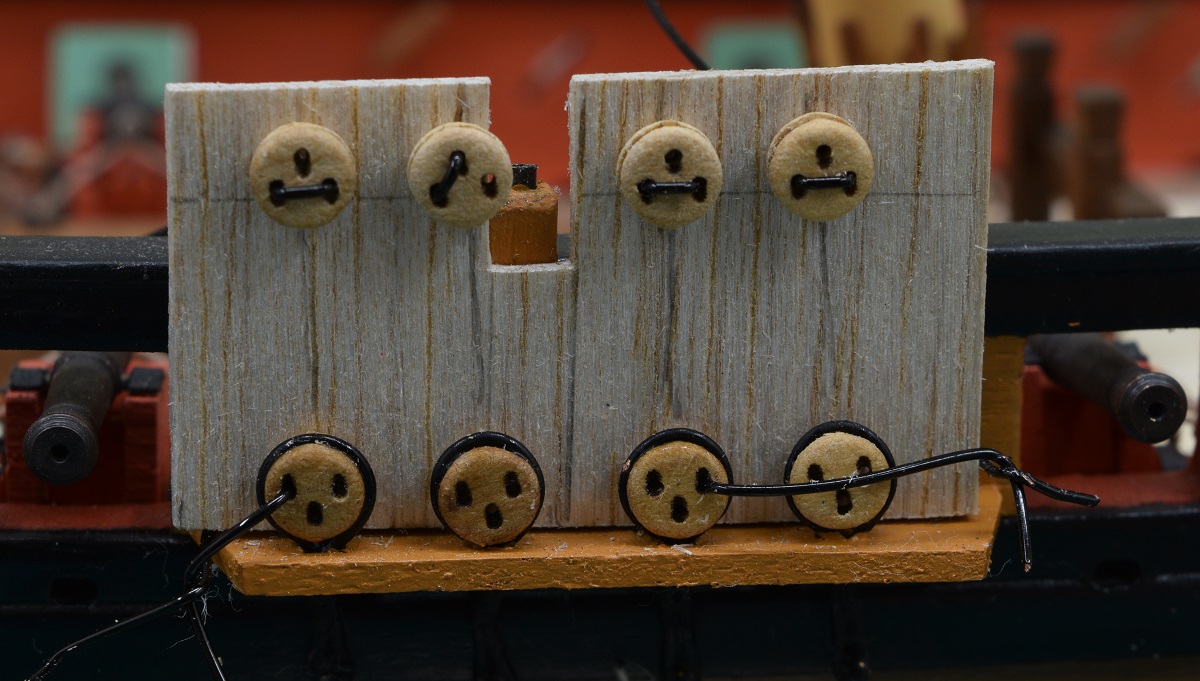   Then, started on actual rigging stuff. I made the backstay pendant. This goes around the top of the main mast before anything else, and has blocks at the ends which will attach to tackle on the rails near the ships wheel on either side.  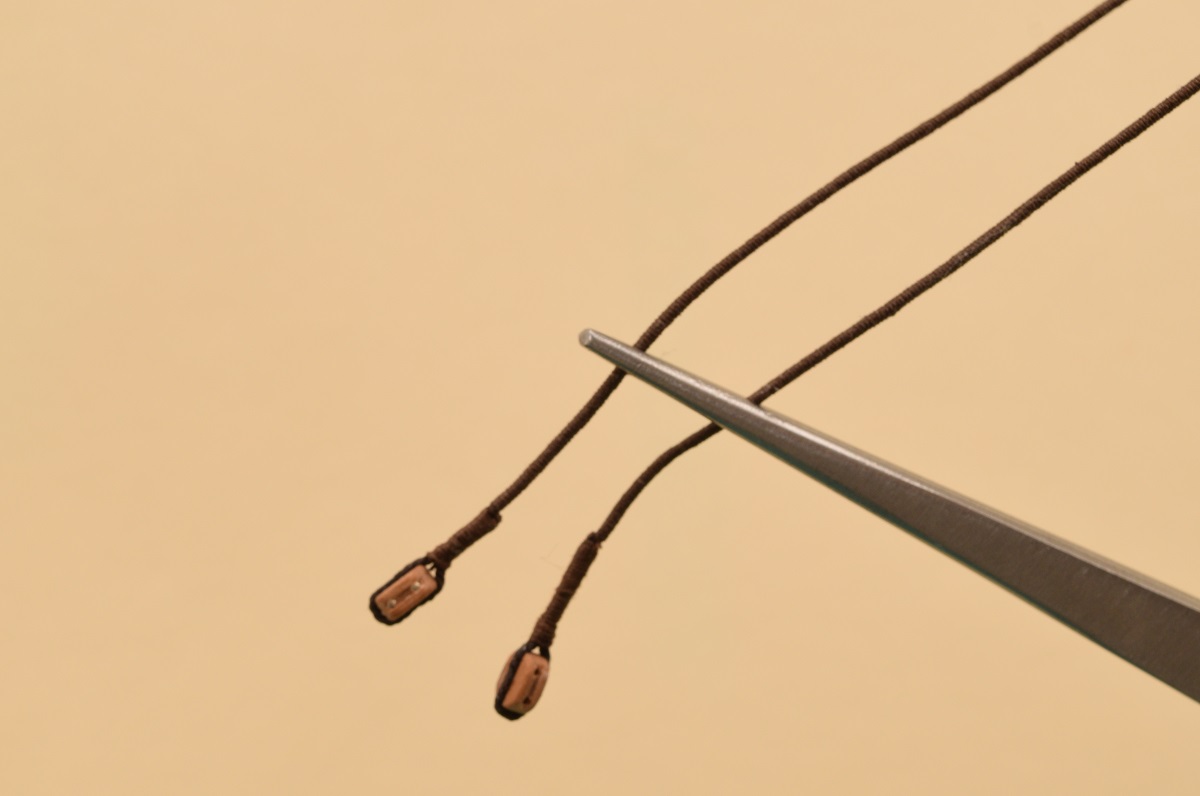 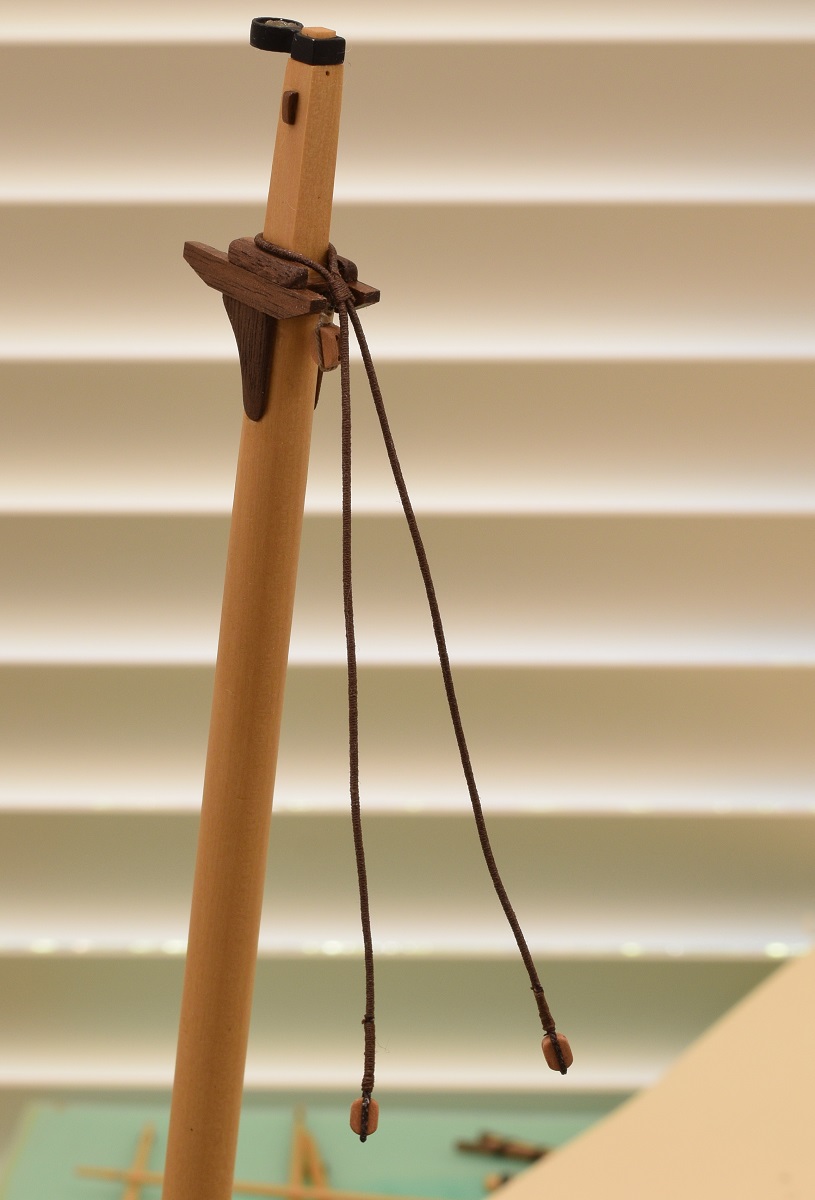 Next I made the first piece of rigging that will actually make the mast un-removable from here on out. It's officially part of the ship now. This is the Spreader Yard Horse. I have no idea why it's called a horse, but it is. I'm learning lots of new things about sailing ships by doing this. This thing actually acts as a secondary mast, and the lower yard (the spreader yard) attaches to this, not the mast. The reason is that the yard needs to be able to be lowered to the deck, and it if was attached directly to the mast, the parrel (the thing that holds it to the mast, err.. to the horse) would run into the main sail hoops that are around the main mast. I had to re-read the bit about this thing several times, and look at the rigging plans a bunch, before I finally understood what it did and why. In any case, it's the 2nd item that has to go around the top of the main mast, so it was installed next. Here it is in all it's glory, it's the rope running along the front of the mast. 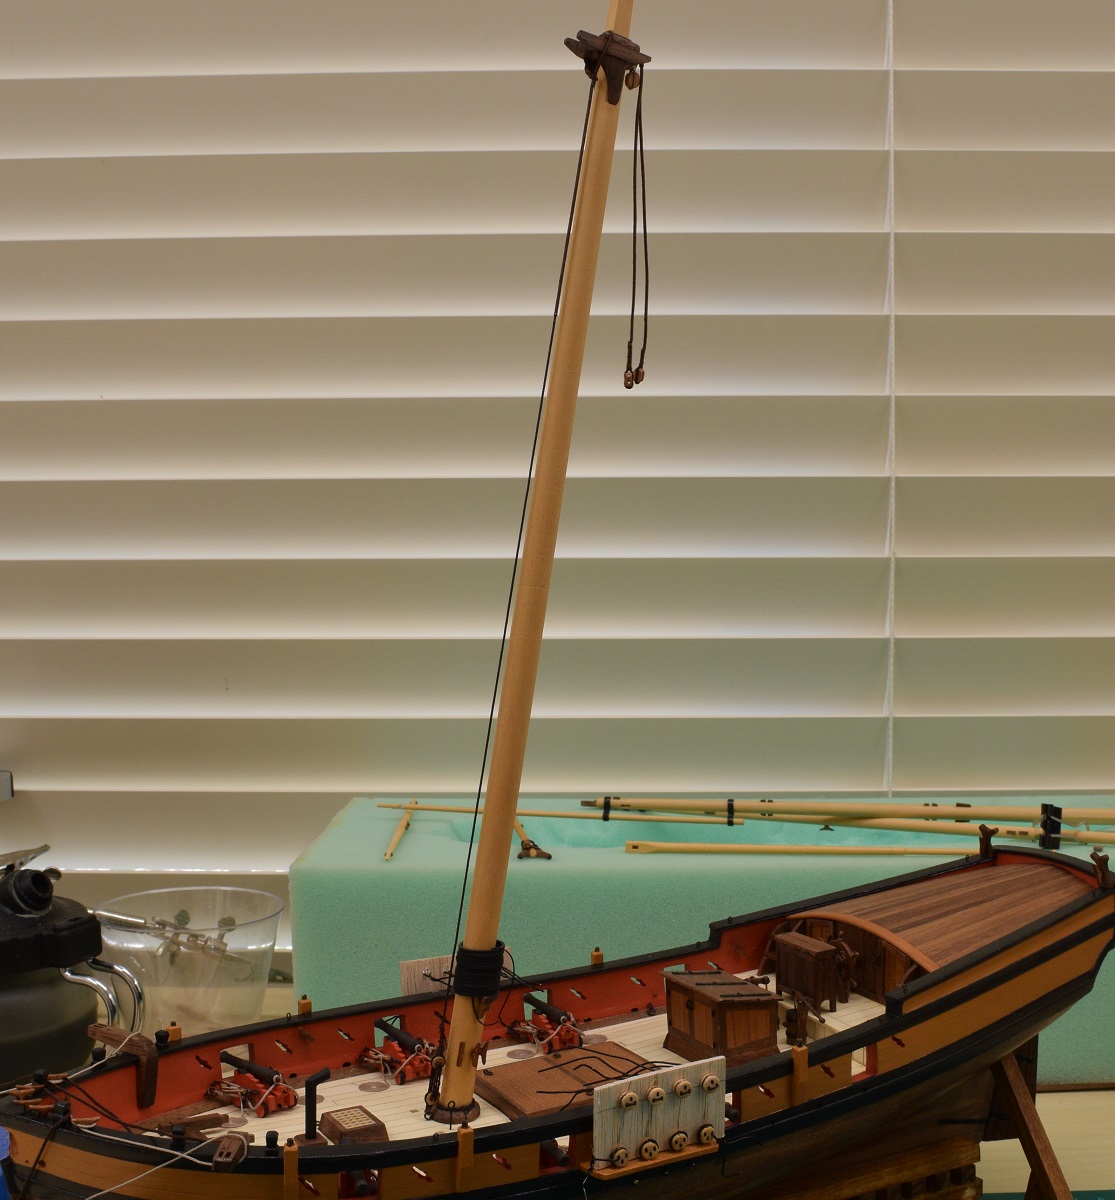 Here is the top. The top mast will go into the spot in front of this, so it won't be able to slip off of the braces it's sitting on (the raised curved pieces on either side - the 'cheeks'). 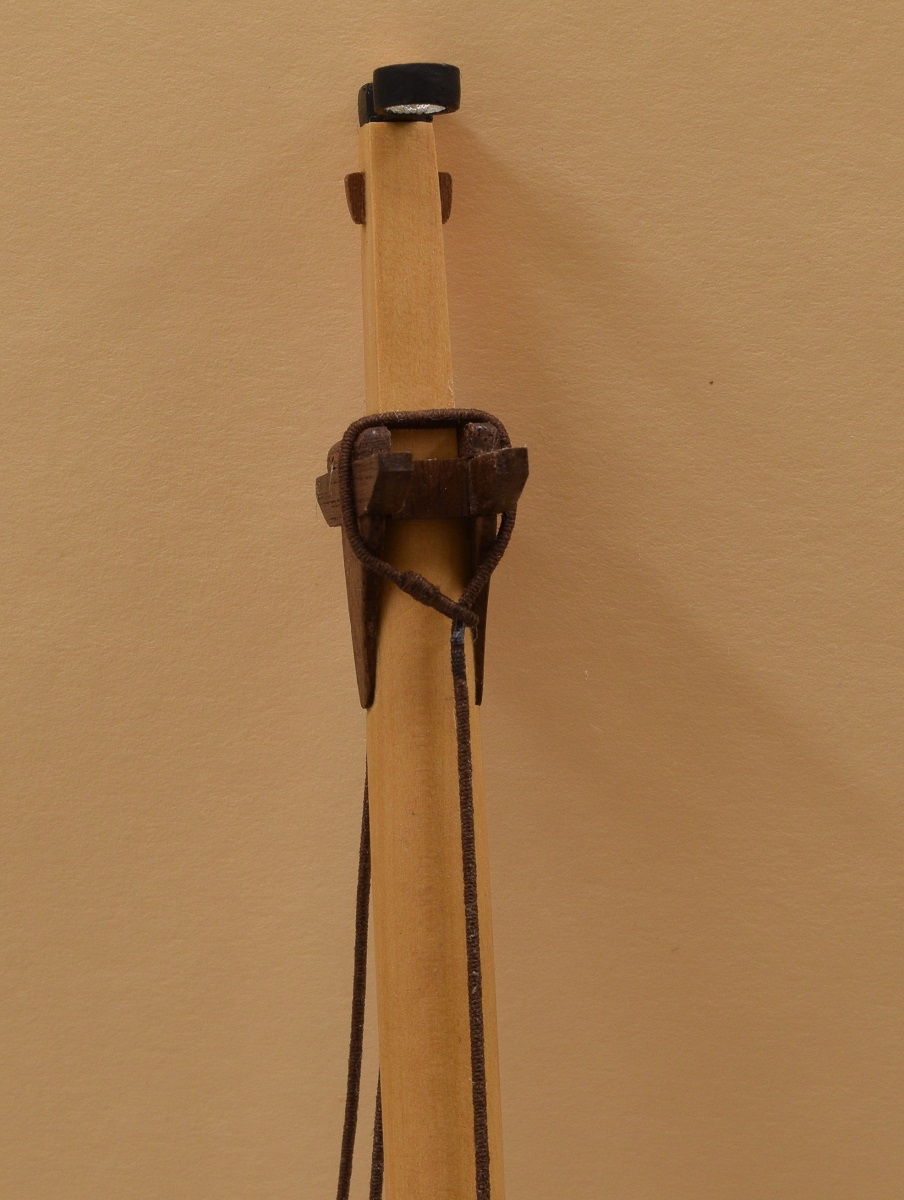 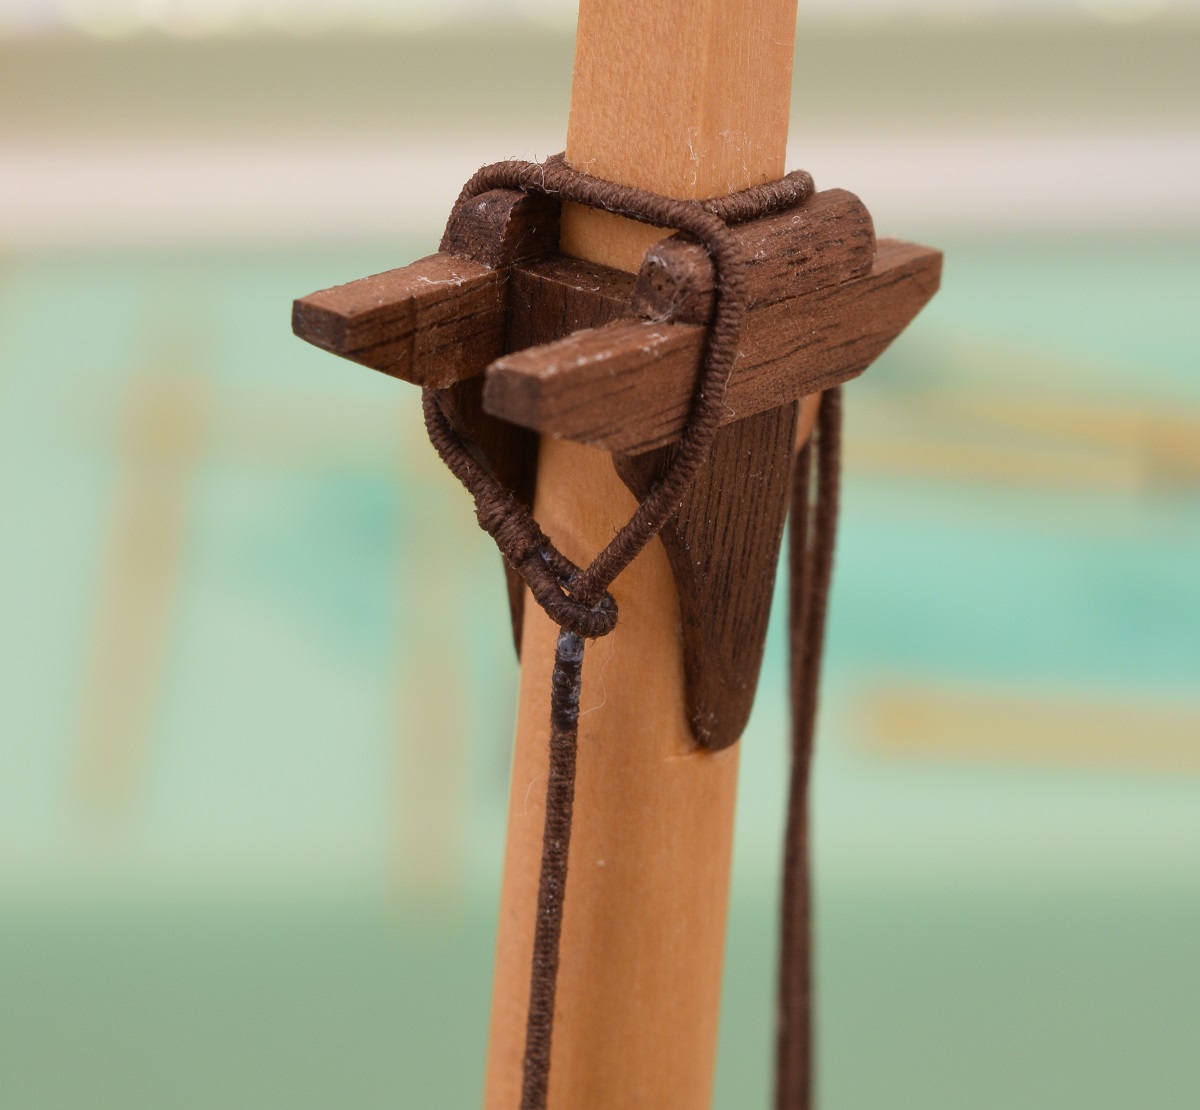 Bottom from front and side: 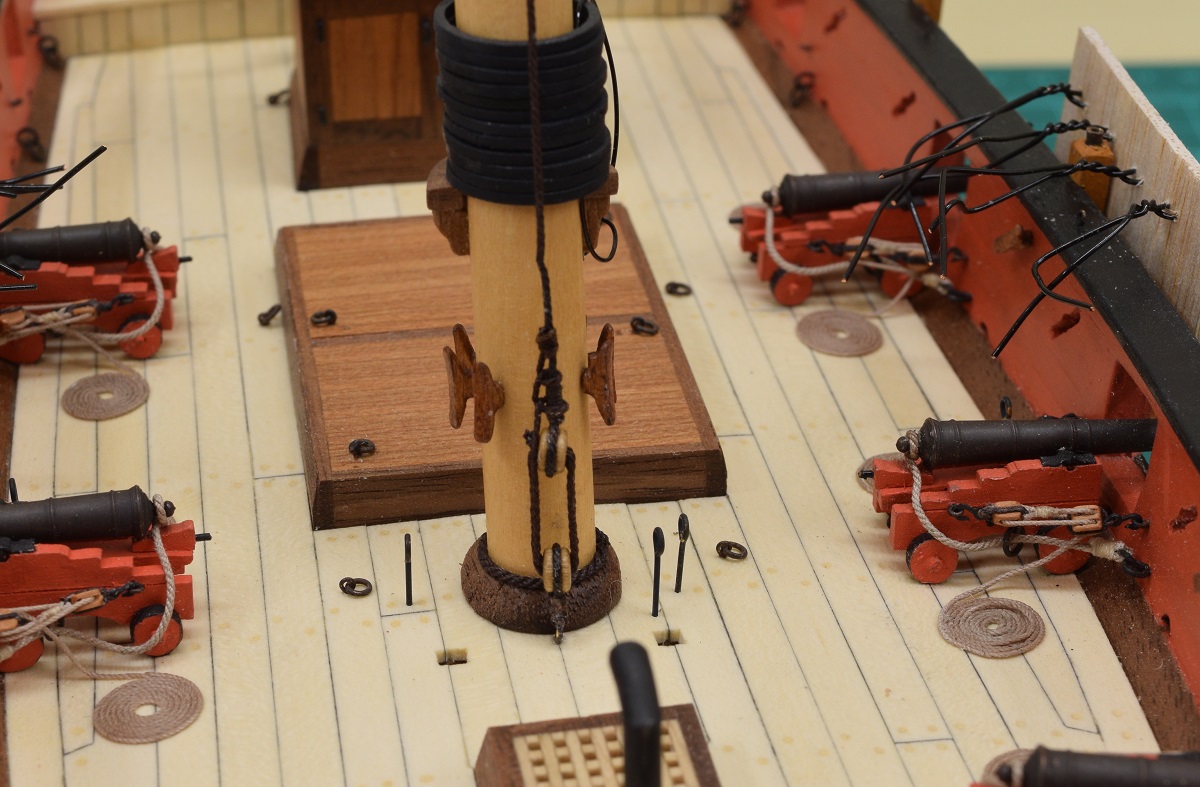  It's attached to the deck with little tiny dead-eyes, just like the shrouds will be attached to the channels later (next actually). Note on time - From starting the attachment of the bow blocks to completing the backstay pendent and the spreader yard horse, the actual time spent was about 8 hours according to my original log. Edit: The 'wet' looking spots on the close-ups are where some white-glue/water mixture was actually still wet. That completely disappears after drying. The Locator fucked around with this message at 18:50 on Nov 22, 2020 |
 #
?
Nov 22, 2020 18:46
#
?
Nov 22, 2020 18:46
|
|


|

|
| # ? Apr 25, 2024 02:37 |
|
|
The Locator posted:This is the Spreader Yard Horse. I have no idea why it's called a horse, but it is. I'm learning lots of new things about sailing ships by doing this. This thing actually acts as a secondary mast, and the lower yard (the spreader yard) attaches to this, not the mast. The reason is that the yard needs to be able to be lowered to the deck, and it if was attached directly to the mast, the parrel (the thing that holds it to the mast, err.. to the horse) would run into the main sail hoops that are around the main mast. I had to re-read the bit about this thing several times, and look at the rigging plans a bunch, before I finally understood what it did and why. In any case, it's the 2nd item that has to go around the top of the main mast, so it was installed next. Here it is in all it's glory, it's the rope running along the front of the mast. Let me know if you don't want to get into the weeds of rigging. So this is a fore-and-aft rigged sloop with a square top rig, right? So there's a top yard and a spreader yard. So this large bit of rope you're describing is the way to get the spreader yard down to the deck? Does it also allow the square rig to be at any height above deck? How does the top yard get up and down? Once the top yard is up, does it just stay all the way up?
|
|
#
?
Nov 23, 2020 03:27
|
|

|
babyeatingpsychopath posted:Let me know if you don't want to get into the weeds of rigging. Yes, it's a fore-and-aft + topsail rig. Correct there are two yards. The top yard is connected only to the top-mast with a parrel. It has a halyard that allows it to be lowered to the bottom of the topmast. The spreader yard is connected via a parrel to the horse, and also has a halyard which would allow it to be lowered all the way to the deck. In order to remove the top yard completely, crew would have to climb up the shrouds to the top of the main mast, the top yard would be lowered to the bottom of the top mast, and the crew would undo the parrel. At that point they could lower it the rest of the way to the deck using the halyard. Of course there are a lot more ropes involved than just the halyards, as every yard has lifts and braces (the lifts attach to the ends of the yard from above, and the braces attach to the ends of the yard from below and either far forward, far aft, or both). All of these together are used to control the specific position and angle of the yards to control the sail, which has more ropes of it's own (cluelines which pull the bottom corners of the sail up, and sheets which pull the bottom corners of the sail down at the very least). So fully removing the yards and sails from the ship involves a fair amount of work by the crew. Based purely on how the rigging is done, this should allow the square rig to be positioned partially in front of the main gaff rig, but I doubt this would be done because the yard would start hitting the shrouds with almost any angle on the spreader yard at all. So it's more likely that the spreader yard would be left at it's maximum height above the deck, and the topsail yard raised and lowered as needed to adjust the size of the topsail, but in reality from my personal sailing experience on a topsail schooner in San Diego, that topsail is only really used when you want to get an extra 1/2 knot or so of speed with a following wind, and it's either fully up, or it's furled. I don't have a huge amount of experience on that type of ship, maybe 12~18 hours, but they never once messed with the topsail other than to fully fly it, or furl it, and only when the wind was at least 10 degrees aft of abeam. Square sails just really don't care for sailing into the wind at all, and the difference small topsails make to a gaff rig when the wind is abeam is almost nothing, but they cause a fair amount of heel, so they just furl them rather than losing power on the mail sails from the extra heel. If any of this doesn't make sense, absolutely ask and I'll try to clarify. Edit: FYI as the log progresses you should see all of this, as I did all the rigging to be fully functional. The yards are not pinned in place, they are held by the rigging as they would be on a functioning ship. The only piece of rig that is pinned is the gaff yard, and that was to simplify installation because of the angle it's at. If the pin was removed it would also be fully moveable by the rigging. The Locator fucked around with this message at 05:09 on Nov 23, 2020 |
|
#
?
Nov 23, 2020 05:07
|
|
|
The Locator posted:If any of this doesn't make sense, absolutely ask and I'll try to clarify. Nope, makes perfect sense. I had assumed the top yard was fixed and it was the spreader that set the furl, not the other way around. Makes a ton of sense. quote:Edit: FYI as the log progresses you should see all of this, as I did all the rigging to be fully functional. The yards are not pinned in place, they are held by the rigging as they would be on a functioning ship. The only piece of rig that is pinned is the gaff yard, and that was to simplify installation because of the angle it's at. If the pin was removed it would also be fully moveable by the rigging. That is so awesome.
|
|
#
?
Nov 23, 2020 05:26
|
|
|
babyeatingpsychopath posted:Nope, makes perfect sense. I had assumed the top yard was fixed and it was the spreader that set the furl, not the other way around. Makes a ton of sense. A great deal of what I always thought regarding the ships from the age of sail was turned upside down for me as I did this project! All my childhood drawings of ships with furled sails were completely wrong.. lol..
|
|
#
?
Nov 23, 2020 05:30
|
|
|
So after getting the spreader horse and backstay pendent up, the next stuff that gets wrapped over top of the mainmast is the shrouds, so those have to be done next, so back to the rope serving as both the forward and rearmost shrouds are served their entire length, and the middle ones get served around the top of the mast where they might rub. The Serv-o-Matic did a fine job and I don't expect I will run out of thread anytime soon.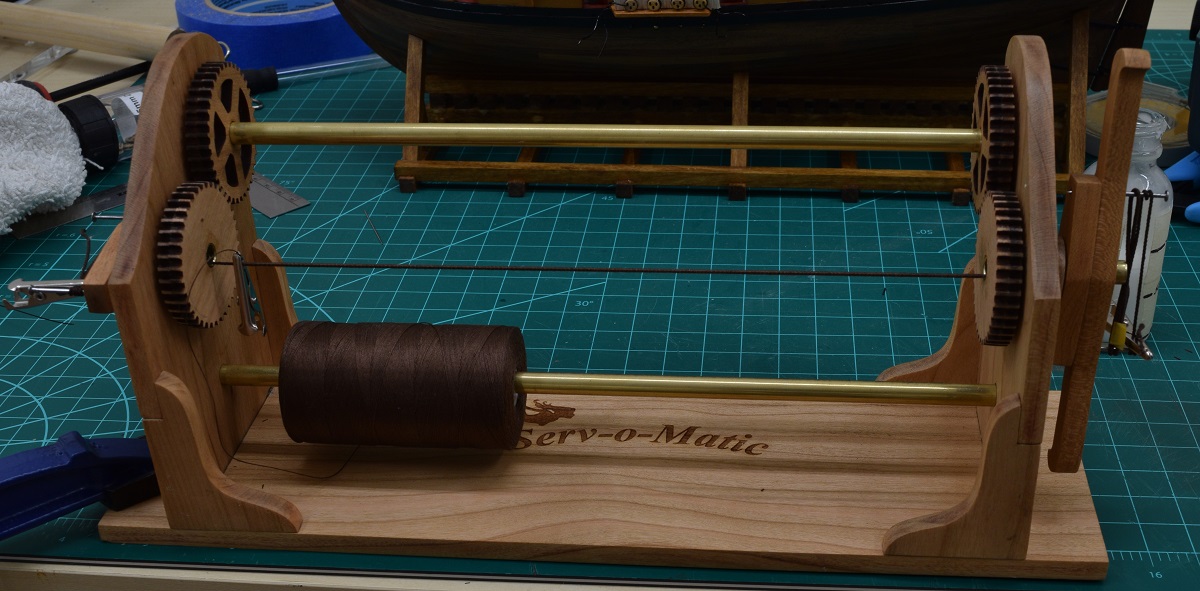 The dead-eye/shroud jigs I made worked fantastically, and allowed me to make much better looking rigging than I would have thought at this point, being only my 2nd build. I also used zip-seizings on top of the dead-eyes to allow the proper rigging of the shrouds crossing over on top of the dead-eyes. Really like the way they turned out. The "zip-seizings" are a way to create 'fake' seizings by wrapping the seizing rope/thread around a metal post and soaking it in CA glue making a hard 'tube' of thread. The metal post is coated in wax or something (I forget what at the moment) so that the CA doesn't stick right away, and the tubes of rope are removed before they can. Small lengths of the tube can then be cut off and placed around ropes to make what appear to be seizings without doing all the work of seizing. For the shrouds above the dead-eyes this was very useful as doing a real seizing would be really tough in these spots, although I'm sure they could be done. Oh yea, the dead-eyes are the round things with three holes in them. 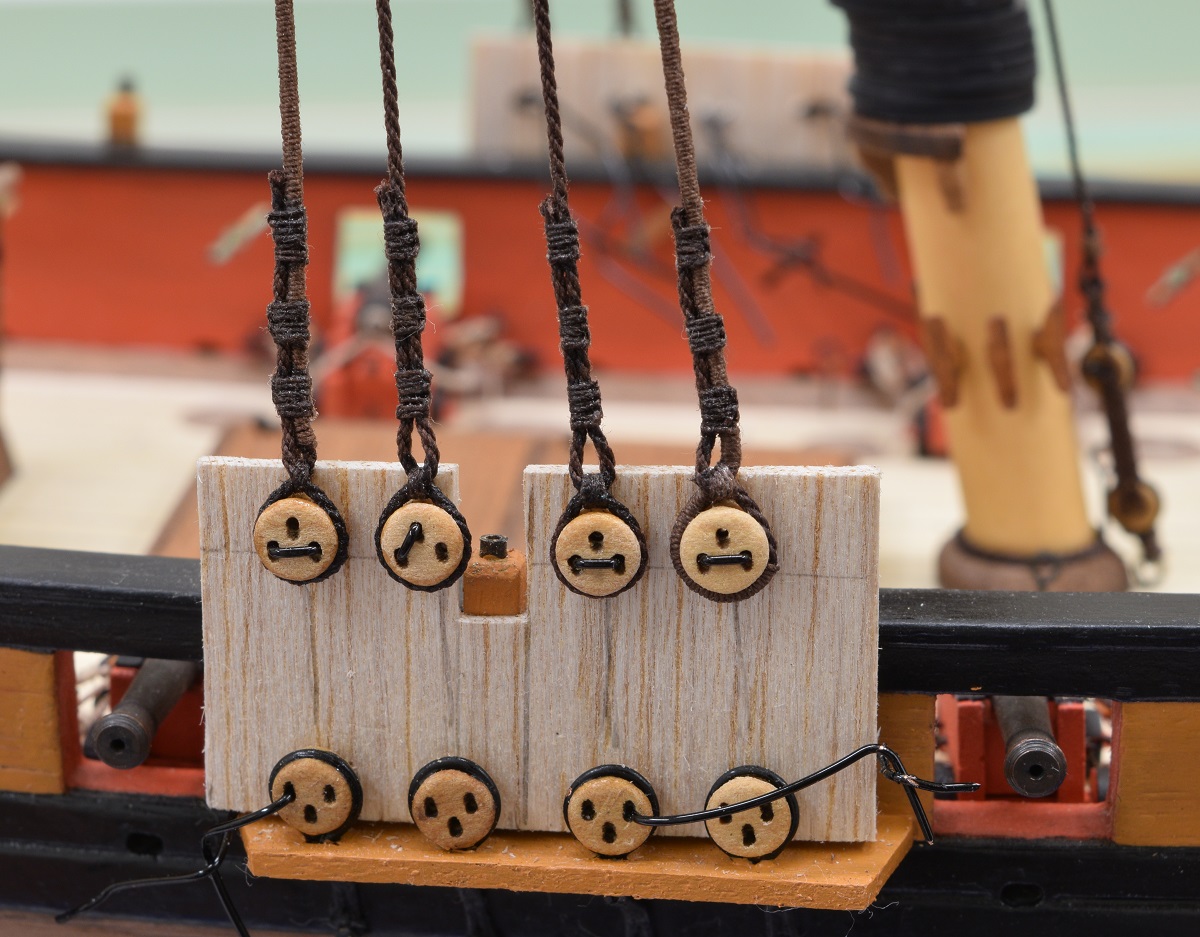  Current status, shrouds completed, but attached to the jigs. I am trying to decide the easiest way to seize the shroud cleats - I am leaning towards removing the jig, and seizing them by sticking the shrouds in a third hand to the side of the ship, one at a time, rather than trying to work on the inside of the shrouds on the ship.   About a year ago, when I first started building the Carmen and found MSW (modelshipworld.com), I spent a lot of time going through build logs, and like any new thing, I think people tend to see a specific 'thing' that make them go "Wow, that is amazing, I could never do that". On this site, for this hobby, there is a lot of that 'wow' factor in many of the logs here, but one of the main ones that stuck out to me (for whatever strange reason) was the mast-heads on some of the ships, where so many ropes come together and chaos should reign, but instead, there is an orderly and neat stack of ropes showing a definite purpose and design. Today I had a real 'wow' moment in my ship modeling.   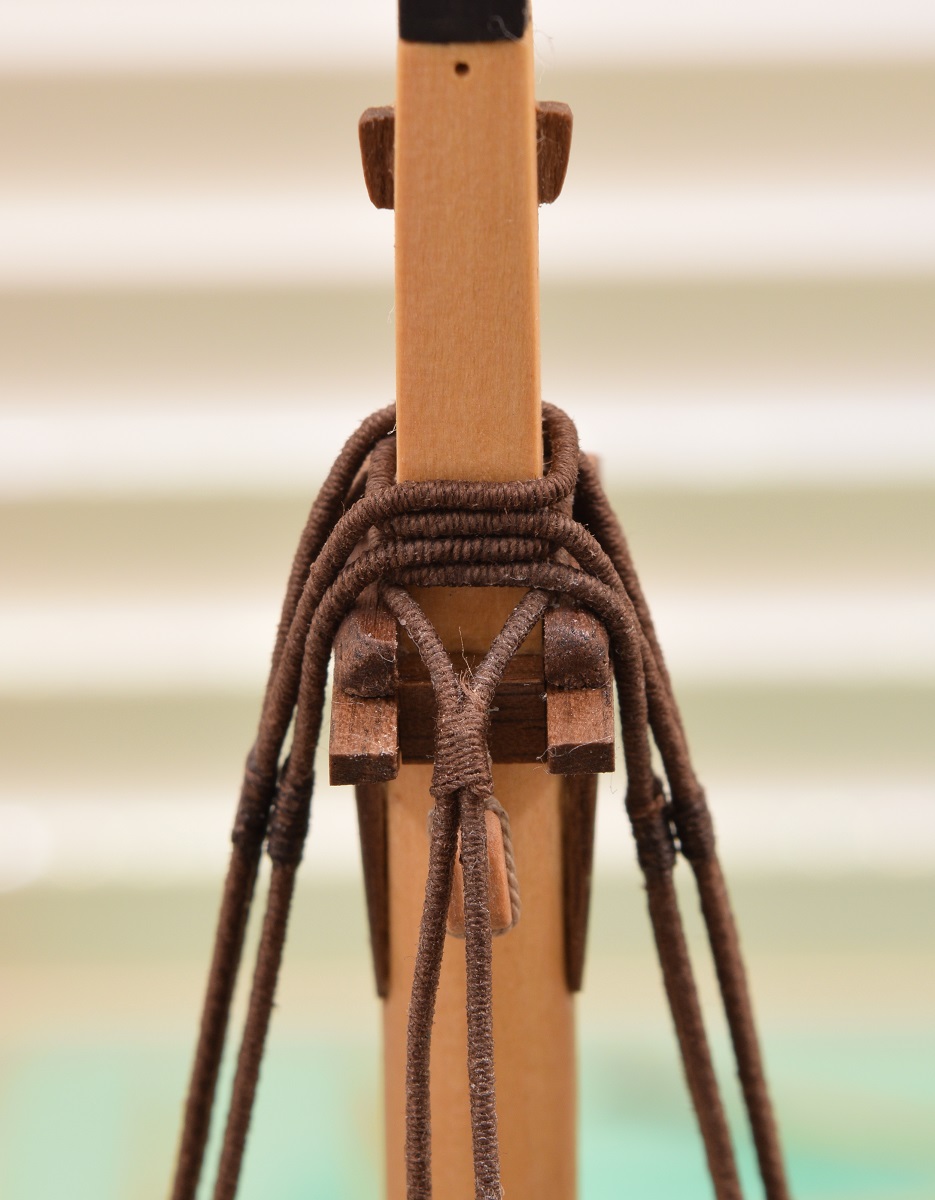 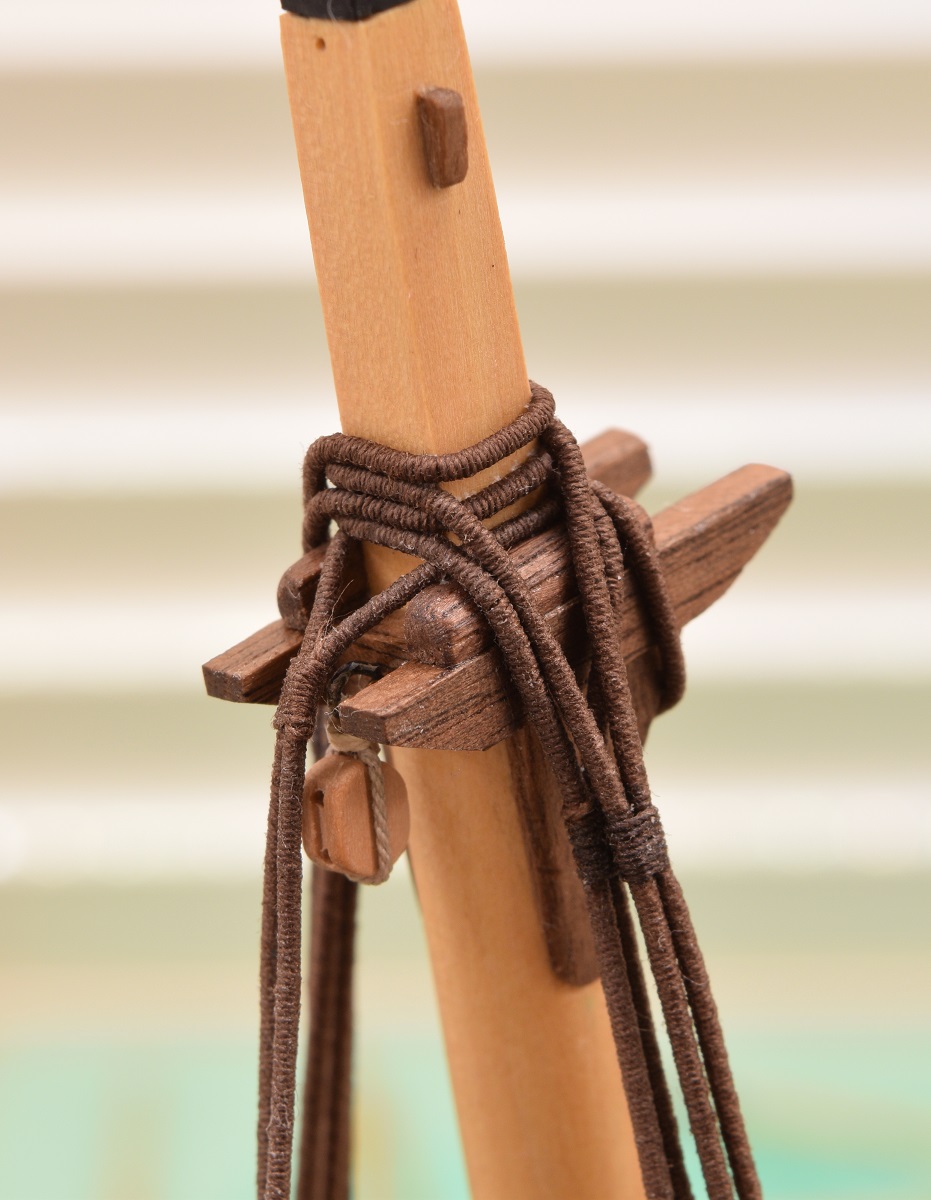 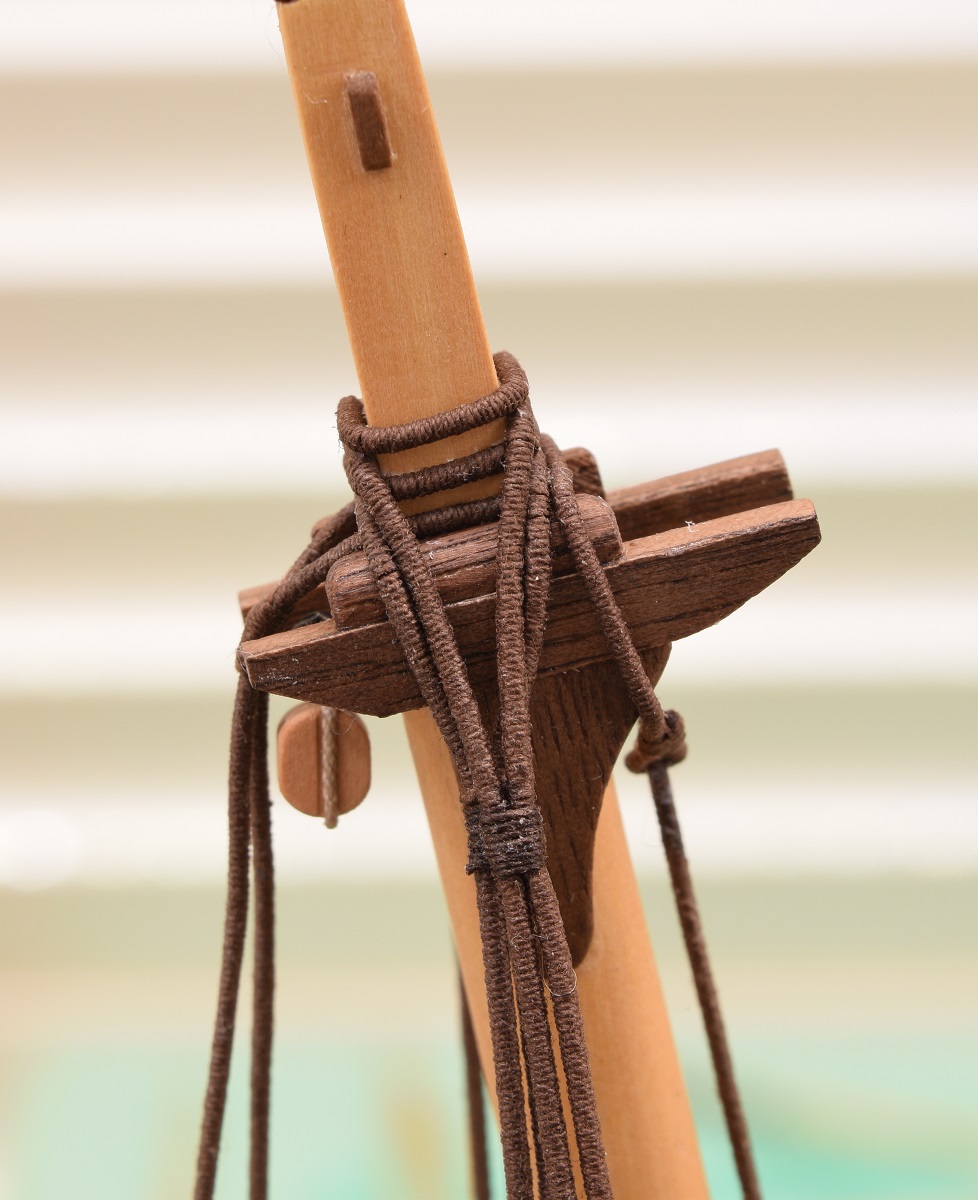 I have no idea why that seems so amazing to me, but it really does, and even now I'm having a difficult time believing that yes, it really was me that did this thing (although there is more to go there of course). There have been plenty of things on this ship that were more difficult than this, and took far more effort to be happy with, but for strange reasons in my head, this is probably one of the coolest moments for me so far in the hobby. It was a good day.
|
|
#
?
Nov 23, 2020 06:01
|
|
|
With the shrouds attached to the dead-eyes, it was time to add the shroud cleats. I hated the look of the kit brittania cast cleats, so I ordered some boxwood shroud cleats from Syren. They look.. somewhat nicer than the cast ones. The cleats are attached to the shrouds with 3 individual seizings? I'm not sure if that's actually the correct nomenclature, but the small rope is wrapped around the cleat in three separate spots to firmly attach it to the shroud. 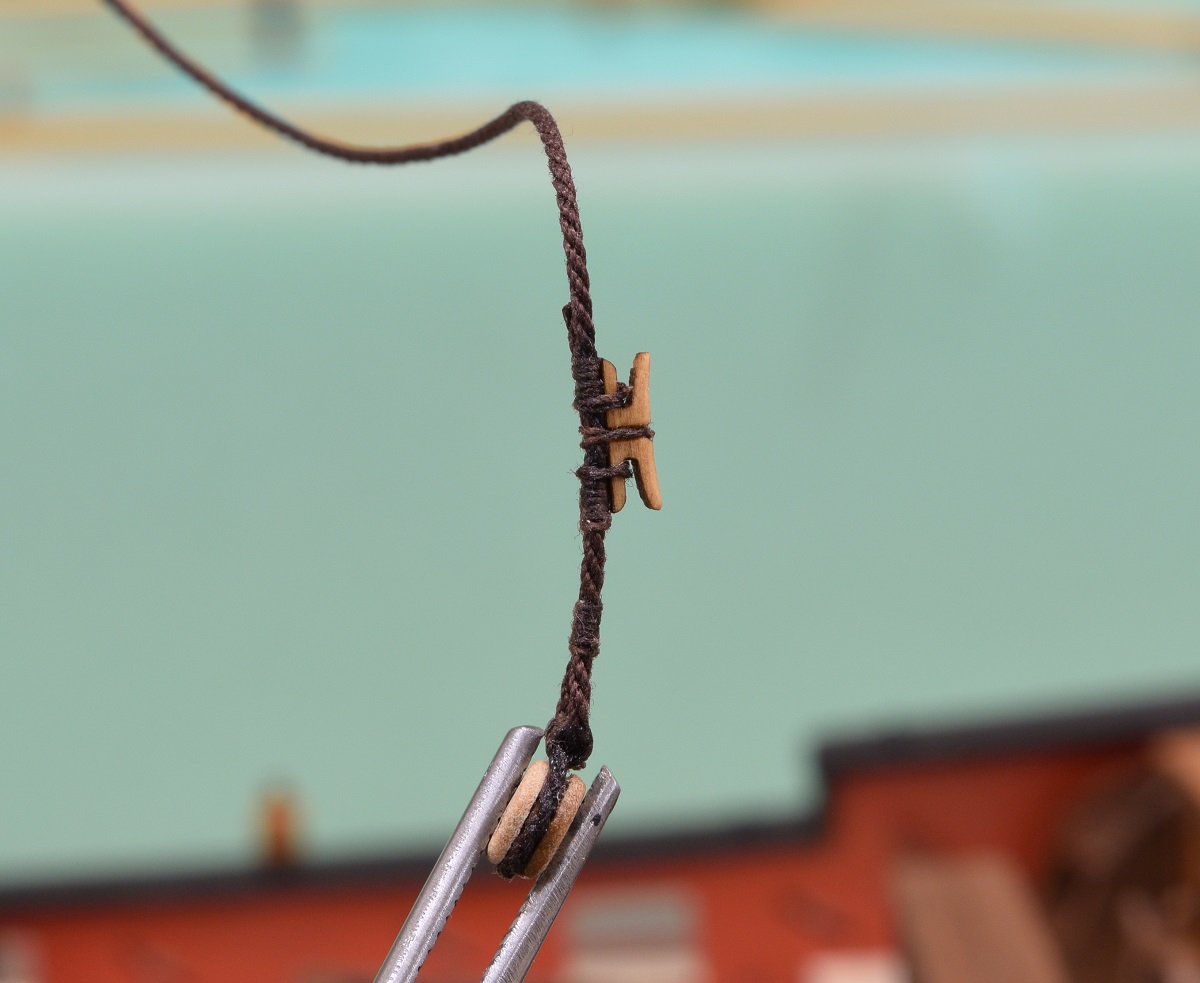 The shrouds are attached to the ship by the use of lanyards which are run through the deadeyes in a very specific sequence starting at the back of the top deadeye where a knot is tied so it can't go through the hole, then down to the bottom deadeye, back up to the top center hole, down to the bottom center, back up to the other top side hole, back down to the bottom side hole, and then back up to the top where it runs past the deadeye and is looped thought the shroud between the deadeye and the shroud coming through to the front. Except that I screwed up and made the shroud too tight against the deadeye and left no room for the lanyard to come through, so I faked it and just ran the lanyard from the back to the front around the shroud and then back under itself. From there it goes up alongside the shroud where it will eventually be tied off with seizings. However, that has to wait for a bit because... Things have been going far to good for quite a while now, so troubles were bound to happen, and tonight.. was the night. The starboard side is coming out great, all rigged up and set for final adjustments before I wrap the lanyard around the shroud and seize the end.  The trouble is on the port side. Even though I measured both sides the same, and everything still measures the same relative to the chain plate locations, the ship is clearly not perfectly symmetrical, as this happened. 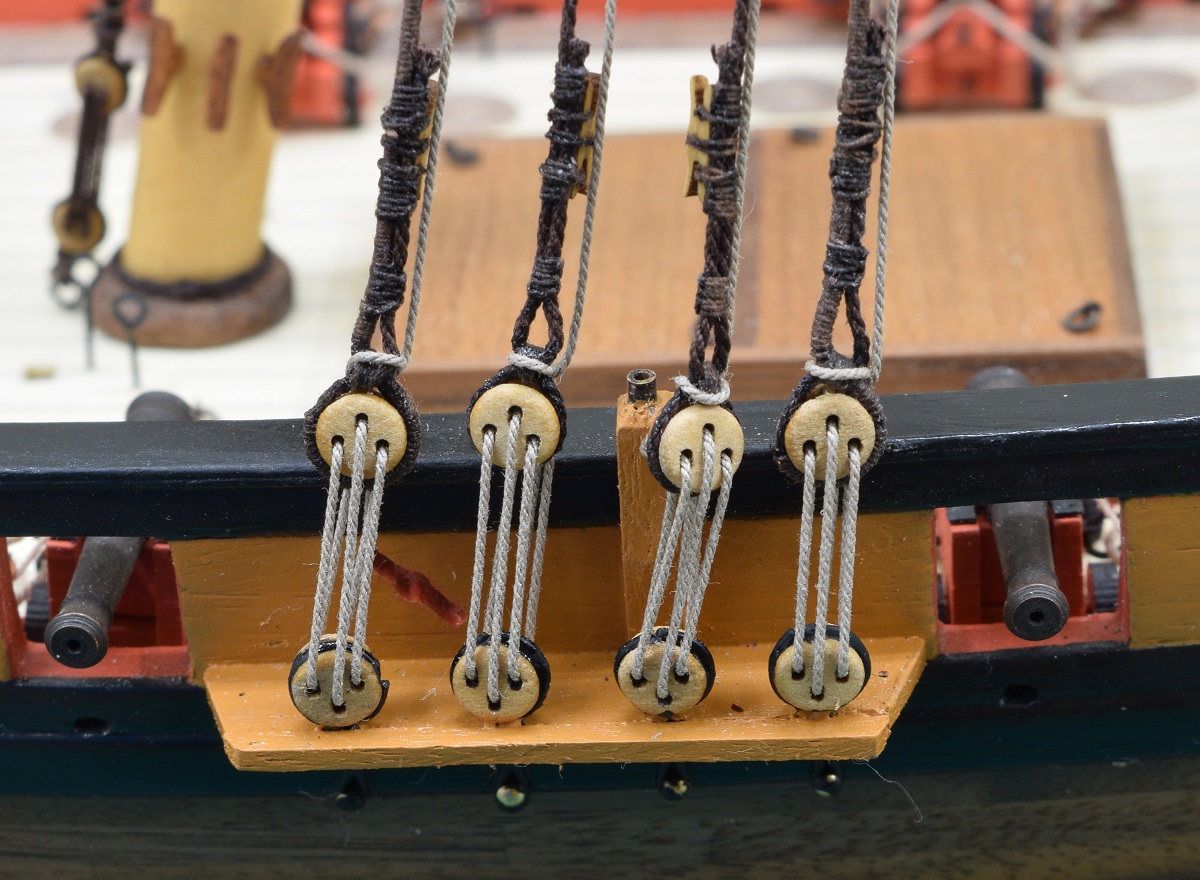 Stupid swivel gun post is interfering with one of the shrouds, and in a big way. 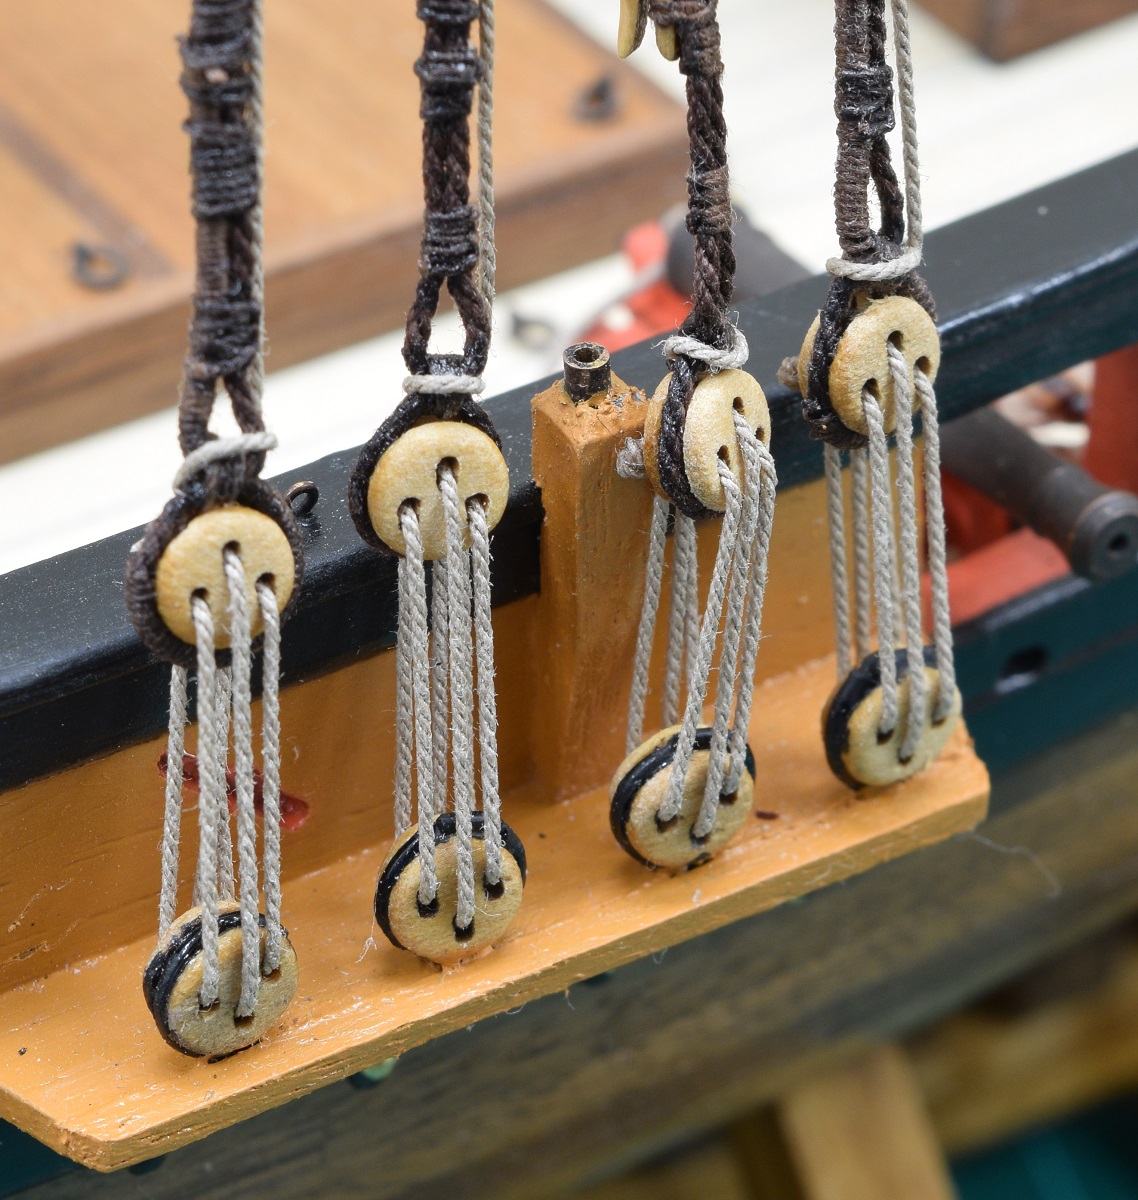 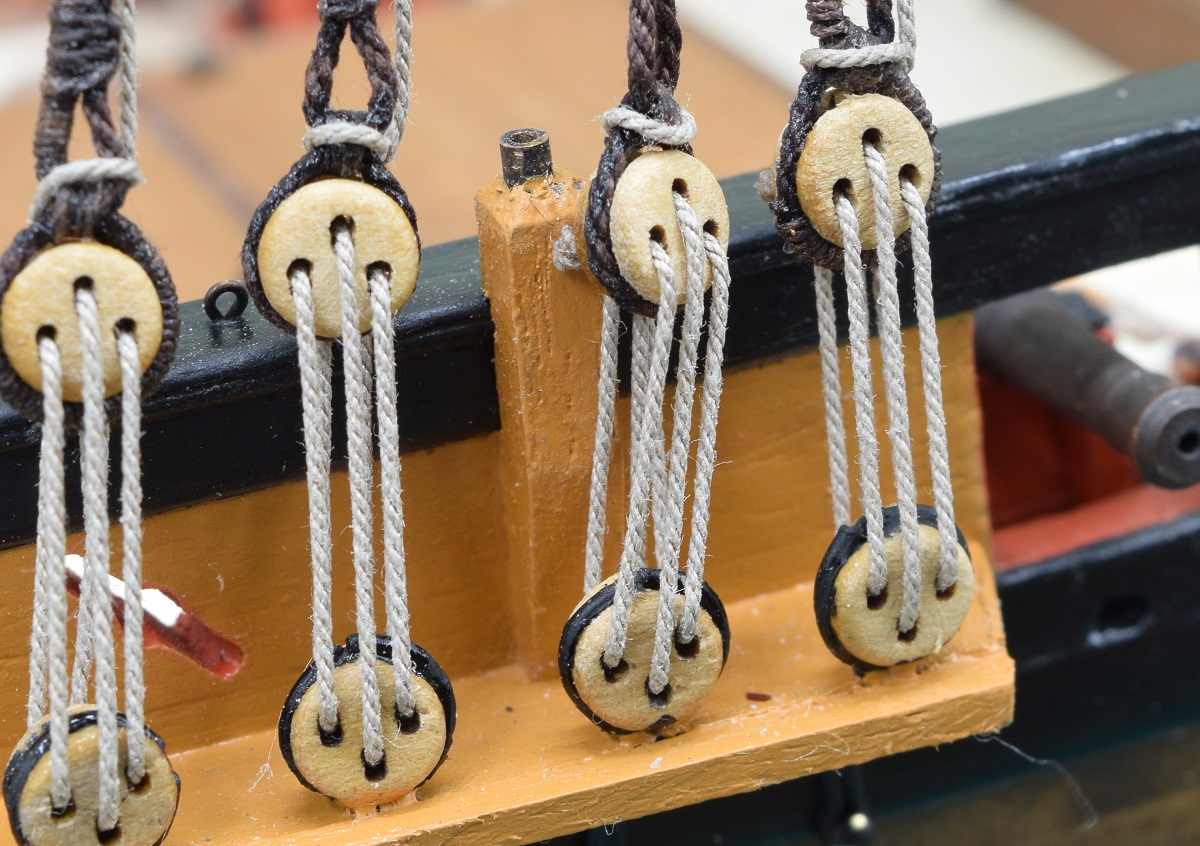 There is really nothing to do except deconstruct it, but man I'm afraid of this, those suckers are attached pretty firmly, and goodness knows how much damage I'm going to do getting it removed. Oh well, it's got to be done, but I'm going to let it rest for the night and start fresh on it after work tomorrow I think. ---------- Tomorrow ------------- Repairs went far better than I could have expected. The pedestal was water soaked for quite a while and then some light tapping popped it right off! 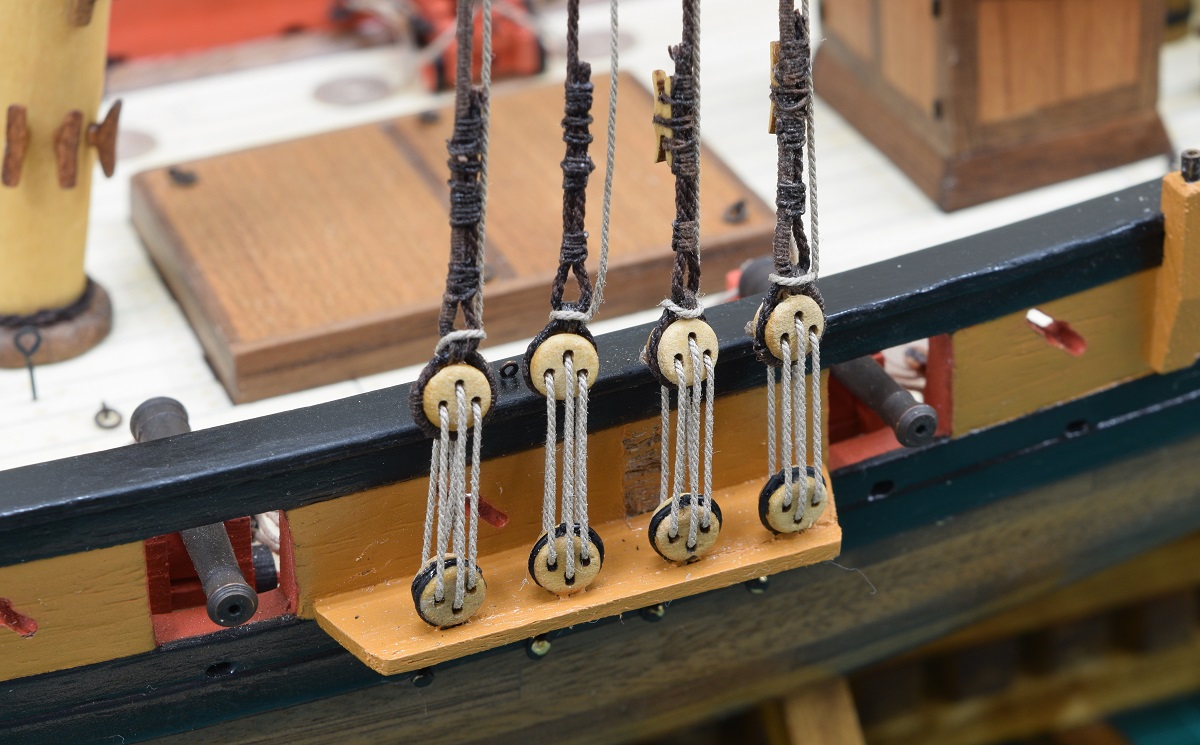 I then pulled the lanyard out of the interfering deadeyes and moved the shroud and top deadeye out of the way. 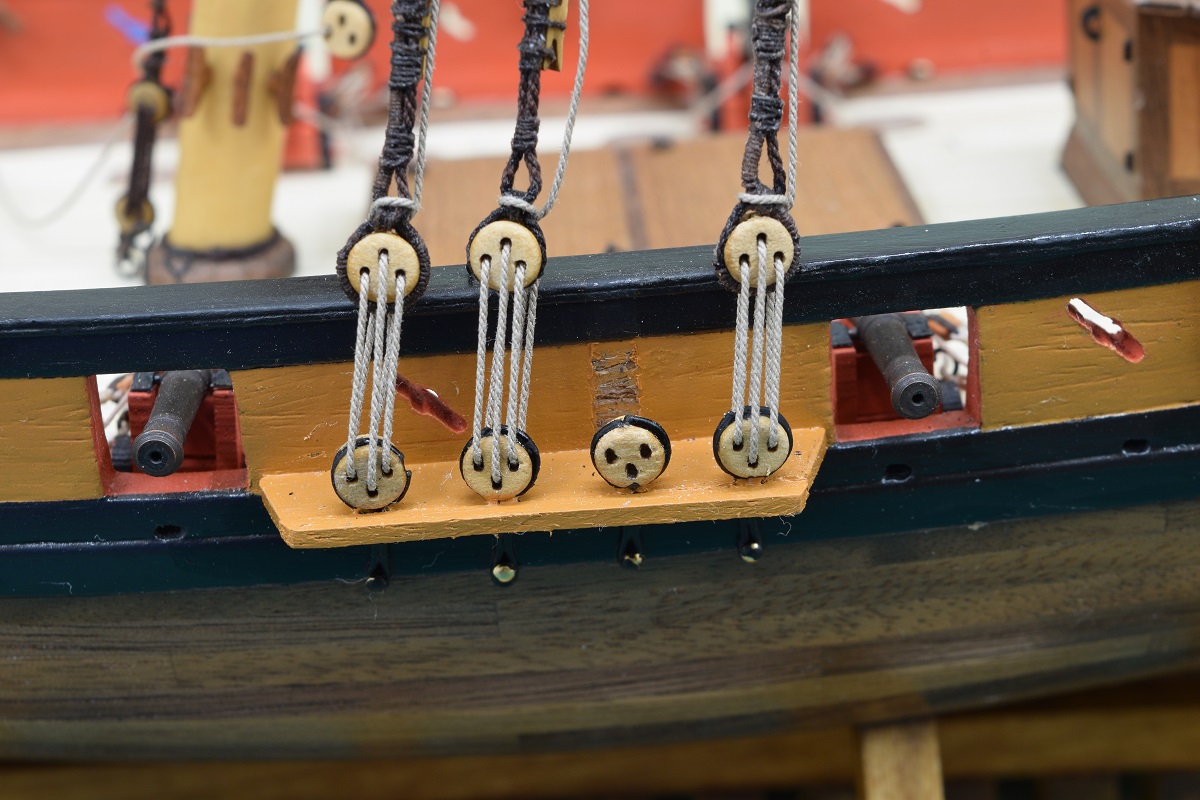 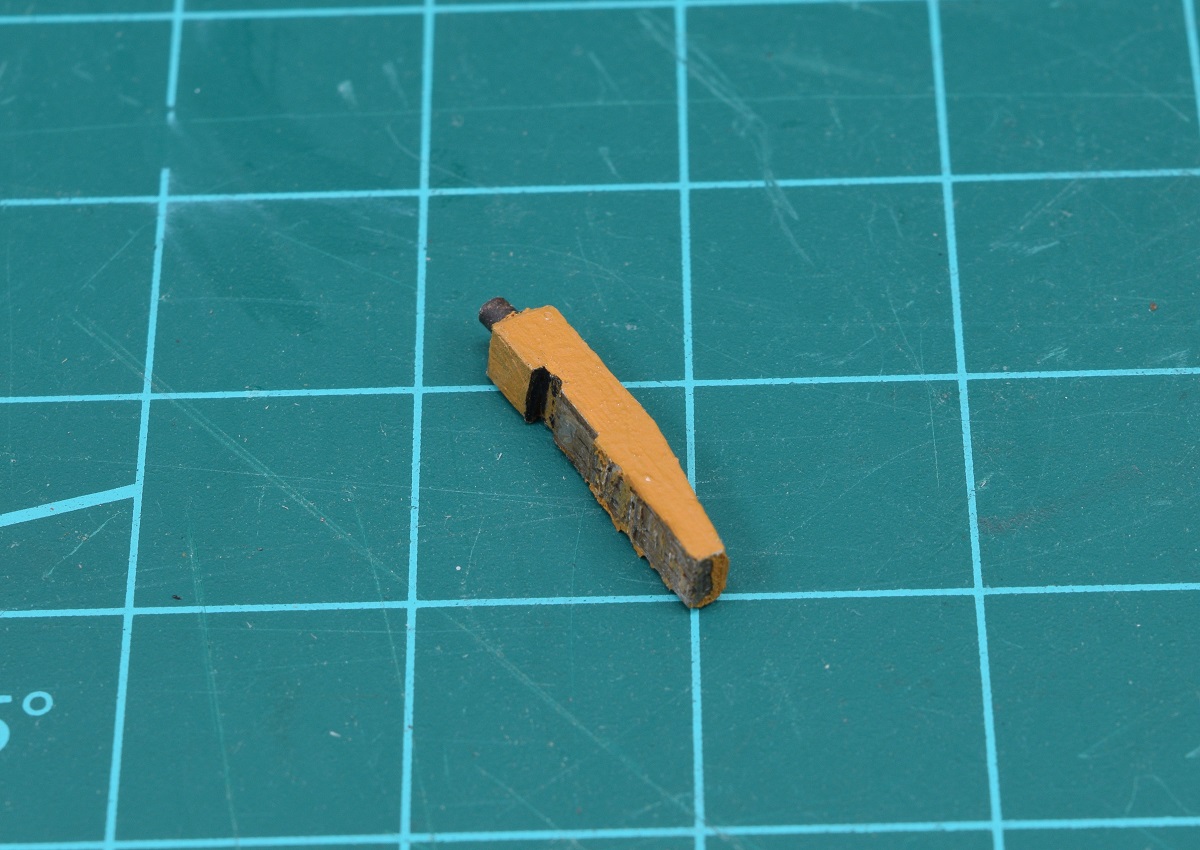 I carefully bent the lower deadeye out a bit for more clearance and then sanded away some of the paint so that the pedestal would have some wood for the glue to adhere to. I likewise cleaned up the glue surfaces of the pedestal itself. I then glued the pedestal back in place, slightly forward of where it was, and then after allowing the glue to dry enough, I did a bunch of touch-up painting in the area. 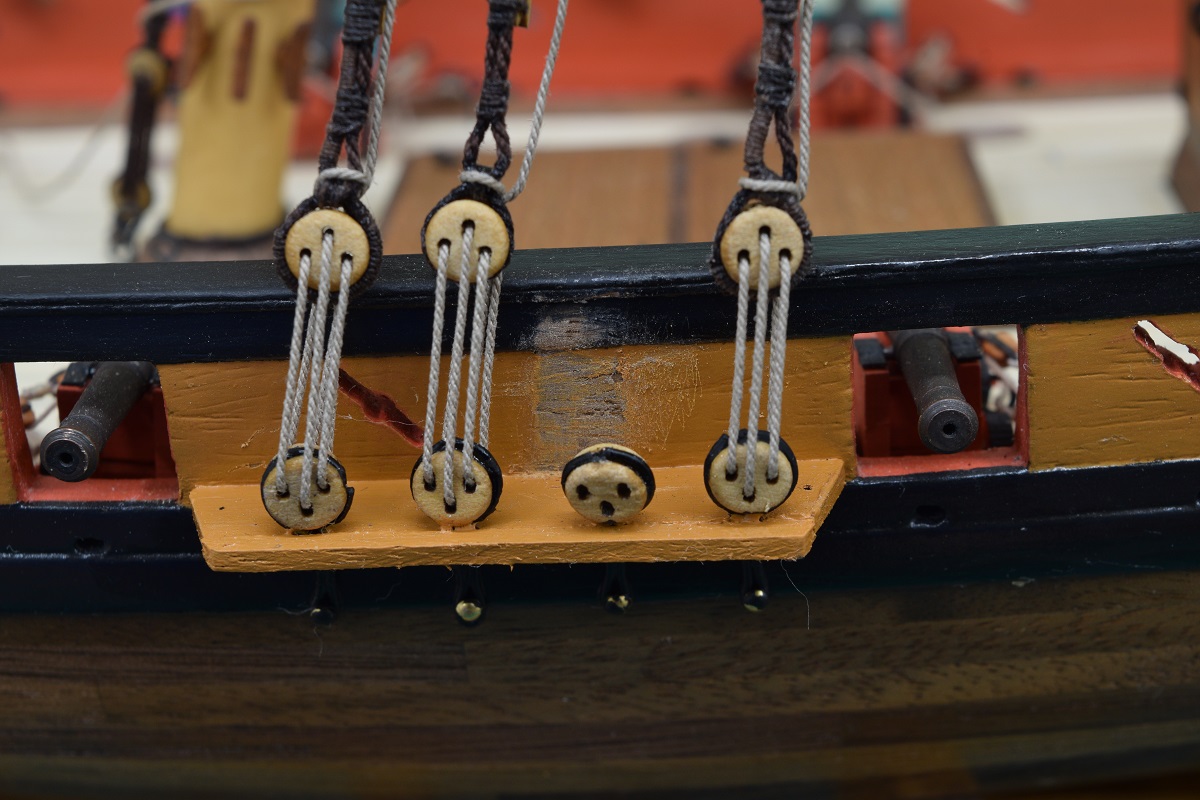   After that, I bent the lower deadeye back into position, and re-rigged the lanyard to the deadeye on the shroud.  After checking everything over, I decided that everything looked good, so I completed the wrapping of the lanyards around the shrouds and added the seizing to hold them in place, completing the port side shroud attachment.   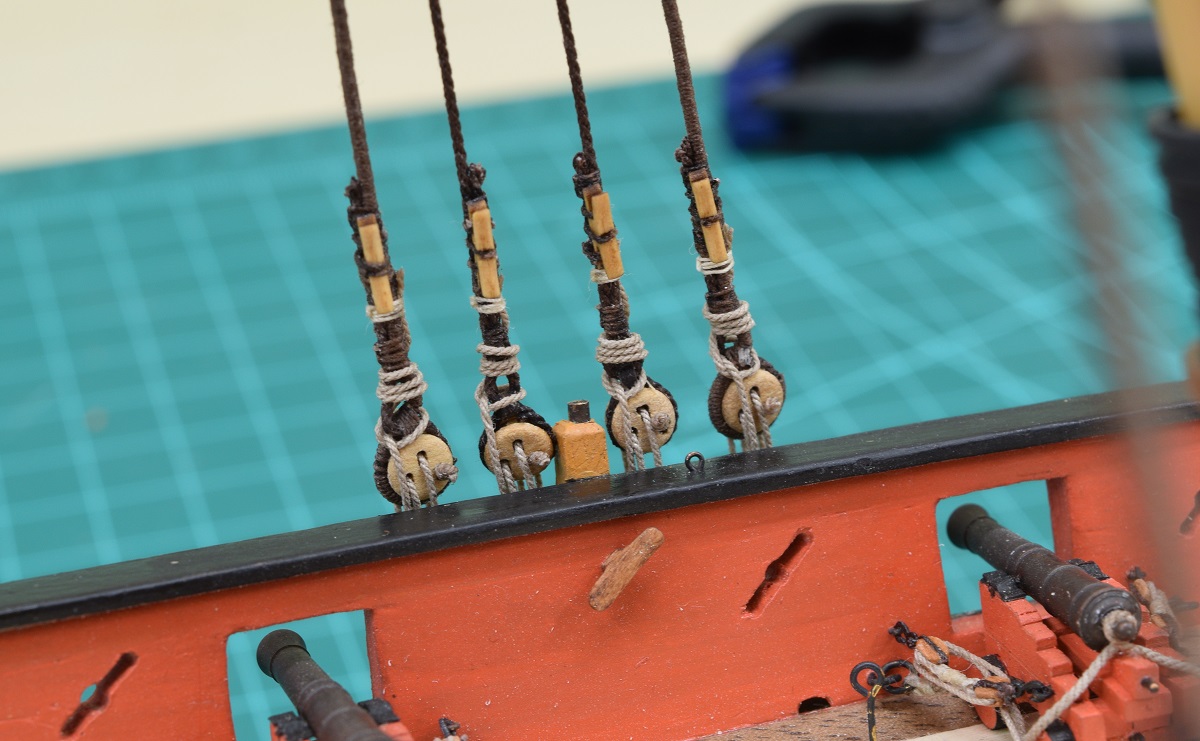 The following evening I finished up the starboard lanyards and finalized the shroud attachments. 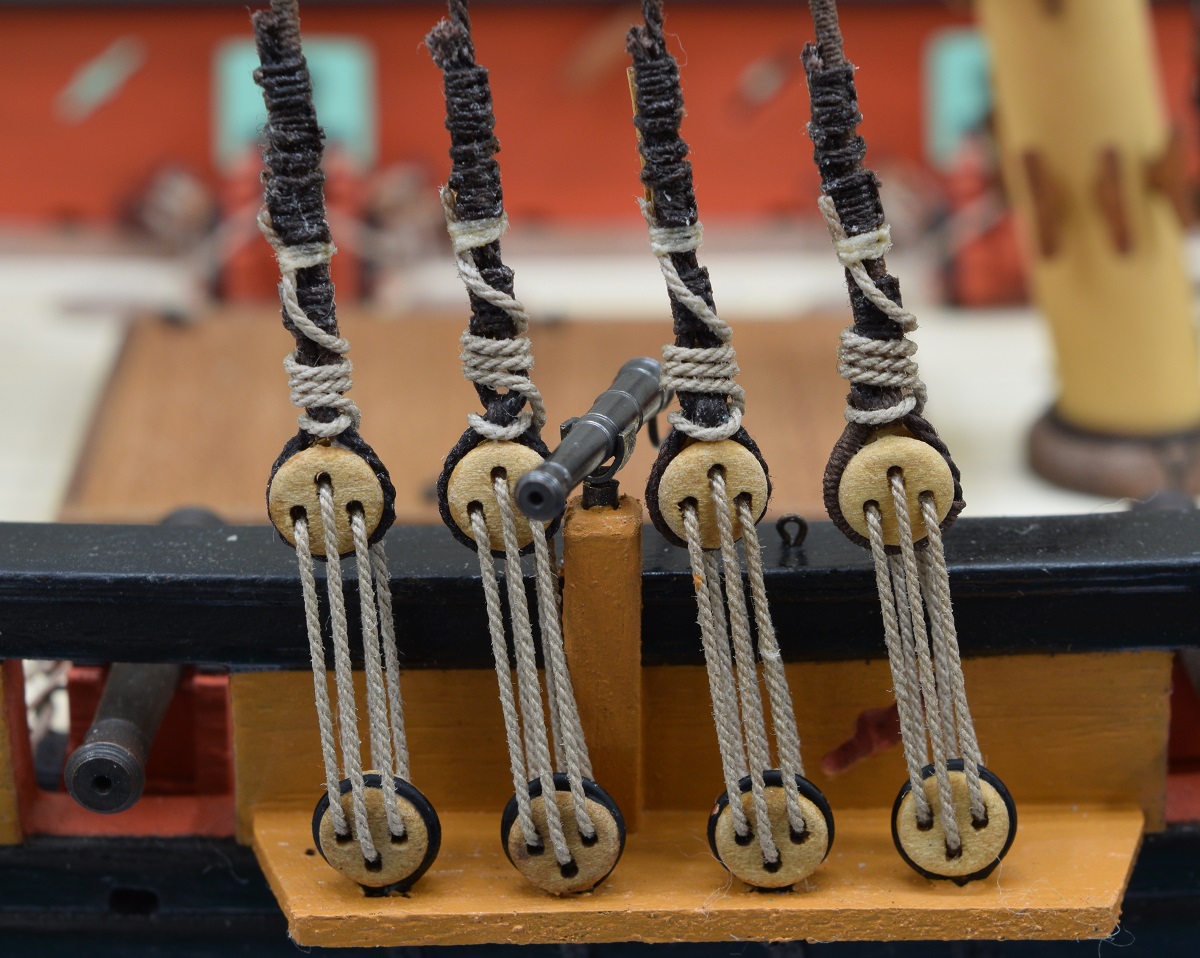  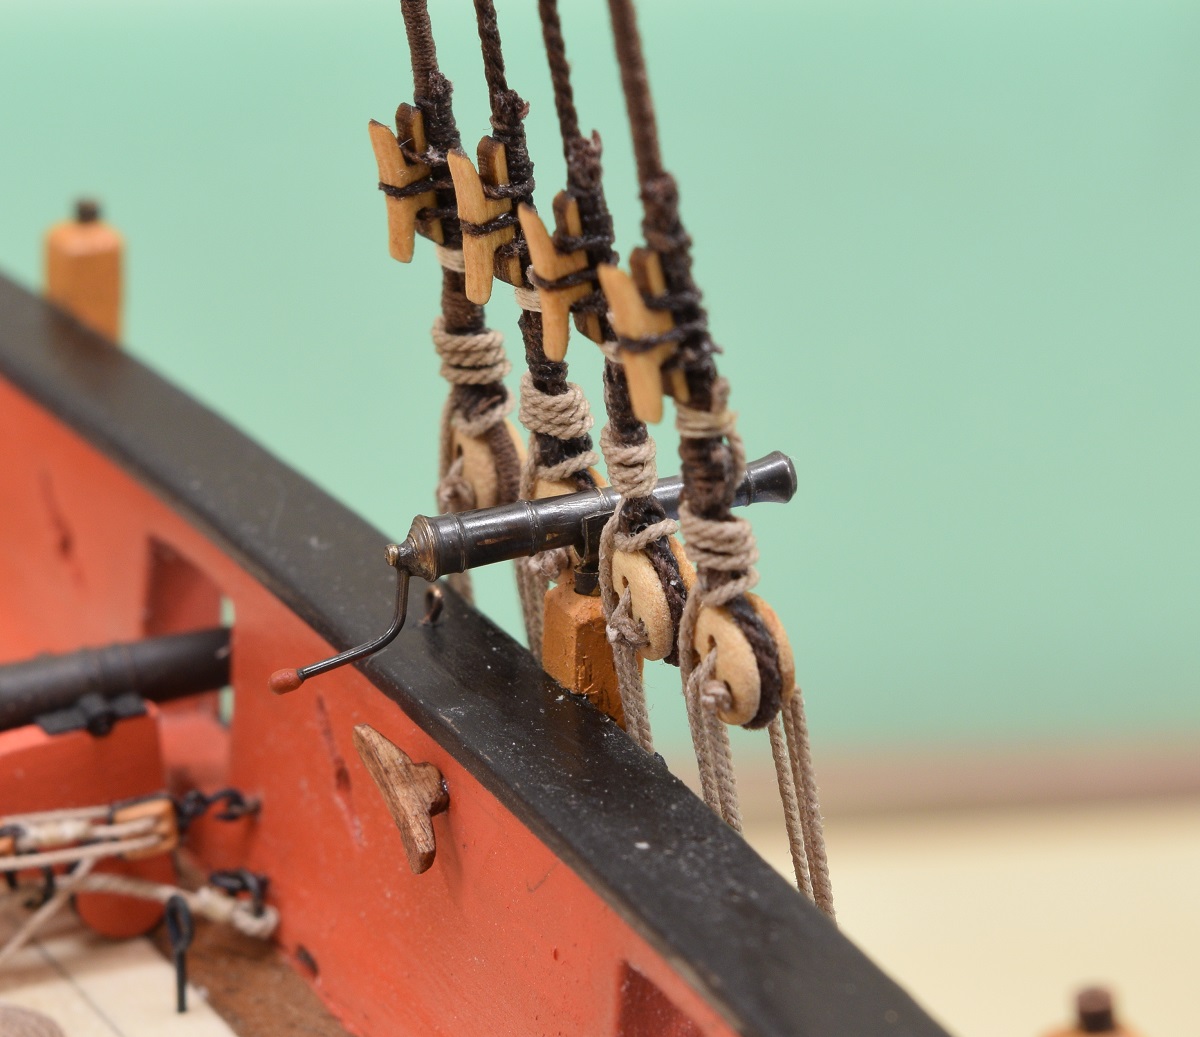 The shrouds are now complete, with the obvious exception of the ratlines (the rope ladders you see on big sailing ships rigging), but the ratlines will wait until as late as possible in the build so that the shrouds are easier to work through for other stuff near the mast. From here I needed to permanently attach the bowsprit, as the next rigging will be done up there. The job-boom will stay off the ship until later. I showed earlier in the build log the creation of the brass replacement strap for the foot of the bowsprit. This is anchored to the deck with large bolts, and bolted through the food of the bowsprit. I used small brass rivets which were blackened to make these connections. In addition there is wood glue between the deck and the bowsprit foot. The brass rivets are not part of the kit, but I added them for the detail. In addition, they are actually functional and make the connection much stronger than it would be with just the strap glued to the bowsprit/deck.  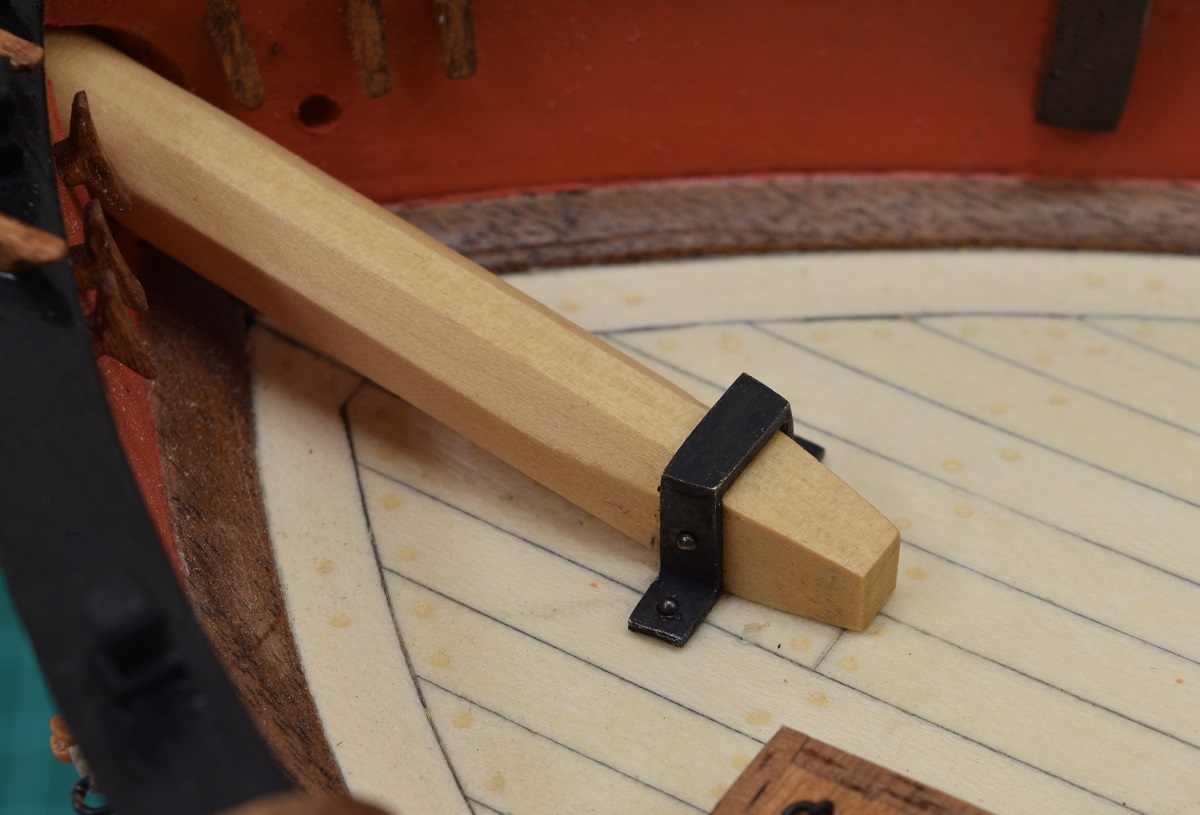 There is another strap that goes around the bowsprit on the outside of the ship called a gannon strap. This is provided in the kit as another one of those white cast metal parts, and somewhere along the way I lost the part. Rather than order a new part from Model Shipways and waiting for it to arrive, I just made a new one out of brass, and again used 4 small brass rivets to attach the gannon strap to the top of the stem. Once again the addition of the rivets was for the detail and adds functional strength to the strap. 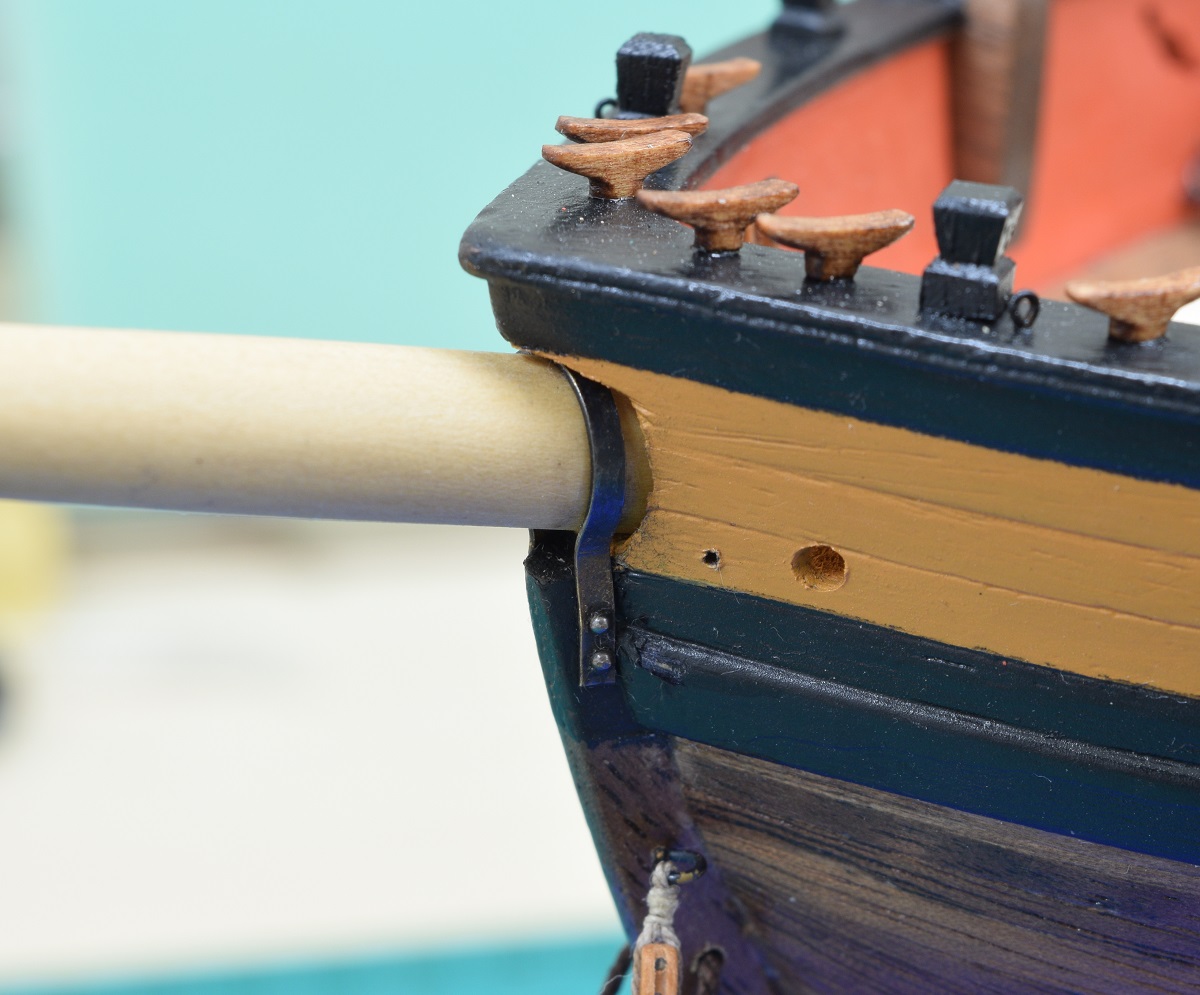 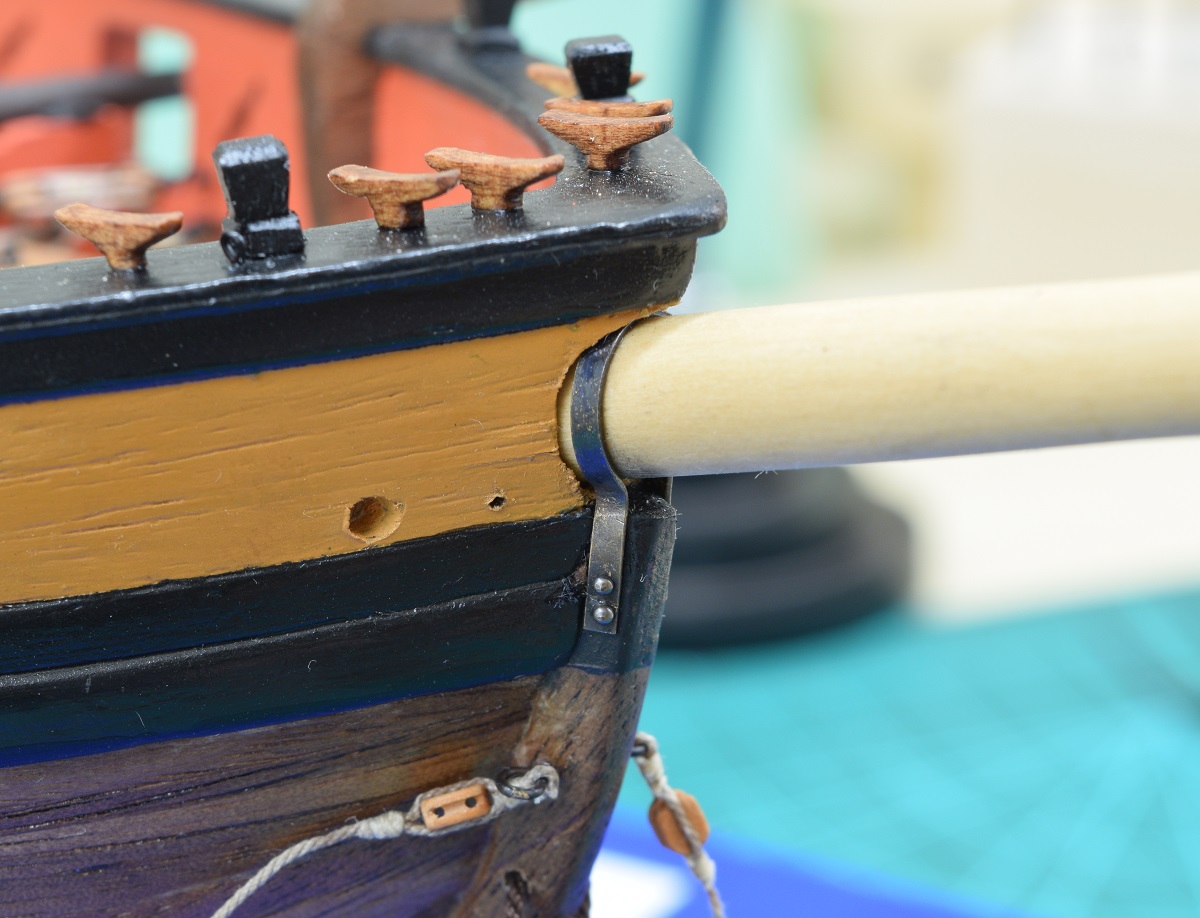 Next up the rigging will begin for the bowsprit.
|
|
#
?
Nov 24, 2020 04:37
|
|
|
Let the bowsprit rigging begin! First up, The Bobstay. The end of the Bobstay is attached with a collar arrangement that is two eye-splices with a bullseye in the middle. The eye-splices wrap around the bowsprit, but don't meet up, they are lashed together around the bowsprit with rope. Another bullseye is on the end of the Bobstay and the two bullseyes are lashed together with a lanyard. A bullseye as can be seen in the pictures is a simple donut of wood with an indent around the outside. Think of a 'squashed' thread spool. These are a way to allow 'lashings' to tighten different pieces of rigging down. Doing this with just ropes would wear through very fast as rope-on-rope connections fray the rope rapidly. 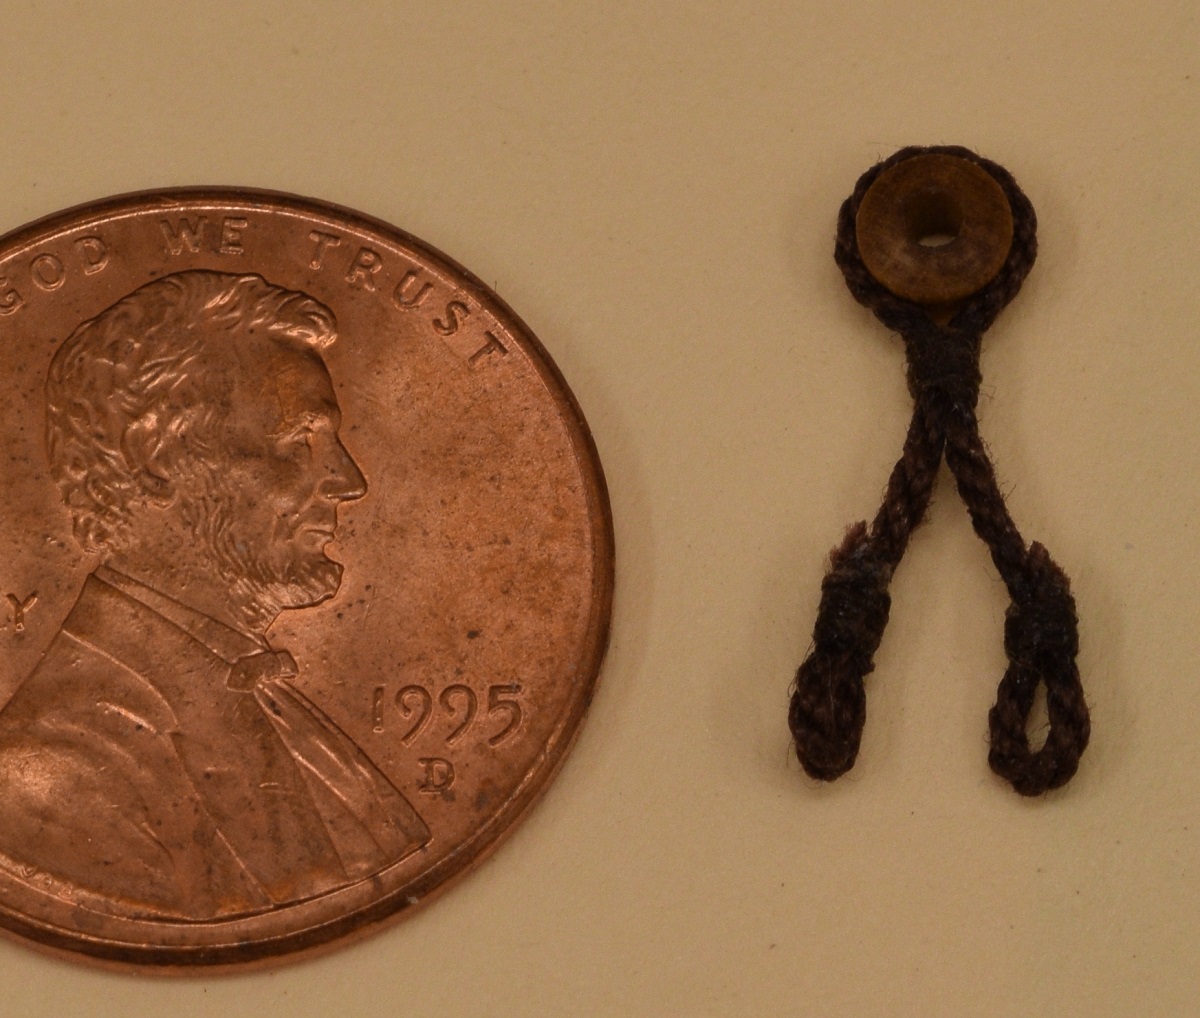  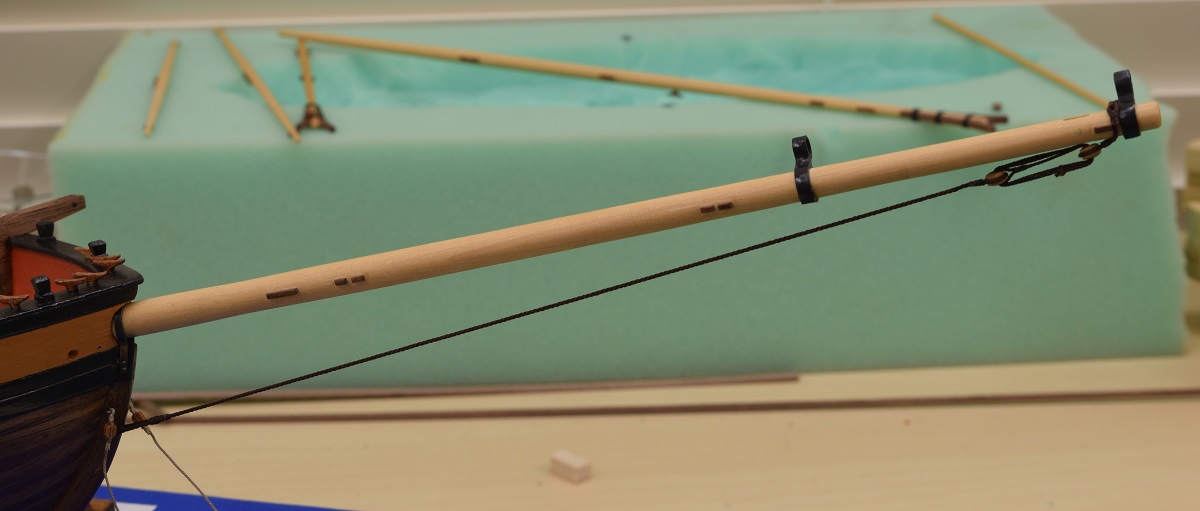 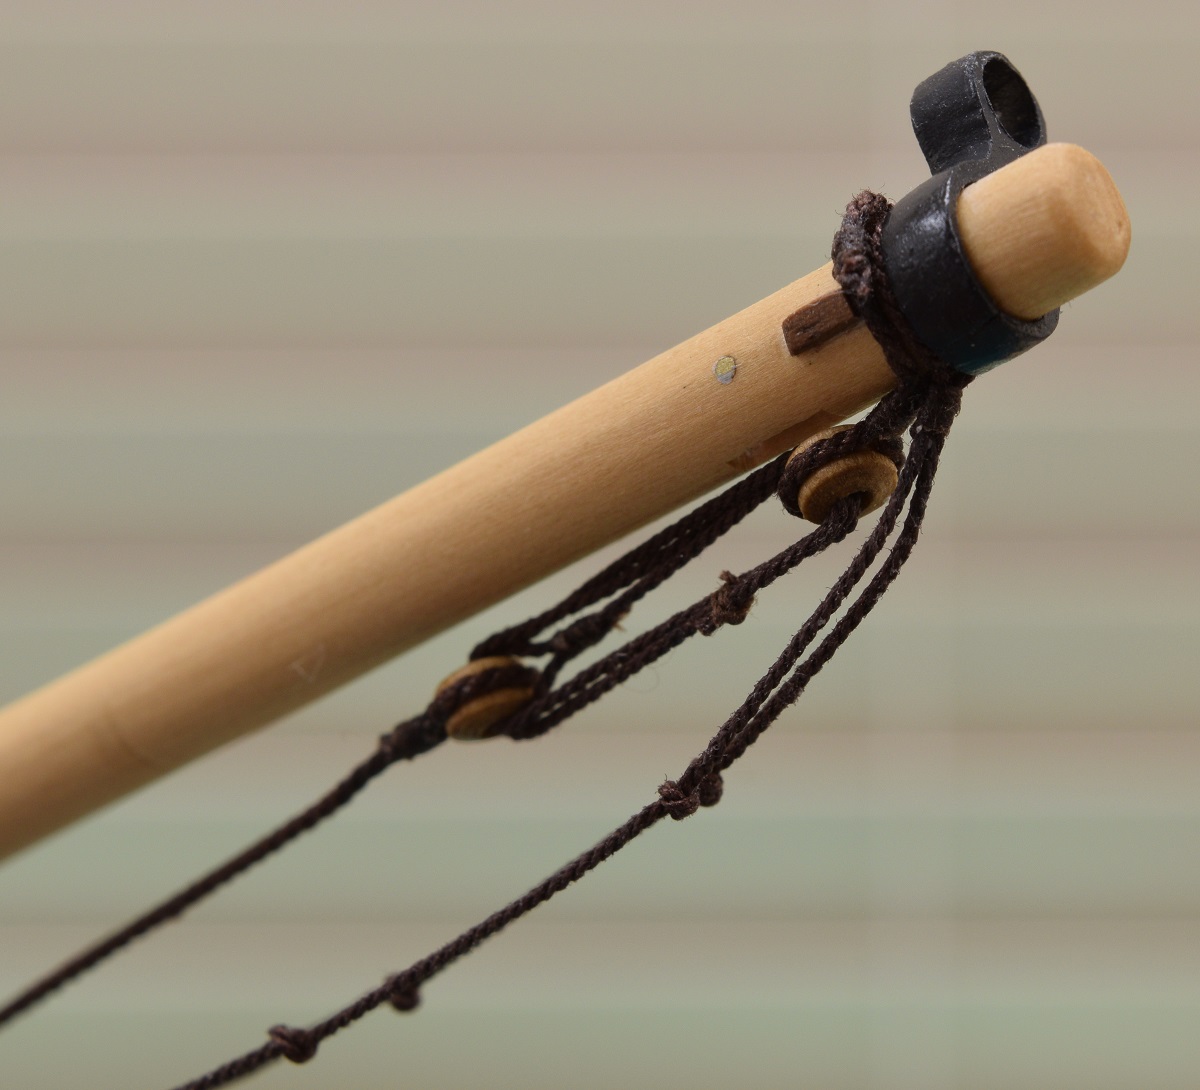 The next picture shows a bit of the foot-ropes. I'm working on getting these to hang naturally by soaking the rope in 50/50 white glue & water mixture, then clipping little alligator clips to them for weight and letting it dry. It's sort of working but it's got a ways to go. Footropes are pretty self explanatory. The sailors would stand on these ropes while working on the sails/rigging on the bowsprit. The same sort of rope will exist under the spreader yard for the sailors working up on the topsail, furling the sail or removing the gaskets (ropes tied around the sails to secure them when furled) to allow it to unfurl. 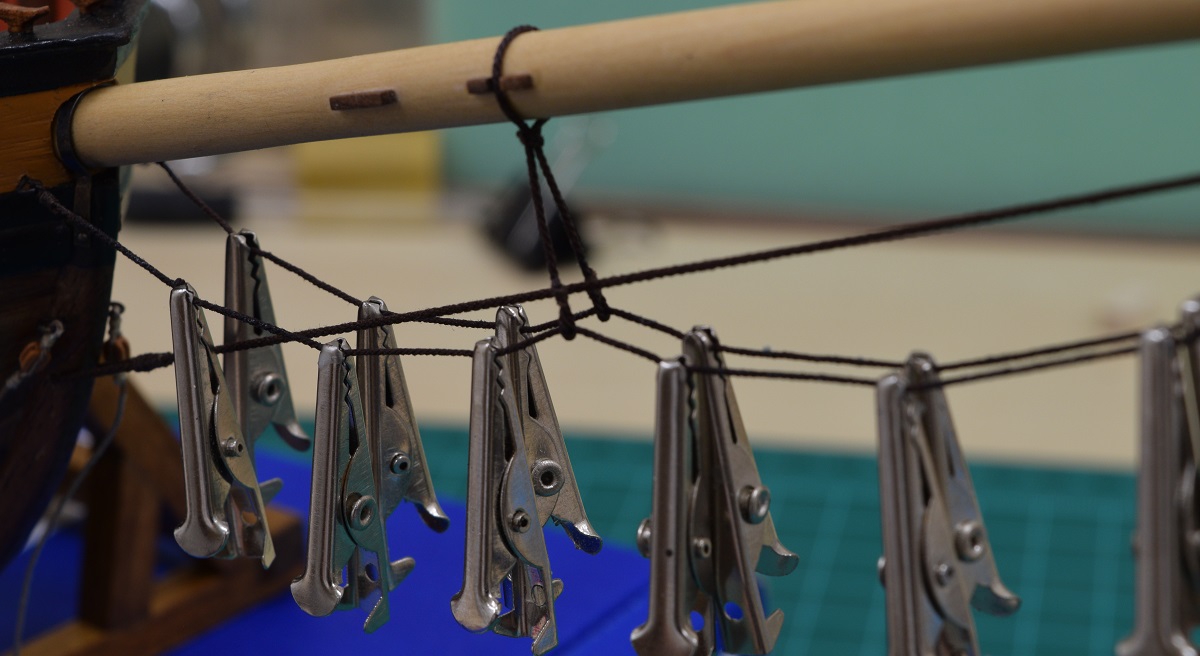 The next piece of rigging is the thickest rope on the entire ship except for the anchor cables, the forestay. I made the mouse by sticking a small dowel in the lathe and drilling a hole through the dowel just large enough for the forestay to fit into, and then shaping the mouse with a file and cutting it off (saw this method in a post here on MSW!) I then glued the little wooden mouse to the rope, painted it brown so it wouldn't show the light wood through if I left any gaps, and then served the forestay right over the wooden mouse. It came out pretty good. The mouse is just a spot in the rope that's larger so it prevents the eye-splice from sliding over it. The forestay is a large rope that runs from the mainmast to the bowsprit. 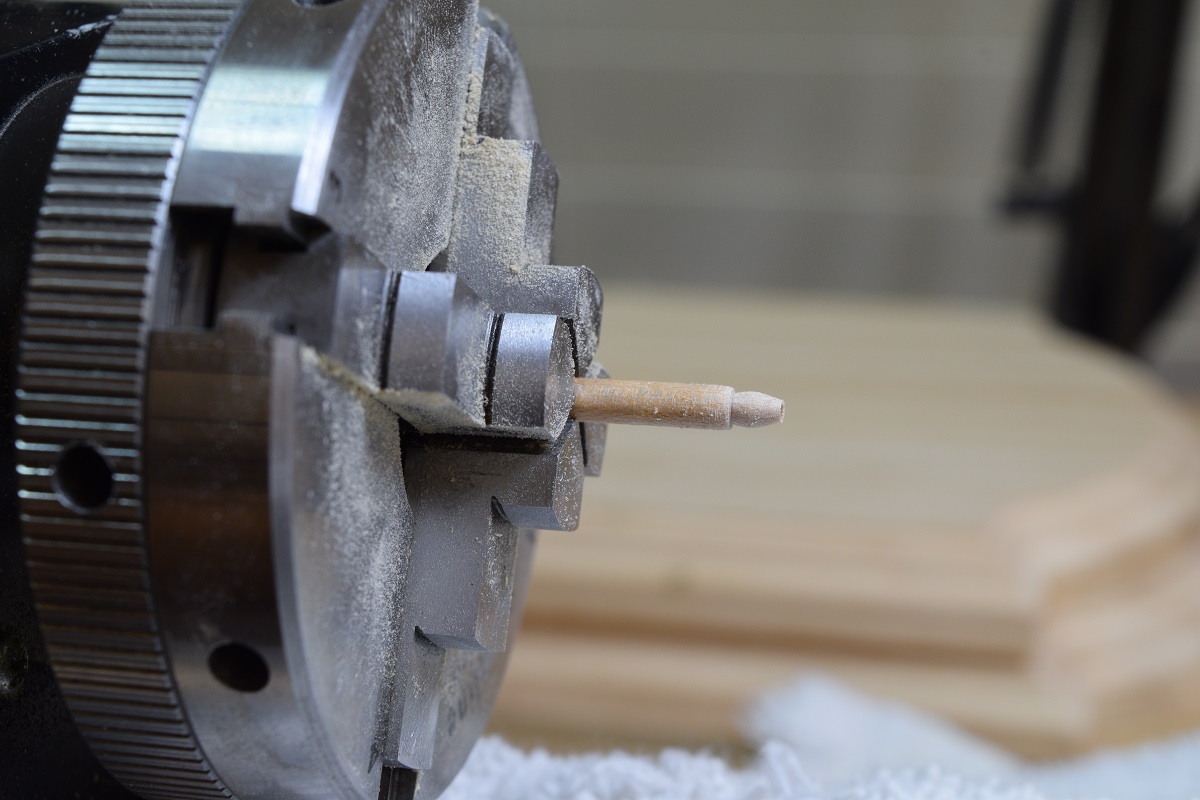 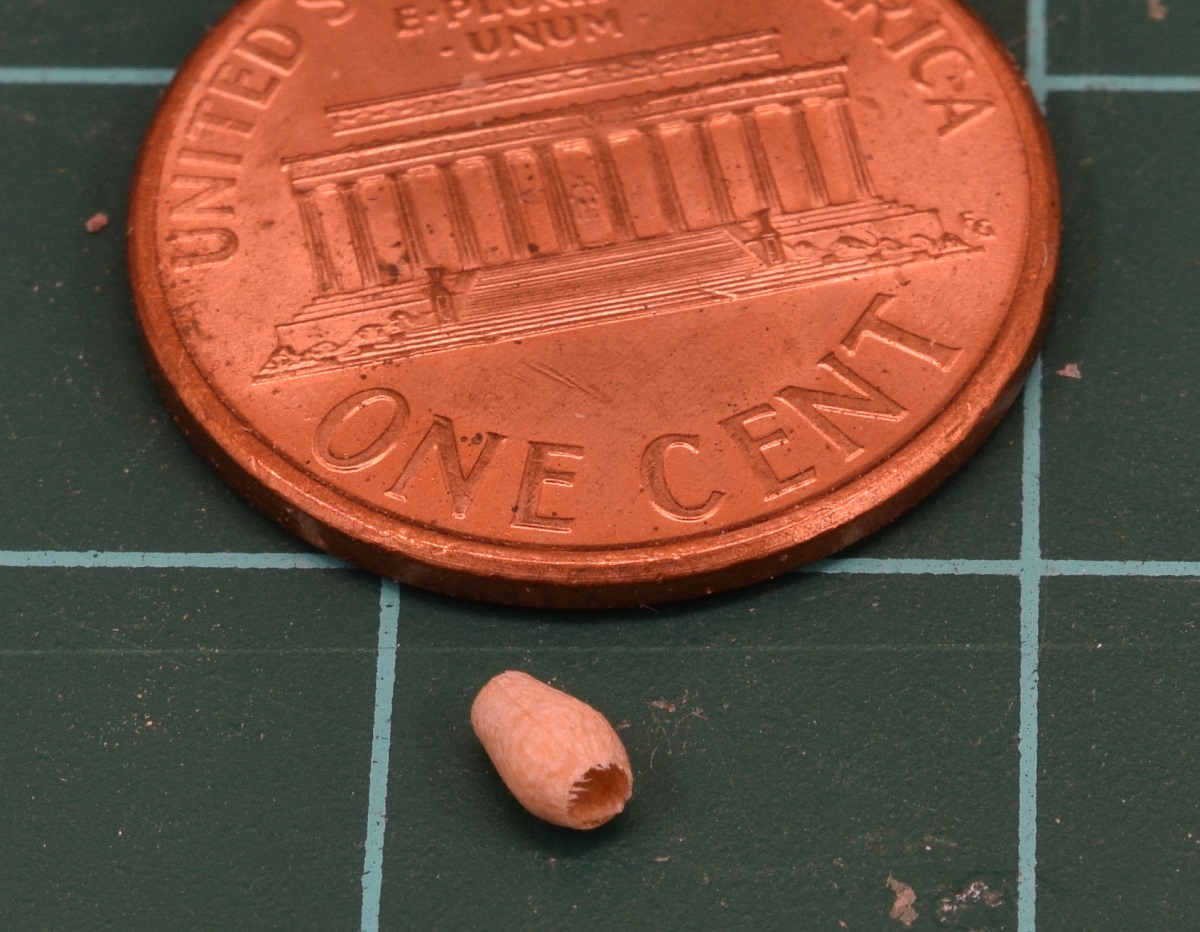 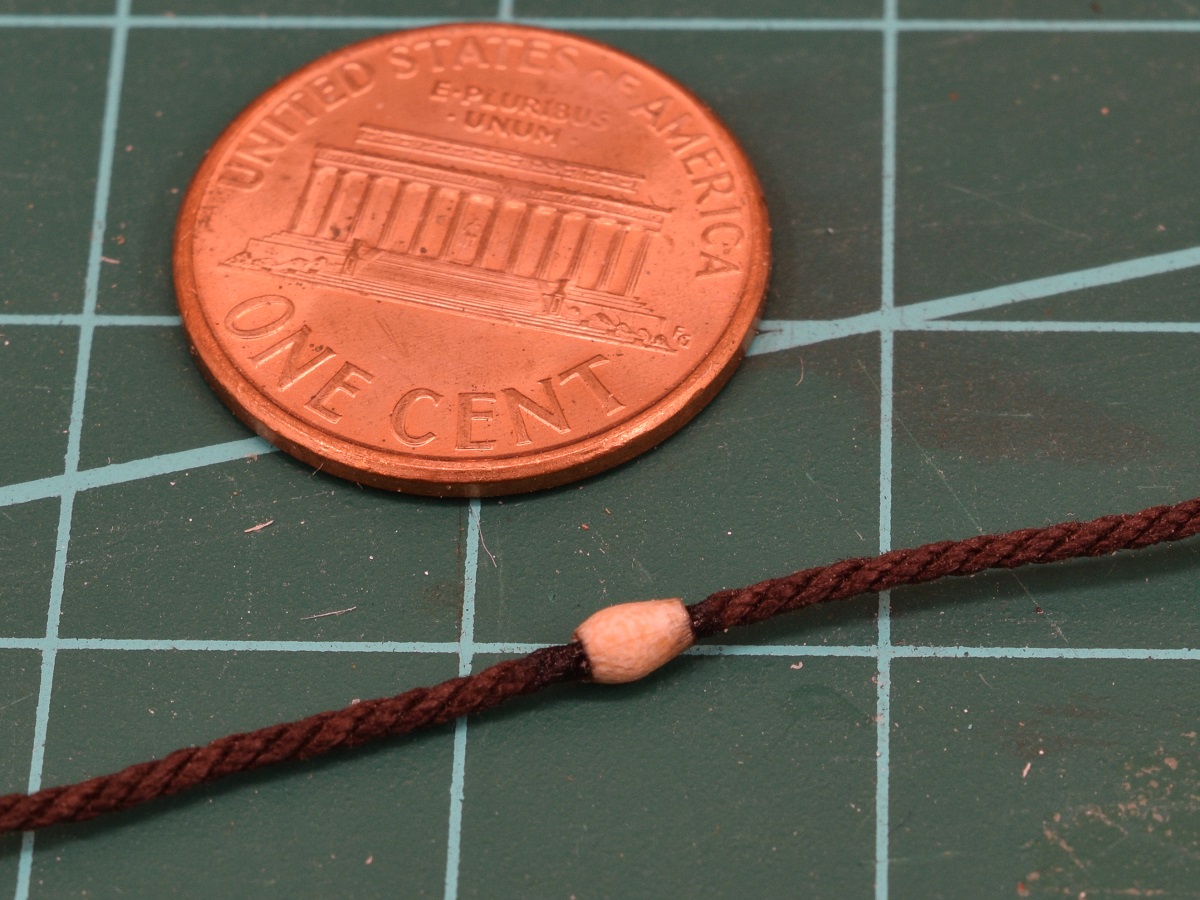 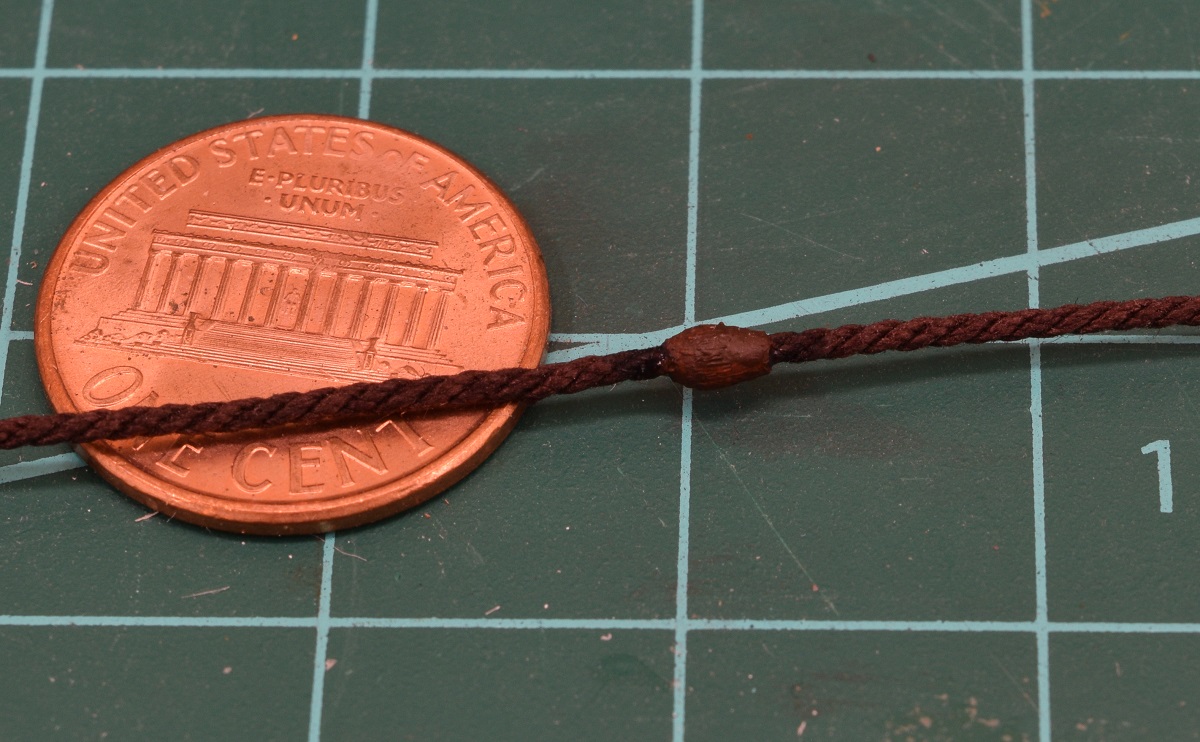 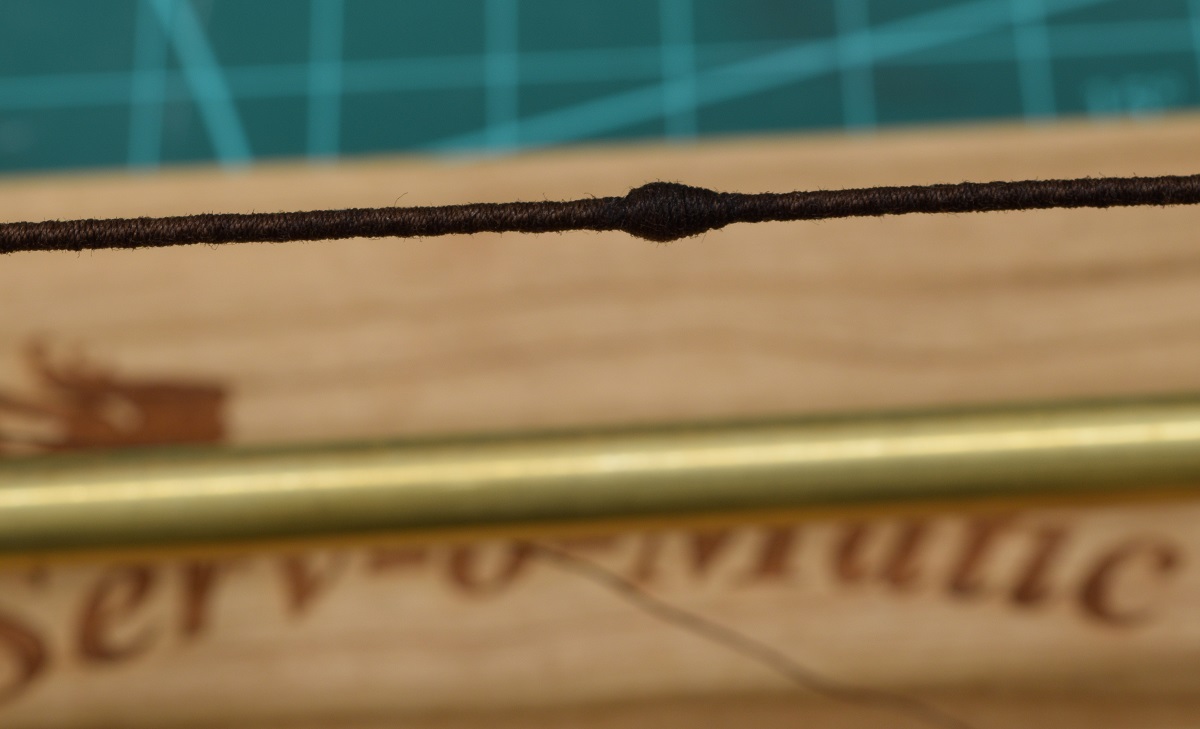 The bottom end of the forestay is attached to the bowsprit by the means of two hearts. One heart is attached to the bowsprit with a lashed setup just like the end of the bobstay, and the other heart is wrapped by the forestay and seized. Then a rope goes back and forth between the hearts, gets tightened up, and seized to itself. The kit provided hearts are terrible, so I replaced them, just like so many other things on this build, with 7mm closed hearts from Syren. The eye-splice on the end of the forestay.  The top of the forestay showing how the mouse and eye-splice work to fix the rope in place. 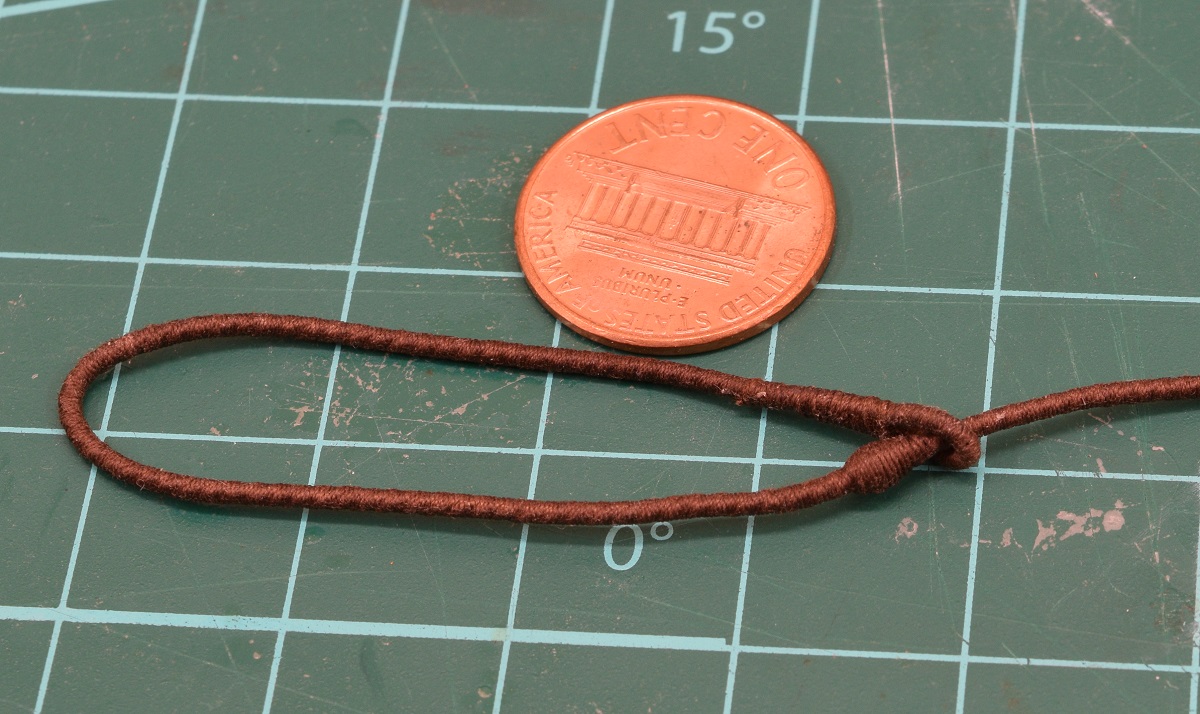 The kit hearts are the ugly charred things on top. The new hearts are on the bottom. 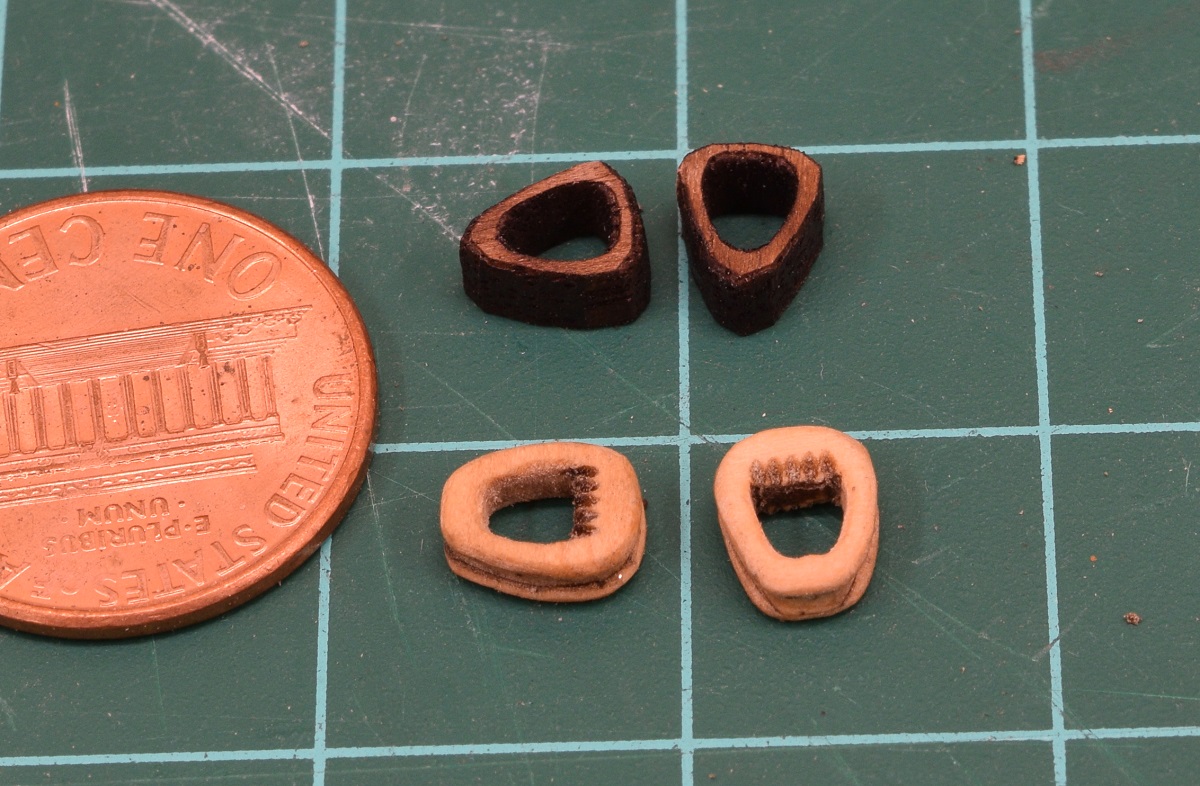 The top of the forestay gets wrapped around the top of the main mast above and around all the other crap already up there. 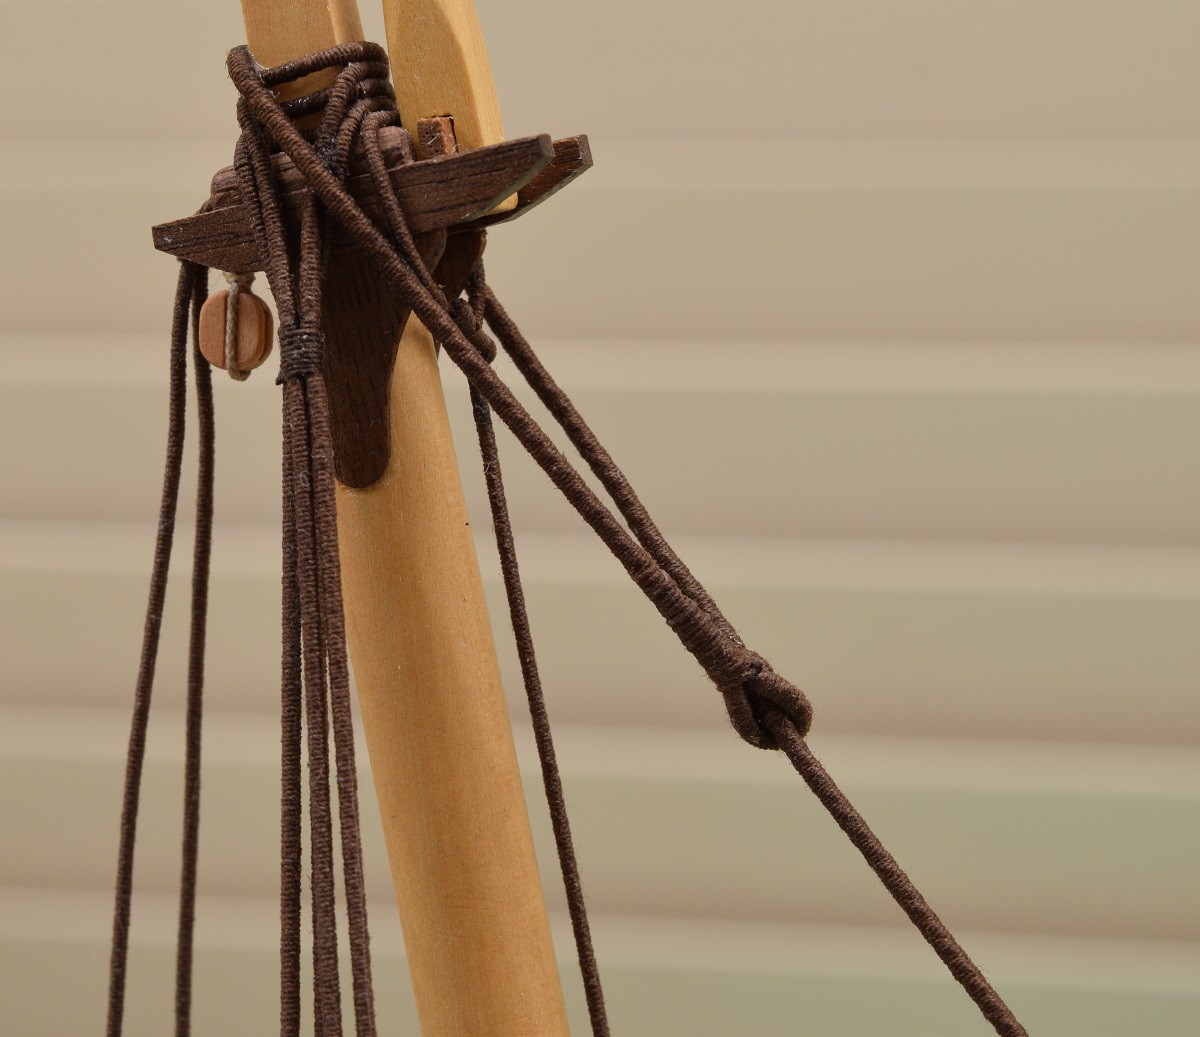 The bottom end showing the heart lashed to the bowsprit and the rope between with the three seizings where it's tied off to itself. Those seizings sucked, but I am quite pleased with how this all turned out. 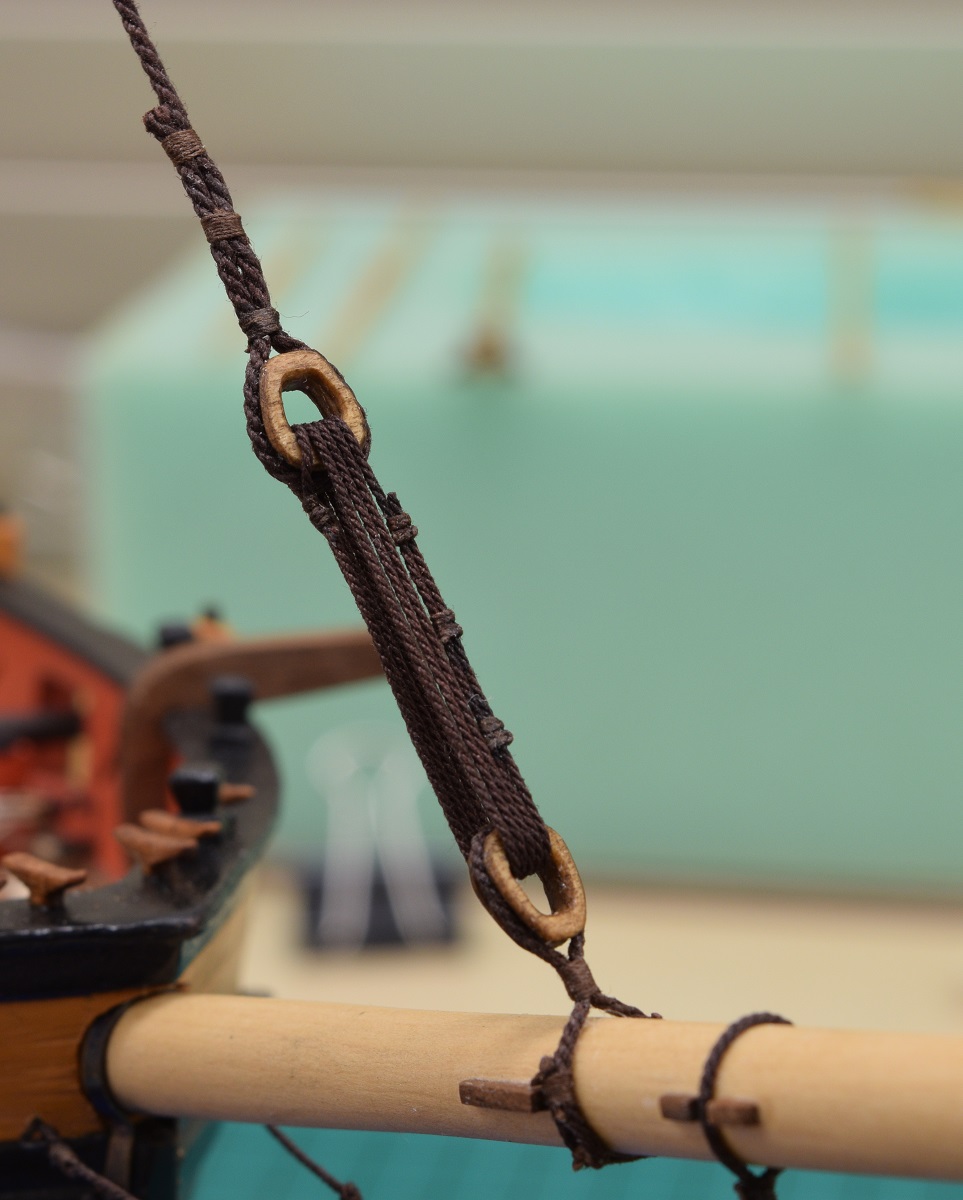 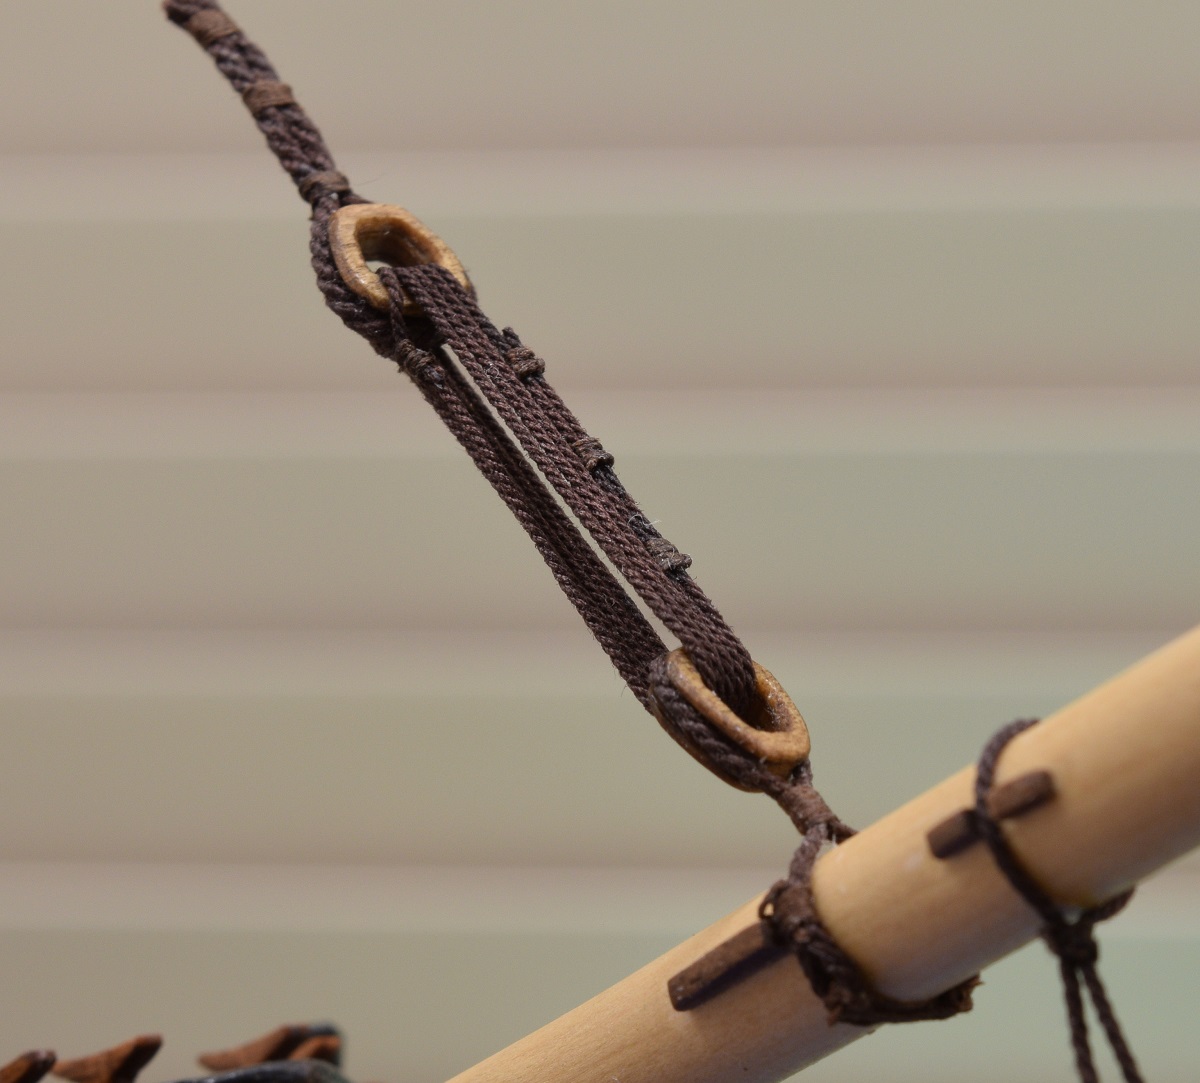  And the 'big picture' with the forestay in place. 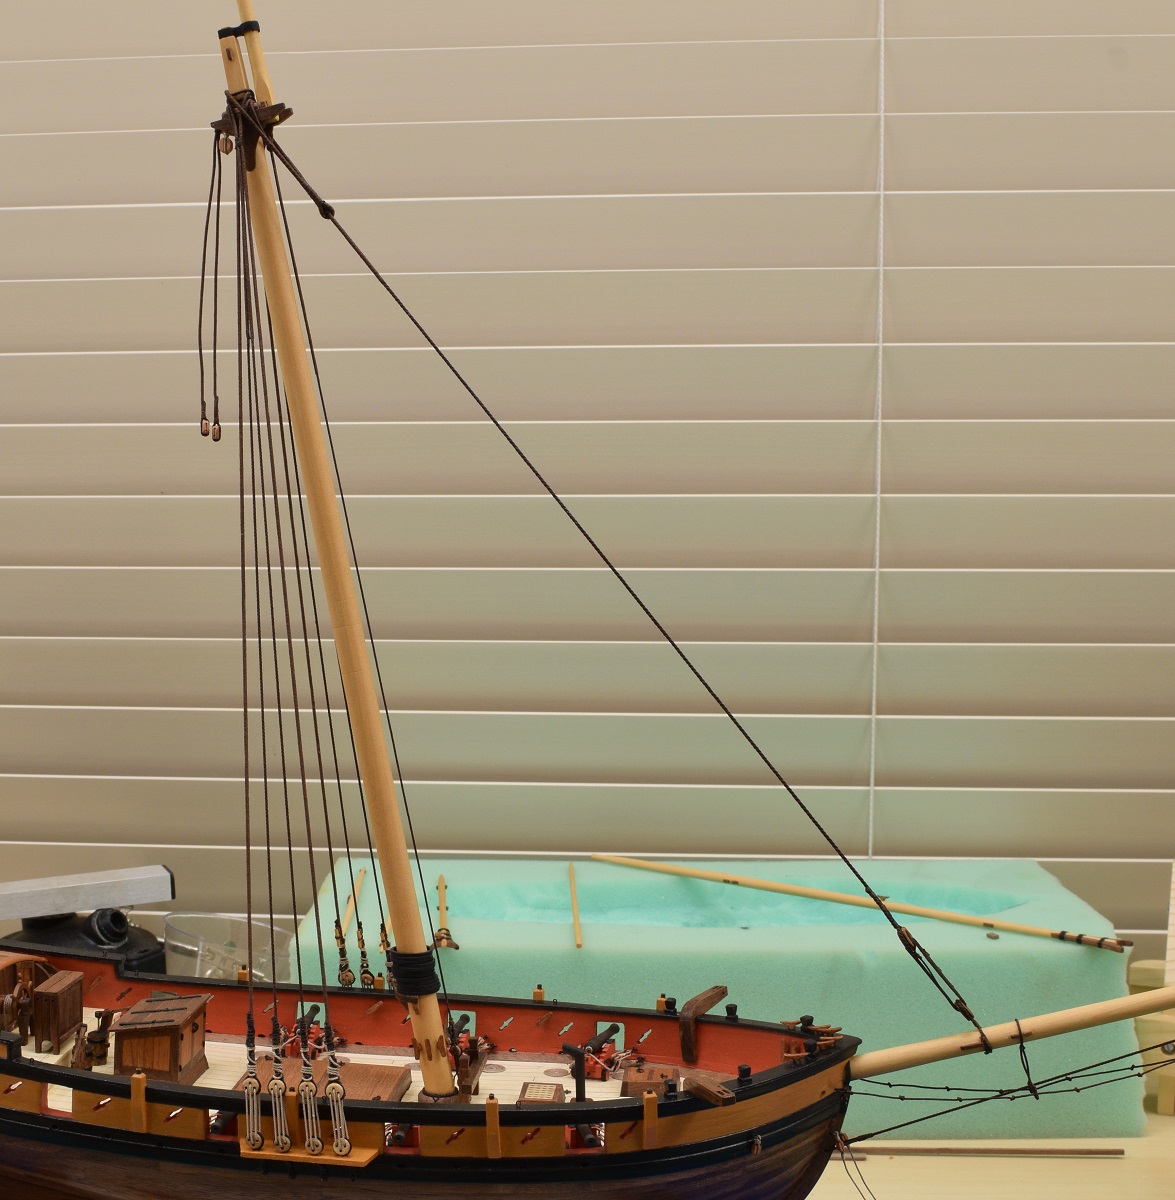
|
|
#
?
Nov 25, 2020 01:39
|
|
|
Oh.. the other end of the bobstay attaches from the two bullseyes back to the stem. This isn't shown very well in the photo, but there is a hole in the stem from side to side, and the stay just runs through the holes, back to itself and is spliced there, which is why the bullseyes and lashing arrangement exist at the bowsprit end, to adjust the tension. This line transfers the strain from the rigging and sails that are pulling 'up' on the bowsprit into the keel of the boat, because the bowsprit alone could not handle all the stress.
|
|
#
?
Nov 25, 2020 01:49
|
|
|
Quick rigging stuff. "Rig" can refer to two things on a sailing vessel. First, it can refer to the way the sails are laid out, or the 'sail plan'. An example is "ship rigged" is the classic full square sail warships of the Napoleonic era. This little ship has what is called a "fore and aft" rig, but also has a square rigged topsail. So someone would look at this ship and say "she has a fore and aft rig". The second way it is used is as a collective word for all the rigging on the ship (i.e. all the ropes and cables related to handling sails). Some people include the actual masts/spars/bowsprit, etc. in that collective 'rig', but I don't think that is standard practice, I think the rig should only include the ropes, cables, and in some cases chains. Rigging is divided into two classes, standing, which supports the mast (and bowsprit), and running, which controls the orientation of the sails and their degree of reefing. With that out of the way, what I've been working on so far is the standing rigging, which in general all goes up and stays up on a sailing ship, whether the sails are stowed or not. Note that I use brown rope for the standing rigging, and light tan rope for running rigging. The reason is that since the standing rigging stays up all the time, it is normally treated with tar, which turns it dark brown/black, in order to help preserve it from the salt water and extend the useful life before the rig needs to be replaced. In this update, I continue working on the standing rigging. I begin by making another mouse for the jibstay (smaller, since it's a smaller rope) and getting it all rigged up. 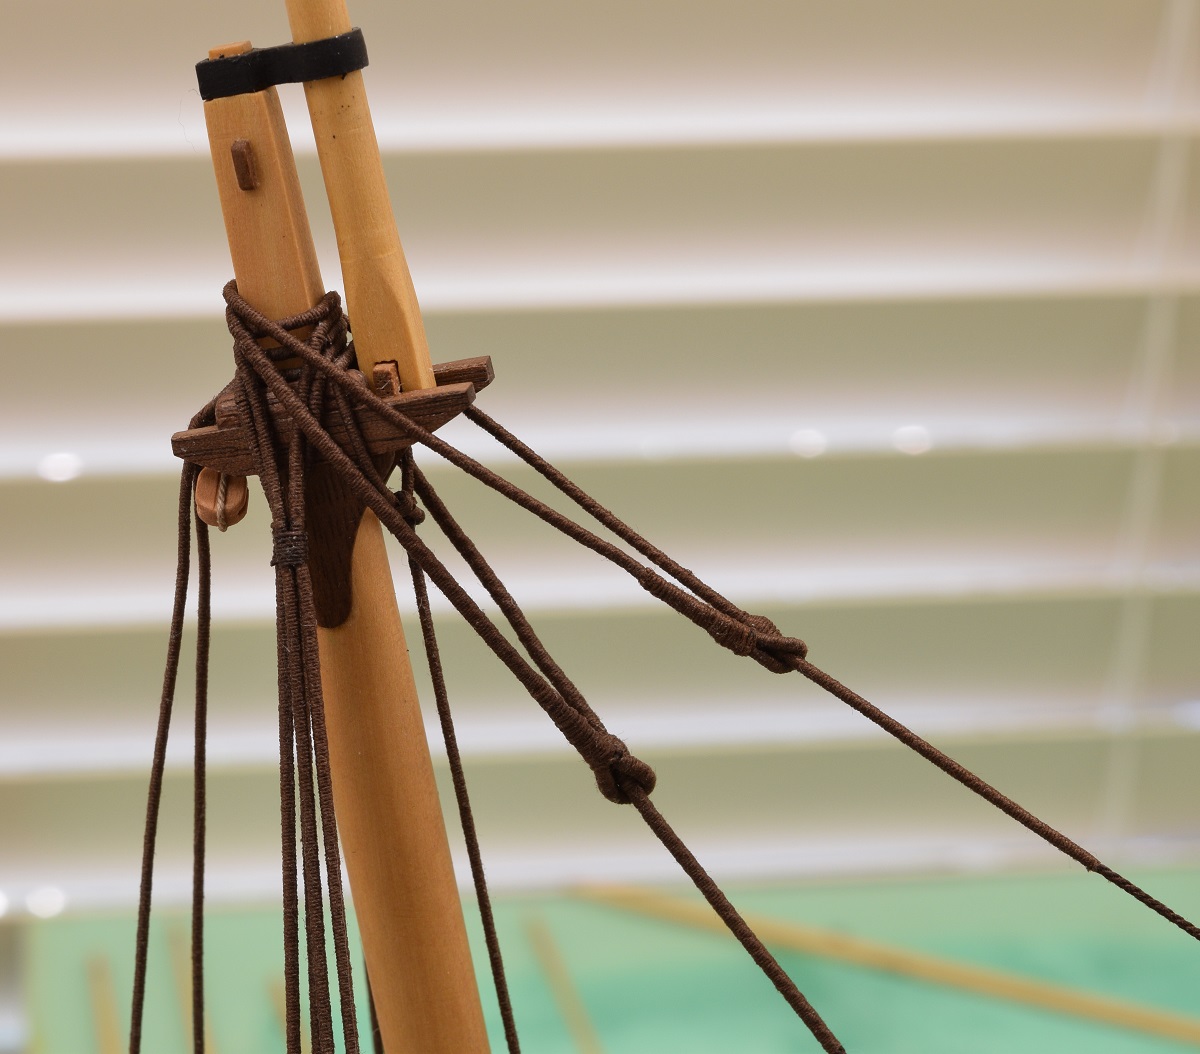 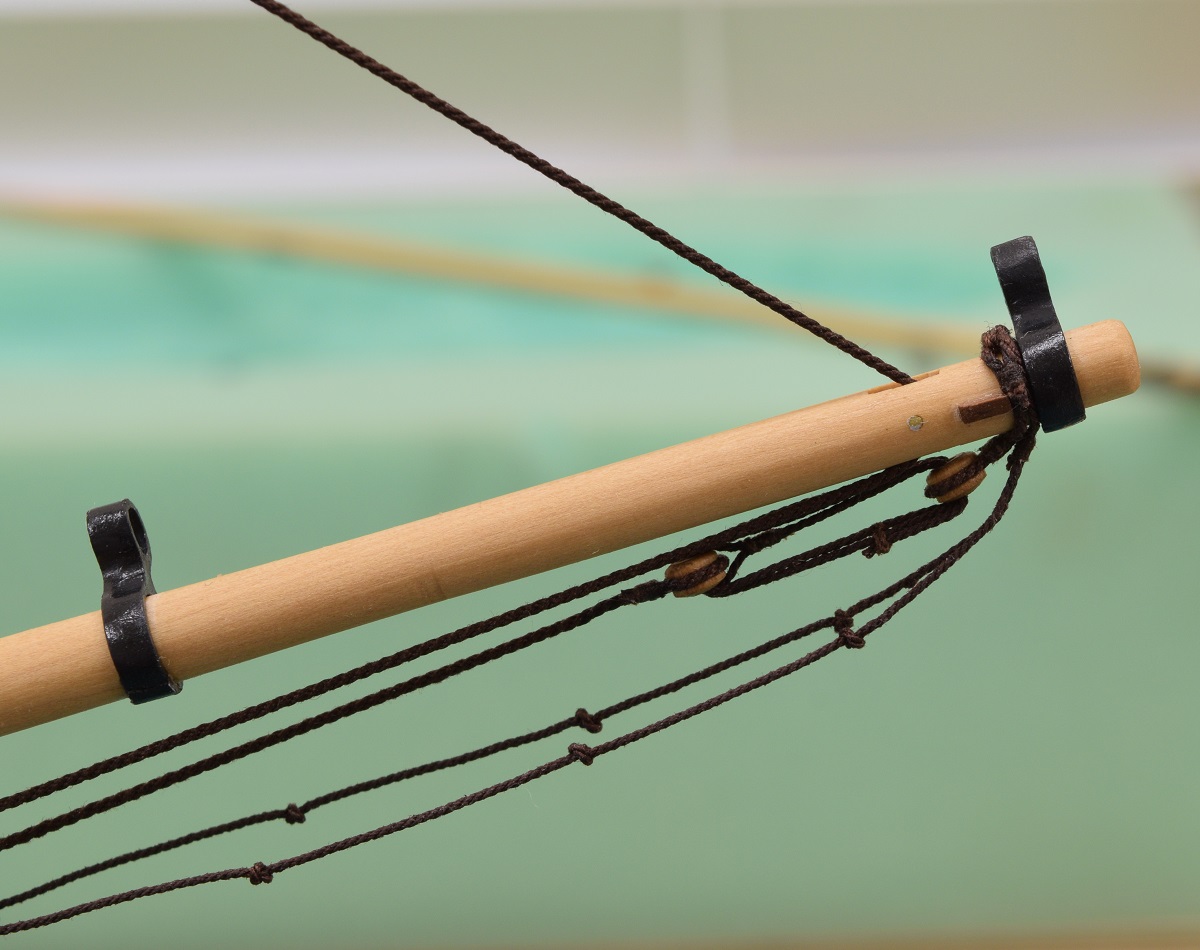 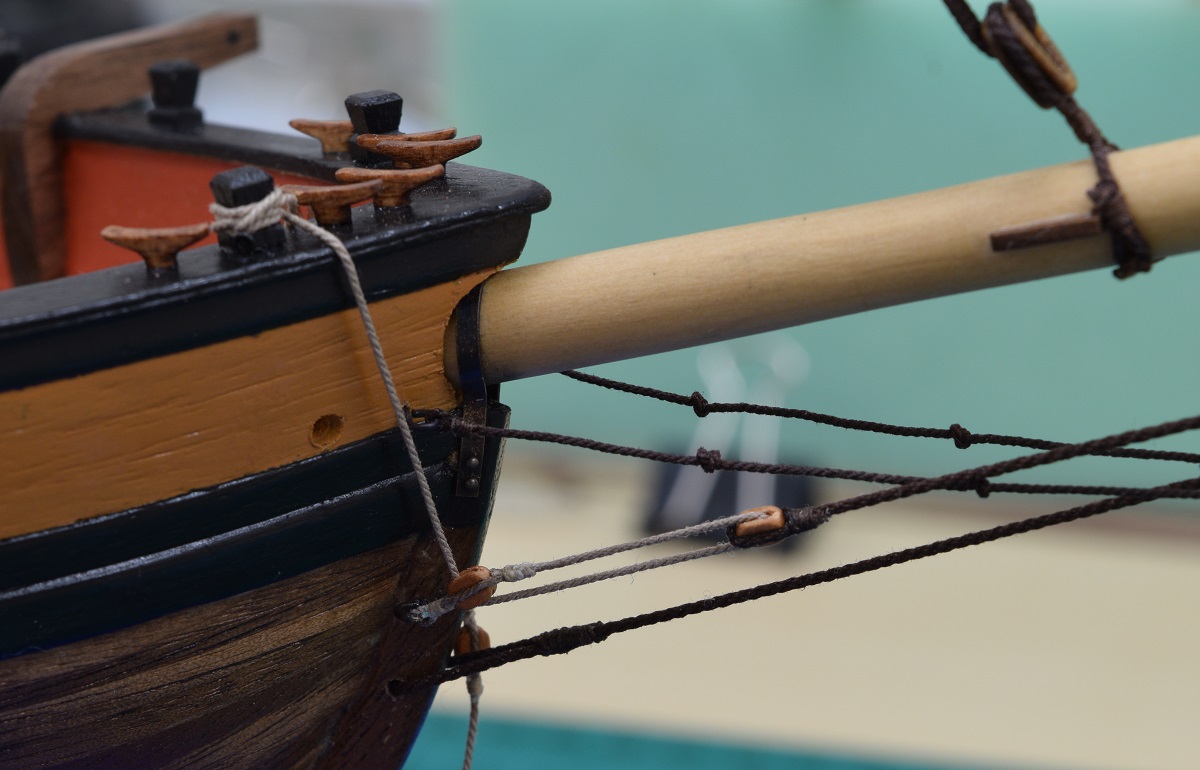 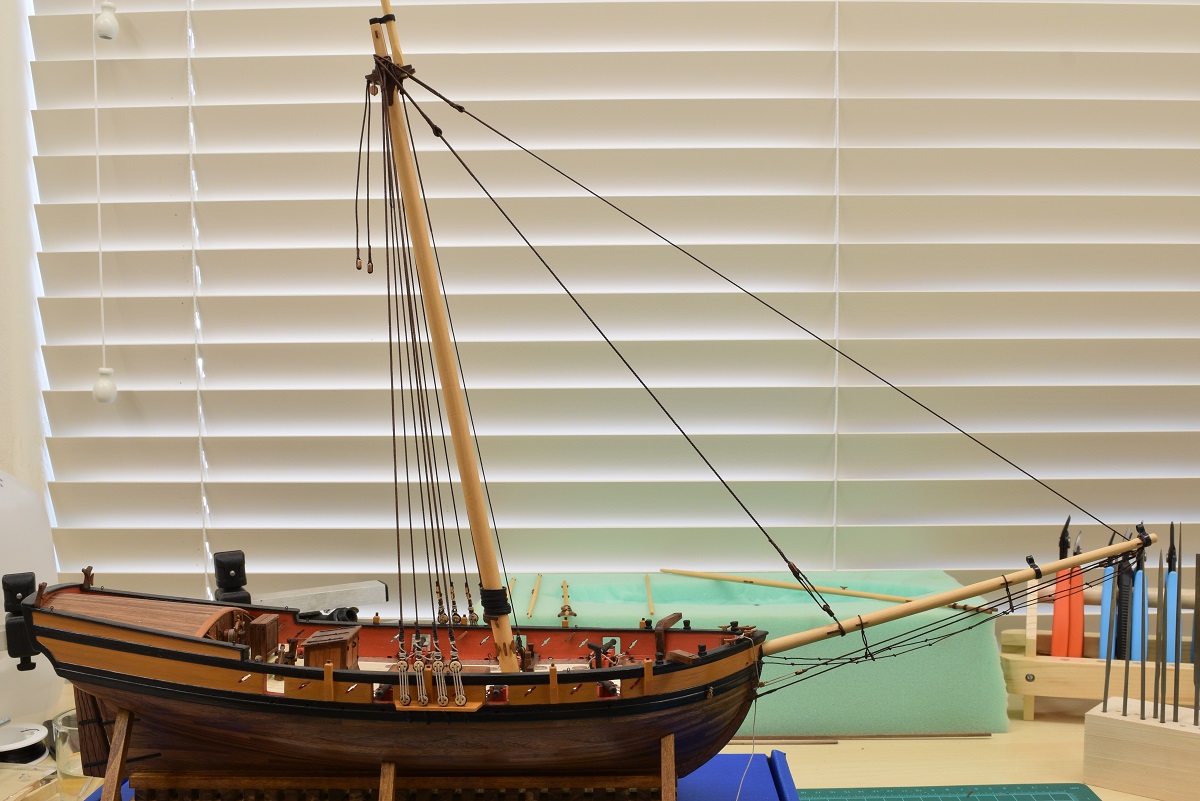 I then moved to the back stays. The main back stays and top mast back stays attach to the same eye-bolt for some stupid reason, so I spent quite a while making the block and pendant arrangement on the eye-bolt before I was ok with it. 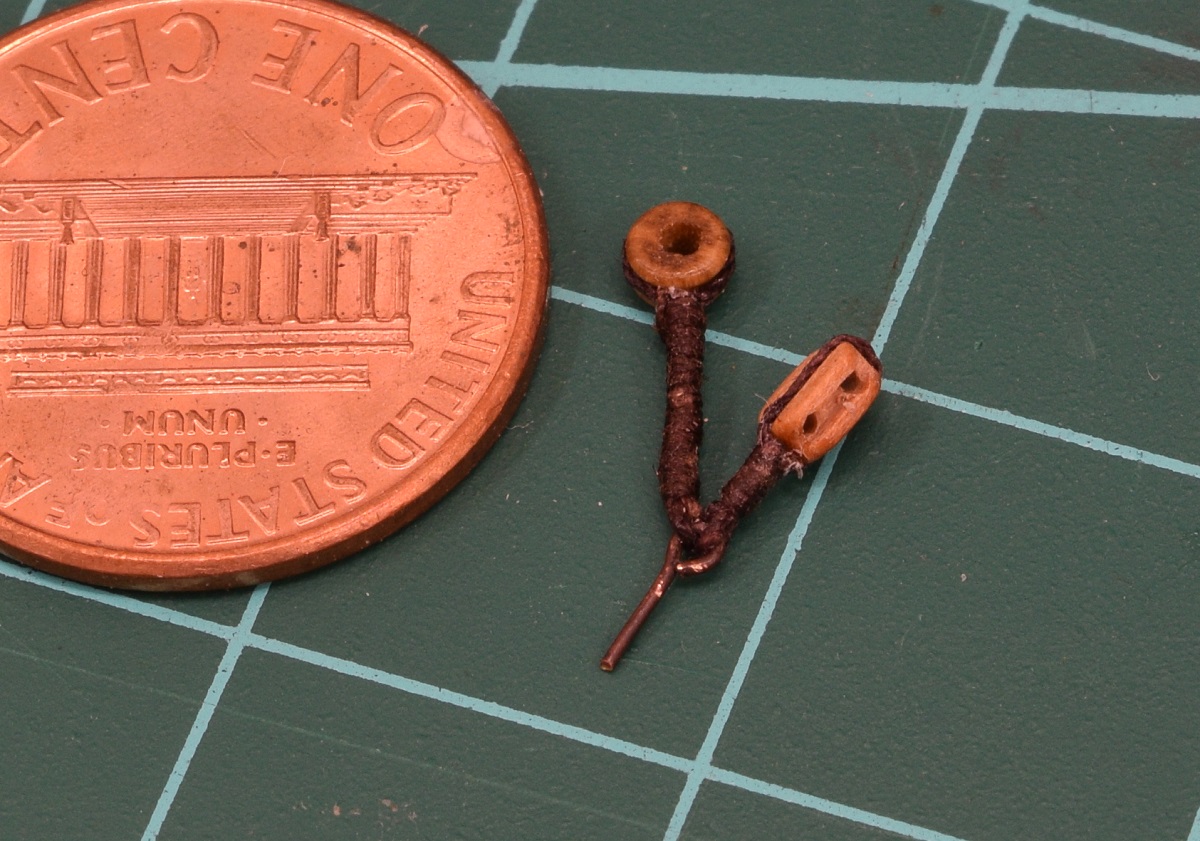 Then I couldn't get the eye-bolt to go back into the hole that I'd just pulled it out of, and managed to apply too much force, and break both the eye-bolt, and the block. Grrr... Oh well, replaced the eye-bolt with a larger one, and proceeded on. Some of these pictures didn't come out that great, sorry about that. Kind of interesting trying to figure out how to take pictures of the tiny little rope details rather than the large stuff that the camera wants to latch onto. 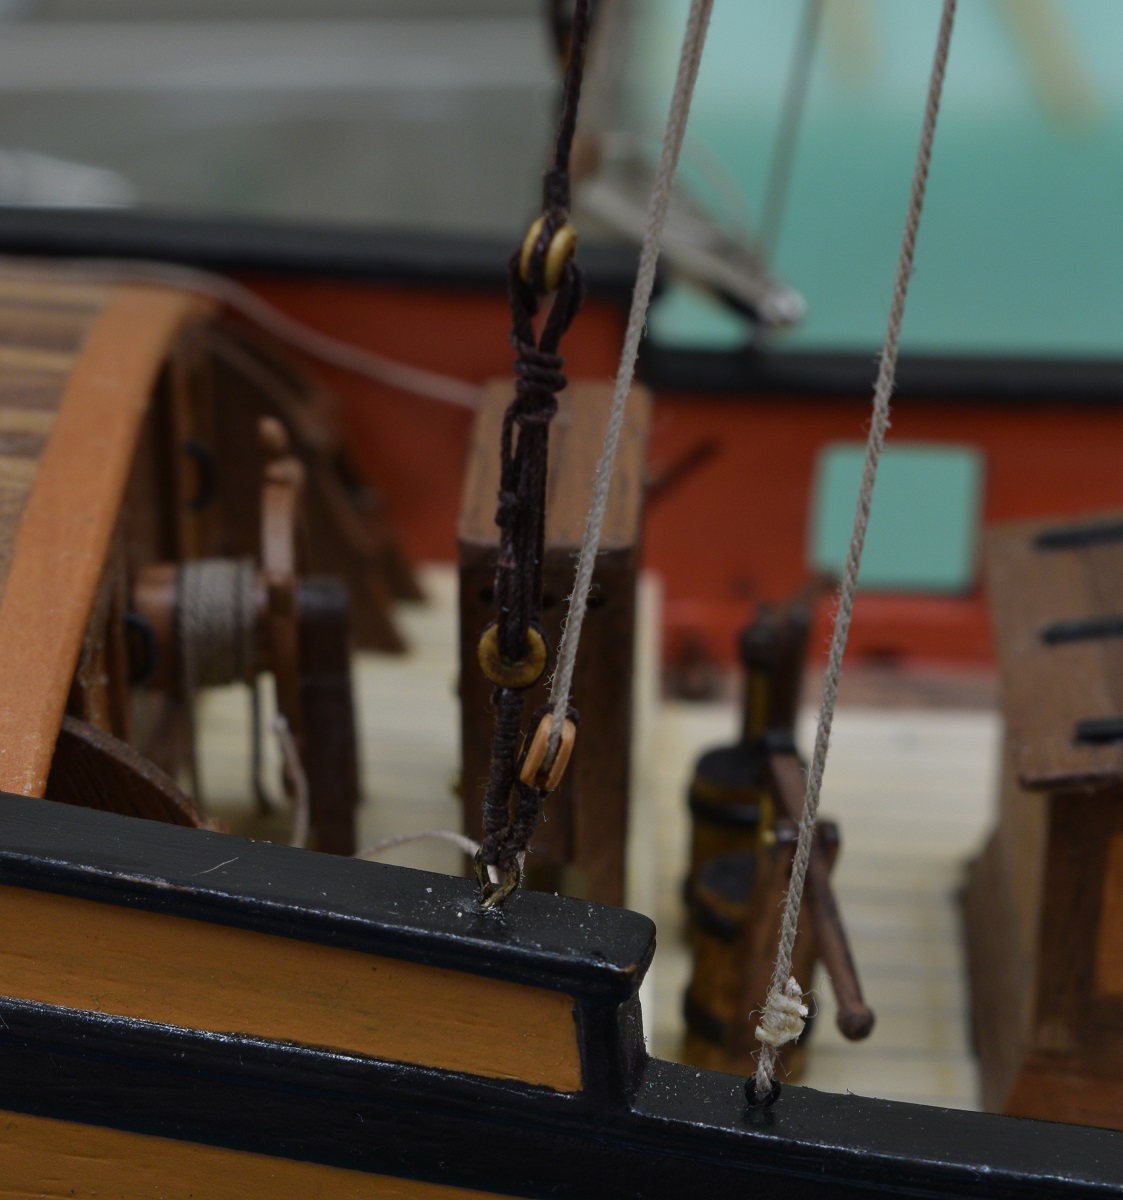 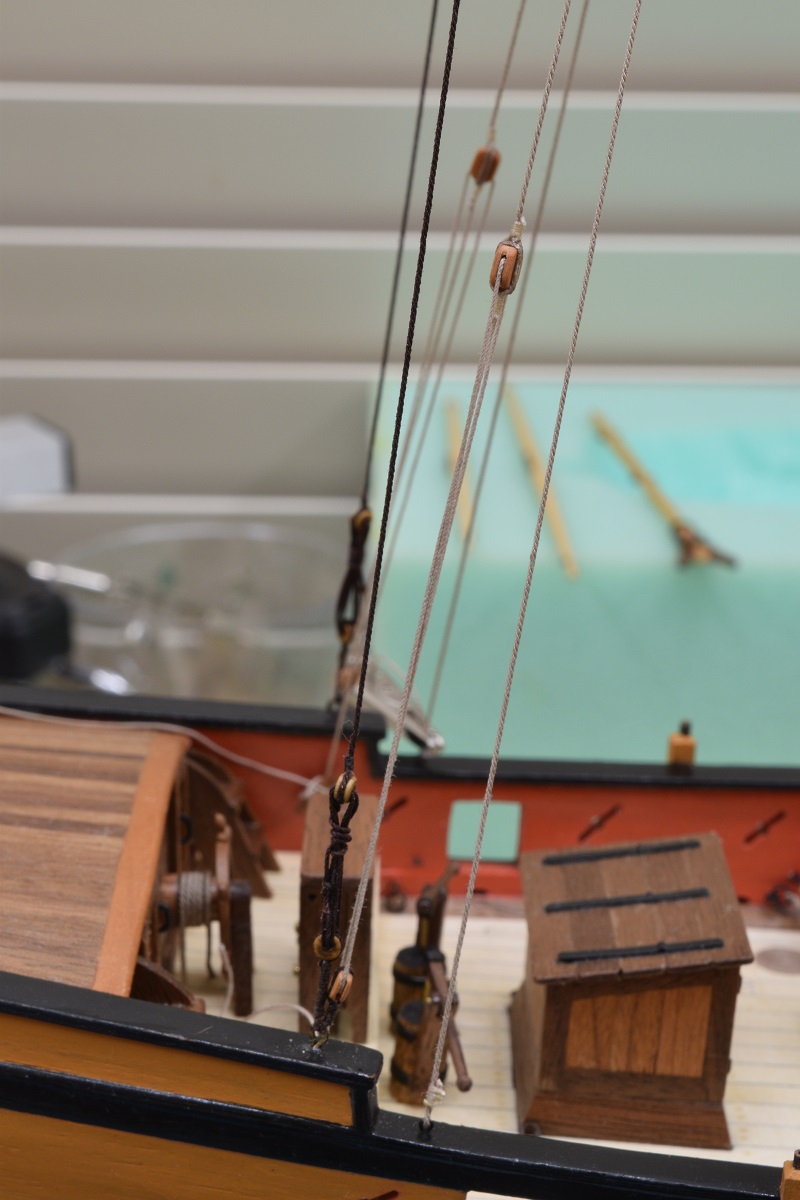 I realize now as I'm reposting this so much later, that I somehow managed to skip a big chunk of this part of the rigging, and even in my raw image files there is nothing, so I guess I just got focused and forgot to take pictures or even include the description in my build log! In the above photo's, the forward light tan rope is attached to the backstay pendent that you might remember was the very first thing that went on the top of the main mast. The dark brown rope however, is the topmast backstay, and it somewhat obviously is attached to the topmast. This of course means that the topmast had to be placed and permanently affixed to the boat before the topmast backstays could be attached. In the next few pictures you can see that not only was the topmast placed, and the topmast backstays, but also the jib boom was attached to the bowsprit, and the flying jib stay was attached from the topmast to the flying jib. View of the backstays and forestay attached to the top mast. 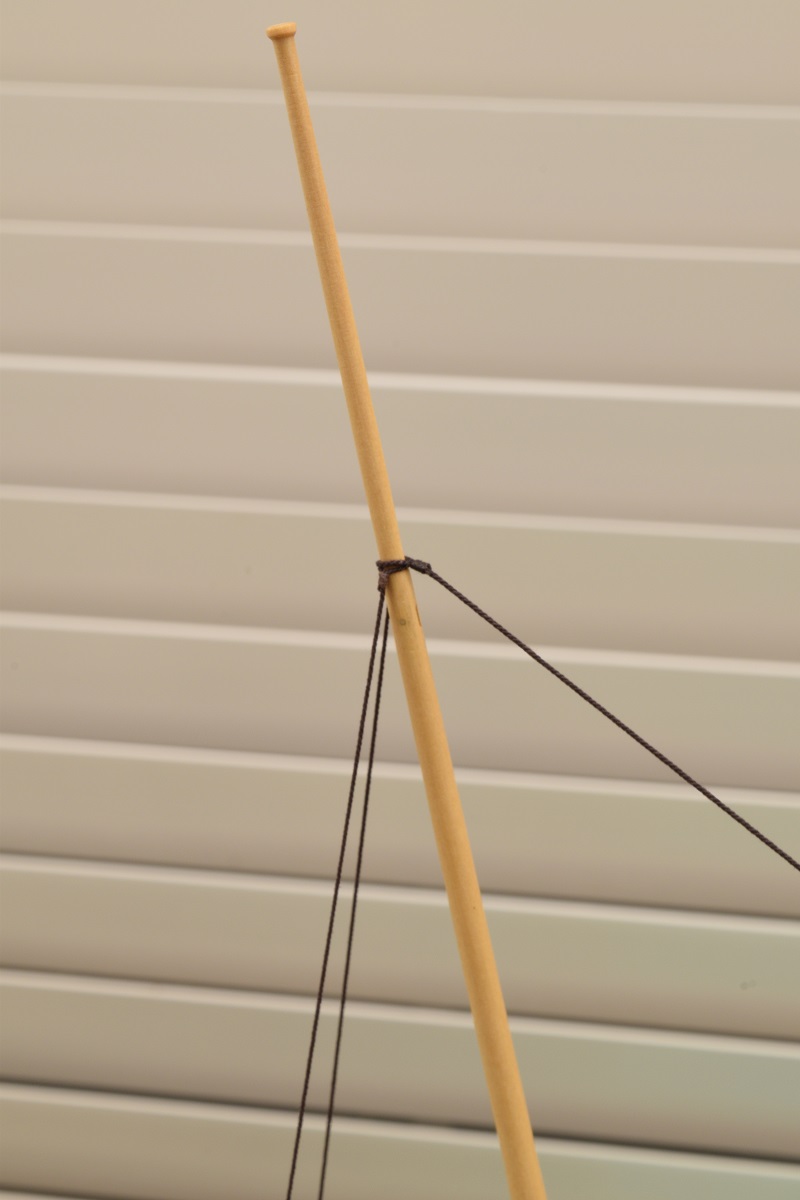 View from above looking down on all the described work. 3 foreward stays and 2 sets of back stays. 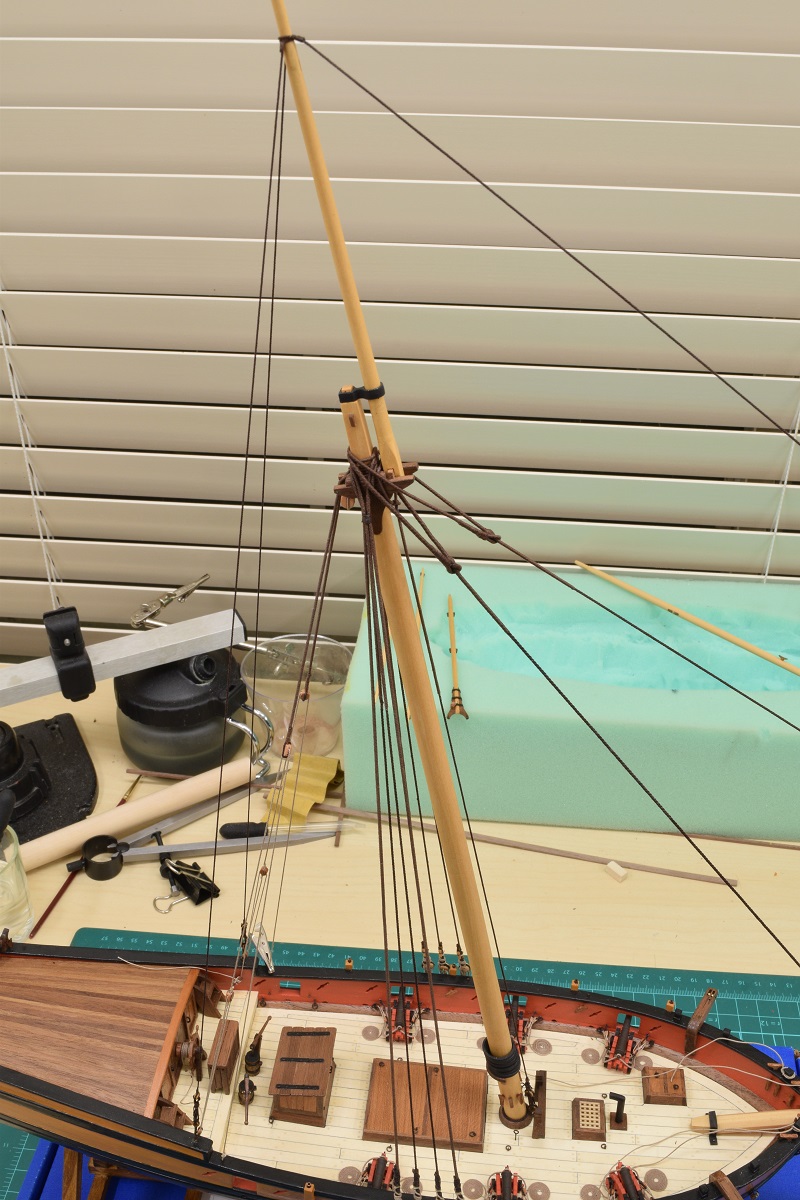 Bow showing that some of the belay points are now being used. None of the belayed lines are permanently attached with glue, just attached with the ropes as shown.  Not completely happy with the jib boom heel rope (the rope that is wrapped around the very bottom of the jib boom adding a lot of strength so that the metal 'collar' arrangement isn't taking the load alone), but neither am I sure of any way to improve it, so this is likely how it will remain. 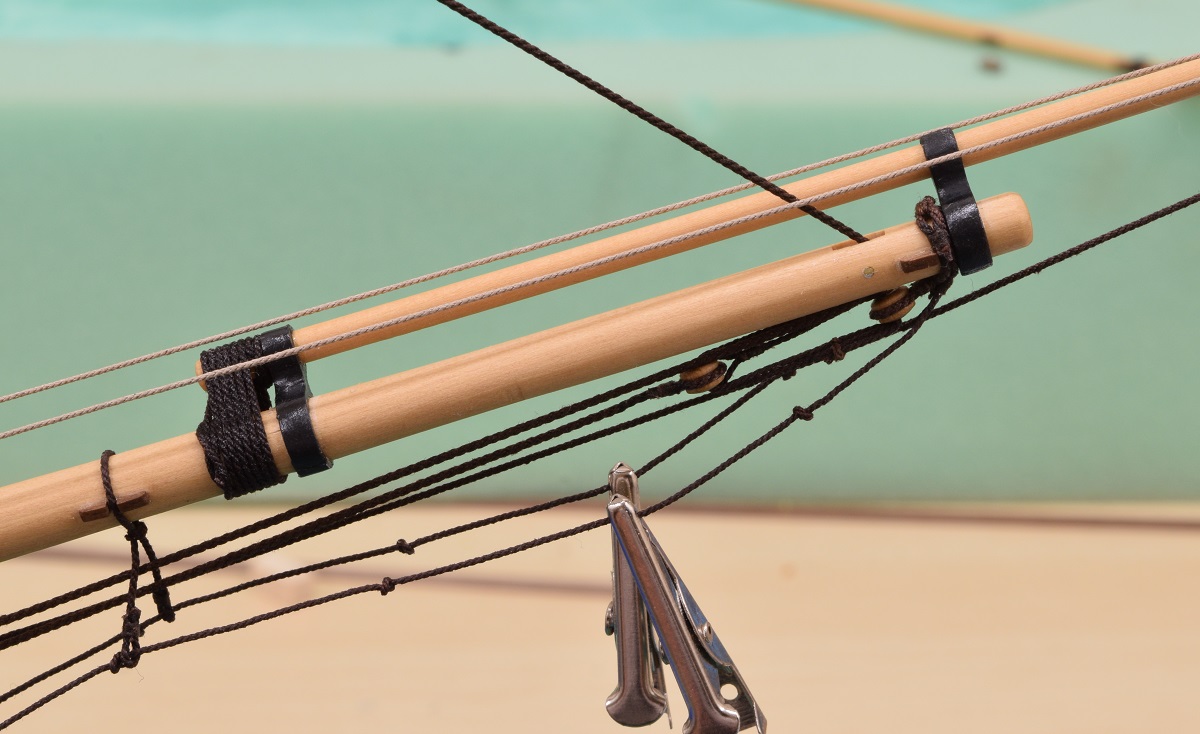 The kit calls for a traveler ring, but doesn't include one, so I made one out of brass, after considering making a spiffy one like I've seen in other build logs with the hooks and other bits, but discarding that idea for the time being. Maybe in a future build. The traveler ring is a big ring that goes around the jib boom. The flying jib forestay comes down through the ring, then forward to the sheave in the flying jib and then back to the hull where it's affixed. There are ropes attached to both sides of the traveler ring that allow the ring to be pulled in closer, or be let out to move closer to the tip of the flying jib. This allows for the angle of the flying jib stay to be changed depending on wind conditions and gives much more adjustment as to how the flying jib sail is flown. 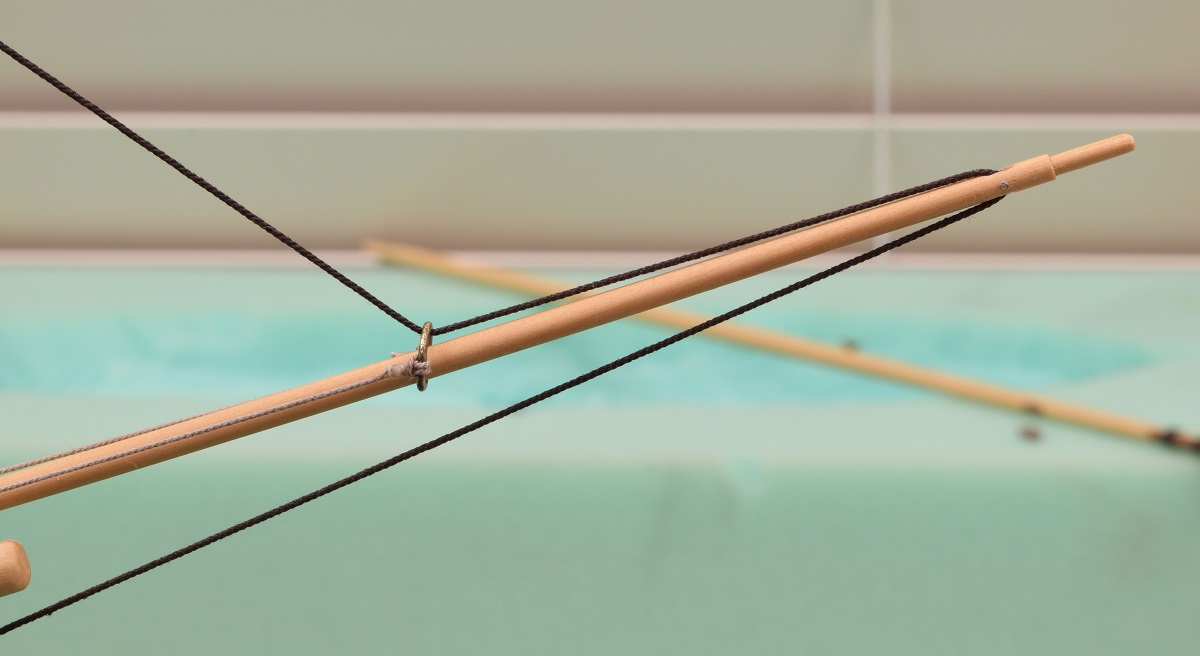 Finishing up with an overall shot at this point. Still need to add the bowsprit shrouds to complete the bowsprit standing rigging. 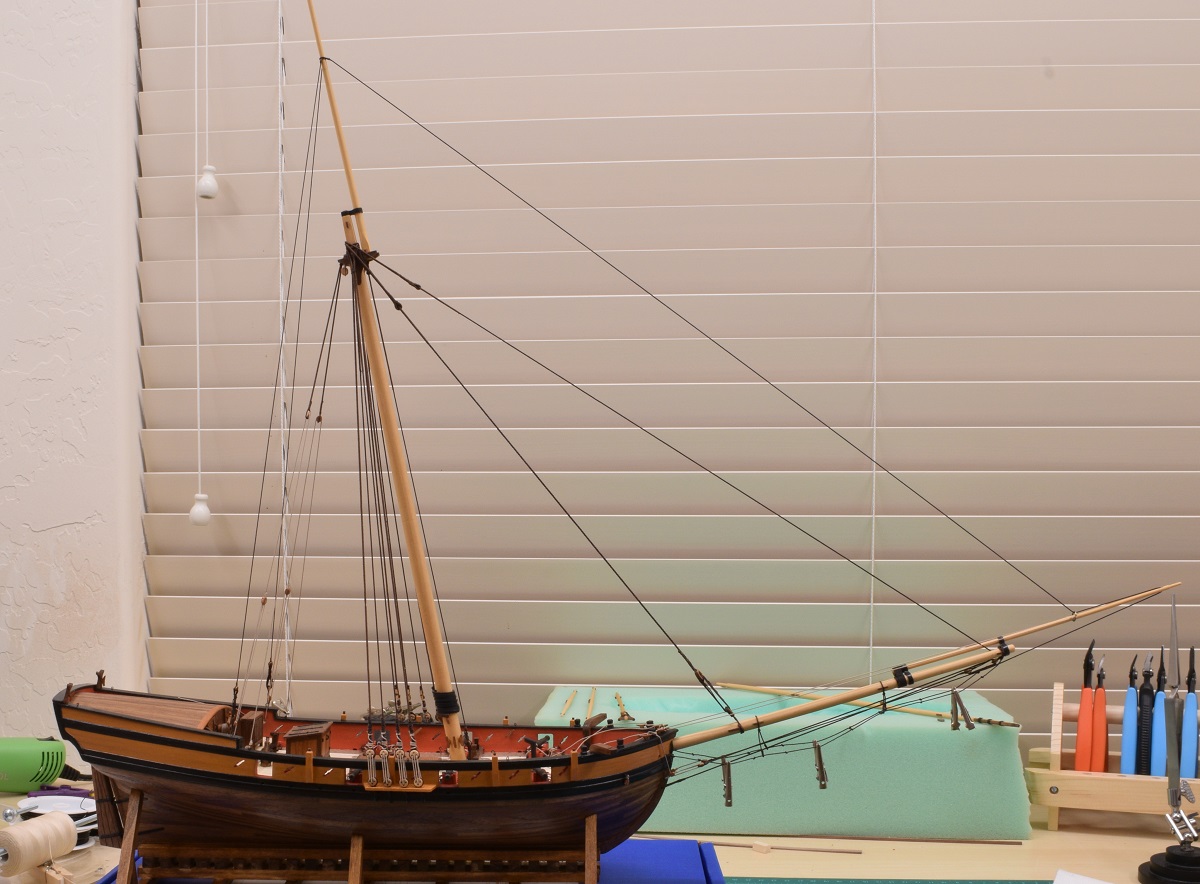 I also added a name-plate to the stern, and allowed my inner nerd to name her... 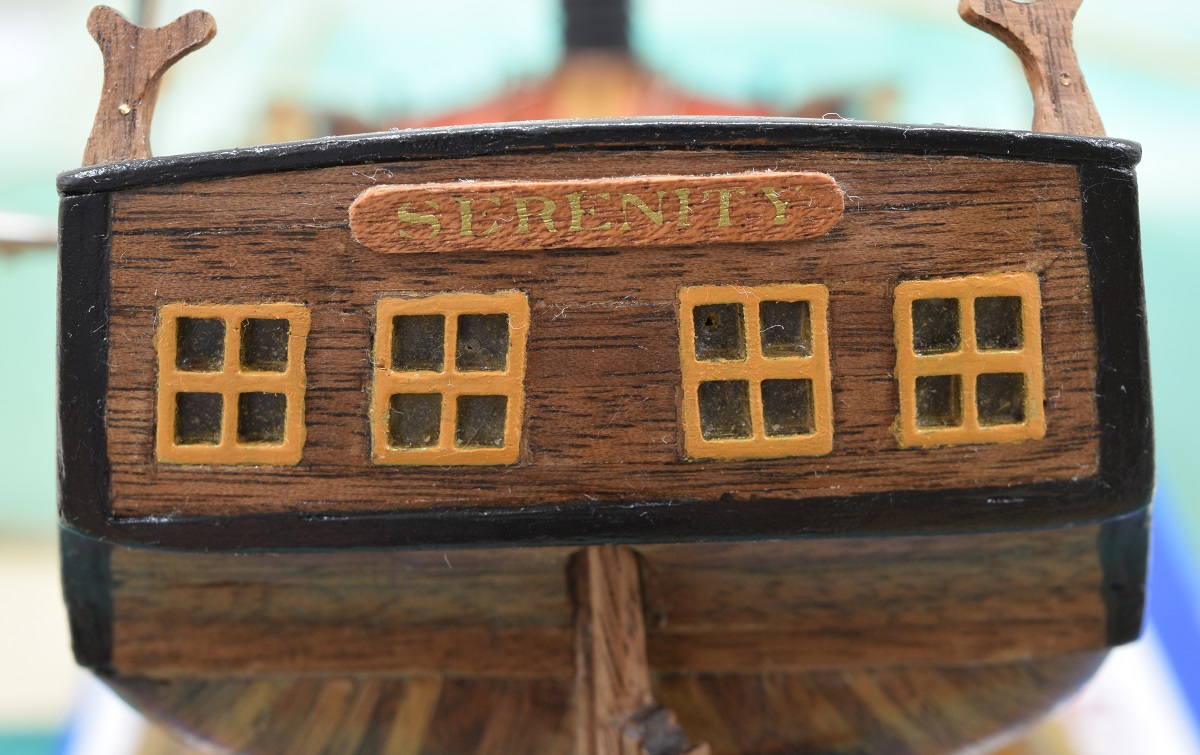
|
|
#
?
Nov 25, 2020 20:35
|
|
|
Standing rigging was completed by adding the bowsprit shrouds, and I'm working through the running rigging now. I have already learned an important lesson in rigging. No matter how good I think my research and sources are on the rigging, walk through the entire process myself, at least a few times, and make my own 'order' and checklist. I'm running into so many things that really should have been added at a much earlier time because it would have been so much easier, whether it be the blocks that are seized to the stays, to the various blocks on the masts, or the Jeers block. All of them could have been done easier (and better) at much earlier stages in the rigging. Anyway, I've completed the following (I think): Bowsprit shrouds. Jib Halyard, downhaul, and tackle. Fore Staysail Halyard, downhaul, and tackle. Gaff rigged and mounted. Gaff Peak Halyard and tackle. I've also added a bunch of blocks to the mast and top mast, as well as some ropes that attach to those blocks which can be seen taped up into coils. Some photo's. 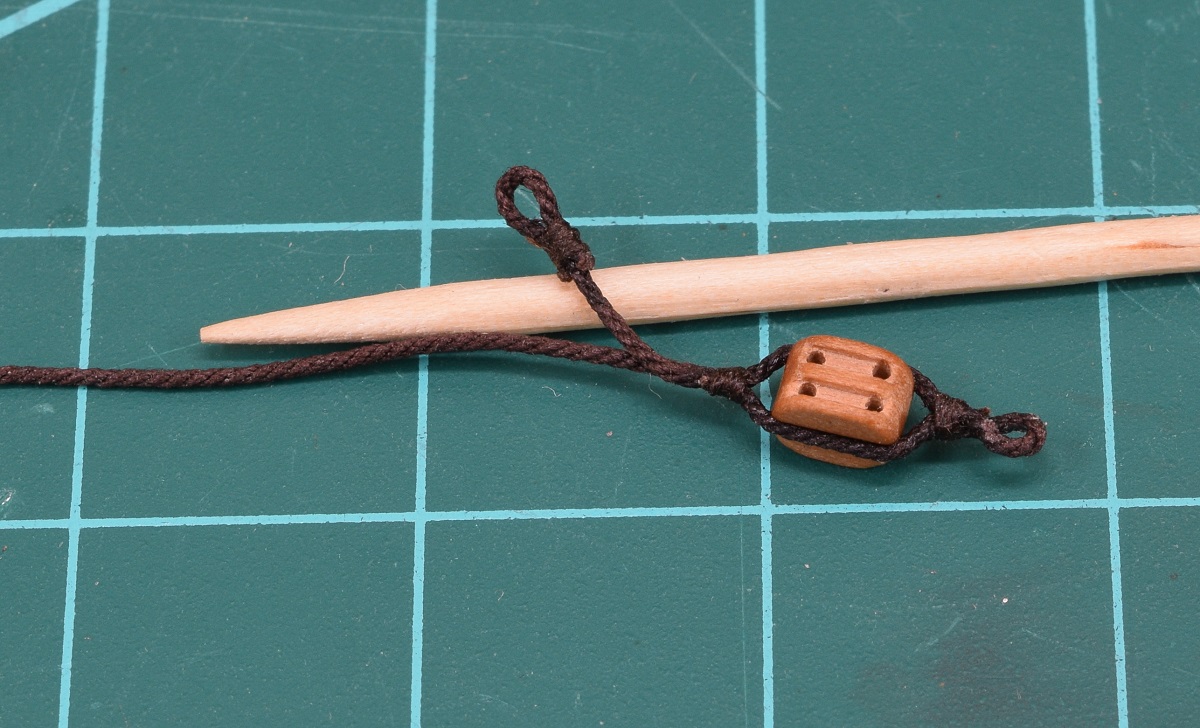 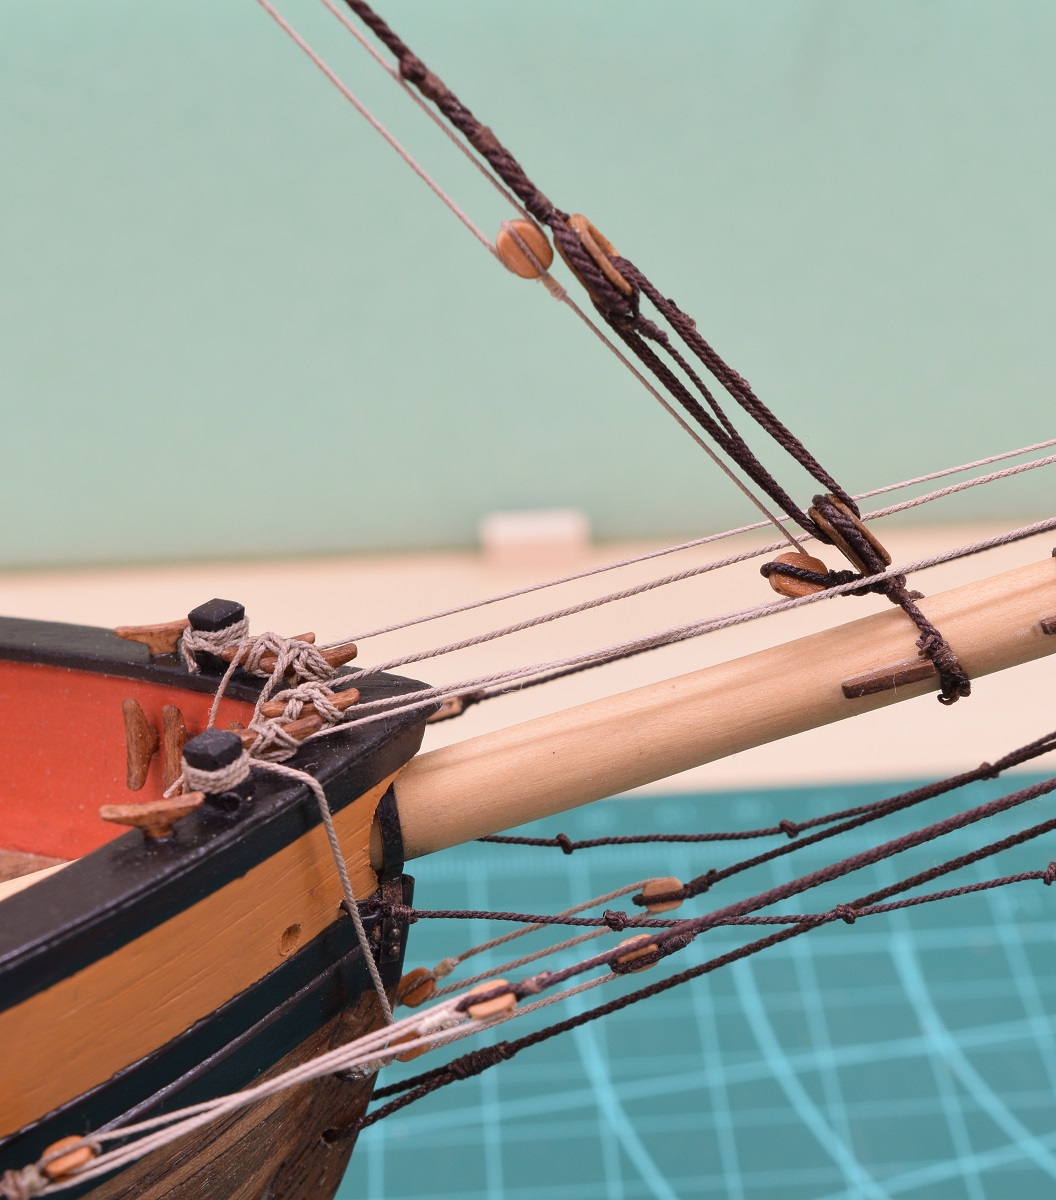 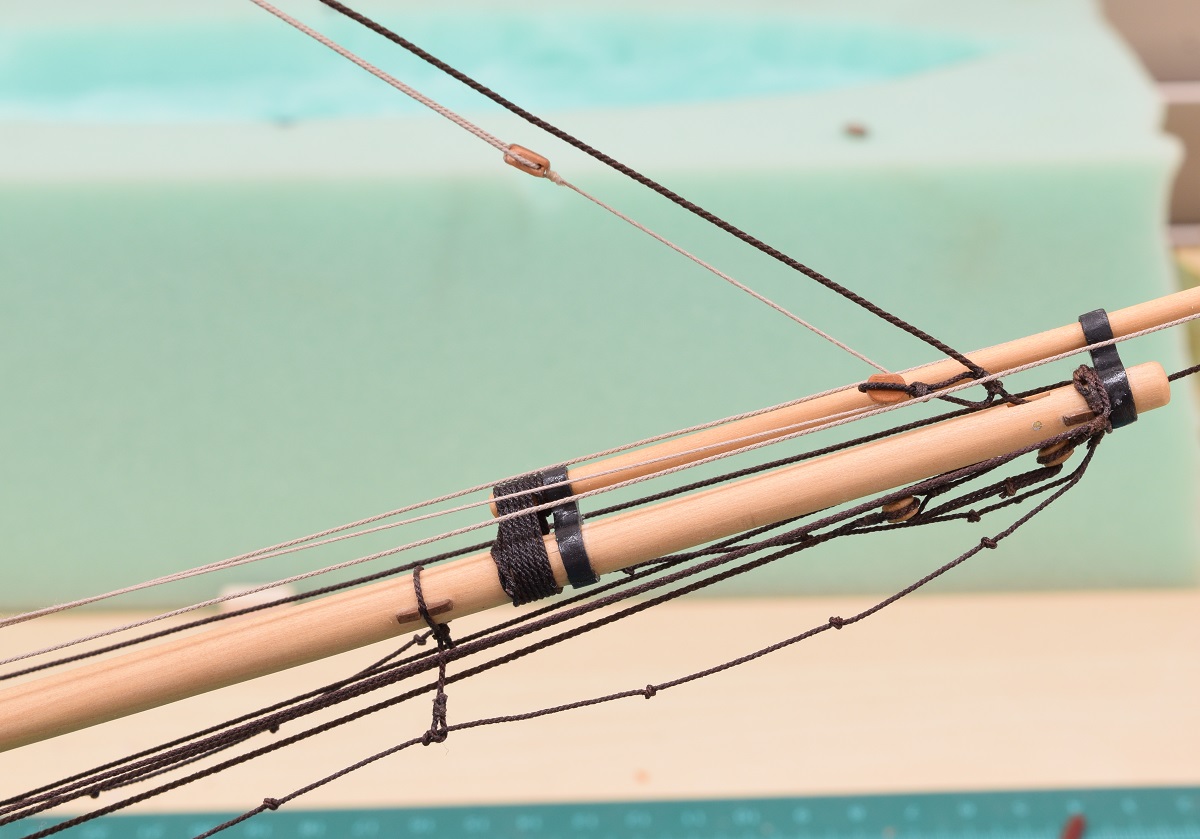 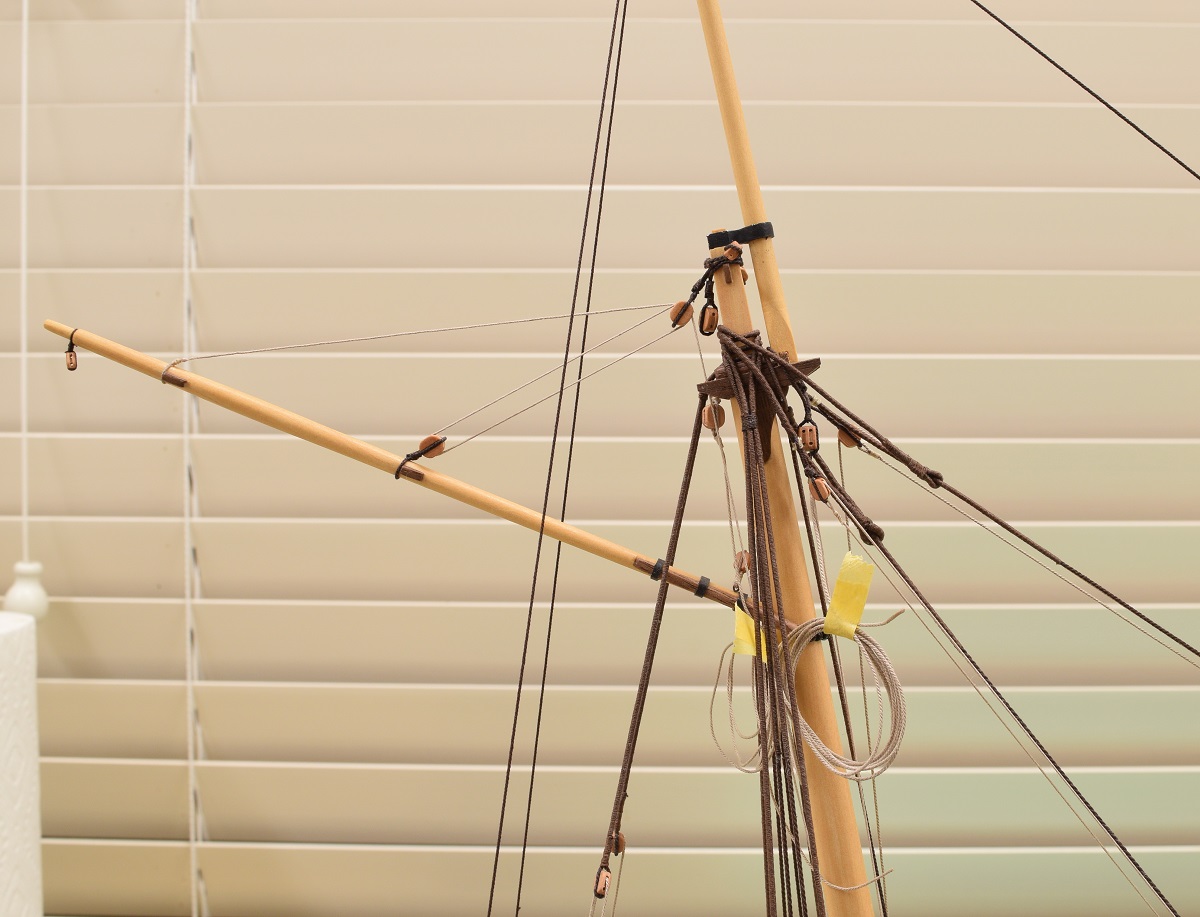 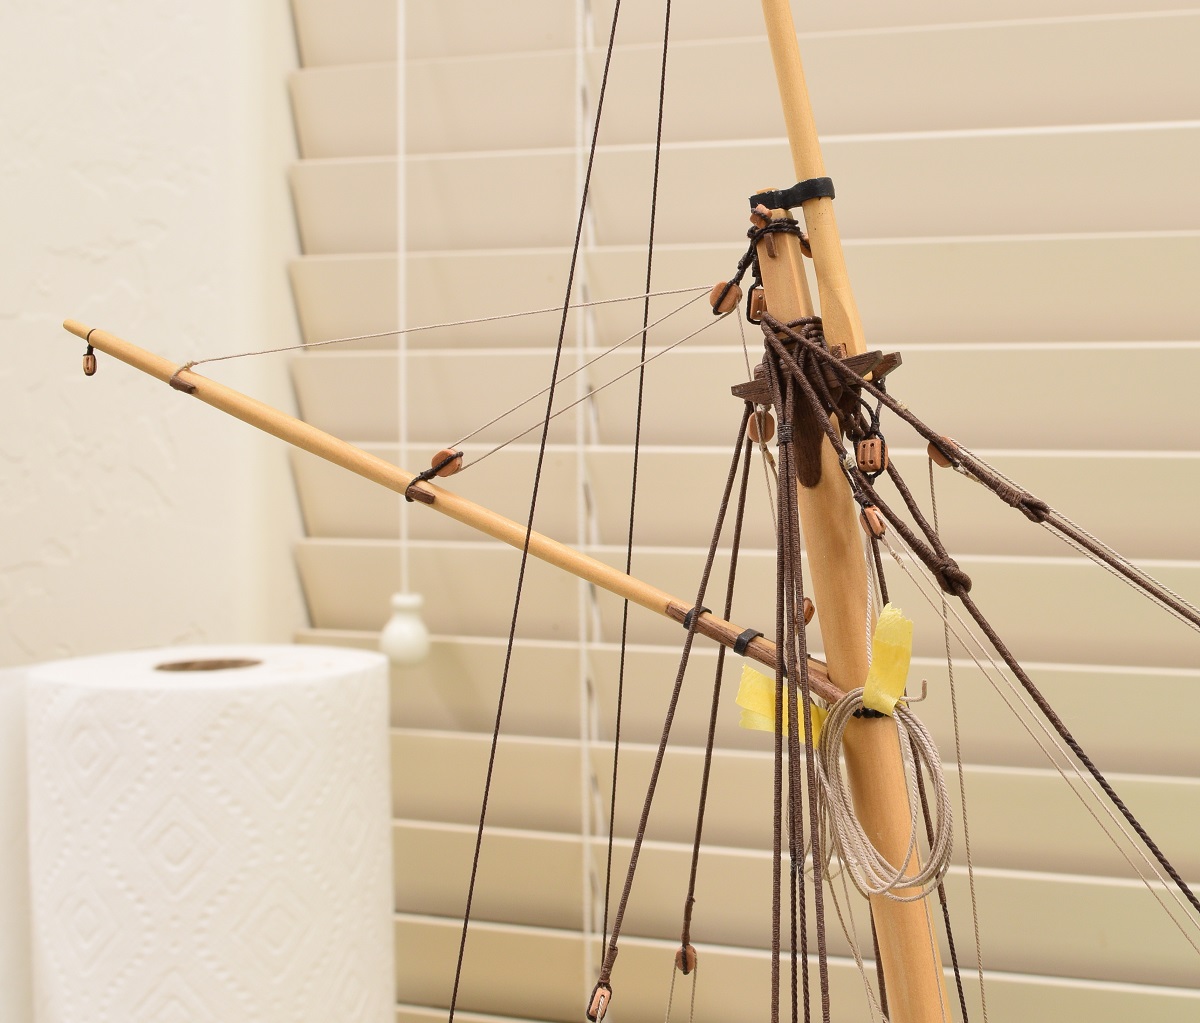 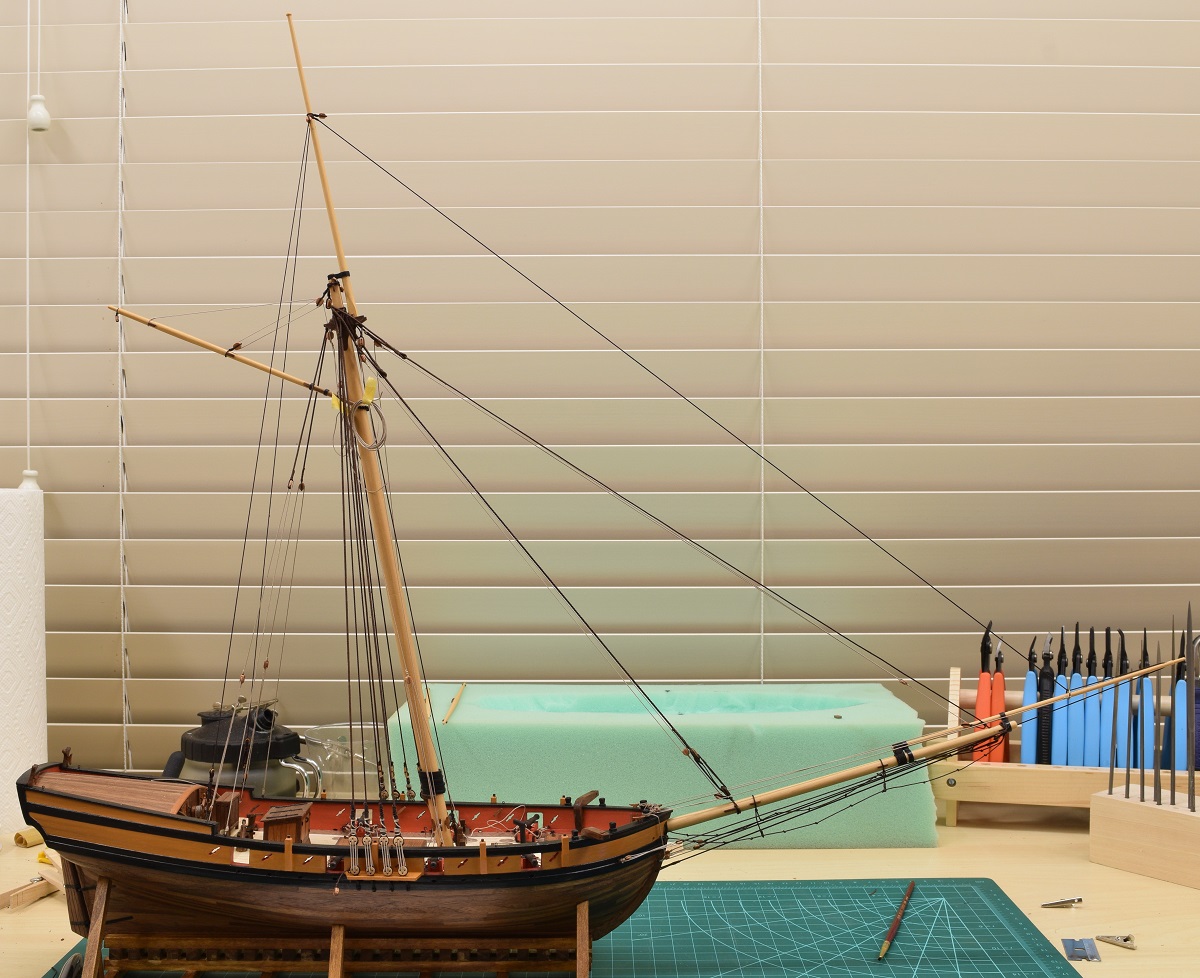 I have also realized that the jib traveler ring is too far back on the jib boom, and because I'm an idiot I already trimmed the in-hauls that hold the traveler ring, so I removed both of those, and tomorrow I'll redo that entire thing so that the dark rope that is the farthest one out on the jib boom will be much closer to the tip of it, giving me more room for some of the other lines and tackle that have to be added. Took some pictures after re-doing the jib traveler/inhaul. 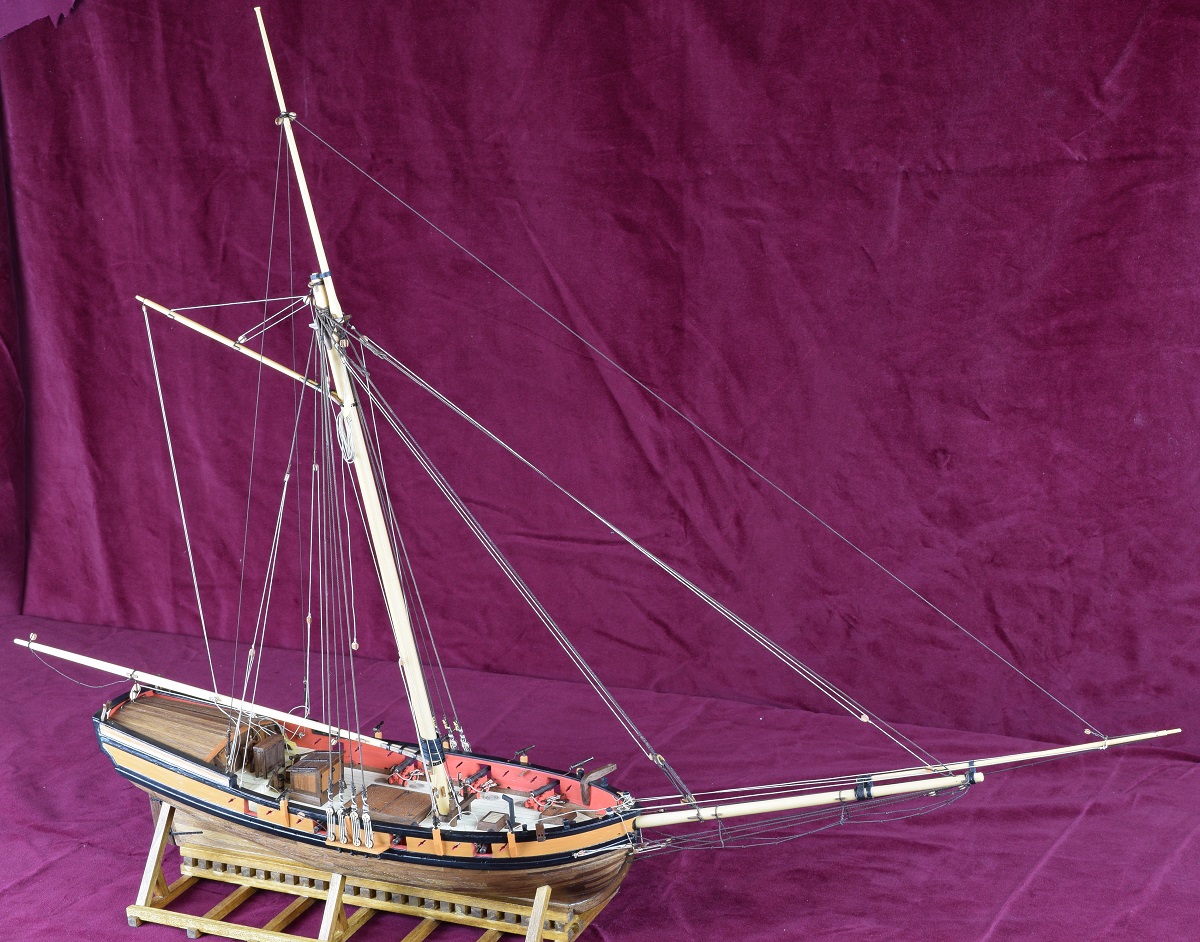 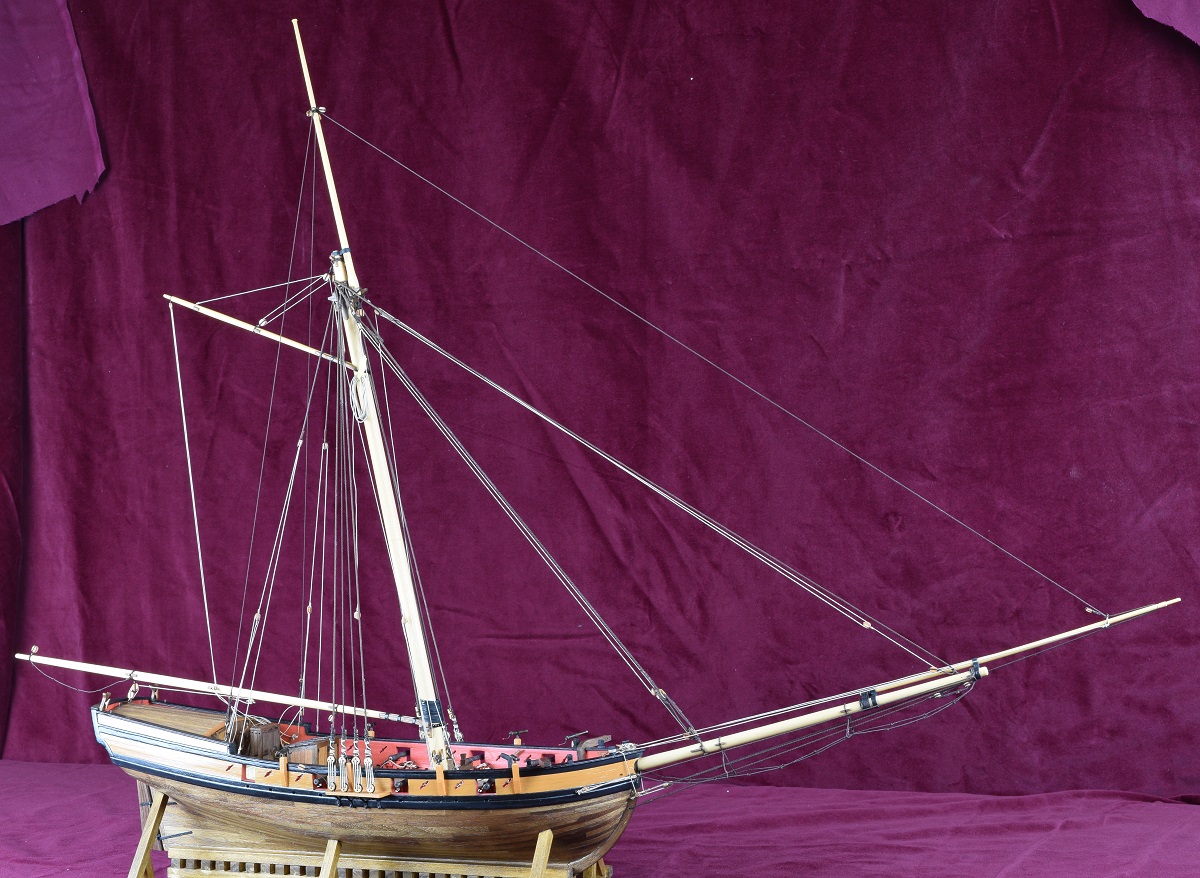 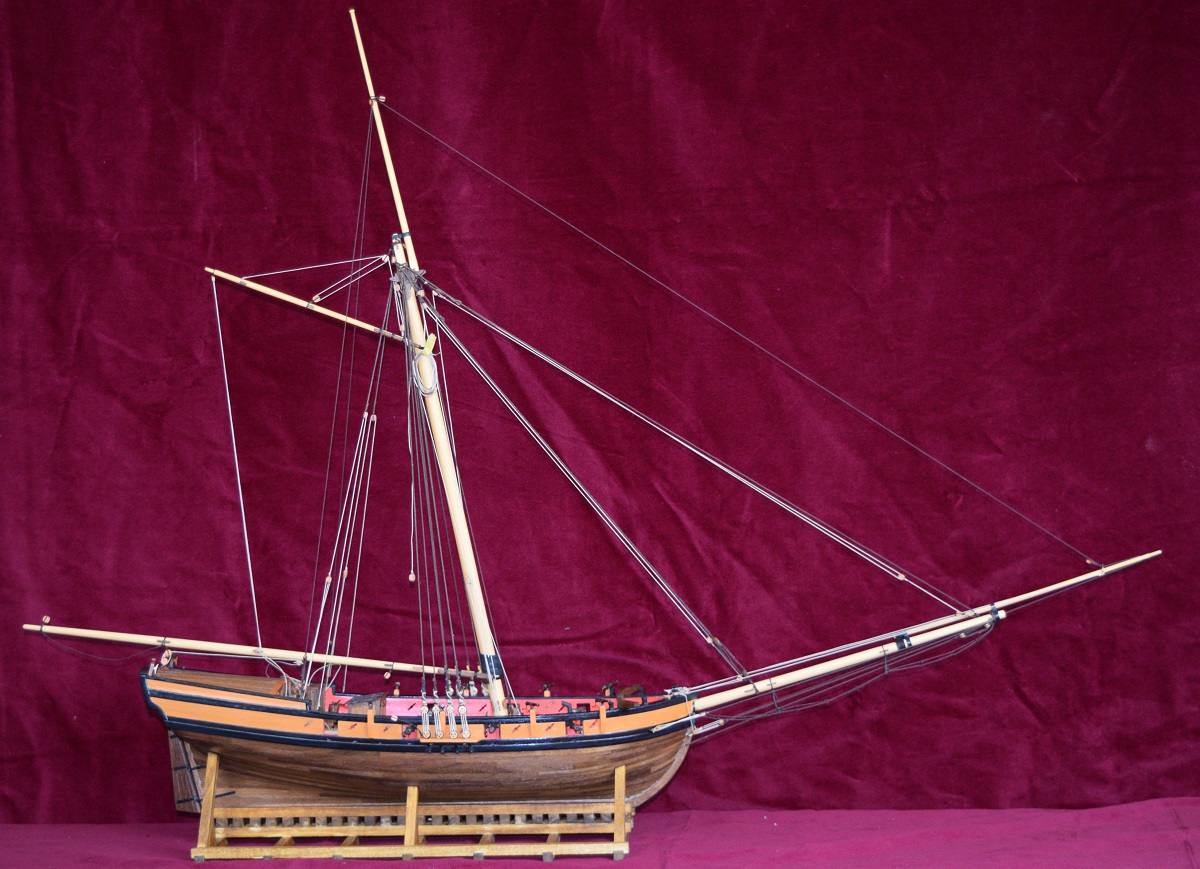 The jib traveler/inhaul arrangement looks much better now I think, and the main boom is mounted with foot-rope and the flag halyard, as well as the traveler on the cabin top (blackened brass) and the boom sheet is rigged. This update was a bit short on explanations, so feel free to ask questions on anything that interests and/or confuses you.
|
|
#
?
Nov 27, 2020 04:40
|
|
|
The Locator posted:This update was a bit short on explanations, so feel free to ask questions on anything that interests and/or confuses you. Sorry if this is a stupid question, but to what extent are the ropes actually structural in the model? As an example, I assume the jib boom weighs approximately nothing, but it's only held to the bowspirit with some little pieces of (I think) brass and all of the ropes at least appear to have a decent amount of tension on them. Is that part of the illusion or are the ropes actually keeping it in place? Sub-question, do you have to do upkeep to keep the ropes from stretching out/going slack every few years or do they mostly hold up fine on their own?
|
|
#
?
Nov 28, 2020 00:19
|
|

|
Wallet posted:Sorry if this is a stupid question, but to what extent are the ropes actually structural in the model? As an example, I assume the jib boom weighs approximately nothing, but it's only held to the bowspirit with some little pieces of (I think) brass and all of the ropes at least appear to have a decent amount of tension on them. Is that part of the illusion or are the ropes actually keeping it in place? No such thing as a stupid question! The dark colored ropes on the model, the standing rigging, are all fully functional, but obviously there is no real stress on them, they are just pulled tight enough to look tight and then tied off. The bowsprit is attached to the ship at the base as was described in the log, with both glue and brass rivets. The jib-boom is attached to the bowsprit with both the metal fittings (they are that cast white metal stuff, so not super strong, but good enough) and of course with all that rope that wraps around the base of the jib-boom and the bowsprit. Both the bowsprit and jib-boom would stay put just fine without any rigging. The mast is inserted into a hole in the deck that only allows it to fit one way, and at the approximate correct angle (rake), however, it is not permanently attached to the hull in any way (glue or pins), the mast is held to the boat and held at the correct position completely by the rigging. So while again there is no real stress on it, the standing rigging is serving the same function on the model as it would on a real ship. I dust the ship and ropes occasionally but otherwise they have no need to be maintained. The one thing that does change is that they twist/untwist depending on the temperature and humidity, so sometime some of the rigging is twisted and sometimes it's not! I won't be posting anymore updates until Wednesday as I'm on a short vacation right now and just on my phone. The Locator fucked around with this message at 20:50 on Oct 8, 2022 |
|
#
?
Nov 28, 2020 01:00
|
|
|
Back to the updates! After two nights of fiddling with little rope and blocks, I managed to complete the rigging of the spreader yard. The inner blocks and the parrel were the biggest pains, since they are lashed, and the parrel has to be served in place. Inner blocks 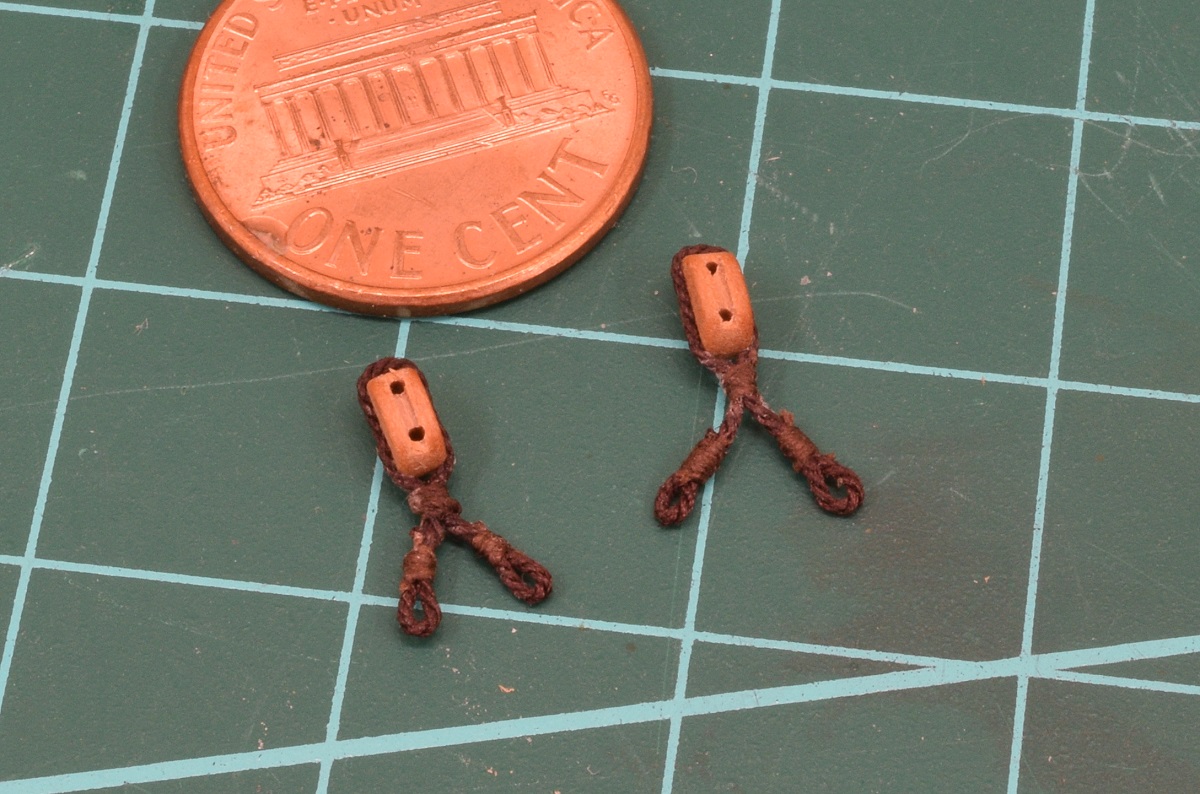 Blocks, foot ropes, parrel and jeers block on the spreader yard. 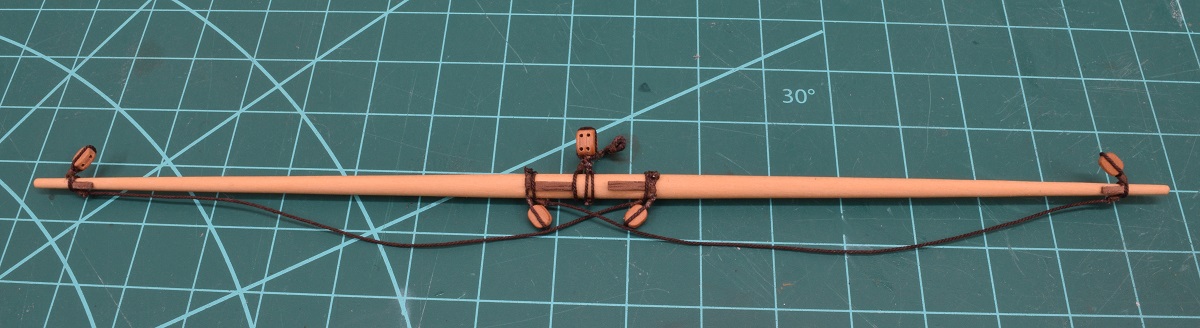 All the outer lines on the spreader yard. In order from inside to outside they are: Foot ropes, block for topsail sheet, after brace pendant, fore brace pendant, lift. 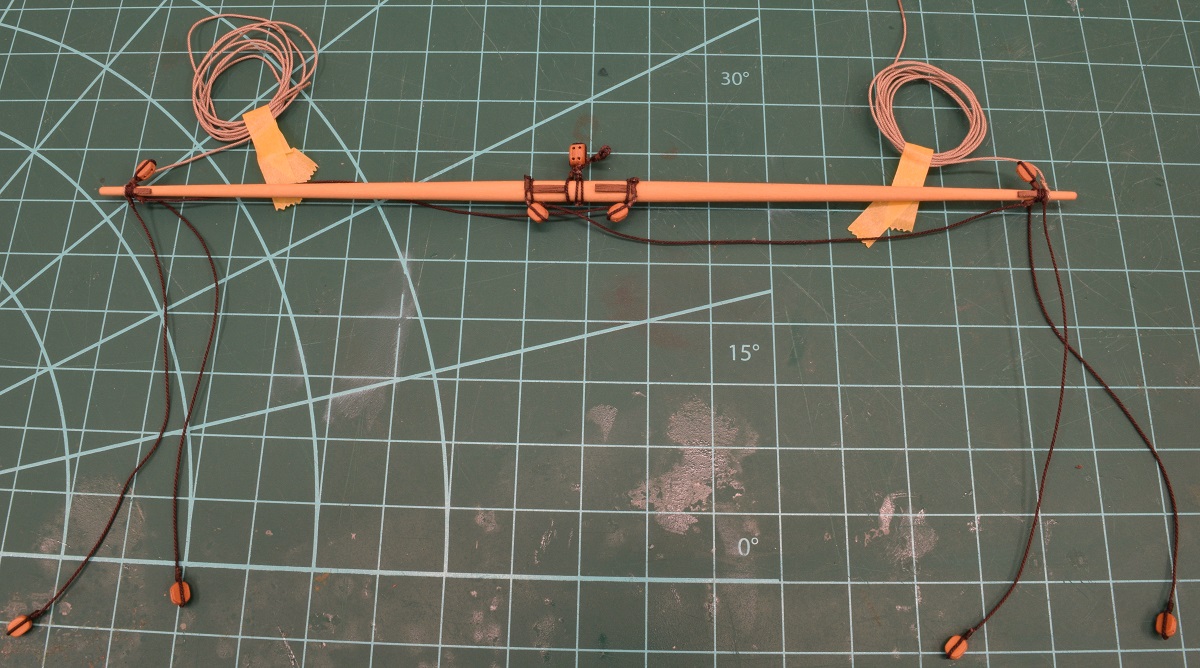 So... many... ropes... I have no idea how people that do full ship rigs, in much smaller scales than this, don't go completely insane. Attached the main outhaul, which just dead-ends at the sheave on the boom since I don't have sails, and the boom lift. 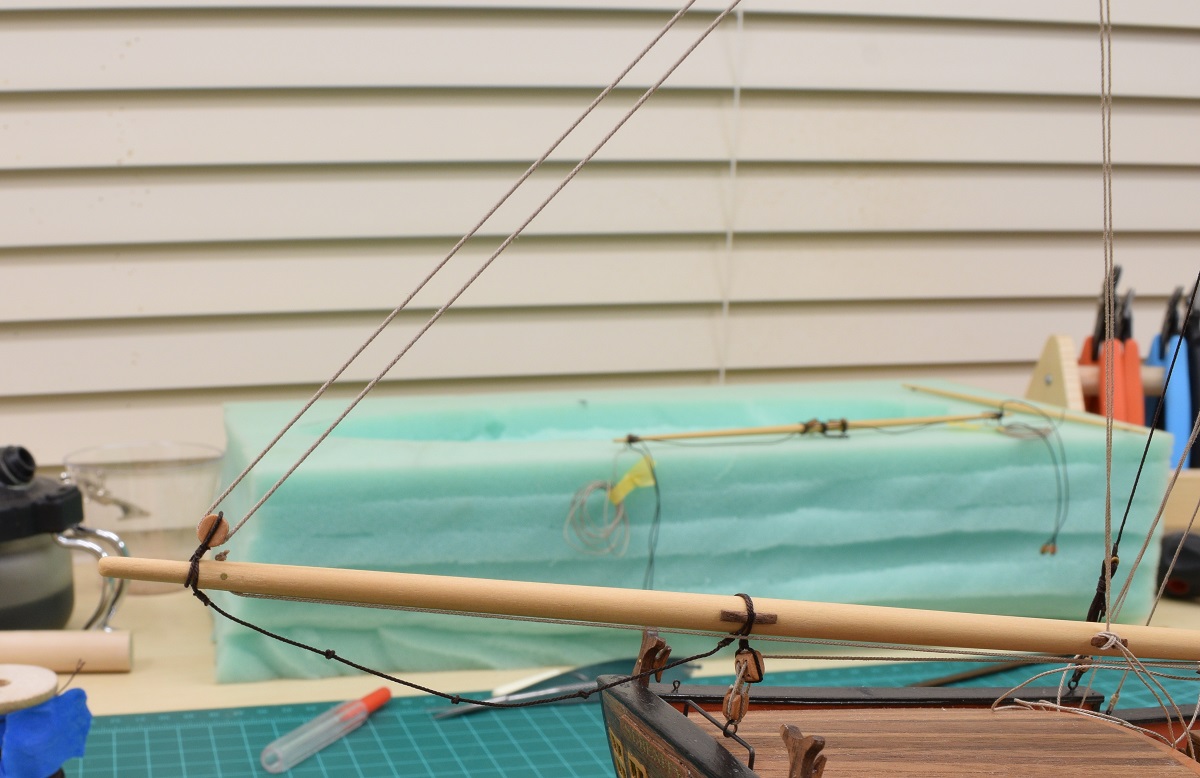 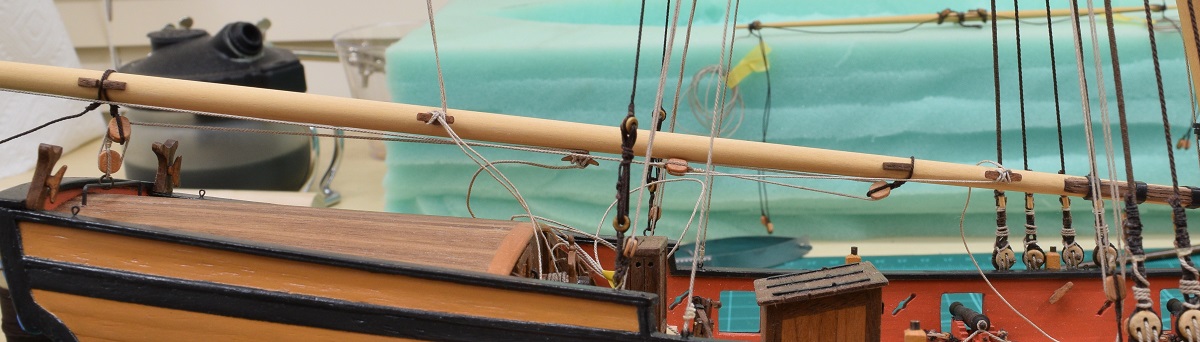 Massive mess of ropes and blocks. New to this mess is the boom lift, and the gaff throat halliard. 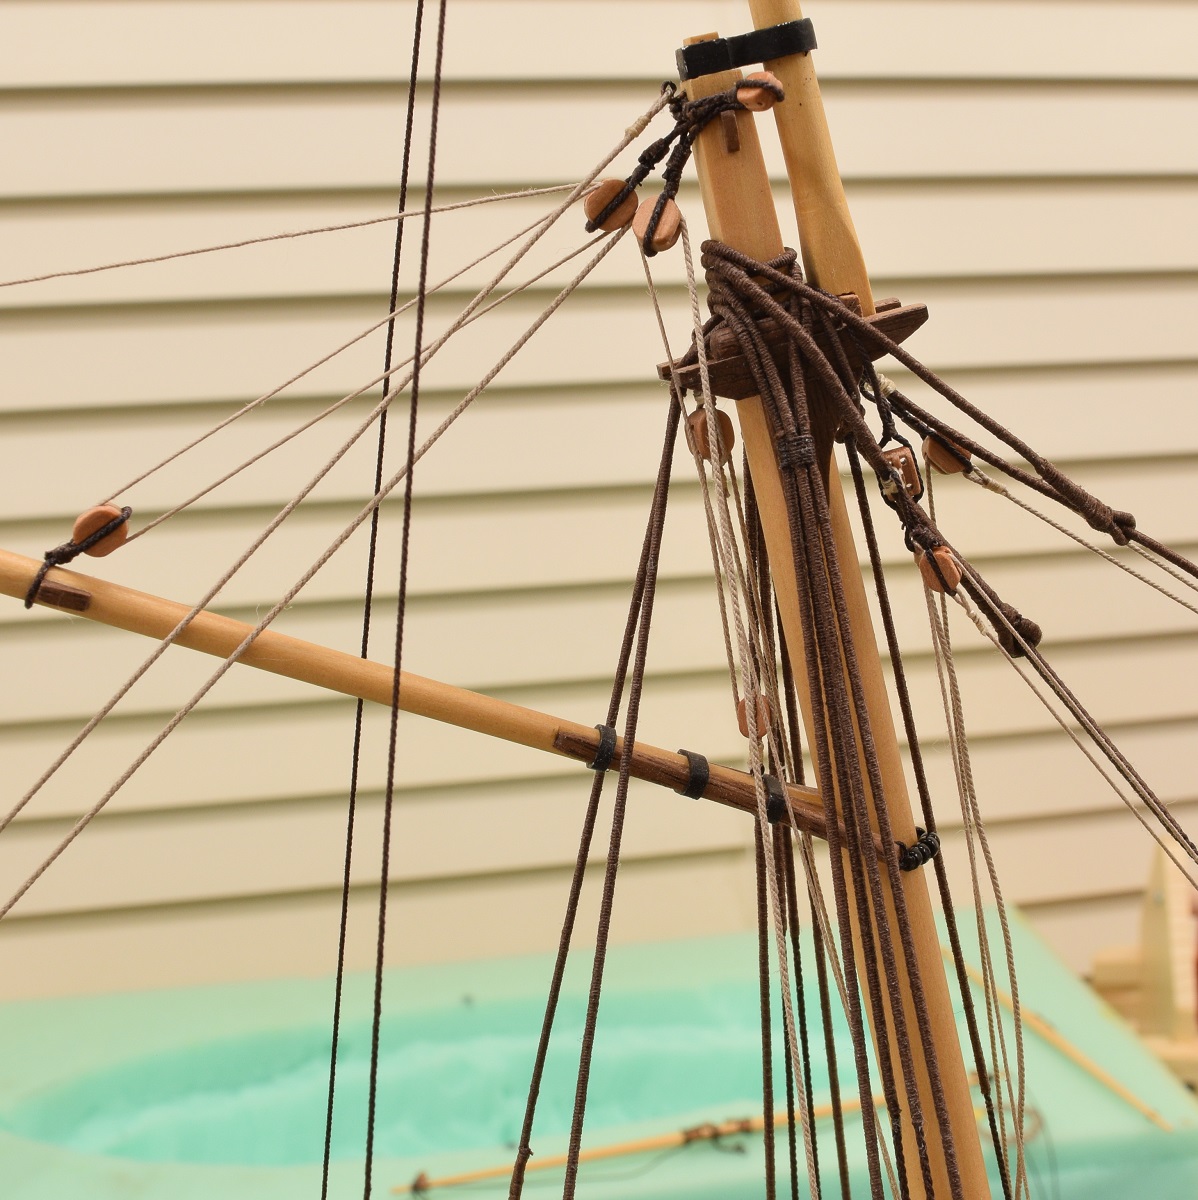 Boom lift tackle. Belaying this off to the cleat on the shroud was.. an interesting experience.  Top from the other side with a better view of the gaff throat halliard. Slightly out of focus, sorry about that. 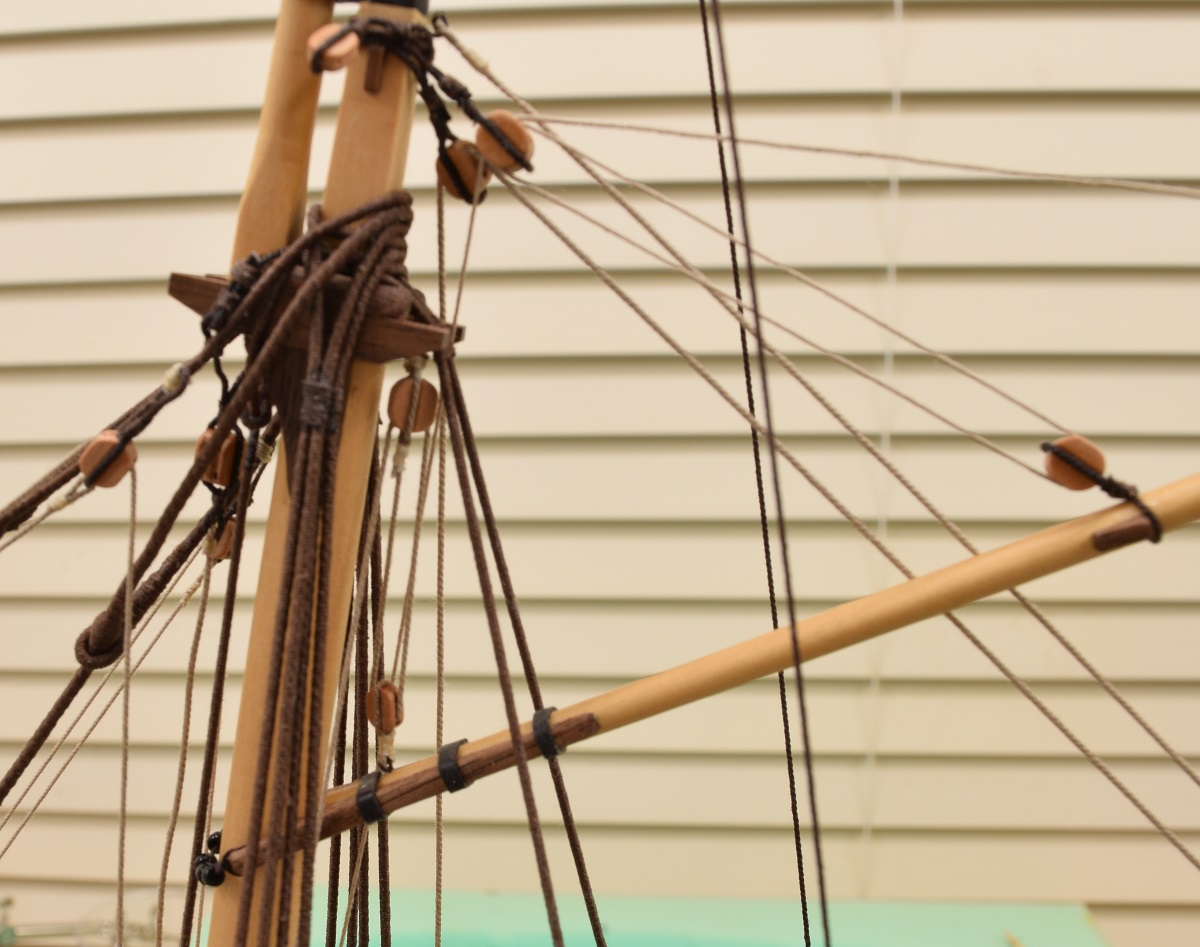 Gaff throat halliard tackle and belayed to the Riding Bitt. 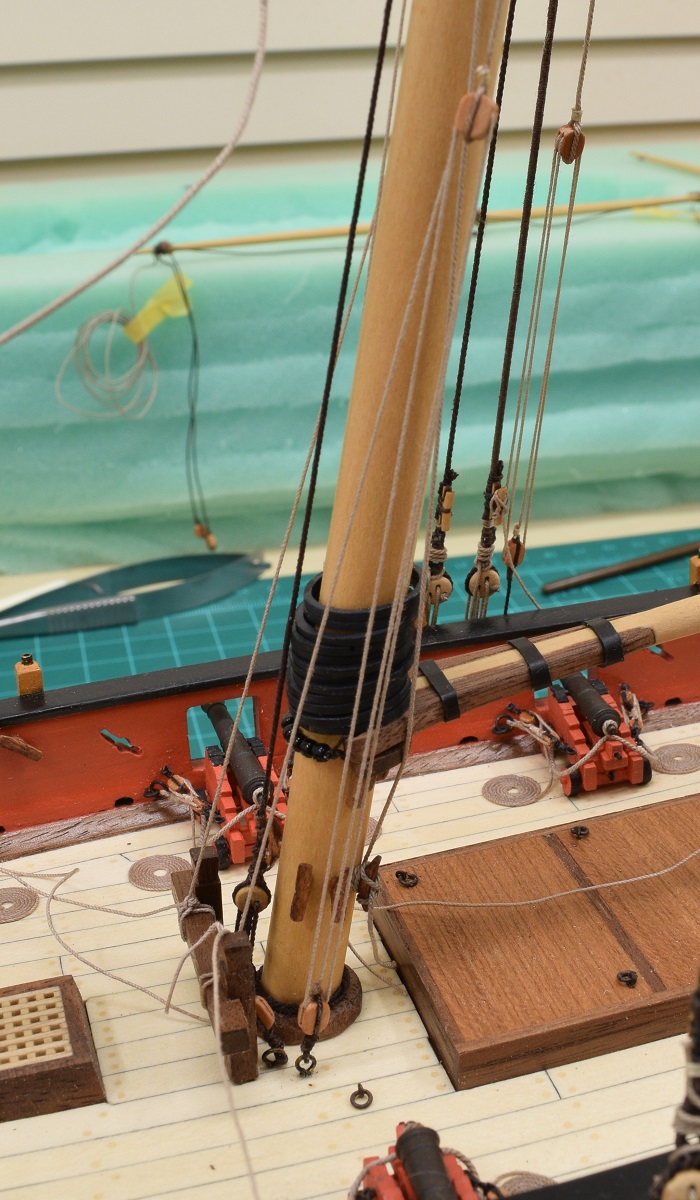 Cleaning up all the belayed ends, and adding coils is going to be pretty interesting later on.
|
|
#
?
Dec 2, 2020 20:26
|
|
|
And now, the rigged spreader yard goes up to the top of the spreader yard horse.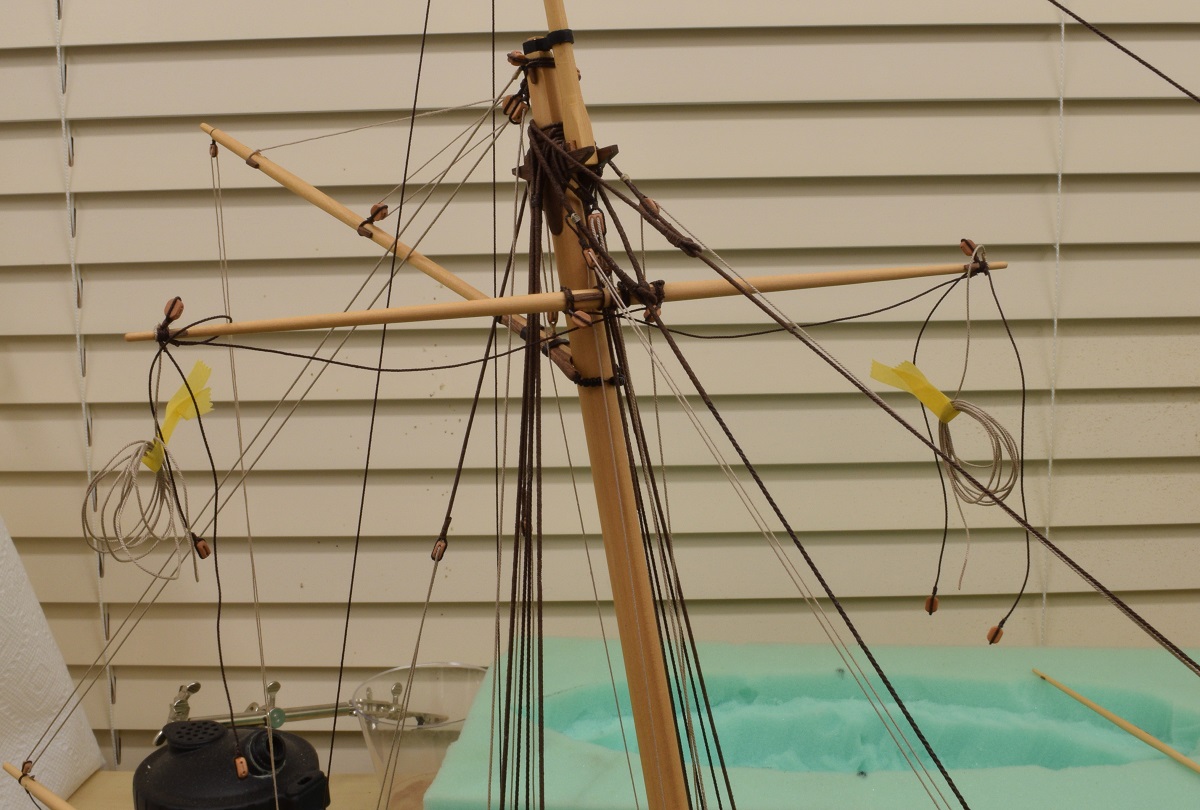 Jeers tackle rigged. This is the tackled that raises and lowers the spreader yard, which hangs from the jeers block up at the top of the spreader yard horse. 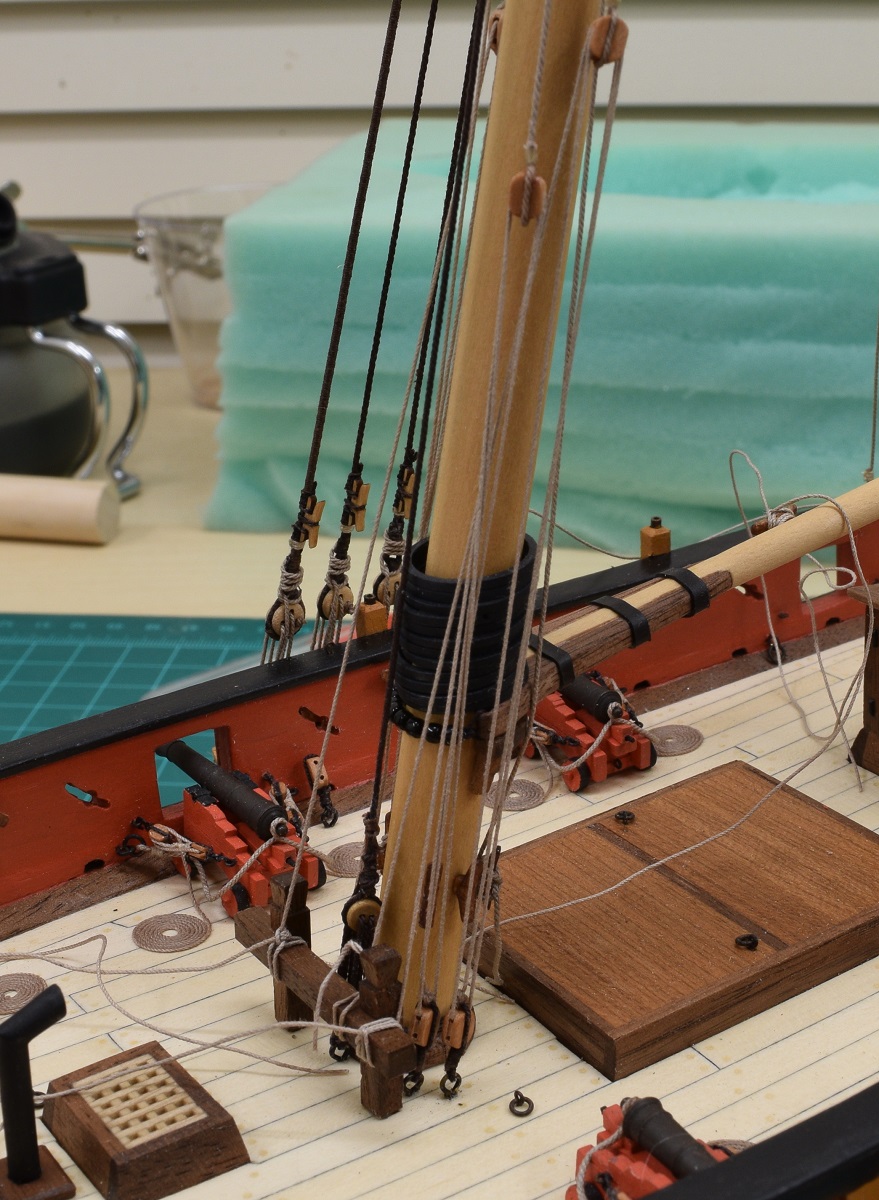 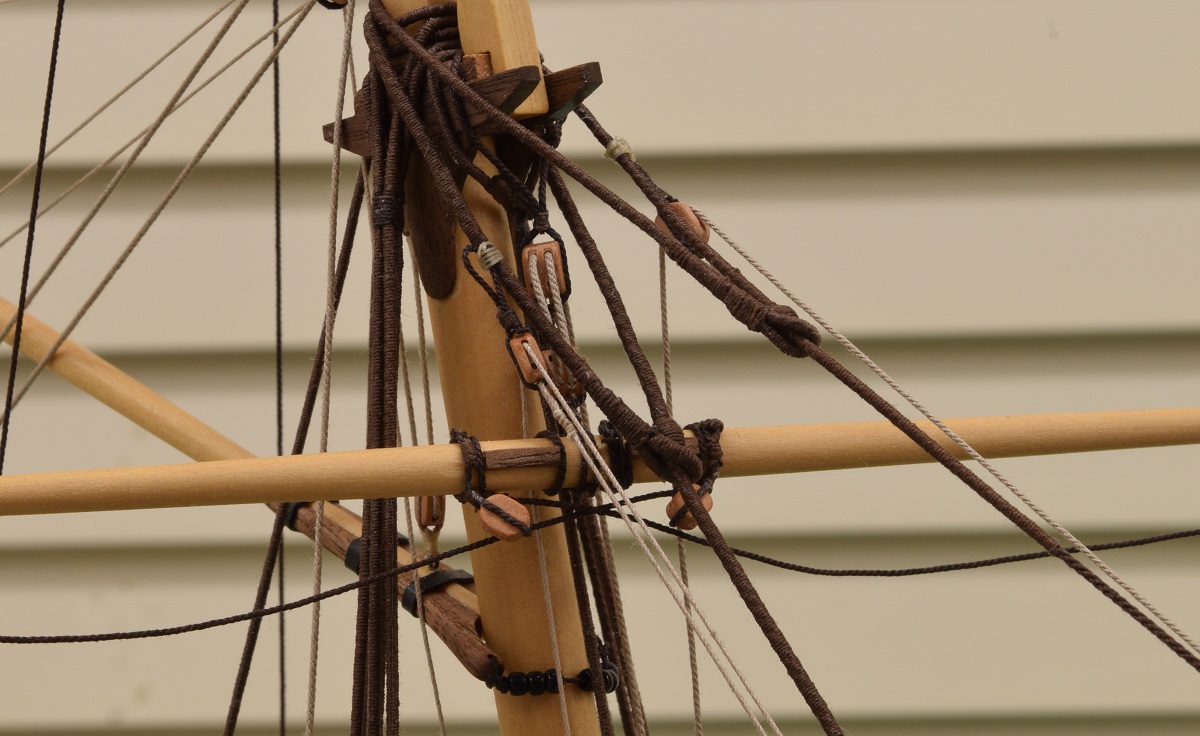 Nothing holding any downward tension yet, so the jeers tackle and block are sort of loose. Can see the served parrel around the served spreader horse though, now lashed to the yard. 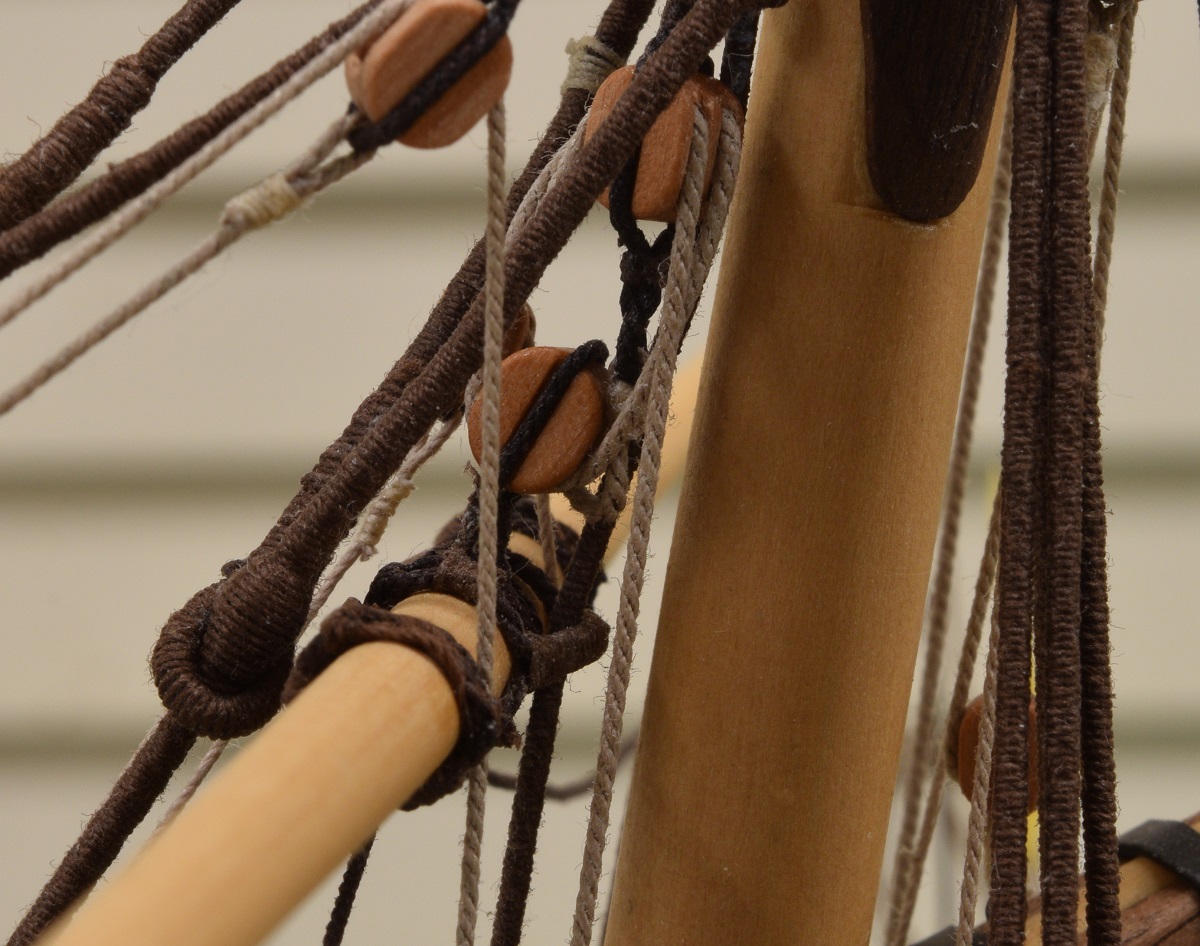 Every time I work on another piece of the rigging in the middle of everything I feel like I'm one twitch or sneeze away from ruining everything. Every time I finish belaying off a line it's like I managed to successfully defuse a bomb. Tonight I got the spreader yard lifts and aft braces rigged. At this point it's pretty obvious that stuff is going to start getting in the way, so I'm going to have to break down and do the ratlines next, so I guess that's the next project, yay for lots and lots of clove hitches! --------------- On the original build log there was a lengthy discussion about the rigging and what I did differently than the kit plans/instructions, and of course parts, and this was one of my comments on that.. I really love the effect of the serving, I couldn't be happier with how the serving has come out, and the look is great. Even the spreader yard parrel, which probably nobody else will ever notice when looking at the model (other than me), I think is so much better with the serving, even though doing that bit by hand while one end was attached to the yard was a huge pain in my rear end. :P I've also downsized most of the rigging line, using a rigging plan that I found on modelshipbuilder.com. http://modelshipbuilder.com/page.php?188 Many of the blocks are also downsized (especially the cannon tackle) from the kit sizes. Seizing all of my rope terminations has also done a lot for the overall look I think, but that might just be me thinking it does, since I'm the one that's spent so much time seizing little ropes!
|
|
#
?
Dec 4, 2020 04:26
|
|
|
Onward to the ratlines! Ratlines are just the rope 'ladders' made on the shrouds to allow the crew to climb up the rigging. They are simply ropes tied to the shrouds with clove hitches. I made a simple guide out of a manila folder that I clipped in behind the shrouds to help me space and align the ratlines.  Then, the clove-hitching begins!  Addendum - After looking at all the pictures I took while I was in San Diego from all the ships that had ratlines, I chose to use the dark brown rope to make the ratlines, even though most of the ships there had tan rope ratlines. The reason is, that in every single picture other than the super close-up shots, the ropes look brown/black from any distance at all. They appear to be the same color as the standing rigging unless you are right up on top of them, for whatever reason. If I could go back in time a few weeks I would probably have ordered the light brown rope to do the ratlines with, because I think that would be perfect, but since I don't have any of that rope in the right size, dark brown is what I'm going to use. I think the tan just stands out too much, and as you move away from the model it doesn't blend in like the tan lines on the real ships do. My goal is to make the ratlines look as realistic as I can, meaning they should have a bit of slack in between each shroud, and not be pulling the shrouds together. On real ships that have ratlines, they are pretty inconsistent looking. I had a picture of the ratlines on HMS Surprise in San Diego here, but I can't remember where I stored that image on the server. If anyone really wants to see it go ahead and ask and I'll look for it. ---------------------- And, the starboard side is done. I was hoping to finish both sides this weekend, but I had a fair number of other chores to do around the house, and I discovered that I was only able to tie off about 6 lines before feeling the need to get up and do something else for a bit, so it took a little time. Tomorrow night I'll put lines on the guide for the other side and start the next half. 
|
|
#
?
Dec 5, 2020 00:18
|
|
|
The Locator posted:Addendum - After looking at all the pictures I took while I was in San Diego from all the ships that had ratlines, I chose to use the dark brown rope to make the ratlines, even though most of the ships there had tan rope ratlines. The reason is, that in every single picture other than the super close-up shots, the ropes look brown/black from any distance at all. They appear to be the same color as the standing rigging unless you are right up on top of them, for whatever reason. This is 95% because ratlines get all kinds of foot traffic, and so are VERY dirty in comparison to most of the rigging. So three nautical terms that came up that I like to expound upon: When you were new and starting this rigging, you wanted someone to "show you the ropes." When you were done, you could name them all and therefore "really know the ropes." Also, you were talking about the running bitt earlier. If one of the halyards got loose before it was 100% belayed, you wanted to make sure to hold onto it until "the bitter end" (the end that's tied to the bitt) so the whole yard doesn't come down.
|
|
#
?
Dec 5, 2020 02:53
|
|
|
Interesting notes on the origins of those sayings babyeatingpsychopath! Onward to more little clove hitches! After I don't know how much time, finally finished tying clove hitches on the port side. Same method as the other side, first set up the pattern behind the shrouds, held by small alligator clamps, then start with the bottom one and work up towards the top.   It gets a lot trickier near the top where there is very little room between the shrouds, and it's difficult to keep from accidentally pulling the shrouds together, but eventually I got there. Just before the final trimming... 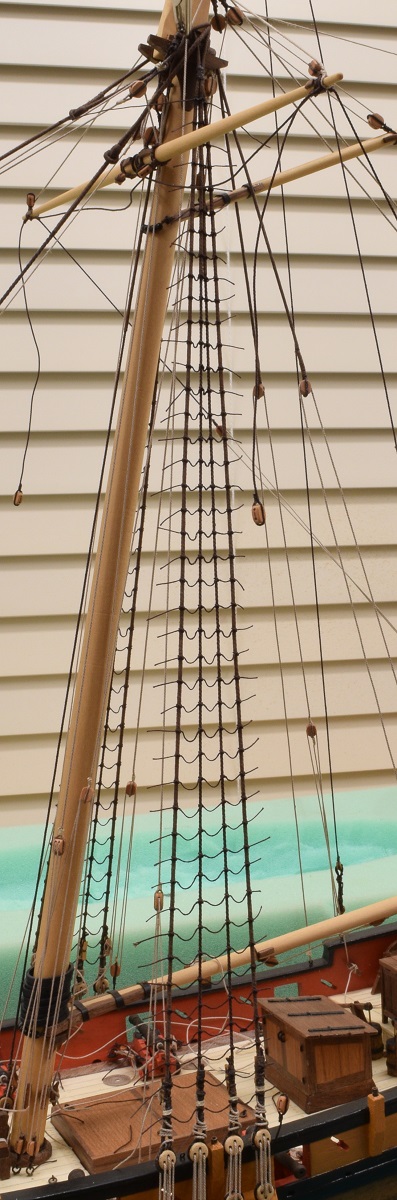 Then trimmed off all the loose ends. 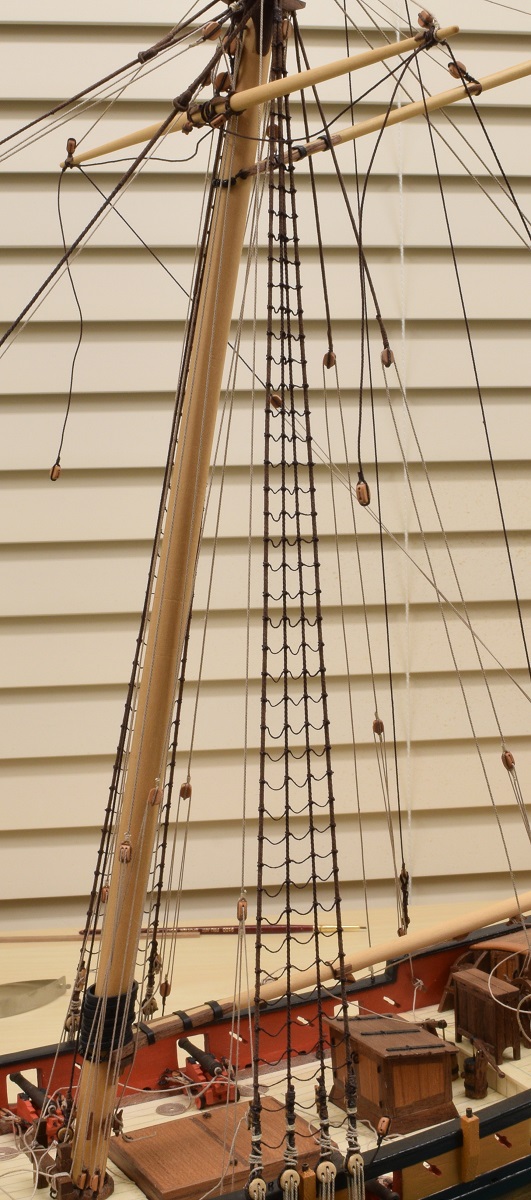 Closeup of finished ratlines (starboard side).  And a couple shots of how the ship looks overall with the completed ratlines on both sides. 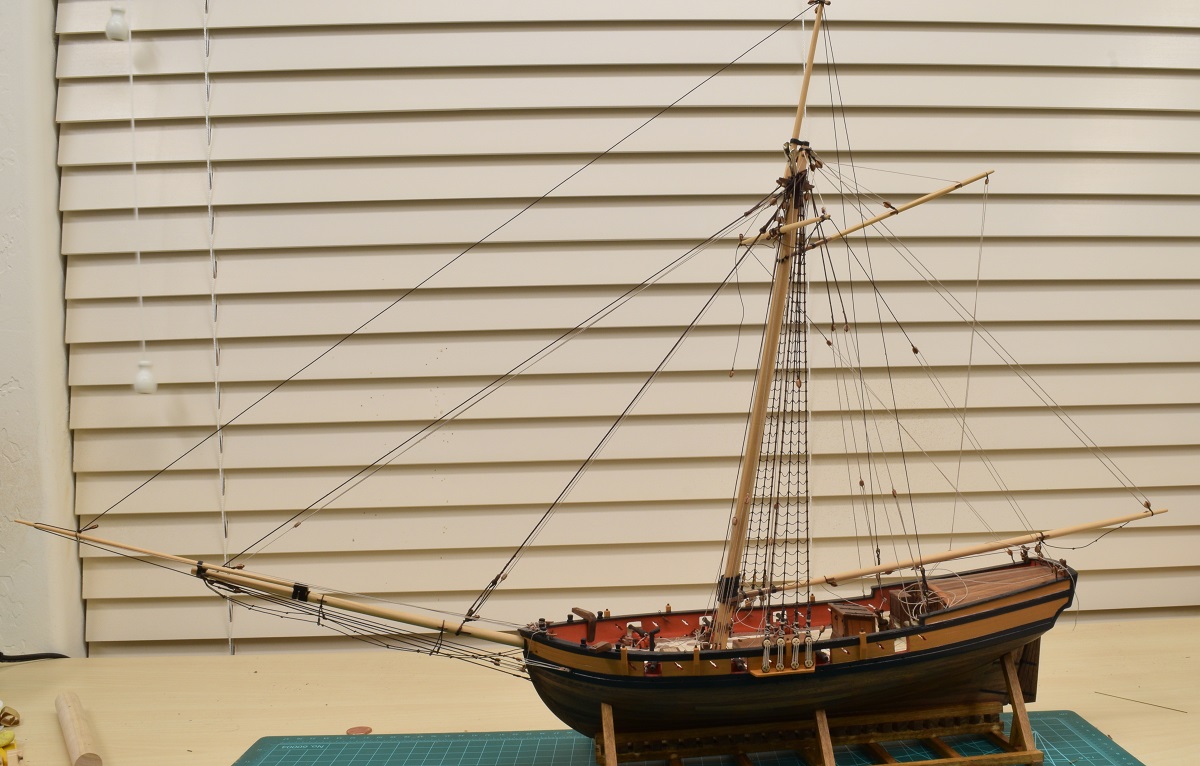 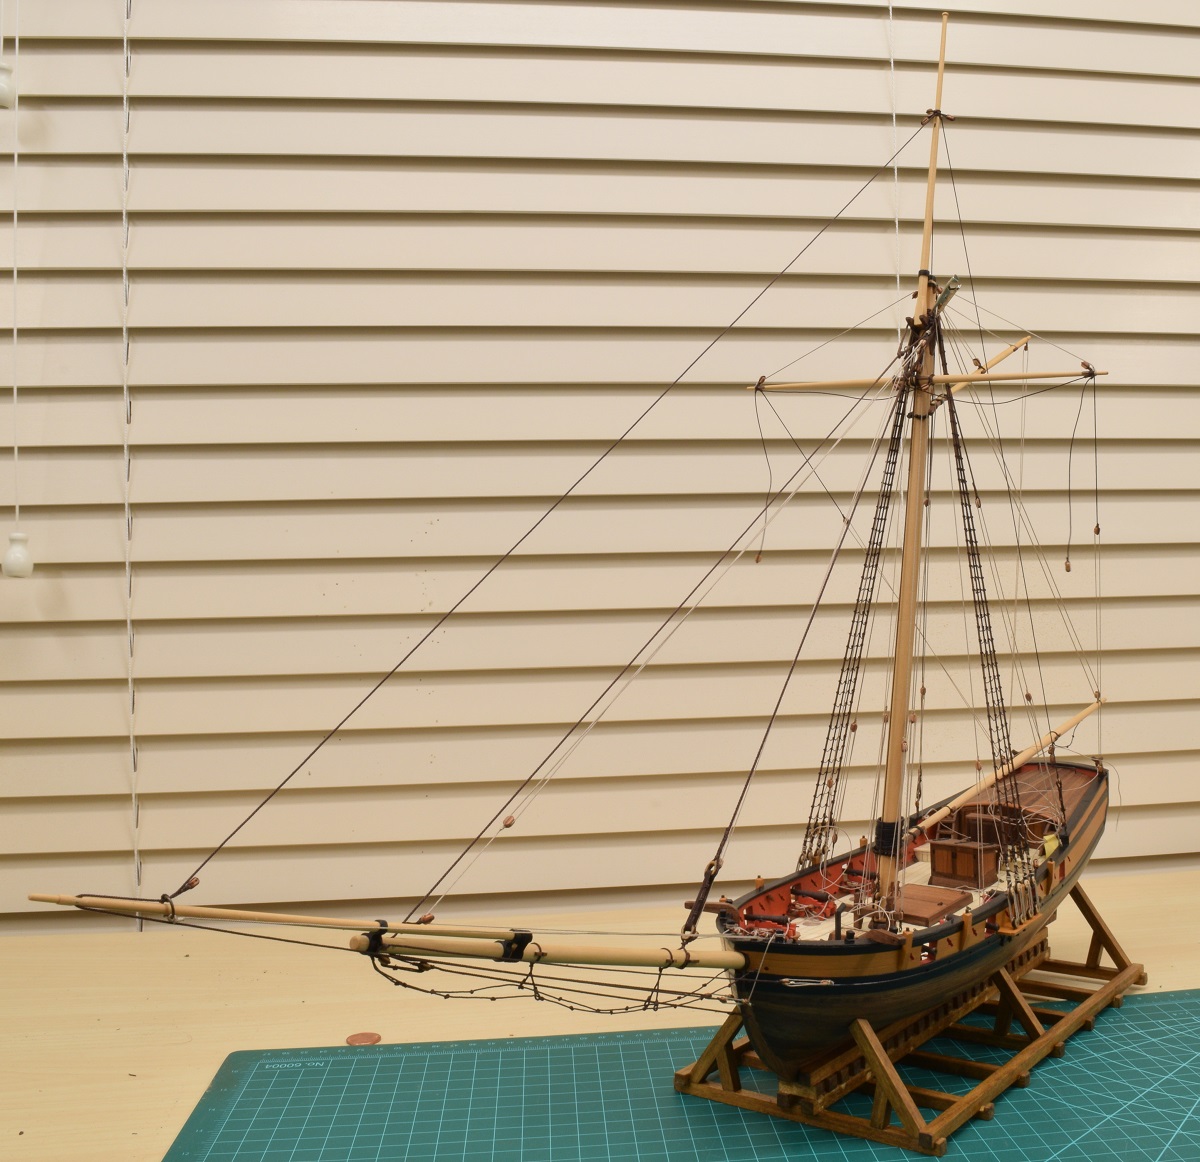 At this point the model is.. maybe a month or so from completion if things go well. I also need to build a base to hold the slipway with the ship on it.
|
|
#
?
Dec 5, 2020 20:18
|
|
|
Now that I'm done with the ratlines, it's back to the other rigging. I had previously rigged the aft braces, and needed to do the fore braces. The fore braces attach to the bowsprit with a collar, which is supposed to go between the bowsprit chocks and the iron ring. Well, I placed the chocks and the ring per the plans, rather than figuring out before-hand how much crap was supposed to go in that space (lesson learned here). There are already ropes doubled up in this space, and there was no way that a collar was going to fit here as well, so I placed the collar on the forward side of the iron ring, simply because there's just nowhere else to put it without going all the way back and remaking the bowsprit, which I'm just not going to do as that would set me back months. "Good Enough" time. Making the collar... Starting with a pair of 5/32" double blocks, and a couple of 6" lengths of .025" dark brown rope, and a couple of long pieces (48") of .012" tan rope. Step 1 - Make a couple of eyes in the ends of both brown ropes for the lashing. 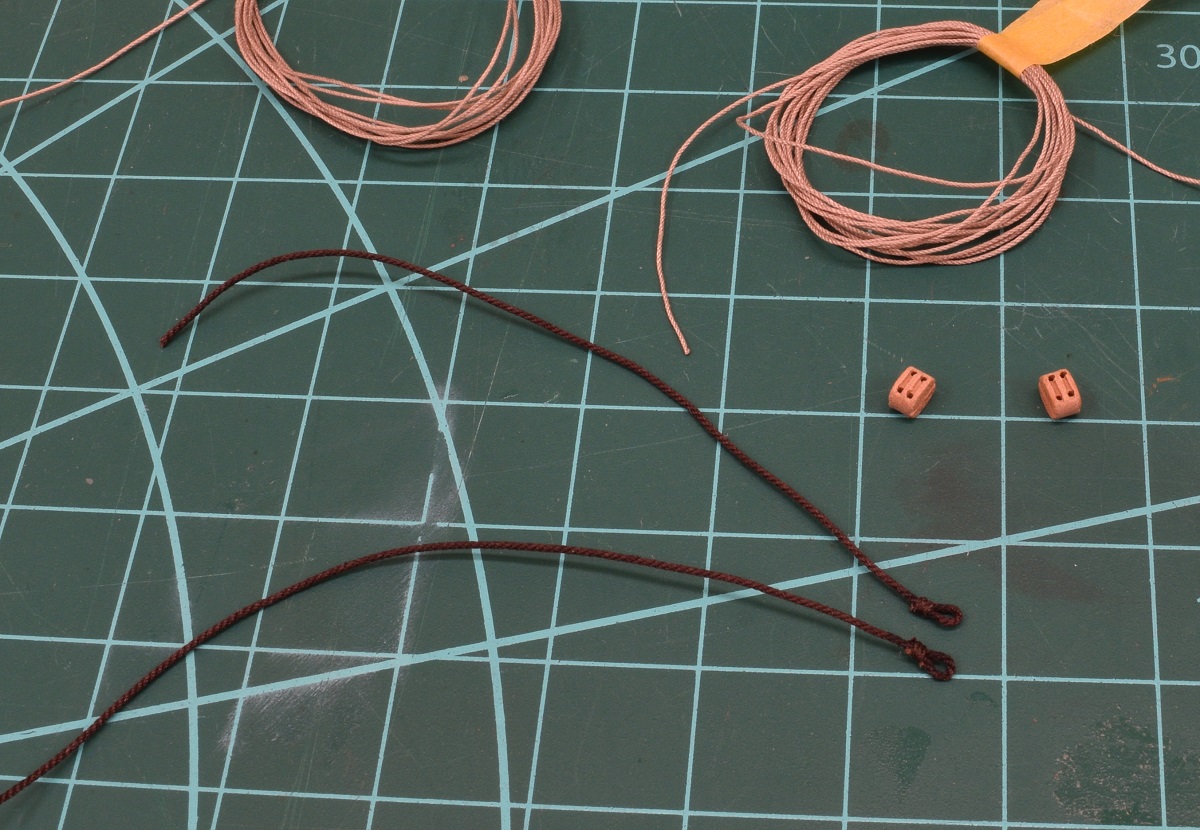 Step 2 - Seize the two brown ropes together to form the bottom of the collar that will be lashed around the bowsprit. 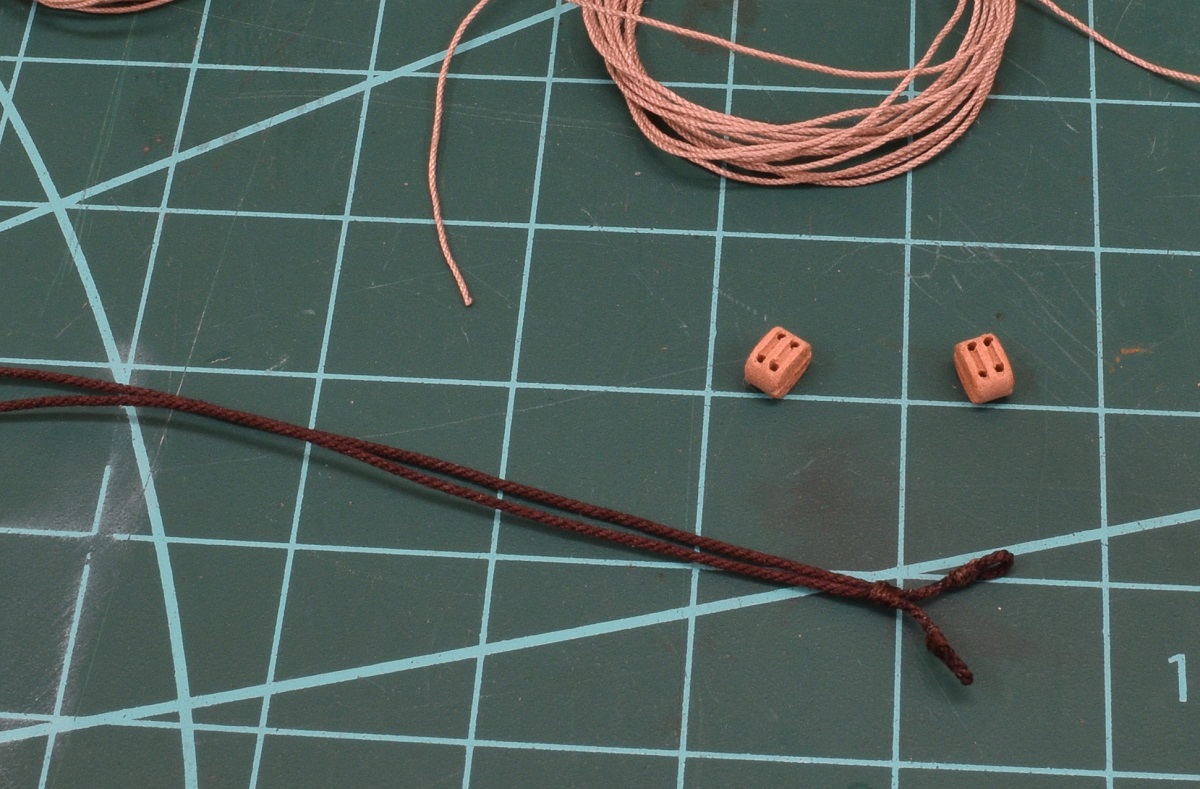 Step 3 - Seize the double blocks into the brown ropes. 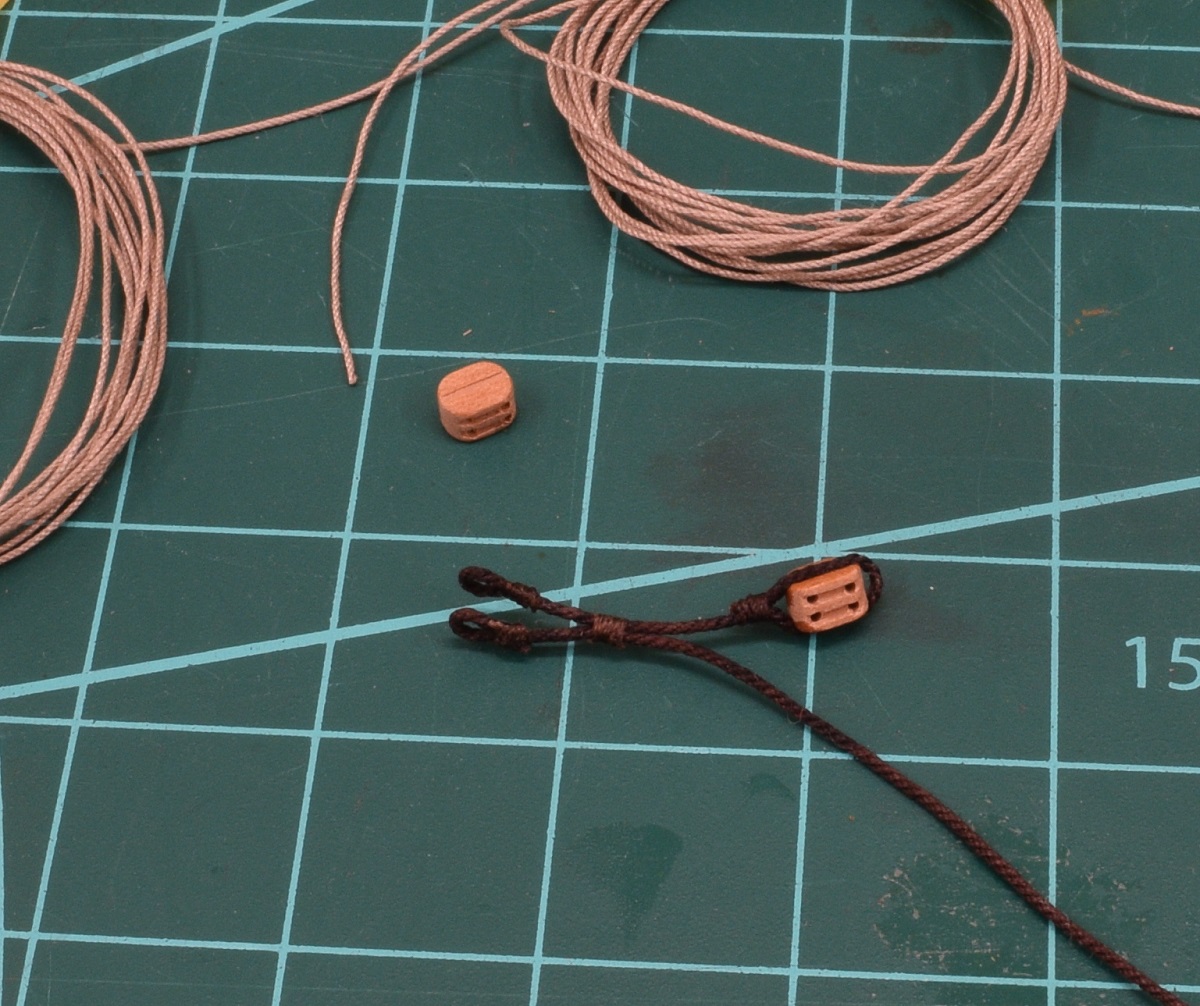 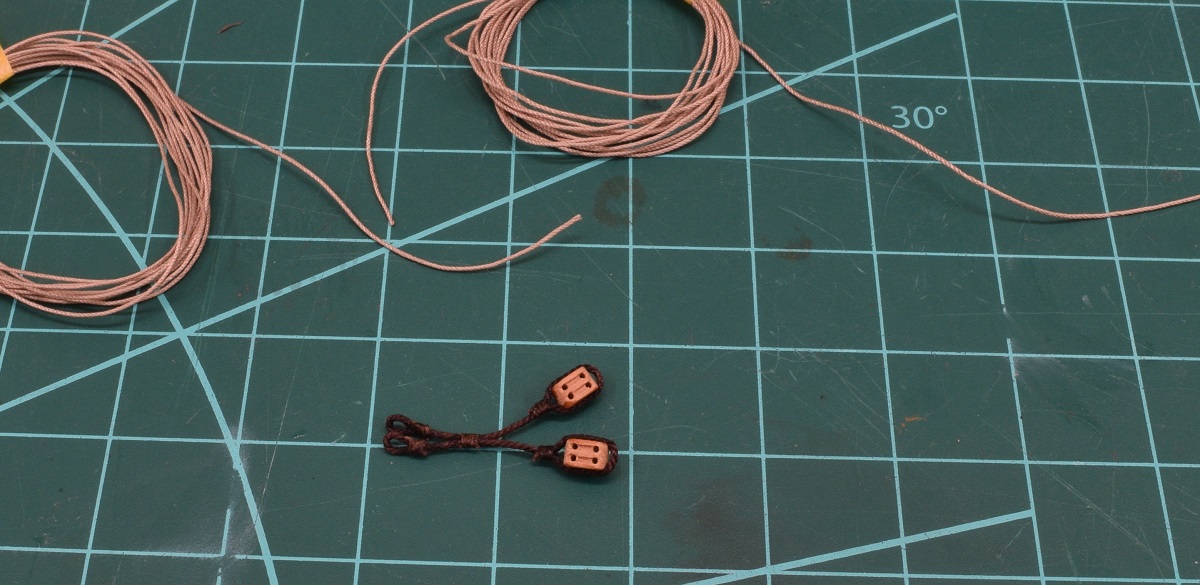 Step 4 - Seize the long tan lines under the brown ropes. These will the the standing ends of the fore braces. 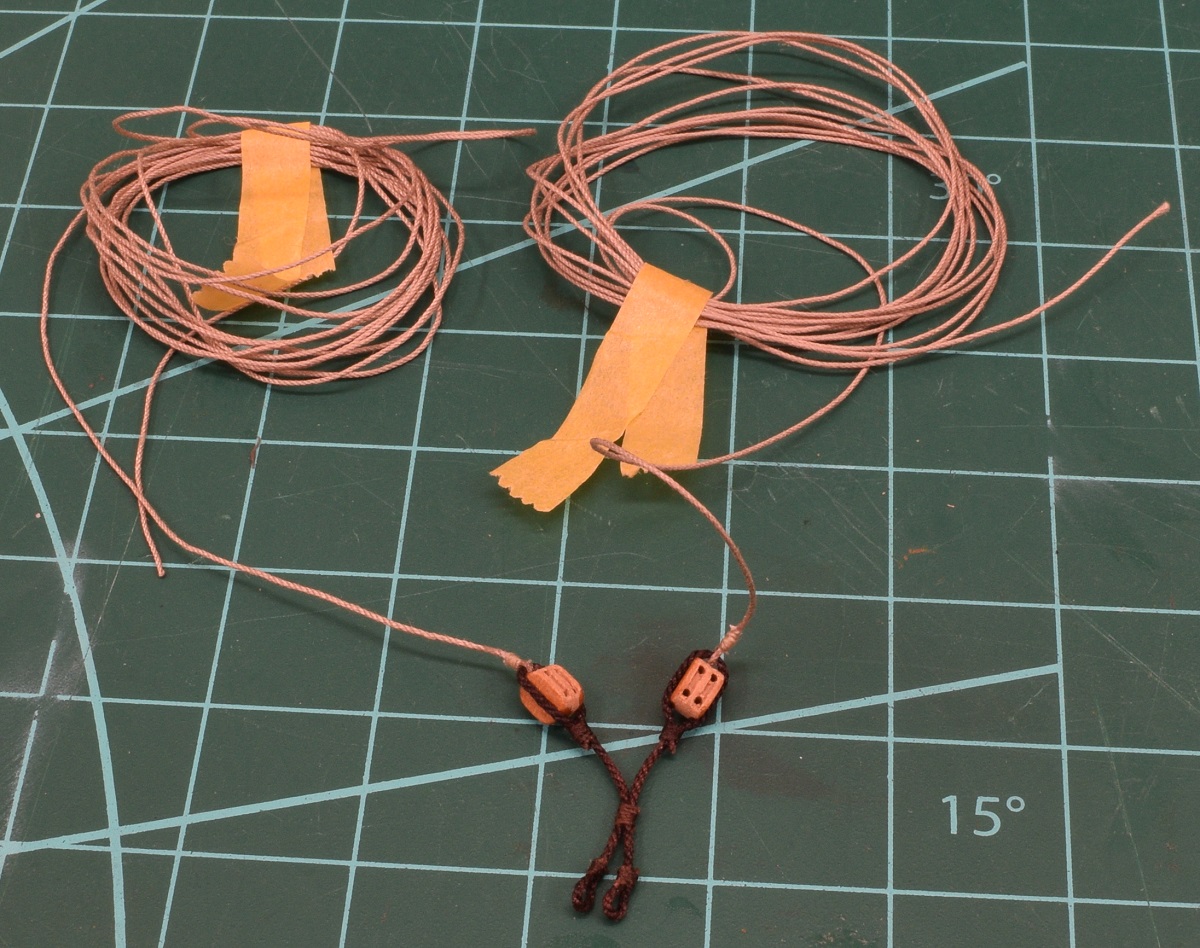 Step 5 - Lash the collar to the bowsprit with brown thread. I still haven't figured out a decent way to take pictures of these lashings under the bowsprit. 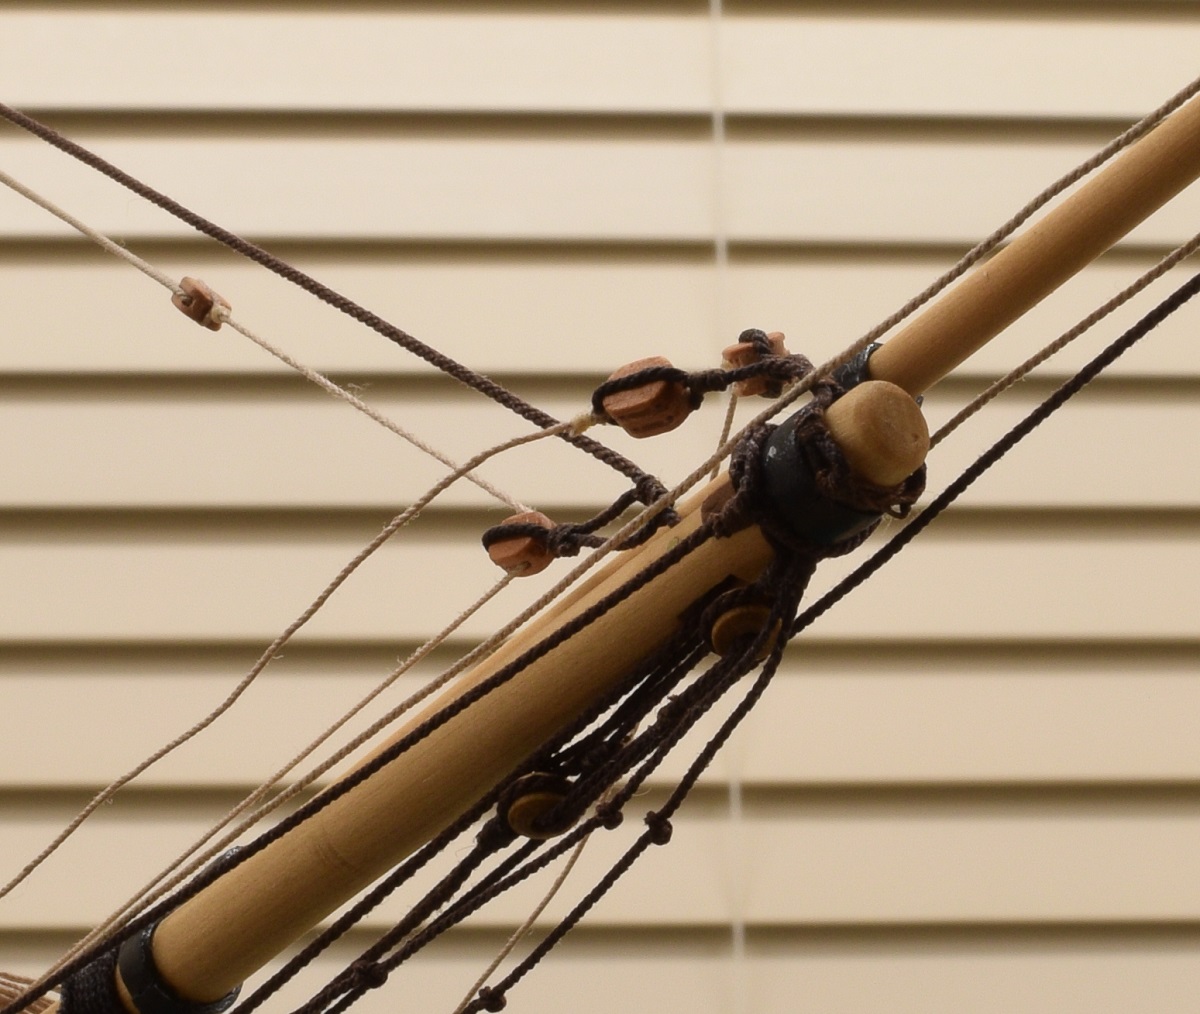 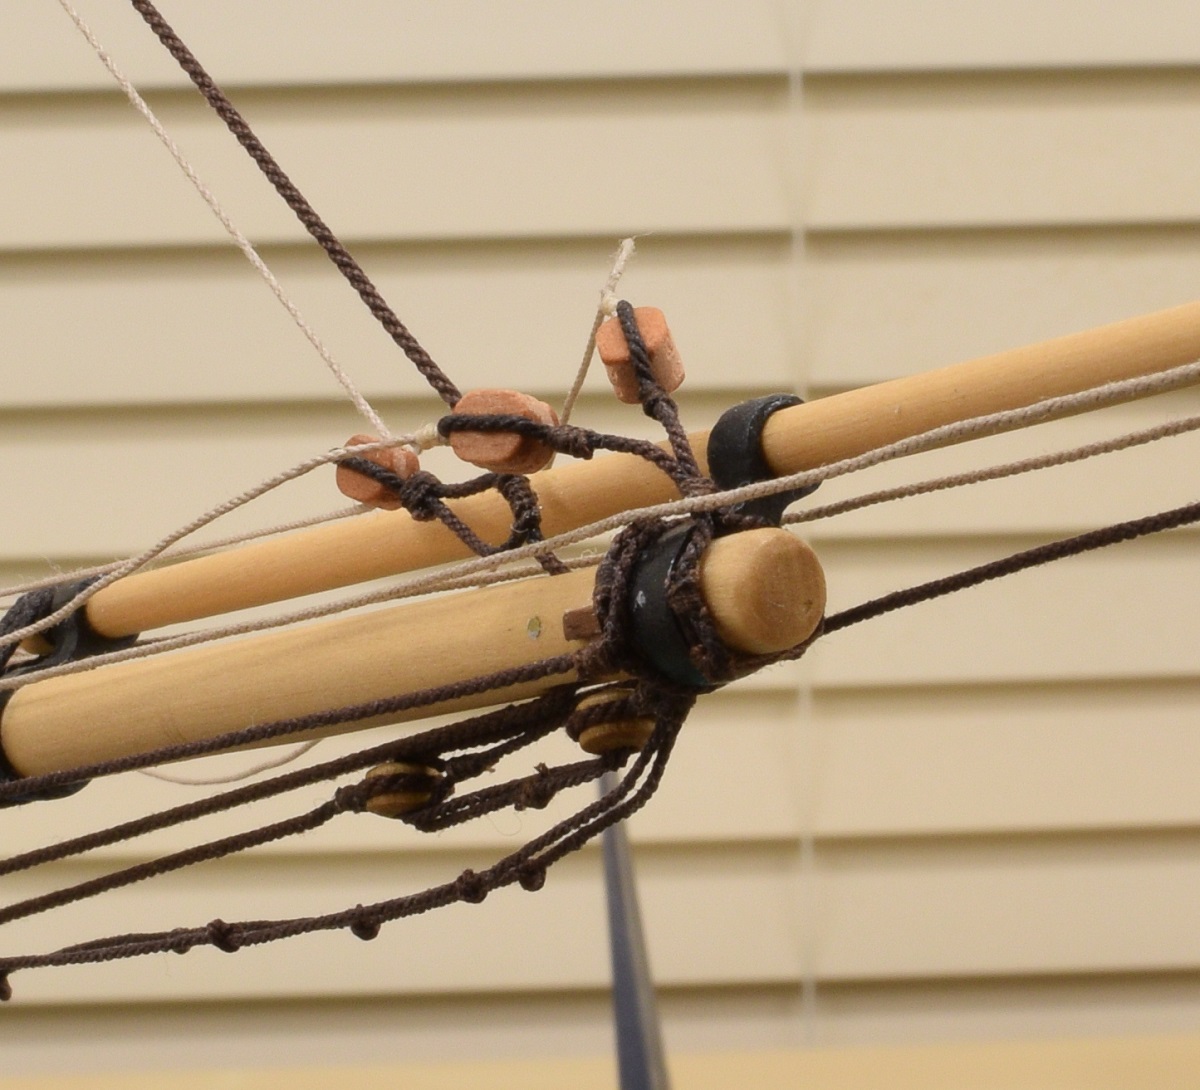 Step 6 - Rig the fore braces. These lines run from the standing end at the collar up to the pendants handing from the ends of the Spreader Yard, then back through the outside hole in the double blocks in the collar, and then to the bow where they are belayed on the inner cleats on the bulwarks next to the bowsprit. 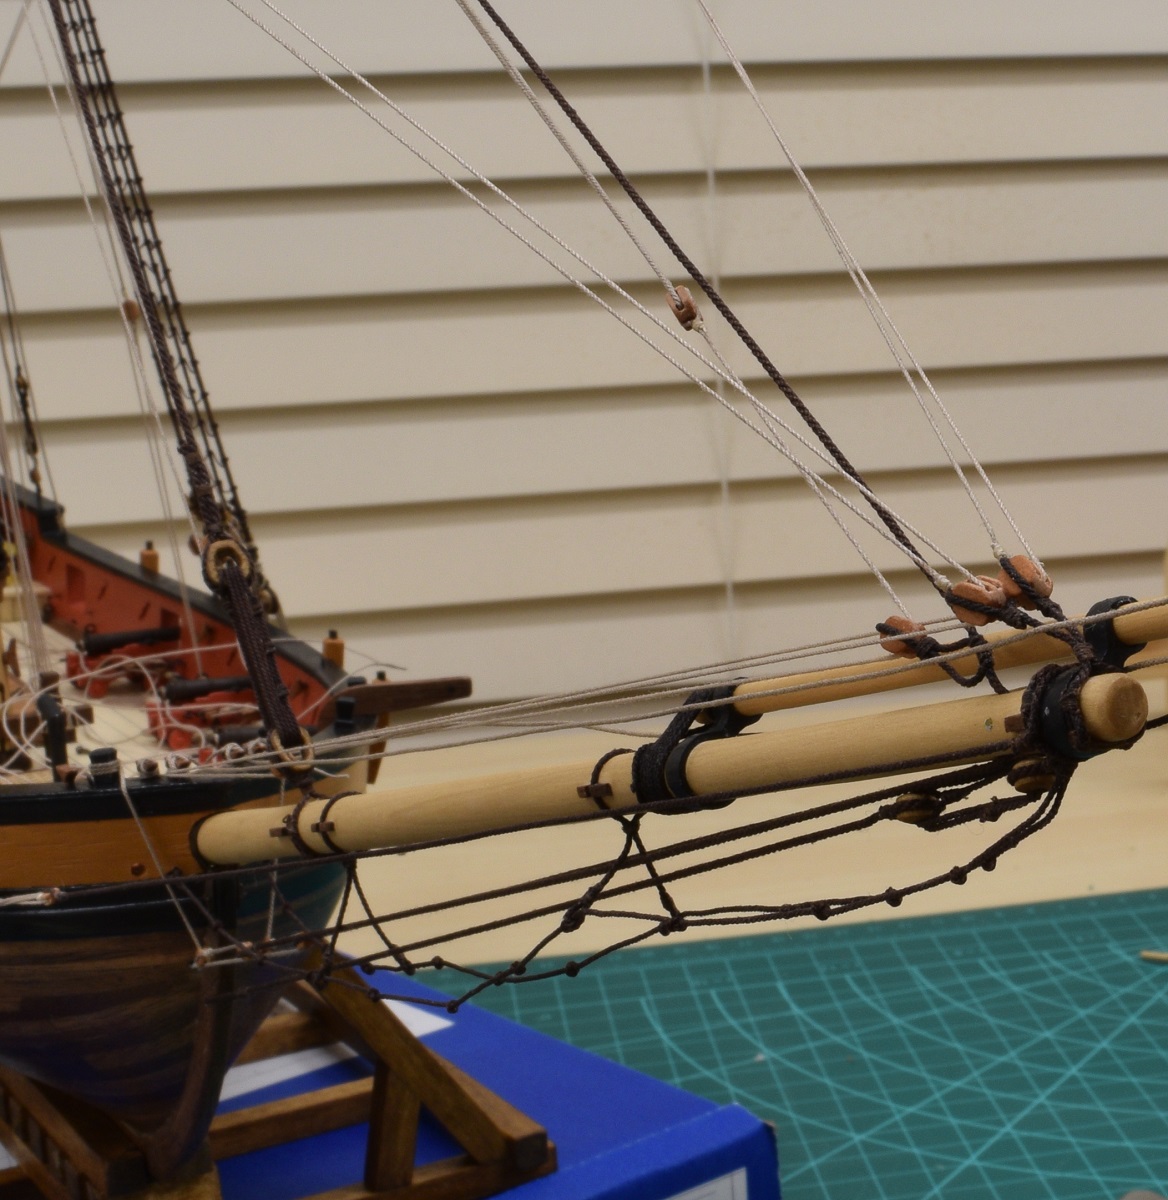 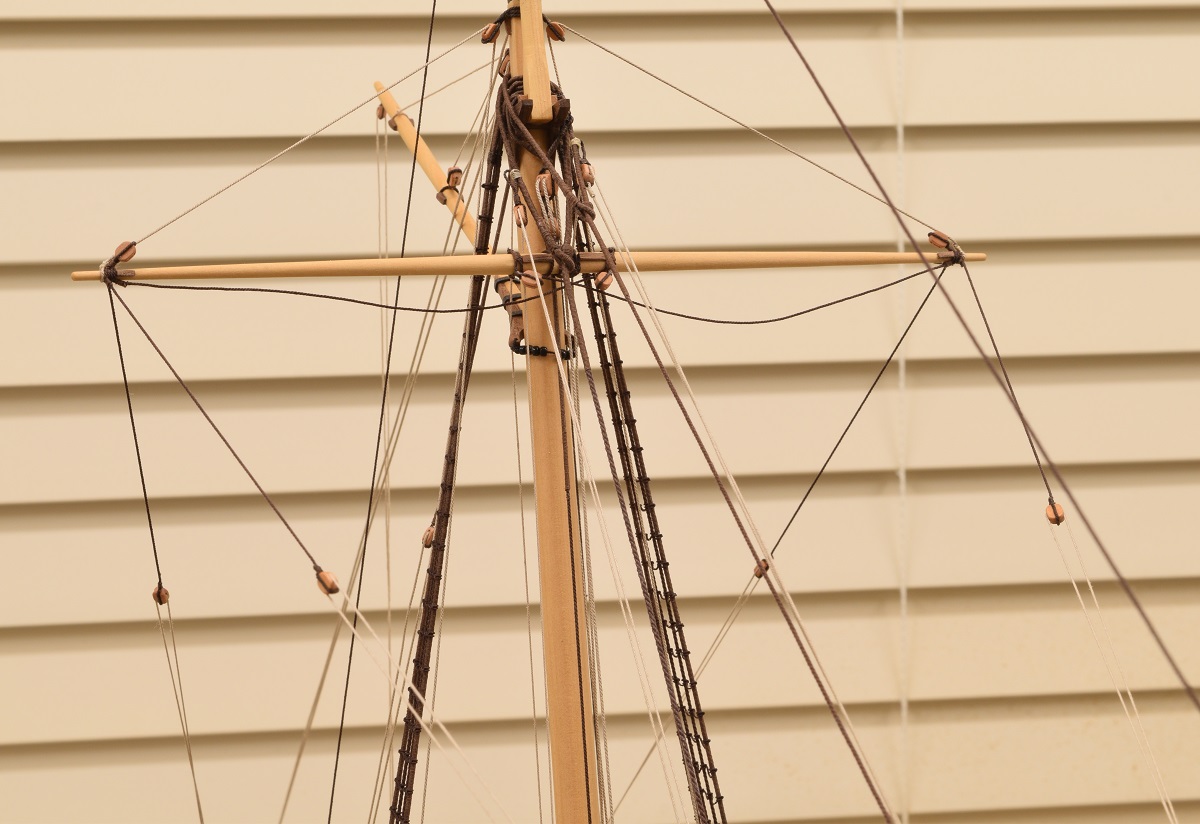 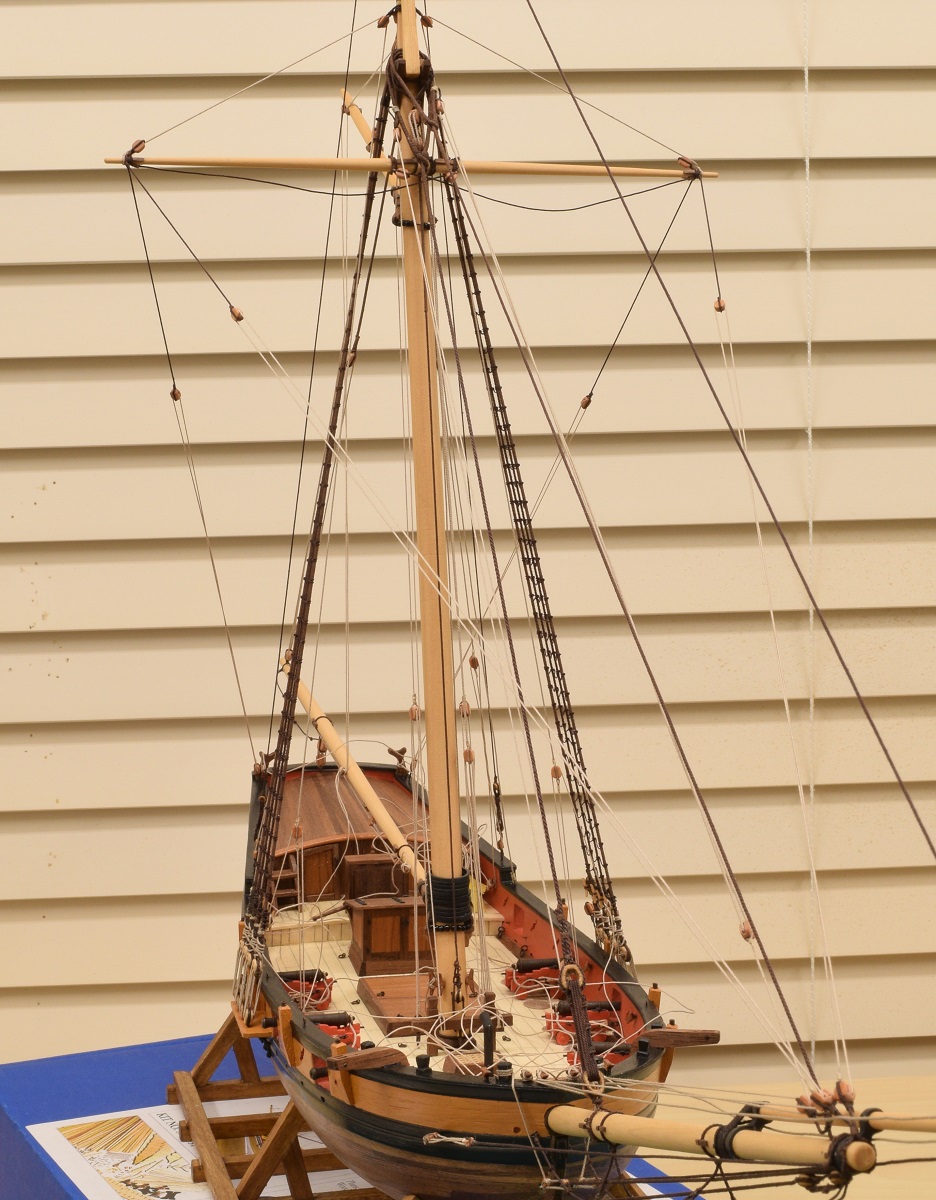 The deck is getting really covered by loose rope ends now, cleaning all of them up and making coils is going to be quite a project. Next I need to rig the top yard.
|
|
#
?
Dec 6, 2020 21:16
|
|
|
Onto the completion of the rigging. The last big item was the top yard. First thing was to make the parrel that holds it to the top mast. It has one end closed in an eye-splice, and the other end has a pair of eye-splices so that it can be lashed in place after wrapping it around the top mast, and the double rope between is served. 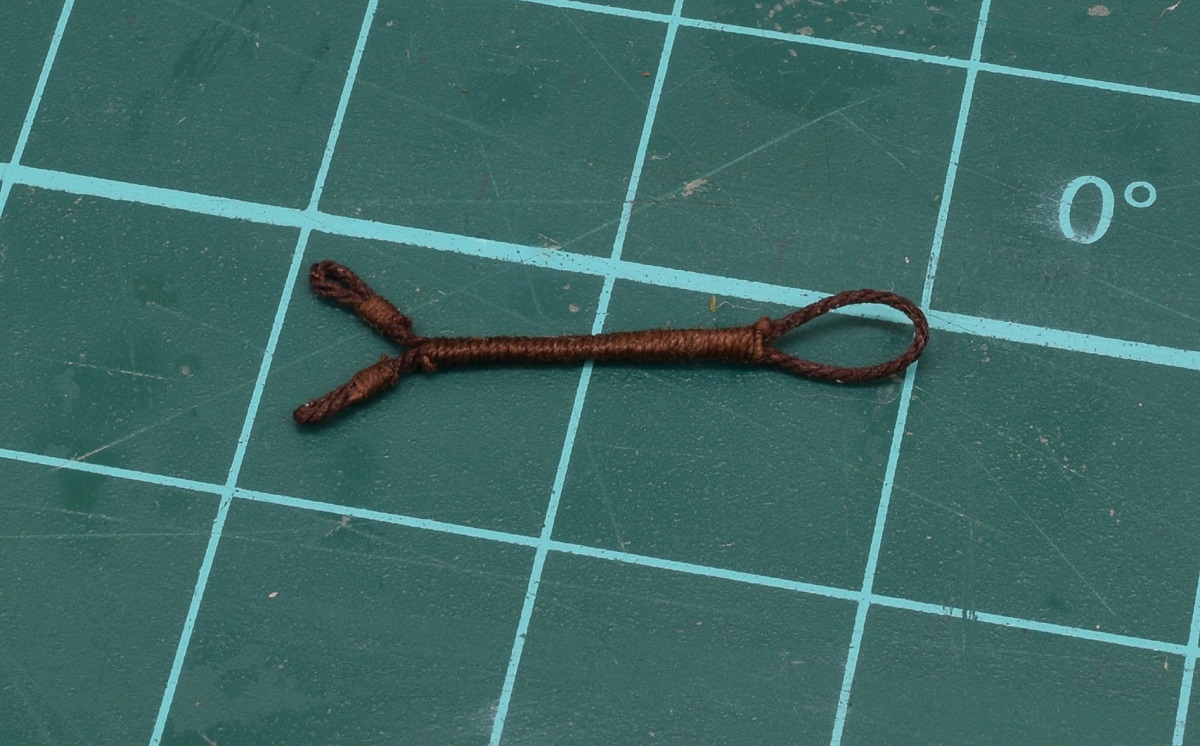 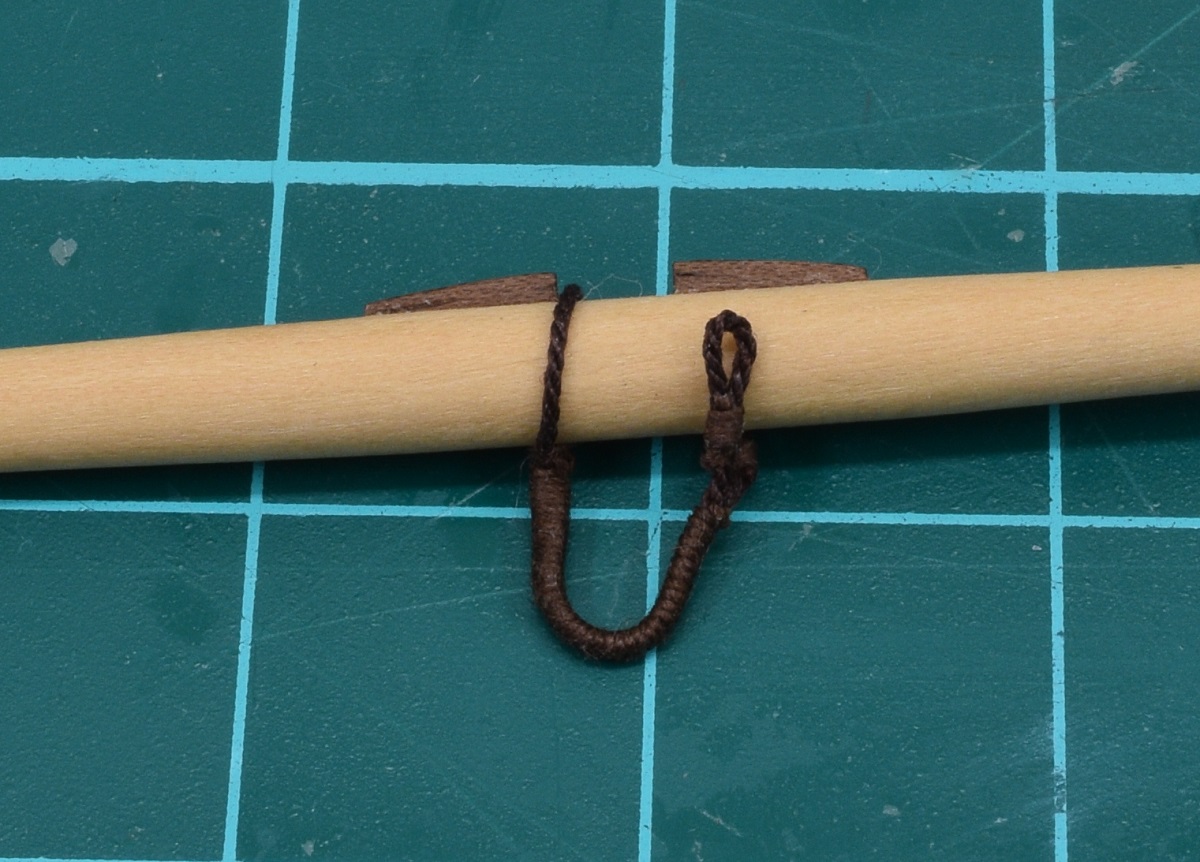 Here is the top yard all rigged up and ready to hang. In addition to the parrel, there are a pair of blocks, the foot-ropes, a brace and lift on each end, and the halyard in the center. 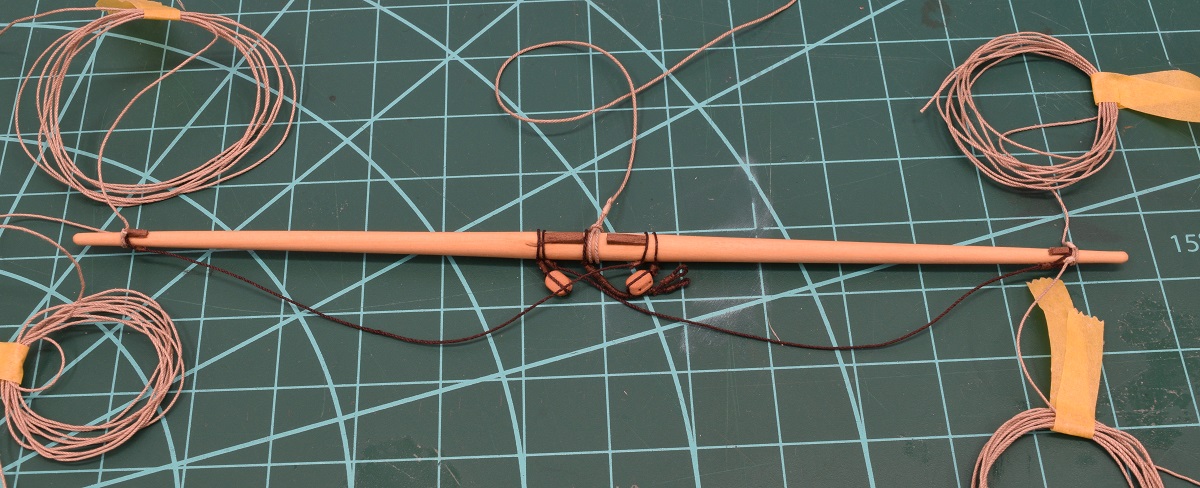 This shows how the parrel holds the yard to the top mast, and the halyard supports the yard vertically. Also a wider shot prior to rigging everything, with just the halyard holding it up. 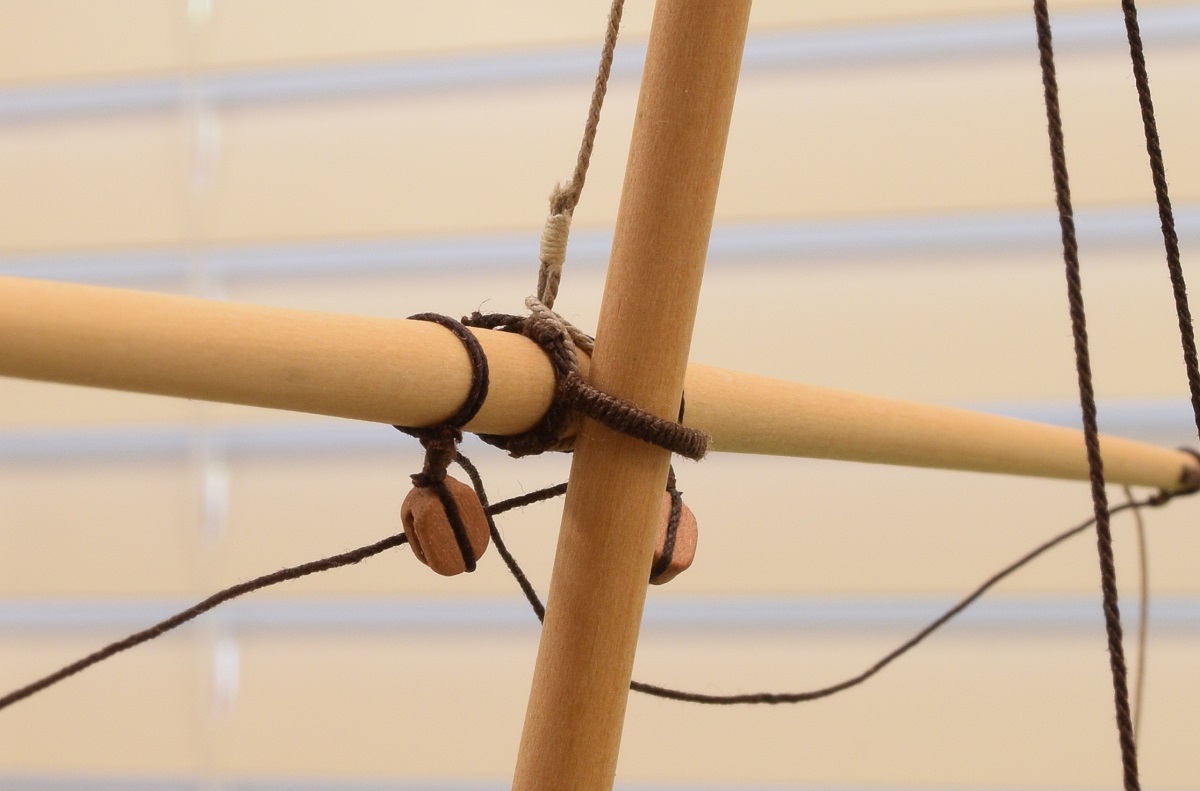 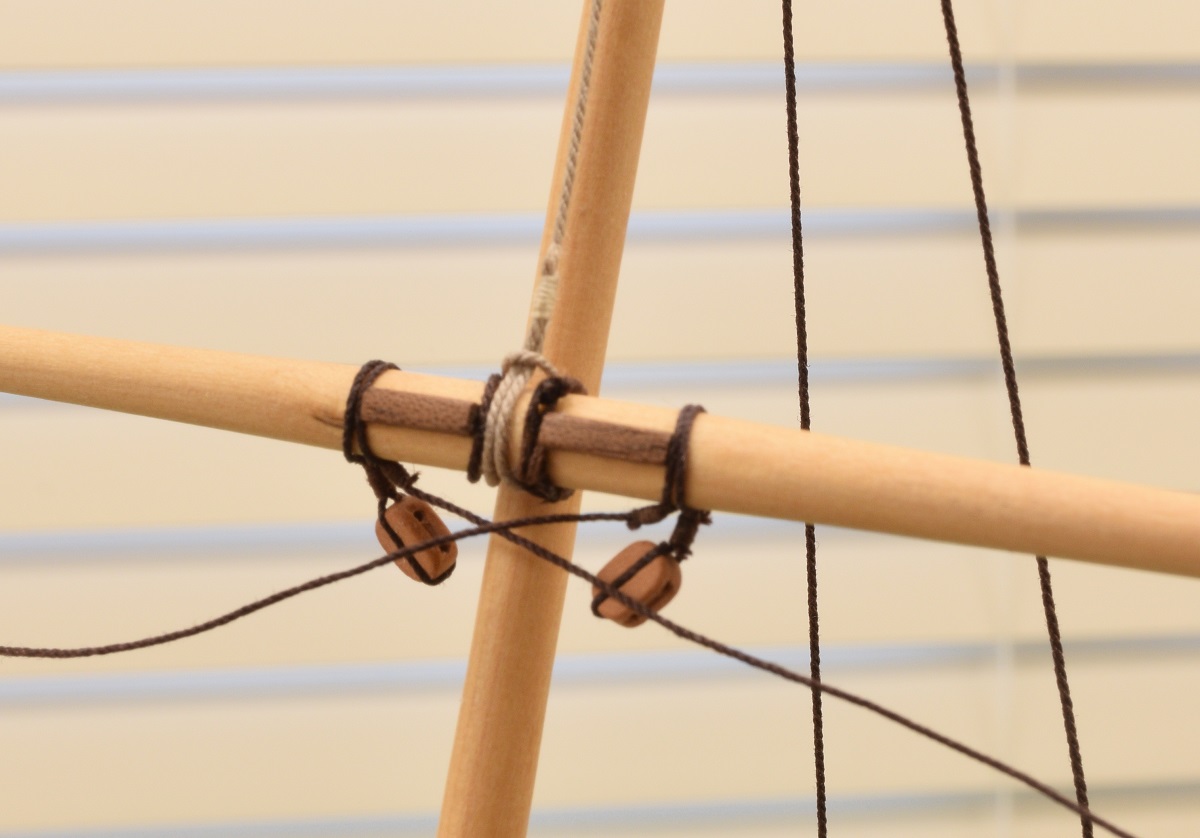 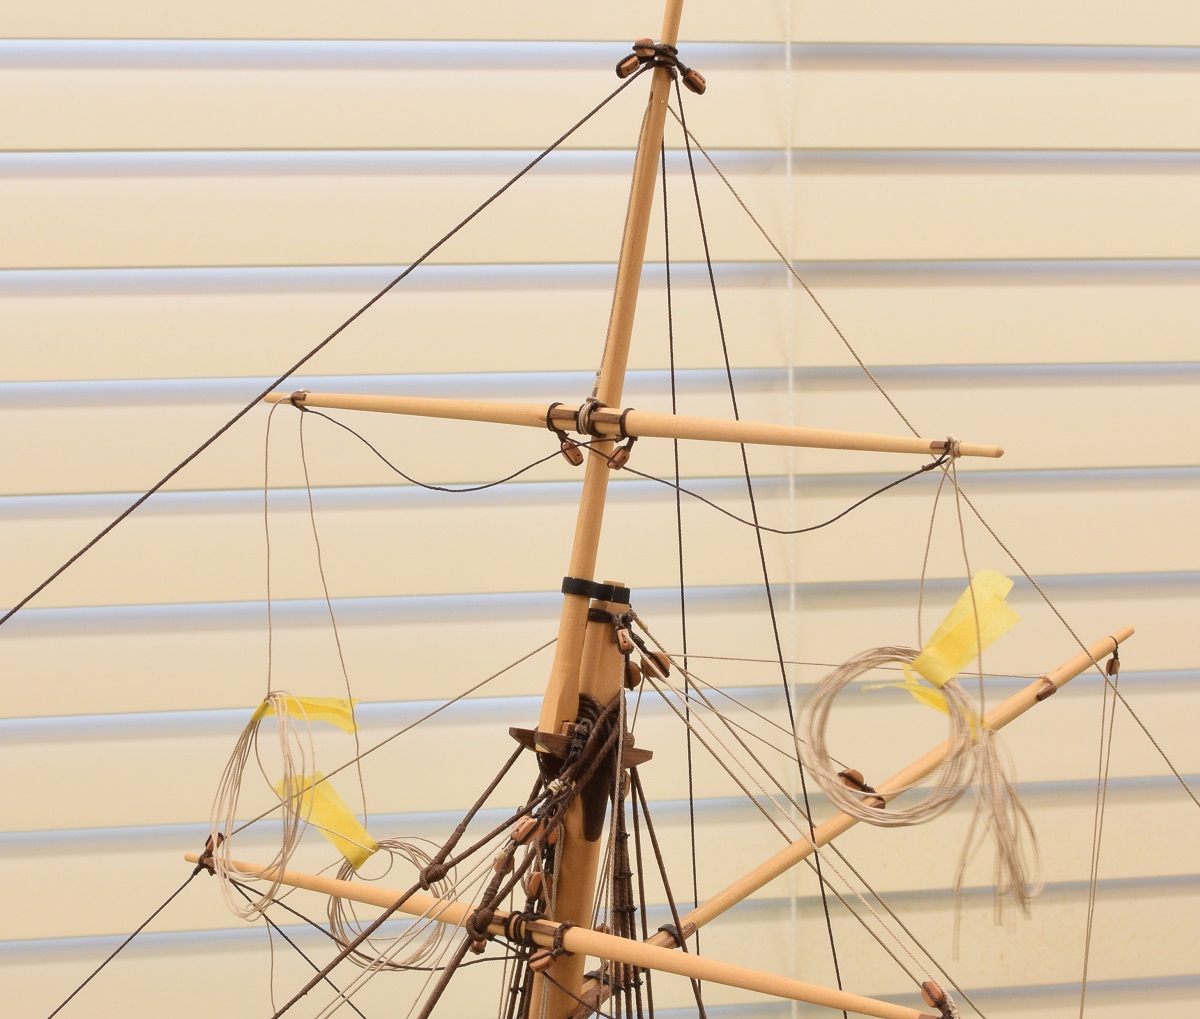 Jump to the end, I rigged all the lifts (top yard and spreader yard which actually hangs from the two blocks on the top yard), braces, and the flying jib halyard and inhaul. Edit: The original build log was incorrect here. The lines that are going through the two blocks on the top yard are the clew lines for the topsail, not the lifts for the spreader yard, which run through the blocks on the mast.  And what it looks like with all the rigging in place. All the rigging is still long at the bottom belaying points so that I can adjust things. 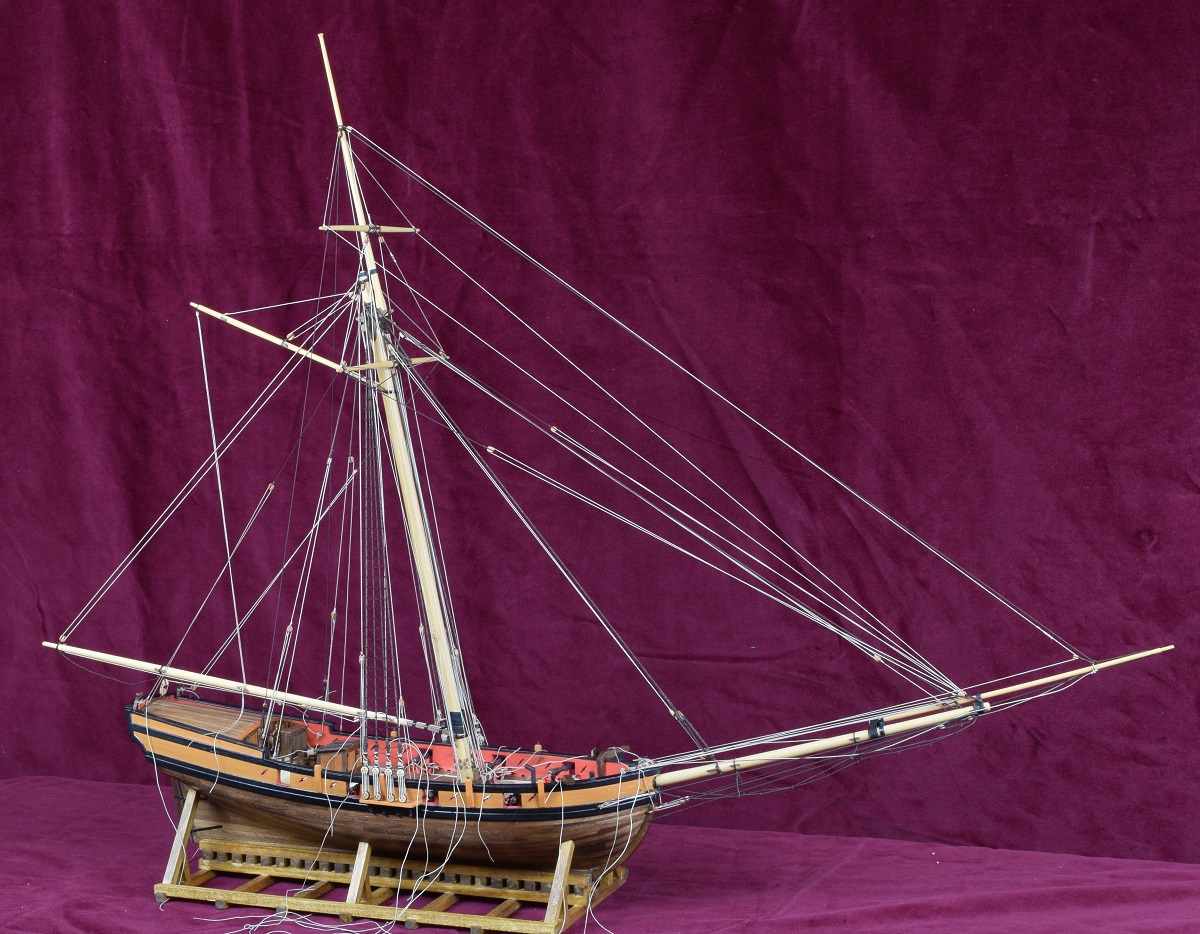 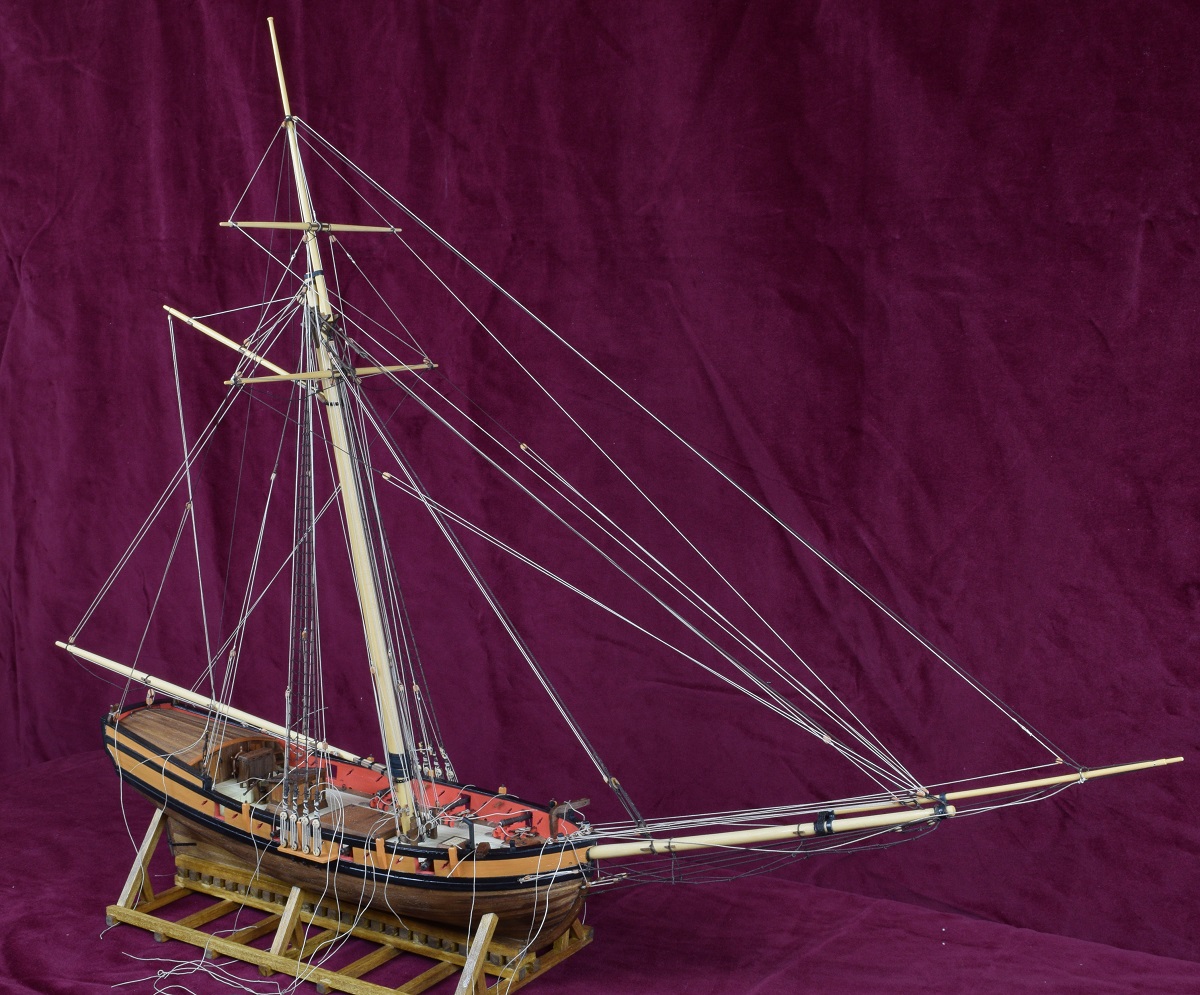 All the blocks and sheaves work. All the parts are actually held in place by the rigging, and it's all functional, in that I can adjust the rigging however I want. I can raise or lower the yards, and adjust the angle of the yards and boom (the Gaff is pinned in place due to the angle for mounting it, but if I cut the pin, it would also be adjustable). If I had sails, the clew lines, in-hauls, and out-hauls would all function to raise and lower the sails. All that's left now is to make the anchors and bouys and rig them to the catheads, clean up all the ropes on the deck after final adjustments, and then make rope coils for all the ropes at their belaying points. Oh, I also need to re-do a few of the swivel cannons before I mount them, and then do overall touch-ups as needed, and make the base for it to sit on. Still a lot of work left to do, but drat it's great to see it looking pretty much done. The Locator fucked around with this message at 22:37 on Dec 7, 2020 |
|
#
?
Dec 7, 2020 22:33
|
|
|
So I made some anchors, and was really happy with how they came out...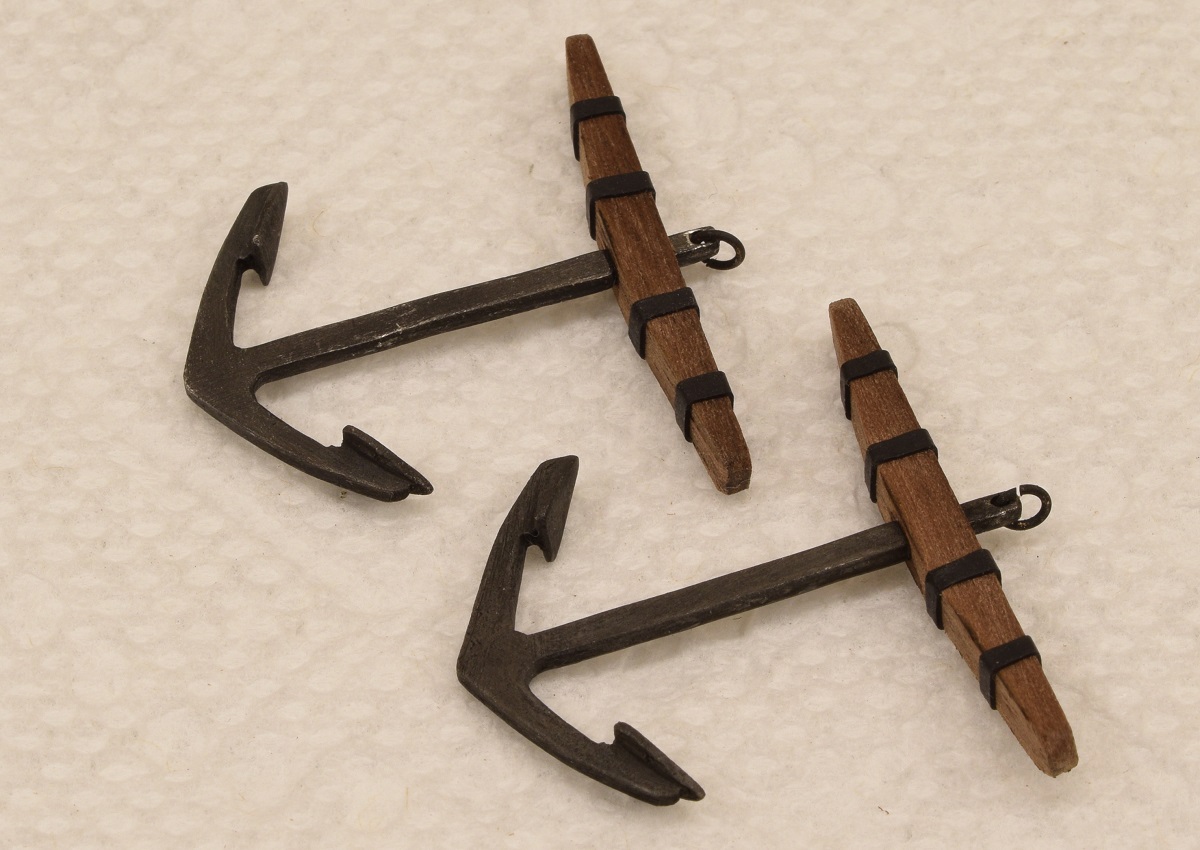 Right up until I posted that picture, and then realized that I made them completely wrong, so had to tear them apart and remake them. 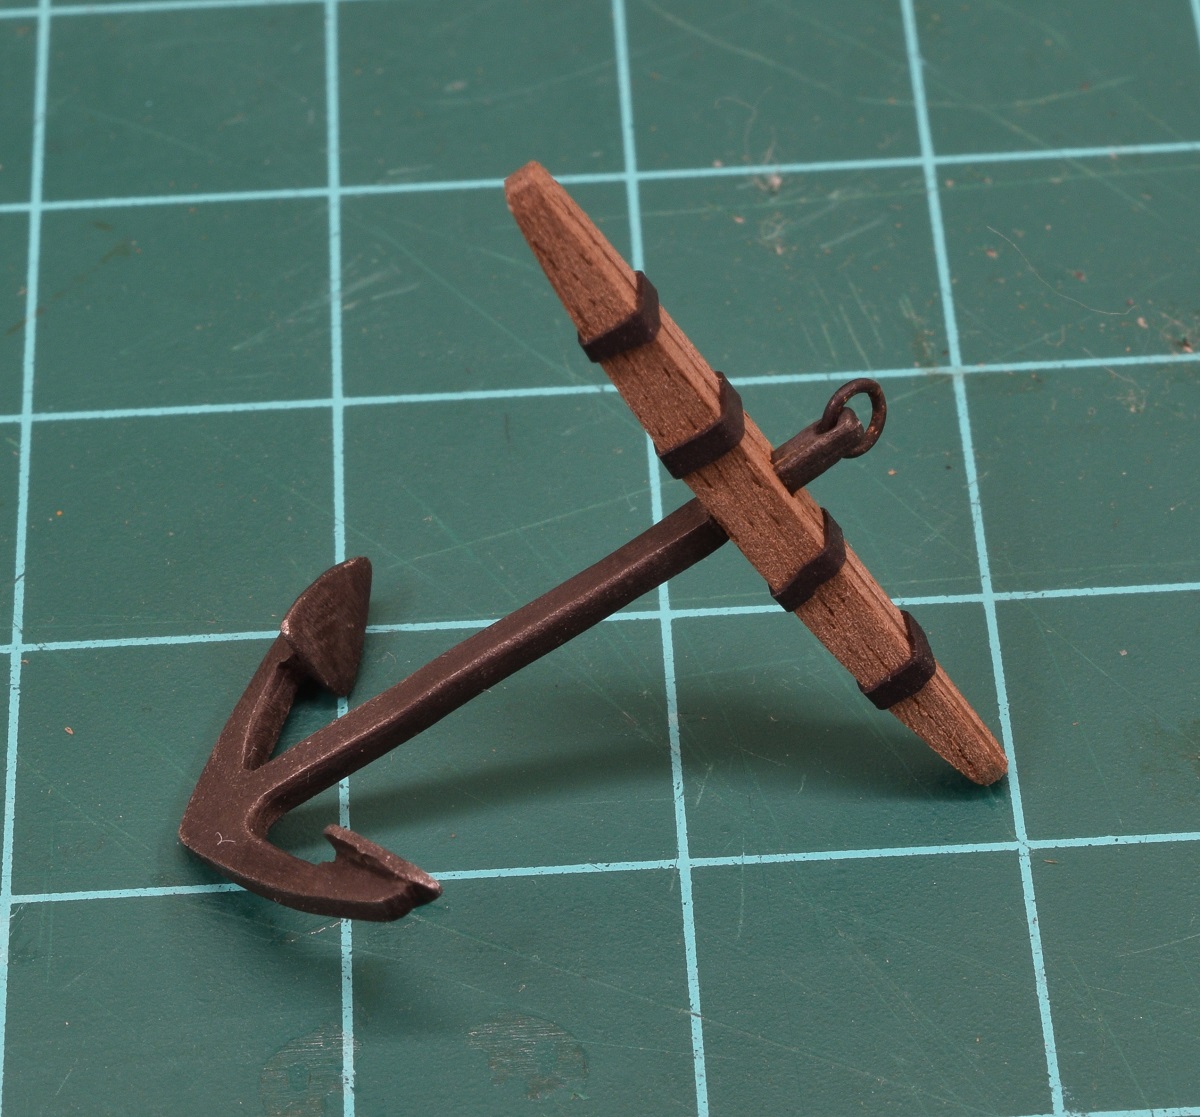 I've discovered that I don't really like rope coils very much. Seems like a great thing to dislike given my subject choices, hahaha.. In any case, I'm working on getting a jig that makes coils I like, and I think I'm getting somewhat close, but still not there. I started working at the stern, and I'm done with the stern, quarter-deck, boom, and shrouds now. 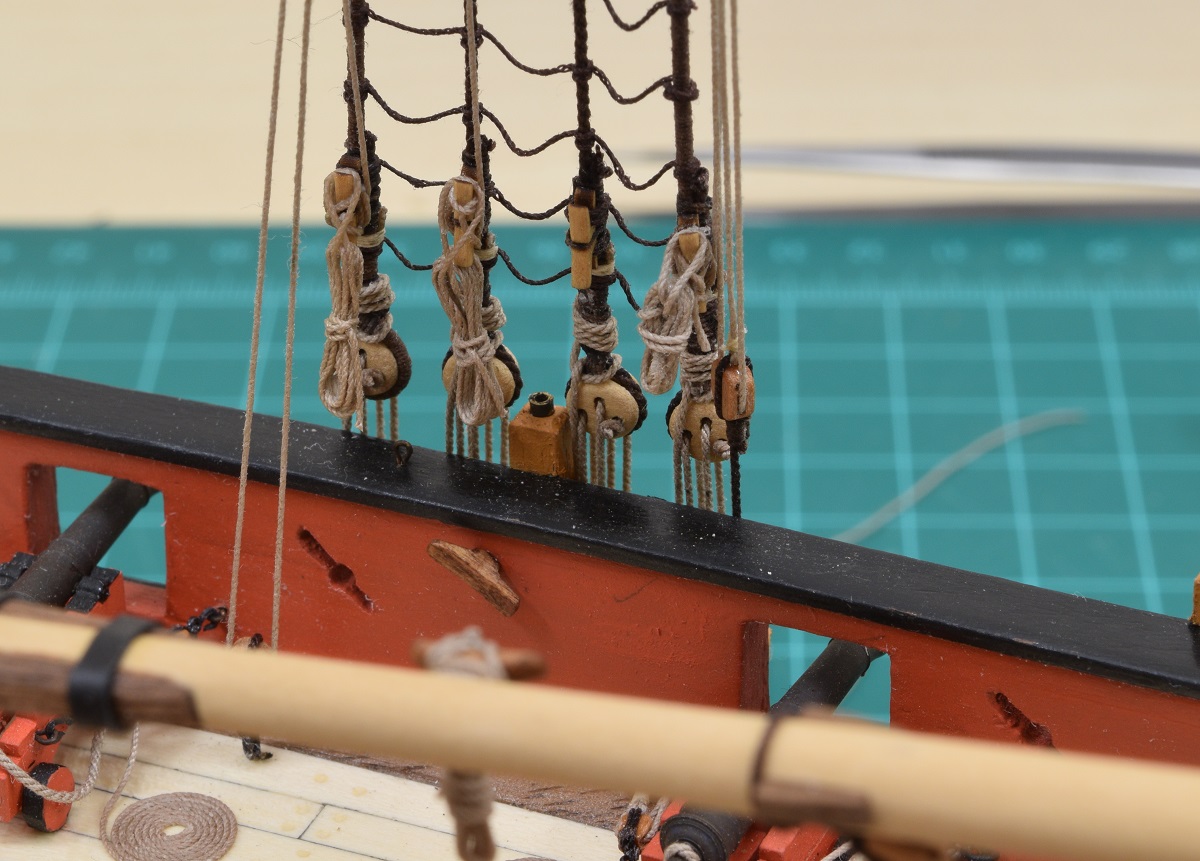 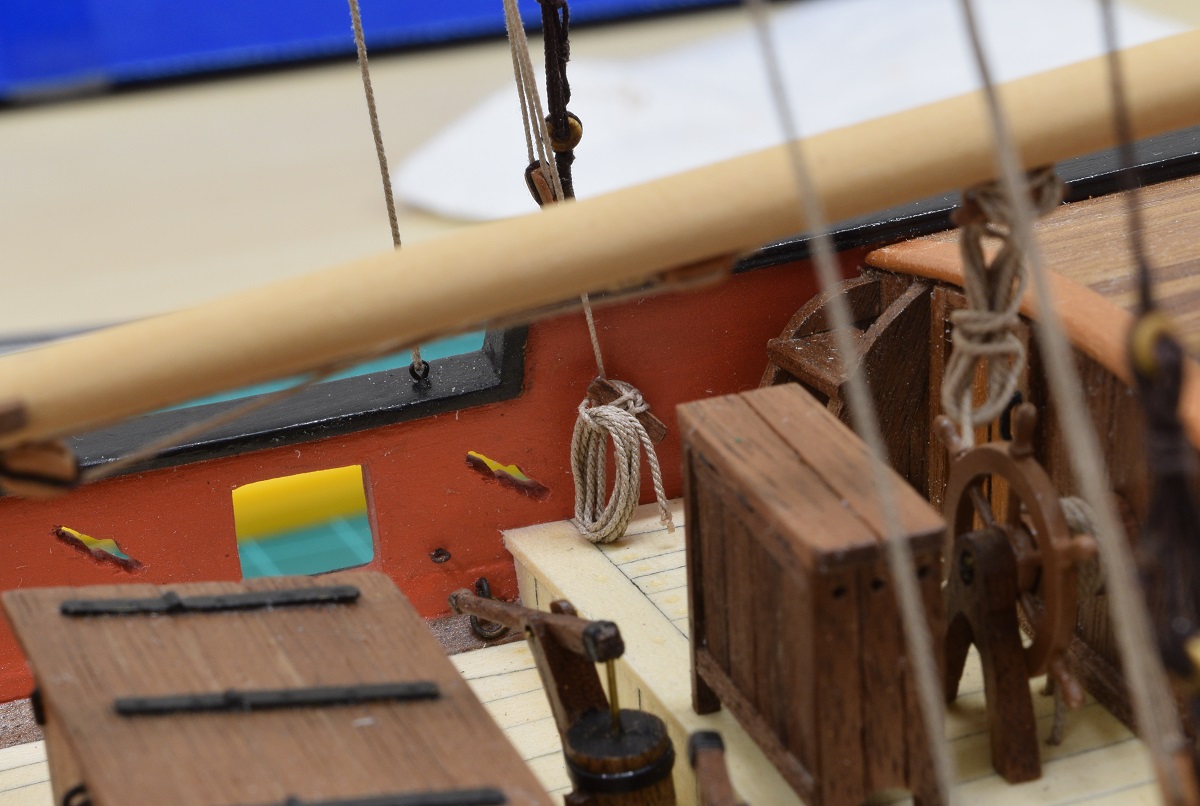 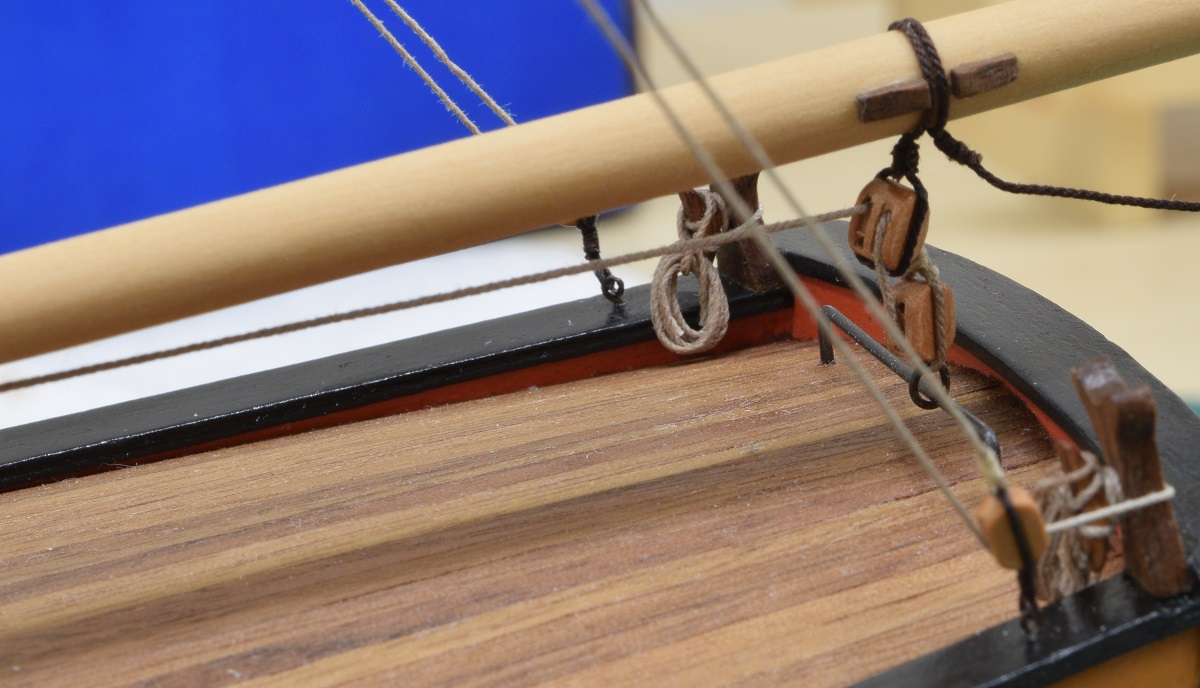 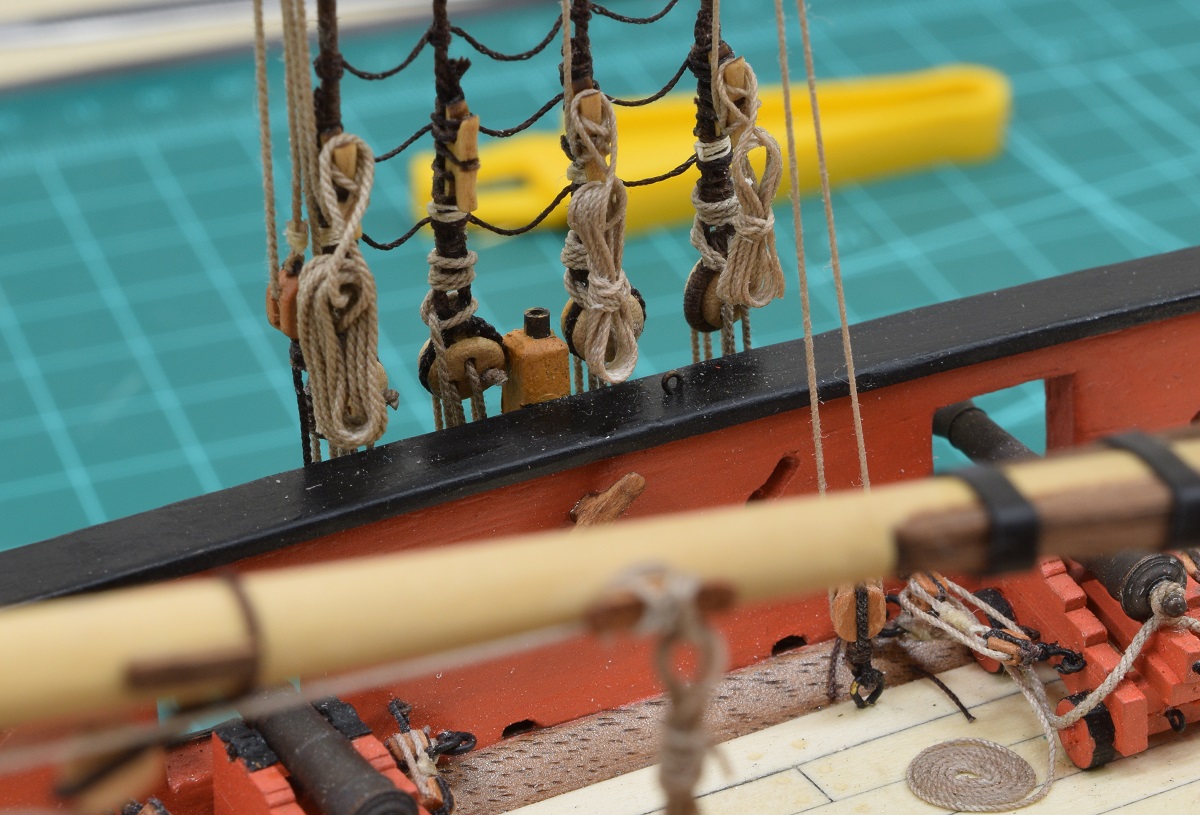  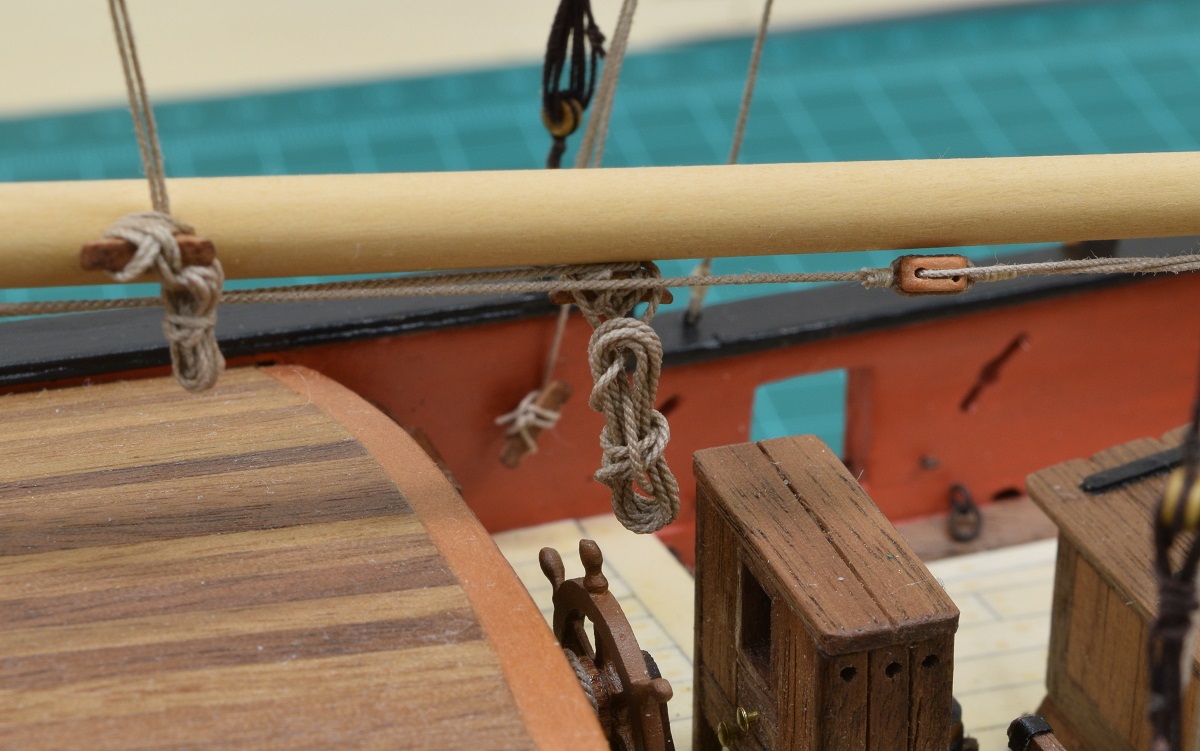 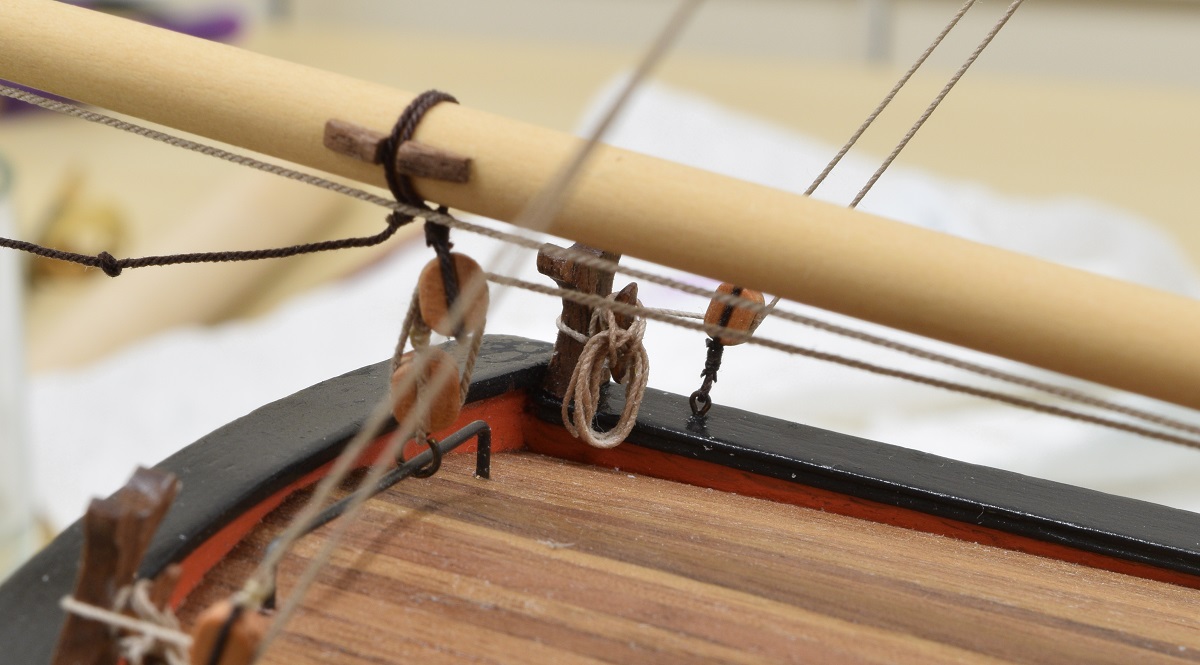 The coils are taking much longer than I expected them to, but oh well. Getting a bit better as I go along.
|
|
#
?
Dec 8, 2020 18:30
|
|
|
Here is the extremely simple jig that I use for making rope coils (after a few iterations). The brass tubing is cut at a 45 degree angle at one end and just stabbed into the balsa block, so adjusting the size of the coils is a simple matter of moving them to different spots on the block. Also, finally a use for balsa wood! 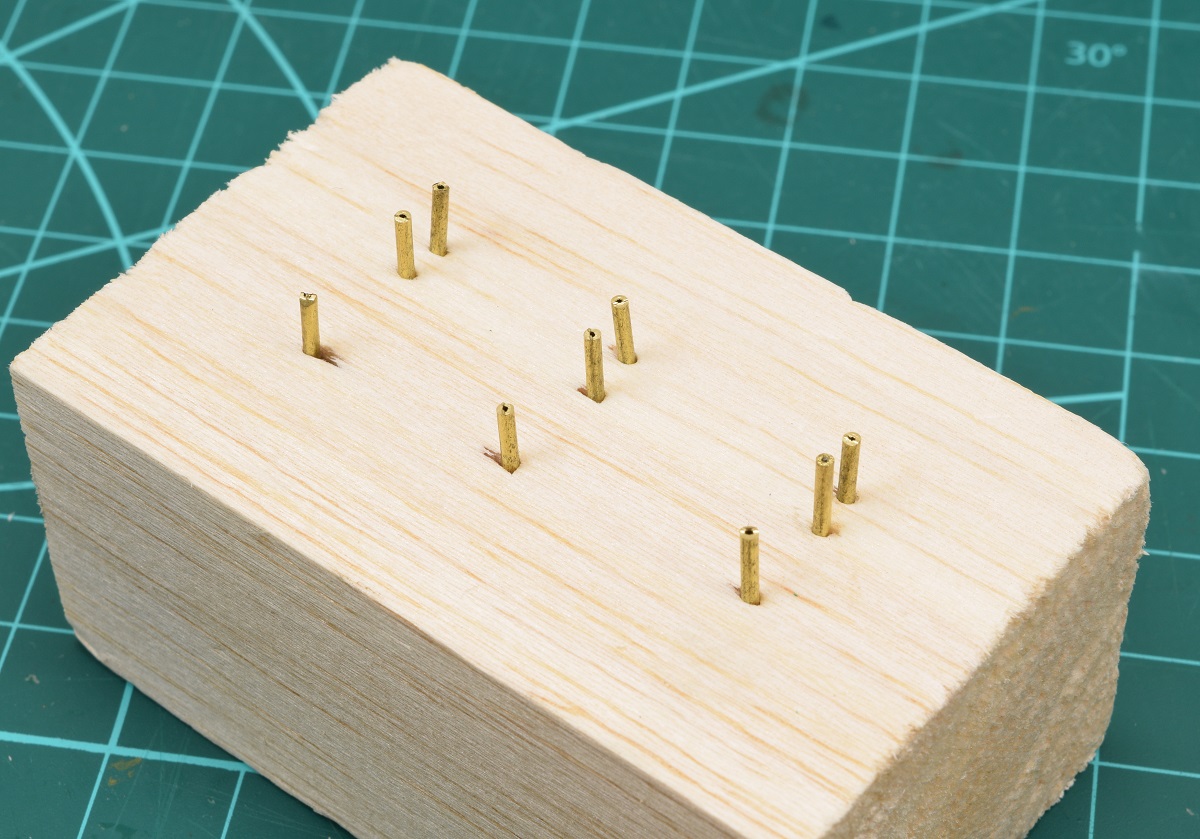 I put a scrap plank underneath to keep the rope off of the balsa block for a couple of reasons. So that the rope doesn't stick to the balsa since it's so soft, it's easy to pull up pieces of the balsa that need to be cleaned off. The space underneath allows easy threading of the rope on coils that I want to tie off in the middle. Finally, the space makes it much easier to push the rope off the brass from underneath without messing up the coil. 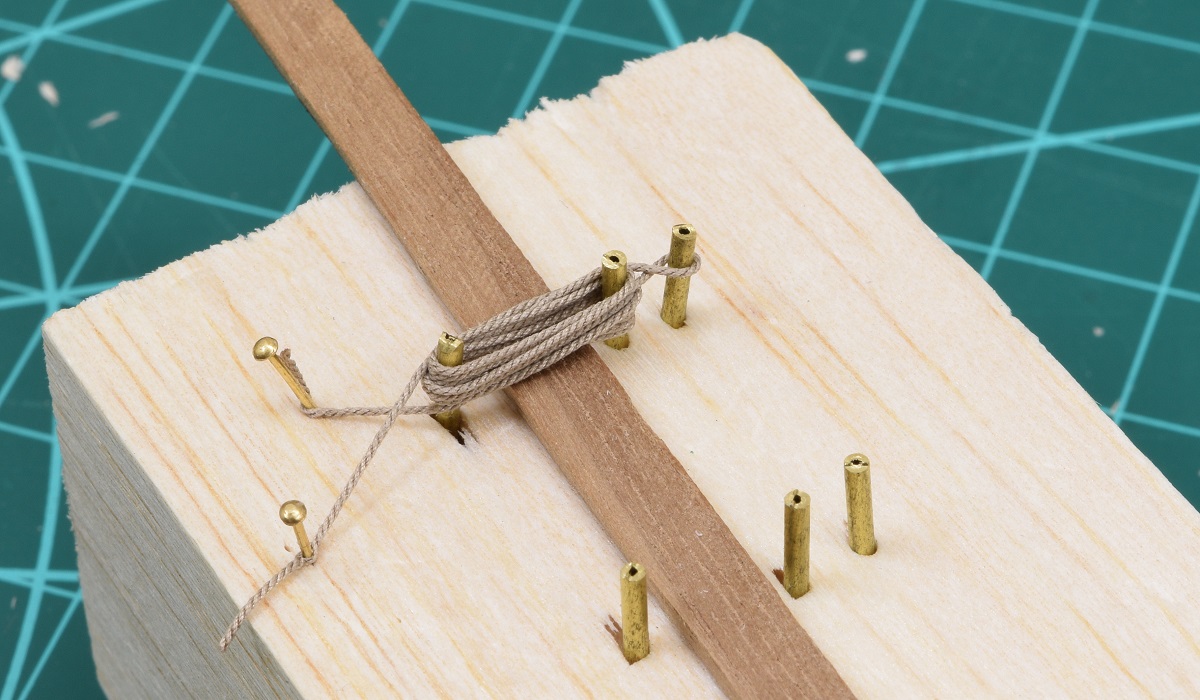 This rope coil I made overly large on purpose to see how it would look sort of folded up against a bulkhead, as there were plenty of coils that were done like this on the ships I saw in San Diego, so I figured I'd try it. Easy enough to pull it off if I decide I don't like it. 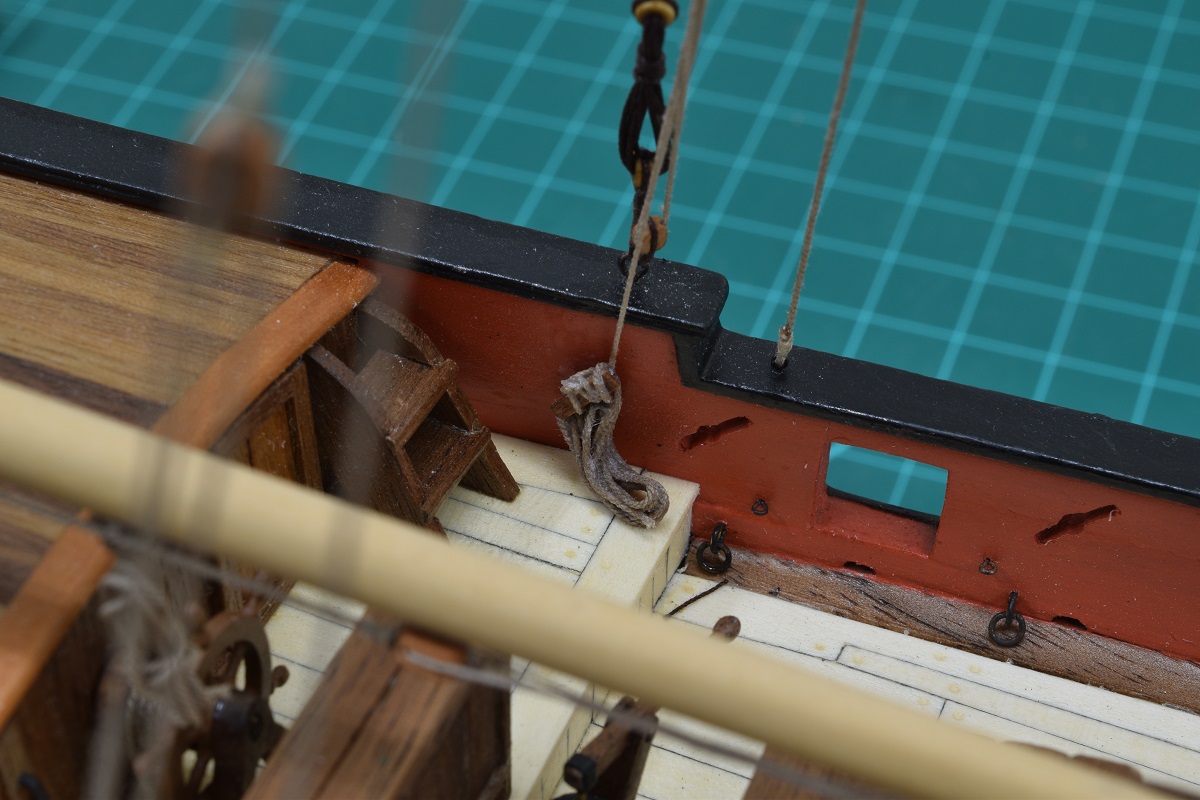 Here is a picture of the little balsa-wood jig in use with 3 coils in various states of the glue soaking in and drying, followed by a couple pictures of the way the base of the mast turned out. The tooth-pick with alligator clamps thing in the photo is holding that last coil in position while it dries, hopefully staying in position when I remove it! 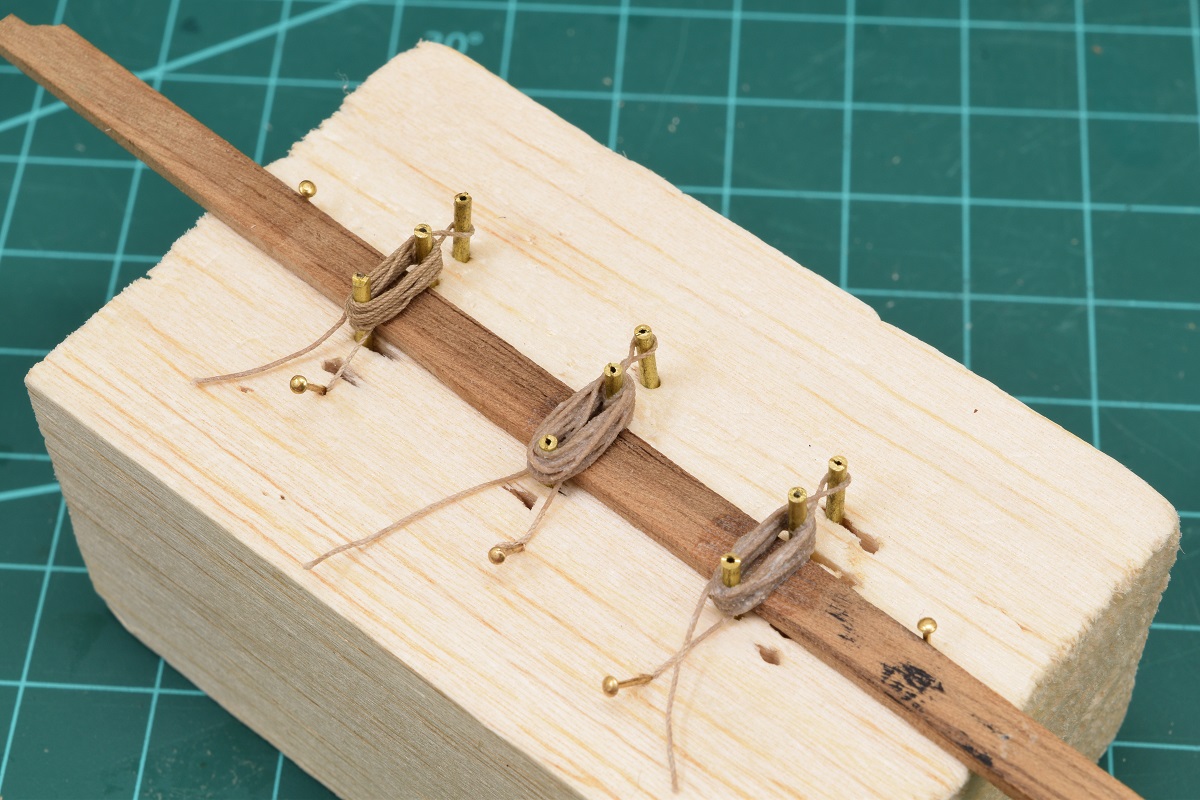  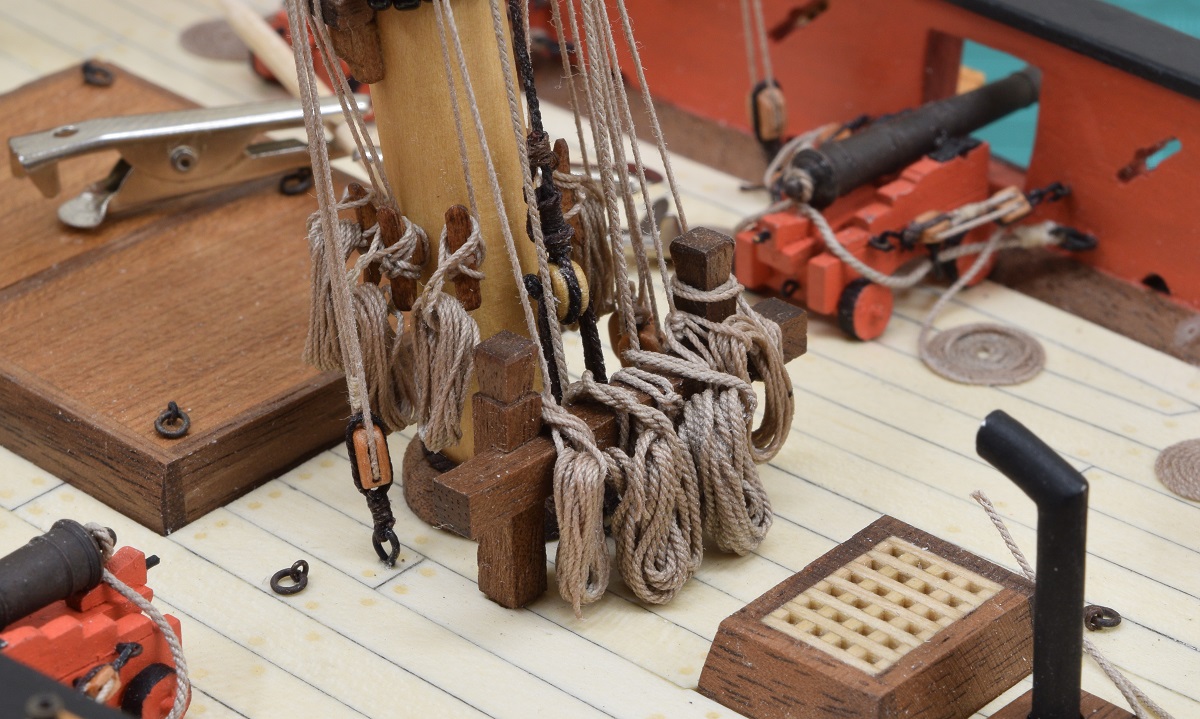 --------- 5 days later ----------- So yea. Rope coils. I don't know why, as they really aren't any more tedious than lots of other things I've done on the ship, but I really had a hard time motivating myself to finish these, but I think the end result is certainly worth the effort expended. I finally finished up the bow tonight. There are 11 lines that terminate at the bow (would be more if I was building this with sails). Here is what it looked like with the lines terminated, but not trimmed, before I started adding the coils. 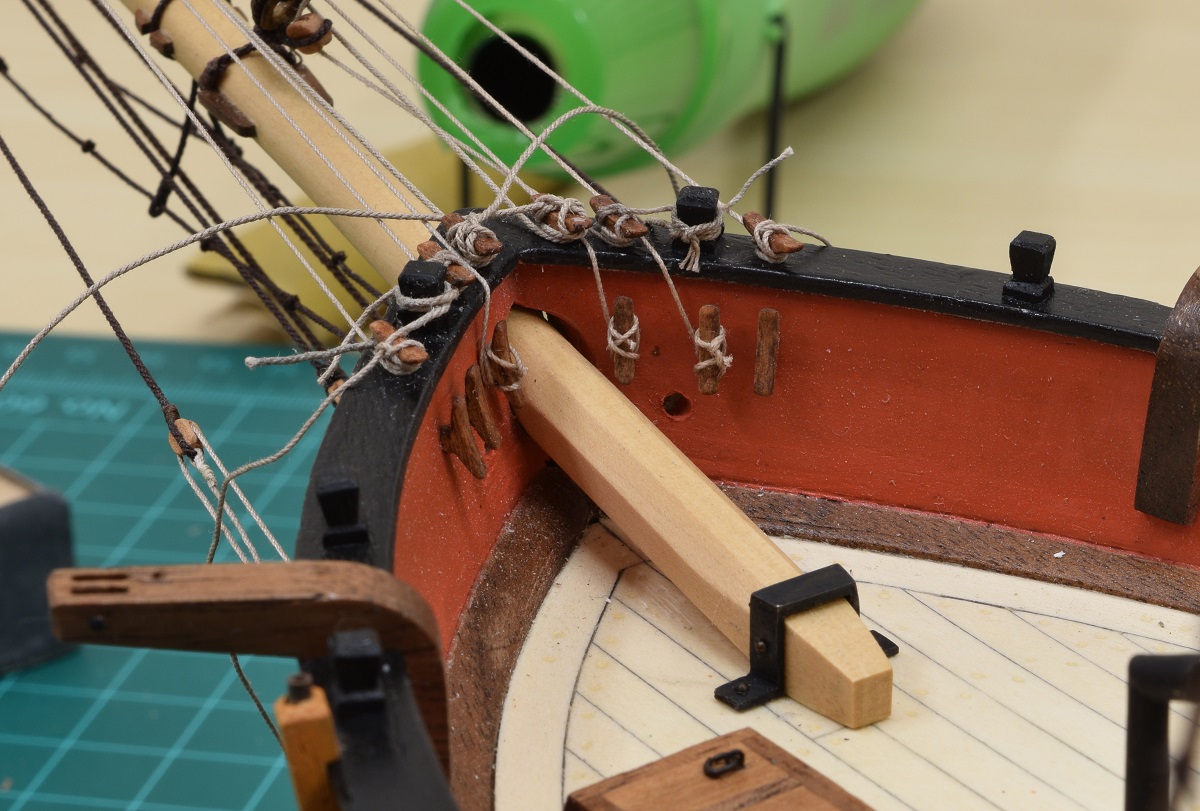 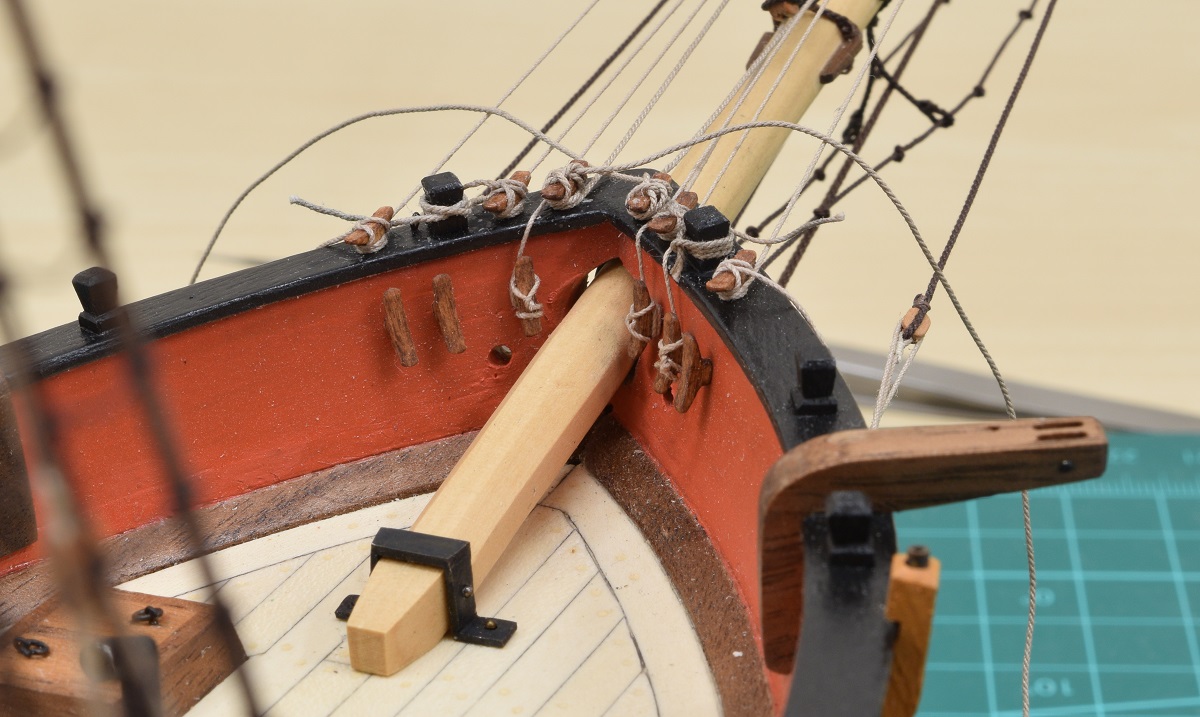 First step was to add the three coils for the lower tier of ropes on the bulkhead. 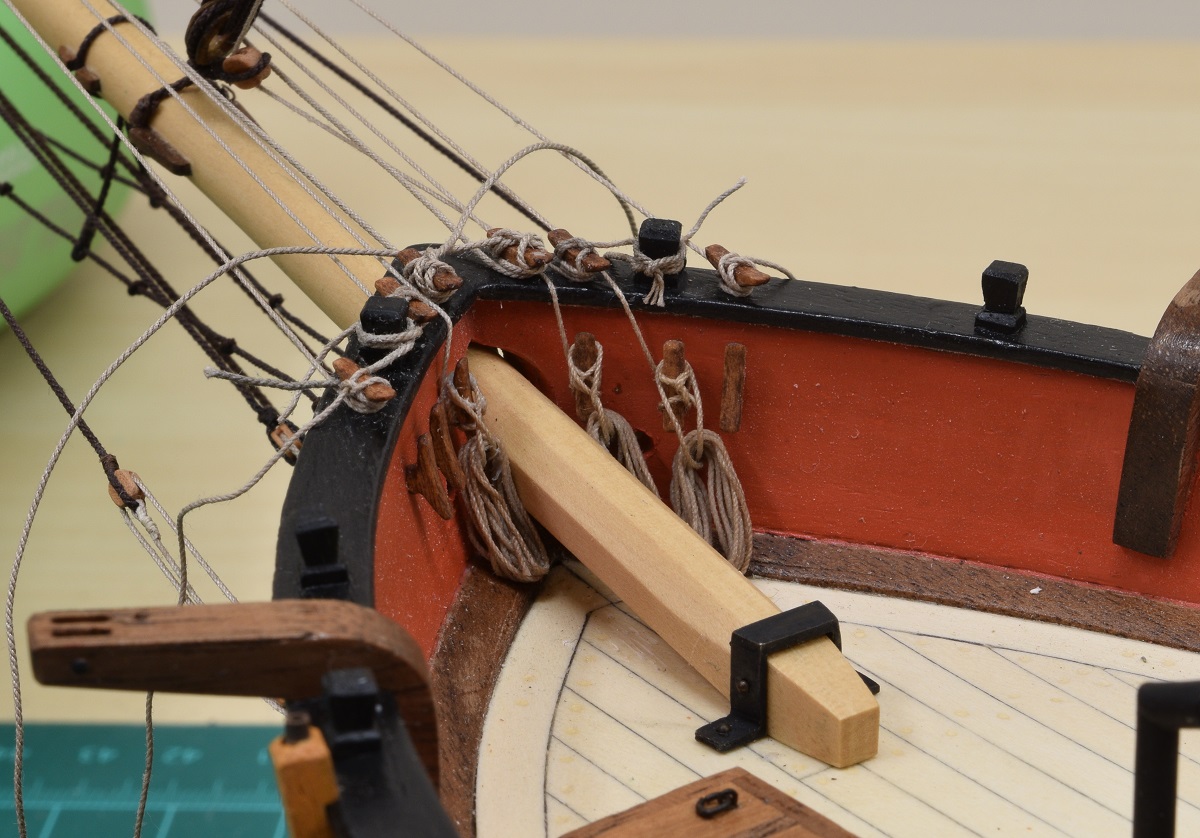 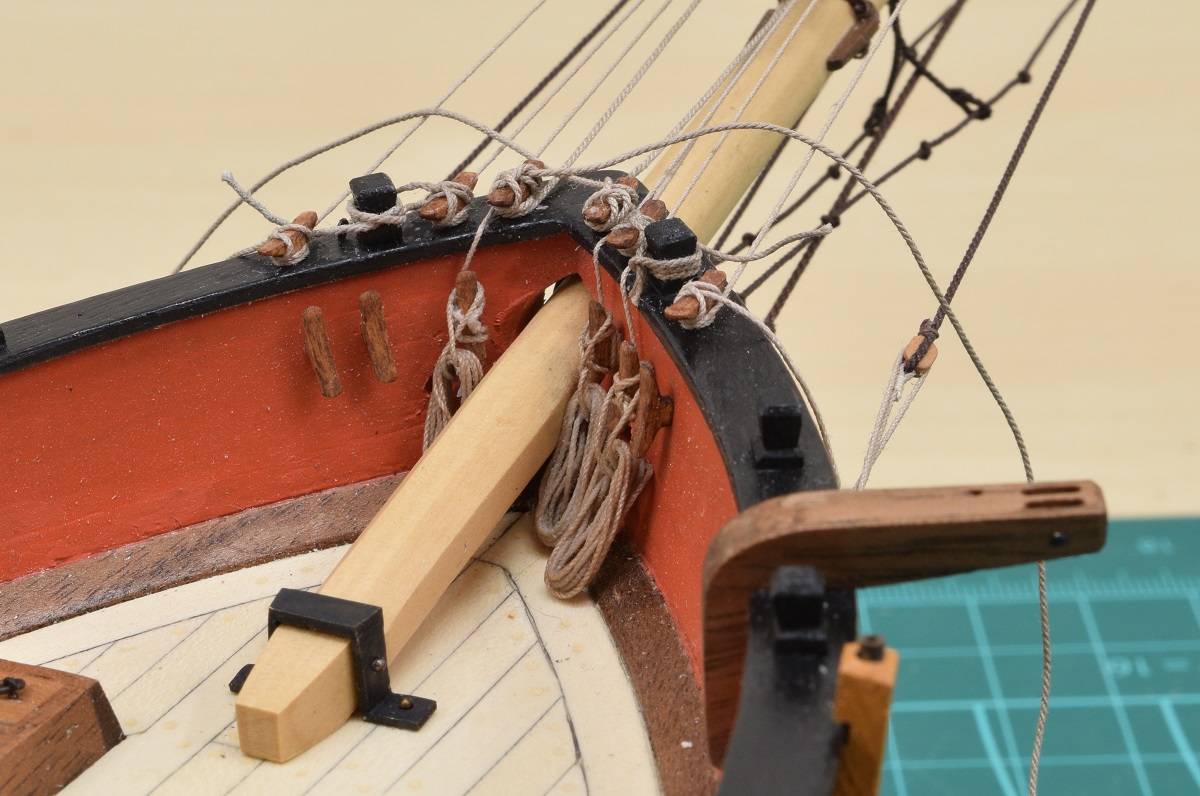 After the lower coils were dry, I started adding the upper coils. There are 8 coils on the upper row of belaying points. 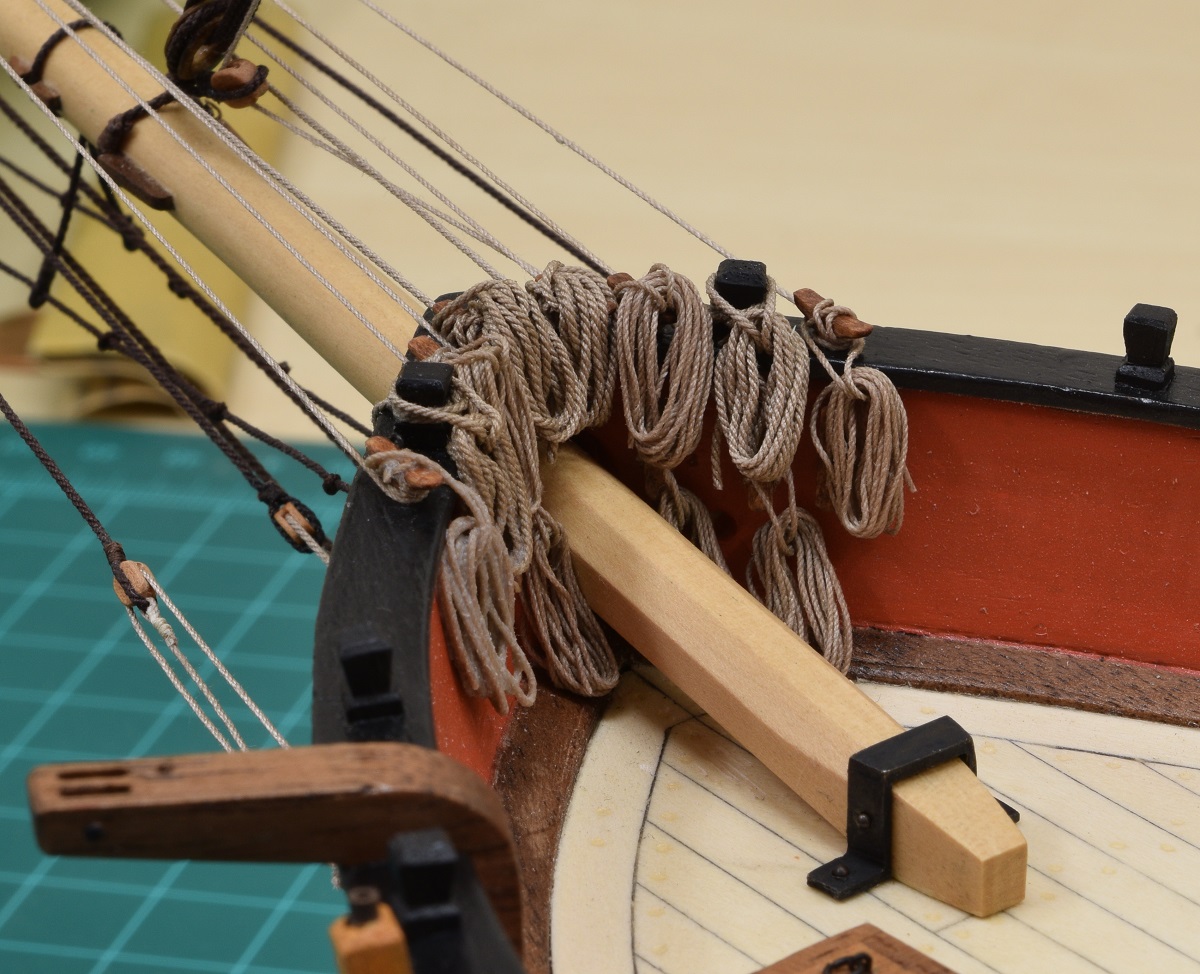 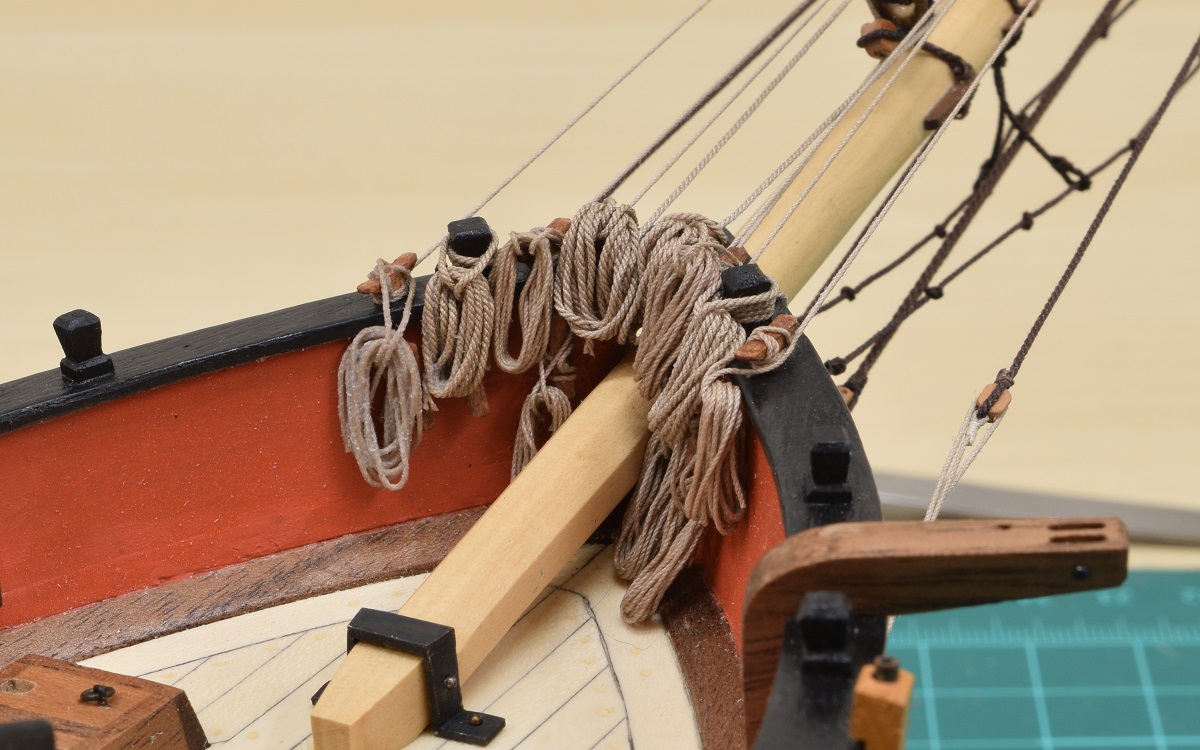 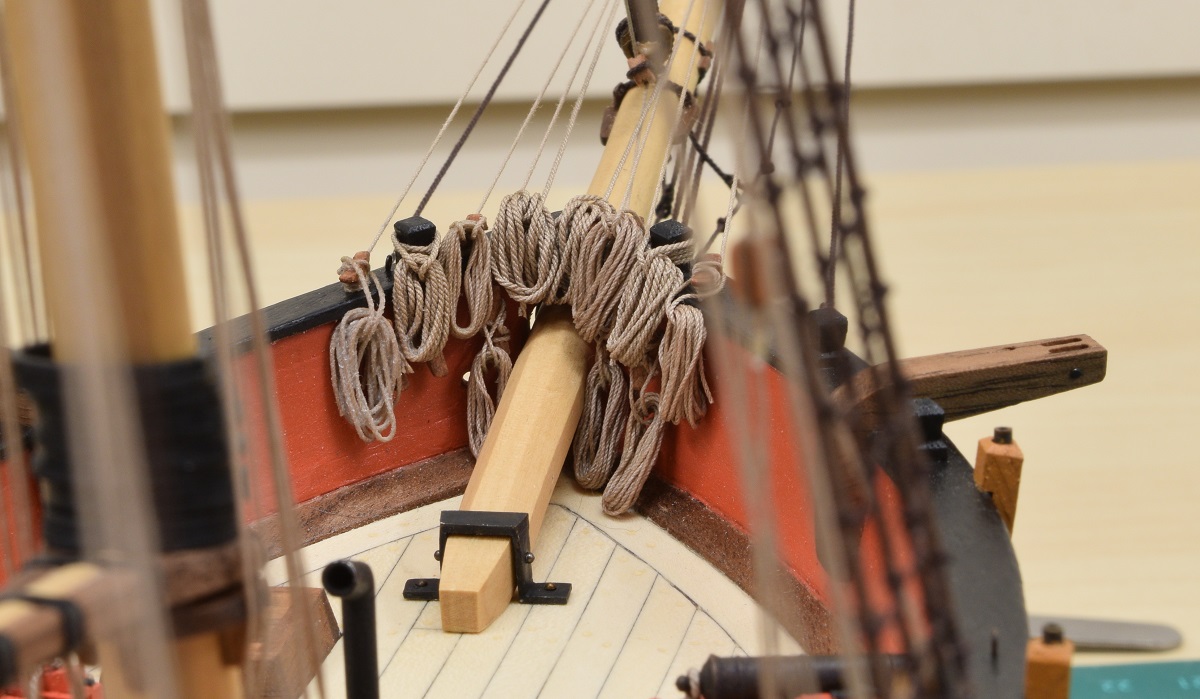 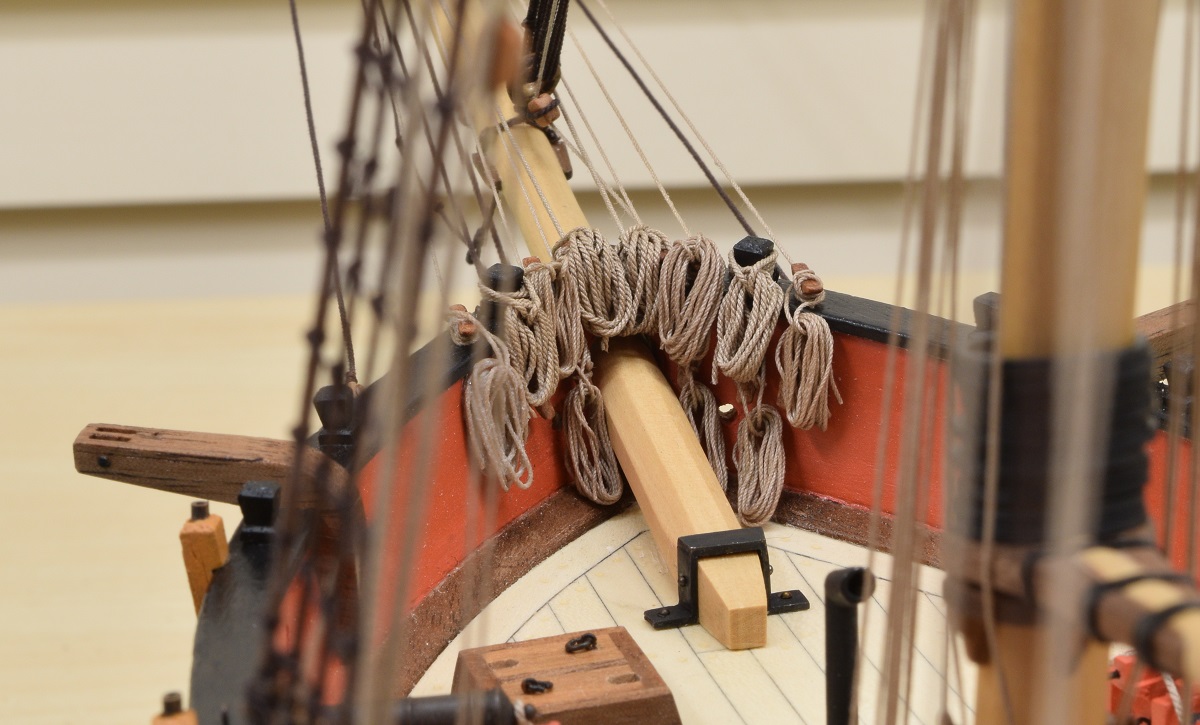 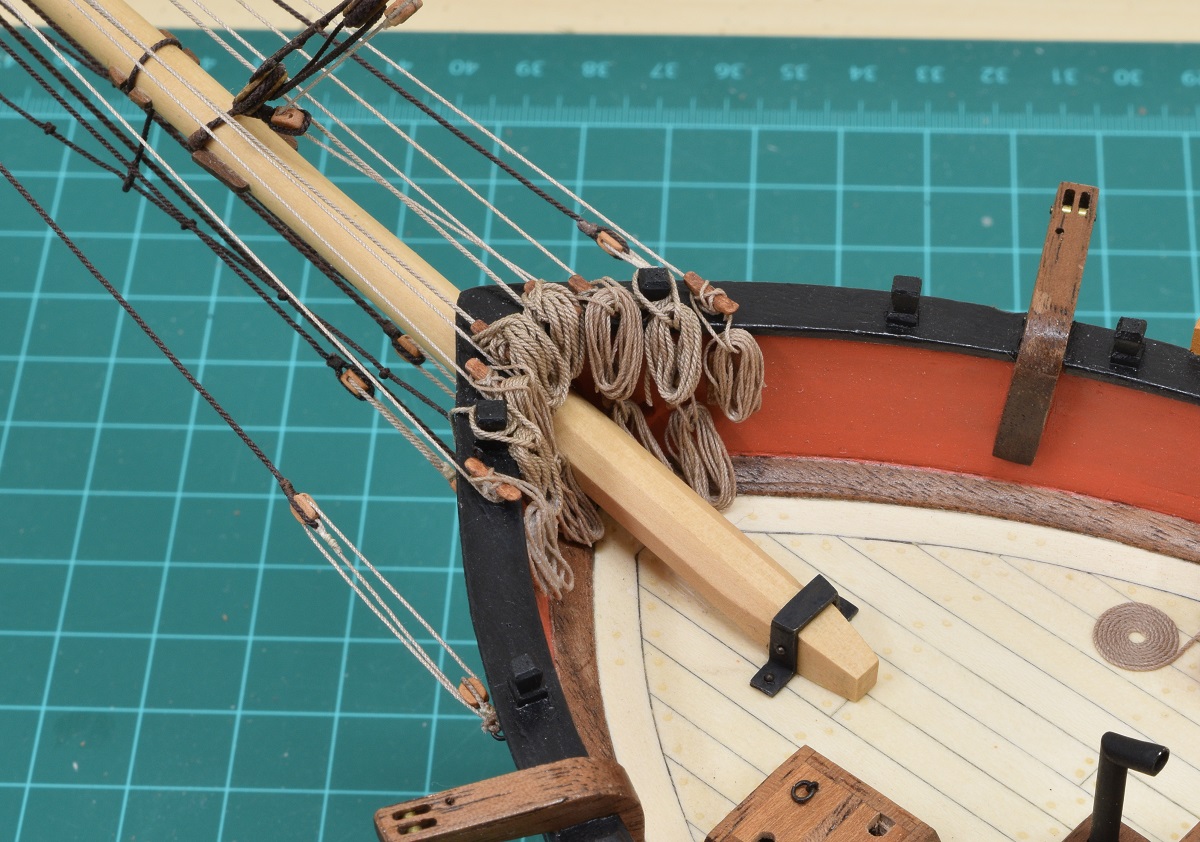 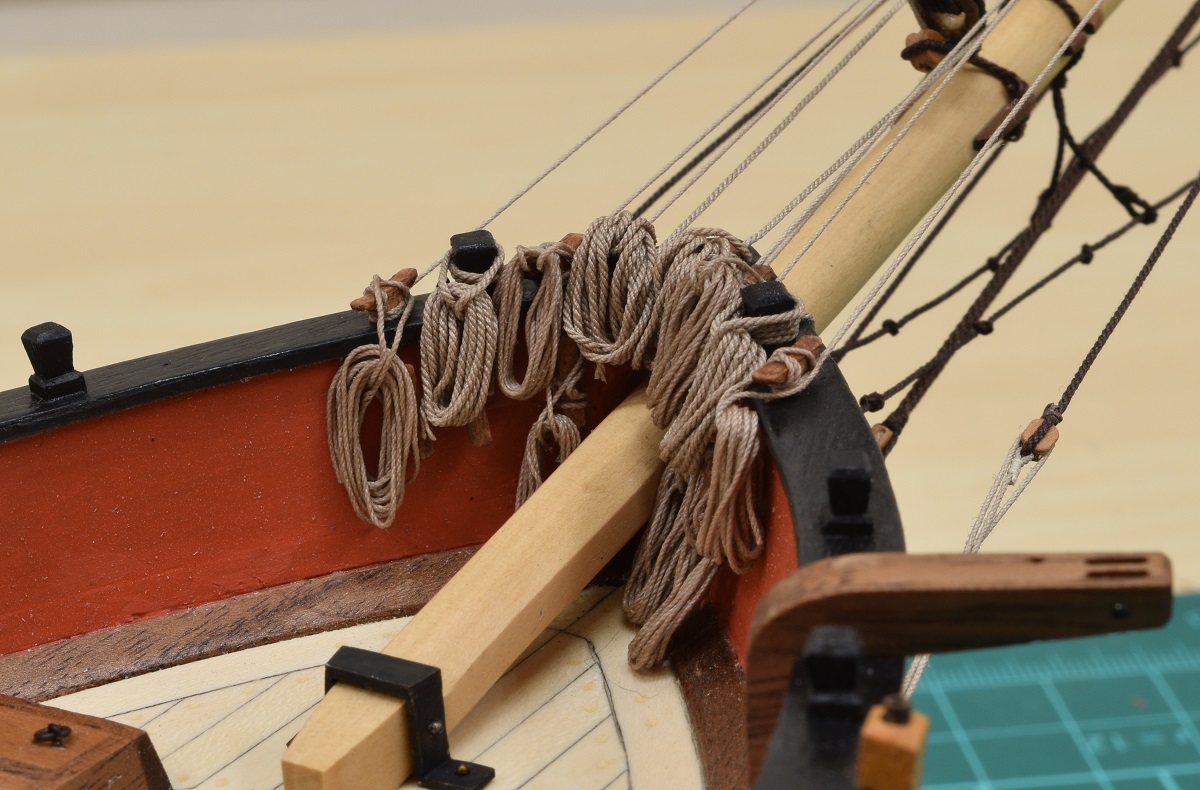 Next I need to rig the anchors up, which of course means making a couple of buoys and then rigging the catheads to attach to the anchor rings. I need to decide whether to rig them hanging, or lashed to the timberheads. I might do one of each. Then of course, I have to make coils for all 4 of those ropes, and then coil the main anchor cable on the deck after running them through the hawse holes. Once that's done, I have to fix the few swivel guns that are still not fixed, and I'll be done with the ship (but not the display base).
|
|
#
?
Dec 9, 2020 20:57
|
|
|
Heading towards the finish line, I broke out the soldering stuff and worked on fixing my swivel guns. I had bad solder joints that broke on three of them, which of course needed to be repaired. In the process of fixing 3, I broke 2 again, which is pretty much how all of my soldering on the swivel guns has gone, but after a few more attempts, I got them all together and the joints seem to be good now. I re-blackened the newly repaired guns, and now all 8 swivels are pretty much ready to go on the ship after the anchor's are finished.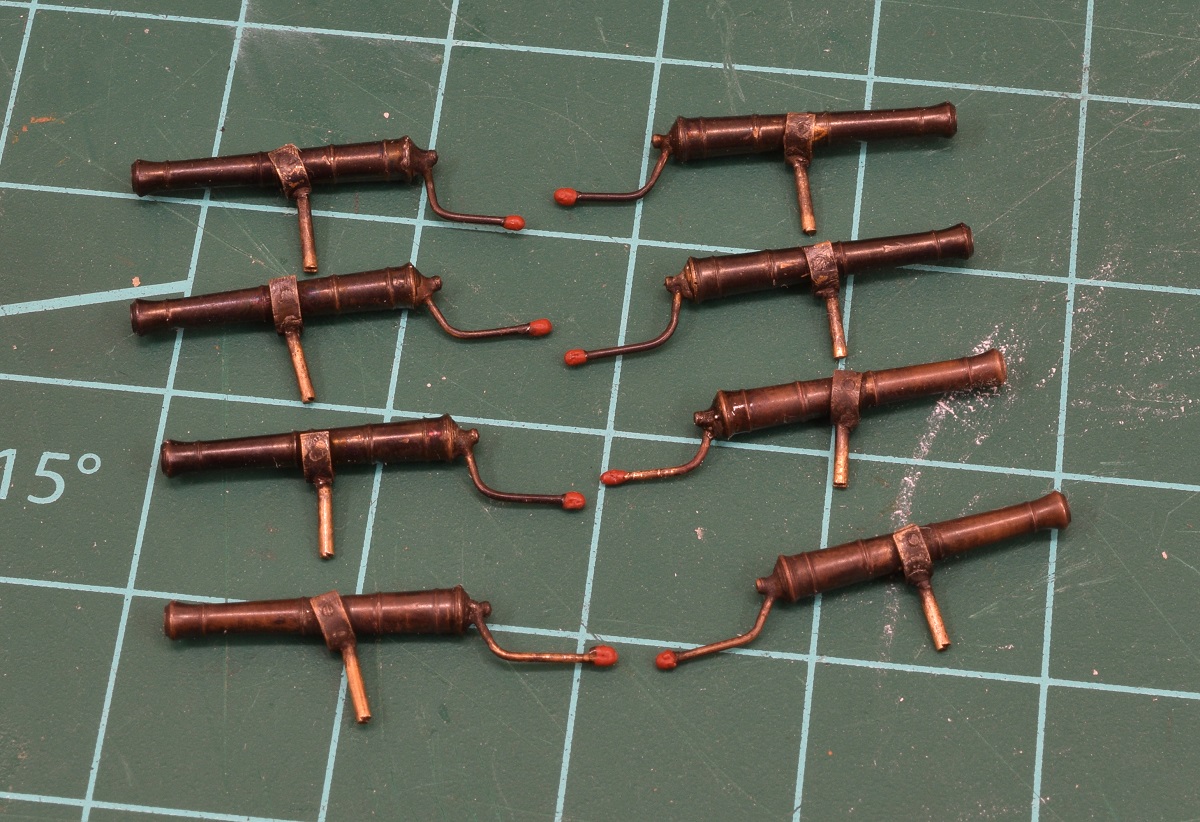 Anchors on these ships were attached to bouys so that they could be pulled out of the mud/off the bottom from the bottom end of the anchors. The bouys for the model would be shaped out of wood, painted, and wrapped with a rope 'harness'. 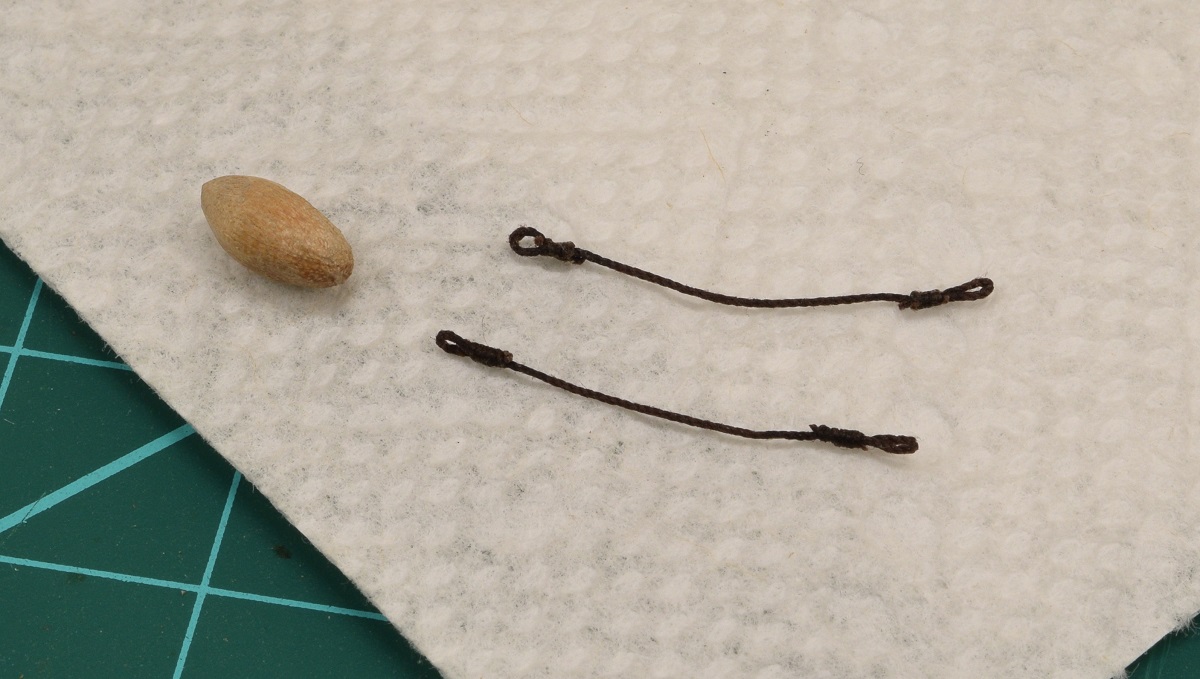 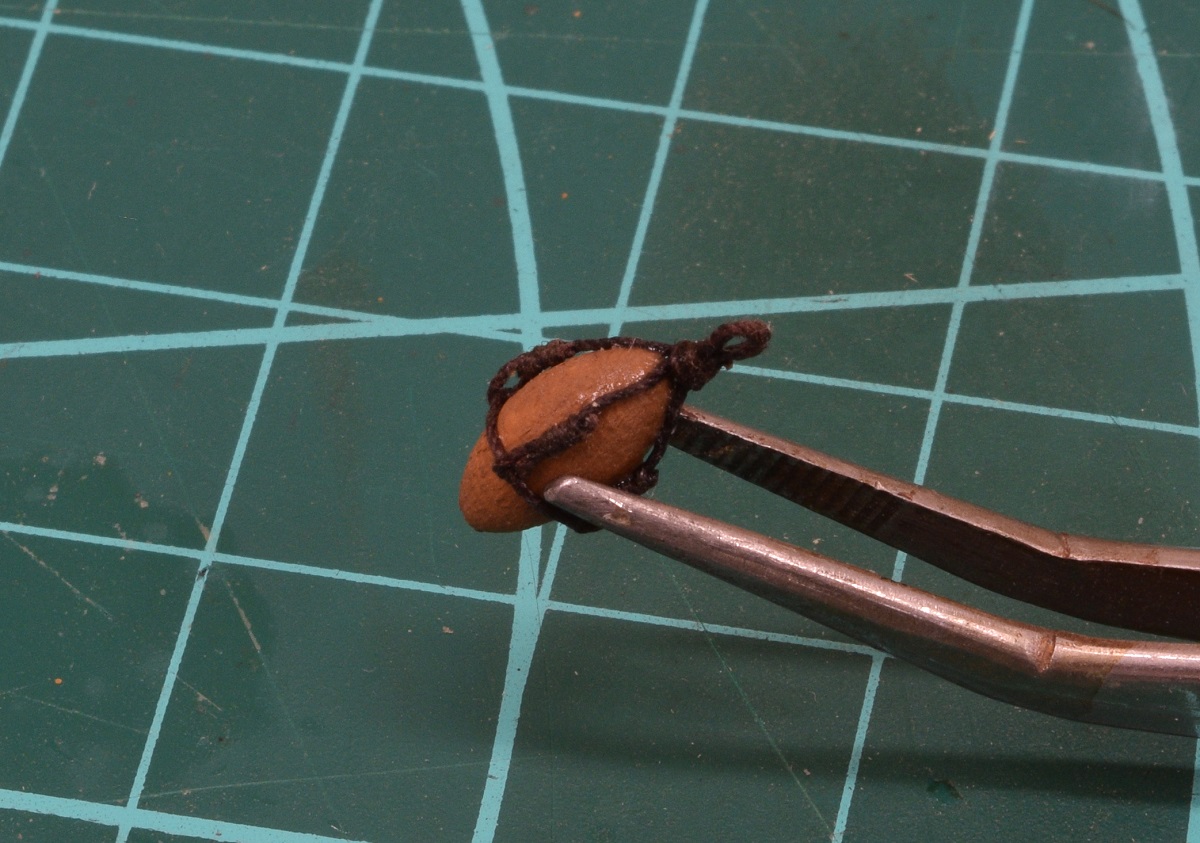 Another similar part of the harness goes on from the other end of the bouy and they are interleaved to secure the bouy completely within the harness. I also finished work on the base that the model would sit on for display. 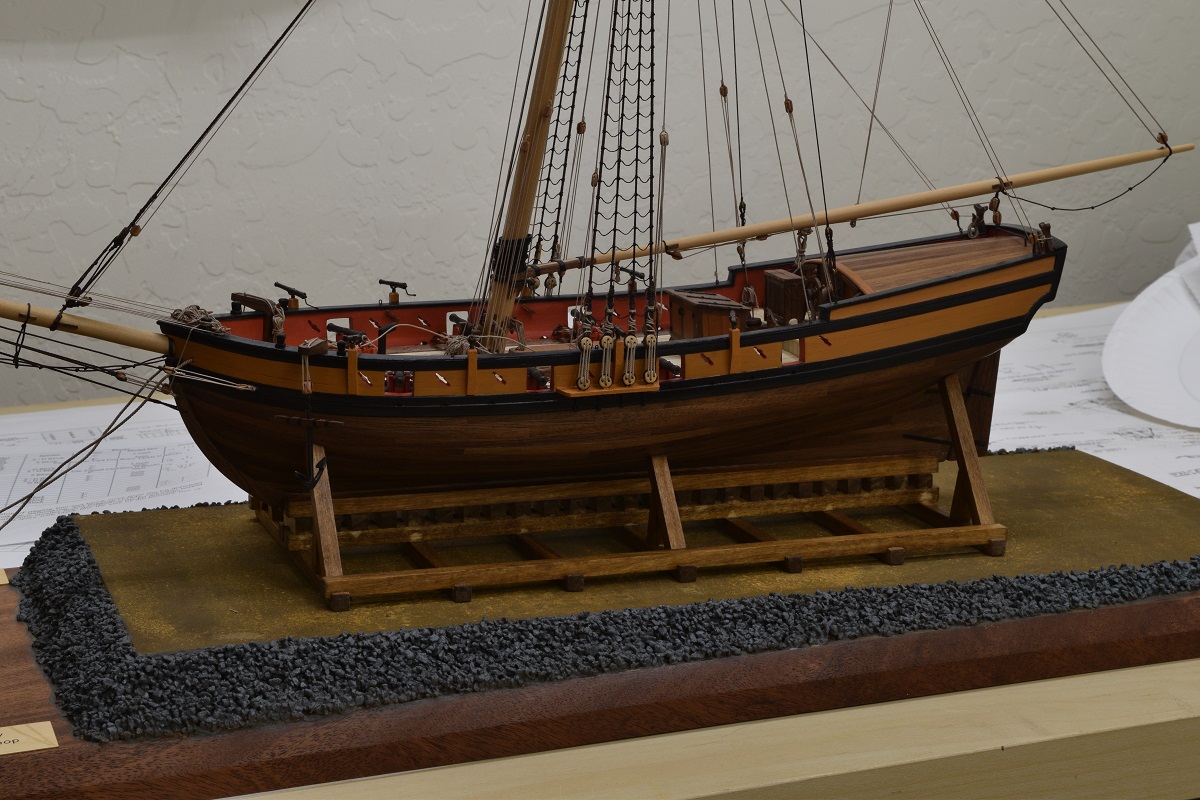 I spent a lot of time messing with the anchors, but I simply couldn't find a position where they looked decent to me when lashed to the timberheads, so I chose to display them hanging from the catheads. I then spent far more time than I probably should have messing with the anchor buoys, and in the end was just unhappy with how they looked when properly attached to the anchors, so I decided to display the ship without them. I may make a couple of rope coils and place them on the empty timberheads where the buoys would be hung and belayed, but other than that, and some inspection and touch-up painting/matting, the Serenity is done. Image dump (bigger than usual - 1600x on the long side)... 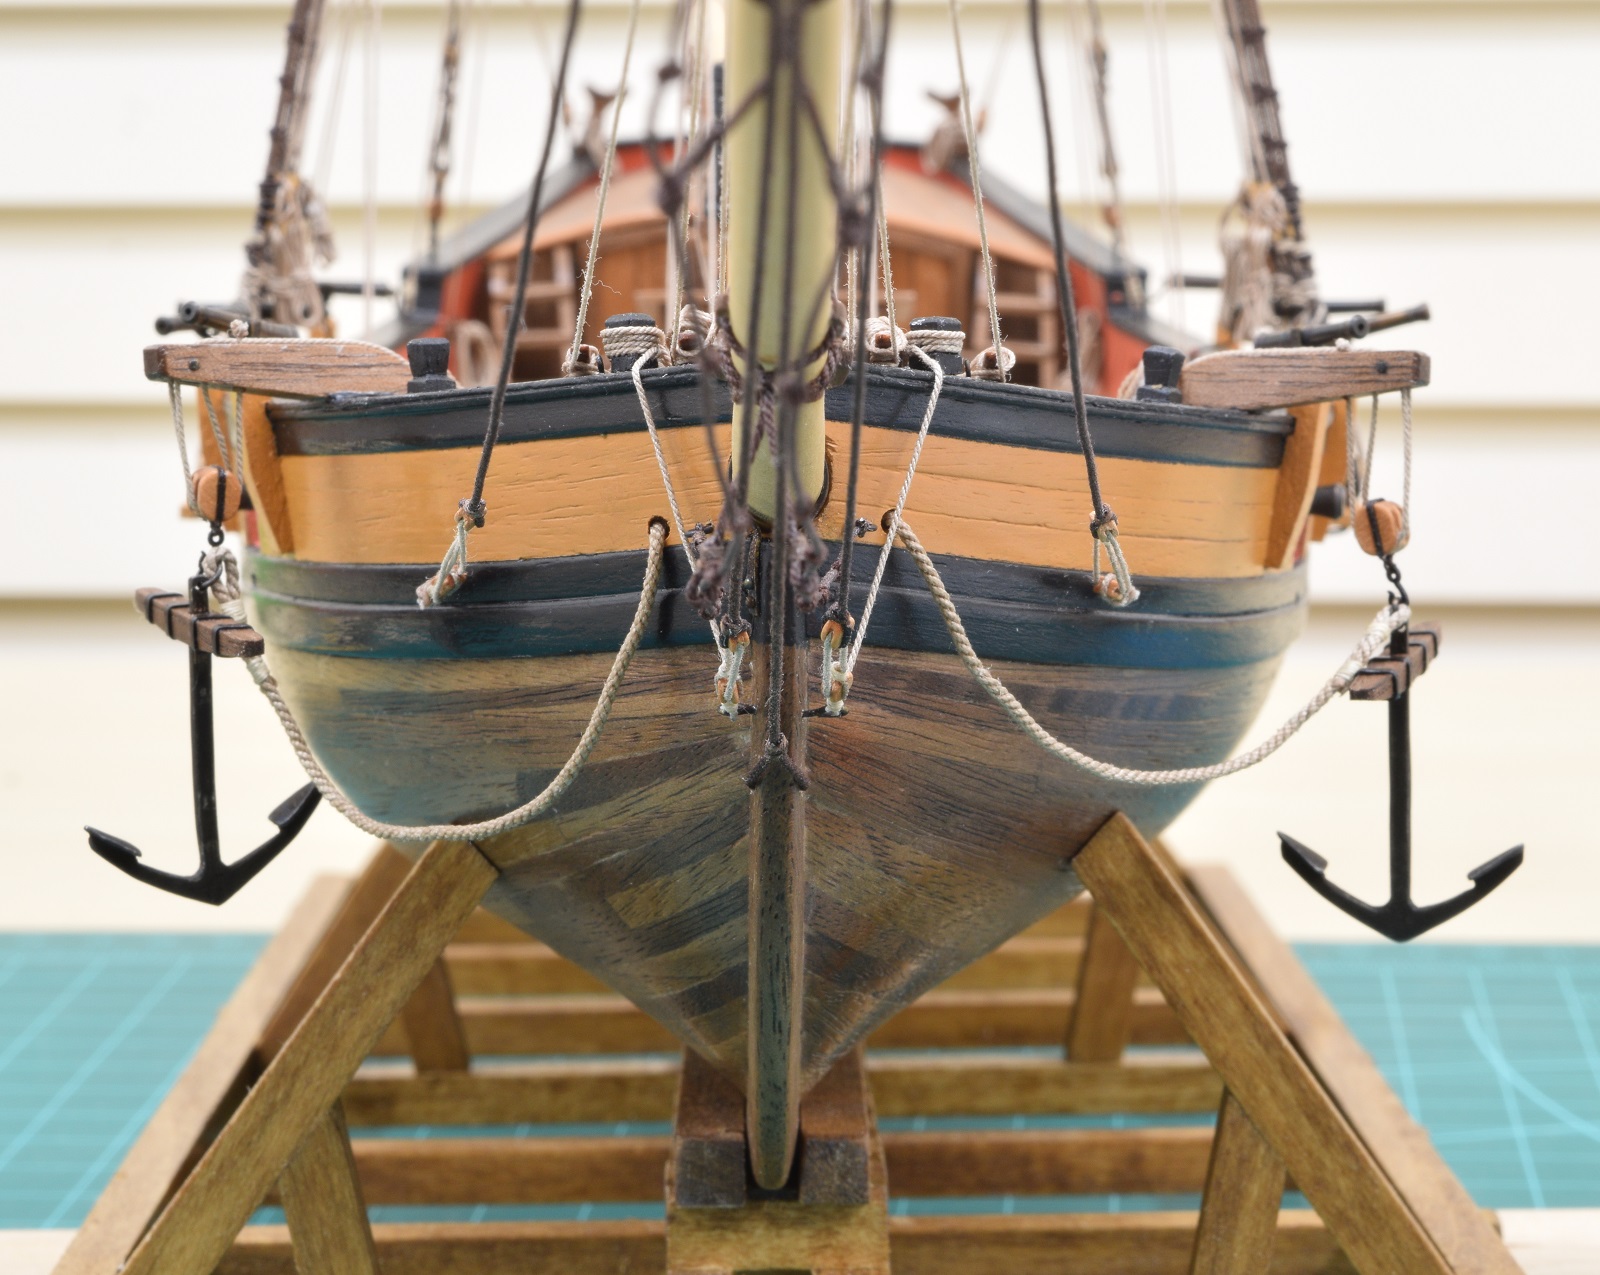 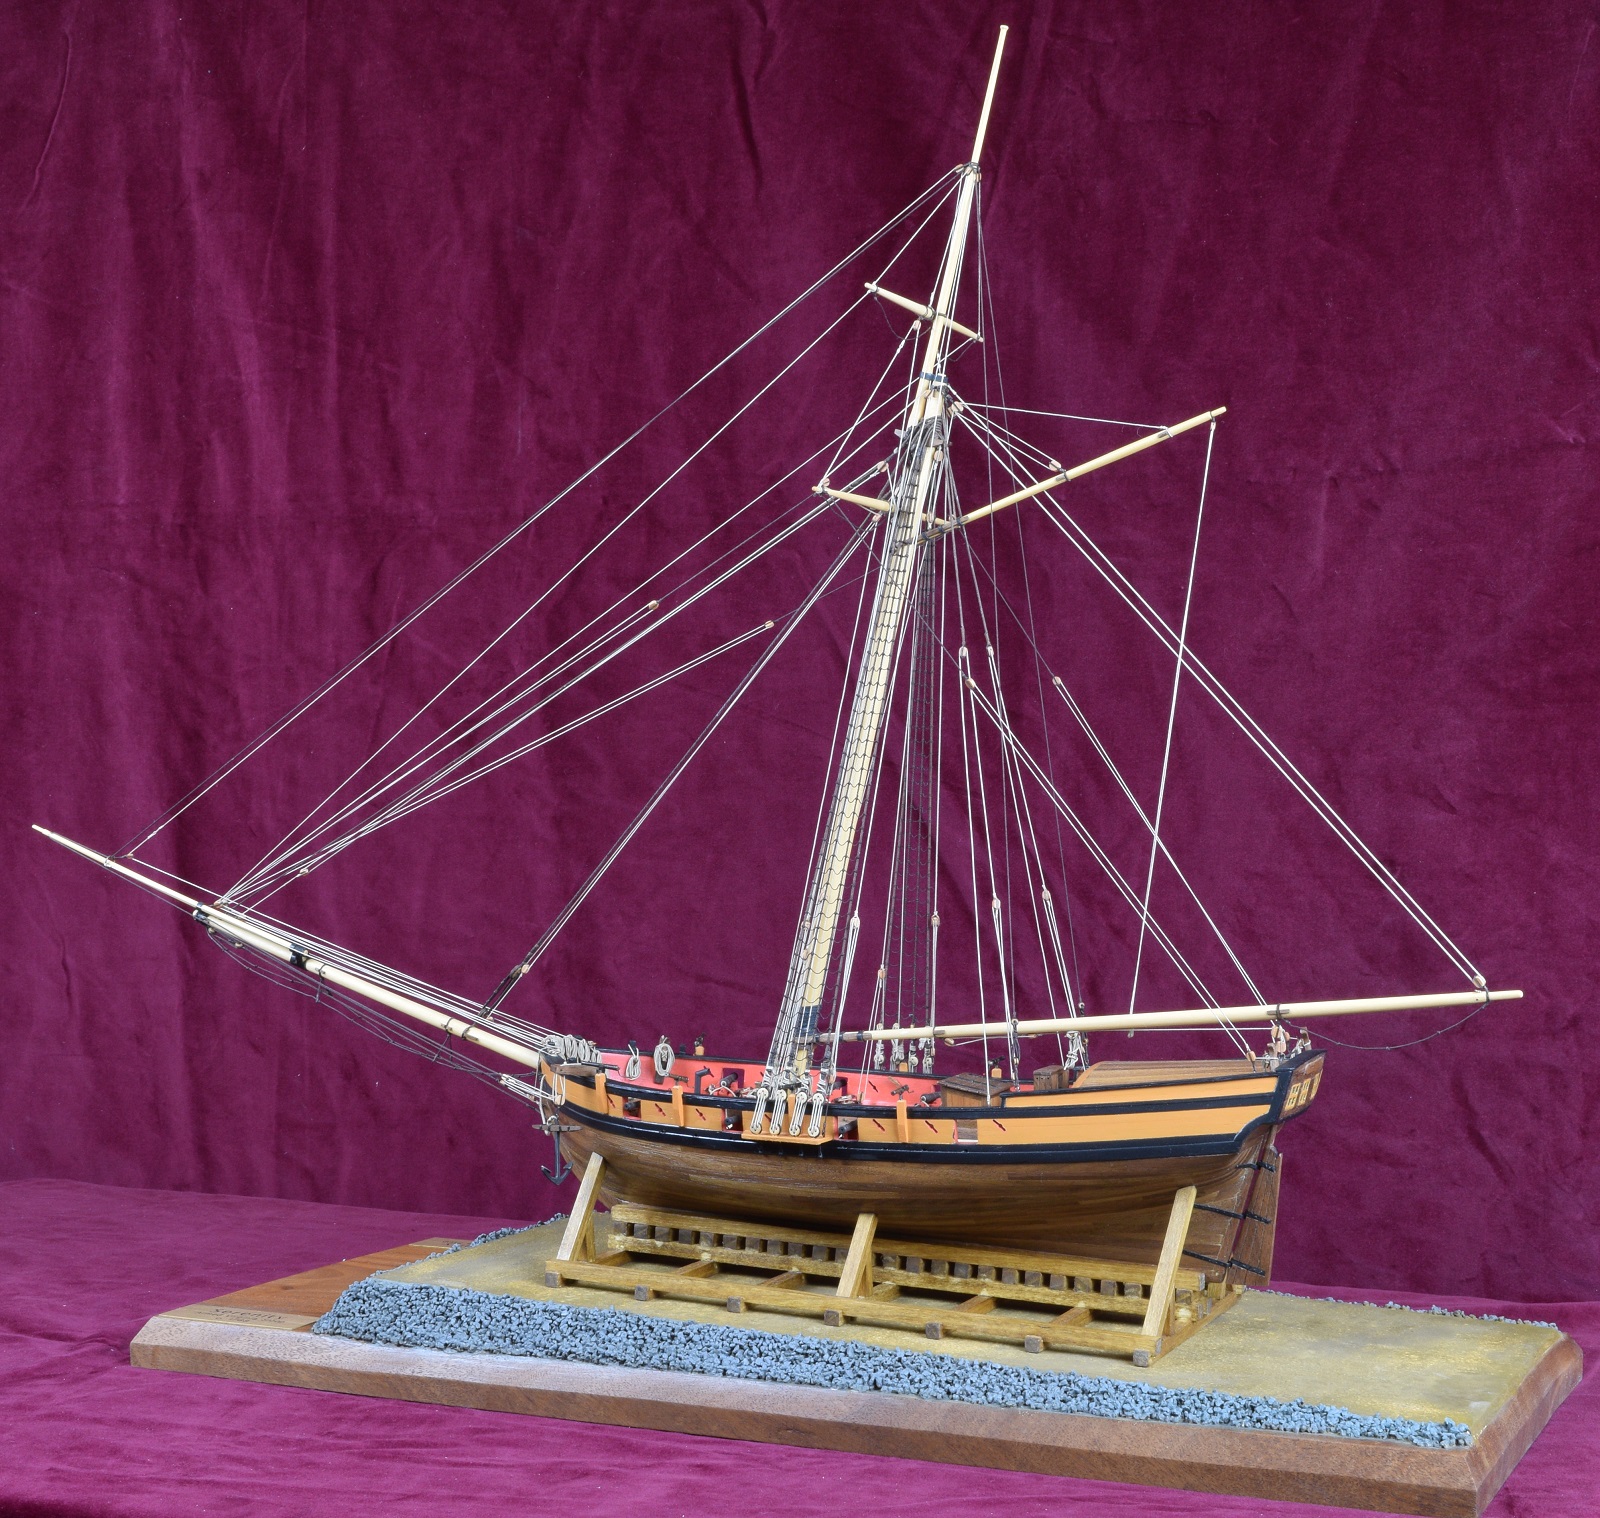 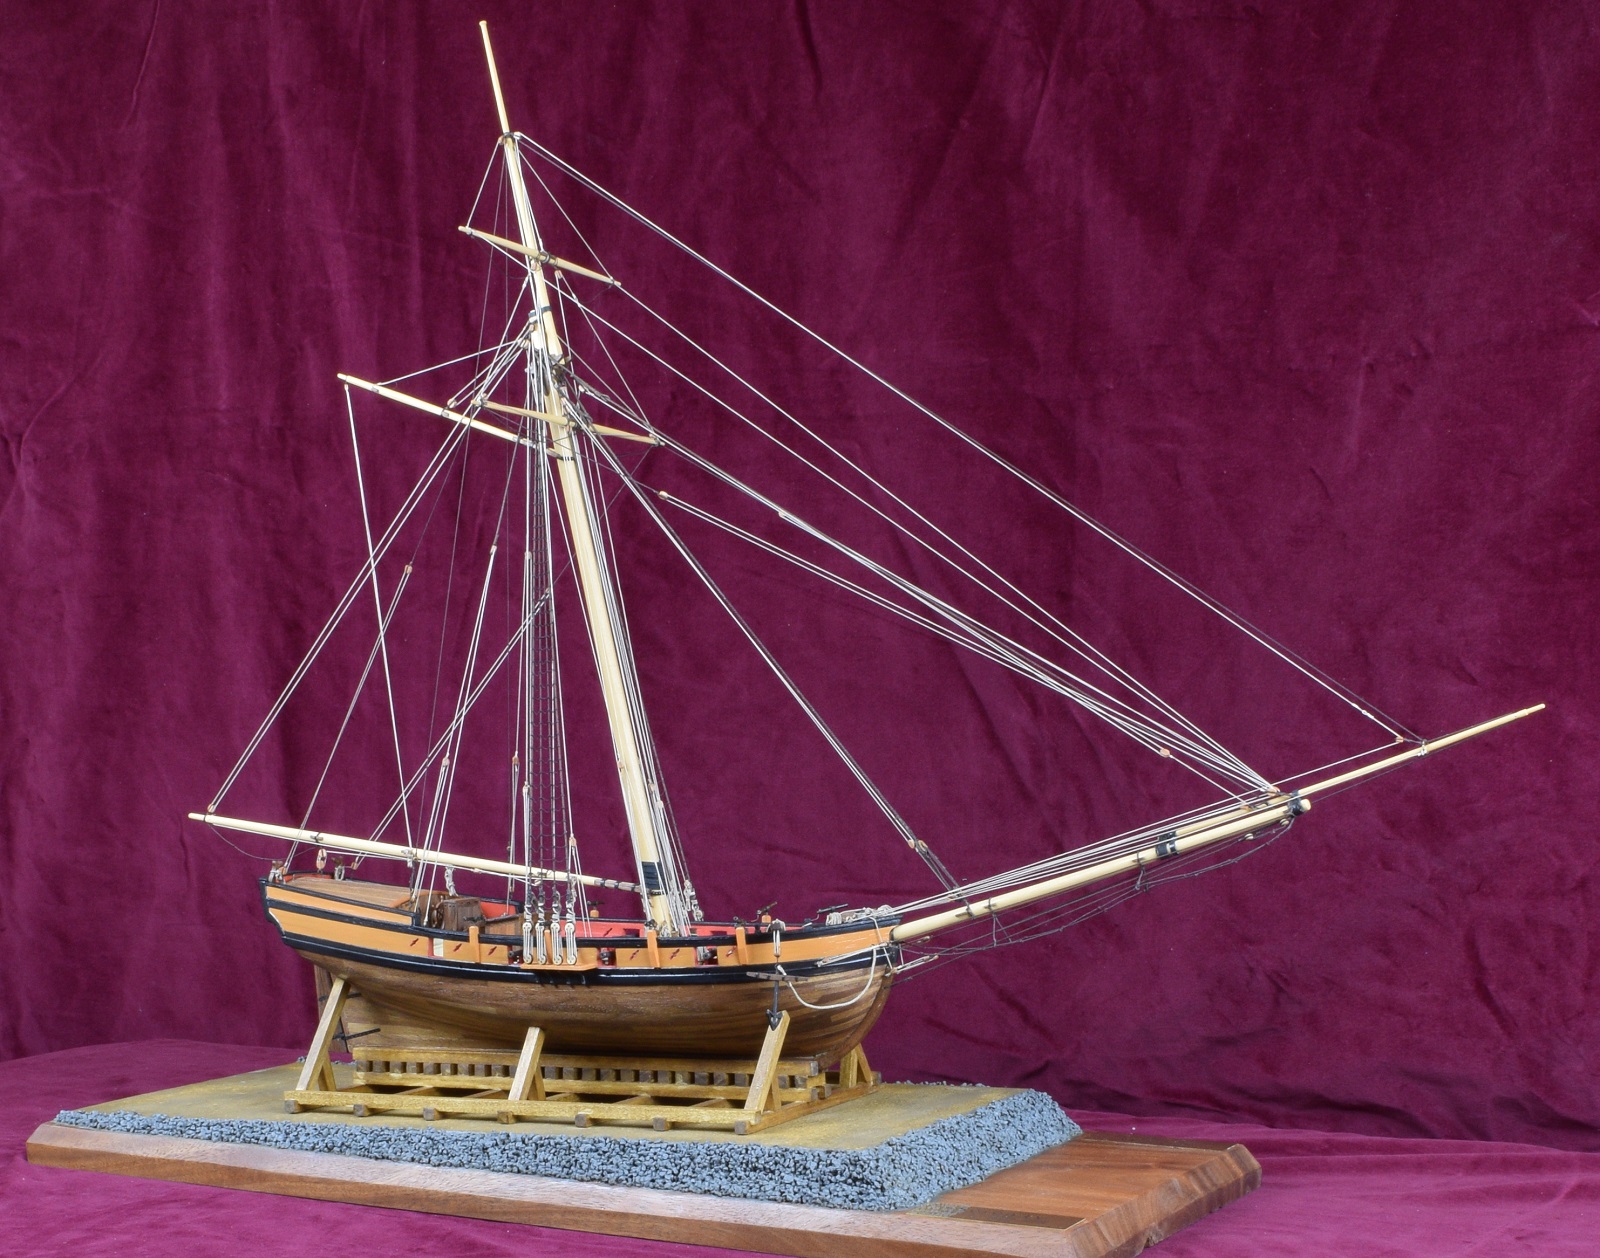 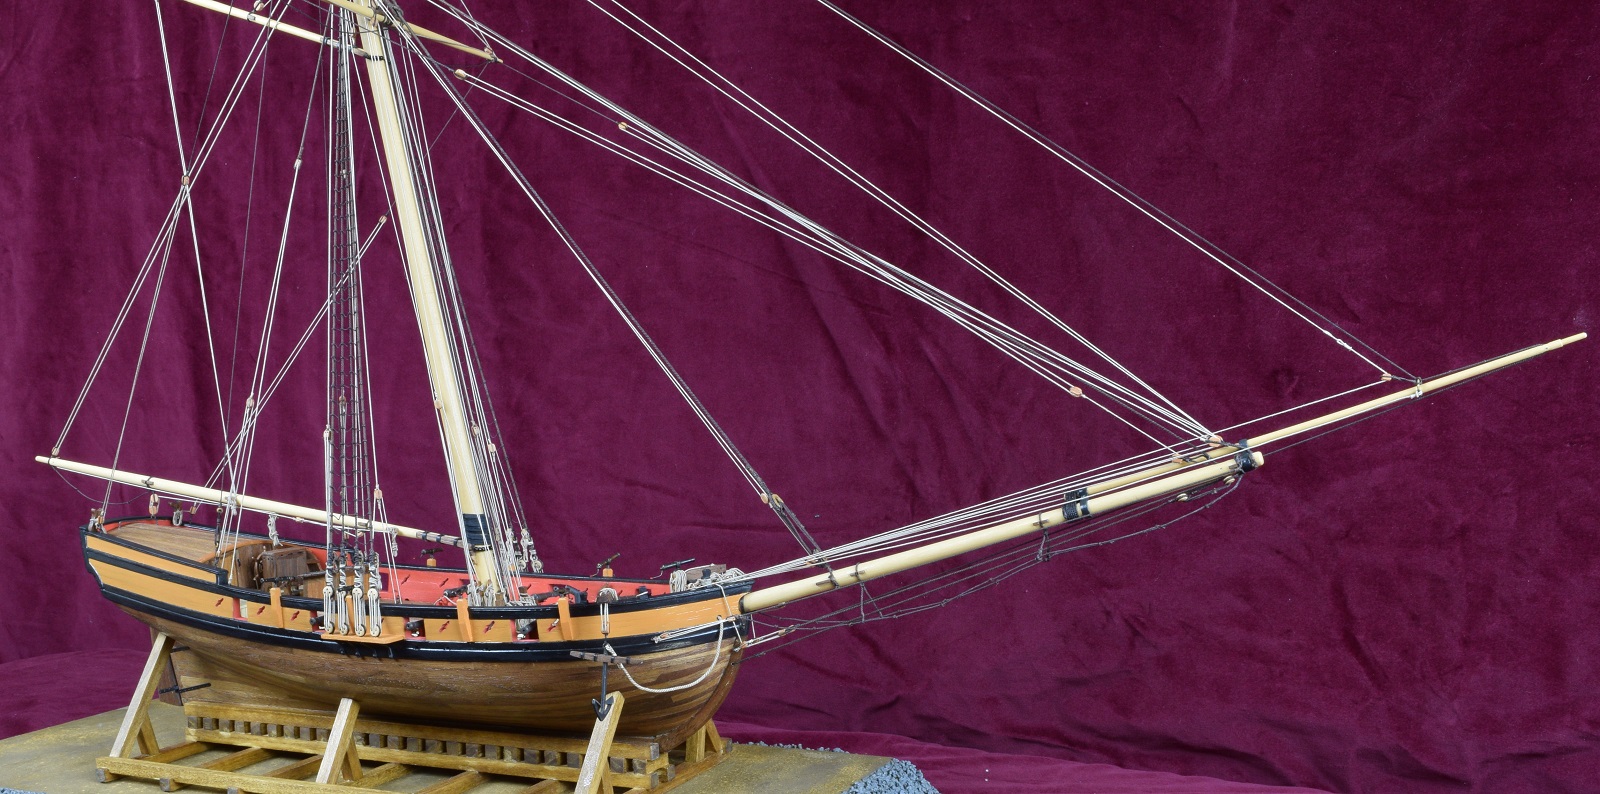 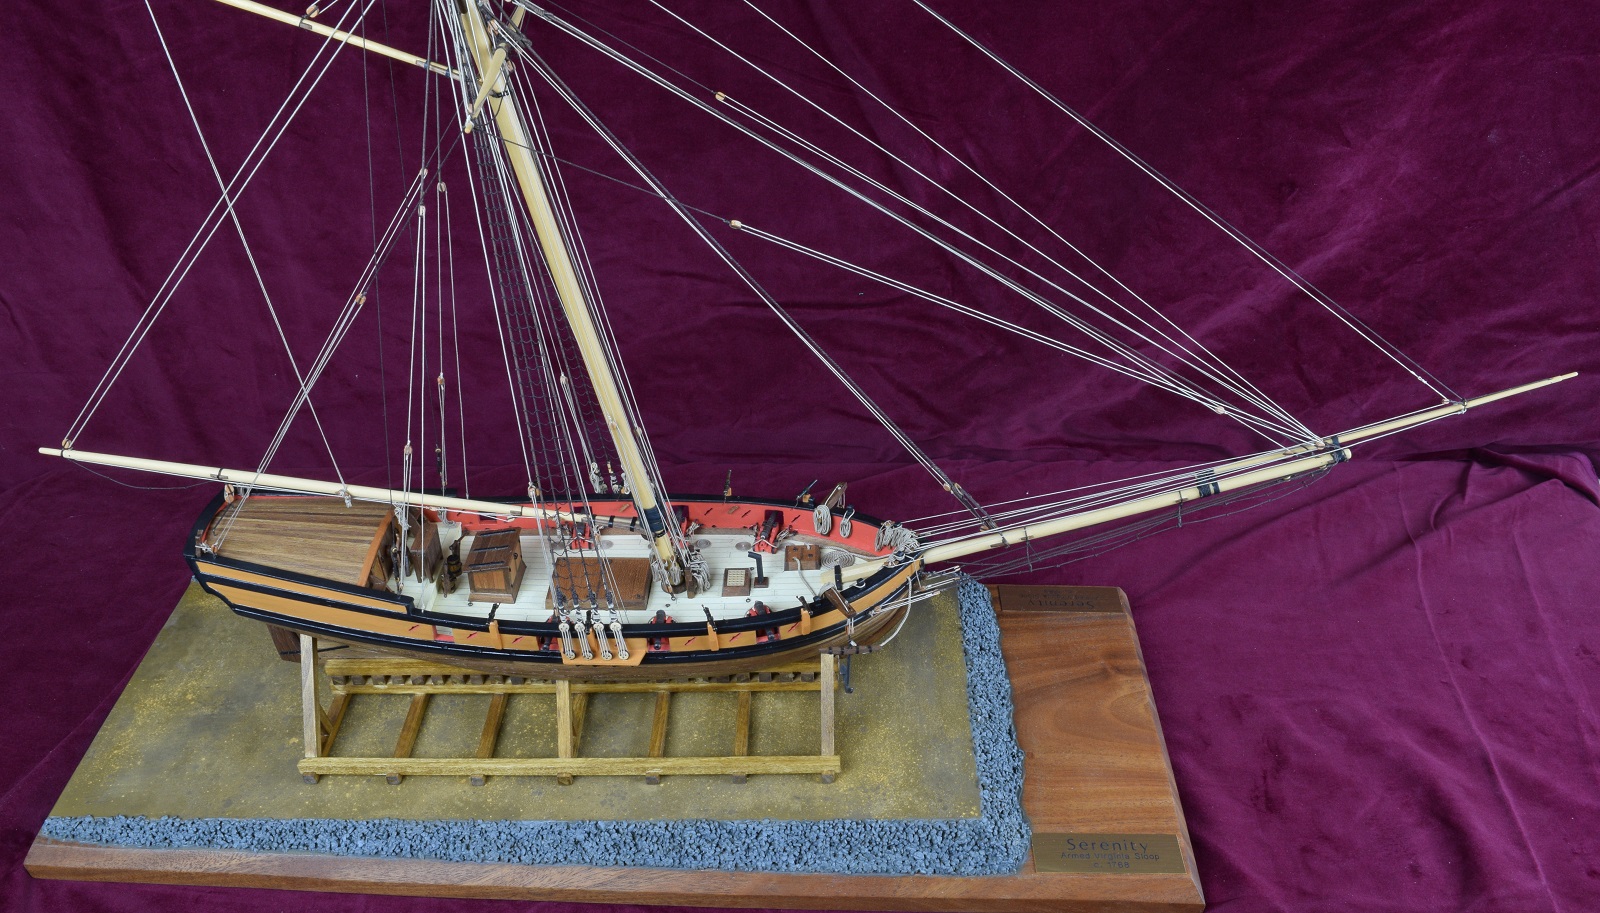 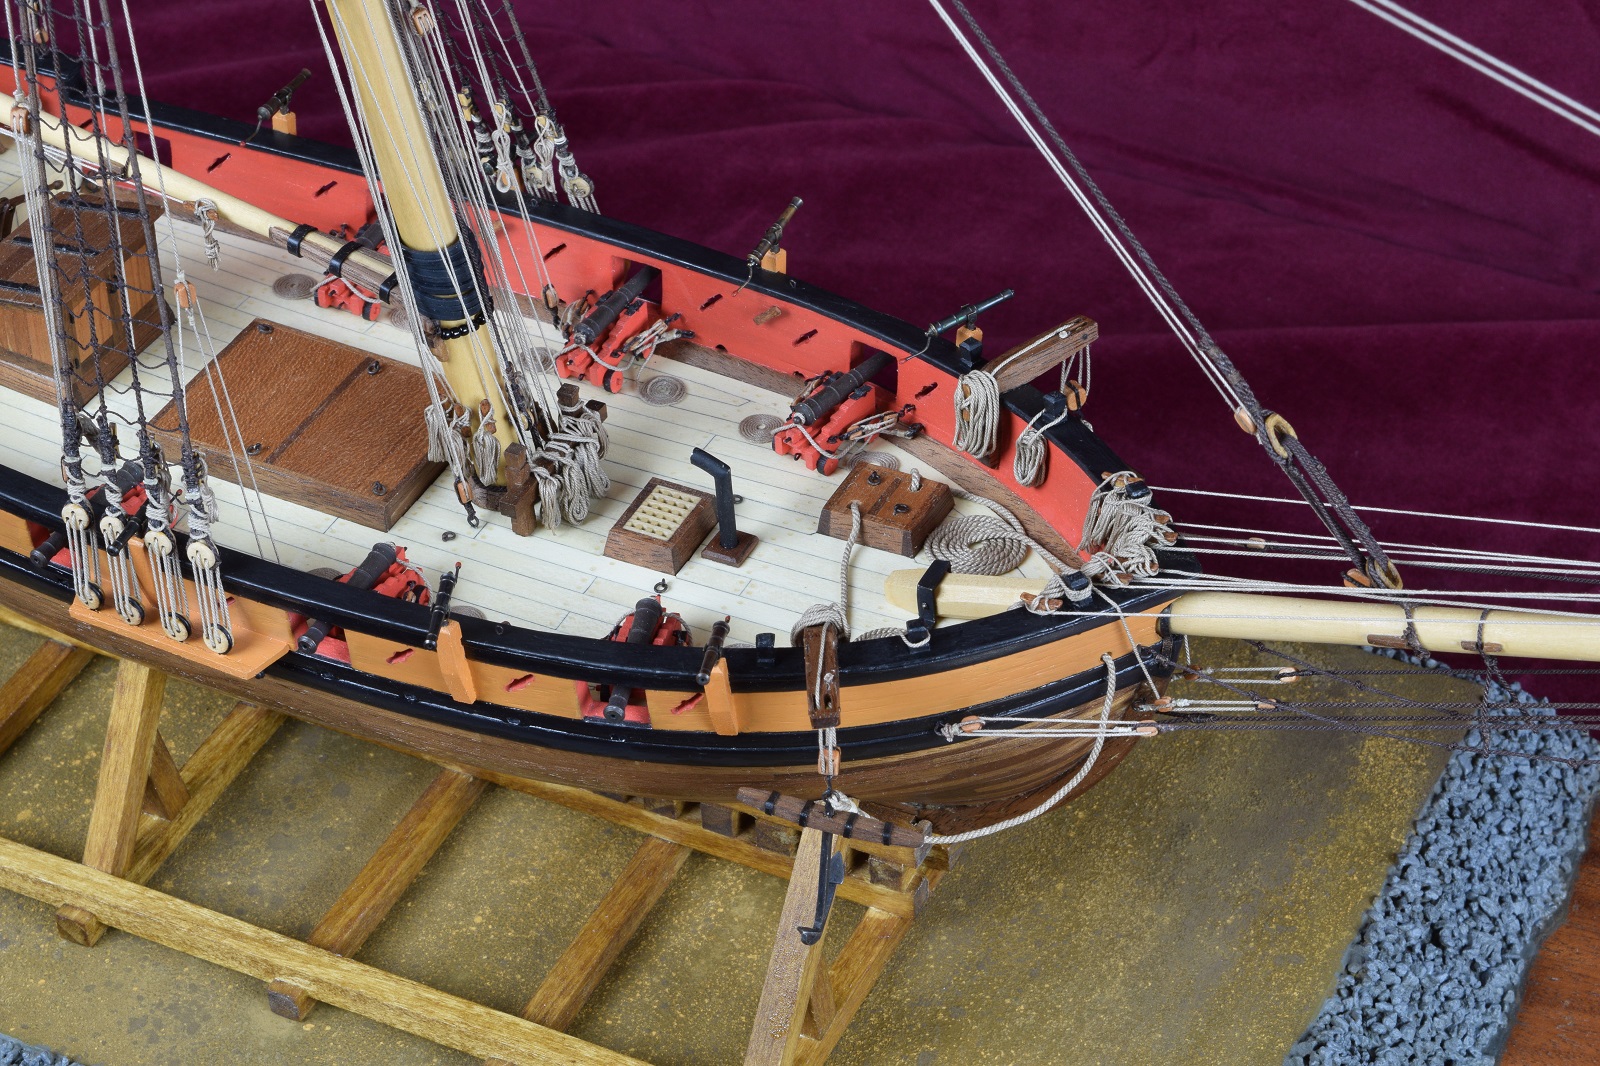 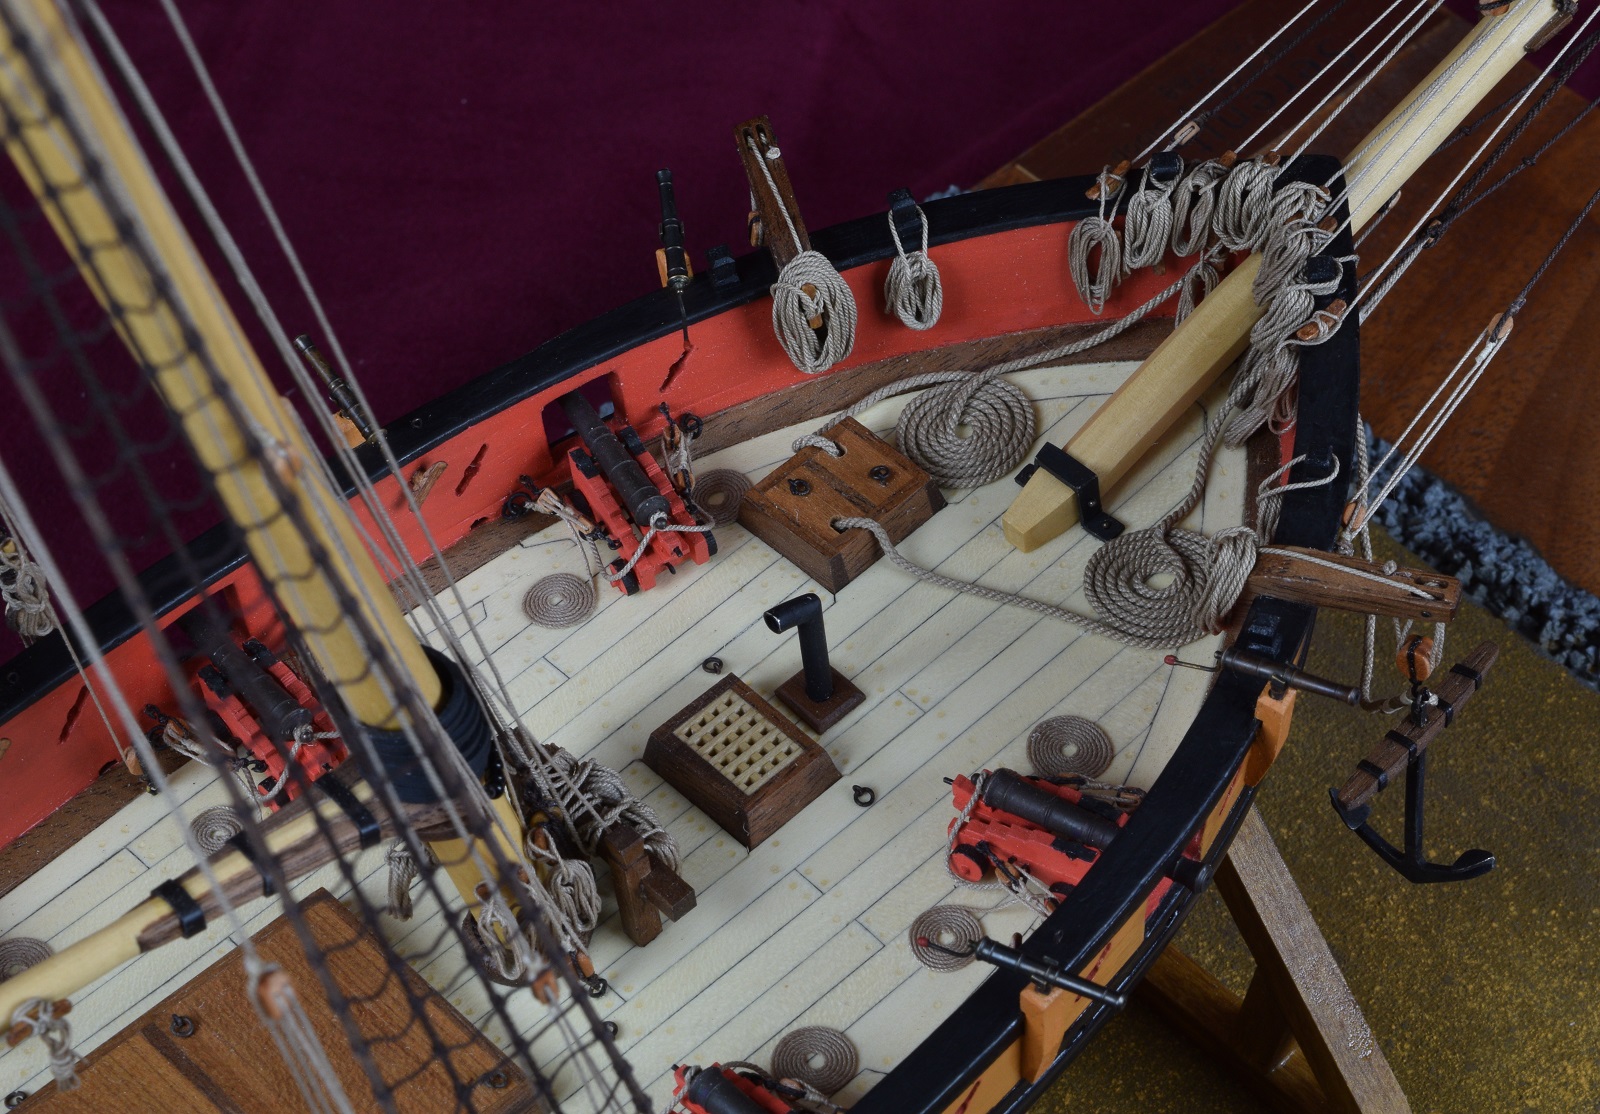 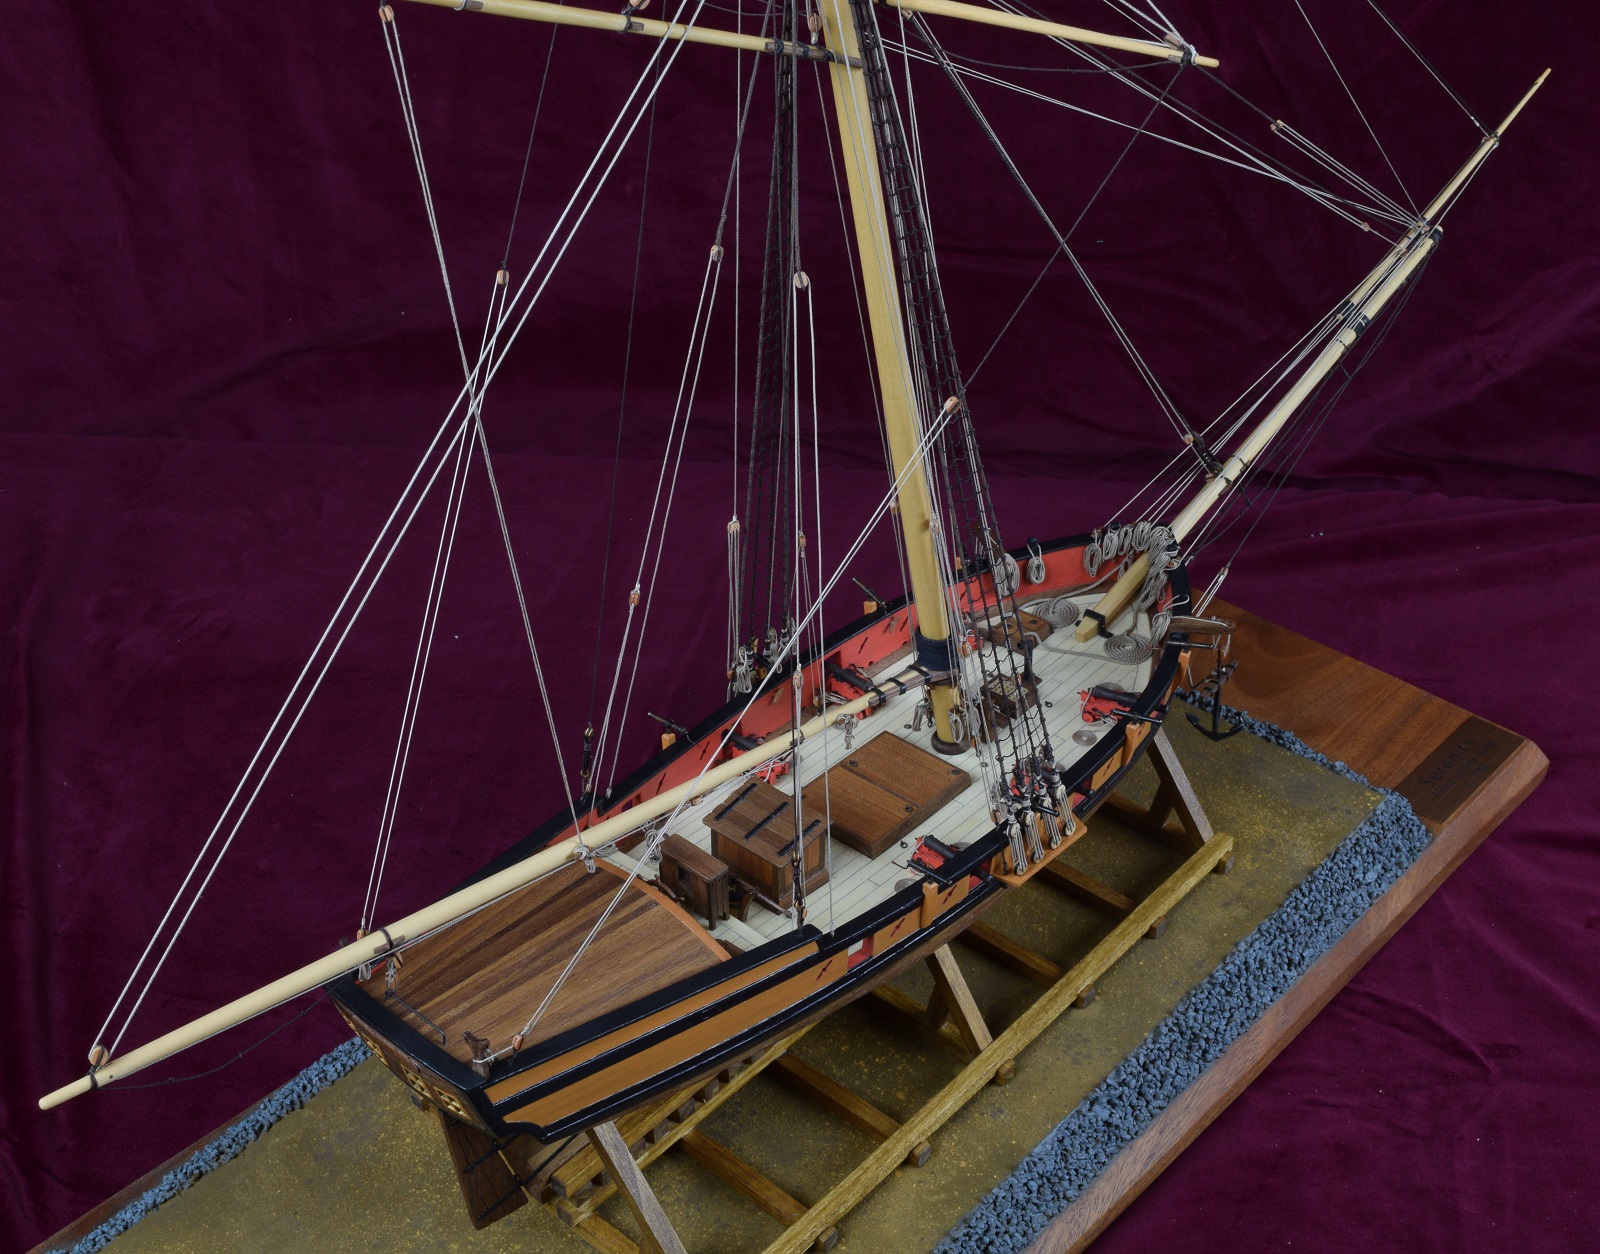 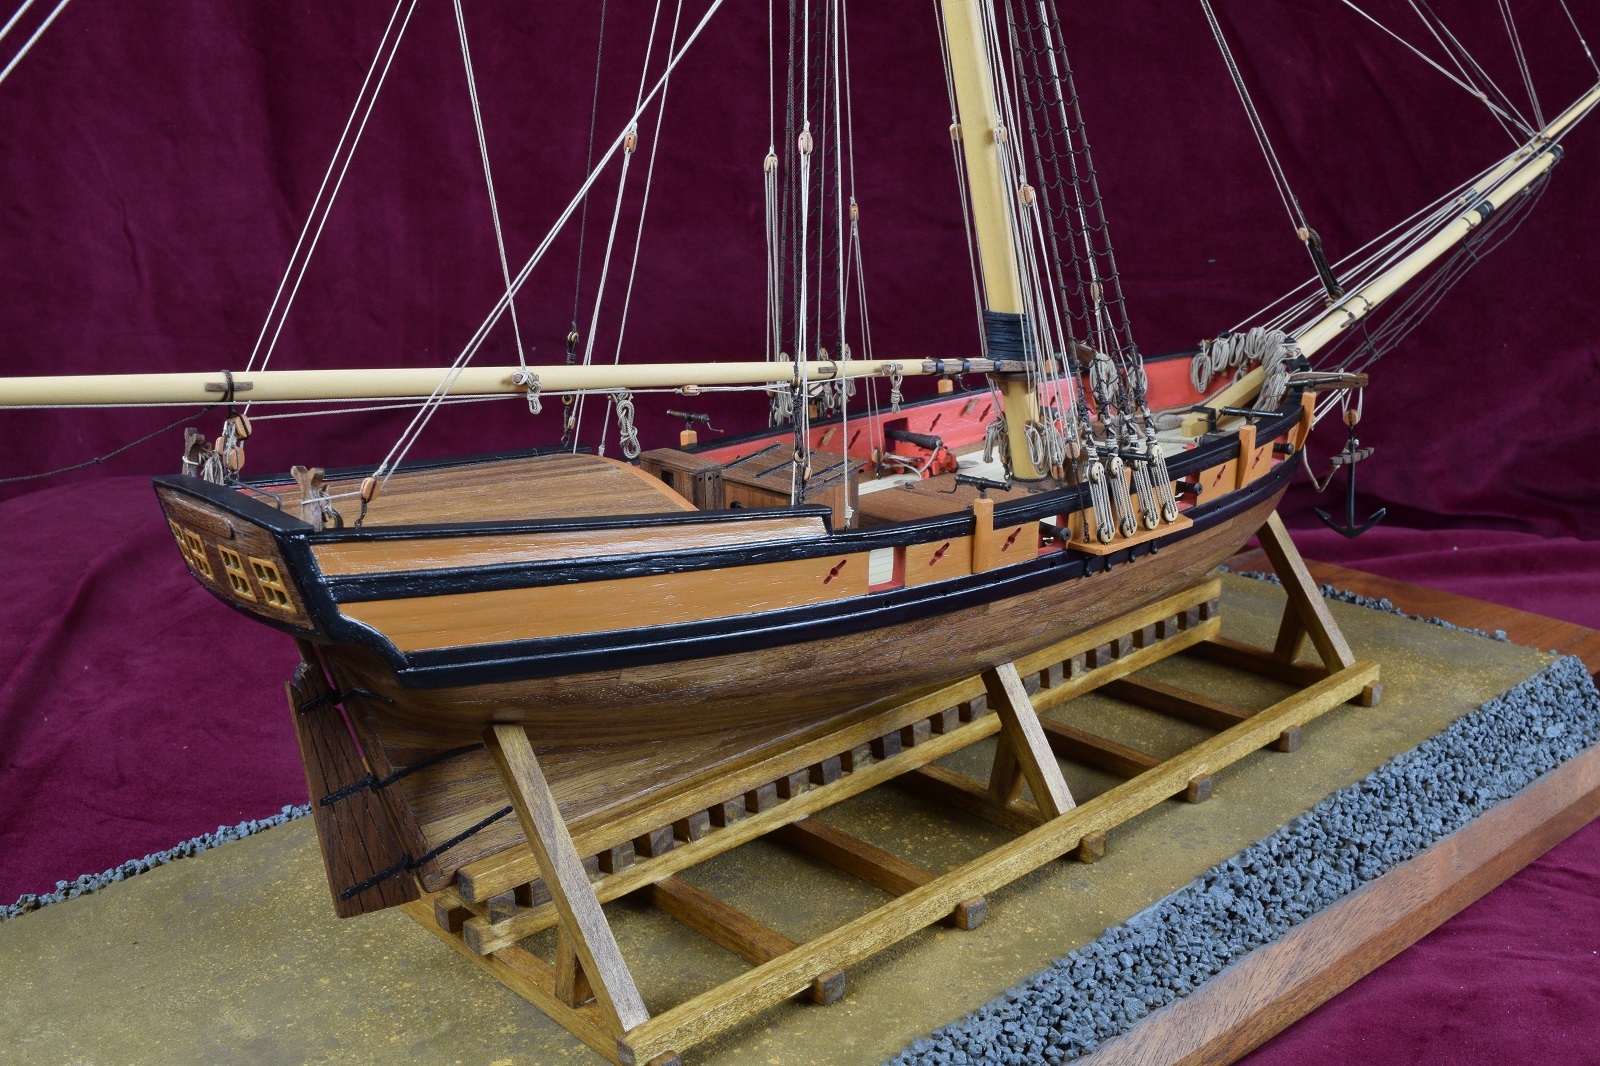 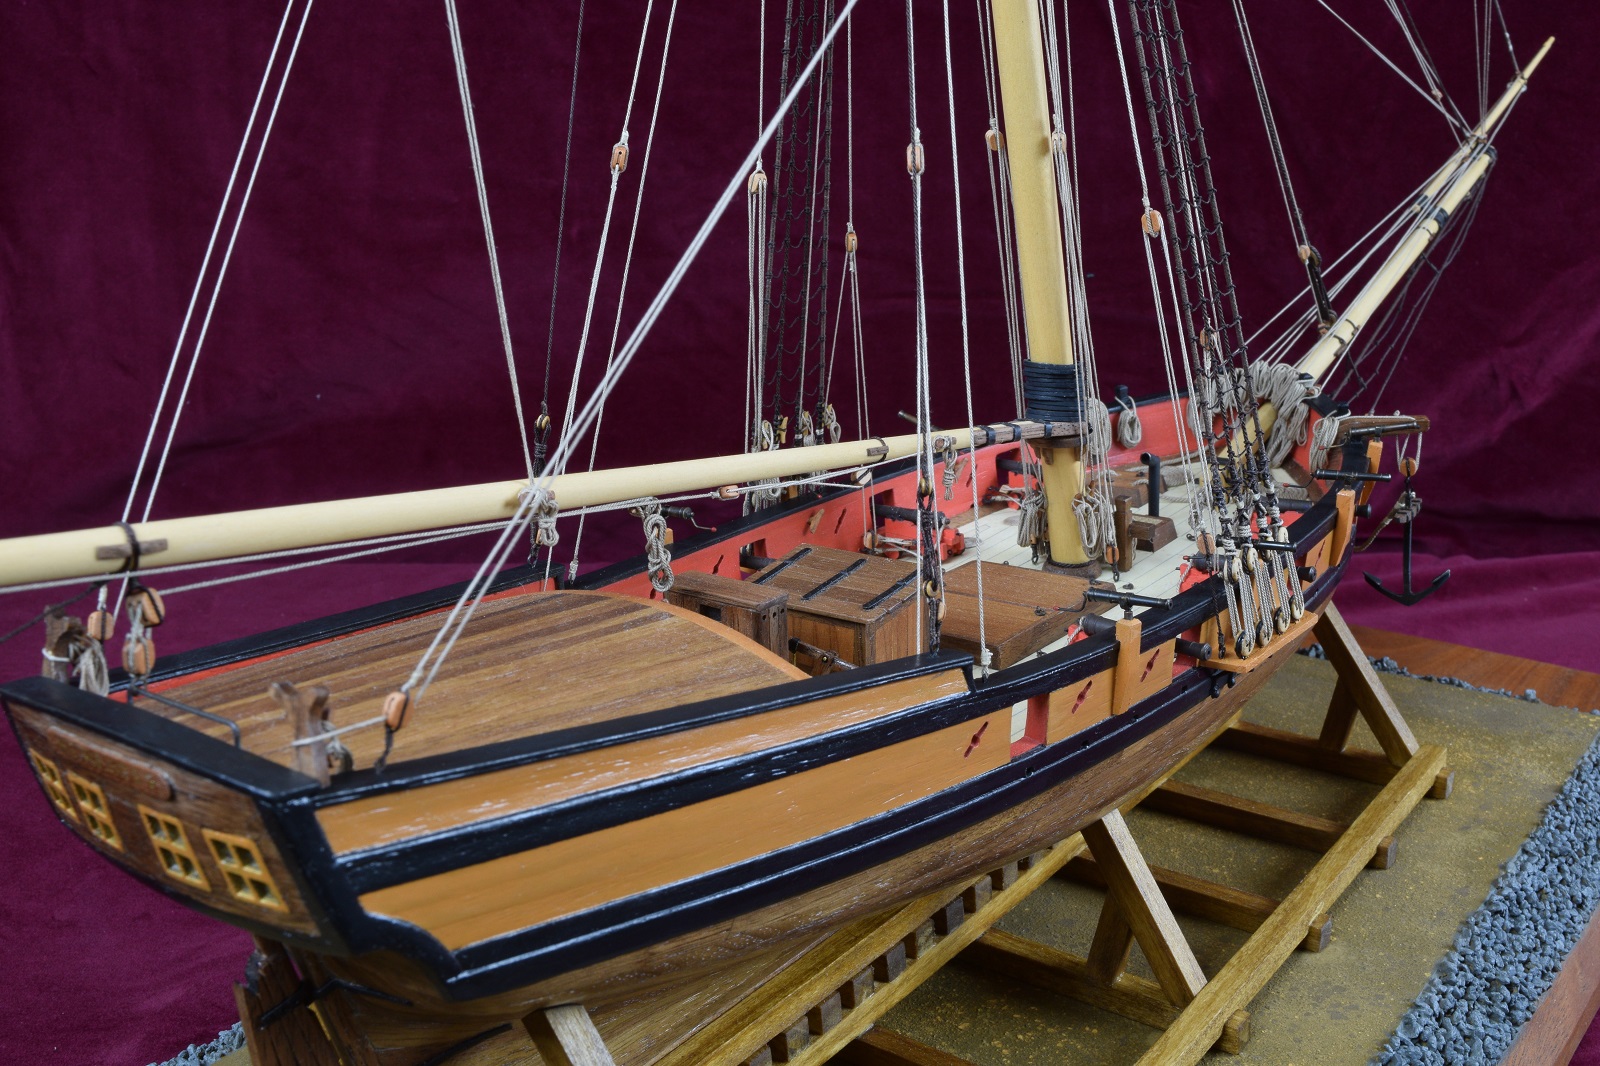                       Thus completed 13 months of construction (with some breaks) and probably around 1200 hours of work. I didn't keep a log so that's just a wild assed guess. This was my 2nd wooden ship model, and I found that I was quite happy with the results and took it to a fair number of model shows in the year or so after it was completed, with results that I couldn't be happier with. Less than a month after completion was the IPMS Modelzona show in the Phoenix area, which is one of the larger model shows in the Southwest US. The Serenity took 1st place in class, and Best Ship, which means it was finalist for best in show.  I then took it to Las Vegas for the IPMS show where they told me that wooden ships were more than welcome, and I got an honorable mention. Lol.. judging at model shows is pretty strange as I was learning. A few months later I took it to San Diego for the San Diego Model Expo, another IPMS show, where I was up against much of the same competition that beat the snot out of me in Las Vegas... First Place in class, Best Ship, Best of Show.  I probably took perverse pleasure in accepting the awards in San Diego while the Chief Judge of the Las Vegas show sat in the front row. I might be a petty person. I also took the ship to another show in San Diego which is not IPMS affiliated where it took a gold. They don't do the same type of competition, you just get copper, silver or gold based on quality. Finally, in the summer of 2016, IPMS held their national convention in Phoenix, so I took the ship to that show, which was just staggeringly huge. I took first place in sailing ships, and was 2nd to an amazing scratch build for best ship. This is pretty much the pinnacle of model shows in the states, and I couldn't be happier with getting a first place in that show (the award is hilariously just a small gold medallion, nothing even close to as cool as the plaques that the other shows award). And that ends the saga of the Serenity, which now lives a peaceful life on a shelf in my living room, where occasionally I remember to dust it. As always, feel free to ask questions and I'll do my best to give an understandable answer. My next project is currently in the planning stages and will be much larger and take multiple years to complete. I plan to start a build log for that once it's underway enough to be interesting. I hope you enjoyed the much-compressed adventure of building a little wooden ship. The Locator fucked around with this message at 04:34 on Apr 6, 2021 |
|
#
?
Dec 10, 2020 05:24
|
|
|

|
| # ? Apr 25, 2024 02:37 |
|
|
Saw this in the circus and it is so loving sweet.
|
|
#
?
Dec 14, 2020 04:41
|
|
