


|
Bakelite? What the gently caress Soichiro?
|
 #
?
Mar 24, 2022 13:39
#
?
Mar 24, 2022 13:39
|
|


|

|
| # ? Apr 19, 2024 03:15 |
|
|
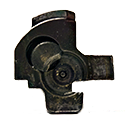
Bakelite is tolerant of temperatures over 100c and also very oil/chemical resistant. Pretty decent choice for an impeller, though i don't know why they went for bakelite and not aluminium or so.
|
|
#
?
Mar 24, 2022 14:41
|
|


|
It also shatters more easily than glass. 99% of my experience with bakelite is breaking it
|
|
#
?
Mar 24, 2022 16:49
|
|
|
Jim Silly-Balls posted:It also shatters more easily than glass. 99% of my experience with bakelite is breaking it Soichiro expects you to handle the pump with care. Fwiw 90's German cars use plastic impellers, I'd much rather have bakelite.
|
|
#
?
Mar 24, 2022 19:20
|
|


|
There is all kinds of poo poo going on inside that water pump. I'm glad I have a Civic. At least they're simple.
|
|
#
?
Mar 24, 2022 21:00
|
|

|
Aprilia scooters use plastic impellers and I've seen more than one which lunched itself. Maybe bakelite is the way to go!
|
|
#
?
Mar 25, 2022 03:22
|
|

|
LimaBiker posted:Bakelite is tolerant of temperatures over 100c and also very oil/chemical resistant. Pretty decent choice for an impeller, though i don't know why they went for bakelite and not aluminium or so. Yeah my guess is in their testing the bakelite was stronger than the plastic tech they had in the late 70's/early 80's, but who knows why they wouldn't have chosen aluminum. It survived to this day so they couldn't have been totally wrong. The OEM replacement pumps are all metal bladed.
|
|
#
?
Mar 25, 2022 12:52
|
|

|
captainOrbital posted:There is all kinds of poo poo going on inside that water pump. That pic is of the water pump drive area plus the back (side?) of the transmission. Not all of that is for the pump
|
|
#
?
Mar 25, 2022 19:38
|
|
|
Jim Silly-Balls posted:That pic is of the water pump drive area plus the back (side?) of the transmission. Not all of that is for the pump  The upper right arm is connected to a shaft leading back to the shifter, the bottom left leads back into the case to the shifter drum and forks. This whole area is bathed in oil and that seal is what stops coolant from seeping into it. I'm just waiting on a few parts.
|
|
#
?
Mar 29, 2022 16:23
|
|
|

|
|
#
?
Mar 29, 2022 17:52
|
|
|
lmoa
|
|
#
?
Mar 29, 2022 20:35
|
|
|
|
|
#
?
Mar 29, 2022 20:36
|
|
|
 Drake no  Drake yes  For every job a tool. Sometimes that tool is me, sometimes it is a couple PVC joints and scrap wood.  This turned out better than expected. I had anticipated issues getting the PVC "molds" to release after the fiberglass cured but a little torque on them and they twisted and wiggled right out. I use car wax as a release agent. This makes the final result smooth on the correct side but rough on the who-loving-cares side. This saves on sanding.  They will get cut off and only stick in 1.5" or so at the deepest. Looking back had I thought of this at the start I could have both filled the original single light hole and created the two round holes at the same time.  Fairing mount reinforced and a tab welded on to move the gauges forward. There is plenty of room below now for the cables to move without binding. This was a huge issue when I bought it.
|
|
#
?
Apr 17, 2022 03:27
|
|
|

|
|
#
?
Apr 17, 2022 03:31
|
|
|
 Cut the depth down and test fit the lights. They're NC23 reproductions. The fit inside the cylinders is perfect.
|
|
#
?
Apr 17, 2022 19:33
|
|
|
That is very cool
|
|
#
?
Apr 17, 2022 20:47
|
|
|
that turned out fan fuckin tastic
|
|
#
?
Apr 17, 2022 21:44
|
|


|
Yeah that owns. Let me know when I can pick it up.
|
|
#
?
Apr 17, 2022 22:10
|
|


|
I'll take one in rothman's or classic HRC livery. My Nigerian father in law is forwarding the deposit as we speak.
|
|
#
?
Apr 17, 2022 22:22
|
|
|
HenryJLittlefinger posted:Yeah that owns. Let me know when I can pick it up. Slavvy posted:I'll take one in rothman's or classic HRC livery. My Nigerian father in law is forwarding the deposit as we speak. 
|
|
#
?
Apr 18, 2022 13:17
|
|
|
Why isn�t there an I Don�t Understand button?
|
|
#
?
Apr 18, 2022 14:06
|
|
|
It's not about understanding, it's about feeling the vibes.
|
|
#
?
Apr 18, 2022 16:33
|
|
|
The vibe is Honda don't know what they're doing anymore, like a war hero with Alzheimer's, and only one man is brave enough to take matters into his own hands and do what's right. Double round headlights, single sided swingarms and shamelessly extruded frame spars are of cultural and/or religious significance.
|
|
#
?
Apr 18, 2022 19:34
|
|
|
Needed a way to mount the headlights. Originally the front headlight (F2? F3? Not even sure what it is) was mounted to the bracket bolted below the steering head, with the upper fairing bolted to a bracket that mounted to the tank bolt. You can see these in the pictures above. The fitment was crap. The rear mount was removed, and the the front mount was modified heavily to make the fairing mount "ears", so it no longer has the headlight tabs. I decided to fix the headlights directly to the fairing so the whole thing comes off as one. First I create some quick "molds" out of aluminum tape:  I mixed up some resin and dropped some shredded up fiberglass into it to make a slurry. Without the fiberglass the resin can be very brittle. I pour the slurry into the molds and let it cure, then sand it down so I have strong mount points:  If I had some M5 brass inserts around I would have epoxied them in, or I could have epoxied or glassed in some m5 nuts, but I felt like a bit of experimenting. I once fixed a stripped bolt from the bottom of a boat by threading the bolt into the hole filled with marine epoxy. When the epoxy cures, you spin the bolt out and are left with threads. So with this in mind I turn to the local welder, JB, who is up to the challenge. I fill those holes with JB's magic and thread a bolt with some car wax on it (release agent) into the JB and let it cure. After curing I turn the bolt out (they break torque with a delicious CRACK) and I'm left with threads. You can thread a bolt in there and pick the whole fairing up by it, so it should have plenty of hold for a couple of plastic and glass headlights.  Brass inserts are the better way to go here, if I had some lying around. M5x.8 bolts don't have very thick threads and my worry is that vibrations will eventually weaken them. A little loctite in the thread should keep things nice and tight. 
|
|
#
?
Apr 23, 2022 11:46
|
|
|
Last fall while riding the Sherpa I got a whiff of fuel and it started losing power. I could see a small pinhole leak on the bottom of the tank, and since that hole was now the path of least resistance the bike was starving for fuel. I was a mile and a half away from home, didn't have the power to ride home, and didn't have anything to plug the hole.....so I had to walk-of-shame the bike back home while it peed out fuel in a small but steady stream. Fuckin bikes, man. Anyway I drained the tank and can see rust down in the seams of the tank, but the rest of the tank was near perfect. This is a sign of very long term storage without the bike moving. Not wanting to gently caress with it too much I put a tank patch on the hole and added an inline filter. This tank needs a liner, but I'm not going to do it until the end of the season. The pinhole is still patched so I drained the tank again and this time put evapo-rust in and let it sit for two days. Then I drained it and coated the insides with fogging oil. This should stop it from flaking as long as there is fuel in it. Taking this opportunity I changed out the pilot jet from 17.5 to 20, which will definitely help the cold bloodedness. I also have a manual petcock replacement for the vacuum one.  I think I paid $75 shipped for the Hawk tank, which might not sound like it but is a steal. Since the Hawk was such a low volume bike, the most difficult pieces to obtain are now the tank the the rear plastic cowl. This one has a few small dents that need to be filled and is coated with a liner, but is still in better shape than the one on the bike.  In better news this is now a running, mostly fully functional but ugly bike. I'll be doing a couple extremely cheap things to make it look better. You might notice the rear end sags, this is because the air shocks no longer hold air and bottom out.
|
|
#
?
May 3, 2022 01:51
|
|
|
Very nice work. Also, is a goldwing a goldwing if it has no bags? :hmmm:
|
|
#
?
May 3, 2022 20:33
|
|


|
Steakandchips posted:Very nice work. Thanks, took it down to the bank today and on the way out saw the bike against the backdrop of a mid size vehicle. I'd never noticed how small the Oldwings are without all the bodywork. It's roughly the size of a Bonneville. Heavier than the Triumph, I'd guess still close to 600lbs wet, but the weight is so low you don't feel it. Hilariously easy to scrape with those awful floorboards on it (the standard pegs are hard to find used).
|
|
#
?
May 4, 2022 00:31
|
|
|
What are you going to do for the rear shocks? Those are one of the more critical things I need to take care of on my GL1100, and I�d like to not spend crazy on that.
|
|
#
?
May 4, 2022 01:42
|
|
|
Revvik posted:What are you going to do for the rear shocks? Those are one of the more critical things I need to take care of on my GL1100, and I�d like to not spend crazy on that. Options that I've found from cheapest to most expensive: 1. Rebuild air shocks with new rings. Hope they seal. 2. VTX1300/1800 should fit, can't confirm it. 3. Randakk's has a decent selection of new ones. Their sales tells me cheap replacements 32-0107 (~$110 shipped) should fit. 13" Hagon eye-to-eye (~$260 shipped) should fit but will be a little long. https://www.randakks.com/motorcycle...er=name.keyword 4. YSS has a shady looking US distributor that quoted me something over $400 for a pair, you can find them shipped from Europe for under $300. 5. Bitubo ($500 shipped from EU). 6. Ohlins etc etc. e: stick Progressive (brand) in there too, around $300 shipped. Gorson fucked around with this message at 10:53 on May 4, 2022 |
|
#
?
May 4, 2022 03:47
|
|
|
No more vacuum petcock: Sherpa is refueled and starts much easier now with the bigger pilot jet.
|
|
#
?
May 4, 2022 03:53
|
|
|
hell yeah brother I�ll drink to that gettin things done
|
|
#
?
May 4, 2022 04:14
|
|
|
First step of filling in the lower gaps for the exhaust, roughing it out. Those sharpie scribbles mean something to my addled brain.
|
|
#
?
May 22, 2022 18:01
|
|
|
A pic of final (I swear) fairing alignment before I took it down for glassin'. You can see a little bit that I've shallowed out and softened the "eye sockets".
|
|
#
?
May 22, 2022 18:05
|
|
|
That looks really really good.
|
|
#
?
May 22, 2022 19:22
|
|
|
Choke plunger from a XT225 works in the Sherpa: I just need to replumb that fuel line. One less cable to go bad or bind. Gorson posted:The crazy things you find in carb sets. Check out this GL1100 carb rack I bought off FB marketplace for $40: From another thread. It gets deeper. One side of those carbs had 120 main jets, the other side had 145's (one of which was aftermarket). There's another bike that uses 120 main jets and has very close (but not exactly the same) carbs as the GL1100, and that's the GL1000. Also, the floats on that side were adjusted to GL1000 height. So my guess is that someone combined a set of 1100 and 1000 carbs. This rack had a pilot jet that would not clear. I had another rack of carbs with the same carb that wouldn't clear, so I split both sets down the middle and boiled the gently caress out of both. I use a mix of pine sol and water but I don't know if it matters, the idea here is just to get as much heat as possible into that pilot jet to blast it free with air. I was able to clear one half, and taking this rack combined it with the other working half, installed 145 mains all around, set the correct float heights, and now this thing runs pretty good: 
|
|
#
?
Jun 7, 2022 02:34
|
|

|
Exhaust cuts/fills on the lower fairing are nearly done. Added a little bump below where each header curves back into the fairing: 
|
|
#
?
Jun 9, 2022 02:36
|
|
|
Before:
|
|
#
?
Jun 9, 2022 02:38
|
|
|
Excellent work.
|
|
#
?
Jun 9, 2022 02:44
|
|
|
hoiiiype
|
|
#
?
Jun 9, 2022 14:55
|
|
|

|
| # ? Apr 19, 2024 03:15 |
|
|
YOU CAN NEVER DROP IT But seriously, looks great.
|
|
#
?
Jun 9, 2022 14:56
|
|
