

|
Finished another talking plushie. She'd all the bits together, I just needed the other auction to end before I could list her. You can see her talk here!    If you're actually interested in the auction, you can find it linked in my deviantart here. She's a slightly older version of the pattern, than Applejack (the previous one I made), which is most noticeable in the bridge of her nose and the length of her back legs. Things I had changed recently with my work. I'd probably make her eyes a bit smaller in the future too.
|
 #
?
Apr 5, 2012 03:12
#
?
Apr 5, 2012 03:12
|
|


|

|
| # ? May 15, 2024 14:04 |
|
|
Brainbread, I don't have PM, but could you possibly email me at [redacted] when you have a spare moment? I'd be interested in commissioning you at some point. ")
LITERALLY A BIRD fucked around with this message at 21:50 on Apr 6, 2012 |
|
#
?
Apr 6, 2012 16:37
|
|

|
Alrighty. Last batch of commissions, auctions and the like. First attempt at making her. The hair through me for a "loop" the first time because I put her tail on upside down, which let me confused for a few minutes on how to do it.  In which I was too lazy to retake the photo, and instead just colour corrected in photoshop. I made the eyes smaller in this one, and rounded the ears off - this was a commission. I used fatter pieces for the center strips on the head, and made the nose a bit more pronounced as well. I think I will also start adding significantly more weight to the back feet to help balance. The changes in head size, plus the amount of hair makes them a teeny bit front-heavy, which makes taking photos a problem in my tiny lightbox. When I move out, I'll probably make a new one about 50% larger (when I have space for it).  And another commission I finished instead of studying. They wanted EMS colours with the EMS logo, and I think it turned out well enough. I changed the head pattern after this one (this head shape is a few days old, not the same one used for the other two).
|
|
#
?
Apr 10, 2012 04:39
|
|
|
Not exactly plush but I think it still counts: Revenge on lovely days at work 
|
|
#
?
Apr 10, 2012 07:10
|
|
|
Comrade Quack posted:Not exactly plush but I think it still counts: I think the rule is, "Is it functional? -> No -> Post in Plush Thread" I recognized the character, but I don't recall his name. Its from Southpark, right?
|
|
#
?
Apr 10, 2012 07:18
|
|
|
Brainbread posted:I think the rule is, "Is it functional? -> No -> Post in Plush Thread" Its slightly functional in that its a puppet. It is Mr Hat from South Park. (I briefly thought his name was Mr Hand when I was about to google for a picture). Yes, I do use it to say the things I want to but shouldn't.
|
|
#
?
Apr 10, 2012 15:32
|
|
|
I never want to make this again (jokes on me, I have another commission for it). Her hair bits totaled in at 24 pieces (8 each). That took me a good few hours of planning and cutting and screaming at them for spiraling. Looks good though! I wish this commission wasn't from like 2 months ago, when my prices were lower. She probably took me about twice as long as a "normal" plushie. I doubled the amount of beads in her feet too. They weren't heavy enough to keep them really well balanced in the original amounts. Still squishy though!
|
|
#
?
Apr 12, 2012 18:02
|
|
|
Brainbread posted:I never want to make this again (jokes on me, I have another commission for it). Her hair bits totaled in at 24 pieces (8 each). That took me a good few hours of planning and cutting and screaming at them for spiraling. Have you thought about doing the hair highlights as pieces on top of the rest of it? You could try folding the edges under or doing a zigzag in matching thread over the edge. Mr hat is pieces on top of pieces. The red stripes are on top of a white hat rather than white and red pieces sewn together.
|
|
#
?
Apr 12, 2012 20:45
|
|
|
Comrade Quack posted:Have you thought about doing the hair highlights as pieces on top of the rest of it? You could try folding the edges under or doing a zigzag in matching thread over the edge. Mr hat is pieces on top of pieces. The red stripes are on top of a white hat rather than white and red pieces sewn together. I worried about doing that, as I figured the seams at the sides would be a bit too obvious/not look good. I'll try it out next time I make a multicolour'd piece of hair. Maybe it won't drive me to drinking.
|
|
#
?
Apr 12, 2012 21:37
|
|
|
Yeah I would say go with Comrade Quack's suggestion and satin stitch over the edges of strips laid on top of the main color. Appliqu� power!
|
|
#
?
Apr 13, 2012 01:06
|
|

|
Brainbread posted:I worried about doing that, as I figured the seams at the sides would be a bit too obvious/not look good. I'll try it out next time I make a multicolour'd piece of hair. Maybe it won't drive me to drinking. This is what scraps are awesome for. gently caress around as much as you please, try different things and don't worry that you've wasted material or your time cutting pieces out.
|
|
#
?
Apr 13, 2012 01:39
|
|
|
nolen posted:Yeah I would say go with Comrade Quack's suggestion and satin stitch over the edges of strips laid on top of the main color. Appliqu� power! ... Satin stitch? Applique? I don't know what these mean. 
|
|
#
?
Apr 13, 2012 03:14
|
|
|
Brainbread posted:... Satin stitch? Appliqu�: the fancy name for what I said. Satin stitch: the back and forth back and forth stitch used to cover large areas. In short, take piece A and lay it on top of a larger piece B. then set your machine to zigzag stitch with very short stitch length. Then sew over the edges of piece A attaching it to piece B. If I've done a terrible job consult google or wait for Nolen to wander back by. Edit: here's a YouTube video http://www.youtube.com/watch?v=qlPECmbwSOc&feature=youtube_gdata_player Comrade Quack fucked around with this message at 04:17 on Apr 13, 2012 |
|
#
?
Apr 13, 2012 03:29
|
|
|
Comrade Quack posted:Appliqu�: the fancy name for what I said. You've pretty much covered it. Often times you will want to use a piece of fusible webbing and iron/steam on the top piece to the bottom piece before stitching. Here is an example of a doll some random person online has made that uses this method. (Sorry, too lazy to upload to imgur so I'm just going to link it). http://i6.photobucket.com/albums/y220/juumou/IMG_8049.jpg You'll notice the paws, eyes, and mouth are a different fabric than the minky and have been bordered with a satin stitch (zig zag with very tiny stitch length).
|
|
#
?
Apr 14, 2012 07:22
|
|
|
nolen posted:You've pretty much covered it. Often times you will want to use a piece of fusible webbing and iron/steam on the top piece to the bottom piece before stitching. My concern lies with the 3 and 6 coloured pieces of "hair". With 3 colours, it won't be that bad (I can just line the smaller colours side by side, stitch them on), but with the 6-coloured manes, there is not "base" colour that I am working with. Eg.  Like the tail on this character. I'm not sure if I can/should do an applique in that case. Is there a good rule of thumb for it?
|
|
#
?
Apr 14, 2012 10:32
|
|
|
Brainbread posted:My concern lies with the 3 and 6 coloured pieces of "hair". With 3 colours, it won't be that bad (I can just line the smaller colours side by side, stitch them on), but with the 6-coloured manes, there is not "base" colour that I am working with. It might not be perfect for you in every situation. That's why I'm advocating trying a bunch of stuff out on scraps. You can play around with overlapping the sections a bit and then trimming the bottom piece to cut back on bulk or leave it. It sounded like what you were doing involved a lot of hand stitching. I'm curious to know how that factors in.
|
|
#
?
Apr 14, 2012 17:34
|
|
|
 The distance between the stitches is a bit much, but I've always had difficulty with my machine when I change up the stitch distance (it jams a lot). But it made doing this beanie way easier.
|
|
#
?
Apr 14, 2012 21:46
|
|
|
I guess a good rule of thumb would be "if it drives you to drink, try a different method." I don't think it would work well on Rainbow Dash, like you said, but it might be perfect for Twilight. Cute beanie by the way.
|
|
#
?
Apr 14, 2012 22:13
|
|

|
flutterbyblue posted:I guess a good rule of thumb would be "if it drives you to drink, try a different method." this. You can stitch over a section multiple times if you think that would work better. With satin stitch like that it's easiest for me not to back stitch but to use the bottom thread to pull the upper thread to the backside then tie them together.
|
|
#
?
Apr 14, 2012 23:28
|
|
|
edit: looks like I should be all set on this front, thanks goons!
Arnold of Soissons fucked around with this message at 12:39 on Apr 17, 2012 |
|
#
?
Apr 17, 2012 02:27
|
|

|
Arnold of Soissons posted:edit: looks like I should be all set on this front, thanks goons! Good to hear! I do make other things, but I haven't upgraded my account so I couldn't inquire ^^ Anyhoo. Some more stuff I made  Stitch spacing is still a bit apart, but I fixed that for a deer hood that I made, so I am pretty sure I'll be able to make use of this for the next commission I have to work on. Thanks for sharing the secrets of Applique with me. Not having formal training in sewing is turning out to be a bit of a detriment
|
|
#
?
Apr 18, 2012 19:18
|
|
|
  "Vinyl Scratch" plushie as a gift. I got metal plates at the back of the embroidered goggles, and magnets inside the plushie behind the eyes. Edit: Tinypic decided my photo was no longer good, I guess? Replaced with newly uploaded version. Brainbread fucked around with this message at 20:48 on Apr 23, 2012 |
|
#
?
Apr 20, 2012 21:59
|
|
|
Brainbread, do you ever take non-pony commissions, or do you do strictly pony work? I'm asking both out of curiosity and because I'm thinking of getting a (not pony) commissioned sometime in the near future and I always prefer throwing people from SA work if I can.
|
|
#
?
Apr 20, 2012 23:54
|
|

|
Rootbeer Baron posted:Brainbread, do you ever take non-pony commissions, or do you do strictly pony work? I'm asking both out of curiosity and because I'm thinking of getting a (not pony) commissioned sometime in the near future and I always prefer throwing people from SA work if I can. I've done non-pony stuff before, such as Griffons  Little Deer Things  Most of my commissioned work is purely pony-related, and my prices for commissions are based on that. What you're looking to have made, a photo reference if possible, and how much you're planning on spending (I can give a size and time estimate off that). Brainbread fucked around with this message at 00:56 on Apr 21, 2012 |
|
#
?
Apr 21, 2012 00:09
|
|
|
Email sent, feel free to take your email address out of your post if you're worried about spam. Also, just to stay on topic, I do love all the plushes in this thread and I'm super envious of all of your skills. I don't even like MLP and yet I find myself craving those goofy ponies, that's how talented you guys are.
|
|
#
?
Apr 21, 2012 00:54
|
|
|
Finished a new guy! It's a newtgat from viva pinata, a friend asked me to make it for her.  \/\/\/ yep blackflare fucked around with this message at 17:37 on Apr 21, 2012 |
|
#
?
Apr 21, 2012 17:16
|
|

|
blackflare posted:Finished a new guy! It's a newtgat from viva pinata, a friend asked me to make it for her. Ho ku! Are those iron-on eyes?
|
|
#
?
Apr 21, 2012 17:20
|
|
|
  Fiddling with the contrast settings on my camera to actually get the colours right. It looks correct, but the photos look almost smokey. So. I think I have to buy a really good camera soon, and proper lighting. I have a mix of tungsten, fluorescent, and natural light when I photo >.> I do like how they look. The point on the nose is always a bit iffy for me, but it looks like it worked out on at least one of them. I need to make more consistent toys.
|
|
#
?
May 1, 2012 02:14
|
|
|
     I really like the first one. I found a sweater-knit something or another that looks like it'd be perfect as a scarf. Turned out it was. Was a blast to do. The others feel more like work though, sadly. I love new character designs, as re-making the same one over-and-over gets a bit tiresome! But this little batch is done. Whew. Back to work.
|
|
#
?
May 3, 2012 23:58
|
|
|
My mom collects kangaroos, so I made these for her last Christmas:    The pattern I used was McCall's 6400, and I gave them bows also but never got a good picture with those on. They were handstitched and took forever, then I ended up getting a sewing machine for Christmas myself  Also, just made:  From nolen's  pattern. The small one is 1/3 size and was for practice, that's why he looks a bit off (pulled the dimple string too hard, now he's a buttchin.) If there's still any interest in frogs, I'd really like to make and sell more of both sizes! pattern. The small one is 1/3 size and was for practice, that's why he looks a bit off (pulled the dimple string too hard, now he's a buttchin.) If there's still any interest in frogs, I'd really like to make and sell more of both sizes!
|
|
#
?
May 4, 2012 01:47
|
|

|
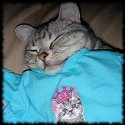
Haven't posted in here forever, you guys have been keeping busy with some AMAZING work. Has anyone done a comic or anime convention? Because I'm at a loss and not sure if I should make more smaller items or big plushes? In the meantime, here are a few plush items I've made recently:  Free Candy? by deadly_sweet, on Flickr  In-bread Cat by deadly_sweet, on Flickr  Ironman Plush by deadly_sweet, on Flickr
|
|
#
?
May 4, 2012 20:34
|
|

|
deadlysweet posted:Haven't posted in here forever, you guys have been keeping busy with some AMAZING work. Thiis is great. Somehow made him even more adorable. I really have no experience from conventions (I've never even been to one >.>), but I'd figure the smaller stuff would be a safer bet. Get more impulse buys out of people, and if it doesn't sell, its not as big of a chunk of your time that was "wasted".
|
|
#
?
May 4, 2012 21:57
|
|
|
I've got a question, what's the best craft glue for felt/fleece? I used krazy glue for the pupils and nostrils on my frogs but I'm sure there's something more appropriate I could be using.
|
|
#
?
May 4, 2012 22:12
|
|
|
Voltin Bolt posted:From nolen's It depends on how much you're hoping to sell them for and what kind of marketing you may be able to do on the forums. I don't know how closely you followed the frog pattern discussion, but I don't know how much interest still remains. Shortly after Nolen released the pattern one goon had a thread selling them for $95 and I don't think they got many takers. The ones I was made I auctioned at about $60-75. I had a SA mart thread for a while with those and other stuff and didn't get too much interest. I hate gluing stuff like that on so I sew stuff like that. I think company that makes crazy glue also makes a bunch of other glues like fabric and maybe even felt specific. I'm not sure how different they are. I think I remember deadlysweet using glue on a fruitcake. Plus I totally love her(?) stuff.
|
|
#
?
May 5, 2012 02:12
|
|
|
Voltin Bolt posted:
This looks so good! Yay! Regarding glue, I'm with Comrade Quack: sew 'em on and don't worry about them coming off later. Though I will say that the original frog used fabric glue, so take that as you will.
|
|
#
?
May 5, 2012 07:09
|
|
|
Comrade Quack posted:Not exactly plush but I think it still counts: It counts, it counts! It made me laugh so thank you.
|
|
#
?
May 5, 2012 07:19
|
|
|
All of my eyes and details are either buttons (stitched on) or iron-ons, so I have no idea what kind of glue to use. Also, just finished an all-day project. 16" tall to her horn. The applique suggestion y'all gave me worked out really nicely, though I also ran a straight stitch over top of it to flatten both halves of the fabric together, and to align it with the texture stitches. She's also ridiculously pose-able too. Going from  To  Her tail acts as a bit of a copout as it acts as almost another leg for standing.
|
|
#
?
May 5, 2012 09:53
|
|
|
I'm not worried about the krazy glue as far as strength is concerned, it just annoys me how it makes the felt stiffen up after it's applied. I've got a bottle of Aleene's tacky glue lying around, but I bought that for papercrafts and I think it's really water soluble... though they make fabric glues too, maybe those are good? I'm terrible at pricing things, looking at the previous frog thread I was thinking around $50 for fullsize ones might work? Something like $20-30 for the small frogs probably, I've also got pieces printed for a half-scale version. I'm hoping at least the cheaper ones will garner some interest, they can be desk buddies and stuff! Just waiting on a replacement camera cable so I can get better pictures before I try starting a SA-Mart thread. Also I forgot to add this one to my last post, it was a prototype for a giant tarantula pattern I've been trying to figure out for ages:   I got tired of sewing the legs so it's missing its pedipalps (and spinnerets cause I got lazy.) The weird fabrics are cause I was literally using whatever scraps I could find, the ideal finished version would be faux fur, as anatomically correct as possible, and 2.5-3' long 
|
|
#
?
May 5, 2012 11:05
|
|
|
Voltin Bolt posted:I'm terrible at pricing things, looking at the previous frog thread I was thinking around $50 for fullsize ones might work? Something like $20-30 for the small frogs probably, I've also got pieces printed for a half-scale version. I'm hoping at least the cheaper ones will garner some interest, they can be desk buddies and stuff! Just waiting on a replacement camera cable so I can get better pictures before I try starting a SA-Mart thread. When I'm doing a commission, I general price it at $15/hour + materials (for standard stuff), and if its something interesting or fun, I generally just ignore that I spend 15 hours on the thing. Minimum wage + materials is probably a decent heuristic if you're not working, but if its just a hobby charge whatever. That tarantula looks fantastic. Are the legs poseable? (I generally use pipe cleaners for that kind of thing. They fill out the bits and work nicely for bending)
|
|
#
?
May 5, 2012 18:27
|
|
|

|
| # ? May 15, 2024 14:04 |
|
|
   Another commission done. The fetlocks are a bit time-consuming to do; I put a layer of fabric on the inside of the main body (so I make the body normally, then add the "hoof" colour as another leg piece). I then cut the outside piece to make the rough edges, and use the hoof colour as the bottom piece. Its just a nightmare for really thin legs; makes them hard to stuff. And thank y'all so much for telling me about applique. The armour was made entirely by doing that. I just stitched the yellow straight to the purple bottom layer on the outside, drew the pattern of the inside part on it with a fabric marker, and then put my stitches down. It was easy to cut out the yellow to reveal the bottom layer, and looks pretty good for my first attempt at it.
|
|
#
?
May 11, 2012 21:15
|
|