

|
Suicide Watch posted:Yeah, this must be it. Thanks! depends what kind of grain you're adding. I'd rather shoot clean iso and add grain than to shoot at a high iso for the "grain" effect of noise.
|
 #
?
Dec 24, 2012 03:23
#
?
Dec 24, 2012 03:23
|
|


|

|
| # ? Apr 27, 2024 15:39 |
|
|
Did the new 4.3 update make LR weird for anyone else? Where it was running perfectly smooth in 4.1 and 4.2, all of a sudden it will nearly crash and sometimes freezes if I switch to Develop mode, takes much longer to load initially, and lots of other things now make it chug along. Is there some setting I can change?
|
|
#
?
Dec 24, 2012 19:05
|
|

|
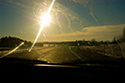
Is it even worth trying to close out the light source at the top of the frame? I didn't notice it when I took the shot and now it's really distracting me  I've tried cloning it out a few times, each is a bit closer, but I'm just not very good at it. Any clone tool tips?  I guess I could just crop it a bit more and then clone out the rest. Google Butt fucked around with this message at 23:08 on Dec 26, 2012 |
|
#
?
Dec 26, 2012 22:55
|
|


|
Google Butt posted:Is it even worth trying to close out the light source at the top of the frame? I didn't notice it when I took the shot and now it's really distracting me This should be an OK clonejob as there's a strong set of horizontals to work with - if you set your clone point on the border of the blue and tan and then move the destination point horizontally and make sure the preview clone is level (this may only be in newer photoshop versions, you'll have to just eyeball it if theres no clone preview) you should be able to take out all the fitting in a few strokes. Make sure you 'stop and go' or the clone source will pick up the fitting as you pass over where it was originally, the brown bit at the top you'll need to do a lot of short strokes. Literal 3 minute job: 
NoneMoreNegative fucked around with this message at 01:37 on Dec 27, 2012 |
|
#
?
Dec 27, 2012 01:35
|
|


|
Make sure you create an empty transparent layer first, and have the tool of your choice sample "Current & Below".
|
|
#
?
Dec 27, 2012 02:06
|
|
|
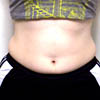
While you're at it, can you clone that sandwich into my tummy? It looks tasty.
|
|
#
?
Dec 27, 2012 02:52
|
|

|
xzzy posted:While you're at it, can you clone that sandwich into my tummy?  So I spent a hour dicking around with cloning and working with a mask..then I tried the content-aware patch tool. Took 15 minutes and imo more passable than the results I was getting before. edit: How does the rest of it look? Colors/levels? 
|
|
#
?
Dec 27, 2012 03:18
|
|
|
Was going through some old photos and decided to try cleaning this one up. It was taken at a car show, there was a rope barrier at the top right and some people's feet/legs that I removed. The light source is awful I know, just wondering if it still looks obviously edited
|
|
#
?
Dec 28, 2012 17:59
|
|

|
Google Butt posted:
The colors look good to me but I am on my laptop with a crummy screen. There is a hot spot that catches my eye on his top forehead and I personally would add some more contrast overall but otherwise it looks good. I would soften the patch work done on the upper right corner a touch, it looks too sharp.
|
|
#
?
Dec 28, 2012 21:48
|
|

|
neckbeard posted:Was going through some old photos and decided to try cleaning this one up. It was taken at a car show, there was a rope barrier at the top right and some people's feet/legs that I removed. The light source is awful I know, just wondering if it still looks obviously edited It looks okay. Have you tried taking off some of the hot spots with clone tool to see what you end up with? I love how the light is picking up the gills it's just the top facing surfaces that are ruined.
|
|
#
?
Dec 28, 2012 21:53
|
|


|
Anyone in these parts use a dropbox-style "folder syncing" software with Lightroom? I'm in the process of setting up a home cloud storage type deal, and one thing that would be cool to do is sync my Lightroom catalogs across multiple computers so I can process photos on any computer I own, and those edits will show up all my other computers. I'm just not sure whether Lightroom will appreciate me doing this.
|
|
#
?
Dec 28, 2012 22:49
|
|
|
xzzy posted:Anyone in these parts use a dropbox-style "folder syncing" software with Lightroom? Should be OK as long as you make sure not to have Lightroom open on more than one computer at a time.
|
|
#
?
Dec 29, 2012 05:05
|
|

|
Same bird, I have no idea what I am doing, he;lp. I guess I'm asking which way looks better, should I be cropping differently, what can I do to make it be better-looking period, etc. I wet print b&w, this is completely new to me.  
|
|
#
?
Dec 29, 2012 08:11
|
|
|
Does anyone find the auto tone button in Lightroom 4 accurate or useful? Compared to what I consider a nicely exposed and balanced shot, Lightroom usually makes it look really blown out and overexposed.
|
|
#
?
Dec 30, 2012 12:00
|
|

|
All autocorrect buttons on anything are someone else's idea of what your photo should look like, which is probably bad.
|
|
#
?
Dec 30, 2012 13:10
|
|


|
I have 2 monitors hooked up to my PC. A small 17" LG screen using generic drivers and a 23" Dell SP2309 using its "correct" drivers. If I look at images in a browser on either monitor they look "right". If I look at images in Lightroom on the small LG monitor it looks "right". If I look at images in Lightroom on the larger monitor images end up looking more yellow and brighter. LG monitor: browsers/Lightroom/photoshop  Dell monitor: Lightroom/photoshop  Can anyone help me with this? I'm sure it's related to colour profiles but damned if I know how the hell to fix it.
|
|
#
?
Dec 30, 2012 13:35
|
|

|
I was just messing with calibrating monitors yesterday and there is an option in windows 7 to calibrate them by adding or subtracting the levels of red blue or green. It basically gives you five shades of gray and you adjust them to make them look as neutral as possible. It helped me take out some of the yellow in my older monitor. It was located under an "advanced" tab in the monitor properties. dont hate the playa fucked around with this message at 17:45 on Dec 30, 2012 |
|
#
?
Dec 30, 2012 17:43
|
|
|
I have a photoshop question that I've been unable to find an answer to. A lot of my shots are processed like what you see in the picture below, where I've masked separate areas of the picture, grouped them via mask, and applied different processing to each masked area. 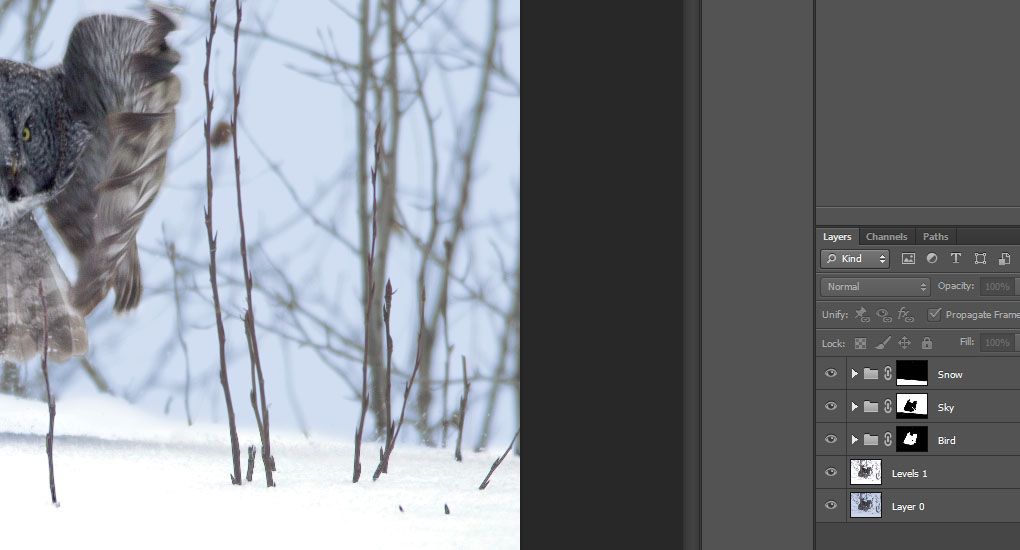 Now say I want to remove the branch that is covering part of my bird. Currently the only way I know to do this is to flatten all my layers and then start cloning, but is there a way to do this so that I don't need to flatten the image first (other than doing the cloning step first to get rid of the branch)?
|
|
#
?
Jan 1, 2013 05:59
|
|

|
Are you not using adjustment layers?
|
|
#
?
Jan 1, 2013 06:03
|
|
|
TheLastManStanding posted:Are you not using adjustment layers?
|
|
#
?
Jan 1, 2013 06:12
|
|
|
InternetJunky posted:Now say I want to remove the branch that is covering part of my bird. Currently the only way I know to do this is to flatten all my layers and then start cloning, but is there a way to do this so that I don't need to flatten the image first (other than doing the cloning step first to get rid of the branch)? Create a new empty layer at the top of the stack. Set source mode of clone/heal/whatever to "current layer and below." The catch you may run into is that because you've already sharpened, you're committed to working with that sharpened data. If you've made any color, contrast, or tone changes using dialog boxes rather than adjustment layers, you're also committed to those. If you decide down the road you don't like any of those things then you'll have to do the entire clone job again. Ideally, you want your cloning at the bottom of the stack (just above the background), your adjustments on top, and then any kind of sharpening or other final touches at the top either layered or done on a merged layer. Sometimes it doesn't always work out that way (like, say, if you just now decided you don't like that branch), but it makes life easier when it works. TheLastManStanding posted:Are you not using adjustment layers? Looks like Molten Llama fucked around with this message at 07:28 on Jan 1, 2013 |
|
#
?
Jan 1, 2013 07:18
|
|

|
Rather than making permanent alterations to layers and then masking, you can make adjustment layers (the little black/white circle at the bottom of the layers palate) which are non destructive, can be changed at any point, and can each have individual masks: That way your image is only taking up one layer. For this image, since you are already have everything set up like you do, you can select all (ctrl-a), then copy merged (crtl-shift-c), then paste: This makes a new layer that is basically a flattened version of your image, but without actually flattening it. That way you can clone however you want without losing your previous masks or layers. Also, if you hadn't found out already, you can merge selected layers (ctrl-e) rather than flatten: This can be useful if you want to merge your cloned edits back in at some point without losing other layers.
|
|
#
?
Jan 1, 2013 07:25
|
|
|
Thanks for the replies everyone.TheLastManStanding posted:Rather than making permanent alterations to layers and then masking, you can make adjustment layers (the little black/white circle at the bottom of the layers palate) which are non destructive, can be changed at any point, and can each have individual masks: That way your image is only taking up one layer. quote:For this image, since you are already have everything set up like you do, you can select all (ctrl-a), then copy merged (crtl-shift-c), then paste: This makes a new layer that is basically a flattened version of your image, but without actually flattening it. That way you can clone however you want without losing your previous masks or layers. Also, if you hadn't found out already, you can merge selected layers (ctrl-e) rather than flatten: This can be useful if you want to merge your cloned edits back in at some point without losing other layers.
|
|
#
?
Jan 1, 2013 15:23
|
|
|
So I'm having some considerable trouble with some photos I took today. I just got a t3i converted to infrared in which I have to manually set the white balance in camera for each lighting situation. However, when I view the photos in Bridge/preview it's completely jacked up. In my files the color is correct, in Bridge it's completely wrong, and when I view in preview or iPhoto they're way overexposed. If I import it into camera raw in photoshop the white balance is "as shot" but I can't adjust the sliders to any resemblance of what it should be. It just gives me that at one end of the spectrum and crazy over-saturated at the other. Any other raw photo with my MK II? Fine. This is the first time I have ever encountered this before. What in the hell is going on and how do I fix it? 
|
|
#
?
Jan 3, 2013 06:14
|
|
|
The problem with bridge/preview is probably that the white balance is outside the limits of their converter (which wouldn't surprise me for preview, but seems odd for bridge). When I process my IR photos in lightroom the color temp slider is about two or three clicks from the left and it's extremely finicky; a click in either direction is pretty much full red or full blue. I generally have to type numbers in to get it where I really want it. But even then it doesn't matter two much since I end up using gradient maps to give the images false color, but the tiny color separation that I do get out of using a good color balance leads to a cleaner final image. Are you not using a visible light filter?
|
|
#
?
Jan 3, 2013 06:39
|
|
|
I'm using the Super Color IR filter from Life Pixel: http://www.lifepixel.com/infrared-filters-choices If the WB is outside the limits, is there another software I could be using? Even just to make it a jpeg at this point so I don't have to trash the photos?
|
|
#
?
Jan 3, 2013 16:24
|
|
|
So I'm trying to do a photo-illustration using some images of money (bills), and Photoshop actually recognized this and locked me out of that file haha. That's a first for me.
|
|
#
?
Jan 3, 2013 22:31
|
|

|
Yea, PS has had that feature for a few versions.
|
|
#
?
Jan 3, 2013 22:36
|
|

|
GIMP doesn't implement currency detection, if you really need to edit the image.
|
|
#
?
Jan 3, 2013 23:24
|
|
|
Eh it's not that big of a deal. Just made me laugh, is all.
|
|
#
?
Jan 3, 2013 23:26
|
|
|
That's due to the EURion constellation, right? http://en.wikipedia.org/wiki/EURion_constellation Pretty cool I thought.
|
|
#
?
Jan 4, 2013 00:53
|
|

|
Squibbles posted:That's due to the EURion constellation, right? Black magic supplied as a black box to Adobe by a shadowy world banking consortium.
|
|
#
?
Jan 4, 2013 02:11
|
|
|
InternetJunky posted:Thanks for the replies everyone. You may also want to use stamping (copying all visible content into a new layer) in your workflow. Its basically the same process quoted except as one keyboard command: Ctrl+Alt+Shift+E (Mac users naturally use Option instead of Ctrl)
|
|
#
?
Jan 4, 2013 07:38
|
|
|
Molten Llama posted:Black magic supplied as a black box to Adobe by a shadowy world banking consortium. Wow, that is actually quite fascinating.
|
|
#
?
Jan 4, 2013 17:35
|
|
|
Squibbles posted:Wow, that is actually quite fascinating. I had a quick skim but I seem to be able to open currency images in my photoshop? How come?
|
|
#
?
Jan 4, 2013 17:42
|
|
|
Zlatan Imhobitch posted:I had a quick skim but I seem to be able to open currency images in my photoshop? How come? Yeah I'm not sure what exactly triggered it. Here was my process: 1) I found a couple currency images on google. They were of the new Canadian bills, and pretty clearly taken by someone & their home camera 2) I opened them in Photoshop, desaturated them, used them as background images in a couple illustration roughs 3) One of my roughs got locked out. The other didn't. Not sure what triggered it in the one and not the other.
|
|
#
?
Jan 4, 2013 17:45
|
|
|
I'm trying to achieve this look.  It's kind of a hazy/muted color effect I've seen in a lot of pictures, almost looks like a painting. I havent had much luck replicating the effect. Anybody have an idea of how to get this look? skram fucked around with this message at 05:44 on Jan 7, 2013 |
|
#
?
Jan 7, 2013 05:37
|
|
|
It looks like a combination of low contrast and split toning. In Lightroom, switch your tone curve to points, then drag the black point up say 1/5 of the way. This means that pixels that were black in the original are now 80% grey. Then add an orange/yellow tone to the highlights, and maybe a little green to the shadows.
|
|
#
?
Jan 7, 2013 12:57
|
|
|
Solid color fill layers set to exclusion will also do the trick. Here's a quick example and the steps I took: 1. Duplicate background layer, set its blending mode to screen, and decrease its fill opacity to 75% 2. Use color balance tool to increase warmth 3. Use curves tool to create contrast 4. Create solid fill layer, set layer blending mode to exclusion, and choose a dark blue color
|
|
#
?
Jan 8, 2013 17:46
|
|
|

|
| # ? Apr 27, 2024 15:39 |
|
|
Instrumedley posted:Solid color fill layers set to exclusion will also do the trick. Instead of a solid color layer I find its better to use a flare shot on black set to screen mode and colorized. That way there is a gradient and light source, making it look more natural. You can shoot flare elements at home using a light source and a black card/floppy to get something like this. I like a basic gradient flare without the circles but sometimes they add to the image. Don't be afraid to stretch and warp the living poo poo out of it to position it just watch out for banding. (I didn't shoot this) 
raggedphoto fucked around with this message at 05:35 on Jan 9, 2013 |
|
#
?
Jan 9, 2013 05:32
|
|