|
You can "export as catalog" from the laptop and then "import from another catalog" on the desktop. Not sure if there's a more efficient workflow, but that's what I do.
|
 #
?
Nov 4, 2015 20:14
#
?
Nov 4, 2015 20:14
|
|


|

|
| # ? Apr 29, 2024 20:00 |
|
|
Get bittorrent sync or any other syncing software you fancy installed on both machines. Point this program at your Lightroom catalog on one machine and let it copy it to the other.. presto, you have all your photos and Lightroom edits on both machines. btsync isn't as great as it was as they're trying to make it a subscription service, if you find that distasteful you can hunt down the last free version which was 1.4.111 and works fine. Syncthing is an open source alternative.
|
|
#
?
Nov 4, 2015 20:25
|
|

|
xzzy posted:Get bittorrent sync or any other syncing software you fancy installed on both machines. Point this program at your Lightroom catalog on one machine and let it copy it to the other.. presto, you have all your photos and Lightroom edits on both machines.
|
|
#
?
Nov 4, 2015 20:28
|
|

|
Do you guys have super large SSDs in your laptops then? Or are just super ruthless with deleting photos you're not massively keen on? I'd like to do that, but I only have a 120gb Air so I do the export as catalog method and then clean the library out each time. I'm not working on laptop that much mind, just when travelling.
|
|
#
?
Nov 4, 2015 21:05
|
|


|
I just don't have a lot of SSD's yet. My desktop does have a small SSD, what I've taken to doing is my initial import goes to the SSD, I do some edits and delete rejects there, then move the catalog to my normal HDD.
|
|
#
?
Nov 4, 2015 21:06
|
|
|
I edit on 2 desktops. One of them has my archive, the other doesn't. LR doesn't give a poo poo and will just show the drive as DC'ed.
|
|
#
?
Nov 4, 2015 21:08
|
|
|
Haggins posted:I need to reconfigure my Lightroom workflow. I currently have an iMac which was my sole computer for editing and archiving. Today I just bought a Macbook, which I would like to use to edit photos on the road and eventually move to my iMac when I return home. As a techie I just want to say that moving them to your iMac is not a valid archiving strategy. If you're at all serious about keeping your stuff or you have paid work like weddings, you want to archive to the cloud. I'm on the far far far side of the spectrum and run an Asustor 2U 9 bay system which let's me run a raid for drive redundancy. Everything gets moved there over the network from the SD cards, the wife and I both pull down whatever we need locally or if we are just curating it's fast enough over the gigabit network to open stuff directly over the network drive. After processing we save updates or final publishes to that raid as well. For important stuff, it gets auto sent to the cloud (based on folder structure) after we curate and/or process. Cloud space is a lot cheaper then it used to be but is still not so cheap that I'm willing to store just anything up there. This whole thing is far more elaborate and expensive then we really need but I've worked on too many computers that had scrambled data to believe that keeping something on a single hard drive was ever a good idea. Even if your drive never goes out, you got theft, fire and water damage that can destroy your poo poo far too easily. You may have just been talking about local archiving but it worries me, so please everyone consider how you're keeping your poo poo so you don't have to go bug your "good with computers" friends to try and bail your rear end out after poo poo goes south. Anubis fucked around with this message at 00:15 on Nov 8, 2015 |
|
#
?
Nov 8, 2015 00:12
|
|

|
https://www.youtube.com/watch?v=V-DPJ-UuguQ
|
|
#
?
Nov 15, 2015 23:39
|
|
|
So if I wanted to step into touching up RAW images as an absolute beginner (My computer artistry peaks at using paint), should I try going right into Lightroom? Or is there decent, cheaper, easier to use software available, if not as feature rich and powerful. More interested in spending 5-10 minutes on one or two good pictures sort of thing.
|
|
#
?
Nov 16, 2015 22:00
|
|
|
There are some open source options out there if you just want to dip your toes, but last time I looked into them they were so clumsy it almost wasn't worth the effort. Most of them are super basic conversion tools with limited options for adjusting curves and exposure.. they're basically conversion tools that output a tiff that you import into an actual paint program, such as gimp. So basically.. just get Lightroom. You can get a 30 day trial with creative cloud to see if it's something you might like, or you can hunt down a CD copy of an older version for cheap.
|
|
#
?
Nov 16, 2015 22:10
|
|
|
Golluk posted:So if I wanted to step into touching up RAW images as an absolute beginner (My computer artistry peaks at using paint), should I try going right into Lightroom? Or is there decent, cheaper, easier to use software available, if not as feature rich and powerful. Spend the $10 a month on Lightroom/Photoshop. If you hate it after a month you paid nothing. If you hate it after 2, you are only out 
|
|
#
?
Nov 16, 2015 22:12
|
|

|
It's a 12 month contract isn't it? But yes, Lightroom is going to be your easiest step forward. I much prefer working quickly in LR to trying to remember where everything is in PS.
|
|
#
?
Nov 16, 2015 22:28
|
|
|
EL BROMANCE posted:It's a 12 month contract isn't it? But yes, Lightroom is going to be your easiest step forward. I much prefer working quickly in LR to trying to remember where everything is in PS. Oops, I thought it wasn't. Spend a month with it then.
|
|
#
?
Nov 16, 2015 22:30
|
|
|
Alright, I'll give the month trail a shot to go through some tutorials. Speaking of, any tutorials stand out for the basic and most commonly done adjustments in Lightroom? Of course, first I have to learn to take some half decent photo's first to work with. Nothing like finally getting the camera in hand, taking a few shots, and realizing you have a lot of work ahead of you to get those great looking shots people are posting.
|
|
#
?
Nov 17, 2015 00:35
|
|
|
Anthony Morganti's channel on YouTube has a full guide to the latest version. Definitely enough to get you started. Otherwise Lynda.com or CreativeLive if you want to spend money. I'd just stick to YT to start personally.
|
|
#
?
Nov 17, 2015 00:38
|
|
|
Creative Cloud inundates you with tutorial crap when you first install it too, so browse through that.
|
|
#
?
Nov 17, 2015 00:50
|
|
|
Golluk posted:Alright, I'll give the month trail a shot to go through some tutorials. Speaking of, any tutorials stand out for the basic and most commonly done adjustments in Lightroom? Lightroom isn't even that hard to use; sure you can use tutorials to see how some procedures are commonly done but mainly it's a matter of adjusting/playing with sliders until you achieve the effect you like/are trying to emulate. Once you understand curves and the main terms (luminosity, saturation, hue) you just start messing around. Or you can get a collection of presets and use those as starting points.
|
|
#
?
Nov 17, 2015 03:51
|
|

|
Do yourself a favor and learn how to set up the import / cataloging / archiving features of LR from the get-go. It'll save you the headache of reorganizing later if you do decide to stick with it.
|
|
#
?
Nov 17, 2015 15:20
|
|
|
Suicide Watch posted:Lightroom isn't even that hard to use; sure you can use tutorials to see how some procedures are commonly done but mainly it's a matter of adjusting/playing with sliders until you achieve the effect you like/are trying to emulate. Once you understand curves and the main terms (luminosity, saturation, hue) you just start messing around. Or you can get a collection of presets and use those as starting points. Pretty much this. EL BROMANCE posted:Anthony Morganti's channel on YouTube has a full guide to the latest version. Definitely enough to get you started. Otherwise Lynda.com or CreativeLive if you want to spend money. I'd just stick to YT to start personally. It's not uncommon for libraries to offer Lynda.com access to patrons, worth having a look. Saint Fu posted:Do yourself a favor and learn how to set up the import / cataloging / archiving features of LR from the get-go. It'll save you the headache of reorganizing later if you do decide to stick with it. I... need to do this 
|
|
#
?
Nov 17, 2015 22:01
|
|
|
Saint Fu posted:Do yourself a favor and learn how to set up the import / cataloging / archiving features of LR from the get-go. It'll save you the headache of reorganizing later if you do decide to stick with it. Yeah, definitely worth reading up on how people do this and work out what's best for you. I personally have folders separated by place as I've been travelling around a fair bit the last few years. Never move files once they're in the library using Finder/Explorer or you'll cause all kinds of headaches. It took me far to long to find the 'show one folder up' on the context menu after doing some re-org. I'm kind of happy the way my setup is now. Kind of.
|
|
#
?
Nov 17, 2015 23:40
|
|
|
Anubis posted:As a techie I just want to say that moving them to your iMac is not a valid archiving strategy. If you're at all serious about keeping your stuff or you have paid work like weddings, you want to archive to the cloud. I'm on the far far far side of the spectrum and run an Asustor 2U 9 bay system which let's me run a raid for drive redundancy. Everything gets moved there over the network from the SD cards, the wife and I both pull down whatever we need locally or if we are just curating it's fast enough over the gigabit network to open stuff directly over the network drive. After processing we save updates or final publishes to that raid as well. For important stuff, it gets auto sent to the cloud (based on folder structure) after we curate and/or process. Cloud space is a lot cheaper then it used to be but is still not so cheap that I'm willing to store just anything up there. Oh I agree, I just mostly wanted a master collection with all my photos instead of having some lingering around on the laptop. I have a 3TB on my iMac which I use time machine to back up to a 4TB external drive. On top of that I use Backblaze which backs up all my photos/data in the cloud to cover in case of fire/theft/ whatever. Haggins fucked around with this message at 01:06 on Nov 20, 2015 |
|
#
?
Nov 20, 2015 01:04
|
|

|
Does anyone have an opinion on Capture One, or other alternatives to Lightroom? (I'm using Windows, but don't let that stop the discussion from going elsewhere.) I started looking because LR has been running like a butt for me lately. Like, it's so slow that I'll think it's crashed sometimes. It may be fixable, but it got me wondering what else was out there. I'm messing around with the C1 trial, and while the workflow is weird, and there are a lot of things I don't understand yet, the raw files from my a6000 look awesome immediately upon import. In LR, the starting point is always a washed out mess with weird colors (especially skin tones, especially especially for non-white people, holy poo poo). I spend half my time just trying to make things look as good as the in-camera jpegs. I bet there's some kind of preset I could make that would improve the import experience in LR, but the way things come out in Capture One is eye-opening. Are there other programs that you'd recommend checking out? Any pros or cons of Capture One that you think I should be aware of? Should I just suck it up and use Lightroom and stop trying to be a special snowflake?
|
|
#
?
Nov 21, 2015 01:31
|
|

|
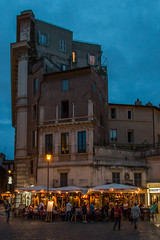 IMG_6612.jpg by Chris Erwin, on Flickr IMG_6612.jpg by Chris Erwin, on FlickrI can't get what I want out of this picture. I'd like it took look darker out, and to emphasize the warm light from the restaurant, as if it were a moody painting. Any advice on what to try in Lightroom? I don't quite get the tone curve tool yet, and that's probably the answer. Should I also move the temp slider warmer for the whole thing?
|
|
#
?
Nov 25, 2015 05:01
|
|


|
I'm not quite sure if I understand you correctly; do you want it to be darker in general, except for the restaurant? If so, you can use a graduated filter that you pull down from the top towards the restaurant. You can also use the brush tool, tweaking exposure/shadows, etc. I usually try different things until something works. I'm no Lightroom wizard, but I'd say the lights from the restaurant is warm enough already. A tiny exposure bump (alone or together with the stuff mentioned above) might be all you need. If you want the light to be warmer still, you can use the brush tool on the restaurant and tweak the temperature there.
|
|
#
?
Nov 25, 2015 12:17
|
|

|
I have Lightroom set to convert all to DNG and also store my changes in DNG as they're done, which is useful as I sent a few pictures to a friend and he was able to import them into an (earlier) version of LR and see what I'd done rather than start with just the base image. Question is this - I backup to Amazon when I can be arsed, rather than at a set time pre/post editing so my pictures on their servers are in a different state to they are on my computer. As long as I have the DNGs up there, regardless of settings saved in them, and the latest copy of my library... I'm golden if I have a massive crash, right? Library overrides DNG local settings is essentially what I'm hoping for.
|
|
#
?
Nov 25, 2015 12:43
|
|
|
Erwin posted:
I usually don't like editing other people's photos and I hope you forgive me for doing so. Are you looking for something like this?  It's all photoshop instead of lightroom if so. A layer on my butts to decrease brightness, drop saturation, and some manual burn in the highlights to keep it from being too "hdr". A burn layer on the upper parts of the building to eliminate a lot of the ambient light (again, otherwise it looks very HDR). Some yellow paint on all lights and the bistro (and some of the street and building directly above the lights) so you don't have to mess with the overall color balance down there, yet you get more of that incandescent pop. Not to say my work is any good at all but if this is closer to how you want it ending up, you'll need tools that can separate out pieces of the photo instead of using sliders to edit on the whole.
|
|
#
?
Nov 25, 2015 15:55
|
|
|
Dial down the HDR look and you're golden.
|
|
#
?
Nov 25, 2015 17:48
|
|


|
Judge Schnoopy posted:I usually don't like editing other people's photos and I hope you forgive me for doing so. Are you looking for something like this? That's definitely more of what I'm looking for, yeah. I'll try Photoshop instead of Lightroom - I think I need to work more in Photoshop in general and realize that the photos that I really want to do something with I need to work on in Photoshop. Thanks! And nice Cloud to Butt Plus usage.
|
|
#
?
Nov 25, 2015 21:32
|
|
|
Wikipedia Brown posted:Does anyone have an opinion on Capture One, or other alternatives to Lightroom? (I'm using Windows, but don't let that stop the discussion from going elsewhere.) i find C1 to be slower than LR so your result is weird to me The thing you want in LR is in the develop module all the way at the bottom under Camera Calibration. Change the profile from "Adobe Standard" to the simulation of w/e in-camera mode you like. You can set all your photos to have this change applied to them on import. Here is a web page that explains it all using canon RAWs as the example https://photographylife.com/how-to-get-accurate-canon-colors-in-lightroom. The stuff available in the profile selection changes based on the type of camera the raws came from.
|
|
#
?
Nov 25, 2015 22:01
|
|

|
Erwin posted:That's definitely more of what I'm looking for, yeah. I'll try Photoshop instead of Lightroom - I think I need to work more in Photoshop in general and realize that the photos that I really want to do something with I need to work on in Photoshop.
|
|
#
?
Nov 25, 2015 23:45
|
|
|
Anything amazing in the new Capture One Pro 9 that would warrant switching from Lightroom?
|
|
#
?
Dec 2, 2015 09:18
|
|

|
I hope this is right place to ask this stupid question but I can't figure it out. Lightroom on Mac - how can I adjust sliders with mouse wheel? Clicking on the slider and spinning wheel doesn't seem to work... Edit: Okay, so apparently this is Windows specific, what the heck. On Mac one can: click on slider name (although there is no feedback that you can click on it) and use +/- keys or click on slider number field and use up/down keys or grab hold of number field with mouse to drag My work computer was changed for Mac and I feel like fish out of water ugh whatever jeez fucked around with this message at 12:10 on Dec 4, 2015 |
|
#
?
Dec 2, 2015 09:52
|
|

|
Wikipedia Brown posted:Does anyone have an opinion on Capture One CO windows user here. The engine has always been the selling point of CO, I haven't touched LR in ages due to how well it handles. Considering how much of a shift it is from LR you're best off clicking the ? button on panels to pull up the online manual (PDF tends to come a little while afterwards.) The Phase One Youtube channel is regularly updated with webinars and short promotional/how-to videos, webinars can drag on a bit but they cover workflow and shortcuts to get anyone up and running. Customization is amazing in CO so if you're not keen on the location of functions in the toolbar or tool tabs just add, remove, shift, or float them like Photoshop; keyboard shortcuts can also be rebound. As a bonus the license allows 3 installations, subscriptions 2, so you can split the costs with others who are interested. The downside is that its not as simple as LR, you will need to sit down and really tinker to get your ideal/perfect settings as well as understanding. Its also lacks some features, the web gallery is incredibly sparse but effective, and there is a lack of built in map support or book setting. Editing raw in Photoshop becomes editing a linked file and tabbing between both. As for the people who say it runs slow I can't comment, I've used the software for so long that I am accustomed nor did I notice a big performance hit when importing my LR catalog. Although I can say the cache can be incredibly large if you're trying to keep an entire library in offline mode. Normally you can just search for the oldest .cop files in the catalog preview folder and toss them. KinkyJohn posted:Anything amazing in the new Capture One Pro 9 that would warrant switching from Lightroom?
|
|
#
?
Dec 2, 2015 20:10
|
|

|
I submitted a photo to Tony & Chelsea yesterday, and the first thing they said was the colours are too pushed, which in reflection I understand and agree with. The shoot was in Mexico for my friends' wedding, and as Urban Brits we're not used to sunshine and colour in our surroundings, so it was real hard to fight the urge to push the sliders more than I usually would despite knowing it's a bad thing. So I'm curious as to where people think the cut off point is, and whether everyones taste match around the same area. Before I post, I'll just say I think stuff that looks like this:  is hideous, and I'm certainly not one of those Flickr people who obsess over this. While I think the picture I submitted wasn't realistic, I'd like to think I had some reasoning for wanting to push the colours further (and I did so while trying to keep the skin tones under control), and I think there are some outlets where a more saturated image can look correct. Maybe not wedding photography, but marketing and poo poo like that. The only differences between the five photos will be the setting of the Vibrance slider. There is a +20 clarity applied and a tiny nudge of saturation too. None of these match the photo I submitted because I realised in hindsight that the white balance I'd used was a bit low and not as pleasing as raising it to around 5500.  Vibrance 0  Vibrance 25  Vibrance 50  Vibrance 75  Vibrance 100 (imgur's compression not helping matters, but hope the effect comes across anyway) The image I submitted was closest to the 75, in retrospect I've pulled it down to just under 50. Also the rest of the series were not pushed as heavily as this particular one, I was lulled into it by the water. Stupid, colourful water. EL BROMANCE fucked around with this message at 15:40 on Dec 11, 2015 |
|
#
?
Dec 11, 2015 15:36
|
|
|
Are you modifying the yellows or oranges in HSL values? The sand and the couple look desaturated while everything else gets increasingly bumped up. As the vibrance/saturation rise, the focal point increasingly shifts away from them toward the lower left corner. The rocks on the middle left also have a high amount of contrast (dark shadows). The color seems the most realistic/good between 50/75.
|
|
#
?
Dec 11, 2015 17:14
|
|

|
I think using the vibrance slider at all is a bad idea. In my opinion you should only use individual channels for messing with colors.
|
|
#
?
Dec 11, 2015 17:20
|
|
|
Yeah there's some Red/Orange saturation pull down (orange more than red) and a raise in the luminance of both those channels, while the purple saturation is pulled down completely because Vibrance seems to love to add purple into whites from nowhere. The yellows remain at 0 in HSL. I was trying to look after the skin tones, especially as a week in the heat meant the bride had some sunburn which I wanted to hide. RS: yeah, that's probably the best way to approach things, and I should do that for photos I want to spend more than a few minutes working on. With the above I tend to use Vibrance to see how it affects the photograph at each strength, find the one I like then adjust the HSL to remove the effects of it that I find unnecessary. My Clarity and Vibrance are usually at most in the 20-30 range, Saturation just has a touch up as I find it fucks up skin tones too much.
|
|
#
?
Dec 11, 2015 17:34
|
|
|
Don't Use The Clarity Slider
|
|
#
?
Dec 11, 2015 17:40
|
|

|
Also Chelsea and Tony are loving terrible, stop looking to them for advice.
|
|
#
?
Dec 11, 2015 17:48
|
|
|

|
| # ? Apr 29, 2024 20:00 |
|
|
EL BROMANCE posted:I submitted a photo to Tony & Chelsea yesterday, and the first thing they said was the colours are too pushed, which in reflection I understand and agree with. The shoot was in Mexico for my friends' wedding, and as Urban Brits we're not used to sunshine and colour in our surroundings, so it was real hard to fight the urge to push the sliders more than I usually would despite knowing it's a bad thing. So I'm curious as to where people think the cut off point is, and whether everyones taste match around the same area. Why in the hell would you give a poo poo what 2 horrible photographers have to say about your photos? Have you seen their portfolios? Also - you should be going for what the water looked like in the real world.
|
|
#
?
Dec 11, 2015 17:49
|
|