

|
 Welcome admirals, ensigns and other personel. This is the thread for LA PLATAN COMMANDERS, all San Marcans please leave now! Now that they're gone, its time to get down to business. Here is a map of the naval area!  Your naval bases and cities are listed there. Here is the map of your glorious and totally accurate claims to the various islands of the Goondanian Sea.  Disputed Areas. Burgundy lines represent the San Marcan claim on the islands whereas the burgundy areas are areas of predominate LA Platan settlement. Blue is for the San Marcan claims and settlement. THE LA PLATAN FLEET LA PLATAN BASING posted:Naval Station Buho: OTHER NATIONAL ASSETS: Your nation has access to 5 Collier Ships and has 3,000,000 tons of commercial freight. YOUR OBJECTIVES: Three Possible Victory Conditions: Sink every ship in the opposing fleet OR Capture all disputed islands and hold them for two months OR Acquire 5,000 Victory Points Ways to Acquire Victory Points posted:
FLEET INTELLIGENCE Throughout the game, information from the other side may leak, be intercepted or acquired from civilians and spies living on the other-side. It may be inaccurate or it can provide vital clues about fleet movements, ship information or other aspects of your foe. By default, both sides know the details of their opponent's Pride of the Fleet: Los Santanos posted:Los Santanos 1911 (1) 20 kts (92) 922 DP D 3.0� 2X21.0�* (461) Fleet Intelligence Believes that The Los Santanos is in Naval Station San Robert In addition you know the number of ships in the enemy fleet: 9 Battleships 5 Cruisers 11 Destroyers La Platan Intelligence Has been working overtime for the war. Infiltration of San Marcan Ship yards has yielded information about the San Marcan Battleship Classes. San Marcan Battleships: posted:
Enemy Fleet posted:
Orders On the strategic map, plan out operations for several days, a typical turn will usually encompass half a month. Assign ships, squadrons and fleets to various tasks, as complex as coordinating amphibious assaults to something as simple as a patrol or defend order. Giving orders is simple. Simply indicate where on the map you want something to happen, how many ships are participating and when it is to occur. Conditional orders may be given as well. For example if a fleet is assigned to defend a port, it can be ordered to sally out to assist a nearby fleet or a different base if attacked. Any questions may be directed now! Good Luck!  ORDERS DUE IN 48 HOURS ORDERS DUE IN 48 HOURS
|
 #
?
Jun 7, 2015 04:26
#
?
Jun 7, 2015 04:26
|
|


|

|
| # ? Apr 26, 2024 01:02 |
|
|
If I may make a suggestion that we reorganize our forces. Our current system creates mixed squadrons (i.e. BBs and DDs in the same squadron). Given the fact these ships have different performance, tactics, and roles, I suggest we create homogeneous squadrons (i.e. an all-DD squadron). Danaru, you can assign Warhammer651, Perestroika, and myself to each command a fleet. I'd prefer to take 2nd Fleet, but I'm flexible. The new structure should look like this: Naval Station Condor: 1st Battle Fleet: Commanded by:_______________________ 1st Viento (pre-dreadnaught BB) Captain Powell (old BB) 2nd O�Henry (AC) Zenteno (PC) Naval Station Aquila 2nd Battle Fleet: Commanded by: VADM Bacarruda 2nd Alfonso Lator (dreadnaught BB) :Pride of the Fleet: Hurac�n (pre-dreadnaught BB) Toro (PC) 2nd Raul Tejada (DD) Sebastian Mendez (DD) Jesus Ramirez (DD) 3rd Emanuel (DD) Simon Bolivar (DD) Capit�n Jarapa (DD) Naval Station Buho: 1st Blanco Encalada (PC) Emile (AC) 1st Quri (DD) (Silla) DD Anata (DD) Chapi (DD) El Pomo (DD) *Reinforcements arriving June 6th (from the south* Liberaci�n (BB) Orgullo (DD) Fuerte (DD) Vanguardia (DD) I recommend that the Liberacion be attached to 2nd Battle Fleet and the 3 destroyers be assigned to 1st Battle Fleet or to the 1st Patrol Fleet to form the 4th Destroyer Squadron (DESRON 4). Bacarruda fucked around with this message at 09:59 on Jun 7, 2015 |
|
#
?
Jun 7, 2015 06:37
|
|

|
Jimmy, both sides are unbalanced. The San Marcans have almost twice as many battleships as us. Here is our fleet: 4 Battleships 5 Cruisers 11 Destroyers The La Platan First Sea Lord posted:Viento (BB) By contrast, they have: 9 Battleships 5 Cruisers 11 Destroyers
|
|
#
?
Jun 7, 2015 06:40
|
|
|
Bacarruda posted:Jimmy, both sides are unbalanced. The San Marcans have almost twice as many battleships as us. Yes those numbers look bad, but I would urge you to double check the statistics of your battleships compared to the Marcans. *Edit. That being said if things get too bad to early on, I'll be willing to help the scales a bit. Jimmy4400nav fucked around with this message at 07:11 on Jun 7, 2015 |
|
#
?
Jun 7, 2015 06:48
|
|
|
Jimmy4400nav posted:Yes those numbers look bad, but I would urge you to double check the statistics of your battleships compared to the Marcans. I did that. San Marcan Battleships posted:Battleships: 9 La Platan Battleships posted:Battleships: 4 Their Antonio Morenos and our Captain Powells are roughly equal. Our Vientos are better than the Garibalis, granted. But not wildly better. And they have a 5:2 ratio in their favor. And the Alfonso Lator is marginally tougher than their Los Santanos, but its outgunned in the main and secondary batteries. If we get into a head-to head fight with both battle forces, I grant that we'd have a chance. But they have more volume of firepower and more hulls. That will force us to spread our firepower to engage their entire fleet and makes it much harder to sustain losses. It might be worth making each fleet have a different specialization. The San Marcans can have their battle wagons. If we picked up more destroyers (like 5-6 destroyers) or perhaps a decent pre-dreadnought and 2-3 DDs, I'd be happy.
|
|
#
?
Jun 7, 2015 07:26
|
|
|
Bacarruda posted:I did that. Hmmm, okay understandable, again this is my first time running a self made thread game, so I was bound to make some mistakes here and there. I'll fix this for you AND make it work for the game. Alert: From the Office of the PresidentThis latest outbreak of hostilities couldn't come at a more fortuitous time. We'd just finished negotiations with the Republic of Columbia to help bolster our fleet's standing a bit more than what it was. Steaming in on JUNE 6th to the south will be our reinforcements. -The C.S.S Richard Holbrook, to be renamed Liberaci�n -3 Destroyers of the Series 1 Production line, Formerly C.S.S Astor, Brooks, and John Micheal, to be renamed Orgullo, Fuerte and Vanguardia C.S.S Gallant Class posted:
A1 Series posted:A1 Class (1911) (3) 32 kts (1) 25 DP 235 ft 4 X 20.0" (6)
|
|
#
?
Jun 7, 2015 08:09
|
|
|
I'll just go ahead and repost Jimmy's explanation of ship stats here, so we have all the relevant information in one thread:Jimmy4400nav posted:Also to give you guys an example of what a ship looks like and some of the data that plays a role in my calculations (again you all wont need to worry about all the fancy math), he's an example ship and what stuff means.
|
|
#
?
Jun 7, 2015 09:20
|
|

|
Jimmy4400nav posted:I'll fix this for you AND make it work for the game. Awesome! Three cheers for El Presidente! -- Alright, strategy time. The first order of business is to reorganize our fleet (see this post for some suggestions). Our current fleet structure is too rigid. We have destroyers in the same squadrons as battleships, which limits what both can do. Split up the units and create dedicated battleship, cruiser, and destroyer squadrons. This will allow us to do things like have destroyers make quick commerce raids, without fear of being tied down by the slower battleships. Secondly, we should plot out our long-term goals. We should figured out how we intend to win. Three Possible Victory Conditions: posted:1. Sink every ship in the opposing fleet I've bolded the best two options. Sinking every ship will be too drat difficult. They'll always have a few destroyers floating around. Taking all the islands will require us to destroy their main battle force while keeping our navy and shipping intact enough to make and support landings. It's all-or-nothing strategy that forces us to stake everything on amphibious landings. Earning 5000VPs will be difficult, but it gives us the most options. I'm inclined to focus on this plan, using Earning VPs: posted:Sink/Damage Enemy Ships: 1 Victory point awarded for each DP worth of enemy ship damaged or sunk in the war. Given that the other team has old, slow, short-ranged warships, it's likely that they will seek to concentrate their forces on the northern (and possibly the southern) islands chains. They will probably pursue a similar victory strategy of trying to earn VPs and take our islands. You can see the current division of the islands here:  Their fleet is likely deployed as follows:  Force A (including the BB Los Santanos, the pride of their fleet) is based on San Robert. This is probably their main battle fleet (expect appx. 5 battleships, 2-3 cruisers, and 5-6 destroyers) Force B is probably based at Aguilar. This is their support fleet (expect appx. 2-4 battleships, 2-3 cruisers, and 4-5 destroyers) Force C is probably based on Santa Maria. This is their patrol fleet (expect 2-3 cruisers and 4-6 destroyers) -- I think we should follow the following phases for the first few days of the battle. Phase 1: Mayhem During the early days of the game, we seek to create as much havoc as possible. Lay mines, raid shipping, bombard enemy troops, shell ports, and all the rest. When conditions are favorable, we meet the enemy in battle. When they are not, we retreat and live to fight another day. It may be worth setting up minefields in the open sea as a prelude to the traps we'll spring in Phase 3. Phase 2: Bite We focus on taking land. Support our troops with bombardment missions and/or stage amphibious landings. Don Pera and Santa Maria are prime candidates for invasion. They are home to major naval bases, so denying them to the enemy would be valuable. They are semi-remote, which will slow the enemy's reaction time and give us time to set up traps. Phase 3: Hold The enemy fleet will almost certainly react to our amphibious operations and bombardments. This creates a perfect opportunity to ambush them. We can set up offensive minefields on the flanks of the landing force. When the enemy moves in to attack us, they will run into our mines. Furthermore, we can mass our fleet and counterattack. Phase 4: Consolidate We hold the ground we have taken, re-basing ships to our new conquests, setting up large defensive mine networks etc. Phase 5: Evaluate We figure out our next steps. We may repeat Phases 2-4 on another set of islands, or do something else. -- Here is a suggested outline for Phase 1  1st Battle Fleet (Bacarruda) 1. Shell the northern edge of La Tropico, supporting our land offensive there. 2. Lay mines off the northern shore of La Tropico 3. Split off the destroyer squadrons to lay mines 4. Battleships bombard San Robert; the destroyers lay mines 5. Battleships and destroyers rendezvous with 2nd Battle Fleet south of La Vaca 6. Search for enemy fleet; if fleet not found, return to Base Aquila 2nd Battle Fleet (?) 1. Bombard Don Pena 2. Rendezvous with 1st Battle Fleet 3. Search for enemy fleet; if fleet not found, return to Base Aquila 3rd Patrol Fleet (?) 1. Search for enemy fleet south of Barba Coa; if no fleet found, continue with mission 2. Lay mines 3. Bombard Barba Neckra, supporting our land offensive there. 4. Bombard Donostia
|
|
#
?
Jun 7, 2015 11:16
|
|
|
So, now for a few questions, mostly in terms of how long stuff takes. Are we supposed to give orders just on a per-turn basis, or is it possible to fine-tune them on a per-day basis? Could you for example do something like "For the first five days stay in the harbor, during the next five days transit to X, then during the last five days do Y"? -Approximately how far can a ship travel per day/turn for a given speed? Mathematically speaking a ship cruising at 10 knots should be able to make one hex every three hours, so ~8 hexes a day or ~120 a turn, but in practice it probably works differently? -About how long does mine-laying take? For a simple baseline, how many turns would it take for one destroyer to mine a single hex? -What exactly constitutes "offensive" mining? I suppose laying within the Marcan-claimed parts of the disputed areas would count, but are there any other places where it'd count? -Is commercial shipping affected by mines along their (probable) routes, and does sinking it this way afford VP? -Do you require any particular orders/strategies for how the ships are supposed to act during naval combat, or is that exclusively handled by the captains (i.e. you)? Oh, as for force allocation, I'd be cool with any of the options, though I'm leaning slightly towards something light with destroyers. Perestroika fucked around with this message at 13:33 on Jun 7, 2015 |
|
#
?
Jun 7, 2015 11:17
|
|
|
I'll take 3rd fleet, I have a soft spot for DD's ever since I read Last Stand of the Tin Can Sailors. That said Bacarruda posted:Our current fleet structure is too rigid. We have destroyers in the same squadrons as battleships, which limits what both can do. Isn't that how poo poo is supposed to work? DDs act as a forward screen for the BBs to ensure they don't get jumped and that enemy forces don't get too close while the BBs nuke the poo poo out of everything within range?
|
|
#
?
Jun 7, 2015 17:43
|
|

|
Alright gentlemen, we've got a lot to discuss. Let's get right to it.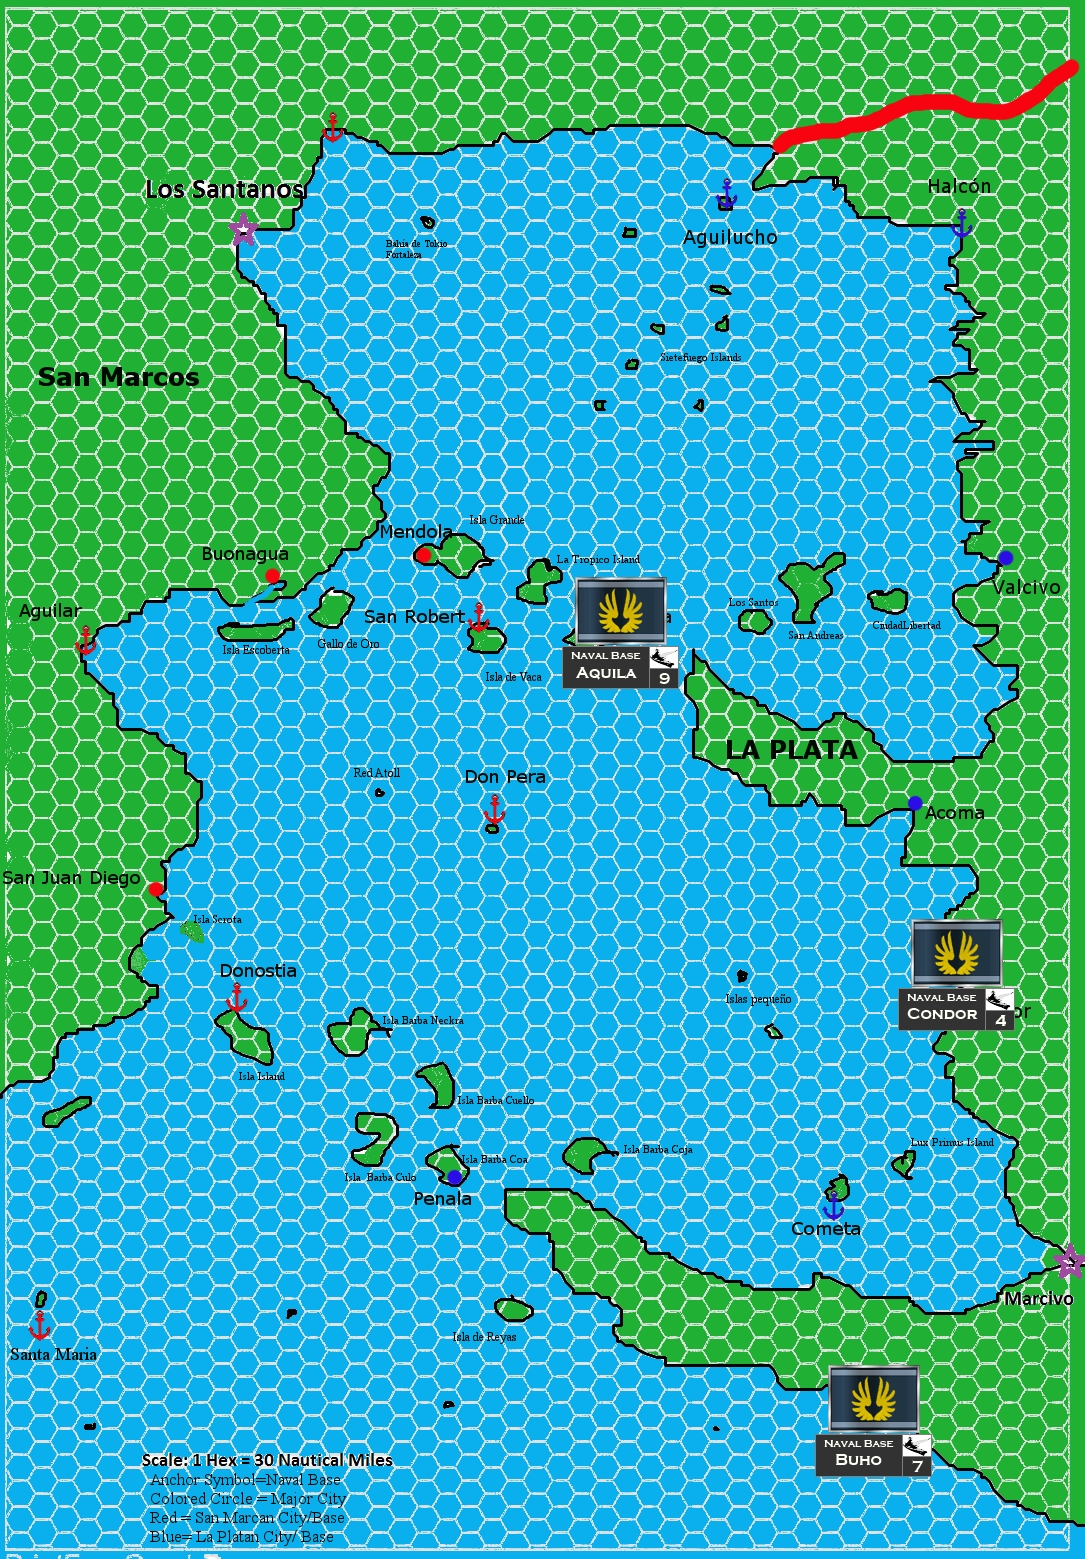 We currently have these three staffed bases. VA Bacarruda has asked to take command of the fleet at Aquila. VA Warhammer651 has asked to take command of the fleet at Buho. VA Perestroika will take control of the fleet at Condor. I will leave any inter-fleet squadron management to their commanders. With that said, VA Bacarruda has some ideas you may want to consider. Keep in mind, we're at a disadvantage until our reinforcements arrive on June 6th. I'd like to avoid major head on battles until we're able to level the playing field. Regarding the enemy, our brave spies have sent us information regarding the classes and builds of the enemy ships. We also have intel on the location of their flagship, the Los Santanos. The sinking of their flagship will tilt the scales significantly, but I don't want any of you risking your fleets to bring it down. Losing any ships at all will sting us more than it would sting the enemy to lose one of theirs. We currently don't know where the enemy fleets are located, however we know the San Marcan bastards have been rattling their sabers near Mendola. They know we want our island back, and they're not afraid to show it off. Our spies are pretty sure the Los Santanos is based at San Robert, which is very close to Aquila. Be cautious, Bacarruda.  While we can't be certain, this is a likely basing situation for the San Marcans. We can expect immediate hostilities near Aguila, but beyond that we will need to scout to find the enemy fleets. Depending on their priorities, they may have a fleet based out of Santa Maria instead of Los Santanos. Keep this estimation in mind, but don't follow it as gospel. 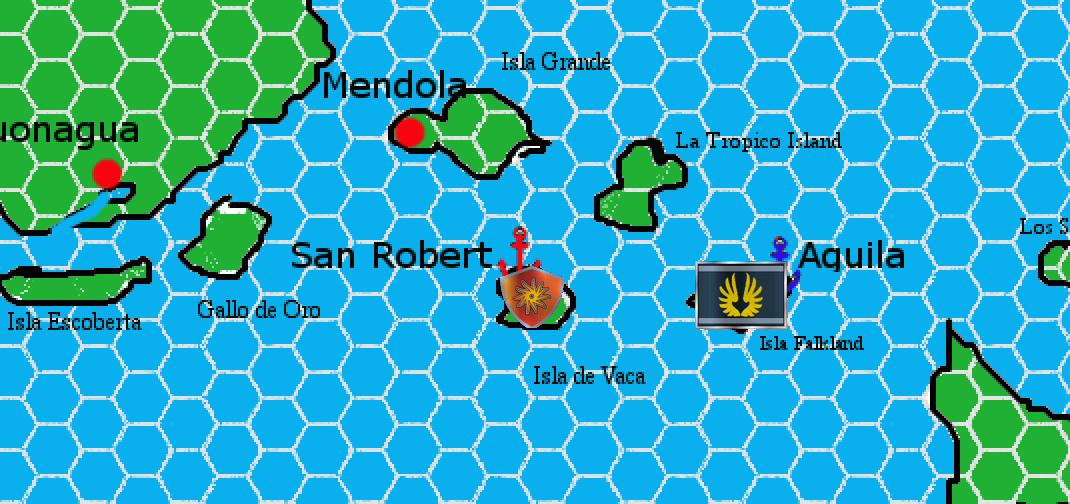 Combat Zone Alpha This will be our most likely stage of the first battle, due to Aquila Base and San Robert Base. The San Robert Base will likely try to attack Aquila first to stop any attempt at raiding Mendola. Aquila Base has our largest fleet, and will hopefully be able to hold it's own until Reinforcements from Condor can arrive. IMPORTANT NOTE: Whoever controls Combat Zone Alpha will have a major advantage. Alpha effectively cuts the map in half. Our northern bases of Aquilucho, Halcon, and the city of Valcivo will be open season to San Marcan attack if we lose control.  Combat Zone Bravo While less of a powder keg than Alpha, Bravo will be an equally important theatre in this war. Bravo contains the La Platan city of Penala, as well as a San Marcan naval base, and a city on the San Marcan mainland. Penala is outside of San Marcans claim, but we can't rule out the San Marcan cowards attacking it solely because it's nearby. The two closest allied naval bases are Buho and Cometa. Regarding our long term plan: quote:Sink every ship in the opposing fleet As Bacarruda mentioned, Objective 1 is unlikely due to us being outnumbered. Keep in mind that the opposite is also true, and the enemy fleets may hunt you specifically. We will need to be VERY opportunistic in the early stages of our war. Objective 2 becomes more feasable once our reinforcements arrive. Before then, stay on your toes. No plans are set in stone, improvise as much as you need to to stay alive. For now, keeping our ships afloat is more important than winning points. I cannot stress this enough. quote:Sinking the enemy pride of the fleet: 1,500 VP A good source of points will come from raiding 'undefended' naval bases. Keep in mind that these bases will have turret batteries to attack, but they're immobile. We can switch damaged ships out of battle, they cannot. Also keep in mind that opportunistic raiding of merchant vessels will gain us small amounts of points that will add up. It may not seem honourable, but honour isn't a virtue we can afford considering the enemy has shown themselves to sink civilian vessels out of spite. -Short Term Plan VA Bacarruda - Aquila Base You have a tough job with a large enemy fleet right next to you. The plan listed in your post will be a good starting move. Use your discretion to decide what will be best for your fleet at the current time. Be liberal with those mines, but be careful, the enemy may have the same idea. Hold the line and for the love of god keep the VA Perestroika - Condor Base Proceed immediately to Don Pera naval base. If the base is void of ships, shell the island. If an enemy fleet is spotted there, proceed north to assist VA Bacarruda. Keep in contact with Bacarruda's fleet, if the opportunity arises, a pincer attack will confuse and damage the enemy. Avoid solitary combat, your ships are large, but they're slow. VA Warhammer651 - Buho Base Proceed to Santa Maria base. If you spot an enemy fleet or can confirm Santa Maria is empty, disengage immediately and reconoitre Donostia Naval Base, then San Juan Diego. You'll be our eyes in the south for the early stage, we need to get a fix on where the enemy fleets will be coming from. Once recon is complete, proceed to Penala and place mines within the island chain's waters. Leave the waters to the east empty, we will use that as a corridor. Feel free to suggest or ask for elaboration on anything. Also consider a more personal name for your fleet for easier communication.
|
|
#
?
Jun 7, 2015 18:20
|
|

|
Perestroika posted:So, now for a few questions, mostly in terms of how long stuff takes. Are we supposed to give orders just on a per-turn basis, or is it possible to fine-tune them on a per-day basis? Could you for example do something like "For the first five days stay in the harbor, during the next five days transit to X, then during the last five days do Y"? Yep, your example is pretty much exactly what I'm looking for. I'm in general looking for orders per turn,but its totally fine to put as much conditionals on those orders as you like as well as different objectives. If combat is possible, I'll be sure to let players know and give them an option to try and retreat. Fleet speed will be set by the admiral in charge, since ships can move at different rates, I'll leave it to you to determine how fast you want the fleet to go (the downside of having so manu different ship classes). But a good rule of thumb is to average the fleet speed. Remember a fleet can only move as fast as its lowest ship. Yep mining in the disputed zones counts, as well as mining in waters not controlled by you, so off San Marcan harbors and cities or in area you think shipping might go through. Yes commercial shipping is affected by mining. Ships may be lost and routes may shift if mine fields are laid. In terms of orders and strategies, I'll leave the big picture stuff to you guy so complex movements, where to move in map distances, engagement ranges, when to unleash torpedoes, when you want to fall back. The finer stuff like nudging the ship to get a better firing solution, firing once in range, etc, I'll handle so you guys don't have t whip out protractors to find the optimal torpedo firing solution (seriously, that how the game figures out torpedoes.  ) )Also other questions I've answered for the other thread about general rules: I'm cool with you guys changing the names of the ships if you want, just know if the enemy knows the name of the ship, they'll know the new name. Shipping is mostly neutral, I'll basically be rolling dice to see how much may pass through an area at a certain time and who it belongs to, though some will likely pass through certain choke points. Assume both governments have issued warnings to merchant shipping about the state of war. Some will take the expected routes, others may take the longways around. Shadowing will basically be several dice rolls behind the scenes, in general, fast and/or small ships have a better chance of shadowing a fleet without being scene. You'll want to be able to see them (or their smoke) and get a rough bearings. Underway repairs are made at a slower rate, usually only enough to bring some strengh/speed or effectivness back to the ship until it can get to port. Once it port, the ship will be out of action for an unknown amount of time depending on the repairs, it can be rushed out of the yard early, but I'll roll for chances of something possibly breaking on the ship or a different kind of malus that might affect it later on. Rearmament at sea will dispatch some of your commercial freight to your fleet to resupply it if you don't want to return to a city or port. For coaling you'll have to arrange rendezvous with one of your coaling ships (they're in a kind of Schrodinger's position where they can be anywhere for port.) In port you can just re coal. Coilers are mostly for if you're doing a long patrol or going a far distance. If you control a city or base on a disputed island, then the invasion requires only a third of the time and resources to proceed since it's assumed the cities and bases have a large quantity of soldiers already present, and have the facilities to quickly process transports.
|
|
#
?
Jun 7, 2015 18:54
|
|
|
Jimmy4400nav posted:If you control a city or base on a disputed island, then the invasion requires only a third of the time and resources to proceed since it's assumed the cities and bases have a large quantity of soldiers already present, and have the facilities to quickly process transports. Where in the book does it explain land invasion? I took a quick read through, but I don't remember seeing that part 
|
|
#
?
Jun 7, 2015 19:01
|
|
|
Danaru posted:Where in the book does it explain land invasion? I took a quick read through, but I don't remember seeing that part It's something I'm homebrewing in to give the naval campaign some more life, for the book most of the strategic map stuff is just for pre-battle stuff, mechanism to facilitate naval fights. I wanted it to be a bit more dynamic and reflective of the various uses of navies in a war. I hope that's alright with all of your guys, otherwise the map would basically be a giant game of wheres waldo to find the enemy fleet and fight one or two battles and be done. I'm still new to playing this online so I'm trying to find a sweet spot of fun for you guys and having an experience playing as steam ship fleets.
|
|
#
?
Jun 7, 2015 19:04
|
|
|
Jimmy4400nav posted:It's something I'm homebrewing in to give the naval campaign some more life, for the book most of the strategic map stuff is just for pre-battle stuff, mechanism to facilitate naval fights. I wanted it to be a bit more dynamic and reflective of the various uses of navies in a war. I hope that's alright with all of your guys, otherwise the map would basically be a giant game of wheres waldo to find the enemy fleet and fight one or two battles and be done. I'm still new to playing this online so I'm trying to find a sweet spot of fun for you guys and having an experience playing as steam ship fleets. Oh sweet, I thought I missed it  I'm down with it I'm down with it
|
|
#
?
Jun 7, 2015 19:11
|
|
|
Danaru posted:VA Perestroika - Condor Base  I haven't even left port and I've already been promoted! My momma will be so proud! I haven't even left port and I've already been promoted! My momma will be so proud!Annoying Don Pera first sounds like a plan. If it turns out to be empty, it seems like it might be a good idea to mine the immediate area as well (assuming it's not too time-consuming), to hinder the supply shipping going through it and to leave a nasty surprise for any forces looking to drop in for a quick resupply. In the medium term (i.e. after we've received our reinforcements), it might even be a good idea to outright blockade it with a minimal detachment of fast ships to draw out an enemy reaction force that could be caught between Bacarruda and me.
|
|
#
?
Jun 7, 2015 20:58
|
|
|
Danaru posted:
All things considered, my fleet isn't exactly built for straight-up fighting, so I don't really see a reason to keep my fleet bunched up. I'm instead thinking of sending 1st squadron (Blanco Encalada, Quri, and SIlla) to investigate Santa Maria while 2nd squadron (Emile, Anata, Chapi and El Porno) immediately goes to investigate Donostia. They would traveled in a combined force most of the way there, before splitting up. In the event neither squadron makse contact with the enemy, 1st squadron will do a bit of shelling at Santa Maria while 2nd squadron lays mine between the island of Donostia and the mainland, hopefully luring at least some of their ships into the minefield where we can laugh at them. If they encounter enemy forces, we'll play it by ear. in pictoral form 
|
|
#
?
Jun 7, 2015 22:02
|
|
|
warhammer651 posted:All things considered, my fleet isn't exactly built for straight-up fighting, so I don't really see a reason to keep my fleet bunched up. I'm instead thinking of sending 1st squadron (Blanco Encalada, Quri, and SIlla) to investigate Santa Maria while 2nd squadron (Emile, Anata, Chapi and El Porno) immediately goes to investigate Donostia. They would traveled in a combined force most of the way there, before splitting up. In the event neither squadron makse contact with the enemy, 1st squadron will do a bit of shelling at Santa Maria while 2nd squadron lays mine between the island of Donostia and the mainland, hopefully luring at least some of their ships into the minefield where we can laugh at them. If they encounter enemy forces, we'll play it by ear. Sounds good, I wasn't sure how you planned to split your ships so I just played it as if it was one solid fleet. Perestroika posted:
Good call, I'd like to know how long mining would take in general, but dunking a couple mines off the coast will get us some points either way
|
|
#
?
Jun 7, 2015 22:30
|
|
|
Danaru posted:Sounds good, I wasn't sure how you planned to split your ships so I just played it as if it was one solid fleet. Well then, Since I have official approval from the top brass Naval Station Buho Orders 2nd squadron are to load up on the maximum number of mines they can carry without impacting their speed 1st and 2nd patrol squadrons are to travel together along the course indicated by the BLACK line. At the end of this course, 1st Squadron is to proceed along the course indicated by the PURPLE line, and scout the port of Santa Maria. In the Event that no enemy forces are present, they are permitted to RAID or BOMBARD the base, depending on defenses present. Commerce raiding is permitted while en route. At the End of this course, 2nd squadron will proceed along the course indicated by the RED line, and scout the port of Donostia at the end of the course. If no Enemy forces are present, they are to mine the poo poo out of the harbor entrance, or hexes immediately adjacent if harbor defenses render mining the entrance unfeasible. If Enemy forces are encountered during operations, Squadron is to immediately radio position, heading, number, and estimated class of enemy forces. if facing an inferior force, they are permitted to engage. If facing a superior or equal force, they are to shadow enemy forces and regularly radio updates on their position. If engaged by superior forces, squadrons are to attempt to break contact and make for Peanala at best speed (that avoids likely enemy course). Further orders will be issued depending on the situation once they arrive. Ships too badly damaged to continue fighting are to make best speed to the nearest base capable or repairing and rearming them. Once operations are completed, squadrons may commence Commerce raiding at their own discretion. warhammer651 fucked around with this message at 00:26 on Jun 8, 2015 |
|
#
?
Jun 7, 2015 23:16
|
|
|
Danaru posted:
Mining will depend on the number of ships you select for mining duty. Each can carry a certain amount of mines. Destroyer: 20 Mines-30 mines. Every 2 decrease speed by 2 kts Light Cruiser: 40 Mines-60 mines Every 4 decrease speed by 2 kts Cruiser: 60 mines-100 Mines Every 8 mines decrease speed by 2 kts Battleship: 80 mines-150 Mines Every 14 decrease speed by 2 kts The lowest number is how many mines a ship can carry without their speed being affected. After that each uptake will reduce their speed by 2 knots depending on the ship class. Since each hex represents 30 nautical miles, to saturate one square nautical mile with mines, you'll need at minimum of 288 mines. If its a small area, it will require proportionally less mines. Mining its self doesn't take too long, once a ship arrives in the area it wants to mine, it'll spend several hours there dropping its load. It'll take several hours to drop all the mines it carries. The larger the area, the longer it'll take. Most of the time will be the transit to the mining location. As a corollary, please note carrying mines can be dangerous, if a ship gets into combat, you'll be carrying a bunch of explosives on your ships outer area, so it'll take several combat turns to safely jettison all the mines you carry.
|
|
#
?
Jun 7, 2015 23:33
|
|
|
Jimmy4400nav posted:Mining will depend on the number of ships you select for mining duty. Each can carry a certain amount of mines. How many mines would be required to make traveling across a hex give say, a 30+% chance of hitting a mine?
|
|
#
?
Jun 7, 2015 23:47
|
|
|
warhammer651 posted:How many mines would be required to make traveling across a hex give say, a 30+% chance of hitting a mine? Give it more than the 288 mines and you'll get a better chance of hitting something. The percentage will depend on how many ships are passing over the area and if the minefield is detected. Saturate an area enough though and commercial traffic and maybe warships will stop travelling through the area.
|
|
#
?
Jun 8, 2015 00:24
|
|
|
Edit: nv, wrong thread
Jimmy4400nav fucked around with this message at 04:24 on Jun 8, 2015 |
|
#
?
Jun 8, 2015 01:47
|
|
|
24 hours left to get in orders
|
|
#
?
Jun 8, 2015 04:24
|
|
|
warhammer651 posted:Isn't that how poo poo is supposed to work? DDs act as a forward screen for the BBs to ensure they don't get jumped and that enemy forces don't get too close while the BBs nuke the poo poo out of everything within range? You're absolutely right. Destroyers and battleships are often part of the same fleet for that reason. But within that fleet, they are divided into homogenous units. For example, at Jutland, the Royal Navy had the 2nd Battle Squadron, composed of battleships like HMS King George V and HMS Ajax. This was the main battle line, designed to go toe-to-toe with the enemy. And then there was 4th Destroyer Flotilla, the scouts and torpedo attackers. You're welcome to organize your fleet however you want. The reason I plan on dividing things up is. One, it's more historically accurate and I'm a history nut. Two, it give me more operational options. I can send my destroyers off to go raid and pillage without having to drag the battleships along. Three, it gives me more tactical options. My destroyers can operate as a cohesive, 5-6-ship unit, leaving my battlewagons more free to work as a team. And if push comes to shove, it's completely viable to split off mix-and-match units to form task forces. For example, when it comes time to do naval invasions, we may create a bombardment/escort TF of destroyers and battleships, while the rest of the destroyers and cruisers lay mines to screen the landings.
|
|
#
?
Jun 8, 2015 04:59
|
|
|
1st Battle Fleet orders "Coming to your island and being dicks" tour  If the Zenteno counts as a full-sized cruiser for the purpose of carrying mines, load up on this mine complement: Both battleships will take on 80 mines each, both cruisers 68 mines each, for a total of 296 mines. If the Zenteno instead turns out to be classed as a light cruiser for the purpose of carrying mines, have the mine distribution look like this instead: Battleship Viento: 94 mines (-2 kts) Battleship Capitan Powell: 80 mines (-0 kts) Armoured Cruiser O'Henry: 76 mines (-4 kts) Protected Cruiser Zenteno: 48 mines (-4 kts) Total: 298 mines Part 1: The fleet is to set out towards Don Pera at an efficient cruising speed (~10 kts), and should take no more than three days to arrive at their destination. Once there, the fleet will halt just outside of visible range while the first squadron consisting of Viento and O'Henry will detach to ascertain whether there are enemy naval forces present within or nearby the base. If the base turns out to be empty of enemy forces, the fleet will first thoroughly mine the approaches to the base with its whole complement of mines (I'm not certain whether this would mean mining the hex that the island is in or one of the surrounding ones, pick the one that counts as blocking the port for the purposes of victory points). Then all ships will spend one day and 1/3rd of their ammunition to bombard the base. If the base is protected by significant enemy naval forces, disregard it and directly move on the the second part of the orders. Part 2: The fleet will move northwards to rendezvous with 2nd Battle Fleet and will from there on accompany its main body. If the fleet has not yet used or dumped its mine complement, it will mine one of the two marked hexes first, prioritising the southern one unless it has already been mined or the approach appears blocked by enemy forces. All ships are permitted to bombard enemy islands (prioritising Isla de Vaca) when the opportunity presents itself and it doesn't interfere with any other orders as long as this won't reduce their remaining ammo below 1/3rd of their total complement. Conditionals: Enemy commercial shipping is to be mostly disregarded during part 1 of the orders, unless it happens to be right on the way and catching it would not significantly slow down the timetable. After part 1 is completed it may be engaged whenever feasible. The cruisers may detach to chase after it if they expect to have better odds of catching it than the battleships (i.e. once they carry no more mines and are back to full speed), but should stay within one hex distance of the battleships at all times. If contact with a weaker enemy force is made, the fleet is permitted to engage them cautiously, making full use of the superior range of the Vienta and O'Henry. If the enemy withdraws do not pursue, and if the enemy attempts to close in maintain distance and fall back towards 2nd Battle Fleet. If contact with an equal or stronger enemy is made, notify 2nd Battle Fleet of its size and position but do not engage. If the enemy pursues, swiftly and cohesively withdraw towards 2nd Battle Fleet and radio for assistance. When doing so, try to draw the enemy somewhat eastwards to allow 2nd Battle Fleet to ideally catch it in a flanking pincer movement from the north. If this is successful, engage them firmly to inflict as much damage as feasible without overly risking our own ships. If 2nd Battle Fleet is caught in a major engagement or about to start one and radios for assistance, immediately abort any current operations and move to assist them at best speed. Attempt to catch the enemy force in a flanking pincer movement if possible. The cruisers are permitted to detach to make better speed if it is judged that their earlier arrival can make a difference without severely endangering them, otherwise engage as a cohesive fleet. If any ship's ammo or coal reserves fall to 1/3rd or below, they are to detach and resupply at the nearest base (preferably Aquila) as soon as it's feasible and safe to do so. If two ships are below or near the threshold, they are to detach and resupply together. If any ship is significantly damaged, it will move to the nearest base to repair. If it seems uncertain whether it can make the trip on its own, detach one cruiser (preferably the Zenteno) to accompany and assist it. If at any point the fleet is reduced to only one single ship out at sea (most likely due to the other ships withdrawing to resupply or repair), that ship is to immediately join up with the nearest suitable friendly force (e.g. one that is not under orders to move far away or at greater speed than the ship is capable of) and remain with them until it can rejoin with the others. If no suitable friendly force is within easy reach, instead move to the nearest harbor, prioritising any harbor that is currently resupplying or repairing ships any of the other ships of this fleet. Well, that turned out to be a bit longer than I expected. If any of this is stupid and bad, feel free to yell at me
Perestroika fucked around with this message at 17:47 on Jun 8, 2015 |
|
#
?
Jun 8, 2015 11:17
|
|
|
Orders for 2nd Battle Fleet A state of war now exists between us and the San Marcans. Their fleet may be larger, but our ships are newer, our men braver, and our cause better. Here are your orders. Firstly, the 2nd Battle Fleet will be reorganized as follows. Some ships will change their names: my Chief of Staff posted:2nd Battleship Squadron (BATRON 2) Secondly, the following vessels will take aboard sea mines: - -Toro (PC): 60 mines -all destroyers: 30 mines each (max speed -10 knots = 20 knots) Total mines: 334 Thirdly, 2nd Battle Squadron will set to sea and begin carrying out these orders. My intent is for us to be a "fleet in being," albeit one with very sharp teeth. We are faster than the San Marcans, which means we can quickly sail to raid, then fade away. All ships will take notice of the following standing orders: Standing Order 1: Maintain radio silence. Complete all signals with Very guns, Aldis lamps, signal flags and wig-wag/semaphore. There are only two cases in which radio silence may be broken: if the enemy's main force is spotted or if the commanding admiral must coordinate with other La Platan fleets. Standing Order 2: Immediately destroy any San Marcan civilian vessels which may raise the alarm. Standing Order 3: The following formations will be standard: --Cruising formation:  *note:separation between ships in this formation is 300 yards, separation between squadrons is 7,000 yards --Mining formation:  *note:separation between ships in this formation is 500 yards, separation between squadrons is 8,000 yards --Bombardment formation:  Planned Course:  1. All ships (with the exception of the Hurac�n) will proceed to the marked hex "M") 20 knots at and lay a minefield of 334 mines. The Hurac�n will follow the fleet at 18 knots and will rendezvous with them at the marked point ("R1"). *If contact is made with enemy warships, you are to immediately disarm and jettison your mines, seek to break contact with the enemy, and head for Base Aquila.* Sail in cruising formation en route to point "M" Sail in mining formation during mine-laying operations 2. All ships (including Huracan) will rendezvous at "B1," sailing at 18 knots. On reaching "B1," they will begin bombardment of San Marcan army positions on La Tropico Island for one day. La Platan army forces will attempt to advance under cover of this naval gunfire. Sail in cruising formation en route to Point "B1" Form up in bombardment formation during the attack. *If contact is made with enemy forces, 2nd Battle Fleet will immediately cease its bombardment mission, seek to break contact with the enemy, and head for Base Aquila* 4. 2nd Battle Fleet will move at 18 knots along the indicated course to the marked point "B2" off Base San Robert. Sail in cruising formation 5. 2nd Battle Fleet will begin raiding/bombarding Base San Robert, which it will do for 3 hours. Form up in bombardment formation Battleships and cruisers will silence coastal guns before hitting shore faciliies. Destroyers will target any shipping at anchor and engage "soft" targets of opportunity. 6. 2nd Battle Fleet will break off raiding and follow the marked route south to rendezvous with 1st Battle Fleet at point "R1." 2nd Battle Fleet commander will break radio silence to contact 1st Battle Fleet. 7. 2nd Battle Fleet will coordinate operations with 1st Battle Fleet. Bacarruda fucked around with this message at 16:41 on Jun 8, 2015 |
|
#
?
Jun 8, 2015 14:19
|
|
|
ORDERS FINAL Everyone got theirs in early, so I feel safe calling it an hour early.
|
|
#
?
Jun 9, 2015 02:48
|
|
|
Jimmy4400nav posted:
That's La Platan efficiency for you  I bet those San Marcan chumps are still arguing over who gets which fleet I bet those San Marcan chumps are still arguing over who gets which fleet
|
|
#
?
Jun 9, 2015 02:56
|
|
|
June 1st-June 6th Weather: Clear, light breeze. The naval campaign opens with clear weather for the Goondanian Sea. With such clear visibility and cloudless skies, search efforts are able to be much mire successful than they usually would be. Day 1: The 2nd Battle Fleet leave Station Aquilla and travels several hours to its designated mining location. Taking the better part of 7 hours to drop its load into position, the fleet then makes its way to designated bombardment location. After taking a hour and a half to rest the sailors and zero the guns, the bombardment begins. [+ 50 Victory Points For the Mining] 1st Battlefleet departs Station Condor making way to Don Pera. 1st Patrol Fleet departs station Buho making all haste to it's rendezvous point in the sea. Day 2: 2nd Fleet's Bombardment continues, shells rain down on San Marcan positions for hours. Around two thirds of the way through the bombardment however, pickets in the one of the destroyers radios that it sees smoke on the horizon. Motoring ahead, the destroyer Arrogante reports that it spots four battleships, a cruiser and several destroyers. Following orders, the fleet breaks bombardment and motors south for several hours before returning to port at Aquilla. Meanwhile, Platan Troops advance from their trenches and take several towns near the border of the line. In addition, a major Marcan military base falls to the combine bombardment and assault. With this impediment removed, the Plantan soldiers advance further into the interior of Tropico. [+100 for the bombardment]  Blue is your fleet, red is the San Marcasn Day 3: 1st Battlefleet arrives at Don Pera and spends the next several hours deploying mines outside the harbor. Before the sun sets, the fleet ranges its gun and begins the bombardment of the base and of the nearby town. [+150 Victory Points for the harbor mining] 1st Recon fleet reaches the rendezvous point and splits its self into 1st and 2nd Squadron. 1st Squadron makes its way to Santa Maria, 2nd Squadron makes its way to Donostia,. Day 4: The Don Pera bombardment commences in full force. One third of the ship�s magazines are emptied in the bombardment of the area. Docks, storage depots, repair equipment and the costal batteries are heavily damaged in the assault. The fleet takes minor damage. [La Plata 100 Victory Points] Platan soldiers take the last bastion of strength on Tropico, several fishing villages in the Marcan controlled sector. Due the lose of the base the day before, effective resistance had stagnated [+100 for taking Tropico] Day 5: Out of the city of Mendola, hundreds of San Marcan soldiers pour across the forests and towns of Isla Grande, seizing a number of key Platan defensive points. The defenders organize a hasty retreat deeper into the island. The La Platan attack fleet leave Don Pera and makes with all due speed to station Aquilla. 1st Squadron arrives at Santa Maria. Finding little in the way of defense, the destroyers mount a daring Raid into the harbor destroying the main defense, the rest of the fleet is freed up to steam into the port and open fire at point blank range on may key structures and instillations. After several hours of ferocious attack, the base in barren. [La Plata 200 Victory Points] Day 6: More grim new from Isla Grande, the San Marcans made another strong push from their bases and took more than a dozen miles on the front. At the rate of their advance, forecasters predict the island will fall any day. Your brave raiders on Santa Maria begin to make their way back to Penala to re-arm, though the fleet still possesses 2/3 of the armaments it had. 2nd Squadron approaches Naval Station Donostia. Keeping out of sight range, they begin to offload their mines. Progress is slow due the concerns over the enemy�s potential positioning, but in the need, the squadron is able to offload its mines and starts to make its way for Penala. To the south a radio signal emenates: �.All La Platan Naval Vessels� LPN Liberaci�n on station in the south, ready to provide assistance!  I decided to make the update 6 instead of 15 since a lot of stuff happened. ORDERS Jimmy4400nav fucked around with this message at 07:17 on Jun 9, 2015 |
|
#
?
Jun 9, 2015 06:51
|
|
|
Jimmy4400nav posted:Day 2: 2nd Fleet's Bombardment continues, shells rain down on San Marcan positions for hours. Around two thirds of the way through the bombardment however, pickets in the one of the destroyers radios that it sees smoke on the horizon. Motoring ahead, the destroyer Arrogante reports that it spots four battleships, a cruiser and several destroyers. Following orders, the fleet breaks bombardment and motors south for several hours before returning to port at Aquilla. Do we get any points for the bombardment? We had 6 destroyers, a cruiser, and two battleships pouring shells into the San Marcans. Surely that had some impact? Were our troops able to make any headway as a result of the attack?
|
|
#
?
Jun 9, 2015 07:11
|
|
|
Bacarruda posted:Do we get any points for the bombardment? We had 6 destroyers, a cruiser, and two battleships pouring shells into the San Marcans. Surely that had some impact? Weird, it ddn't post. Yeah you got 100 victory points for the bombardment and took tropico on Day 4.
|
|
#
?
Jun 9, 2015 07:17
|
|
|
Jimmy4400nav posted:Weird, it ddn't post. We took the whole island? Badass. vv e: did you put up a mine icon off Donostia? I didn't see it on the map. Bacarruda fucked around with this message at 08:15 on Jun 9, 2015 |
|
#
?
Jun 9, 2015 08:06
|
|
|
Bacarruda posted:We took the whole island? Badass. Yep, that' what happens when the dice roll comes up really good in your guy's favor!
|
|
#
?
Jun 9, 2015 08:15
|
|
|
We are now sitting on 600 Victory Points. Not bad for six day's work. Vice Admiral Perestroika, good to have you at Base Aquila. With 1st Fleet and 2nd Battle Fleet together, we've got a lot of striking power at our disposal. There are several things I'd like to attempt during the next two weeks. 1. Defensive mining of Base Aquila. If our fleets are at sea, this crucial port is extremely vulnerable. To protect the harbor, I'd like to lay a belt of mines about 15,000 yards deep off the harbor entrance, with swept channels for our ships to enter and exit. 2. Address the Isla Grande situation. The situation on Isla Grande is extremely worrying. At this point, we have several options: A: Abandon the island. Thousands of La Platan soldiers would be killed or captured. This would force us to undertake a bloody and risky amphibious landing in the future if we intend to retake the island. B: Evacuate the island. Risky, but it may be worth it to save the thousands of soldiers trapped there. C. Bombard San Marcan lines. This may stabilize things enough to allow the La Platan army to dig new defenses and hold out. D. Reinforce the island. Get our fastest ships (ocean liners, destroyers, light cruisers), load them with troops and supplies and dash to the island under cover of night. E. Bombard Mendola. This will interfere with San Marcan logistics and may force them to pull back troops and artillery to defend the capital, relieving pressure on our men. 3. Raid/Mine San Robert. If we leave behind the slow Capitan Powell, and load the rest of our ships with mines, we can carry am maximum of about 680 mines at a speed of 18 knots. That's enough to heavily saturate the harbor mouth of San Robert and one of the nearby hexes. Best case, we might manage to bag several warships if they return to base and hit the mines. Worst case, they have to deal with the massive hassle of cleaning up mines for several days, giving us free rein in the area. Alternatively, we could forgo mining and simply shell the city and the port, which would put a huge damper on their operations Better yet, we could combine the two. Laying mines, shelling the port, and then watch them blunder into the minefield while we shell and torpedo them. 4. Raid Los Santanos and San Bernado. Detatch the destroyers (and possibly the cruisers) to raid Los Santanos and San Bernado. It'd be risky and the loss of destroyer escorts would limit our fleets' ability to operate while they were detach. Still, it'd be huge slap in their face to shell their capital. As a bonus, if if we use all the cruisers and all the destroyers we can carry just enough mines to mine San Bernado, albeit at reduced speeds. Danaru and Perestroika, thoughts?
|
|
#
?
Jun 9, 2015 08:18
|
|
|
Bacarruda posted:We are now sitting on 600 Victory Points. Not bad for six day's work. I quite like the idea of mining San Robert. It's a rather aggressive and risky movie, but if we pull it off we'll have made both of the enemy naval bases in the area highly unappealing. From then on, any enemy ship that we damage that tries to retreat back to either San Robert or Don Pera for repairs will have a decent chances of running into a mine and be sunk entirely. If we follow it up with a quick raid it might even pull away enemy forces to reinforce/protect the base, which would then blunder right into the fresh minefield. While we do that, Capitan Powell can be used to put up the defensive minefield around Aquila. Sure, it'll take a while longer because it'll have to make several trips, but those are short trips and it should be fairly safe with the coastal batteries nearby. As for Isla Grande, I'd probably lean towards just bombarding the place like a motherfucker, ideally both the enemy forward positions to stabilise the front lines and the city to disrupt reinforcements and allow our lads to regroup. We'd be able to do it right after dealing with San Robert, it wouldn't leave us quite as open to enemy interference (in fact it'd leave us concentrated enough to be able to bloody their nose if they come at us), and we'll have enough guns there to likely make a significant difference in the fighting with just that. Once that's done, we'd ideally be able to ascertain (perhaps by radioing the commander on the ground or something? No idea how thorough the rules are in that regard) whether our position there is strong enough to justify throwing more soldiers in there right away or to evacuate them. As for Los Sanatos and San Bernado, I'd say we should disregard them for the moment. Going after either of them would leave a significant part of our force isolated for a fairly long time for relatively little gain. We should focus on gaining dominance over the island chain here first and foremost, once that's done we can deal with the northern area pretty much at our leisure. Edit: Jimmy, I assume that the orders deadline is 48 hours again, right?
|
|
#
?
Jun 9, 2015 09:51
|
|
|
Jimmy, can our ships lay smokescreens? Can star shells be fired? Are night battles possible? Danaru, which fleet are the Liberaci�n (BB) and the Orgullo, Fuerte and Vanguardia (DDs) being assigned to? My preference is to have the destroyers go to 1st Fleet and the battleship to 2nd Battle Fleet. We're gonna need more ships in Zone Alpha Perestroika posted:I quite like the idea of mining San Robert. It's a rather aggressive and risky movie, but if we pull it off we'll have made both of the enemy naval bases in the area highly unappealing. From then on, any enemy ship that we damage that tries to retreat back to either San Robert or Don Pera for repairs will have a decent chances of running into a mine and be sunk entirely. If we follow it up with a quick raid it might even pull away enemy forces to reinforce/protect the base, which would then blunder right into the fresh minefield. While we do that, Capitan Powell can be used to put up the defensive minefield around Aquila. Sure, it'll take a while longer because it'll have to make several trips, but those are short trips and it should be fairly safe with the coastal batteries nearby. Good points. Here's a rough plan for the San Robert Raid. The mine loadouts (assuming we want an 18-knot top speed) 1st Fleet: Viento (pre-dreadnaught BB): 80 mines (-0 kts) O'Henry (AC/heavy cruiser): 68 mines (-2 kts) Zenteno (PC/light cruiser): 44 mines (-2kts) Total: 192 mines *we're leaving the Capitan Powell behind to do harbor mining off Aquila, it will carry 150 mines (-10 knots) 2nd Battle Fleet: Justicia (dreadnaught BB): 108 mines (-4 knots) Hurac�n (pre-dreadnaught BB): 80 mines (-0 knots) Toro (PC/Light Cruiser): 44 minutes (-2 knots) All destroyers (x6): 30 mines (-10 knots) = 180 mines Total: 412 mines We'll proceed to San Robert at flank speed (18 knots). Once we get there, we'll send in a destroyer to scope out the harbor and make sure there aren't any enemy ships in the harbor. If there are San Marcan ships in the harbor, we'll have to make a decision. If the force there is light, rush in and sink it, then quickly lay the mines. The force is larger, we should have the destroyers lay a smokescreen, hastily lay a few mines to screen our retreat, dump the rest and then beat it for home. If they aren't the harbor, we'll proceed with the mine-laying operation. We will lay mines around the harbor entrance and on our eastern flank. While we lay mines, we'll keep a couple of the destroyers on the flanks to lay more mines and acts as pickets. If they don't show up to interfere with our mining operations, we might as well raid/bombard the harbor. We'l need to make sure we have pickets keeping an eye out for the San Marcans. If we do that, their fleet will almost certainly have time to make an appearance. We'll have mines, ships with an 18-knot minimum speed, and a force of 4 battleships, 3 cruisers, and 6 destroyers. That's about the size of their main force; but our ships are newer and faster. We can fight or run equally well. If by some miracle they don't try to stop us leveling their major naval base, we can head take an indirect route and return to Base Aquila.
|
|
#
?
Jun 9, 2015 14:57
|
|
|
I take it I didn't have enough mines to completely block the port of Donostia then, since no points were awarded for it. and Neither of my fleets encountered ANY enemy forces? That's... worrying, actually. At the very least we should have picked up the radio traffic or seen SOME sign of the enemy. With all of my ships still pretty good on supplies, I could do a bit of raiding or shore bombardment. I'm kind of at a loss since I thought I'd encounter SOMEONE by this point. Anyone have any requests?
|
|
#
?
Jun 9, 2015 16:12
|
|
|
A drat good first week, gentlemen! Let`s keep this momentum going.Bacarruda posted:Danaru, which fleet are the Liberaci�n (BB) and the Orgullo, Fuerte and Vanguardia (DDs) being assigned to? I agree with your plan. 1st Fleet is in dire need of forward guard/scouts, and 2nd Fleet has the resources to support the Liberaci�n in battle. Sorry 3rd Fleet, we need to keep you guys nimble, you're going to be doing a lot of subversion while 1st and 2nd keeps the heat up north. I'm also inclined to agree with Perestroika regarding our next move. We could take the fight to their capital, but it would leave our islands wide open. Don't worry, I want to move troops on their capital as bad as you guys, but we'll want to hold back until we either find or make an opening. Regarding Isla Grande, the San Marcans have a heavy advantage, in that they can deploy directly from Mendola. If they're focusing their forces there, it's likely that they have a fleet defending the city. With that said, our boys in the Army are in a pinch, and the La Platan Navy isn't about to stand idly by. Bacarruda, your plan looks solid, and damaging San Robert will do a lot to destabilize the San Marcan hold on the area. Follow your plan but also be wary of mines. The San Marcans may be cowards, but they're not dumb. They've doubtlessly placed mines in the area between La Tropico and Isla de Vaca. If you have the chance and are undetected, consider having some of your ships sweep for mines on the way in. Perestroika, have your fleet assist 2nd Fleet's approach and battle if it comes to that. I would also like you to attempt to bombard the San Marcan frontline on Isla Grande if the opportunity arises. Any heat we can take off our boys will assist them a great deal. LPN Liberaci�n, all ships shall proceed directly to Penala and dock. Await further orders. Warhammer651, your squads are both already headed to Penala. Dock and rearm as quickly as you can. Once rearmed and refueled, escort the LPN Liberaci�n to Aquila Base. Avoid combat when possible, but if the enemy fleet is small, consider engaging to sink the enemies or scare them off. We need these reinforcements to get to Aquila Base as soon as possible. Once the LPN Liberaci�n and her fleet dock at Aquila, proceed to Acoma. Await further orders. Jimmy, I'm assuming any soldiers have to come from a city like Acoma, I want to move troops onto Isla Grande with 3rd Fleet as an escort, how would the logistics of that work with the game rules? Also how long would it take for 3rd Fleet to rearm and refuel at Penala? edit: warhammer651 posted:and Neither of my fleets encountered ANY enemy forces? Honestly it is a little unnerving that we've barely seen any enemy fleets. Take care not to underestimate the enemy, gentlemen. Danaru fucked around with this message at 16:26 on Jun 9, 2015 |
|
#
?
Jun 9, 2015 16:23
|
|
|

|
| # ? Apr 26, 2024 01:02 |
|
|
1st Patrol Fleet Orders All squadrons are to RENDEZVOUS at PENALA. Rearm, and refuel, but DO NOT take on any mines. Once rearmed, PATROL local area until LPN Liberacion arrives. Once she has arrived, LPN Liberacion, 1st Squadron and 2nd Squadron are to make best speed to AQUILA, where the Libercion's battlegroup shall rendezvous with our other fleets, then make best speed to ACOMA. If Enemy Forces sighted while en route to PENALA, Inferior enemy forces are to be neutralized with all haste. Radio Position and estimated heading and speed of Superior enemy forces before breaking contact. If Enemy Forces encountered en Route to AQUILA, Immediately Radio Position, Size, and Heading of enemy forces. If force is inferior, permission is granted to engage. If enemy forces superior, attempt to break contact or distract enemy from the Liberacion. DO NOT engage merchantmen while en route. If Merchant is flying San Marcan flag, eliminate before our position can be reported. Enemy forces encountered en route to ACOMA, Radio position and engage immediately. I am sorely tempted to keep my squadrons separated and have 1st squadron escort the Liberacion's battlegroup while second goes off to play Viking on San Juan Diego.
|
|
#
?
Jun 9, 2015 17:07
|
|