

|
Red Winter Finnish Thread This is the Finnish team thread for Let�s Play Red Winter. If you are a Soviet commander, that huge image above should tip you off that something�s not exactly right! Go back to your own thread. This OP will only contain necessary links and information. The game proper begins in the second post. Charts, Tables, Manual, Rules Post, The Map (for easier reference) Recovery
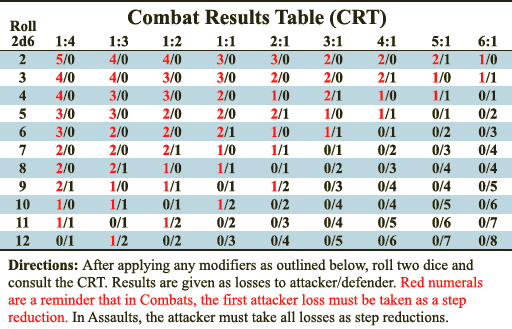 Combat shifts: - Attacking from a frozen lake hex or across a bridge hexside - attacker CS halved - Ranged Attack Suppression: 1L/1R per marker, up to 3 column shifts in either direction - Concentric Attack: 1R - Defender in Frozen Lake: 3R (4R vs Soviets) - Pajari: 1L/1R in favour of the Finns - Defender in Dug-In hex: 1L - Morale Bonus: 1L/1R (2L/2R in Assaults) - Finnish Submachine Guns: 1L/1R in favour of the Finns in every Assault not into a frozen lake Ranged Attacks
Ranged Attack modifiers:
  The Manual Rules Post Current Finnish OOB - you can edit it however you wish to make it as useful to you as can be. Or pretty. It�s up to you. If you need a refresher on the rules and don�t want to read the Rules Post, you can read the OP of the main thread. Just don�t peruse the rest of it, as I�ll be posting Super Secret Info there. Game Tips Playbook, edited posted:
Tevery Best fucked around with this message at 17:13 on Jun 30, 2015 |
 #
?
Jun 23, 2015 13:21
#
?
Jun 23, 2015 13:21
|
|


|

|
| # ? Apr 26, 2024 11:04 |
|
|
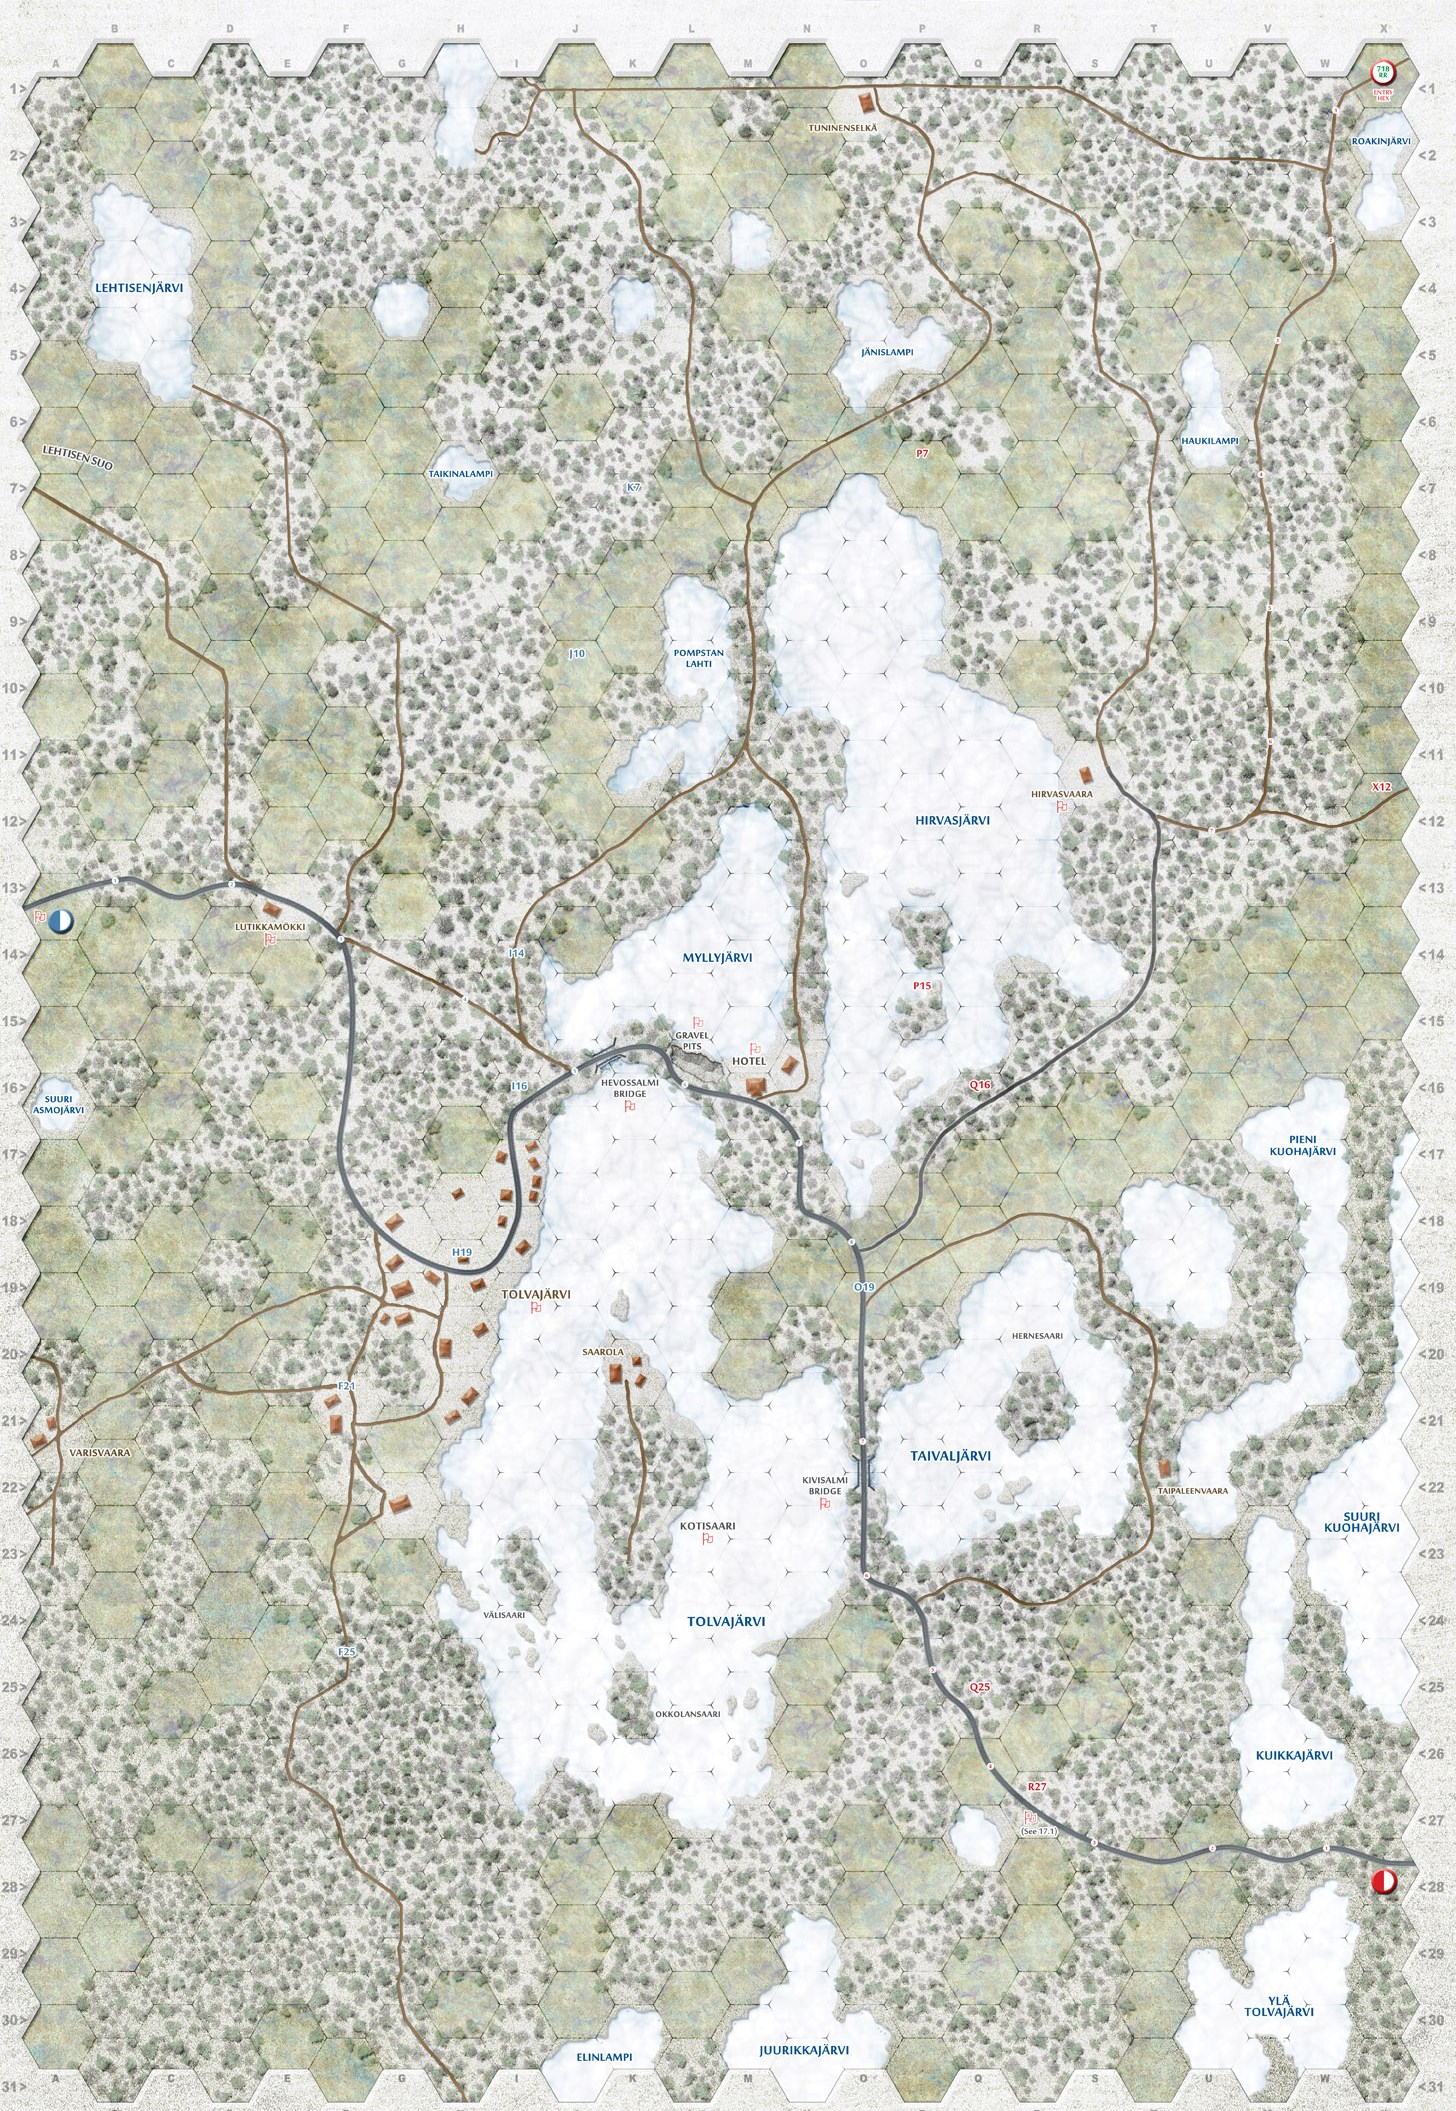
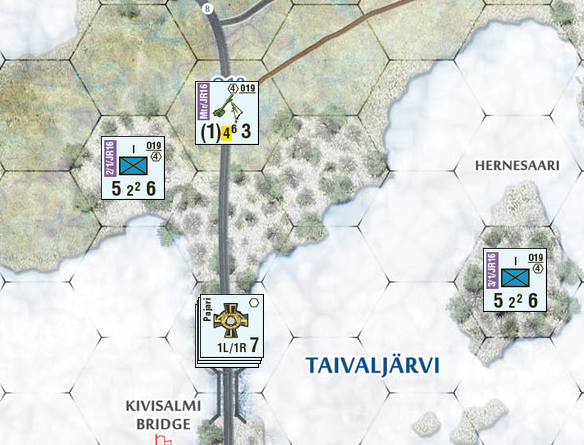
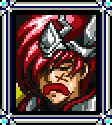
All right, men! We thought that a front as wide as ours was completely undefensible. So far, we�ve been proven right. We�ve been on the run for a week now. Up until this point, wherever we stood, we were quickly outflanked due to the Soviets� overwhelming numbers. But it ends here. This area is the perfect staging ground for our defence. The enemy must secure this narrow strip of land if they are to advance any further. And with a bottleneck such as what we have here we stand no better chance of halting their advance. The first companies of JR16 has already arrived and is ready to deploy, and not a moment too soon. Scouts report that a full Soviet rifle regiment is bearing our way from the southeast, aiming to smash us, achieve a breakthrough and continue west to flank the Mannerheim line. We can�t let them take the road.  Fist, let�s take an overview of our forces. 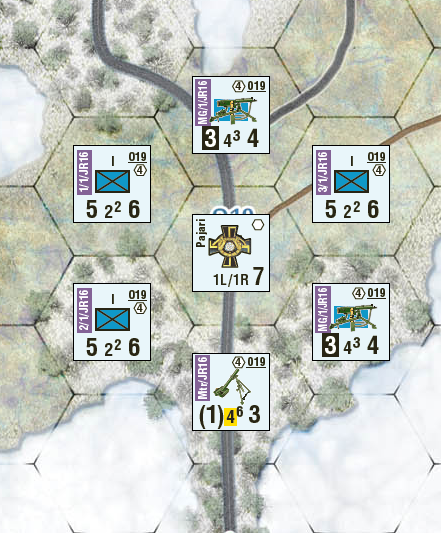 Captain Junkozeyne�s first battalion of JR16 - and one of the regimental mortar platoons, subordinate directly to Major Davin Valkri - will form our first line of defence until it can be reinforced. It�s in good position to deploy near the Kivissalmi bridge. The units in the screenshot above (except Pajari) must start the game set up within 4 hexes of hex O19, i.e. in the zone below: 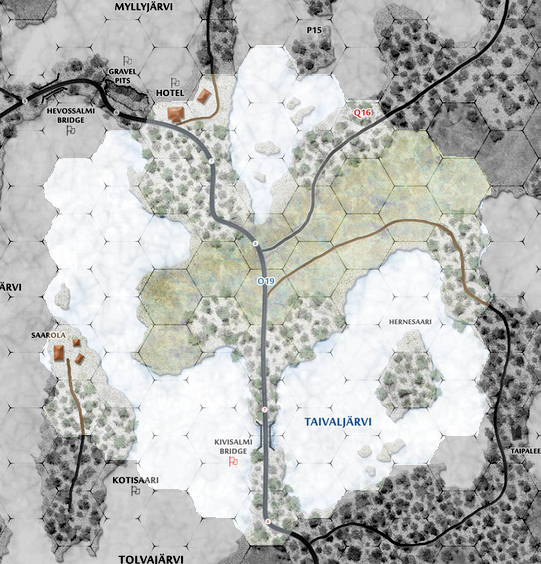 Note that you need to obey stacking restrictions (i.e. not more than 5 units in a hex, and not more than 3 of those may be infantry companies - Pajari doesn�t count either way). We have a few more units stationed under Captain Bacarruda in Tolvajarvi village: 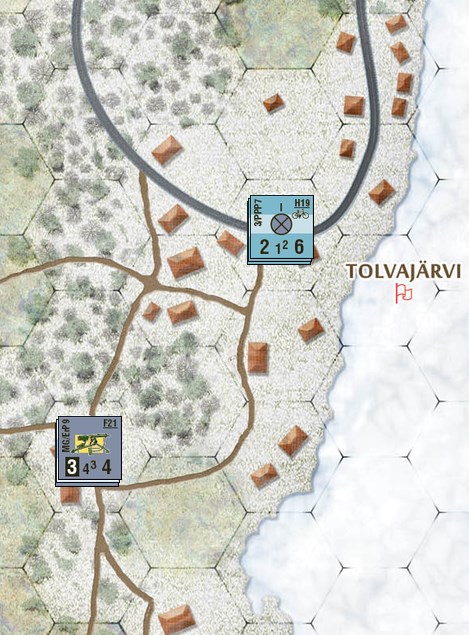 These start the game in fixed positions. They represent roughly two battalions, but are actually a battalion and a half, and are missing a bunch of machine guns. They�re the remnants of Task Force Rasanen, split off from the remainder of that group by the Soviet 139th Rifle Division�s advance.    The northern stack is, at least, a cohesive unit. It represents the entirety of 7th Bicycle Battalion. PPP7 had fought hard in the last few days to hold the Soviets off near the Ristisalmi narrows, but standing alone against a regiment they had no chance. Many of them abandoned their heavier weapons during the rout. They fought well, but now need a chance to recover.    The other group is a hodgepodge of various units. 8/3/JR37 is a single company from 37th Infantry Regiment which was on loan from its parent unit just when the war started. We also have the 3rd Company of 112th Independent Battalion and 9th Independent Battalion�s MGs - the rest of those units has pulled back to the rear to recover. 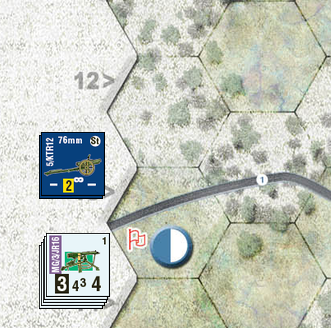     Finally, Davin Valkri�s 3rd Battalion of JR16 is just about to arrive in the field. They start off map and will enter in your Action Phase. They must move into your supply source hex (the one with the blue-white icon) first, but they may use road move to get there, and may move normally from there on. There are small blue numbers on the road from there to the front to show you just how far a unit may get by spending a given number of MPs (remember about the Extended Move rule!).   You also have two artillery battalions. They provide support from off-map and are under Colonel Danaru�s direct control. They don�t move, they just fire - but remember, only on your turn or the Soviet turn, not both. Once all your units are set up (currently only the forces near Kivisalmi need placements), Danaru will place Pajari stacked with any other Finnish unit on the map. Good luck, commanders.
|
|
#
?
Jun 23, 2015 13:25
|
|
|
So I'm currently thinking about how to setup and as I'm not that experienced with wargames maybe some feedback would help. So the Soviets push from the southeast, have the superior numbers and their obvious goal is to take the bridge. They could cross the lake but that seems unlikely as it would put them in a vunerable position. They could also use the other road to circle the lake and flank from the east. So to stop their advance somewhat it seems to be good to bottleneck them at the bridge. If I understand the rules correctly, if I take 1 infantry company and 2 MG to O21, anything that attacks from O22 and below gets their CS halfed, so that seems like a good first defensive position, right? To discourage them from flanking us, 1 infantry company could also take the Island on R21. That leaves me with 1 infantry company to deploy, maybe on O20 to provide ranged support?
|
|
#
?
Jun 23, 2015 16:51
|
|

|
Junkozeyne posted:If I understand the rules correctly, if I take 1 infantry company and 2 MG to O21, anything that attacks from O22 and below gets their CS halfed, Correct. Junkozeyne posted:That leaves me with 1 infantry company to deploy, maybe on O20 to provide ranged support? Friendly units block line of sight for ranged attacks, so you won't be able to hit people on the bridge this way (ice is fair game). It would, however, prevent the enemy from advancing after combat. Tevery Best fucked around with this message at 17:17 on Jun 23, 2015 |
|
#
?
Jun 23, 2015 17:13
|
|
|
Yeah, since your infantry company has a range of 2, there's no way to get them into ranged support position against targets on the bridge without putting them on the frozen lake. An MG on P20 or N20 (the forests above the frozen lake hexes) would be able to provide support, I think. Don't let me tell you what to do with your battalion, but with your last infantry company you might want to consider guarding Kotisaari island, parking on N20 or M20 to overwatch the west side of the lake, or even deploy on the main road on the opposite side of the bridge to keep the Soviets from rolling right up to O21 (remember, it's on the main road) and making the bridge defense untenable on turn 1. Obviously that's a huge risk, but it'd give the bridge defenders a chance to dig in and solidify that hardpoint even more. For my part, I plan to rush my battalion to the hotel area and the second bridge asap turn 1, but would you be happy with the mortar deployed at O19, P19 or M20? Davin Valkri fucked around with this message at 19:29 on Jun 23, 2015 |
|
#
?
Jun 23, 2015 17:32
|
|

|
Ok, let's go with 1/1/JR16 and the two MG/1/JR16 on O21, 2/1/JR16 on N20 and 3/1/JR16 on R21. Though this will give the Soviets room to advance I hope the Bridge will give me enough advantage to minimize losses. Should also spot any weird movements from the enemy. I don't expect to hold that position too long so I guess i would be happiest with the mortar on O19, should make a safe retreat possible.
|
|
#
?
Jun 23, 2015 21:55
|
|
|
Fair enough. Probably shouldn't think about grinding down the Soviets at this stage (the other two options would be self-spotting on hypothetical bridge attackers, but would also be within easy MG/mortar range as well); we should conserve our forces. Mtr/JR16 to O19
|
|
#
?
Jun 23, 2015 22:29
|
|
|
Okay then! Danaru, let me know where you want to put Pajari and we'll be ready to go.
|
|
#
?
Jun 23, 2015 22:31
|
|
|
Do we know when reinforcements are coming? One would suppose that they could telegraph or radio ahead which may help with planning but maybe this isn't the case (be it historical or for gameplay purposes by the designers).
|
|
#
?
Jun 23, 2015 22:45
|
|
|
Once the game begins proper, I'll be notifying you when the next reinforcement wave will arrive. They're coming soon, don't worry.
|
|
#
?
Jun 23, 2015 22:54
|
|
|
I foresee the Ruskies gunning for Kuvisalmi bridge early on, so Lt. Col. Pajari will join Junkozyne's men at O21.
|
|
#
?
Jun 23, 2015 23:19
|
|

|
Ah, what does the thread title refer to? Is there some association between Finland and memes I don't know?
|
|
#
?
Jun 24, 2015 01:50
|
|
|
The PYF meme thread had suffered an invasion of Finnish memes and it stuck to their thread name. It was the best I could come up with on short notice 
|
|
#
?
Jun 24, 2015 07:27
|
|
|
 The men of 1/JR16 assemble around Kivisalmi bridge and prepare to defend it. The crossing is extremely narrow and will make for a good defensive chokepoint, so let's hope the Soviets can't flank it!  Speak of the devil! Scouts have returned, bringing news of a Soviet battalion-sized formation heading your way down the road! They must intend to give you no respite! You don't know the exact make-up of that force, but it's most likely just the first of many... 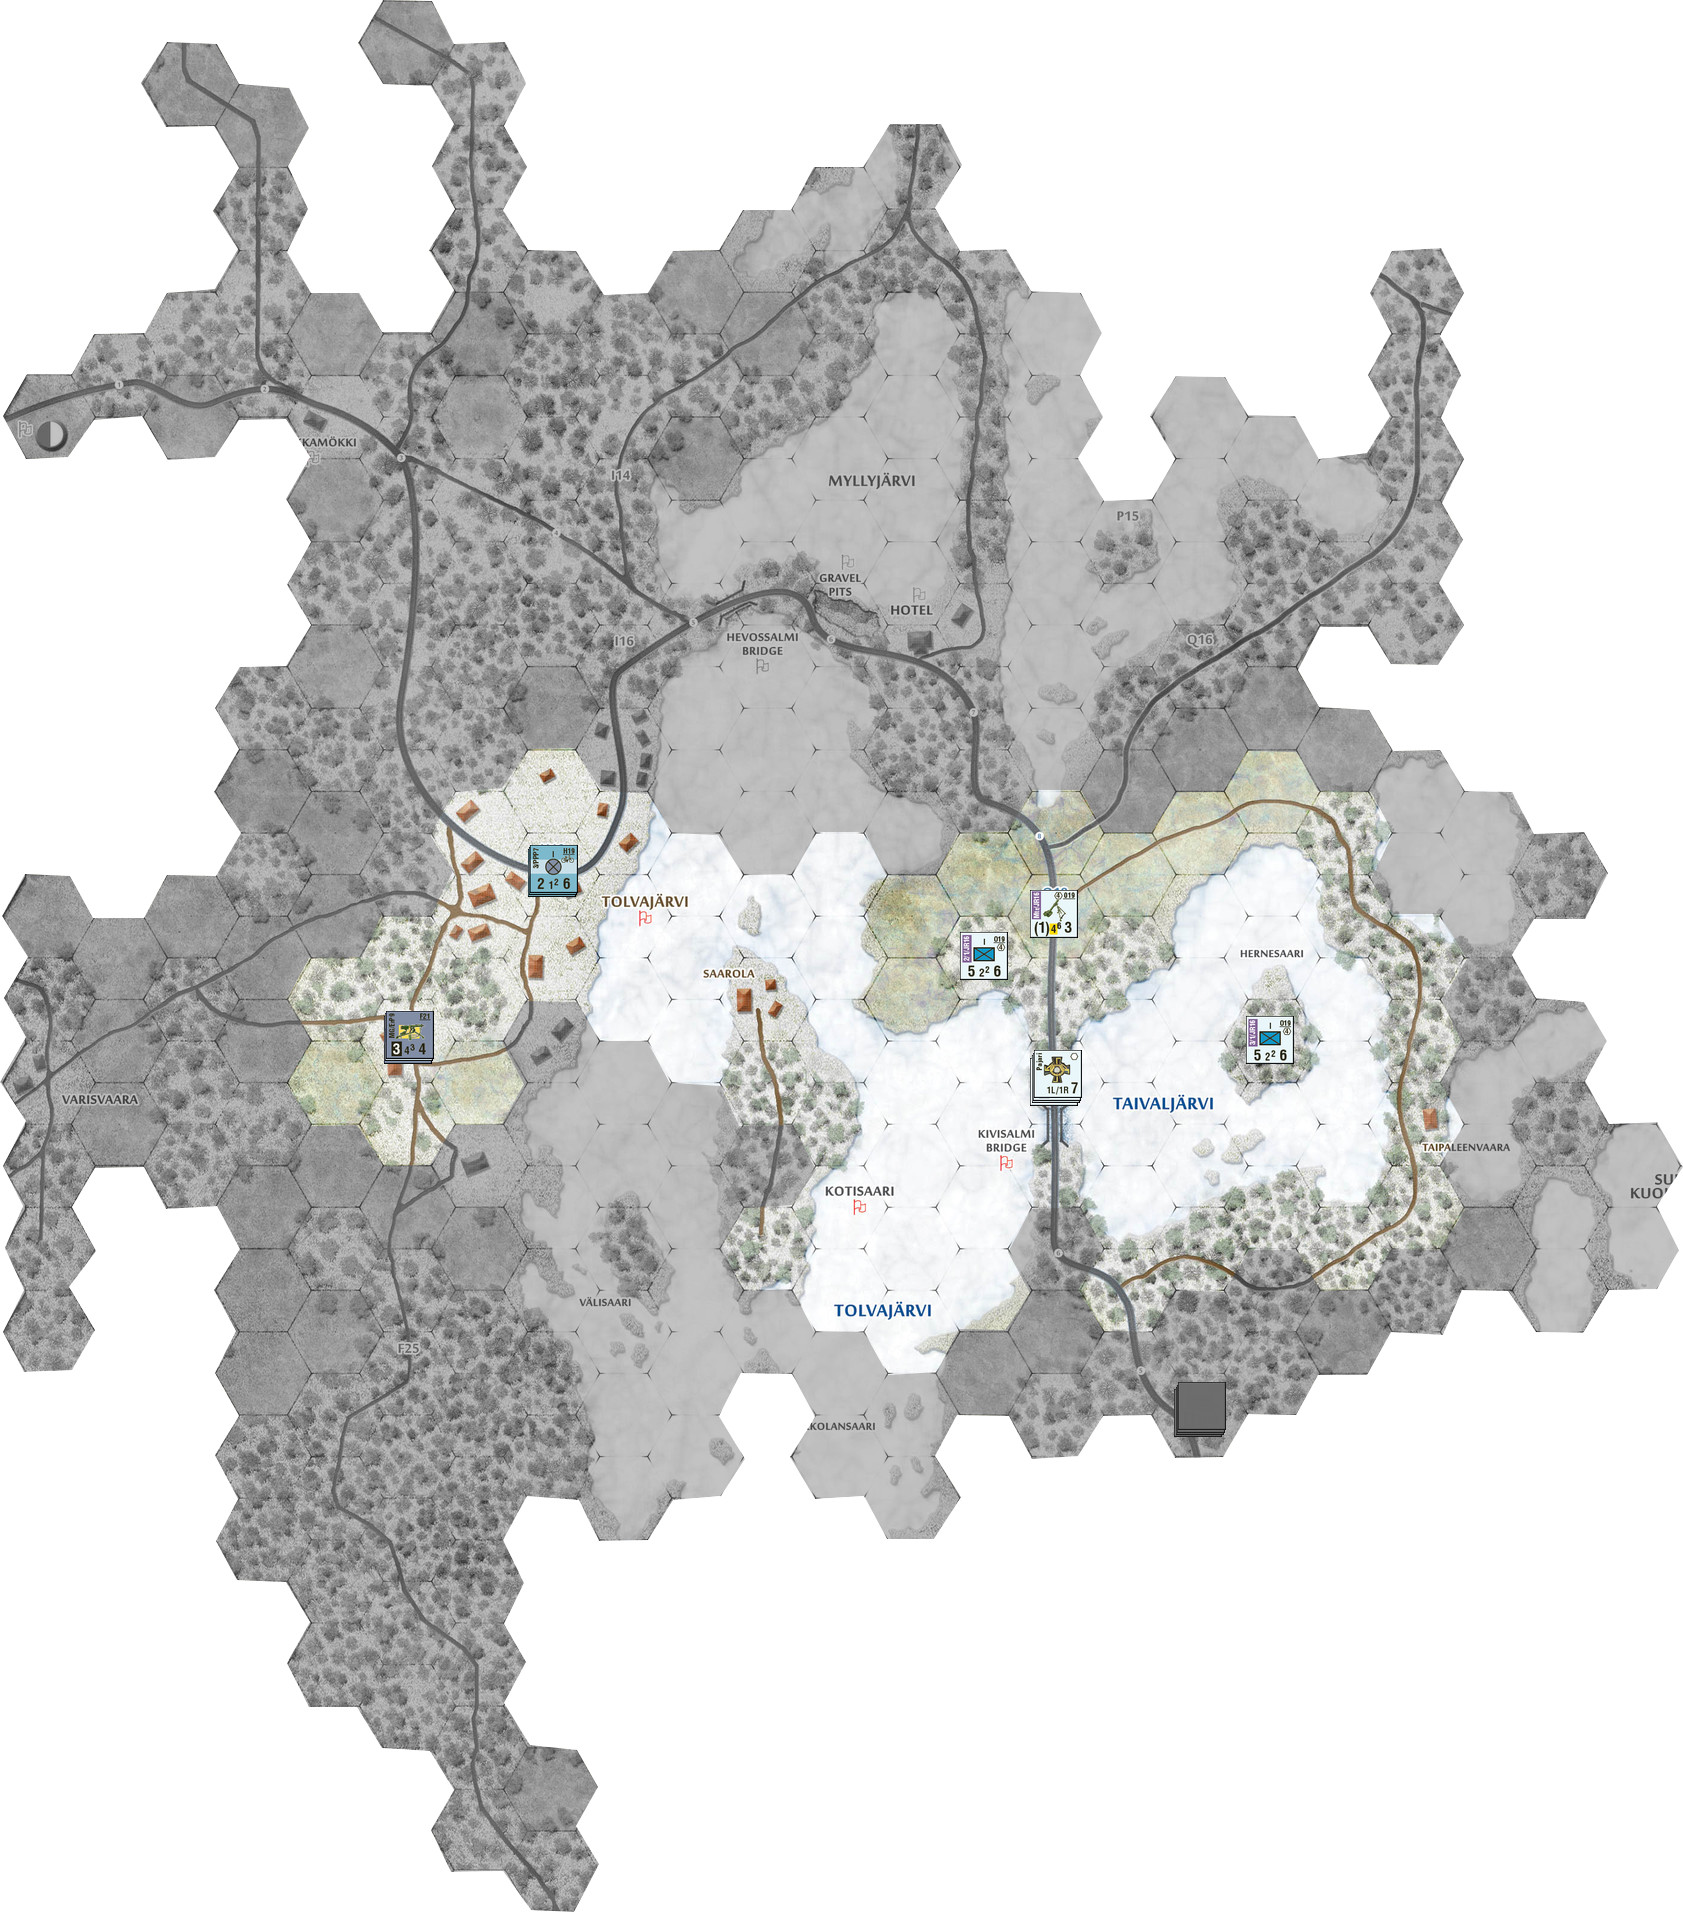 Here's what you can see. Let's talk about how fog of war will work in this LP. The full-colour hexes above are hexes your units can see. If there were any enemies in those hexes, you'd have known their exact force composition. Note that sometimes you will be able to see a hex, but not move into it - not this time, however. The greyed-out hexes are the scouted hexes, and correspond to the hexes you can move into without Assaulting. This would normally include Extended Movement, but in this case I forgot to input it (and it would only expand the map a few road hexes up north, so  ). If the only thing stopping you from moving into a hex is the enemy Zone of Control, I'm placing the unit that exerted it on the map. If you would be able to move into a unit's ZOC normally, but were prevented from moving any further because you've ran out of movement points, the unit is not shown. In other words, there may be Soviets lurking just beyond the edge of this map. ). If the only thing stopping you from moving into a hex is the enemy Zone of Control, I'm placing the unit that exerted it on the map. If you would be able to move into a unit's ZOC normally, but were prevented from moving any further because you've ran out of movement points, the unit is not shown. In other words, there may be Soviets lurking just beyond the edge of this map.This map will be updated after every Phase of your turn, but not on enemy turns (because that would be a lot of work for no purpose, since you can't move then). You will be notified of any enemy movements in your sight range and scouting range. Notice how the reinforcements' vision range and scouting range is not shown, since they are not on the map yet.  Weather Report Roughly 30-40 centimetres of snow have accumulated on average in the general area. Current weather: overcast, no precipitation. A dense fog formed in the early morning, but it is dissipating now. It still limits visibility to about 1700 yards (4 hexes) and provides a -1 DRM to all Ranged Attacks.   Soviet Morale Bonus begins! This means the enemy will receive an extra shift in their favour in Combat (two in Assaults) and get a +1 Dice Roll Modifier to all attempts at recovery! They will retain this bonus until tomorrow, so be ready for them! The enemy are now taking their Action Phase. Once they're done handing out orders, I'll show you any of their results that you can see. While you're waiting, let's talk about the Soviet Objectives. 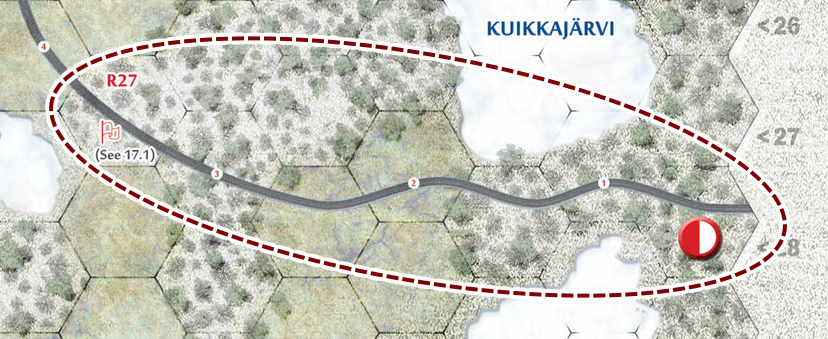 Their first objective are the first seven hexes of the main road. Capturing these is worth 5 VPs - and you can hardly do anything to contest them at this point... 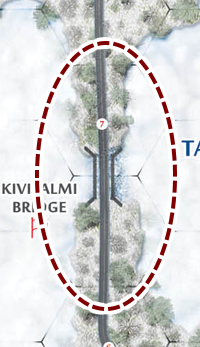 The Kivisalmi bridge. A good defensive position, worth 5 VP to the Soviets if they can capture both hexes. 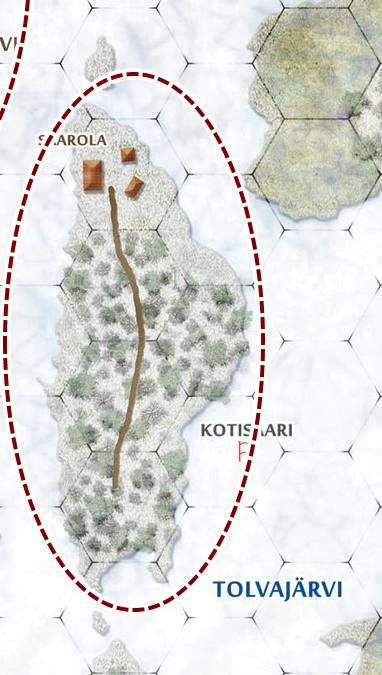 Kotisaari Island represents both a nice opportunity for a flanking move around the Kivisalmi bridge and a chance to leap across Tolvajarvi lake and strike at the village. It would also hinder any attempts you can make to attack the enemy flanks. The lake around it may prove dangerous, however. Controlling any hex of Kotisaari grants the Soviets 5 VPs, which gets upgraded to 10 VPs if they can grab all five hexes of the island. 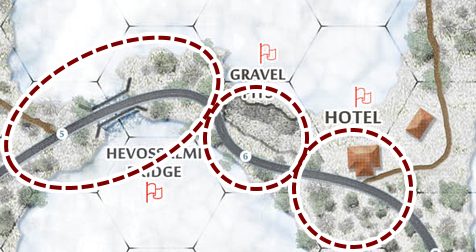 The next three objectives are right next to one another, but that doesn�t mean they�re bound to fall in a bundle. The Hevossalmi bridge is similar to Kivisalmi, but more difficult to flank, and as such can grants 10 VPs. The Gravel Pits do not have any in-game effects, but are worth 10 VPs. The Hotel is worth a whopping 15 Victory Points, but it can be turned into a real fortress - the sturdy building is the only hex in the game which absorbs the first loss taken by the defenders in a combat. 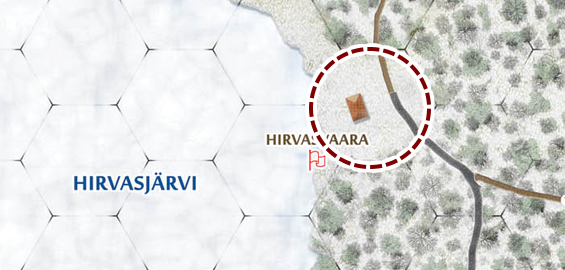 Far off to the northeast lies the hamlet of Hirvasvaara (10VP). Holding it allows the Soviet to control Hirvasjarvi lake and would grant them a supply link to the north. 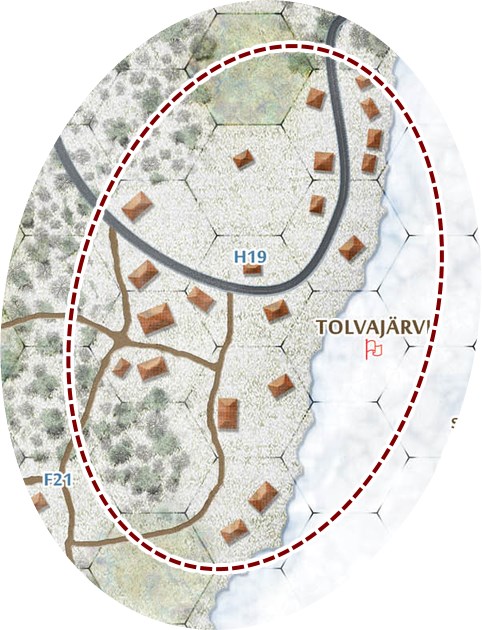 Tolvajarvi village. Whoever holds it can instantly block off the main road and interdict any attempts to cross the lake. For that reason, it�s worth 5VP� per each of the eight hexes. 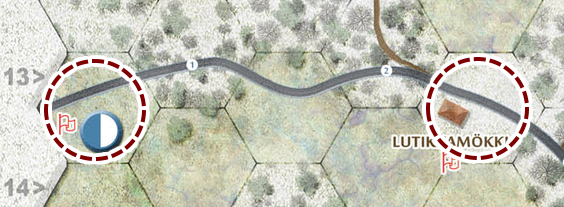 Your last lines of defence: the hamlet of Lutikkamokki and your supply source hex, each worth 10 VPs. Remember that each of the above objectives is only worth half as much if it is out of supply. When the enemy first enter your supply source hex, your artillery will limber up and get the gently caress out of dodge, and will be removed from the game permanently. This is worth 5 VPs to the Soviets. 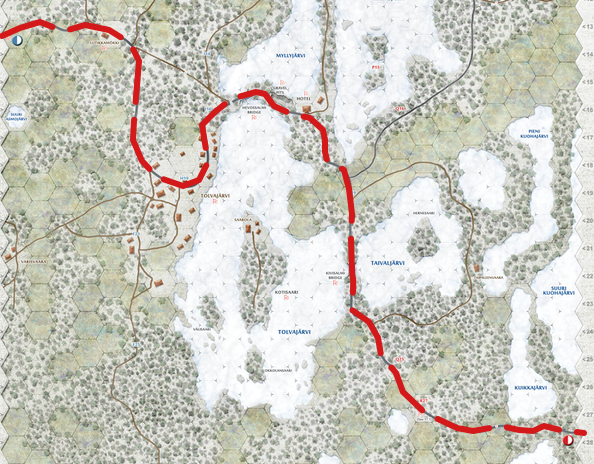 Finally, the big prize. Controlling the entirety of the main road instantly rewards the Soviets with 10 VPs, and if you manage to hold it until the end of the enemy turn, you instantly win the game (same goes for the Reds!). This won�t be easy, mind you...
|
|
#
?
Jun 24, 2015 12:37
|
|
|
Good call putting a unit on Hernesaari, Junkozeyne. Now at least if they try to bypass the bridge we have at least one turn's warning and a possible blocker.
|
|
#
?
Jun 24, 2015 15:50
|
|
|
Orders for Task Force Rasanen This turn: roll to recover Next turn: move out  ski messengers to Captain Junkozeyne and Major Davin Valkri posted:Sirs, We current have nothing guarding the Taipaleenvaara road, which gives them a chance to flank us. Shouldn't we at least send a small force their to guard it? Bacarruda fucked around with this message at 06:07 on Jun 26, 2015 |
|
#
?
Jun 26, 2015 04:30
|
|

|
Bacarruda posted:We current have nothing guarding the Taipaleenvaara road, which gives them a chance to flank us. Shouldn't we at least send a small force their to guard it? Counting movement squares, we'll have at least one turn's warning before an attack from the Taipaleenvaara road will be a threat, and since the bridge is on the Main Road I fully expect that to be their main effort, at least for this turn. The bridge defenders will probably be able to back up and cover an attack from that area if it comes to it, and by turn three the 3rd Batt. reinforcements will be on station, either at the Hotel or further up. Also don't forget that most of your command is at half strength. You might want to consider rolling to recover instead of moving, esp. the one company of bikers you plan to hold in reserve.
|
|
#
?
Jun 26, 2015 04:54
|
|
|
Davin Valkri posted:Counting movement squares, we'll have at least one turn's warning before an attack from the Taipaleenvaara road will be a threat, and since the bridge is on the Main Road I fully expect that to be their main effort, at least for this turn. The bridge defenders will probably be able to back up and cover an attack from that area if it comes to it, and by turn three the 3rd Batt. reinforcements will be on station, either at the Hotel or further up. Got it. Gonna roll to recover, then move out.
|
|
#
?
Jun 26, 2015 06:07
|
|
|
Bacarruda posted:Got it. Gonna roll to recover, then move out. Well, you don't need to do that for all of them. I'm just saying that your units are a bit brittle at the moment, that's all. I guess we'll see if they send units over the lake immediately.
|
|
#
?
Jun 26, 2015 06:24
|
|
|
You've received unexpected, special reinforcements! Say hello to Kangra and MonotoneMorgan! Also, a general remark. Remember that the images below may be edited to hide units you can't see or scout out. The only way to be 100% sure that a given hex is empty is to see it on the "vision" image. 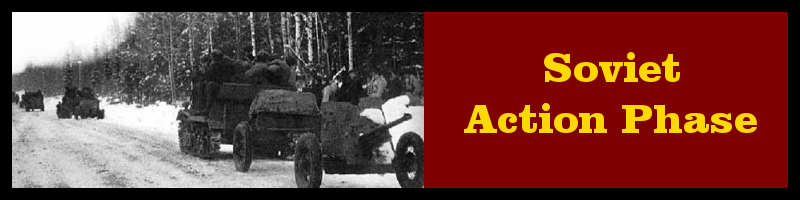 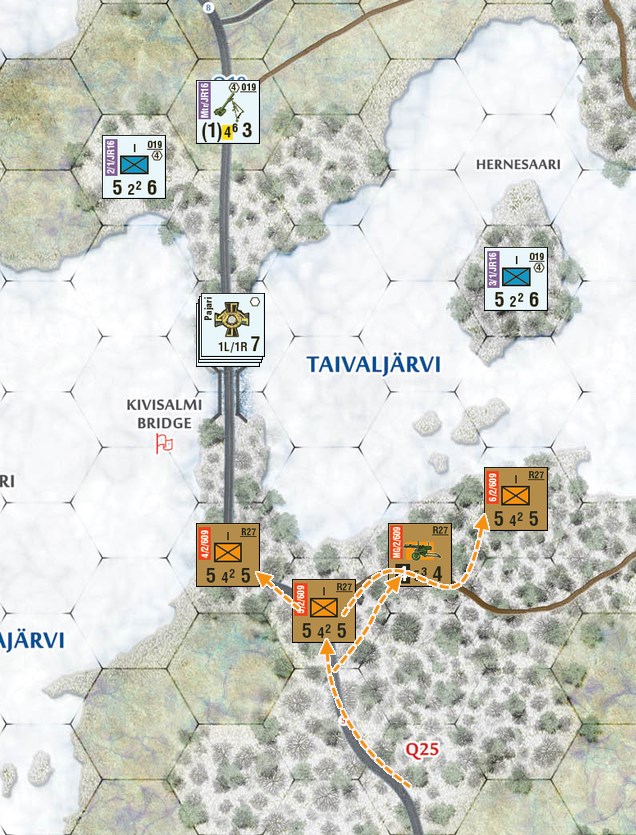 A battalion of Soviet troops pours out of the woods and lays out on the shores of Tolvajarvi and Taivaljarvi. They begin setting up MG emplacements on the southern embankment and you trade some long-range automatic fire, but nothing serious comes out of this. They seem to be preparing for an attack, but don't hit you just yet. Maybe your positions on Kivisalmi were enough to give them pause?  Kivisalmi bridge in the summer, seen from the west. The small white patch in the back is the Taipalenvaara homestead.  The Soviets initiate no Combats and no Ranged Attacks. The turn passes to you!  All your artillery and mortars are now ready to fire. You have two 76mm batteries with enough ammo for a total of 3 fire missions. Next ammo delivery: before sunset. You receive no Replacements. Next reinforcements arrive: in the afternoon.  All your units may now: - Move up to their Movement Allowance (see OP for terrain costs), stopping at enemy Zones of Control, and/or Assault; - Attempt Recovery, if they're a reduced-strength infantry company; - Start Digging In (Digging In counters remaining: 9) (infantry and MGs only). Reinforcements may now enter the field via your Supply Source hex. 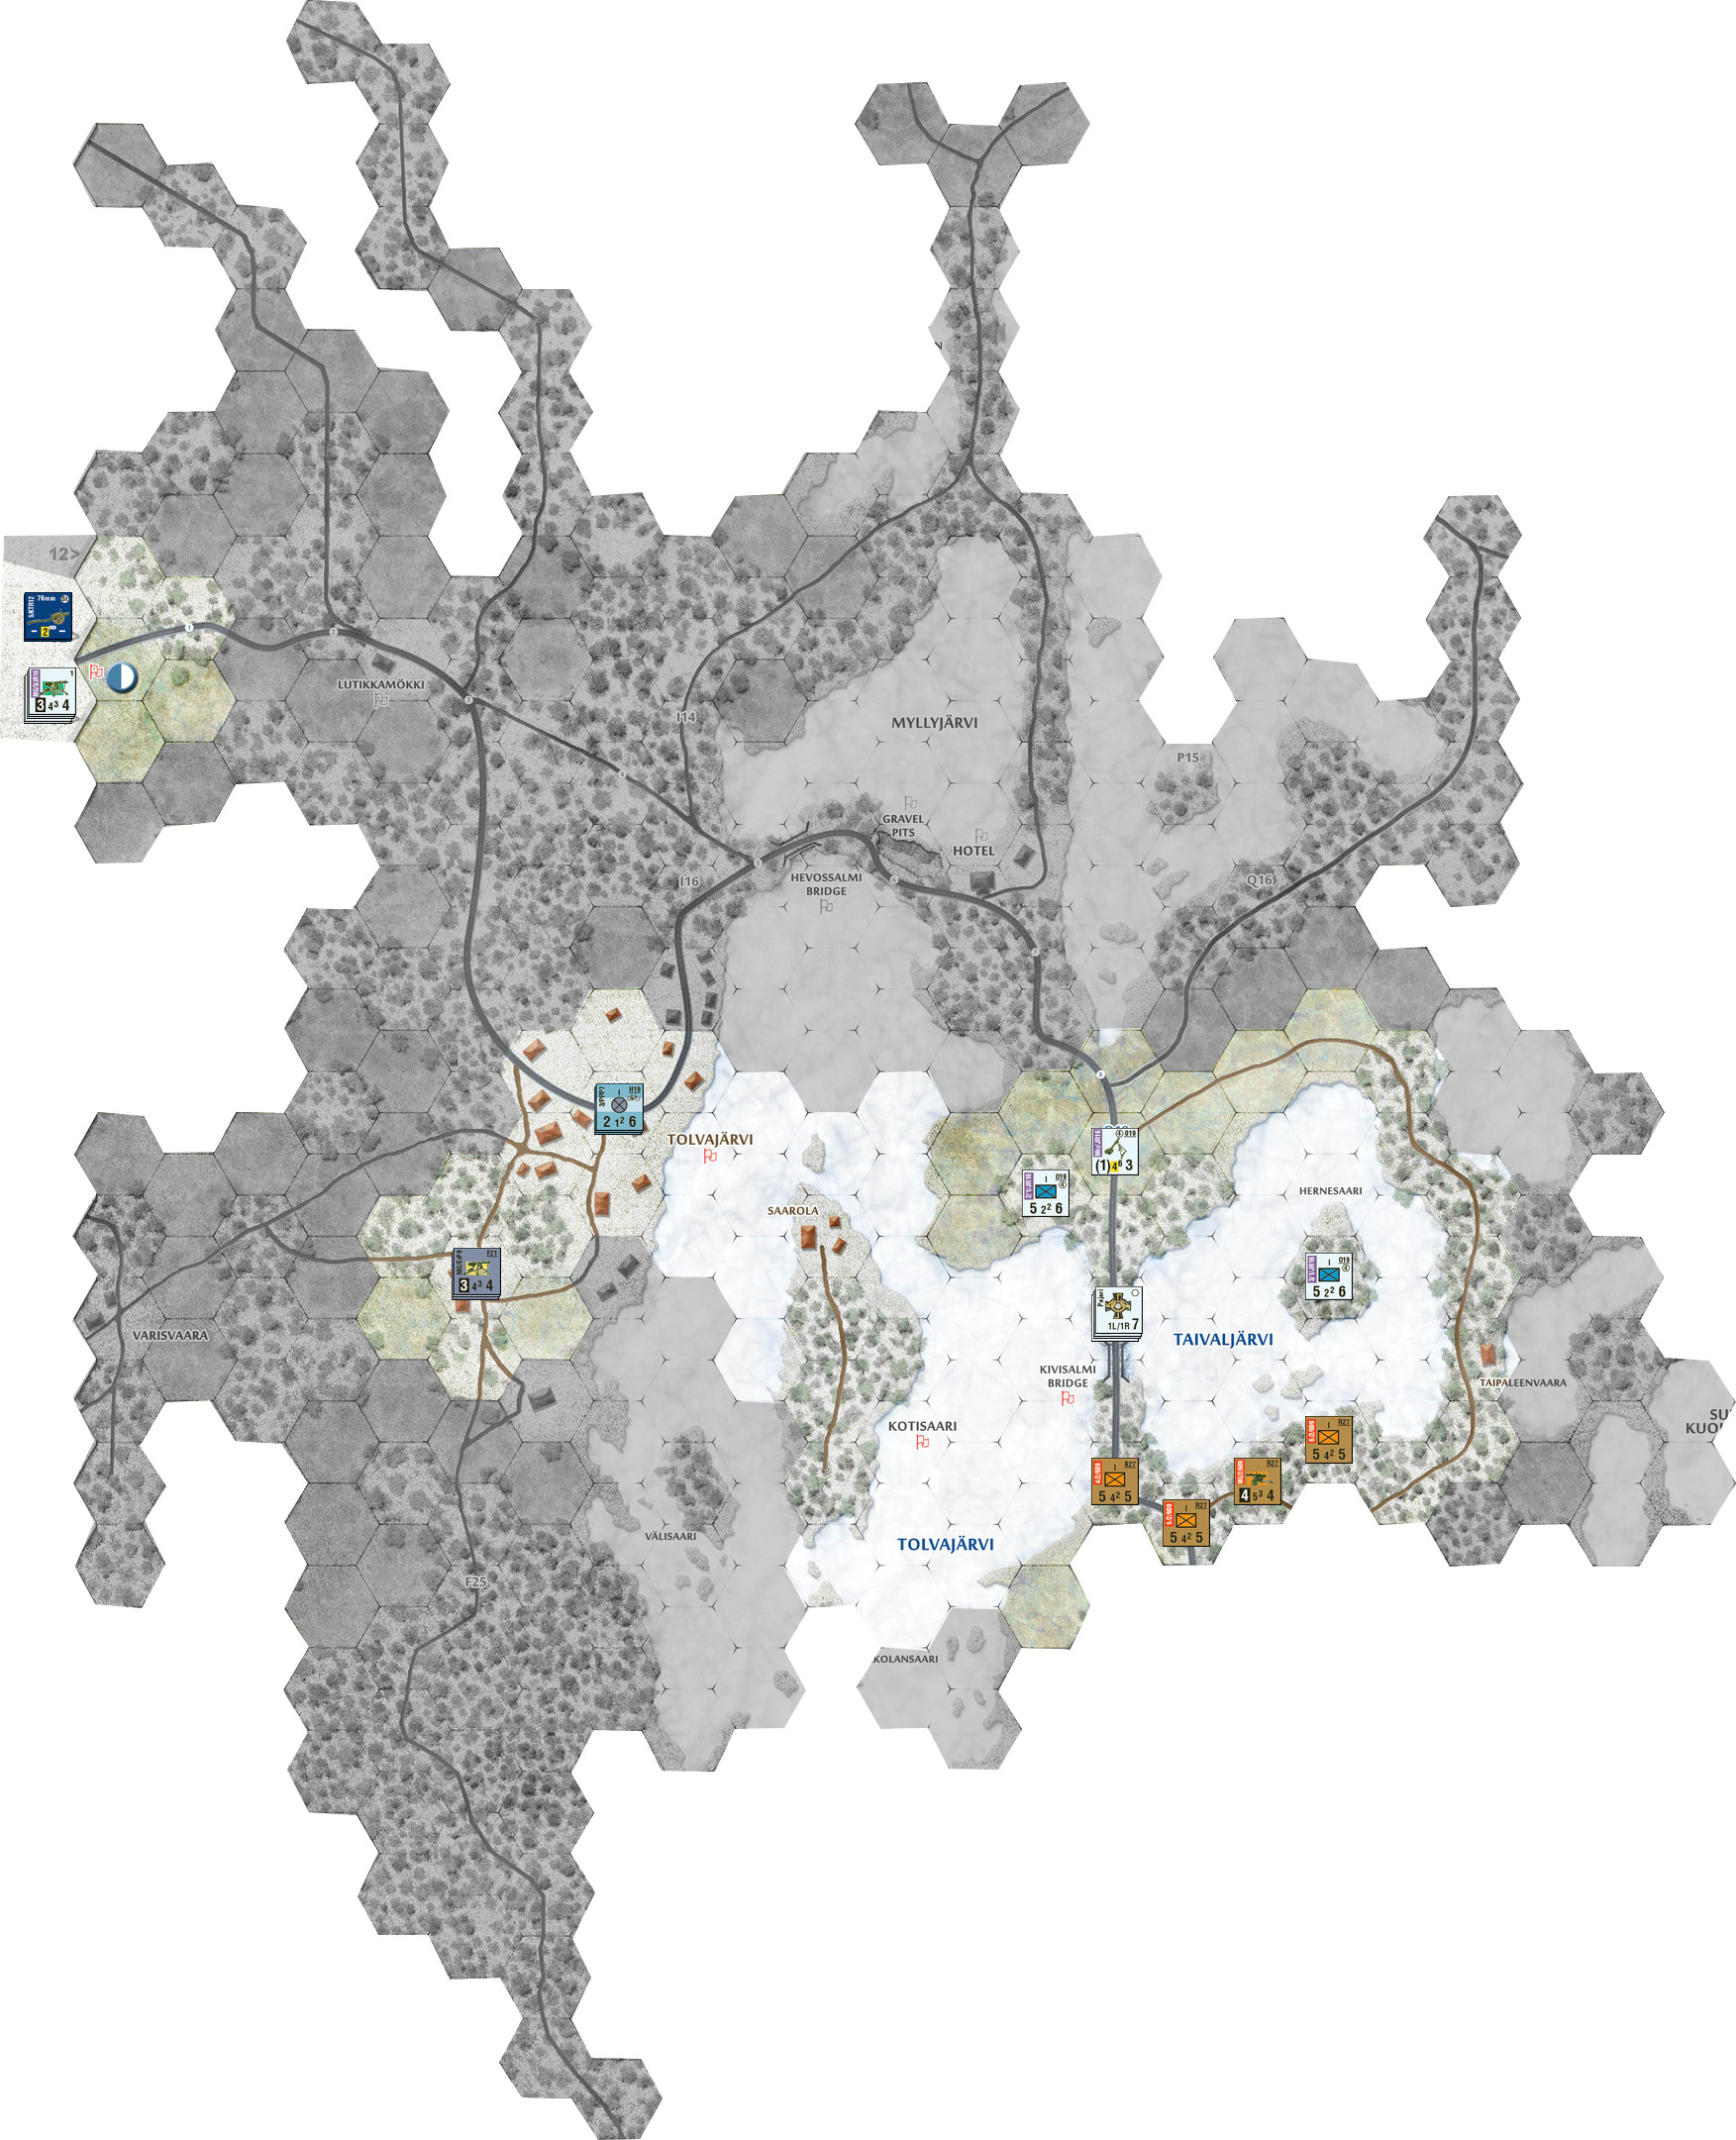 :alarm:The deadline for orders is 4 PM GMT on Sunday, June 28th!:alarm: Tevery Best fucked around with this message at 22:52 on Jun 26, 2015 |
|
#
?
Jun 26, 2015 22:18
|
|
|
Terve, everybody! I checked out of the main thread at the very start, so I'm unspoiled. It looks like my units haven't arrived yet, so for now I'm in advisory mode, I guess.
|
|
#
?
Jun 27, 2015 00:12
|
|
|
Glad to have you on board! We (and by We I mean Me because I'm dumb) will definitely need your help later. What are the Soviets doing? They're not forcing the bridgehead, they're not going fully down the Taipaleenvaara road, they're not moving on Kotisaari...Are they setting up for a massive attack on the bridge with their own mortars/arty, or some kind of assault, maybe? Junko, how would you feel about moving 2/1/JR16 to Kotisaari? Maybe linking up with the MG under Bacarruda's command? Danaru, my plan is to set up hardpoints and dig in at the Hotel and the left side of Hevossalmi Bridge. Any better places you want me to deploy?
|
|
#
?
Jun 27, 2015 02:43
|
|
|
It does seem that being out of supply isn't that big a penalty in the short-term; if they can concentrate a lot of force at one point where we aren't expecting, they can either try to sow panic or destroy one or more of our units and withdraw. Scouting is going to be pretty important for us. They may just be cautiously scouting us too. Thinking about what they can likely see right now: the road to Taipal. is clear, and they probably have eyes on Kotisaari.
|
|
#
?
Jun 27, 2015 03:10
|
|
|
Davin Valkri posted:Glad to have you on board! We (and by We I mean Me because I'm dumb) will definitely need your help later. I think they plan on hitting the bridge hard this turn with artillery and infantry assaults. It might be worth digging in as soon as possible. As for Kotissari, I think it's likely they plan on attacking it. Because of the terrain penalties the Soviets face (and the terrain bonuses my skiing Finnish bicyclists get), I'm confident my men will beat them there. --- Orders for Task Force Rasanen Move out! Once you reach your positions, dig in as soon as you can. Have 3/PPP roll to recover as soon as it can, and have it keep rolling to recover in future turns until it is back to fighting strength. Once that's done, have it dig in. -- Tevery Best,what was the result of my recovery rolls? Which units do Kangra and MonotoneMorgan have? Bacarruda fucked around with this message at 03:17 on Jun 27, 2015 |
|
#
?
Jun 27, 2015 03:14
|
|
|
Units use their move to attempt a recovery, Bacarruda. Sorry if I didn't make that clear.
|
|
#
?
Jun 27, 2015 03:16
|
|
|
Davin Valkri posted:Units use their move to attempt a recovery, Bacarruda. Sorry if I didn't make that clear. I get that. What I'm asking is if any of the recovery rolls succeeded and any units are back to full fighting fettle.
|
|
#
?
Jun 27, 2015 03:18
|
|
|
You didn't have time to attempt any! Recovery rolls only happen in your Action Phase, and when you first made that post, it was still the Soviets' Action Phase. Sorry for the confusion! EDIT: as in, there was no turn back then. It went like Setup -> Soviet Turn. Your turn is now. EDIT2: Kangra and MM have no units just yet. I'm thinking about splitting your command into two, but even then, one battalion would just go to Ghost of Mussolini. Tevery Best fucked around with this message at 06:56 on Jun 27, 2015 |
|
#
?
Jun 27, 2015 06:54
|
|
|
I'm content to wait till the reinforcements come in for my command. Excited to be fighting as the underdogs again.
|
|
#
?
Jun 27, 2015 08:39
|
|
|
Alright, we know Ivan sure as hell didn't send four platoons to take the road. They've either got more men hiding behind the current front line at Kivisalmi, or if they're playing clever, they might have a team sneaking across down south across Tovaljarvi Lake. If so, they won't be able to get to an effective position for a while, and we'll have reinforcements before then. Davin Valkri, go ahead with that plan, it gives the boys at Kivisalmi a point to fall back on in case Ivan puts up too much heat. Bacarruda, you're actually already doing what I was going to suggest, so you do you. Junkozeyne, you're likely to be hit by mortars sooner rather than later. If you can get eyes on the mortar team, I can have artillery barrage them and take some heat off your men. We've only got three salvos ready so we need to make our strikes count. Kangra and MonotoneMorgan, welcome to the fight. We'll have to see what units you end up controlling before finding a good spot for you, but consider the south of Tolvajarvi village. At worst, we catch Ivan sneaking up to bite our flank, at best, we catch Ivan with his pants down.
|
|
#
?
Jun 27, 2015 13:00
|
|
|
The Soviets could also be marching up to the east of Taipaleenvaara no? Since they're hid from LOS by the depression of the lake, we wouldn't find out they were there until they pop up to the west of the intersection and go straight for the mortar crews. It would take a few more turns but considering the limited amount of forces we have at the moment they may have gambled that we wouldn't catch them on the vulnerable ice. May it not be a better idea to hold onto one of those bicycle units as a scout/probe unit?
|
|
#
?
Jun 27, 2015 14:48
|
|
|
Since enemy movement will still show up in the scouted area we should have enough warning if they try to flank the bridge from the east. Even if they went far enough to the east to completely evade our vision they still have to show up in our scouted area eventually so they shouldn't catch us completely unaware. The fog of war makes it really unnerving to plan ahead, and I mean that in a good way. Honestly the movement we've seen so far from the Soviets puzzle me, did they try to flank and saw our unit in the lake or what are they trying to do? I will propably send 2/1/JR16 to the village to further try to see what they aee trying to do and maybe dig in on the bridge. Will post final orders tomorrow (I am aware of the deadline) since I am still on the road today. Also welcome to our new comrades, let us show those reds what real winter warfare means!
|
|
#
?
Jun 27, 2015 21:25
|
|
|
Orders confirmed! Okay, how's this? Orders for 3/JR16 MG1/3/JR16: Move to the blue "4" on the map MG2/3/JR16: Same 7/3/JR16: Move to the blue "5" on the map 8/3/JR16: Same 9/3/JR16: Move to the blue "6" on the map
|
|
#
?
Jun 28, 2015 03:22
|
|
|
Ok my orders are the following: The units on O21 begin digging in 2/1/JR16 moves to L22 The units on O21 may never get to finish the dig in action since I'm pretty sure the enemy will move in on their next turn and it is a 2-turn action, but it will cost us nothing to try. 2/1/JR16 may give us a better picture of the situation south of the bridge or expose some flanking units. Let's wait and see what those Soviets are up to. Ranged combat is currently too risky while not having a clear picture what we're even facing and where their force will strike.
|
|
#
?
Jun 28, 2015 12:51
|
|
|
Hey, I was away for a few more hours than I expected, and I have some questions regarding your current orders. Since it's my fault that I didn't ask earlier, I'll give you a couple more hours to reply to them.Davin Valkri posted:Orders confirmed! Okay, how's this? Do you remember you can use Extended Movement to go up to the blue 8 on the road (hex O18) with anything other than MGs, which can then go to the Gravel Pits? Bacarruda, your orders to try and recover all your units leave your MGs with nothing to do, since they're full-strength at start (and wouldn't be able to recover anyway - only infantry can do this). Do you want them to do anything, or wait for the rest of the force?
|
|
#
?
Jun 28, 2015 15:33
|
|
|
Oh, derp! Okay, then, completely forgot extended movement! Let's have one MG go to our side of Hevossalmi Bridge and one to the Gravel Pits. The 3 infantry companies will go to the Gravel Pits, the Hotel, and the blue 8.
|
|
#
?
Jun 28, 2015 16:40
|
|
|
Junkozeyne posted:Ok my orders are the following: Technically I think we're limited in the number of units that can dig in or be dug in at once (since Tevery announced a count). But I think in this case you would be right to start it regardless of the limit. Also if I'm not mistaken we can recover dug-in markers. So the cost is miniscule, although if I'm wrong on that point it may be a bit greater. Question for Tevery Best: Do we get the chance to recover dig-in markers, or are they lost once we move out/lose the hex?
|
|
#
?
Jun 28, 2015 22:45
|
|
|
There is a limit of how many Diggin In/Dug-In tokens you may have on the board at any given time, but you can remove them back to the pool at will. So yes, there is pretty much no downside to digging in whenever you have a unit without any more sensible things to do.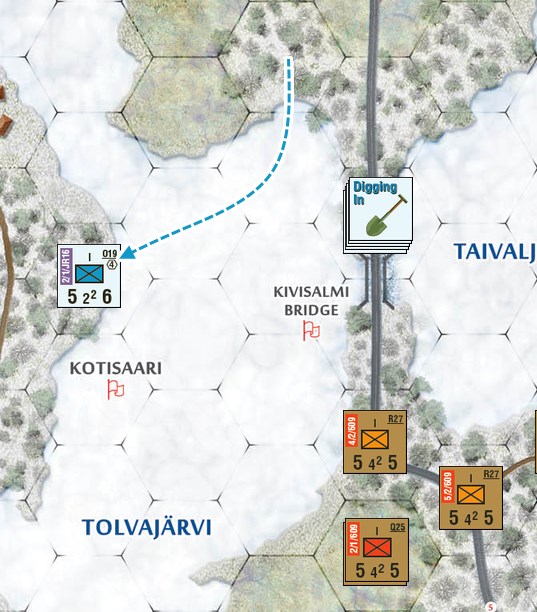 JR16's 2nd Company moves over the ice to Kotisaari, remaining well out of effective enemy range. Once there, they spot two more Soviet infantry companies grouped together south of the bridge. 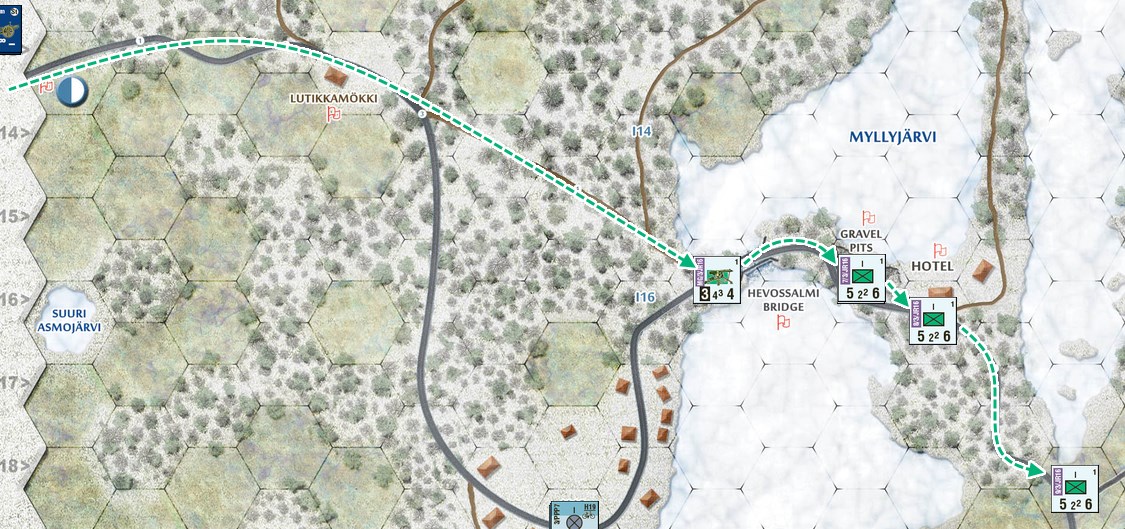 Reinforcements start to move eastwards. Some of the men stop in the Hotel-Gravel Pits-Hevossalmi bridge area, but one company makes it almost all the way to the frontline.  Captain Bacarruda's forces rally in Tolvajarvi. Some receive minor replacements, others are able to regroup scattered subsections. Tired soldiers rest and prepare for new battles. All rolls are made with a +1 DRM, since the units are more than 3 hexes away from the enemy. 1/PPP7 attempts Recovery: 6+1 = 7 - attempt successful! 2/PPP7 attempts Recovery: 6+1 = 7 - attempt successful! 3/PPP7 attempts Recovery: 1+1 = 2 - attempt failed. 8/3/JR37 attempts Recovery: 6+1 = 7 - attempt successful! 3/ErP112 attempts Recovery: 4+1 = 5 - attempt failed. 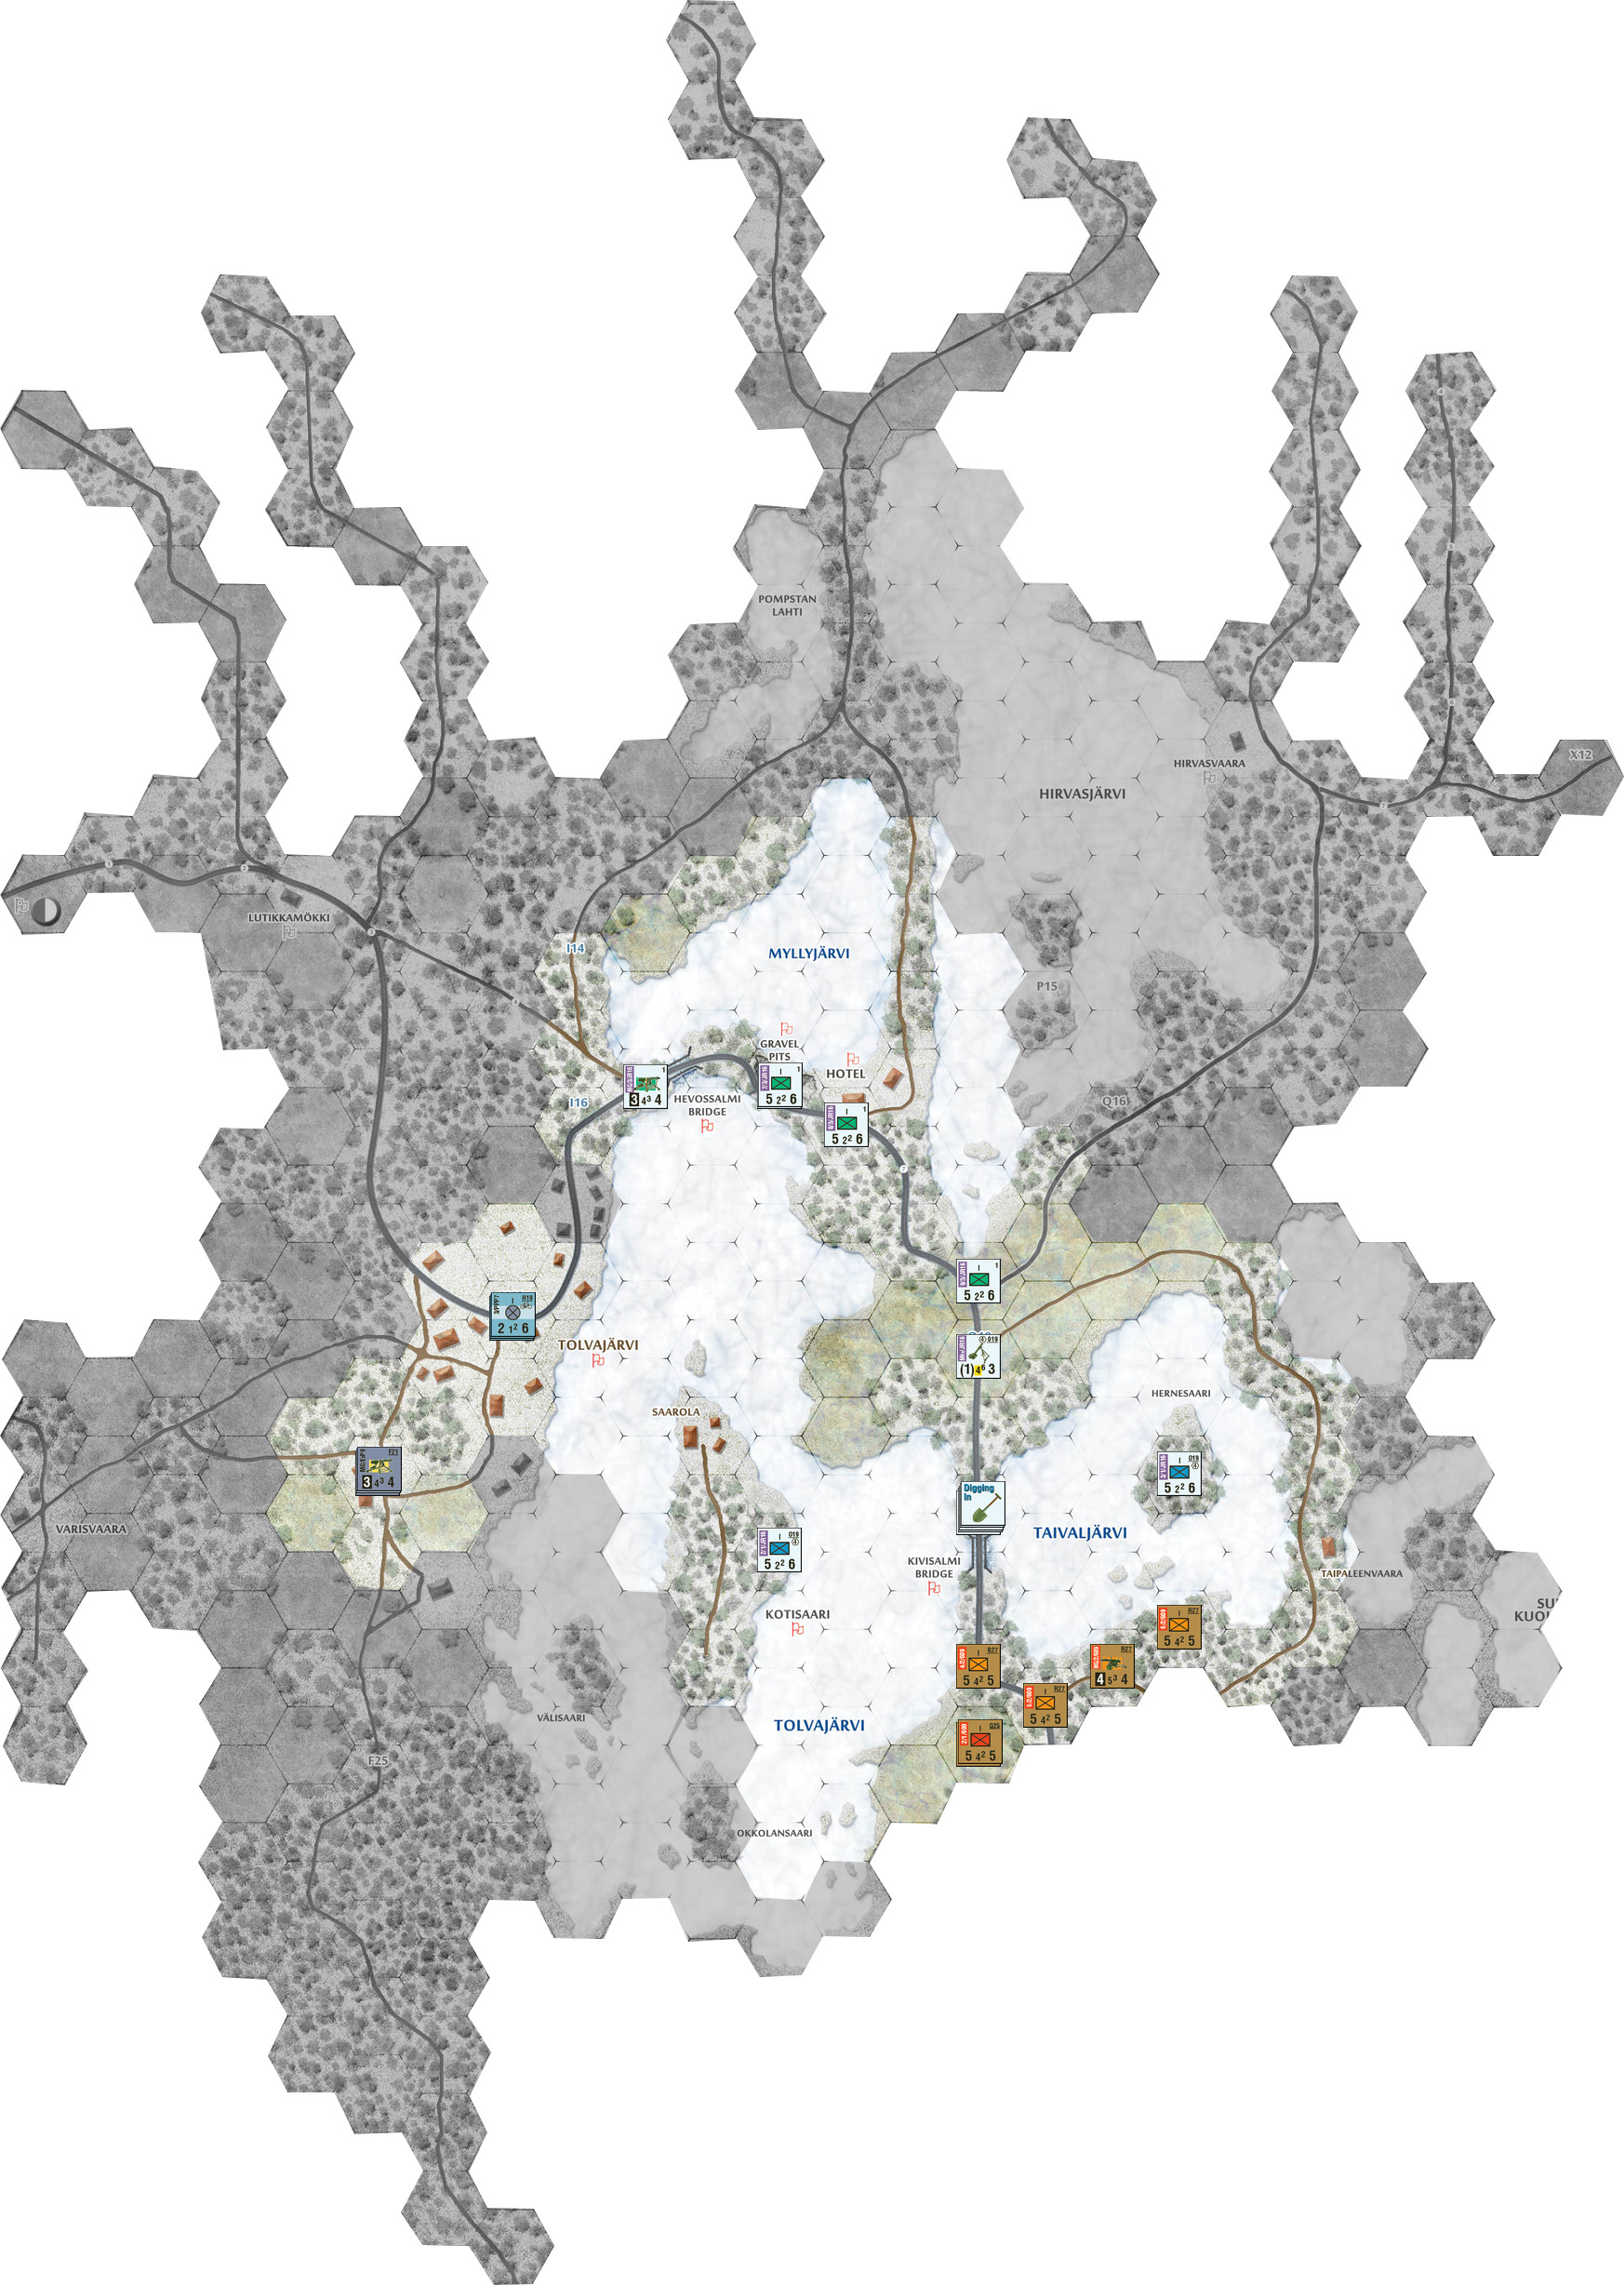  You have no units adjacent to the enemy and no capacity to perform an effective Ranged Attack (best you could get would be a Suppressed token, and those go away at the end of your Combat Phase), so I skip your Combat Phase and the turn ends. Victory Determination Phase No side controls the entirety of the main road. Soviets now have 5 VPs for controlling the first seven hexes of the main road.  Weather Report Current weather: overcast. The morning fog has now completely dissipated. That means vision now extends up to about 2100 yards (5 hexes). There are no more adverse modifiers to Ranged Attacks. The Soviets receive no replacements. The Soviet Morale Bonus continues! The Soviets are now taking their actions. Stand by and wait for their results.
|
|
#
?
Jun 28, 2015 23:03
|
|
|
To clarify, is the Soviet morale bonus until tomorrow (so midnight "today") or is it through tomorrow inclusive?
|
|
#
?
Jun 29, 2015 16:38
|
|
|
Until tomorrow. It will be gone at first dawn.
|
|
#
?
Jun 29, 2015 16:44
|
|
|

|
| # ? Apr 26, 2024 11:04 |
|
|
Recovery went well, 3/5 recovered units is a pretty good result. Do you think they'll push through the bridgehead no matter the cost? Next turn will be an interesting one.
|
|
#
?
Jun 30, 2015 10:03
|
|