


|
I have one of those pin cushions (mine's green) but it doesn't have the top part. Neither does my wife's. How did you keep it on!?
|
 #
?
Aug 15, 2015 23:12
#
?
Aug 15, 2015 23:12
|
|


|

|
| # ? Apr 28, 2024 00:41 |
|
|
Colonial Air Force posted:I have one of those pin cushions (mine's green) but it doesn't have the top part. Neither does my wife's. Haha, dunno! Maybe I'm just a better tomato parent.  My mom has one too that I can remember from when I was a kid, and it still has its top too. v🙀v Blue Footed Booby fucked around with this message at 14:11 on Aug 16, 2015 |
|
#
?
Aug 15, 2015 23:24
|
|


|
I have actually started on the rigging, finally! Not going to be anything like that Royal Caroline model, but I'm happy with how things are going so far. Started by attaching some blocks to the bow that will hook to the bowsprit when it's installed. I'm putting that off as long as possible, it's so long, and thin at the end that I'm afraid of breaking it while turning the model around to work on it. 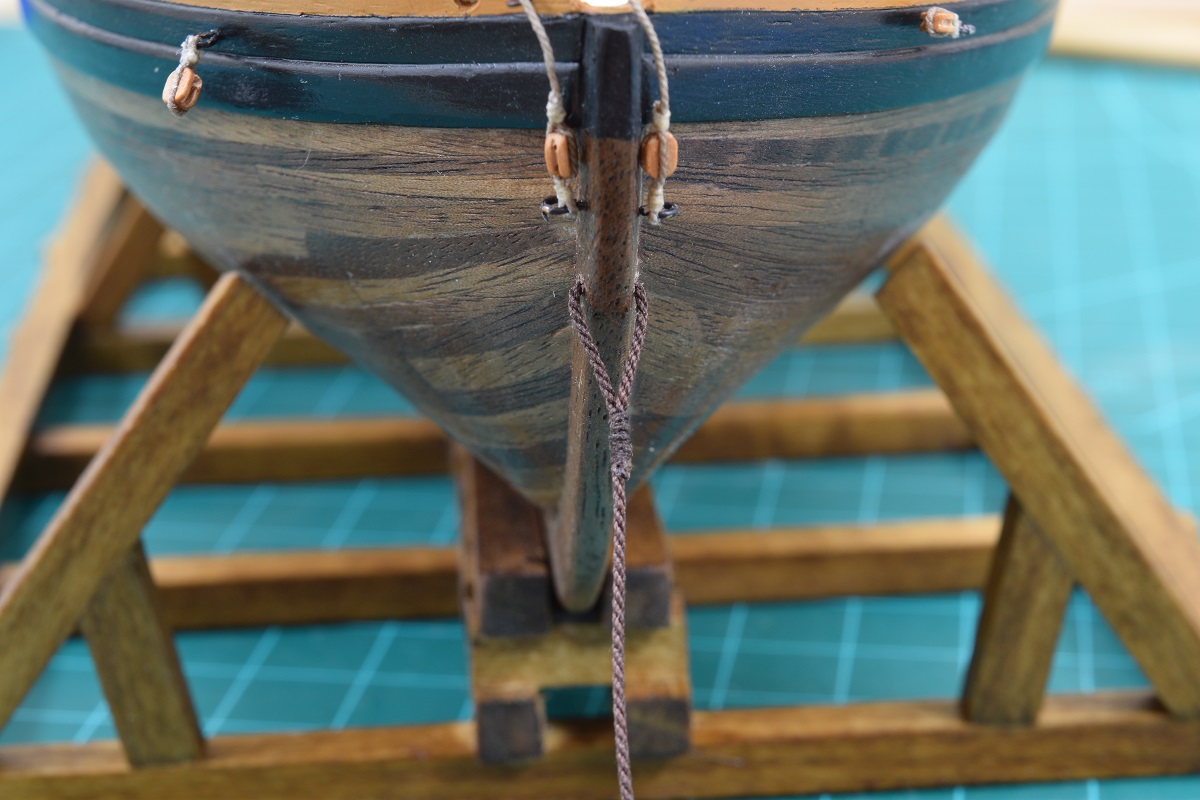 Unfortunately, there is very little I can do on the bowsprit itself before it's installed to the ship, so I moved to the main mast, which while it will be sticking up, it won't be sticking way outside of the hull to the front, so I think it's a lot safer to have in place for a long time, and it's also much thicker and tougher than the bowsprit. First thing was to figure out a way to make the shrouds all line up properly at the bottom where they will tie into the dead-eyes that were mounted in the channels earlier. I ended up using a thin piece of wood, and drilling holes into it to hold the upper dead-eyes with soft copper wire, so that I will be able to attach the shrouds to them while they are held in position. I made a line to align them vertically, and then held the shroud lines down in the position that they would run in order to orient them to be in a straight line when the shrouds and lanyards are all rigged. You can see the pencil lines I made by holding the shrouds in front as shown here. 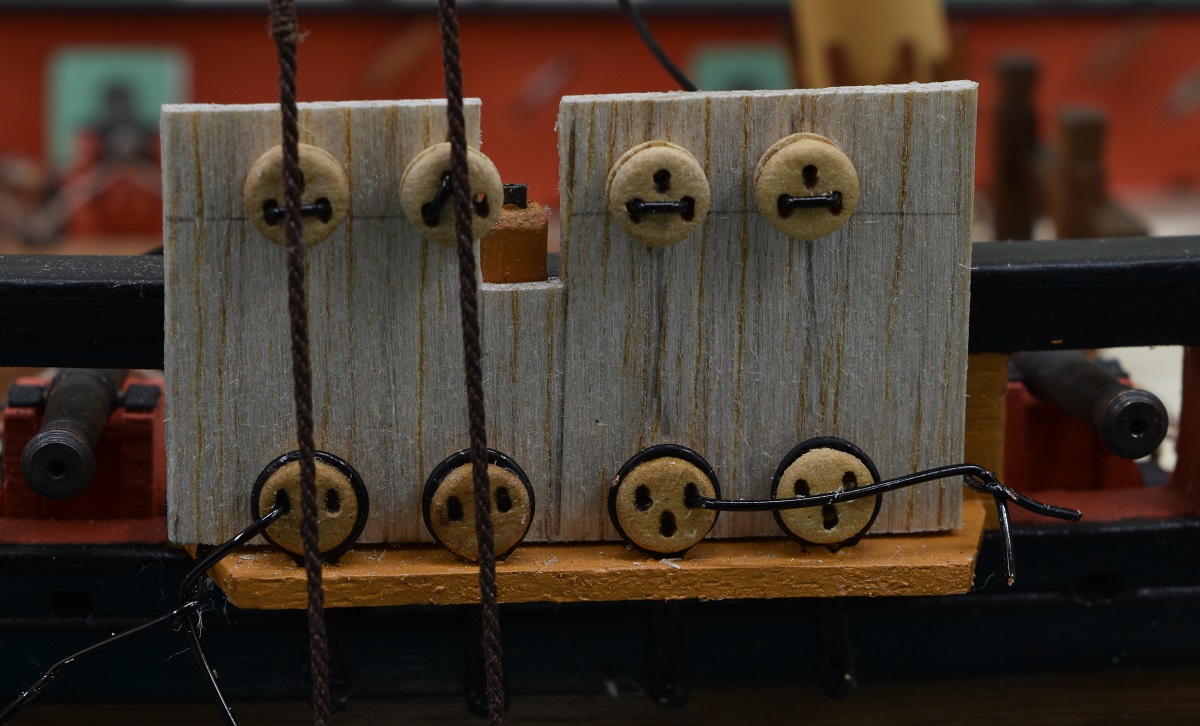 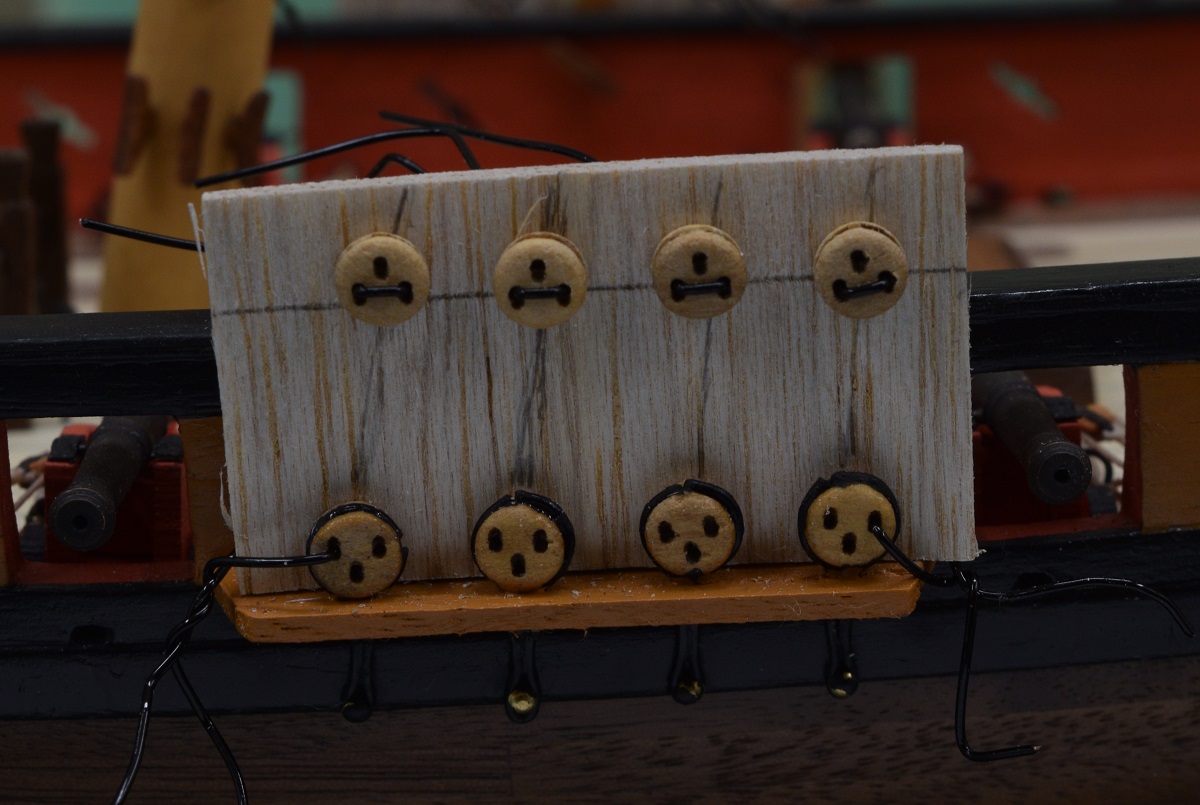 Then, started on actual rigging stuff. I made the backstay pendant. This goes around the top of the main mast before anything else, and has blocks at the ends which will attach to tackle on the rails near the steering wheel on either side.  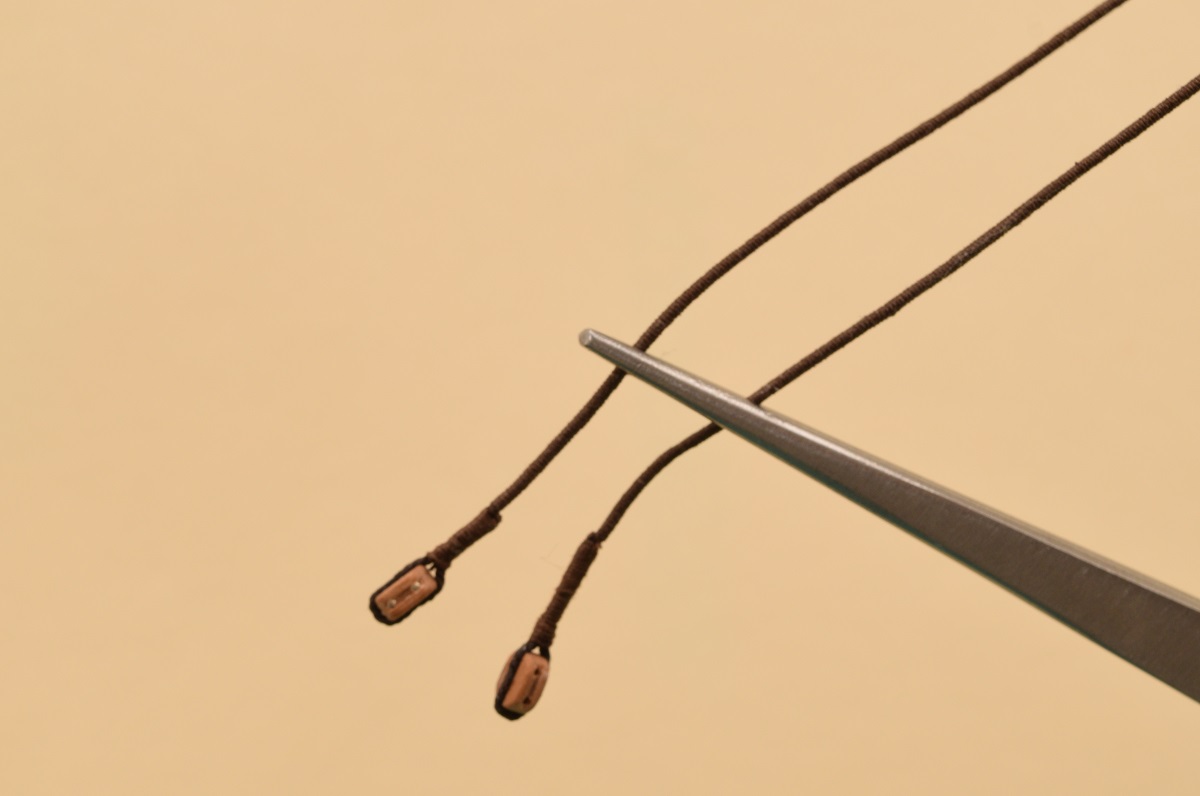 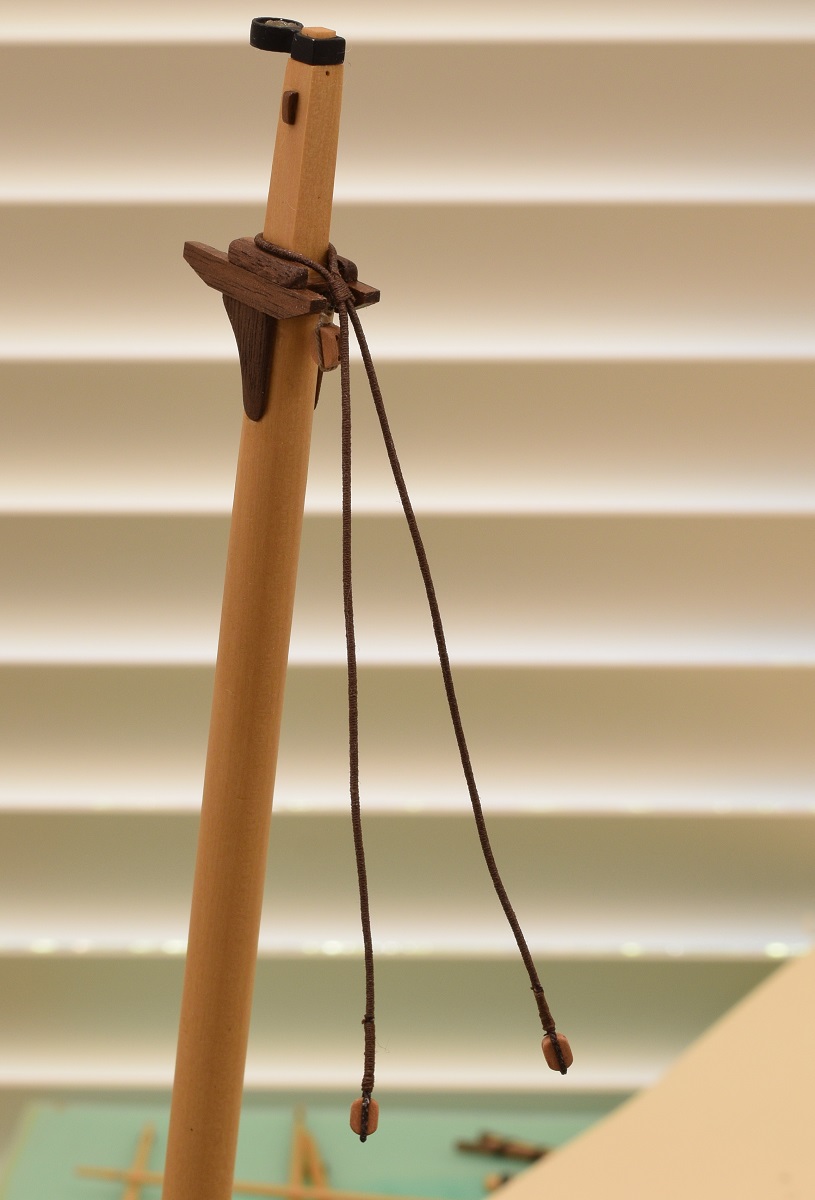 Next I made the first piece of rigging that will actually make the mast un-removable from here on out. It's officially part of the ship now.  This is called the Spreader Yard Horse. I have no idea why it's called a horse, but it is. I'm learning lots of new things about sailing ships by doing this. This thing actually acts as a secondary mast, and the lower yard (the spreader yard) attaches to this, not the mast. The reason is that the yard needs to be able to be lowered to the deck, and it if was attached directly to the mast, the parrel (the thing that holds it to the mast, err.. to the horse) would run into the main sail hoops that are around the main mast. I had to re-read the bit about this thing several times, and look at the rigging plans a bunch, before I finally understood what it did and why. In any case, it's the 2nd item that has to go around the top of the main mast, so it was installed next. Here it is in all it's glory, it's the rope running along the front of the mast. Details of the top and bottom also shown. This is called the Spreader Yard Horse. I have no idea why it's called a horse, but it is. I'm learning lots of new things about sailing ships by doing this. This thing actually acts as a secondary mast, and the lower yard (the spreader yard) attaches to this, not the mast. The reason is that the yard needs to be able to be lowered to the deck, and it if was attached directly to the mast, the parrel (the thing that holds it to the mast, err.. to the horse) would run into the main sail hoops that are around the main mast. I had to re-read the bit about this thing several times, and look at the rigging plans a bunch, before I finally understood what it did and why. In any case, it's the 2nd item that has to go around the top of the main mast, so it was installed next. Here it is in all it's glory, it's the rope running along the front of the mast. Details of the top and bottom also shown.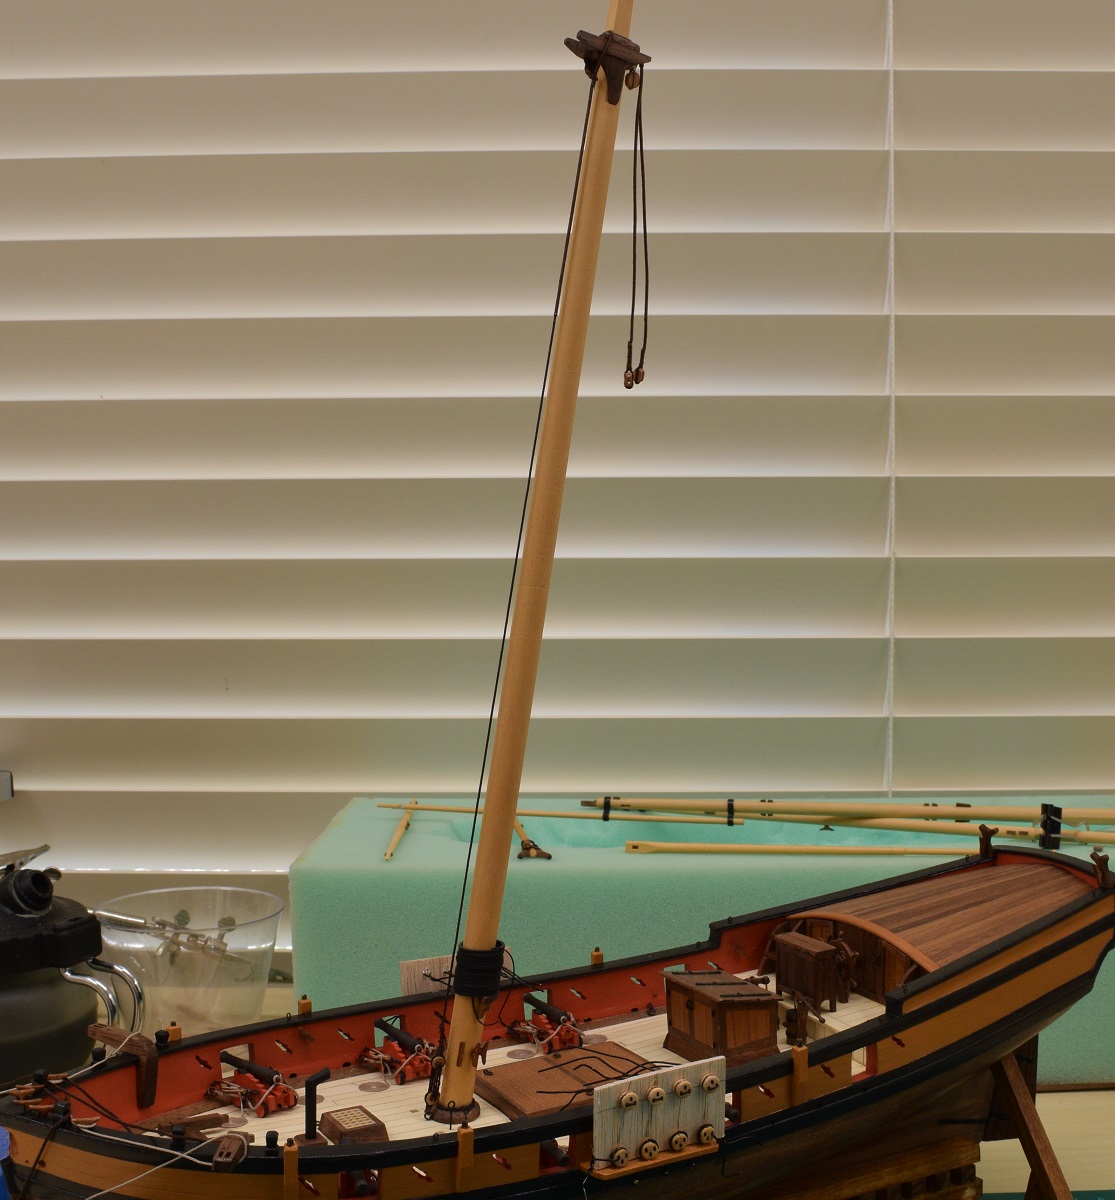 Top - 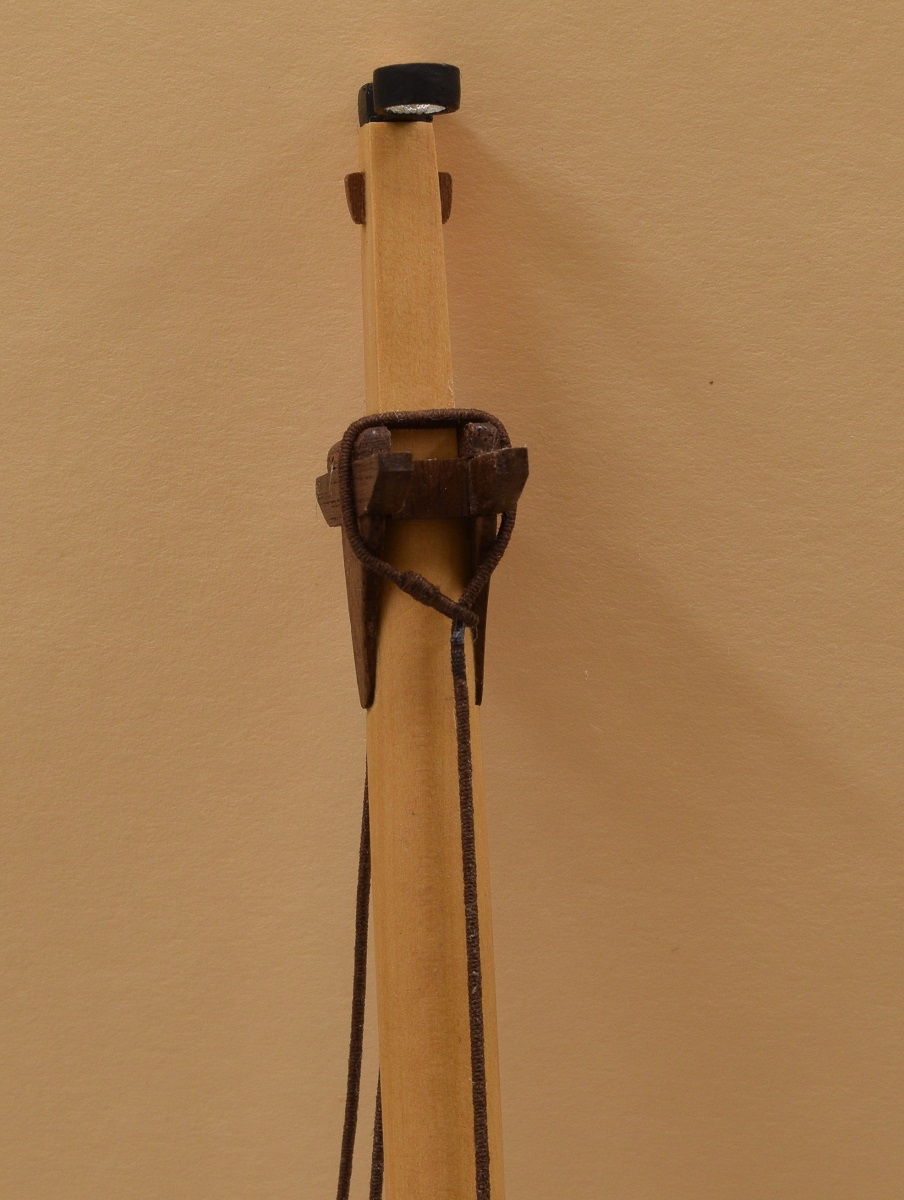 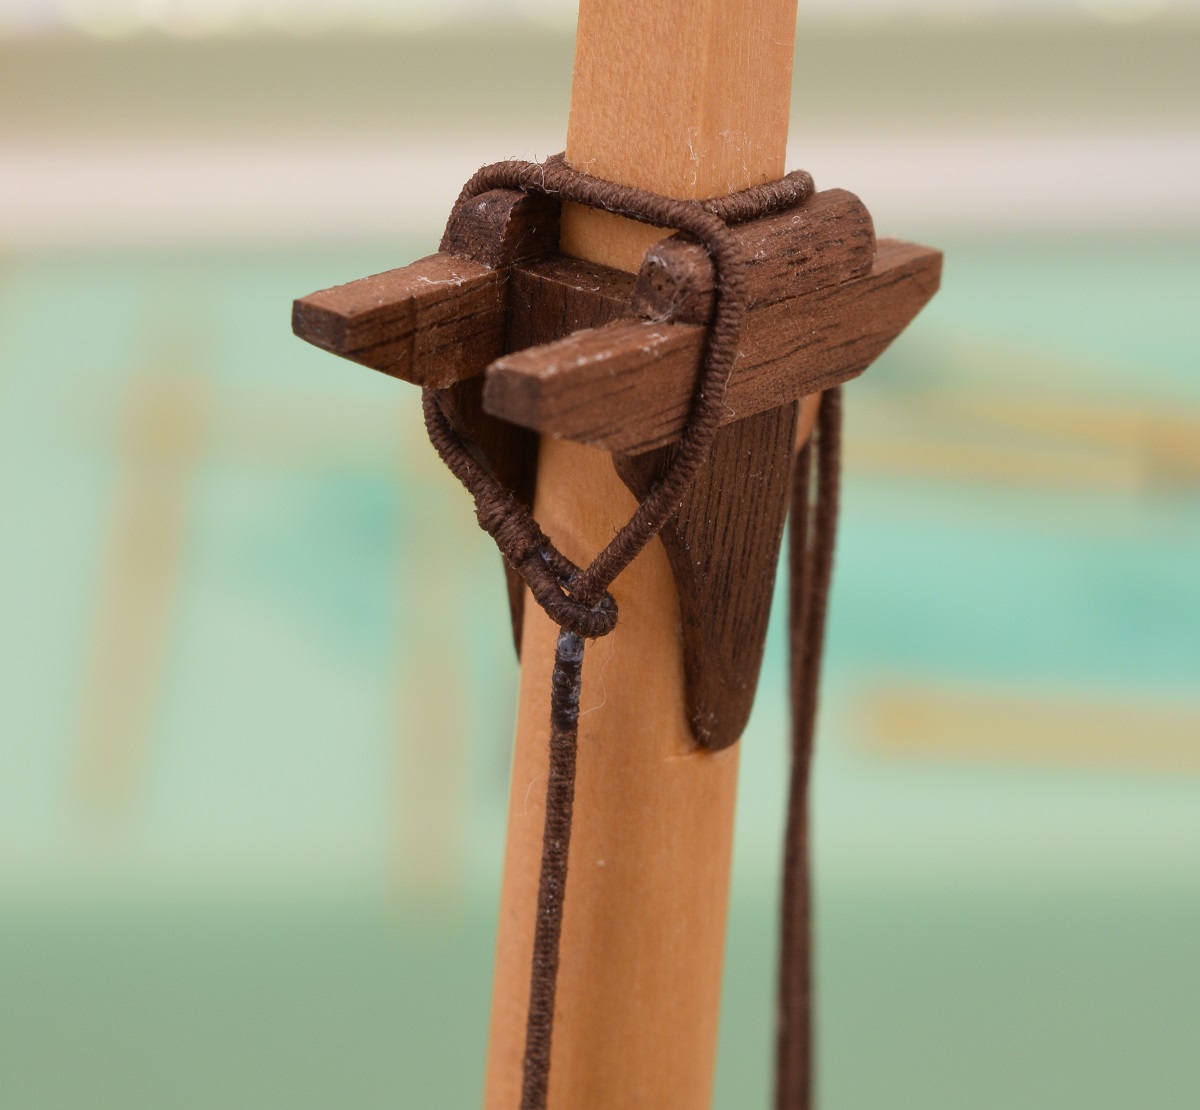 The top mast will go into the spot in front of this, so it won't be able to slip off of the braces it's sitting on (the raised curved pieces on either side). Bottom from front and side - 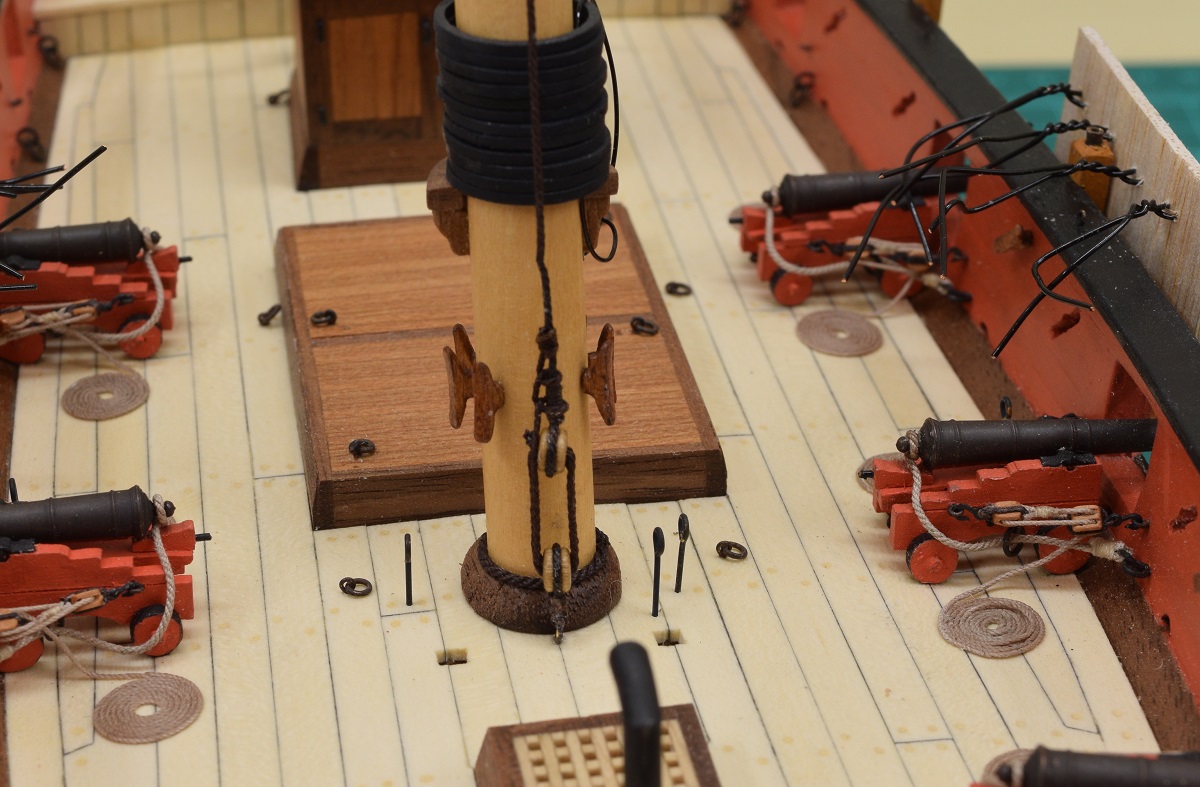  It's attached to the deck with little tiny dead-eyes, just like the shrouds will be attached to the channels later (next actually). And that's an update of probably 8 or so hours of ship-building. Strangely, when I'm focused on working on it, I don't really realize how much time is passing at all. I guess that means I enjoy this stuff!
|
|
#
?
Aug 16, 2015 02:44
|
|


|
Anyone here managed to finish a Meng T-90A? The track link jig it comes with made me think it would be easy. Holy gently caress was I wrong. Great kit though.
|
|
#
?
Aug 16, 2015 10:02
|
|

|
Space Jam posted:Anyone here managed to finish a Meng T-90A? The track link jig it comes with made me think it would be easy. Holy gently caress was I wrong. Great kit though. Post pics of the kit plz? Found some in Google, but I can't find ones that are both non poo poo and clearly labeled as far as what's the kit and what's aftermarket. Meanwhile, I'm working on the tracks for my tiger II:  It's Academy; I posted pics of my greener than intended hull and turret on a previous page. Nice kit. I post this mostly to give you non tankers who are working on crap tank a look at the most common alternative to vinyl tracks, alongside the working tracks posted earlier. VVV whenever I see the round thingies I see little screaming faces. Like electrical sockets but with ropes through their eyes. And some of them are cyclopes. Blue Footed Booby fucked around with this message at 03:04 on Aug 17, 2015 |
|
#
?
Aug 17, 2015 02:23
|
|
|
Today's project (and last nights) was the shrouds. Lots of serving of rope, but I think I'm good on thread for a while. 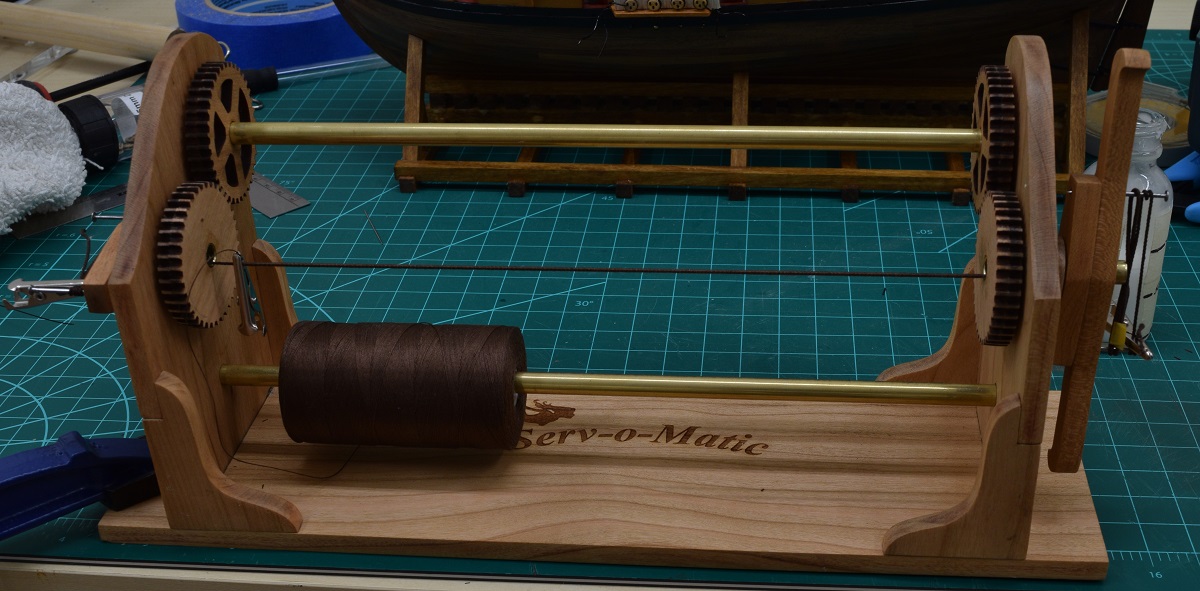 The dead-eye/shroud jigs I made worked fantastically, and allowed me to make much better looking rigging than I would have thought at this point, being only my 2nd build. I also used zip-seizings on top of the dead-eyes to allow the proper rigging of the shrouds crossing over on top of the dead-eyes. Really like the way they turned out. 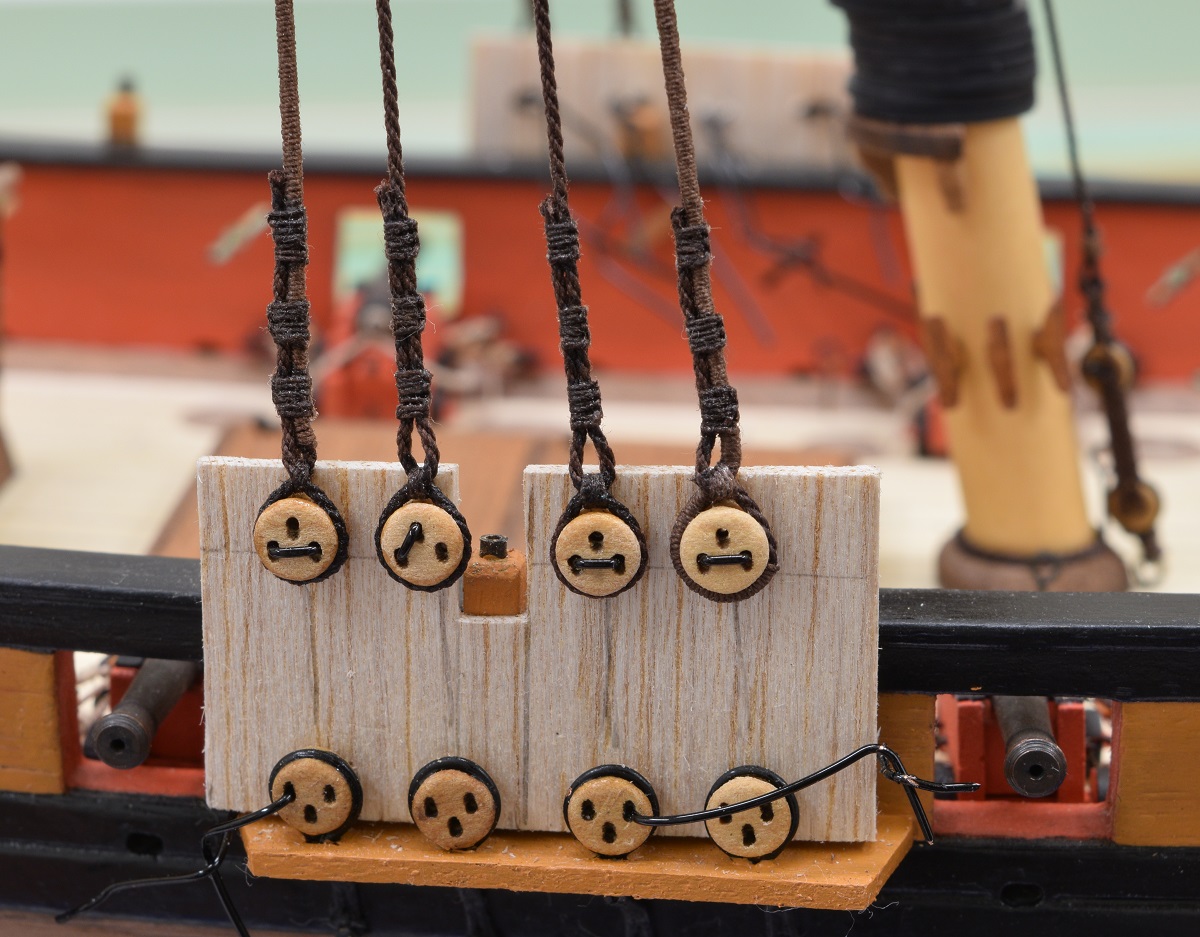 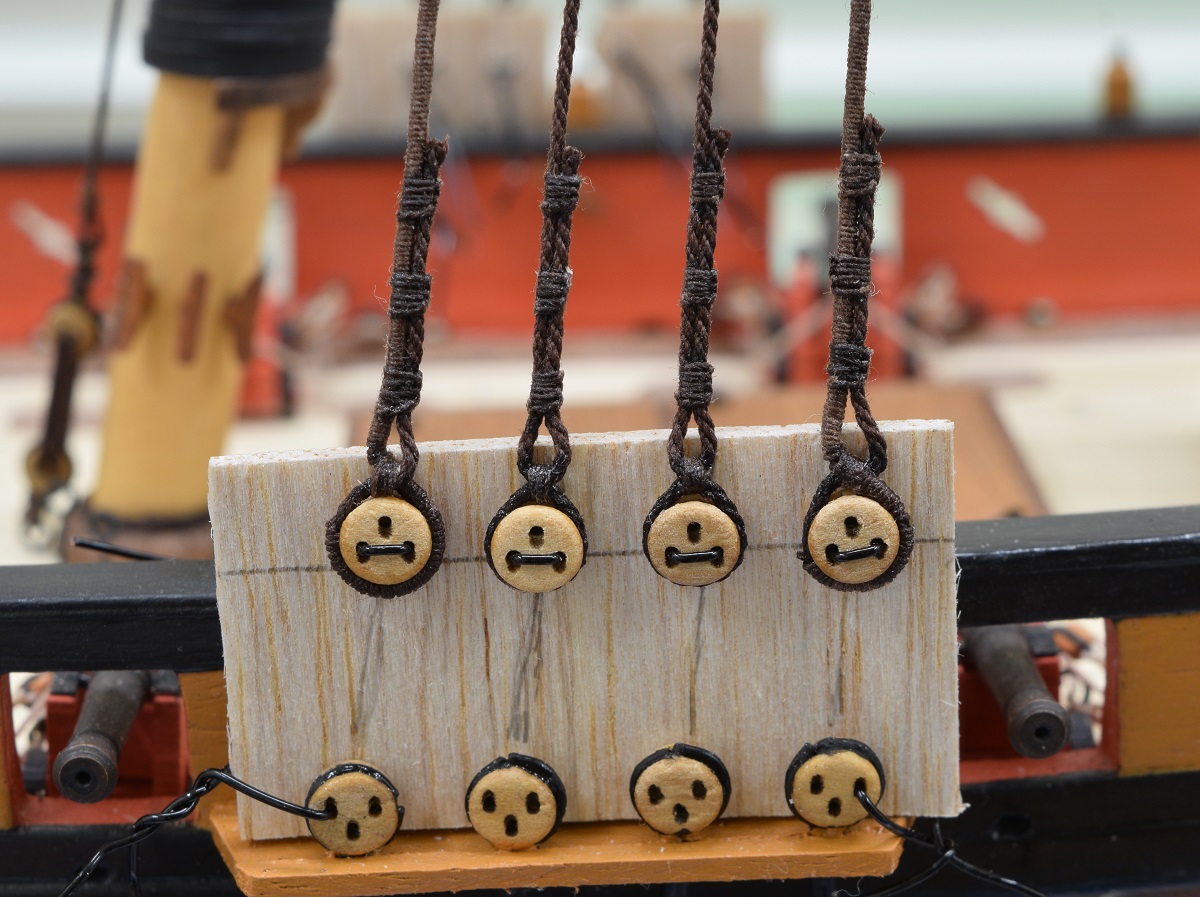 Current status, shrouds completed, but attached to the jigs. I am trying to decide the easiest way to seize the shroud cleats - I am leaning towards removing the jig, and seizing them by sticking the shrouds in a third hand to the side of the ship, one at a time, rather than trying to work on the inside of the shrouds on the ship. 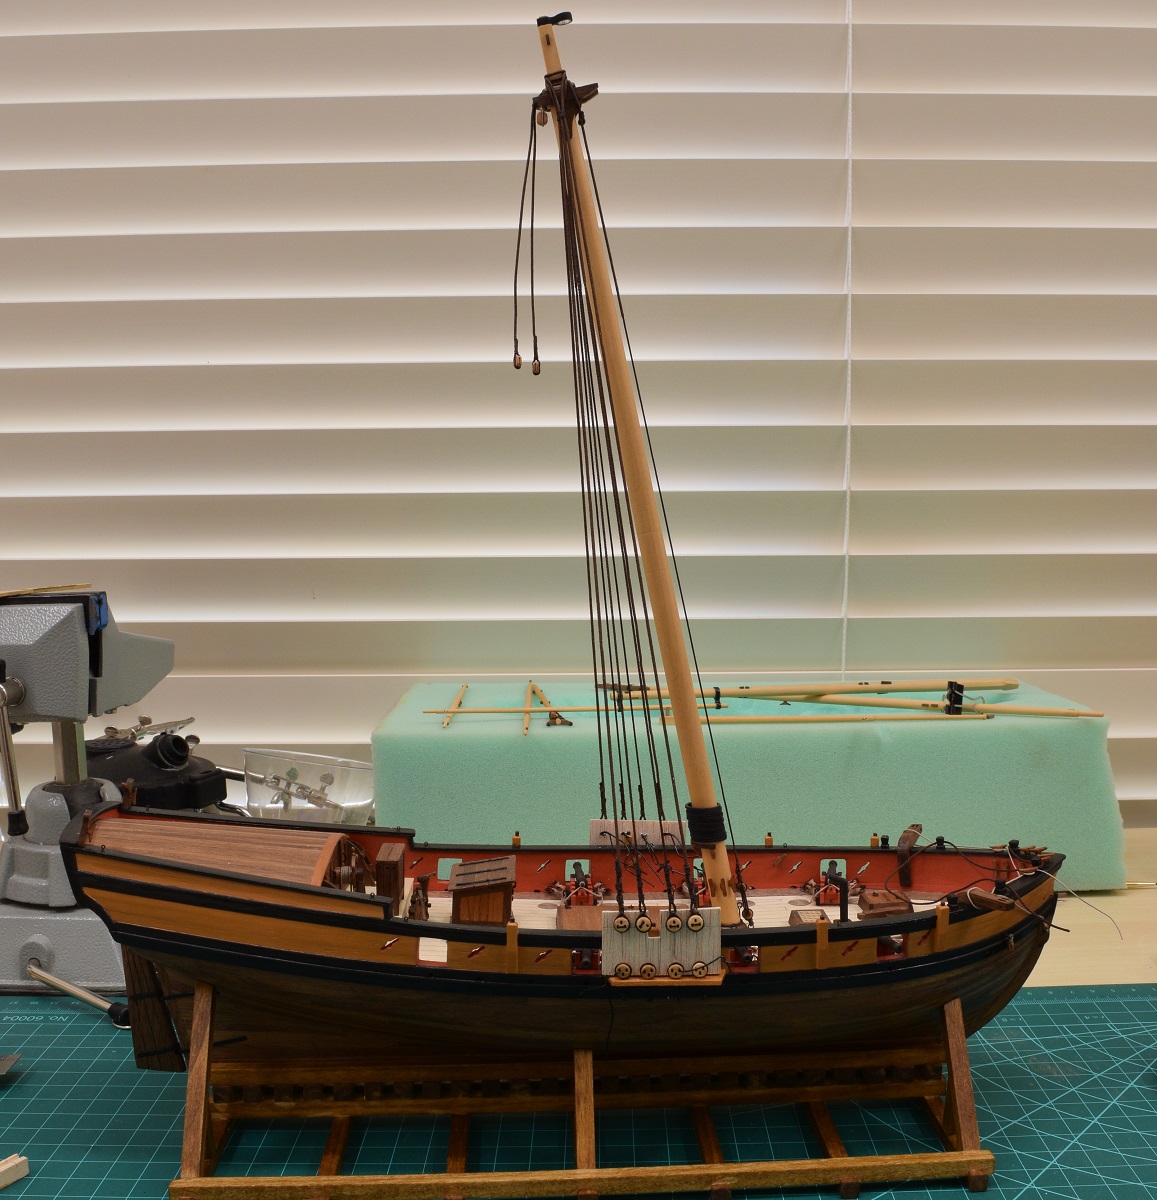  About a year ago, when I first started building the Carmen and found MSW (thanks goon that gave me that site link a year ago!), I spent a lot of time going through build logs, and like any new thing, I think people tend to see a specific 'thing' that make them go "Wow, that is amazing, I could never do that". On MSW, for this hobby, there is a lot of that 'wow' factor in many of the logs, but one of the main ones that stuck out to me (for whatever strange reason) was the mast-heads on some of the ships, where so many ropes come together and chaos should reign, but instead, there is an orderly and neat stack of ropes showing a definite purpose and design. Today I had a real 'wow' moment in my ship modeling. 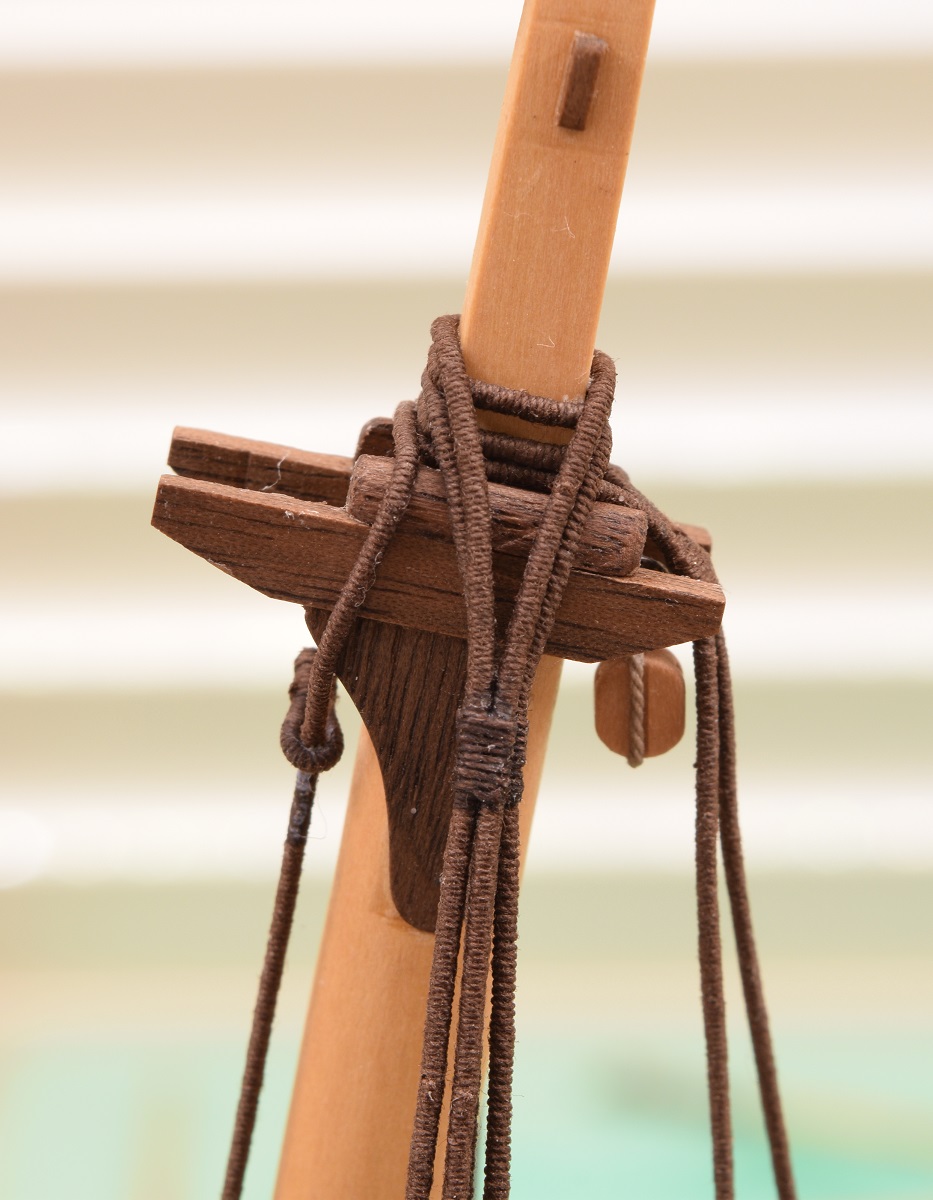 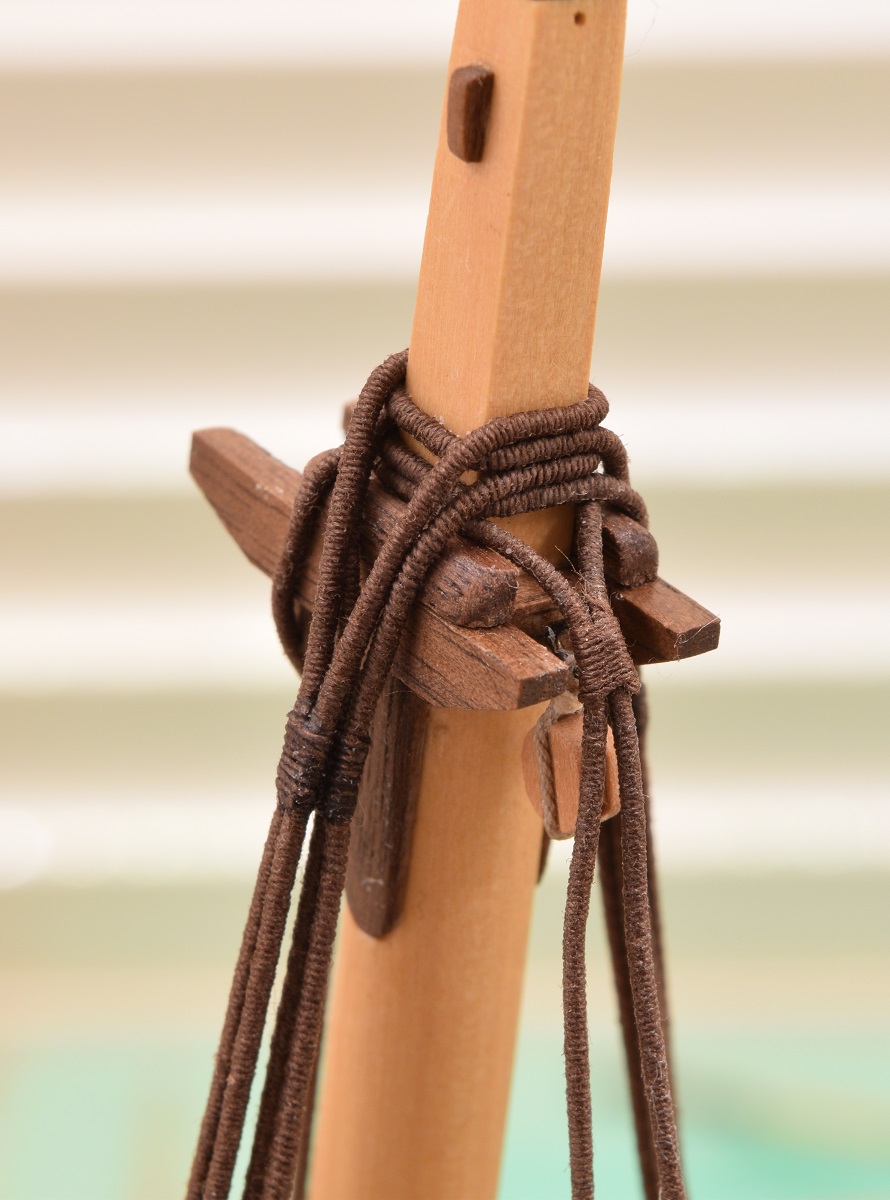 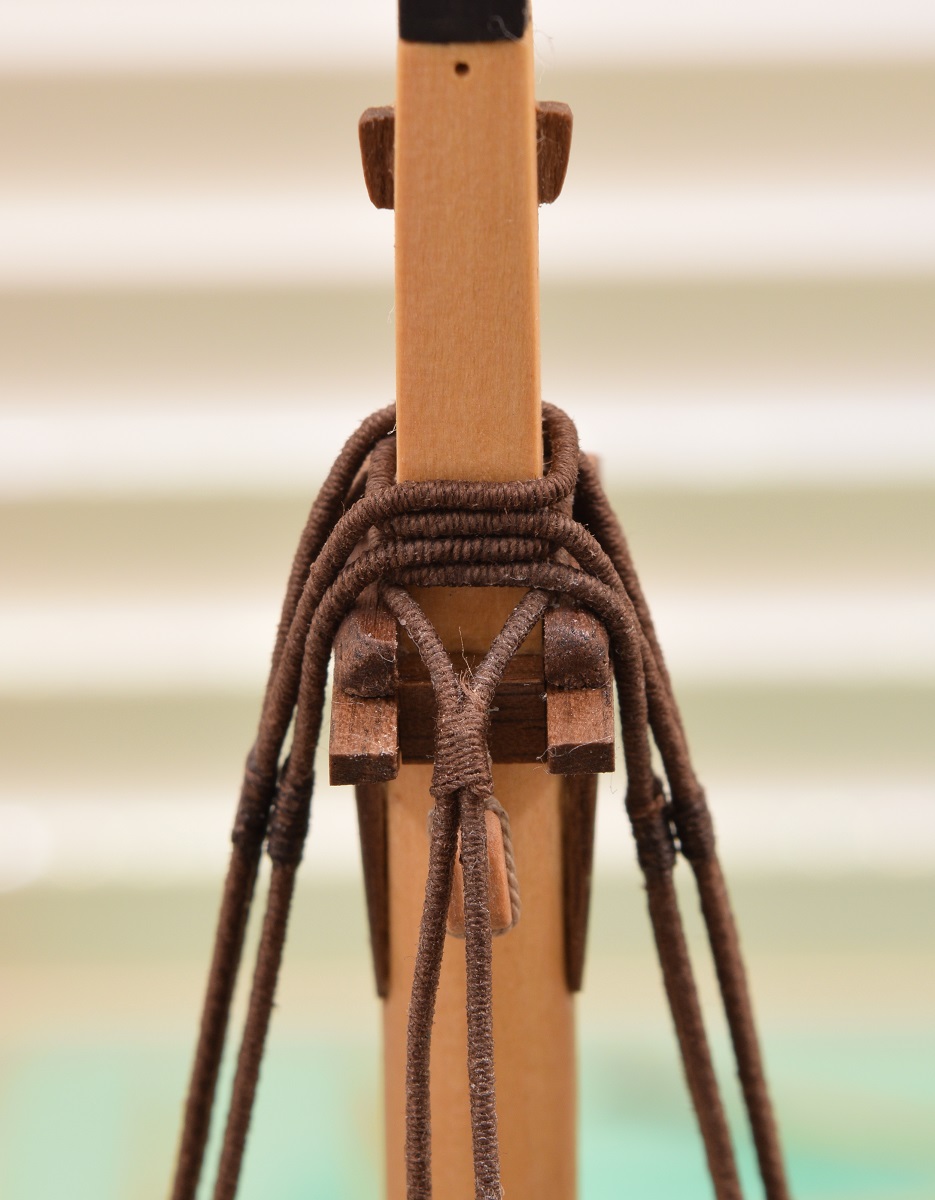 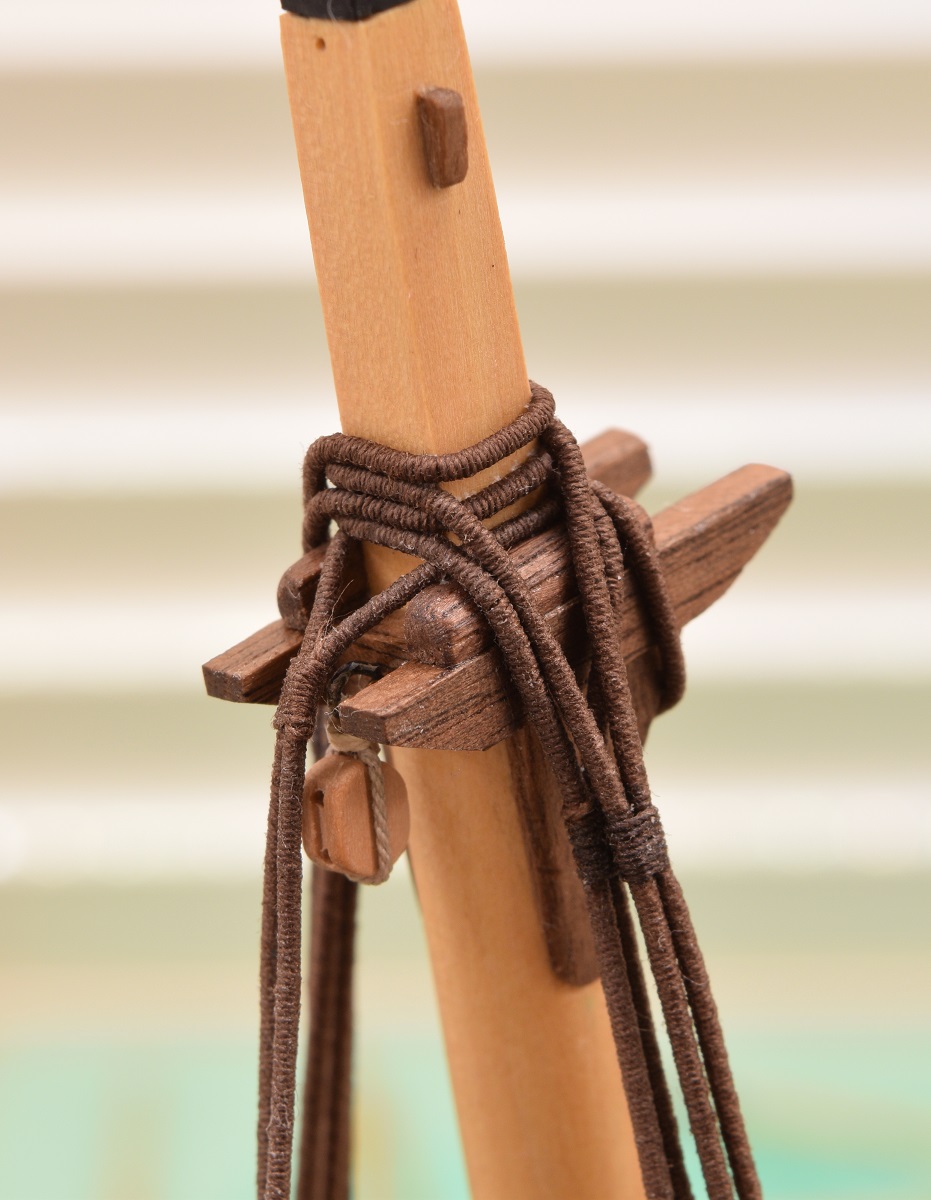 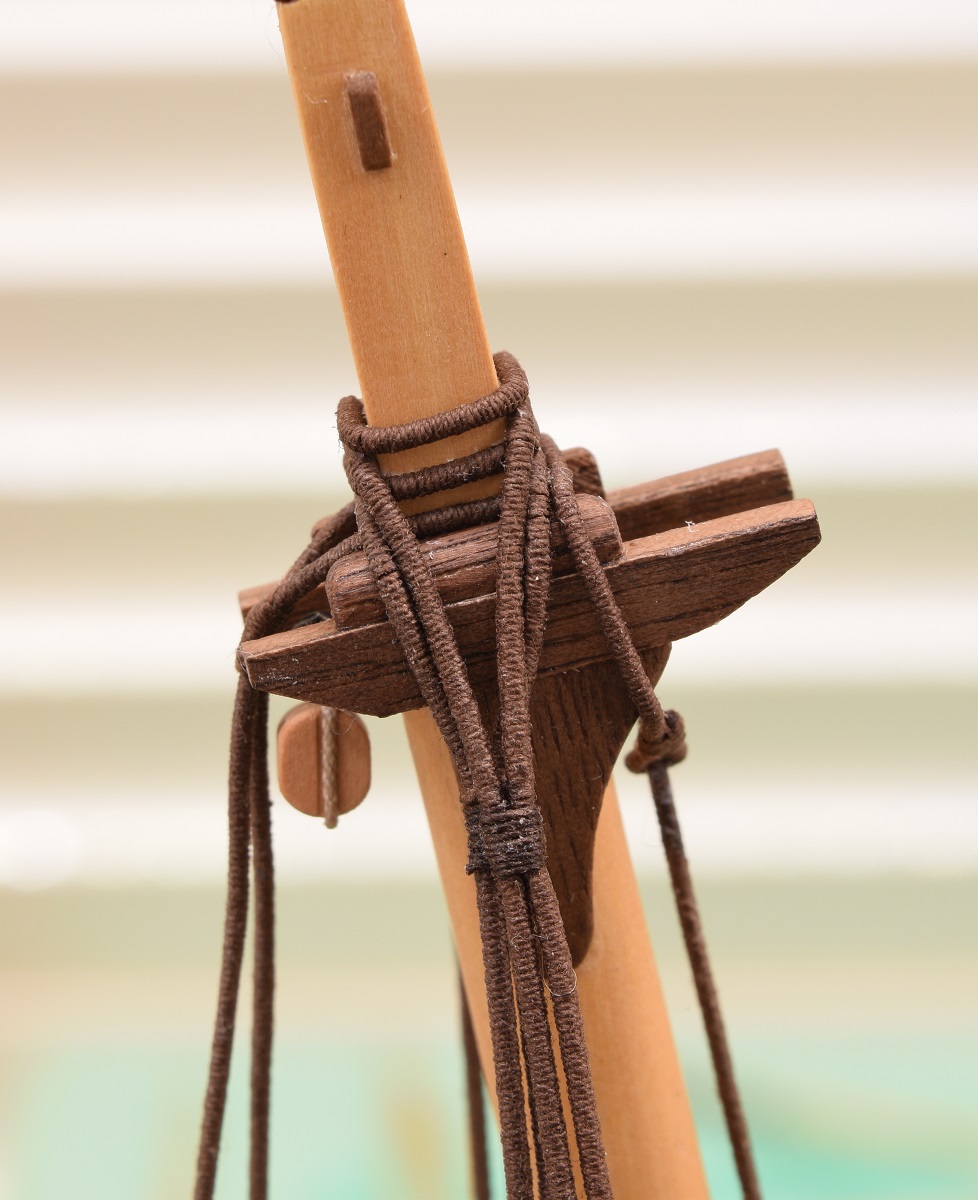 I have no idea why that seems so amazing to me, but it really does, and even now I'm having a difficult time believing that yes, it really was me that did this thing (although there is more to go there of course). There have been plenty of things on this ship that were more difficult than this, and took far more effort to be happy with, but for strange reasons in my head, this is probably one of the coolest moments for me so far in the hobby. It's a good day. ^^ Re: Tracks. Maybe I'll not do tanks if I get back into plastic modelling 
|
|
#
?
Aug 17, 2015 02:41
|
|
|
Blue Footed Booby posted:Post pics of the kit plz? Found some in Google, but I can't find ones that are both non poo poo and clearly labeled as far as what's the kit and what's aftermarket.
|
|
#
?
Aug 17, 2015 02:54
|
|

|
Arquinsiel posted:Urbanmech bestmech. Word. Though the hunchback that came with it resists painting. I washed it, then primed it, then gaped in horror as the primer came off in sheets at the lightest touch. So I stripped and cleaned it with a brush and dish soap, and there are still parts that slough paint. It's the most water resistant mold release agent I've ever encountered. I should have just run it through the dishwasher.  VVV 
Blue Footed Booby fucked around with this message at 03:28 on Aug 17, 2015 |
|
#
?
Aug 17, 2015 03:10
|
|
|
I've heard of people doing that, but then the guy I know who swore by it... stopped. After his grease filter was invaded by the SS.
|
|
#
?
Aug 17, 2015 03:18
|
|
|
Blue Footed Booby posted:Word. Is it plastic, or cast?
|
|
#
?
Aug 17, 2015 03:39
|
|
|
The Locator posted:Is it plastic, or cast? Pewter. I figure I could put it in a vegetable strainer to keep it from becoming a permanent resident of my dishwasher's intestine. I considered dishwashing my last tank, but I thought better of it after I googled, and the only guy who said it was a good idea also admitted to having used his dishwasher to cook salmon.
|
|
#
?
Aug 17, 2015 03:46
|
|
|
Blue Footed Booby posted:Pewter. I figure I could put it in a vegetable strainer to keep it from becoming a permanent resident of my dishwasher's intestine. Some people claim good luck with small ultrasonic cleaners. Not sure what they fill the tank with though.
|
|
#
?
Aug 17, 2015 04:04
|
|


|
Blue Footed Booby posted:
Well drat. Apparently that is a real thing that people do. To be fair, they wrap the salmon airtight, but still. Learning new and wonderful things everyday. 
|
|
#
?
Aug 17, 2015 04:19
|
|

|
Blue Footed Booby posted:Pewter. I've heard great things about Jax Chemicals cleaners ( http://www.jaxchemical.com/index.html ). They don't seem to have a pewter specific one, but they make a Pewter Black product, so maybe one of their cleaners would work on Pewter as well. Might be worth sending them a note to ask.
|
|
#
?
Aug 17, 2015 05:03
|
|
|
The Locator posted:About a year ago, when I first started building the Carmen and found MSW (thanks goon that gave me that site link a year ago!), I'd be interested in that link. Also, that'some seriously beautyful rigging
|
|
#
?
Aug 17, 2015 09:55
|
|


|
Blue Footed Booby posted:Pewter. I figure I could put it in a vegetable strainer to keep it from becoming a permanent resident of my dishwasher's intestine. Try vinegar essence. Japanese steam train update: 10 % finished 
Greyhawk fucked around with this message at 11:52 on Aug 17, 2015 |
|
#
?
Aug 17, 2015 10:02
|
|
|
Blue Footed Booby posted:Pewter. Half an hour in nitro solvent, a night in acetone, and if that fails, find the maker and make them eat the model.
|
|
#
?
Aug 17, 2015 12:46
|
|
|
Greyhawk posted:Try vinegar essence. Hmm, will try that. Thanks! Pierzak posted:Half an hour in nitro solvent, a night in acetone, and if that fails, find the maker and make them eat the model. I like the cut off your jib. 
|
|
#
?
Aug 17, 2015 12:53
|
|
|
Greyhawk posted:I'd be interested in that link. Thank you. http://modelshipworld.com If you ever see a reference in my post to 'MSW', it's referencing that site, Model Ship World, which is the official forum of the Nautical Research Guild.
|
|
#
?
Aug 17, 2015 13:26
|
|
|
Thanks :-) EDIT: Oh my god, the skill of these guys....  That's just insane. In a good way.
|
|
#
?
Aug 17, 2015 13:46
|
|
|
Time to repost:Pierzak posted:Every now and then someone comes around to remind me why I respect this hobby and at the same time think you're loving insane. This time it's a cardboard KV-1 tank. Have a good read (in Polish, but lots of awesome pics).
|
|
#
?
Aug 17, 2015 14:23
|
|
 ):
):
|
The Locator posted:Thank you. I've actually been following your build over there.
|
|
#
?
Aug 17, 2015 15:39
|
|
|
Pierzak posted:Time to repost: That is insane and I want to try it. Are they plan built or scratch? Even after the bastatd elf thread my polish is pretty poor.
|
|
#
?
Aug 18, 2015 00:12
|
|

|
Sanguine posted:That is insane and I want to try it. Are they plan built or scratch? Even after the bastatd elf thread my polish is pretty poor. Depends. The Mack Bulldog thing is a cheap model the type you'd get at a newspaper stand, but tweaked and upgraded to hell and back. IIRC, the KV-1 is partially built on plans and partially scratch (but not plans of the kind you arrange the parts on, more like technical documentation and detailed photos). Lots of his stuff is BCG-based (Brand Clear Glue aka a certain Chinese paper glue that soaks into the paper and gives it clay-like properties for a while). Also, what is the elf bastard thread. Pierzak fucked around with this message at 01:23 on Aug 18, 2015 |
|
#
?
Aug 18, 2015 00:42
|
|
|
Sanguine posted:That is insane and I want to try it. Are they plan built or scratch? Even after the bastatd elf thread my polish is pretty poor. It's a kit http://engel-michael.io.ua/album644474 A 700 part cardboard kit. For 6 Euro. Greyhawk fucked around with this message at 00:53 on Aug 18, 2015 |
|
#
?
Aug 18, 2015 00:51
|
|
|
Greyhawk posted:It's a kit A good suggestion as the next craptank-equivalent 
|
|
#
?
Aug 18, 2015 01:00
|
|
|
This reminds me that I've been wanting to give this thing a shot: http://www.closertogod.net/Serenity/ It seems to be a bit easier to assemble than the 700 part cardboard model, but I really want a Serenity model and there will probably never be a plastic kit for it.
|
|
#
?
Aug 18, 2015 01:04
|
|
|
Serenity now, insanity later.
|
|
#
?
Aug 18, 2015 01:34
|
|


|
Troll Bridgington posted:This reminds me that I've been wanting to give this thing a shot: I feel the same way about the Mass Effect ships. You can collect model kits in the goddamn game, but the closest real life thing you can buy is a pre-painted figurine sort of thing.
|
|
#
?
Aug 18, 2015 02:06
|
|
|
Paper models amaze me, but frighten me. I fat-finger and break so many parts in wood, and remember doing the same back as a kid in plastic, I can't even begin to imagine how many re-do's I would have in paper before accidentally crushing the entire thing by knocking over a heavy glass on it or something. At which point I'd burn my house down in a rage I'm sure (while trying to just burn the model).
|
|
#
?
Aug 18, 2015 02:27
|
|
|
Pierzak posted:Lots of his stuff is BCG-based (Brand Clear Glue aka a certain Chinese paper glue that soaks into the paper and gives it clay-like properties for a while). Hrmm, I'll have to look up the glue. That serenity looks cool as. The bastard elf CYOA thread was a bit of a winner from GBS, its probably in the goldmine now. Worth a look if you're bored.
|
|
#
?
Aug 18, 2015 02:46
|
|
|
Serenity was put out as a resin garage kit, but I'm not too sure if it's still available. You might have to pay a little bit of money to have something sturdier than cardboard 
|
|
#
?
Aug 18, 2015 04:00
|
|


|
The swivel gun pedestal on one side of the ship is interfering with the shrouds. :aargh: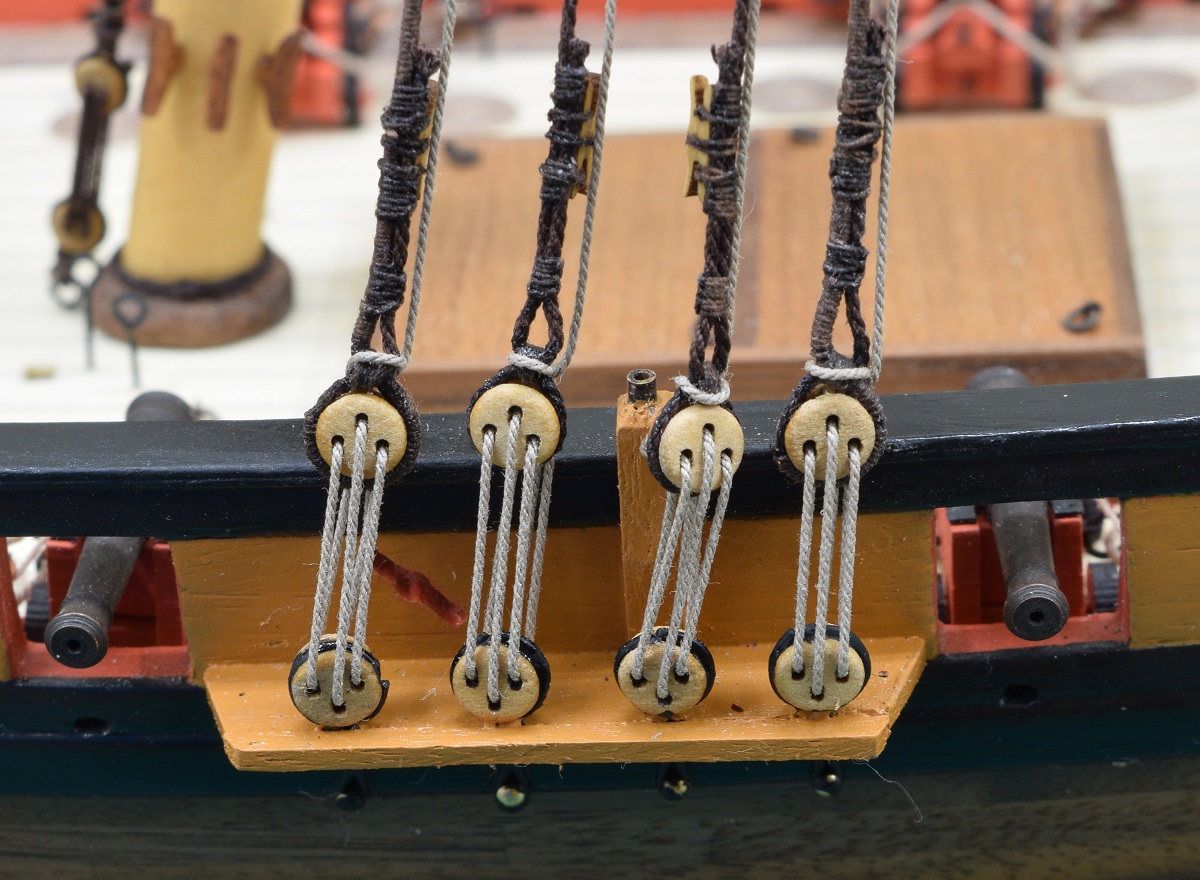 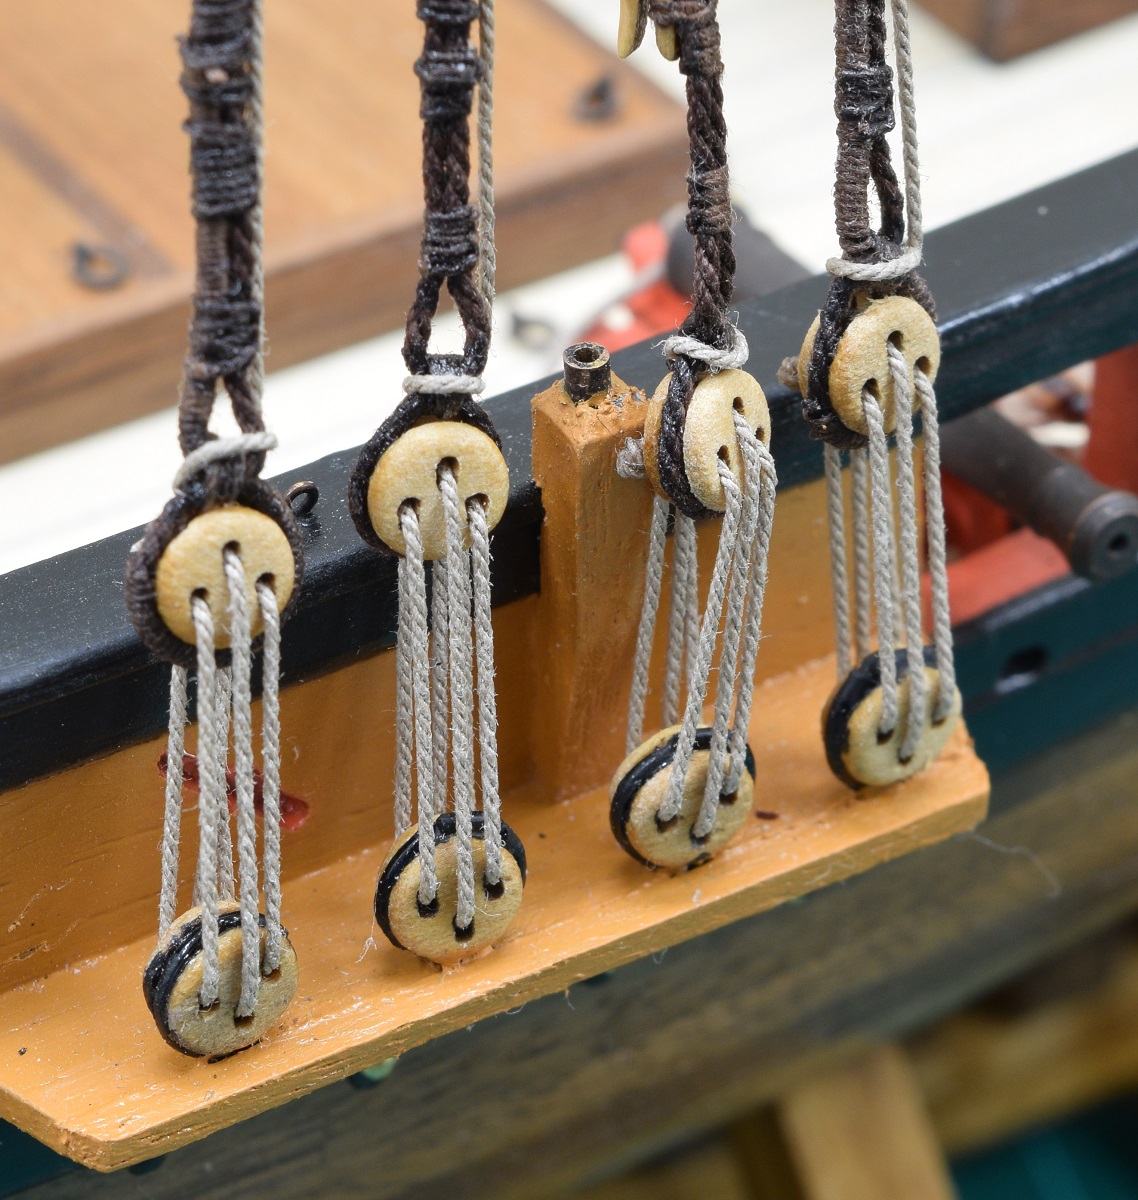 I'm going to have to rip the pedestal off and move it forward about 1/8" to get it to sit properly between the dead-eyes. Oh man.. I'm terrified of this, I'm going to gently caress something up badly. Going to leave it until after work tomorrow, giving me a full day to take up a religion and pray. 
|
|
#
?
Aug 18, 2015 06:44
|
|
|
Blue Footed Booby posted:I feel the same way about the Mass Effect ships. You can collect model kits in the goddamn game, but the closest real life thing you can buy is a pre-painted figurine sort of thing. Well, theres always the Metalearth kits at least. http://www.3dmetalmodels.com/mobile/category.aspx?id=117
|
|
#
?
Aug 18, 2015 07:08
|
|
|
After reading a bunch of tutorials about hair spray, I bought a can just to try it. It's great timing that I just have to have a craptank guinea pig sitting primed and ready. And yeah, the rubber tracks just broke again.
|
|
#
?
Aug 18, 2015 07:56
|
|

|
lilljonas posted:After reading a bunch of tutorials about hair spray, I bought a can just to try it. It's great timing that I just have to have a craptank guinea pig sitting primed and ready. Did you see this one? It's pretty good. http://otakurevolution.com/content/laymans-gunpla-guide-hairspray-chipping-tutorial
|
|
#
?
Aug 18, 2015 08:56
|
|
|
Complete! Happy to say that I was able to put the final finishing touches on the 1/35 Jagdpanther last night. Really happy with the end result. Took about a month and a half from opening the box till now. Painted with Tamiyas and Vallejos using the hairspray chipping method. Weathered with oils and pastel powders. Camo netting is medical gauze from an old first aid kit. I have to admit that the ideas for the bare hub and broken tracks on the left side were stolen from a recently-posted feature at armorama. For the former, I cut and sanded one of the road wheels down to make just the hub. I was terrified I'd botch it and be left without a wheel.  But it turned out all right. But it turned out all right.Scalemates Project Page with WIP albums and a rundown of included parts. Full imgur album with some specific comments on photos and techniques.       Constructive criticism and feedback is always welcome. I'm still learning and fumbling my way through this whole process, but I'm really happy with the way this kit turned out.
|
|
#
?
Aug 18, 2015 13:09
|
|

|
wtfbacon posted:
As you should be! I'll be bookmarking this little fella; you did everywhing great, the weathering is amazing and I really like the side plates. I'll be looking at it when building some kraut tanks.
|
|
#
?
Aug 18, 2015 14:43
|
|

|
Update on my model ship still have to do the sails. It is the advanced version of a beginner model I did with my father when I was 10. Also showing off my new bath mat!  
|
|
#
?
Aug 18, 2015 16:53
|
|
|

|
| # ? Apr 28, 2024 00:41 |
|
|
euclidian88 posted:Update on my model ship still have to do the sails. Haha, that's a fantastic backdrop. I'm imagining Lilliputians embarking on a voyage of discovery from your bathtub.
|
|
#
?
Aug 18, 2015 17:39
|
|