|
One of the walls in my place has a big window in the middle of one of the rooms. It's pretty revealing, and I'd like to put a blind up to give the room some privacy. The only issue is that we are forbidden from drilling anything into the walls. However, it does have a kind of intended 'sill' that I could theoretically hang something off. Is there a product on the market that would allow something like this, or am I going to have to jury rig something to get the blinds to hang from the sill overlap instead of inside the wall? Edit: Here's a pic to make these question sound (a little) less dumb:  It's an indoor window, and the top piece of wood there has a gap behind it of ~3cm. The way I was thinking of setting it up was to use a hooked bar to hang a piece of wood that I could then attach the blind to, but it'd be pretty ugly and inelegant, which is why I was hoping there was a way to get a nice-looking premade one in. Brain In A Jar fucked around with this message at 02:10 on Jan 6, 2016 |
 #
?
Jan 6, 2016 01:42
#
?
Jan 6, 2016 01:42
|
|


|

|
| # ? May 7, 2024 11:09 |
|
|
I was gonna suggest a privacy film, like fake stained glass or something, but it looks like the windows already are stained glass. Short of some kinda glue or epoxy, I don't think there's any way you're going to get curtains hung off that window. That wooden trim is probably only held on with a few small nails, not enough to hold up the weight of curtains. Maybe check with your landlord to see if you can get permission to put up a curtain rod or ask if they would do it? Small holes are really easy to patch, and probably the least destructive thing you could do there. Maybe get a floor standing privacy screen instead?
|
|
#
?
Jan 6, 2016 02:45
|
|


|
Your walls are white. You could always just drill and do a good job spackling when you're done. Alternatively, hang a privacy curtain from Command Hooks.
|
|
#
?
Jan 6, 2016 16:31
|
|


|
EssOEss posted:The lovely floor under my chair is crumbling because of the terrible casters eating it up. I have replaced the casters but the damage is already done. How do I fix this? I know nothing about floors. For laminate like that, you would have to replace the entire chipped board and maybe the one adjoining that chipped side. Laminate boards snap together, the edge of one board on top of the edge of the adjoining board. The problem is that you might need to take up the entire floor to reach the damaged board, depending on how the edges are layered. kid sinister fucked around with this message at 18:53 on Jan 6, 2016 |
|
#
?
Jan 6, 2016 18:47
|
|

|
EssOEss posted:The lovely floor under my chair is crumbling because of the terrible casters eating it up. I have replaced the casters but the damage is already done. How do I fix this? I know nothing about floors. This is probably your cheapest and easiest bet--it'll stop it from getting worse, hide the damage, and prevent it from happening again.
|
|
#
?
Jan 6, 2016 22:35
|
|
|
If its not glued together, least work is to take a circular saw and run a couple of lines up the length of the bad board, if you can avoid hitting the sub floor. Knock out your pieces. You'd have to modify and glue in the new piece since you can't really snap them in together in the center of the floor. Safest way is to start from a wall and pull up each piece one at a time.
|
|
#
?
Jan 6, 2016 22:47
|
|

|
FogHelmut posted:If its not glued together, least work is to take a circular saw and run a couple of lines up the length of the bad board, if you can avoid hitting the sub floor. Knock out your pieces. You'd have to modify and glue in the new piece since you can't really snap them in together in the center of the floor. This is a job for an ossiclating tool.
|
|
#
?
Jan 7, 2016 01:59
|
|

|
OSU_Matthew posted:Likely replacing that kinda laminate floor is more trouble than it's worth. What did you replace your casters with? I'm just curious. Seconding the floor mat idea as a necessity from here on out. These floors can't take tons of abuse as you found out.
|
|
#
?
Jan 7, 2016 04:44
|
|

|
Zahgaegun posted:What did you replace your casters with? I'm just curious. Even real wood floors can't take that kind of abuse. The previous owners of my house just puttied over the massive splits, cracks, and gouges that a rolling chair made next to the built-in desk. I wish I were at home to take a photo, but suffice to say it's awful. The rest of the wood floors survived a hundred years of foot traffic really quite nicely, but couldn't hack a few years from a rolling chair.
|
|
#
?
Jan 7, 2016 18:48
|
|
|
Was changing out my door locks on my new place, and noticed that on the one door the door jamb is largely missing behind the strike plate. The bottom screw is in a minimal amount of wood, and the top screw is actually a deck screw with a series of washers behind the strike plate where the door jamb should be with the screw driven into the next stud. I know the right way to fix this is to replace that whole piece of wood, but is it reasonable to just get something like this? 
|
|
#
?
Jan 9, 2016 01:11
|
|
|
FogHelmut posted:Was changing out my door locks on my new place, and noticed that on the one door the door jamb is largely missing behind the strike plate. The bottom screw is in a minimal amount of wood, and the top screw is actually a deck screw with a series of washers behind the strike plate where the door jamb should be with the screw driven into the next stud. Well, first the obvious question: do you have a separate knob and lock on that door? If so, what's the spacing between them? Does it match your new double strike plate? Second, it will be a lot of work to chip out the wood you do have with a chisel to make that double strike plate fit flush. It might be the same amount of work to just repair the door frame properly. I recommend using a oscillating tool. They're great for making plunge cuts. Third, you will get more security from any strike plate if you use those long screws and screw through the jamb and into the stud behind it. Fourth, adjustable strike plates come in handy, especially if you have an older door. They're also nice for doors with kerf mounted weatherstripping.
|
|
#
?
Jan 9, 2016 19:18
|
|
|
Do appliance repair questions go here?  I have a 10 year old fridge which I bought new, the second cheapest one home depot sold the day I went in doing no other research. It is a freezer on top / fridge on the bottom double door model. It came with an ice maker which I haven't left installed because it always made awful ice. It has been having a frosting problem, so I assume this means "something" is wrong with the defrost circuit. It keeps food cold and frozen food frozen until the drain plug in the back fills up, then food starts getting freezer burned or worse, and the fridge part starts getting water in it. I tested the actual defroster by unplugging the molex connector and sticking my multimeter in it on "continuity" (I got it for christmas, so...) it beeps and gives a reading in ohms which I forgot to write down but the manual says was <= 60Ω. It also beeps if I hold the probes together in this mode. Then I traced the wires, it looks like white one joins to the connector for the icemaker, which also goes into the white on the plug in the back which goes into a mysterious land behind the back of the freezer. 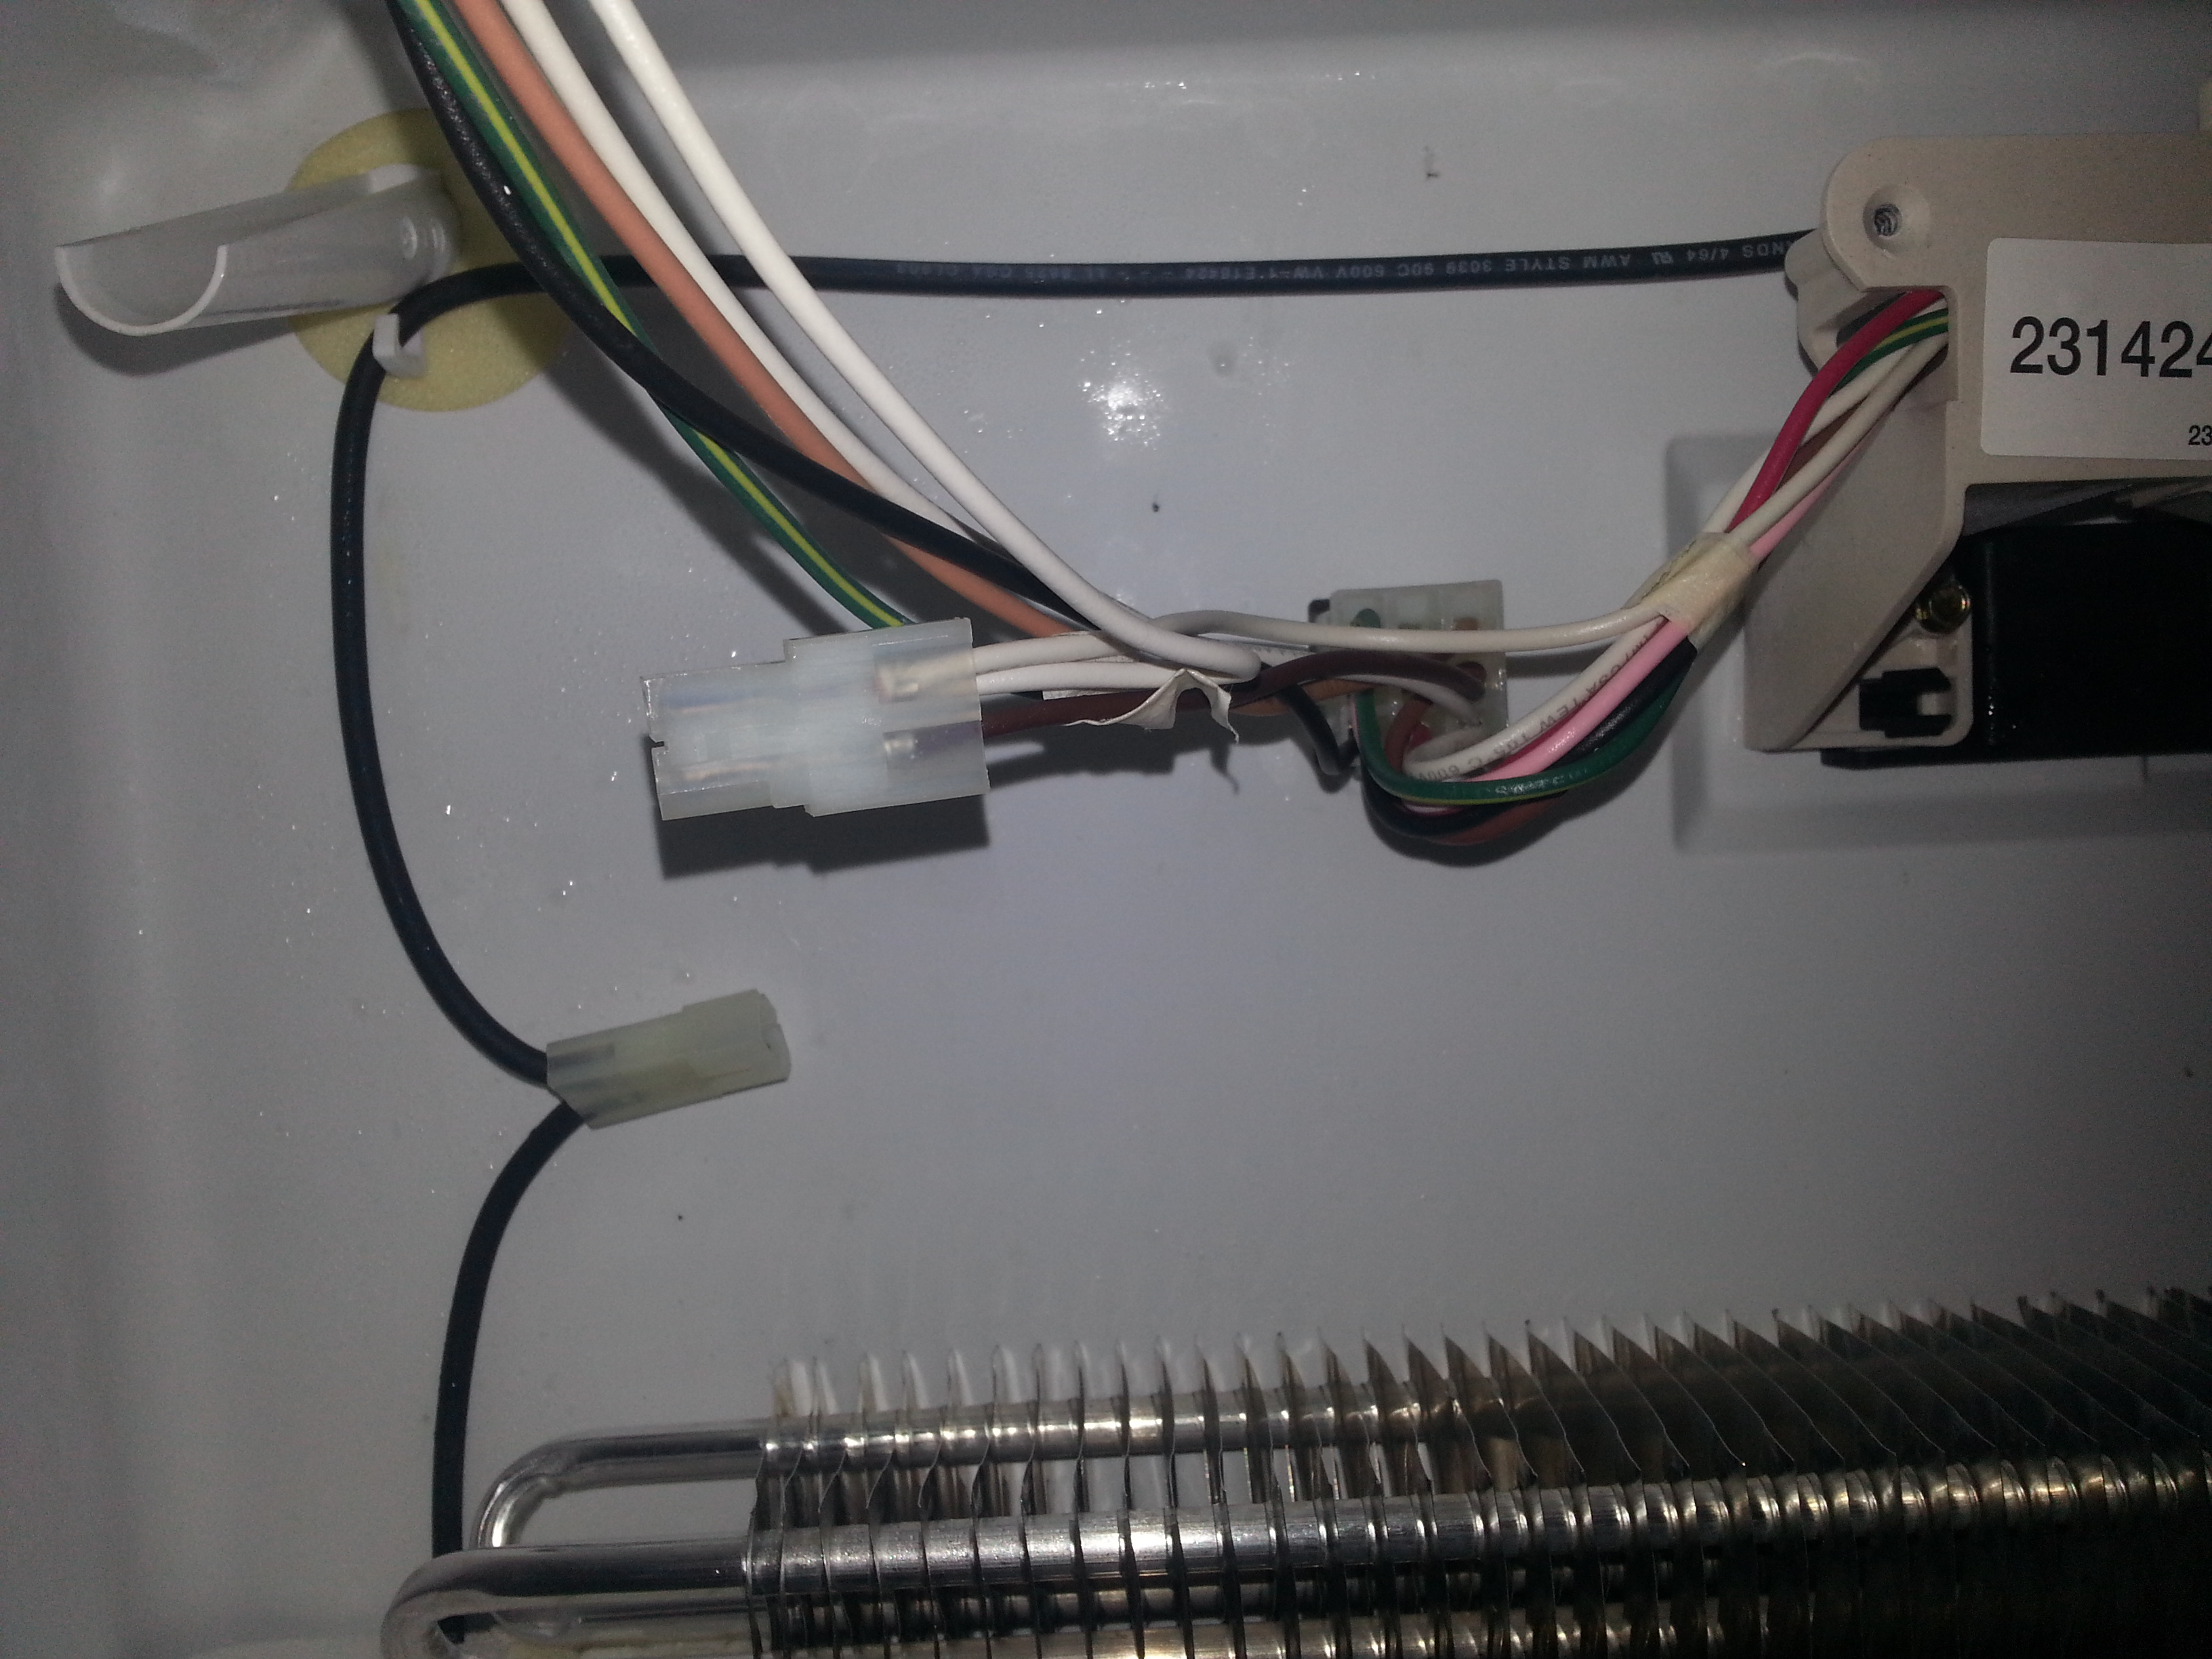 Brown joins to the back plug, and then runs across the top of the fan module over to this guy, whose pink wire runs back to the back of the fridge plug of mysteries: 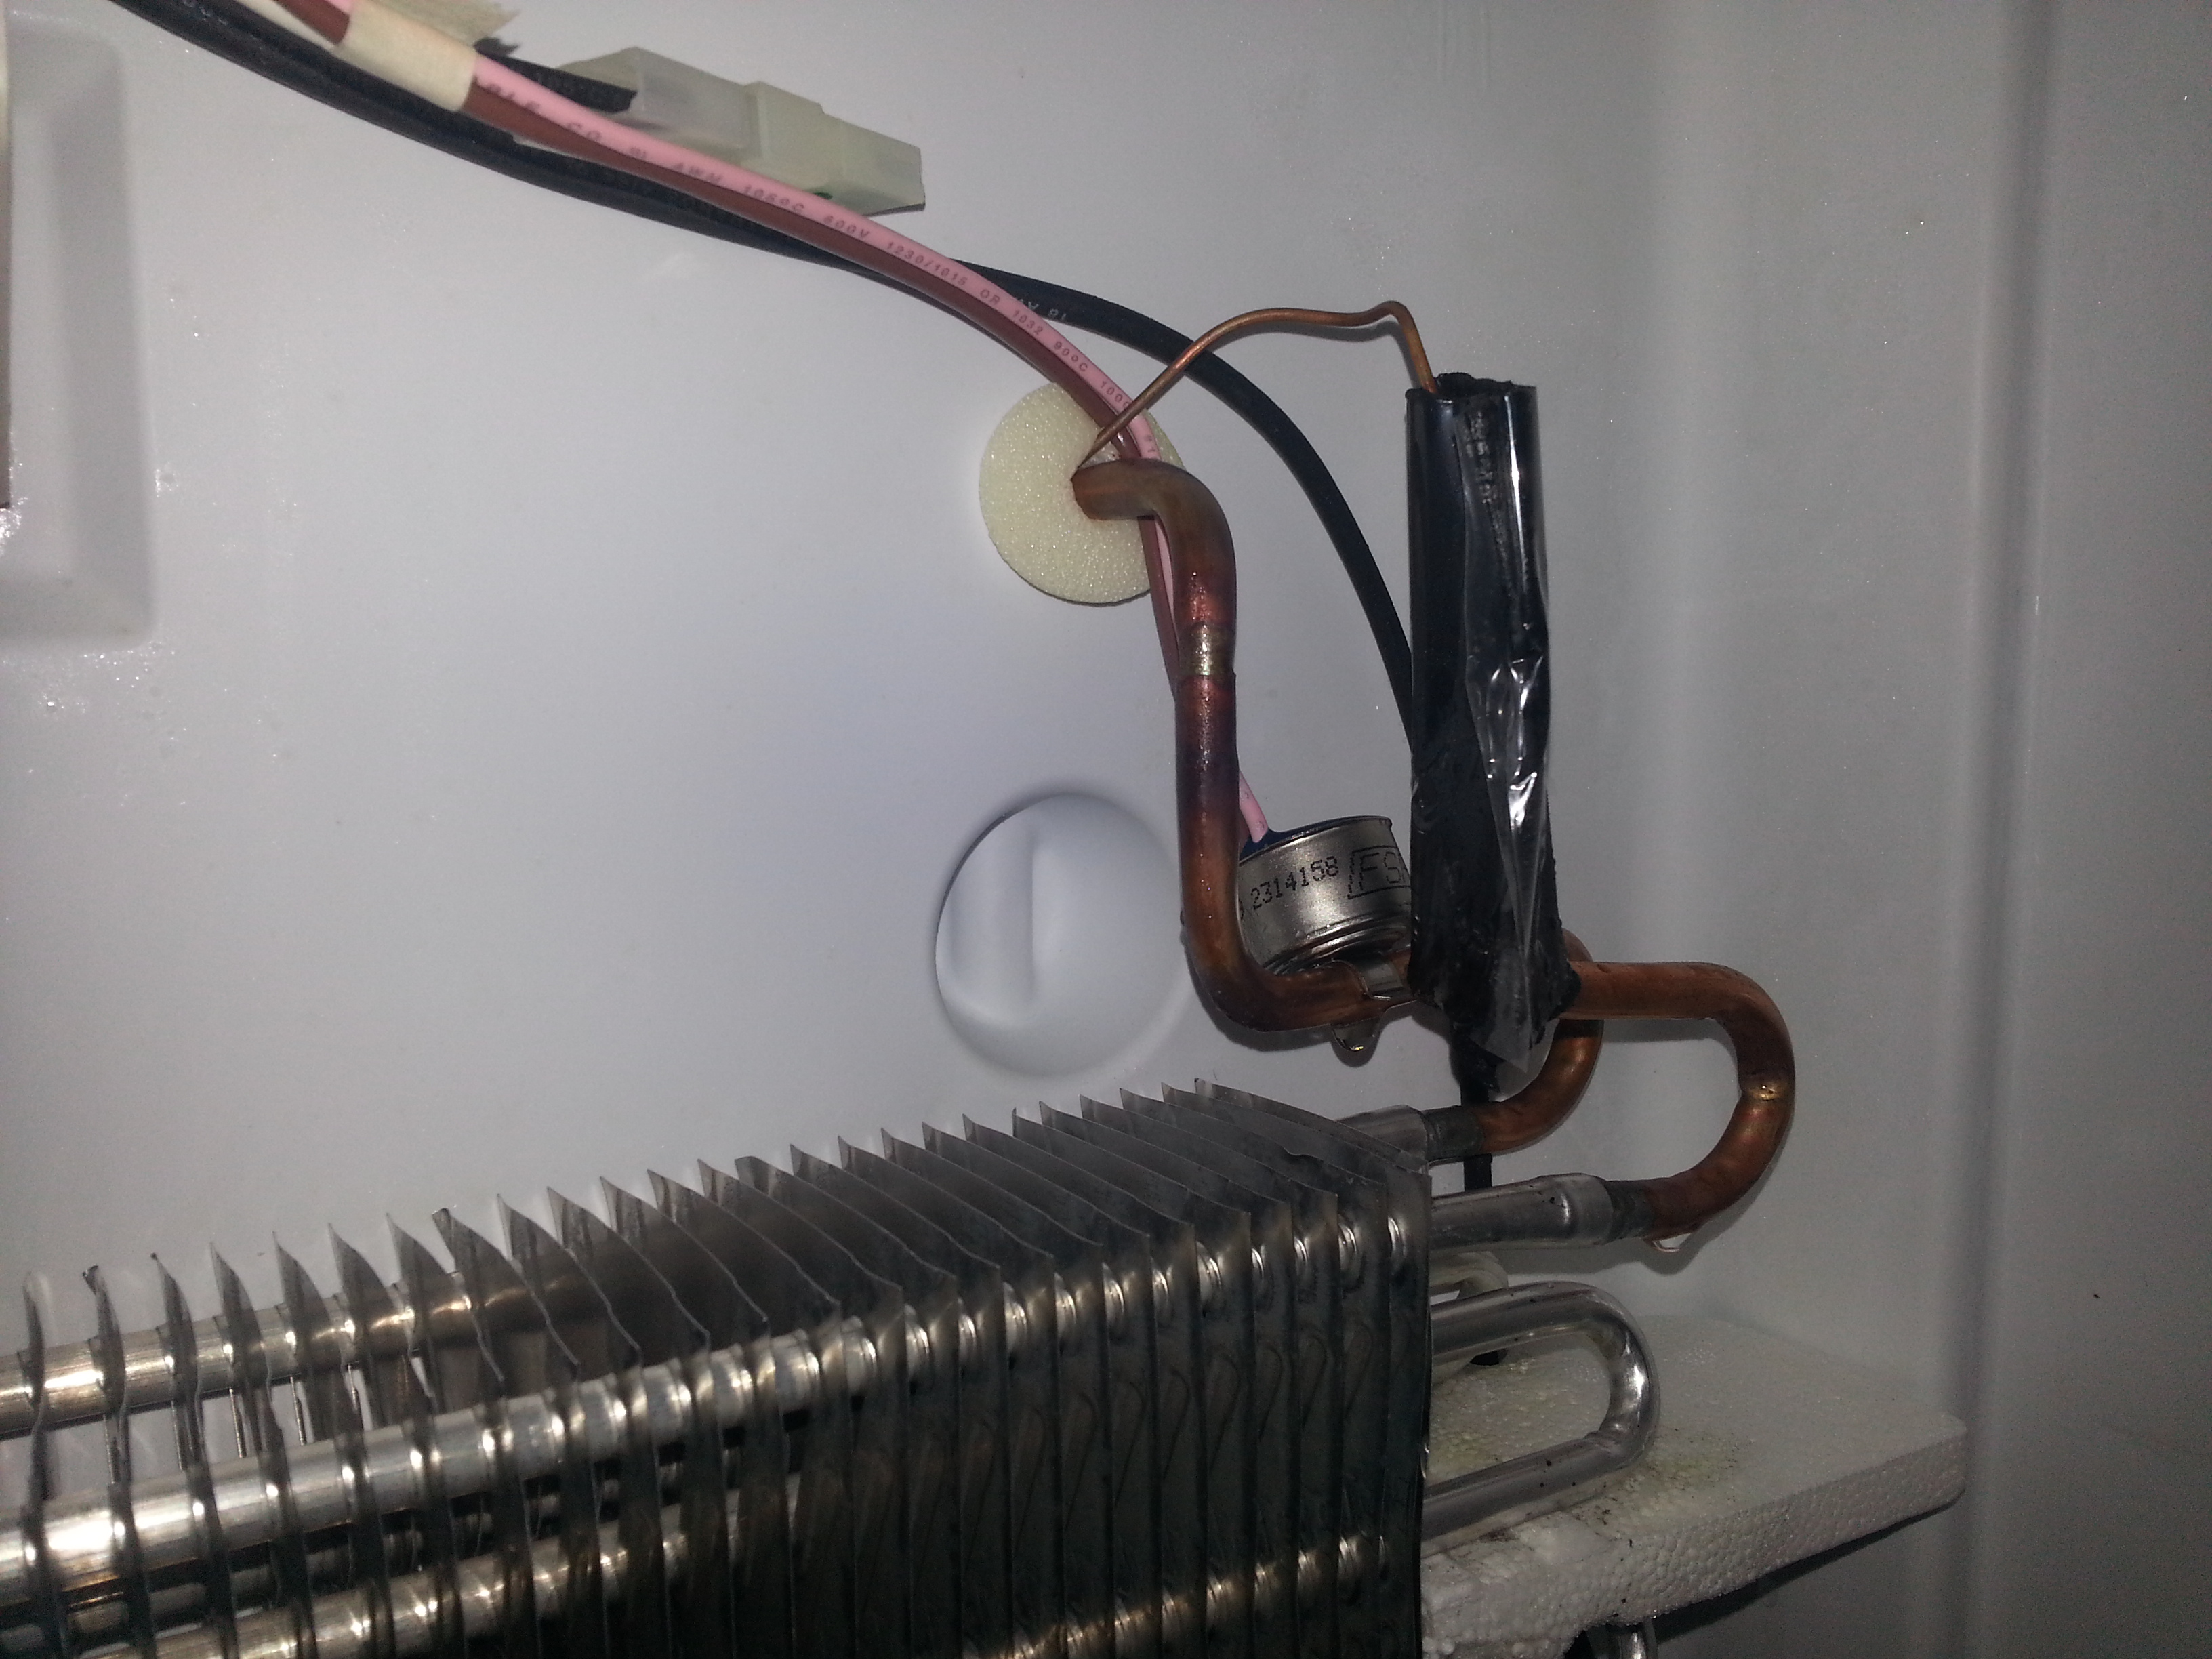 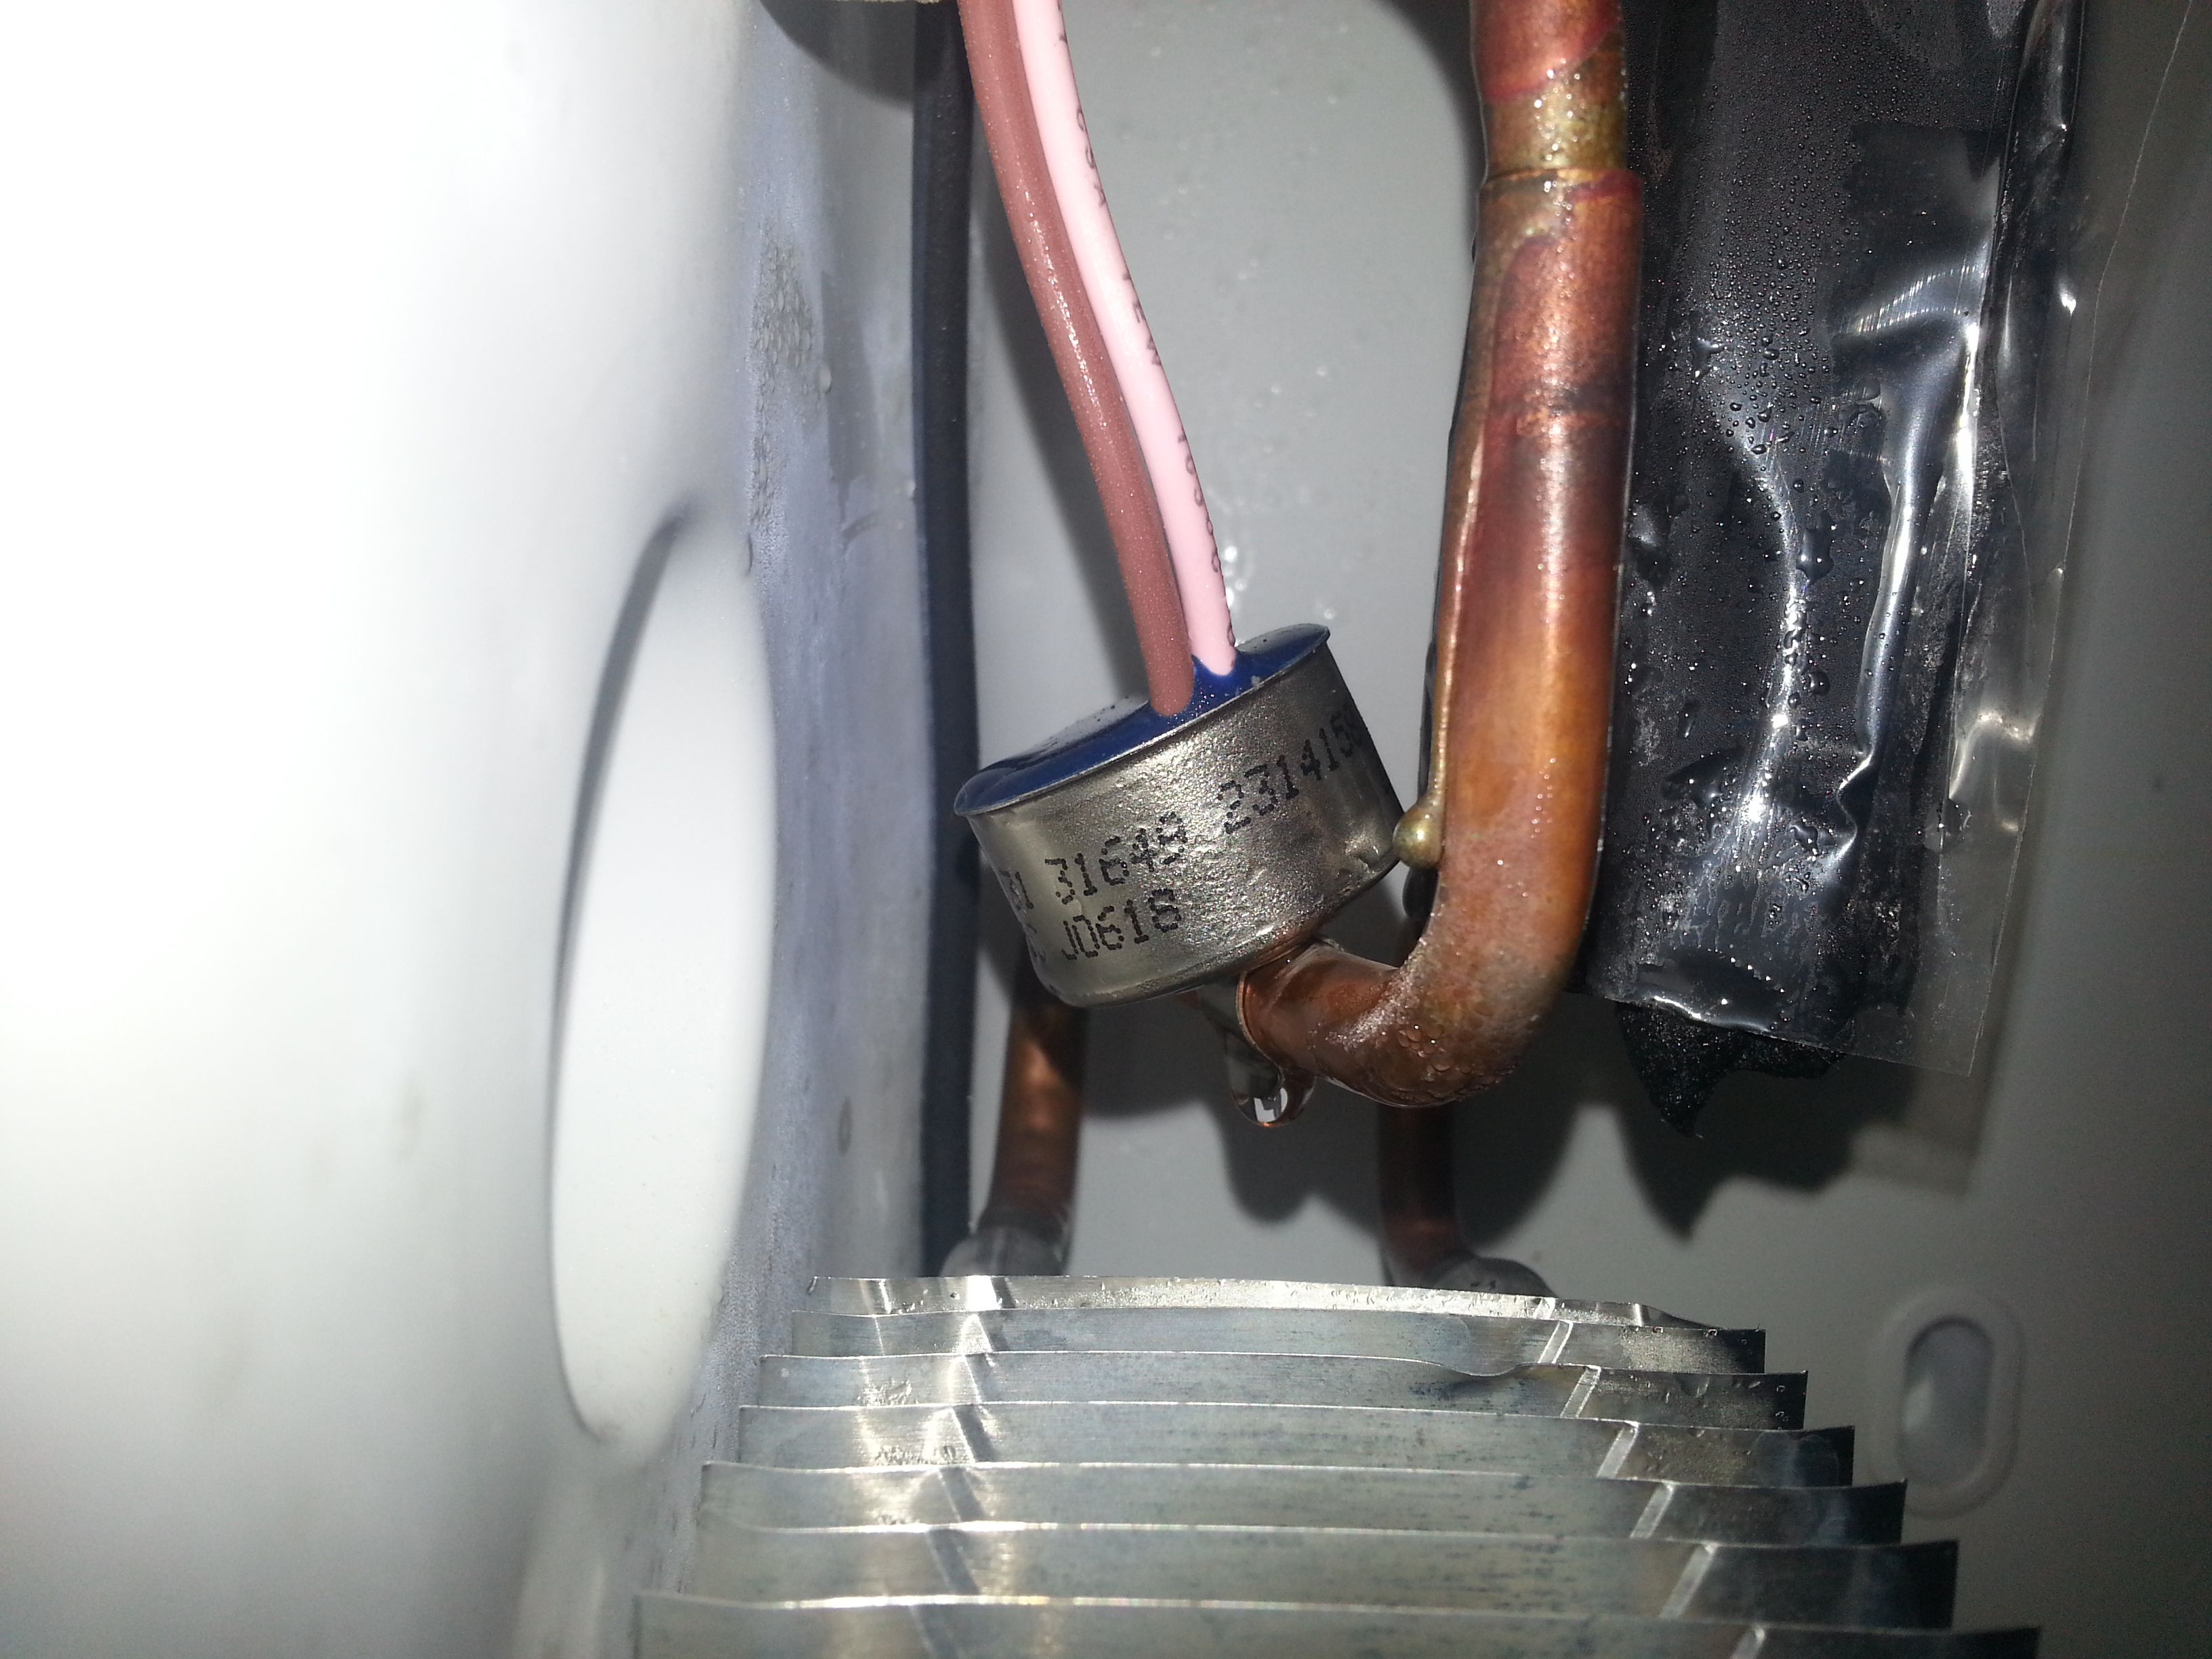 As I look at this pictures, I see the white/black molex connector in top of the picture and wonder what that is, after I have put everything back together. This is what I have, "Roper by Whirlpool" Manufactured May 2006, Model RT21LMXK009, 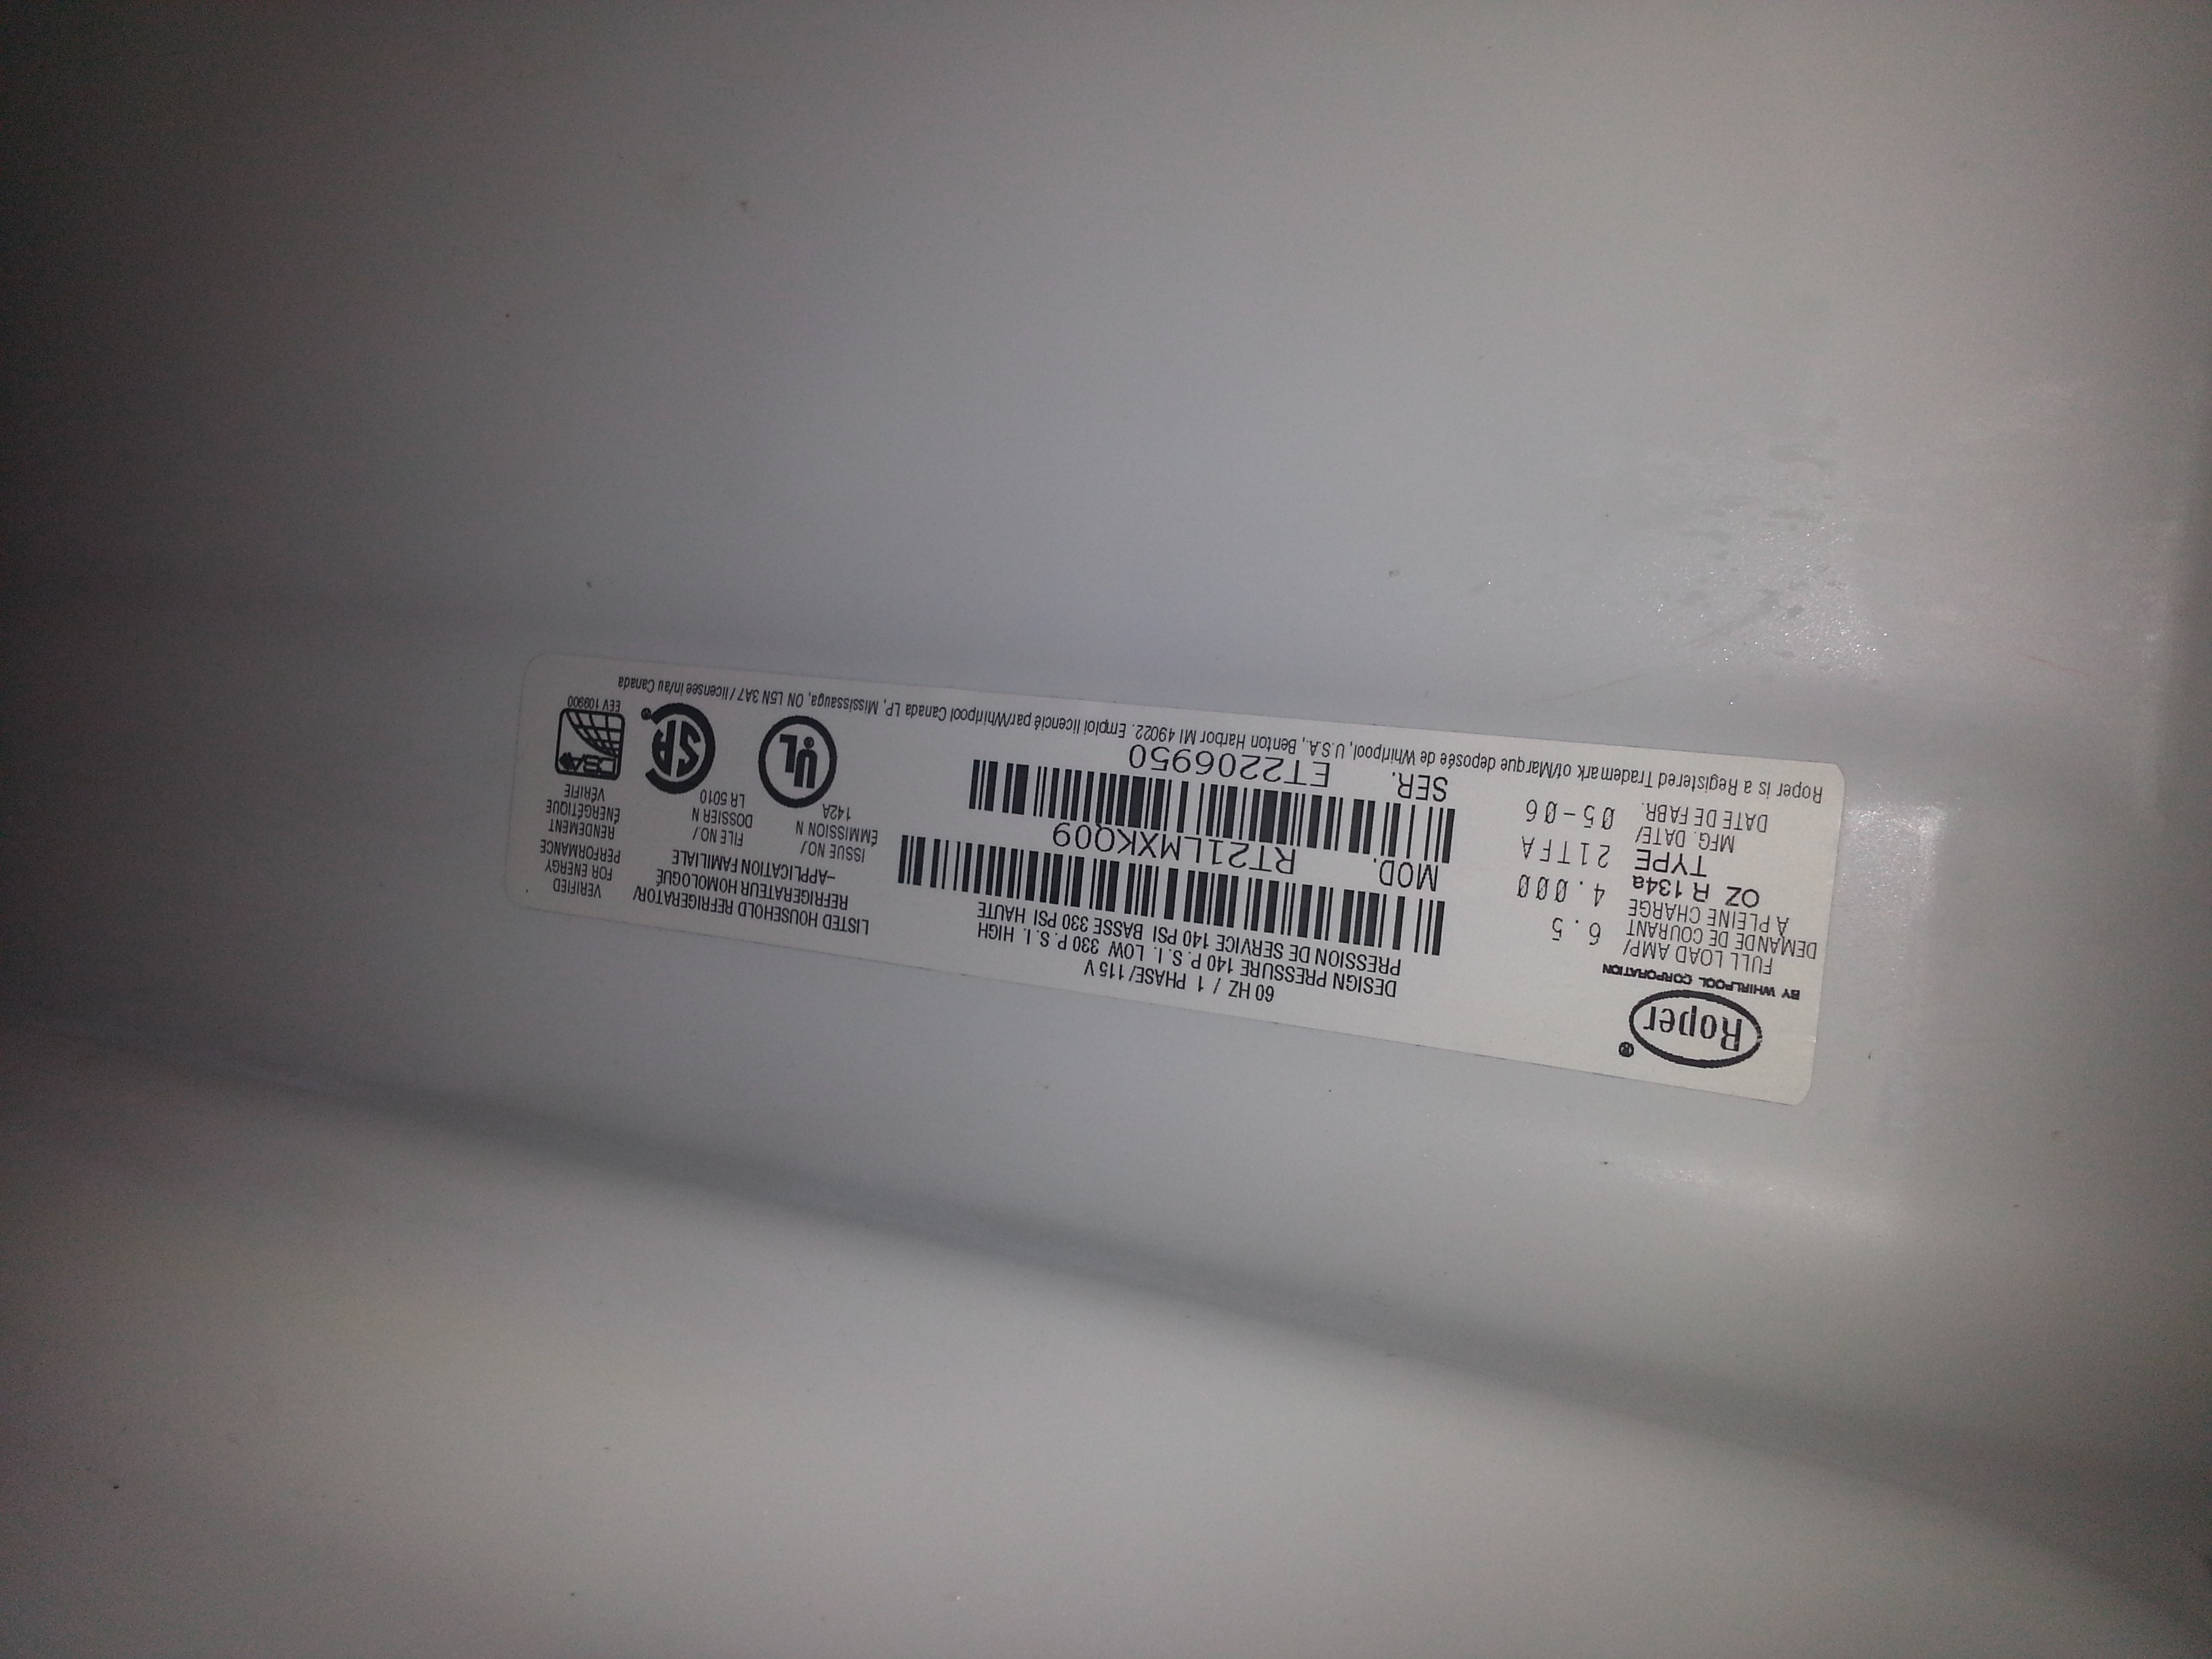 Where do I go from here? Is there an easy way to test the module it seems to be running to? Do I need to take the back off the fridge and look?
|
|
#
?
Jan 9, 2016 20:05
|
|

|
For calking between an interior window frame and the wall--is silicone the way to go? What's the most appropriate?
|
|
#
?
Jan 9, 2016 20:48
|
|

|
beepsandboops posted:For calking between an interior window frame and the wall--is silicone the way to go? What's the most appropriate? Do you mean window trim and the wall? Because you should be using low ex foam between the frame and the rough opening (behind the trim). I use vinyl caulk for trim. Specifically this. It's a lot easier to deal with than silicone (you can smooth it easily with a wet finger and a sponge).
|
|
#
?
Jan 9, 2016 22:37
|
|

|
H110Hawk posted:Do appliance repair questions go here? First off, a multimeter tests for lots of things, which I'm sure you're aware of if you read the manual. Second, "continuity mode" is to test if there is a complete circuit between the 2 probes of the multimeter. Continuity modes have beeps if there is a complete circuit. The beeping is useful if you got your hands poked somewhere that it would be hard for you to turn your head to see the readout on the multimeter. If the continuity test shows a complete circuit, then you know that all the metal in between where you touched the probes is a complete. There are no breaks in it, just like when you touched the probes directly together. There was nothing holding back the flow of electricity then, so the multimeter showed a low resistance. Well, that test comes in handy when touching heating elements, like the one in your freezer. Let me explain how heating elements work. Just like a toaster or electric blanket, heating elements actually work by resisting the flow of electricity. When somethings resists electricity, it turns a portion of that electricity into heat, a useful property for a heating element. The more heat generated, the higher the resistance. However, since heating elements are using up a portion of that otherwise-perfect flow, heating elements should show higher than zero resistance. The first thing to check should be the drip tube. Just for the record, is there anything stuck in it that could cause ice to build up?
|
|
#
?
Jan 10, 2016 03:50
|
|
|
kid sinister posted:First off, a multimeter tests for lots of things, which I'm sure you're aware of if you read the manual. Second, "continuity mode" is to test if there is a complete circuit between the 2 probes of the multimeter. Continuity modes have beeps if there is a complete circuit. The beeping is useful if you got your hands poked somewhere that it would be hard for you to turn your head to see the readout on the multimeter. If the continuity test shows a complete circuit, then you know that all the metal in between where you touched the probes is a complete. There are no breaks in it, just like when you touched the probes directly together. There was nothing holding back the flow of electricity then, so the multimeter showed a low resistance. Well, that test comes in handy when touching heating elements, like the one in your freezer. Yup. I did in fact read the manual! (Hence <= 60 Ohms.) I was super 100% hoping to find that the heating element was broken in some way, even if I knew it was an extreme long shot given the simplicity of a heating element basically being a coil of wire even if it goes through a lot of stress getting below freezing then heating up. I know the fundamentals, but I've rarely gotten my hands dirty on this sort of thing. kid sinister posted:The first thing to check should be the drip tube. Just for the record, is there anything stuck in it that could cause ice to build up? The drip tube is what we're cleaning, it seems to fill with ice. We put nearly boiling water into it out of our electric kettle (speaking of electricity -> heat), eventually it "clears" and life goes on, but now this is the second time this has happened. This video is for a different brand, but the cooling element (etc) all is identical, look ~35s in: https://www.youtube.com/watch?v=_ycWz_U_GDU My way of saying "thanks" : https://www.youtube.com/watch?v=EViyccc2t9w
|
|
#
?
Jan 10, 2016 06:00
|
|
|
kid sinister posted:Well, first the obvious question: do you have a separate knob and lock on that door? If so, what's the spacing between them? Does it match your new double strike plate? Not yet quote:Second, it will be a lot of work to chip out the wood you do have with a chisel to make that double strike plate fit flush. It might be the same amount of work to just repair the door frame properly. I recommend using a oscillating tool. They're great for making plunge cuts. Oscillating tool for the chiseling? Or to repair the door frame?
|
|
#
?
Jan 10, 2016 07:14
|
|
|
FogHelmut posted:Not yet Chisel = flush strike plate work. Oscillating tool = jamb work. H110Hawk posted:Yup. I did in fact read the manual! (Hence <= 60 Ohms.) I was super 100% hoping to find that the heating element was broken in some way, even if I knew it was an extreme long shot given the simplicity of a heating element basically being a coil of wire even if it goes through a lot of stress getting below freezing then heating up. I know the fundamentals, but I've rarely gotten my hands dirty on this sort of thing. Well good for you. You now know how useful a multimeter can be. Seriously though, probably the most useful test will be that continuity test, especially with that beep. Again for the record, look closer down that drip tube. Is there anything inside? I'm talking minuscule burrs. What about the angle? Is it too horizontal that water doesn't get the chance to get out before it freezes?
|
|
#
?
Jan 10, 2016 07:50
|
|
|
FogHelmut posted:Was changing out my door locks on my new place, and noticed that on the one door the door jamb is largely missing behind the strike plate. The bottom screw is in a minimal amount of wood, and the top screw is actually a deck screw with a series of washers behind the strike plate where the door jamb should be with the screw driven into the next stud. I would get the even larger strike plates that go along the edge of the door so you have some solid wood to screw into. Most doors have enough clearance between the frame that you can just screw it on without having to sand or chisel the edge away. It really depends on how solid the door is now to say if it would be better to replace the whole door. If your current door has a large window, or there is a window right next to the door, any security upgrade is going to be pointless.
|
|
#
?
Jan 10, 2016 10:36
|
|

|
kid sinister posted:Again for the record, look closer down that drip tube. Is there anything inside? I'm talking minuscule burrs. What about the angle? Is it too horizontal that water doesn't get the chance to get out before it freezes? Ok, I will take the rear cover off the fridge to hopefully see how the drip tube runs. If it's non-obvious from whatever gets exposed in the rear why it might get blocked up I'll try to figure out some way to see down / snake down from the top. It's location makes it nontrivial to see down from the top as it's below the (to my knowledge) fixed cooling coils/fins. Thanks again for your help and suggestions.
|
|
#
?
Jan 10, 2016 16:07
|
|
|
Got a weed whacker? String trimmer line is a great way to snake these kinds of lines out (and the sunroof drains on your car).
|
|
#
?
Jan 10, 2016 16:56
|
|
|
Motronic posted:Got a weed whacker? String trimmer line is a great way to snake these kinds of lines out (and the sunroof drains on your car). I do! That is a fabulous idea. When I started reading your sentence I had this horrifying thought of how a weed whacker was going to be involved in chiseling a door for a strike plate. 
|
|
#
?
Jan 10, 2016 18:49
|
|
|
Why not, I once watched my idiot neighbor using a sawzall on the front end of his car.
|
|
#
?
Jan 10, 2016 19:12
|
|


|
stubblyhead posted:Why not, I once watched my idiot neighbor using a sawzall on the front end of his car. That doesn't sound that weird. Reciprocating saws are great for all kinds of demo work. Was he trying to get off a bumper that was pinched in place due to a crash?
|
|
#
?
Jan 10, 2016 20:12
|
|
|
If memory serves it was a brake job.
|
|
#
?
Jan 10, 2016 20:51
|
|
|
Okay, this is a bit specific. I have a Whirlpool fridge, model ET20TK. I've started getting puddles of water showing up on the shelves in the refrigerator compartment and under the bottom drawers. Some googling indicates this is fairly common, and that the drain line that leads down to the condensate pan under the unit is blocked by ice or a chunk of crud. Pull the condensate pan, yep, it's completely dry, nothing's draining into it. My problem is that the manual is useless for telling me the location of this drain line, and a visual inspection of the inside of the unit shows nothing that looks like any kind of drain, there is nothing I can find in the entire refrigerator compartment that drains anywhere. Any suggestions?
|
|
#
?
Jan 10, 2016 21:17
|
|

|
Phanatic posted:Okay, this is a bit specific. On my fridge it was a tiny rubber duck valve (it looks like a duck beak) that was located on the roof of the compartment in back of the fridge. After opening the compartment in back I pretty much had to just reach in and feel around to find it. It was black and only about 3/4 inch in diameter, so it can be hard to spot. Also, once you've cleaned the valve it will still take a day or so for the ice to clear out, so don't be surprised if you continue to see some buildup afterward. TheLastManStanding fucked around with this message at 21:34 on Jan 10, 2016 |
|
#
?
Jan 10, 2016 21:31
|
|
|
Phanatic posted:Okay, this is a bit specific. The top of ours is behind a panel in the freezer. Remove a few screws and it pops off revealing the freezer coils/fins, fan, heating element, and drain. Check youtube for videos of people cleaning your (or similar) fridges for help.
|
|
#
?
Jan 10, 2016 21:35
|
|
|
The rest of the frame is solid. I don't know how sawing out part of the frame and replacing it is any less work than replacing the whole board. This is what I'm looking at -  I haven't installed the deadbolt yet, so I'm not worried about its placement in relation to this one if I use the double strike plate.
|
|
#
?
Jan 10, 2016 23:29
|
|
|
I have a math problem. Let's say I'm building a roof. Pythagorean theorem dictates that if I want to use 12' beams and 8' rafters, my rise is going to be 5'3 1/2" ~ish. But it doesn't take into account material thickness. Also, Pythagoras doesn't help with mitering angles. This is to be a pole barn. I need to know thicknesses for W Y and Z, in addition to X length as well as N and M for mitering. I feel like there should be a formula for calculating these values, but I do not know of it. 
|
|
#
?
Jan 11, 2016 03:11
|
|
|
DreadLlama posted:I have a math problem. Let's say I'm building a roof. I'll just leave this here: http://northlandconstruction.com/products/6968/techsheet/Stanley-QuickSquare-Manual.pdf
|
|
#
?
Jan 11, 2016 03:36
|
|
|
This site is very useful if you need a customizable image: http://www.blocklayer.com/Roof/RafterEng.aspx And don't forget a speed square. e: didn't click that above link that's all about using a speed square. The Gardenator fucked around with this message at 10:10 on Jan 11, 2016 |
|
#
?
Jan 11, 2016 09:38
|
|


|
I've got a question about radiators and thermostats (I rent a house so I can't swap out the thermostat.) and am trying to tweak things to save money. It's an odd setup since the thermostat's downstairs in the kitchen - which is open to the stairs - the bedroom's the second floor, and the top floor's the lounge. The boiler's a combi boiler. I've heard two conflicting things about turning the radiators down - they have TRV valves. I only really need the bedroom, bathroom and lounge heating for any length of time. Some people have said that if I turn the radiators down - particularly the big one in the kitchen - the boiler will only kick in when the radiators pull hot water. Other people have said that the boiler will fire up until the thermostat temperature is reached in the kitchen. The kitchen radiator's the biggest one in the house, and seems to get pretty hot, even if I set it on '1', the lowest temp. Can anyone enlighten me on this? Should I be setting the thermostat lower - it's currently at 17 - or sticking with keeping the radiator at 5 in the lounge, and 2 in the bedroom and bathroom. Darth Ronson fucked around with this message at 22:35 on Jan 12, 2016 |
|
#
?
Jan 12, 2016 22:31
|
|

|
Either of the two scenarios is a possible configuration. But if your configuration didn't need a thermostat, you probably wouldn't have one. If the kitchen is getting warmer than you want with the lowest TRV setting, then your only option is to turn down the thermostat. If that leaves other areas too cold even with the highest TRV settings, then you're just hosed.
|
|
#
?
Jan 12, 2016 23:32
|
|

|
Speaking of thermostats, they overshoot the specified temperature by a couple degrees and kick in a couple degrees below, correct? My furnace was still going at four degrees above the setting with no signs of stopping anytime soon. Is this normal, or is there a problem? Also, am I correct in assuming my gas furnace is either on or off? There's no 50% or anything right?
|
|
#
?
Jan 13, 2016 05:24
|
|
|
I believe some thermostats have a "buffer" of sorts. The Nest flat out states it has one of +/- 3 degrees and my Honeywell has a +/- 1. I'm sure this is done for some purpose, likely to prevent the hvac from constantly kicking on at the slightest flicker of temp change.
|
|
#
?
Jan 13, 2016 05:38
|
|

|
couldcareless posted:I believe some thermostats have a "buffer" of sorts. The Nest flat out states it has one of +/- 3 degrees and my Honeywell has a +/- 1. I'm sure this is done for some purpose, likely to prevent the hvac from constantly kicking on at the slightest flicker of temp change. I also have a Honeywell, which is also supposed to keep it within 1°. Sounds like it's defective then. Is there a more reliable brand, or is this just the inevitable unlucky unit? Also, how is the more frequent cycling going to affect the health of my furnace?
|
|
#
?
Jan 13, 2016 08:07
|
|
|
Darth Ronson posted:I've got a question about radiators and thermostats (I rent a house so I can't swap out the thermostat.) and am trying to tweak things to save money. It's an odd setup since the thermostat's downstairs in the kitchen - which is open to the stairs - the bedroom's the second floor, and the top floor's the lounge. The boiler's a combi boiler. Are thermostats for boilers more complicated? I spent the $20 and 30 minutes to swap out the thermostat on the last house I rented so I could have a programmable one, but that was for forced air.
|
|
#
?
Jan 13, 2016 17:27
|
|

|
stubblyhead posted:Also, am I correct in assuming my gas furnace is either on or off? There's no 50% or anything right? You are probably correct. Two stage and modulating furnaces exist, but they are not common. stubblyhead posted:Also, how is the more frequent cycling going to affect the health of my furnace? More cycles probably reduces the life span of your furnace. Anything more specific than that is likely a trade secret known only by furnace manufacturer engineering departments. Hashtag Banterzone posted:Are thermostats for boilers more complicated? I spent the $20 and 30 minutes to swap out the thermostat on the last house I rented so I could have a programmable one, but that was for forced air. They can be the same, or much more complicated. Darth Ronson's may just be a simple on/off the same as yours (plus the thermostatic radiator valves, which are basically equivalent to "smart" registers). But a "combi" boiler is typically modulating and condensing, which means there are two additional variables that can be controlled to change the behavior of the system - flow rate and water temperature. If his system is reasonably well designed, the thermostat is also trying to control the flow rate so that the system is running as much as possible, with minimal cycling, so the TRVs can do their thing effectively.
|
|
#
?
Jan 13, 2016 19:07
|
|
|

|
| # ? May 7, 2024 11:09 |
|
|
I am trying to readjust one of my ceiling light fixtures. It is suspended by four cables, and inside it is held in place by some really awkward things. What is this fitting/coupling/clamp/whatever called?  The three (really drat small) ball bearings go inside that metal plunger and grab on to the wire. The brass part goes on top of everything and threads into a socket in the fixture. I assume that puts pressure on the springs, which puts pressure on the ball bearings. How can I get these back together once they've come out like this? I feel like I need a thousand tiny little fingers to make it all work. Also, how am I supposed to work with these things without them coming apart like this? Apparently I should be able to just loosen the brass fitting a little and be able to pull the wire either way. In practice, it only lets me pull the wire through one way--the way that shortens everything. Of course, I have to be wanting to lengthen it instead.
|
|
#
?
Jan 13, 2016 19:20
|
|