


|
 Its theoretically done! Next step is to load some film, which I'll be doing with a mate in a few weeks
|
 #
?
Oct 14, 2023 08:58
#
?
Oct 14, 2023 08:58
|
|


|

|
| # ? Apr 29, 2024 01:58 |
|
|
Super jazzed that I�m able to successfully take measurements such that the deck boards land directly atop the blocking as planned. If I�d missed, I probably would have been annoyed enough to take an entire course of blocking out in order to scootch it over an inch. No need! I sneak out between meetings to lay down a board or two when I can. Goes surprisingly fast that way. Not as fast as if I could just skip work and get it done, but I�m almost there!  Really happy with how it�s come together.
|
|
#
?
Oct 18, 2023 22:42
|
|


|
Been playing around with turmeric anthotype pgotograms This is a very cheap way to produce something very pretty   
|
|
#
?
Oct 19, 2023 12:07
|
|
|
Jestery posted:Been playing around with turmeric anthotype pgotograms Ooh, is that a cousin to cyanotype? Looks pretty amazing, and the fact it's turmeric-based is simply  --------------------------------------------- I'm quoting myself from the leatherwork thread: Trabant posted:The bag is done! To recap, the patterns are from Dieselpunk.ro (bag, strap), the leather is 6-7oz veg tan and ~3oz suede from Tandy, and hardware is from Buckleguy.
|
|
#
?
Oct 27, 2023 22:50
|
|


|
That bag is very awesome
|
|
#
?
Oct 28, 2023 00:57
|
|

|
Trabant posted:Ooh, is that a cousin to cyanotype? Looks pretty amazing, and the fact it's turmeric-based is simply Very much so Functionally very similar, just less sensitive by far, but the same techniques (photo grams, anthotype, digital negatives) can be done as well Its a positive process though, and cyanotyping is a negative process Just mix a couple taps of turmeric powder with a spirit and filter to get your dye (careful it stains) and use as you would cyanotype Except the developer is a base solution, you can use bicarbonate of soda if you are doing it around kids But you will get a more vivid shape if you use borax Its unfortunately not fast and will fade after about a year or 2 in ambient UV, or a day or so if left in the sun Nonetheless very pretty and wildly wildly cheap, my first run at it I made maybe 10-15 ml and I've made tens of A5 prints with some still remaining
|
|
#
?
Oct 28, 2023 03:53
|
|
|
After a long hiatus I finally mustered the will to finish my pre-COVID wood fired pizza oven. It was a fairly steep learning process and a quite a series of headaches but once I got my wrist in the brick laying went fairly smoothly. Arches are tough.  Bonus action shot! Haven't quite dialled in the optimum cooking temp (as several burnt naan bread can attest) but if the weather holds I'll be able to use it in anger this weekend. Just need to make the peel and the door.. 
|
|
#
?
Oct 30, 2023 22:52
|
|
|
That's cool. Is the... cement? mortar?... on the outside of the bricks necessary? I liked the clean look of the bricks.
|
|
#
?
Oct 31, 2023 14:42
|
|


|
That looks awesome and a wood fired oven is something I definitely plan to build one day.
|
|
#
?
Oct 31, 2023 14:48
|
|
|
Jestery posted:turmeric anthotype pgotograms prisencolinensinainciusol
|
|
#
?
Oct 31, 2023 15:23
|
|

|
SouthShoreSamurai posted:That's cool. Is the... cement? mortar?... on the outside of the bricks necessary? I liked the clean look of the bricks. The outside dome is just to keep the rain off the insulating layer and the vermiculite core as pictured below. Someone once said to me that the mortar's only job is to keep the bricks from touching. I'll probably spadge a load of waterproofing over the dome once the weather has cleared.  Apologies, I just twigged what you were asking. The action shot is from a test fire earlier in the construction. It is just the insulating internal vermiculite layer that was subsequently covered in insulation and the final outer brick layer seen in the first picture. Ipissedmyself fucked around with this message at 01:53 on Nov 1, 2023 |
|
#
?
Oct 31, 2023 21:12
|
|
|
 and I hope you'll post the resulting pizzas too! and I hope you'll post the resulting pizzas too!Kaiser Schnitzel posted:That bag is very awesome 
|
|
#
?
Oct 31, 2023 21:45
|
|
|
Badass pizza oven.
|
|
#
?
Nov 1, 2023 00:12
|
|

|
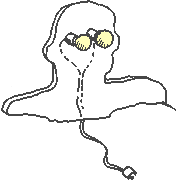
My camera took it's first photos today thanks to forums moderator Megabound
|
|
#
?
Nov 5, 2023 12:01
|
|
|
I think you might have a hair in the gate.
|
|
#
?
Nov 5, 2023 12:23
|
|

|
Nettle Soup posted:I think you might have a hair in the gate. Very much so, the felt I used for the wipes needs a shave and the knobs need a complete redesign Thing is completely light proof tho, and the exposure times are around 4-5 seconds But goddamn , it took a photo 
|
|
#
?
Nov 5, 2023 13:10
|
|
|
That is very cool
|
|
#
?
Nov 5, 2023 20:06
|
|
|
Jestery posted:Very much so, the felt I used for the wipes needs a shave It is awesome, congrats!
|
|
#
?
Nov 5, 2023 21:23
|
|
|
I have some diy light fixtures I want to make, but where can I get LED strips that are hardwired and look good? I've got some cheap ones from amazon that are good for messing around with, but require a plug and have a low CRI. Neopixel lights exist, but those are likely overkill. Don't need individually addressable lights when they're all going to be set to "white." (Though, being able to adjust temperature would be a nice bonus feature)
|
|
#
?
Nov 6, 2023 20:42
|
|

|
Get bicolour / strips that contain two temperatures of white LEDs, and then drivers that can fade between them. I don't have great sourcing advice for you - Film stuff is great but hella expensive, I think IKEA has some decent compromise stuff.
|
|
#
?
Nov 6, 2023 20:47
|
|

|
Jestery posted:My camera took it's first photos today thanks to forums moderator Megabound Serenade posted:I have some diy light fixtures I want to make, but where can I get LED strips that are hardwired and look good? I've got some cheap ones from amazon that are good for messing around with, but require a plug and have a low CRI.
|
|
#
?
Nov 12, 2023 18:43
|
|

|
Serenade posted:I have some diy light fixtures I want to make, but where can I get LED strips that are hardwired and look good? I've got some cheap ones from amazon that are good for messing around with, but require a plug and have a low CRI. I bought these a couple years ago and they're awesome. https://www.aliexpress.us/item/3256801845918511.html?gatewayAdapt=glo2usa4itemAdapt I installed it in an inexpensive aluminum track with diffuser in a U shape that I put around the outside of a framed mirror that my wife uses for cosmetics. The color temp has variability and they are stupidly bright. She's been using them on the lowest brightness and they've been great. Really terrific for even lighting without shadows.
|
|
#
?
Nov 12, 2023 18:59
|
|

|
I have continued developing (lol) my pinhole camera and got some time on a laser cutter and worked this one out Its a half frame pinhole camera, meaning I get 72+ photos from one roll, wildly simple and about as robust as you can get Took some test photos today and some more with V1 So I'll post them once I get them developed   Edit, that was a design deadend to some extent After a bit of loving round with the laser cutter I've settled on this, and am extremely happy with it I'm going to be taking it on a honeymoon where I'm going to see some aurora, and I figure a pinhole will be perfect for long exposure like that and really make some memorable images  
Jestery fucked around with this message at 10:46 on Nov 23, 2023 |
|
#
?
Nov 16, 2023 12:16
|
|
|
UPDATE:   
|
|
#
?
Nov 27, 2023 04:20
|
|
|
That's super cool Jestery, congrats! The pictures have a ton of character with the 'defects' that aren't digitally generated. The film grain, lens scratches, the er, um... side pubes, and just the general knowledge that they were made on a hand-made camera make them awesome. 
|
|
#
?
Nov 27, 2023 05:32
|
|

|
PDP-1 posted:That's super cool Jestery, congrats! ty the side pubes have been designed out in the latest version which (with the assistance of a laser cutter) be able to be made for like 10 bucks, if that ill upload to thingiverse and give a little tear down video in a bit if anyone wants to make one I have ideas for version two, I'm not happy with using tape but its kind of necessary for something this simple next itteration will be tapeless but im too designed out at the moment to feature creep, the drat thing takes photos you know yeah if i want high fidelity I can just use my phone or a high end bit of hardware, im happy having something that projects ~~~FILM~~~ onto a subject even at the expense of detail my long term goal is to set up a small run hobby print shop that can operate entirely without computers and make albums of my year or give away my photos and this dinky little camera is sufficient to produce images that im...happy enough.. with
|
|
#
?
Nov 27, 2023 09:53
|
|
|
Jestery posted:the drat thing takes photos you know Such an incredibly cool and inspiring project!
|
|
#
?
Nov 27, 2023 13:00
|
|


|
Thingiverse page https://www.thingiverse.com/thing:6337099 Playlist with overview, assembly and future plans https://youtube.com/playlist?list=PLgVyu25Zh3FVbK7ExFJ6rIqn_Vchg2lIj&si=aL6KzPdvFPhMX6Dh I've submitted it to hackaday too , so watch this space
|
|
#
?
Nov 29, 2023 11:56
|
|
|
Permanent christmas light install. Assuming it works out long term, should end up way cheaper that having someone install them every year, and there's no way I'm going up there every year anyway. Was about $800 + the cost of renting a lift.
|
|
#
?
Dec 6, 2023 19:36
|
|

|
bobua posted:Permanent christmas light install. Assuming it works out long term, should end up way cheaper that having someone install them every year, and there's no way I'm going up there every year anyway. Was about $800 + the cost of renting a lift. Very cool. What products did you end up using? I would like to put up lights no more than 1 more time on my house.
|
|
#
?
Dec 7, 2023 00:27
|
|
|
I�m also interested in what you went with and how you feel it turned out. Been thinking about doing the same.
|
|
#
?
Dec 7, 2023 00:36
|
|
|
bobua posted:Permanent christmas light install. Assuming it works out long term, should end up way cheaper that having someone install them every year, and there's no way I'm going up there every year anyway. Was about $800 + the cost of renting a lift. This looks slick as hell. Love it
|
|
#
?
Dec 7, 2023 01:27
|
|
|
Went with the led's, controller, and power supply from https://www.permatrack.us/ They were out of the tracks in the color I wanted, so I bought drip edge from home depot at $5 per 10ft already matching my eve color. Drilled holes at 2inch spacing and popped the leds in, then secured behind the eves. Here's a picture of what they look like installed.
|
|
#
?
Dec 7, 2023 02:03
|
|
|
It's really not that fancy, so I'm not putting it in the woodworking thread, but I made this flight board for my neighbor and I to have our annual Mad Elf tasting. (he has one bottle from each of the last 6 years saved, every year we move it up a notch. 2 years ago was the first one, last year we decided to get fancier with it)    I printed out coasters with the years on card stock that will fit into the recesses for the glasses  My co-worker made the logo up for me as he's really good at CNC stuff (that cost me a case of Peroni) and I colored it in using paint markers and hit it with a couple coats of poly. I used the old elf logo because I like it better than the current one, and it is also visually a lot simpler so I figured that would help with turning it into something that can be carved. The wood is maple.  AFewBricksShy fucked around with this message at 18:20 on Dec 16, 2023 |
|
#
?
Dec 15, 2023 16:33
|
|


|
^ Disagree, I think that's pretty great. My most recent project, the wife wanted some matching reindeer to go with the sleigh: 
|
|
#
?
Dec 15, 2023 17:13
|
|
|
SouthShoreSamurai posted:^ Disagree, I think that's pretty great. The deer look great. Does the sleigh easily break down? I could absolutely see doing something like that for next year, but I don't want to have to store a sleigh for the rest of the year.
|
|
#
?
Dec 15, 2023 18:52
|
|
|
Failed at this kinda spectacularly about 3 years ago, decided to finally share my shame: https://www.youtube.com/watch?v=I8LzeYwV35U
|
|
#
?
Dec 26, 2023 05:30
|
|
|
AFewBricksShy posted:The deer look great. Forgot to answer this. Yeah the sleigh breaks down very easily. It's all hidden screws and/or pocket holes. I store it packed flat in the storage space in my shed. The reindeer fell over in very high winds, so that project has added a way to attach them to the sleigh and keep them upright.
|
|
#
?
Dec 26, 2023 06:45
|
|
|
Trabant posted:Failed at this kinda spectacularly about 3 years ago, decided to finally share my shame:  wonderful wonderful
|
|
#
?
Dec 26, 2023 20:11
|
|
|

|
| # ? Apr 29, 2024 01:58 |
|
|
I wanted a drying rack for my bar glasses so I made one out of a spare piece of walnut I had kicking around. If I was going to do it again I'd be a little more careful about the dimensions (that one top part is obvioulsy wider than the rest, but I was just messing around with some scrap. I'd also do the bottom dadoes first, the dado stack kind of blew out some of the angled pieces.
|
|
#
?
Jan 29, 2024 13:57
|
|